Successful Sleeves For An 1836 Blue Cotton Print Dress

I started a blue cotton print dress six years ago that had been on hold for a long time to due frustrations in getting the sleeves to look the way I wanted. I’ll share more about the story of the dress as a whole in my next post, but for now I want to focus on the story of the sleeves.

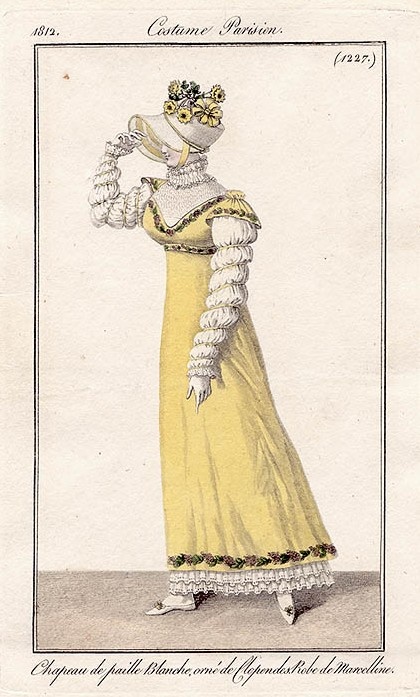
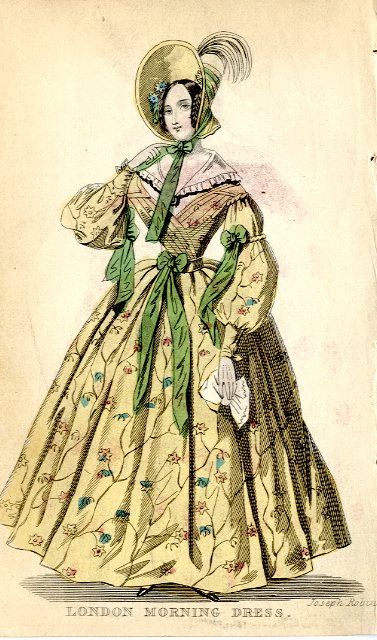
My goal was to create something with the silhouette of the Morning Dress below, which was published by Joseph Robins in The Ladies’ Pocket Magazine in October 1836 (National Portrait Gallery NPG D47686).

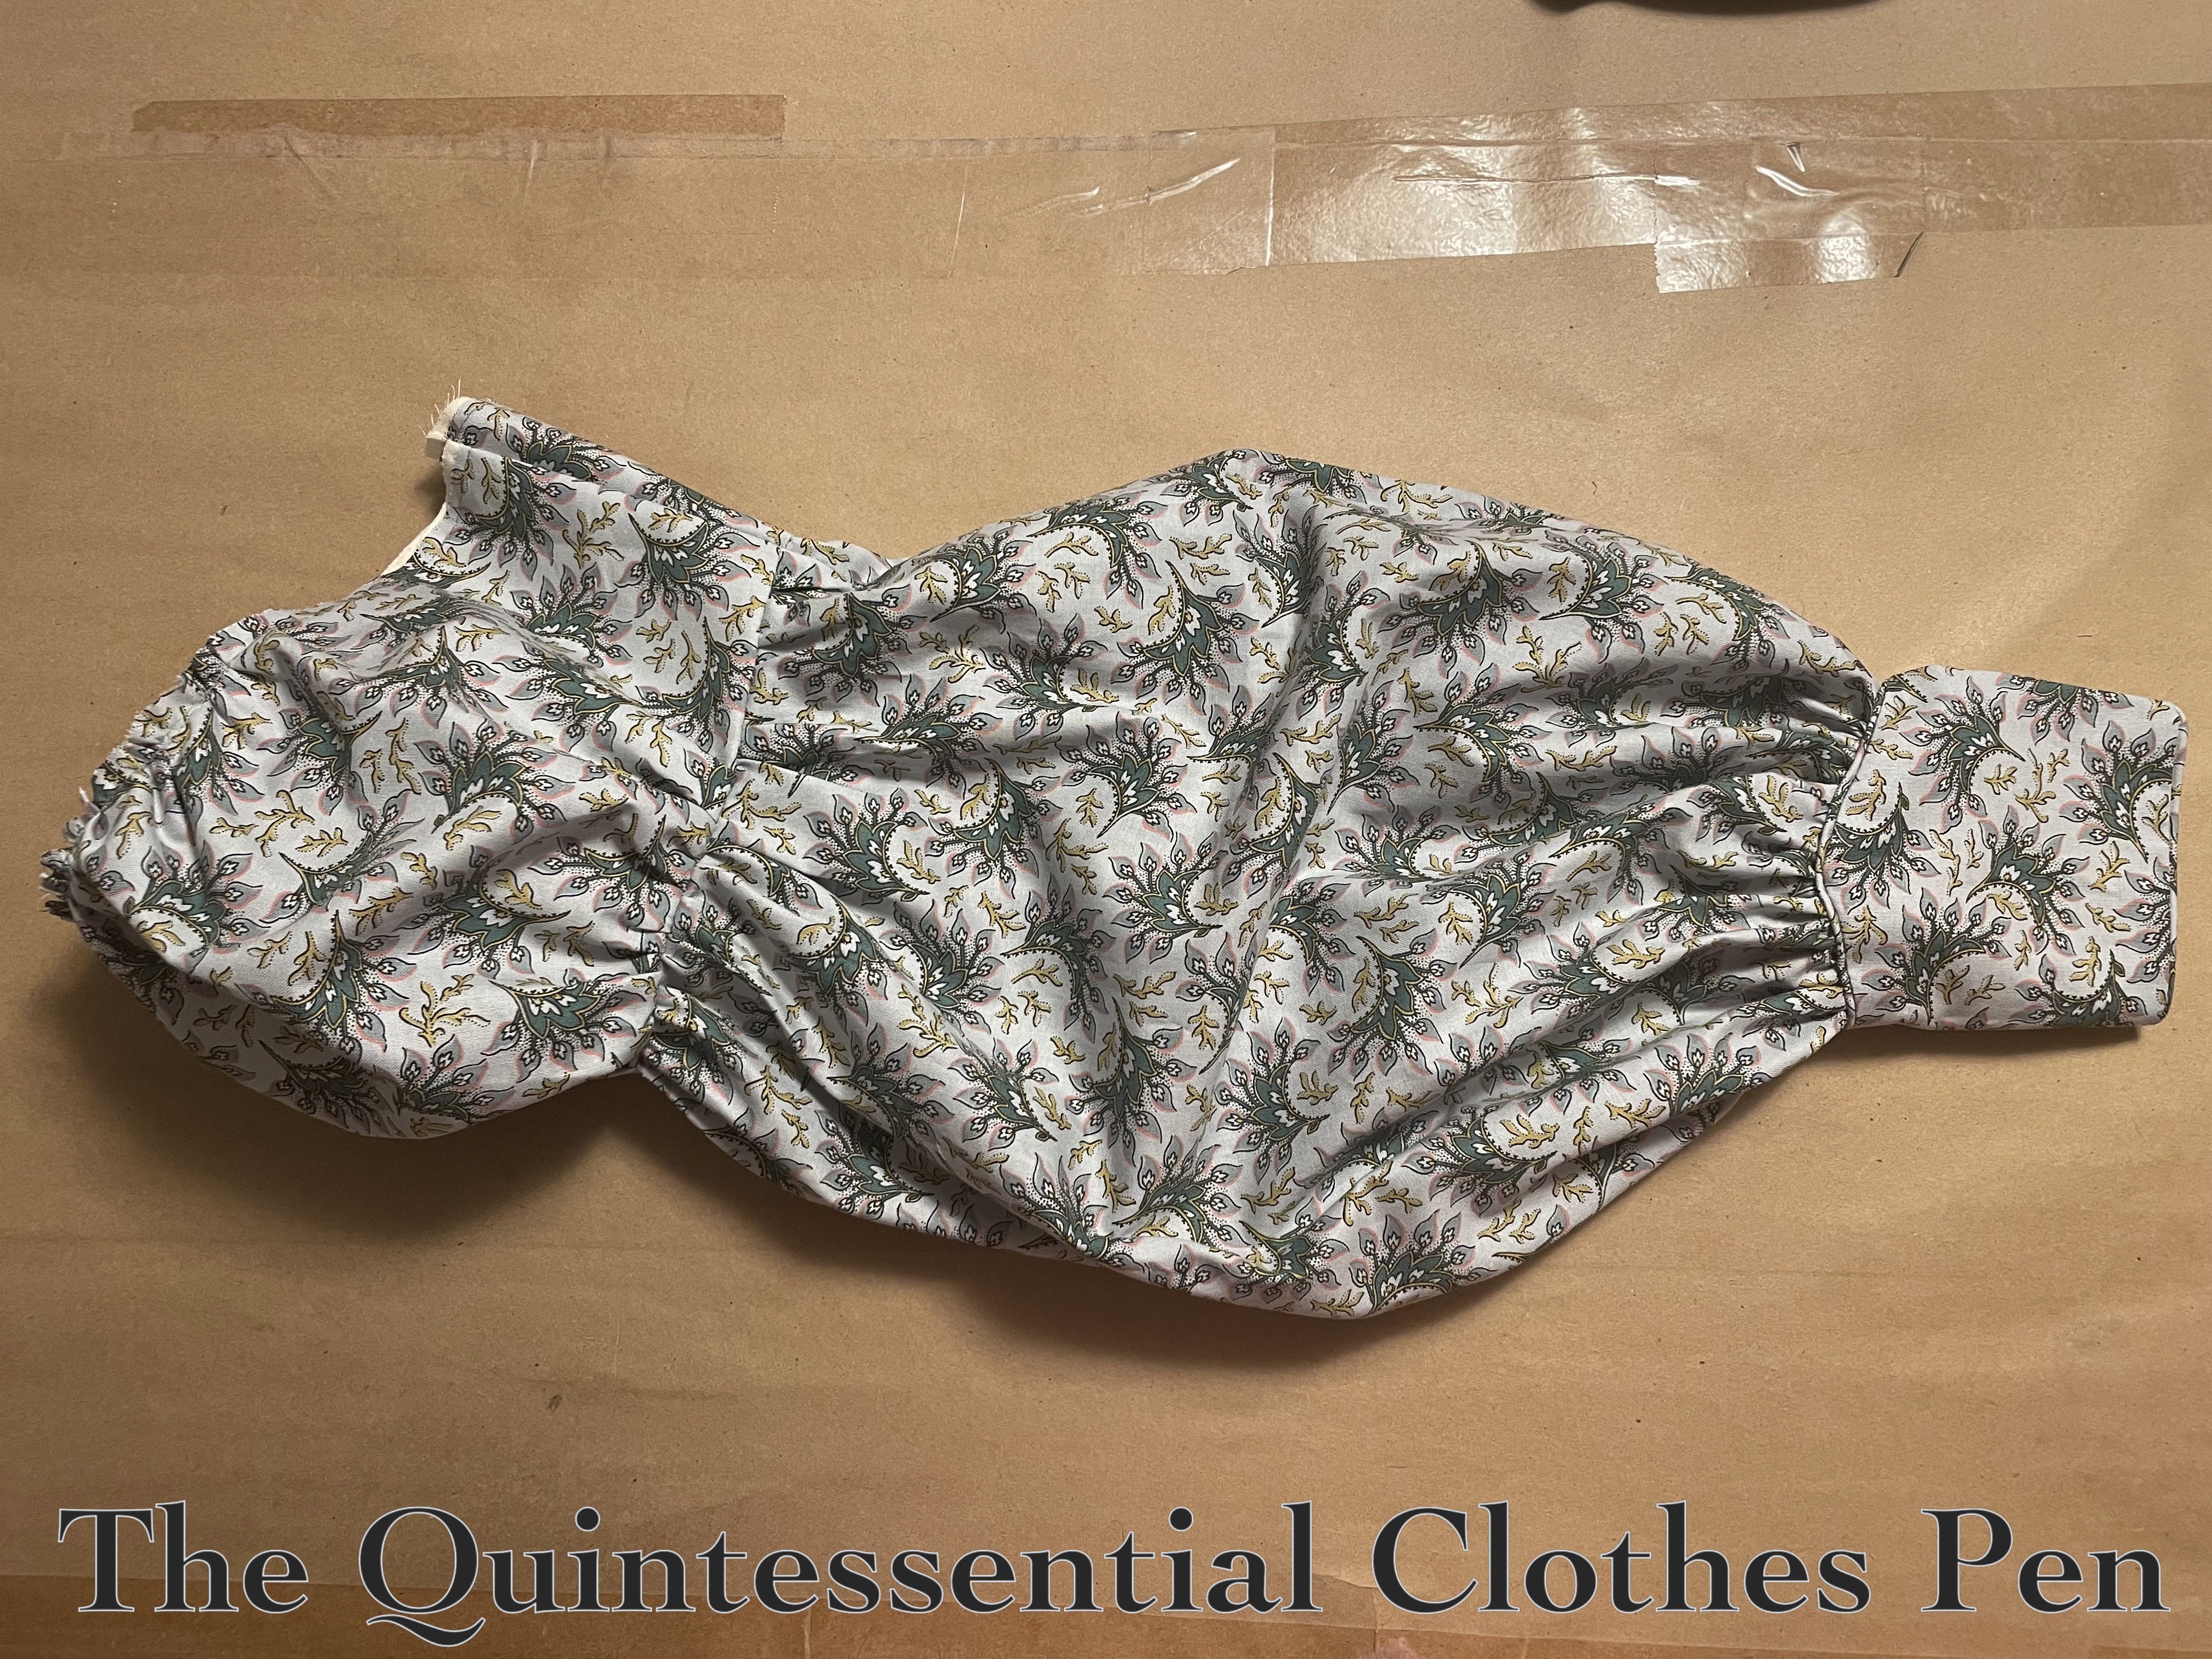
I started with a sleeve pattern from The Workwoman’s Guide (published in 1838 and available in full online here). This had worked for other 1830s sleeves I’d been making around the same time, but I was SO unhappy with what I came up with for this sleeve. It just was not the correct pattern to achieve the look of the fashion plate at all!

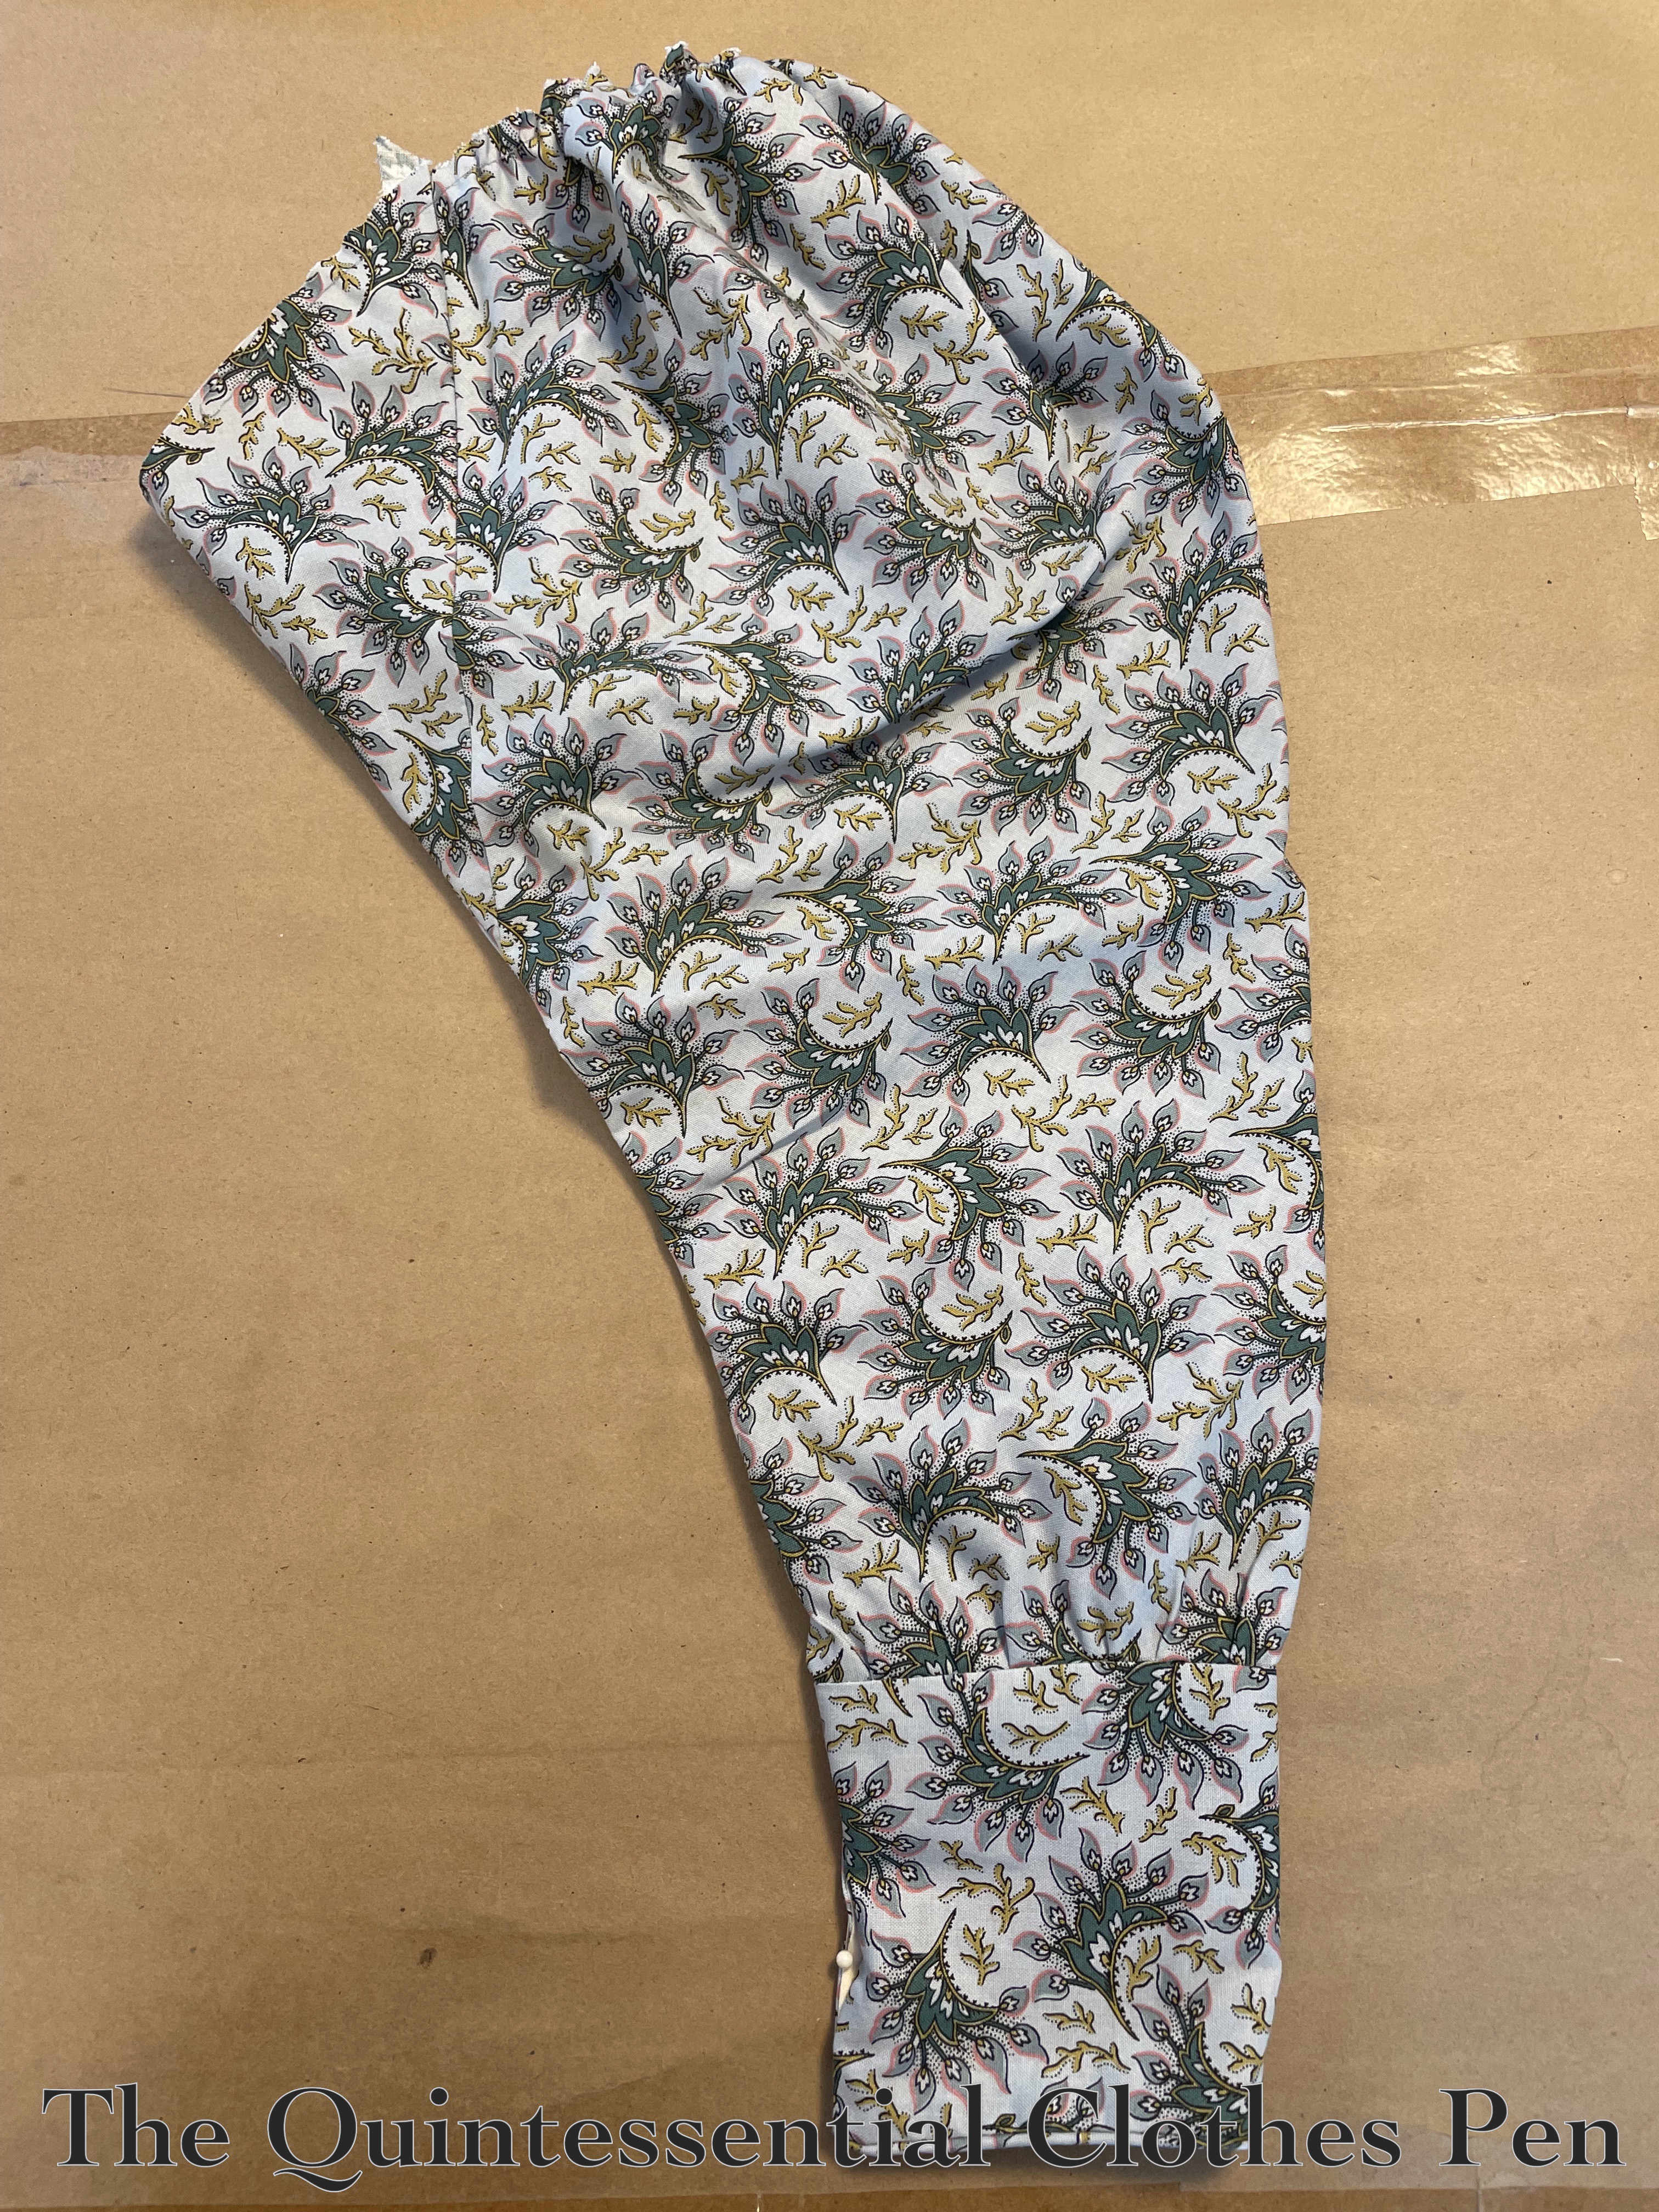
Below is a photo of part of that first sleeve iteration. There was a puff at the top, as well. But the top puff was too tall, the sleeve had the wrong shape, not enough fullness at the wrist, the cuffs were too small (they barely closed), and they were without a substantial enough point to mimic the fashion plate.

So many issues! I was so upset and annoyed that the whole project went into the “in trouble” pile to languish. I didn’t put the rest of the dress away, because I wanted to put it away as a finished project, so in the interim I just had a half finished dress hanging in plain sight for literally years…

This year, I was finally inspired to try again. I decided I just had to start over from scratch and make a pattern that was based on my knowledge of how to achieve a silhouette rather than what was in The Workwoman’s Guide. After creating a pattern that looked good in a mockup, I took apart the old sleeve to see what I would have to work with as well as looking at the remainder of the fabric that had been leftover after cutting out the dress. It wasn’t much, nor were any pieces big enough for the new pattern I’d created. Eek! Would I have to do lots of piecing?

But I had a saving grace, which is that I’d saved the leftovers from my friend’s matching fabric dress with the hope of making a pelerine for myself someday. I decided sleeves were more important than a pelerine and asked if I could use the fabric for that purpose. Luckily, I was well supported with a strongly worded “Yes, make sleeves!”

Fabric sorted out, I proceed to cut and assemble the new sleeves. I mostly used the extra yardage for the new pieces, but by maxing out the seam allowance, the new cuffs were able to be cut from the old ones. They already had piping along the bottom edge and I added it to the tops at this point, as well.

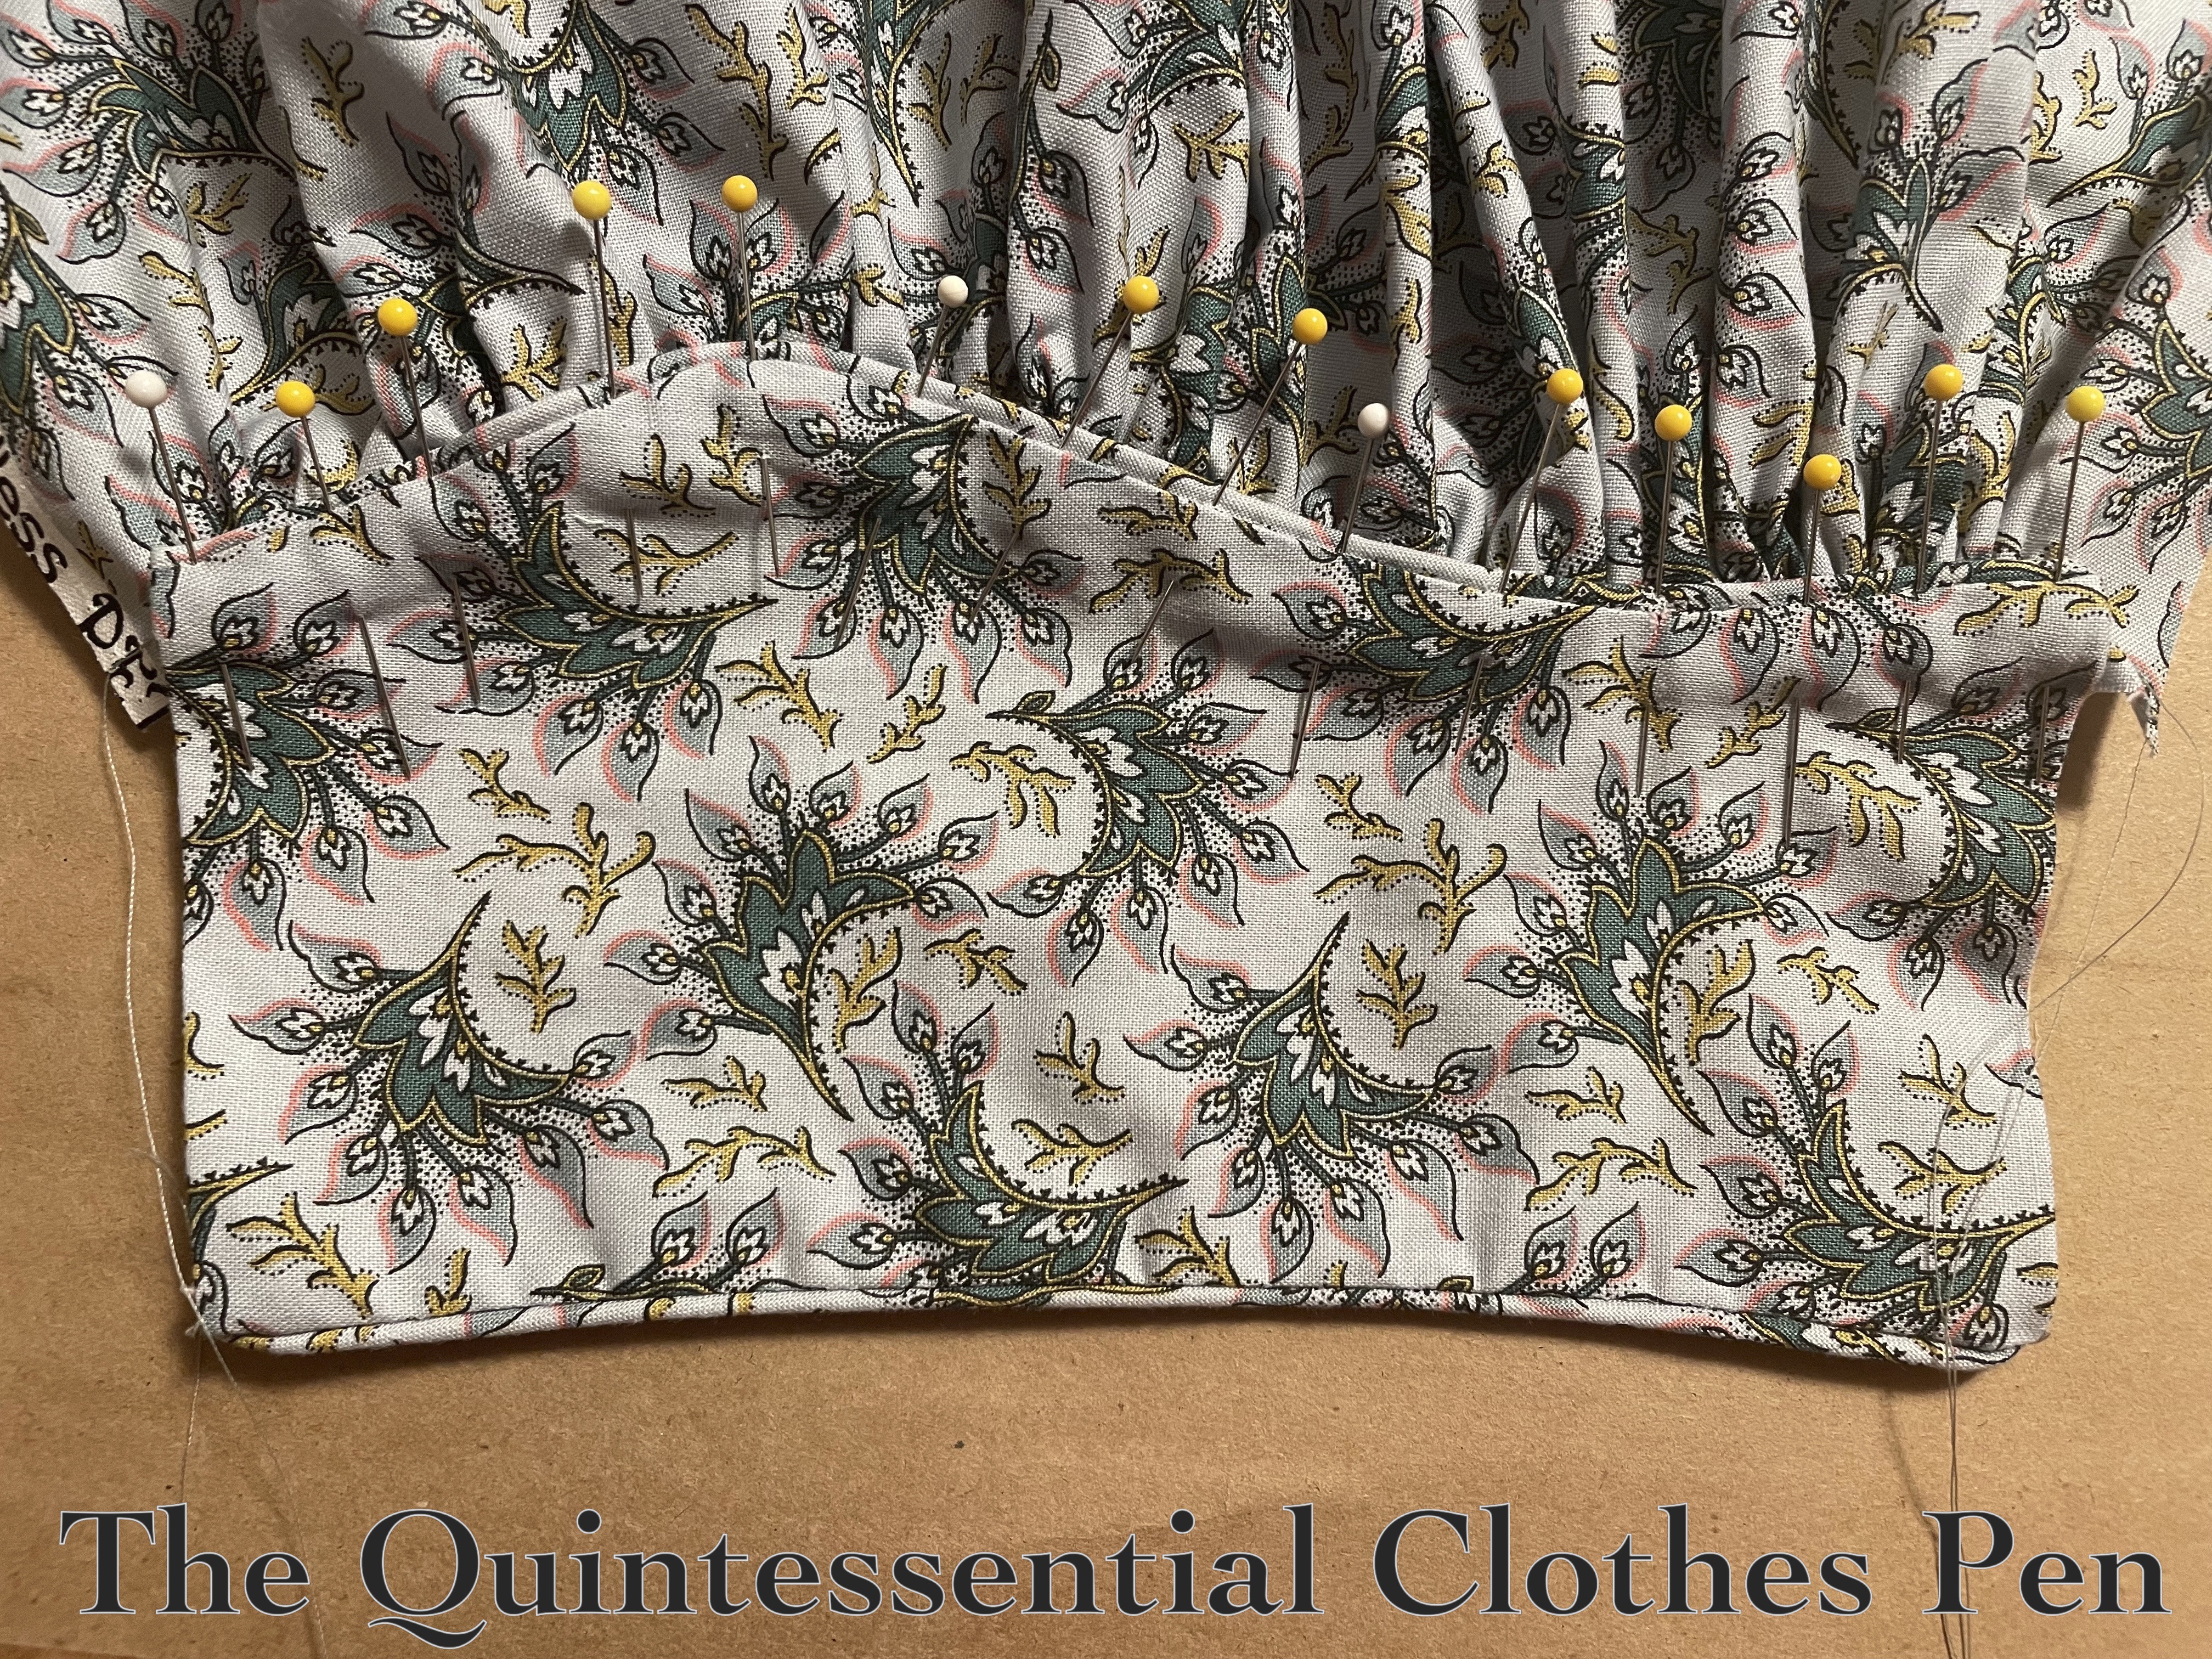
Then the bottoms of the new sleeves were gathered and pinned. I decided to topstitch these by hand in order to keep the nice points and the gathers evenly distributed. I’d realized when I made a mockup sleeve that these details would be way too fiddly to do well on a machine!

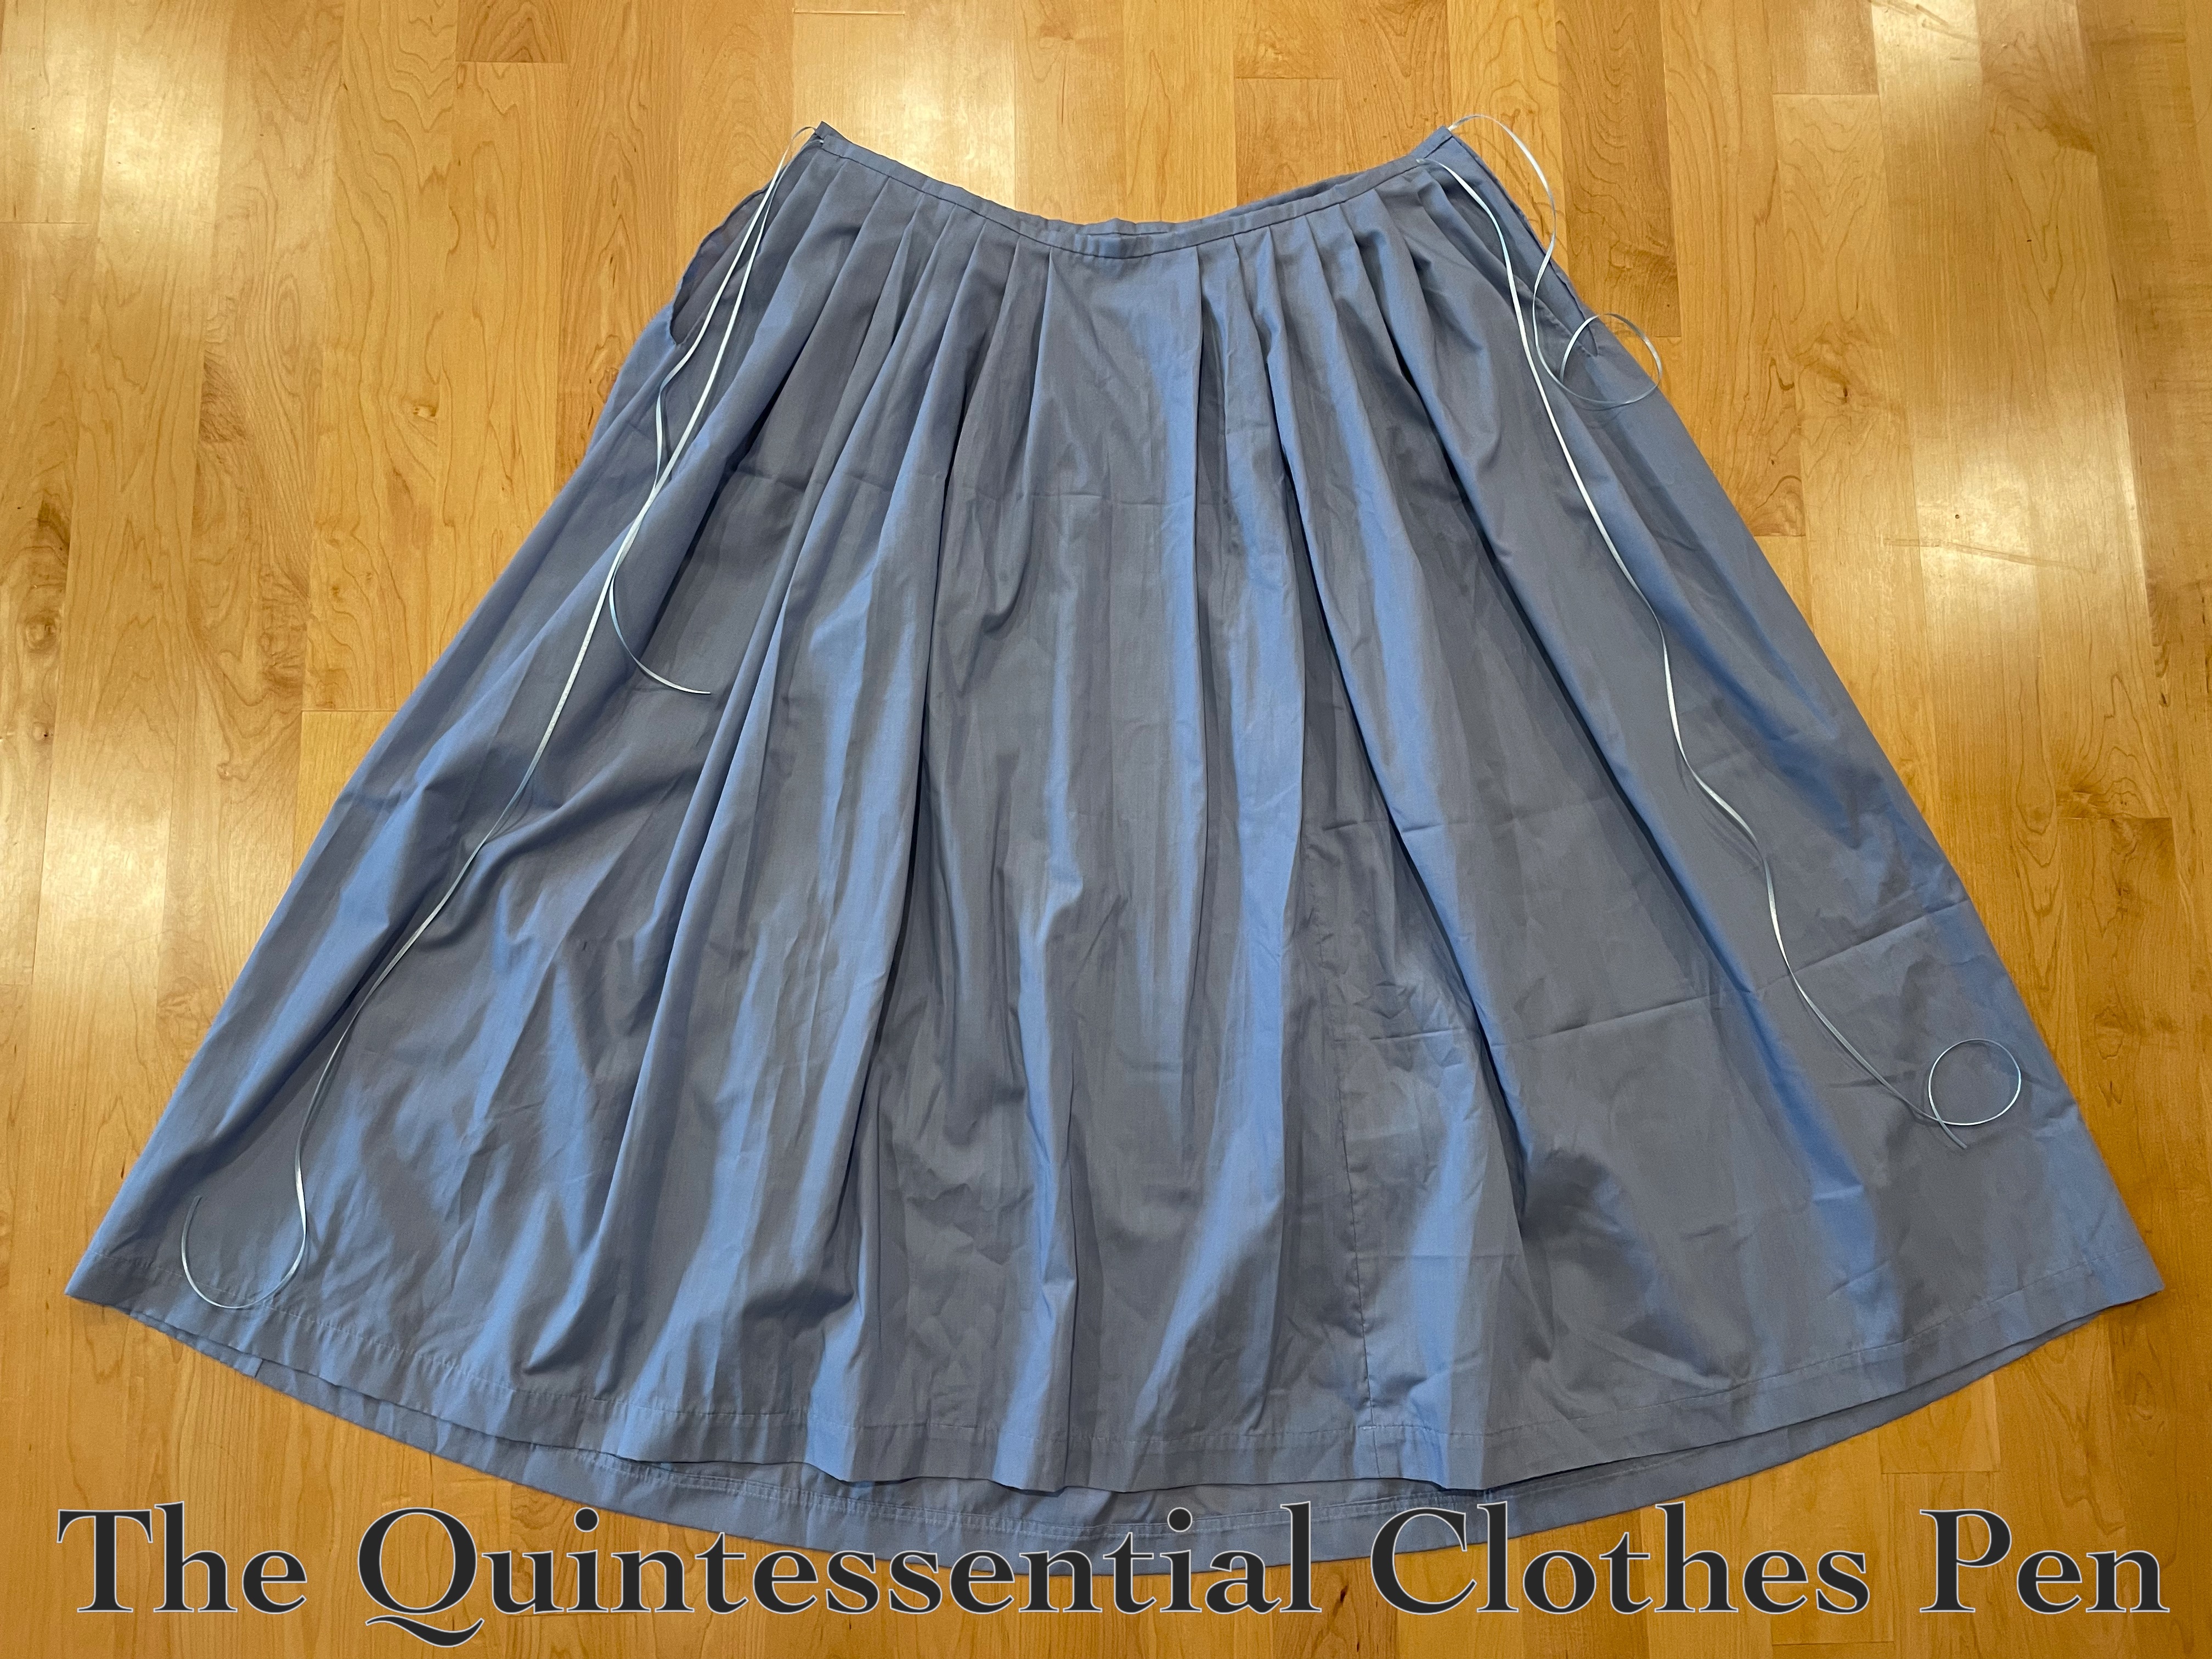
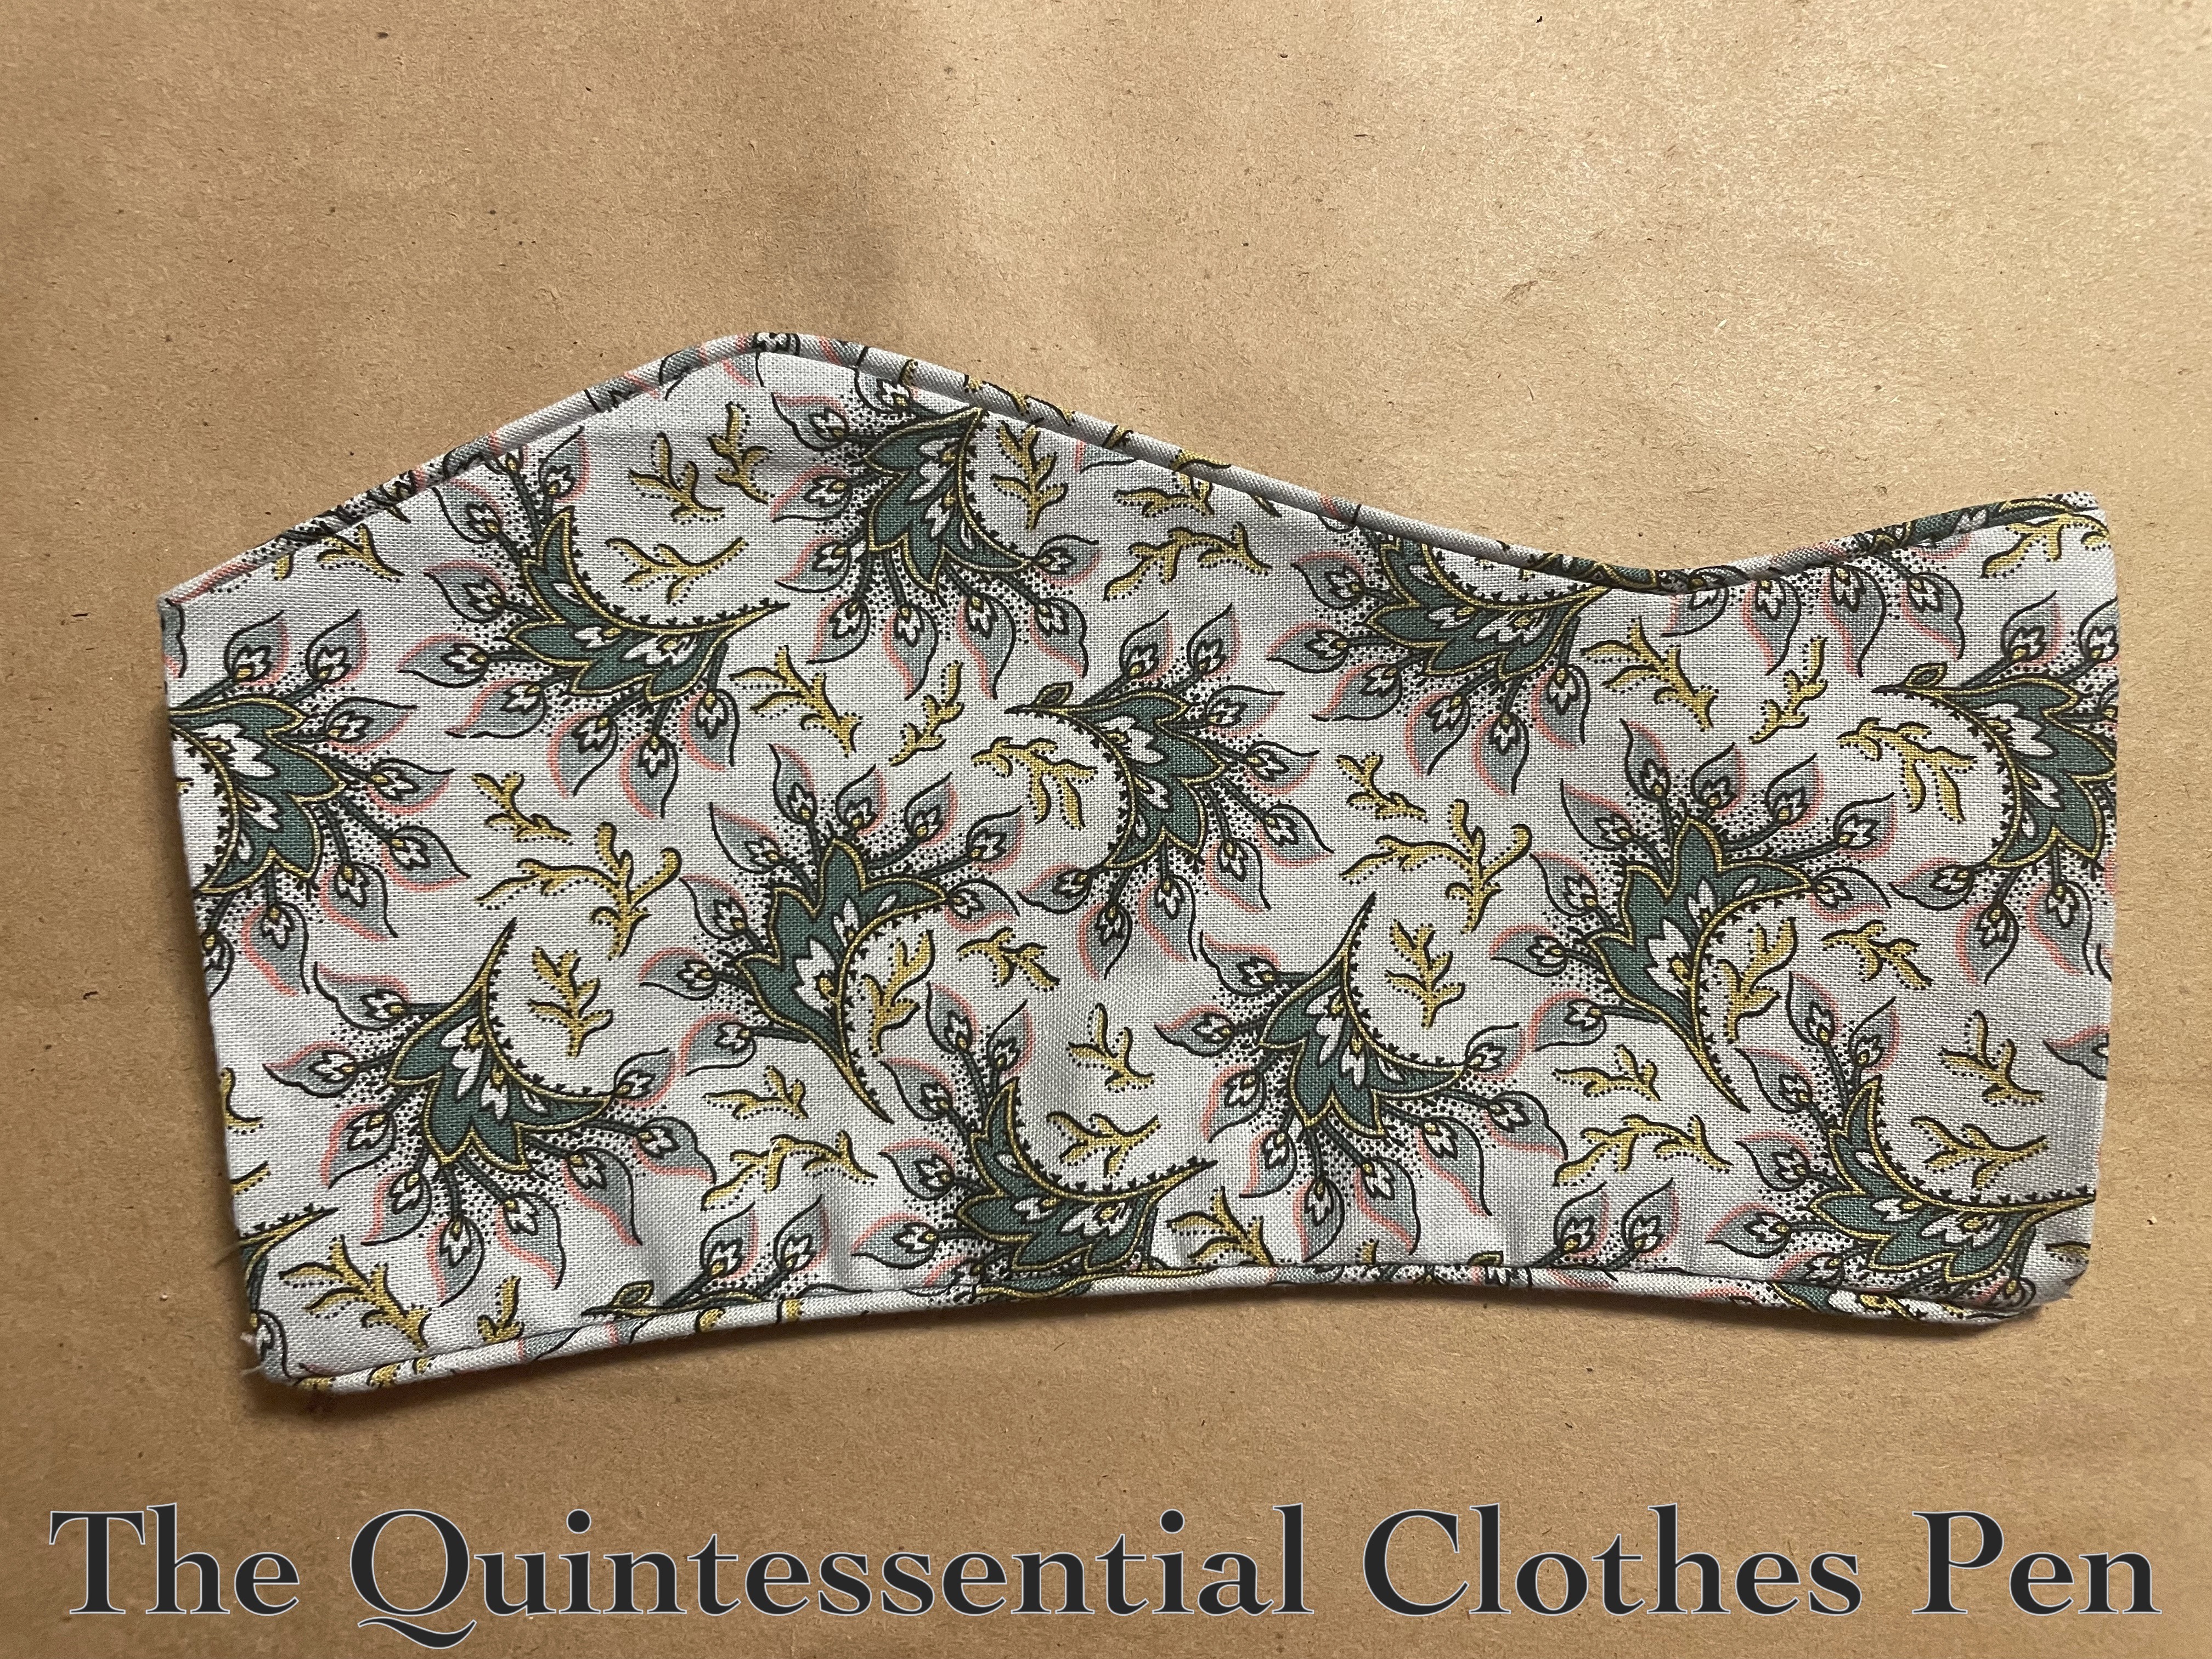
Below is an assembled new sleeve. It looks a bit silly laid flat on a table, but it actually does make sense on an arm!

I had just a few steps left. First, attaching the sleeves to the bodice. Second, adding decorative elements below the top puff. Third, putting closures on the cuffs.

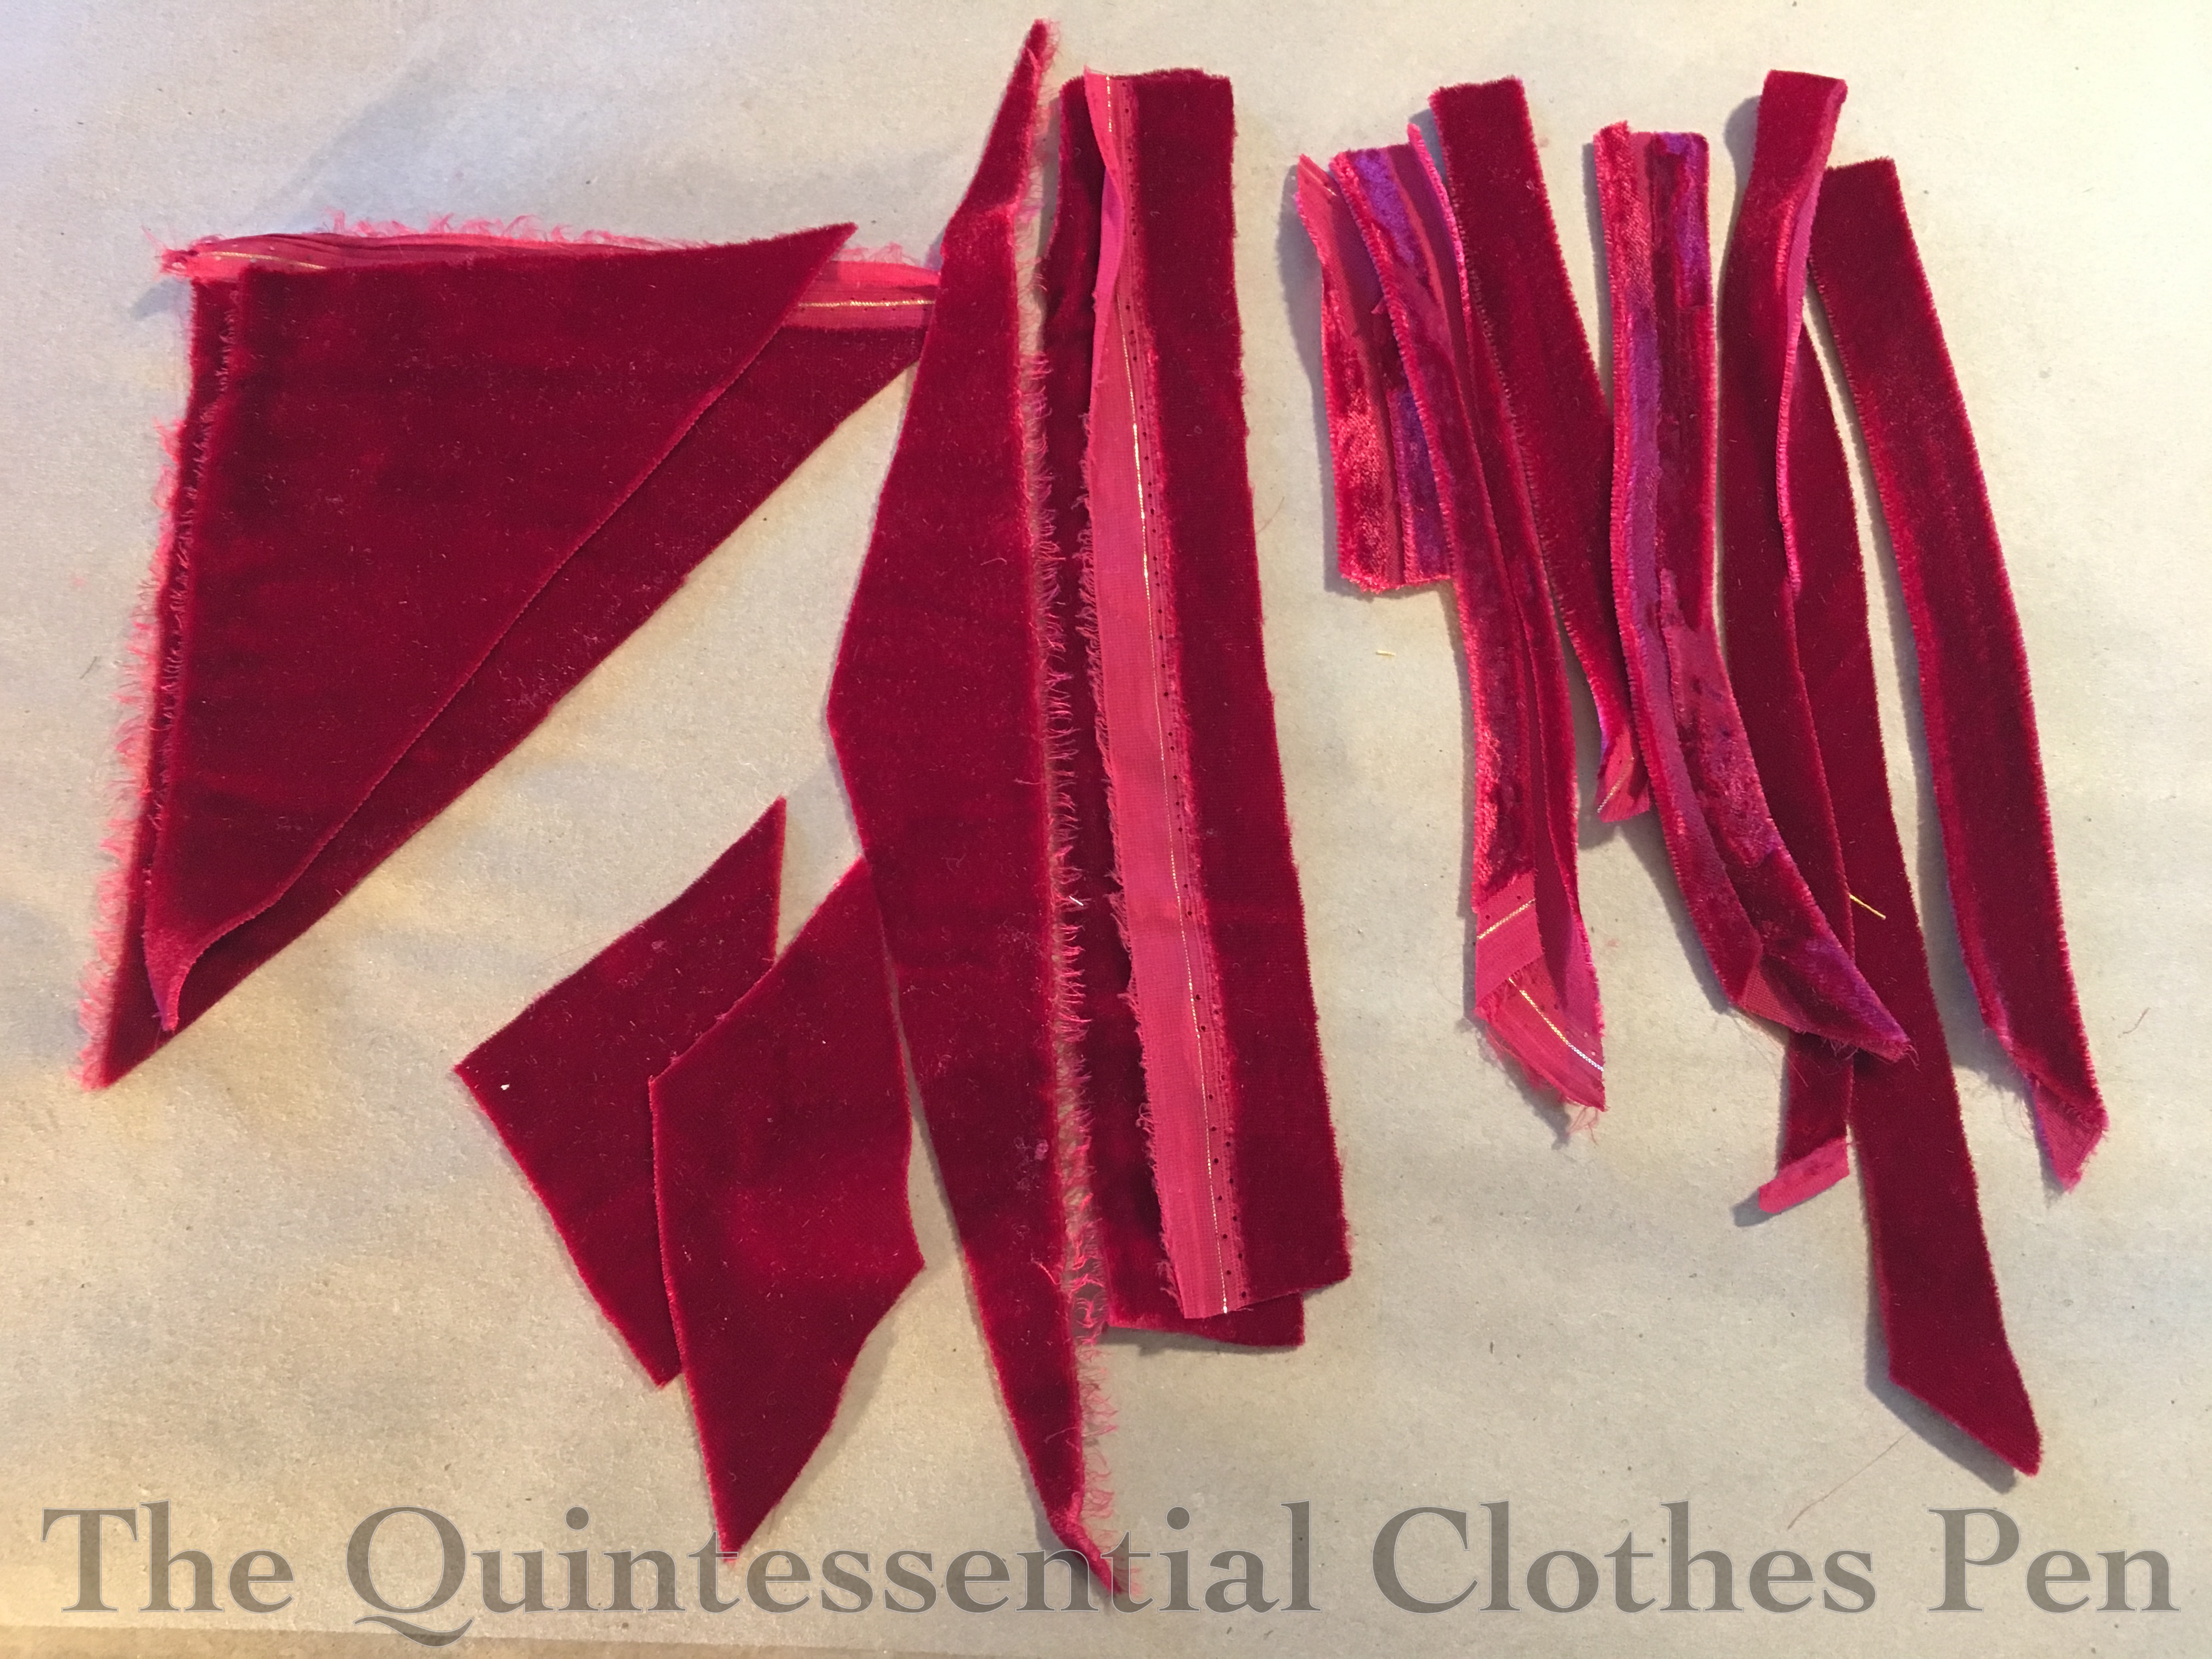
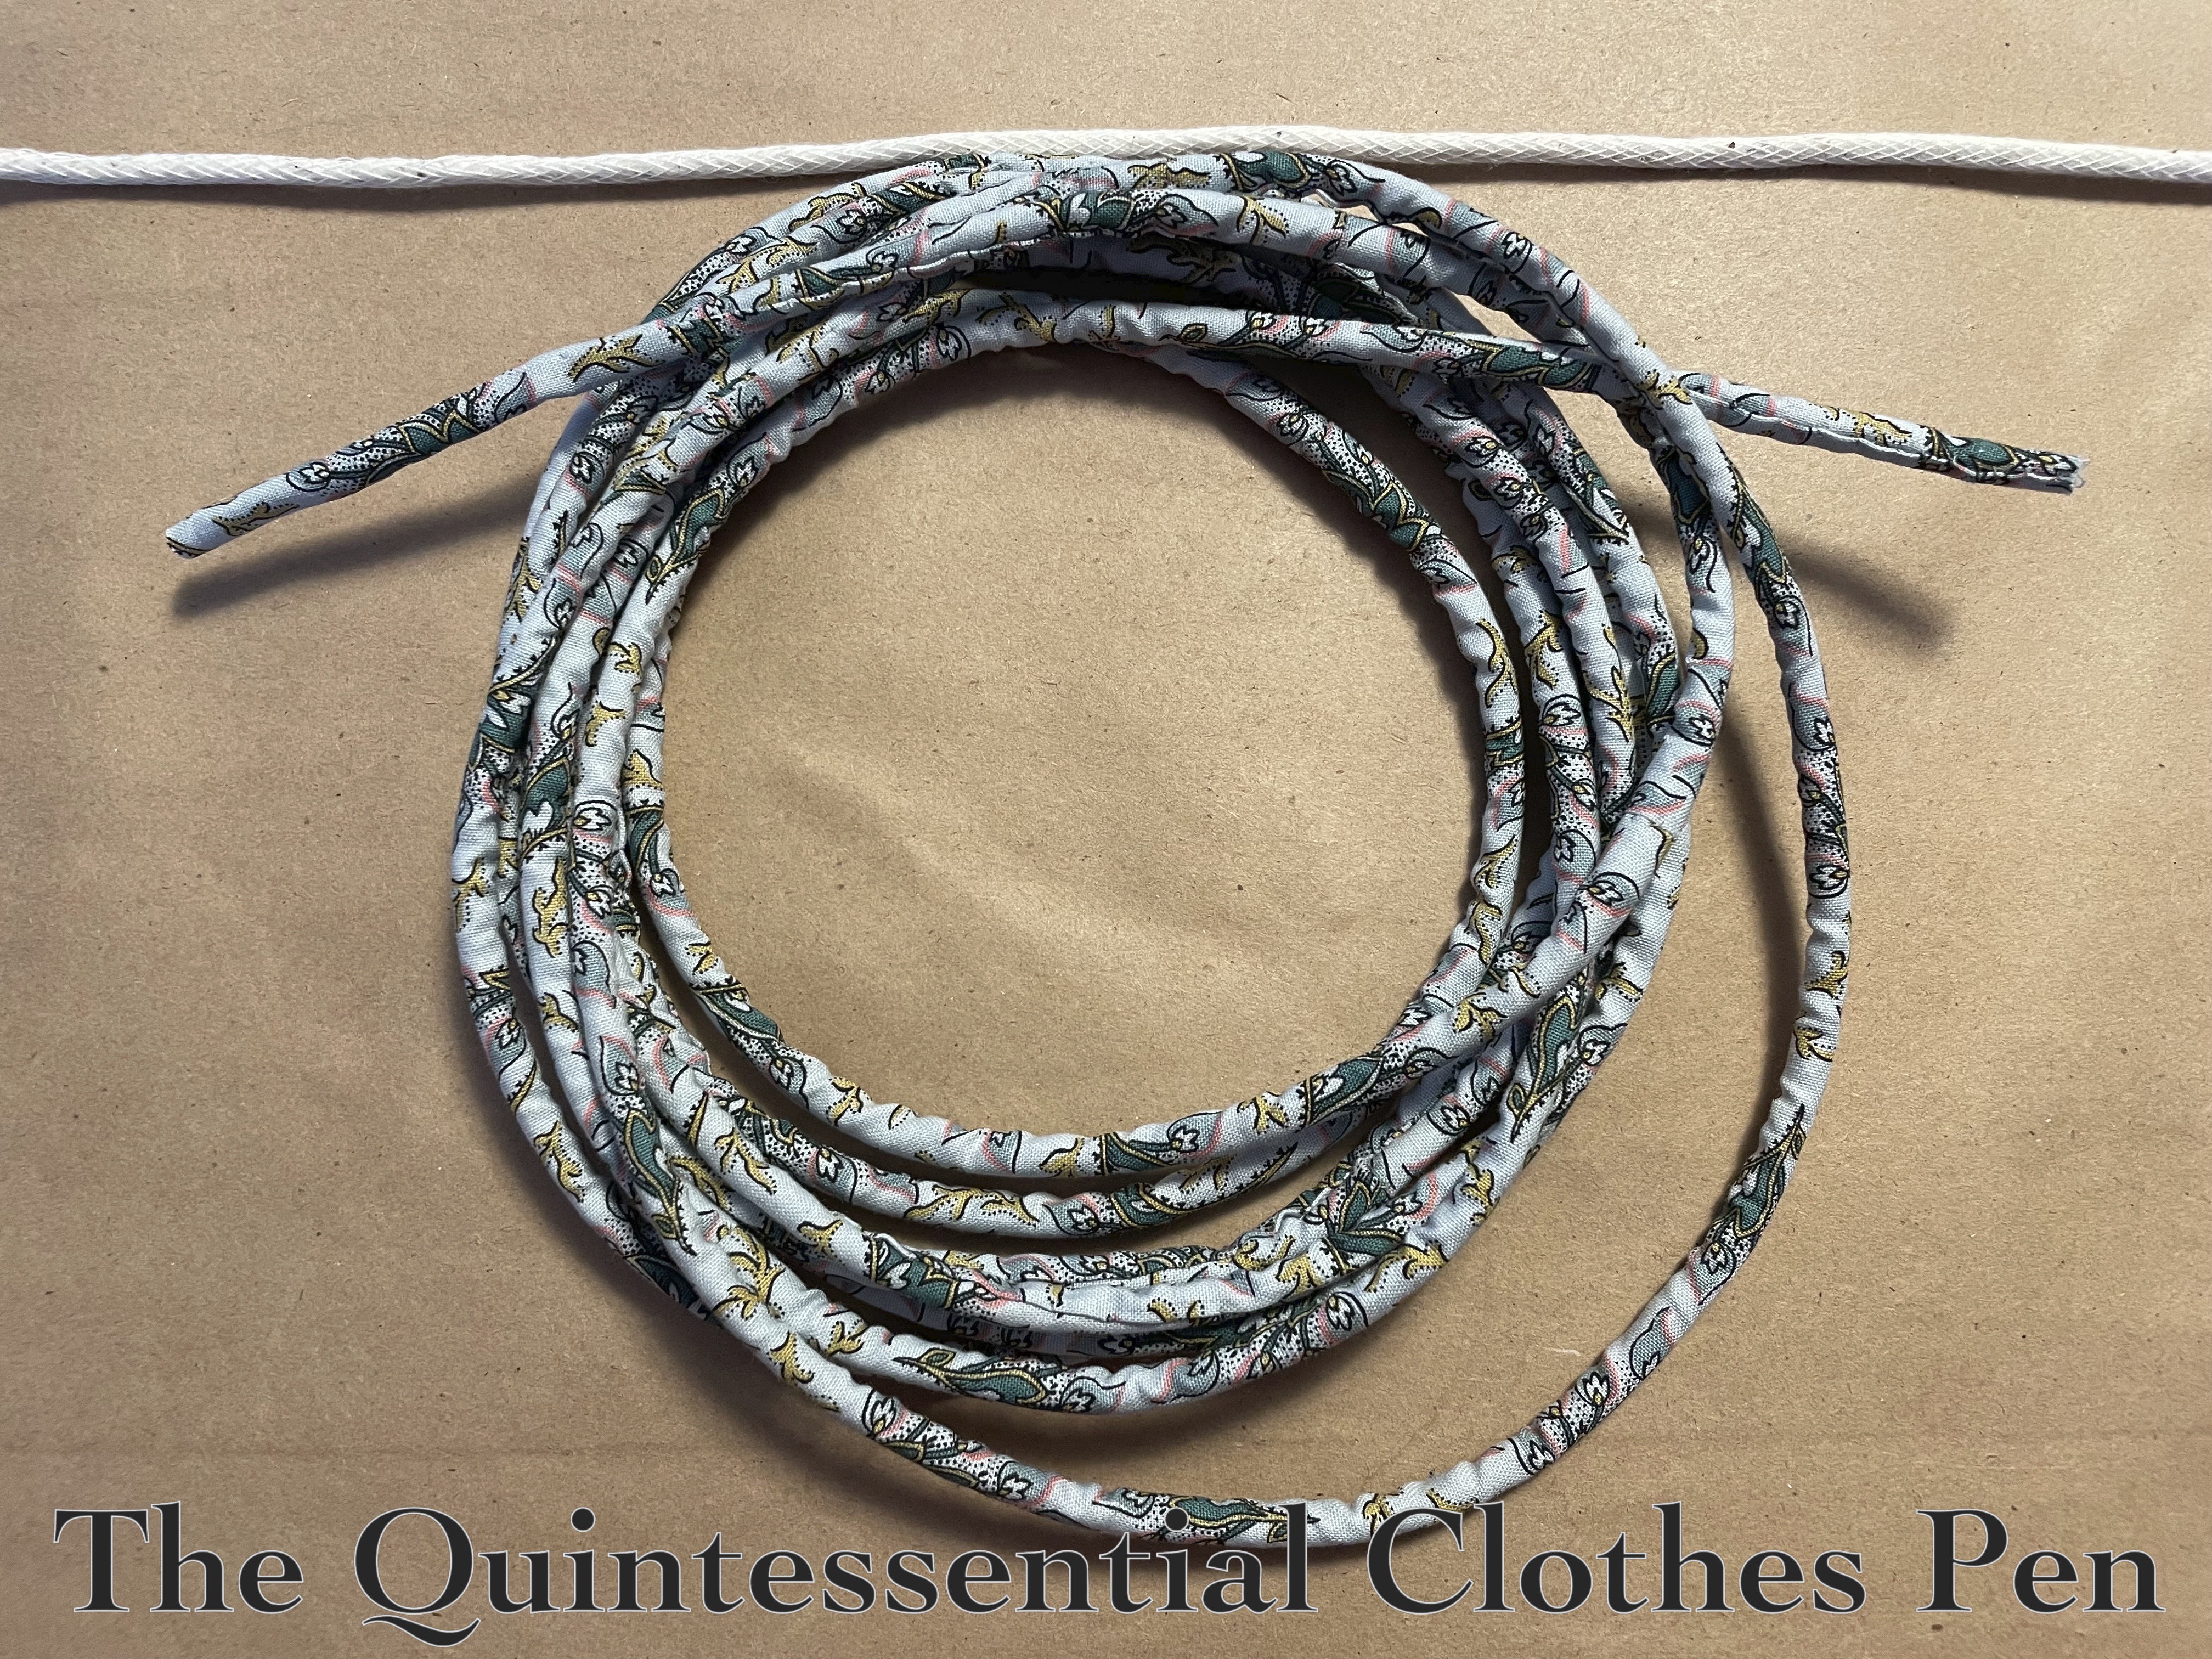
Looking at the fashion plate, it’s unclear exactly what the trim below the top puff of the sleeve is. My eyes perceive it as being the same color as the dress and some form of twist. I thought about this for awhile and decided to go with bulky piping. Instead of the tiny stuff used for bodices, cuffs, etc. I used leftover 5/16″  cotton upholstery cord from decorating projects.

I pieced together some rectangular scraps of the blue cotton, pressed one long edge under, and then wrapped it around the cord and whip stitched it in place. A bit tedious, but sometimes a good repetitive project with no thinking is just the thing. Below is a photo of the finished covered cord, as well as the uncovered cord across the top of the image, to show what is inside.

After finishing the cord, I started from both ends to make a twist that would wrap around the sleeve. I just eyeballed it while pinning the cord in place and then hand stitched it to the dress from the underside, creating a floating twist effect.

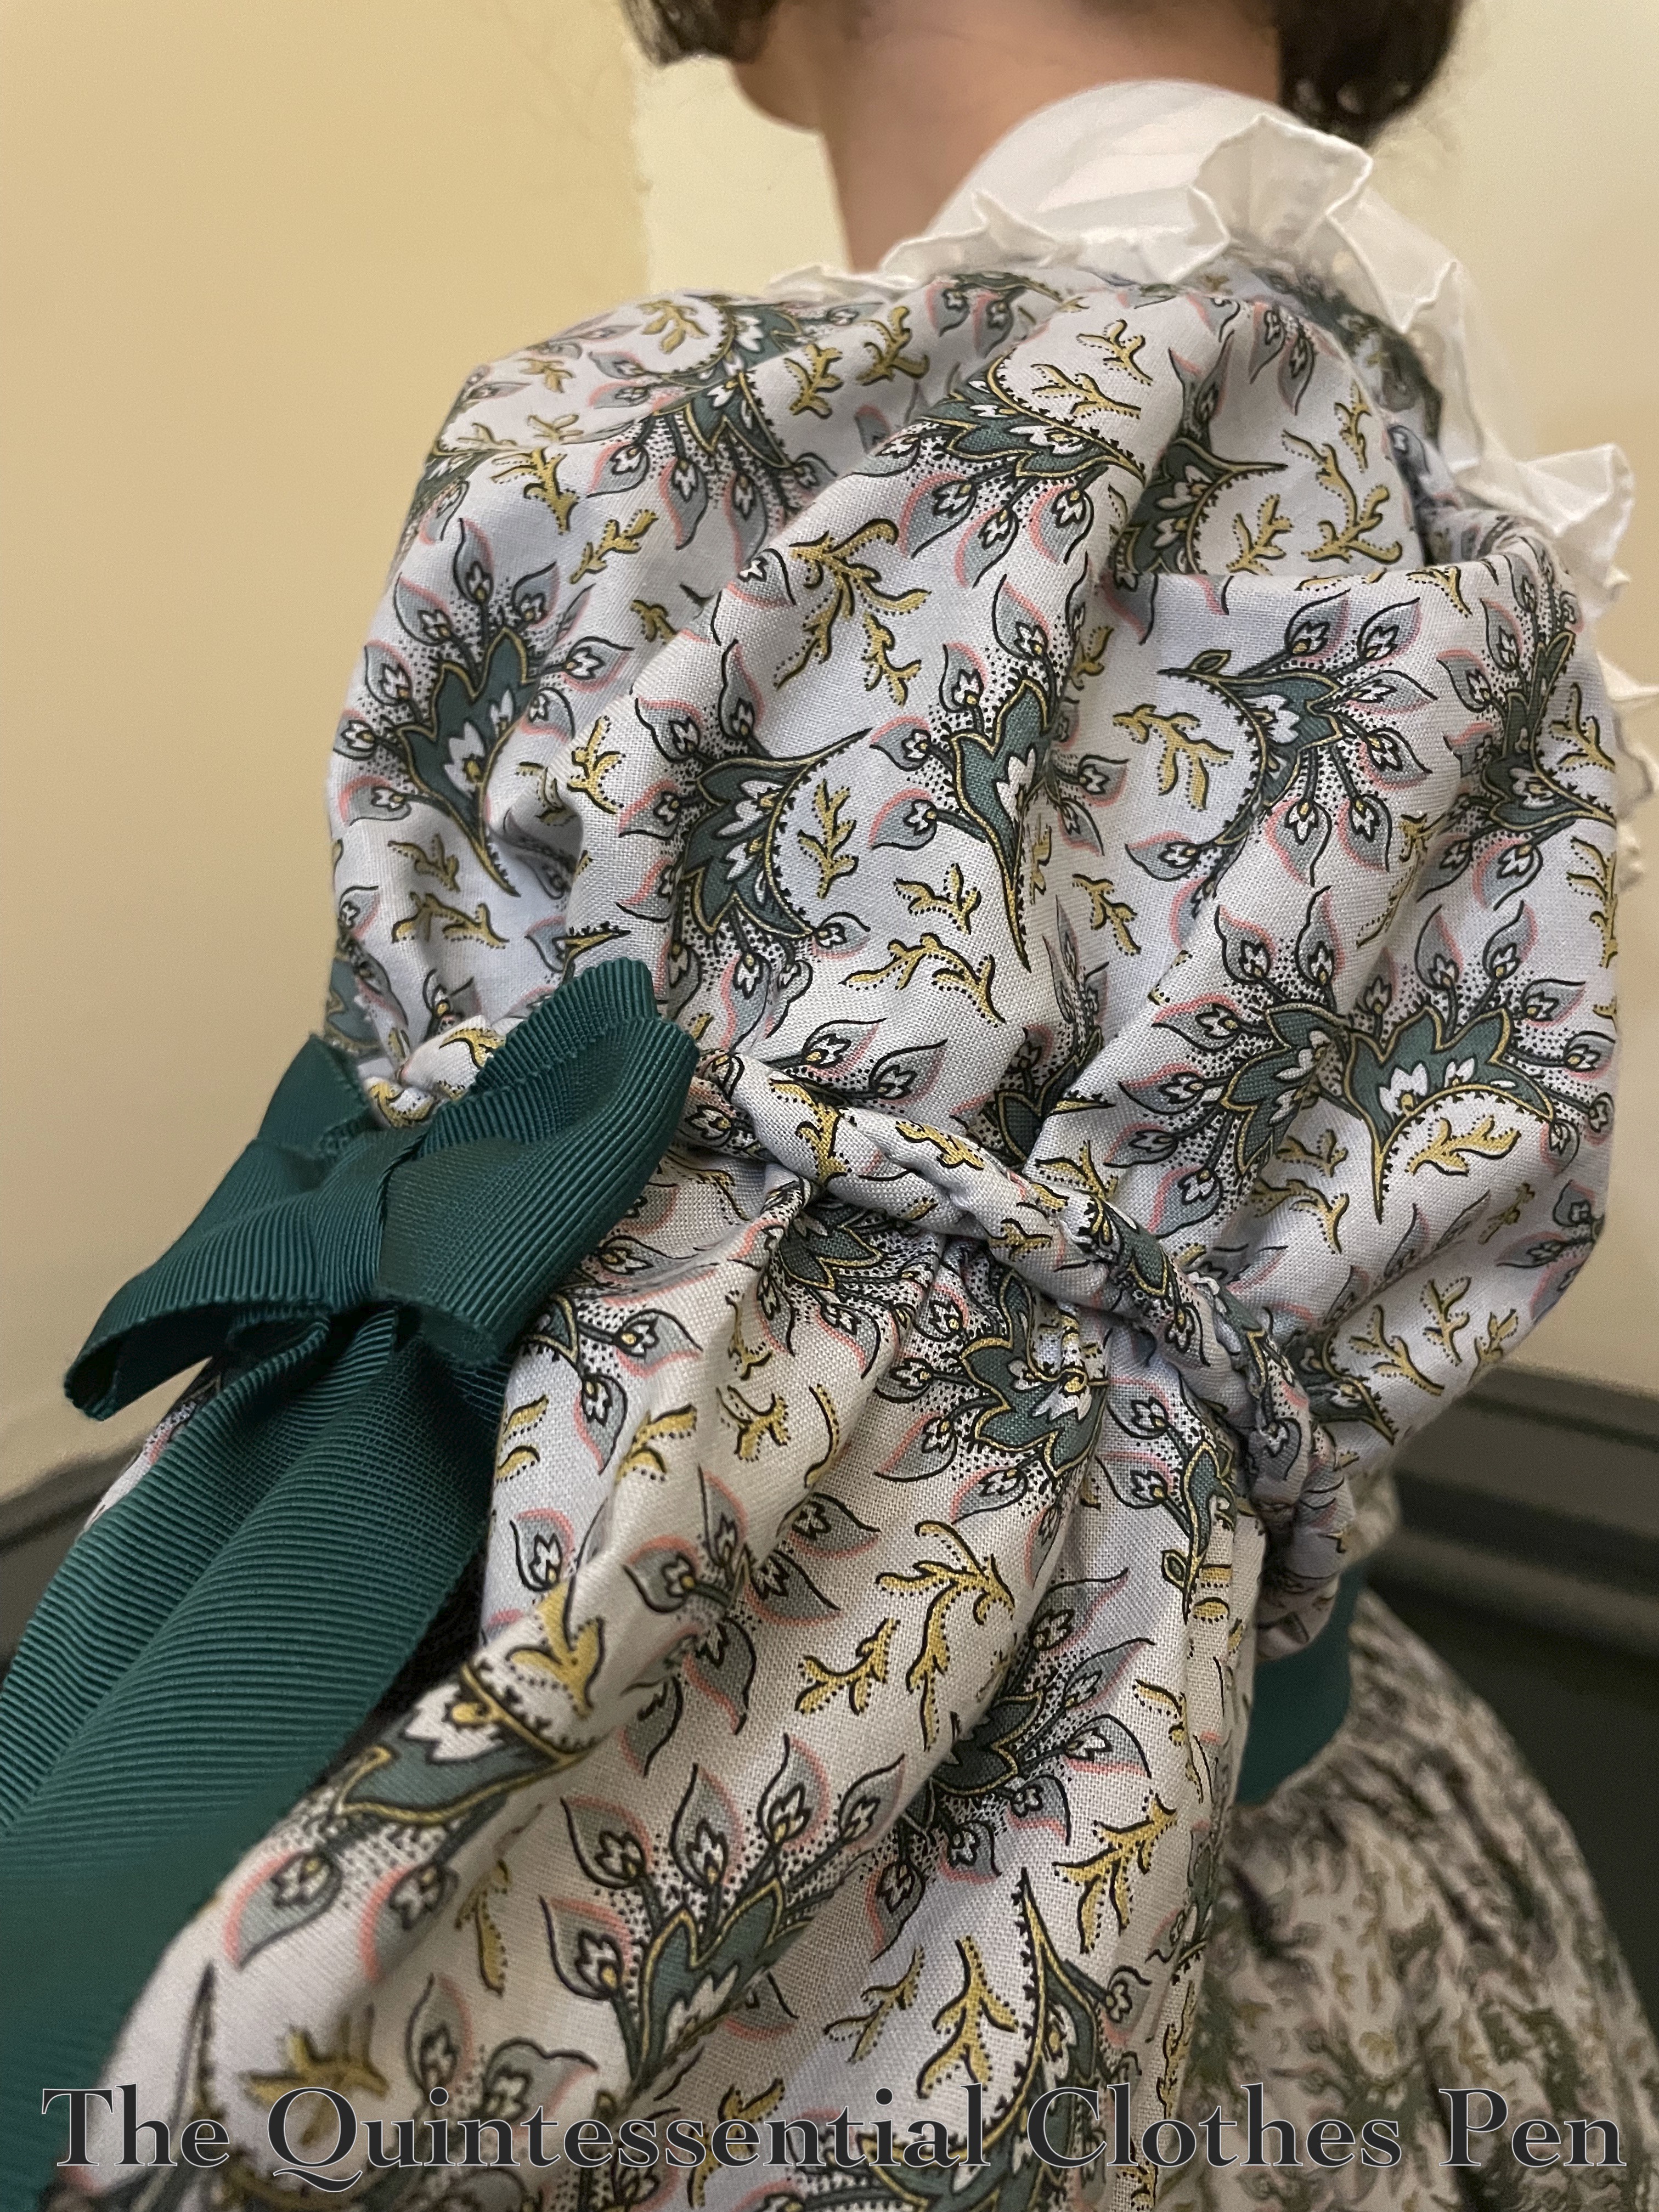
Being matching fabric to the dress, it is a detail that blends from a distance, but up close adds a subtle level of detail to the dress.

You’ll also notice that I added green grosgrain ribbon bows to the sleeves, as well! This is something that was directly inspired by the fashion plate. I’d bought this ribbon in 2021 when the first of my 1830s cotton print dress adventures began and it had been sitting and patiently waiting for me to finally get around to finishing this dress ever since!

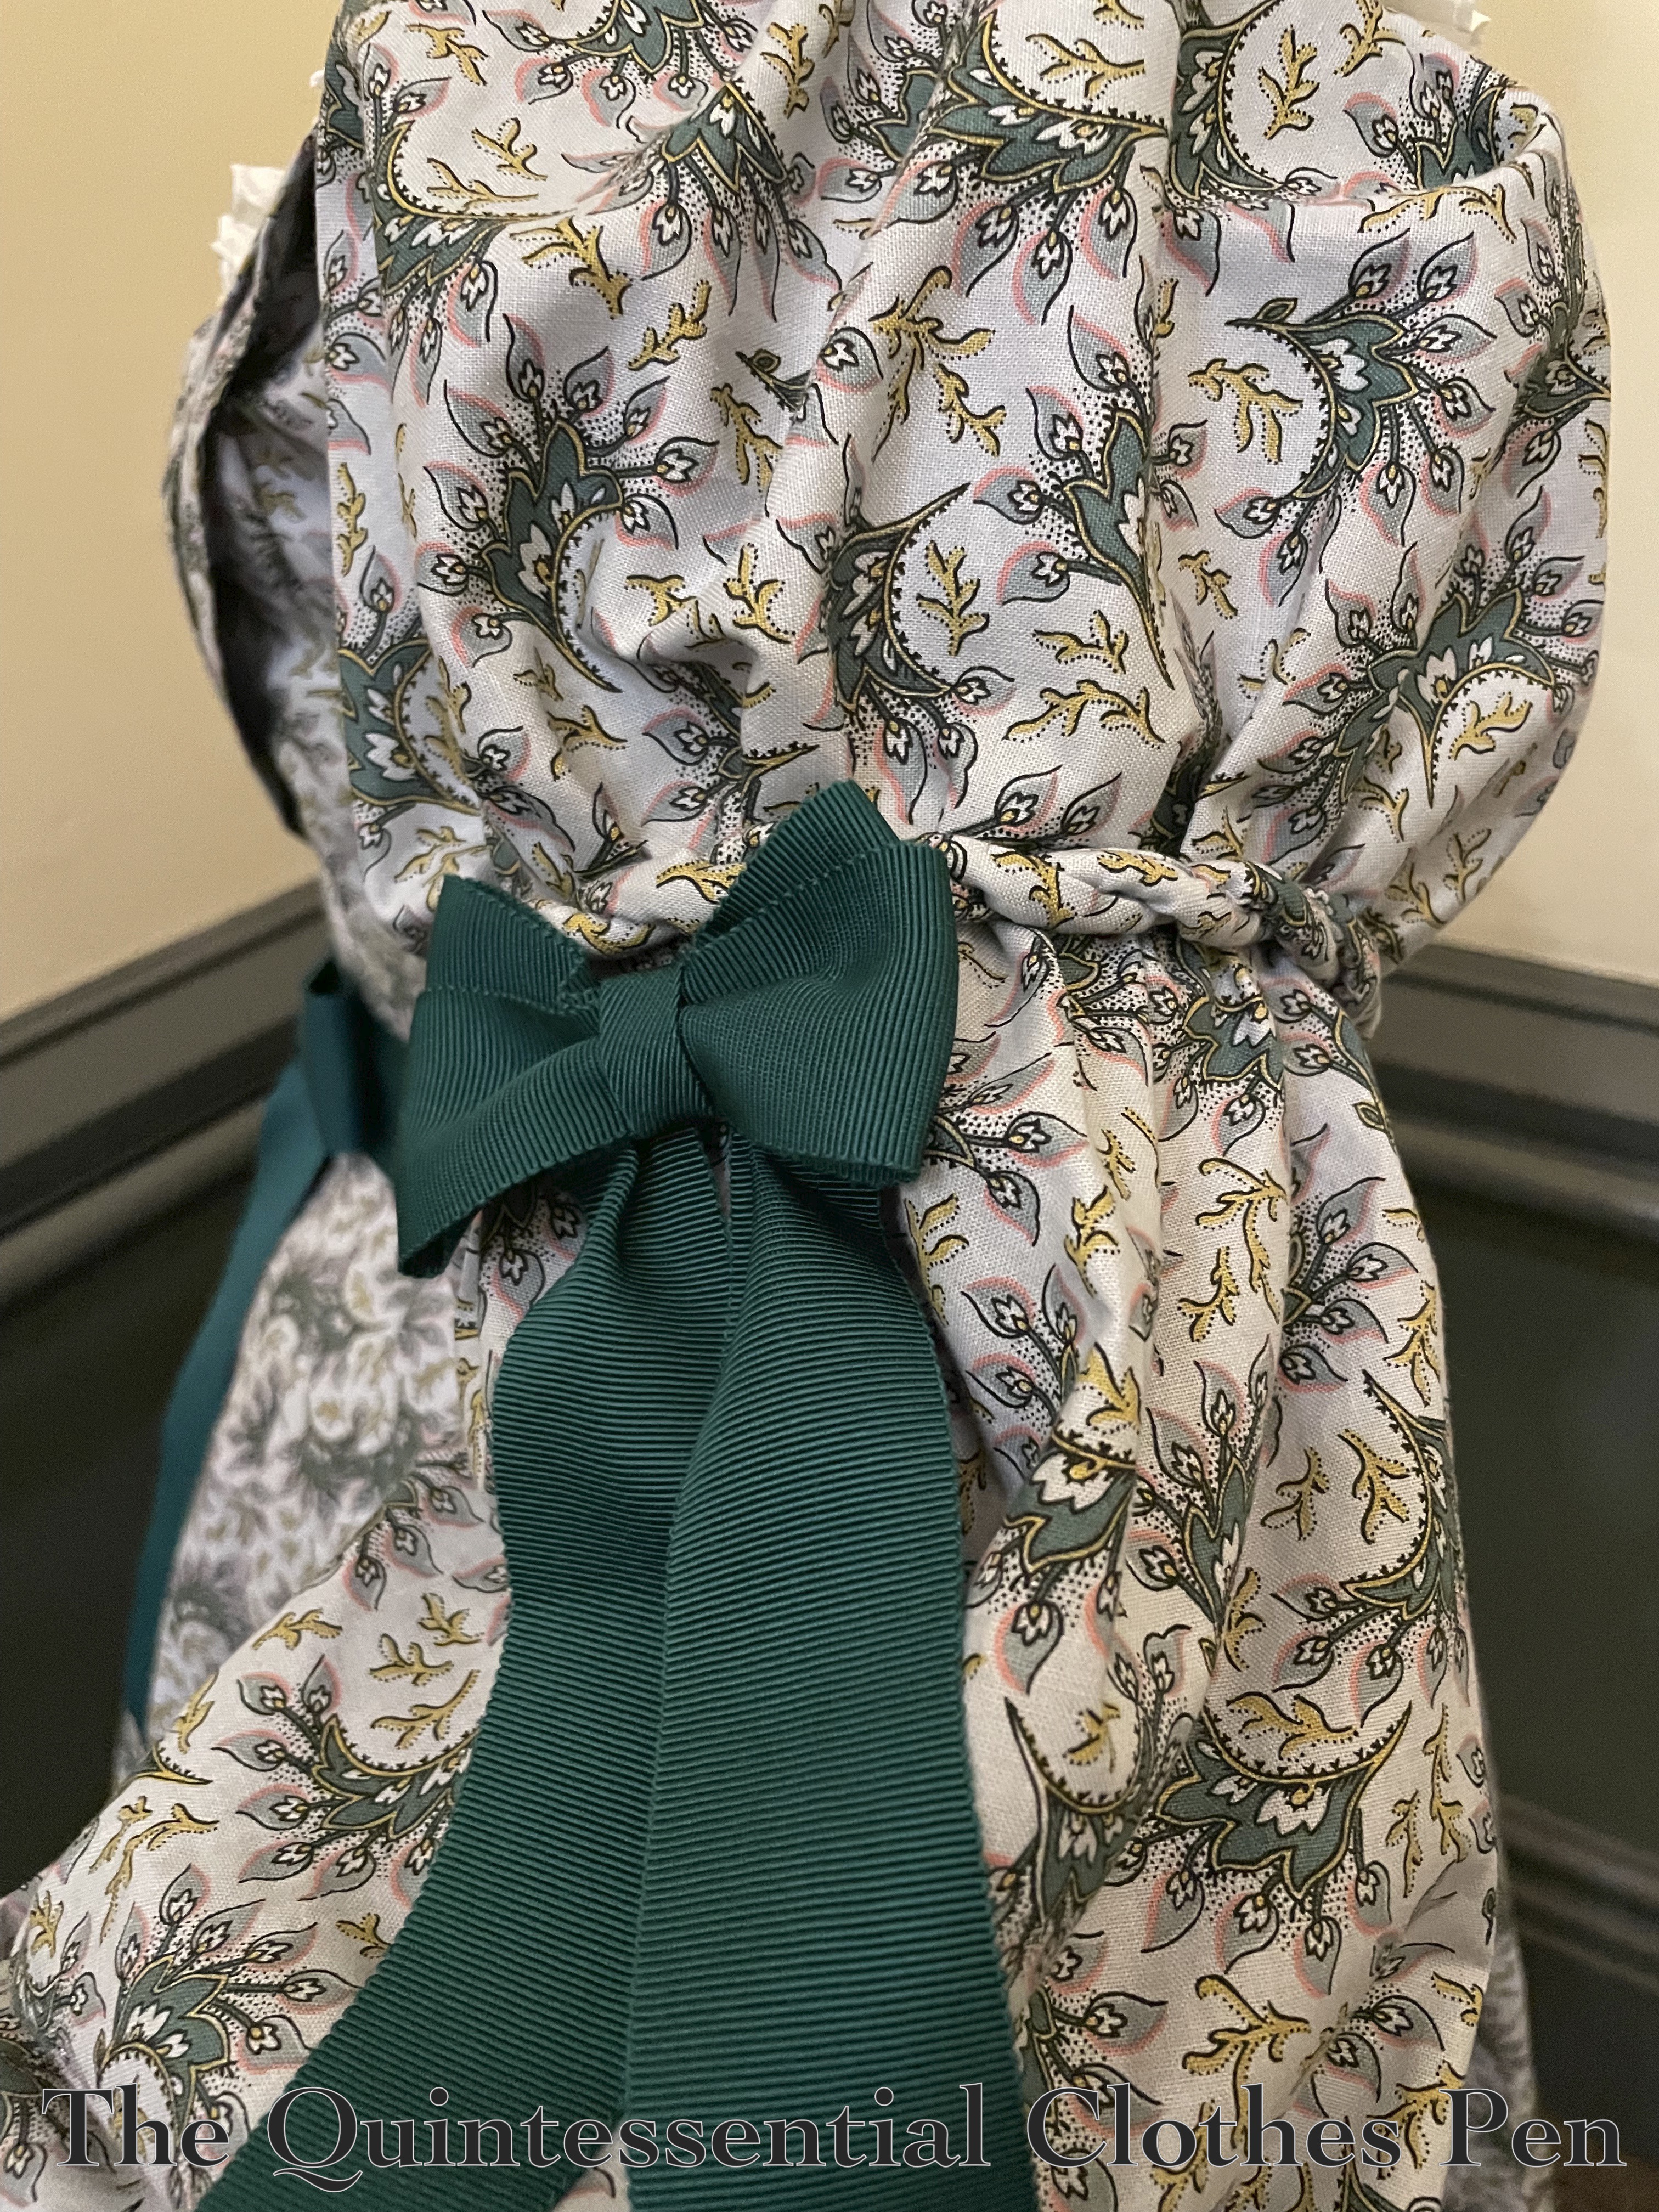
One bow puff didn’t quite look like what I wanted for the sleeves, though I liked the single width of ribbon for the hanging ties. So I added another puff to the horizontal section of the bow to make it appear a little more robust. Scraps of ribbon were used to make the bow centers, as I used up every single inch of ribbon I’d purchased!

After so many years of low level annoyance at this unfinished dress, it is extra exciting to finally have it finished, actually feel pleased with the results, and have been able to wear it! I’ll share more photos of the entire dress in its finished state next time.

18th Century Blue Foundation Petticoat (HSM #8)

In addition to the c. 1770 Pink Panniers that I recently posted about, the blue foundation petticoat pictured below (front view) is also intended to be easily loaned to friends.

I’m super pleased with this for a few reasons:

1 – I was able to easily replicate the construction steps that I used for my Apricot Petticoat in 2013, ten years ago!

2 – I was able to re-make the petticoat from an old project: the 1812 Blue Under Dress I also made in 2013. I was never very happy with this color under my 1812 Striped White Gown (it was blah) and within even a few years of being made it no longer fit the width of my back, anyway.

3 – This remake qualifies for the HSM Challenge # 8, All Tied Up:

Make something that closes with ties, or something that uses knots/bows as a decorative feature.

Just the facts:

Fabric/Materials: Approximately 3-4 yards blue cotton/polyester blend fabric (salvaged from an old dress).

Pattern: None, but I referenced both of these tutorials on constructing 18th century petticoats. Katherine’s tutorial is for a petticoat with an uneven length (to go over panniers, or a bum roll, for example). Rebecca’s tutorial is for a petticoat with an even length (the same length all the way around, to be worn without extra supports). Both tutorials have construction information, Rebecca’s includes a bit more detail in terms of which stitches and methods to use.

Year: Loosely 1700-1790.

Notions: 3ish yards of 1/8″ blue polyester ribbon and thread.

How historically accurate is it?: 70%. Accuracy gets knocked down because: 1- all unseen seams are machine sewn, 2- I used polyester ribbon for ties, 3- I haven’t seen research that shows cotton being used at this time for a single plain petticoat of this sort.

Hours to complete: 5? I didn’t really keep track.

First worn: Has not been worn yet.

Total cost: Free! Materials were either in the stash/gifted to me or re-used from other projects.

Here are more photos of the petticoat, starting with a back view.

And, close-up evidence of weird things, such as the twice-stitched machine hem, which could be useful if I ever want to lengthen this petticoat. These hems are leftovers from the salvaged dress–no hemming required for this petticoat. Perfect!

I followed the instructions as indicated in Just The Facts earlier in this post. This leads to tidily finished waistbands, as you can see here (along with a randomly located vertical seam).

(Another weird thing about this petticoat is where the seams landed on this, now that it is a petticoat and not the skirt of a dress, and that each seam is finished in a different method!)

And here’s a the same view, but with the front folded down to show how the petticoat is made shorter at center from than it is anywhere else.

Below, a final closeup of the extra length at the front folded down and left raw. The top fold is encased in the waistband, which is machine sewn and whip stitched down on the inside.

I was super pleased to just barely fit this petticoat length out of the skirt length of the old dress. The hem circumference was just about perfect, too! And, I was able to cut the waistband strips from the front bodice pieces of the original dress!

All in all, a quick and satisfying project! I’m much more pleased with this as a petticoat than I ever was with it as a dress.

Regency Shoe Revive (HSM #2)

Back in 2012, I happened upon an unusual pair of shoes in a small clothing store. They were quite flat, with little support or durable sole and a slightly square but still rounded toe. The price was great–$10 per pair. I thought the shoes would make excellent Regency dancing shoes, so I bought two pairs, an 8.5 and a 9. The 8.5 were a little tight on my feet which was perfect for dancing as they stayed on my heels even when I rose onto my toes, but the 9 also fit and was great for walking around.

I’ve kept the size 9 nice looking over the last eight years. They have a surprising mid-20th century vintage look in addition to the Regency look, so they are most often worn with 1950s inspired dresses (you’ll spot them with my vintage inspired Happy Clover Dress and 1953 Dot Dress, both pictured below).

But while the size 9 pair hasn’t been worn all that often, the size 8.5 pair have been worn almost anytime I’ve been dancing in Regency clothes for the last eight years. You’ll spot them in all of the posts below (with a few of those highlighted with photos, as well), but of course this is only a small portion of the times these shoes have been worn.

1817 Duchess Gown In Three Stylings
Regency Intensive Dance Weekend 2019
1817 Gold Stripes And Face Framing Curls
Regency Dance Weekend 2017
A Gown Worthy Of A Duchess
Regency Dance Weekend 2016
Regency Shoe Poms!
A Turban Fillet, 1811
Regency Dancing At The Salem Maritime Festival
Refreshing Proof (Chelmsford Regency Ball 2013)
Regency Dance Weekend Part IV: Reception
Lovely Clothes, Lovely Ball: Part I (Pride And Prejudice Ball 2013)
Regency Christmas Party At The Commandant’s House
1812 Guerriere Weekend Part IV: A New 1812 Gown

All that wear has caused the shoes to show their age. While still functional, the exteriors were cracking and peeling around the top and the toes/sides/back were worn and scratched.

But I’m not ready to let these shoes go! So I decided to revive them with a few touch up treatments.

The first touch up step was to glue petersham ribbon around the top edge to bind it off, as well as down the center back seam, for an additional historical touch. I wanted to be done quickly, so I used hot glue, but this really wasn’t the best choice of glue, as it is a bit lumpy under the ribbon in some places.

I purchased the grosgrain from The Sewing Place. They have a beautiful selection of colors, reasonable prices, and low shipping charges.

The second touch up was a bit of white Angelus leather paint to cover the scuffs. (Thinking back, I should have cleaned my shoes before painting them… But I didn’t. So, there’s that.) Again, I was just trying to be quick. I figure these shoes are going to get banged up again as soon as I wear them, so I didn’t need to be too fussy. The white paint didn’t perfectly match my shoes, so I did thin coats and buffed the edges with scraps of cotton to get them to blend. It’s not perfect, but it looks reasonable from standing height.

This was a simple project, but it qualifies for this year’s HSM challenge #2: Re-Use.

Use thrifted materials or old garments or bedlinen to make a new garment.  Mend, re-shape or re-trim an existing garment to prolong its life.

Just the facts:

Fabric/Materials:  1 pair of soft soled flats and white Angelus leather paint.

Pattern: None.

Year: c. 1810.

Notions: Approximately 1 yd of petersham ribbon.

How historically accurate is it?: 50%. In general, the silhouette and style works, but of course these shoes are not perfectly historical in style and the materials are modern.

Hours to complete:  1 hour.

First worn: November 23, 2019.

Total cost: If we’re only counting the revive and not the original cost of the shoes, then approximately $5 for the ribbon. (The glue and paint were in the stash.)

Here’s another view of the completed shoes.

It was my goal to revive these before this year’s Regency Dance Weekend (an annual event each April). I achieved that goal in terms of the date, though sadly the weekend was cancelled this year. But even though I didn’t get to use these for that event, at least now they’re ready for more years of adventure (and I can return them to the closet–they’ve been sitting out since last year to remind me to deal with them!). I’m quite pleased with the end result and the small amount of effort required to update these shoes.

Check out the following links if you’d like to see tutorial-like photos and descriptions of the painting and ribbon-ing process:

Lauren, of American Duchess, wrote a very helpful blog post tutorial back in 2012 showing how to paint shoes as well as the petersham ribbon edging.

Chelsea, of A Sartorial Statement, wrote a blog post about her freshly painted and ribbon-trimmed flats in 2019.

Project Journal: 1863 Apricot Evening Gown Part VII: Finishing Details

Next post will be photos of my finished apricot dress… YAY! But first, I have the final finishing details to discuss. Most of the finishing left was on the bodice, so let’s start with that.

Bertha

Side note: have we ever talked about what a bertha is? A bertha is a collar of lace or other thin fabric, particularly popular during the 19th century. Check out this link to learn a little more about the history of the word.

In my last post, I included a photo showing the assembled front of the bertha for this dress before I attached it to the bodice. My goal was to make the bertha completely separate so that it would be easy to change if I decided to do that at a later time.

The foundation is a single layer of ivory tulle cut to the shape of the front (and one for the back) of the fully assembled bodice. A gathered piece of my lace trim was machine stitched to the bottom edge of the tulle, about ½” up from the cut edge.

On top of that foundation is a second layer of tulle that is gathered at both the top and bottom edges. The top edge is folded under by about ½” and the gathering stitch run through both layers so that the top edge is a fold rather than the cut edge of the tulle.

It took quite a few pins to secure the gathered tulle to the tulle underneath. It was finicky–tulle on tulle… not fun!

And I might have made a mistake while ironing my first foundation piece of tulle. Any guesses about what that was?

Oops! I like to iron with a hot iron but the nylon tulle was having none of that! I had to cut a new piece… and turn down my iron for a bit! The bottom gathered tulle in the above photo shows another failed experiment. That tulle is a full double width folded at the top and gathered top and bottom. I decided it was too bulky and not as elegant and decided to go with my previously explained method of only turning the top to create a fold.

After machine sewing my successful gathered tulle to the base layer of tulle it was time to add velvet trim. The velvet was cut on the bias, both edges pressed under, and then it was slip stitched over the stitch lines in the tulle. I also created velvet bows, as I hinted about last time. This is one of the bows I created before I realized I needed more than I had cut out… oops again!

After recutting my bows, this is the velvet I had left. I didn’t include anything for scale, but the longest piece in this photo is about 6″!

Remaking the bows (or rather, cutting new ones and disassembling ones I had already made) brings us back to where we were in the last post. The old velvet bows had top bow parts and dangling bow parts cut on the straight of grain, but due to my limited fabric I cut out the new bows with bias dangling parts. In the end I’m glad I did, because I think they hang more elegantly than the straight cut version.

Brooches

You might have noticed that the center velvet bow on the bertha has a gold filigree oval on it. In my inspiration it looks like these are buckles or brooches of some kind. I started by trying to use my stash, finding two matching football shaped buckles that I hoped could work. But the more I looked at them the more I didn’t like them.

So I spent a long time looking for something else low-cost that would work. Ideally, I wanted two sizes of the same style, but that quickly proved to be hard unless I wanted smallish very sparkly rhinestone buckles. But of course the scale of this dress is not small. Eventually I found the right search terms to find open centered brooches intended for creating your own cameos. I purchased these and painted them gold using acrylic paint. Despite being the same size for the bodice and skirt, I think they worked well!

Sleeves

I suppose I should also mention the sleeves. They made it onto the bodice but I haven’t talked about them at all. They are cut on the straight of grain and are basically a round-top trapezoid shape, with an outer layer of silk that is larger than an inner layer of my flat lining cotton. The silk was gathered around the bottom and around the armhole to fit. Due to the longer measurement of the silk it rolls up inside the sleeves by about 1″, which keeps the cotton from showing while being worn. Here you can see the poofy sleeves as well as the bertha before it had velvet added.

Oh, but those sleeves weren’t done yet! My inspiration had sleeves that appeared to be droopy continuations of the bertha. This is a detail that is different from all of my previous dresses from this period, so I felt it would be a neat detail to include. It took quite a bit of pondering to decide how to achieve the look and it was something I didn’t feel I could tackle until well into the process when I could see what the bertha and sleeves were doing without the extra layer.

My solution was to create sleeve caps of single layers of tulle with more of my lace and silk pleated trim on top. The tulle rather disappears when worn, giving the effect of floating trim. It’s pretty neat, actually.

Sewing the lace on was easy and relatively fast, as I did it by machine. But the silk… well, I thought I had enough left over from my crazy skirt trimming for the sleeves but those pleats eat silk so quickly! I only had about 75% of what I needed.

It was less than a week before the ball. I had returned the scalloped scissors to my friend so I couldn’t cut more silk. I tried spacing out what I had as much as possible without looking different from the skirt. And I was still short! UGH! Last minute challenges aren’t very fun. I pleated and re-pleated. Got a few more inches covered. Then I decided to harvest some pleated trim from my skirt, from underneath the big velvet bow where it wouldn’t be seen. Not terribly fun, to seam rip something you’ve just made. And the pieces I got were about 5″ in length. But I got them. And I put them on those sleeves. And even though they’re pieced you can’t tell at all and those sleeves got done!

This photo shows the first sleeve in progress, before I realized I didn’t have enough silk trim…

I sewed the sleeve caps on with small top stitches to the outside of the bodice at the armsceye seam. Again, this makes them easy to remove if I want. Also, I’d already set the sleeves… so I couldn’t easily put them into that seam (oops?). In the end, it doesn’t matter that they’re on the outside, because the bertha lace completely hides the armsceye along the top of the sleeve.

Bodice Finishing Details

In addition to sewing on the sleeve caps, I also attached both the front and back bertha layers to the bodice.

I finished my eyelets and ran the lacing ribbon through the top half. I find that 3 yards of ribbon allows me to leave the ribbon laced through the top eyelets and still get in and out, which makes getting dressed faster as the person helping me then only has to lace the bottom half of the bodice and tighten the ribbon at the top.

I also made and whipped in a placket. That’s the rectangular piece that’s rather wrinkly in the center of the photo below. While this bodice fits perfectly now, you never know what the future will bring and this will allow for a slight gap (if needed) that will still look like dress fabric and not like underwear.

I added hooks and thread bars to the bertha at the right shoulder, as well as two along the right back neckline to hold it in place along that edge. There is also a hook on the lace to secure it to the lace on the front of the bertha. Once hooked it looks seamless!

The final step was to sew hooks on the front and sides inside the bodice to allow it hook to the skirt. You can see the hook on the boning at the center front in the photo below.

Skirt Finishing Details

The skirt was basically done once I added my giant velvet bow except for a few things.

I added two hooks and bars to the waistband to close the skirt. The narrow hemmed opening is hidden under a pleat and will allow for future changes in waist size if needed.

I added loops to hook the bodice to. You can see one of those on the left. Turns out I didn’t line the side ones up very well (I think this was the very last task late one night on the last night I was stitching), so we added a safety pin at the ball and hooked the bodice to that. The safety pin is visible just to the right of the loop. At some point I need to move the loop to the location of the safety pin. Boo! There’s always something to fix or repair or change once you wear a garment!

And finally, when I added the waistband I also added hanging loops for the skirt. There’s one poking up on the right. These allow me to easily hang the skirt to keep it from getting wrinkled in storage.

And finally… after many, many hours of sewing, this dress is done. I like big projects but I confess to getting a bit sick of this one after sewing on it every day for about a month at the end of the process. Next post will be photos of the finished dress. (And I can report that I was happy with it in the end! Yay!)

1925 Lace Cloche

I knew I wanted a cloche to go with my 1925 Blue Coral Dress from early on in the process of making it. It was going to be hot when I wore the dress, so I knew I wanted something that would both look and feel lightweight. Turns out any hat was warmer than a bare head (well, one with hair on it!), but that being said, I think this was on the right track with a lightweight hat.

I considered making the cloche from fabric, but couldn’t decide on a style with seams that I liked. However, as I was browsing my Pinterest board, my eyes kept settling on straw, horsehair, and lace hats. It seemed like that was the way to go.

I didn’t have any particular materials on hand or in mind for that type of hat but I had come across a modern cotton lace cloche on Amazon for $14 that seemed like a good starting point. It’s no longer available, but I’m sure a careful search could find something similar. To the right is what it looked like before I started changing it up.

Generally, modern cloches have such a deep crown that they don’t leave any space for hair arranged on the back of the head. I have long hair, so that just doesn’t work for me. Cloches from the 1920s frequently have a cutout in the back to allow for your neck… or hair! They also have more interesting brims than modern cloches often do. Perfect. That’s what I wanted. An interesting brim and a cutout for my hair.

With my design plan in place, I started disassembling the modern cloche. First, I removed the braided band and flower. Then, I started unwrapping the lace on the brim, taking out the stitching that held one circumference to the next. I stopped at the bottom of the crown. I removed the inner hat band for most of the way around the hat, so I could stitch the new brim shape and the back cutout without stitching through the hat band.

Next, I played with the lace I had unwrapped for the brim to decide on a new shape. Once I made some decisions I had to make a few shorter pieces out of the lace, but most of it I tried to keep intact. In the back, I decided where I wanted my cut out to be… and cut it! Then I bound the edge using the lace and topstitched it down to encase the edges.

It was a bit tricky to find an acceptable shape for the new brim. The first few tries were so similar in shape to the crown of the hat that they hardly showed when I put it on my head. I ended up with a brim that flares out a bit so it stands away from the crown of the hat, especially in the front. I had to be careful to cover the ends of the plastic horsehair braid that backs the cotton lace, as it is very poky when cut. I covered the ends either by turning them under or having the inner hat band cover them.

After sorting out the brim and back cutout it was time to reattach the inner hat band. Then I sewed on my trim. Here’s what the hat looked like on the inside after all that.

I’ve loved Leimomi’s cloche decoration in this post since she posted about it in 2014. Having that in mind, I thought of what bits of trim I already had in my stash and what might work for this hat. I decided on a random yard of navy grosgrain ribbon, which I cut into thirds, pleated, and attached in imitation of this hat.

When I styled my hair, I tried to have hair come down to my jawline more than I usually do. I think cloches look less silly if there is some hair showing around them. My hair didn’t really look like a bob, but at least there was some hair showing in the front. In the back, it was pinned into a low twist-y mass of curls.

The great thing about the materials of this hat is that they are intended to be flexible for packing and traveling. Not only is it easy to store this hat but it’s also easy to remove it at a picnic and leave it on the blanket or put it in a bag without worrying that it will be damaged. It can get crushed and bounce back into shape!

In the end, I continue to think my head looks like an egg when I wear a cloche. I like styles that don’t hug my head better! That’s my own feeling–other people don’t think it’s nearly as egg-like as I do! But as egg-heads go, this was better than some attempts, so I think we’ll call it a success! It certainly looks cute on the fence!

Project Journal: Versailles Sacque: A Pretty Petticoat

The petticoat for my Versailles Sacque has been done for a few weeks now, but was waiting in the blog post queue to have its progress made public. It’s sort of boring to look at the whole petticoat, because it’s just a petticoat with longer sides than normal, so I’ve focused the pictures on the more interesting waistband section of the petticoat. (As you can see, this picture was taken before I ironed the front of the petticoat…)

IMG_0866

In making the petticoat I referenced Katherine’s 18th Century Petticoat Tutorial and The Standard 18th Century Petticoat Tutorial at A Fashionable Frolick. The nice thing about Katherine’s tutorial is that it’s adjusted for a petticoat to go over pocket hoops, while the great thing about the tutorial at A Fashionable Frolick is that it has tons of detailed construction information like which stitches to use. Both tutorials are clear and very helpful.

When it came to pleating, I thought I might struggle as Mr. Panniers is larger than normal pocket hoops, but I found that once I put the petticoat on the dress form with Mr. Panniers underneath I could neatly arrange the pleats around the waist and not go into the extra complicated pleated needed for a very square and wide pannier shape (such as in Katherine’s court gown and Kendra’s court gown). Whew! I placed all my pleats off to the side (further than I would for a normal 18th century petticoat) to keep the front of the petticoat flat where the trim will be visible between the fronts of the sacque.

The front panel of my petticoat is the fashionable silk that my sacque is/will be made of. (Enjoy the sneak peak!) The back panels are the same blue mystery fabric that Mr. Panniers is made of. The ties are polyester ribbon to match the silk, because hey, I was already fudging the accuracy of materials with the mystery fabric but on the other hand the color compliments the silk very nicely!

Here’s what the inside looks like. The extra fabric at the top of the petticoat is turned to the inside, slit up the middle to accommodate the curved top edge, and left raw.

IMG_0867

And here is the back. The petticoat is hand sewn. The center back seam is felled mostly because I am slightly obsessive with having nice insides and the other two seams are selvedges. For some reason the raw edges across the top don’t bother me. Go figure.

IMG_0868

I’ve also been playing with hair styling. I’m not satisfied yet, so I don’t consider it done, but at least I’ve made a start! The sacque is coming along nicely, too!

  • Panniers
  • Petticoat
  • Robe a la francaise (with a subset of trimming)
  • Hair
  • Shoes

HSF #3: A Pink Regency Belt Style Sash

My project for the HSF Challenge #3: Pink is a silk belt style sash for my square neck 1812 gown. It’s a small project because I’m working on multiple other bigger projects (two different Regency dresses and a new 1850-1870 corset–more on those in the upcoming months) and I didn’t want to distract myself. Part of my decision to make a belt style sash came from the discussion with friends that led to my previous post on adding variety to Regency sash styles (this post explains what I mean by a belt style sash, in addition to explaining other Regency sash styles).

And now, as usual, on to the facts:

Fabric: None.

Pattern: None.

Year: c. 1810

Notions: About 1 yard pink silk ribbon, some unknown yards of 28 gauge wire, maybe 2 yards grayish blue hug snug, a hook and bar, and thread.

How historically accurate?: Silk is an accurate material, but nothing else is for this time frame. So… maybe 80% for looks and 40% for materials.

Hours to complete: More than it should have because I made the buckle from scratch. Let’s say 4.

First worn: To a vintage dance performance in January.

Total cost: Free (all stash materials)!

IMG_0673
I didn’t have a non-sparkly buckle in the right size, so I decided to make one from wire. At first I thought that it might be cute with the scallops around it, but it didn’t look solid enough from a distance. So I experimented with weaving ribbons through and around the scallops. I tried gold silk ribbon first but it ended up looking like straw. In the end I decided on the hug snug because I liked the color.
IMG_0678
A closeup of the finished buckle. It wound up looking rather braided.
IMG_0675
The finished effect.

For the performance, I sewed the belt to the dress even though I also sewed a hook and bar to the belt. The idea is that I can wear it with another dress in the future if I want to!

Variety Please: Regency Ribbon Sashes

In modern interpretations of Regency costume, there is a widespread use of what I am going to call the “ribbon sash.” By this I mean a length of ribbon, in a contrasting color to the dress and not used to trim any other part of the dress, tidily tied or sewn under the bust, and terminating with long hanging ends. I understand that this style provides an easy way to adorn a dress of any color or add color to a white dress, but I believe that the style is much too often used relative to the occurrences we see of them being worn in portraits, fashion plates, and built into extant gowns. I would like to encourage all of us to have variety in the ribbon sash styles we wear with Regency clothing.

When looking at portraits, fashion plates, and extant gowns, you do find the sort of ribbon sash I described in the beginning of this post, but you don’t find them in anywhere near the same proportion with which they are used today. You do see these types of sashes, but it is a small proportion of the styles worn and you see a variety of other sash styles, too. I would like to share a variety of ribbon sash styles with you and encourage you to pick one of these less used styles if you decide to wear a ribbon sash yourself or if you have the influence to encourage others in their own ribbon sash wearing. By expanding the styles of ribbon sashes worn, hopefully we can all more accurately represent clothing worn in the Regency period.

Generally speaking, there are 4 large categories of ribbon sash styles. I’ve included an example image of each style underneath the accompanying description and I’ve included links to other good examples (below the four sash style descriptions) so you can look at them for more ideas.

1: The Ribbon Sash (as described in the beginning of this post): a length of ribbon, in a contrasting color to the dress and not used to trim any other part of the dress, tidily sewn or tied under the bust, and terminating with long hanging ends approximately 24″-36″. It is very rare to see this style used in a fashion plate or painting with the termination of the sash in any location other than center back.

f718f40238cfc85cf02418565c440a52
Henri François Mulard, Portrait of a lady, circa 1810

2: The Short Sash: a length of ribbon, in a contrasting color to the dress and not used to trim any other part of the dress, tidily sewn or tied under the bust, and terminating with short hanging ends approximately 6″-18″. I have seen this style with the termination of the sash in center back, center front, and  occasionally off to one side of the front.

39b5c0d0d643bba771d16242bc7cd001
Costume Parisien, 1817

3: The Belt Sash: a length of ribbon, in a contrasting color to the dress and not used to trim any other part of the dress, tidily sewn or tied under the bust, and with very short hanging ends or without hanging ends at all. This style is sometimes plain or sometimes adorned with a buckle or bow. The buckle or bow with short ends is often at center front.

bf13efcf8156d526622fc6126c7b045b
Portrait de Laure de Berny ca. 1810 by Henri-Nicolas Van Gorp

4: The Trim Sash: a much more common variant of any of the first three sash styles. Any of the first three sash styles can fall into this category if the sash matches and coordinates, in a harmonious fashion, with trim elsewhere on the dress (neckline, sleeve openings, or hem).

6d79a16093d852e426ea43901059fa9c
Costume Parisien, 1812

All of these sash styles are seen with different styles of termination. I’ve most often seen a variety of bows as well as tidy arrangement of loops. Often, the belt style seems as though the belt sash is actually sewn to the dress, but for the sake of options, I can easily see a ribbon sash made with a closure such as hook and eyes so the sash can be easily added or removed from any outfit. It’s worth noting that there are a substantial amount of images showing ladies from the front who appear to be wearing a ribbon sash of some sort. The trouble is that we often can’t see what’s going on in the back, so we can’t know with certainty what style of ribbon sash is actually being represented, though we can make educated guesses.

Here are more examples of each of the sash styles shown above:

1: The Ribbon Sash

Portrait of a lady, ca. 1810: ribbon sash on a white dress (ties in back)

Costume Parisien, 1813: ribbon sash on a white dress (ties in back)

2: The Short Sash

Auguste-Amalie de Baviere, ca. 1815: short sash (ties in front)

Costume Parisien, 1817: short sash (ties in back)

3: The Belt Sash

Laure de Berny, ca. 1810 (bow in front)

A young woman wearing gloves in a park, 1813

Anna Maria Magnani, 1814 (bow in front)

Woman knitting in a blue dress, ca. 1819 (bow in front)

4: The Trim Sash

Dress, ca. 1810, The Met: belt sash

Dress, ca. 1810-1811, Gemeentemuseum Den Haag: belt sash

Costume Parisien, 1812: belt sash

Costume Parisien, 1812: belt sash

Dress, ca. 1810-1815, Rijksmuseum: belt sash

Family Portrait, 1813: short sash (ties in front)

Of course, these are only a starting point. My pinterest boards have hundreds of pins from the 1800s and 1810s that you are welcome to look at for other ideas. Keep the contrasting ribbon sashes in mind, but don’t forget that you can make sashes out of your dress fabric, too (see below). Sashes made from self fabric are quite common. Look around and see what you can find that inspires you. This Regency Portraits board has a lot of great images showing all sorts of sashes as well.

Here are some great examples of dresses with sashes made from self fabric (meaning that fabric used in the dress was also used to create a ribbon sash look):

Désirée Bernadine Eugénie Clary, ca. 1810: long sash

Costume Parisien, 1810 short sash (ties in front)

Costume Parisien, 1811: short sash (ties in front)

Costume Parisien, 1811: short sash (ties in front)

Costume Parisien, 1812: short sash (ties in front)

Costume Parisien, 1814: short sash (ties in back)

Costume Parisien, 1817: short sash (ties in back)

In looking at my pinterest board covering 1800-1809, I do find that there are some very cute sashes then, too, that are relevant for a potential sash look. In  this period it seems that most sashes match the trim used on the dress, though it is not an absolute rule. I’ll include a few examples of this sort below, so you can look if you’re curious.

Costume Parisien, 1799: short sash (ties in front)

Costume Parisien, 1800: short sash: (ties in front)

Costume Parisien, 1800: trim ribbon sash with long ends

Young Woman Drawing, 1801: short sash (ties in back)

La Belle Assemblee, 1807: trim ribbon sash with long ends

Costume Parisien, 1808: belt sash

Felicite de Durfort von Merry, 1808: belt sash

Charlotte Bonaparte, 1808: belt sash

For the record (and because I always forget!), the official “Regency” is referring to England during the years 1811-1820, following the Prince of Wales being named regent for George III in 1810. In France, the Napoleonic Empire spanned the years 1804-1814. So there is some overlap between Empire and Regency, but not a whole lot. (And just to add another date to the mix, the Federal period in America roughly spanned the years 1780-1830.) For the purposes of this post, I’m using the word Regency to specify the 1810s, but my points about variety in sash styles are relevant for the first decade of the 19th century as well.

As a final note, let me encourage you to use color in Regency dresses (color in trim as well as color in the fabric), especially in those dresses intended to represent the 1810s rather than 1800s. By the 1810s, not all dresses were in white tones, as they were much more predominantly in the first few years of the 19th century. Colors were used often, some of the colors even being rather vivid in tone (don’t get too carried away with very bright colors, though, because chemical dyes weren’t invented till the middle of the 19th century). Check out these great resources that describe and show colors used in the Regency:

Colours used in the Regency and Georgian eras

Regency Colors and Fabrics

Trouble In Curtain Land

A few weeks ago, I was super excited and motivated that I had time to work on my Curtain Along jacket. I made the changes I had deemed necessary from my last fitting and was feeling good about getting it done and how much I liked it… but then I tried it on again to determine center front and decide about trim… and there were new problems, and I was so discouraged!

The problems sum up in the following way:

Problem #1- The sleeves that go with the jacket in Janet Arnold just do not work for me without serious alteration. The crown isn’t large enough for me to be able to move or be comfortable, and the sleeve is at least 4 inches too short. With the sleeves set in the jacket was pulled all over the place and was so unbearably uncomfortable! And the annoying thing is that in the mockup the sleeve worked!

After ripping the sleeves out, and being thankful that, at least, they were what was causing the bodice to do all sorts of wonky things, I bounced back and came up with a solution. I’ll use the sleeve pattern from my 1780s Robe A La Anglaise and recut the sleeves. I’ve got extra Mineral Felicite fabric, so that’s no problem. On the other hand, I have only tiny matching linen scraps left. Of course, it would be totally period correct to use a different linen to line the sleeves than what I used to line the bodice. But piecing is also period correct, and I decided to use all my tiny matching linen scraps to piece together pieces big enough to cut out the new sleeve pattern.

IMG_4850
Extreme piecing. I’m amused by it at this point. This sleeve is only partially completed (there is more piecing to be done!) but you can see the original pattern shape.

I haven’t finished piecing, or cut out the new Mineral Felicite sleeve, or sewn the new sleeves in… but I think that my solution will work, so we’ll call that problem solved. Whew!

Problem #2- After my initial fittings, I had to add an extension to my center front pieces to get the jacket to close comfortably and without wrinkles. It barely closed in my mockup and I thought it would be enough, but in the real fabric it just wasn’t. So I pieced on extensions. Piecing is totally period correct, but this piecing is so… obvious and symmetrical.

IMG_4841
Center front piecing. The yellow headed pins are my center front line. I haven’t done anything about center front since I put those pins in!

This problem is still unresolved. Plus, I can’t decide how I want the jacket to close, anyway. Pins? Hooks and loops? If you have any thoughts about the piecing problem or the closure indecision, please do share!

Problem #3- Trim! I was going to trim the jacket with box pleated blue silk ribbon around the neck, front, hem, and cuffs. I thought I had enough ribbon (6yds), but in the end I think I have not quite enough to trim all of those edges. AND, the blue didn’t seem to pick up the blue in the print as much as I originally thought it did, and I’m worried that even if I do less pleated trim (say, not the sleeves, or something) the trim will look super costume-y and not 18th century. I also have a gold silk ribbon (5 yds). Not enough to trim the whole jacket, but what if I scrap the idea of trimming the edges and instead do some sort of center front bow trim/something of some sort to hide the piecing using the gold? I think the gold looks nice… but what sort of trim would I do that wouldn’t look made-up and costume-y???

IMG_4847
Blue silk ribbon. There’s blue in the flowers, but perhaps not enough blue to make the blue ribbon make sense???
IMG_4848
Gold silk ribbon. Too match-y?
IMG_4844
Blue and gold together, for comparison.

I  have no idea what I’m going to do about the ribbon issue. Bows at center front seem to be used on stomacher front jackets, and stomacher front jackets seem to be exclusively pet en l’air styles. This jacket is not a pet en l’air, though it could be altered to have a stomacher front (thus eliminating the piecing issue). Sigh. I just think myself around in circles. So again, I appeal to you! If you have any thoughts, please share!

Help! I’d really appreciate it!

Belated HSF #11: 18th Century Apricot Petticoat

Life! Is often great, but does rather get in the way of sewing plans sometimes…

This HSF challenge #11 had a due date of June 3rd. I actually finished sewing on June 18th, but I’ve been busy posting about other things so this has been even further delayed. Oh well, I had the best of intentions: to complete this 18th century petticoat for the Squares, Rectangles, and Triangles Challenge.

Description:
Many historical garments, and the costumes of many people around the world, use basic geometric shapes as their basis. In this challenge make a garment made entirely of squares, rectangles and triangles (with one curve allowed), whether it is an 18th century kimono, a flounced 1850s skirt, or a medieval shift.
 
IMG_4606
Apricot (orange) 18th century under petticoat.

Just the facts:

Fabric: Almost all of 4yds of apricot cotton I bought back in January.

Pattern: None, but I referenced both of these tutorials on constructing 18th century petticoats.  Katherine’s tutorial is for a petticoat with an uneven length (to go over panniers, or a bum roll, for example). Rebecca’s tutorial is for a petticoat with an even length (the same length all the way around, to be worn without extra supports). Both tutorials have construction information, Rebecca’s includes a bit more detail in terms of which stitches and methods to use.

Year: Loosely 1700-1790.

Notions: Thread, yellow polyester ribbon for ties.

How historically accurate?: I give it 70%. Accuracy gets knocked down because: 1- the color is a bit vibrant for the period (but it’s an under petticoat, and I wanted it to be fun!), 2- all unseen seams are machine sewn, 3- I used bright yellow polyester ribbon for ties, 4- I haven’t seen much research that shows cotton being used at this time for a single plain petticoat of this sort. On the other hand: 1- all finishing was done by hand, 2- the dimensions and method of creation are historically accurate.

Hours to complete: 6 or 7? I can’t really remember…

First worn: Well, Squishy wore it for pictures!

Total cost: $12 for the fabric. The ribbon is leftover from my childhood craft projects…

IMG_4608
Side view.
IMG_4607
Front. See the yellow ribbon?
IMG_4609
Back. I love how the pleats fan out.

I chose to bind the top with self fabric and use polyester ties in a fun color for this petticoat, since I knew it wouldn’t be seen and I might as well use some of those things from my stash! The back half of the petticoat ties in front, then the front ties wrap all the way around to the front and also tie in front. That’s why you can see all the yellow ribbon crossing in the back. This method used a solid 3 yds of ribbon, though the ends I have to tie with are generous and could probably be shorter if I wanted to save on tie length.

IMG_4604
Back tied in front before the front gets tied. There are hemmed pocket slit openings on each side.

I just love the color of this petticoat. It’s so bright and sunny and cheerful, especially with the yellow ribbons! There’s also a sneak peek in this last picture at what will likely be a future HSF item: the bum roll… more on that soon-ish.