Last year, I made a yellow cotton print 1834 dress (there are tons of details about it in this past post). The yardage leftover after that project wasn’t enough for another full dress, but it was enough for another bodice, and I’d been caught up in 1830s fever!
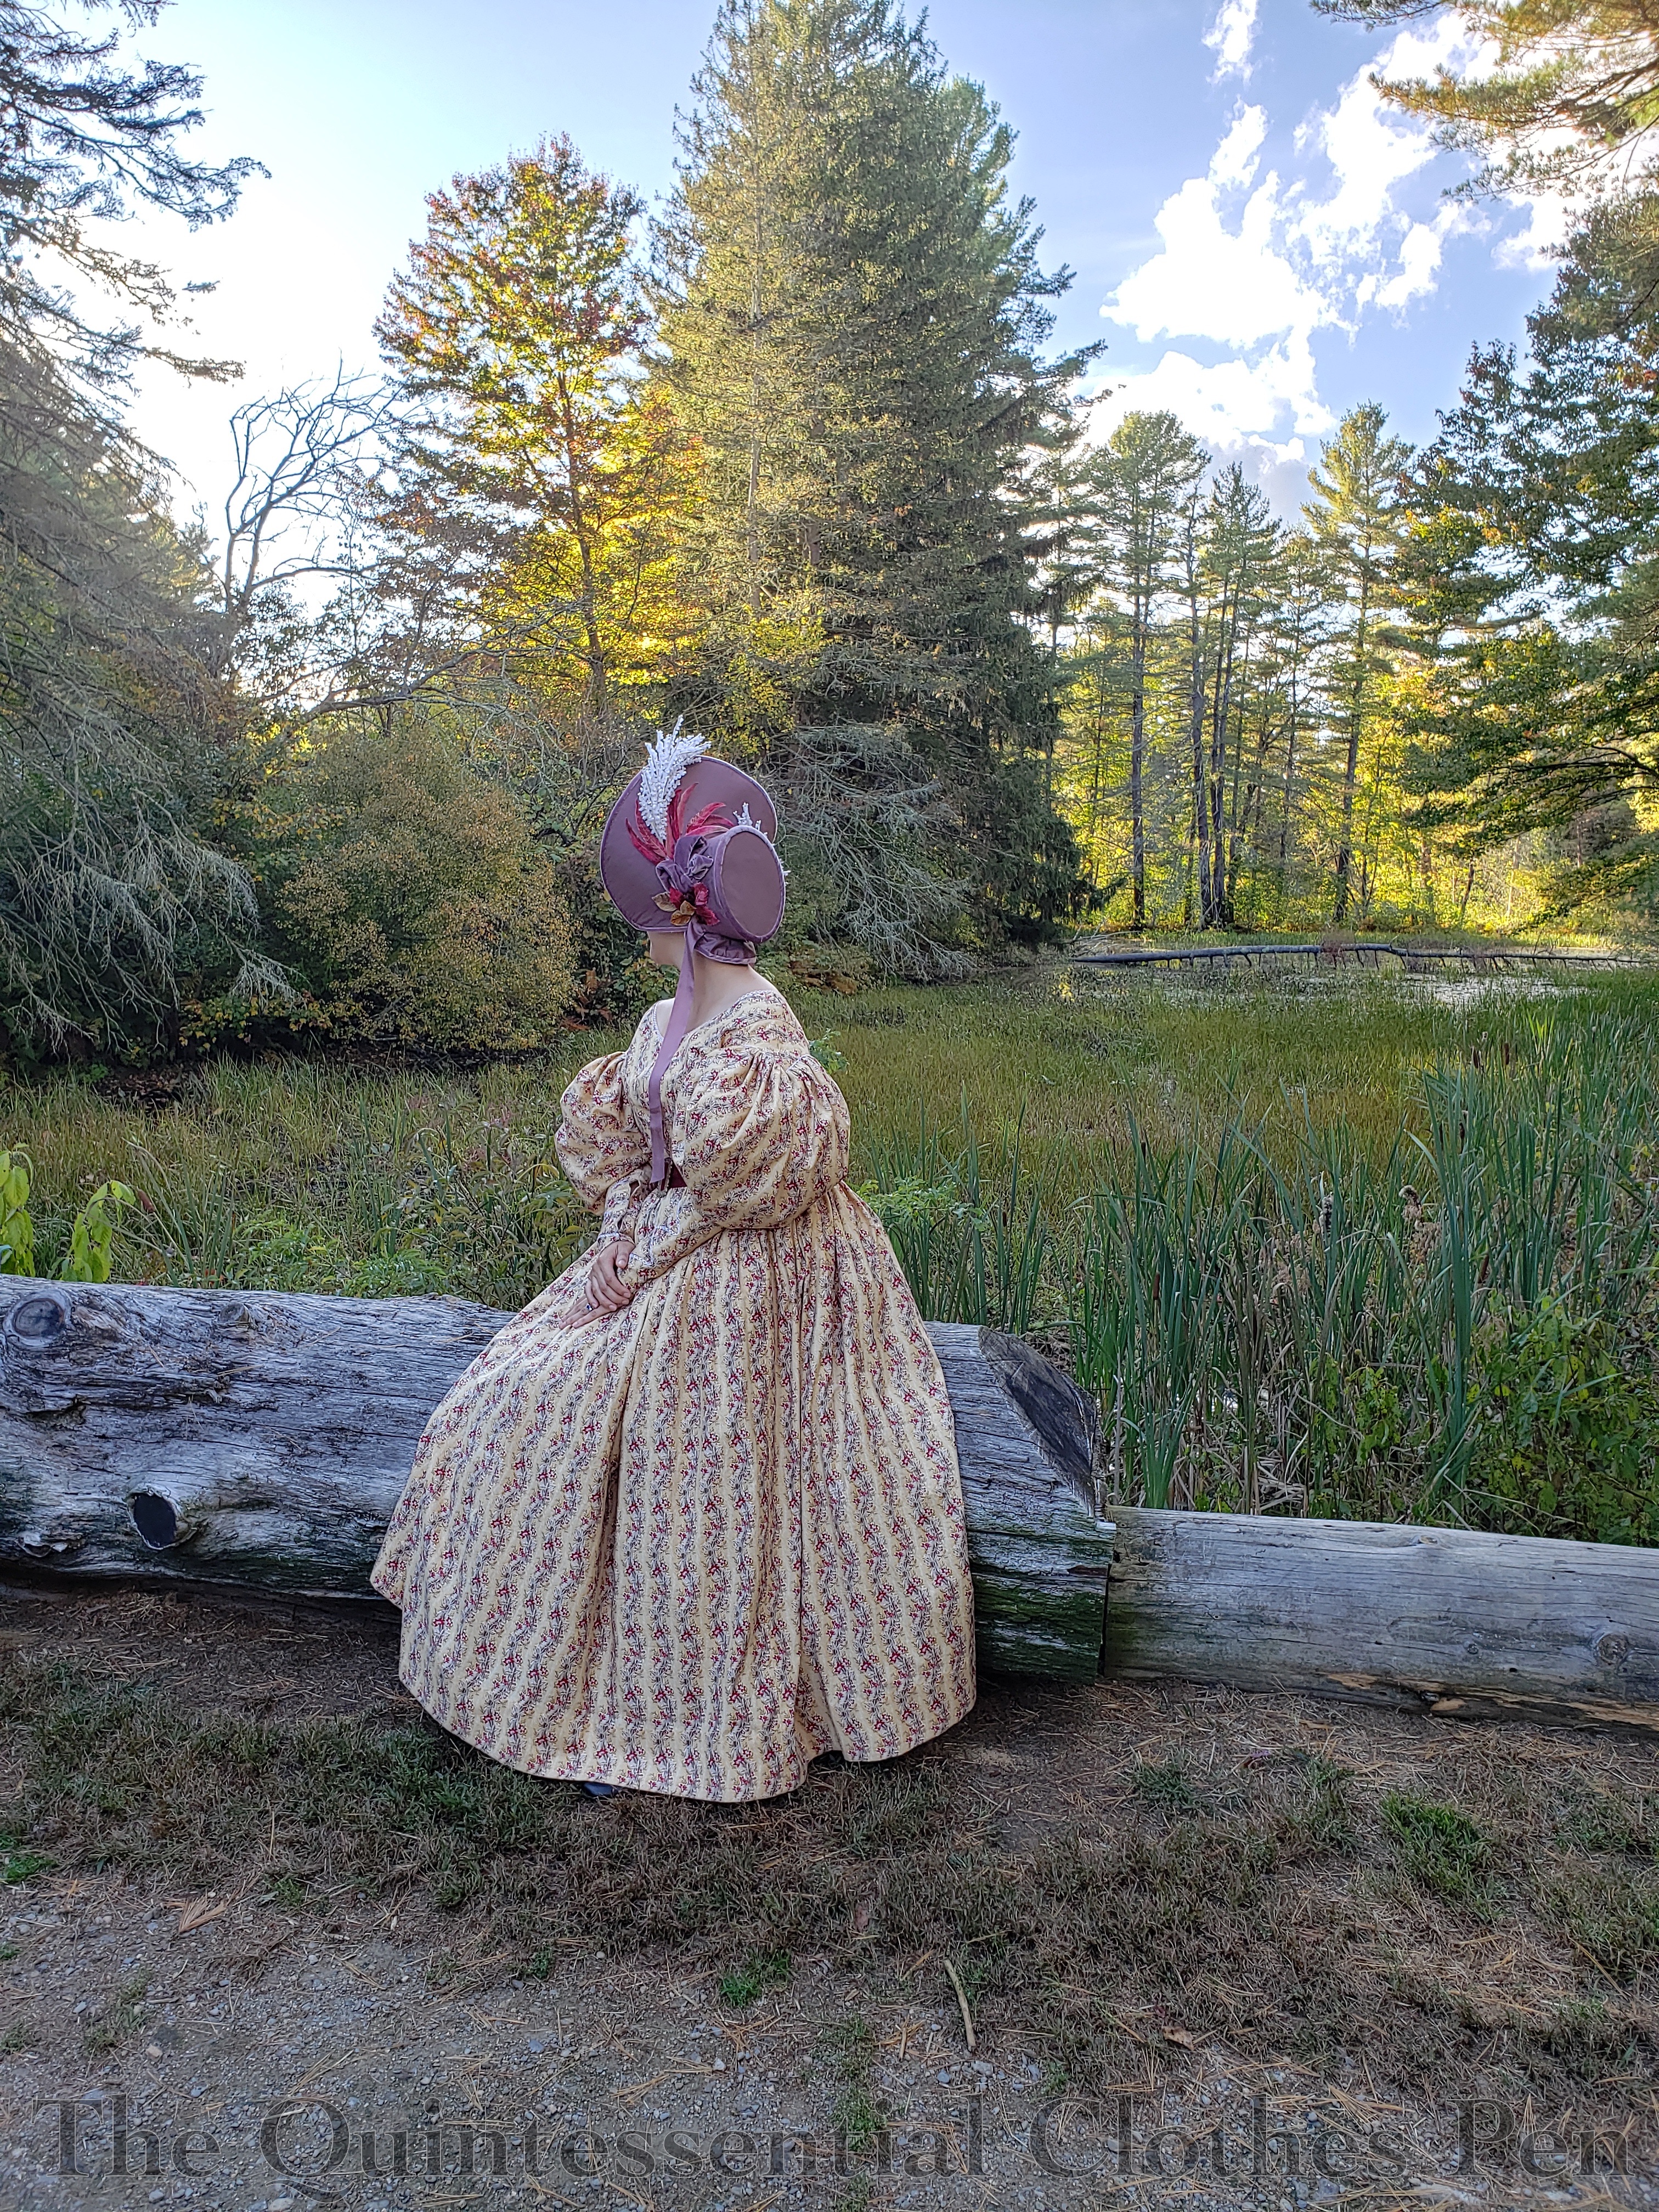
There are so many ridiculous sleeves to explore! Accordingly, I decided to make a second 1830s bodice with different sleeves. I finished the new 1838 bodice earlier this year and over the summer I was able to wear it with my recently finished chemisette.
The 1834 dress was made in two parts, a skirt and separate bodice, so that it was easy to make a second bodice and save yardage on the skirt.
Construction Overview
First, the construction details of the new 1838 bodice, starting with the HSM facts, because this bodice fits Challenge #4:
The Costumer’s New Look: Give an old costume a new look, either by creating a new accessory or piece which expands or changes the aesthetic and use of an outfit, re-fashioning something into a costume item, or re-making an old costume.
Fabric/Materials:Approximately 2.5 yds reproduction print cotton and 1 yd of muslin.
Pattern: The pattern for this bodice is based on patterns contained in Janet Arnold’s Patterns of Fashion 1 and Norah Waugh’s The Cut of Women’s Clothes, as well as sleeve information fromThe Workwoman’s Guide.
Year: 1838.
Notions: 2 ½ yds narrow cotton yarn for cording, about 10 hooks and loops, and thread..
How historically accurate is it?: 90%. The pattern, construction methods, and fabric are all quite good. Inside seams are sewn by machine.
Hours to complete: 22.
First worn: August 2021.
Total cost: Approximately $15.
Construction Details
The back of this bodice is made just like the 1834 bodice, with piping in the side back seams. The armsceyes and neck are also finished with piping.
The main difference in the bodice (aside from the sleeves, which we’ll get to shortly) is the front, which has a deep V shape.
What I saw is that instead of being flatlined (as with the yellow and muslin layers of the back pieces), the lining was stitched separately from the gathered front panels. The muslin provides a fitted shape for the yellow exterior layer. There is a photo of the inside of the bodice of the extant bodice that shows this very clearly.
For my dress, the piping that finishes the back neck continues around the muslin to finish the edge. The yellow exterior pieces of the V edges (which are cut on the straight of grain) are simply pressed under twice.
Here is a closeup of the armhole of my bodice from the inside. The muslin front edge and exterior yellow layer are on the right of the photo. You can also see the ties that hold the sleeve puffs in place.
In addition to those details, the photo below also shows the hooks that are used to attach this bodice to the skirt.
Ok, but the sleeves are the star of the show here, so let’s discuss them! Being from 1838, they still use a lot of fabric (a yard each), but the fullness is pleated to force the puff down to the elbow level.
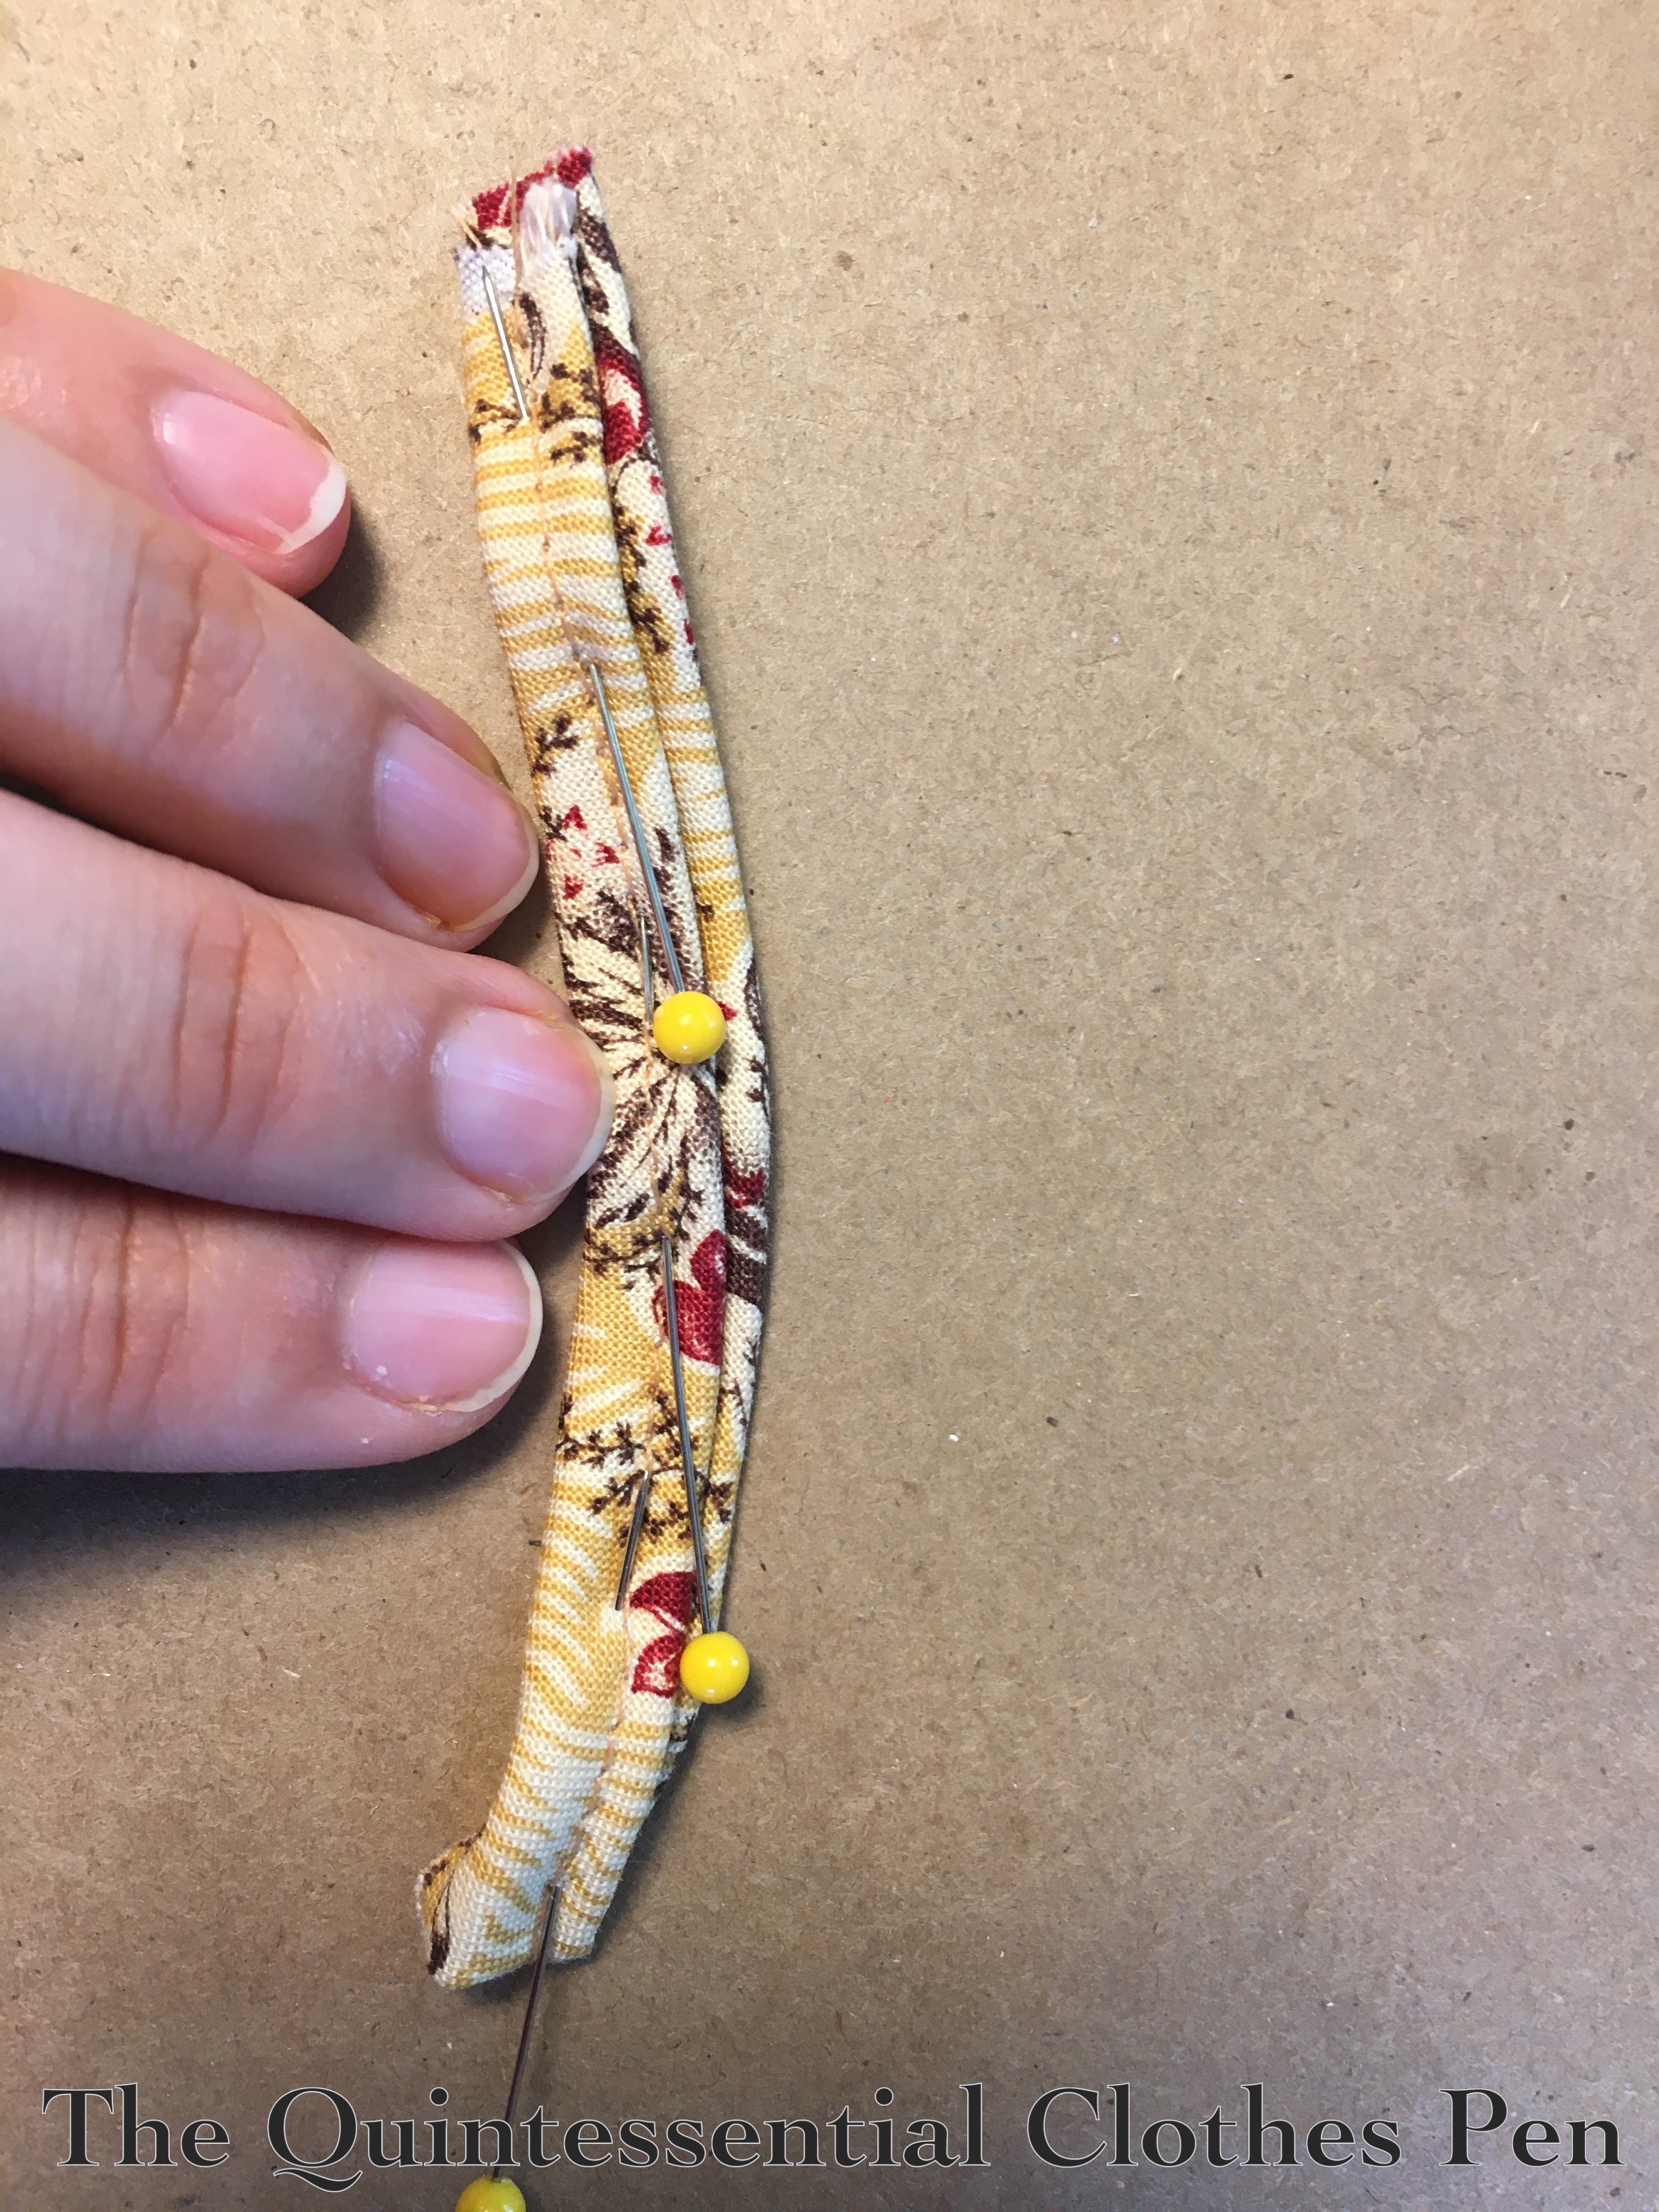
Here’s a closeup of the completed sleeve. The pleats are held in place by two bands of double piping that are hand sewn in place. To make the double piping I machine sewed the cord into one side of my bias and hand sewed it into the other, then pressed the bias in half and attached it through all the layers. In my sample below I didn’t bother to put the machine stitching on the under side, but on the dress the machine stitching is not visible.
Before the piping was added, the pleats were machine basted in place. My machine basting wasn’t exactly where the piping ended up, so I removed the basting anywhere it showed.
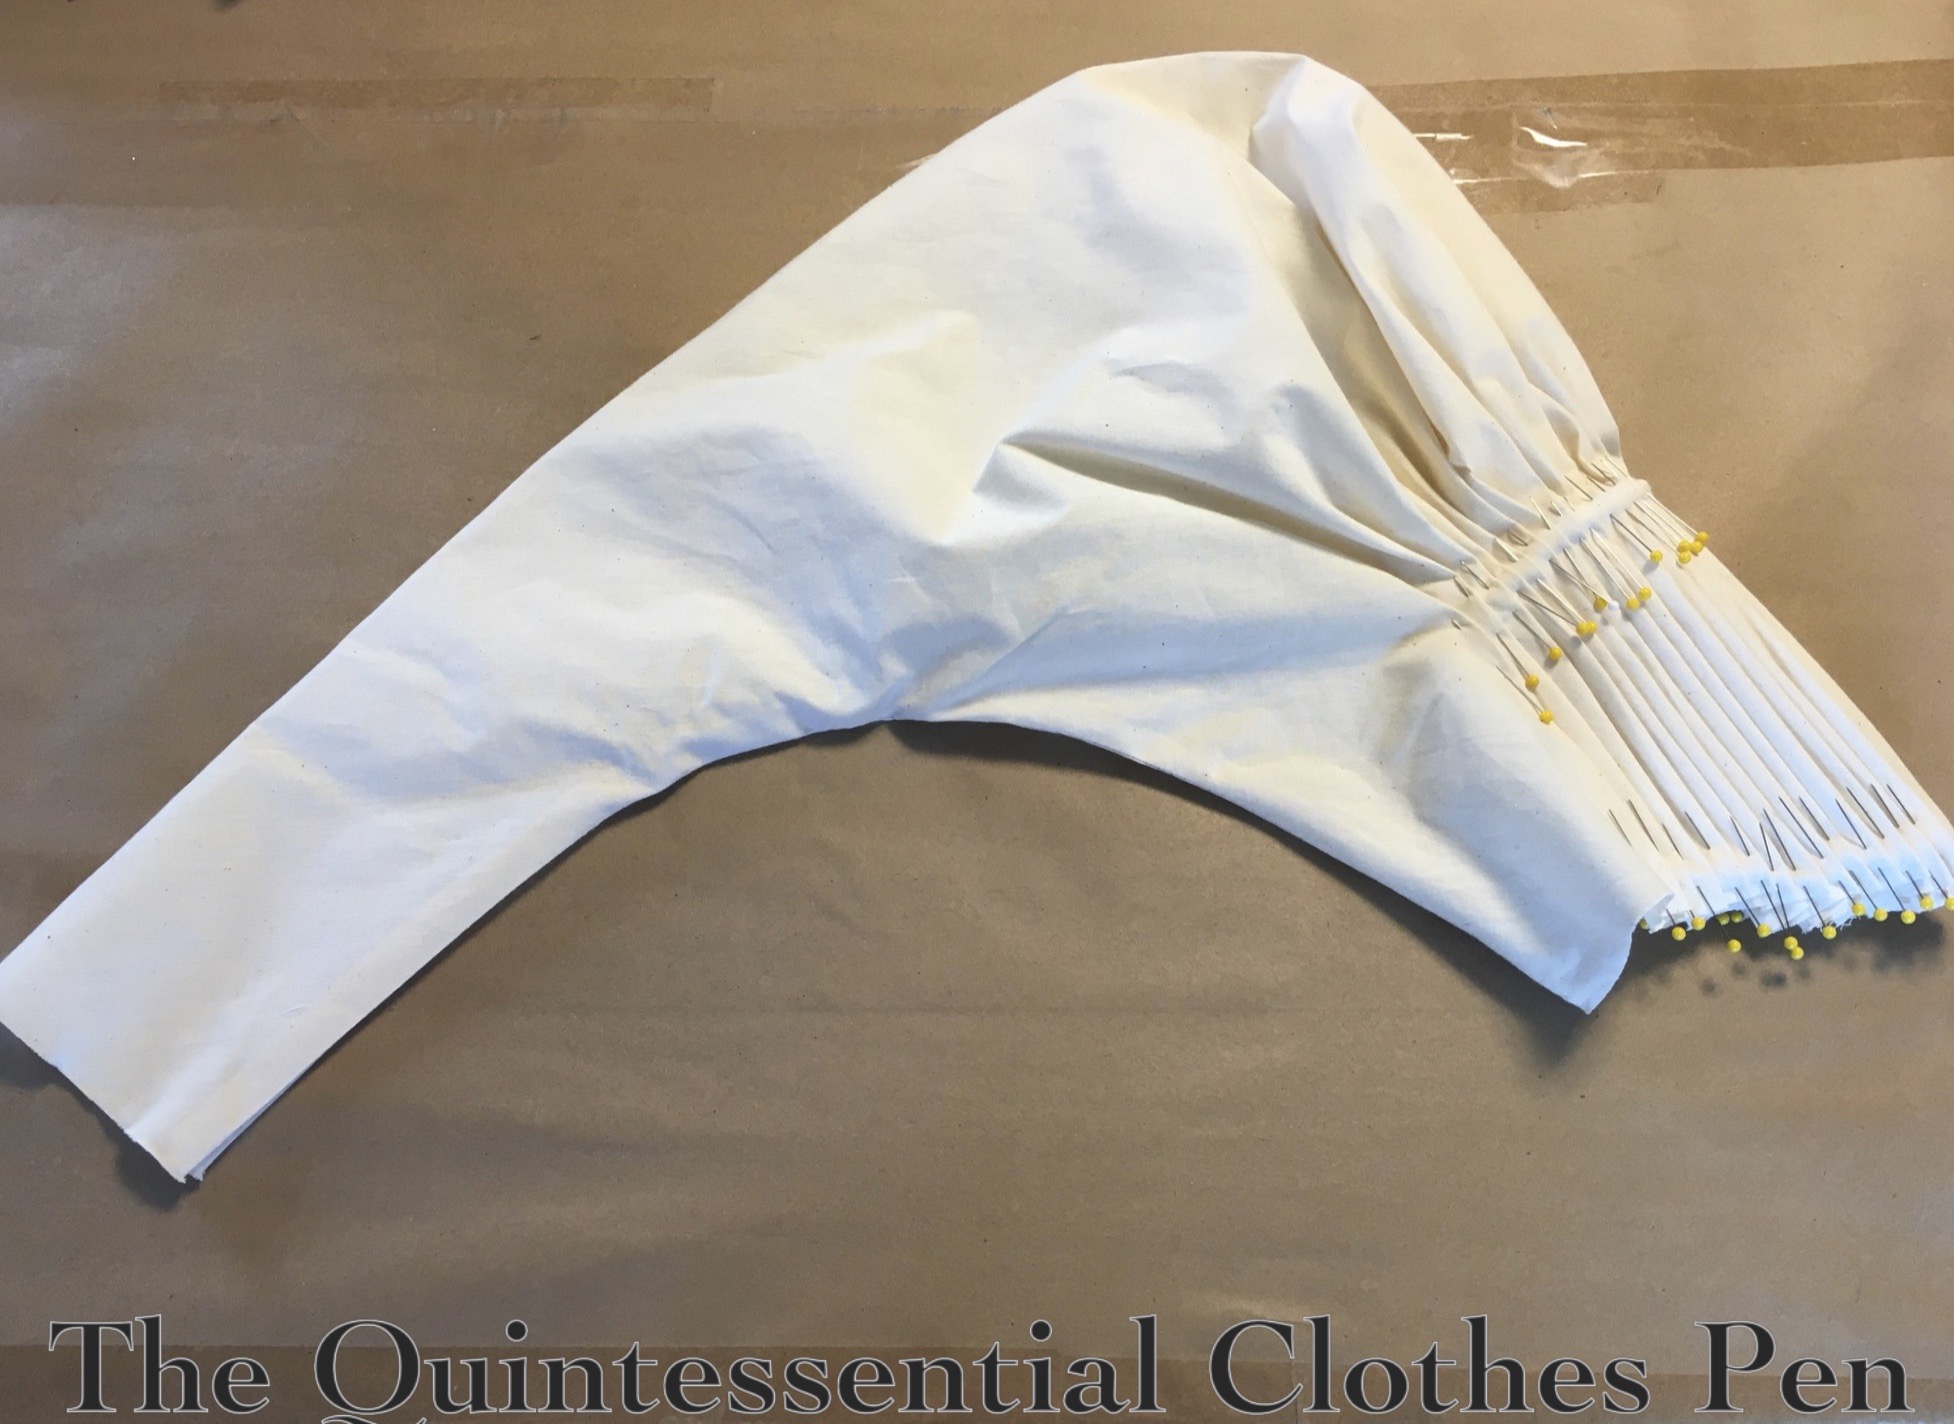
Backing up some more in the process, below is one of the sleeves with the pleats pinned in place. I did this while the sleeves were flat, before I sewed up the inseams.
There’s no pattern for the pleats… it was just a matter of knowing what dimensions I wanted to end up with for my top edge and bicep and then eyeballing it. The pleats vary in depth on the inside, even though the outside is pretty even at ¼”. Part of this is due to the fact that the pleats have to angle in order to create an armsceye that keeps a curve up in the middle. Figuring it out is a great mind puzzle!
Below is the sleve before being pleated, etc. Between being over a yard high and also being cut on the bias you can see why each sleeve takes a yard of fabric!
After pleating and sewing the inseam the sleeves had this shape (below is my mockup sleeve). I really wanted an exaggerated elbow puff, so this isn’t quite the shape I wanted to end up with. To get the shape I wanted, I took horizontal tucks about halfway down the sleeve. This keeps the forearm relatively unwrinkled while creating lots of elbow puff. The tucks are lost in the pattern of the finished dress.
Could I have altered my pattern to not have to take tucks? Sure! I’d probably change the curve of the sleeve inseam to do that. But… I’d already cut my pieces. And adapting sleeve shapes to adjust for changes in styles seemed very appropriate and in the spirit of what 1830s ladies might have done.
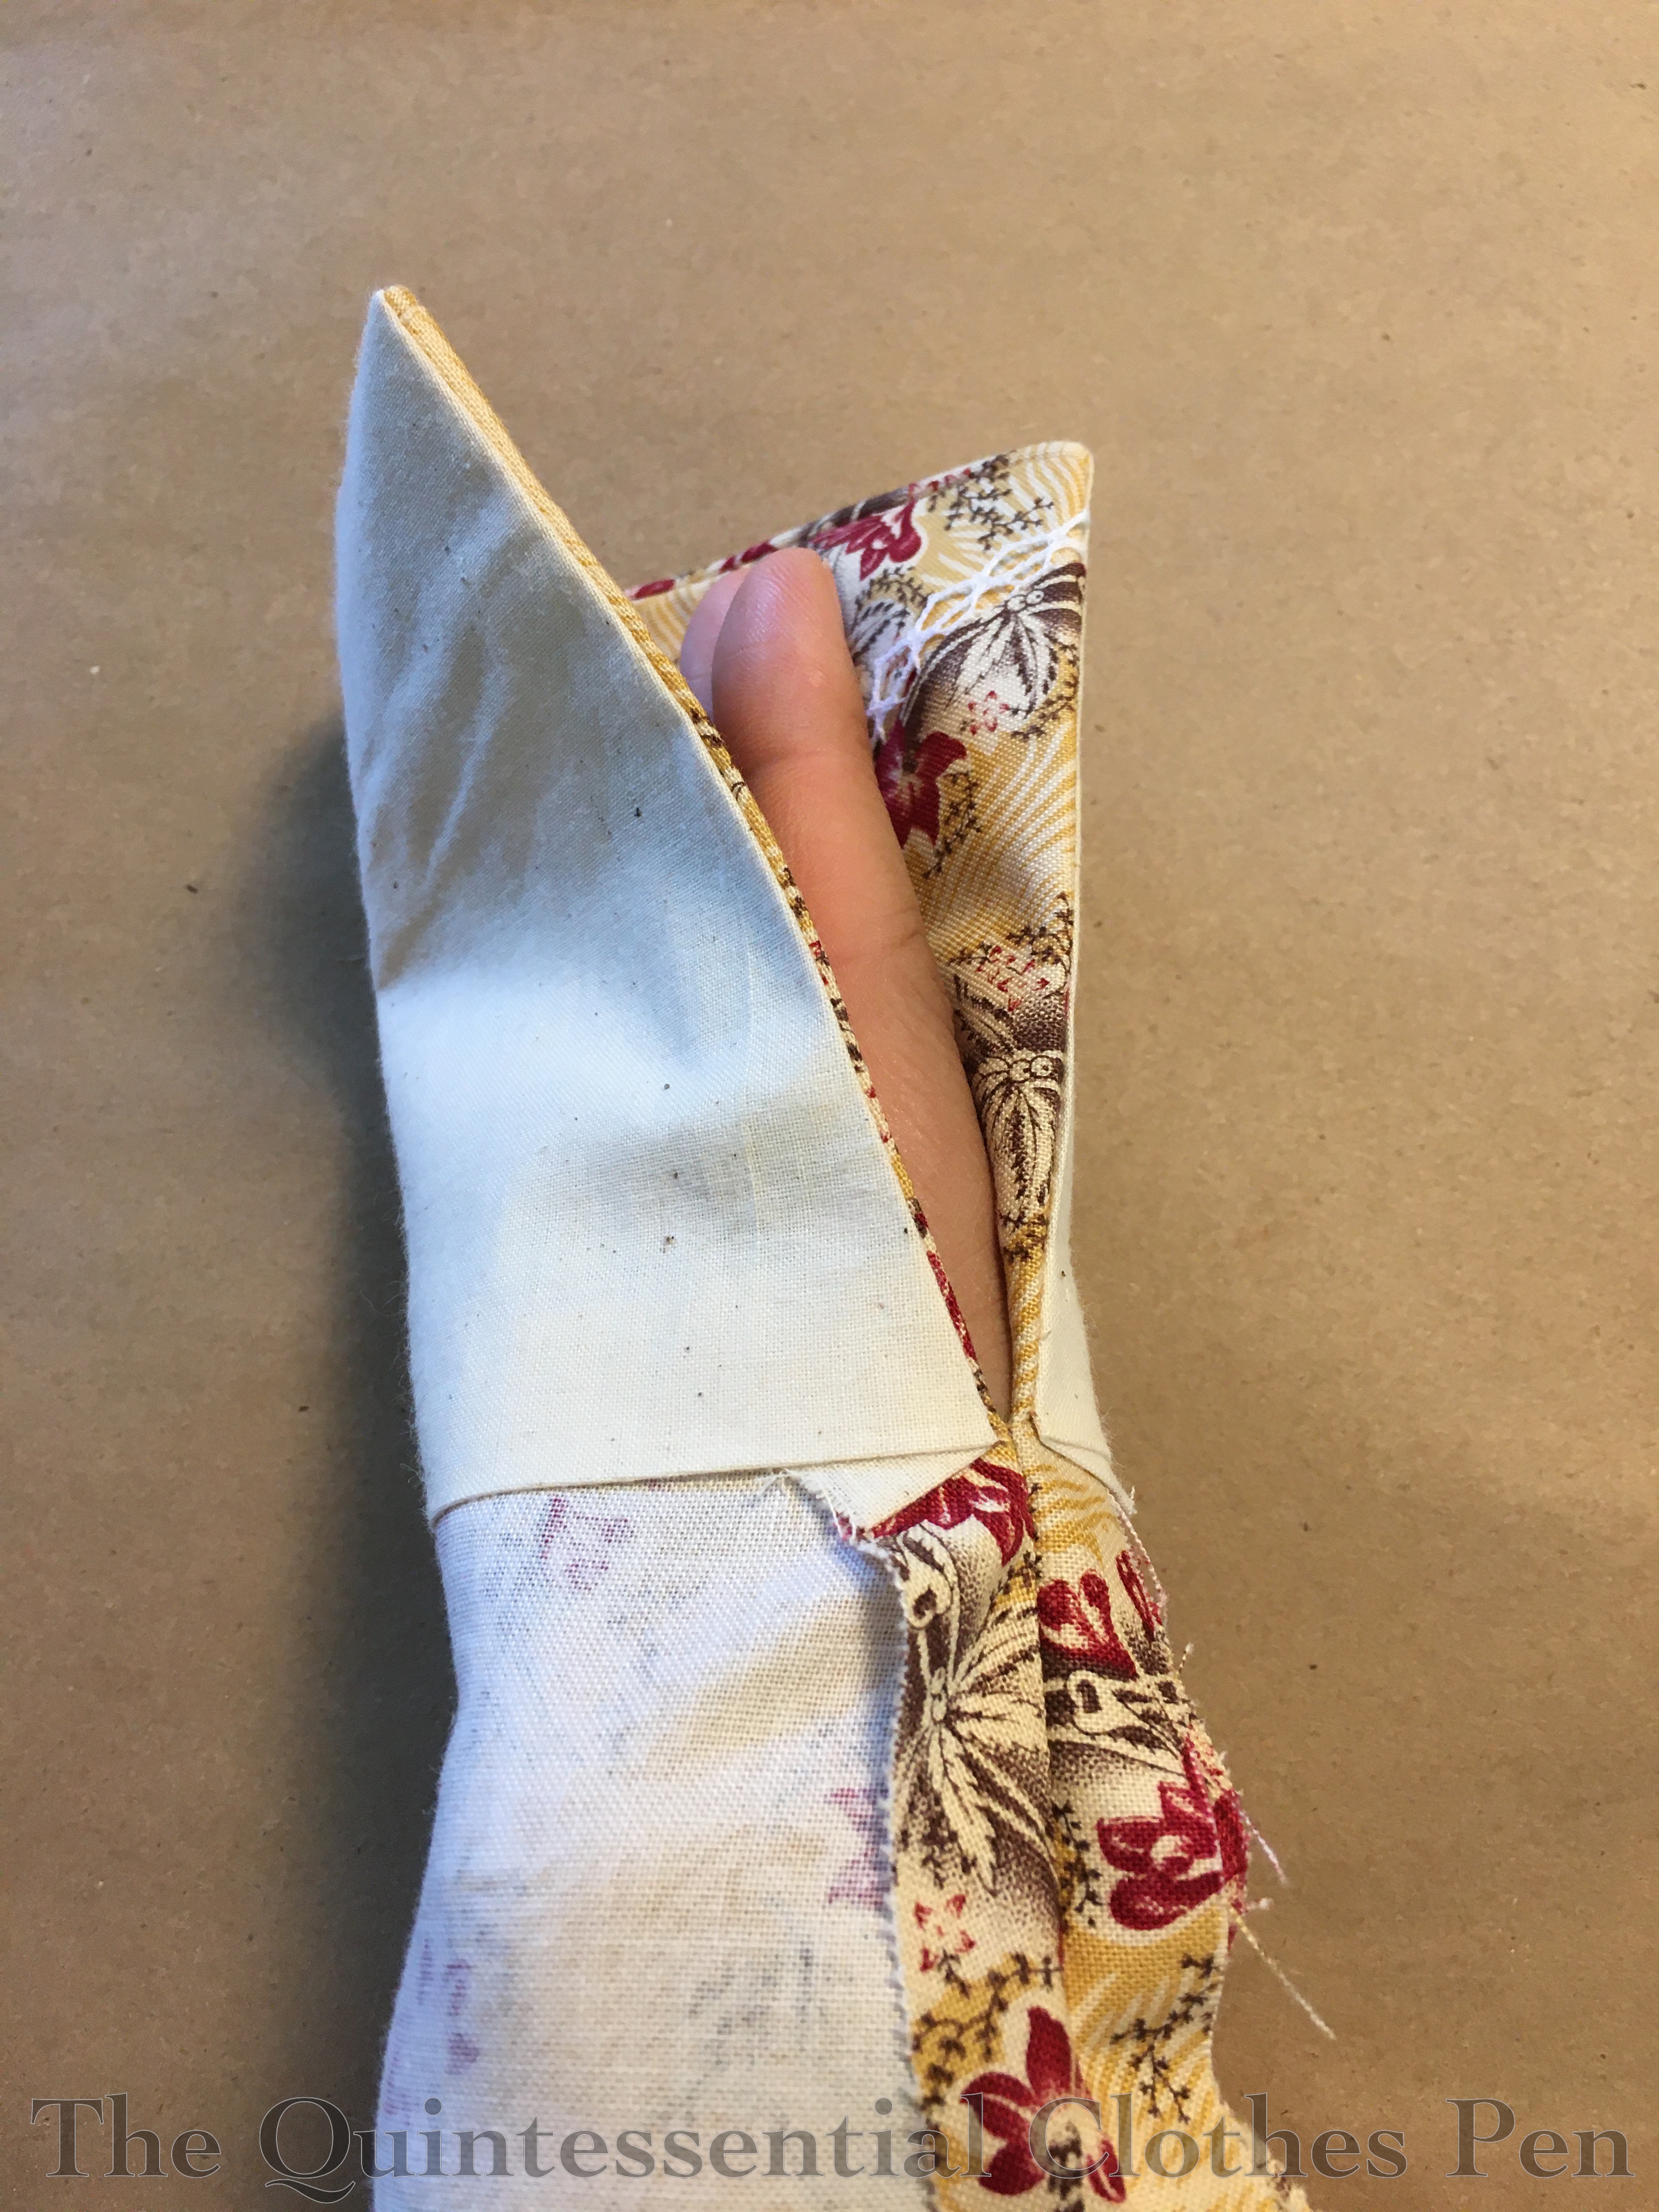
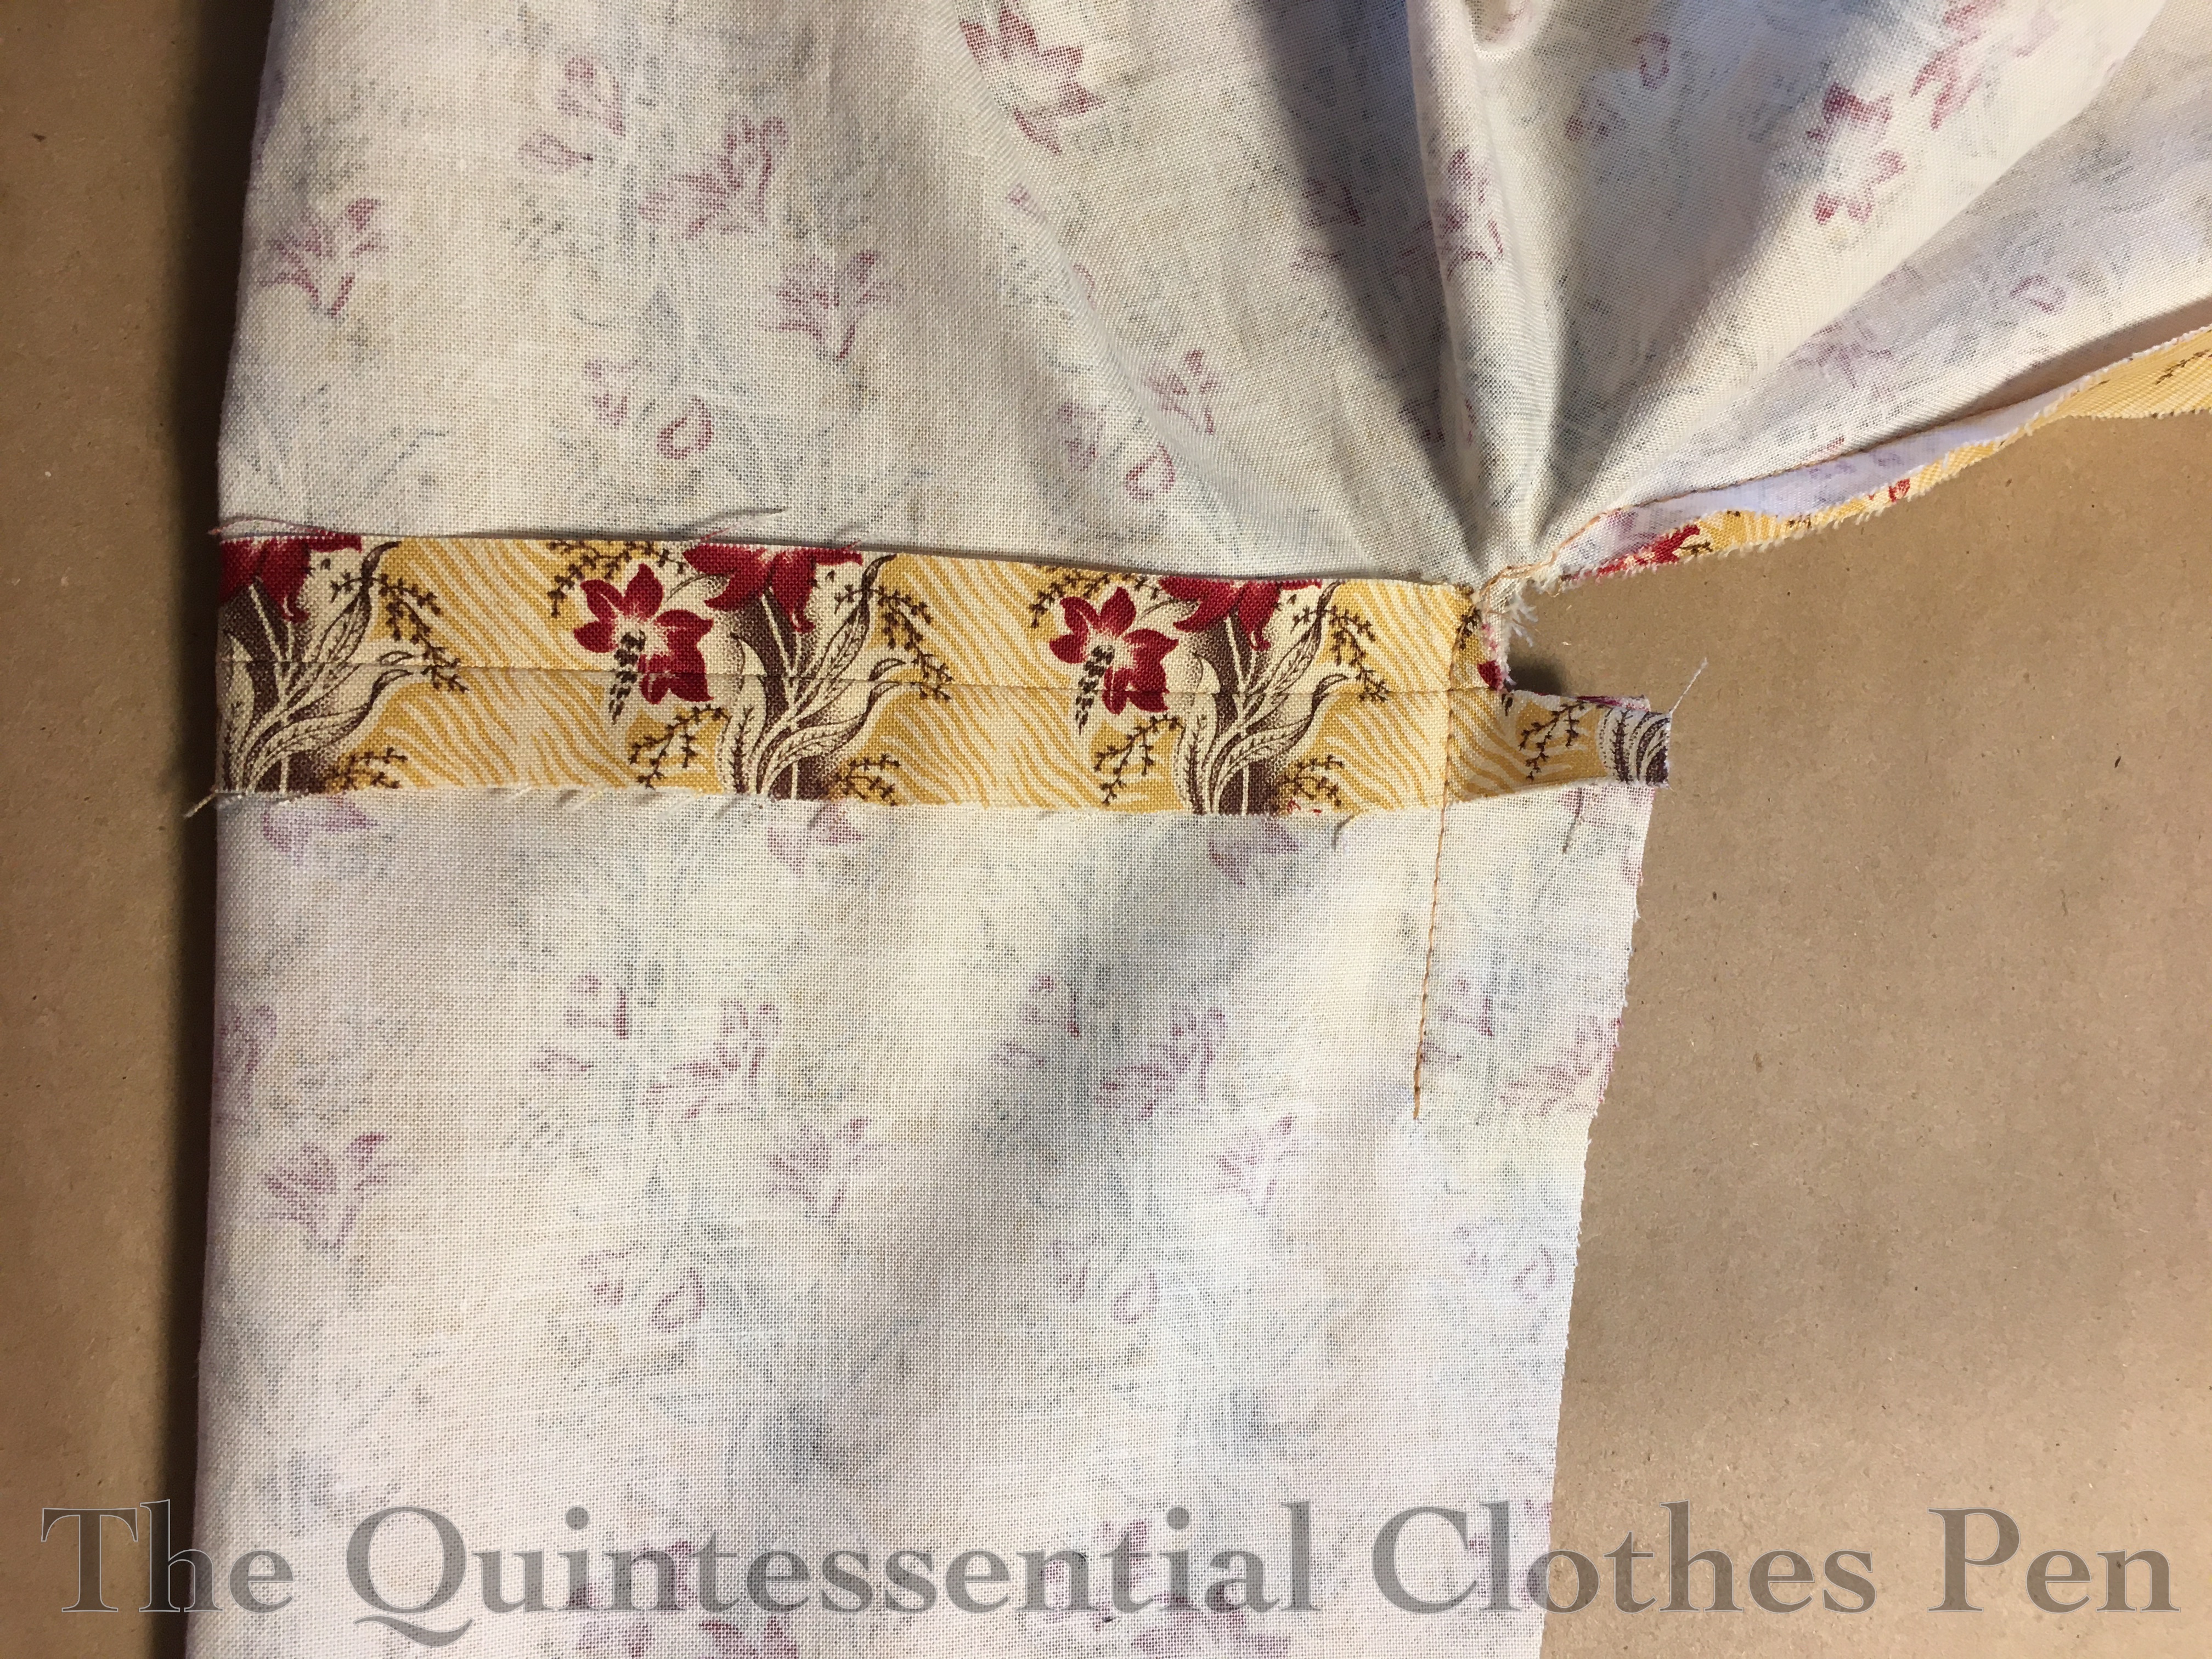
So for a bit more sleeve information… These sleeves have an opening at the cuff to allow for the tight fit of the forearm. The openings are finished with self fabric facings and then the hem is turned up.
Here’s what that looks like on the inside.
And that’s it for construction!
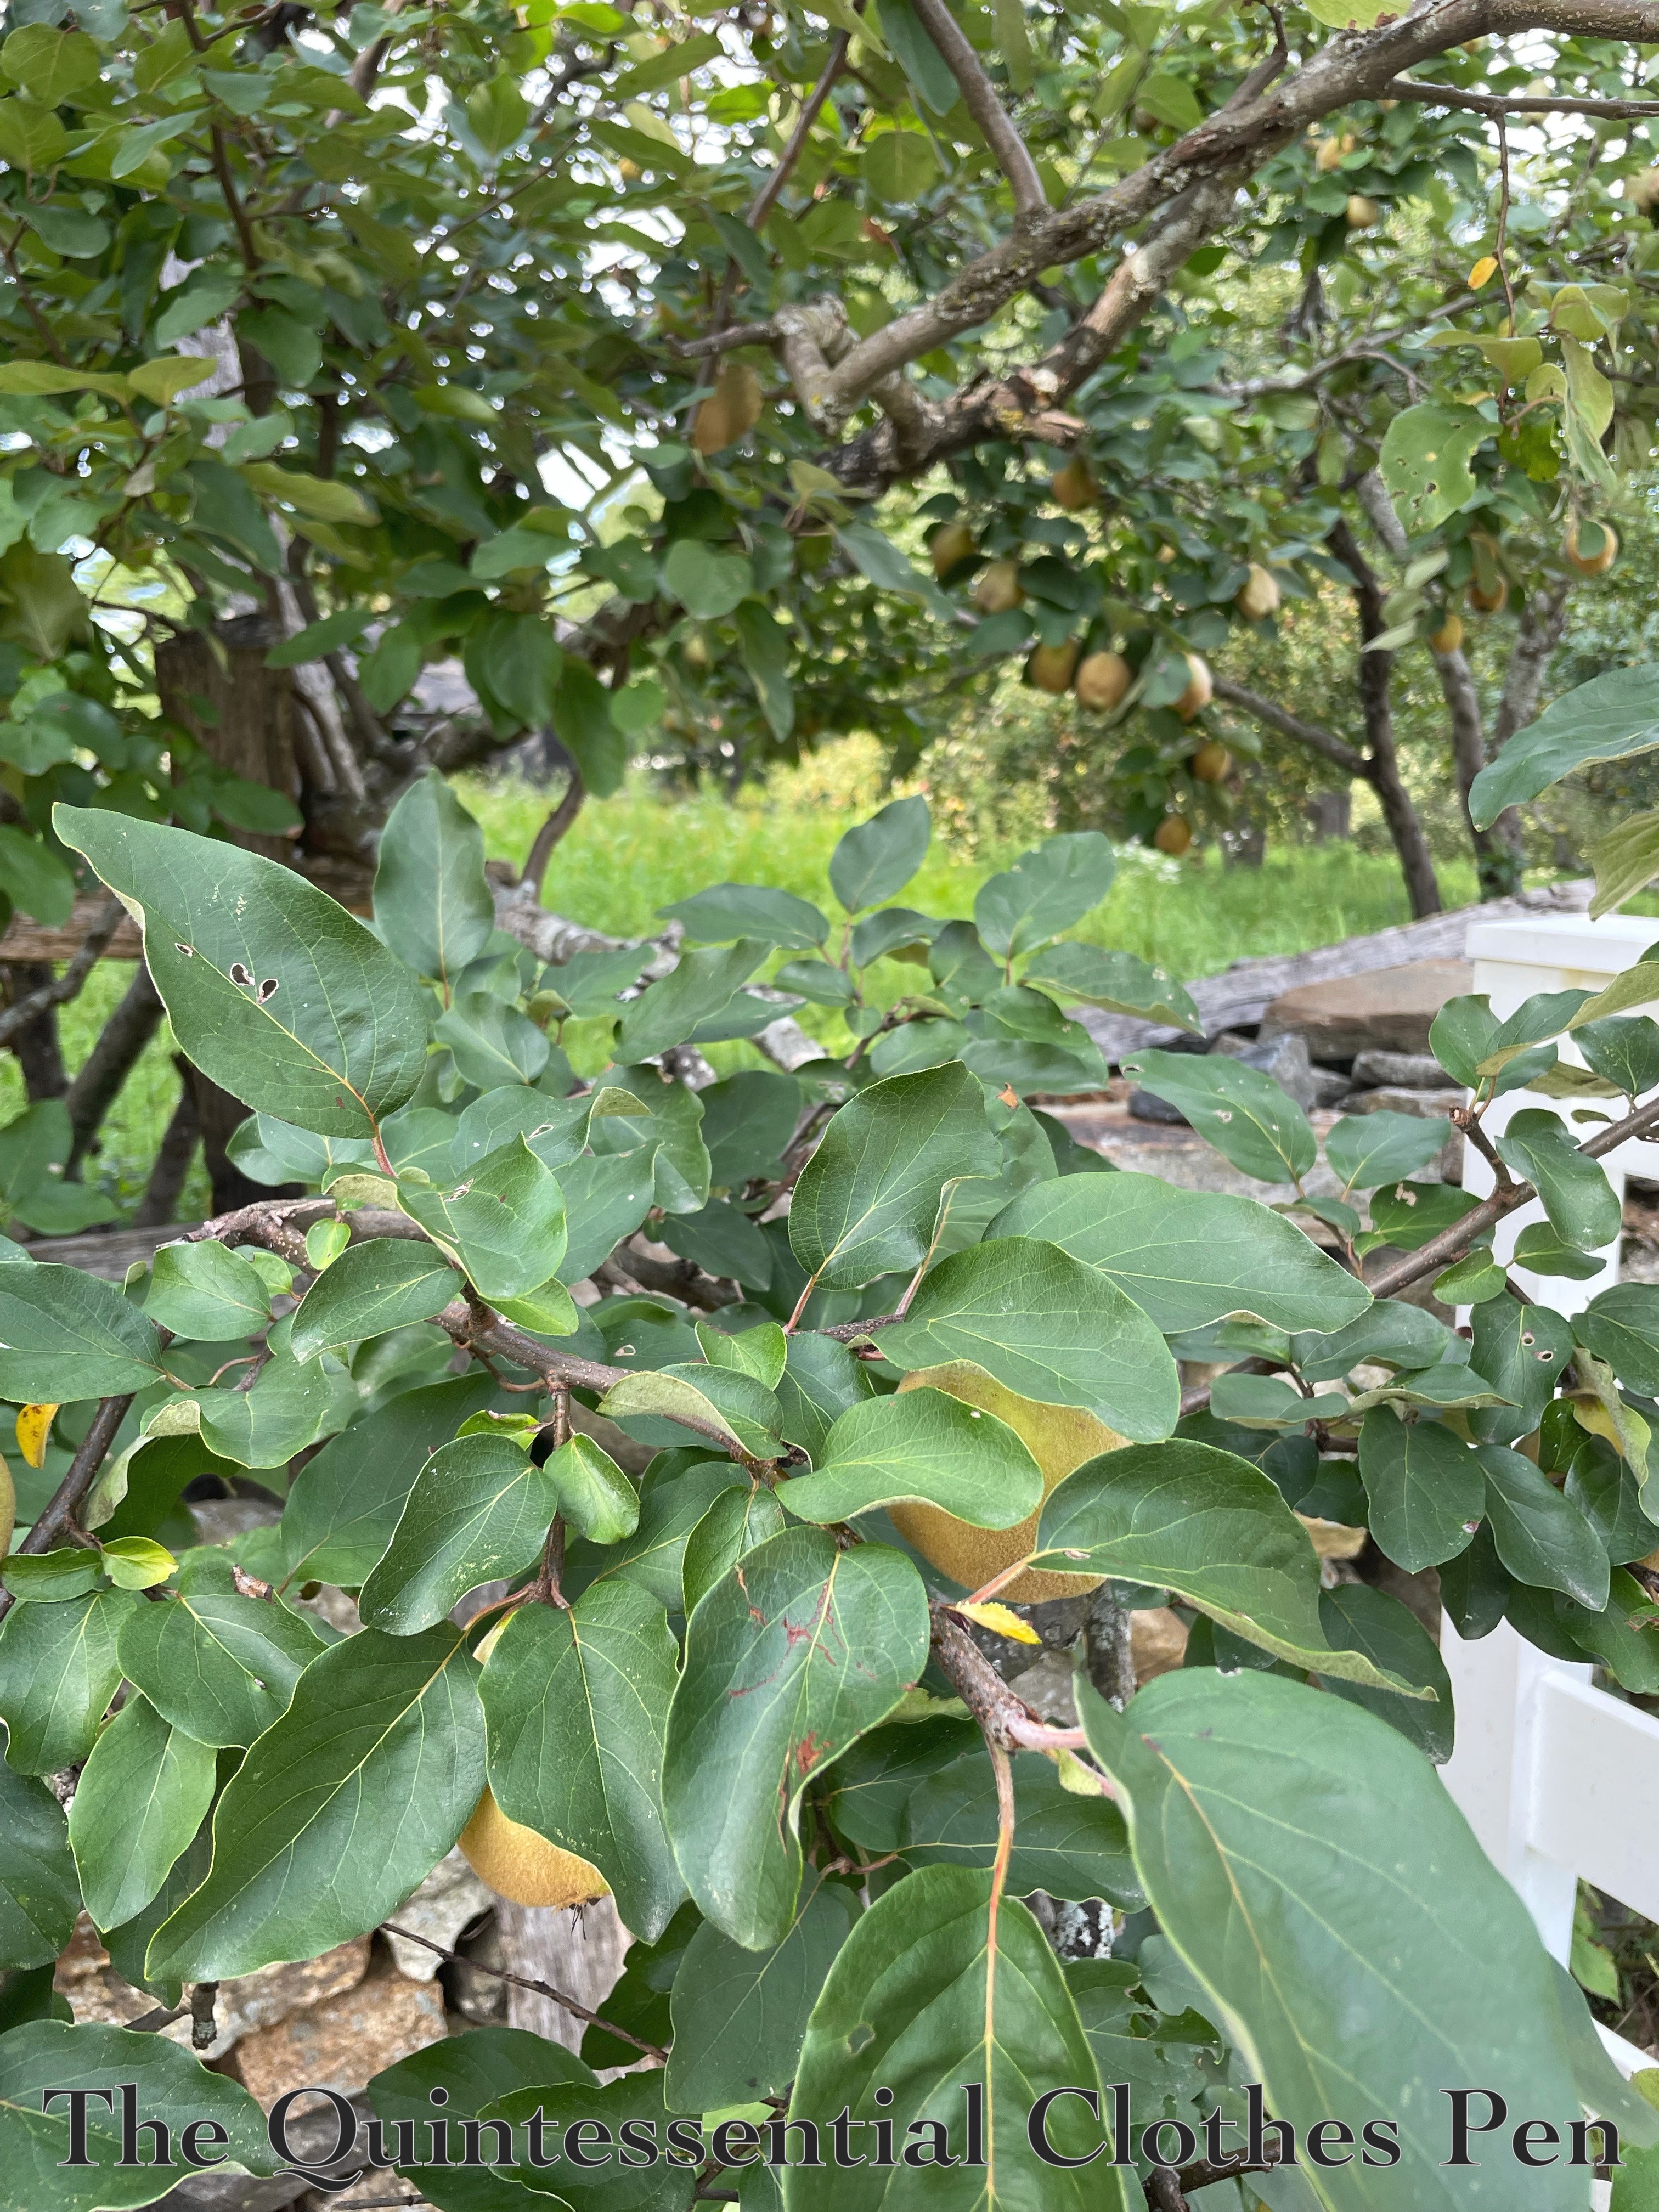
Here’s a bonus photo of the dress with a quince tree. I’ve heard of quinces but never encountered them before.
They sort of look like pears!
I’m very pleased with this cross front bodice and the sleeves that go with them. I appreciate their minute detail even though they were definitely the most time consuming part of this bodice!
Some of my recent posts have mentioned my excursion into sewing clothing from the 1830s. Most recently, in September, I posted about making a corded petticoat to help support a fashionable 1830s silhouette. I also shared a reminder about the fabric I’ve had in mind for an 1830s dress since I bought it seven years ago. It’s finally time to share the finished ensemble created with that fabric!
Today’s post is going to focus on the construction of this dress, but, never fear, upcoming posts will share more finished garment photos as well as construction details about the bonnet.
There is a lot of information about this dress to share and many photos of the process, so I hope you’re ready for a lengthy post!
Inspiration
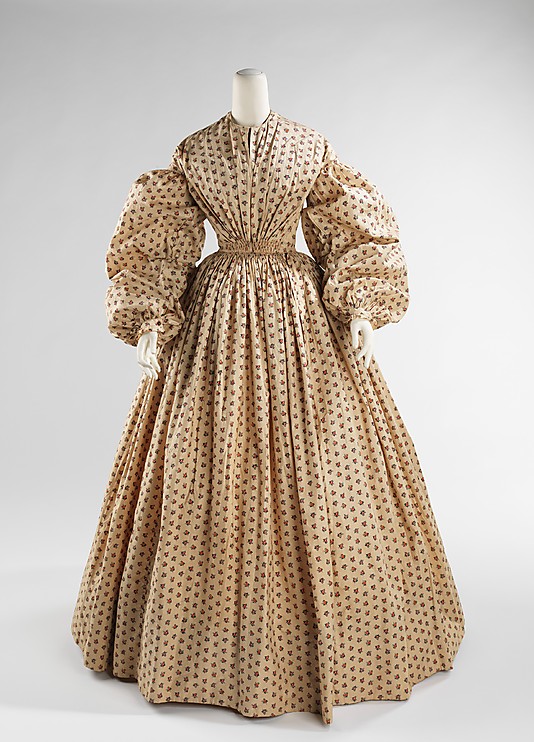
As you probably guessed from the title of this post, this dress is from the year 1834. The trimming details and shape are directly inspired by the dress pictured below, which is in the collection of the Victoria and Albert Museum.
The V & A Dress is dated to 1830-1834. From a style perspective, this makes sense as these are the years from this decade with the largest sleeves, but it is also around this point in the decade that sleeve fullness starts to slide down the arm. This look that is just beginning to show in the V & A dress, which achieves the falling look with the addition of the mancherons at the top. The mancherons both practically and visually push the fullness of the sleeve off the shoulder.
What is a mancheron? The Oxford English Dictionary has the following entry):
mancheron, n. 1.French Heraldry. A sleeve used as a charge. Obsolete. 2. A piece of trimming on the upper part of a sleeve on a woman’s dress. Now historical.
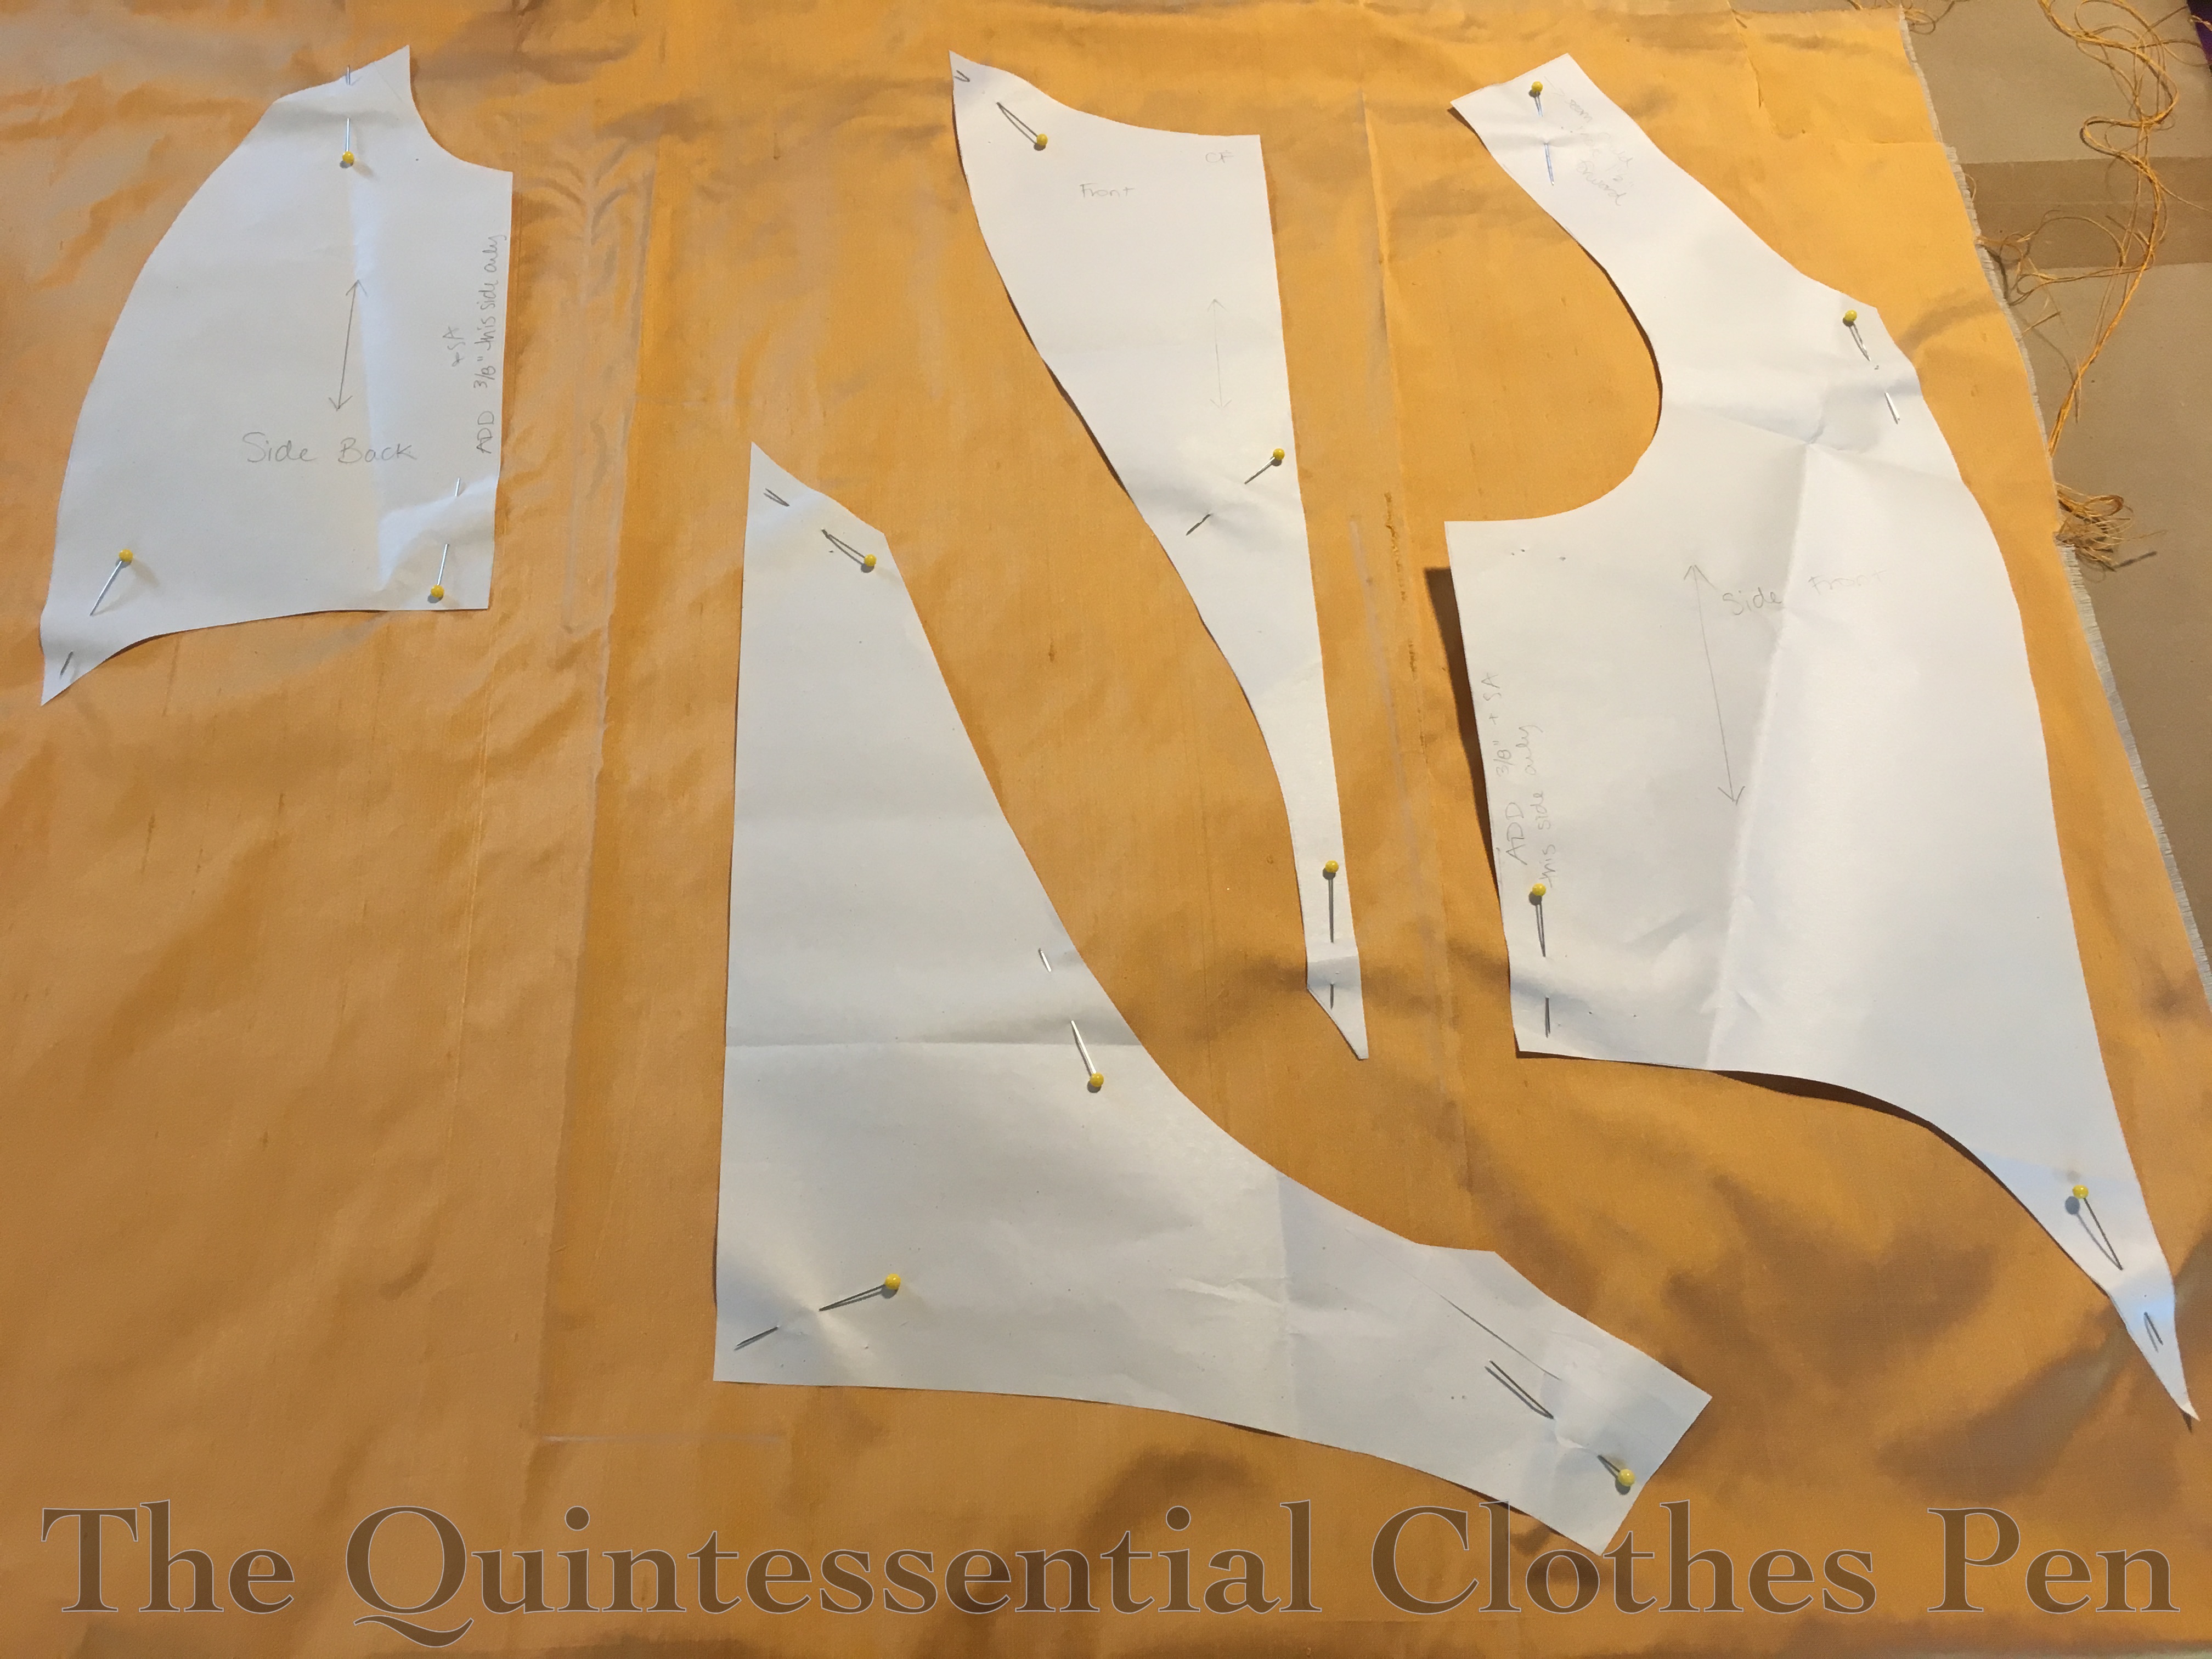
Patterning
The pattern for this bodice is based on patterns contained in Janet Arnold’s Patterns of Fashion 1 and Norah Waugh’s The Cut of Women’s Clothes. I was able to start with my basic darted 1860s bodice and adapt it for the 1830s using information about grain line, dart placement, etc. from the books. This worked well because I know the basic darted bodice fits in areas that can be fussy to fit such as neckline, armhole, etc. and those things (in the 1860s) are still very similar to the shapes from the 1830s.
The sleeve pattern is from Plate 12 (page 84) in The Workwoman’s Guide (published in 1838), which can be viewed on Google Books here. I used the big circle sleeve (Figure 8–shown made up in Figure 7) and varied the top shape so that it forms a downward V shape to allow for my mancherons, which are patterned based on the V & A inspiration dress.
The ladies at American Duchess created a very helpful video discussing sleeve shapes from the 1830s, including showing mockups of a few different sleeve patterns from The Workwoman’s Guide. It is wonderful for seeing how the flat patterns turn into 3D shapes, which I found to be very helpful as I dithered about sleeve patterns.. You can view the video here. Lauren also has a blog post talking about 1830s sleeves, which shows the pattern I chose to use in various stages of its construction, from being flat to being made-up.
The skirt is based on information from the same books as the bodice pattern. It is made of 3 panels of my 45″ wide cotton fabric.
Construction Method Disclaimer
I chose to construct this dress in the mid-19th century way of separate bodice and skirt. This is odd for the 1830s (in fact, I can’t think of any examples that are done this way) as they are usually sewn together to make a one piece dress. However, as I was pondering sleeve options and considering my yardage I was faced with an exciting prospect.
There are so many sleeve variations in the 1830s–super poof, takes-a-while-to-get-used-to-looking-at elbow poof, meticulous pleated details as the poofs are reduced and contained… I wanted to make more than one! Also, I had 10 yards of my beautiful reproduction cotton and I expected my 1834 dress to only use about 7. What would I do with the last 3 yards? That’s not enough to make another dress. But… it is enough to make another bodice, even with giant 1830s sleeves that use a full yard for each arm!
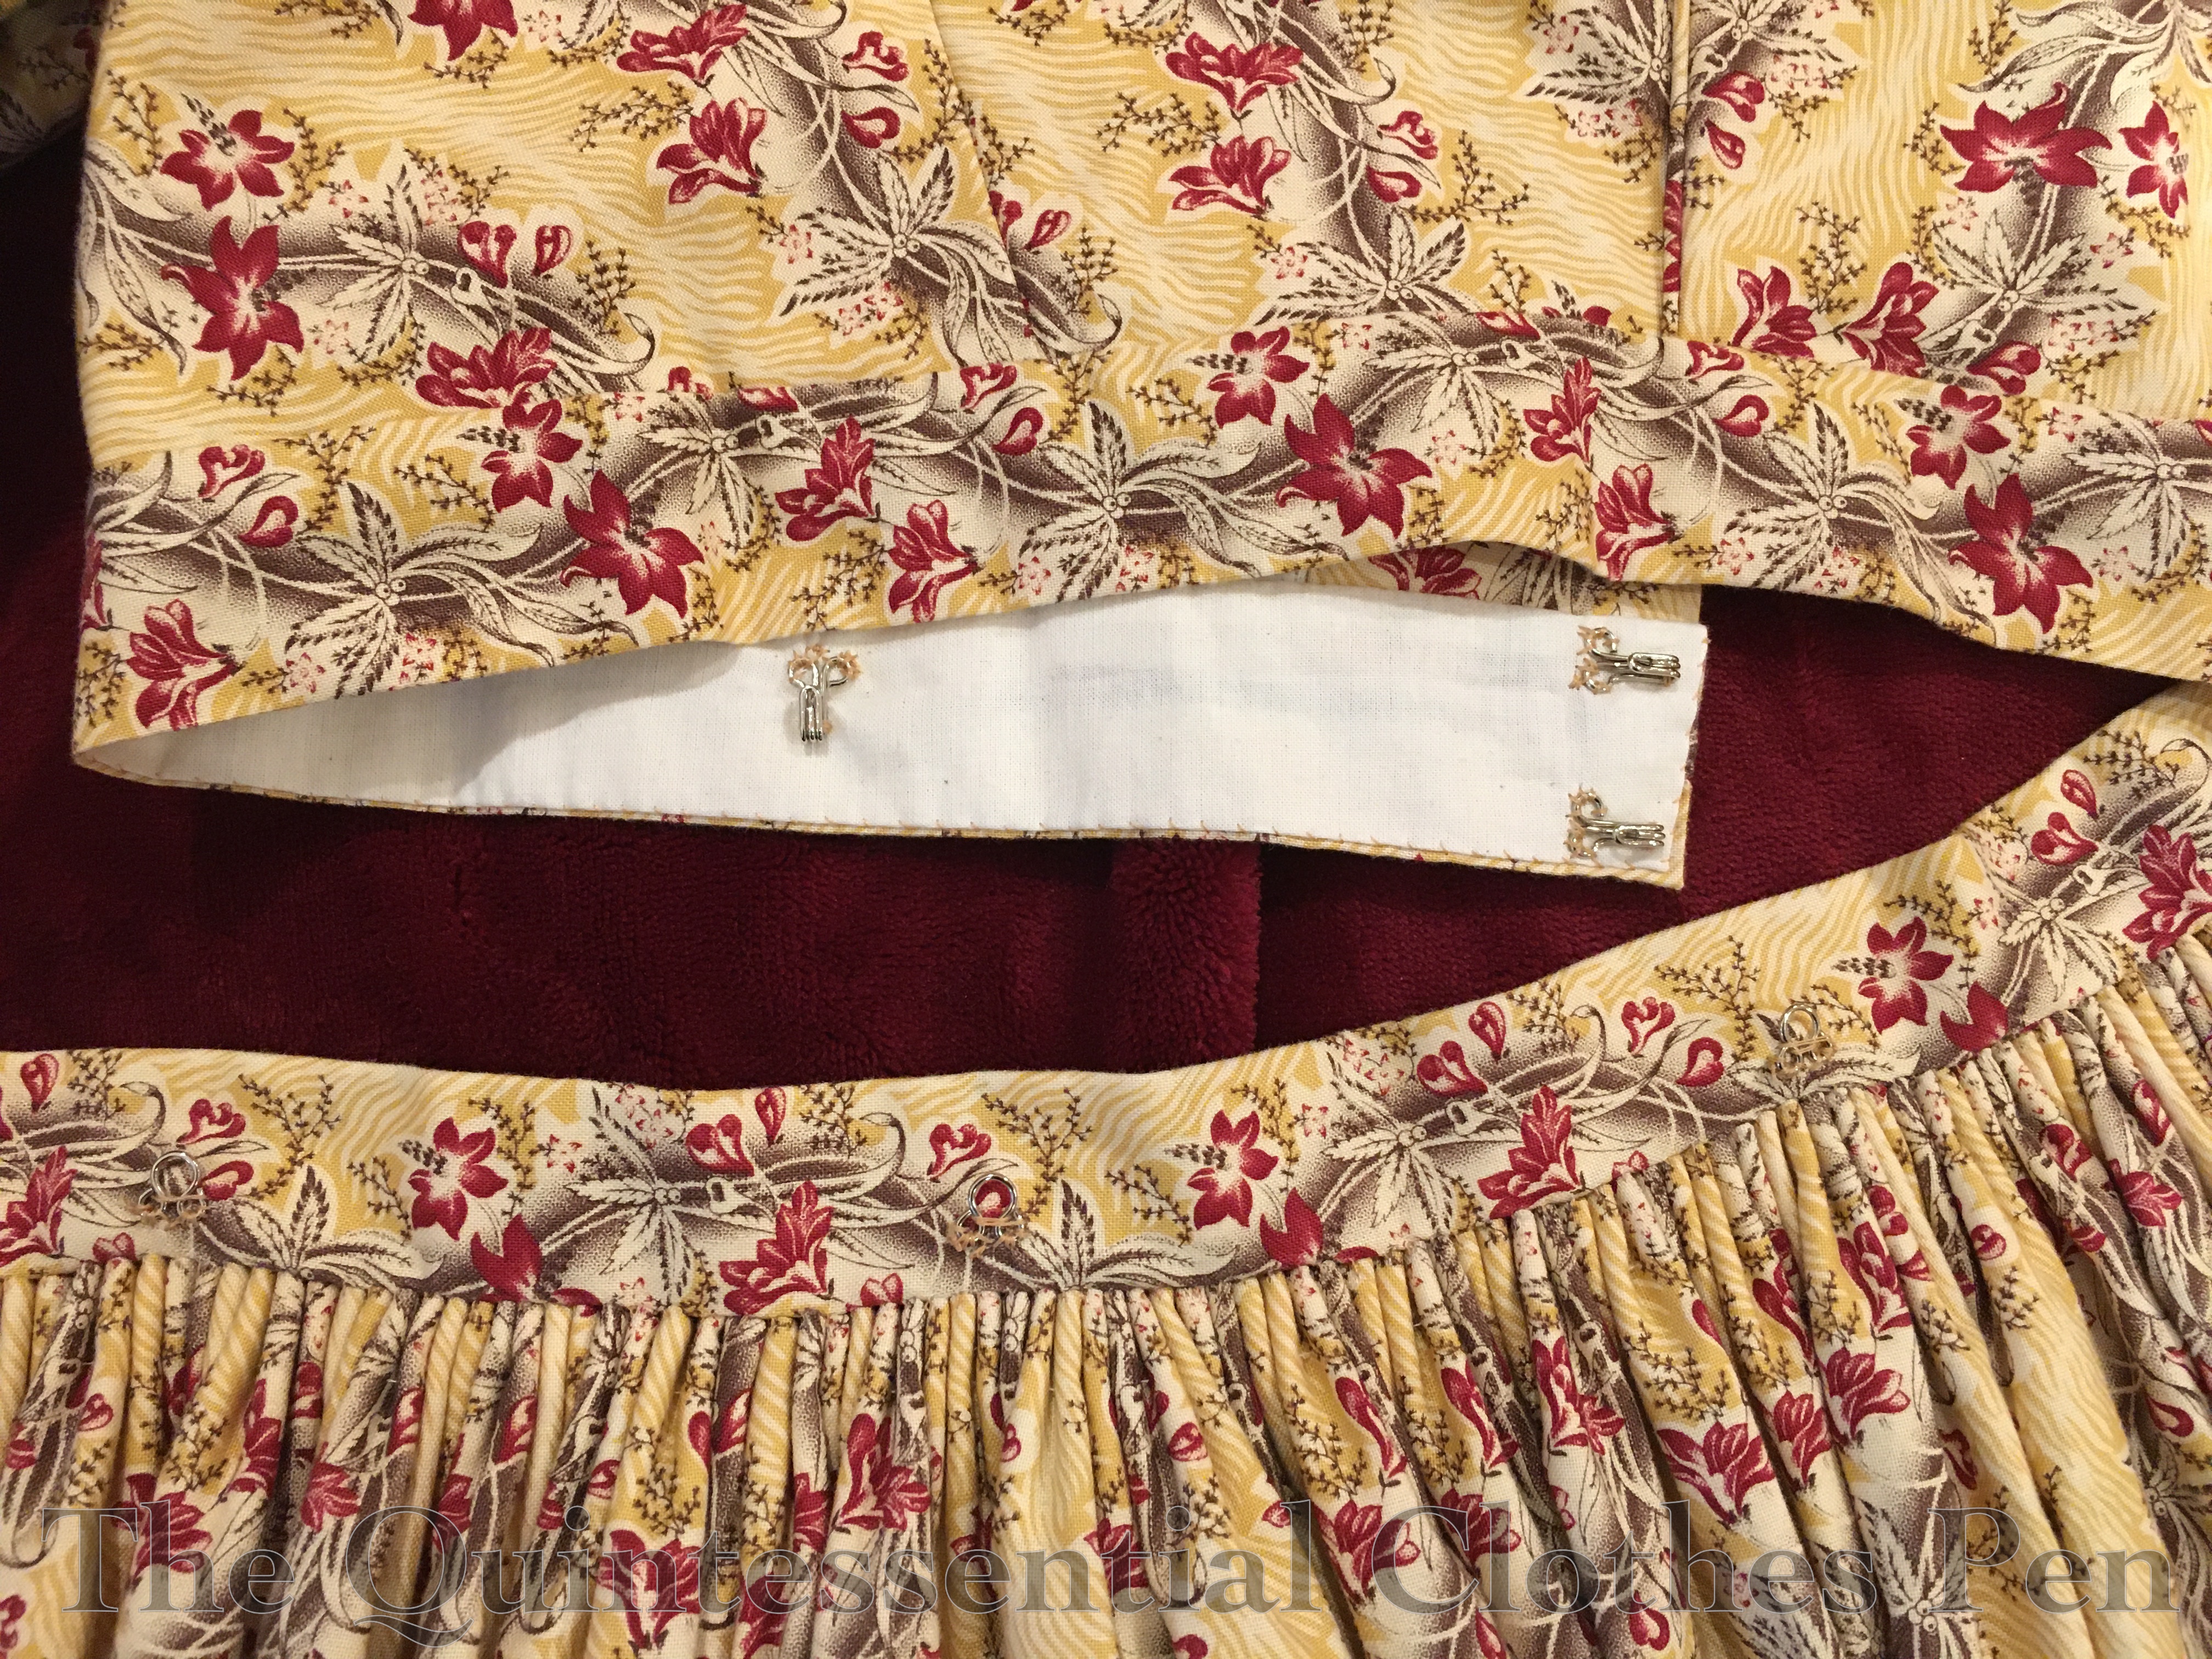
I decided to make one skirt with two bodices, so in addition to this 1834 dress I also have an 1838 bodice halfway completed. It is a variation on a theme, using mostly the same bodice pieces, but with a different front style and different sleeves. More on that in the future, but for the purposes of this post it is an explanation for the fact that the skirt of my 1830s dress hooks to the bodice in a way that is common in the mid-19th century, as you can see below. (The loops on the skirt waistband blend really well with the pattern on the fabric, but you can see them if you look really carefully.)
Skirt Construction
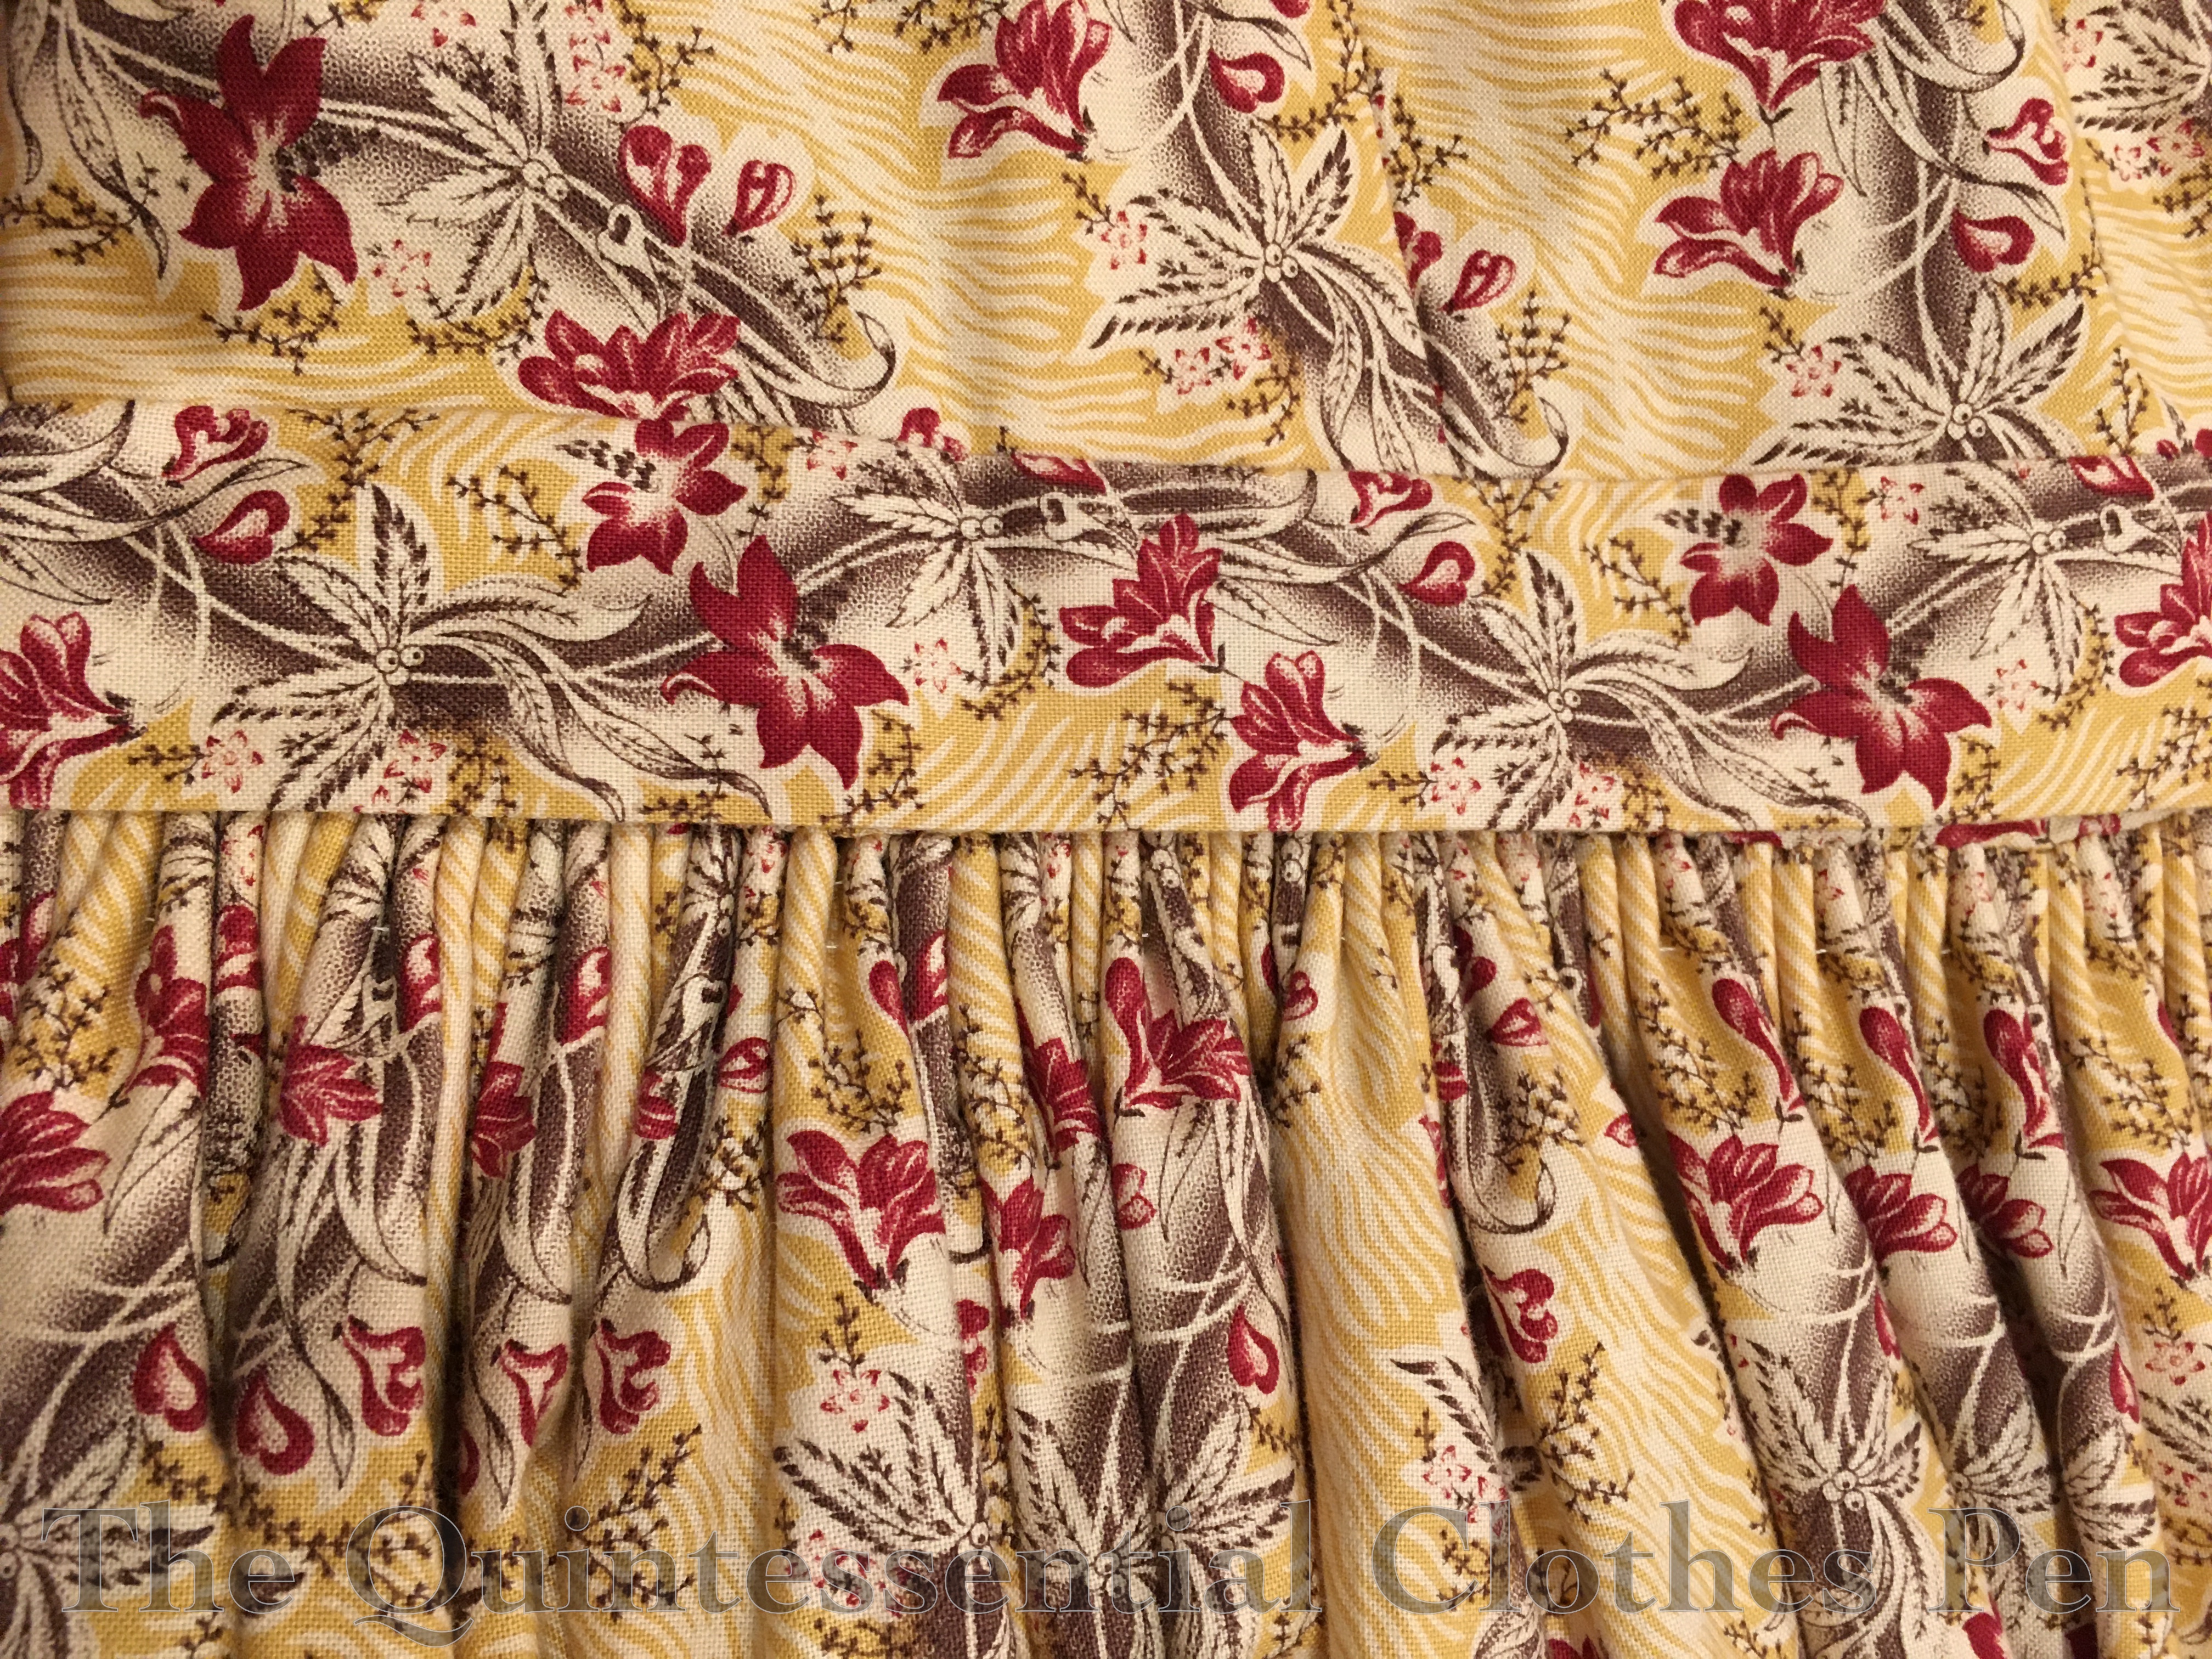
As I mentioned earlier, my skirt is made up of 3 panels of my 45″ wide cotton. They are carefully pattern matched to keep the scrolling consistent across the panels and to help hide the seam lines. They’re not perfect, but they are pretty darn close.
Two seams are on each side of center front and one is at center back. The two front seams have french seamed pockets set into them below the cartridge pleats. This is wonderfully helpful while wearing the dress! I made sure to make the pockets big enough to hold a phone, keys, etc.
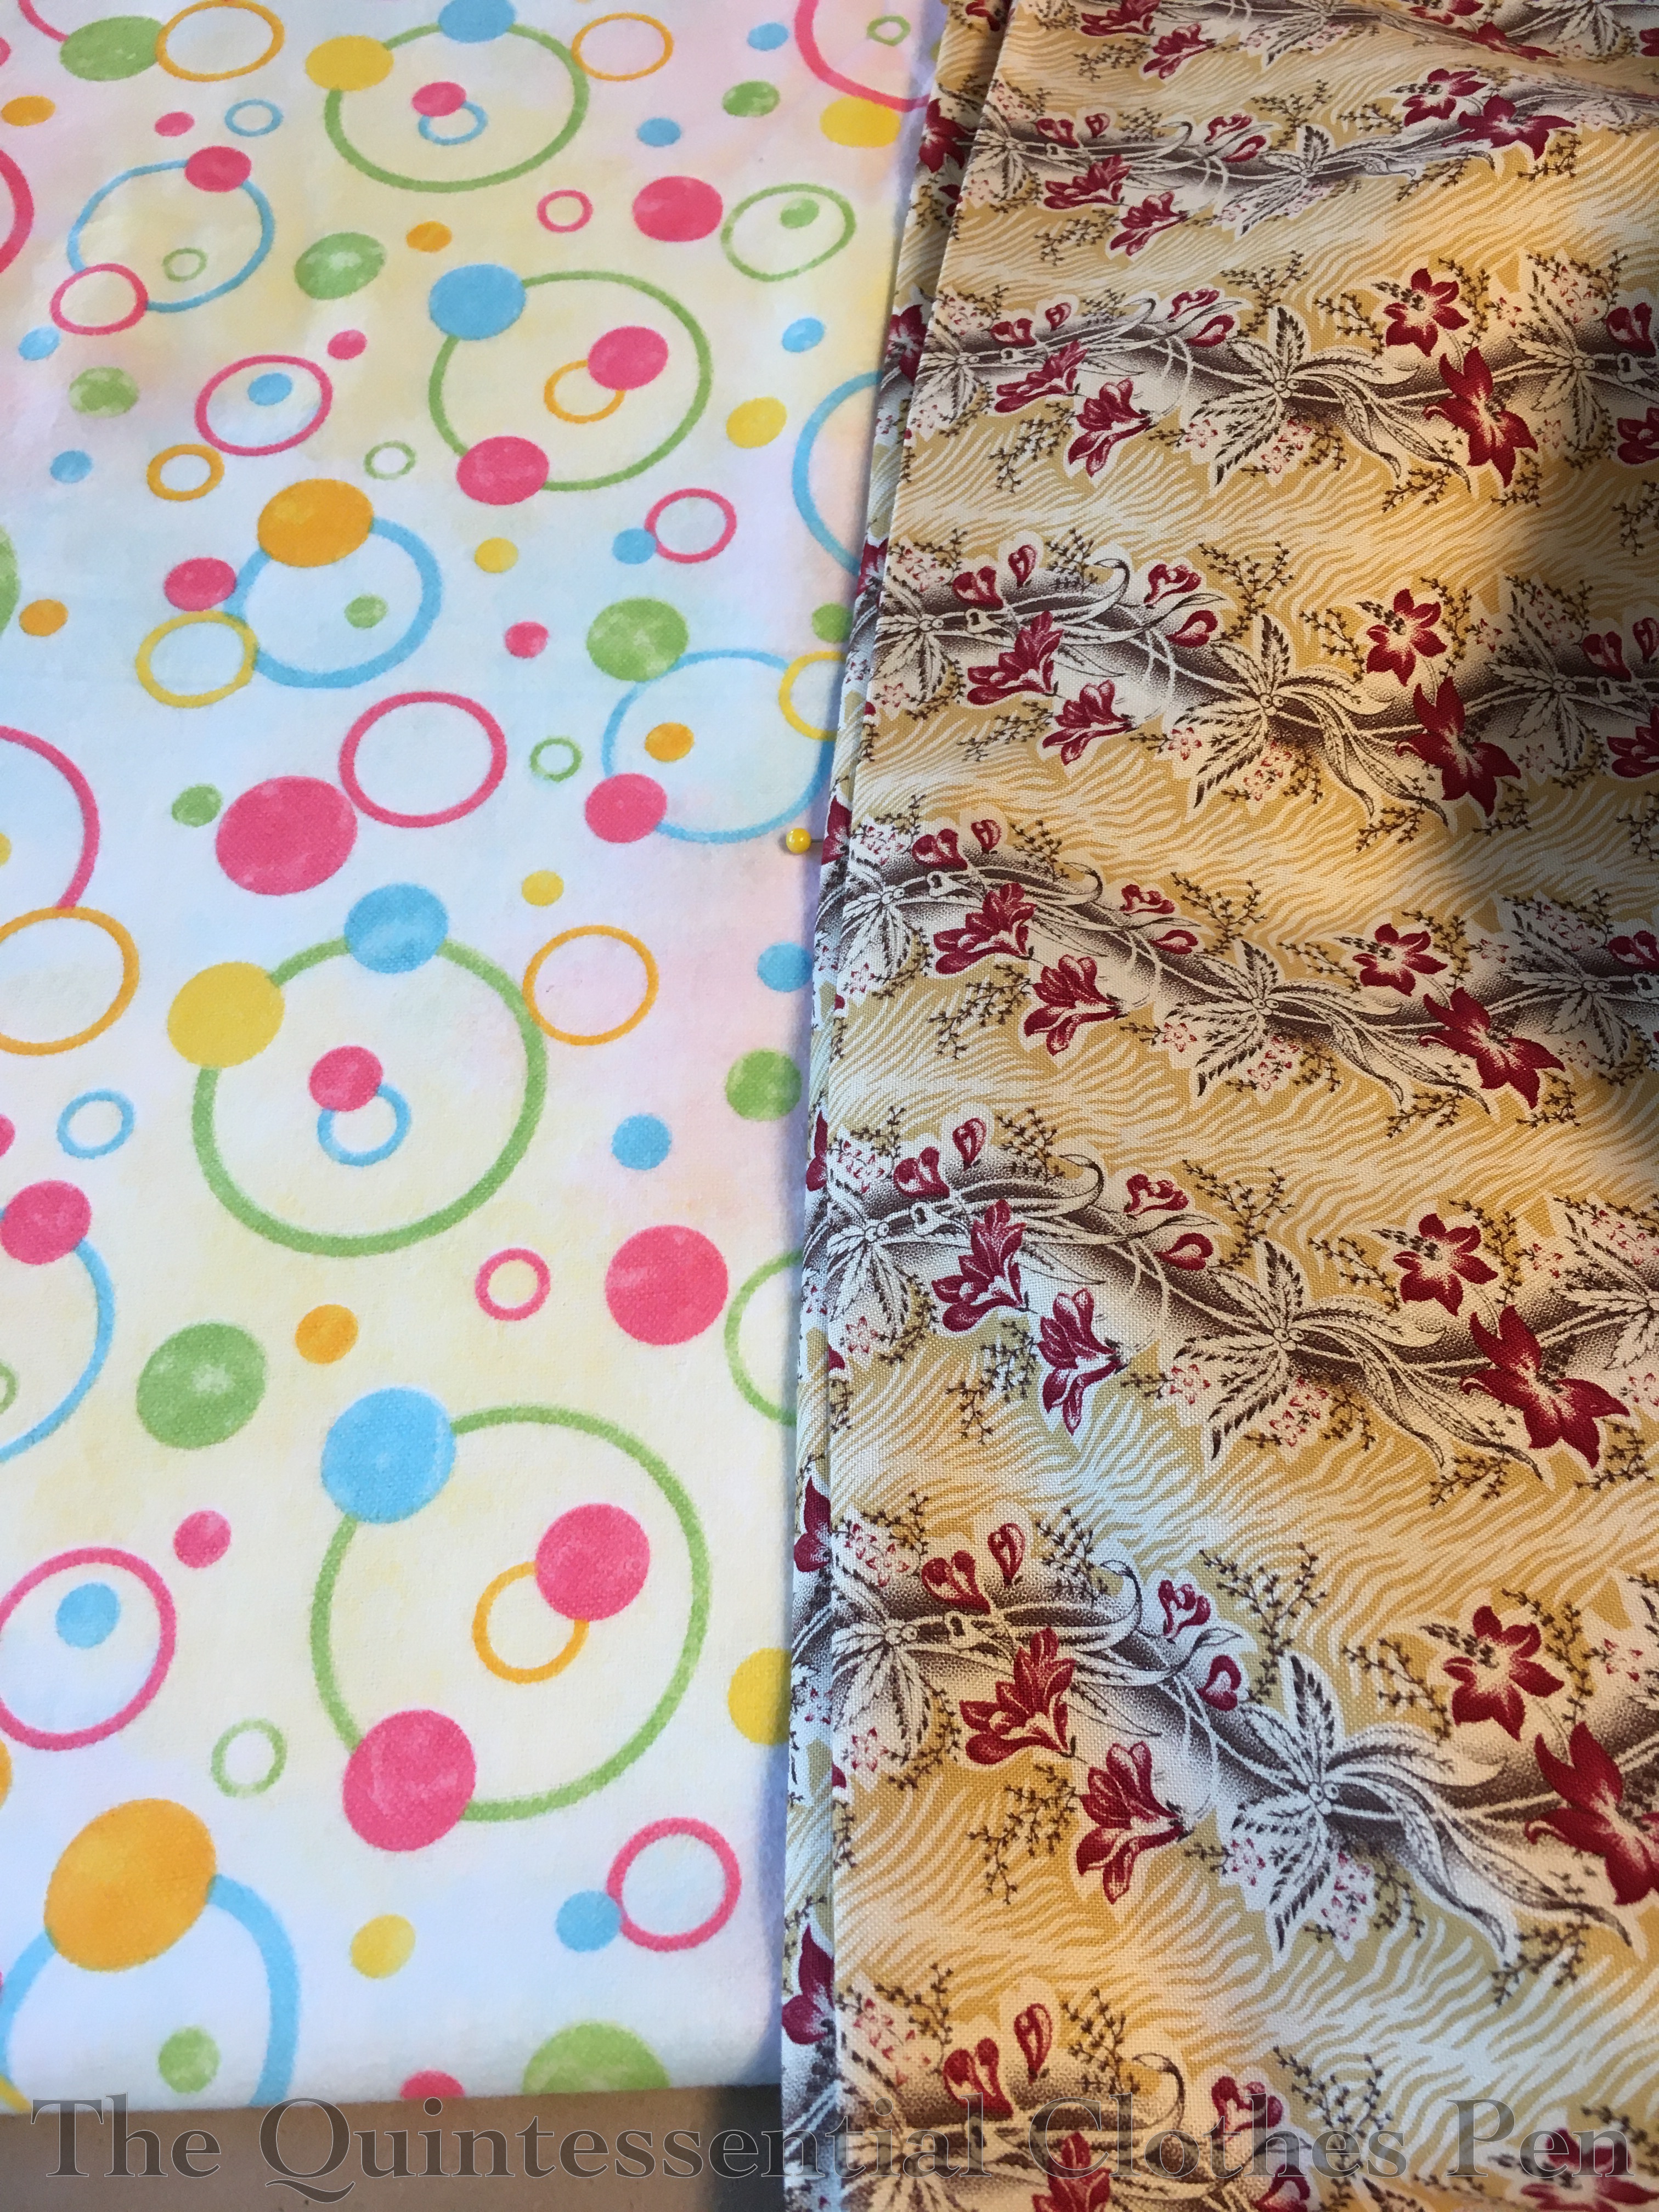
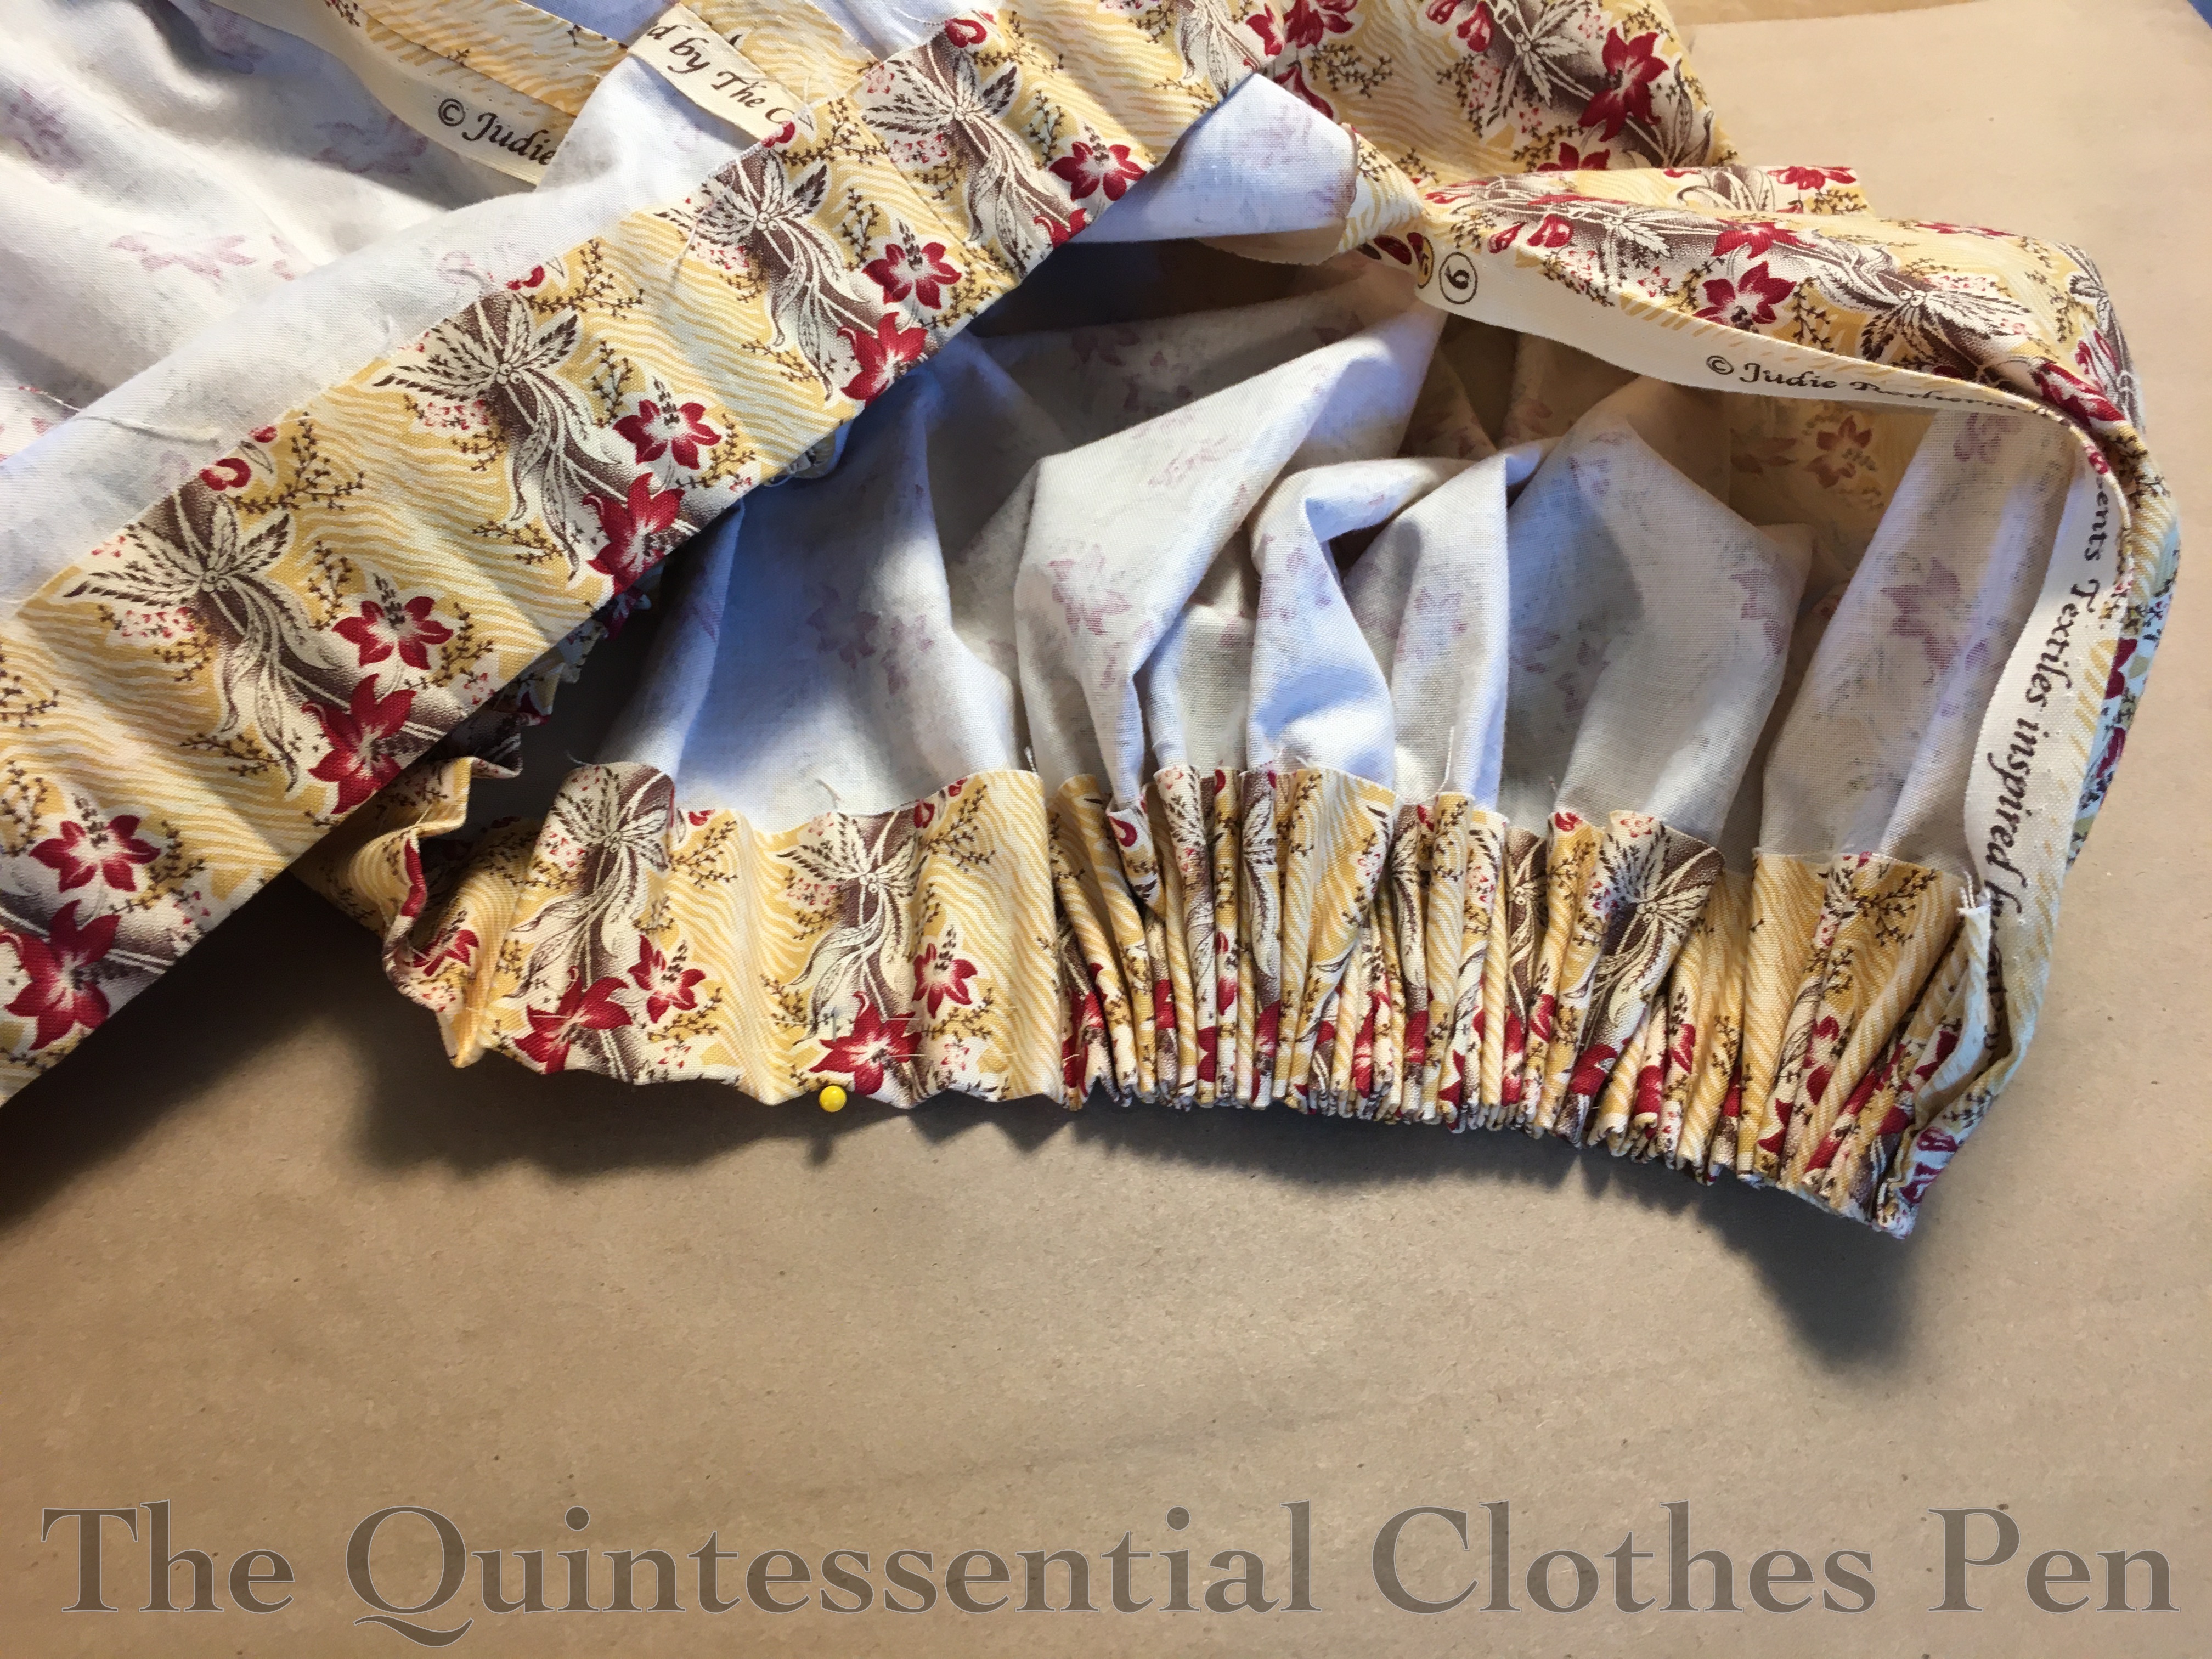
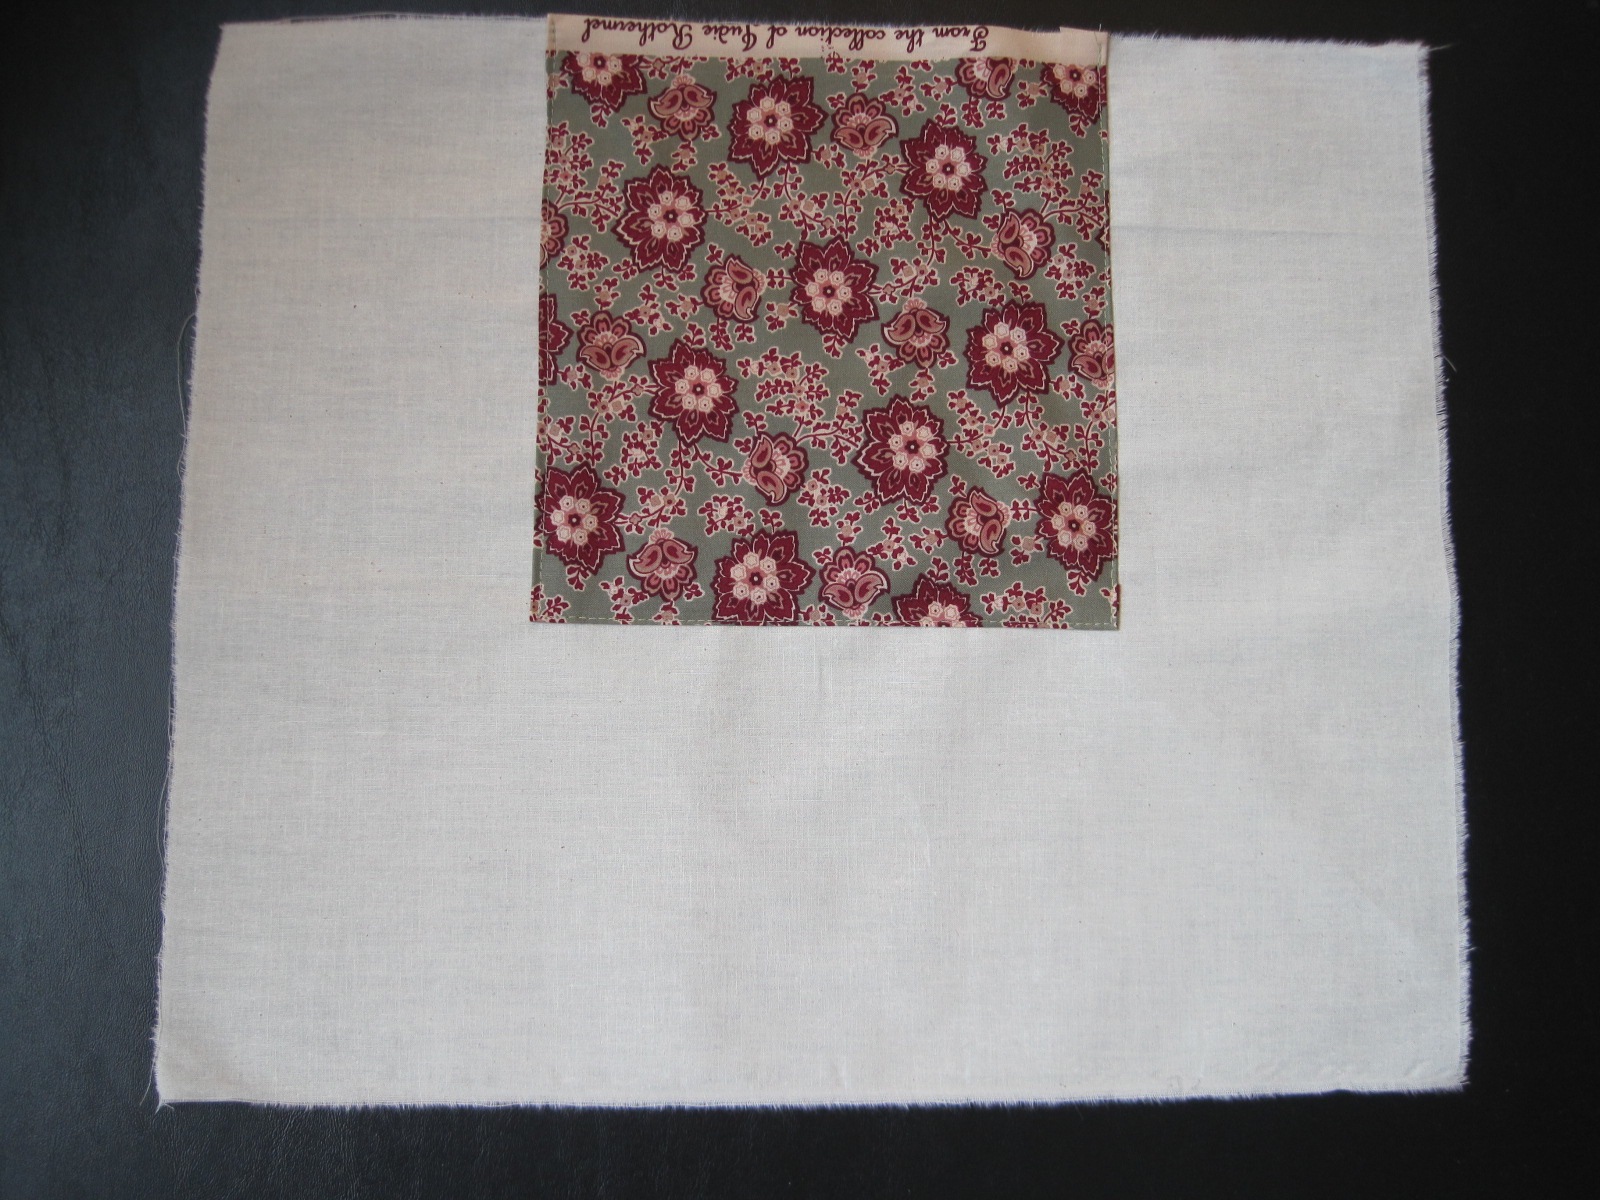
The fullness of the skirt is cartridge pleated to the waistband. I find that this quantity of cotton is weeny looking when cartridge pleated to a waistband without a little help to create loft, so I sandwiched a single layer of cotton flannel into the pleats to help them have a little bit of puff. I just used scrap flannel from my stash for this–the fun dot print pictured below. This is the top of my skirt pressed and ready for pleating!
Here is the skirt in the process of being pleated. The top edge is left raw and folded over the flannel before I ran two rows of parallel stitches to form the pleats.
I absolutely eyeball my cartridge pleats! My stitches are vaguely even but I really don’t worry too much about that. I mark the quarter points of the skirt and waistband and then adjust the pleats to fit. No math for this process!
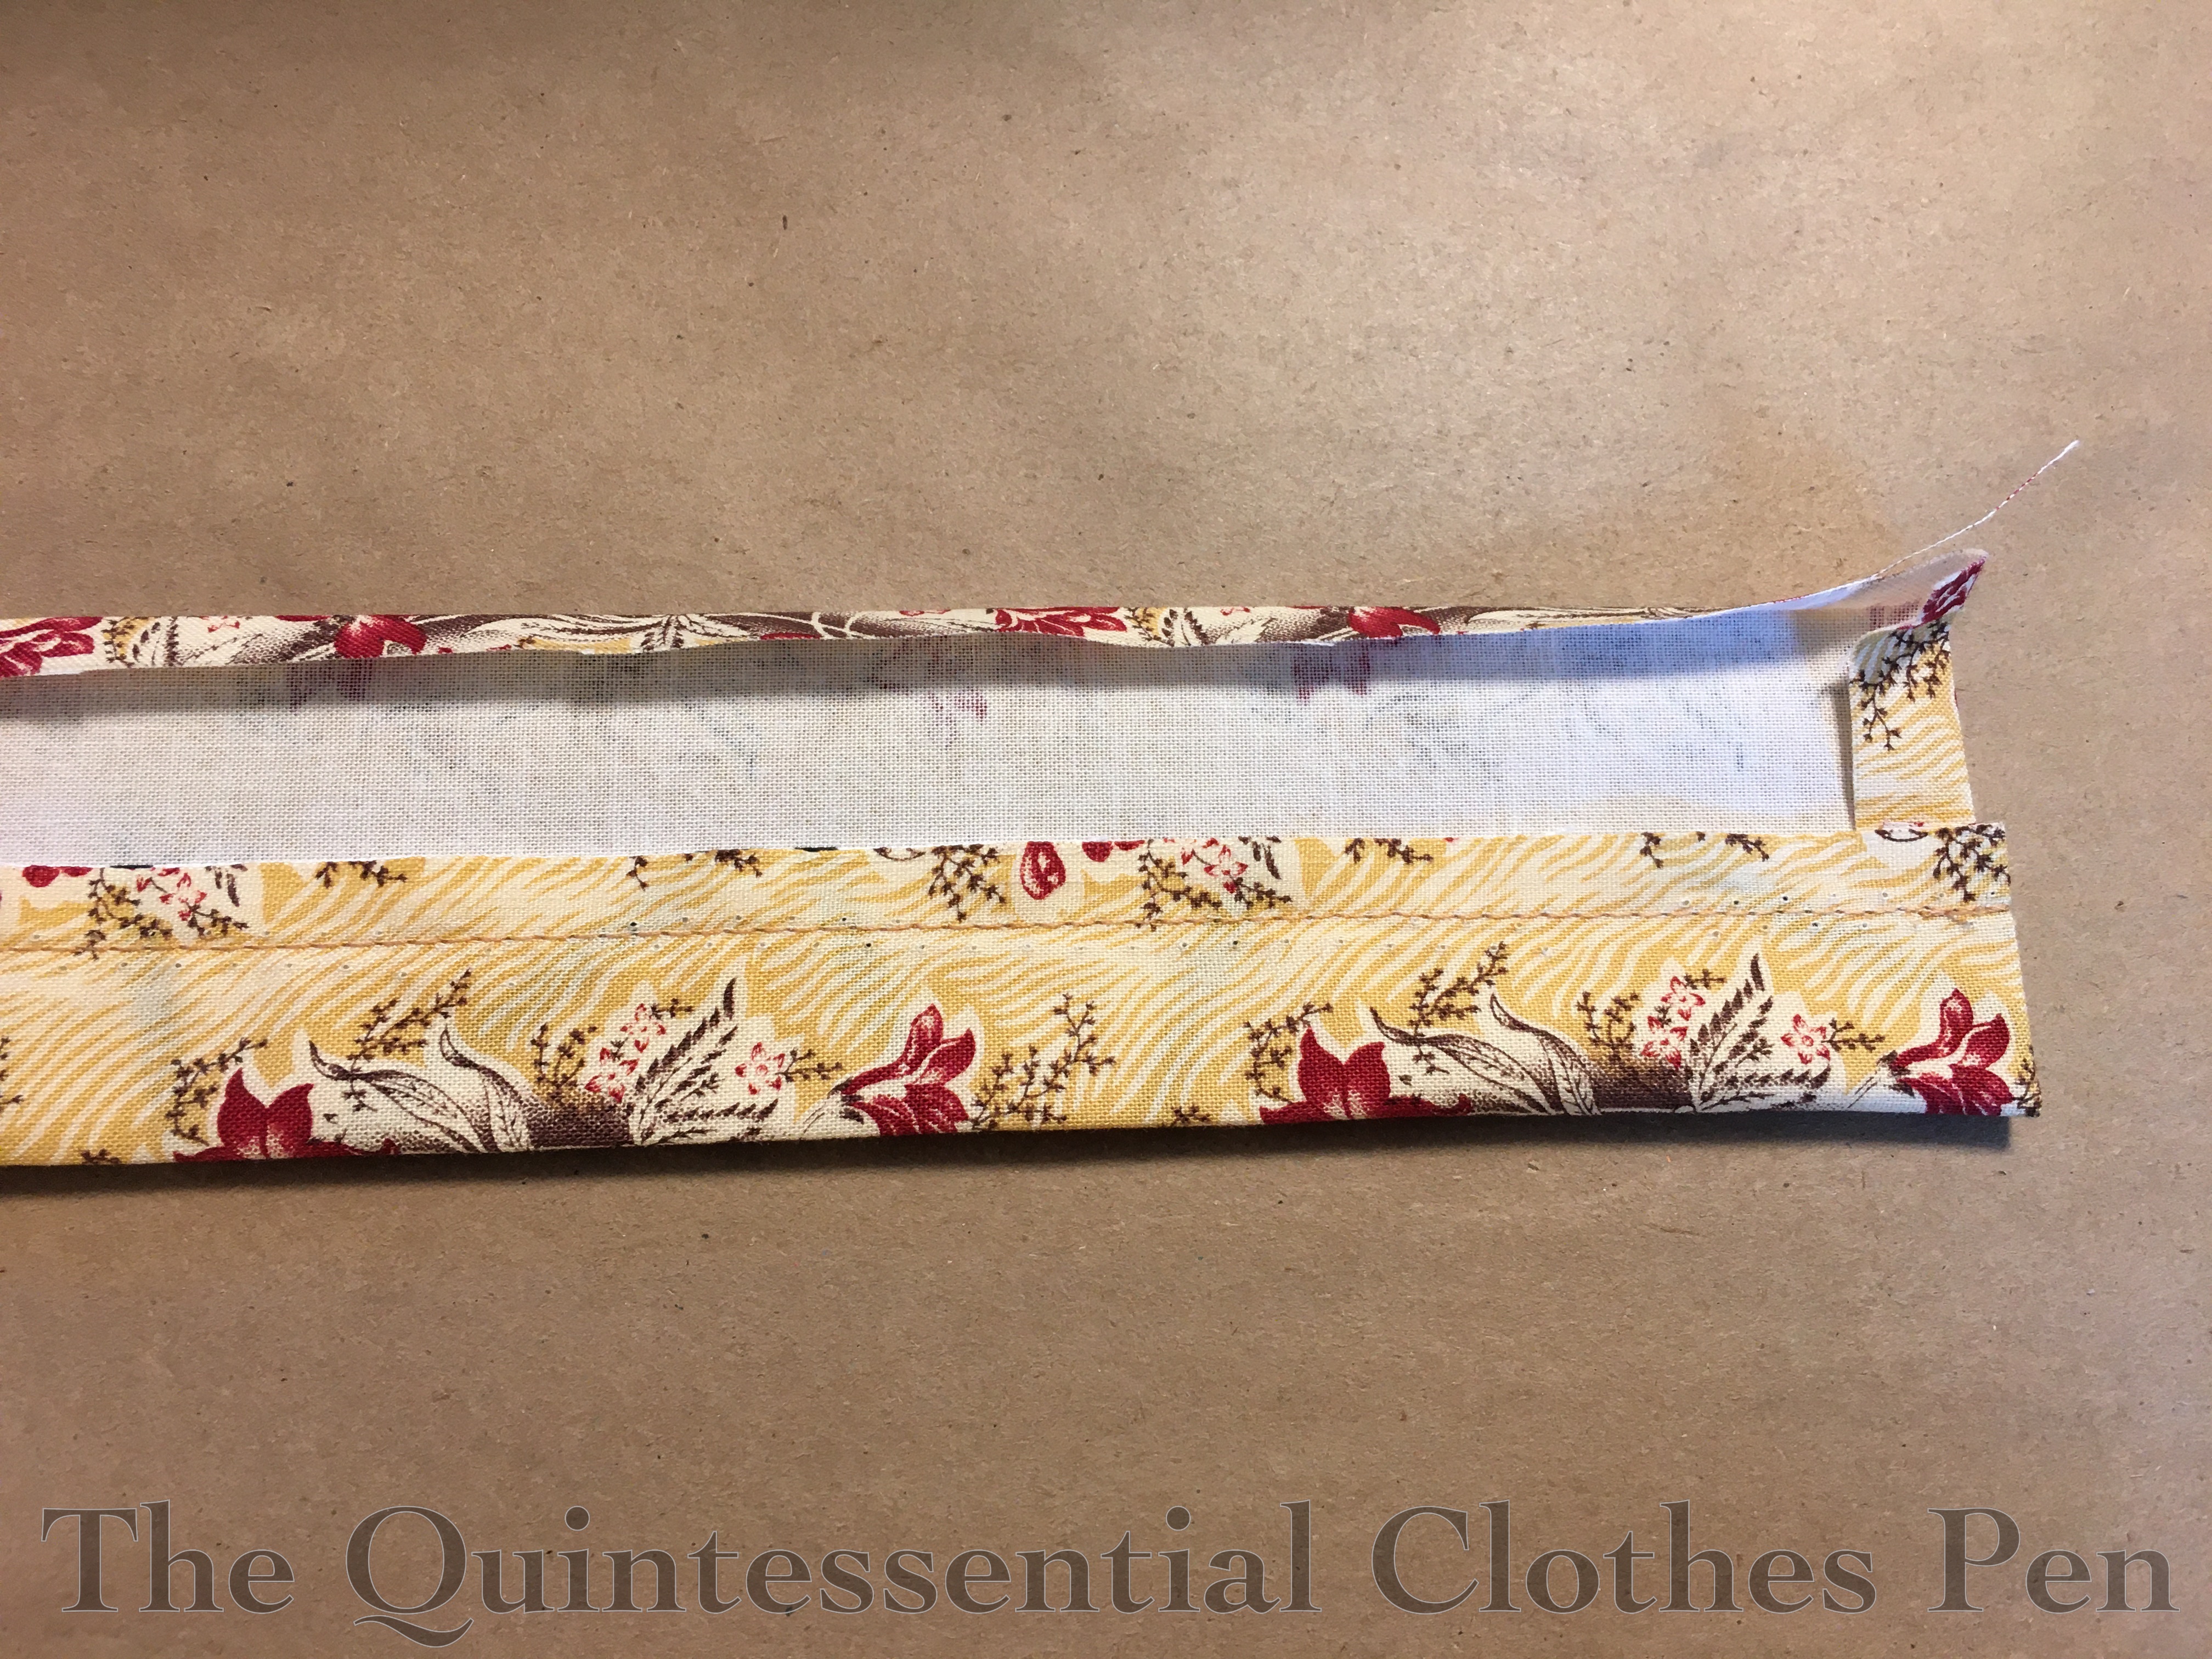
The waistband has a single layer of canvas inside (a scrap from a decorating project) to help stiffen it and provide stability for the cartridge pleats and closures. This is machine stitched to the cotton where it will not show.
The cotton is then wrapped around the canvas and whip stitched in place. I finished the waistband entirely before whip stitching the cartridge pleats in place.
Bodice Construction
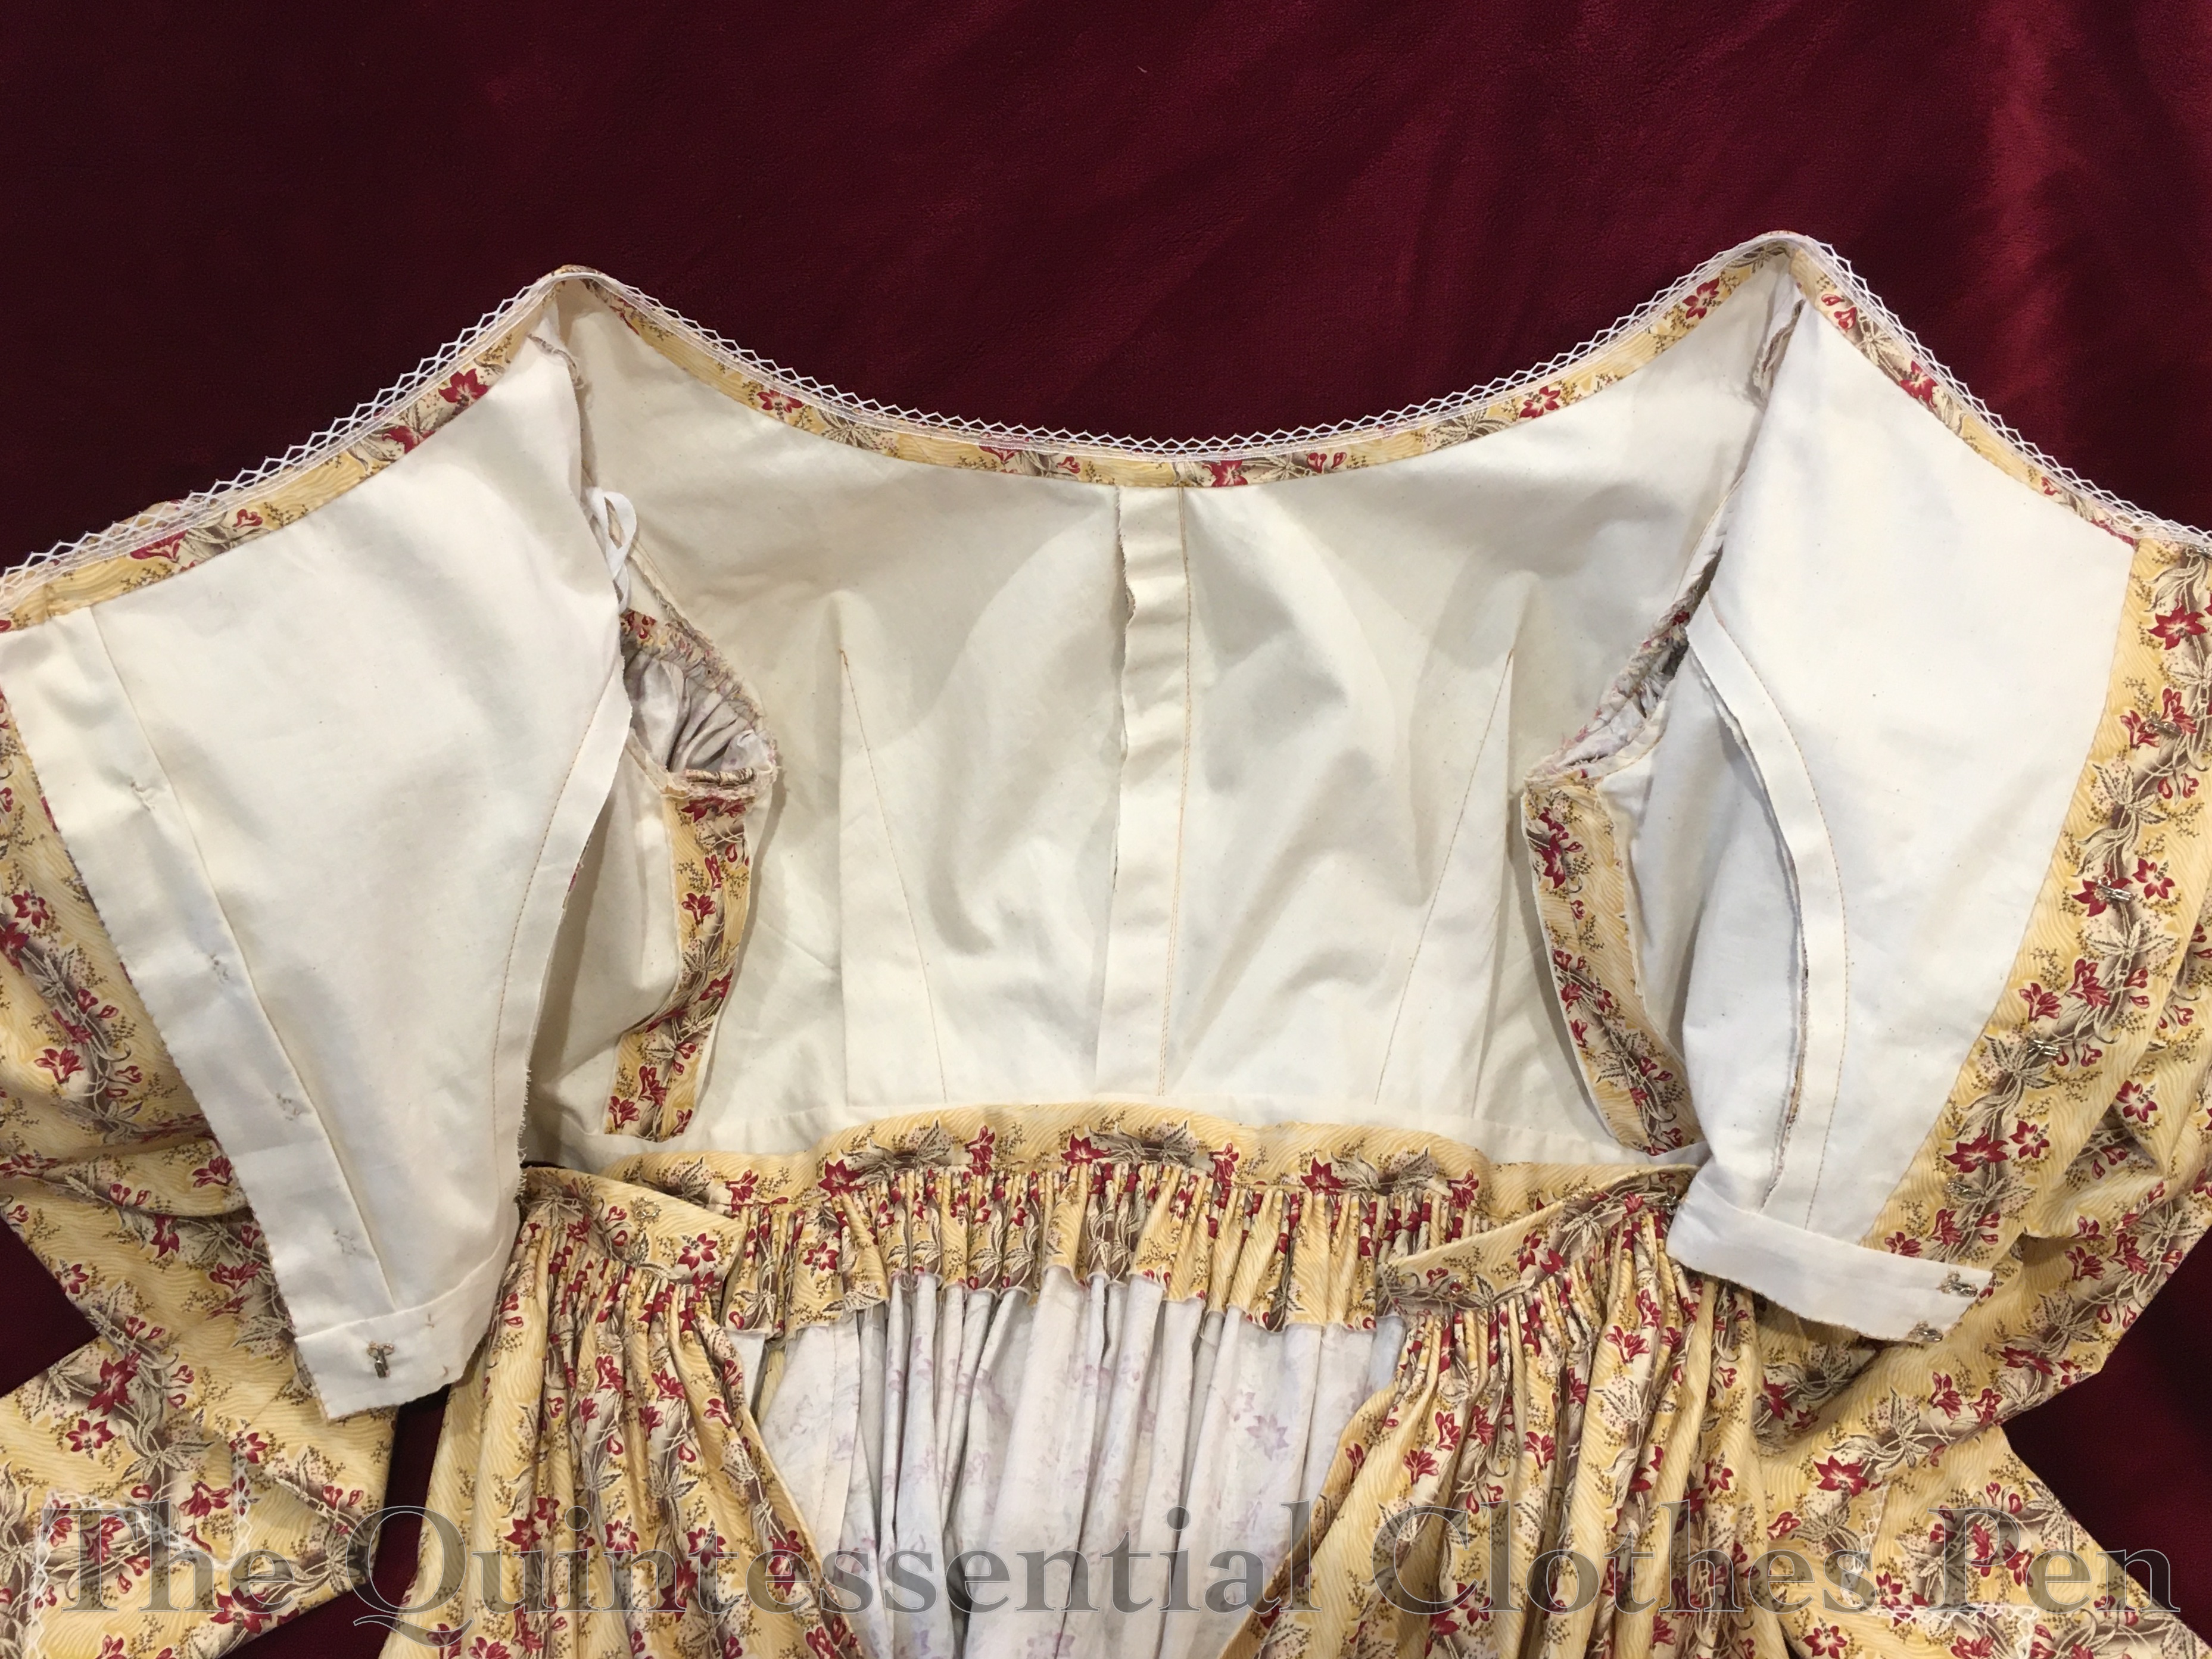
The construction of this bodice is pretty straightforward as 19th century bodices go, though I spent a bit of time searching out photos of extant dress interiors from this decade so I could see how they were finished (or left with unfinished edges!). I found these dresses featured on All The Pretty Dresses very helpful, especially as they have interior views: late 1830s green/blue/red cotton print dress and early 1830s brown dress.
There are other inspirational dresses on my Pinterest board for this project, as well. Many of them are held by the Metropolitan Museum of Art. Those are excellent because you can really zoom in on the photos to look at details, but unfortunately they don’t often show interior views of the dresses.
The hardest part about this bodice was the pattern matching! It was mind boggling to keep the flowers growing upwards, match the wave, keep the dark pink flowers at corresponding places, and keep some parts on the bias and some on the straight.
For example, here is my first attempt at the front bodice, which is cut on the bias. It’s not awful… but it’s just not quite right, and that bothers my eyes.
I very carefully tried again…
And was able to get this, which I was much happier with!
And I was able to use the reject front piece to cut out a pocket piece (and later a bit of bias as well)… no waste here!
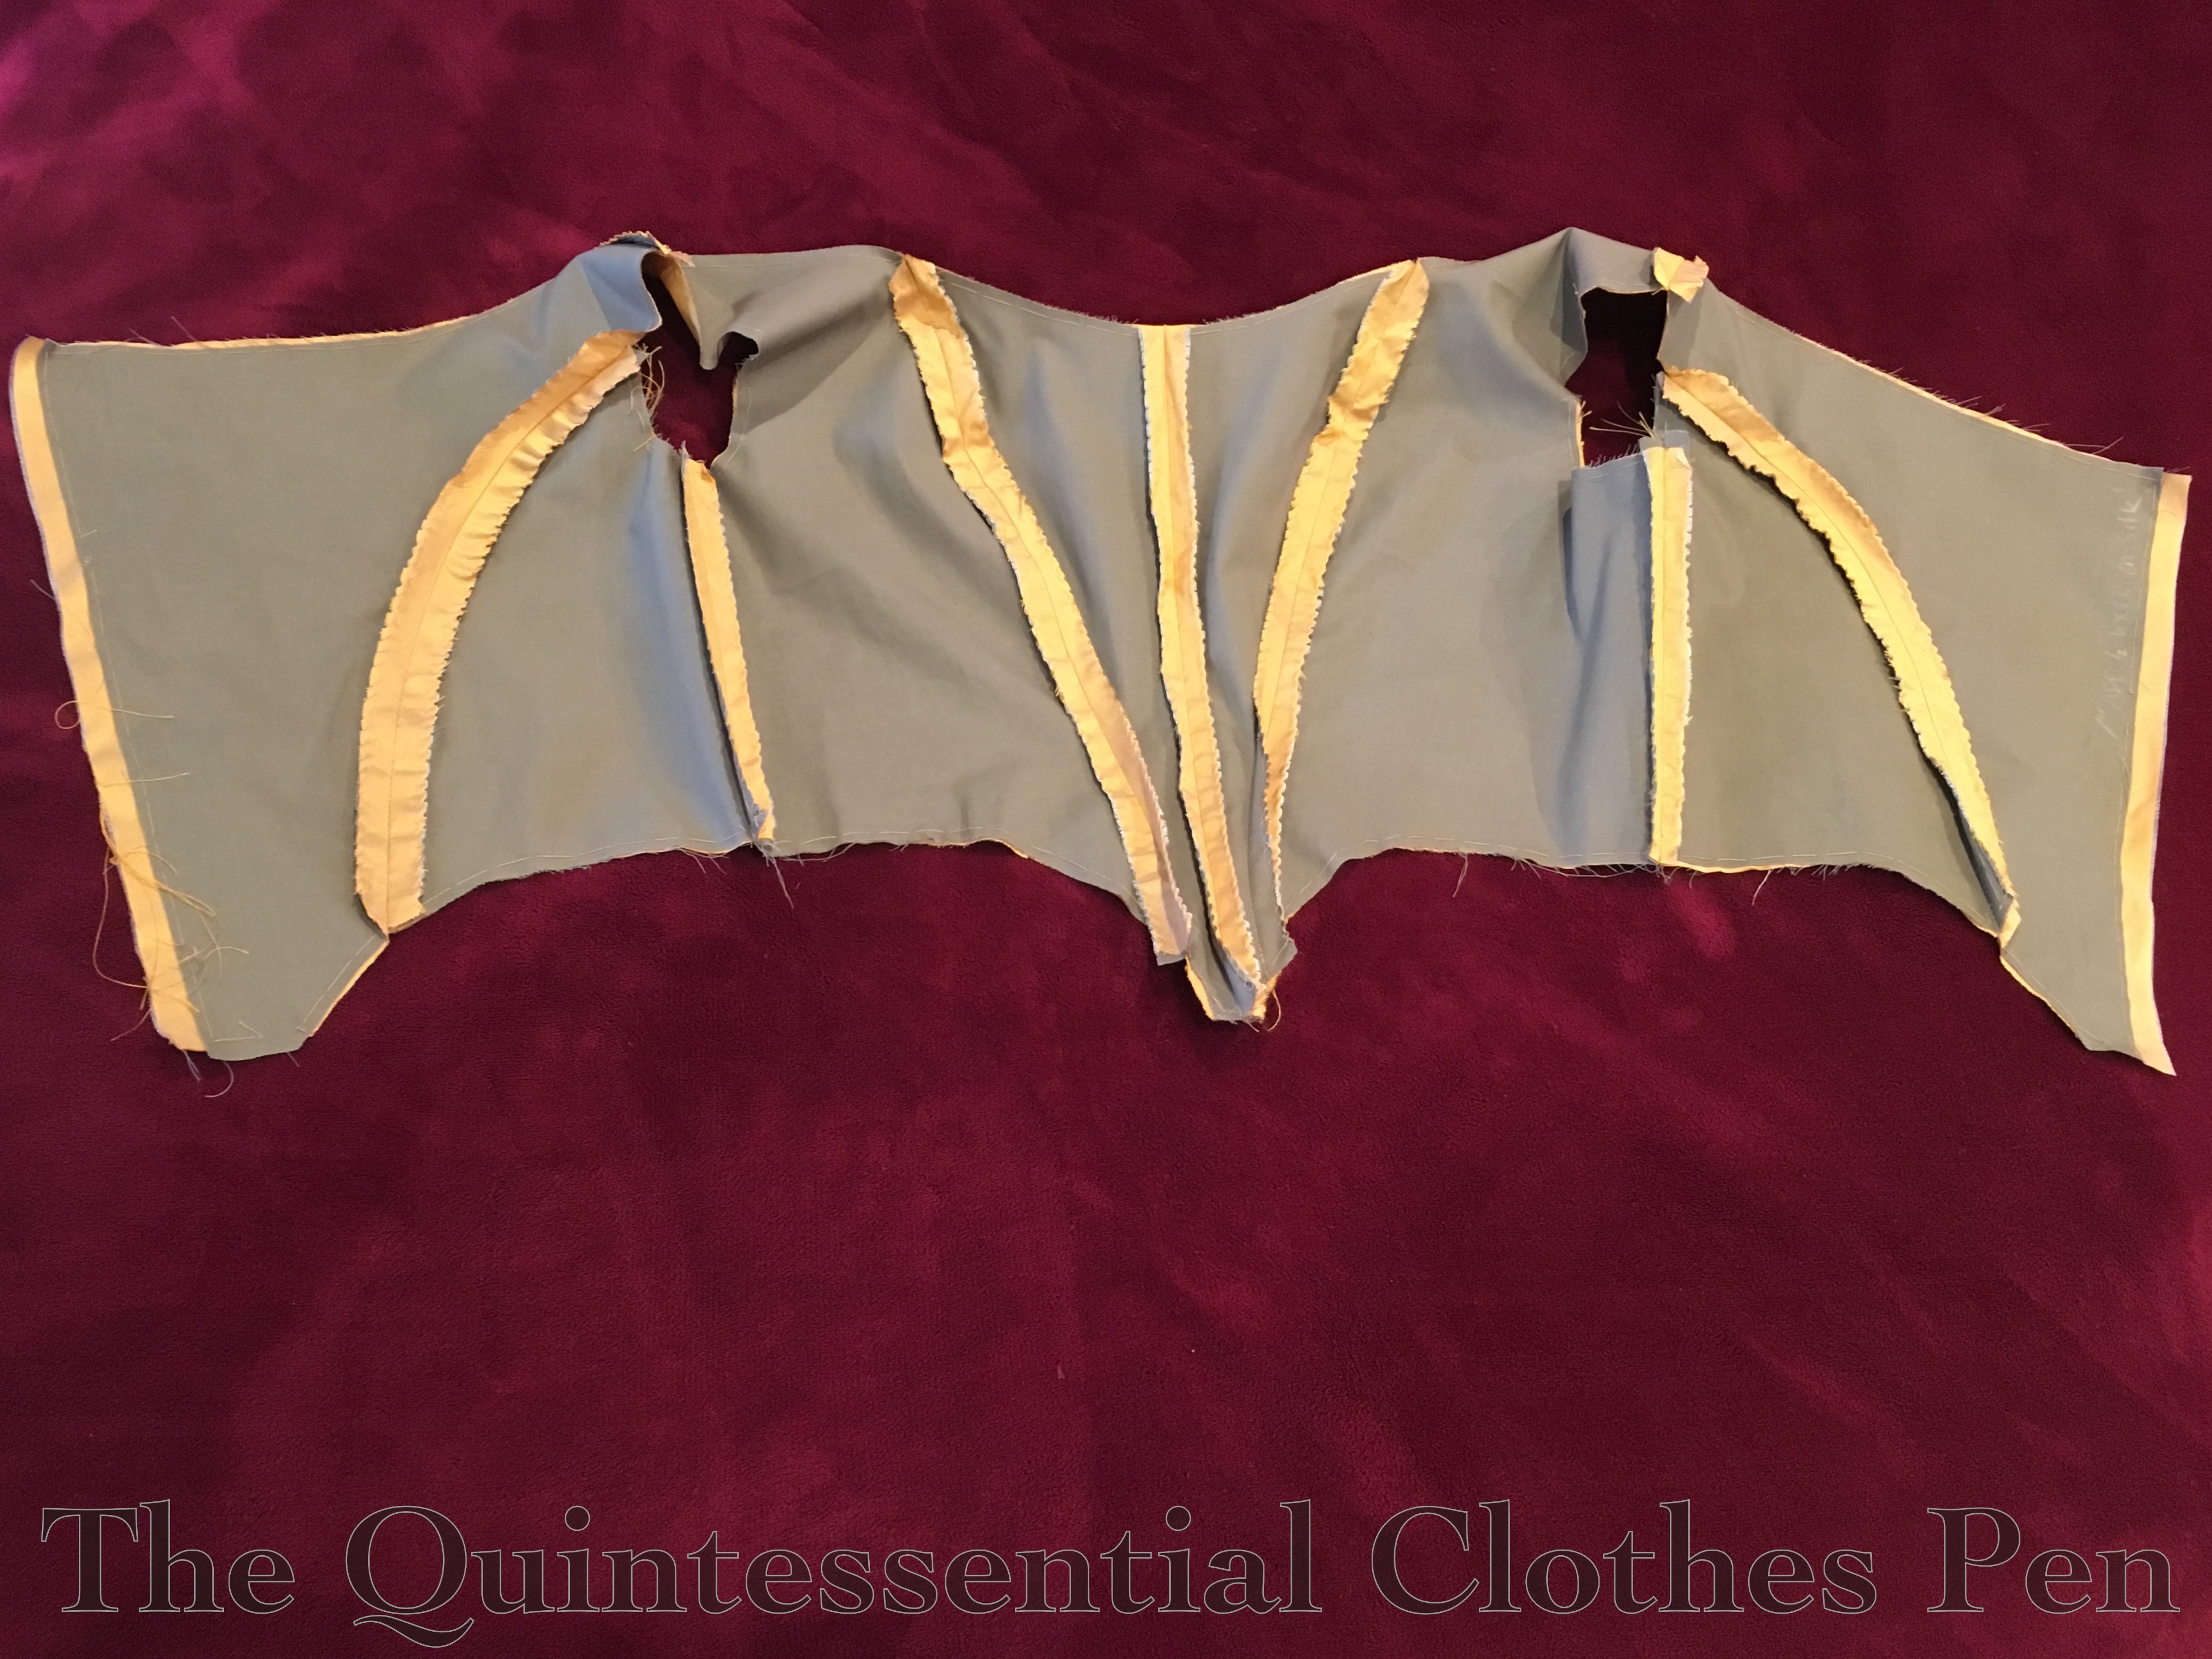
Here is the front piece after flatlining (the fronts, side backs, and backs of the bodice are all flat lined with muslin), stitching the darts, and putting cording down the center front seam.
Ah yes, the cording! There is 1/16″ cotton cording in most of the bodice seams (front, side back, shoulders, armholes, neckline, and to finish the cuffs). This detail is taken directly from extant 1830s dresses.
My cording is made up of bias scraps, some as small as about 4″ long, that are pieced together. The cording is machine stitched. I made it with even seam allowances for most of the seams, but thought ahead and offset the seam allowance for the neckline cording, to make it easier to turn it under and whip stitch later. The photo below shows the neckline cording (on the top) and regular seam cording (on the bottom).
Here are the side back pieces with the cording attached, before being sewn to the back pieces. As you can see, I carefully matched my pattern across these two pieces as well.
And here is one side back sewn to its corresponding back, with the cording in the seam. Even across these pieces my pattern matching is pretty good, especially at the bottom!
And the back! It also makes me very happy, but was a super mind boggle to figure out! I have a flap that overlaps past center back, covering a pleat on the other side that will anchor my loops. I found this detail on a number of 1830s dresses, including this 1835-1836 dress at The Met and this c. 1837 dress at The Met.
It doesn’t look like much until it’s lined up to be closed… and then it’s perfect!
The final step was to finish the bottom. I wanted to have a self fabric waistband on this bodice, as with the bodice at the V & A, so that I would have the option of wearing my dress with or without a belt, while still having the visual change of pattern in the fabric.
The outer waistband and inner muslin facing encase the bottom seam allowance of the bodice. They are machine stitched at the top, have graded seam allowances, and then the muslin is whip stitched along the bottom.
Sleeve Construction
With the bodice mostly assembled, I moved on to the sleeves. These are not flat lined.
I upgraded my sleeve puffs for this ensemble by giving them ties to attach to the armsceye of the dress so I can control the height that they sit at. This is essential for getting the right shape poof with this sleeve style. Looking into a sleeve, here is one sleeve puff tied in place.
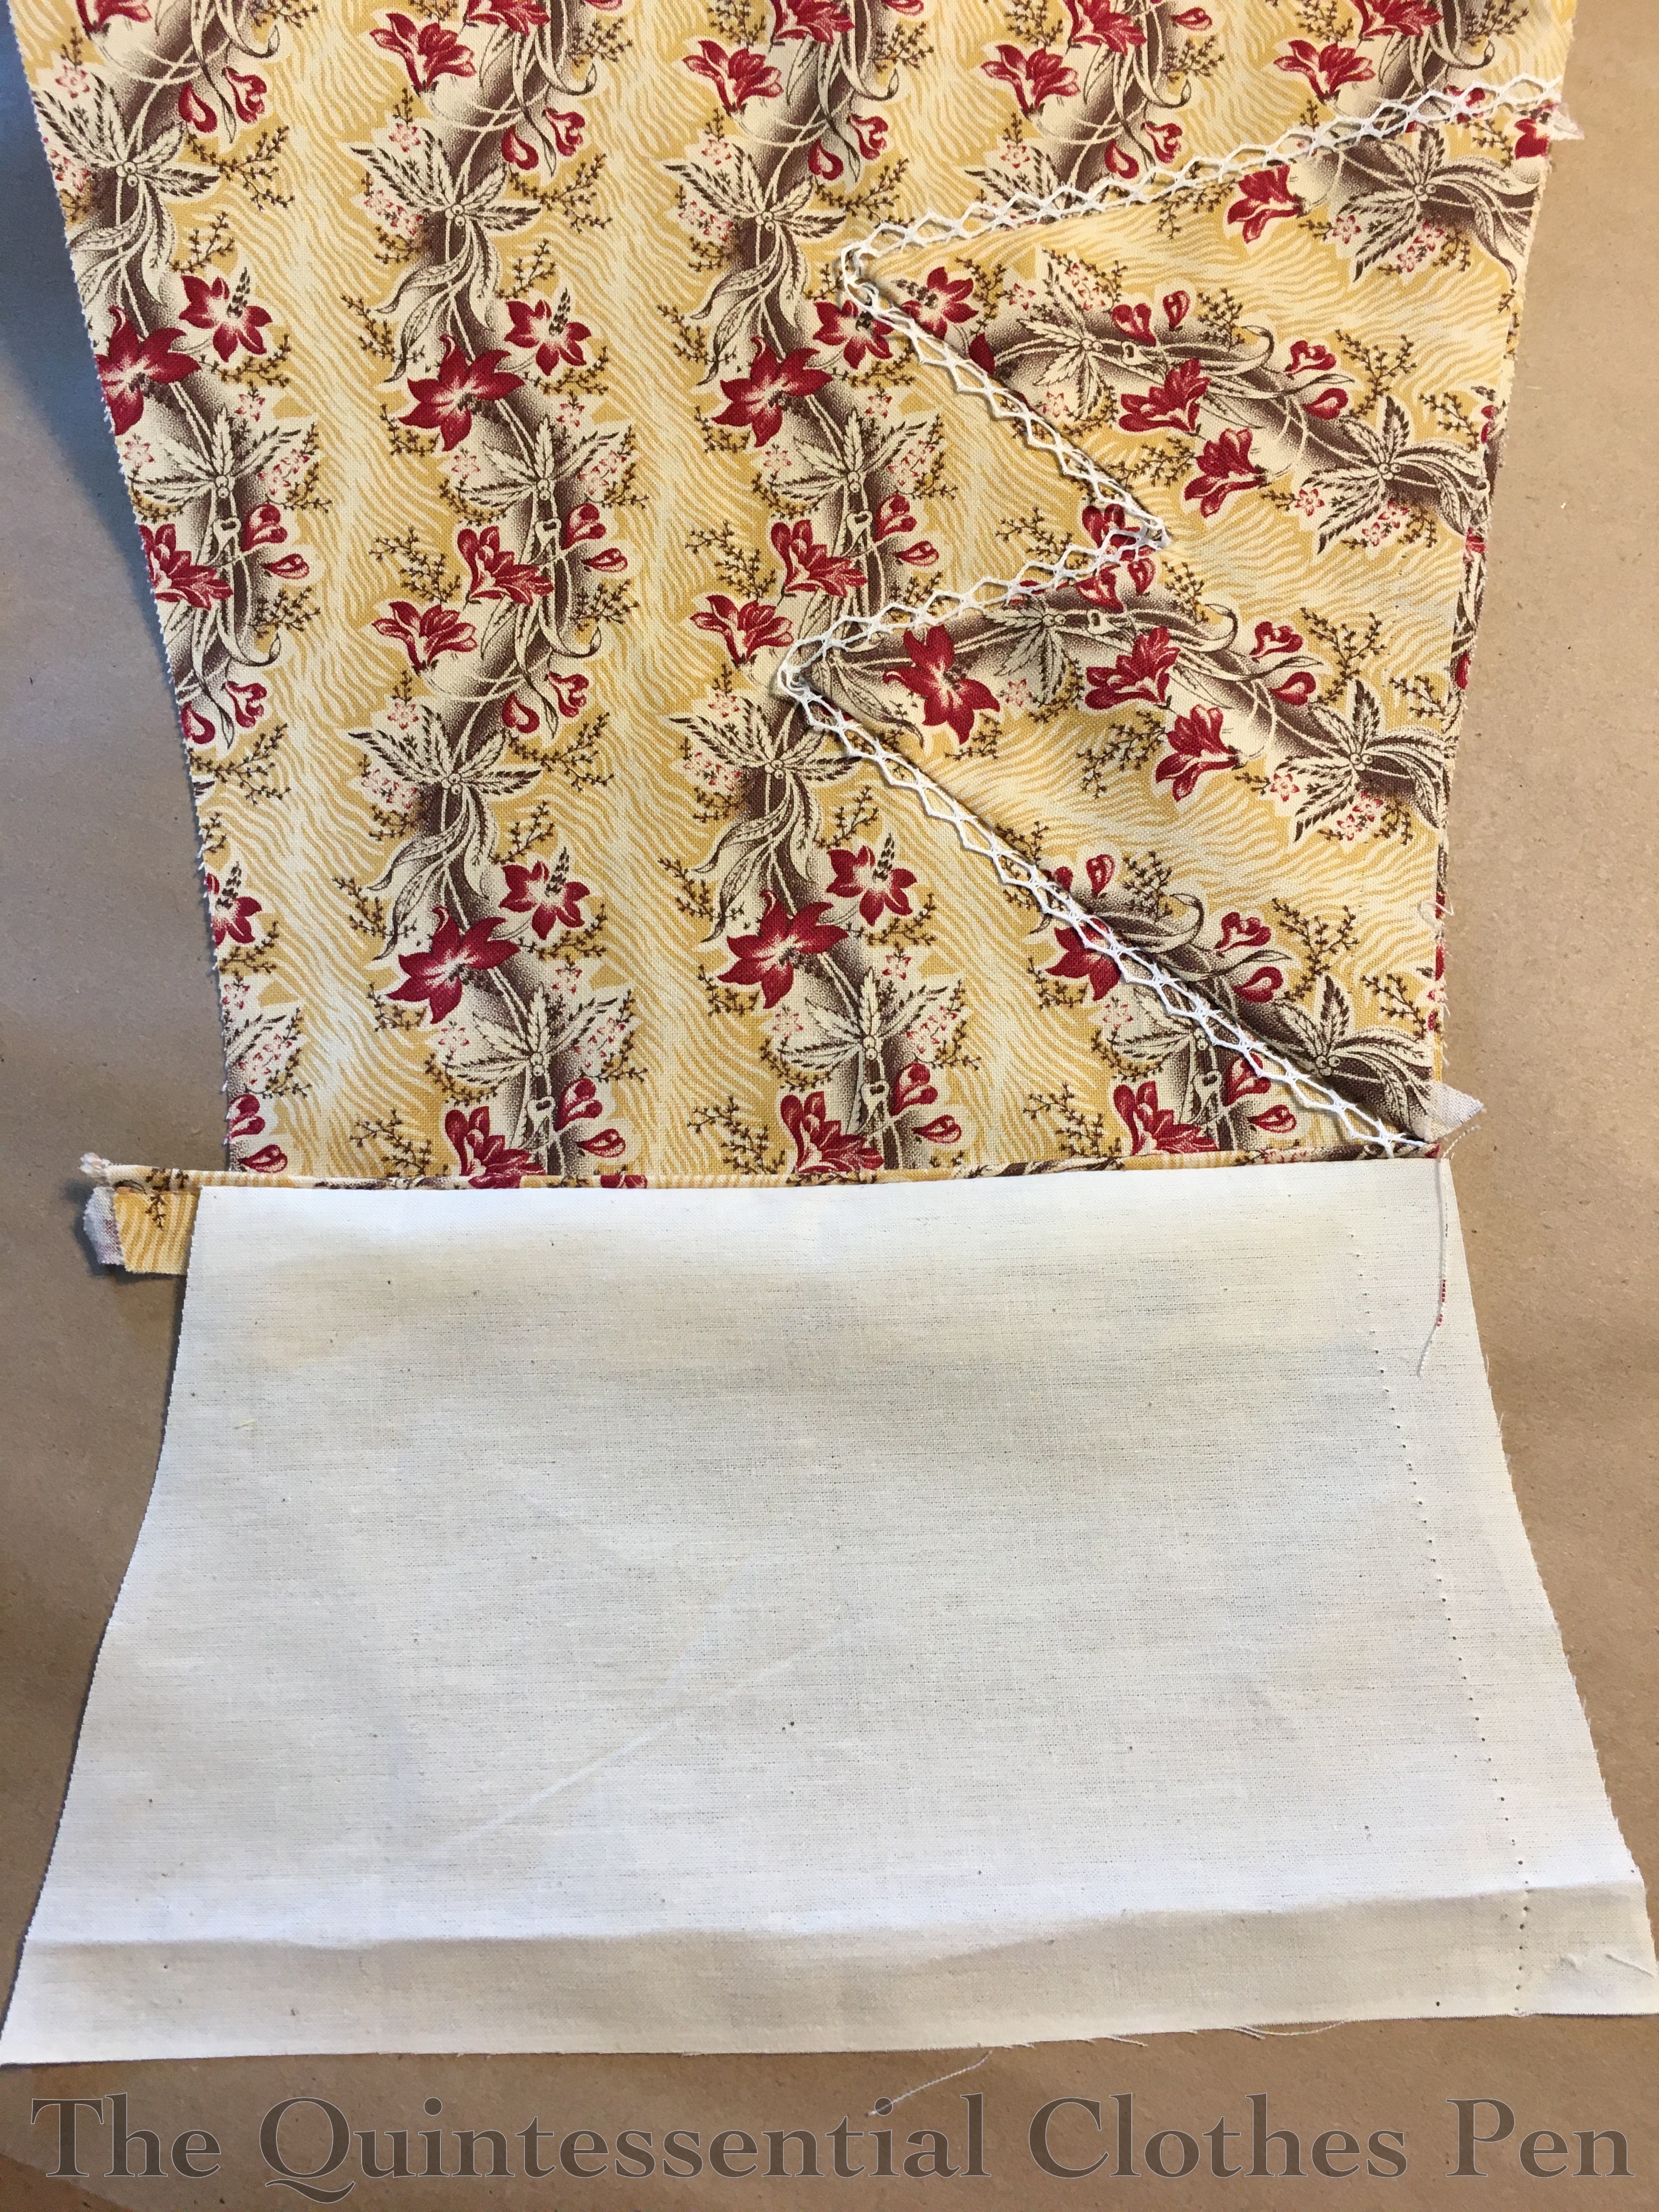
I edged my decorative mancheron and cuff zig zag with narrow lace before attaching them to my sleeve. The cuff zig zags are sewn on by hand, while the full tops of the sleeves are gathered and machine sewn to the mancherons (you can see a the seam allowance from this seam in the photo above).
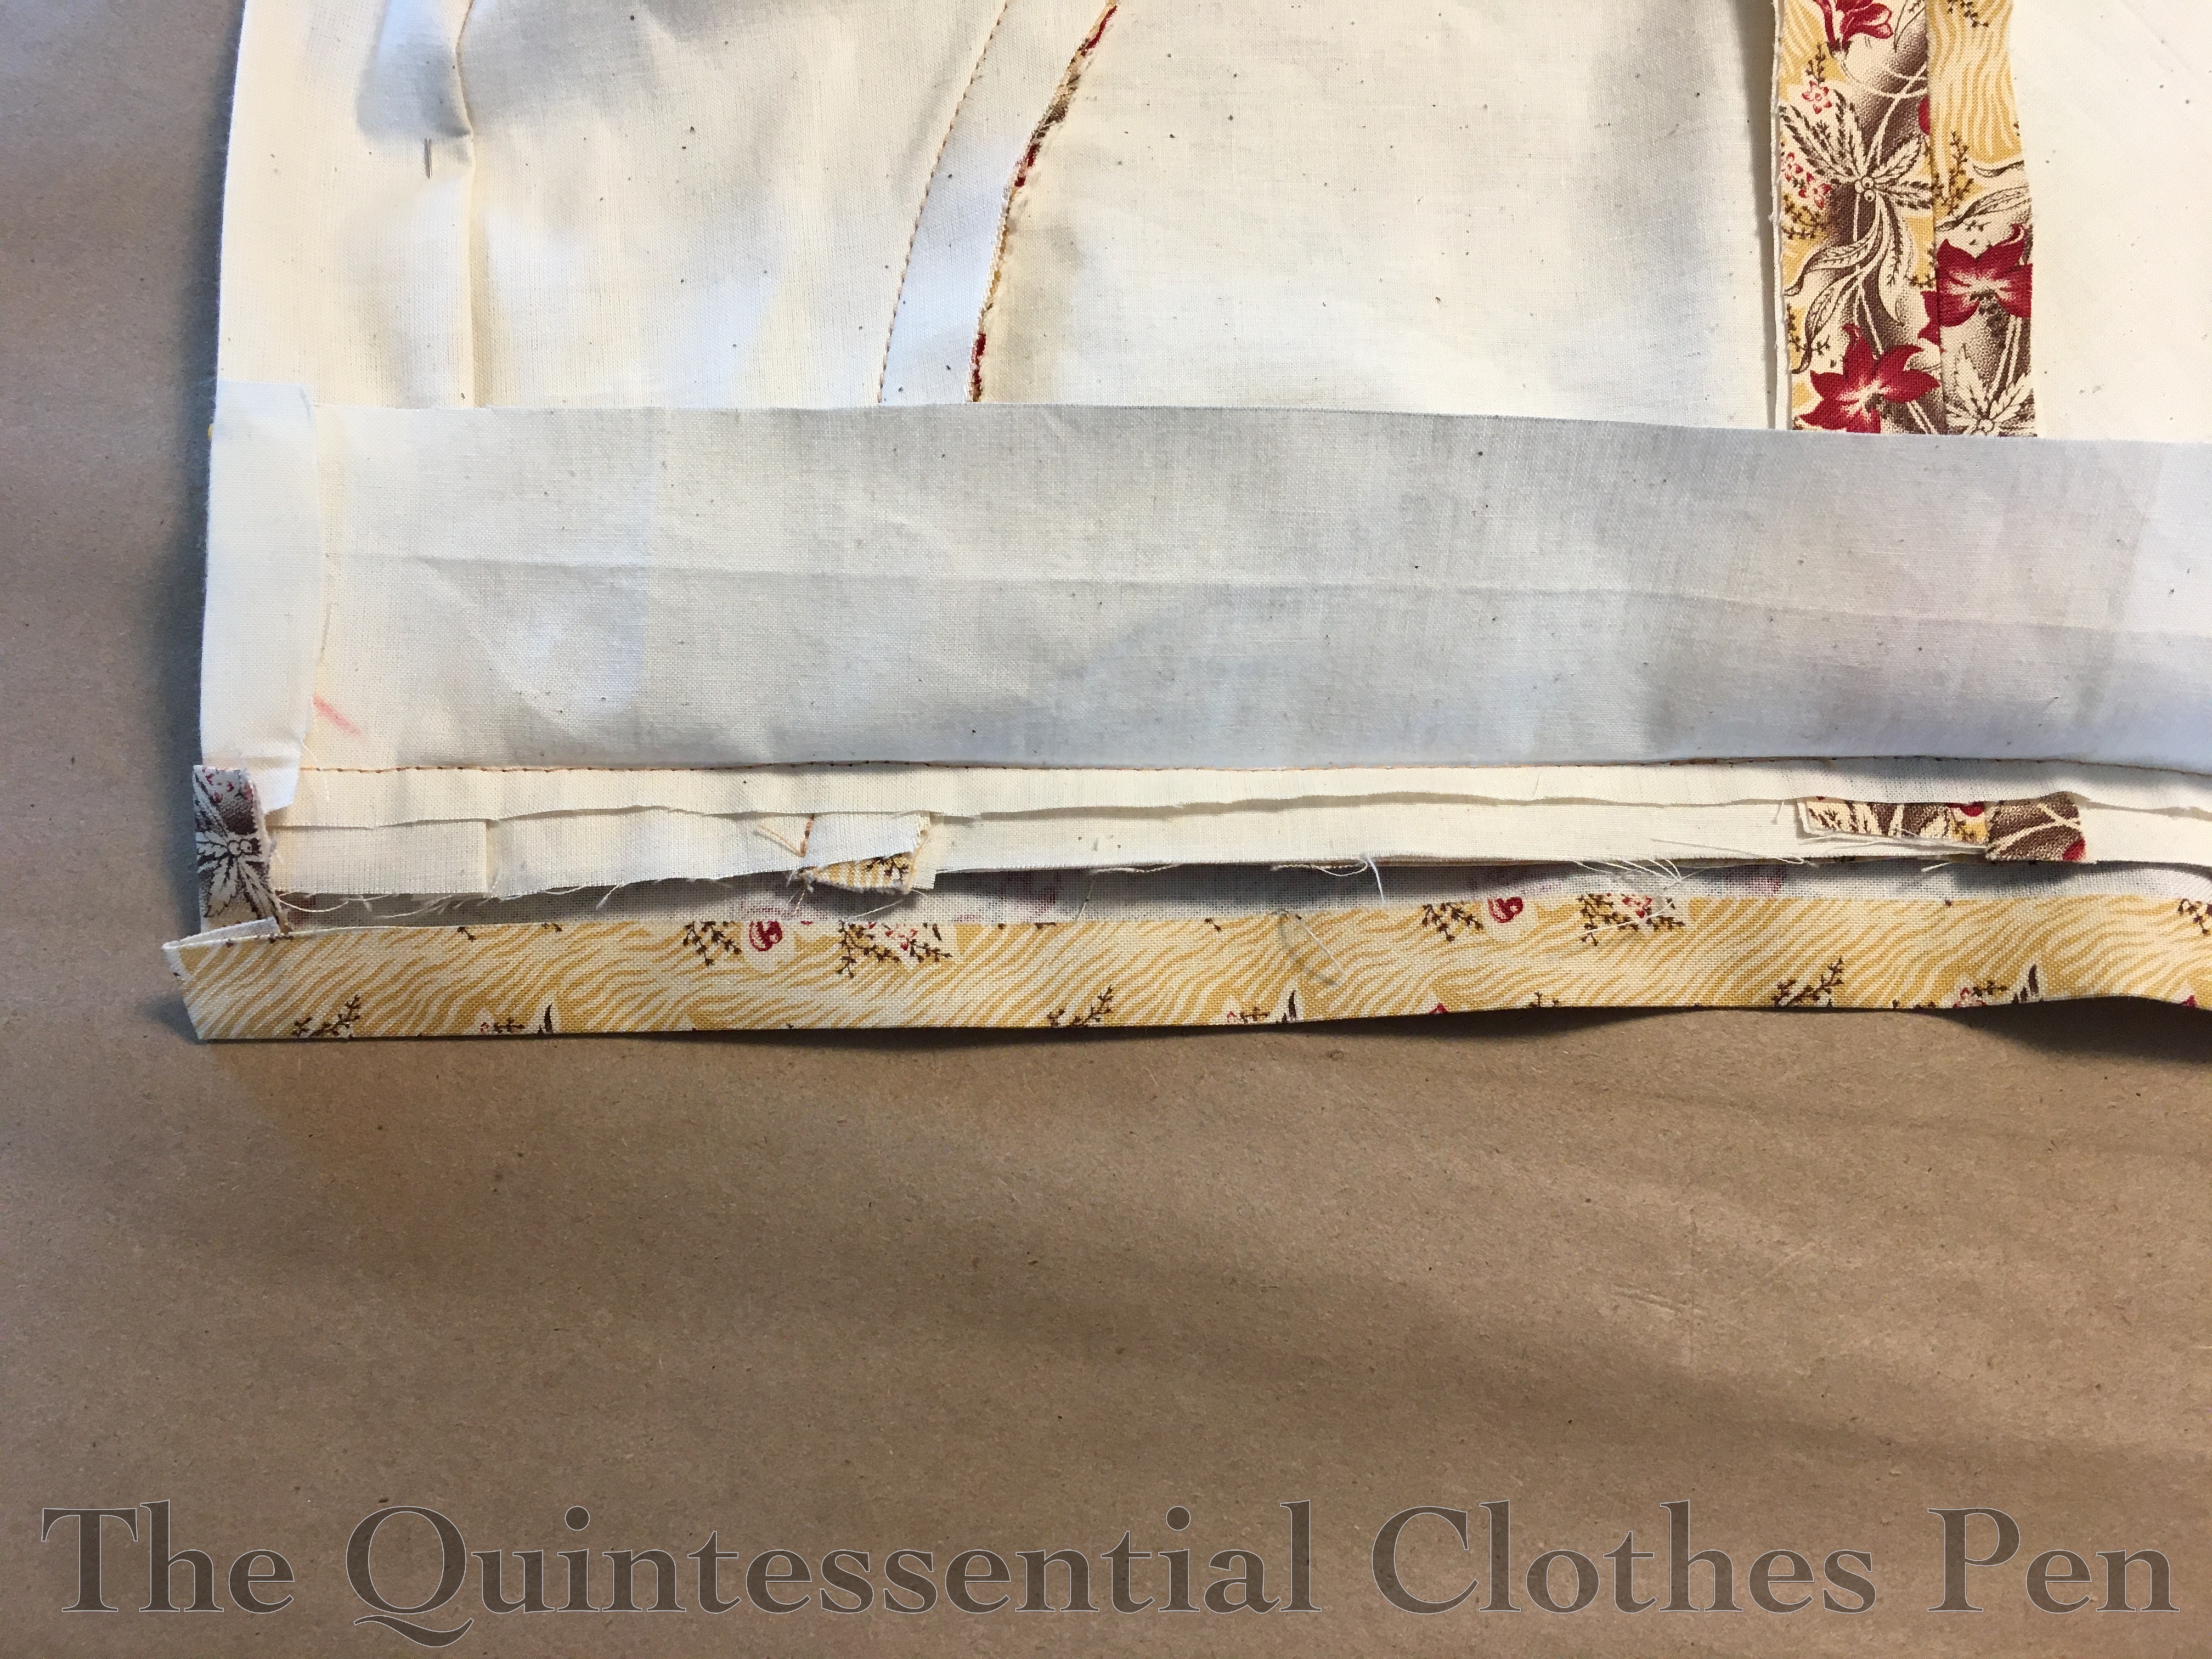
After the trim was added to the cuffs, I sewed cording to the bottom edge and then a muslin facing to finish everything off. This allows me to have nicely finished edges for the sleeve openings, which extend up about 8″ and allow for the tight fit of the forearms.
Here’s what that looks like flipped up and ready to be slip stitched along the top edge. You can see my hand sewing from attaching the cuff zig zag.
So… I got this far and realized that my sleeve was too narrow (even though I’d had no trouble in my mockup!) and my hand wouldn’t fit through the opening! Even if I made the opening higher, the sleeve edges wouldn’t butt, but would have a gap!
It’s good to have extra fabric… Having extra allowed me to make the decision to cut off the old forearm pieces and piece on new ones (with careful pattern matching, of course!). This meant redoing the cuff trim and finishing, but I couldn’t find a better solution. The seam hides under the crazy big sleeves, so it’s really not noticeable at all (even if I hadn’t pattern matched the seam!).
Finishing
Finally, after these various successes and challenges… the dress was done! Here are some more photos of it in its finished state.
This is the inside of the bodice with the skirt attached. You can see machine stitching, seam allowances mostly left unfinished (they really don’t fray at all), neck binding, closures, etc.
This closeup shows a shoulder seam, as well as the neckline and armhole finishing. The bias on the neck is turned under and whip stitched. The lace is sewn on top of that. The armhole seam allowances were trimmed and then roughly whip stitched to hold the layers together. You can also see a little square of the twill tape tie for the sleeve puff (it is sewn to the armsceye seam allowance below the shoulder seam).
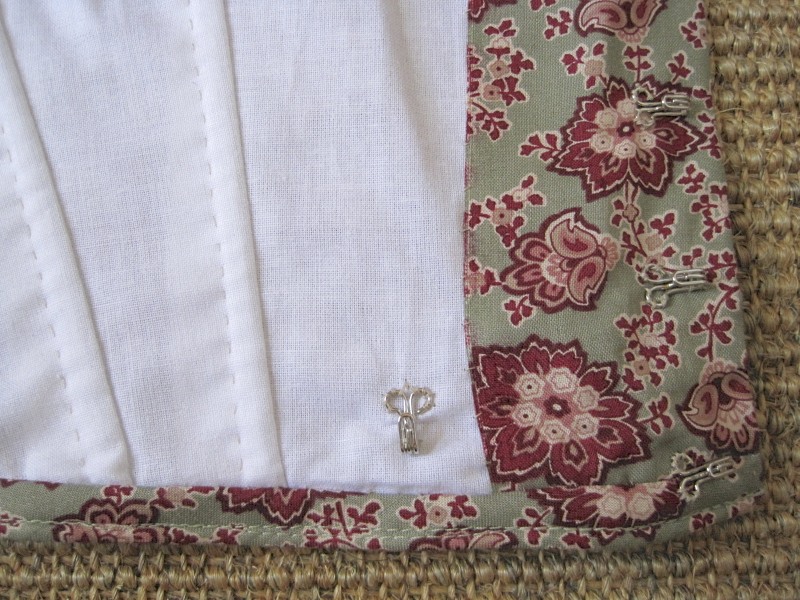
Here is the finished cuff opening. Hidden under the zig zag are the hooks that correspond to the loops on the muslin facing.
This is the center back opening with all of the closures in place. Those hooks really do camouflage well on the brown scroll, don’t they? Doing the closures this way leaves lots of seam allowance at center back for me to make alterations in the future if I need to.
This photo shows the inside of the skirt and bodice. Specifically, you can see the raw edge of the top edge skirt seam allowance folded to the inside (the skirt is intentionally shorter in the front than in the back, which you can see in the varied top edge seam allowanced length), the french seam of the pocket, and the skirt opening, which is simply an opening in the back seam (no placket on this skirt, the fullness of the cartridge pleats easily hides the opening).
One last photo! This is the cartridge pleats and bodice waistband from the exterior. Cartridge pleats are always visually intriguing to me and I also love how the waistband of the bodice is perfectly cut to show off the scroll and flower pattern.
After so many construction photos, here is a reminder of what the completed dress looks like from the exterior. I’m looking forward to sharing more photos in future posts!
Thanks for sticking with me through this very long post!
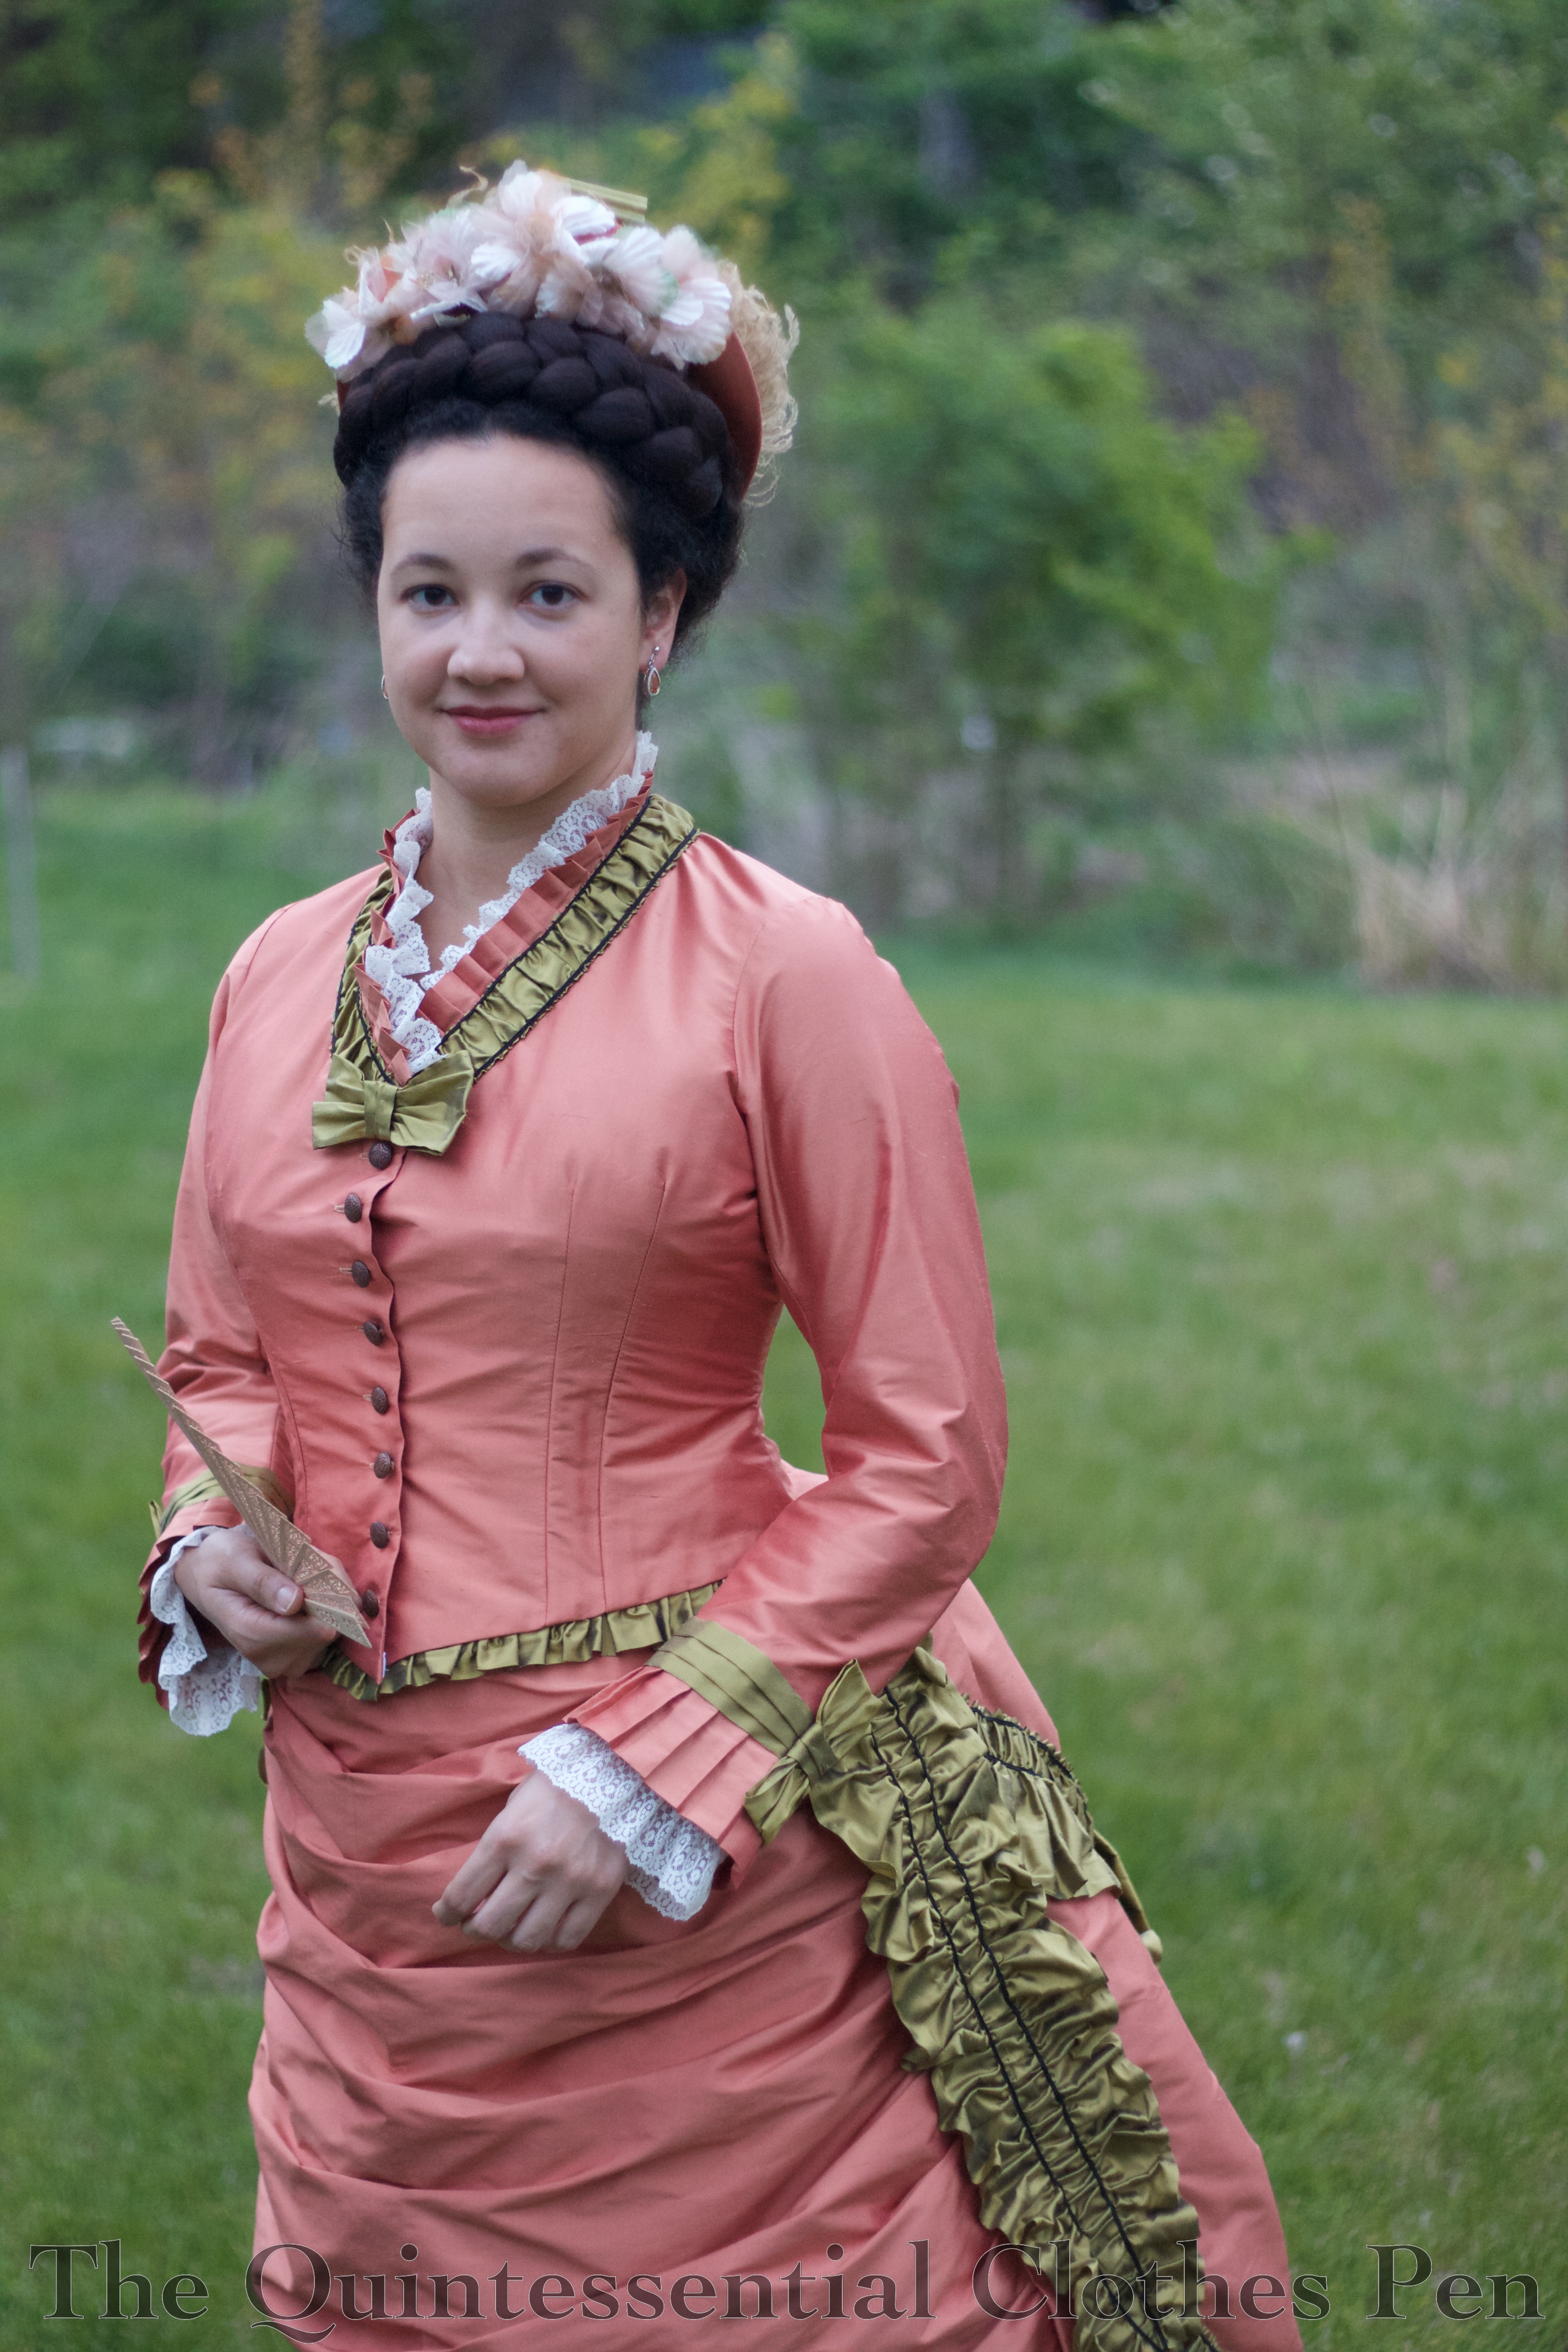
Recently, I’ve been hinting about my new 1875 reception dress. We’ve looked at the hat that I made to accompany it as well as how the hat was made. Now, I’d like to share focused details about the construction of the bodice of the dress.
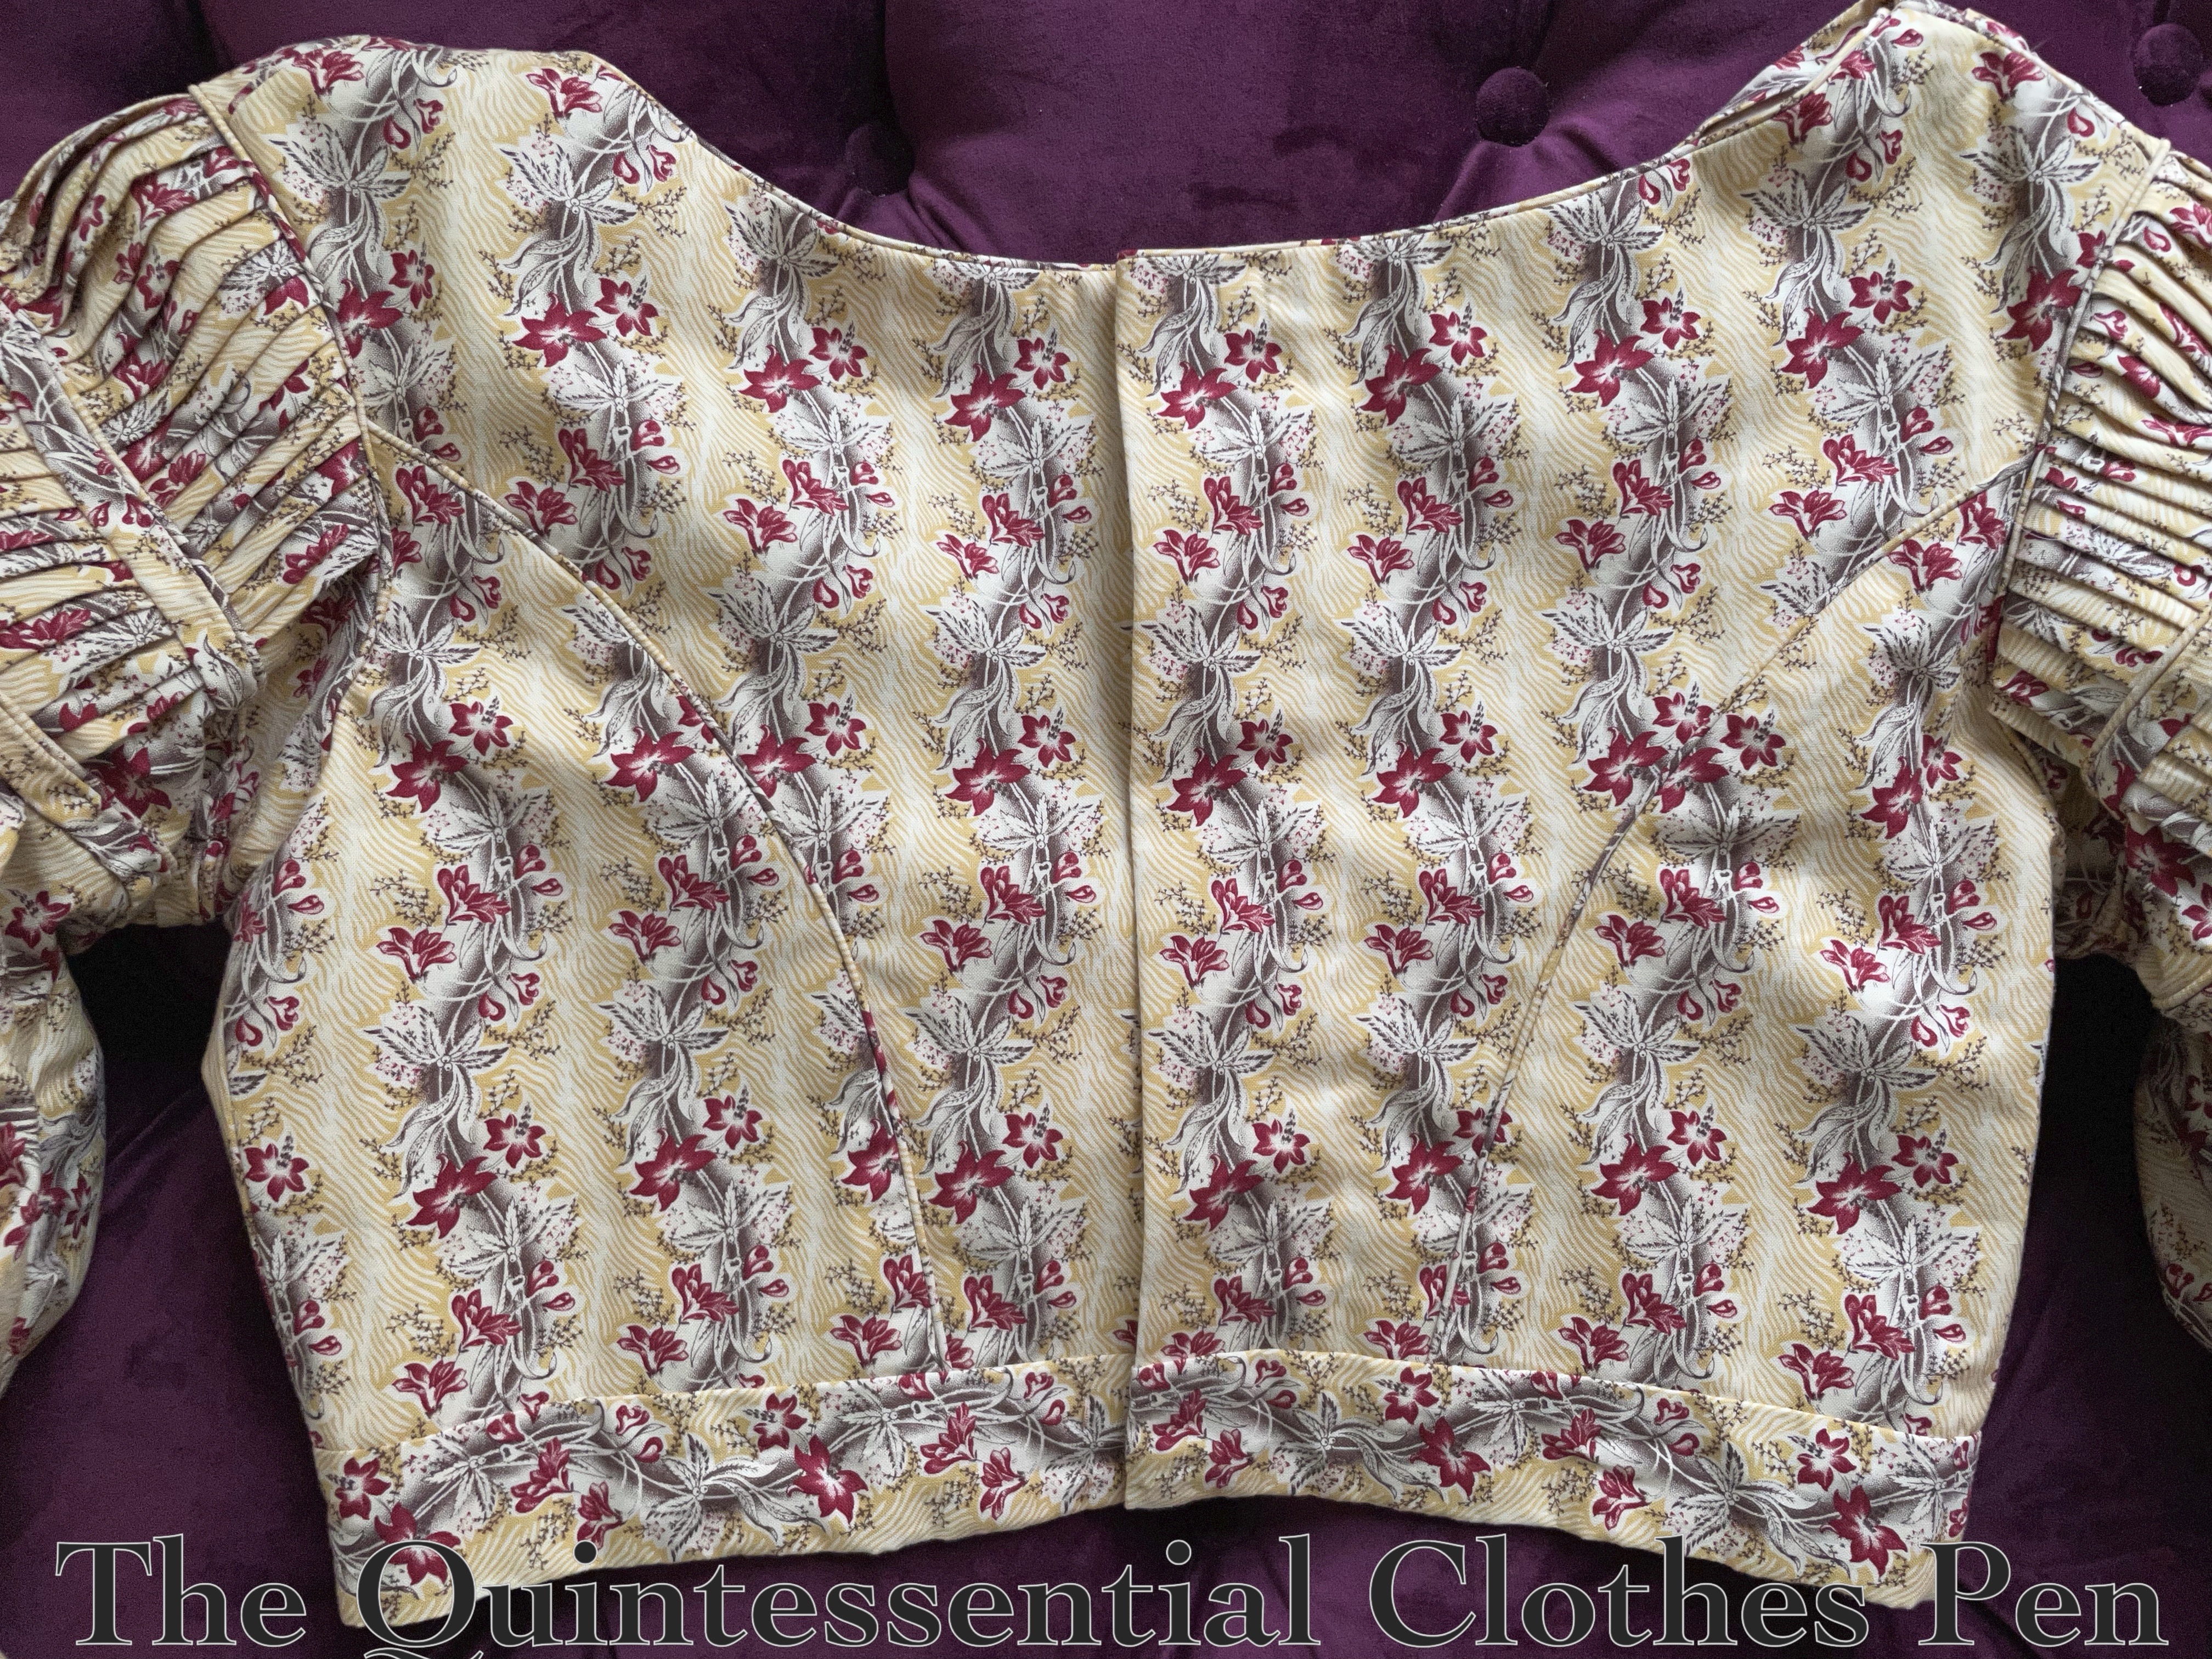
Here is the finished bodice!
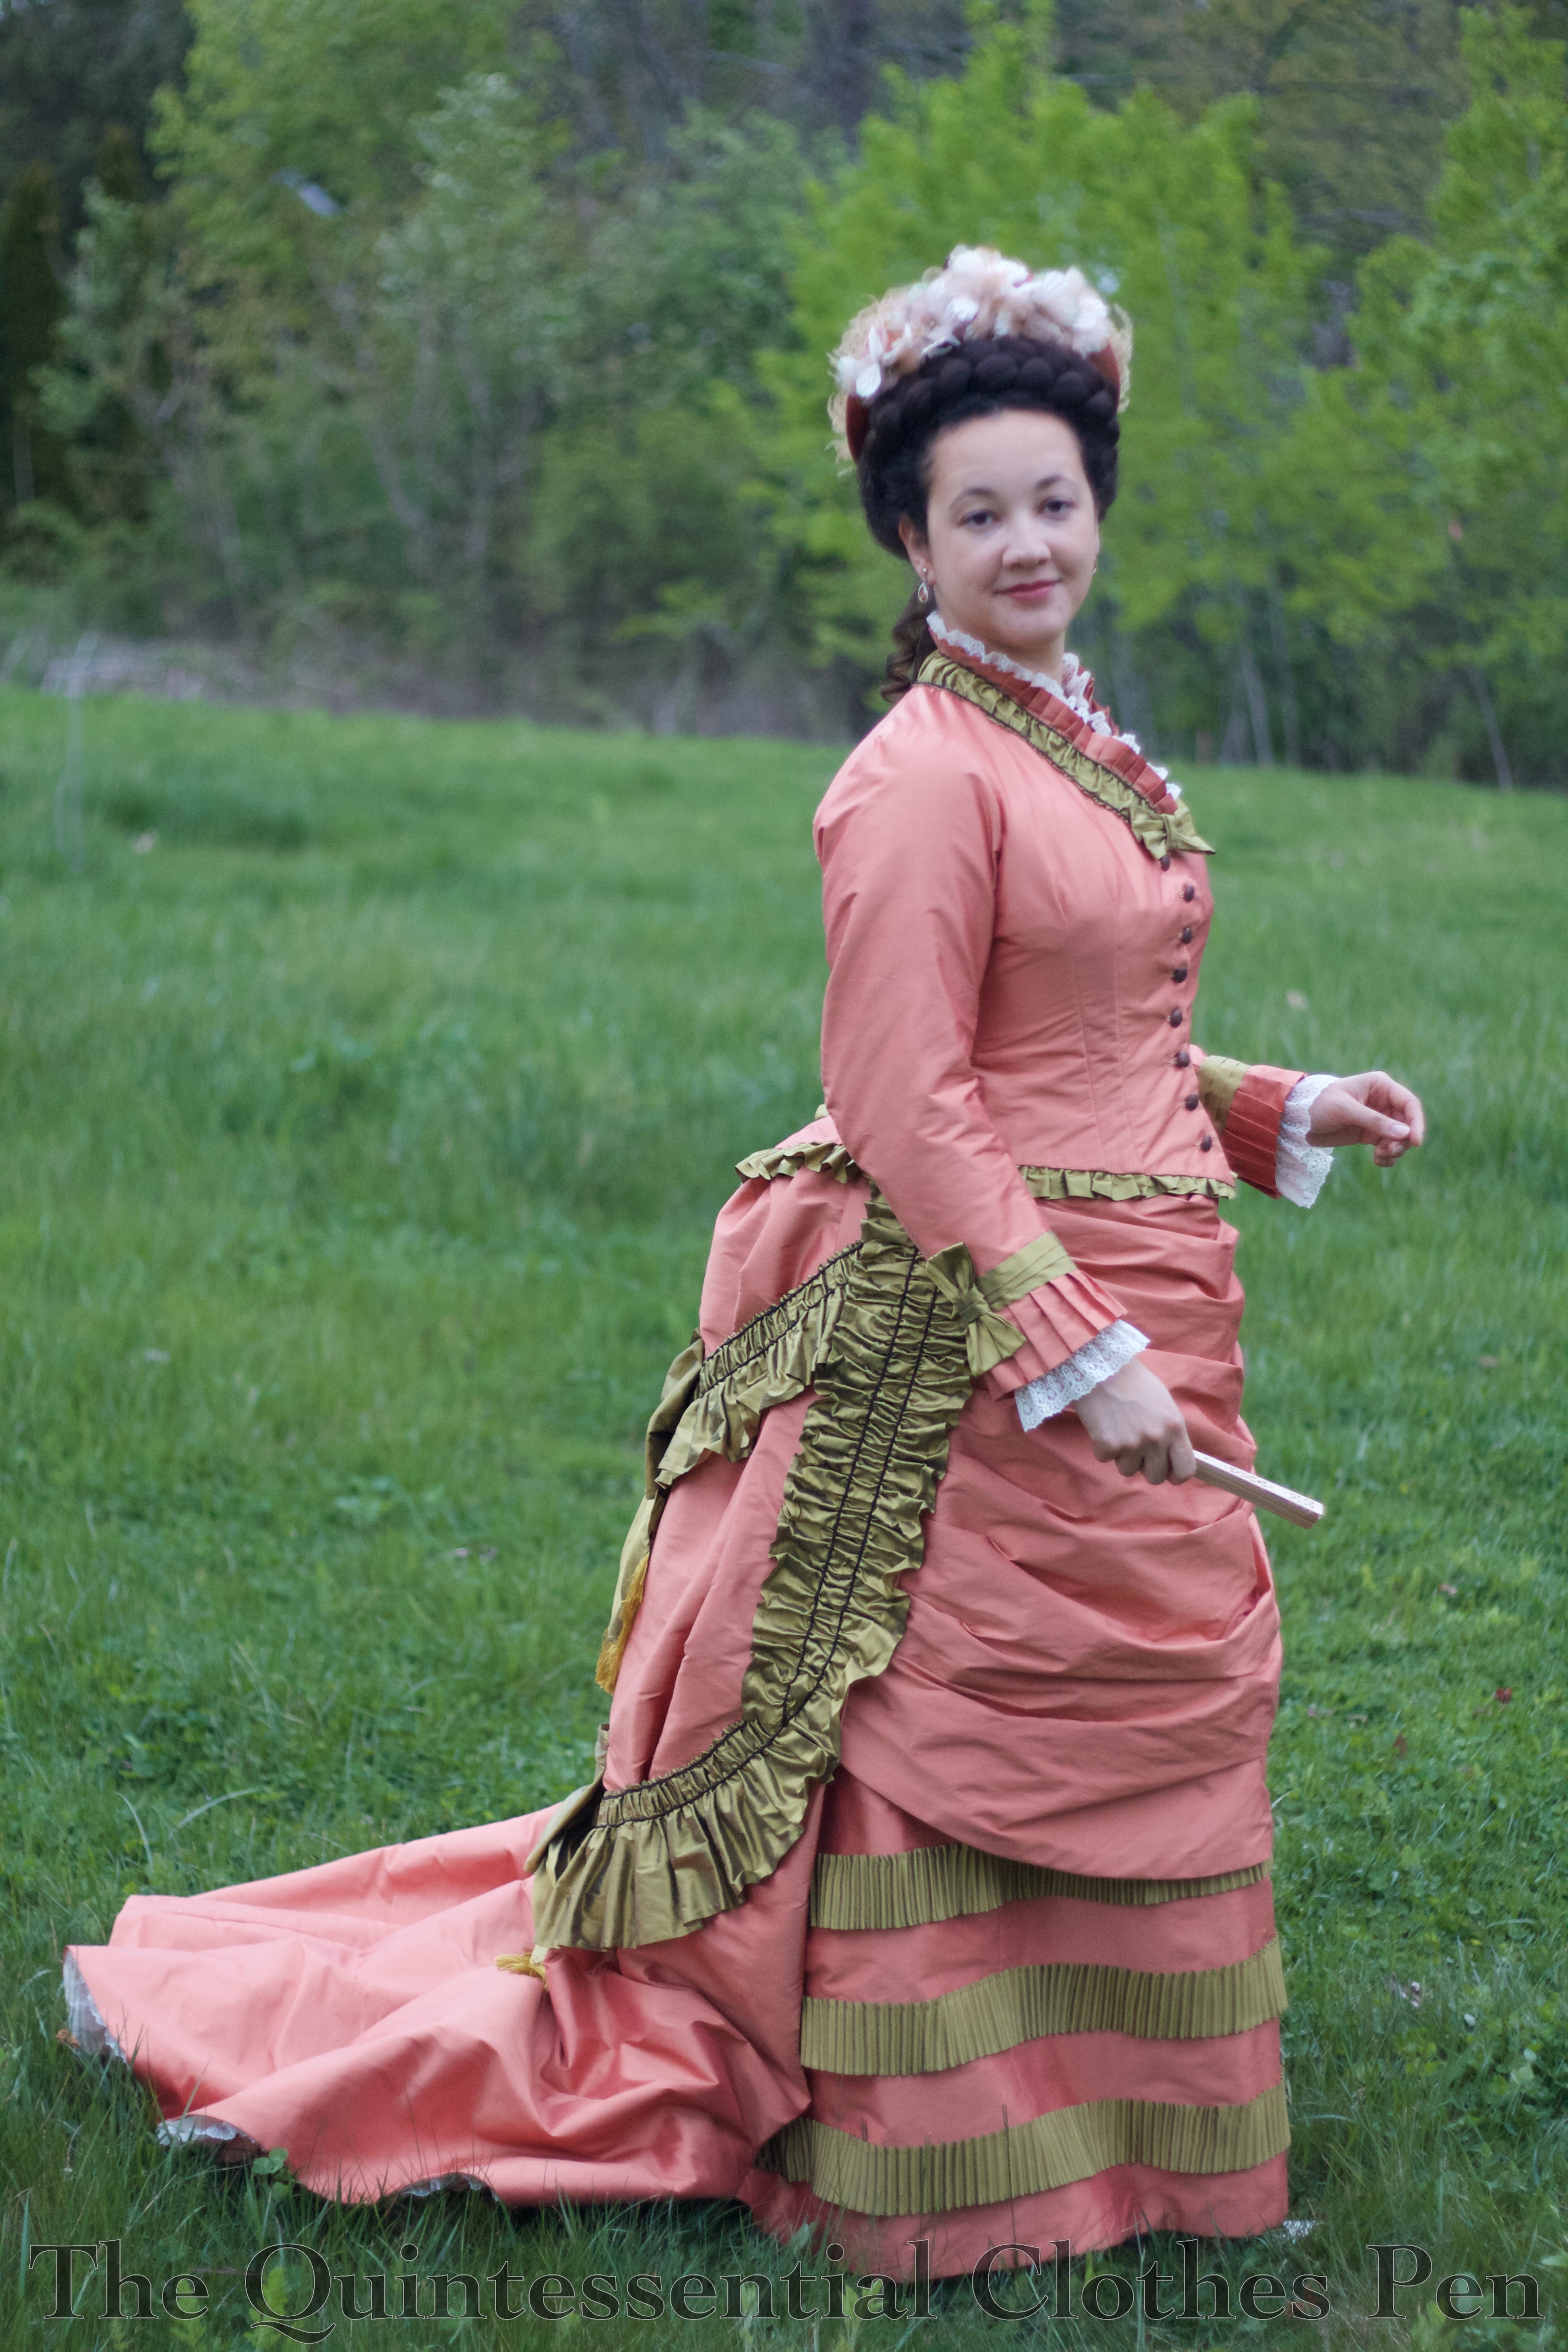
I did a lot of Pinterest scanning to choose a style for the dress (as one does, of course!). There are a number of dresses from 1875/76 that appeal to me, with their swags of fabric, elaborate trimmings, and sweeping trains, but I decided on the fashion plate below partly because I had fabrics in my stash that I thought would work in terms of yardage as well as complementing each other in terms of colors.
If you’re looking carefully, I imagine you’ll notice pretty quickly that my finished bodice does not have the pleated sleeve trim and large cuff shown in the fashion plate. I ran out of fabric! Oops. So I decided to eliminate these details and focus on all the other trimmings on the dress. For example, if you look at the neckline and hem of the finished bodice you will notice that those two edges have similar treatments as in the fashion plate. However, not using the sleeve style in the inspiration fashion plate left me with a style decision to make. How to trim, or finish, the sleeves? Back to Pinterest!
I settled on the sleeve style of the fabulous burgundy and tan dress on the right. This would use less fabric but maintain a similar feeling as other parts of the dress.
Revue de la Mode, c. 1875
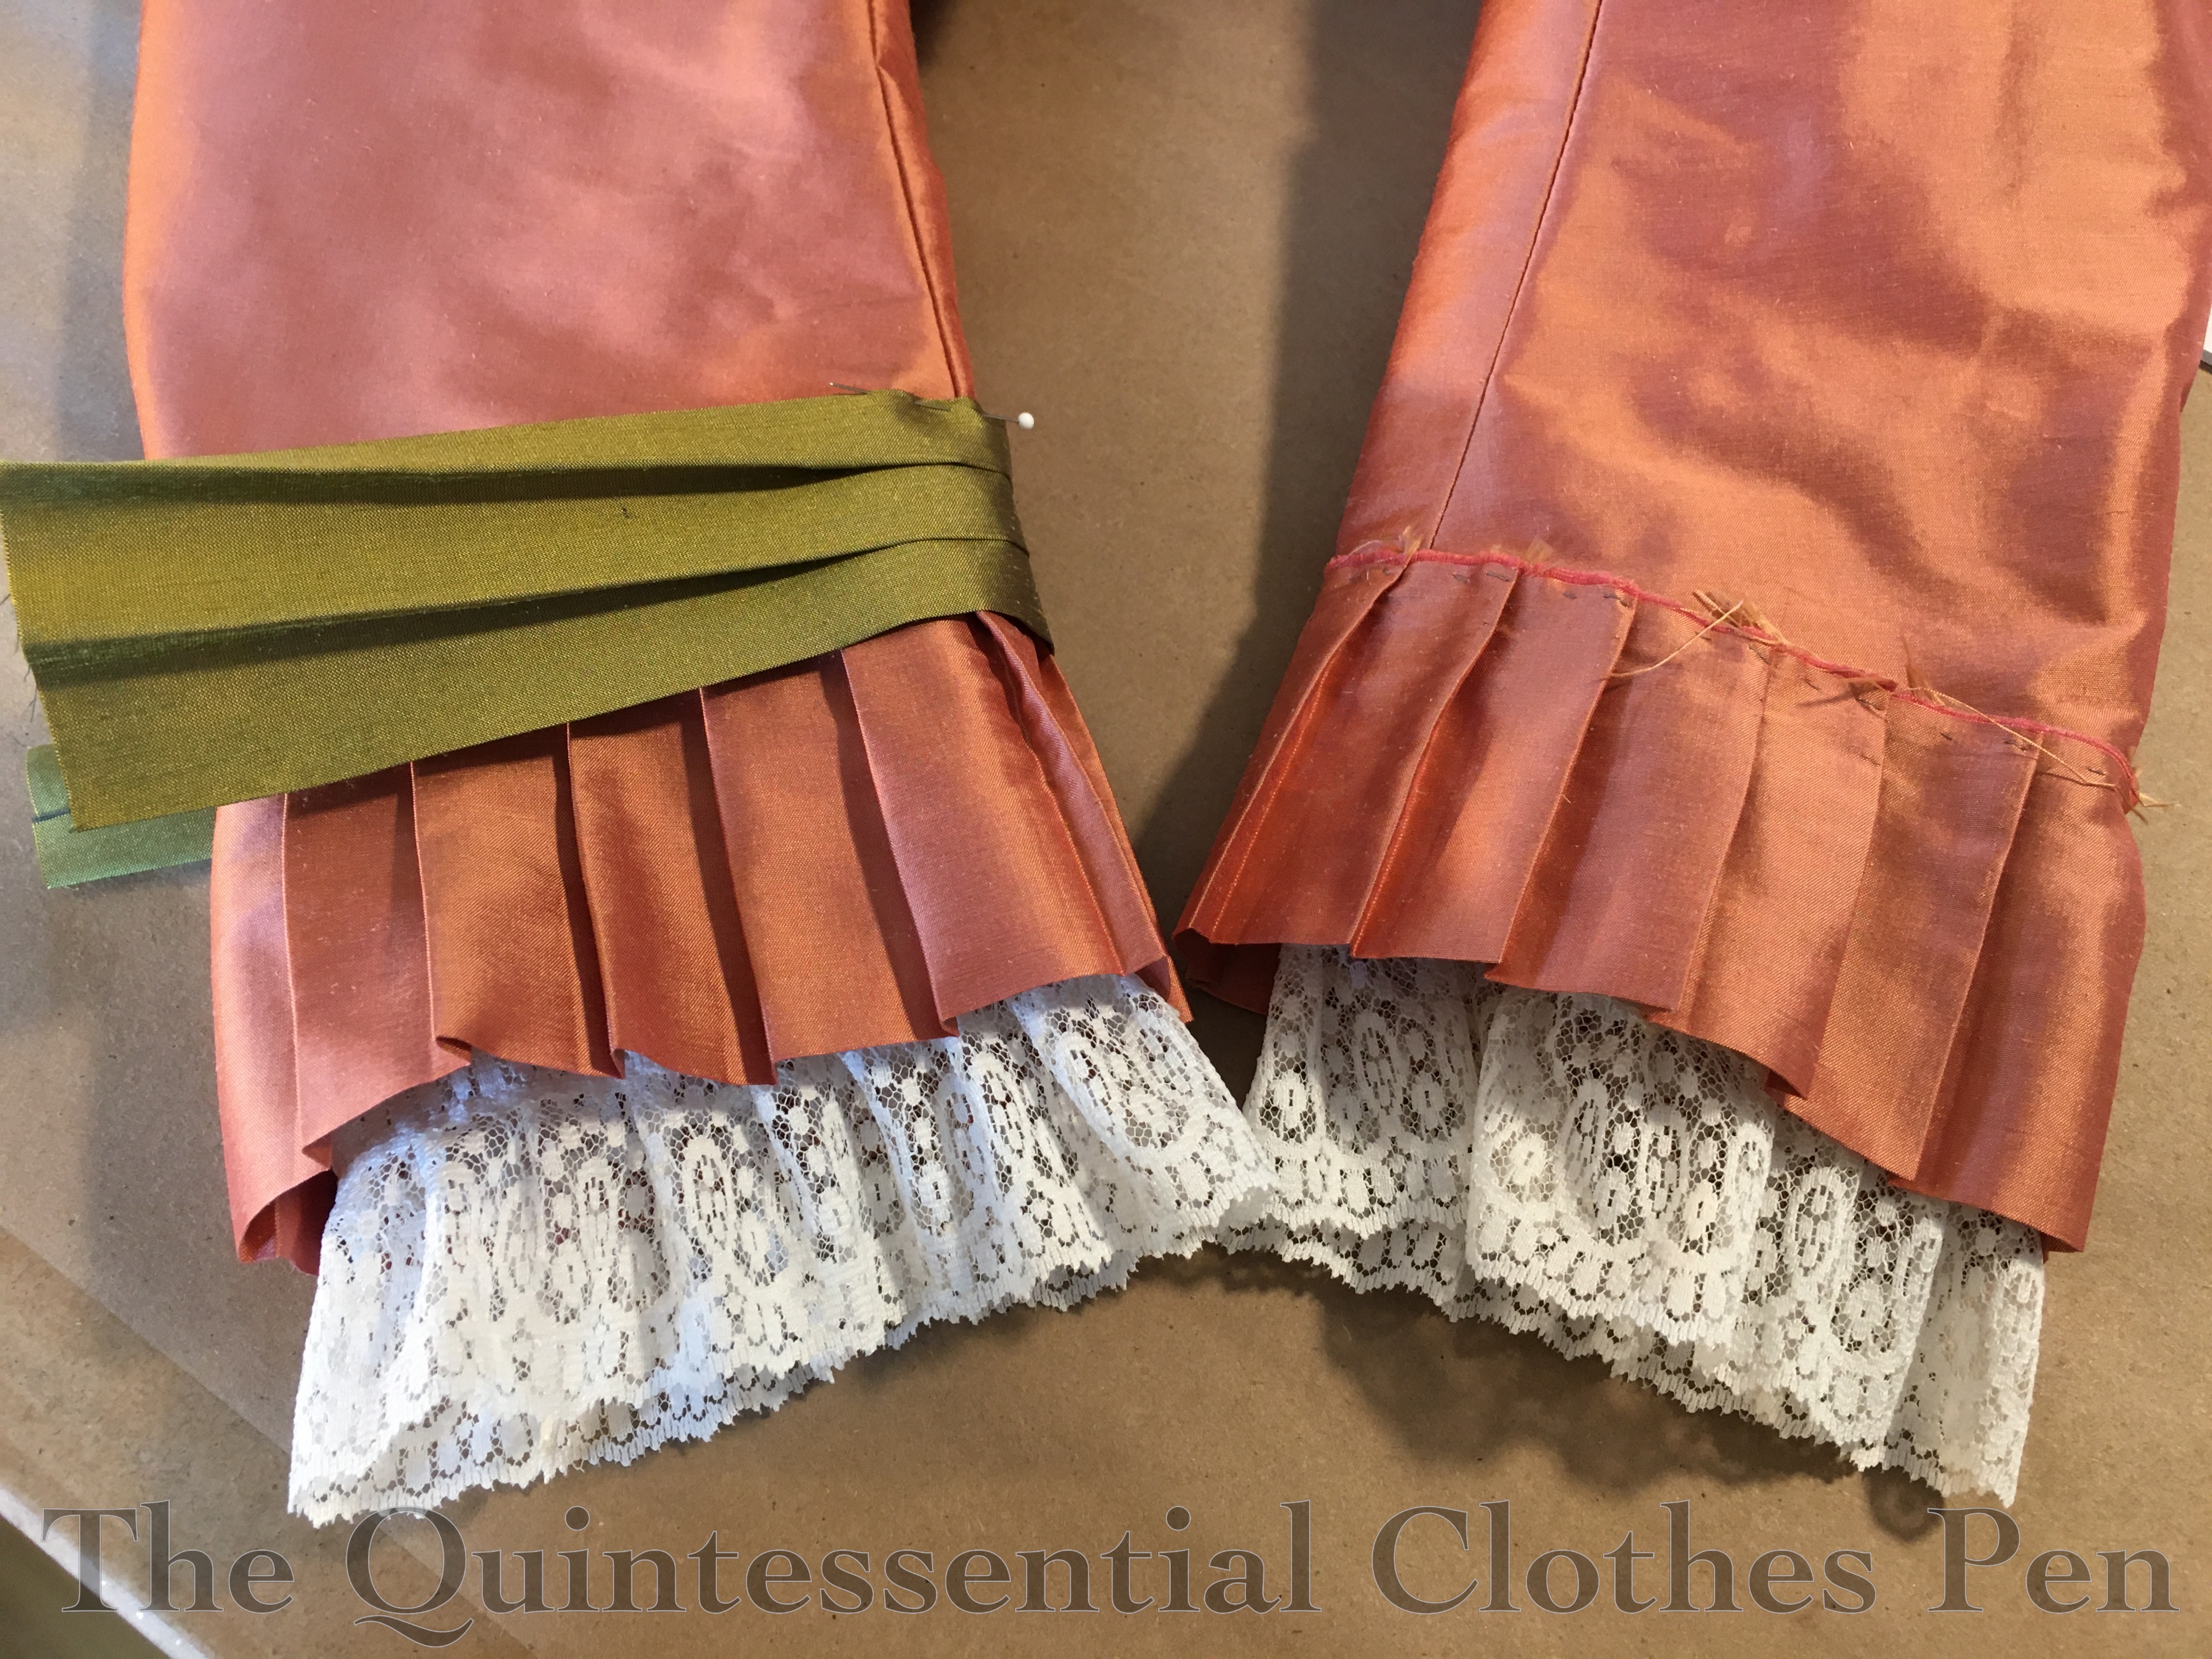
Below are my partially finished sleeves.
I started by cutting them off at a length that made sense with the addition of the pleats and hemming them. The pleats are pressed in the center so that no hemming is needed and the top edges are left raw. These raw edges are then covered by the green pleated bands. The lace is actually two rows of lace (to make the lace twice as wide) that are gathered and then sewn into sleeves. The final step that you can’t see here is a green bow to finish off the back sleeve seam area. The bow covers the raw edges of the green pleated band.
The bodice pieces of silk are flat lined with muslin. The seam allowances are whip stitched to keep them tidy. The bottom edge of the bodice is finished with self bias. The bodice is boned–at the point of this photo only the center back seam has a bone stitched in.
In addition to the center back, I added bones to the side back seams as well. I also added a waist stay. That is the grosgrain ribbon that is stitched to the boning channels. This helps to keep the bodice anchored around the waist if I raise my arms and to keep the back tight against my body. It also takes some strain off of the buttons.
At this point you can also see the green ruffle has been added to the bottom of the bodice. Like the pleats on the sleeves, the ruffle is pressed in half so that no hemming is needed. The top raw edge is hidden by the twill tape.
Here’s another view of the inside of the bodice that shows the green ruffle a little bit more. It also shows the bones on the side seams and a hint of the lace around the neck opening, the edge of which is also covered with ribbon–in this case, petersham. I found the lace too scratchy against my neck on it’s own, even though it feels relatively soft against my hand.
The photo below also shows the bust pads. These are graduated crescents of batting that are stitched together and then covered with cotton. They help to fill out the area just in front of the arm, which often has a natural dip without assistance of this sort. Filling the dip in creates a fashionable rounded shape. Adding the pads is an experiment I was trying out. (Here is an example of a c. 1885 extant dress that has bust pads.)
Here’s an up close shot of the seam allowances of the bodice, also showing the lace and petersham around the neck a little more. You can just barely see the armsceye seam allowances, which are trimmed and whip stitched to keep them tidy.
Finally, here is a view of the front of the bodice in a half finished state.
The two front darts have boning channels stitched into them. All of the ‘bones’ in this bodice are plastic zip ties. The front zip ties are split in half to make them narrower.
This photo also shows the pleats around the neck opening (finished as with the sleeves and bottom ruffle). There are facings on the front edges. This photo was taken before I stitched the buttonholes. They were eventually machine sewn.
After all the internal construction was complete, I added the buttons (they are rubbed bronze looking plastic shank buttons) and the green trim around the neck. The neck trim is a strip of silk that has the long edges pressed under and gathered. The long edges are tacked to the neckline and then black soutache is sewn on top to cover the machine stitching lines. The finishing touch is the bow at center front.
Ta da! Next time, I’ll do an in depth post about the skirt construction, including back views that show off the giant bows, which are probably my favorite part of the skirt.
DONE! I am so glad to be done. I’m also excited to have a new dress (and, despite the challenges and worries along the way, one I like the look of! YAY!).
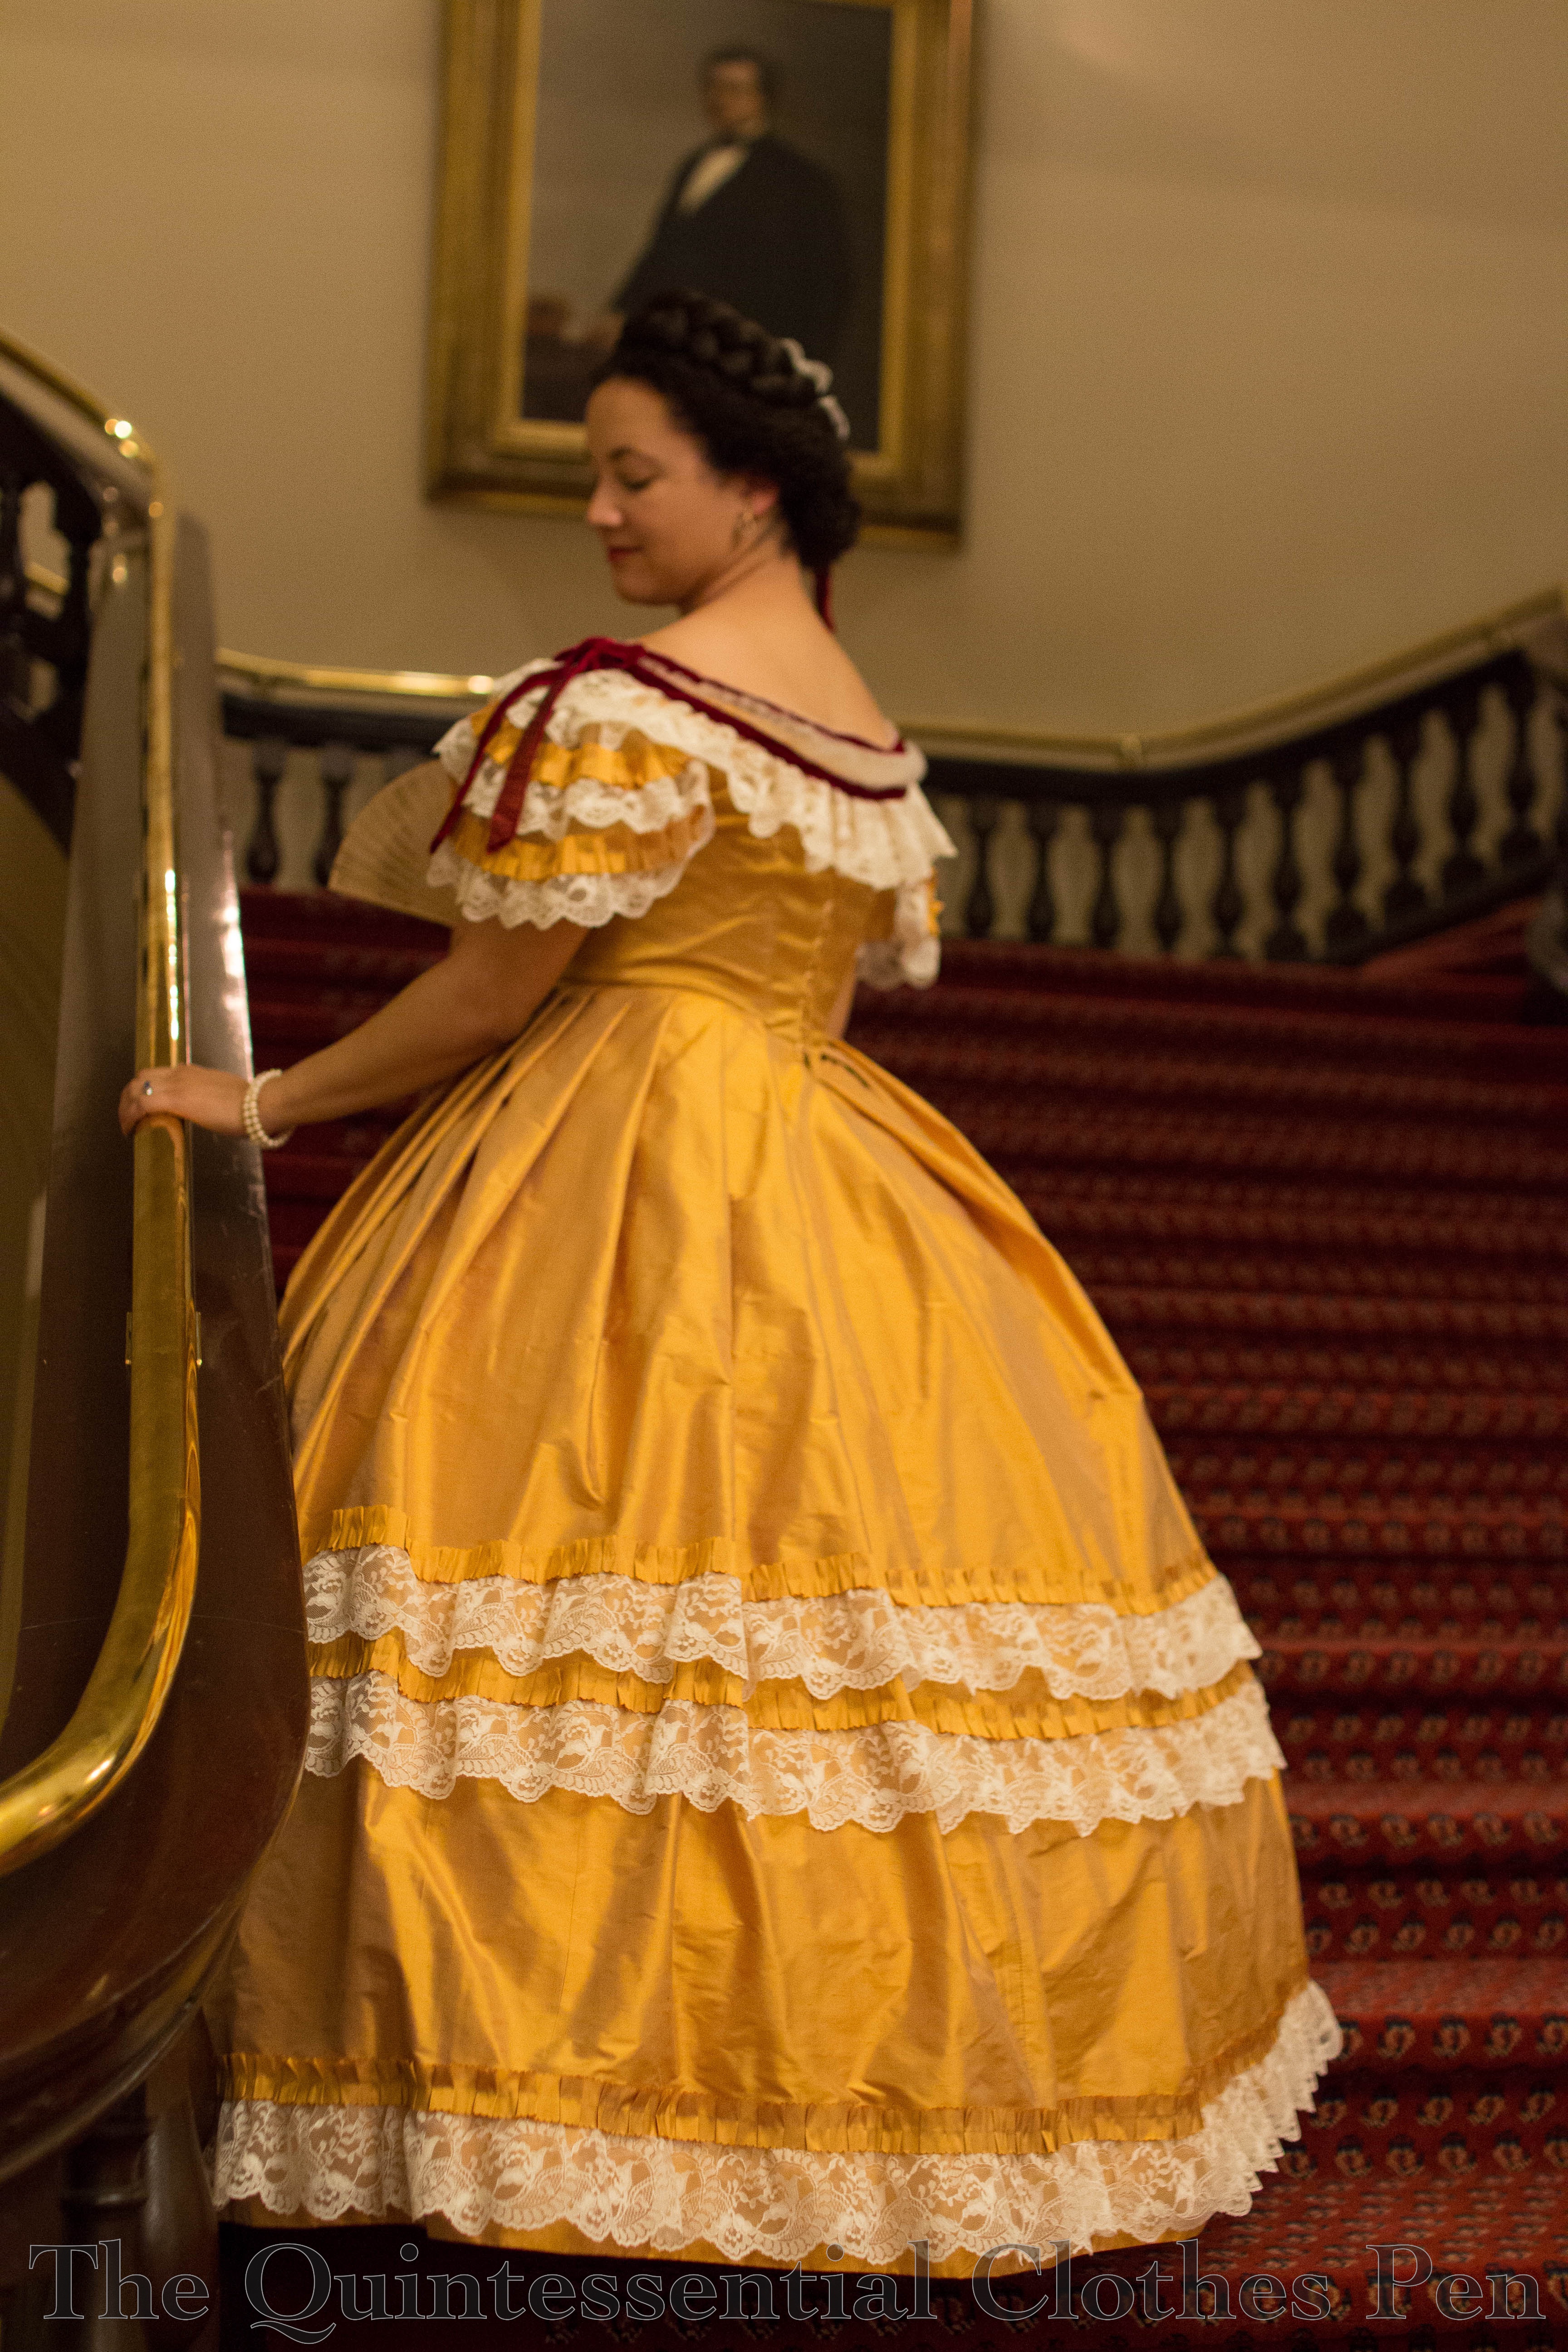
I’ve kept you waiting to see photos of the finished dress. Life got a bit busy after the ball and then I wanted to share my final sewing details with you. But now it’s time to introduce you to Genevieve, my 1863 Apricot Evening Gown, also known as the Orange Monster for the last few months. Here she is!
I’m excited that this dress qualifies for the October HSM challenge.
Details: Sometimes the little things really make something fabulous. Focus on the details of your garment, to create something that just gets better the closer you look.
This dress is definitely one of those garments! I’ll explain and show you lots of reasons why in these finished photos, but there are currently seven other posts in this series sharing tons of details about the planning, patterning, sewing, and trimming process as well.
First, the facts:
Fabric: 6 ⅔ yards of apricot silk, ½ yard of dark red silk velvet, approximately ½ yard of ivory tulle, muslin scraps for hem facing, a scrap of canvas for stiffening the waistband, and about ½ yard of drab cotton for flat lining.
Notions: 25 yards of 3 ¾” lace, 2 brooches, 3 yards of ⅜” polyester ribbon, a few plastic cable ties, about 1 yard of bone casing, a variety of hooks and bars, and thread.
How historically accurate is it?: 95%. A few substitutions of modern materials exist but aside from that it’s pretty much as close as I can get.
Hours to complete: 57.
First worn: September 28, 2019.
Total cost: $112.78
The cost breakdown is as follows: $66 for the silk (local discount store in 2016), $12.50 for the velvet (WM Booth Draper in 2011), ~$2 for the tulle (local discount store in 2011),~$1 for the drab cotton (local discount store in 2018), ~$15 for the lace (Debs Lace and Trims in 2019), $6.28 for the brooches (Etsy in 2019), ~$6 for the ribbon (Farmhouse Fabrics in 2019), and we’ll say $4 for the scraps and other notions since they’re from the stash, reused from other projects/mockups, or used in very small quantities.)
Visible details, you ask? Well, in addition to sharing so many other details along the way, the finished dress has many visible layers of details. The most time consuming detail is the hand sewn 3 tiers of lace ruffle/silk scalloped & pleated trim around the skirt. This detail alone took 17.5 hours. There is a whole post dedicated to this aspect and the details that went into it.
That form of decoration is continued on the bodice sleeve caps. Here’s a closeup where you can see the pleated silk. It is meticulously hand stitched with tiny stitches everywhere it is used.
Another layer of detail is the bertha and sleeve caps. Those have tulle, gathered tulle, and lots of velvet details. My last post explains how these are made.
I found the sleeve caps to be rather unusual amongst dresses from this period, so I was pleased to find this fashion plate which has a similar look.
(This next one is a great ‘I’m plopped and tired of standing’ photo!)
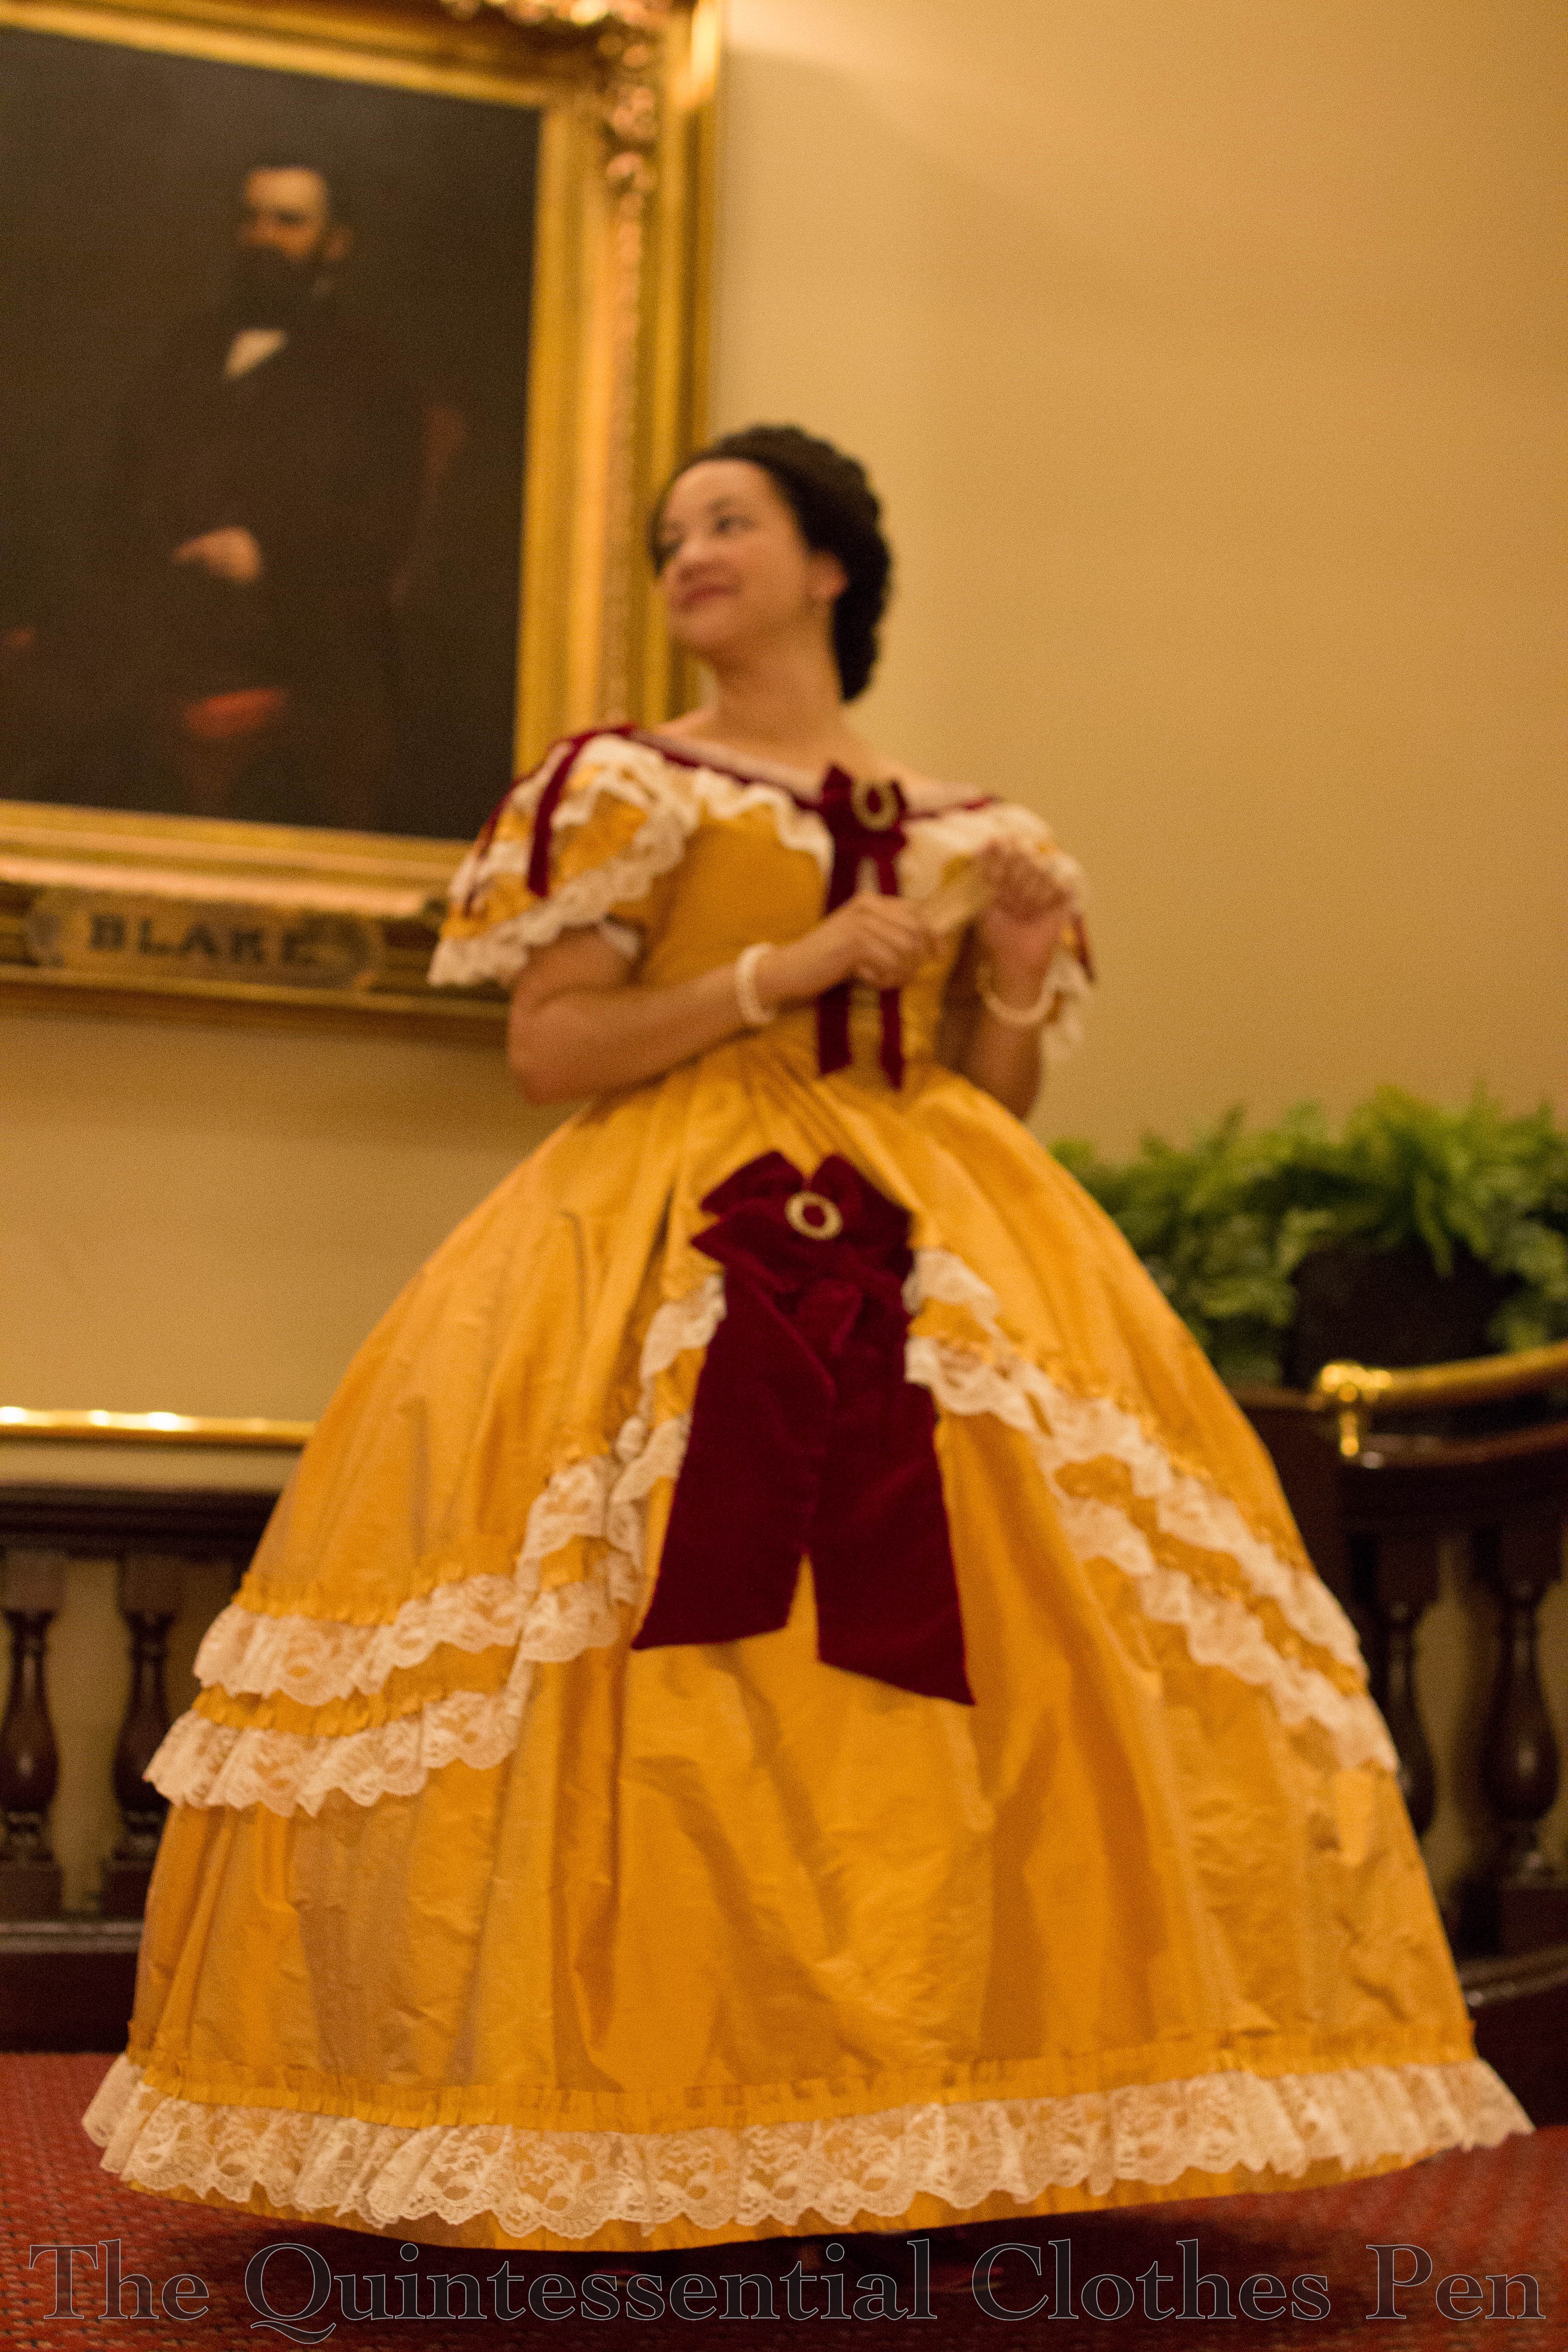
And as for details, let’s not forget the velvet bows in addition the velvet trim. Especially that oversized skirt bow! I also spent quite a bit of time looking for the gold brooches to go on the velvet bows.
Aside from the photo above I don’t have many directly front facing photos of this dress–I guess I did a lot of my posing at an angle–but here is one that is slightly less angled and gives the full effect of all the trimmings.
I was super pleased to wear my American Duchess burgundy satin Amelie shoes with this dress! They matched my velvet trim quite well and were fun to have peeking out from under the giant skirt. It’s such a fun piece of history to have contrasting shoes that actually match your dress! Yay! You can see them in this next photo.
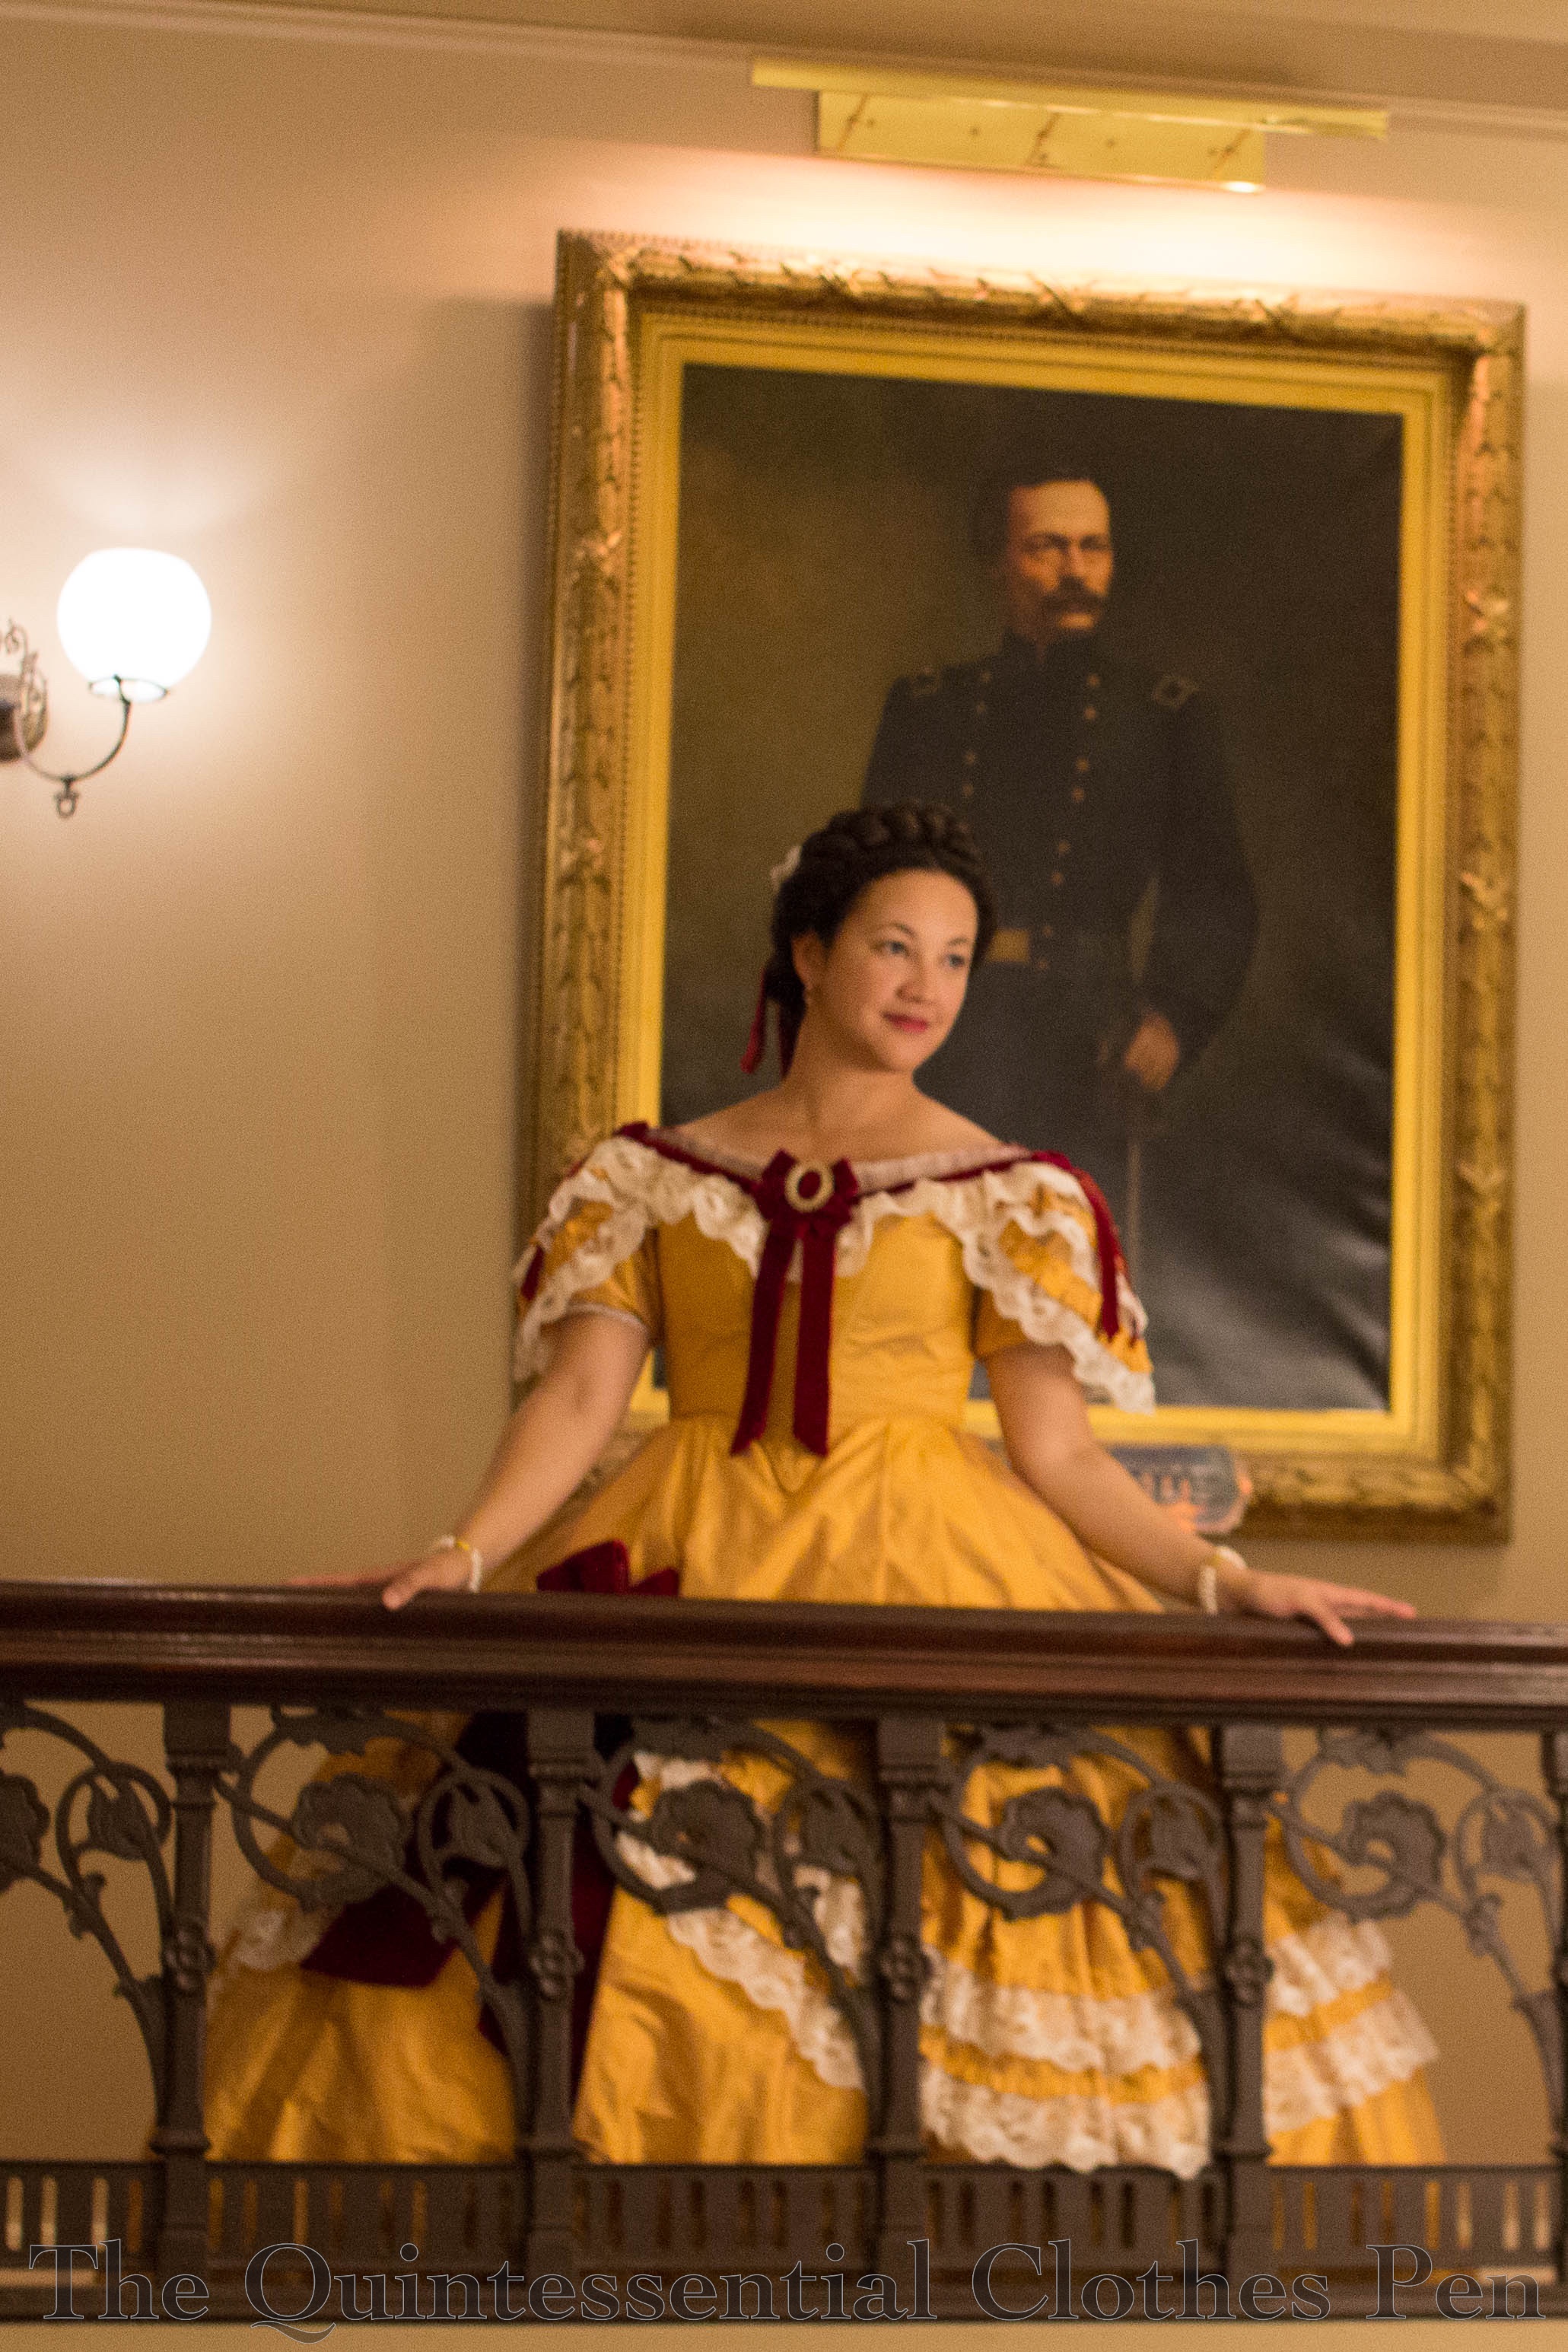
The venue we were in for the ball not only had a number of fabulous staircases leading to the ballroom but also many photos of generals and other military figures from the Civil War. It seemed fitting for this period of dress even if they do occasionally seem to be ‘photo-bombing’! Here’s an example. I love this photo! But does the painting look amused, or disapproving? Hm…
I’ve got a post coming up specifically about my grand crown hairstyle as well as a few photos of the ball in general. For now though, thanks very much for bearing with me through this project! I’ve appreciated your encouraging words and excitement about seeing the finished product!
In the most recent post in this series, I left off my discussion of the creation of my new 1860s dress with an assembled bodice with nicely finished seam allowances. Since then I have made a significant amount of progress on bodice finishing and have also moved on to the skirt and its multitude of trim! But more on the trim in the next post–for now we’re sticking to the bodice.
The next step in my bodice sewing process was boning. The boning helps keep the front point of the bodice smooth over the skirt, keeps the center back edges smooth under the lacing, and supports the other seams, allowing the bodice to fit smoothly over the corset without wrinkling. In the past, I’ve used both steel and plastic for boning 1860s dresses. I’ve found that both options work equally well, though plastic is lighter and easier to cut and shape.
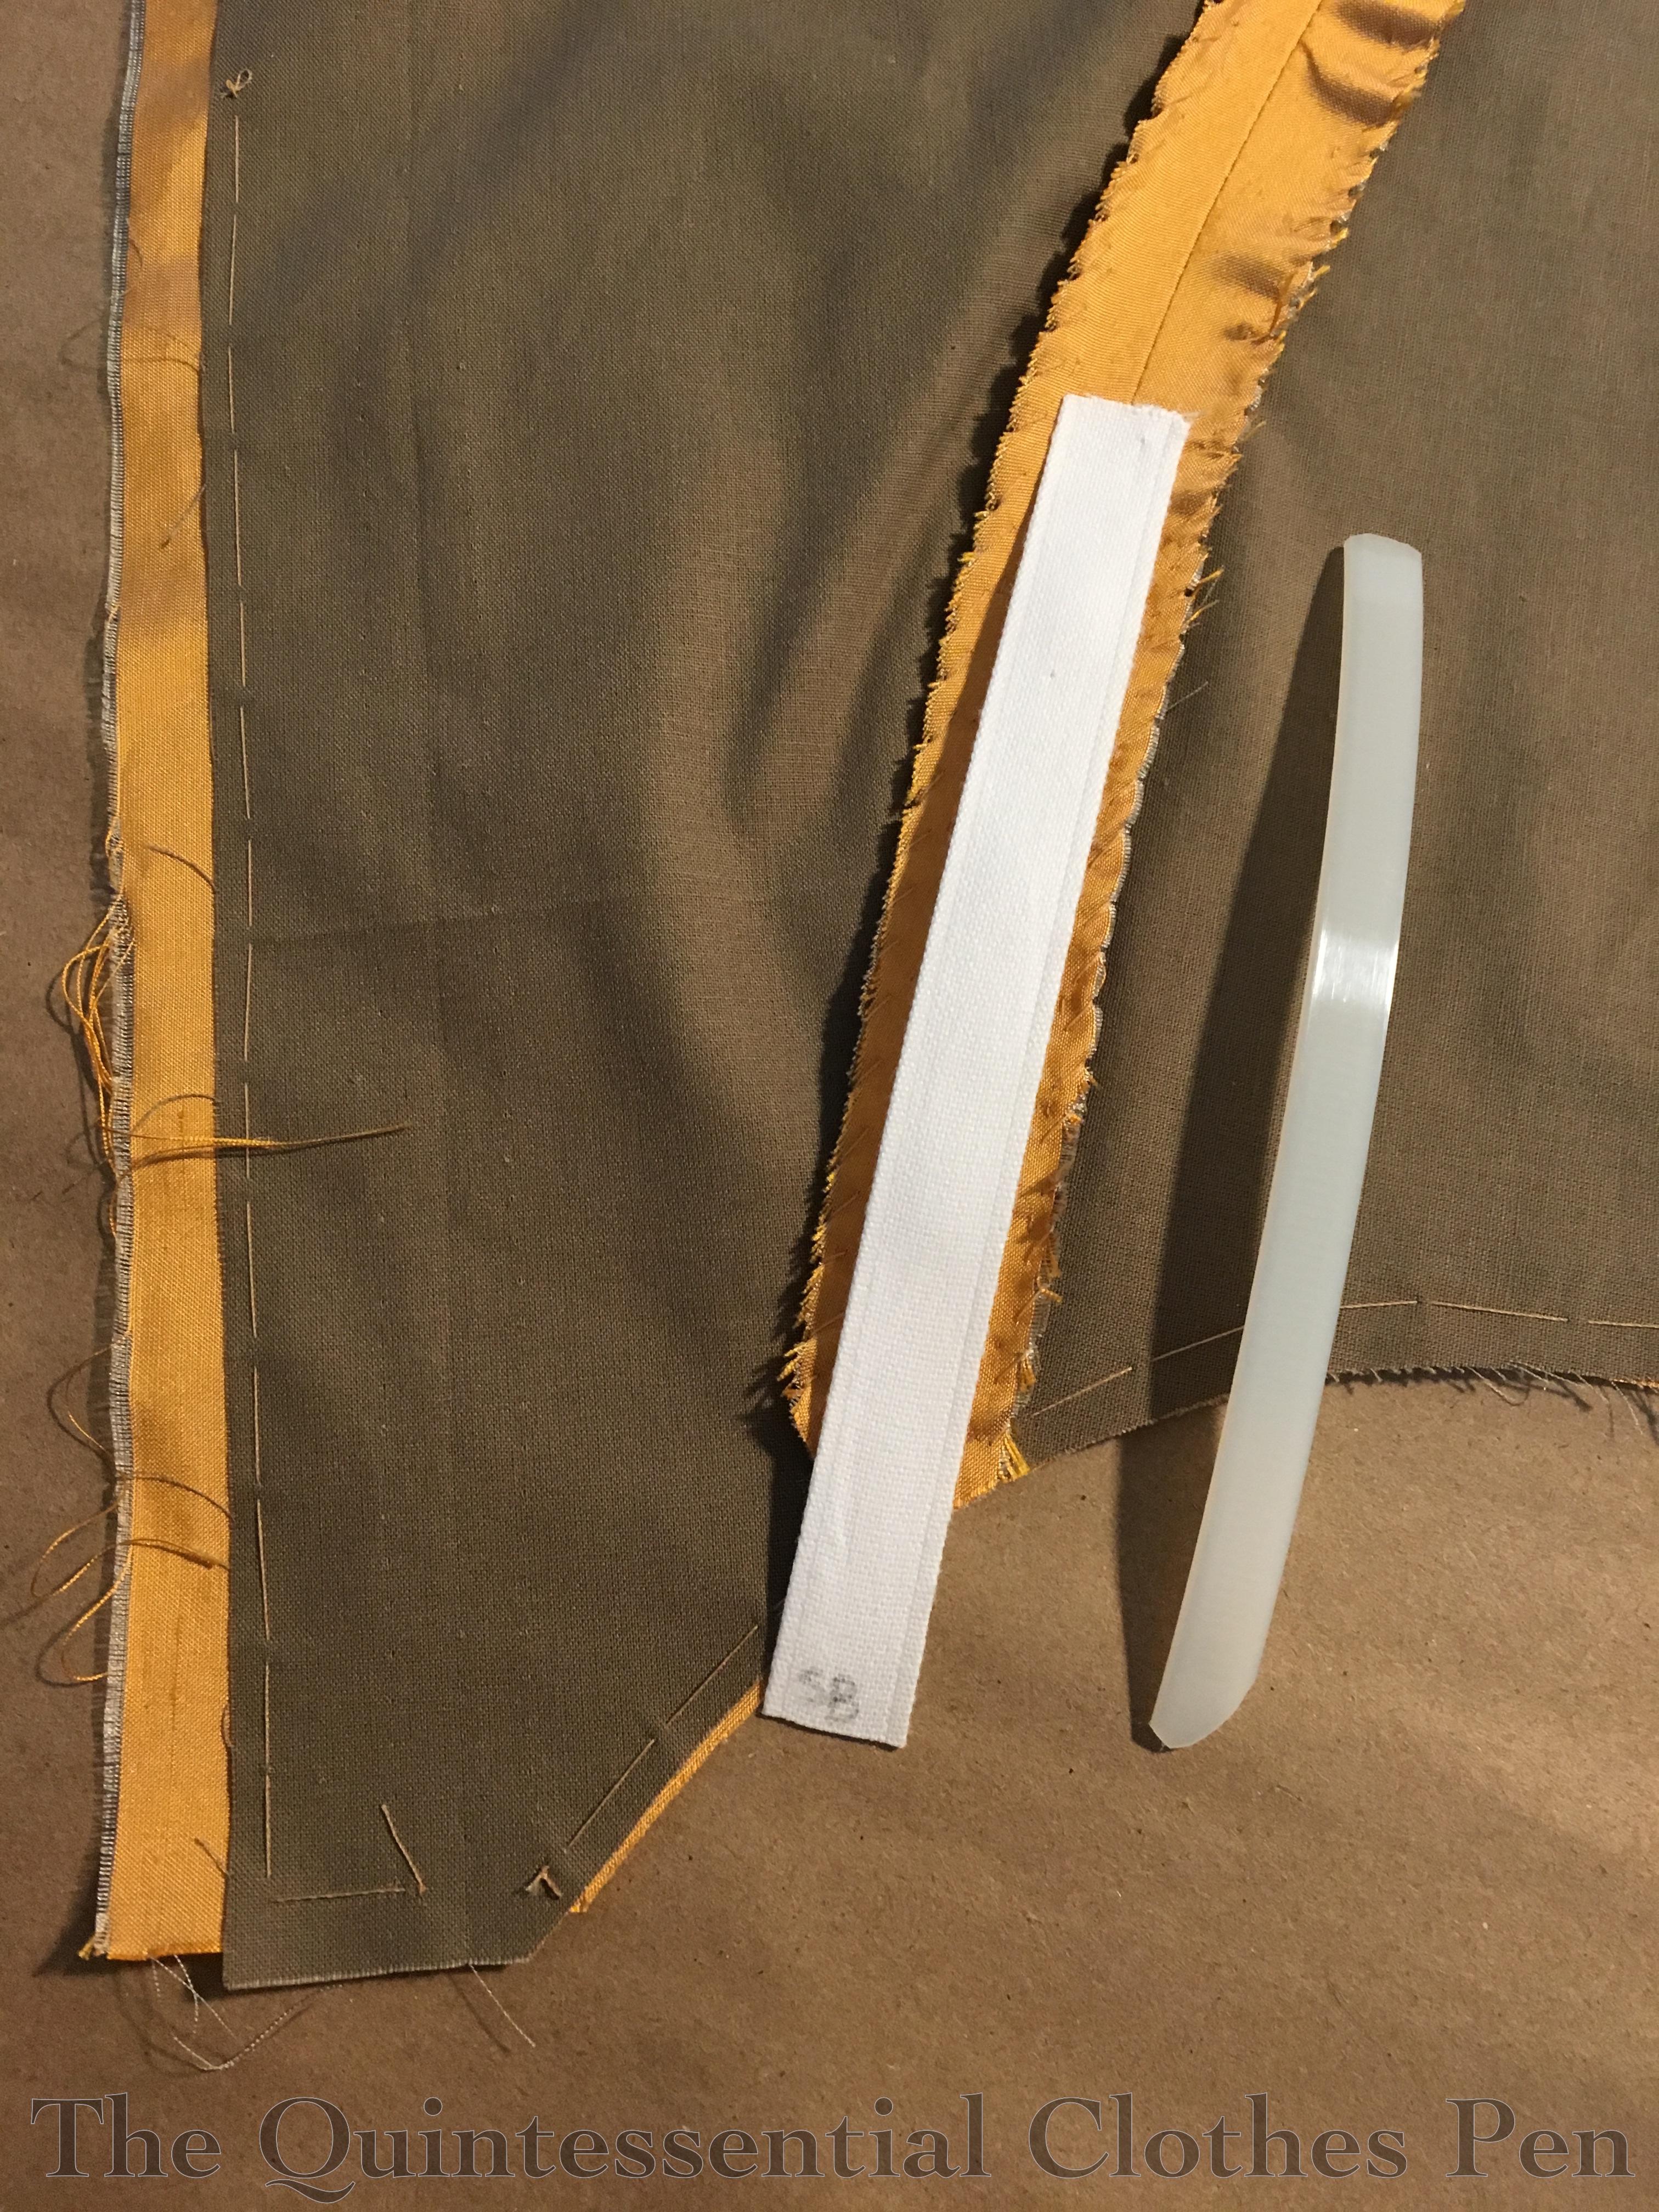
For this dress I chose plastic again. I used ⅜” wide zip ties from the hardware store. They are quite long (18″ I think), so sometimes one zip tie will make multiple lengths and one package lasts for multiple projects, and they are easy to cut with a sturdy pair of scissors (I used my kitchen shears). In addition to cutting the length I needed, I also used the scissors to snip off the pointy corners and, in the case of bones that intersect an edge at an angle, angled the edges to snug up agains the finished edge of the bodice. Here’s an example of what I mean. This is a side back bone sitting next to its bone casing on top of the seam where it will be sewn in.
I cut a length of pre-made bone casing for each bone in the bodice except center back. This densely woven flat tube can be purchased from speciality sewing supply stores by the yard or roll in black and white in different widths. It’s not perfectly accurate, but it approximates the bone casings I’ve seen in 19th century bodices without needing to create my own from scratch. I’ve made some bodices that have used the seam allowances or darts for bone casings, but this fabric and pattern didn’t accommodate that choice.
Here is that same side back bone in its casing, sewn onto the seam allowances with whip stitches. The bone casing end at the top is tucked under to keep the bone from poking out. At the bottom the bone casing is left alone–the bias binding will cover it and keep the bone from poking out without adding bulk.
The photo above also shows the center back edge progress I’ve made. I left extra seam allowance here in order to provide a self facing for my eyelets, then sewed all of the eyelets that won’t intersect with the bias binding (I’ll finish the ones that intersect the binding later in the process). There is a half width plastic bone between the eyelets and the center back edge. This allows for a narrow edge (less than ¼” rather than the full ⅜” width of the zip ties) and stabilizes that edge so it will stay smooth after being laced.
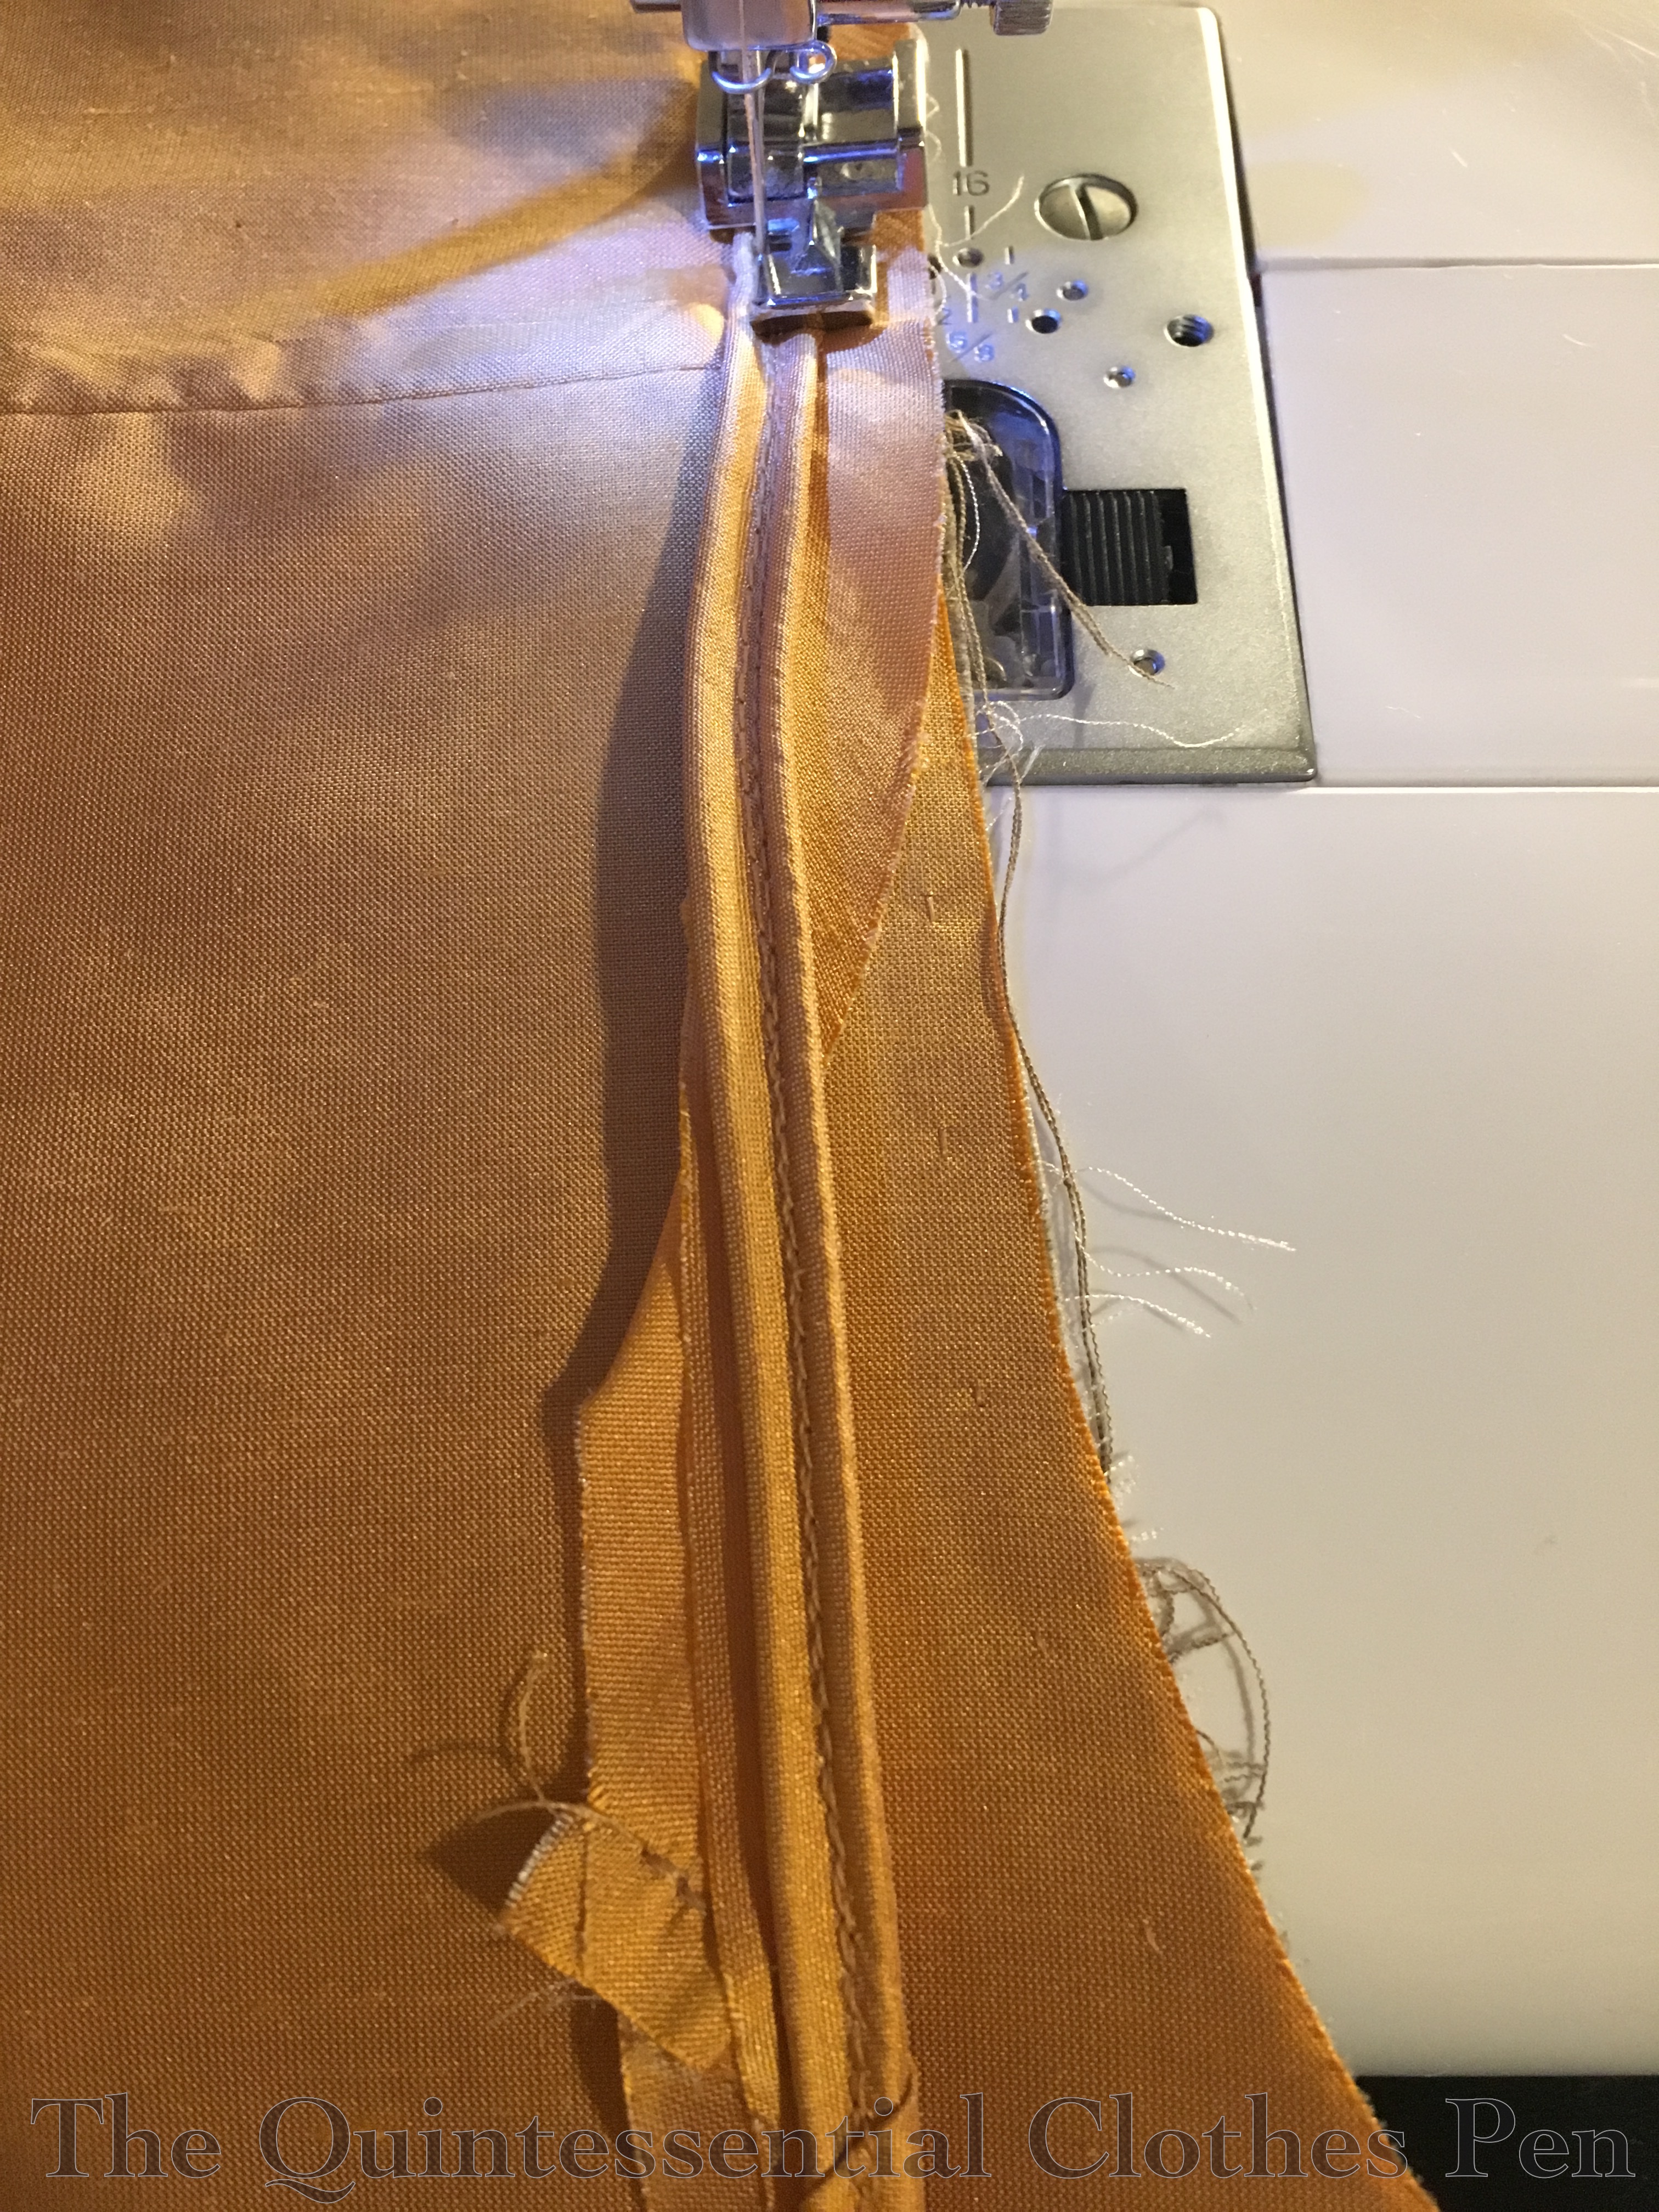
After those steps, I cut, pieced, and sewed very narrow cotton cord into the bias strips for the top edge, armholes, and bottom edge. For this bodice I decided to try something new (based on this 1860-1861 dress at The Met) and do double piping on the bottom edge of the bottom (zoom in on the photos at The Met to see the double piping up close). It’s a subtle detail, but so very 19th century! I made my bias a little wider for the double piping than I did for the single piping.
Here’s the assembled double piping being sewn to the bodice bottom edge. I just winged my method for creating double piping by sewing a first row of cord into the bias, then a second row next to that. For attaching it to the bodice, I sewed between the rows of cord. I graded my seam allowance, then flipped it to the inside to hand sew, just as I would with single cording.
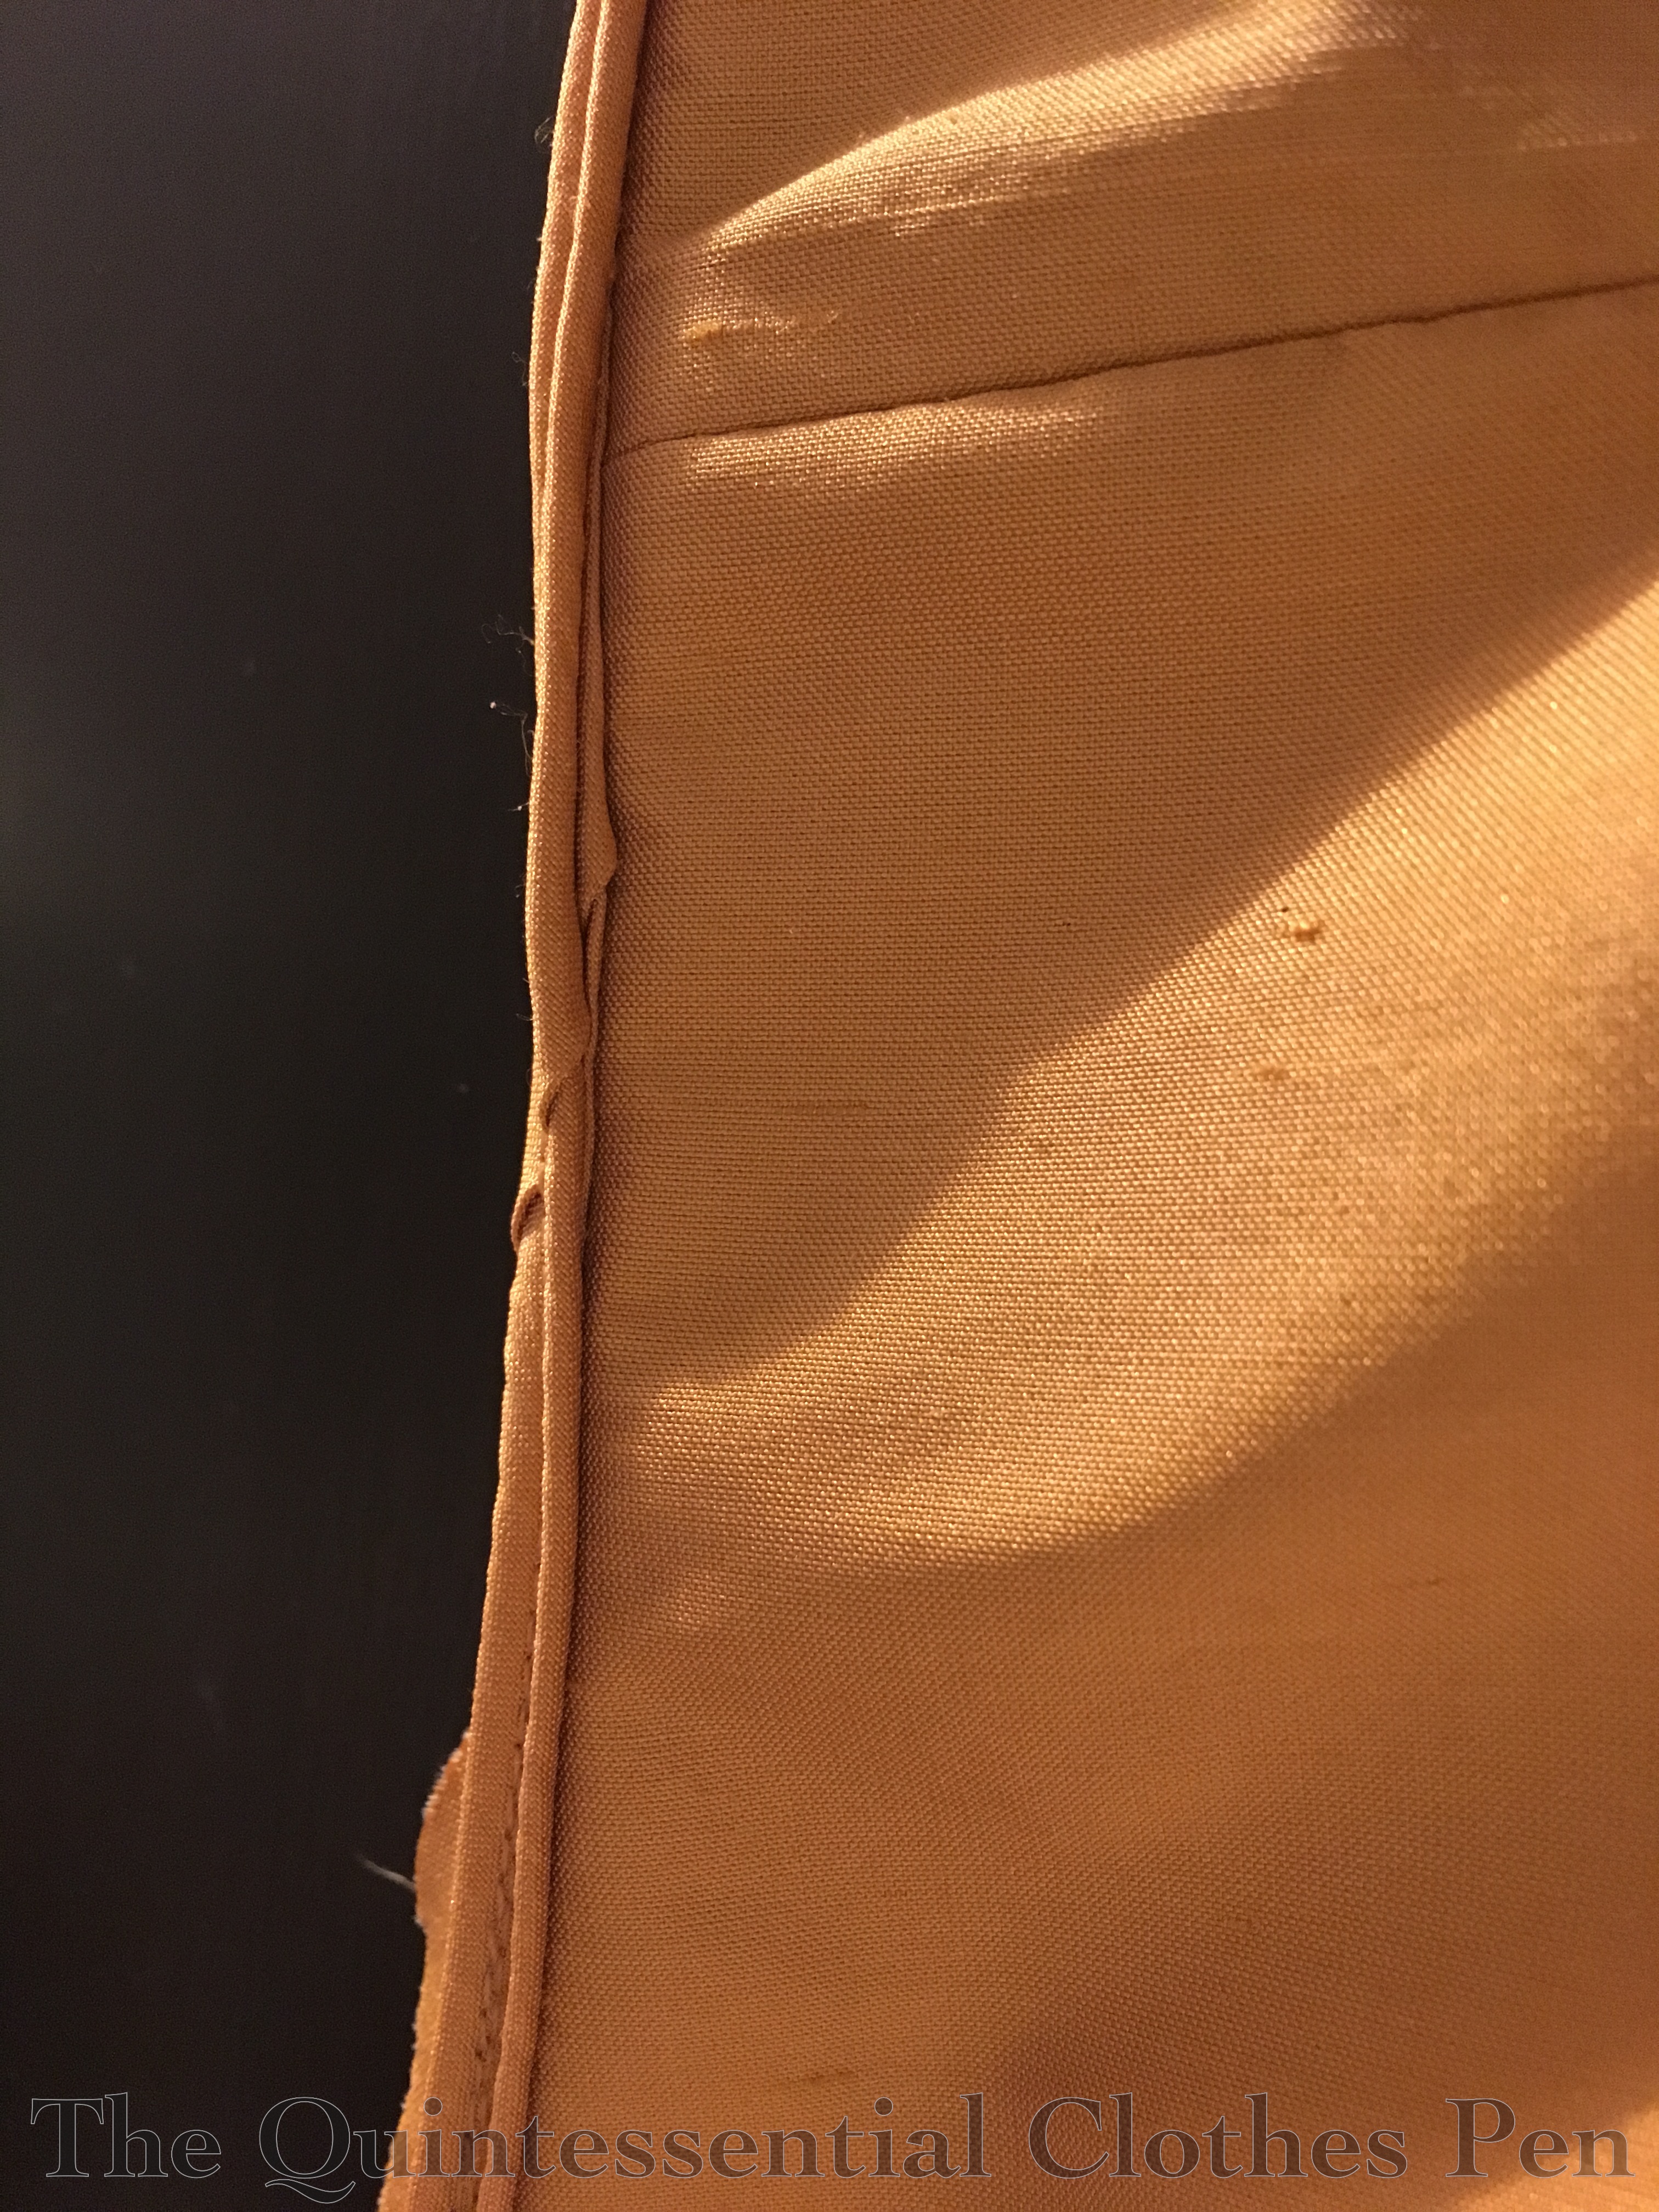
I did run into a few ‘oops’ spots when I sewed the double cord on. Below is an example. Just below the seam is an extra fold of the bias seam allowance. I had to go back and fix a few of these spots.
Aside from that, it was pretty painless! The only problem at this point was that the two rows of cord were pushed apart a bit by the three rows of machine stitching between them, so I ran a line of thread, by hand, between the two rows to snug them together.
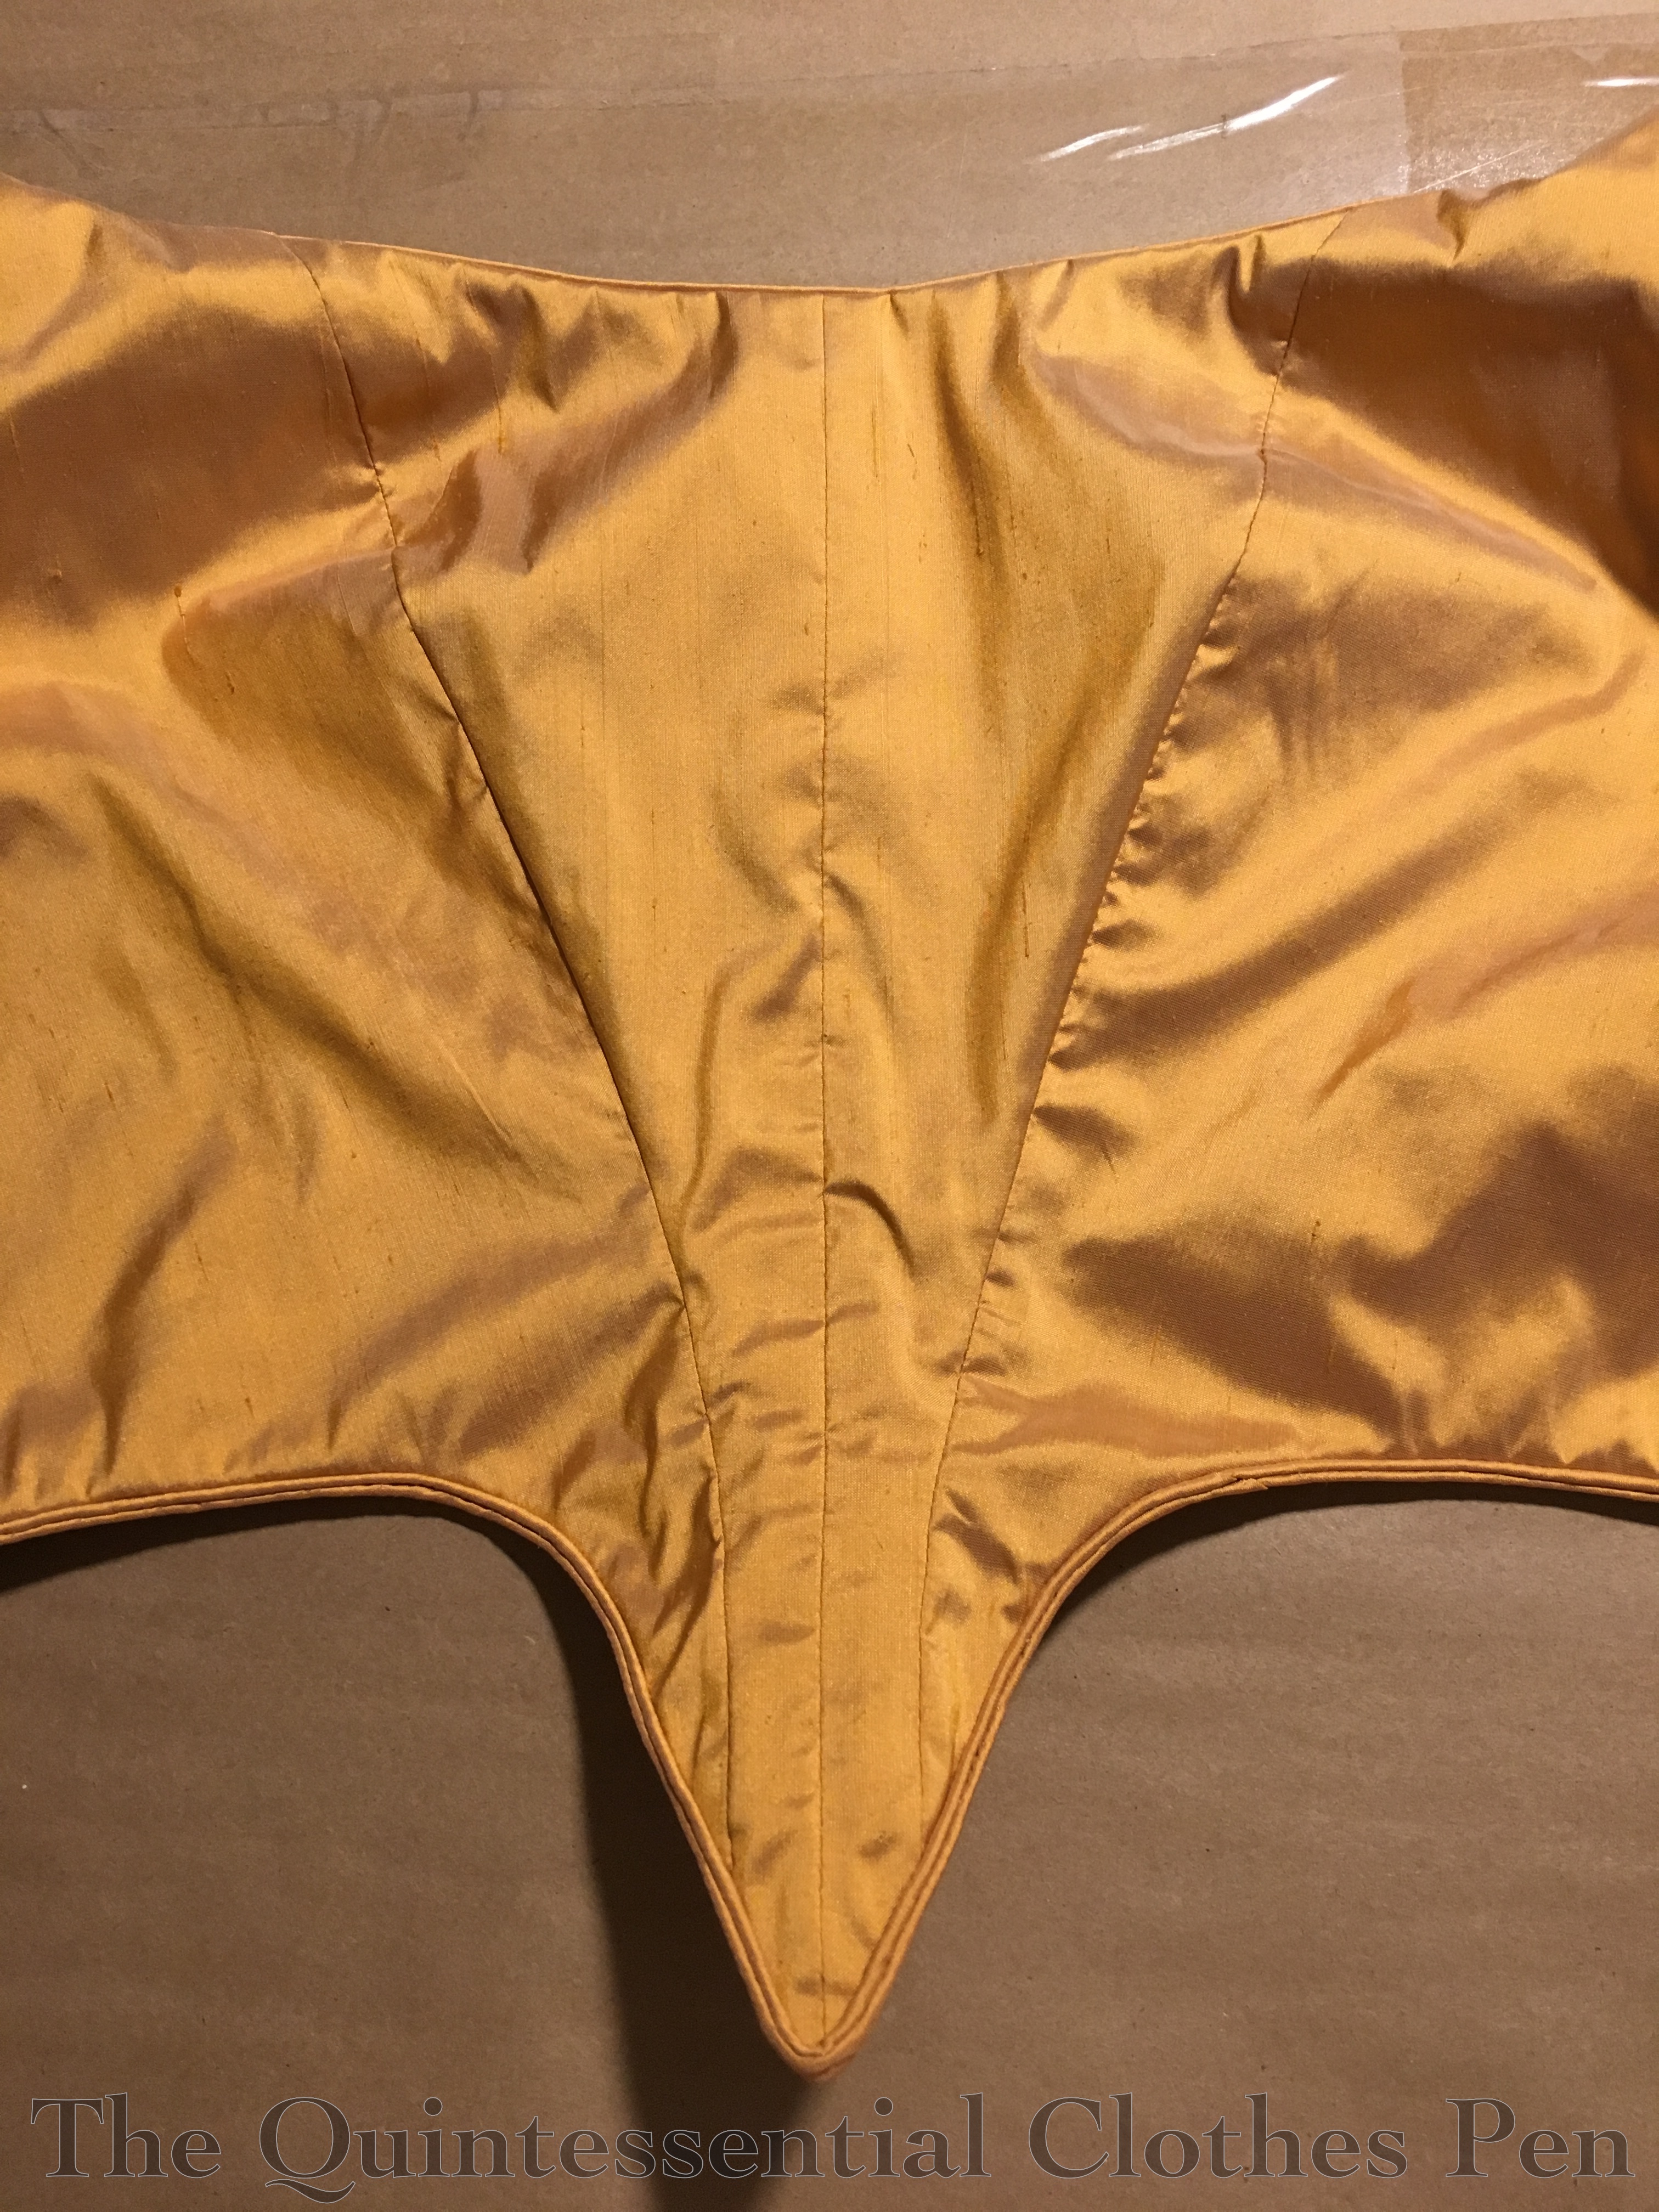
Here’s the inside of the bodice with all of those steps complete except for the bias being flipped to the inside and hand stitched down.
And here’s what the outside of the bodice looked like at this point.
Finishing the bias top and bottom edges really pushed the bodice along towards looking done (although it doesn’t have sleeves or a bertha yet… I’m working on the skirt trim first so I can balance the whole thing out in terms of trim). Here’s the bodice in it’s current state: waiting for sleeves, bertha, and a few more eyelets, but otherwise wearable and done!
The previous post in this series stopped at the point of my successful pattern changes for this new dress. Now we’re on to the more fun part of getting to work on the visible parts of the dress!
The first step after ensuring that my ‘mockup’ flat lining fit was to take the seams apart and press the pieces flat. Rather underwhelming as sewing steps go, but it meant that I didn’t have to cut out a separate mockup of my bodice. Yay!
After that I was ready to cut out the silk bodice pieces!
Before cutting out my bodice, I had to very carefully calculate the yardage I needed for my skirt, the self fabric trim I have planned, the bodice, and the sleeves. It turns out that what seemed like plenty of fabric turned into not as much as I thought once I calculated how much fabric I needed to make pleated trim bands that would circle my skirt three times! 160ish” hem + 3 rows of trim + x2-3 fullness for the pleated bands + maybe seam allowance to do hems on the trim… yikes! I think I’ll be doing a whole post dedicated to my trim plans sometime soon, but back to the bodice for now.
When I checked the fit I didn’t worry about sleeves. I knew that if the armhole fit I could decide on a sleeve option after seeing how much silk I really had to work with.
After measuring all the skirt pieces out and laying out the bodice pieces, I decided to use the sleeve pattern I made for Eleanor with a few changes to save fabric. First, I put the grain on the straight instead of the bias. Second, I made the sleeves a little less poofy than the version on Eleanor.
Then I took the plunge and cut off each skirt panel, the bodice pieces, and the sleeves. That left a few pieces still to be cut–the waistband, bias piping for the bodice, and the skirt trim being the main pieces– but most of the silk cutting was done!
I layered each piece of cotton with the corresponding piece of silk and hand basted each piece around the edges. This flat-lining provides extra support for the silk exterior and allows for finishing that can be sewn to the cotton without showing on the exterior. I reassembled the bodice, pressed my seams open, and then whip stitched each seam allowance over the edge to control the fraying silk.
The next step is to add boning to the bodice to keep it nicely smooth while it is being worn. After that I’m not sure exactly what steps I’ll be inclined to work on. Options include initial work on the skirt and more bodice finishing. Then there’s the trim to think about and execute, too! We’ll just have to see what task appeals most.
Fabric and design decided on, the next step in the process of creating my new 1863 evening gown was to decide on a pattern.
I decided to start with the pattern I used for the bodice of Evie, my 1864 evening gown (this originally came from Janet Arnold’s Patterns of Fashion 2). You might remember that I needed to adjust Evie to fit me two years ago, so I knew that the pattern would not work as is. For the new pattern, I added some space to the waist circumference, bust area, and across the shoulder blades in back.
To test out my pattern changes before cutting into the silk, I cut my flat lining and basted it together to check the fit. Looks good in the front!
And also looks good in the back! Success! No further alterations needed!
The zipper in the back is my fitting zipper–a long separating zipper I can baste into mockups to check the fit without having to pin anything. This is great for fitting on myself! The zipper ensures the my center back edges will meet nicely so I can move on knowing that the bodice will fit.
As a side note, I have to mention how silly bodices from this period look without skirts! The bodice stops at the natural waist on the sides, which makes my legs look super long and my torso super short! This bodice actually stops even a little higher than my natural waist. The layers of hoop, petticoat, and skirt waistbands all add bulk that needs to be accommodated for smooth lines on the finished bodice.
The next step will be to work with the lovely apricot silk that will be exterior of the dress.
“Georgina” is the name I’ve chosen for my new 1858 cotton print day dress. Being a day dress from a new decade (the 1850s), makes her a fabulous new expansion in my wardrobe of historic clothes!
Georgina: 1858 cotton print day dress.Back view.
The dress is constructed from about 5yds of a Marcus Brothers reproduction historic cotton print I purchased earlier this summer. I used Past Patterns #701 and #702 bodice patterns as a starting point, though I had to make significant alterations to achieve a comfortable and pleasing fit, especially in the shoulder/armsceye area. I used the darted pattern for the fitted lining and the gathered pattern for the gathered exterior. The sleeves are the bishop sleeves from one of the patterns, though I totally changed the cuff design.
The cuff design and a lot of other fiddly details were taken from this c. 1852 dress at the Met (pictured below). If you zoom in on the cuffs on the Met website you can see that they look just like mine (pictured later in this post)! I also used the following design elements from the Met dress: piping at the neck and waist, gathers that are tacked down beyond the seam line, button closure on the cuffs, and cartridge pleating all around the skirt. I have a whole pinterest board of inspiring images for this dress and hat ensemble, but this dress is the one from which I took the most information and detail.
c. 1852 Dress, Met.
Here are a few pictures of the fiddly details I integrated from the Met dress:
Gathers at the center back that are tacked down beyond the seam line. I like the controlled look these extra stitches produce.Self fabric cuff finished with a small ruffle. The cuffs close with a hand sewn buttonhole and button.
Georgina’s bodice is lined with white cotton. There are hand sewn boning channels sewn into the bodice in the front darts on each side and on the sides. The bones are then slipped in between the layers of fabric. I didn’t have the right length metal bones, so I used heavy duty plastic wire ties–but–I cut them in half the long way so they are much skinnier than normal (they just don’t look at all historically plausible in their normal width, in my opinion). Once they’re in the bodice, you’d never know they are plastic instead of metal.
The proper left side of the bodice: hand stitched boning channels in the darts, front hook closure, a hook to attach the skirt and bodice together, and nicely finished piping along the bottom edge.
The bodice is finished at the neck and bottom edge with piping that is nicely whip stitched to the inside. There is also piping in the armsceye seam. The sleeve seams are french seamed by machine with the opening seam allowance at the cuff turned twice and stitched by hand. The other bodice seams are all machine sewn and the bodice is hand finished. The bodice closes at center front with hidden hooks and bars. It also hooks to the waistband of the skirt to keep the two pieces from gaping while worn.
The skirt has a wide hem that is hand stitched. The long skirt seams are machine sewn. The waistband is the same cotton print with an interfacing layer of canvas to create stability. The skirt is cartridge pleated and hand sewn to the waistband. There is a single layer of lightweight flannel folded into the cartridge pleats to give them a little more bulk than the thin cotton had on its own.
I also took the time to add pockets to this skirt! This turned out to be really useful for storing gloves, sunglasses, chapstick, a fan… with two pockets a lady can store so many things! Here’s how I made them and sewed them into the skirt:
The pockets are muslin rectangles with a piece of the cotton print topstitched on the top center (this is the part of the pocket that can show while I’m wearing the dress and taking things in and out of the pockets).After the cotton print was sewn on I french seamed the vertical seam and then the bottom seam by machine, making sure that the cotton print stayed centered. On the left is what a pocket looks like with the french seams facing out. On the right is a pocket turned inside out to show the cotton print centered at the top.I left the top part of the vertical seam open and hand sewed that into slits in the skirt using a whip stitch through the pocket and the seam allowances (essentially under stitching the pockets, which keeps the muslin from rolling to the outside!). The pocket slits were made after the skirt was cartridge pleated and attached to the waistband, so the slits stop below the cartridge pleats (it was way too much thinking to try and figure out where the pockets should be before cartridge pleating the skirt!).It worked wonderfully, and the pockets blend right in and are hardly noticeable, even when they gap open! (I’ve turned the edges of the pocket so you can see the muslin pocket for this picture, but they don’t actually stay turned out like that, and you can imagine how the print fabric of the skirt blends right into the print section of the pocket).On the inside, the top edge of each pocket is stitched to the cartridge pleats to evenly distribute the weight of anything in them.
Georgina cost about $18: $15 for the fabric and about $3 for hooks and eyes. The various other fabrics (cotton lining, canvas interlining, etc.) were all in my stash from previous projects (yay!). I first wore Georgina last weekend to a vintage dance performance on George’s Island in the Boston Harbor. I’ve got pictures of the performance and pictures of island exploration coming up soon!
I’ve been stitching away at the re-make of my 1819 Regency gown. The progress:
the bodice and skirt ruffles are all being hemmed by hand and there is only one skirt ruffle left to complete
the bodice has been put together, with the exception of sleeves and the finishing of the neck edge
the seams on the bodice are finished by hand (each seam is flat felled to hide the raw edges on the inside)
Skirt ruffles in progress: I've actually completed more than is picturedThe hem and join of one skirt ruffle
The bodice seams with ruffles insertedThe rolled hem on the bodice rufflesCenter front on the bodice has a double edged ruffleThe flat felled seams on the inside of the bodiceThe flat felled seam used on each seam on the bodice and the hand sewn top stitching (which is only along these curved back seams)
Here is a refresher of the bodice inspiration image. My bodice looks like a reasonable interpretation to me. I am quite pleased with the progress and overall look so far. How do you think my interpretation compares?
The inspiration for my bodice
Lastly, here is the image of the sleeve I plan to use. I described the sleeve in my last post, an overview of my planned gown updates. The sleeve is on a page with many other sleeve variations from the 1830s, but I think that it will suit my 1819 Regency (pushing 1820s) dress quite well. I am debating the possibility of outlining the triangular inset with piping. Do you think that would suit the dress and be a faithful representation of the double line delineating the inset in the image? Alternatively, there is a possibility that I might use green piping or ribbon (the same shade of green used in my 1819 spencer) to delineate that line. But then must I also use the green somewhere else to create visual harmony? Hmm…
From the first few pages of Janet Arnold's early 19th century pattern book


 To make the double piping I machine sewed the cord into one side of my bias and hand sewed it into the other, then pressed the bias in half and attached it through all the layers. In my sample below I didn’t bother to put the machine stitching on the under side, but on the dress the machine stitching is not visible.