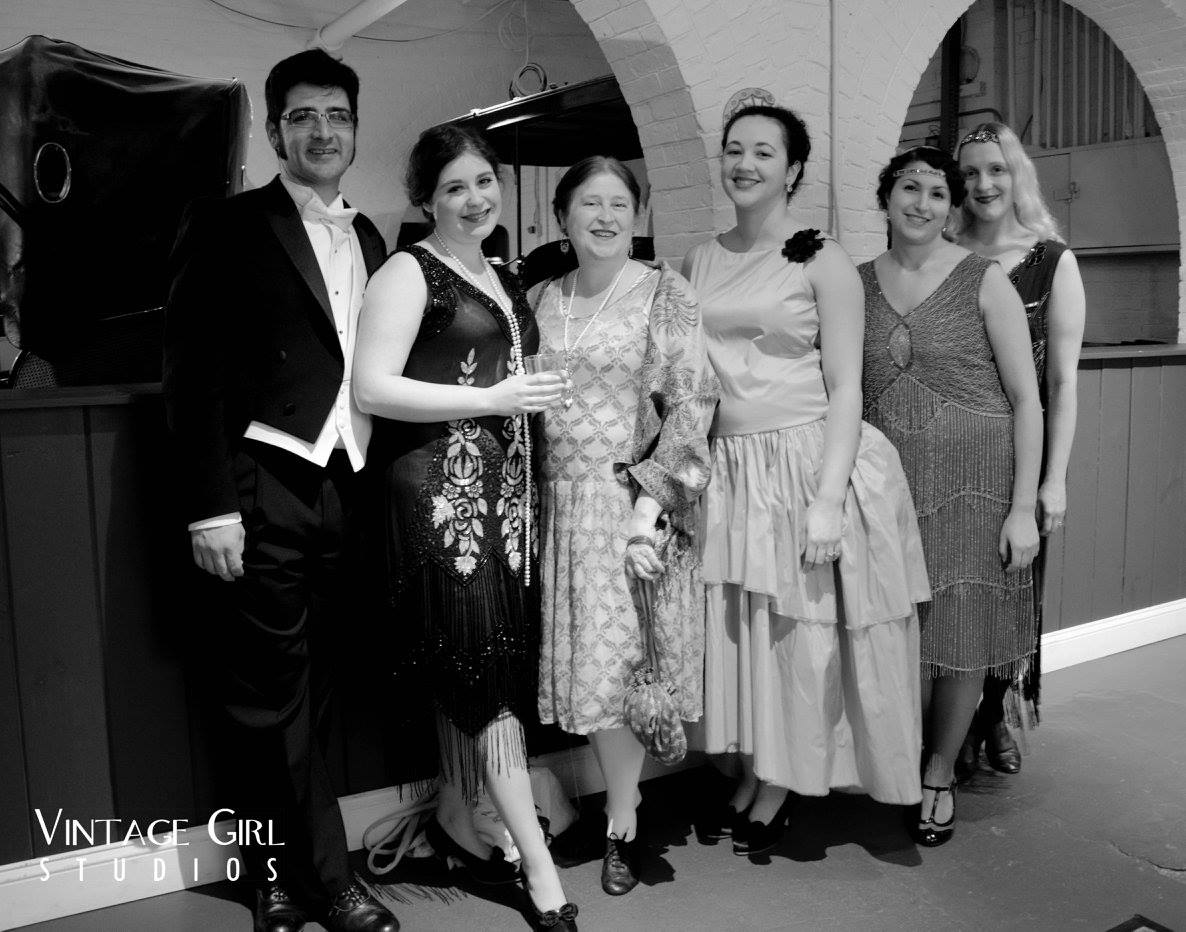
Some friends and I, taken by the official photographer of the night.
In the words of journalist Heywood Broun, “The Jazz Age was wicked and monstrous and silly. Unfortunately, I had a good time.” I don’t know about wicked or monstrous, but I certainly had a silly and good time recently at the Greater Boston Vintage Society’s White Lightning Ball.
Silly faces!
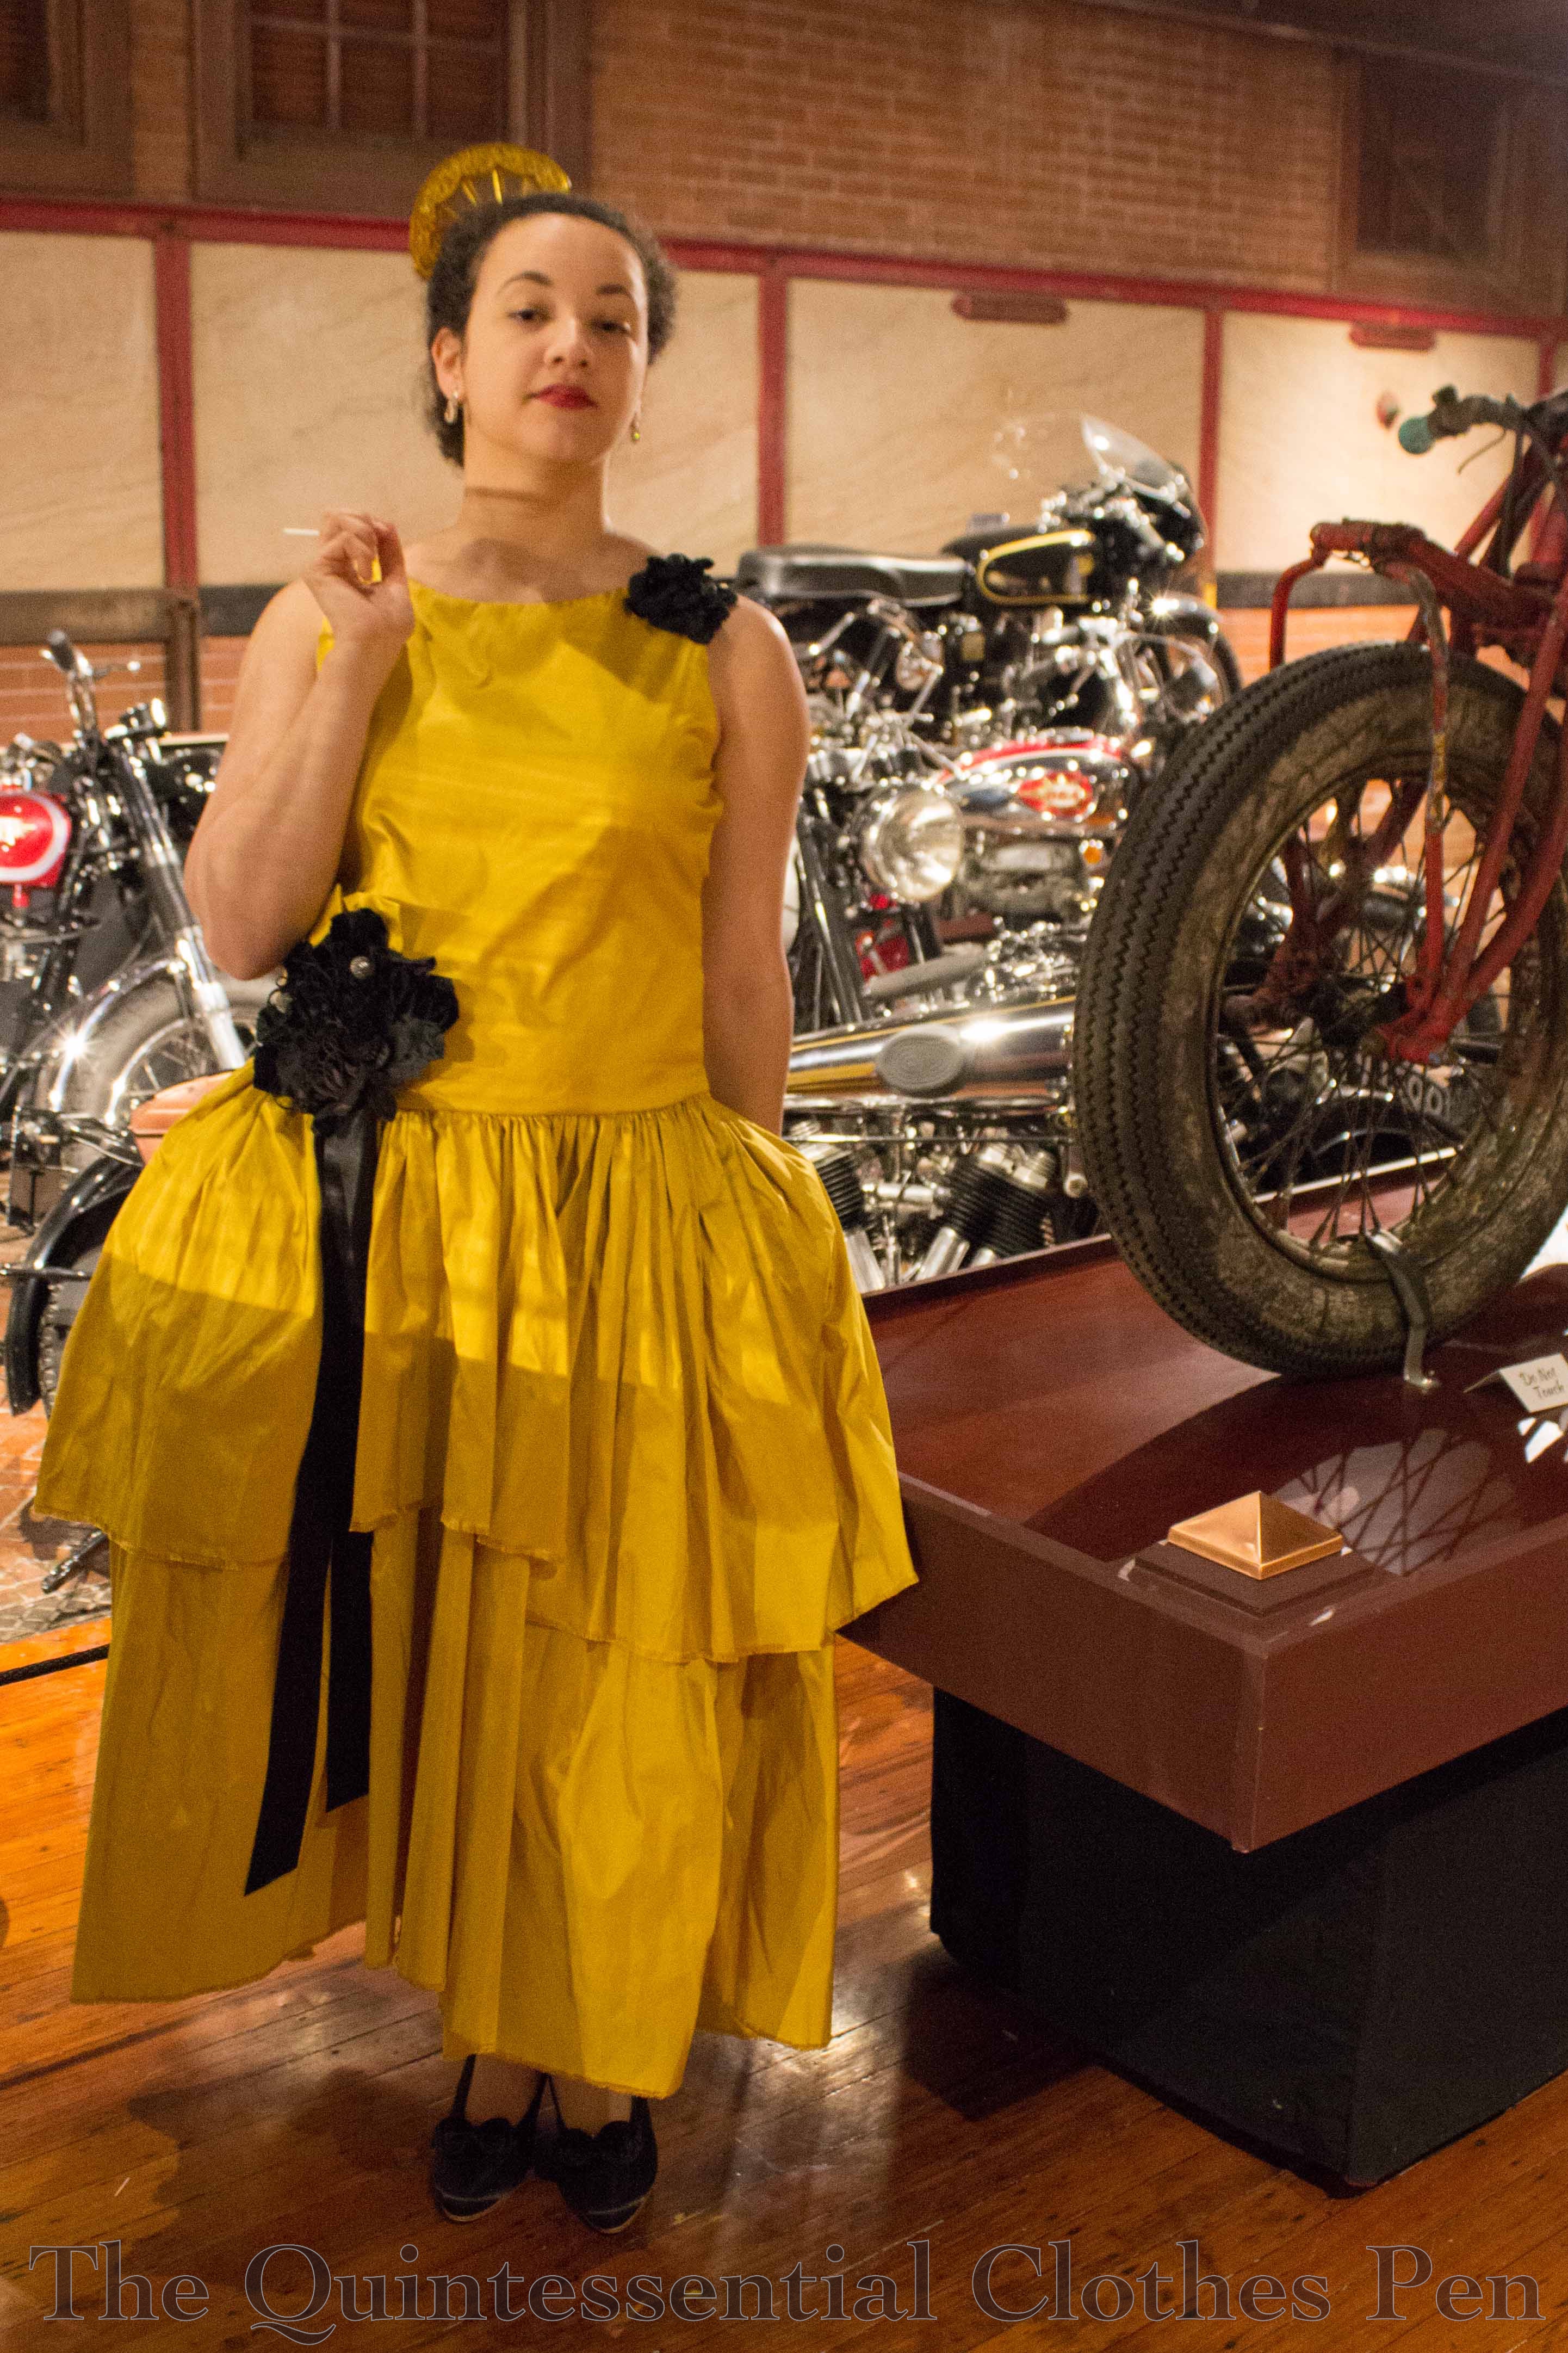
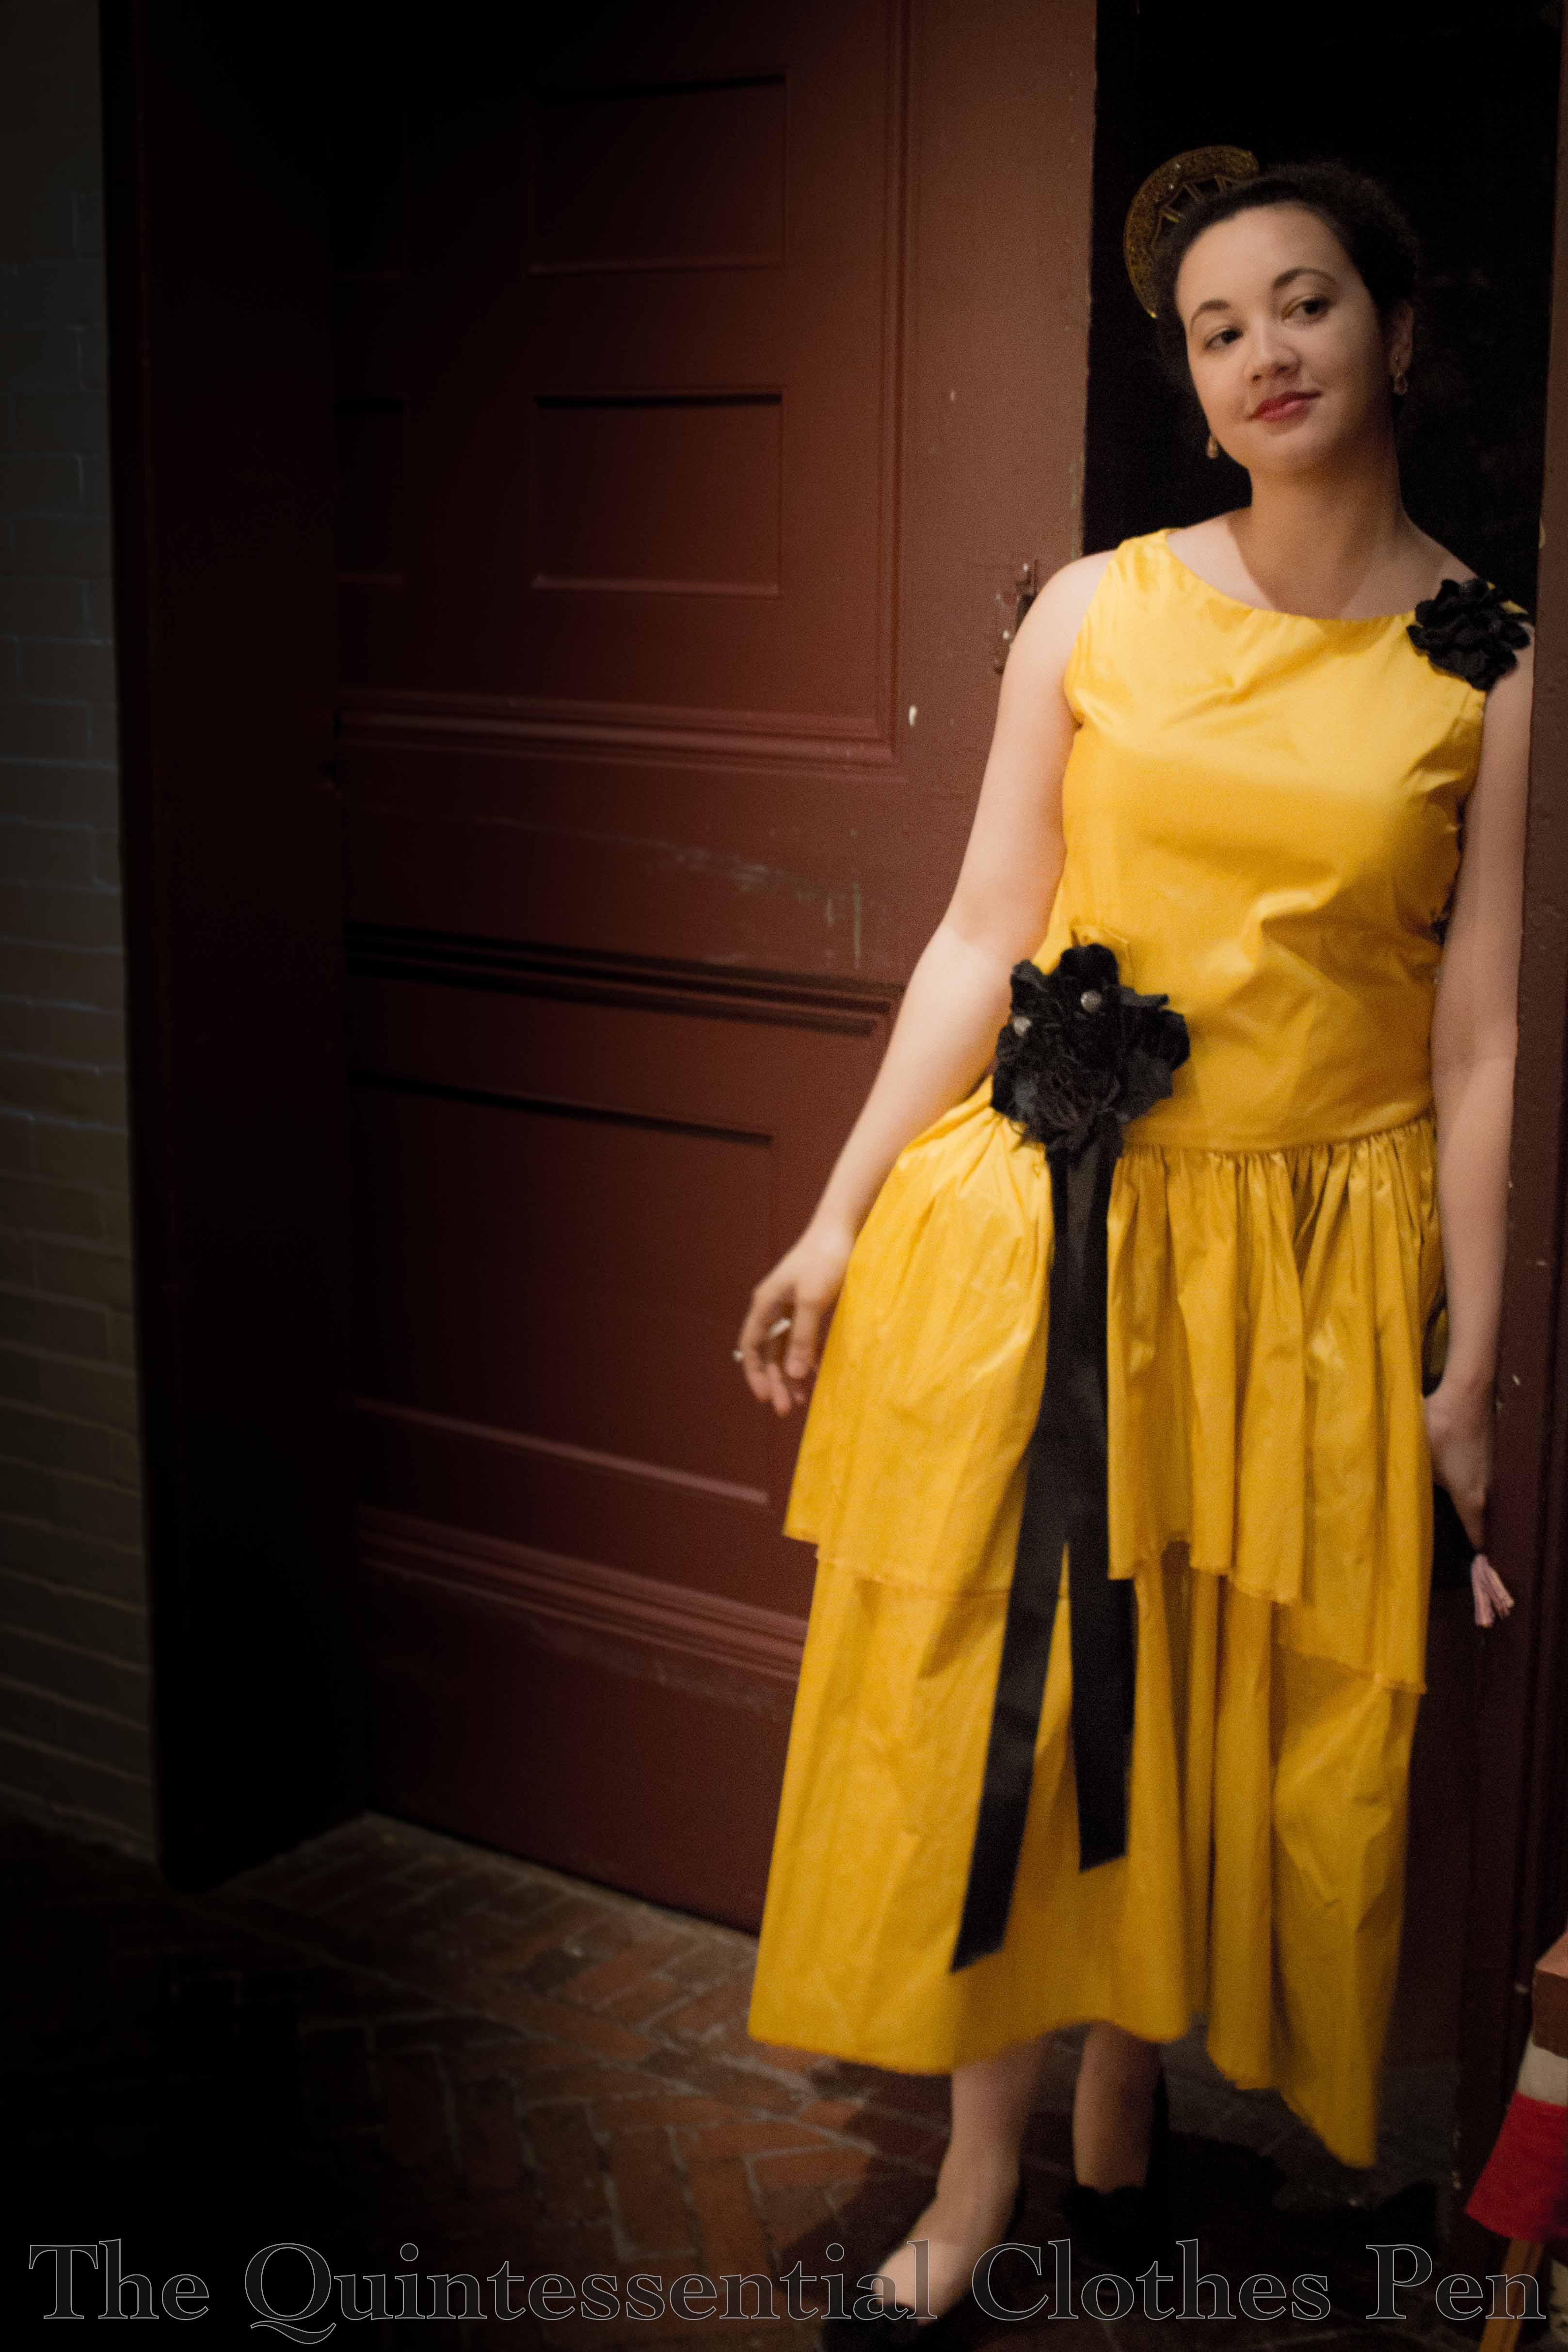
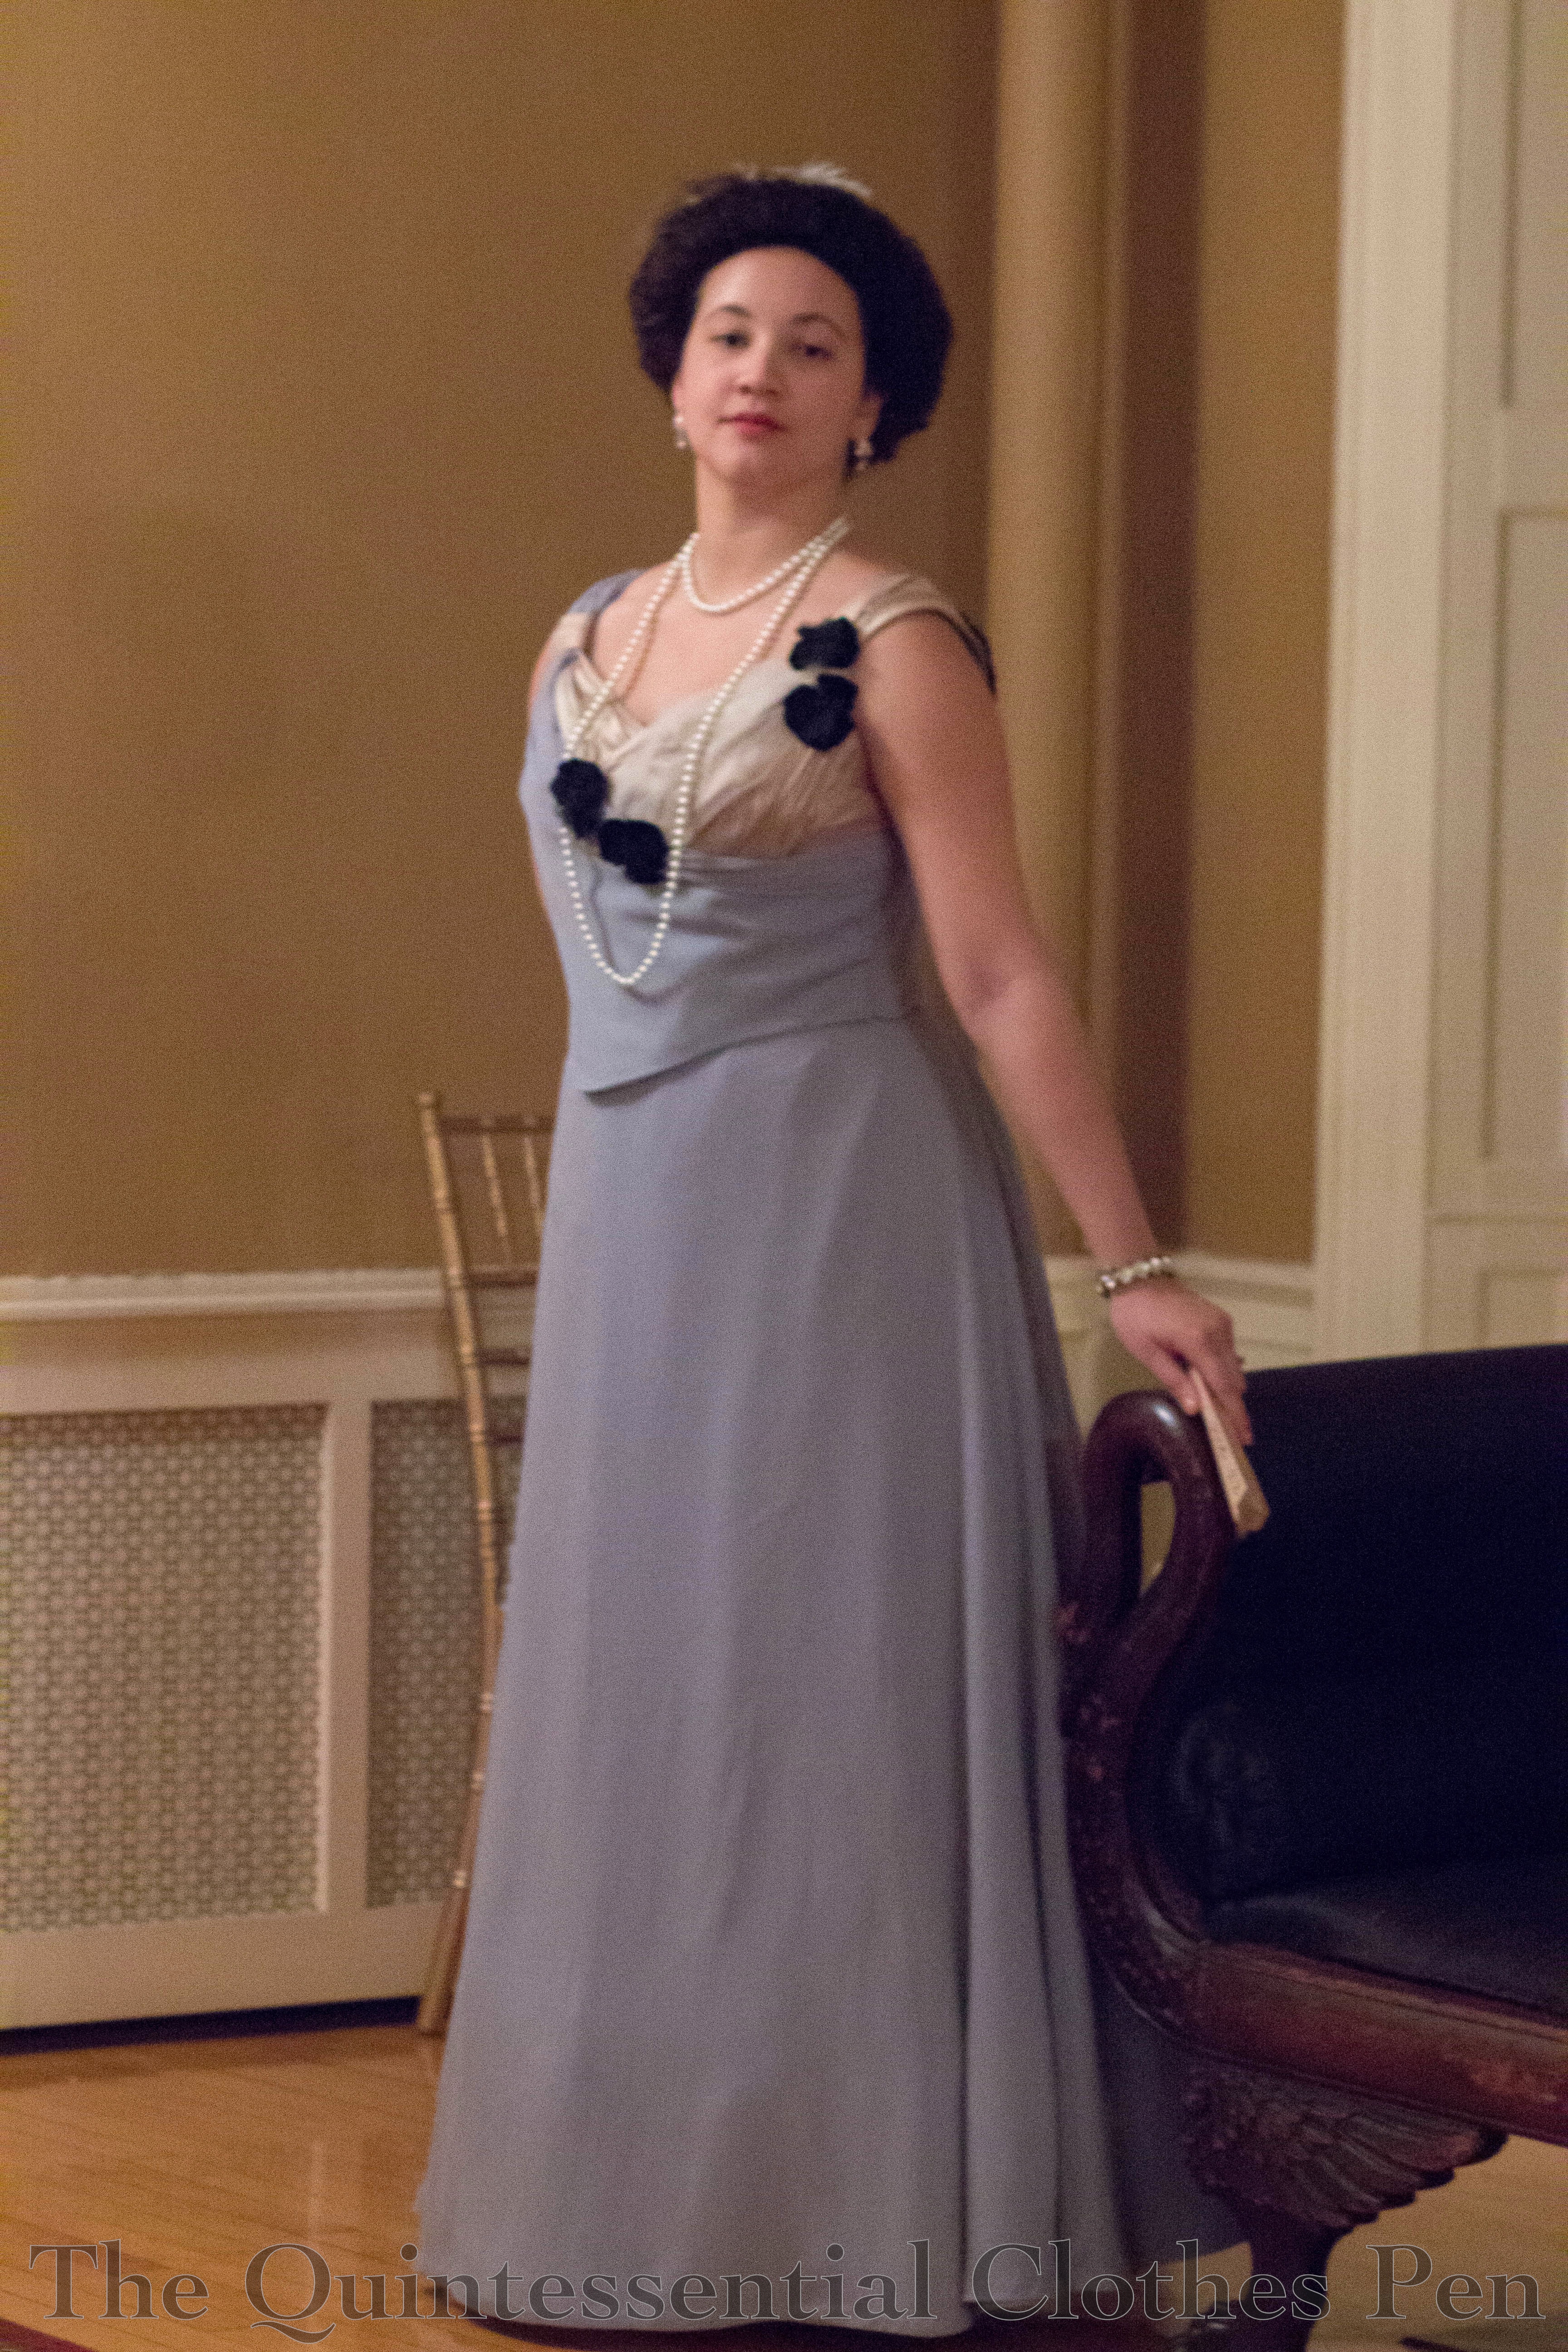
I wore my 1924 robe de style from last summer, updated with new dramatic trimmings that suit the dress much better than the last iteration. It’s such a fun, unusual, and distinctive style to wear. I fielded quite a few questions about the style and happily encouraged people who knew things about it such as that it looked like Lanvin. For my hair, I didn’t have time to attempt waves, so I aimed for a romantic style that was less time consuming, inspired by these: no waves worn with a robe de style, a romantic bun (on the right), and long hair pinned up. Also, this set of drawings shows a large hair comb worn with a robe de style which reminded me that I haven’t worn mine in a long time.
My accessories include: my vintage celluloid hair comb; silver drop earrings with peachy faux stones, which don’t often match things, so it was nice to wear them since they don’t get worn often; and a recent purchase from American Duchess, black Seaburys! (Never fear, there’s a whole post coming about the Seaburys, but for now we’re focusing on the event and the clothes.)
This event is held at the Larz Anderson Auto Museum in what was the Anderson family’s carriage house in the early 20th century. It is a large building with multiple levels used for stabling horses as well as storing carriages and cars. The upper floor of the carriage house housed an exhibit of motorcycles during the event, if you’re wondering about the background. Downstairs was the collection of Anderson family cars from the 1900s and 1910s. They were very fun to look at and so tempting to sit in… I know it wouldn’t be good for the cars… And there were security cameras… so I had to content myself with looking at them and dreaming of reproductions that we could ride in.
My other silly accessory was a candy cigarette. It does rather add to the 20s look, but of course I don’t smoke, so there was rather a lot of me flipping it around in my hand trying to figure out how to hold it and not look ridiculous. I didn’t ever try eating it, so I can’t report how it tasted, but I was pleased that it lasted almost until the end of the night when I dropped it for the second time and it broke in half. Until then it was going strong and gave me something to do with my hands in pictures, which is always a good thing.
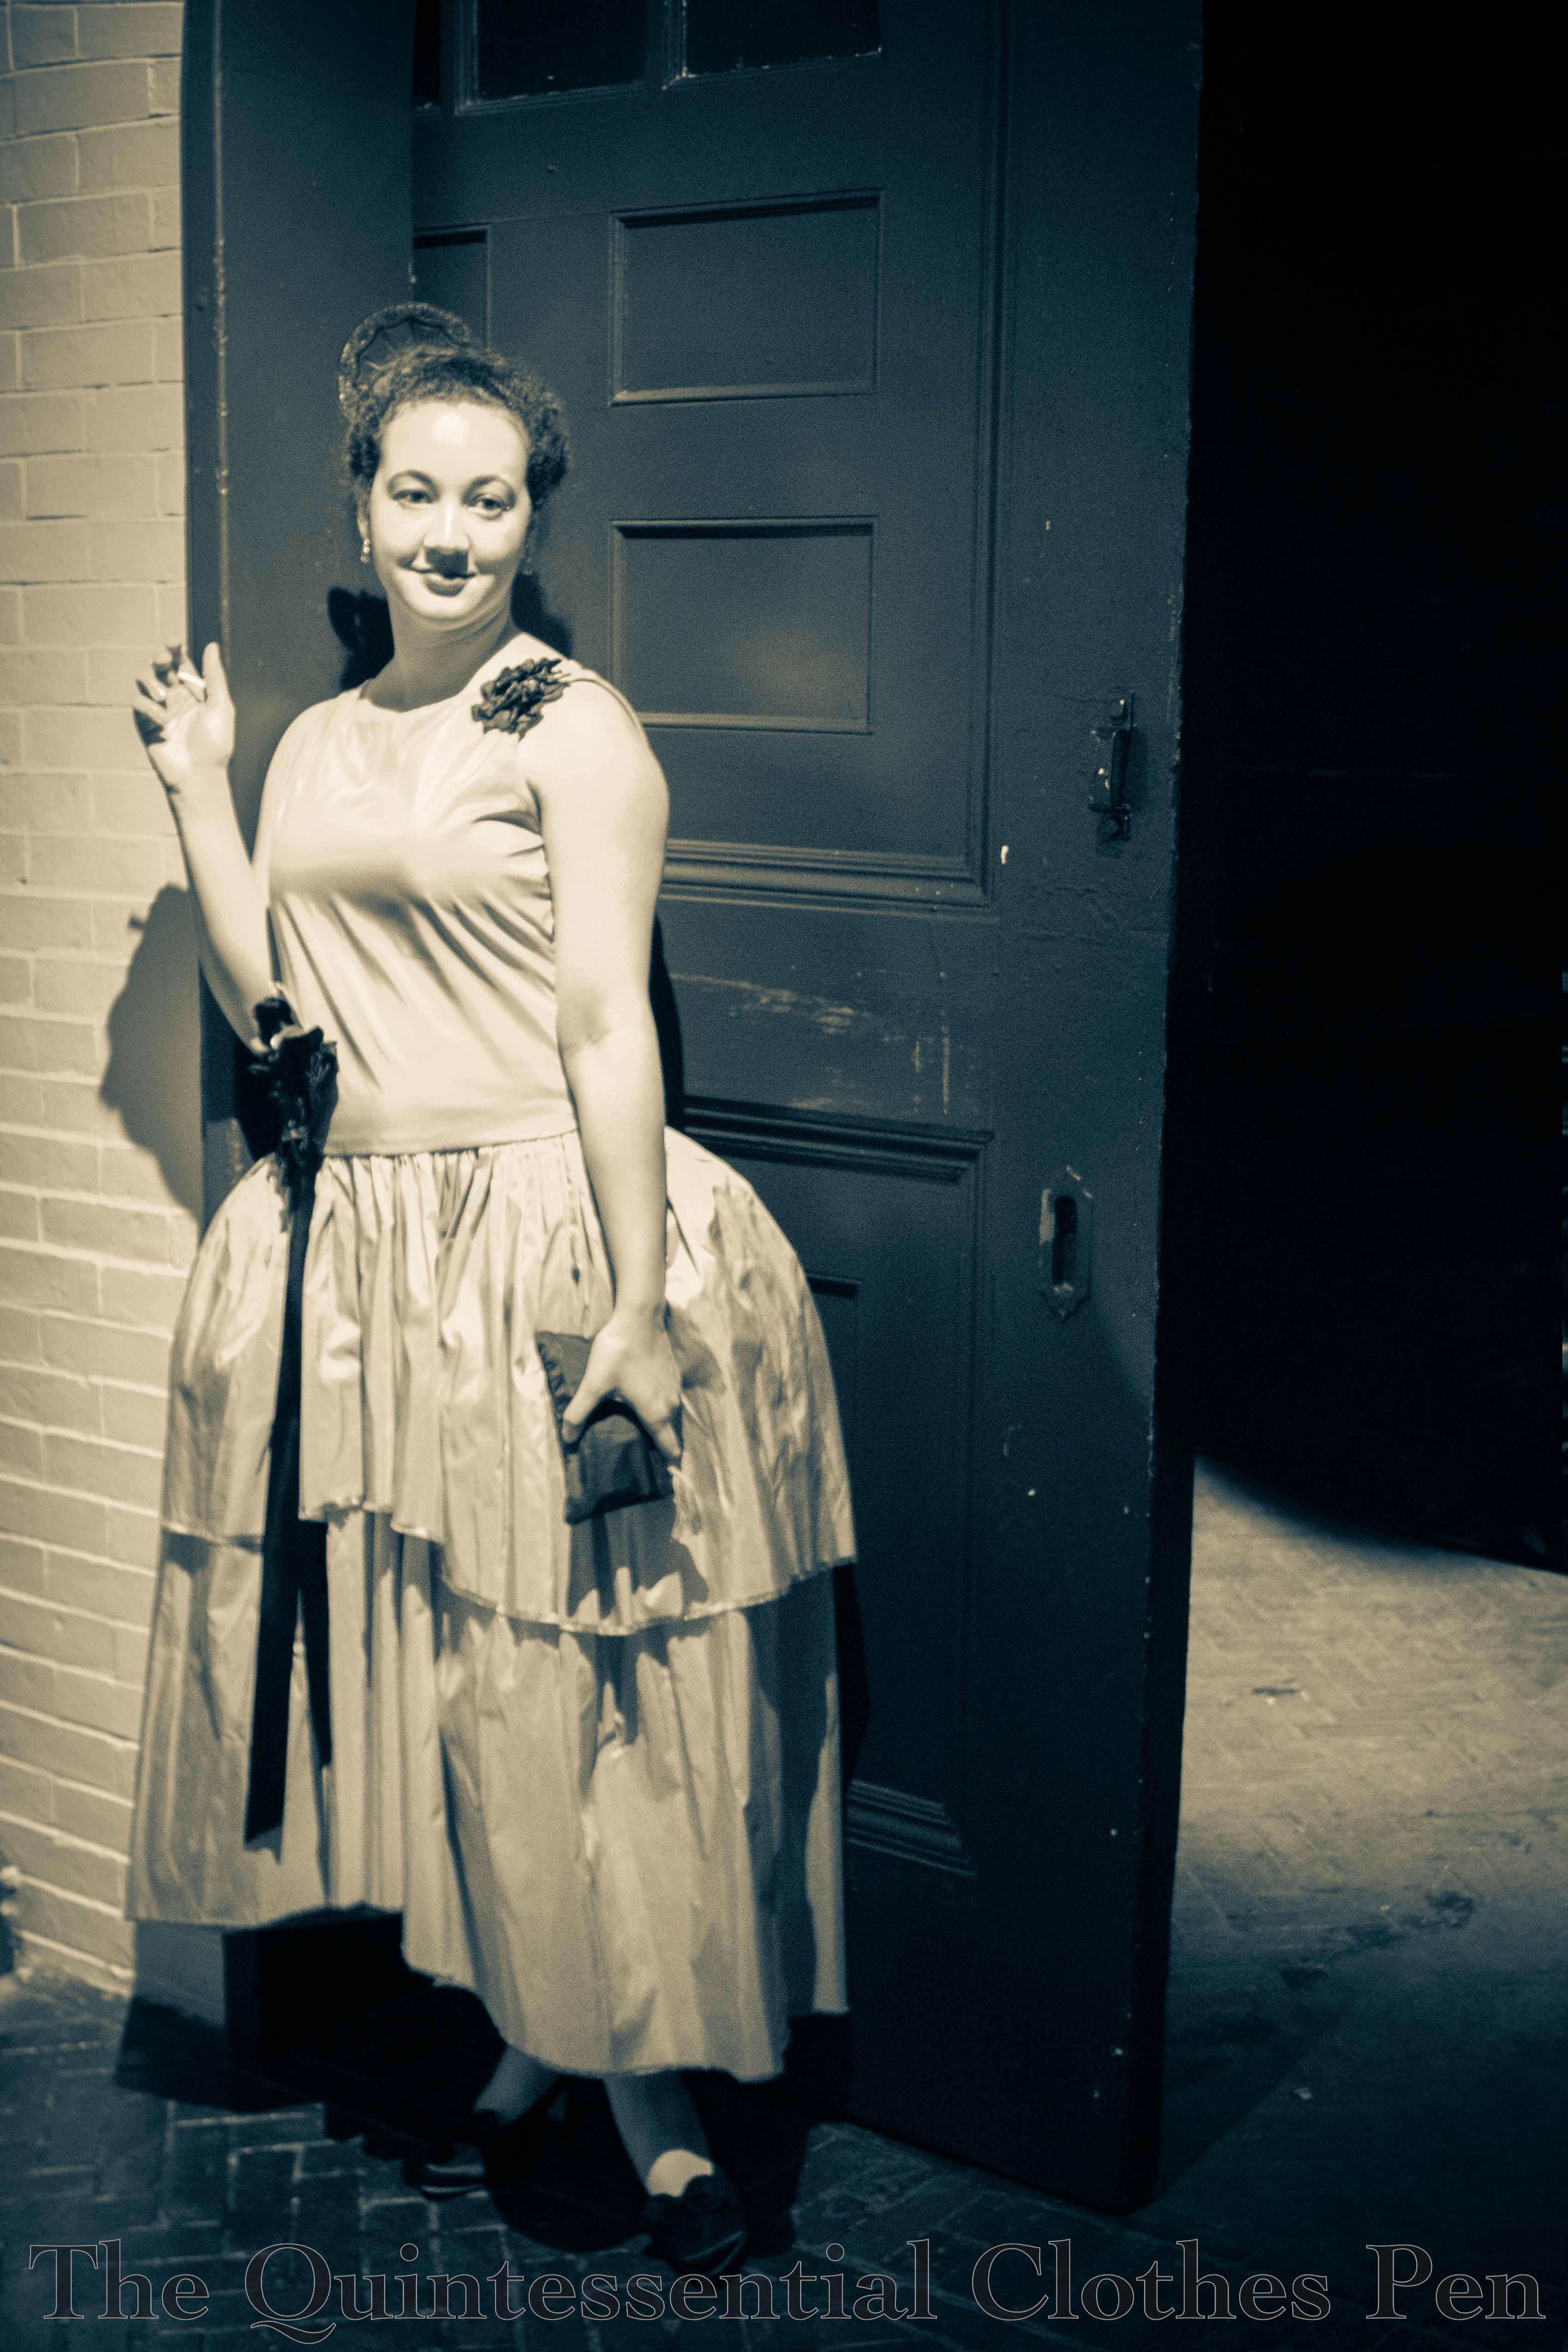
Mostly I stood around and talked to friends, hatched dreamy plans for how to sit in the cars, and took pictures, but we did go out on the dance floor a few times for some Charleston. Too bad nobody got pictures of that!
This was the third year of the event, I believe, but only the first year I had been free to attend. It was fun, and nice to attend an event that I wasn’t helping to run.
When I first wore my 1895 skating ensemble last January, I ran out of time and braid after trimming the back and sleeves. Sometime last year I ordered more of the braid from Debs Lace and Trims* and in November or December I ordered black wood toggles from eBay (super cheap, 50 for $2–I’ll have toggles for life!).
Showing off the finished trim on the back and sleeves from the first wearing.
I’ve only found this one picture of the front of the inspiration skating jacket. It’s not as close-up as I would like, but it was enough to base a plan on for my own jacket. Using that and other images on my sewing project Pinterest board, I planned out the yardage for each new row of trim. After lots of pinning, stringing toggles, and careful sewing I had used up every single inch of the new batch of braid for a total of 10 yards of braid trim on the jacket. But the result is excellent! I’m just as chuffed with the additional trim as I was with the ensemble when I first made it.
It didn’t snow much here this year (such a change from last year!), but we did have a day of sticky snow right after I finished the trim that was lovely to look at. I convinced Mr. Q to take pictures of me around our neighborhood the next morning while the temperature warmed up and everything began to melt. Luckily we made it out early enough in the day that there was still snow!
Passersby were staring, a lady on a balcony started a conversation with me about my outfit, and Mr. Q was, well, out of his comfort zone. I guess I’m just used to the situation. He was not–and I was amused.
However, despite my penchant for making really odd faces and talking when someone is trying to get a good shot of me, Mr. Q did manage to get a number of very nice pictures of the totally finished ensemble.
As you can see, I’ve edited out the odd faces and so far only included some of the more elegant and put together ones I managed to pull off.
Here are some silly ones. I’m not sure what’s happening this one–it looks like I’m blowing a kiss or making a wish. I might have been talking. It’s cute though!
This was a successful pose! Sometimes I just look totally silly when I pose, but I guess curious-what’s-around-this-tree face is not so bad.
And finally, one in which I wonder again what I’m doing… I think I was going to reach up for the tree branch, but then Mr. Q pointed out that it looked weird… It’s a fun silhouette shot, anyway.
*If you haven’t been before, check out Debs Lace and Trims. You can’t beat her prices and most laces and trims I’ve ordered from her have been excellent, with the exception of a few stiff laces when I was hoping for soft lace. But even then, the prices are so low that I put the lace in my stash and use it for other projects without being worried I wasted my money on a product I wasn’t happy with.
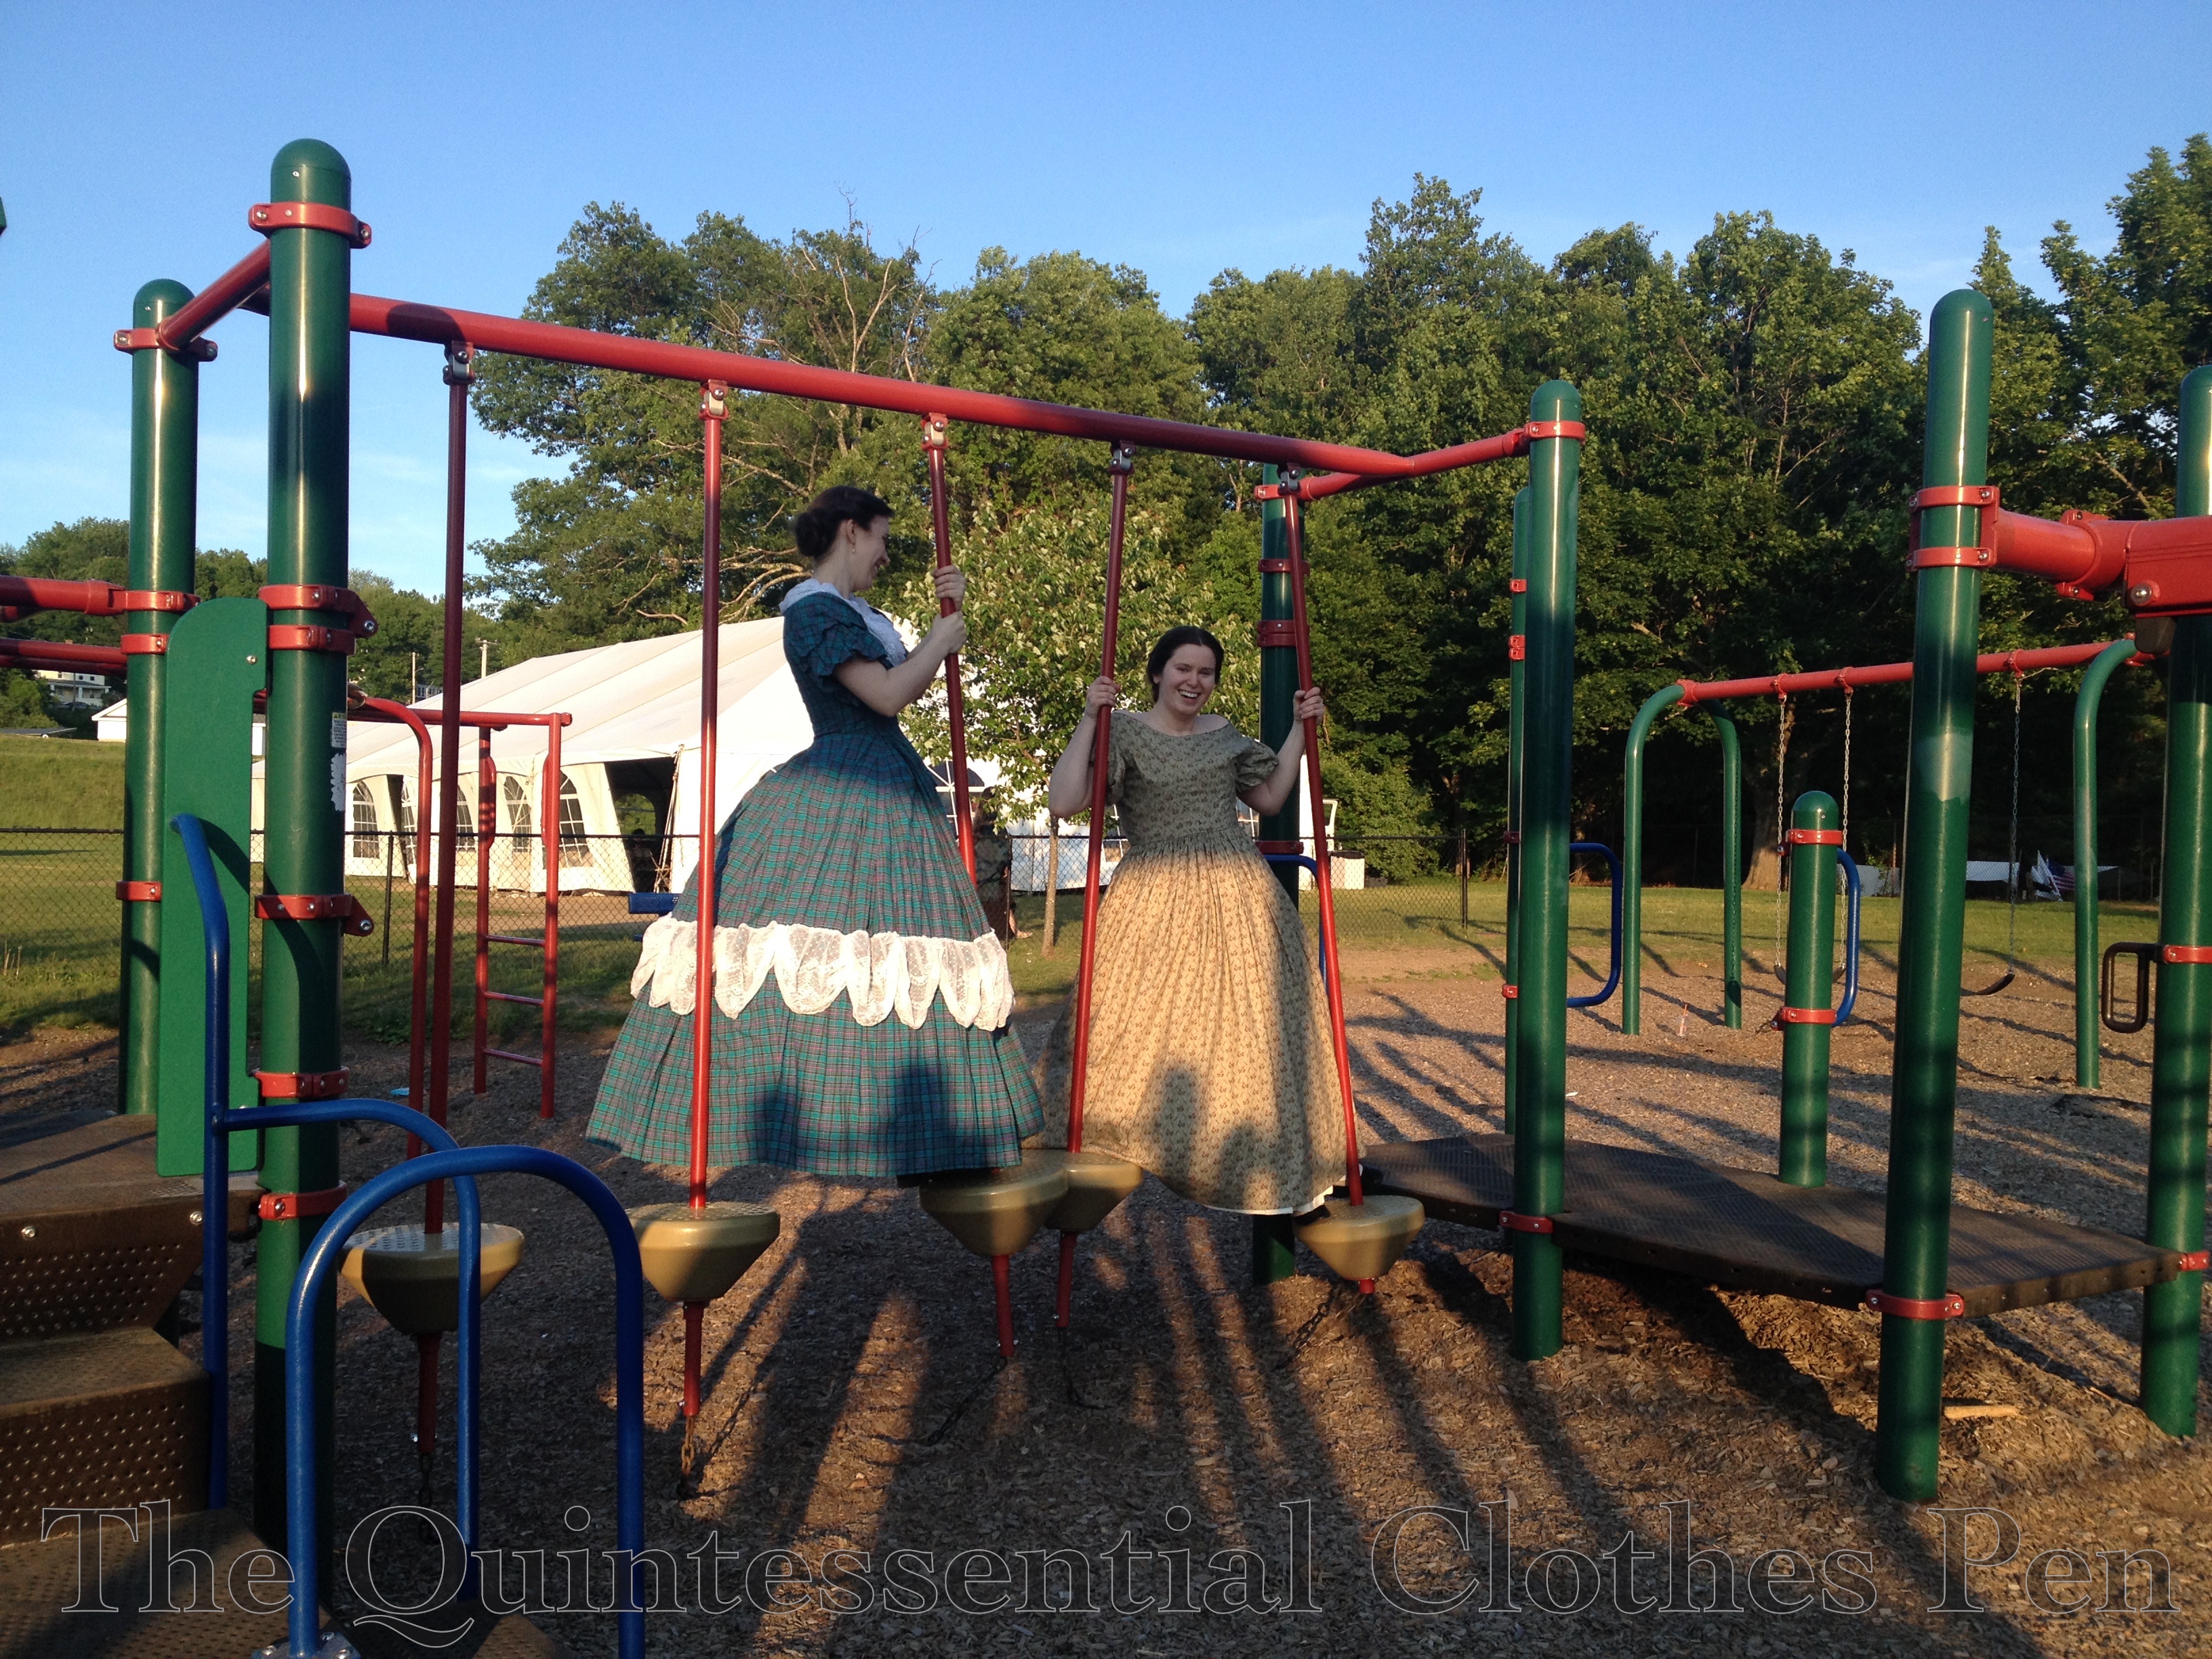
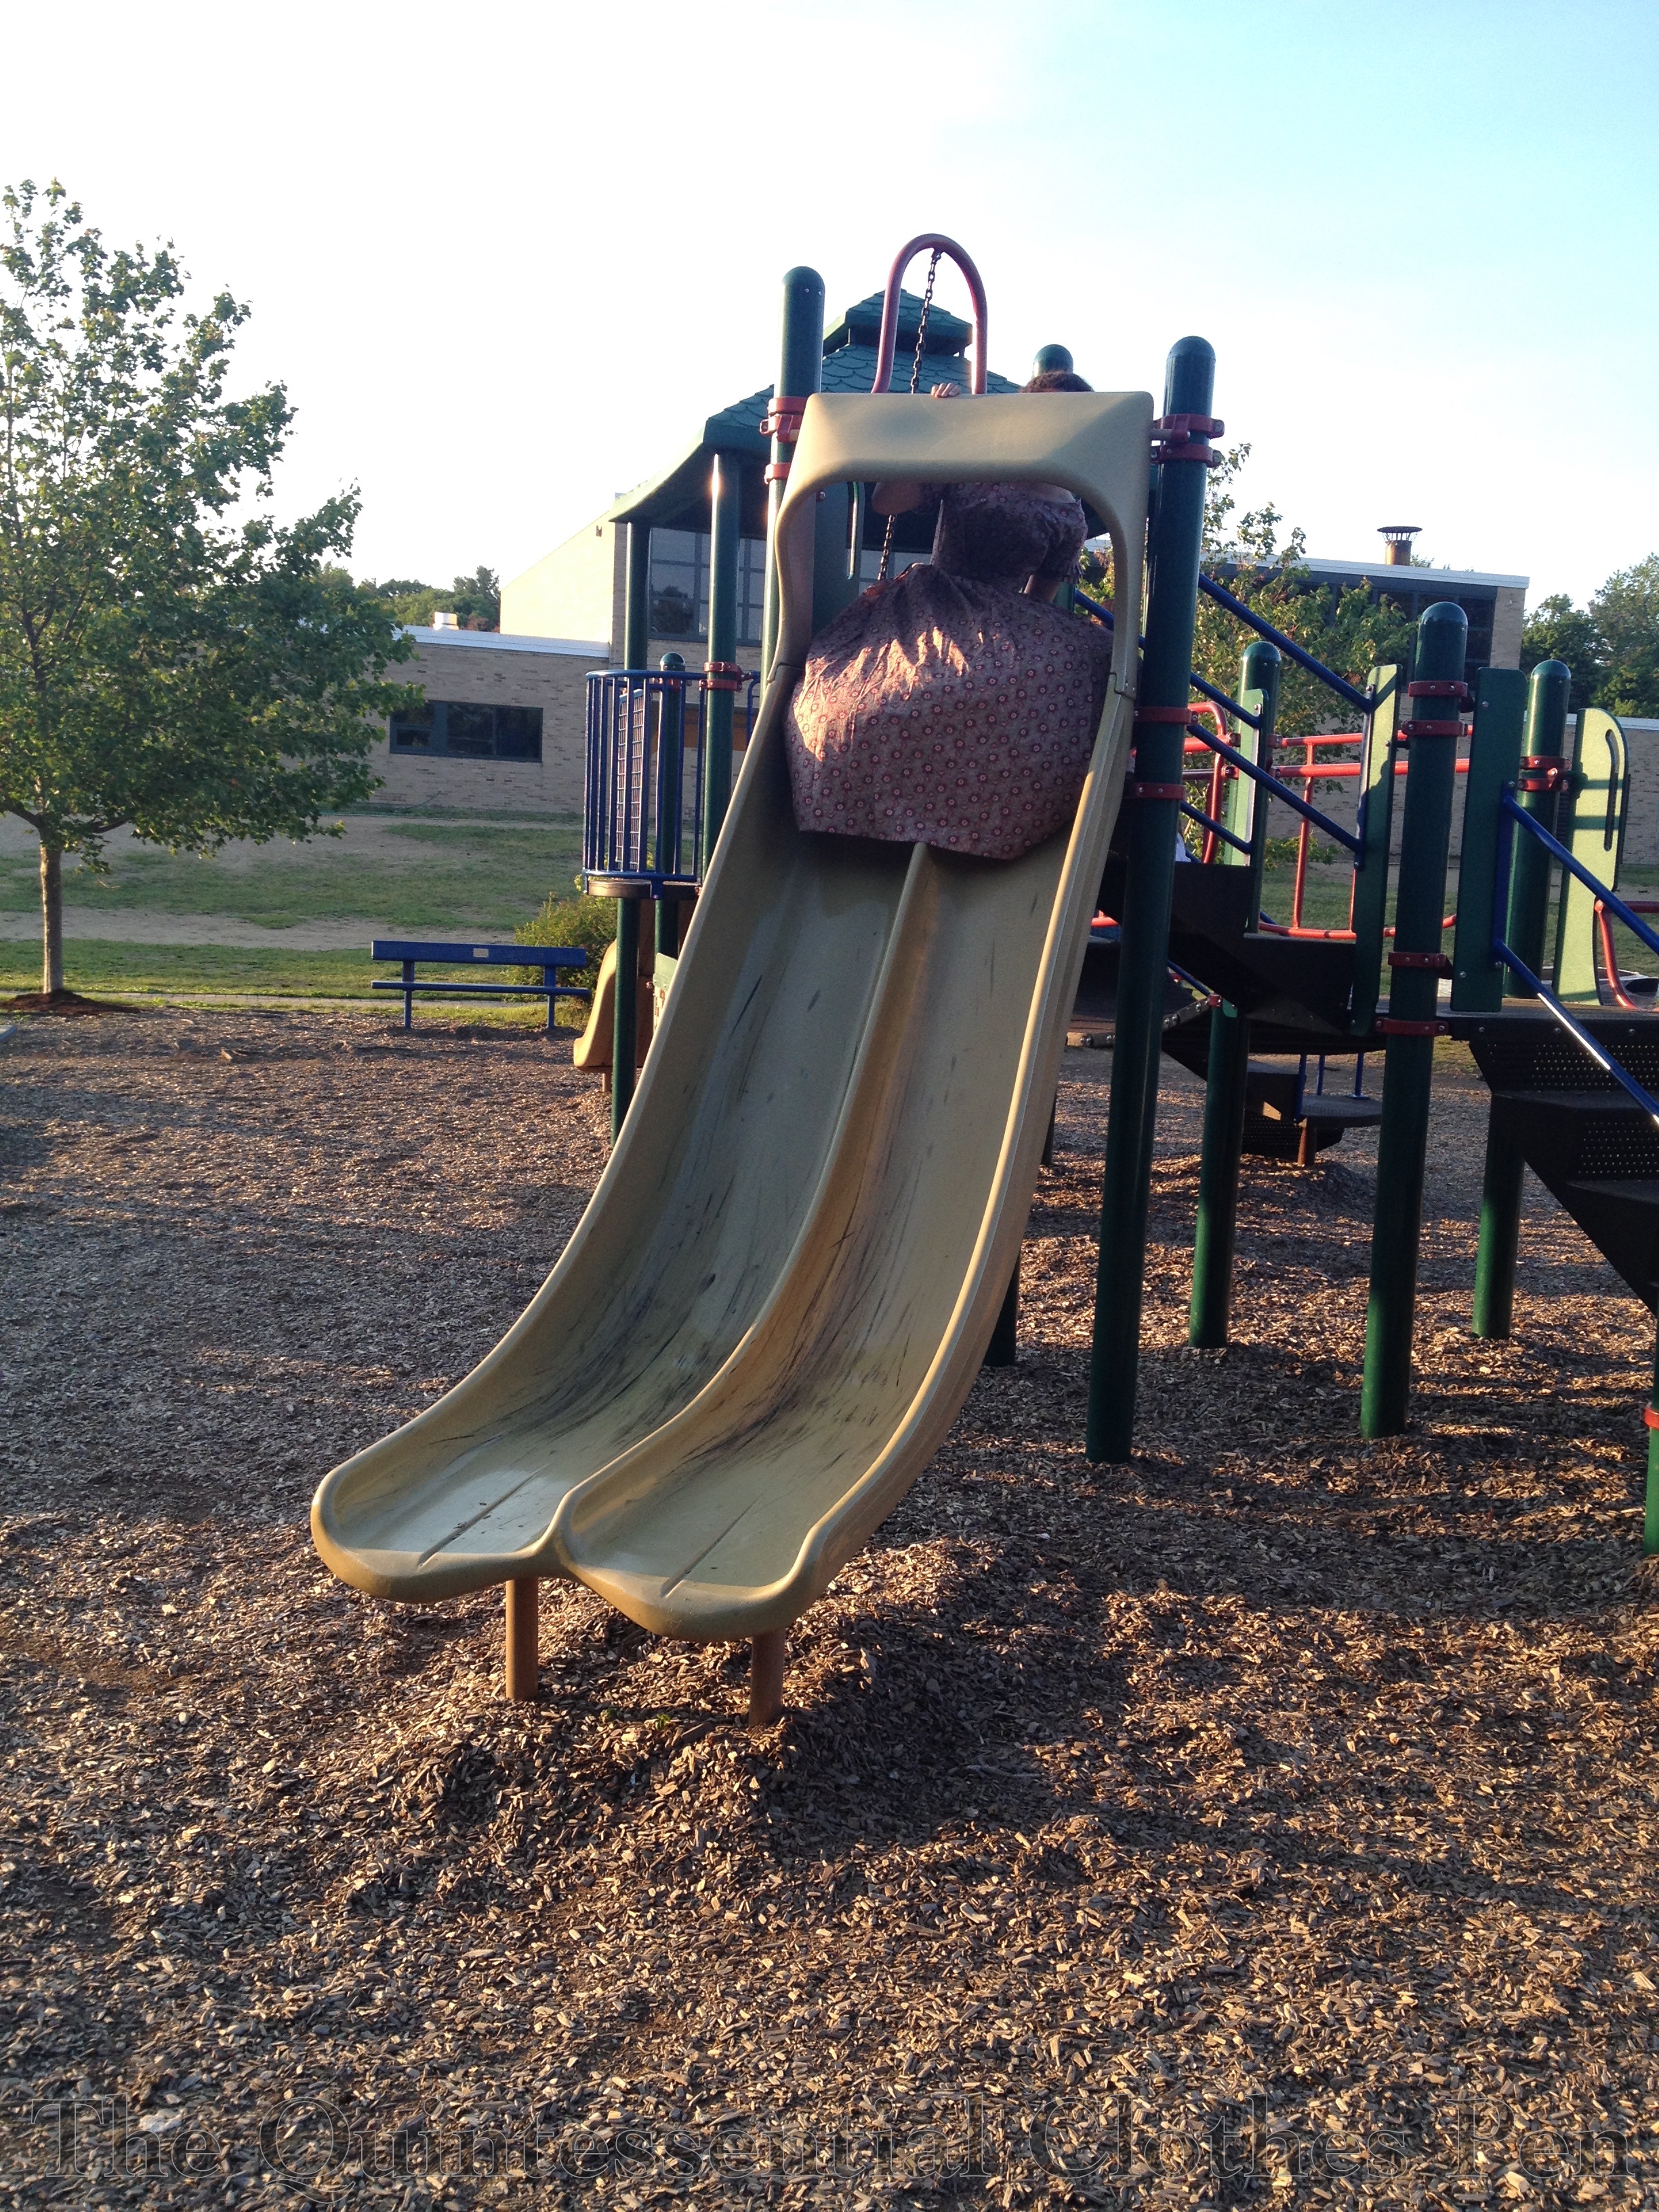
I’ve had a long week and am feeling like silliness is about all my brain can deal with posting for the moment. Plus, I’m ready for summer, or at least spring. So here are some silly pictures from last summer that I’ve been waiting to share until just the right moment. They bring a smile to my face and I hope they do to yours as well! Bring out your inner child and enjoy!
Who says you always have to act like an adult? Playgrounds are fun!
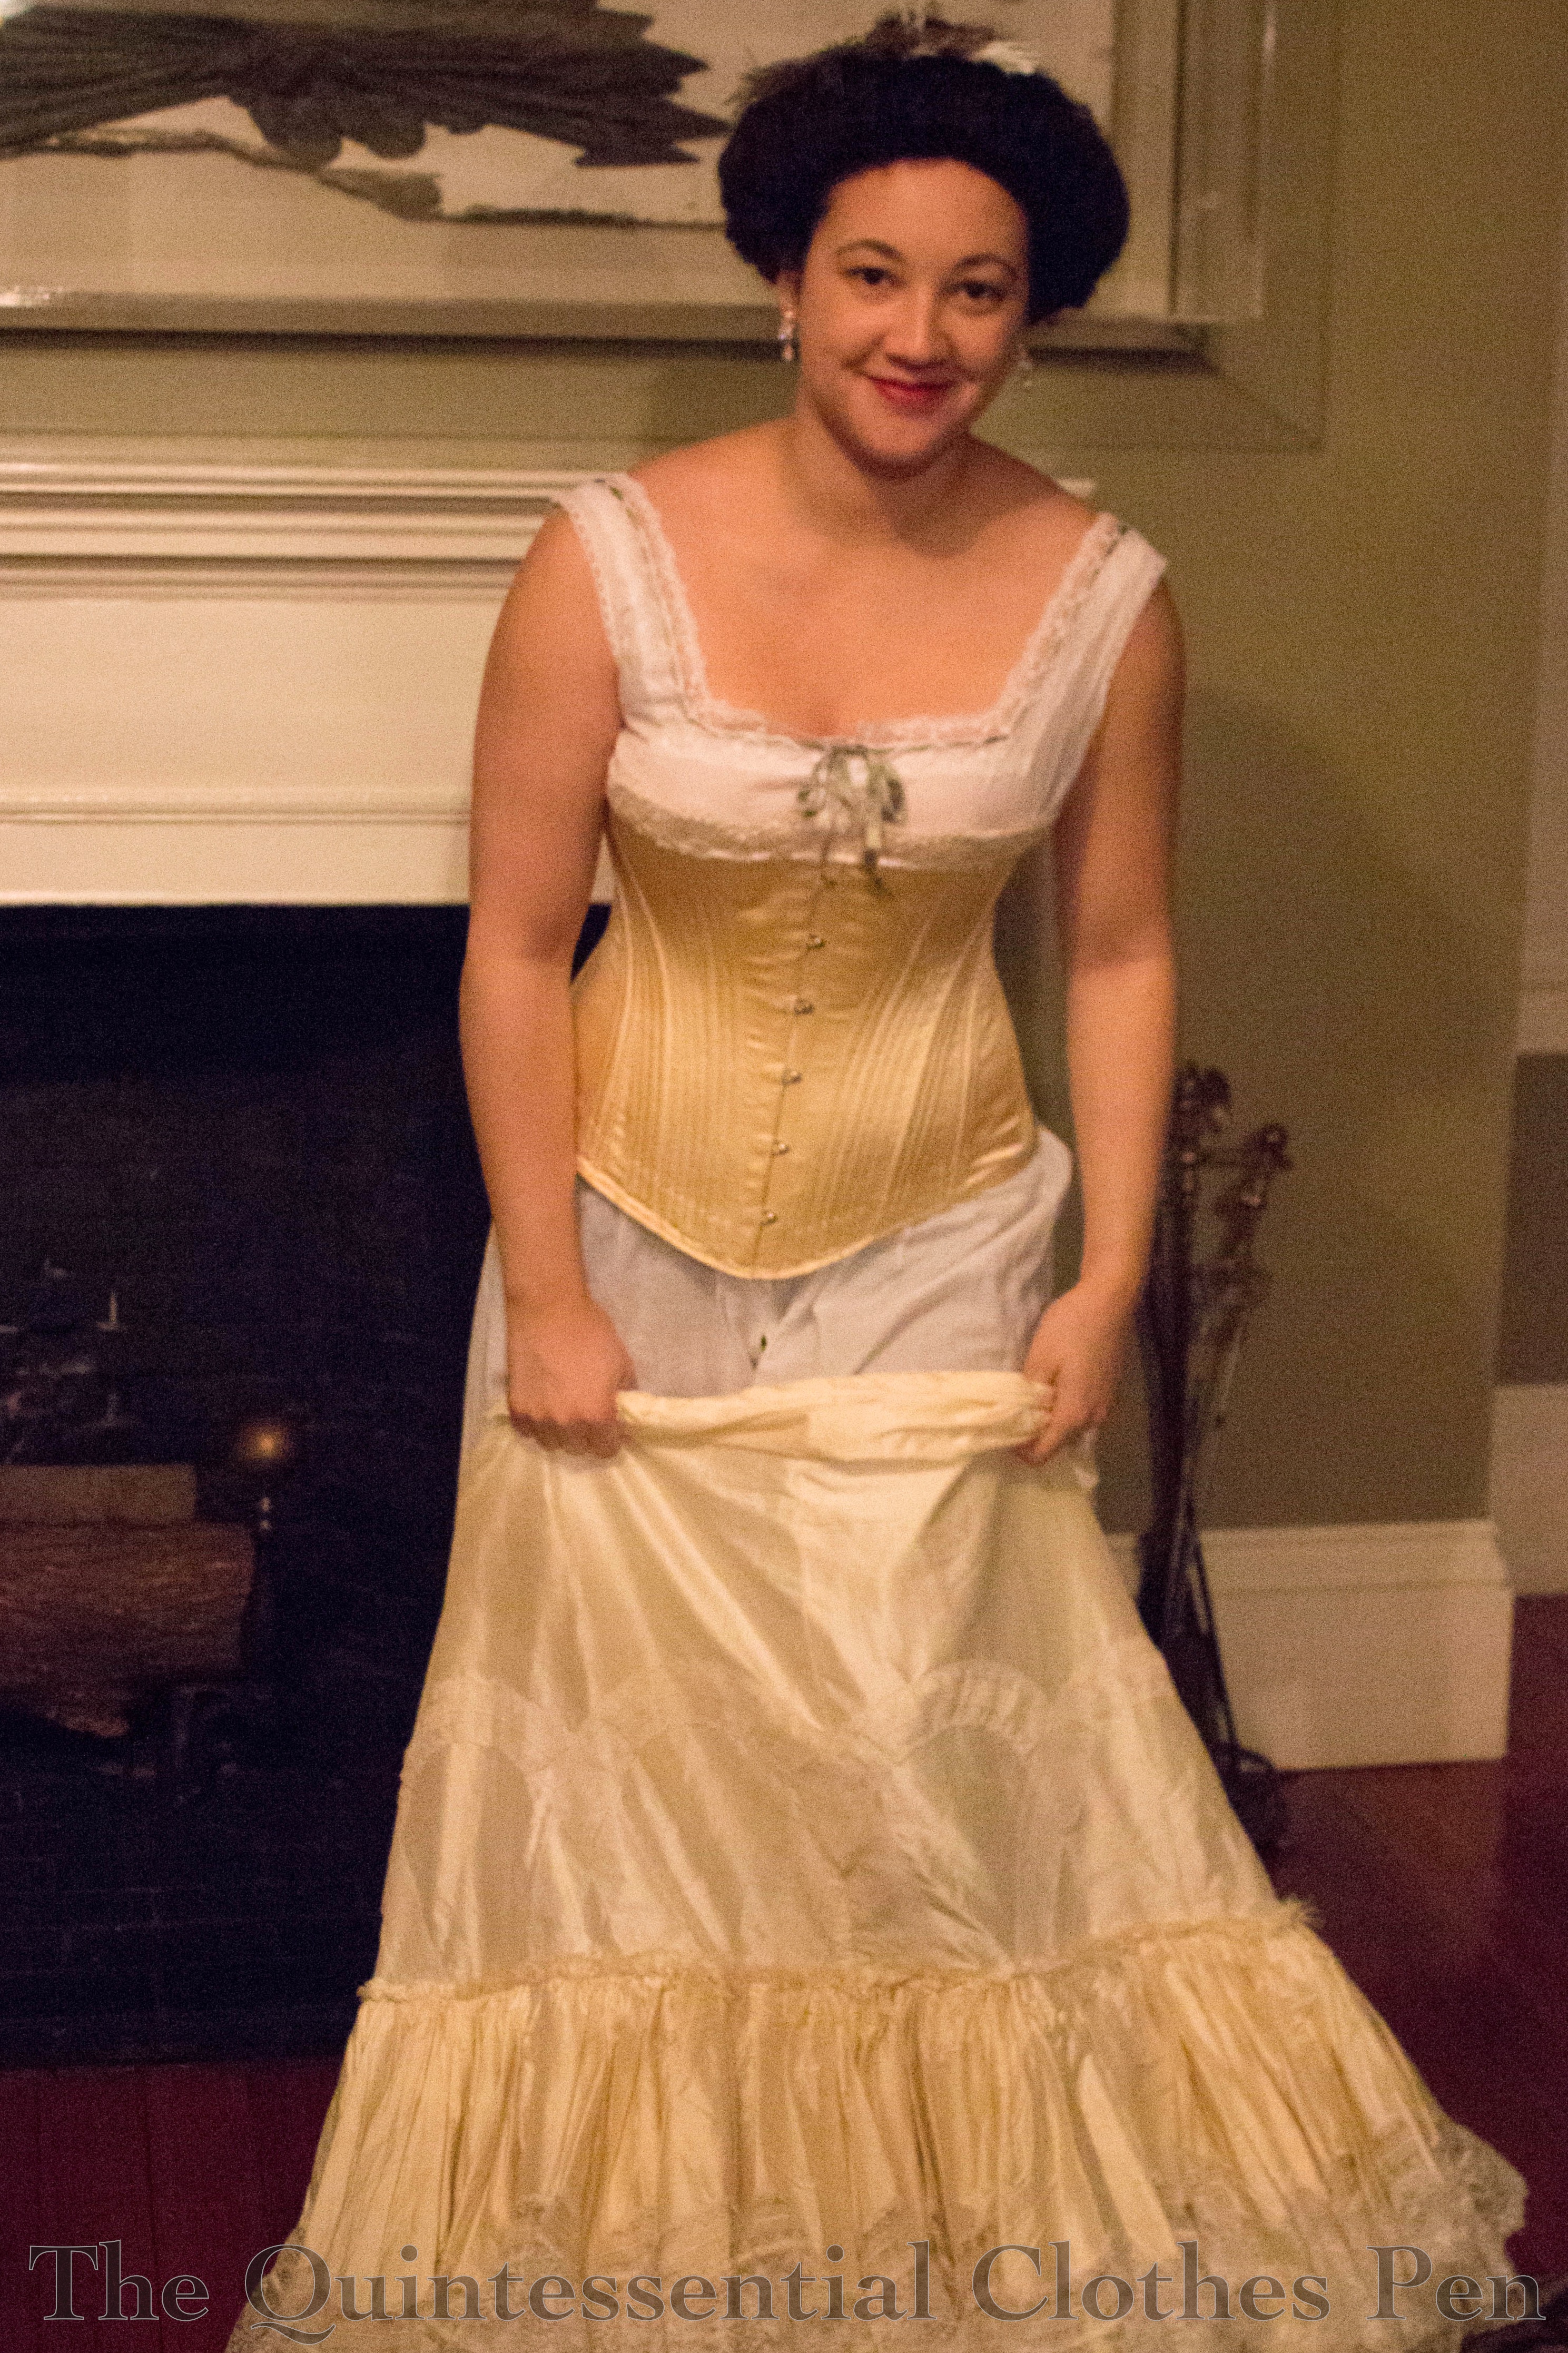
I’m excited that the 1880s corset I made last summer is finally, actually, finished! I got around to adding the finishing touches, lace and ribbon around the top, over the fall. Now there is nothing left to sew, and, after two wearings I can say with confidence that there are no little alterations I want to do! Yay!
The first wearing was in August last year, with my 1885 frills and furbelows dress. The second wearing was in January this year, under my new 1899 evening gown. Both times I found the corset to be extremely comfortable to wear. And in January, I was able to get pictures of the completely finished corset! So, without further explanation, here is the corset in its finished form. (If you didn’t get to read all the intricate details of the patterning, construction, and steaming process, you can see all past posts here, in the project journal.)
The super frilly petticoat was a great prop for these photos! (I’m much better at looking natural rather than awkward when I have props!). It’s from 1903 and was finished in 2011. I’ve worn it many times but have never taken photos of it on me. It’s entirely silk, with two layers of flounces, both made of multiple gathered circles and edged with wide lace in a scallop pattern. It closes with a silk ribbon that threads through the waistband in manner described in Authentic Victorian Dressmaking Techniques. It’s decadent to wear–it makes rustling sounds, has great body, and when you take it off it stands up on it’s own! I can’t remember how many yards of fabric went into this petticoat, but I know it was a lot, with all the circles in the flounces!
Awesome petticoat aside, this corset is pretty decadent to wear, also. Silk, tons of curvy seams and bones, perfectly fitted, lovingly, painstakingly, and beautifully sewn… what’s not to like!
Thanks to the usual camera toting culprit for doing a corset photo shoot with me in the midst of getting dressed for a ball! You know who you are.
(As a side note, it’s a challenge to take historical clothing underwear pictures that look reasonably like historical photos and images but don’t go into the modern lingerie photo direction. See the inspiration here and here? I tried this as well as the standing pose in the second link, but awkward really describes the outcome. But I think we did pretty well in the end. It’s amusing to feel these photos are revealing when I’m quite dressed by modern standards… Do you feel the same way about taking pictures in your historical underwear?)
I was very pleased with my hair for the 1890s ball! One of the reasons I liked the idea of an 1899 dress is because it is close enough to the turn of the century that a Gibson Girl hair style made sense. My hair loves cooperating in poofy styles, so this was perfect!
I created the super poof using a pad made from one leg of a pair of tights. It’s stuffed with cheap “wizard beard” hair that would otherwise have gone in the trash. Being stuffed with synthetic hair, the pad is pretty warm. And I did struggle a bit to get bobby pins through the tights–I need to add loops to the ends for next time I think. Aside from those things, though, the pad was perfect!
I also created a new hair ornament to finish off the coiffure. I had originally thought of bleaching the ostrich feathers to create an aigrette*, like this, but decided that I liked the ostrich feathers as is and didn’t feel like dealing with bleach. There are two feathers: a grey and a white. I found that the white helped create definition for the grey on my dark hair. The sparkly bit is a cheap eBay brooch. I sewed the feathers to it and then used the pin part to bobby pin it in place on my head.
Success! Look at that haughty Gibson girl look (like this)!
*An aigrette is a spray of feathers from an egret. Confusing!
I already had inspiration pinned to a board, I had fabric in the stash (the fabric is more of the same elusive blue I used to make my 1811 evening gown in 2014–it time travels!), and I had an opportunity to wear an 1890s gown this past month! With a vague plan in mind, I started the skirts* sometime in the fall with the sincere hope of getting a fair bit done on them, but only got as far as cutting them out, after which they languished in the closet while I worked on other projects. Languishing is a variation on procrastination, which is the HSF challenge for this January. And so, with the languishing having finished its course, here is the finished new gown.
Just the facts:
Fabric: 5 yards or so of(likely polyester) elusive blue chiffon, 3 yards or so of elusive blue polyester for skirt lining, 3/4 yard or so robin’s egg blue cotton, 1 yard or so of pink glazed cotton, 1/8 yard or so of taupe silk shantung, some small bits of ivory polyester tulle and ivory silk gauze.
Pattern: Created by me, with reference to Janet Arnold dresses from the 1890s.
Year: 1899.
Notions: Wide grosgrain ribbon, bone casing, 1/4″ plastic wire tires, narrow grosgrain ribbon, black velvet and organza millinery flowers, hooks and eyes, and thread.
How historically accurate is it?: Definitely recognizable in its own time. The silhouette is spot on. The colors are inspired by extant clothing. The construction is mostly accurate. The materials are a mix of accurate and inaccurate. I’ll give it 80%.
Hours to complete: Many. I worked on this over a few months.
First worn: January 9, 2016.
Total cost: About $15-$20.
(The low cost is due to the fact that the chiffon and lining fabrics were purchased for the amazing price of $1/yard and that many of the notions and small bits were in my fabric stash.)
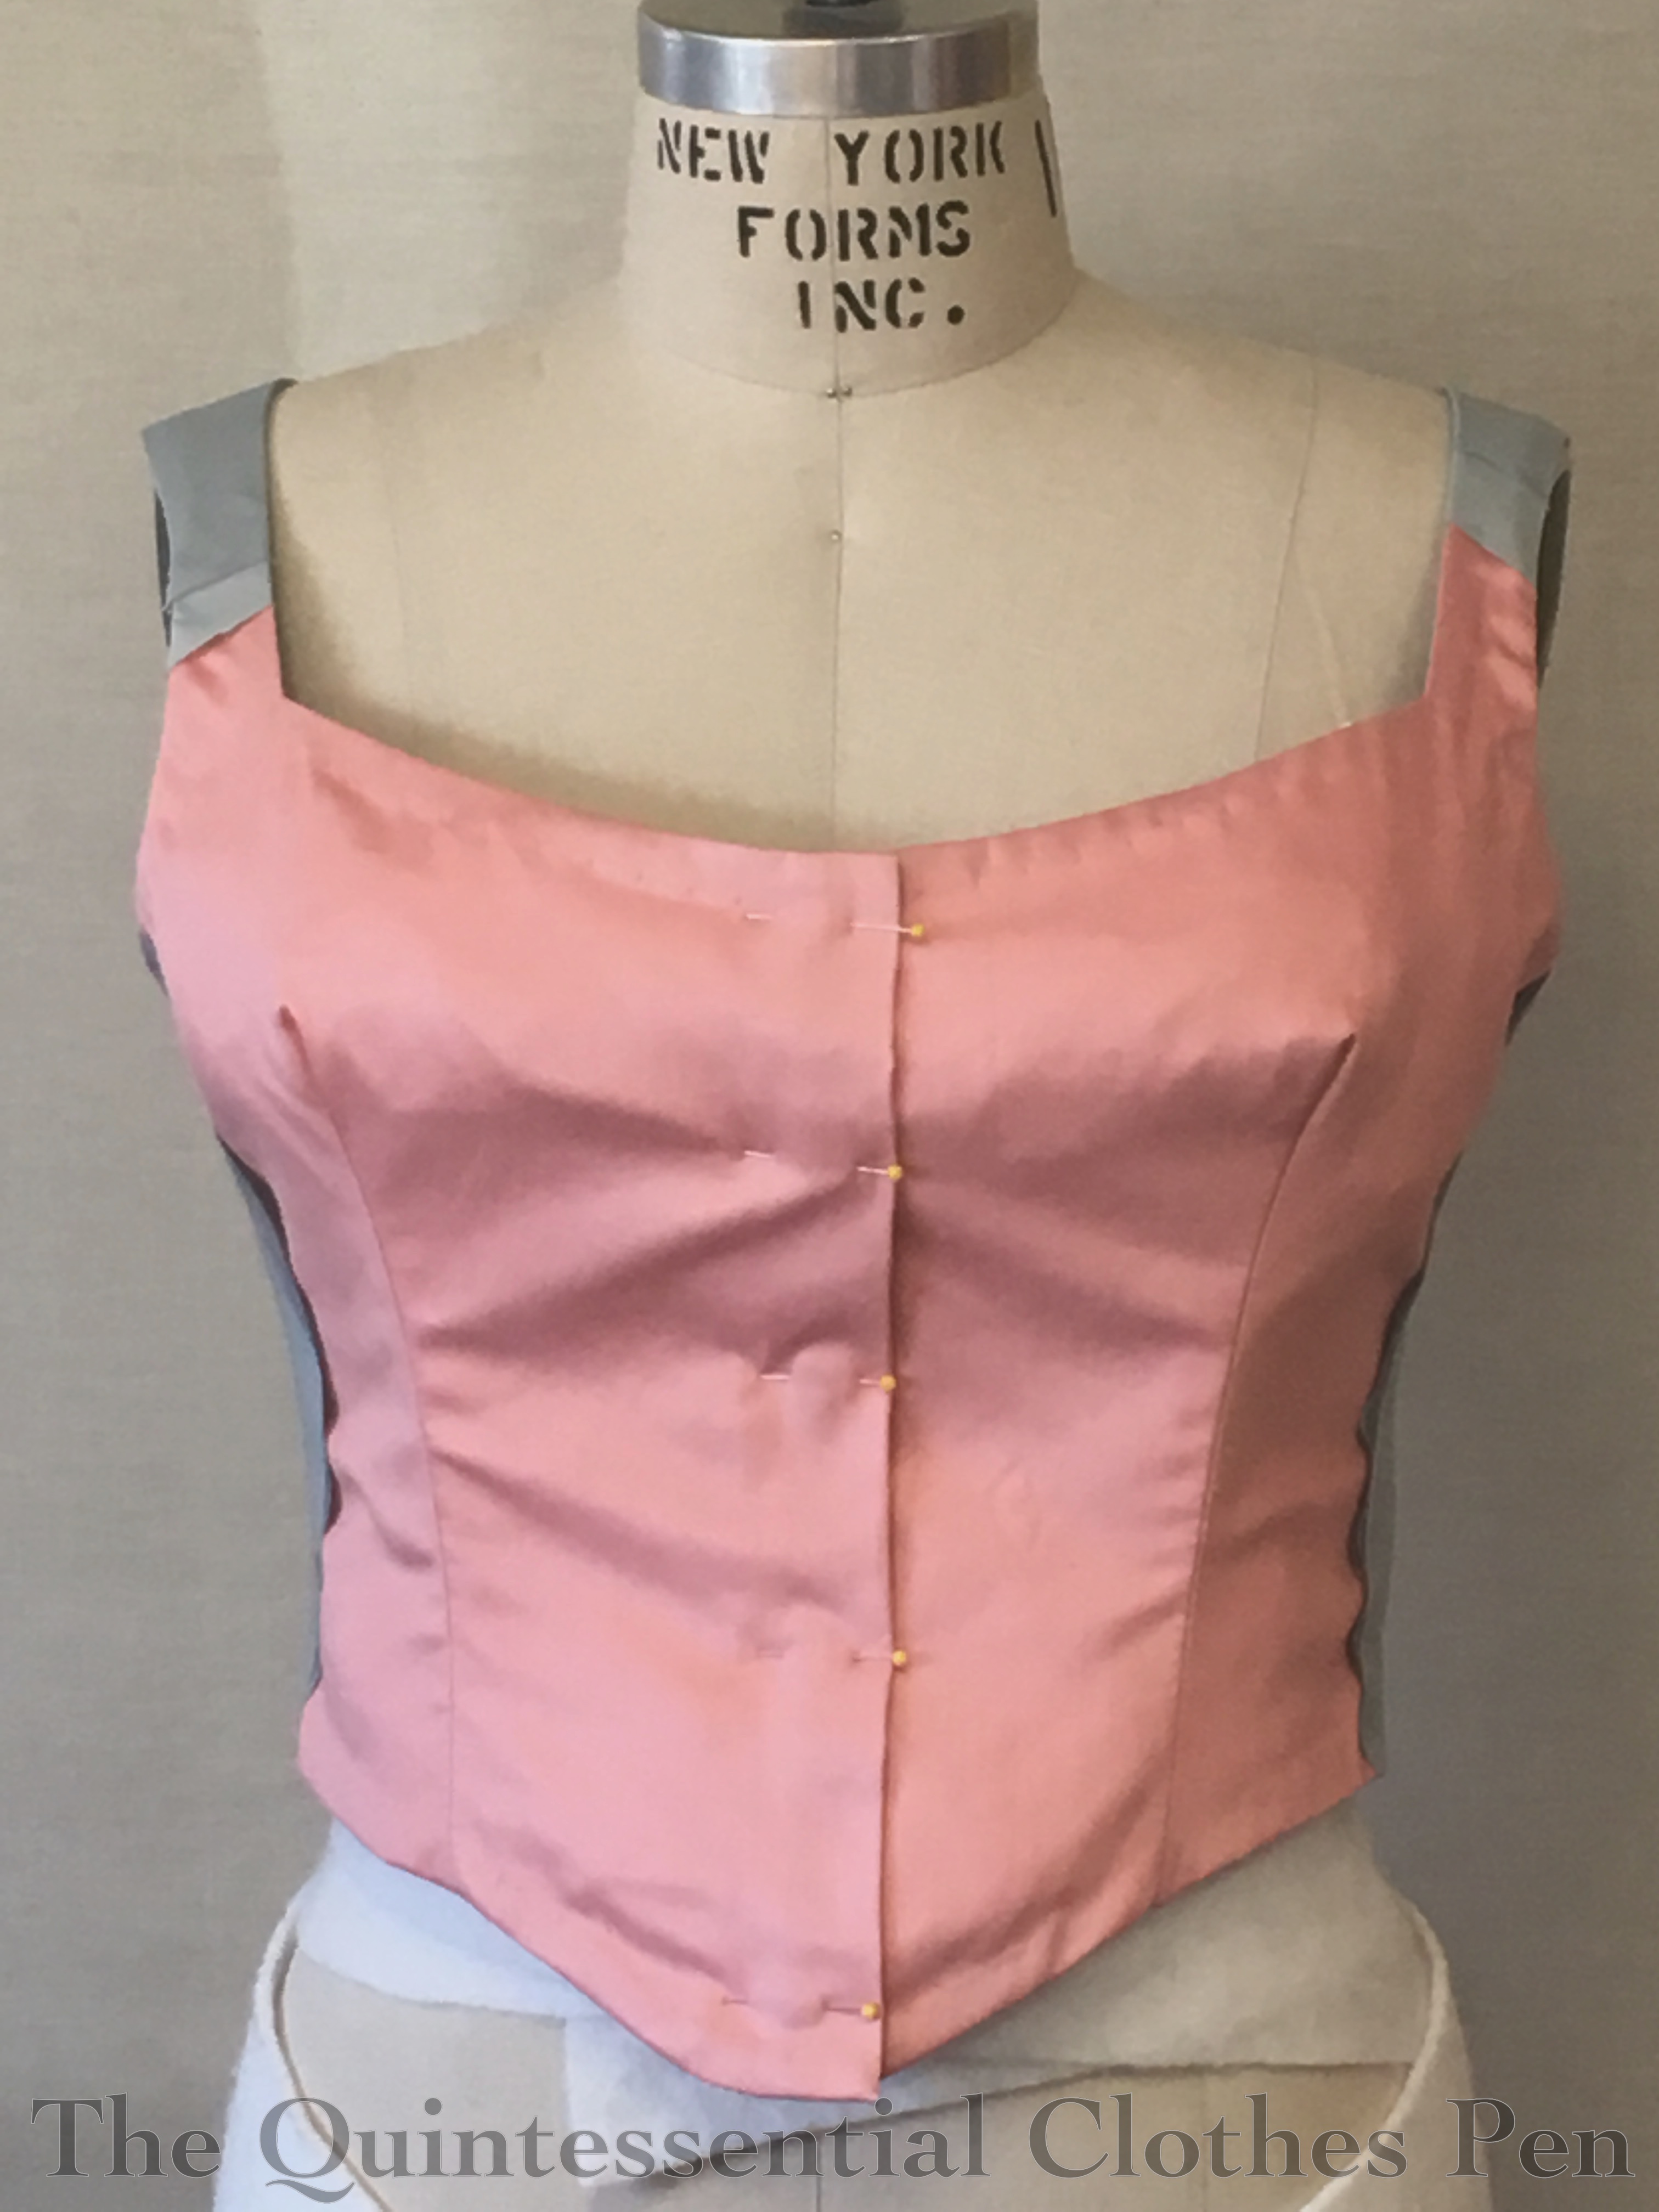
For the bodice, I started with the pattern for my 1893 gown (which was adapted from Janet Arnold originally). The back needed very slight alteration, but the front had quite a few changes, due to being worn over my new 1880s corset and because I wanted different dart placements, neckline, a front/side hidden closure, etc. I did multiple mock-up fittings (no pictures, sorry) before feeling ready to cut real fabric.
Here is the bodice in the middle stages on construction. You’d never guess from the exterior, but the bodice is flat lined with pink! This is not a standard lining color, but I had it on hand, it is the right weight (with a glazed finish, which is standard), and it amused me. By this point, I’d finished my edges, adding boning, nicely finished my interior seam allowances, and covered the back with elusive blue lining and chiffon cut on the bias.
Next was creating the front bodice main piece, which is also on the bias. I draped it and then bagged the lining/chiffon with the robin’s egg cotton to create nice finished edges. The flapping bit on the left of the picture was turned under and hand sewn later in the process.
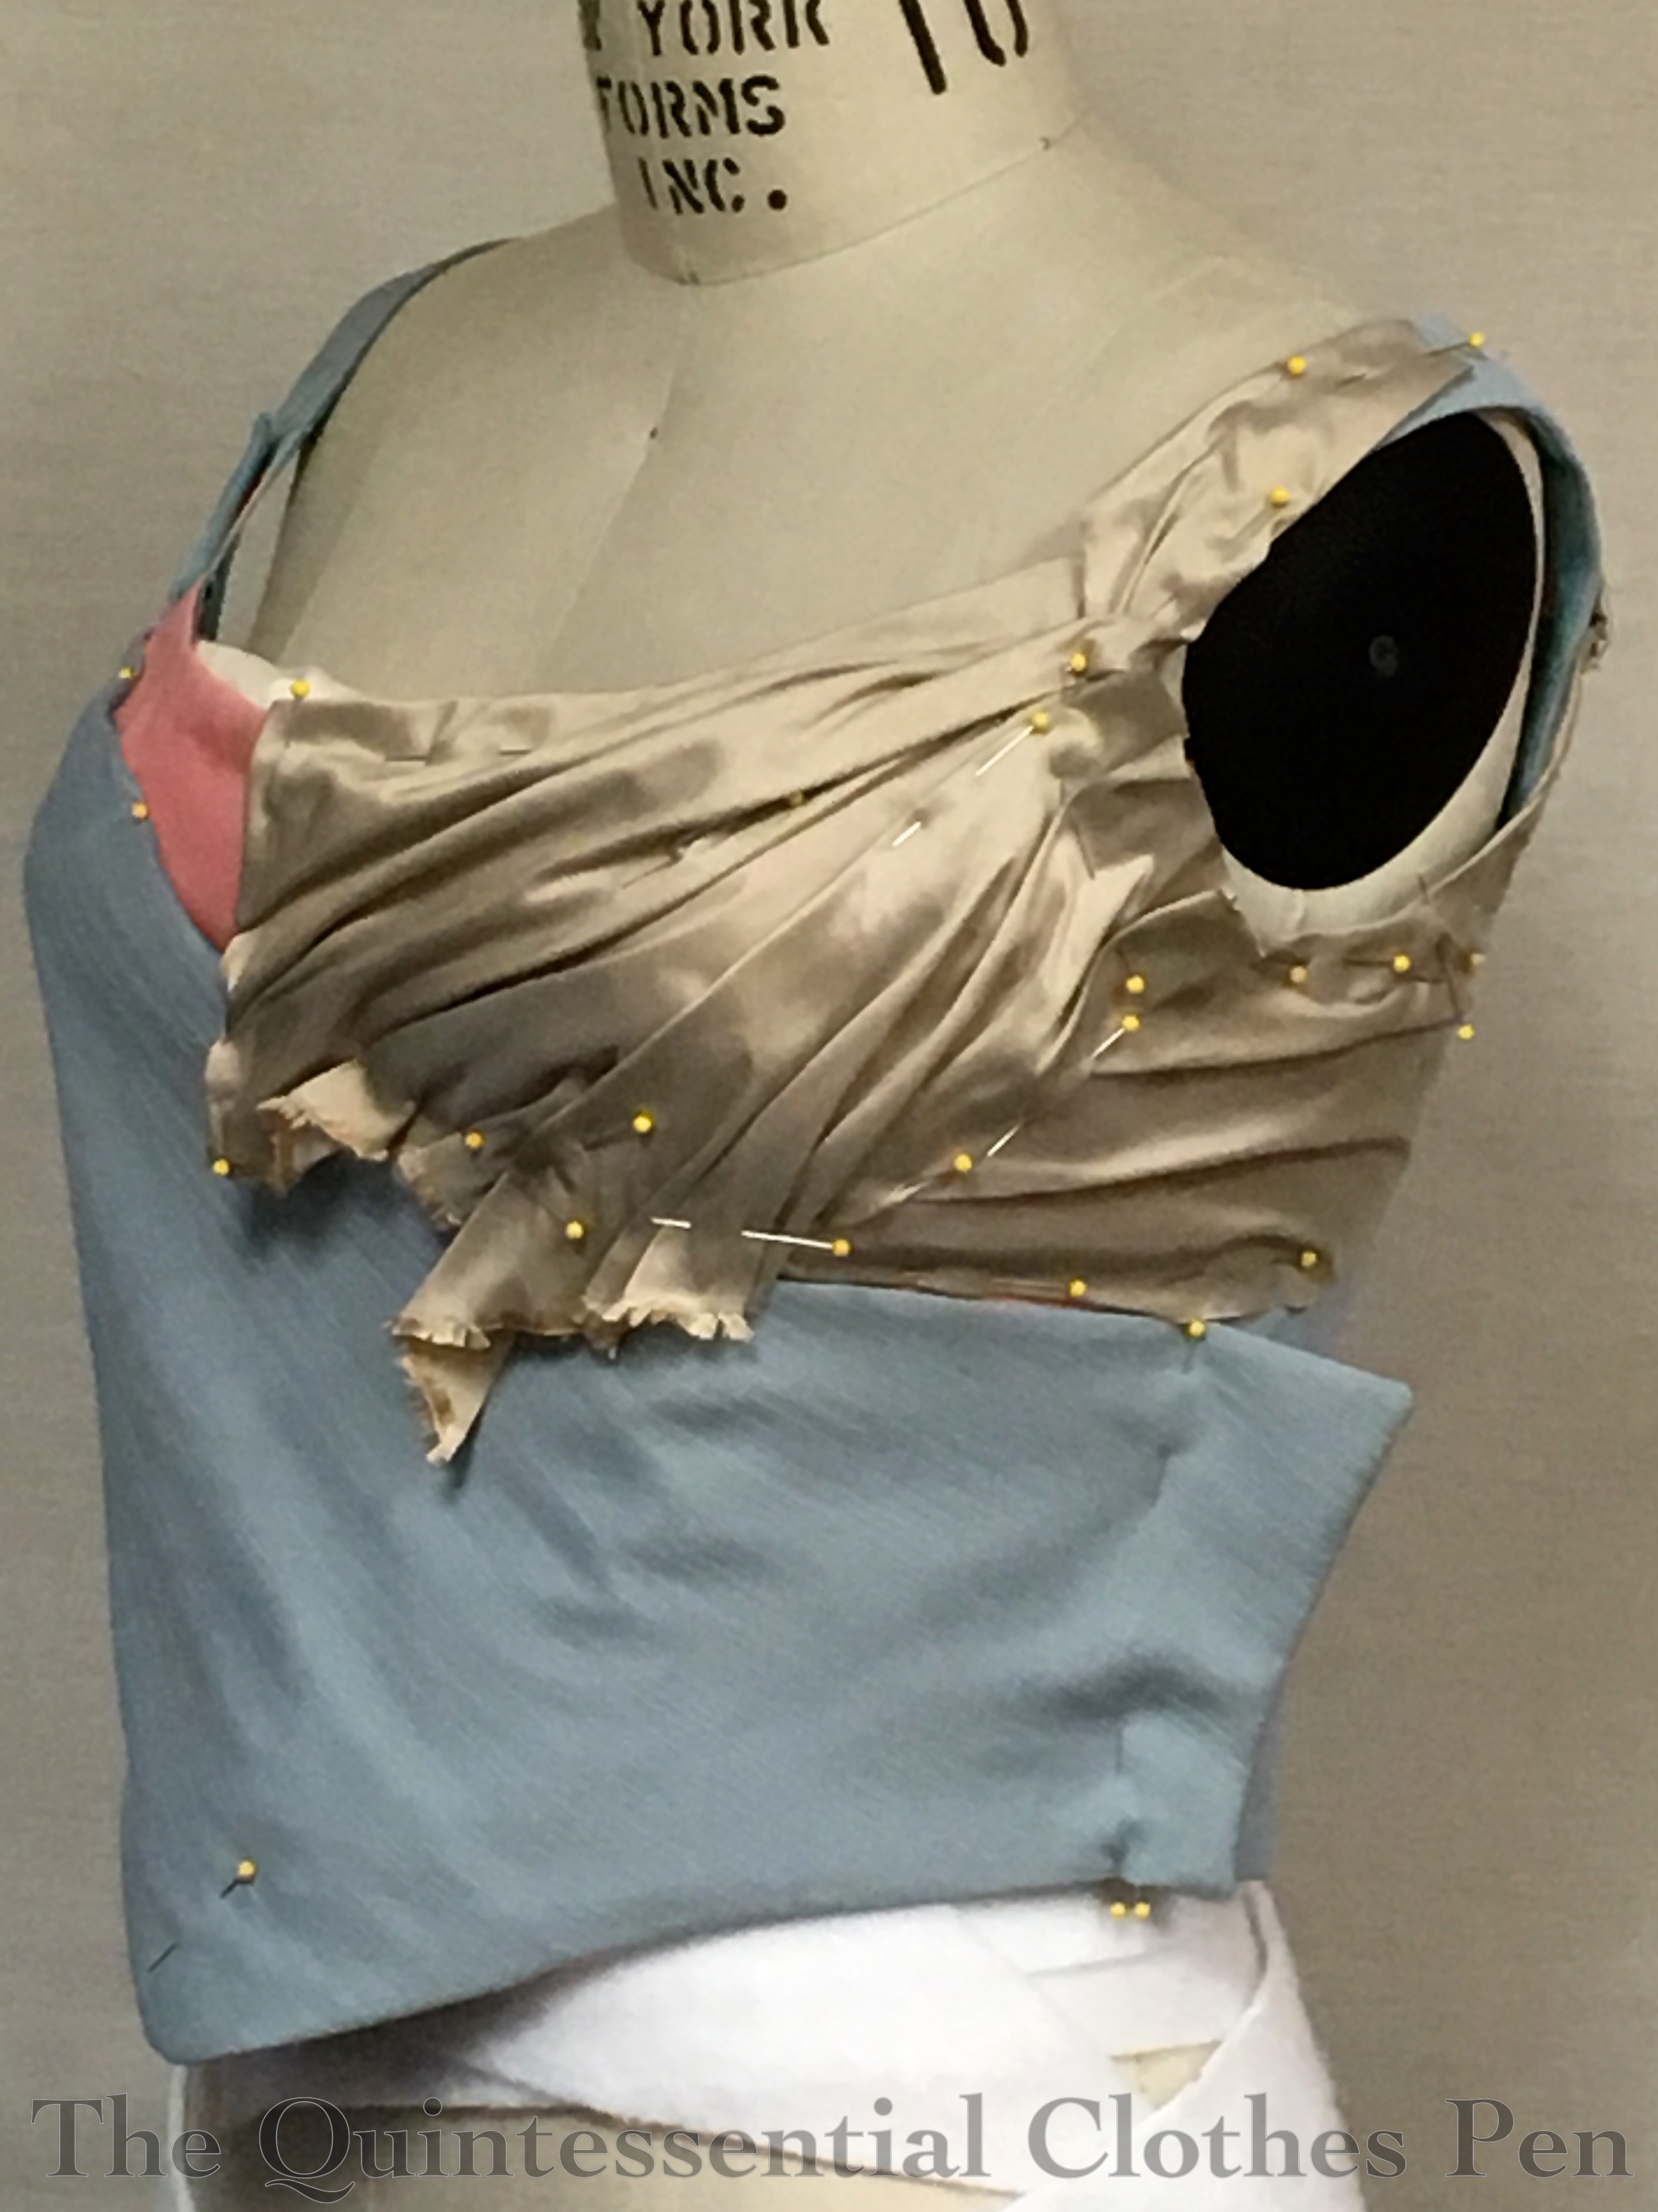
Draping the silk was next. There are actually a number of small pieces carefully pleated before being hand sewn in place.
My original main inspiration was this gown at the Met (and the alternate skirt follows this idea quite closely), but when I looked at my material options, I really loved this variation, also from the Met. Other dresses with a similar cut were also influential, including this, this, and this. Here’s a similar example that clearly shows the shadow of a side closure.
In the next picture, both the left and right sides have been covered in silk. Each side of the bust layers and attaches separately. I also started playing with flower placement at this point. I was inspired to add black accents to the otherwise subdued colors by this dress. I really like how the black pops!
Here’s the back around the same stage.
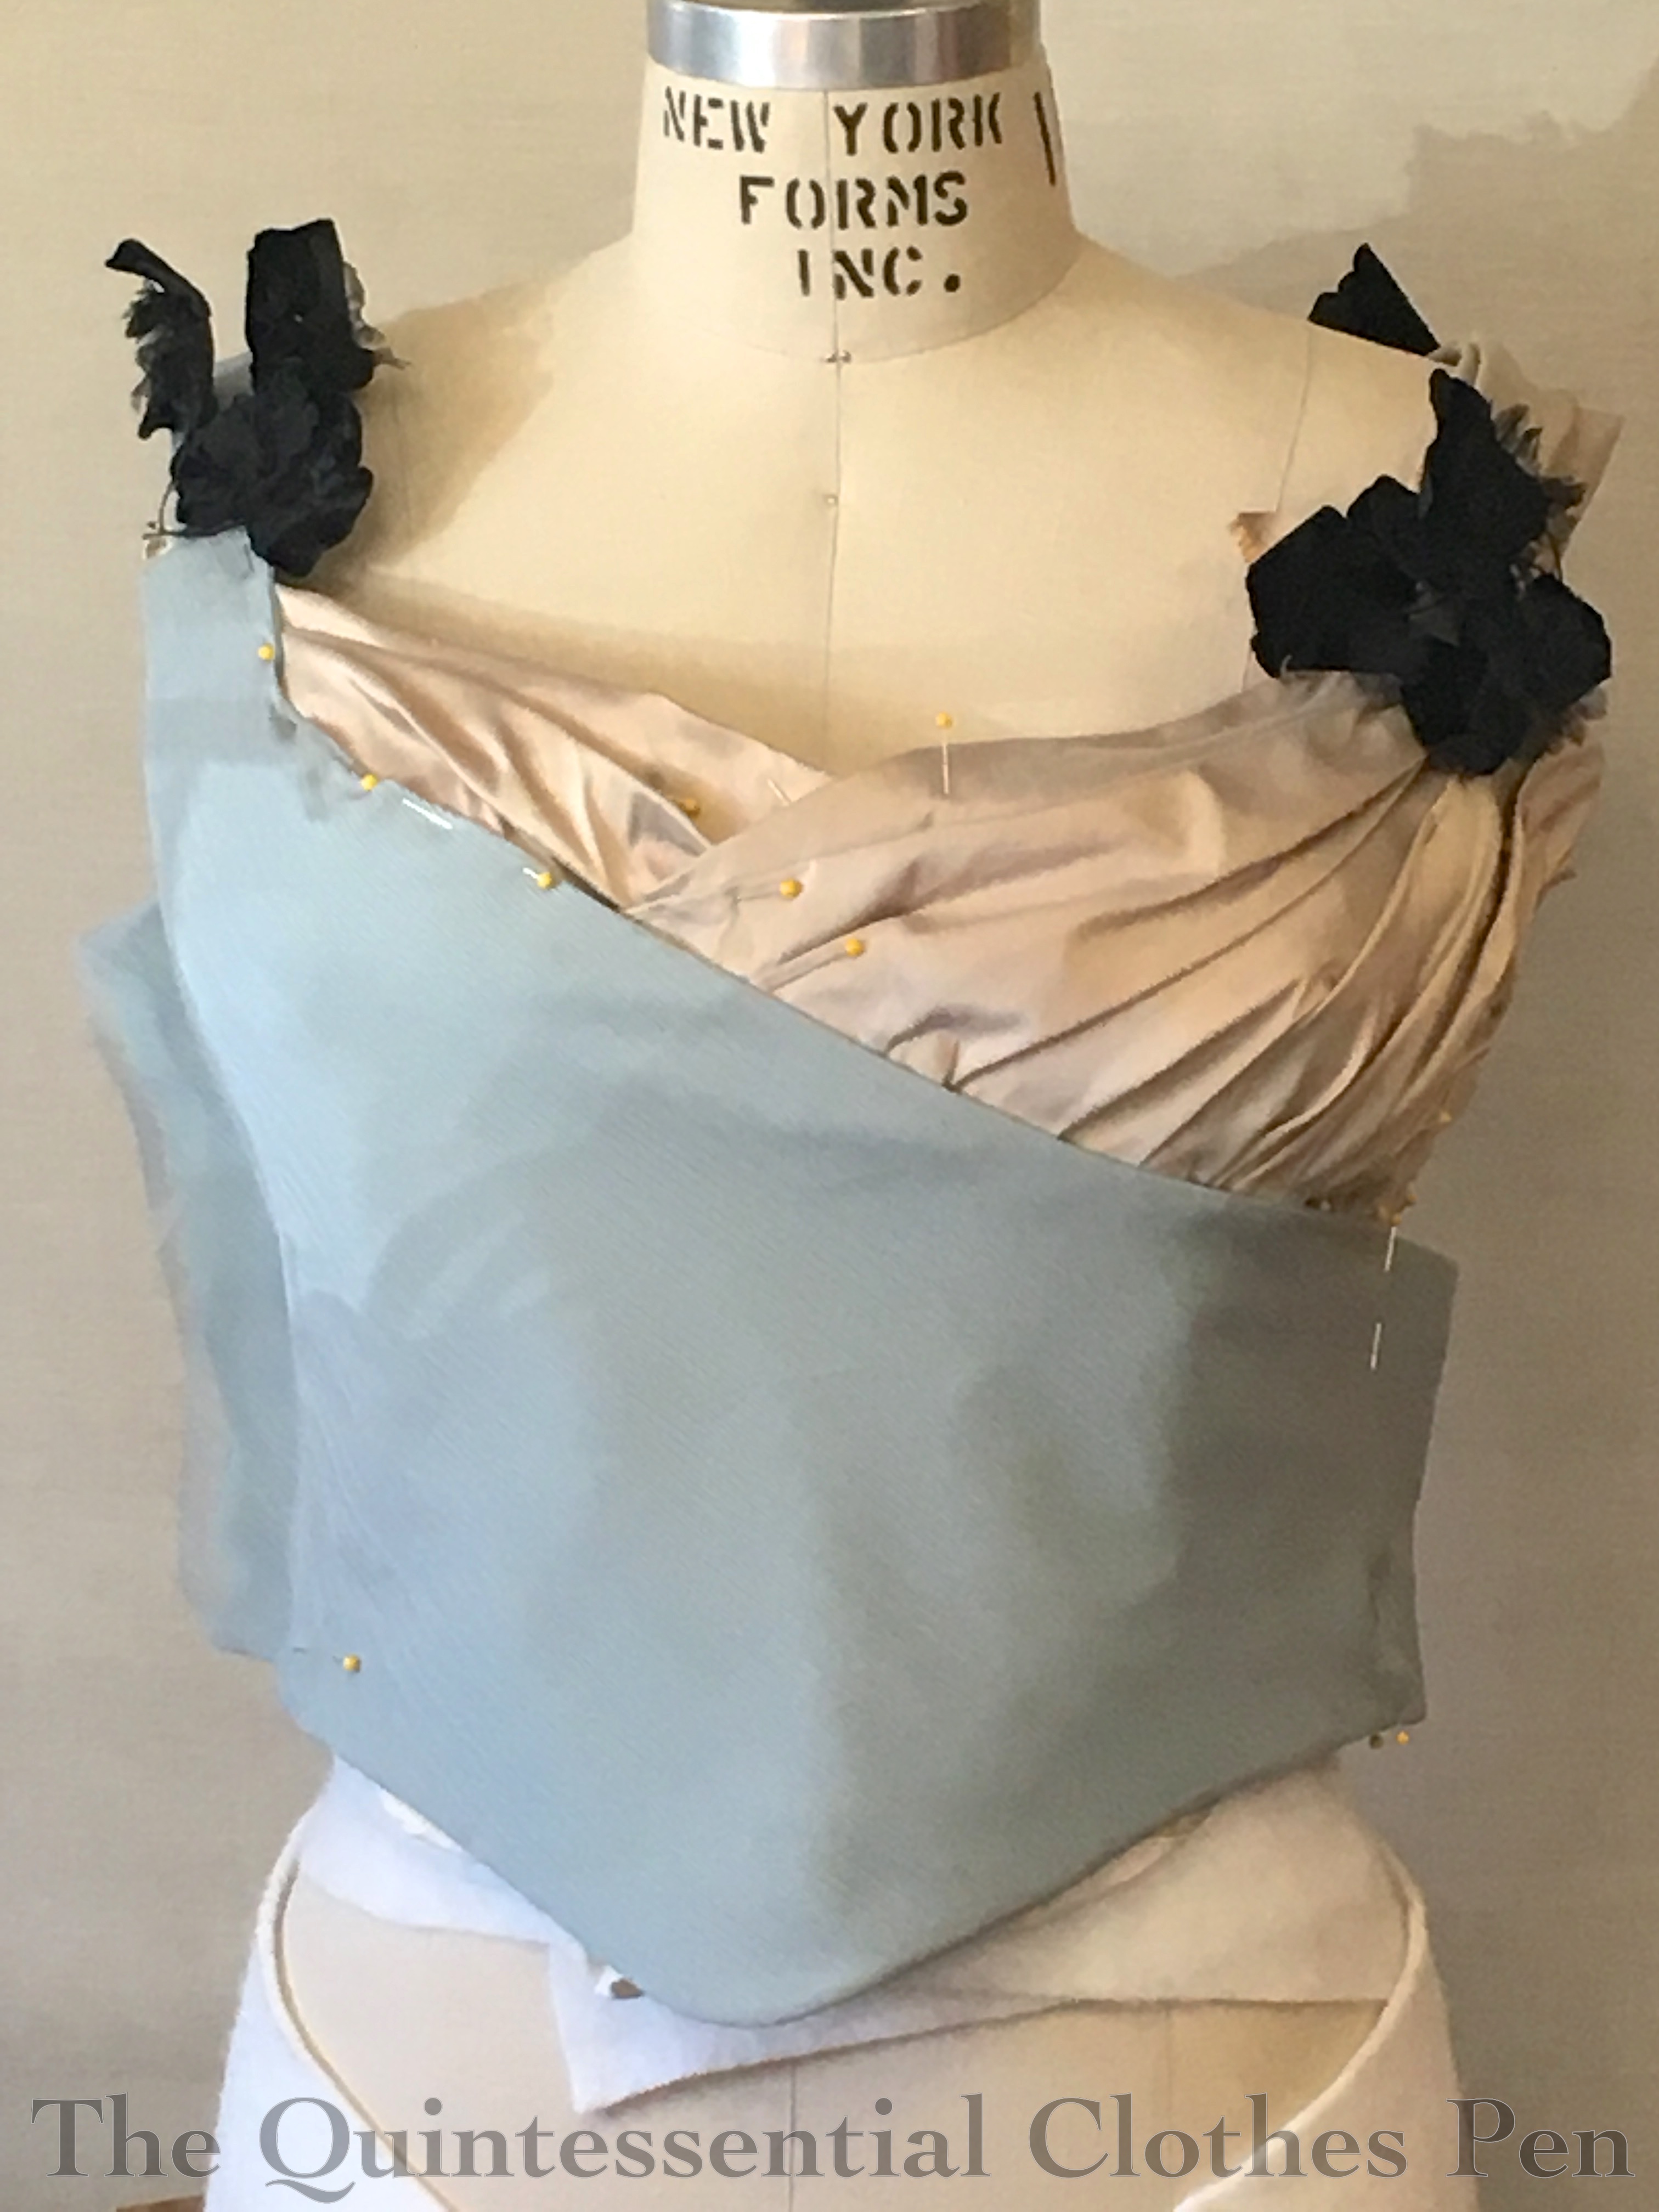
At this stage, I’ve added gauze and tulle to the front and am playing with the chiffon edging. The flowers are tucked into place to see the effect. I’ve also sewn down the proper right (left in the picture) side. The proper left (right in the picture) side is pinned and tucked, waiting for a final fitting before finishing and adding closures.
The back also received a treatment of gauze and tulle in addition to a chiffon edging. You can see that the flowers came in stems of three (these are another part of one of two huge hauls of millinery flowers for super cheap that I’ve had in the last few years, yay!).
Sewing down all the pleats just so, in order to look natural and not constrained, took rather a long time, as did nicely tucking all the silk around the armhole. But it was worth it!
Here is the inside of the bodice, finished. I decided to bind the seam allowances in the same robin’s egg blue cotton that I used for bias binding for the edges and armholes. A hong kong finish is not accurate, but I didn’t feel like hand whip stitching all the seam allowances (although, in the end, it probably would have taken just as much time, or less), plus, I enjoy the effect. There are also closures (yay!) and a waist tape.
And here’s what the bodice looks like with center fronts together. The bit with the tulle actually hooks over the other side (but pictured this way, you can see the closures). After that, the front panel hooks across the front and is securely hooked at the side seam, effectively covering my pink lining.
The untrained skirt is flat in front and gathered at the back. It is cut in an umbrella shape (like my 1895 skating ensemble skirt), so that the only seams needed are center back, and a diagonal seam across the back to add width to the panel. The waistband and placket are standard 19th century style, with the exception of the fact that the ribbon I used to stabilize the thin fabrics is leftover gift wrapping ribbon from wedding gifts we received from Crate and Barrel. Yay! It’s hidden on the inside and folded in half, but it amuses me, because recycling is great and it’s nice to have a bit of Mr. Q-related-something in a dress.
A nice package of placket and waistband pieces. I made one for each skirt.
The most annoying thing about fitting this gown was marking the hem on the skirt. (Fitting the bodice on myself with all the layered closures was also a feat, but more uncomfortable twisting than annoying.) Chiffon is annoying to hem most of the time and it only gets more complicated when you’re marking the hem on yourself. It meant looking in the mirror, bending over to place a marking pin while everything shifted, standing up to check things, and then repeating that over and over again to shift pins by tiny amounts until they all looked good (while wearing a corset and fluffy petticoat of course, so the whole thing would hang properly on my body). Once that was all over, I hemmed each layer with self fabric bias that is turned to the inside and invisibly hand stitched in place.
I was quite successful, but it took a whole afternoon to mark and cut and sew the hem of the chiffon and of the lining (because of course the lining couldn’t stick out or be too short!). The whole thing would have been much speedier if I’d had someone else to mark the hem for me. (I thought of using my hem puffer, but the floor is too close for the puffer to reach and I didn’t have anything to stand on.)
Anyway, the end effect was fabulous. The chiffon and lining swooshed so beautifully that it was necessary to get “swooshy skirt” pictures at the ball just to highlight their movement.
The ball also gave me an opportunity to have fabulous hair and a new hair ornament instead of a tiara as well as an opportunity to photograph my new 1880s corset completely finished and the fabulous petticoat I have for 1890s/1900s styles. It gets worn often, but hardly ever seen (which I suppose is rather the point of a petticoat, but when you have one as lovely as this, it really should be seen!). There will be future posts for the hair and undergarments, as this post is getting pretty long.
Overall, 1890s ball was lovely, with beautiful dresses and beautiful dancers. There were fun new people as well as quiet moments to sit and have engaging exchanges with friends.
And the new gown was very comfortable and fun to wear. I’m looking forward to completing the trained skirt (hopefully without too much procrastination) and wearing it this summer!
*My plan is to have two skirts for this gown, one without a train, for dancing, and one with a train, because trains are fun! I only finished the non-trained skirt for the ball, though the trained skirt is assembled and mostly finished with the exception of a closure and hems.
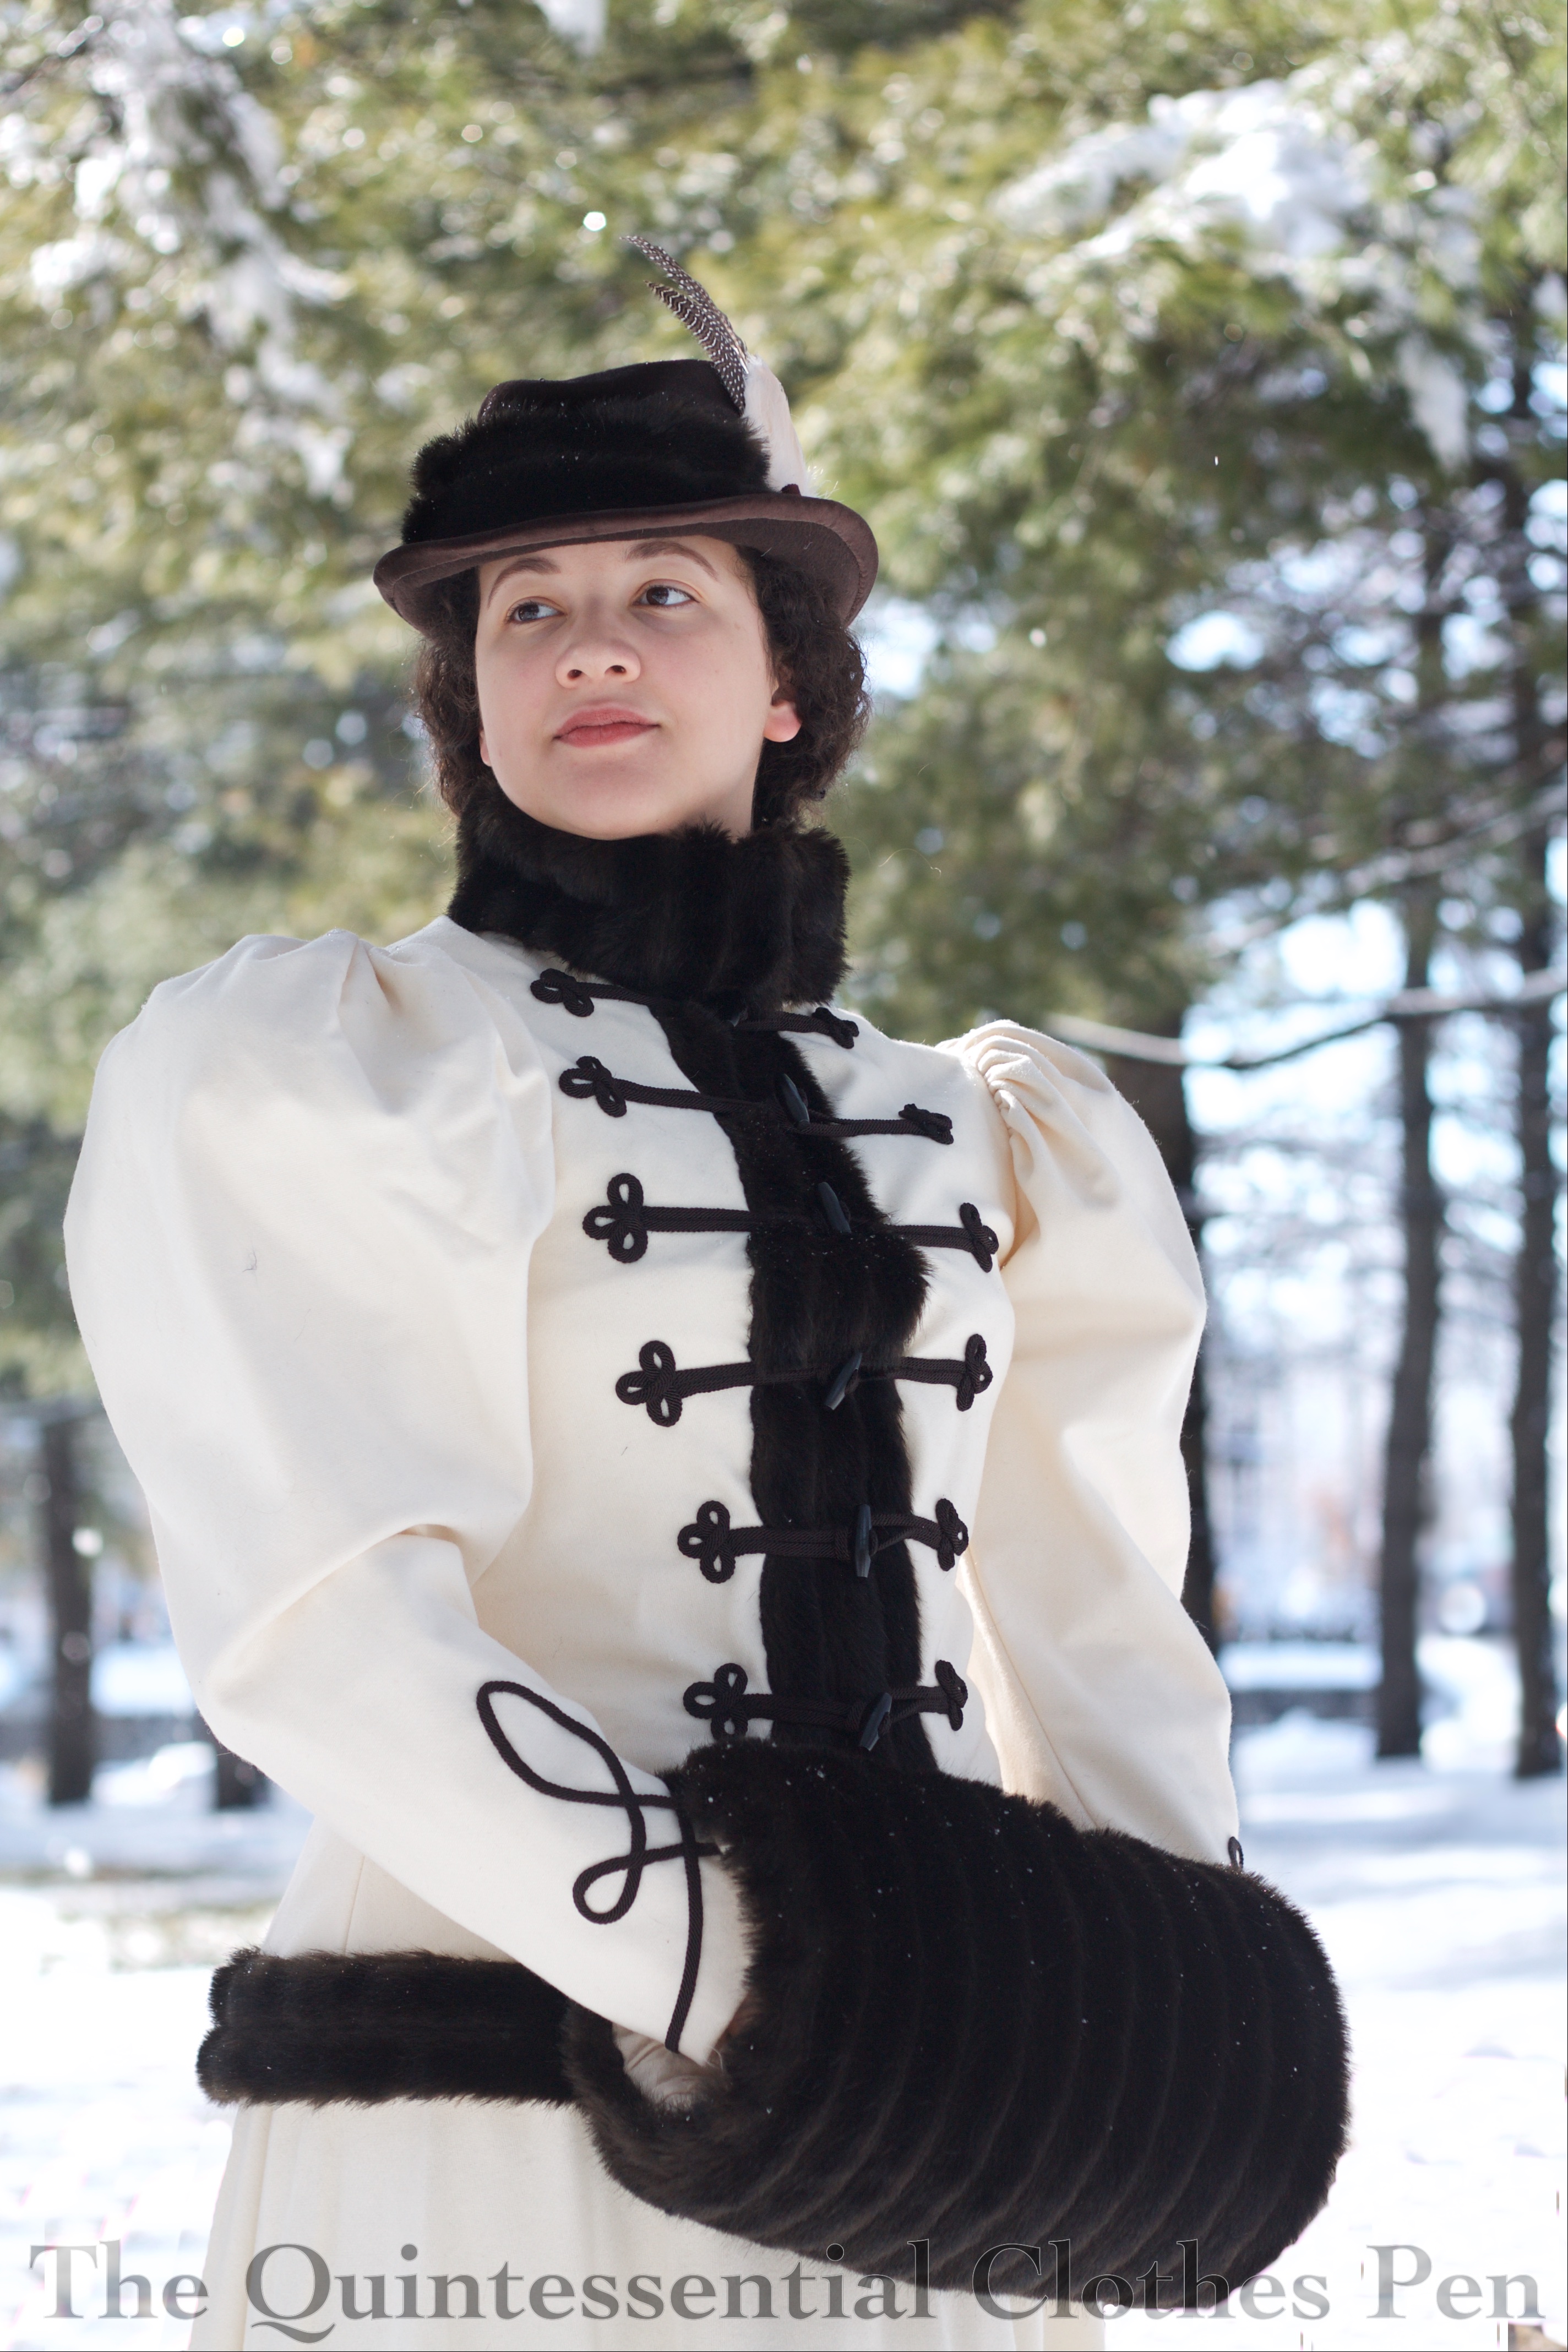
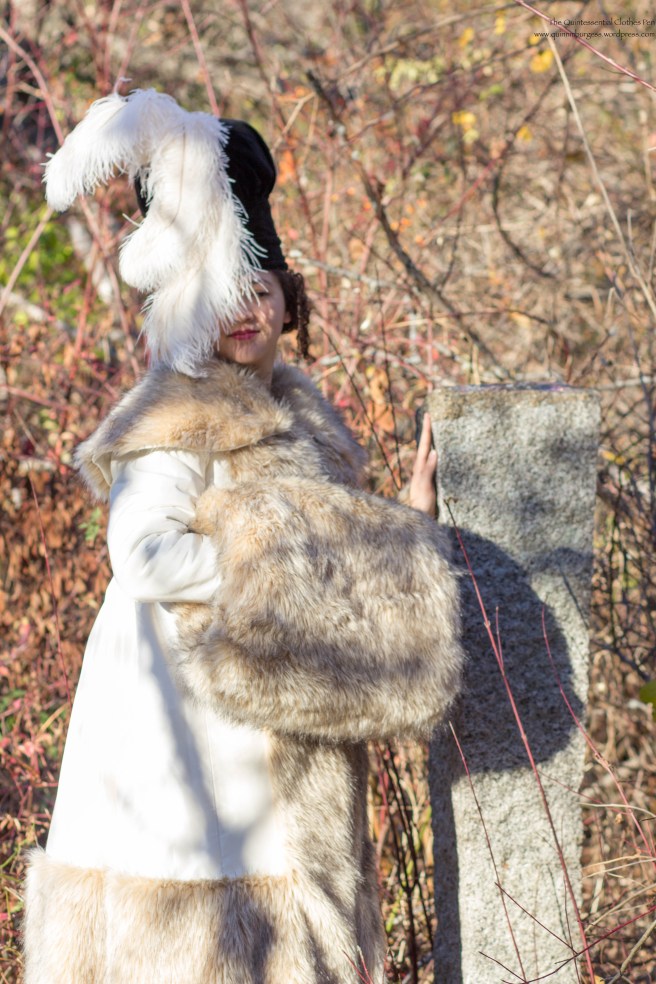
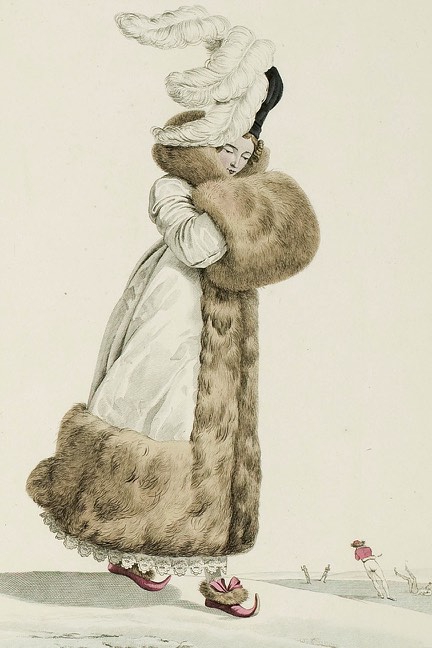
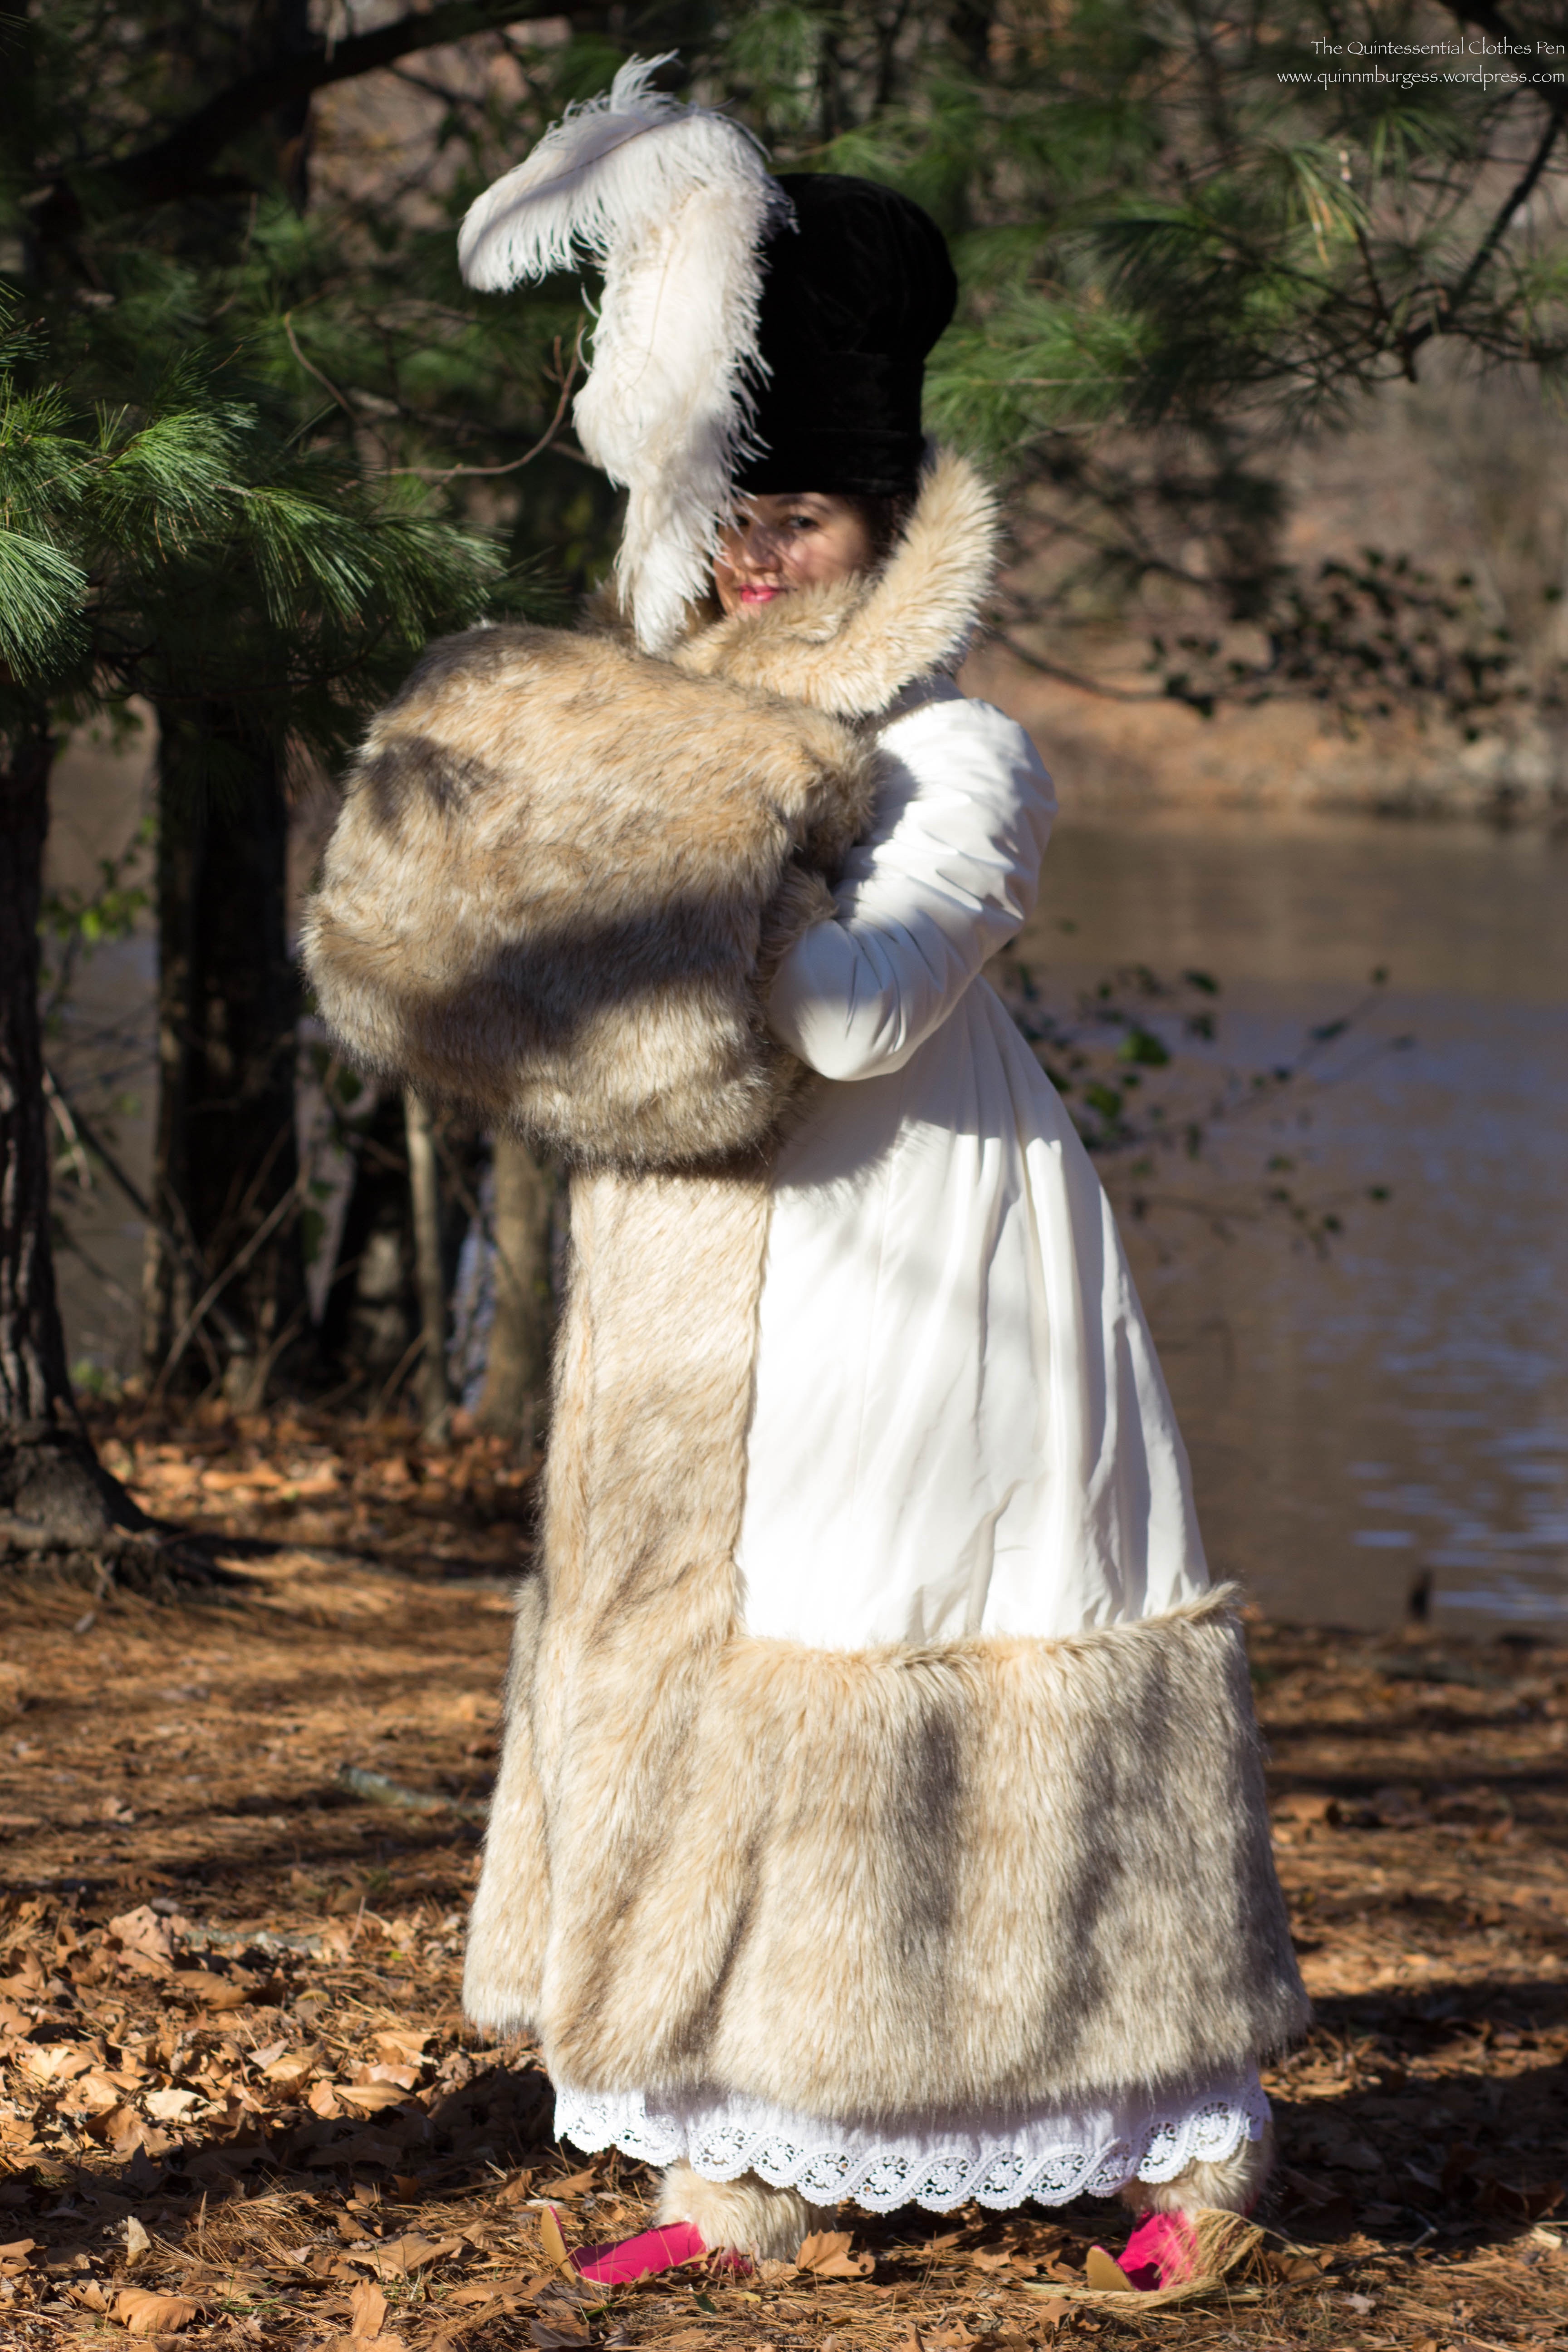
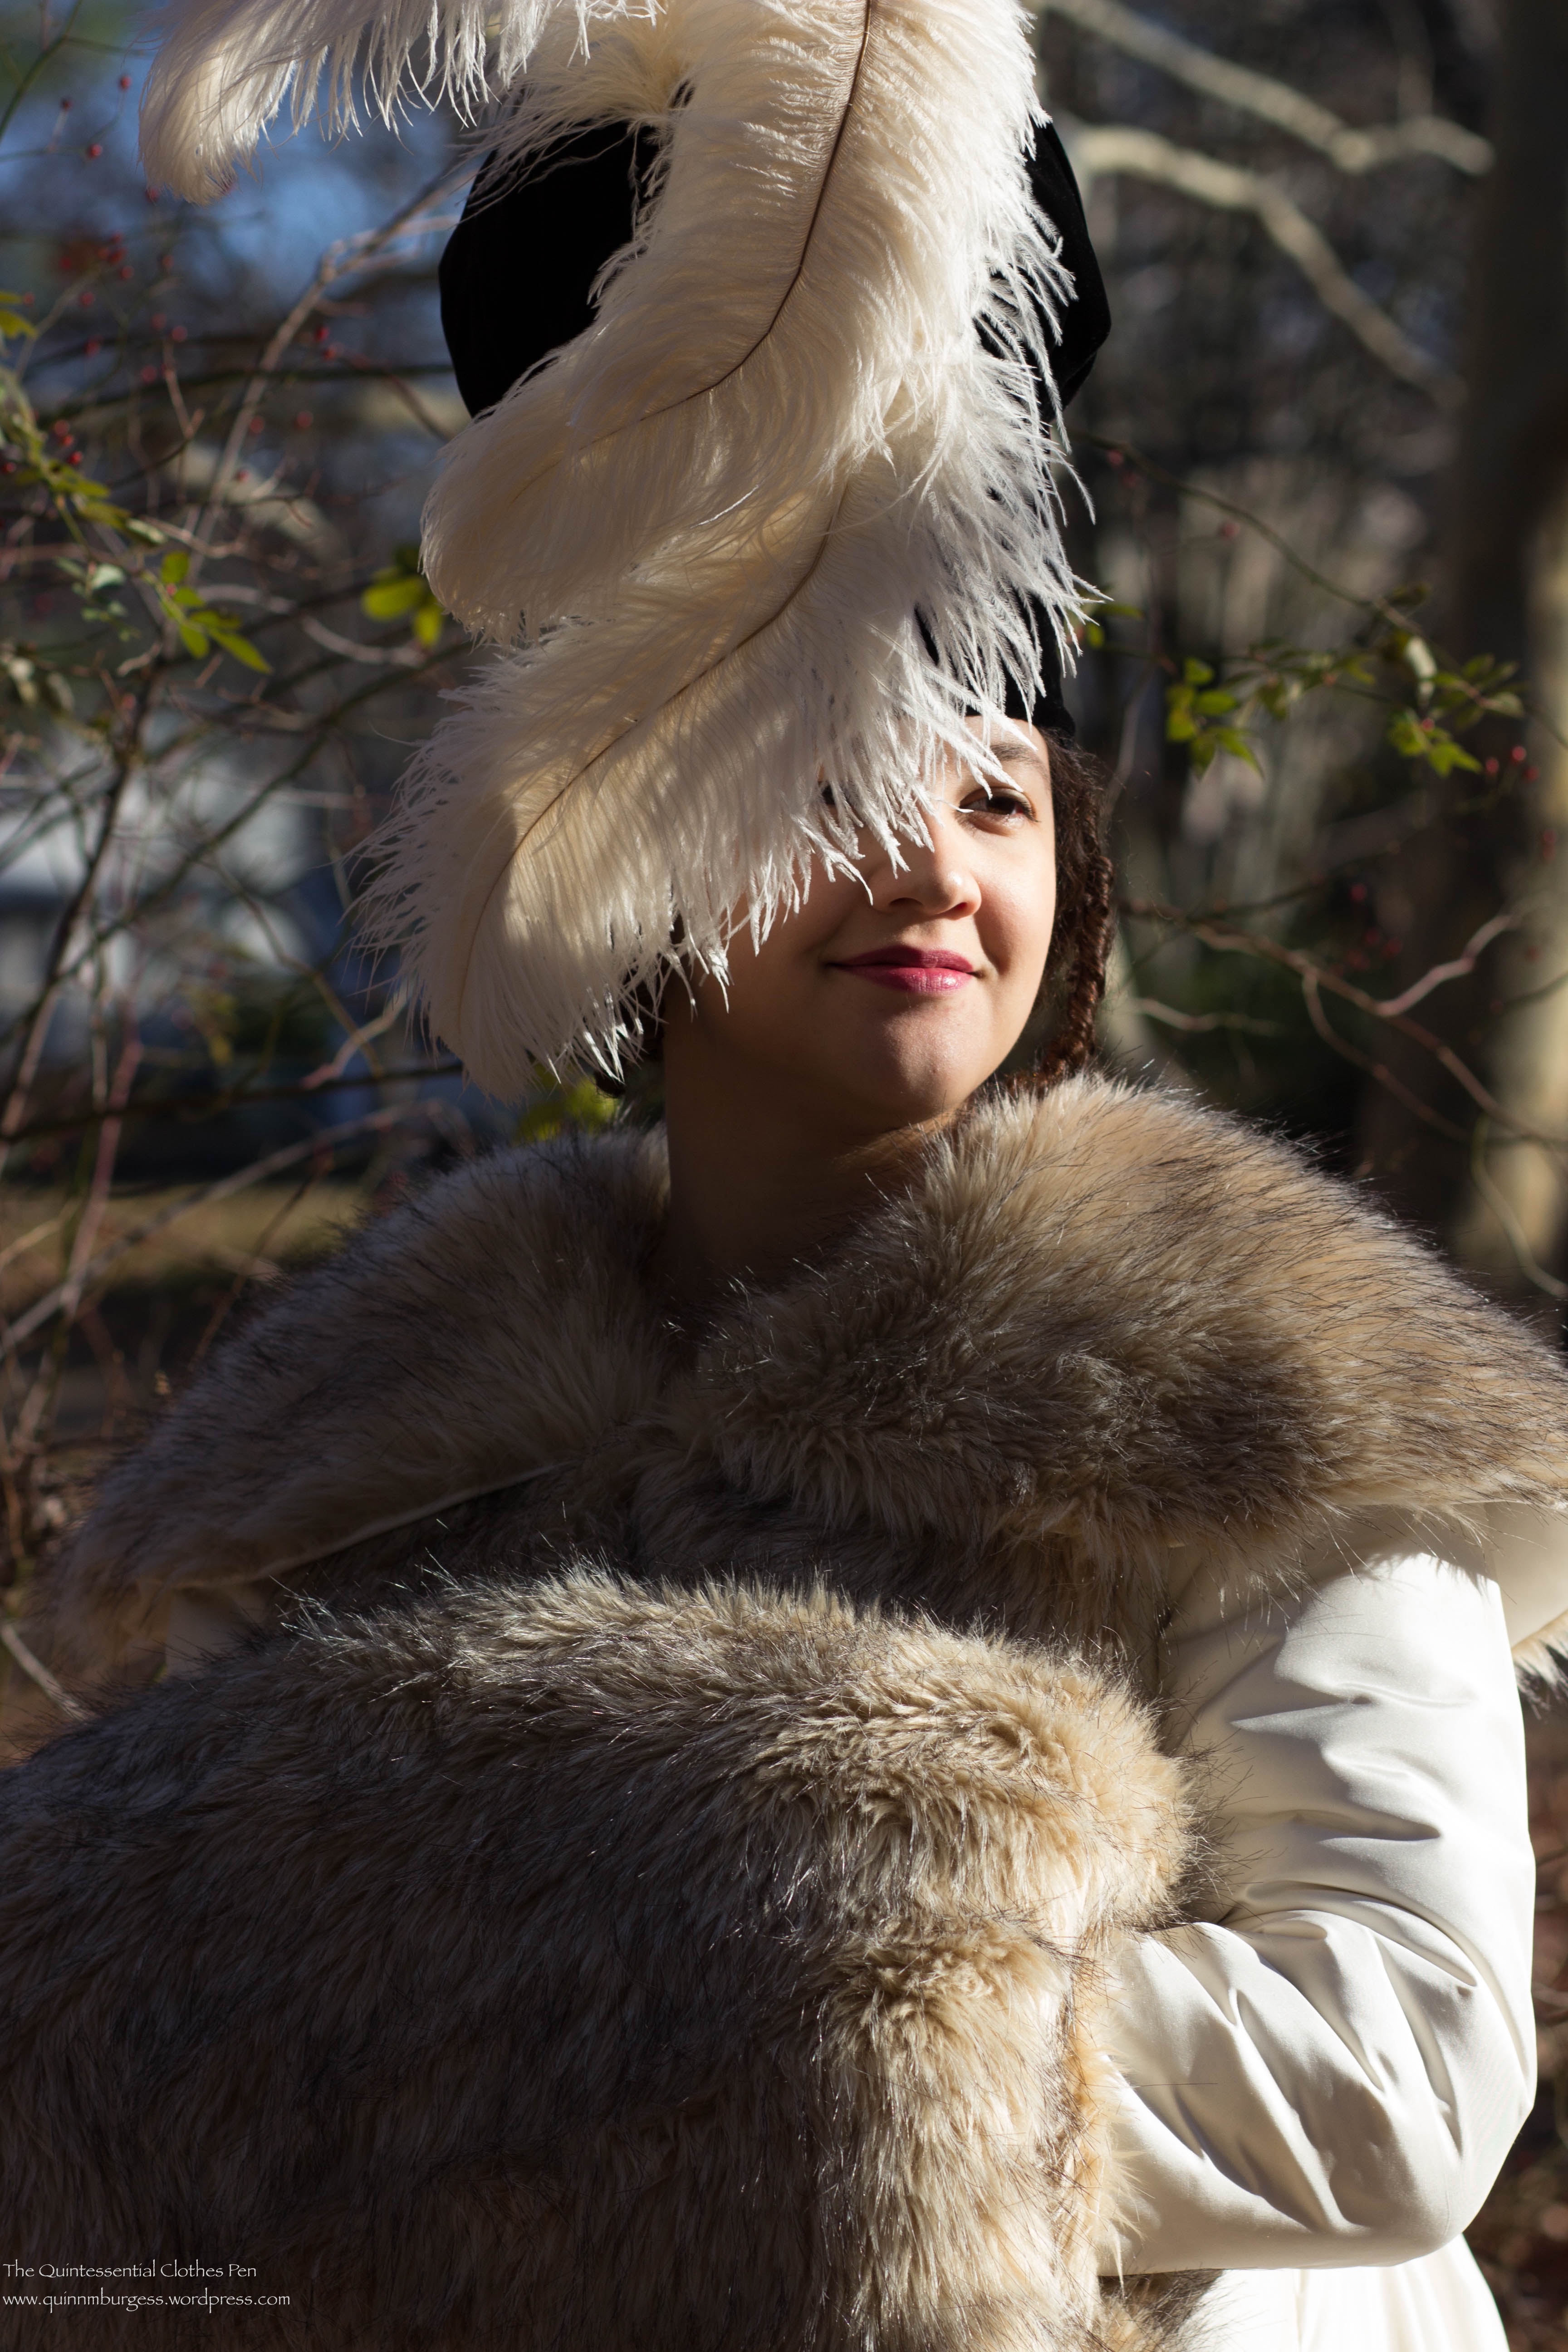
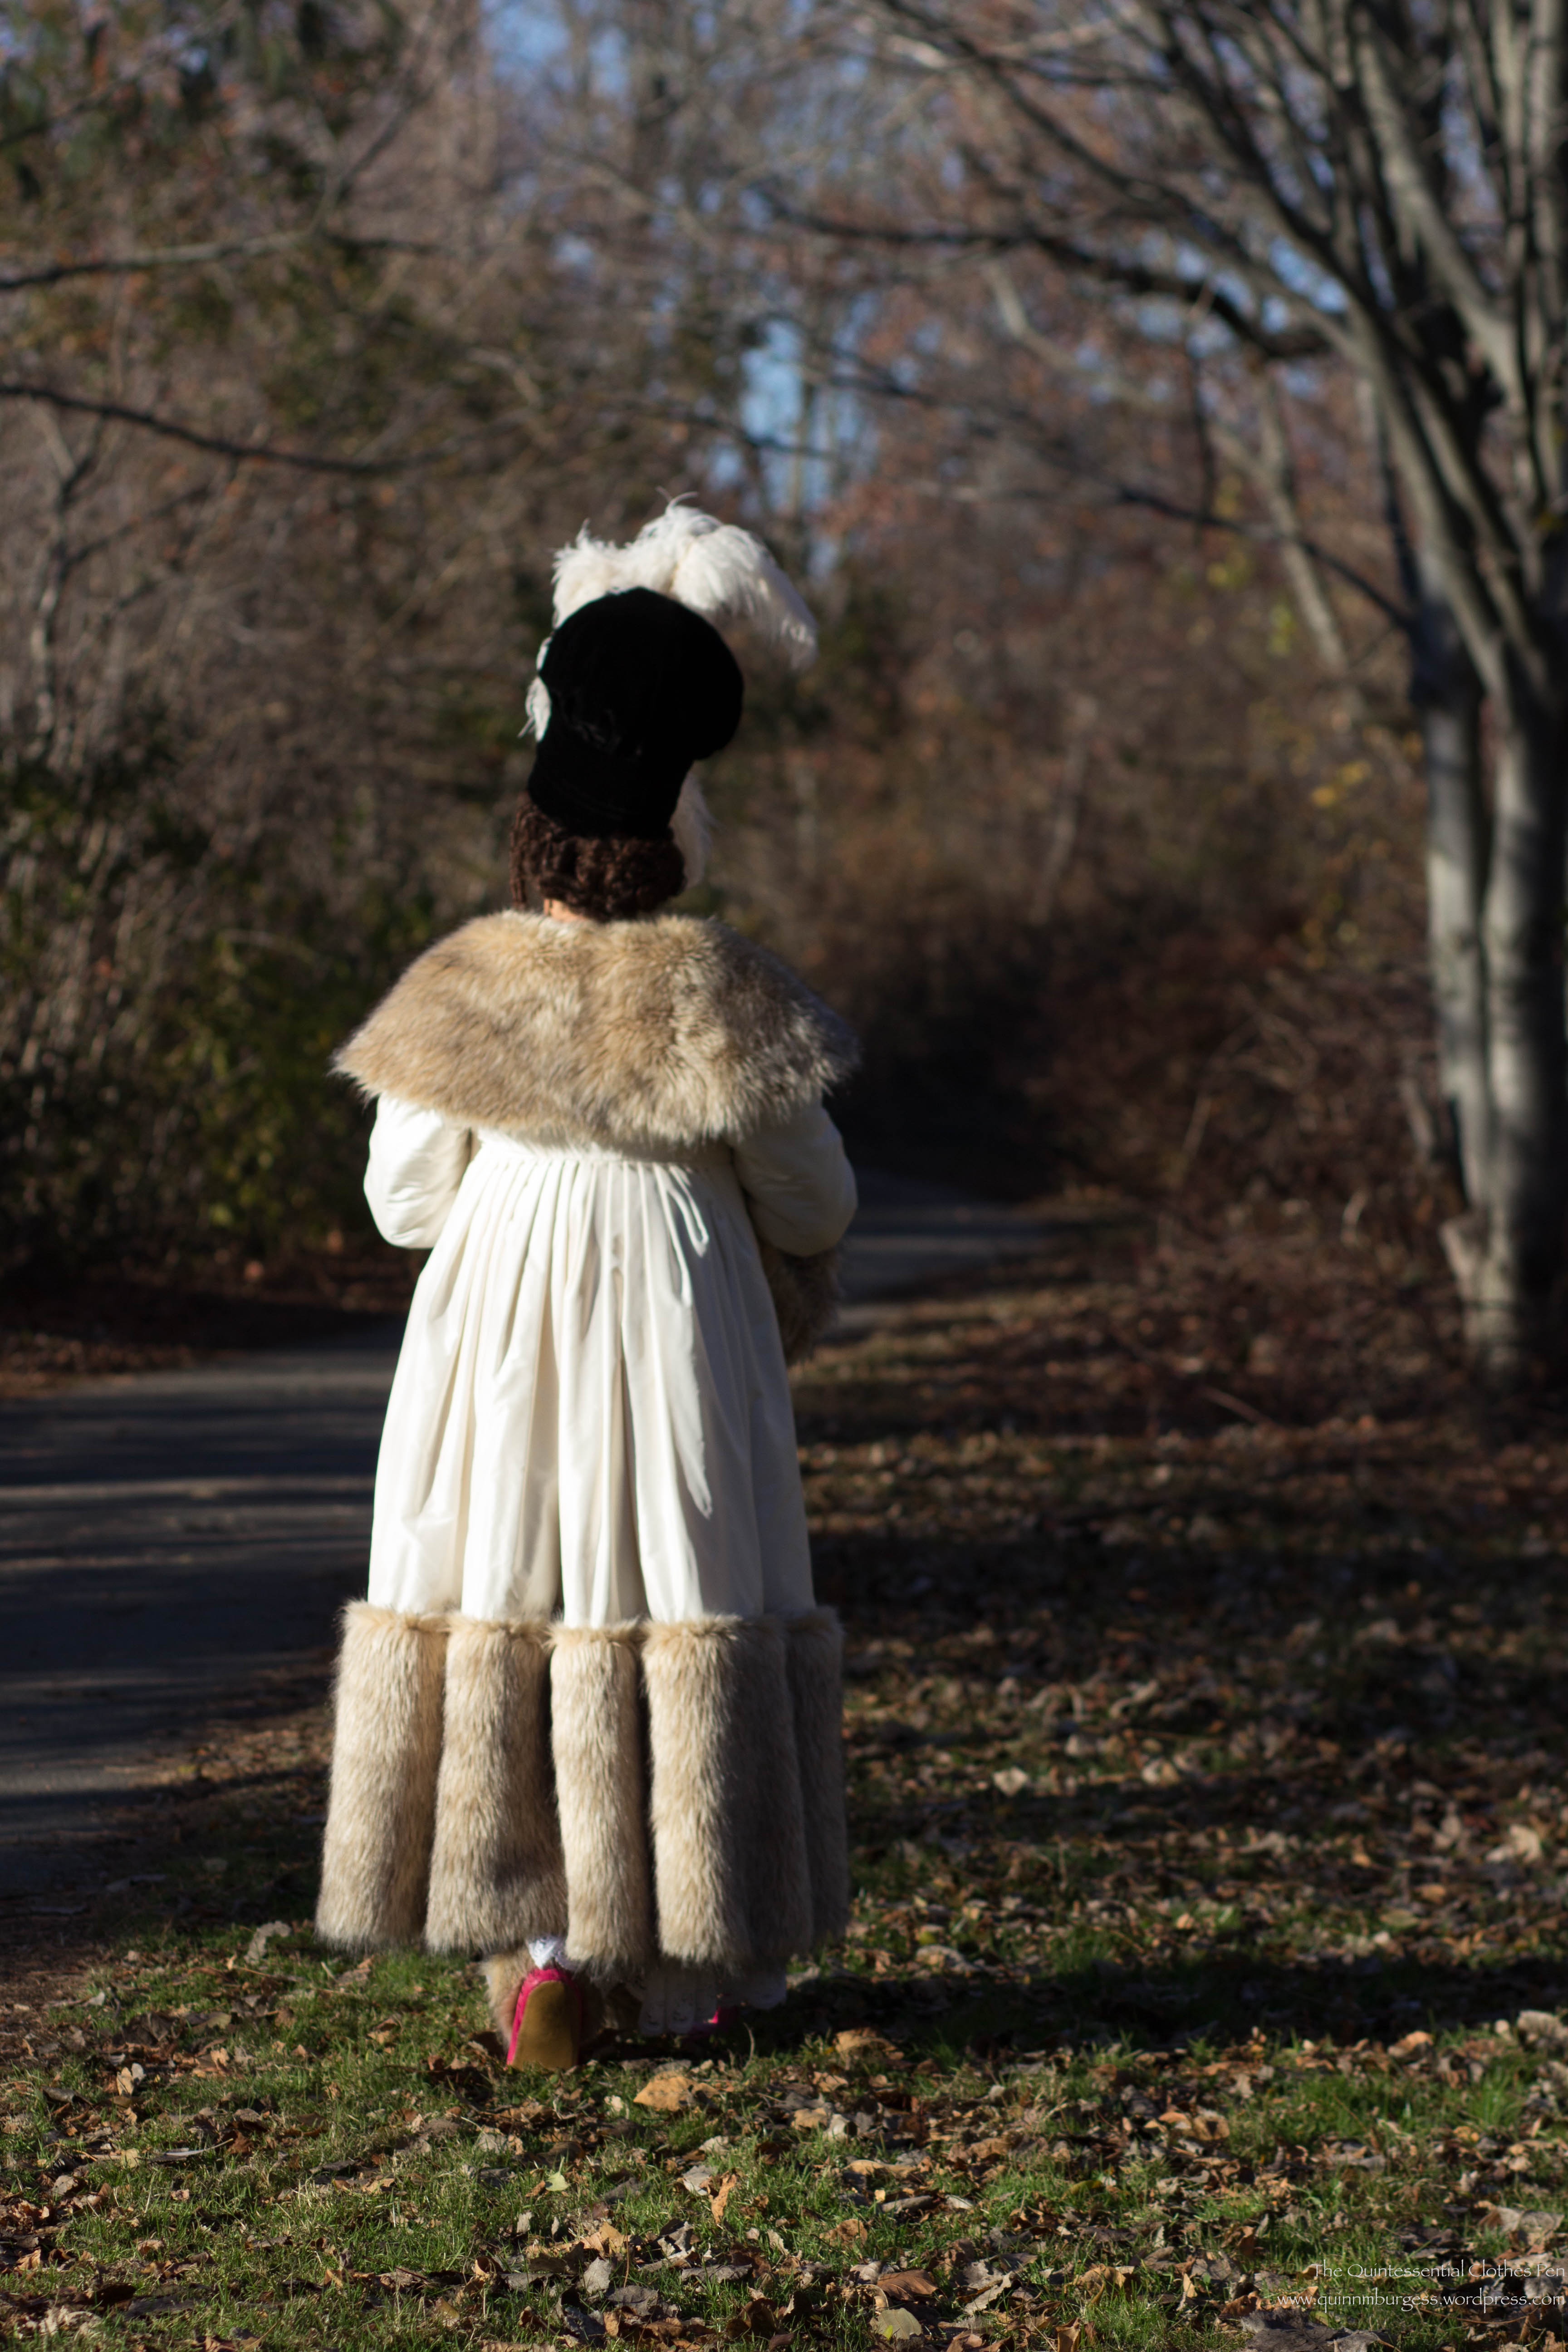
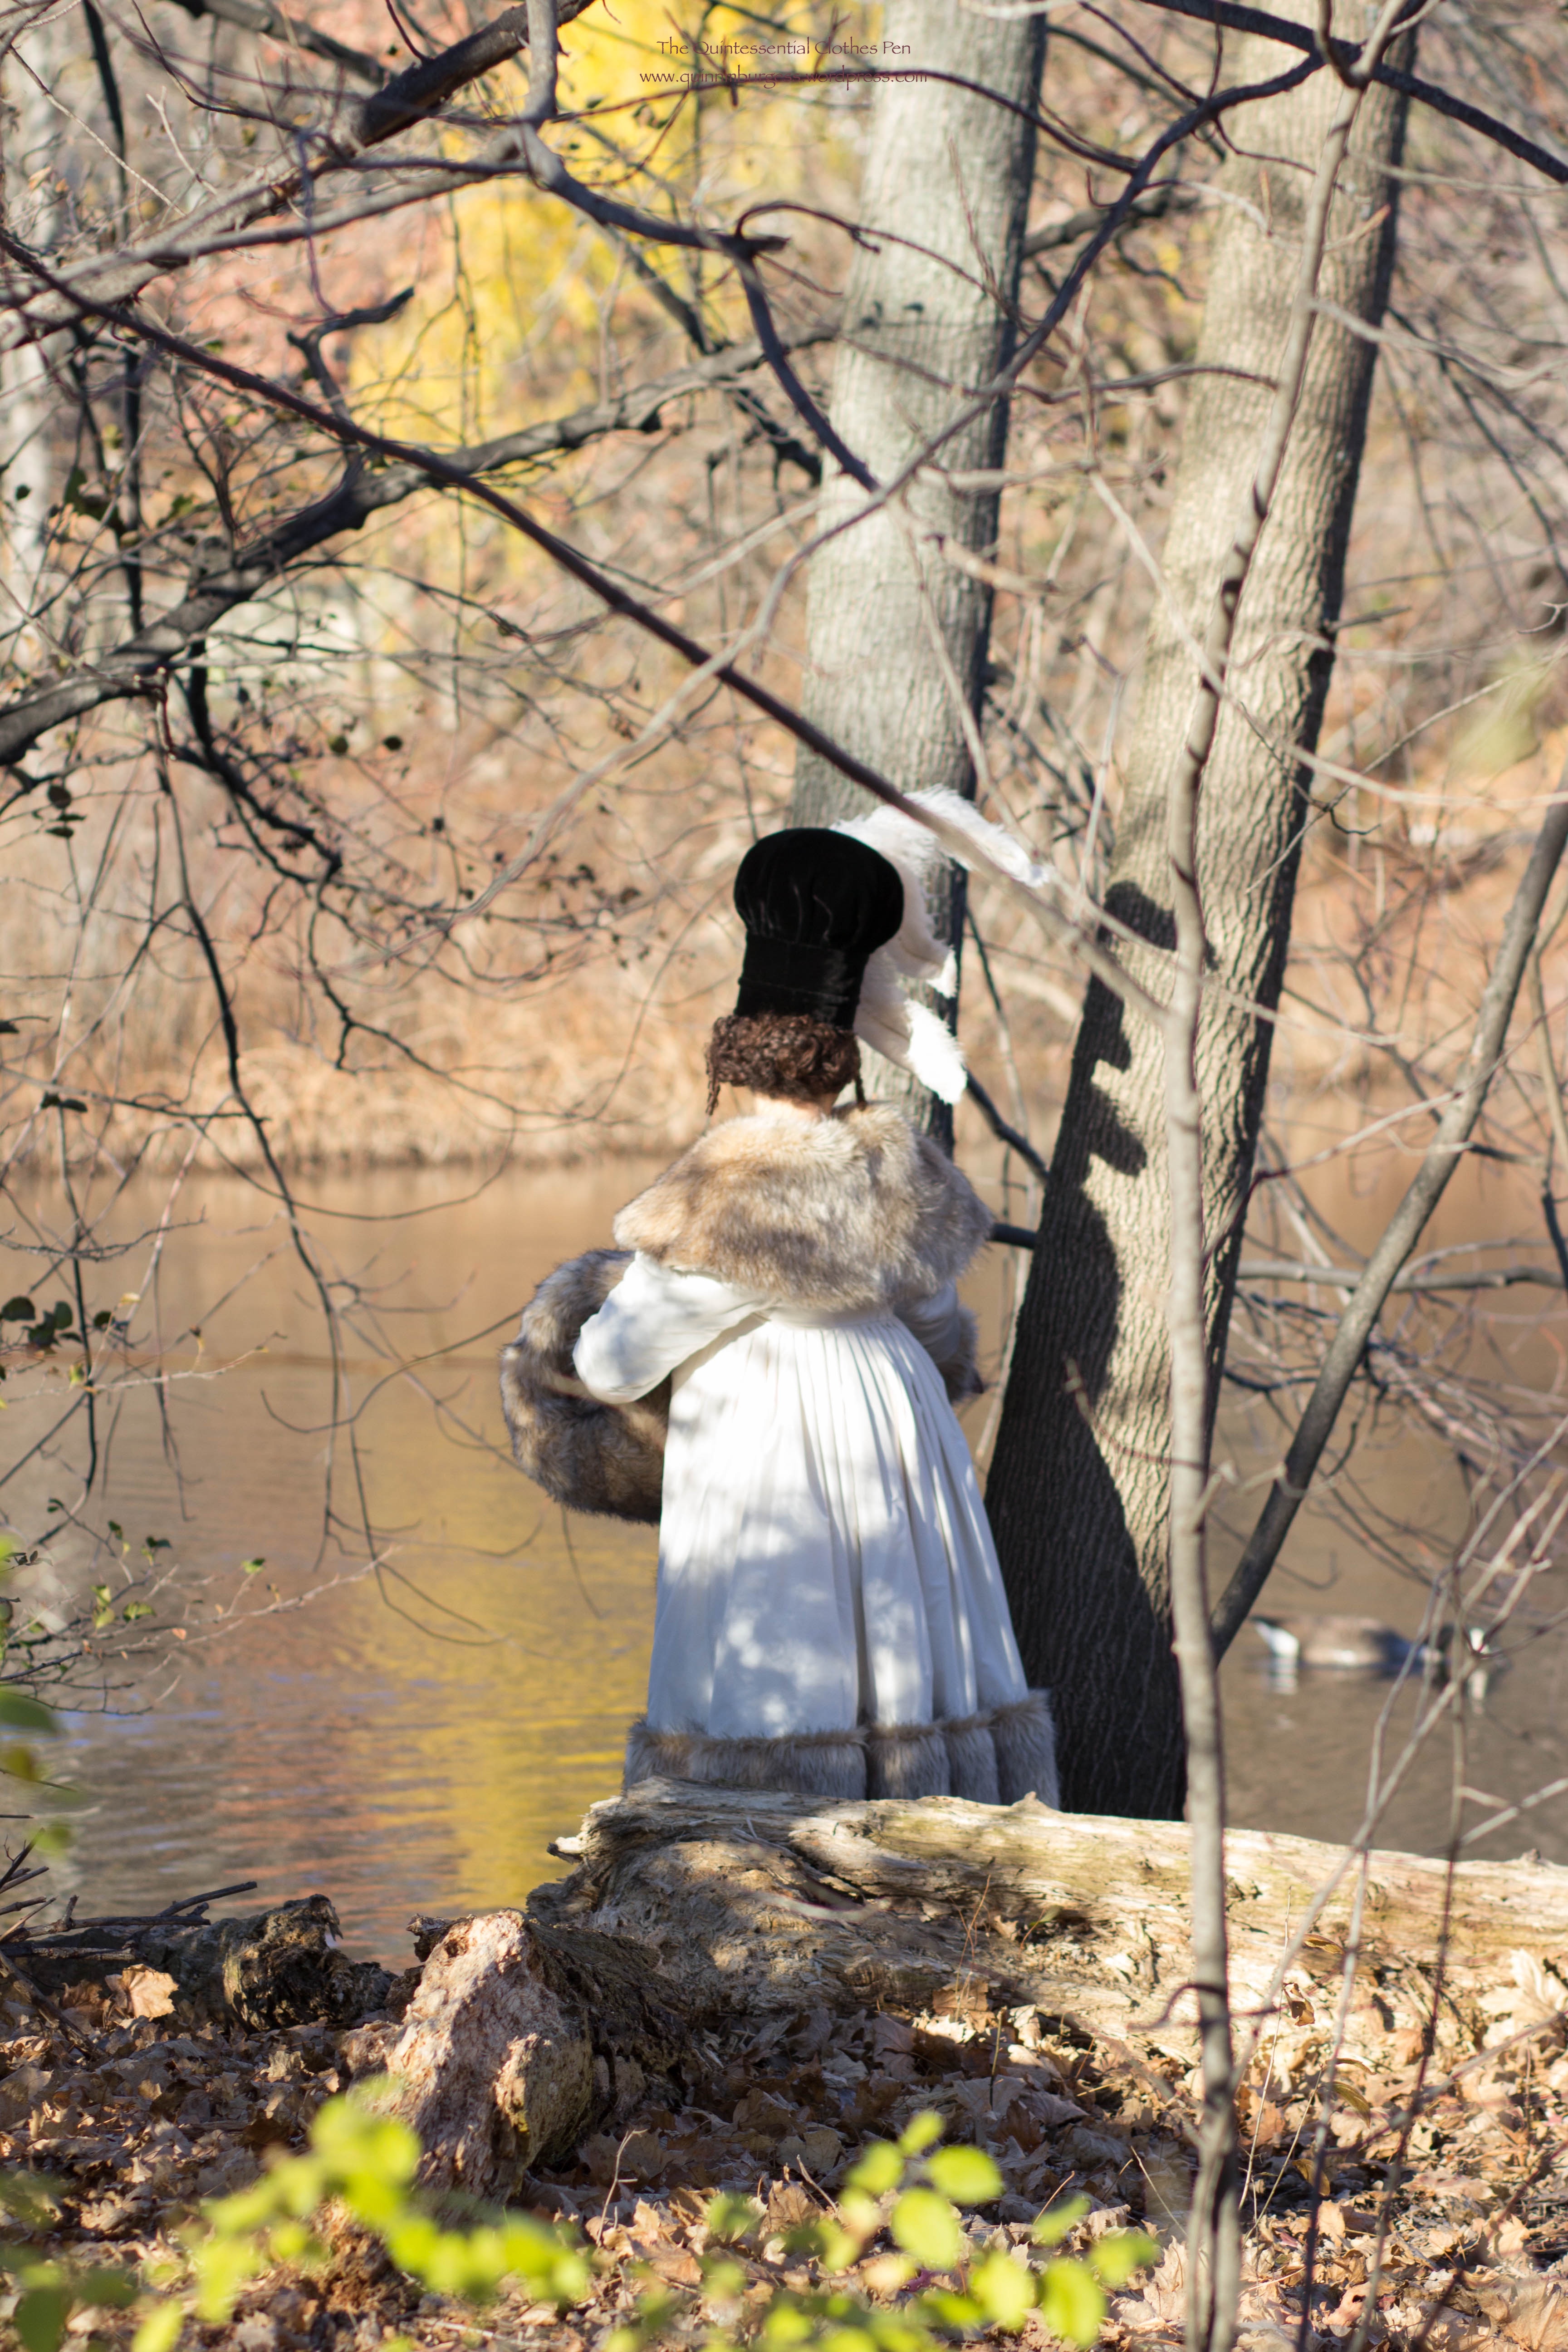
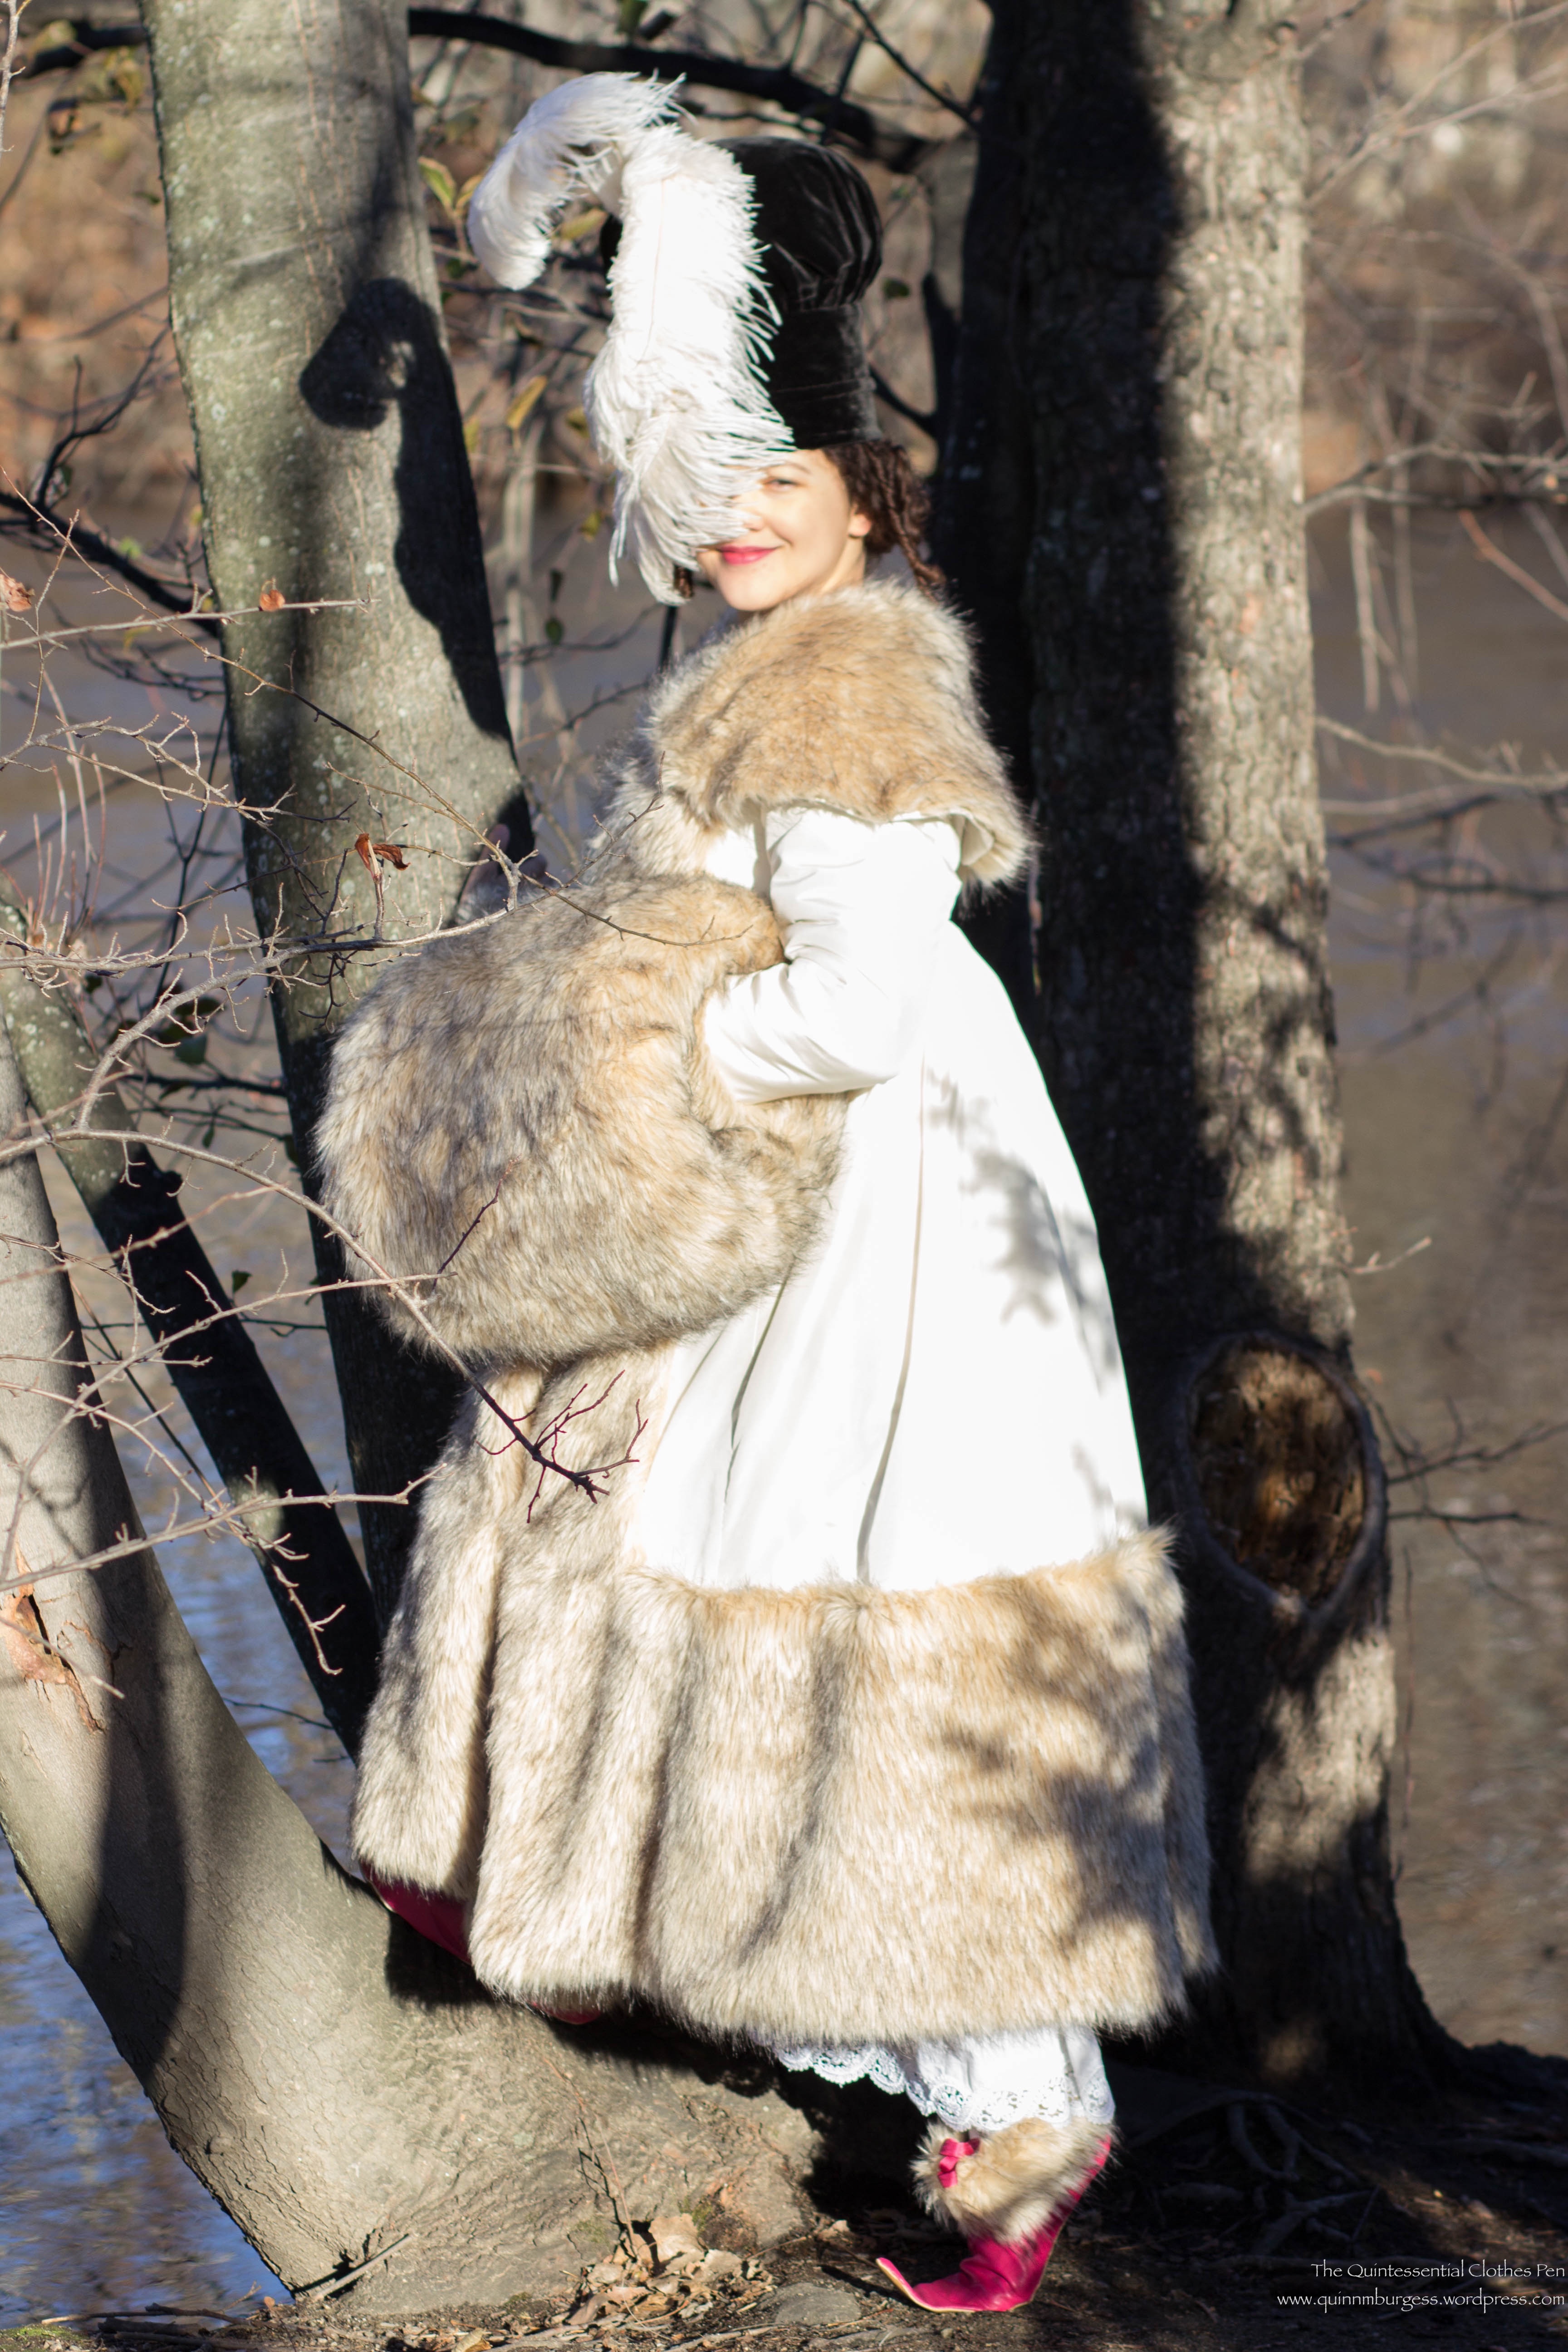
Today, I’m going to share more information about the unusual hat in my Vernet fashion plate.
The caption reads “Toque de Velours.” I already had a rough translation in my head, basically “Hat of Velvet,” but thought I should double check the definitions before deciding on materials.
1: any of various fabrics with a pile or napped surface resembling velvet used in heavy weights for upholstery and curtains and in lighter weights for clothing; also: the article of clothing itself
2: a fur felt (as of rabbit or nutria) finished with a long velvety nap and used especially for hats
Well, the hat does rather resemble a chef hat, doesn’t it? My rough translation was confirmed! Luckily, I had black silk velvet in my stash, which perfectly suited the project.
The hat base is buckram in the simple shape of an oval to fit my head with a flat tip on top. I don’t have pictures, but imagine the shape of a straight sided Lincoln-like top hat without the brim and you’ll have the right idea. The buckram is mulled with cotton flannel and wired around the head opening, tip, and partway up the side. The buckram support is about 8″ tall.
In addition, there is padding to support the poof on top. I chose to use polyester batting–it’s not at all accurate, but I had it on hand and it isn’t seen. There are concentric ovals on top that diminish in size with each layer as well as a few layers around the top of the buckram on the side to provide support for the tucks/pleats.
The “stacked” pleat is on the right.
The poof is a large circle that is flat lined with a piece of muslin to help provide the support for the pleats. The pleats are about 1″ wide knife pleats that are then folded back on themselves to create a double pleat (this website calls this type of pleat a stacked pleat and is the source for the image). To determine the type of pleat, I played around with my fabric until I found a method that created an effect like the fashion plate, which is like fans or slices (you can see it in this post). Then I eyeballed how many to do, pinning and re-pinning until the pleats were evenly spaced and the poof fit into the side of my hat (no math here, I avoid it as much as possible most of the time).
The definition on the sides (at the head opening and about 1.5″ up from the head opening) was created by inserting “cording” under the velvet. My “cording” is actually modern acrylic yarn in sunshine yellow (like the batting, I made this choice because I had the materials on hand, it worked, and it will not be seen–but it is not accurate). I believe there are two or three lengths of yarn in each single section of “cording” to get the right thickness to show under the velvet.
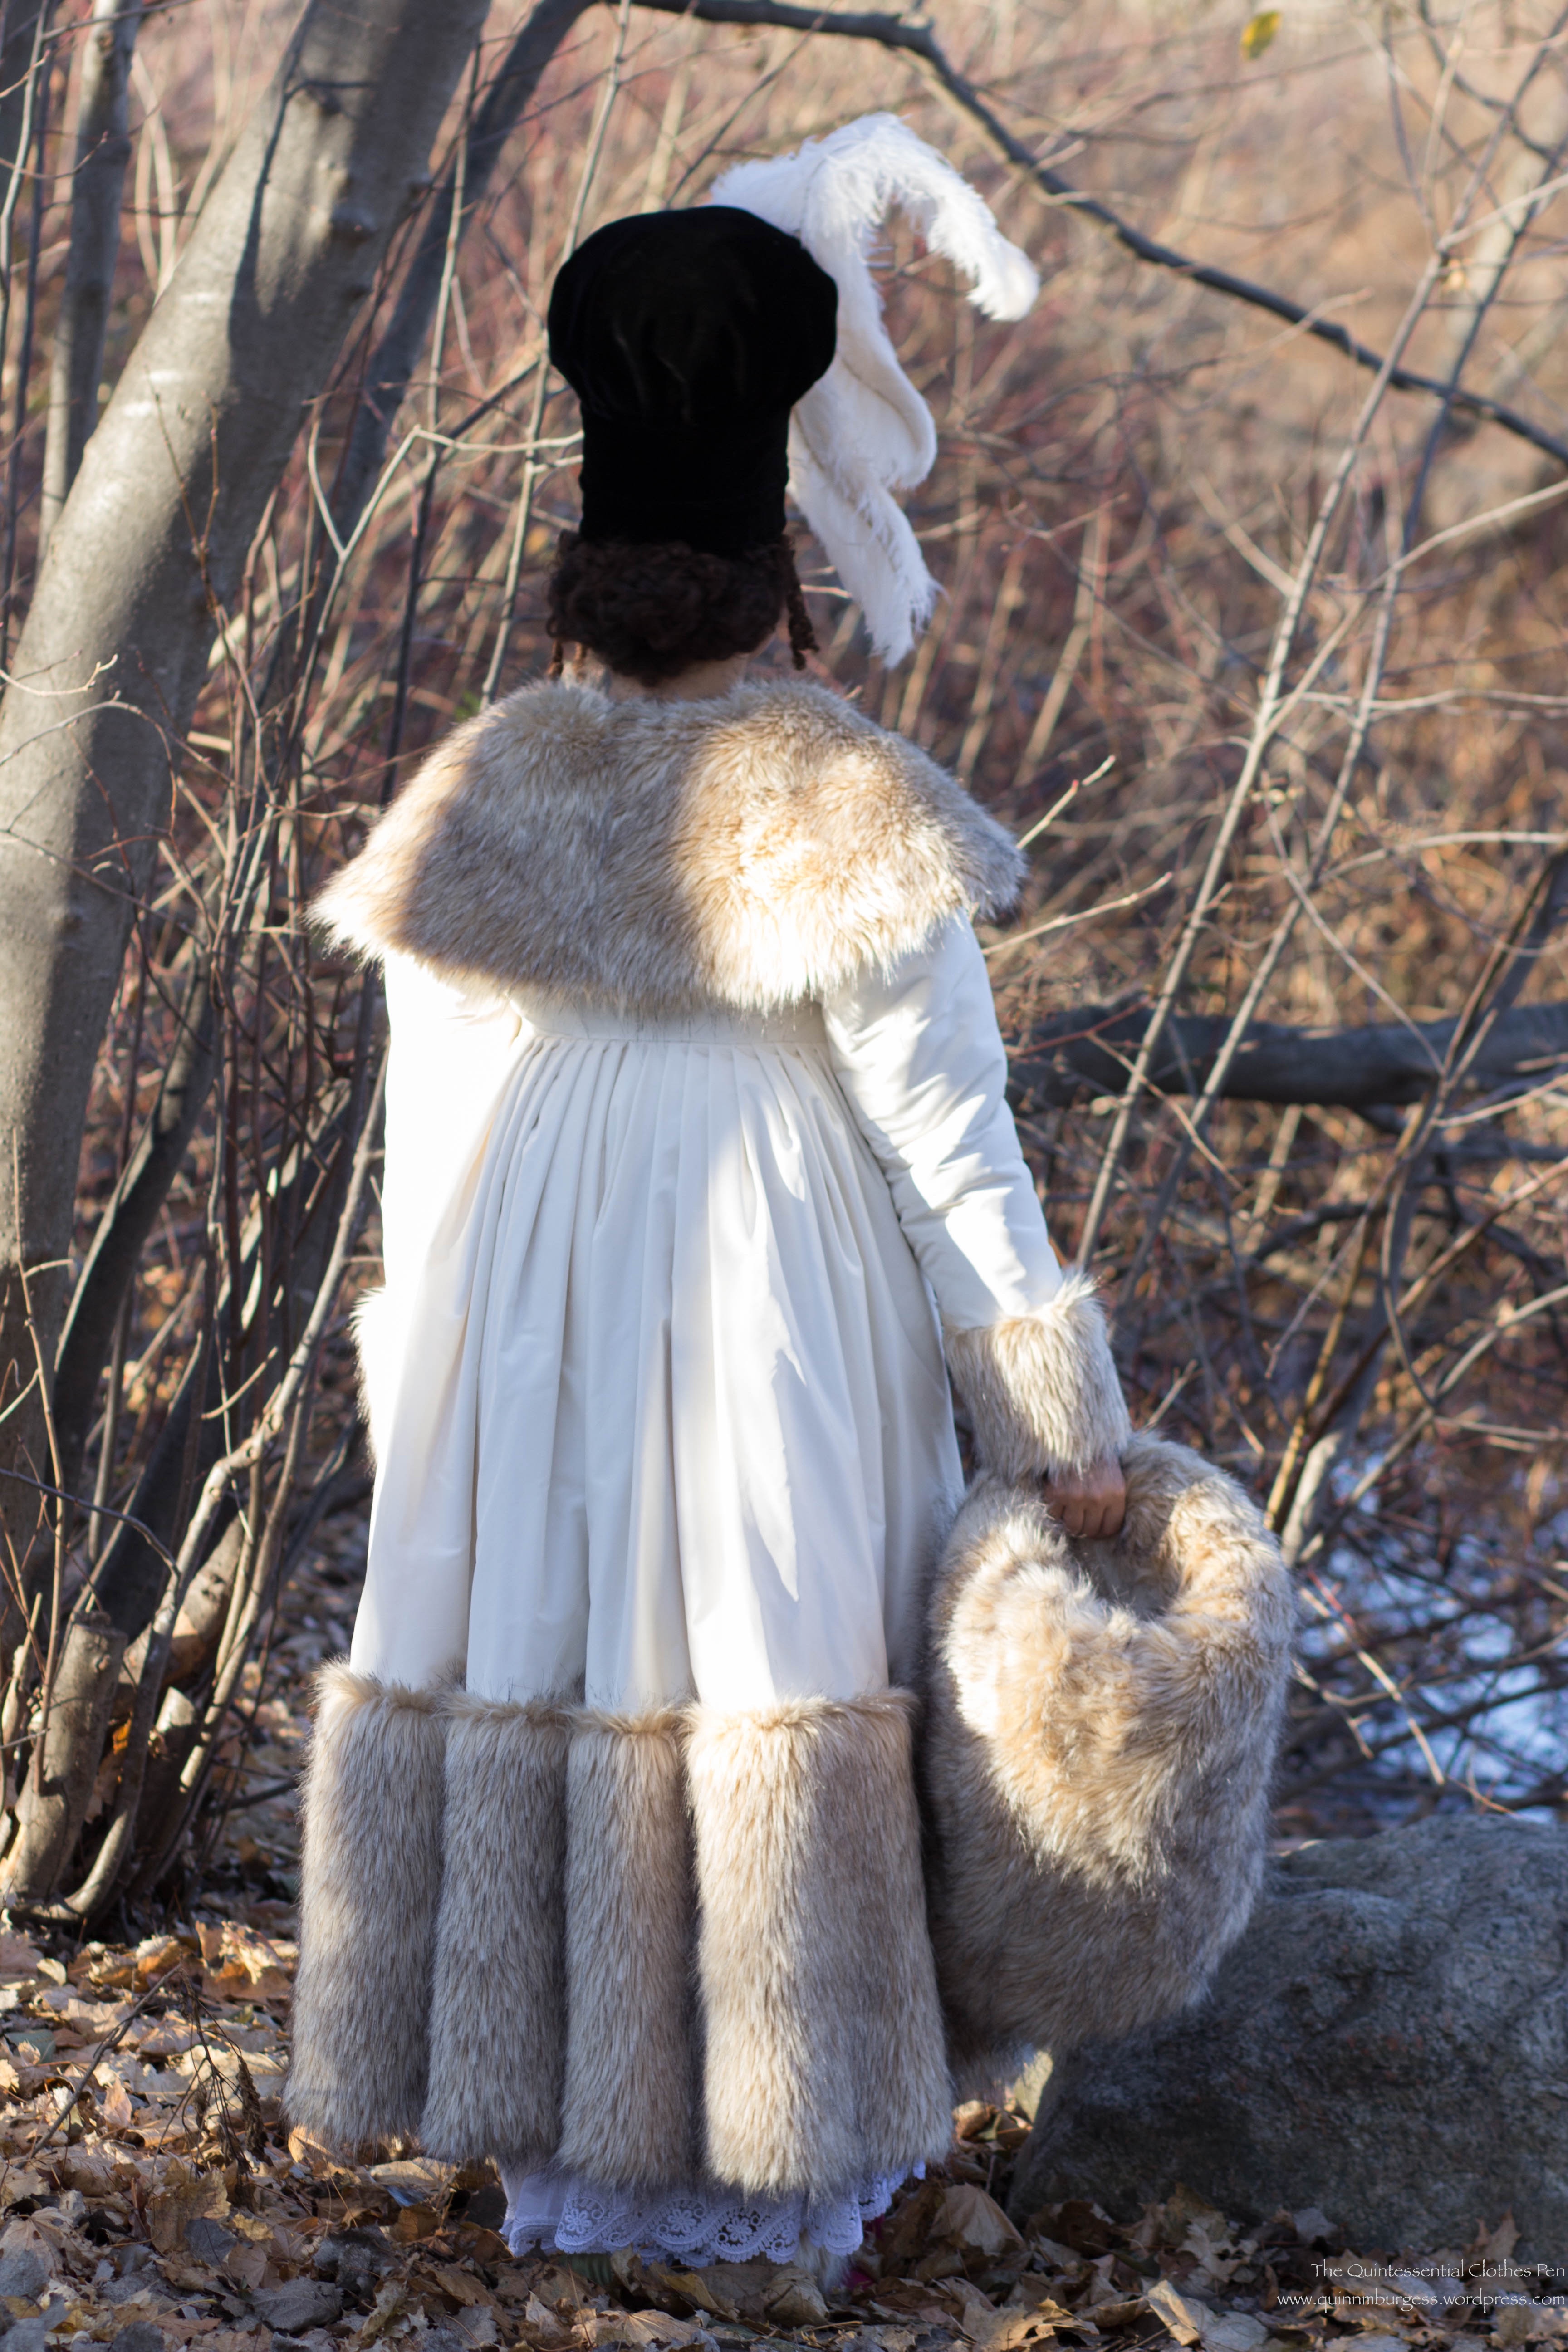
We took this photo specifically to capture the detail of the hat construction (usually the black all washes together, eliminating evidence of all the detail).
The rest is just sewing! The hat is entirely hand sewn, with the layers of velvet either tacked to the mulling or stitched through to the interior of the buckram base. Once I had finished the exterior sewing, I whipped up a lining of black silk to tidy up the inside.
The last step was to trim the hat with the immense ostrich feathers depicted in the fashion plate. I ordered my feathers from Lamplight Feather, which I highly recommend (quick shipping, good quality, and great selection). The hat has 6 total feathers, each 17″-21″in length. Each plume is two feathers sewn together along the central stem before being shaped and sewn to the hat. The trickiest part was shaping the feathers to achieve the shape in the plate. Each plume is shaped so that it does an 180 degree turn (the plumes are attached to the hat standing up, but then are turned downward) in addition to the side sweep shape. As you can see, the wind occasionally blew lots of feather fluff into my face during the photo shoot, but it was totally worth it, to wear such lovely feathers.
Feathers!
I constructed the hat such that it would sit almost horizontal across my head. It’s pretty light in terms of weight and is not uncomfortable to wear, being sized perfectly to fit my head. It also comes down far enough to be quite stable: even with the breeze and moving my head around there was no fear of it falling off.
As fun and silly as it is, I don’t really see a use for it in regular Regency wear. I will likely remove the feathers to use for another project someday (also partly because it would be hard to store the hat nicely with the feathers still attached). I’ve toyed with the idea of removing the poof (and maybe making a tam or turban or something out of it, or just sticking it back in my stash with the rest of the velvet) and using the buckram base with the velvet sides to make a shako style Regency hat. I have no immediate plans to put these ideas into action, except for removing the feathers, which I really should do soon, so I can put the hat away!
I thought I’d start the new year off with photos from my Vernet Ensemble photo shoot. (I’ll be doing separate posts with details about the construction of the ensemble as the year progresses.) I’m so incredibly pleased with my ensemble and with the quality of the pictures. I often have lovely pictures after events and when documenting sewing projects, but these are extra special in terms of the sharpness of the images, the clear colors, and the fun use of a historical lens.
Hopefully, you were following along with the release of finished ensembles in December, but in case you missed mine or haven’t figured out yet which fashion plate I was recreating, here it is.
Plate No. 20 “Toque de Velours. Witz-choura de Satin.”
Below is the “official release” picture. I did my best to mimic the pose of the fashion plate, but it was really hard to wrap my brain around the left and right of things in my own pose relative to the fashion plate. Left was right and right was left, and in the end we did the best we could and called it done. I think we actually did it right, it’s just that I’m facing the camera at a different angle. It still boggles my brain to try and figure it out!
Unfortunately, there was no snow in November when we took these pictures and so I didn’t get ice skaters falling over behind me (also, I would have had to find ice skaters)… but I did get unfrozen water, and you’ll just have to imagine the ice and the skaters!
These last few pictures with the blurred background were taken using a reproduction 19th century Petzval lens. You can read more about the lens and how it causes this effect here, at my photographer’s blog.
I am so incredibly blessed that to have a friend that joyfully enjoys practicing her photography skills with her nice digital camera (with fancy and historical lenses, to boot!) by taking pictures of my endeavors, amongst other things. She happily came over one afternoon in November just to accompany me for the photo shoot and take these absolutely gorgeous pictures. Thank you!!!
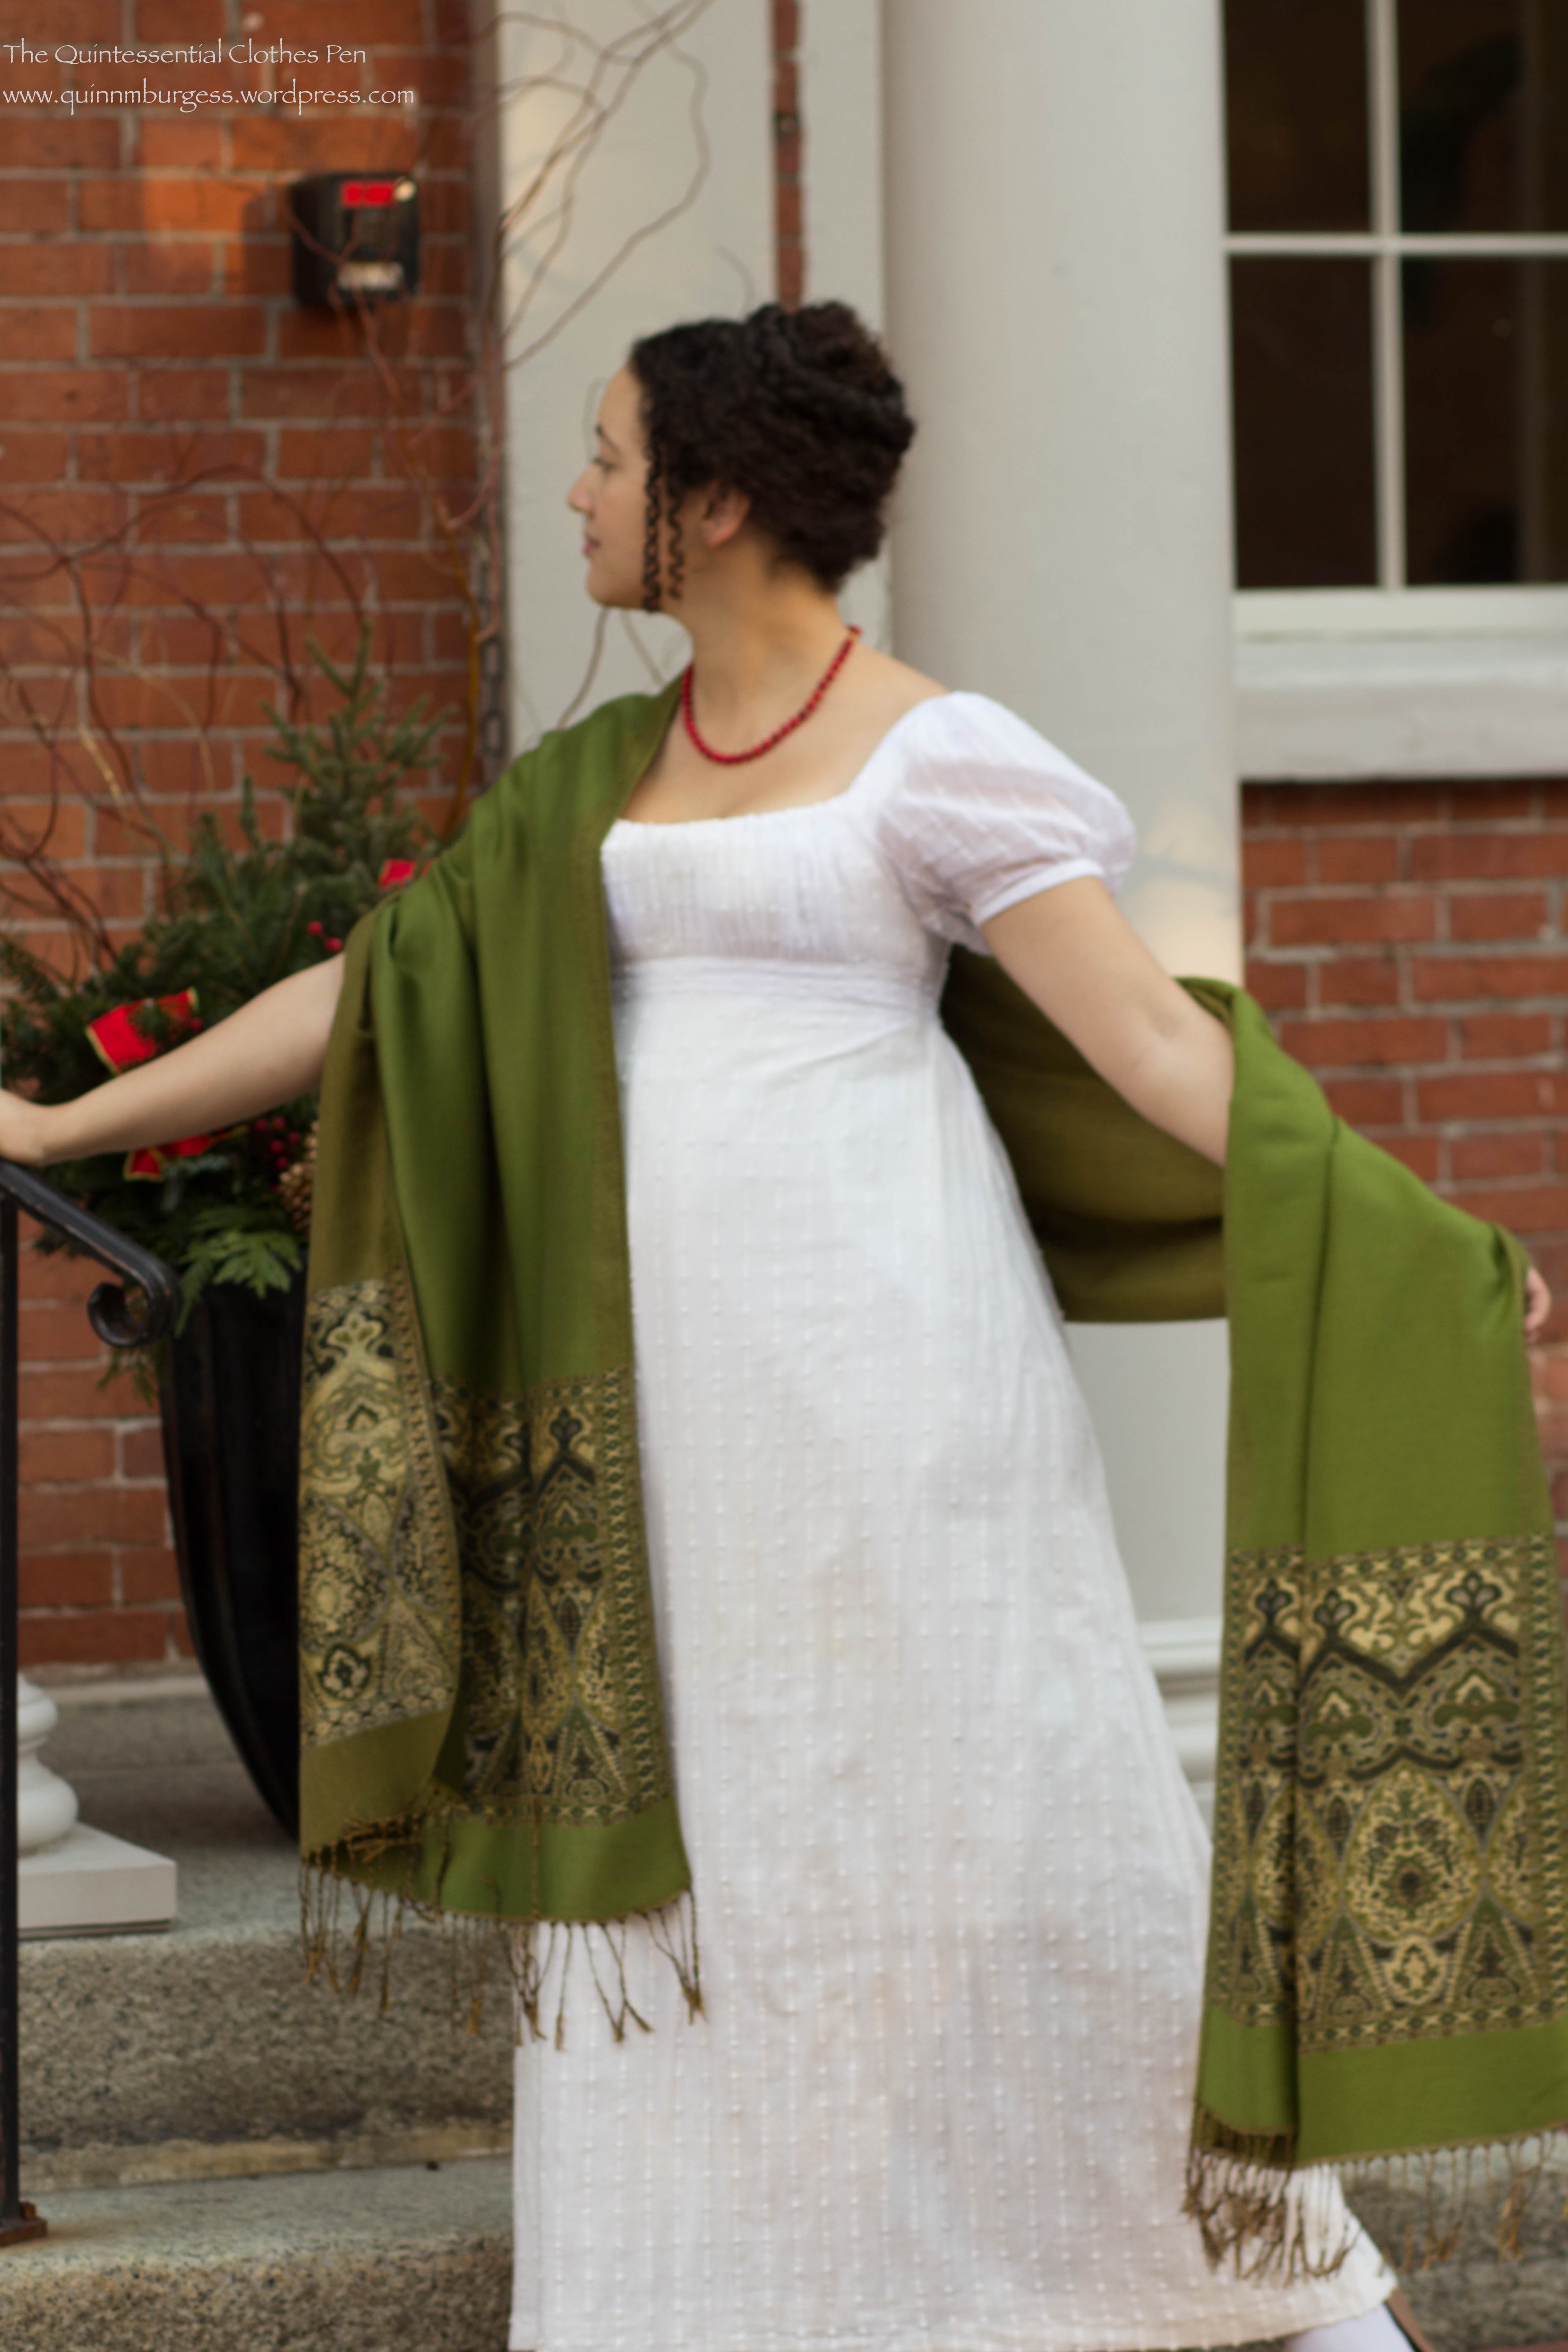
I was inspired this fall to make an extra long Regency shawl. Others around the blog world have done this before–it’s certainly not a new idea I came up with so I can’t take credit for the creativity of sewing two pashminas together to make one longer one.
I started by looking at my Pinterest boards to see what colors popped up often in fashion plates and extant shawls so I could pick a reasonably Regency color for my own creation (this board has a number of fashion plates and extant shawls). Common colors I saw were cream, dark red, grassy green, and dark blue. Occasional other colors included vibrant autumnal orange and rich yellow.
The second step was to consider the colors in my current Regency wardrobe so I could pick a color shawl that would harmonize with my outfits. Lastly, I looked at what was available on eBay for available color options and with sufficiently wide borders around all the edges to have the look of a Regency shawl. I found a few that matched my research but the color that best fit all of my criteria was grassy green. This shawl from the Met is a very similar in color to mine and was an inspiration in terms of border proportions.
How historically accurate is it?: It definitely passes Leimomi’s test of being recognizable in its own time in general and in terms of the color and border trim proportions, but most shawls would have been silk or wool, which mine is not. Also, since it is two shawls sewn together, it has an inaccurate seam down the back. So we’ll sway 75%.
Hours to complete: Less than 1.
First worn: December 5, 2015.
Total cost: About $10-$15.
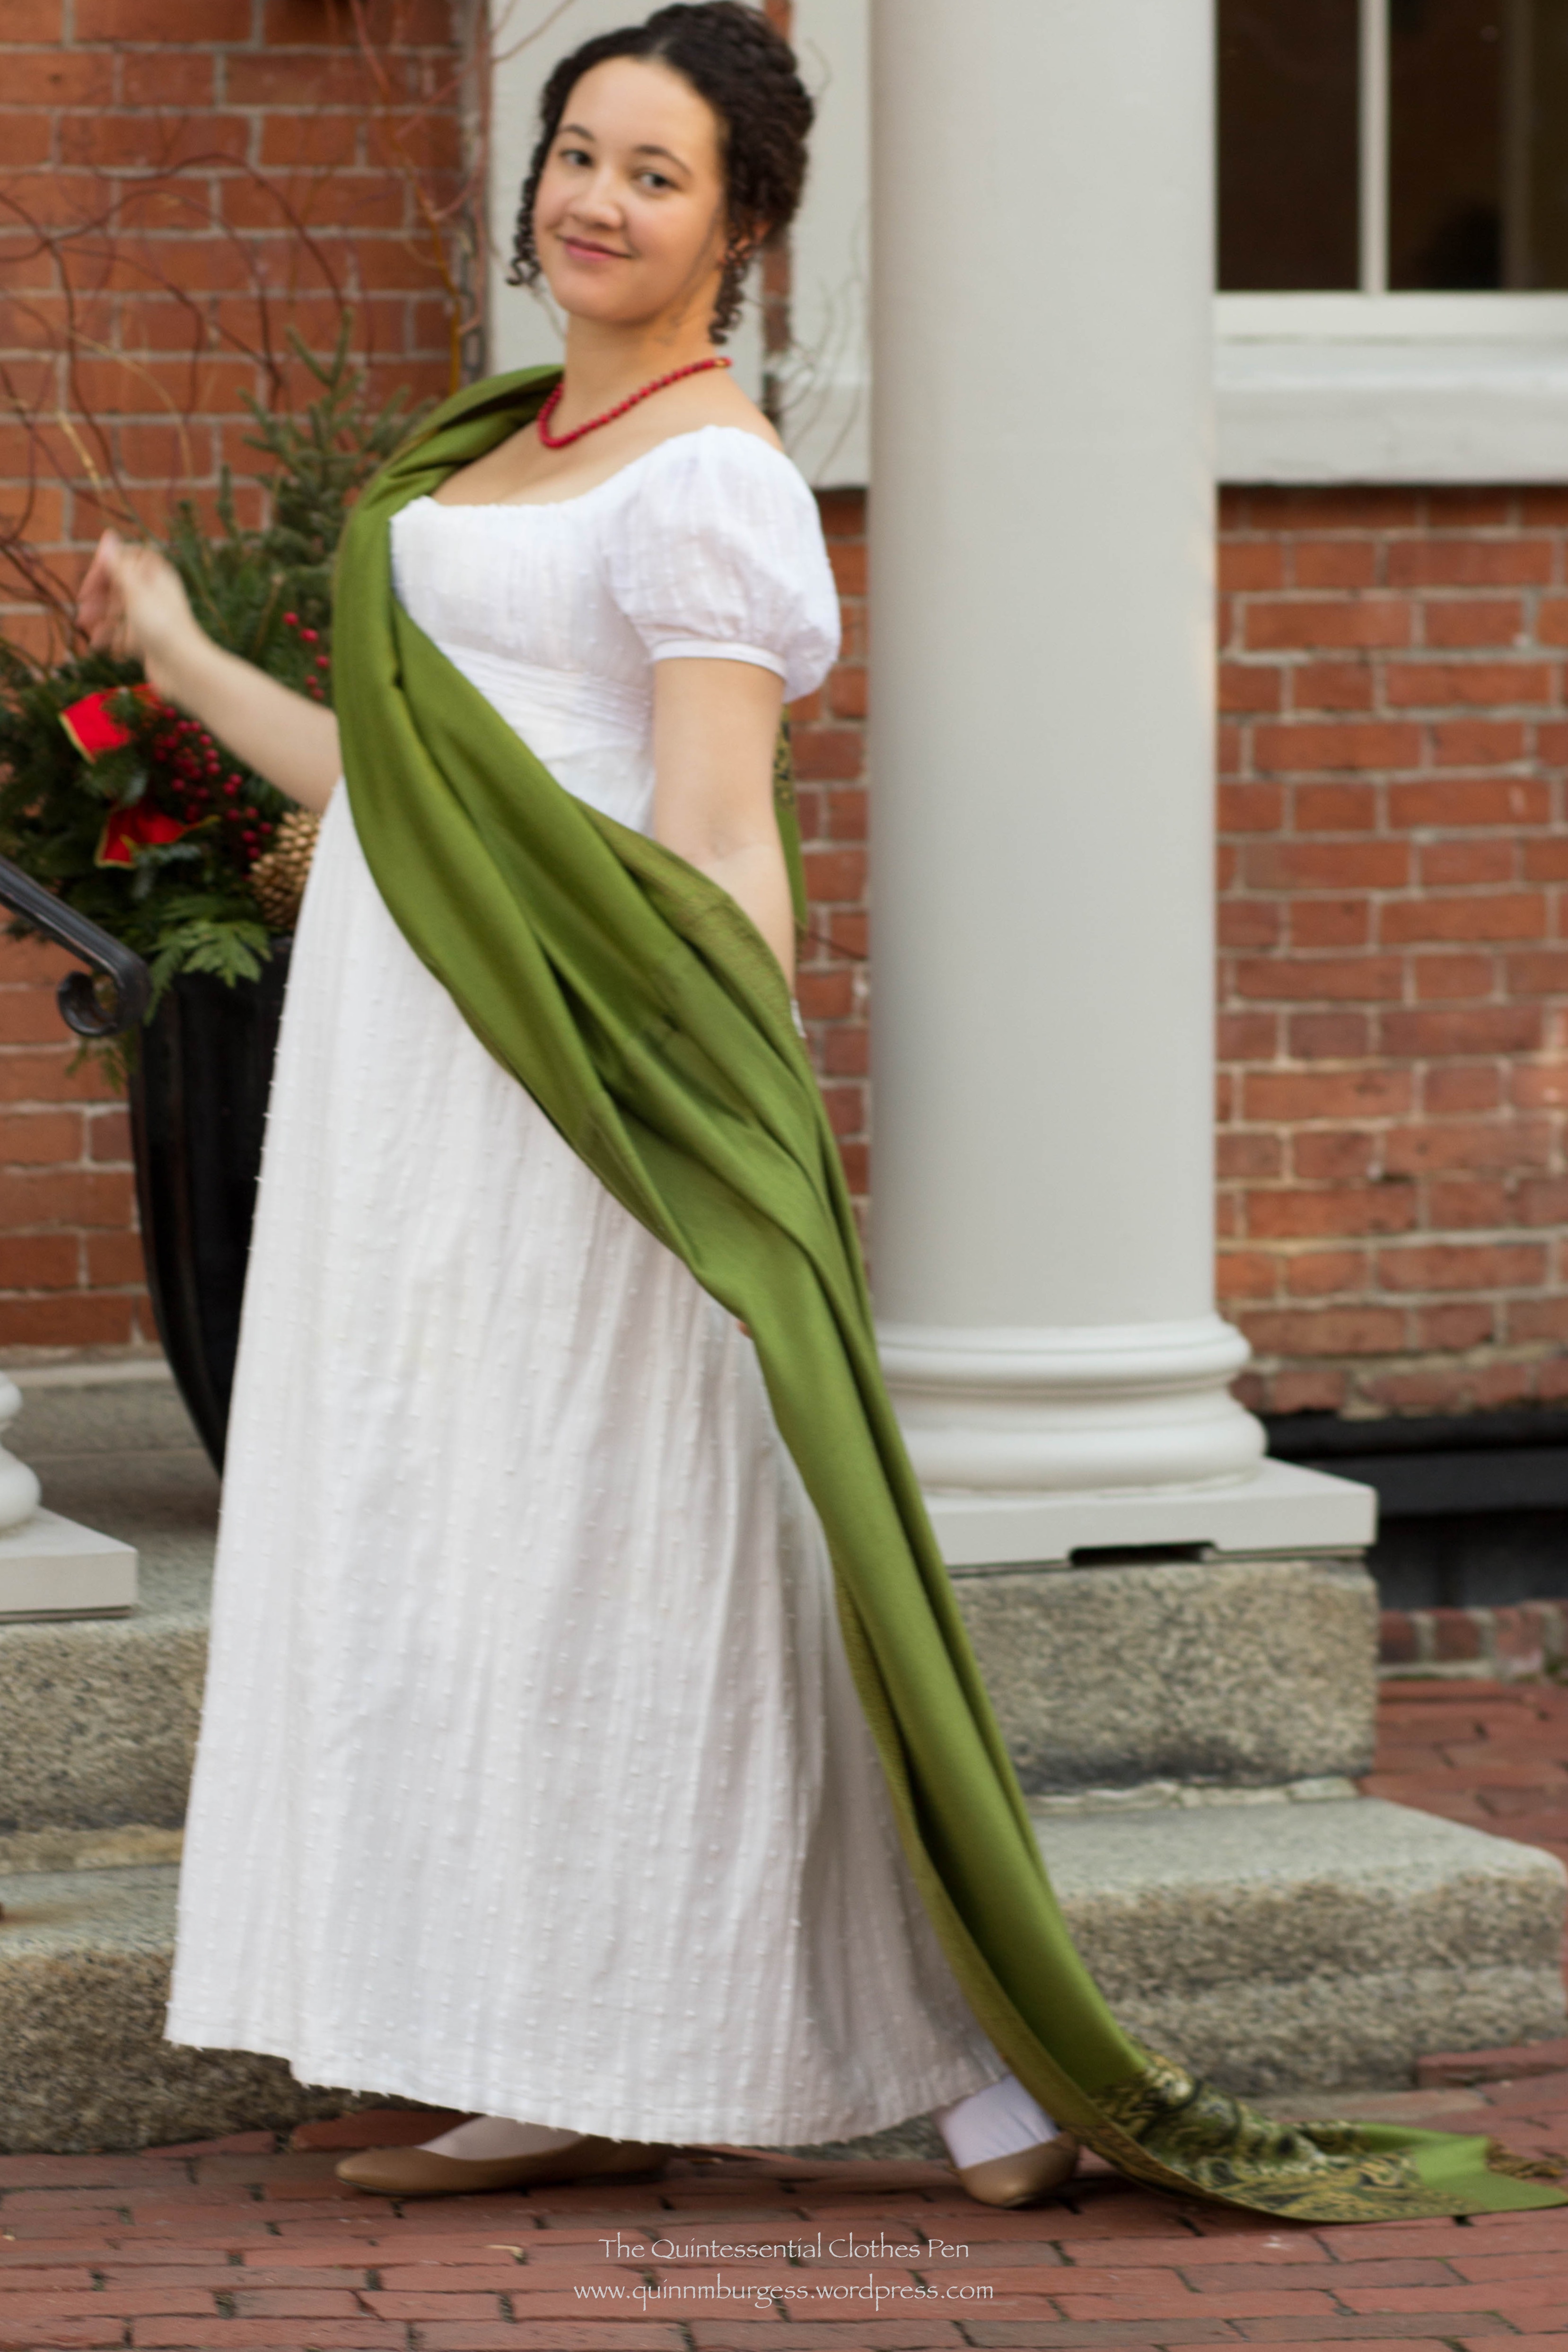
I was dancing in a Regency period hall in December and it was the perfect opportunity to get some of the classic Regency shawl pose pictures. (The hall was decorated for the holidays, which matched my accessories perfectly!) It’s always amusing to me how the shawls are often depicted halfway off the wearer or draped artfully but with no apparent desire to keep warm.
I wore my 1812 square neck dress but removed the pink sash that I’ve had on it for the last two years or so. It was nice to go back to a plain white dress for a change. It’s not plain at all with the new shawl!
I took the time to create a fun hairstyle with small diameter face framing curls and an extra braid of fake hair. I was very pleased with the overall shape and silhouette. (I’ll be sharing more about how I made the curls at some point in 2016 when I post more information about my Vernet ensemble and the photo shoot of the completed outfit.)
I had a blast dancing all day in such a beautiful space. When I cooled off between dances the shawl was great to keep me warm. And I love how festive it looks with the red necklace! I hope your holidays are full of fun, joy, and blessings!
I was all ready last weekend to create lots of picture heavy posts for the blog, and then my computer seriously died and required hard drive replacement. Luckily, Mr. Q takes care of me and established external backups a long time ago, so I didn’t loose anything (whew!!!). The store was able to fix my computer fairly quickly, but I’d lost the weekend to go through pictures and create posts.
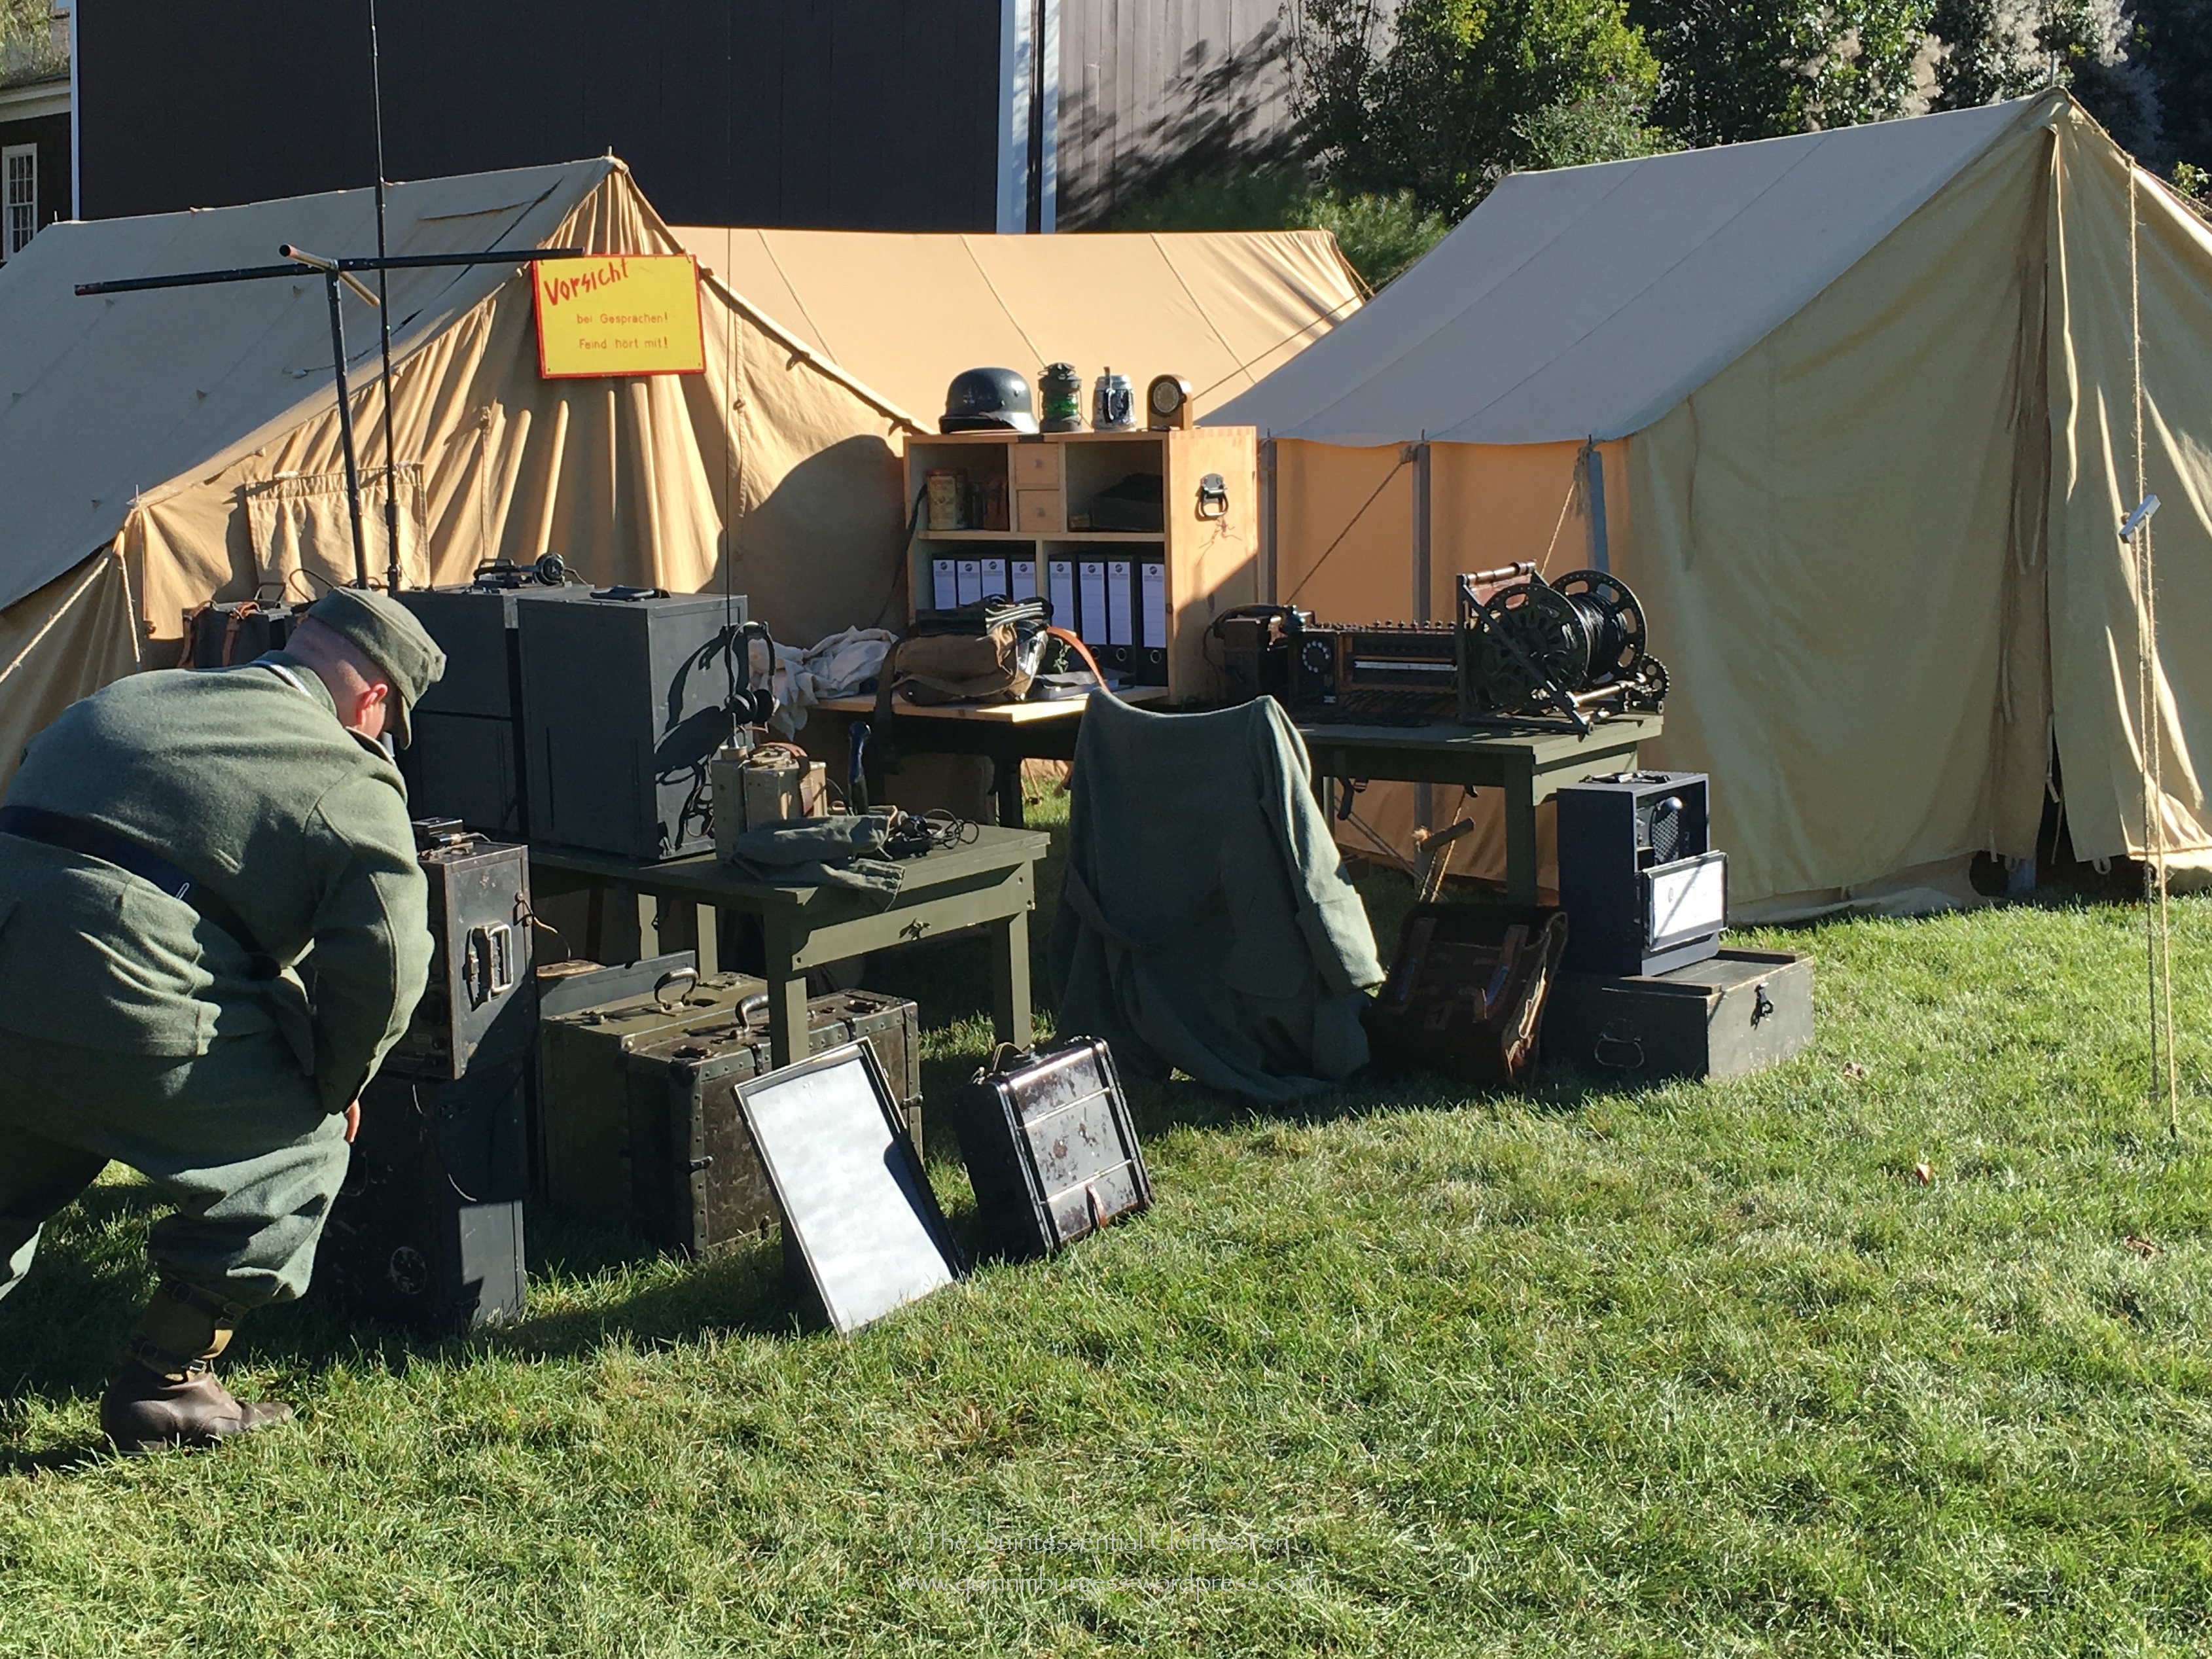
So today is a quicker post with pictures from a WWII event a few weeks ago. WWII is a period I hardly ever visit and don’t have clothes for in my closet, so I was grateful to be able to borrow things from friends and Mr. Q’s closet (he had a polo shirt that looked way better than anything in my closet for this outfit!). The only thing I had was shoes and stockings–thanks guys–I would have been sad indeed without help!
We were a mix of female War Correspondents and Women’s Army Corps. Good thing War Correspondents didn’t have uniforms, because my outfit was a bit thrown together…
The day was gorgeous, though a little cold early in the morning. We just went for the day and enjoyed wandering around the Allied and Axis camps and watching the staged battle. This particular reenactment is known for the large variety of WWII vehicles that are on display and in use, which was neat to see.
Here is the German telegraph set up. The Axis camp actually had a lot of things to look at and one especially interesting interactive set up with food from the period.
The Germans also had some really snazzy cars and other vehicles. They did a few drives around the battlefield before the battle actually started.
Prior to the battle some tanks had been hidden just inside the trees across the grass field. It was my favorite part when they came trundling out mid-battle (especially the well hidden ones that we didn’t spot before things started!). My second favorite part was when, after the battle, they backed the tanks back into the trees to reset for a second battle later in the day.
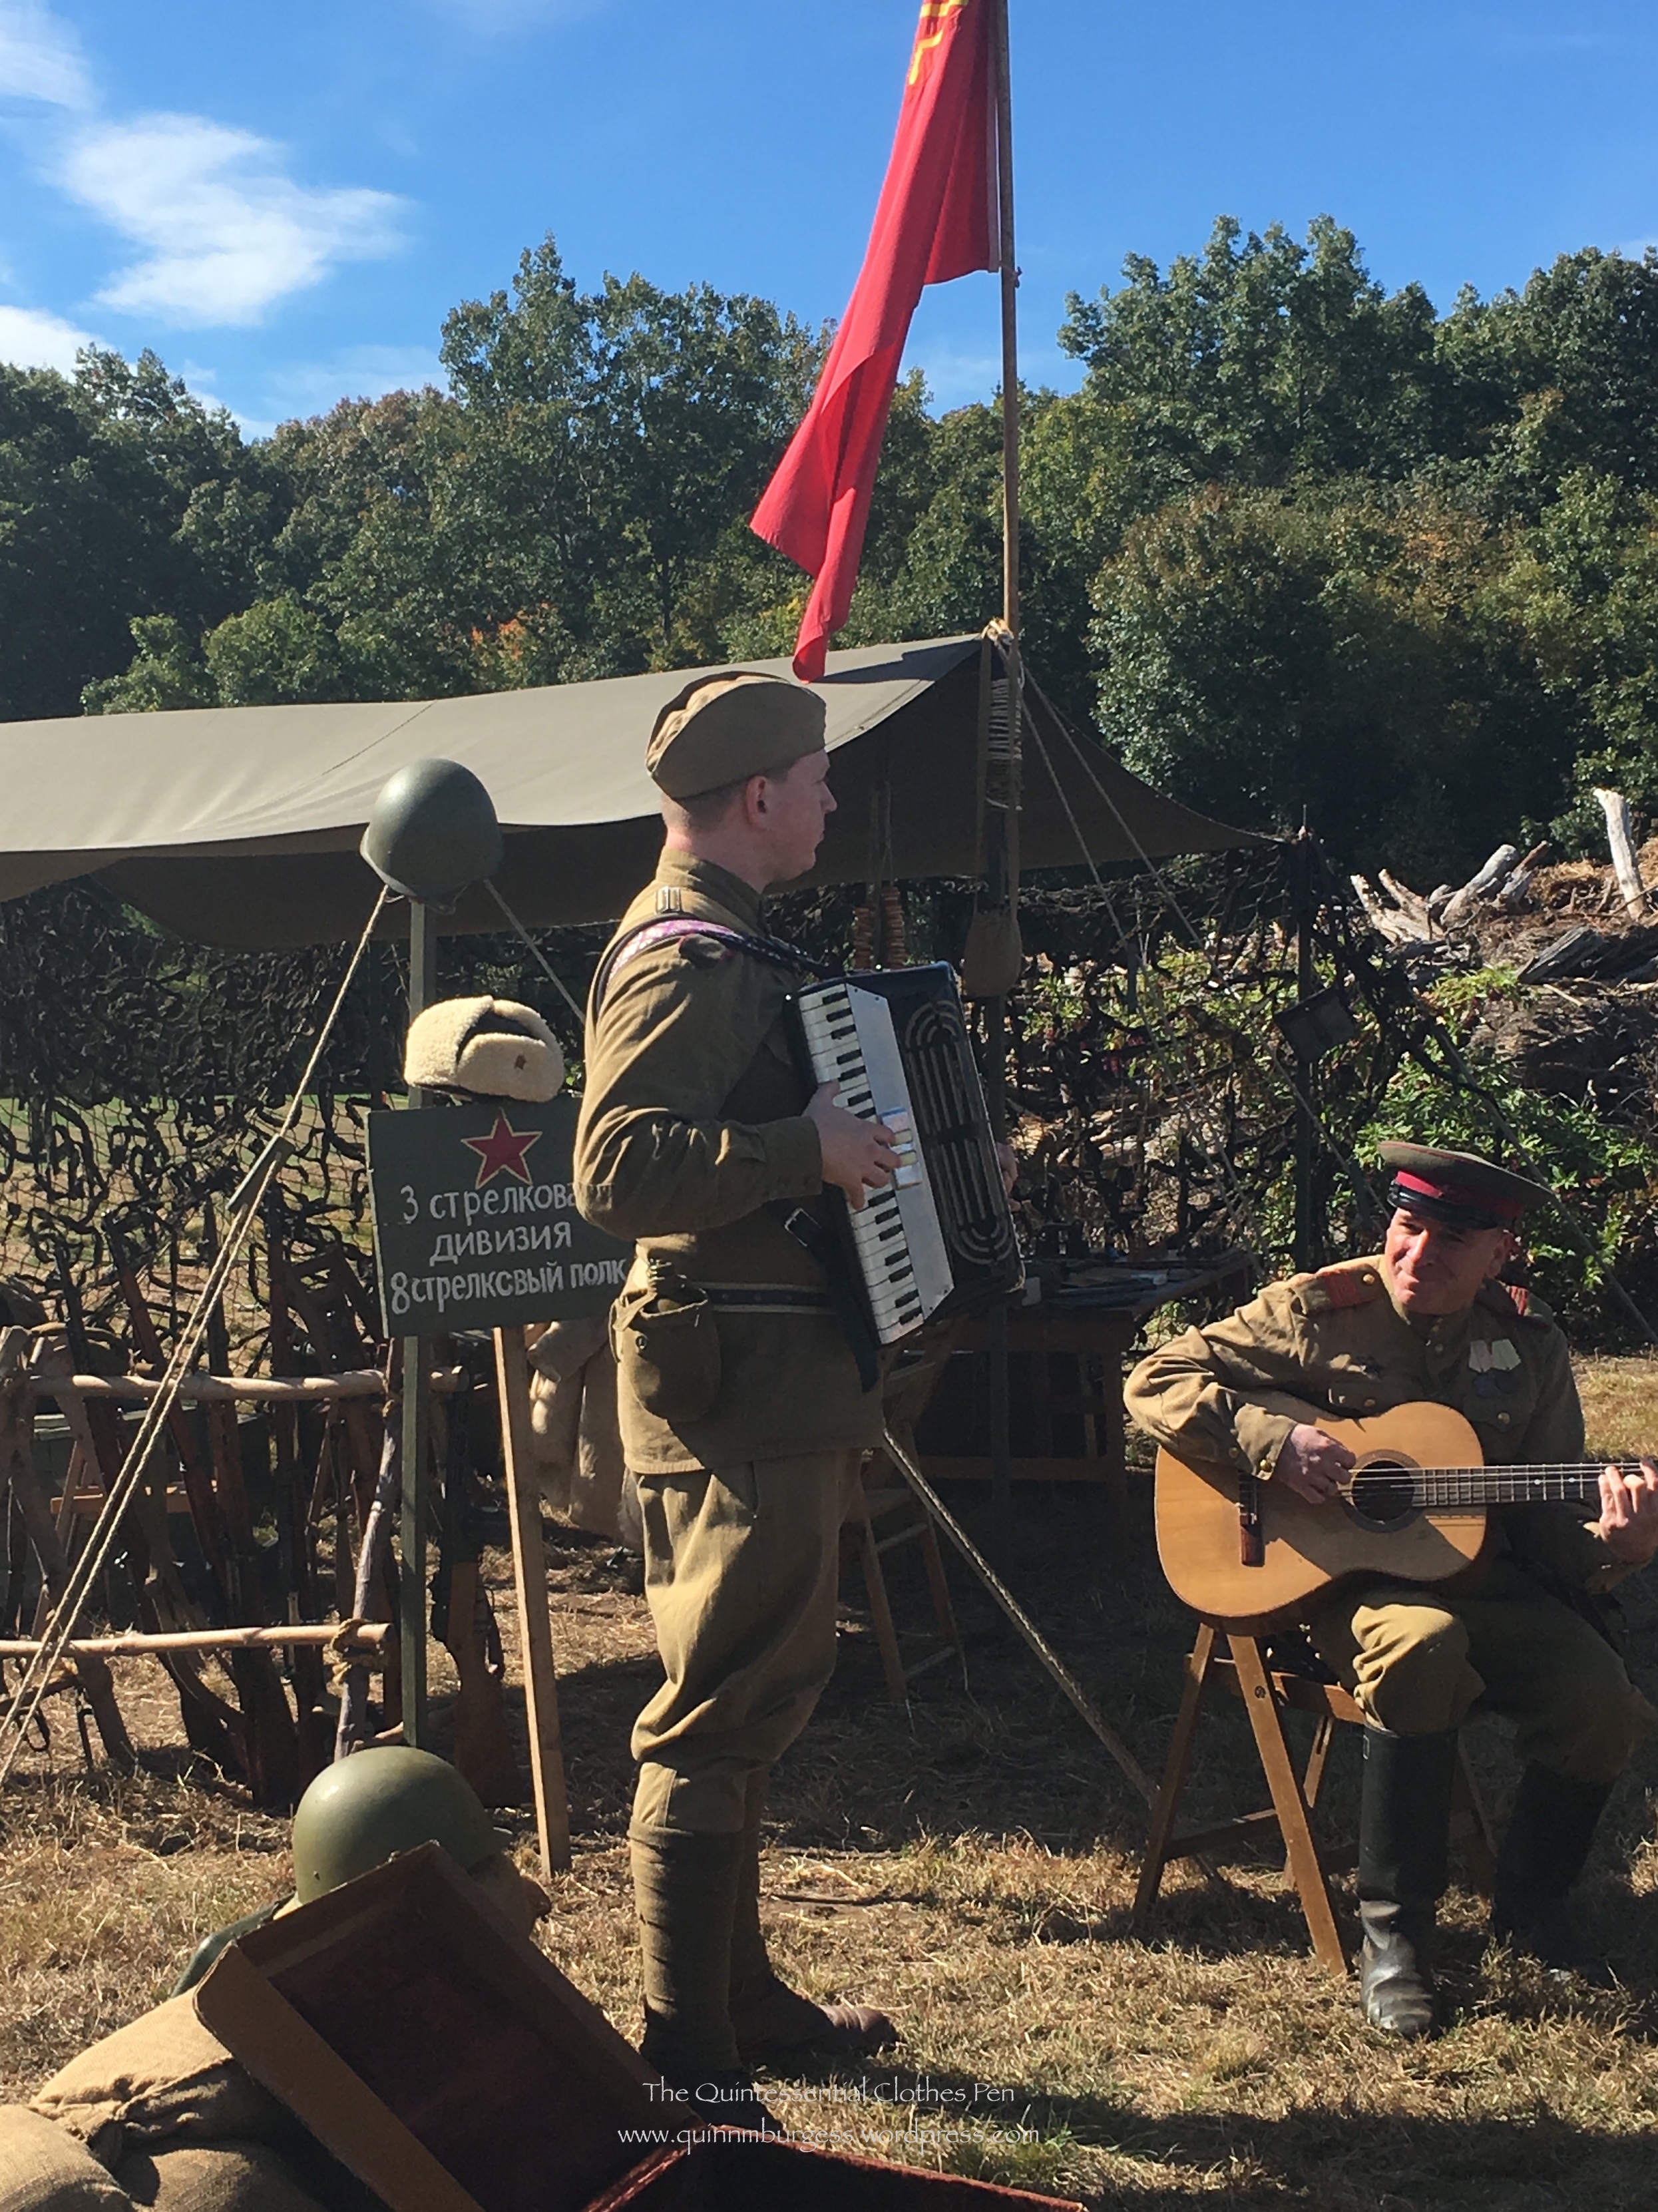
And finally, a Russian unit in the Allied camp. We met another female reenactor who was with the Russian unit (women aren’t that common at these WWII events, you know, so it’s especially neat to meet others, especially those you don’t previous know). The tea and fur coats were pretty tempting while the day was still cold and later in the day there was music! Fun!