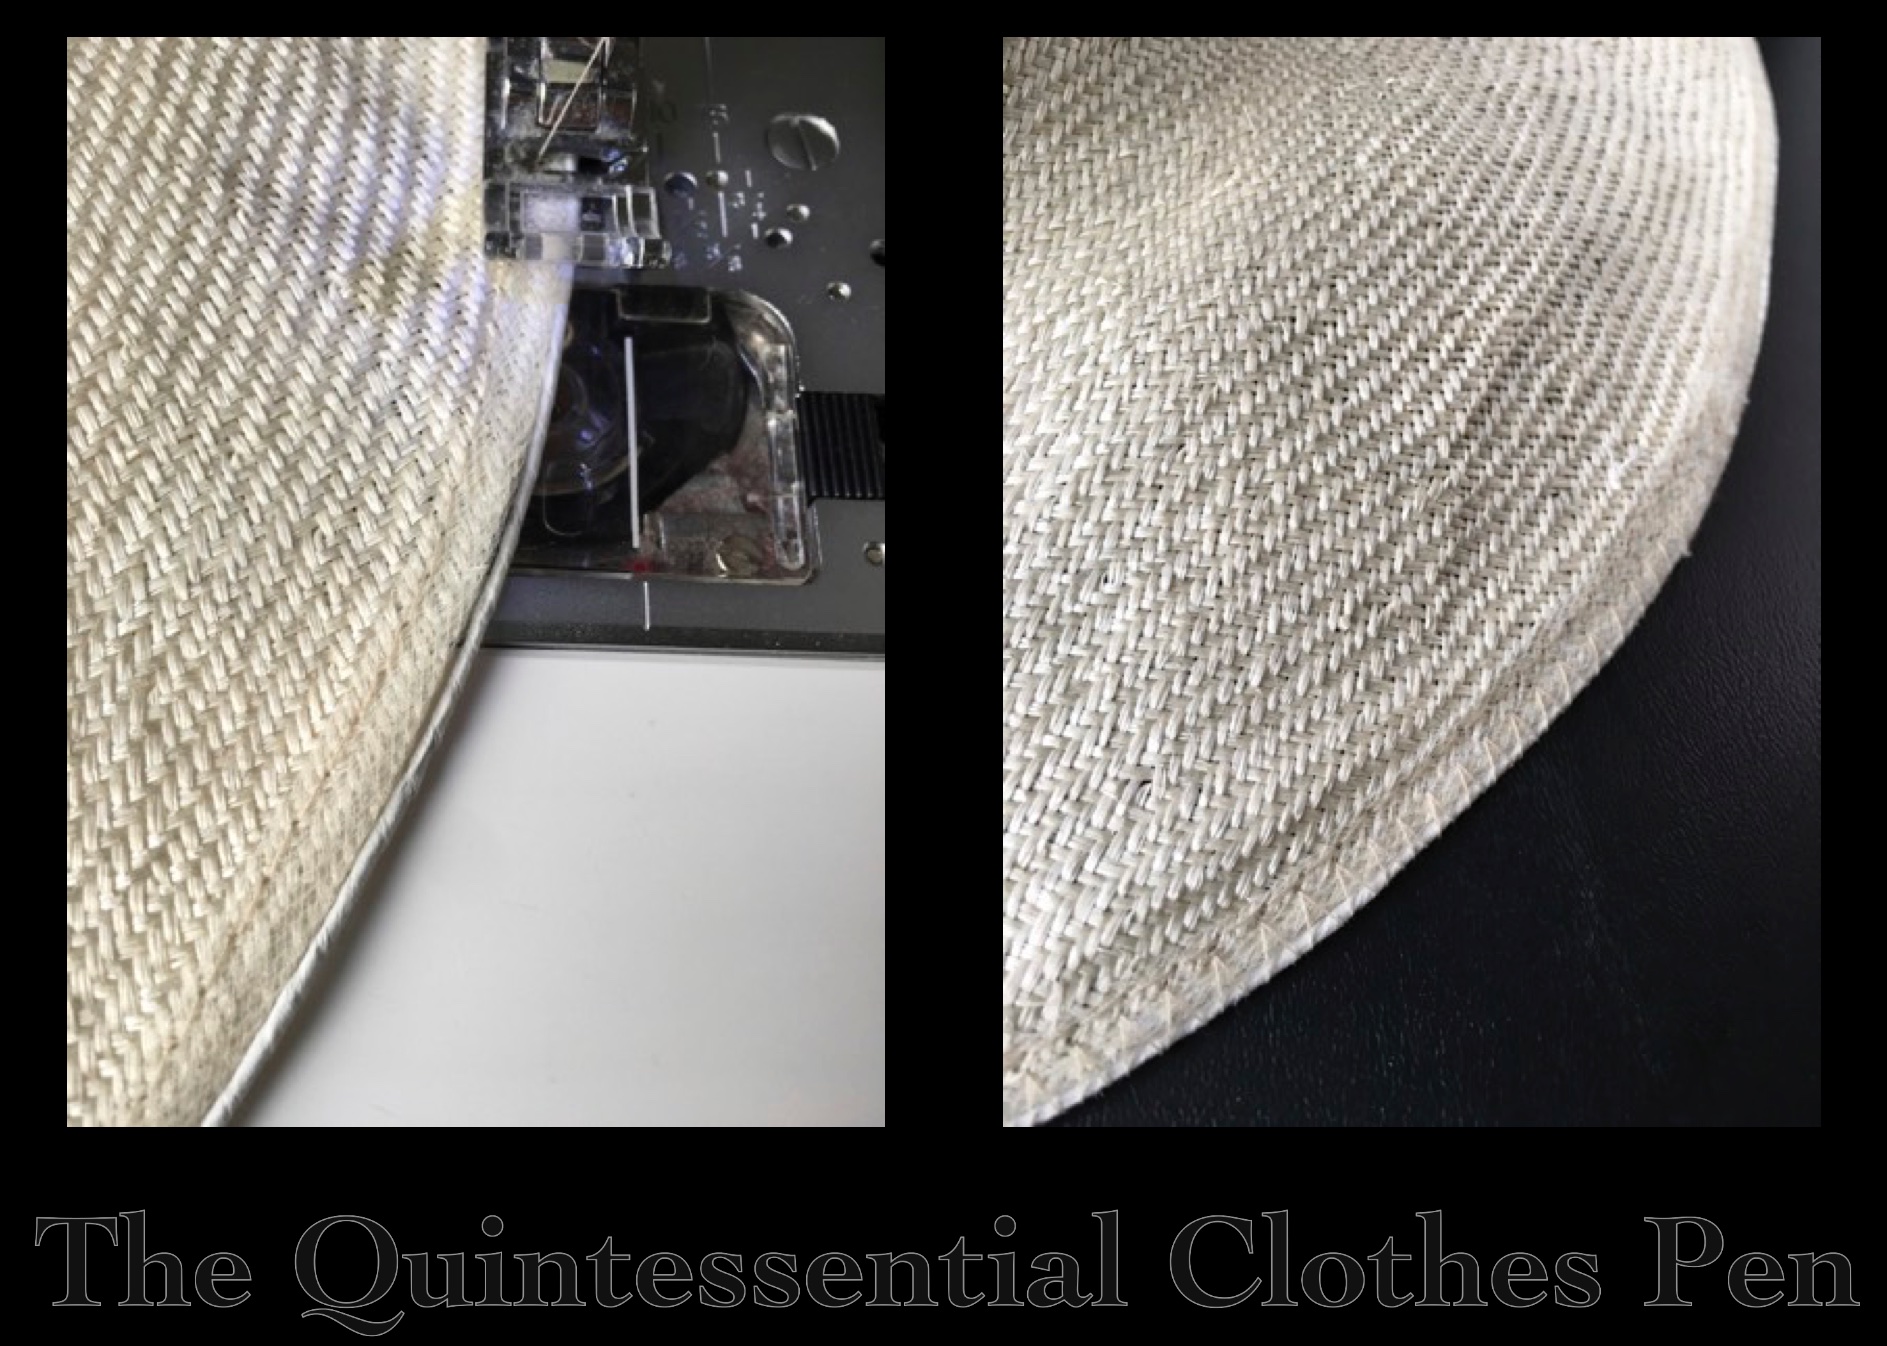
Spots are this nifty piece of hardware that can be used to secure interlocking pieces together. They’re similar to a brad in that they have two prongs on the back of a circular top. The difference I see is that they have a domed top and the prongs come out from other side rather than the center.
Back in April, I posted about the dimensions of my large hoops and how I made my new smaller hoops and stated the goal of adding spots to my old hoops just like I had done for the new hoops. Over the last six months I’ve been slowly adding the spots to my old hoops and I’m pleased to report that the process is complete! My ten year old hoops have reinvigorated life!
For the new smaller hoops I used brass colored spots, but I decided to change it up for my older hoops and used gold colored spots instead. (Both of the spots were purchased from this seller on eBay, who I would certainly recommend.) I’d originally intended the vertical tapes on these old hoops to be able to slide around when needed so that I could force the hoops into an elliptical shape, but since I haven’t done that even once in the last ten years I figured that if/when I want elliptical hoops I’ll make a new support structure and will reinforce these hoops in their current cupcake shape instead of contingent to allow them to be adjustable.
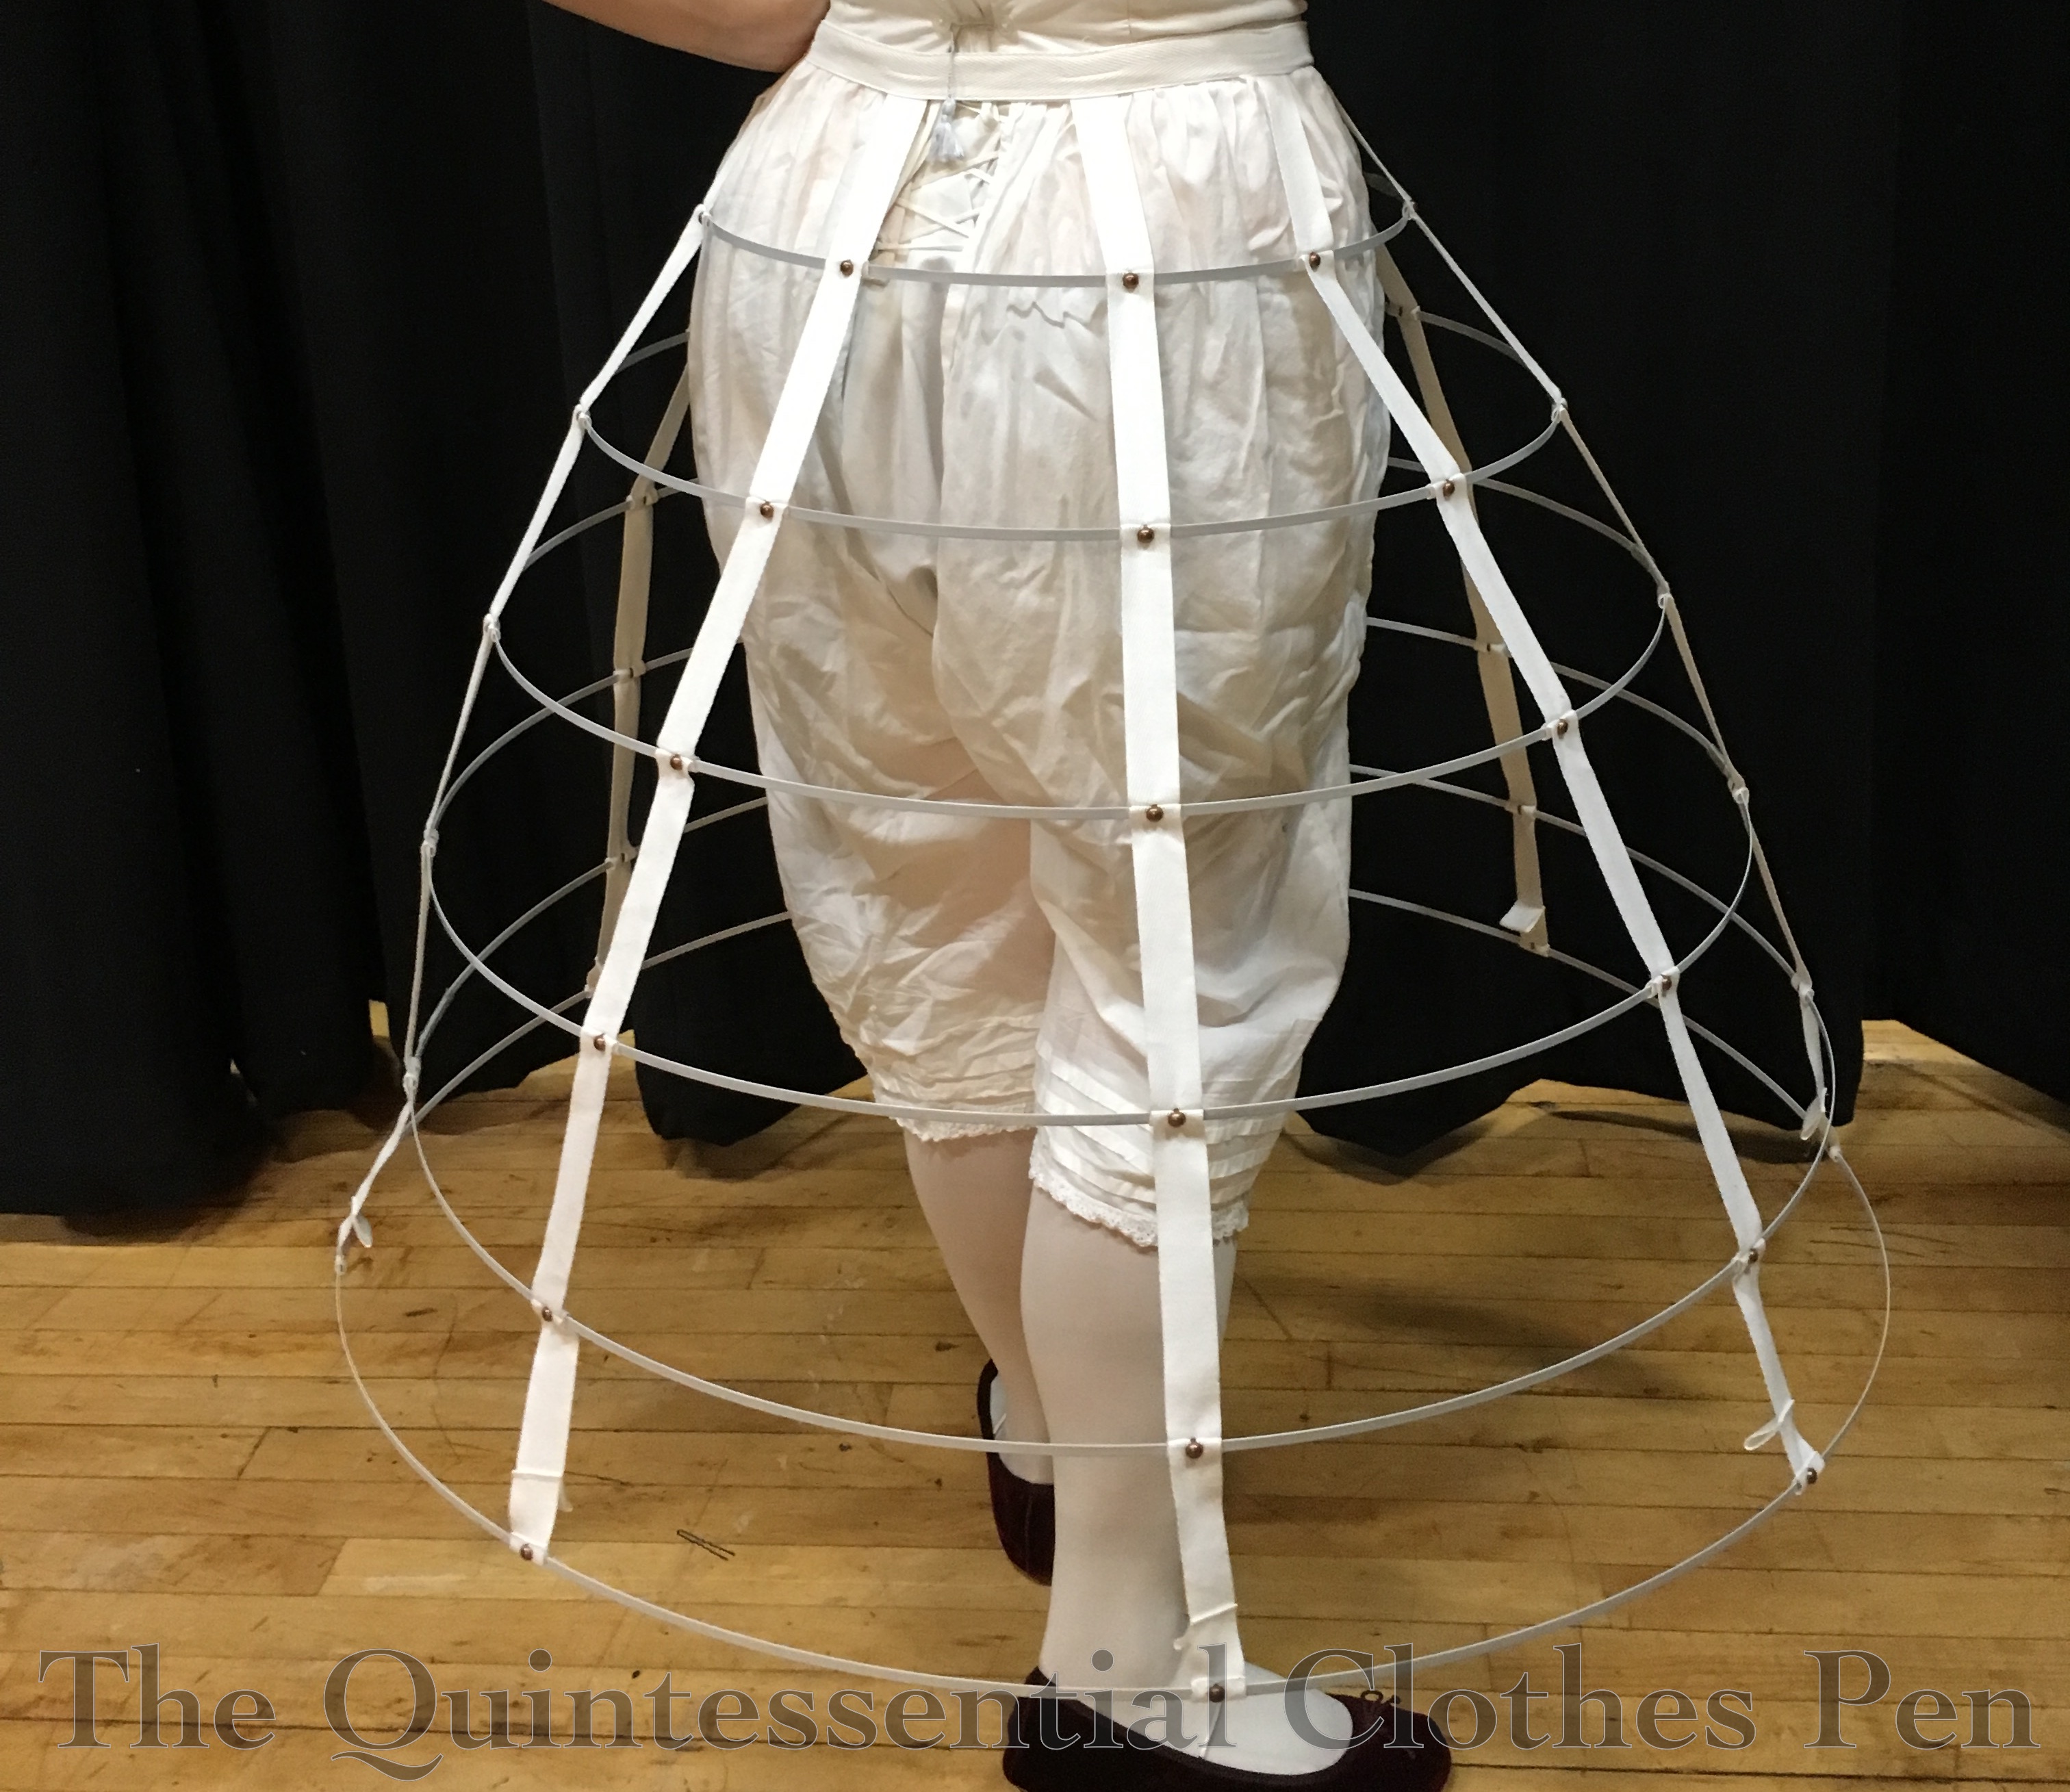
My spots are positioned so that the prongs are at the top and bottom of each horizontal wire. I poked the prongs through the twill tape then used pliers to bend the prongs towards each other to secure them in place. The nice thing about the spots is that as they are folded back you have control over how tightly they are attached. So technically they are still loose enough that I can scoot the vertical tapes around if I really want to. But will I? Probably not.
Back in October of 2016, I made a new, smaller crinoline (also called a hoop skirt) than the one I’d had for about the last 10 years. I thought it would be great, and it was… in terms of shape. Unfortunately, the new crinoline had a fatal flaw: the channels for the hoops were too wide for the slippery-ness of the hoops and therefore all the tapes would slide to one side while being worn, causing the hoops to drop down and create a trip hazard for the wearer. I had loaned these to a friend at a ball and was horrorstruck as I realized the problem and she attempted to dance without realizing the problem. It was such an awful feeling! We solved the problem for the night, but I resolved to fix the hoops before wearing them again and I learned a good lesson about trying out new garments myself before loaning them! I’ll get to my solution for the sliding hoops in a bit, but first I’ll start at the beginning.
The new crinoline was an experiment to see if I could use the hooping from a cheap Amazon hoop skirt like this to create a cage crinoline with smaller dimensions than my usual crinoline, the super-cupcake, which has a decidedly high fashion silhouette. The answer to that question is ‘yes’ it was easy to reuse the hoop steel from the Amazon crinoline to make a cage crinoline.
You see, the super-cupcake looks great with the right circumference of skirt and the right environment (high fashion daywear or a ballroom); however, under a cotton day dress I wanted a more subtle, practical, reasonable shape. I have to admit to liking a big skirt though, so a reasonable crinoline for me still has a larger circumference than what it might be for others. Also, at 5’6″ I am taller than the average woman, which allows me to carry off a larger circumference while staying within reasonable looking proportions. (For more thoughts on practical sized crinolines, Maggie May has shared useful research and an equation to help determine crinoline circumferences.)
Here’s a comparison of my two crinolines worn with cotton dresses: the super-cupcake is on the left and the newer reasonable crinoline is on the right.
Interestingly, the dimensions of these two crinolines aren’t terribly different. The lowest hoop is only about 8″ smaller on the new crinoline. The biggest difference (and what alters the silhouette most) is that the new crinoline has a more tapered shape in the upper hoops.
I’ve provided the following size chart in an effort to help those who might be making or adjusting their own crinolines. Even if you don’t want to deal with all the vertical tapes, you can use these dimensions to adjust the hoop sizes in a ready-made modern crinoline to achieve the same effect.
Interestingly, both of these crinolines have the same vertical tape length that is short enough to keep the bottom hoop decidedly above the floor. The lowest hoop on these is about at my mid-calf height. This keeps my feet from getting tangled–especially useful while dancing! In order to keep my dresses from folding under the bottom hoop as I move, I have a cotton petticoat with a substantial ruffle around the hem which provides stability for the dress worn on top. You can see the length of the super-cupcake on me as well as the ruffled petticoat that I wear over both crinolines in this post.
Here are my two crinolines next to each other while the new one was still in progress. They have an overall similar construction (although I did simplify the new ones, using fewer hoops and fewer vertical tapes).
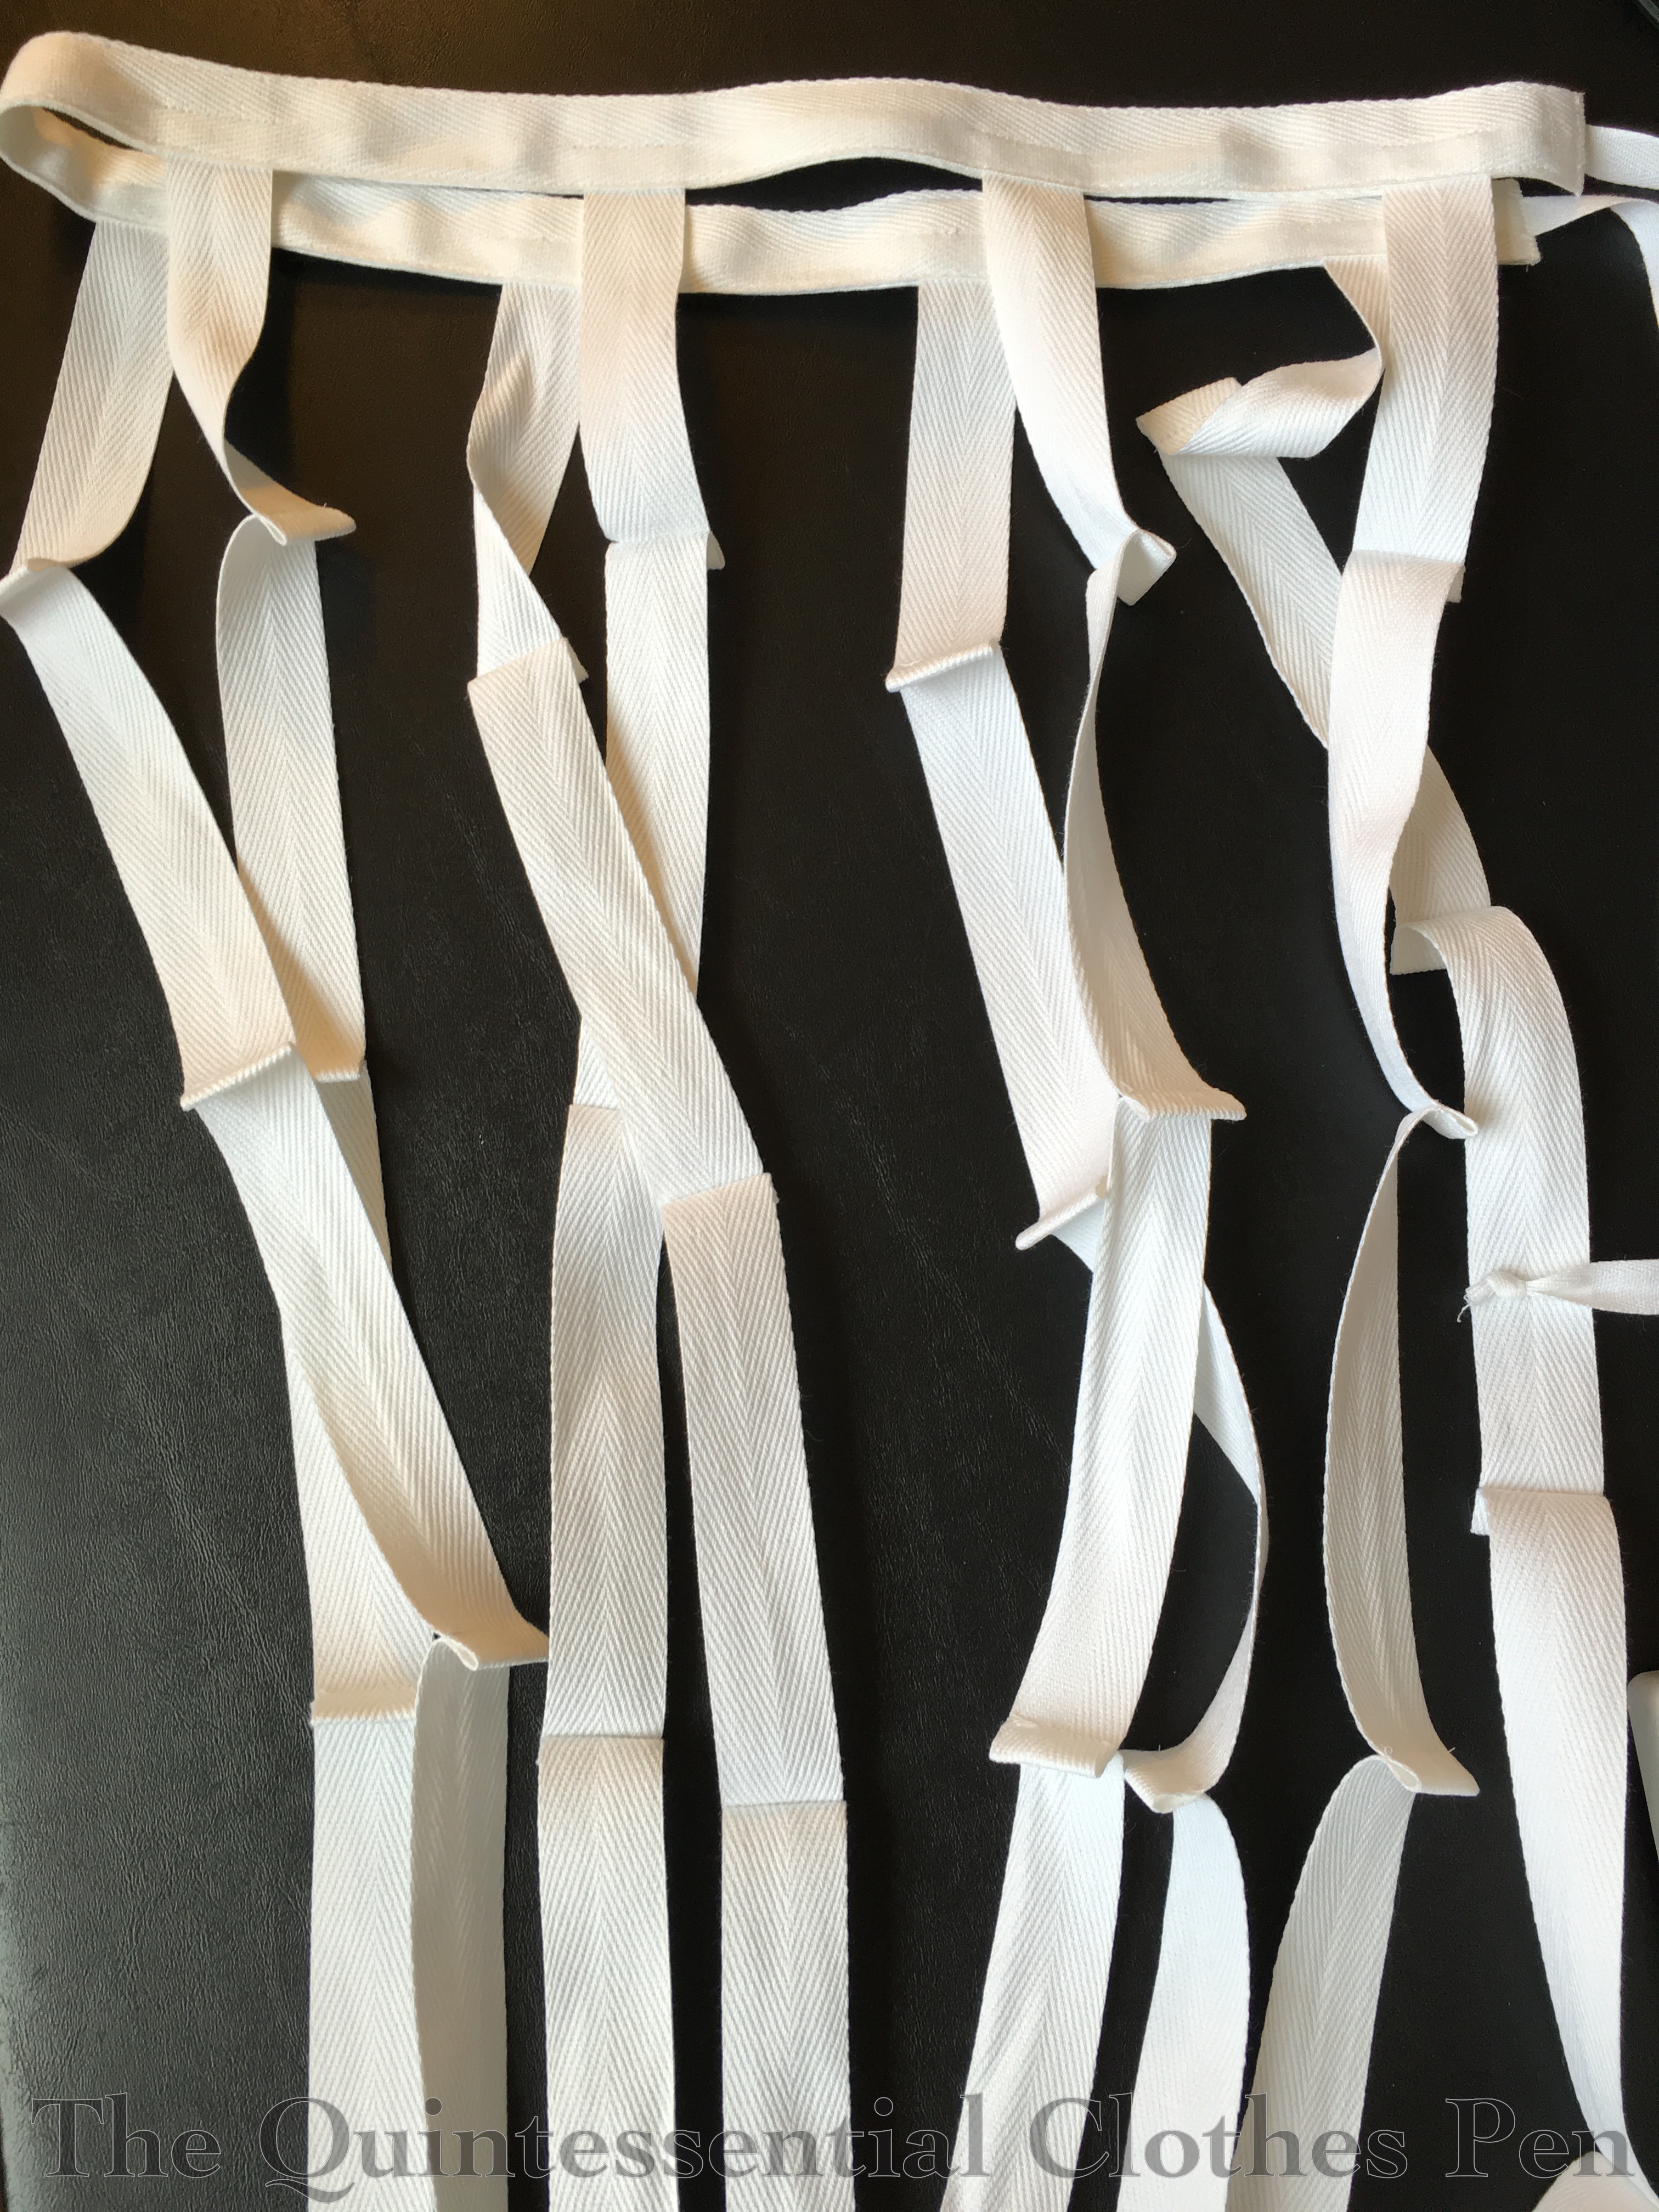
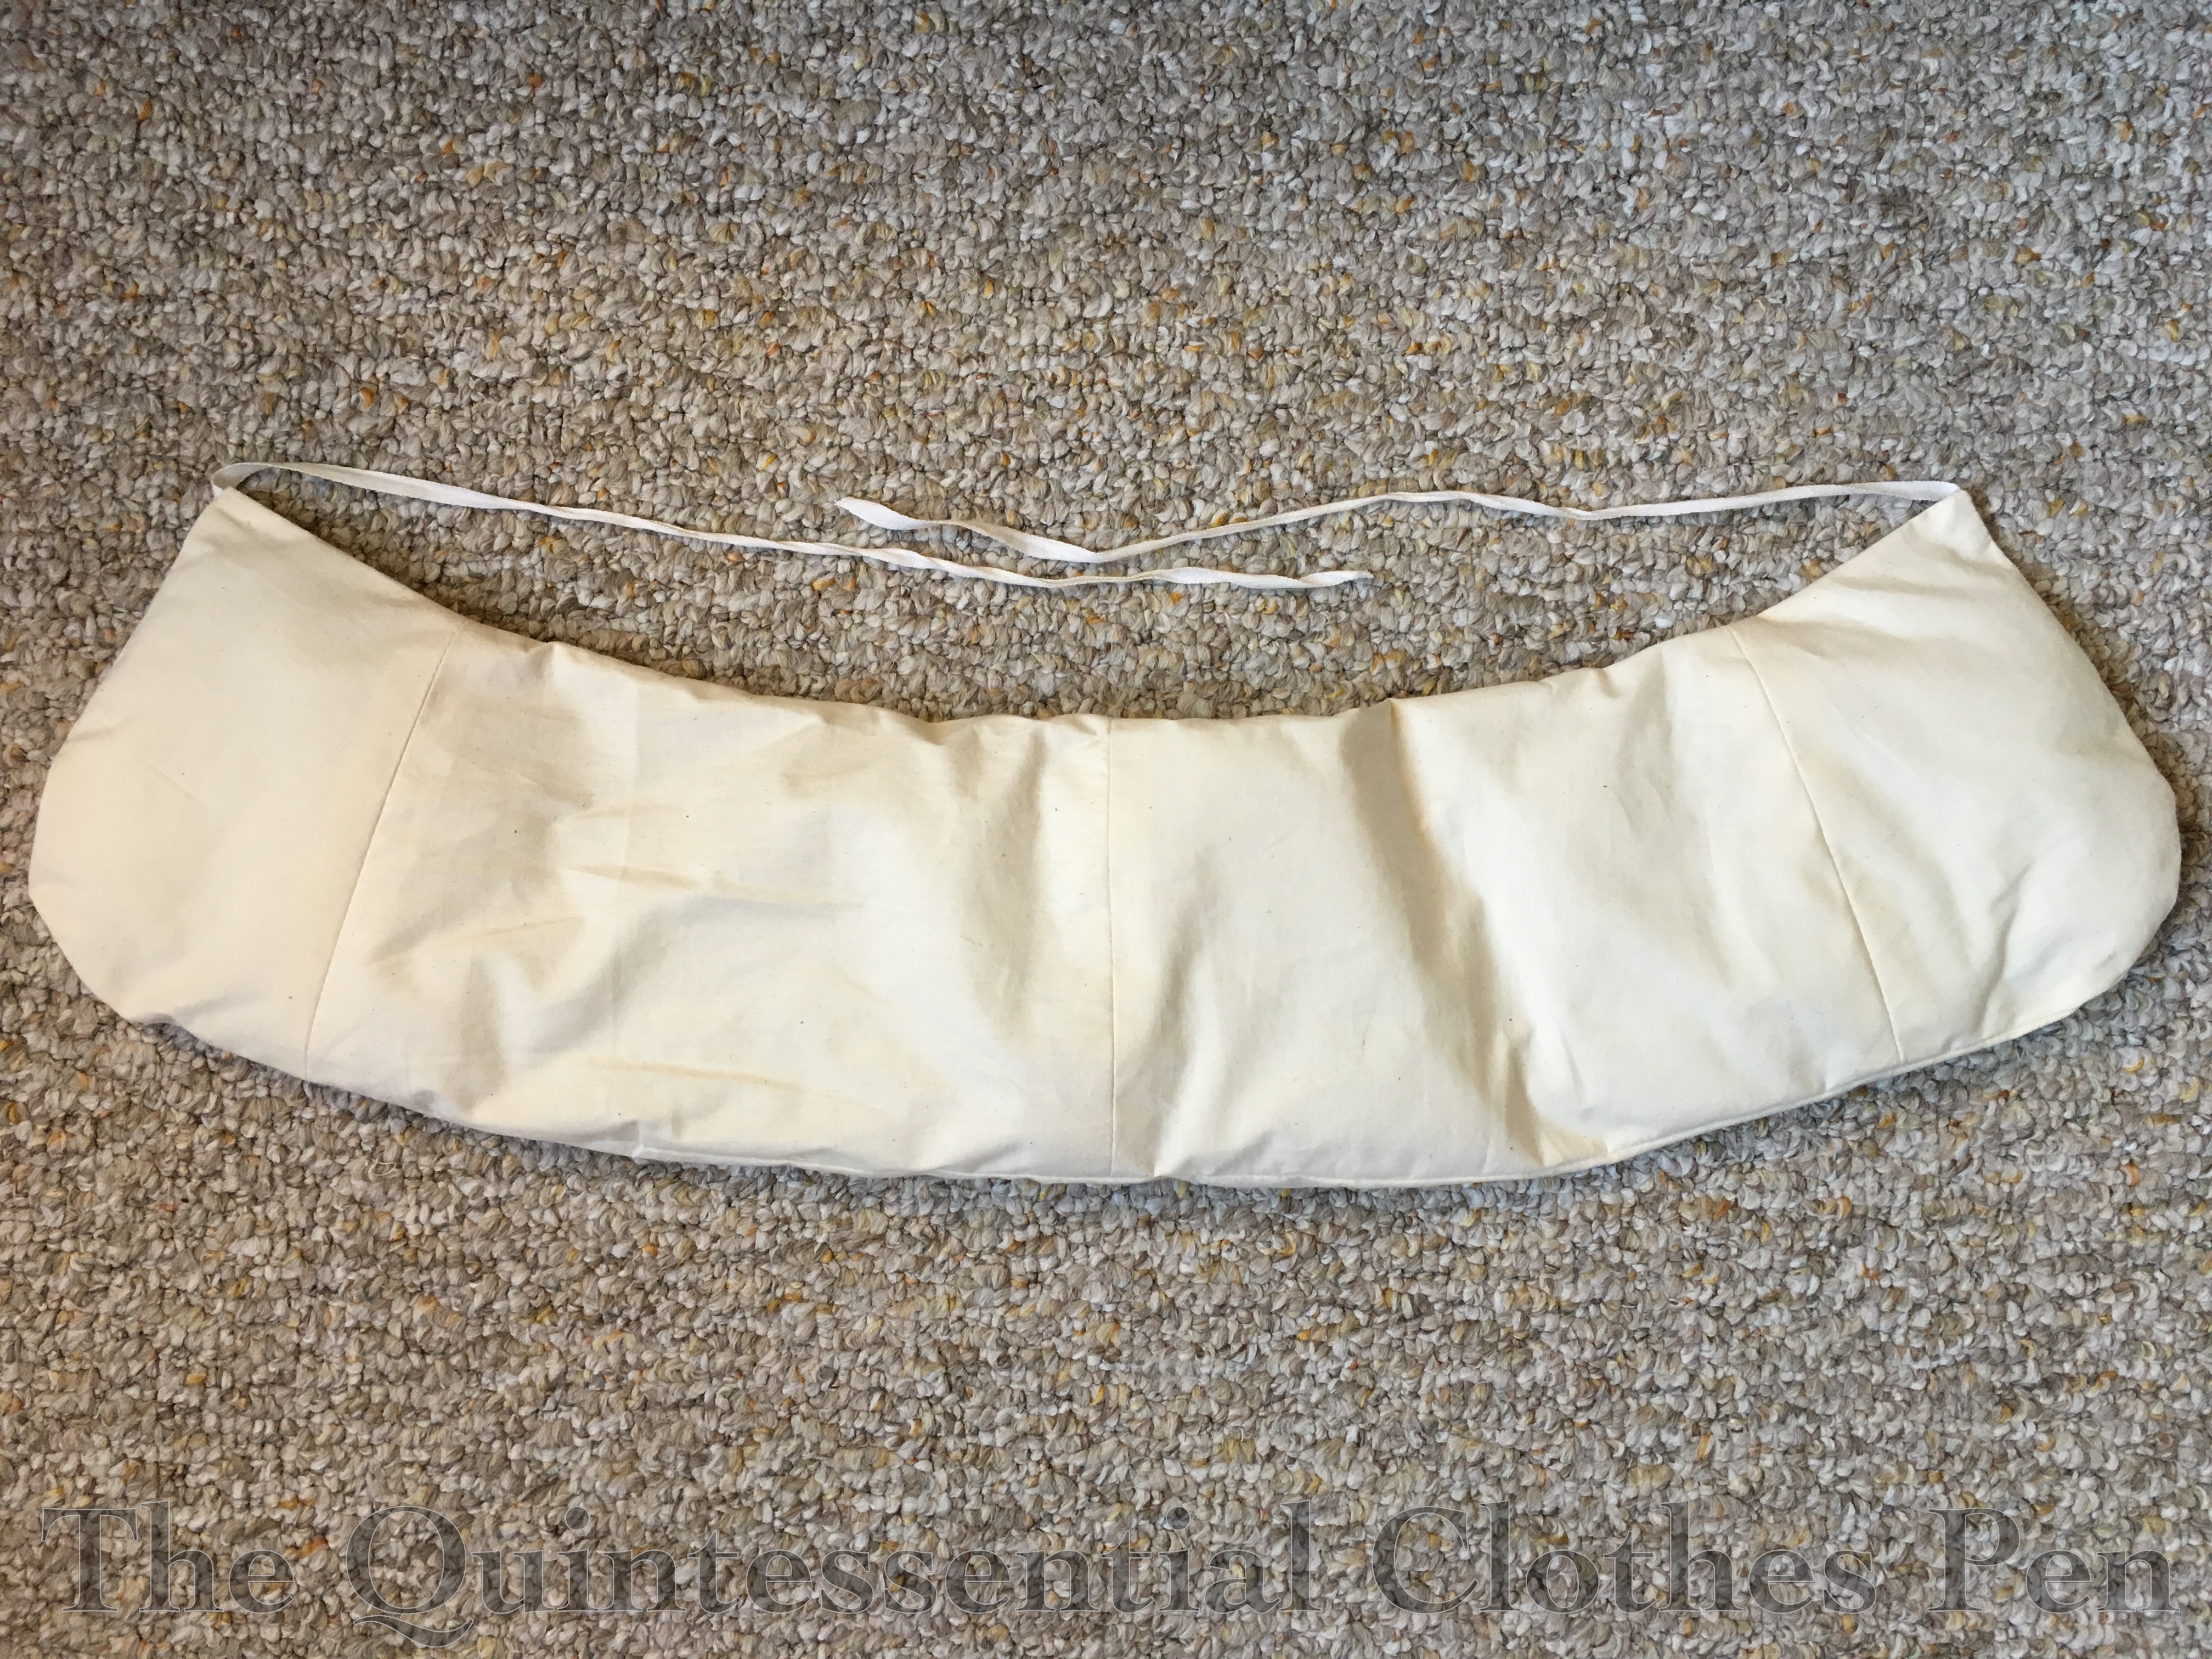
My old crinoline used ivory twill tape for the vertical supports. There are actually two layers of it that are hand sewn together to make channels for the hoops, creating channels along the lines of those seen in this 1859 hoop skirt patent filed by James Draper of New York (while the hoop circumferences are not provided in the patent, the silhouette of Draper’s hoop skirt is similar to that of my super-cupcake). This method used a ridiculous amount of twill tape, so I came up with a way to make the new channels that would use only one layer of twill tape for each vertical support. More on that in a moment.
The old crinoline’s hoops are made from cotton covered steel that was in a ribbon form originally. I had cut each ribbon in half (and over time, the fabric covering started to fall off, which caused me to painstakingly wrap each hoop all the way around with thread to make it more durable–a caution to anyone else using this to make a crinoline, although I’m not sure where you’d source this type of material these days as I believe this type of ribbon wire is no longer being produced). The fabric covering combined with the narrow channels in the twill tape means that the vertical ribbons only slide when I want them to, but that they otherwise stay in place nicely.
For the new crinoline, I machine sewed tucks into a single layer of twill tape to create channels for the hoops. You can see those tucks in the photo below.
I also machine sewed the vertical tapes to the twill tape waistband, because why not–I was machine sewing anyway. The waistband is two layers of twill tape sandwiched together.
That’s basically it for the construction before the awful incident of loaning them out. I cut the hoops to be the dimensions I wanted, slid them through the channels, and used the plastic joiners that had come with crinoline to secure the ends. Done! Or so I thought…
After realizing that these hoops were going to slide horribly, I went back to research to figure out how this problem was solved in the past. What I noticed are little metal dots on each join of hoop to vertical support. That makes so much sense! I wanted to add these to my hoops but I didn’t know what to call them while searching for materials.
It took me a little research to figure it out, but I did and now I’ll share that with you. They are called spots! Once you realize that then a whole world of spots becomes available to you. Decorative ones, bronze, copper, nickel, black… so many options! I got plain domed copper from this seller on eBay and am very happy with them. They’re easy to apply with a pair of pliers and seem quite durable. Now my hoops and tapes stay in place–no more sliding around!
And here is the finished result of the spots on the reasonable crinoline. I like the look as well as the practicality. I’m planning to add gold ones to the super-cupcake as well, for looks more than anything else.
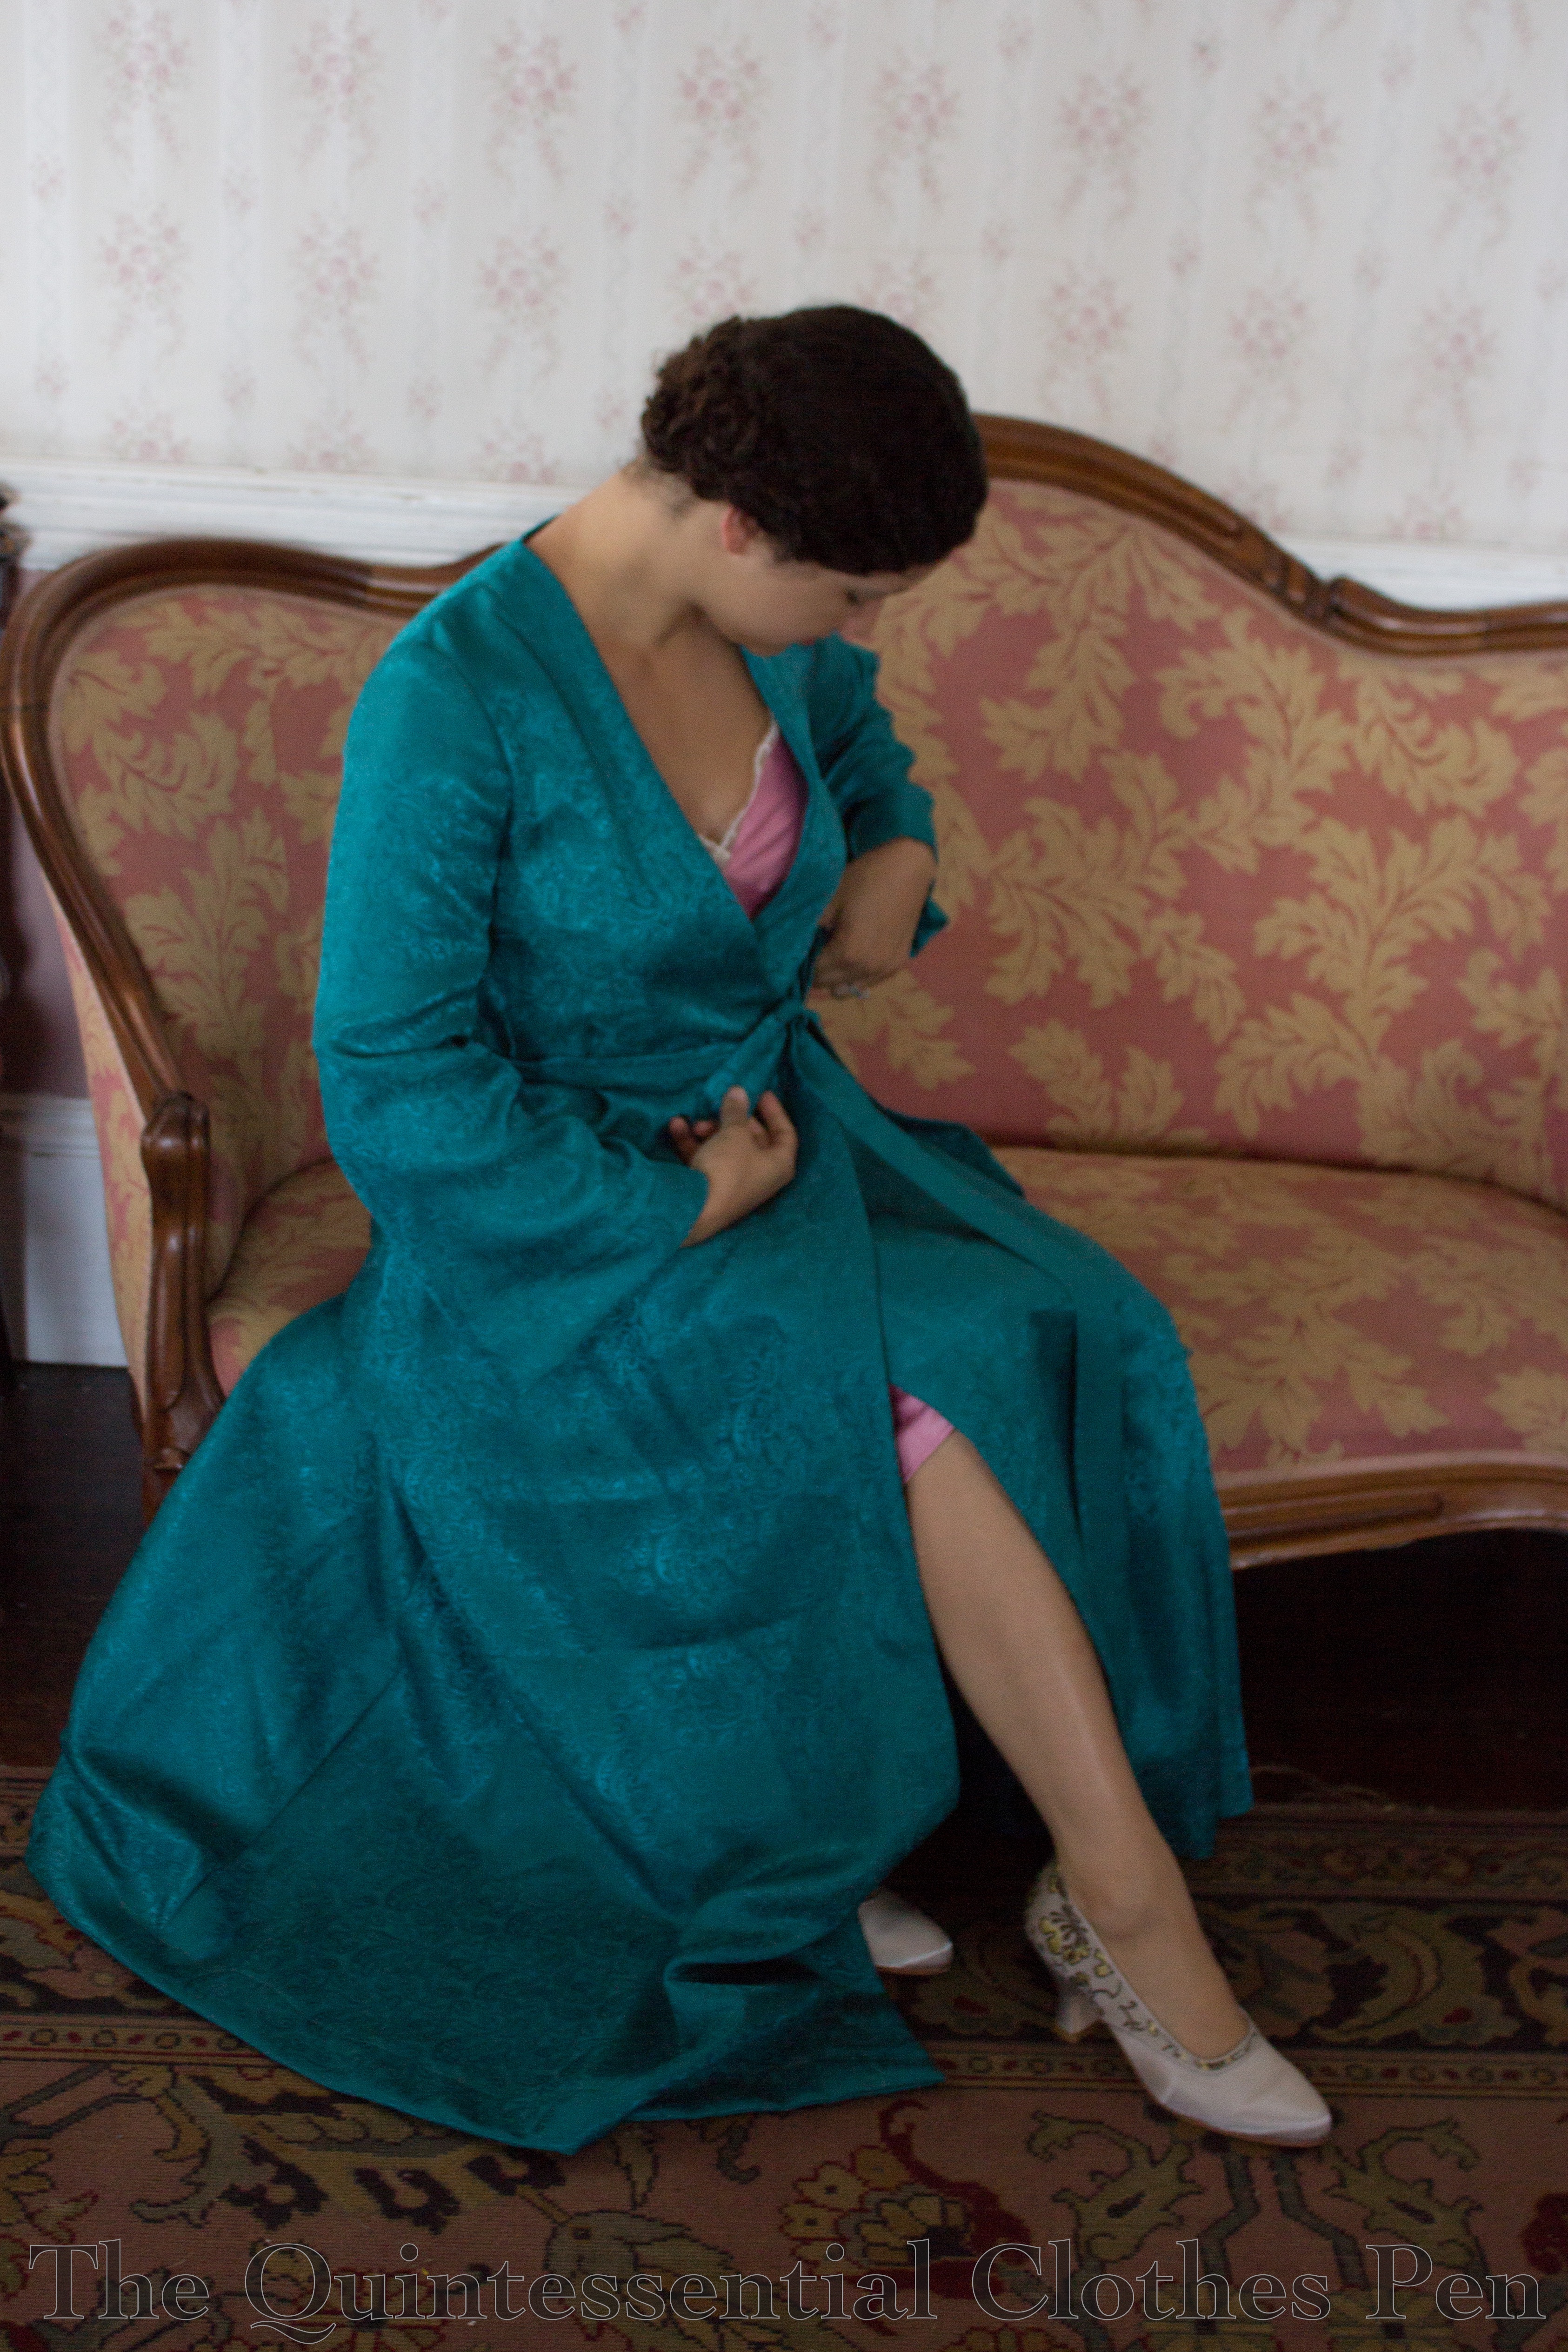
I made this robe about four years ago, for the same film that I made the 1934 Metallic Evening Gown I posted about recently. Like that dress, this robe and the accompanying slip were made and never worn, and so have spent the last four years languishing in my closet.
When I had the opportunity to attend Gatsby On The Isles in 2016 I thought it would be a great opportunity to wear these pieces for breakfast on the second day, and also to get some photos!
The robe is inspired by the silhouette of these robes from 1936. The pattern started life as Burda 7627, which I adapted to get the shape I wanted: a longer skirt with more fullness and sleeves with a little more flare. The slip is inspired by slips in this image from 1934. The pattern for this is actually the same as for my evening gown from 1934, just cut off around knee height and with a different strap situation.
The robe is made from a polyester jacquard. It’s not lined, just faced with more of the same fabric on the edges. The slip is made from polyester charmeuse and edged with lace. Both garments are entirely machine sewn.
I thought it would be fitting to pair these garments with my beautiful silver American Duchess Seabury shoes. These shoes are excellent–a unique historical shape, comfortable, sturdy for walking and dancing, and with gorgeous, lustrous silk exteriors. I even wear these in my modern life–they’re a quirky, elegant shoe to wear for a dressed up event.
On the other hand, I don’t have the opportunity to wear this dressing gown that often (I mean, I could wear it around the house as a modern person, but I don’t, generally speaking), so when I do wear it I really enjoy how elegant and put together it makes me feel. It’s fun to have historical comfy clothes in addition to the day dresses and evening gowns!
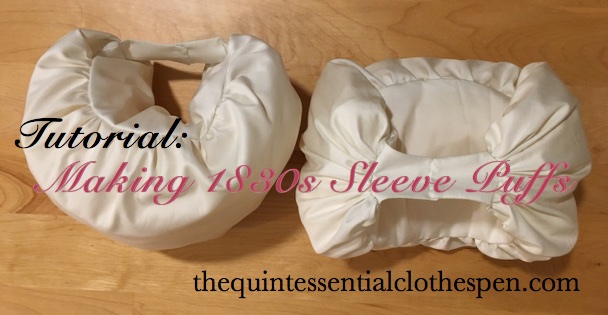
Why make sleeve puffs, you ask? In order to keep the large sleeves of 1830s dresses from deflating, of course! Here’s an example of my 1832 dress without puffs (on the left) and with puffs (on the right). They make such a difference!
I chose to use a sewing machine for much of the assembly of my puffs, but you could easily hand sew all of these steps instead.
To make these sleeve puffs you will need the following materials:
Fabric: ¾ yard of 44″ wide or ⅜ yard of 60″ wide (cotton, linen, and silk are the most historical options, but you can use whatever is comfortable on your skin, just make sure it’s not too loosely woven or too heavy in weight)
Stuffing: I used scraps of stiff net and organza, but you could also use batting, tulle, down, etc.
Thread
To begin, you’ll need to cut out your pieces:
Two rectangles: 25″ wide x 13″tall
Two shaped bases: 18.5″ wide x 7.5″ tall at the center and curved down to 2.5″ tall at the sides
Four end caps (two for each end of your shaped base): use the shaped base as a pattern and cut the end caps so they are 2.5″ wide
Next, you’ll assemble your puffs:
Step 1: Lay your end caps on each end of the shaped base. Sew around the three exterior sides, leaving the side towards the center unstitched.
Step 2: Trim your seam allowances, corners, and clip through seam allowance close to the end of your stitch line on the shaped base.
Step 3: Turn each end cap so the right sides face out–the clip through the seam allowance allows the end caps to sit nice and flat on the shaped base.
Step 4: Run gathering stitches along each individual side of the four sides of each rectangle (not one long gathering line that turns the corners).
Step 5: Pull up your gathering stitches on the long sides and pin to the curved edges of the shaped base. You want to pin the rectangle to the side of the shaped based that does not have the end caps on it.
Step 6: Sew the gathered rectangle to the shaped base and turn it right side out.
Step 7: Now pull up the gathering threads on one short side of each rectangle. Turn the raw edge under and pin the gathers in place. Hand sew these gathers through all the layers, making sure to take small stitches and catch the gathers in many places. Leave the other side open for now.
Step 8: Stuff those puffs!
Step 9: Now pull up the gathering threads on the remaining short side of each rectangle. Turn the raw edge under and pin the gathers in place. Hand sew these gathers through all the layers as well, making sure to take small stitches and catch the gathers in many places. (This is the same as step 7.)
Step 10: Overlap the end caps about ¼” and sew them together.
Ta da! Now you have some sleeve puffs of your very own!
If you’re worried about keeping your puffs in place, ties can be added to the puffs which would be secured to additional ties in the armholes of dresses. Take another look at the those two pairs of extant puffs and you’ll see ties.
I also suggest looking at the puffs other people have made. It never hurts to see more methods of construction. I referenced Fresh Frippery and Stepping Into History when creating my puffs. Have you come across other 1830s puff making resources? If so, please share!
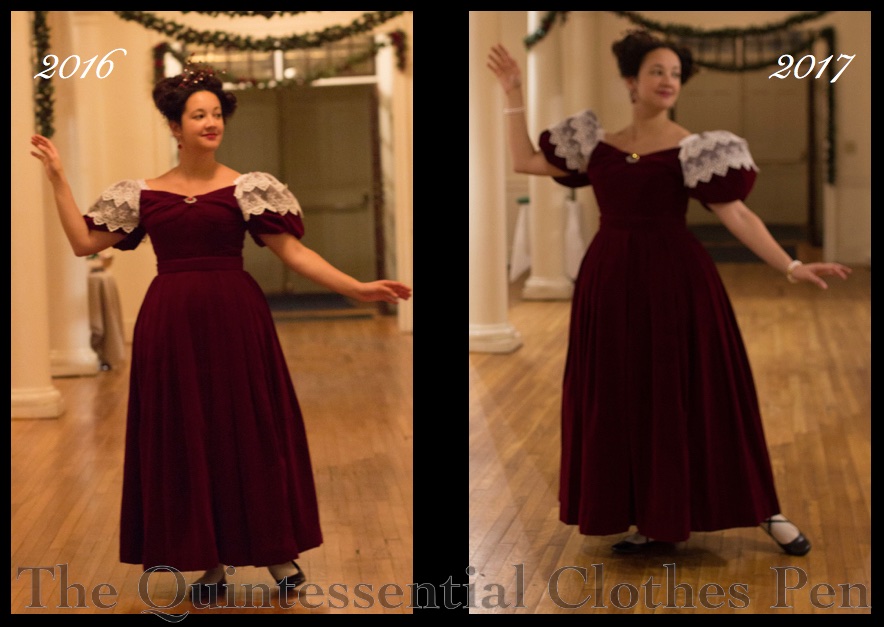
I made an 1832 dress last year for the annual Christmas ball. I was very happy with the dress itself, but a bit saddened by the silhouette due to the fact that I didn’t have time to make all the accessories to help give the dress just the right silhouette. This year I’m wearing the same dress again for the Christmas ball but I’ve taken the time to create two different underpinnings that will really help the shape.
There are two areas where I was disappointed with last year’s silhouette. The first was my sleeves. The dress I made has large beret sleeves but without anything inside to keep their shape they became deflated as the night wore on. The solution: a pair of 1830s sleeve puffs! The one below, from the V and A, is just one example (and what I used as direct inspiration for creating mine).
Conveniently, these fit this month’s HSM challenge perfectly!
HSF Inspiration: “One of the best things about the HSF is seeing what everyone else creates, and using it to spark your own creativity. Be inspired by something that has been made for the HSF over the years to make your own fabulous item.”
Sleeve puffs have been made by multiple people over the years of the Historical Sew Fortnightly/Monthly, though most recently a pair was submitted for Challenge #10: Out of Your Comfort Zone in 2017.
Here are my sleeve puffs!
So, just the facts:
Fabric: Soft cotton twill, polyester organza and stiff net for stuffing.
Pattern: My own, based on measurements and looking at extant puffs.
Year: 1830s.
Notions: Thread.
How historically accurate is it?: Let’s say 95%. It’s entirely recognizable in its own time. The exterior is plausible fabric, the stuffing is not.
Hours to complete: Perhaps 2?
First worn: Not yet! Will be worn in December.
Total cost: Free! All the fabrics are from the stash.
I took in progress pictures of the puffs as I made them, so eventually I’ll post a detailed tutorial for how exactly I made these. But for now, let’s talk about the second area that I was disappointed with my 1832 silhouette last year: the skirt fullness. I had hoped to create a nice round shape, but my silk petticoat alone wasn’t enough. I whipped up a puffer of stiff net gathered onto a waistband, but it didn’t add enough oomph either.
Of course, a corded or starched (or both) petticoat would be the ideal way to fix this problem. I didn’t devote the time to making either of these for this particular dress (and don’t already have them as part of my wardrobe.) Another idea one of my friends had was to use a fluffy many tiered organza petticoat from eBay to get a nice 1830s silhouette. I, however, was inspired by Lauren’s ‘ugly puffer’ (she made it for the 18th century, but the idea can be used to fill out skirts from many different eras) to try and get a better silhouette this year.
I actually used the same net puffer I used last year, but added a gathered layer of pre-quilted cotton from the stash. I hemmed the edges to help add stiffness and used up the small scrap that I had (only about ¼-⅓ of a yard), which amounted to about a 2:1 ratio of gathering.
That, plus giving my silk petticoat a shake out to get the ruffle at the bottom more full and less squashed from storage, seems to help, at least when I tried it on at home. We’ll see how these two underpinnings help at the ball. I’ll have to do comparison pictures between this year and last year!
How do you get an 1830s silhouette? Do you have any creative ways to get the right look?
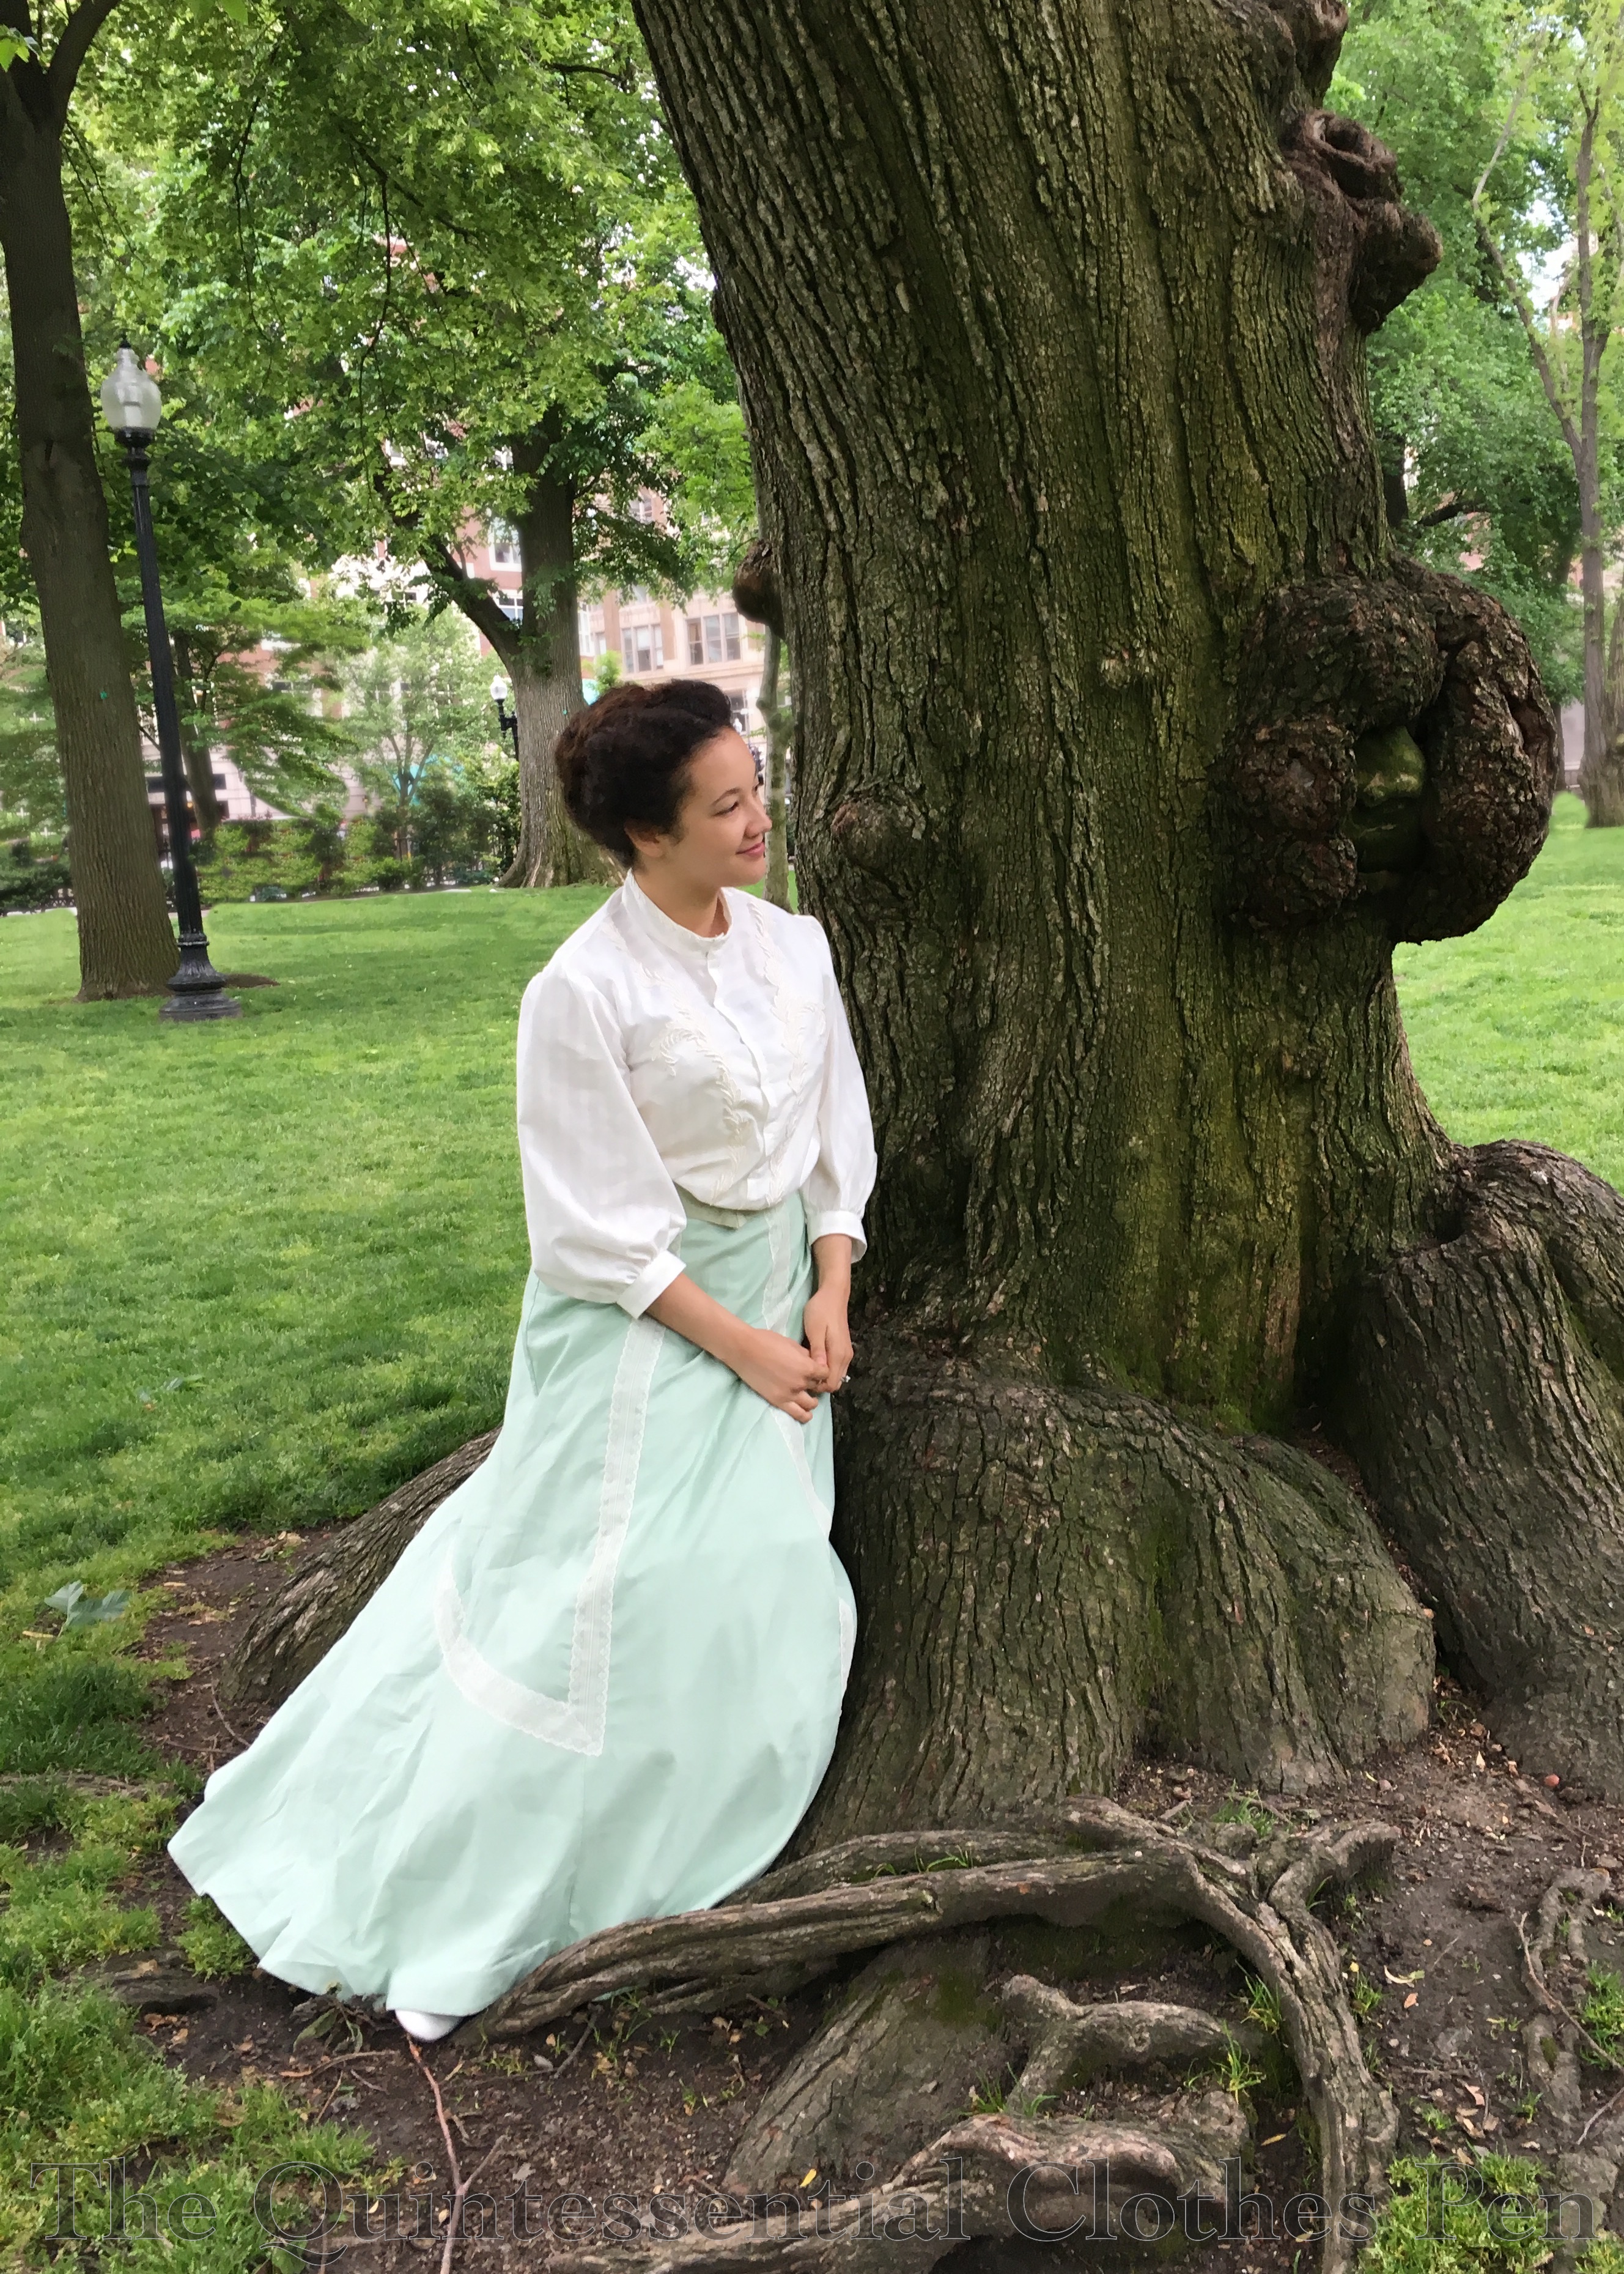
In 2012, I made and wore a c.1900 green skirt and straw hat at Newport Vintage Dance Week. I had plans to make a blouse as well with it but ran out of time and wore a 1913 blouse I already had instead. I wasn’t terribly pleased with the whole look, so I didn’t ever focus on it in a blog post, though I did include it in my overview of the dance week.
At Newport Vintage Dance Week in 2012.
Since then I’ve worn the skirt a few times, but haven’t been able to for the last few years because (and this shouldn’t be surprising given the subject of my last post) the waist was too small!
Thankfully, I had two things going for me that made changing the waist size quite simple. First, I had extra fabric. Second, when I’d originally made the skirt the waist circumference was a few inches too big for the waistband, so I took a tuck on each side of center back. Now all I had to do was let out the tucks and extend the waistband with my extra fabric!
Updated ensemble in 2017.
It took me years to finally get around to doing it, but I’m glad I did, because I really like this skirt and it’s fun to remember the lovely wading adventure we had back in 2012 while I was wearing it! What gave me the final push to do the change was the opportunity for an early summer picnic, for which I had clothes but really wanted to have something new. Who hasn’t experienced that desire?
More About The New/Updated Ensemble
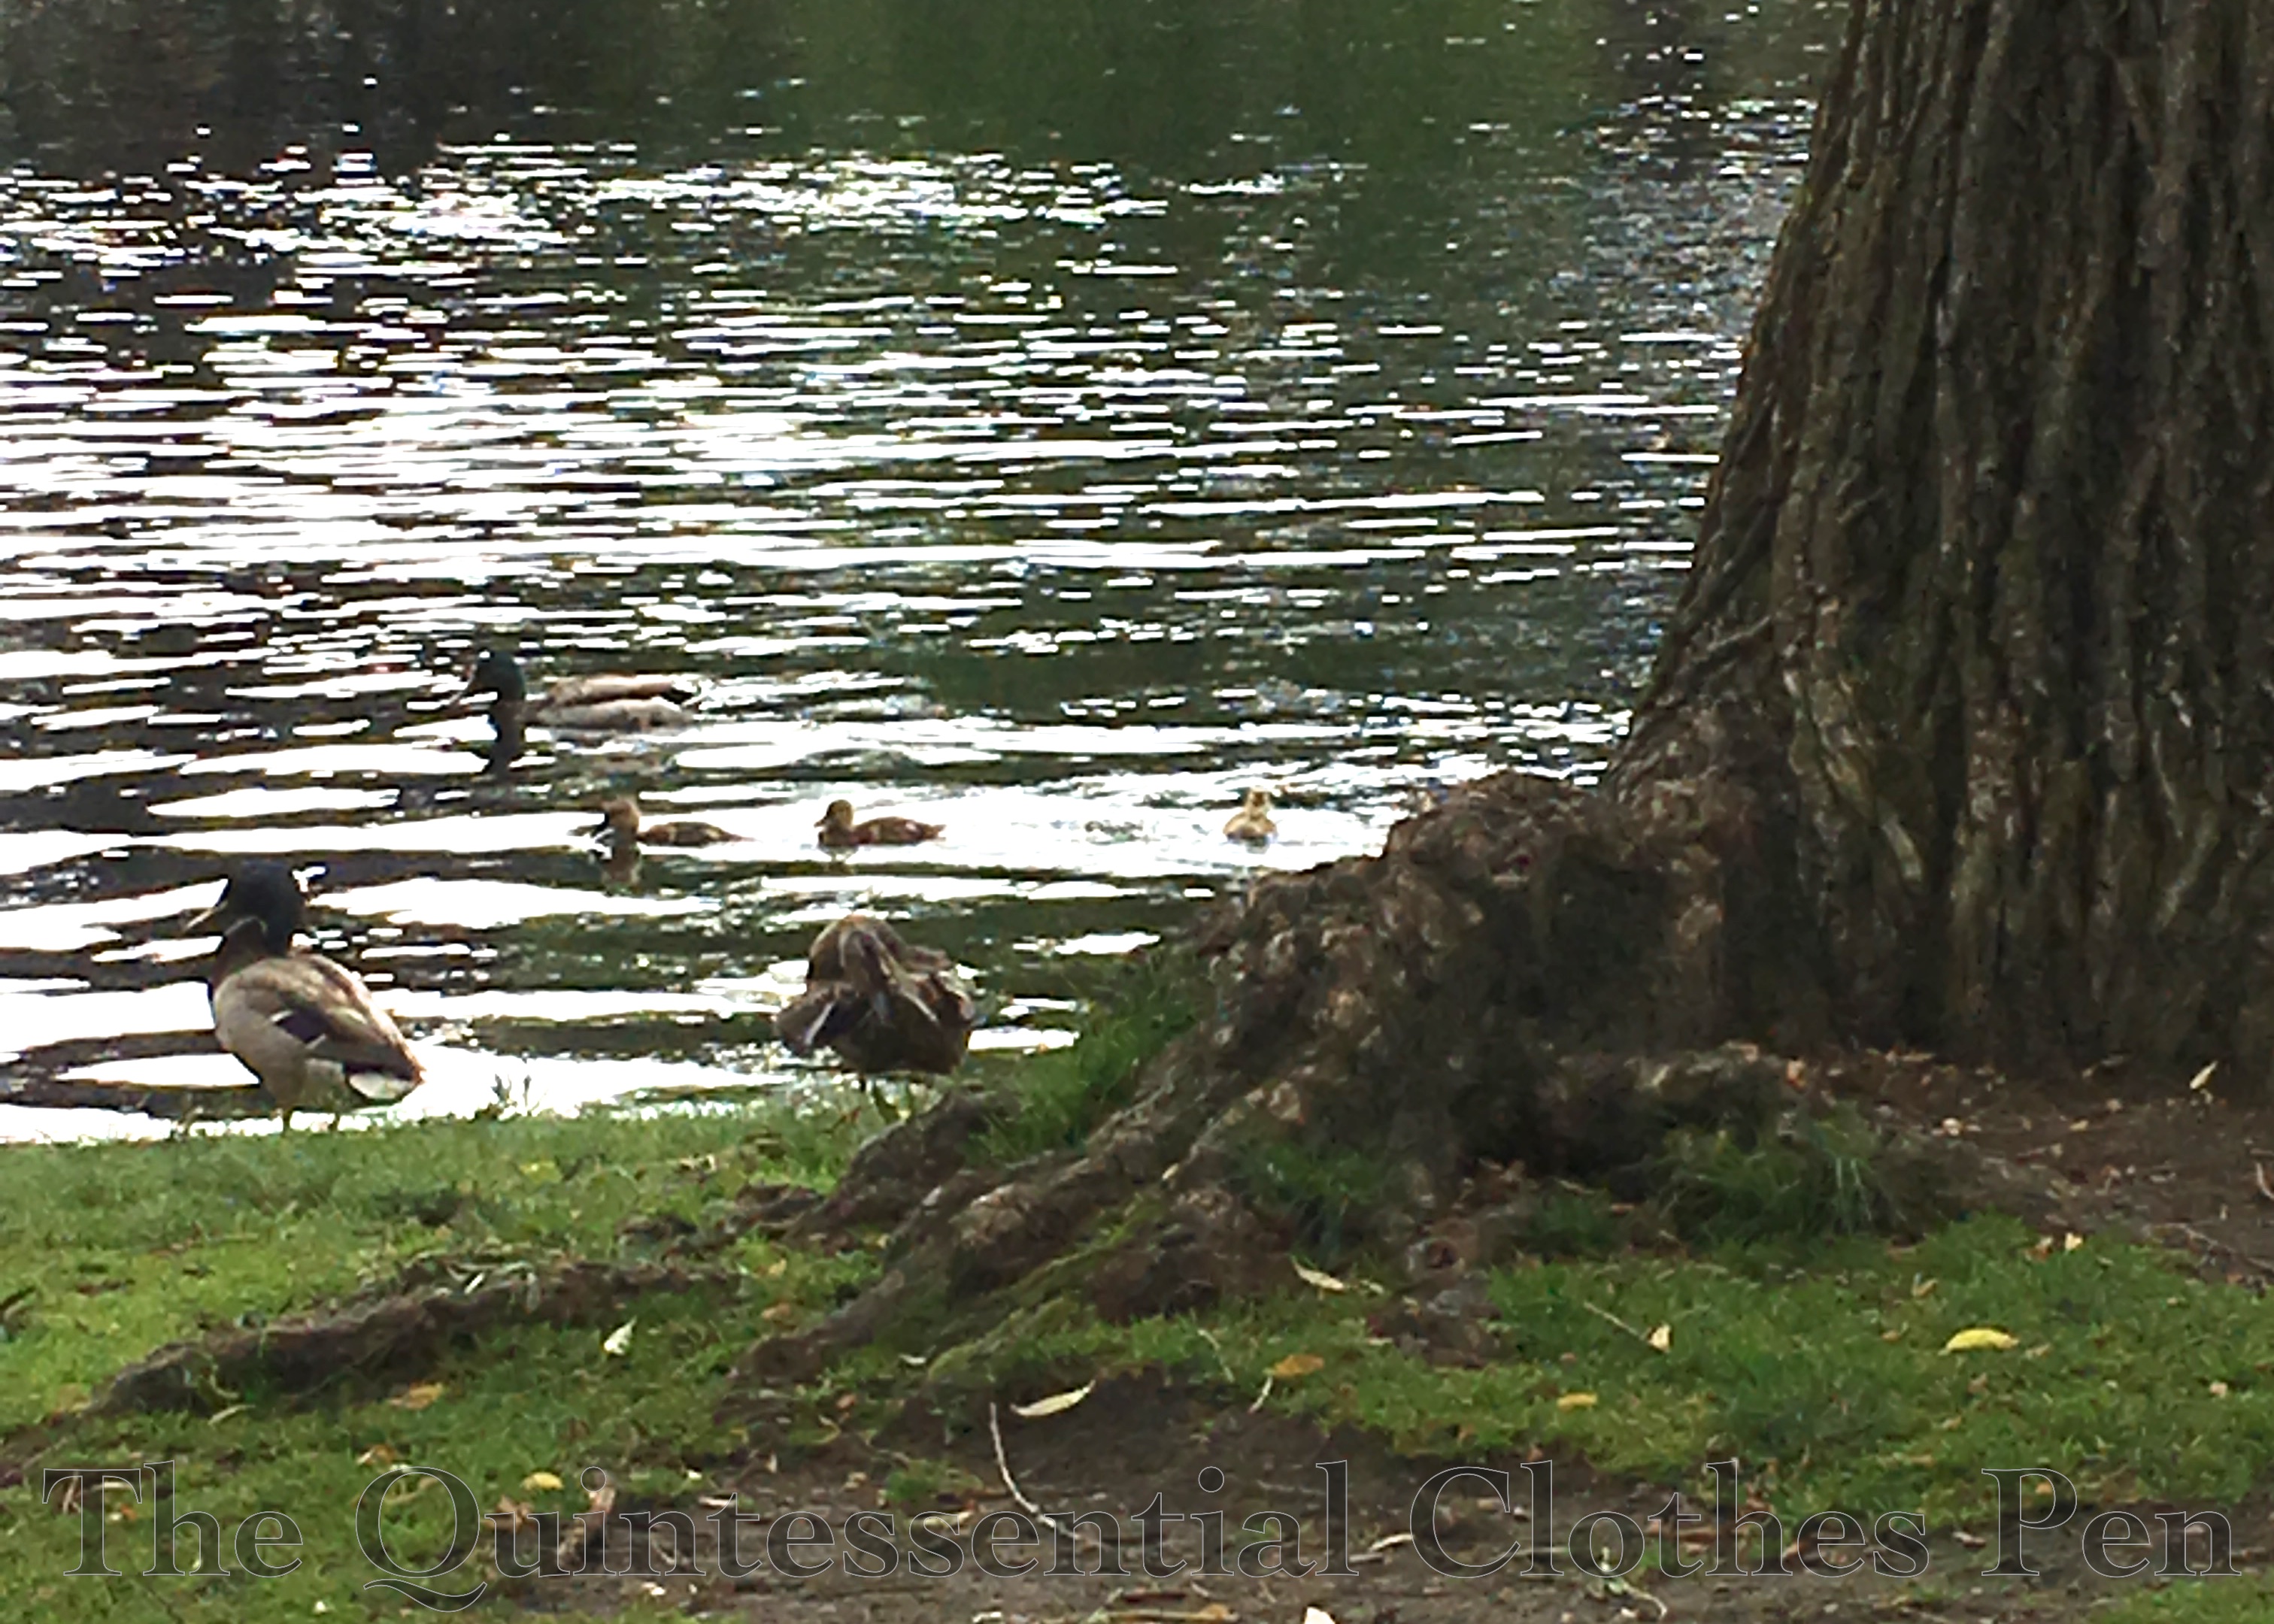
Ducks (and baby ducks) at the picnic!
The picnic provided some lovely backgrounds to take documentation pictures of all the new and updated pieces that form my Anne-inspired ensemble! I ironed out all the wrinkles in the skirt ahead of time… and then sat on picnic blanket before taking pictures, so the back pictures have a rather wrinkly bum.
The Blouse Inspiration
In addition to wanting to update the skirt, I’ve also had that blouse to go with it on my to-do list for years. Instead of going back to the blouse plan from 2012, I started over with new inspiration. (Never fear, the unfinished blouse from 2012 is still in a box waiting for me to go back to it… someday.)
The new inspiration came directly from the scene in Anne of Green Gables when she’s walking down the lane with Gilbert and his horse (just before she gets mad and whacks him with her basket!). I’ve always love her silhouette and decided a blouse with a similar shape would suit the green skirt nicely.
Anne and Gilbert! (And the horse.)
I researched blouses from this period and decided on the year 1904 for my blouse. I was particularly inspired by this ivory c. 1905 blouse, this black c. 1905 blouse, and this blouse that The Met dates to 1899-1902. The idea to play with the direction of the stripes and to have curling lace trim (mimicking embroidery) was taken directly from this page from The Ladies’ Home Journal for April 1904 that Lauren of Wearing History kindly shared on her blog. Other views of some of these blouses as well as other inspiration are gathered on my Pinterest board for this project, here.
The Blouse Construction
My blouse is made of an ivory cotton that is woven with narrow stripes. In the center front panel the stripes are horizontal, while on the rest of the blouse they are vertical. The blouse is trimmed with lace appliqués in the same pattern as the Ladies’ Home Journal blouse from 1904. Unfortunately, all of the subtle ivory on ivory details are hard to photograph.
The blouse is mostly machine sewn and uses French seams except at the armholes, which are left raw. It is finished by hand and closes up the front with concealed hooks and thread bars. There is a twill tape channel for a drawstring at the waist to help control the fullness and the pigeon front.
The silhouette was looking a little deflated for a 1904 pigeon breast look, so I tacked ruffles down the front seams to help fill out the blouse. It’s subtle-but-useful method and was easy since I already had the circular ruffles in my stash.
The Hat Inspiration
The most direct inspiration for my hat was this image from 1903. While I decided against feathers, the general trim placement as well as the poofs under the back of the brim are present in my hat.
There are more inspirational hats here, on my Pinterest board for this project.
The Hat Construction
The hat in the 2012 version of this ensemble was an admirable idea in theory, but not execution. (I was displeased enough that it was remade into my 1885 Flower Pot Hat in 2015.) However, I had another of the same straw base that I decided to remake for the new Anne ensemble.
In 2012, I had used the second straw base to make a Regency bonnet, another project I wasn’t entirely happy with (this is not the right type of straw to get a good bonnet shape). All that needed to be done was removing the trimmings from the hat and taking out the stitching holding the wire around the edge… and I had a straw hat blank ready to be remade into a new hat!
For a hat block, I used a shallow glass bowl covered in tin foil and plastic wrap. I wet the straw base in the bathtub, then used a paintbrush to cover the straw with a layer of my sizing (a bit of elmer’s glue dissolved in water–no formula, I just winged it). I set the hat out in the hot sun to let it dry, holding the edges down with spice jars to keep it from blowing away. (Can you tell I just wandered into my kitchen to see what I had that would work to help me with this hat?)
Reshaped straw hat base next to my improvised hat block.
I tidied up the edges of the hat with scissors, bound the edge of the straw with narrow strips of tulle to keep the straw from fraying, and then reshaped my wire and resewed it around the edge of the hat. I covered these edge treatments with a binding of ivory silk satin, trimmed the hat, and I was done!
The tulle was sewn with a straight stitch. The wire was then stitched with a zig zag.
Sundries
In order to achieve my desired pigeon breast silhouette of 1904, I needed some omph in the back in addition to the ruffles inside the blouse in the front. I tried wearing a small bum pad (about 10″ wide), but then my hips looked sunken by comparison. I determined I needed a new bum pad that would fill in both my hips and backside to help create the illusion I was aiming for.
I also made a new belt to go with this ensemble. I wanted something a little more V shaped in front and a little less dramatic in terms of color. I actually reused the lining from the previous iteration of my new hat to make a new belt. The two shades of green don’t quite match, but they also don’t offend, so I’m pleased.
Instead of a traditional Gibson Girl hair style, I tried a style more like this, with a center part and poofs on each side. It was a bit squashed by my hat, but I was quite pleased with it overall. Unfortunately, I didn’t get any perfect shots of just my hair style. I’ll have to try it again someday and get hair pictures.
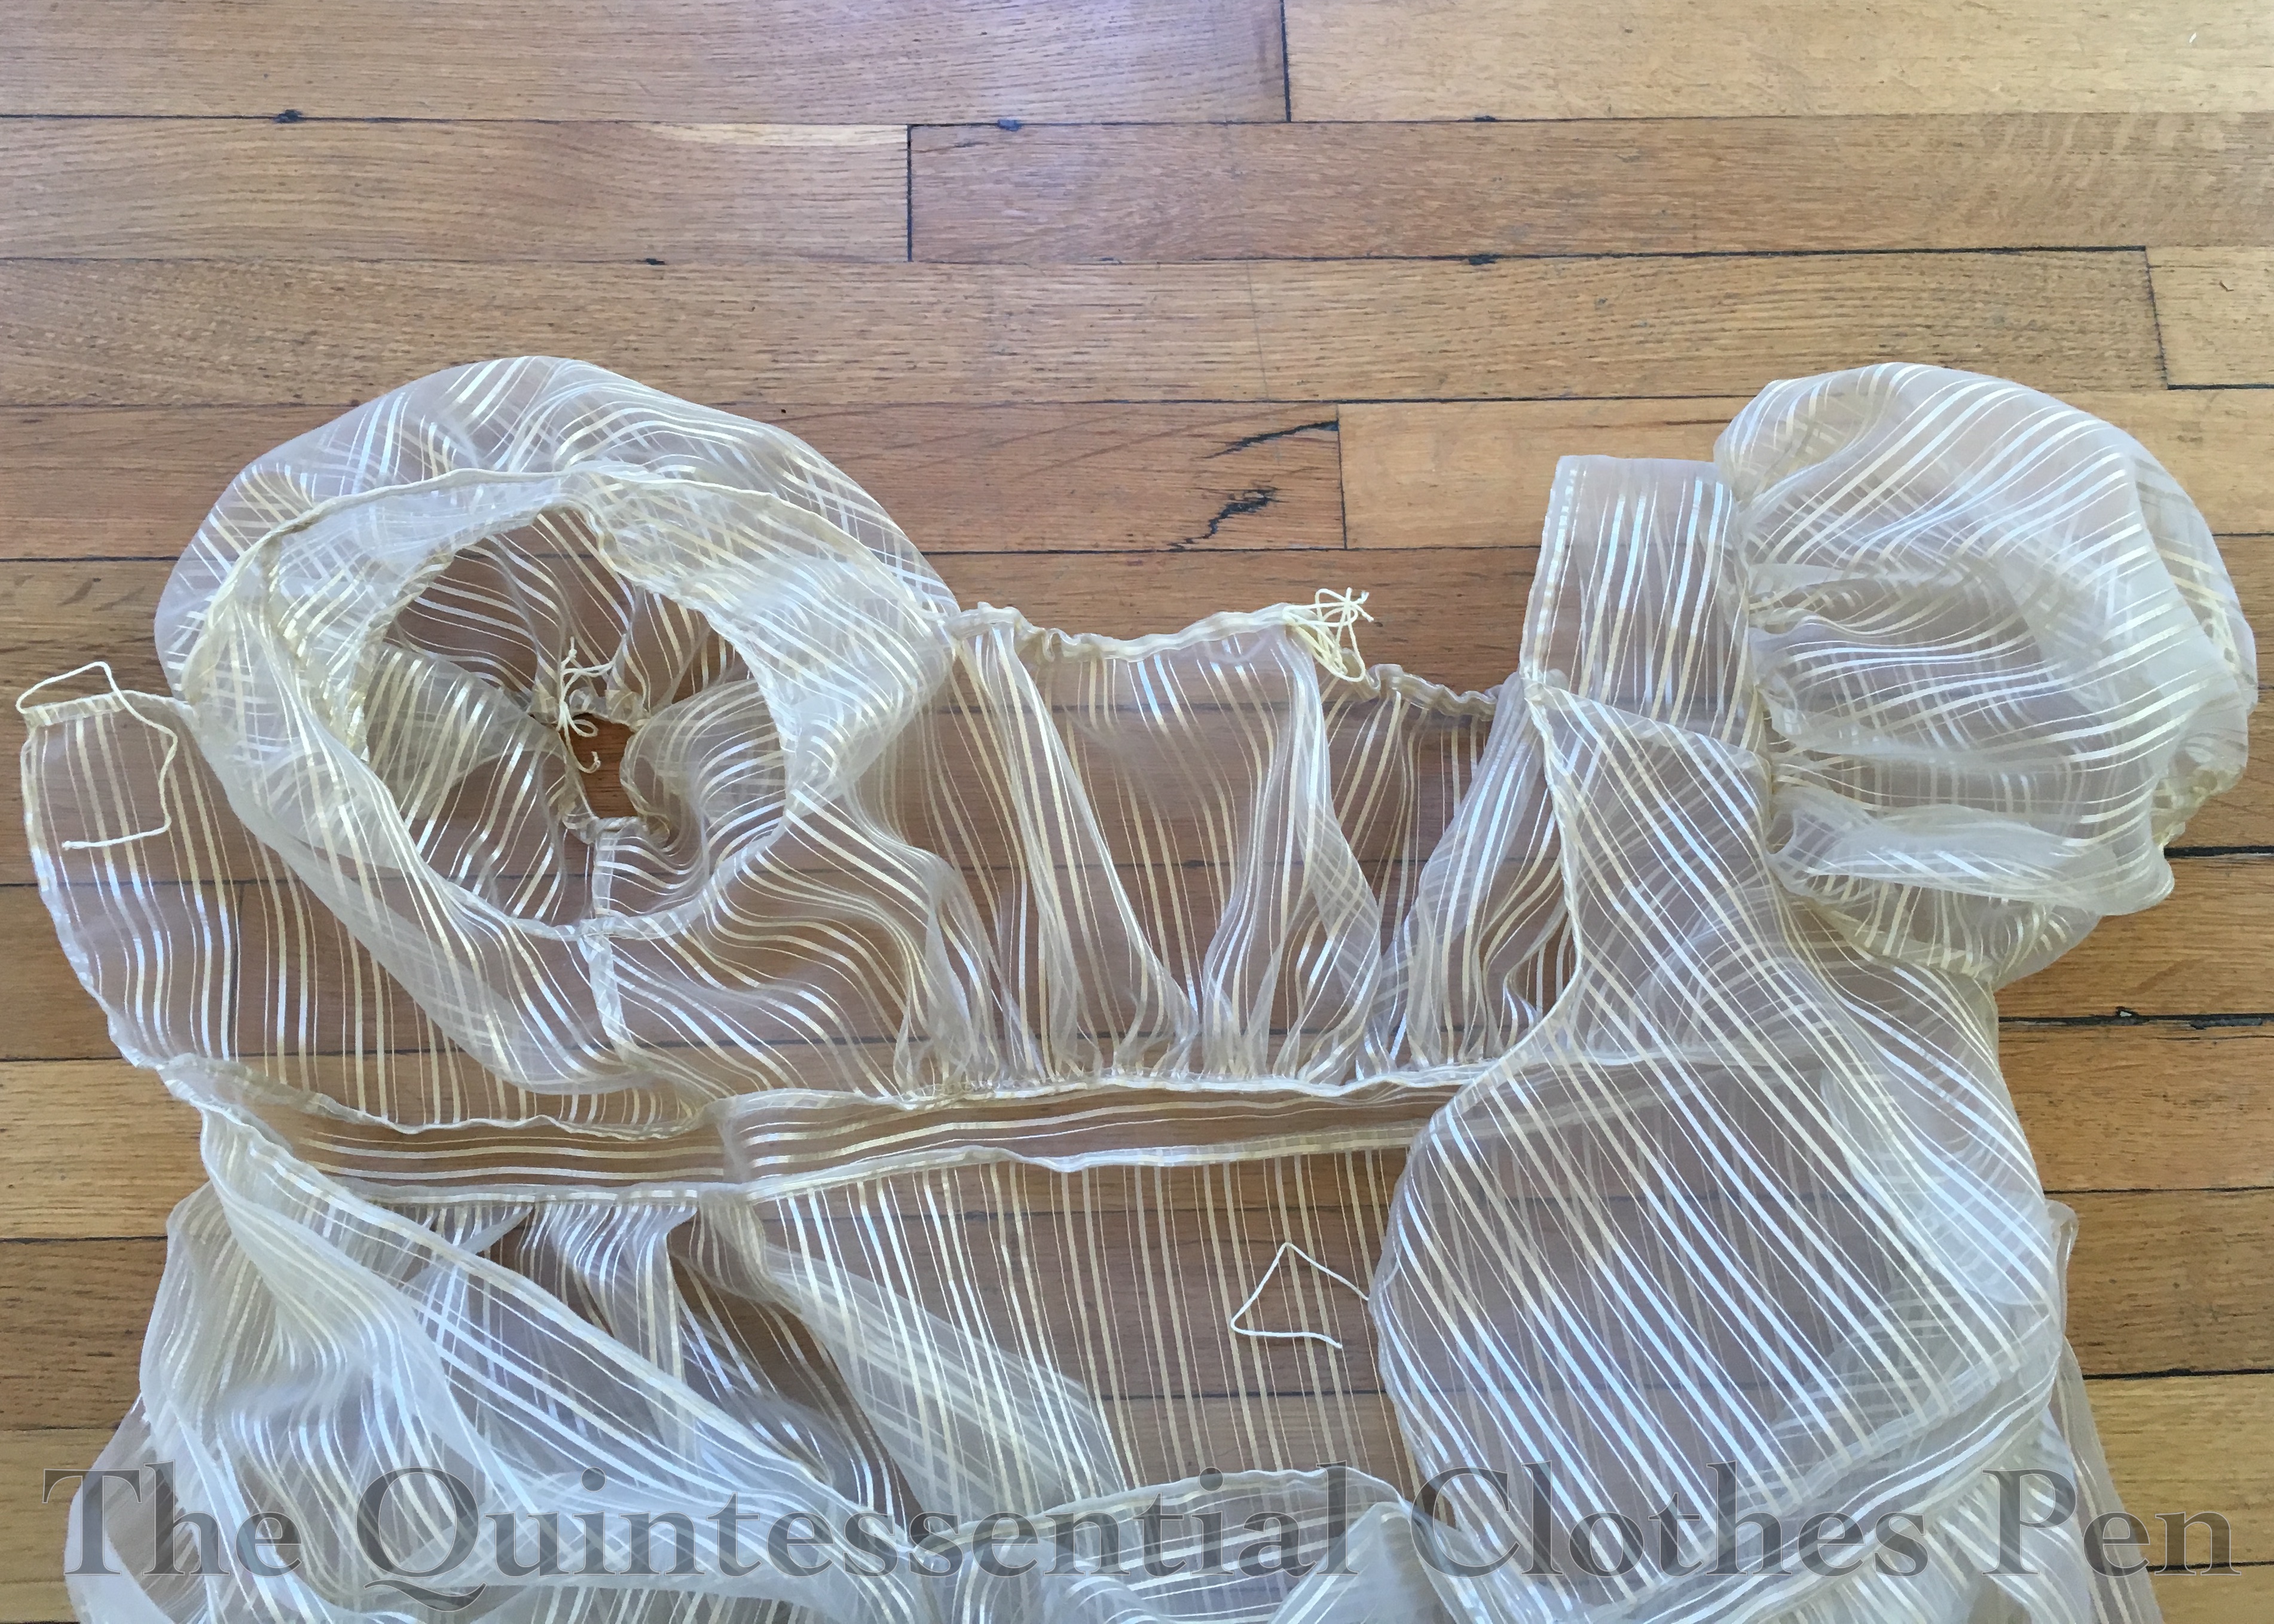
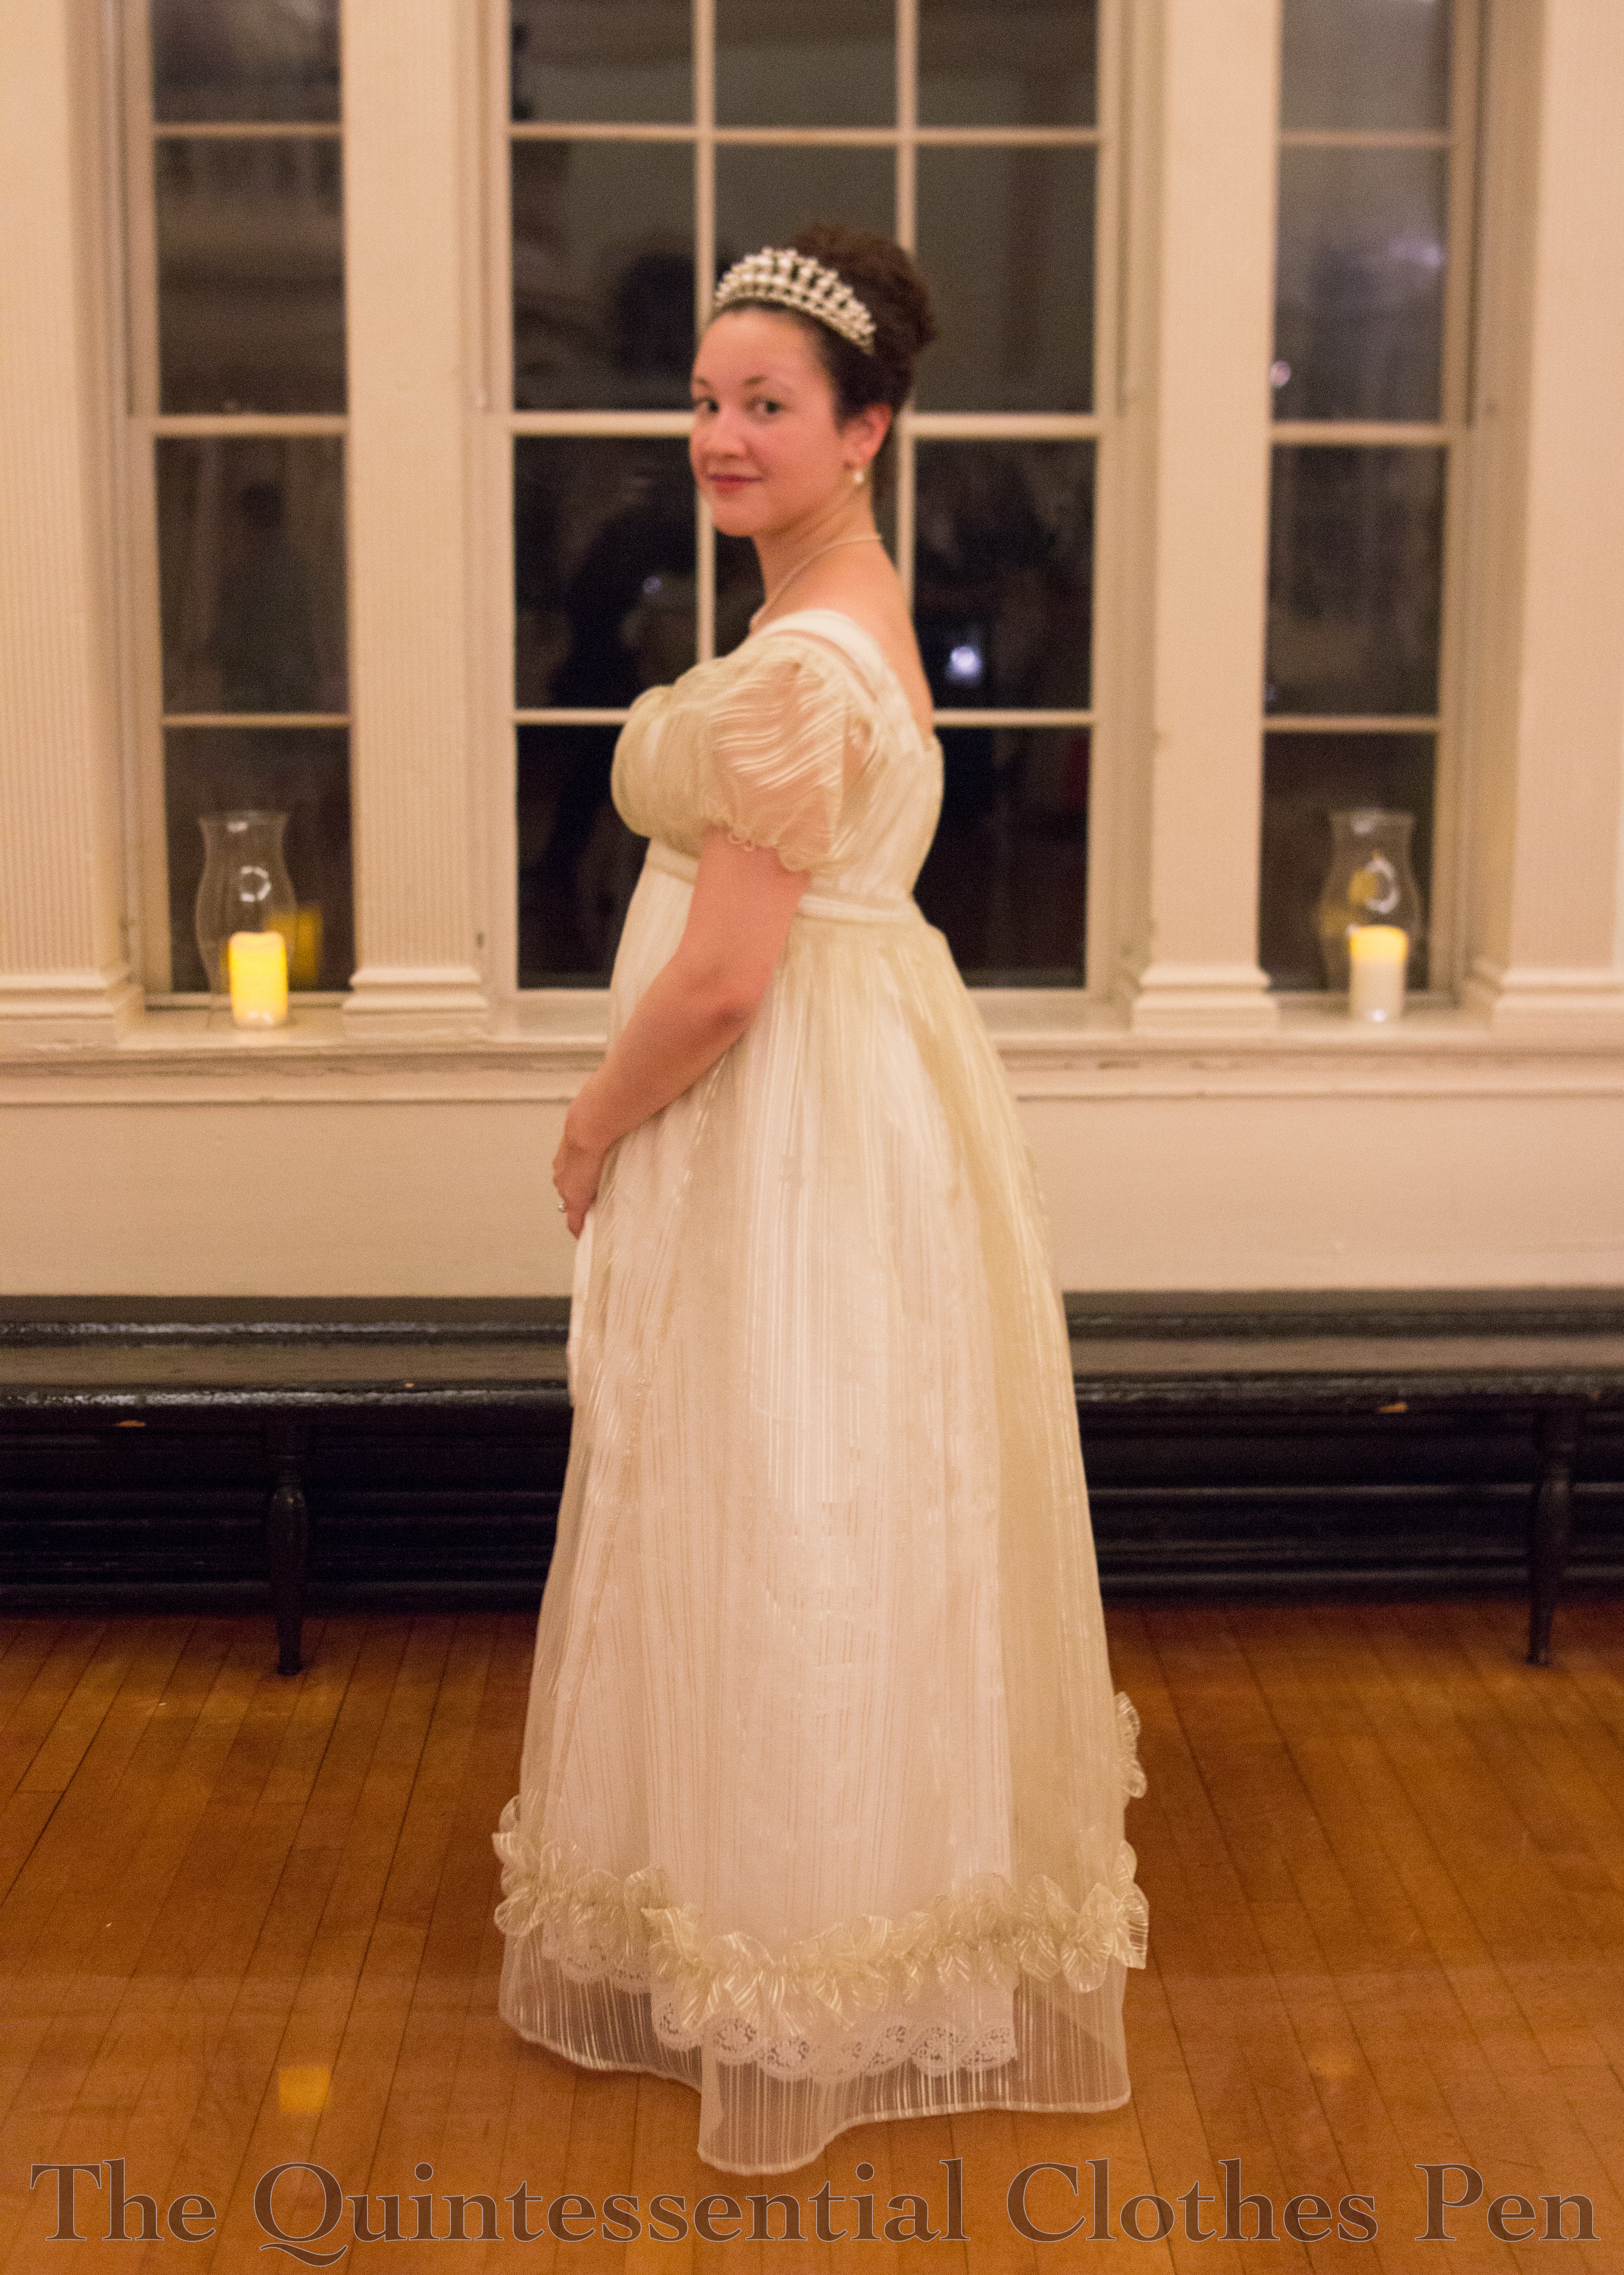
On the same January shopping trip that I unexpectedly found the blush sparkle fabric I made a 1920s dress out of I also unexpectedly found an excellent fabric for a new Regency evening dress. I hadn’t made one in awhile, but I had a Regency weekend coming up and I was wanting something new for the fancier ball (and of course nothing in my stash was inspiring me). In my wanderings around the store, I discovered an organza curtain sheer that brought to mind this particular fashion plate that has been on my ‘to-sew’ list for years.
1819 – Ackermann’s Repository Series 2 Vol 7 – March Issue
I’d been on the look-out for a sheer with black stripes but hadn’t found anything suitable. Once I found the curtain fabric, I debated whether to use it for a dress in this style or to hold out for the black stripe. As you’ll see, I decided to call this inspiration fulfilled by the gold striped fabric that I found. It’s polyester, but that means it was a good price. Occasionally, a polyester can be just the thing.
In addition to the Ackerman’s fashion plate, I also borrowed design ideas from two other striped evening gowns: this earlier Costume Parisien fashion plate from 1809 and this image of the Duchess d’Angoulême c. 1815. My dress is a conglomeration of these and the 1819 fashion plate. I borrowed the sheer overdress idea from 1819, the single row of scalloped trim from 1809, and the bias cut sleeves from 1815. I date my dress to 1817, as the fluffy nature of the organza pushes the silhouette towards 1820, but the single row of trim pulls it back from 1819 just a bit.
I have a full compliment of nicely finished underthings that are perfect for making the sheer dress opaque. It was never my intention to be a scandalous Regency lady with minimal underthings! In fact, to make the ensemble sufficiently opaque, I wore my chemise plus two petticoats under the sheer dress. Without the second petticoat it was clear where my chemise ended (at my knees, in case you’re curious), but I didn’t want to have the illusion of scandal with this, I really wanted opacity all the way down.
Like the new pelisse, the sheer dress provided another perfect opportunity to make further use of my Vernet petticoat, which has a lovely eyelet border at the hem. Here’s another view that shows off the lace on the petticoat.
It’s usual for me to meticulously finish the insides of my garments, but in the case of a sheer dress, that desire became a necessity. Accordingly, all of the inside seams are nicely finished with a mix of French, flat felled, and folding seam allowances to hide raw edges and whipping them together. I kept the finished seam allowances small, so that they wouldn’t detract from the stripes.
The bottoms of the sleeves and the front and back necklines are all adjustable with tiny drawstrings made from champagne colored embroidery floss. The goal was to have ties that would blend and not be noticeable through the sheer fabric.
The pattern for this dress was adapted from other Regency dresses I have made. I think I most closely referenced the patterns for my tree gown and square neck gown, but adjusted the fullness to give this dress a little more oomph.
This dress is machine sewn and hand finished. All of the French seaming was done on machine, as was the assembly of the bodice, waistband, and skirt to make a dress, but all of the other stitching (casings, hems, trim, finishing seam allowances in non-French ways, etc.) was done by hand.
The dress has a scalloped trim band around the bottom, set up high enough to show off the lace on the Vernet petticoat. It’s hand hemmed and it seems like miles… though I think it was only about 9 yards. Hemming, gathering, and attaching this was one of the last tasks and it was going right up until about 2am on the morning of the ball. By the time it was being sewn on there was no measuring or sectioning, just eyeballing, so it’s a little wavier than I would normally allow, but one has to make accommodations (sometimes). I was envisioning the scallops would be spaced out more and therefore be more defined, but as I was furiously sewing the trim on I was not about to cut it up and resew it, so all 9 yards made it onto the dress. It’s fine. I’m happy. I do not plan to re-do the fullness of the trim or the placement!
This is a follow-up to my previous post, in which I shared more about this dress and the masquerade event I wore it to last year. While that post was about the dress itself, this one is about the petticoat that I wore under the dress.
In order to help my dress achieve such a perfect 1950s silhouette, I put together a super-petticoat. It started with an organza petticoat from eBay, which I had worn before but been disappointed in. It just wasn’t big enough! Also, the elastic waistband was a bit tight for comfort.
Layers of the super-petti: tulle, organza, and lining.
To upgrade the petticoat, I took off the waistband, replacing it with a yoke of cotton (inspired by Lily, who has done similar things to her petticoats) finished at the top with bias tape. I cut off the tulle ruffles from a full length bridal-type petticoat that I’d purchased for $5 due to its sad condition (a few rips in the tulle, a broken zipper–easily cut off and discarded) and attached those to the yoke over the organza.
The top of the yoke with tulle attached.
And ta da! Super-petticoat!
The finished super-petti!
This is the same petticoat I wore to the Tiki Party I posted about last year as well. It’s funny how the shape and weight of the skirt over the petticoat produces different silhouettes: a cupcake shape with the bubble dot skirt on top at the Tiki Party and a more angled silhouette with this heavier 1950s dress. But of course the super fluffy-ness of the petticoat is what allows the 1950s dress to maintain a nice shape even with the heavier black dress on top of it. I’m very pleased!
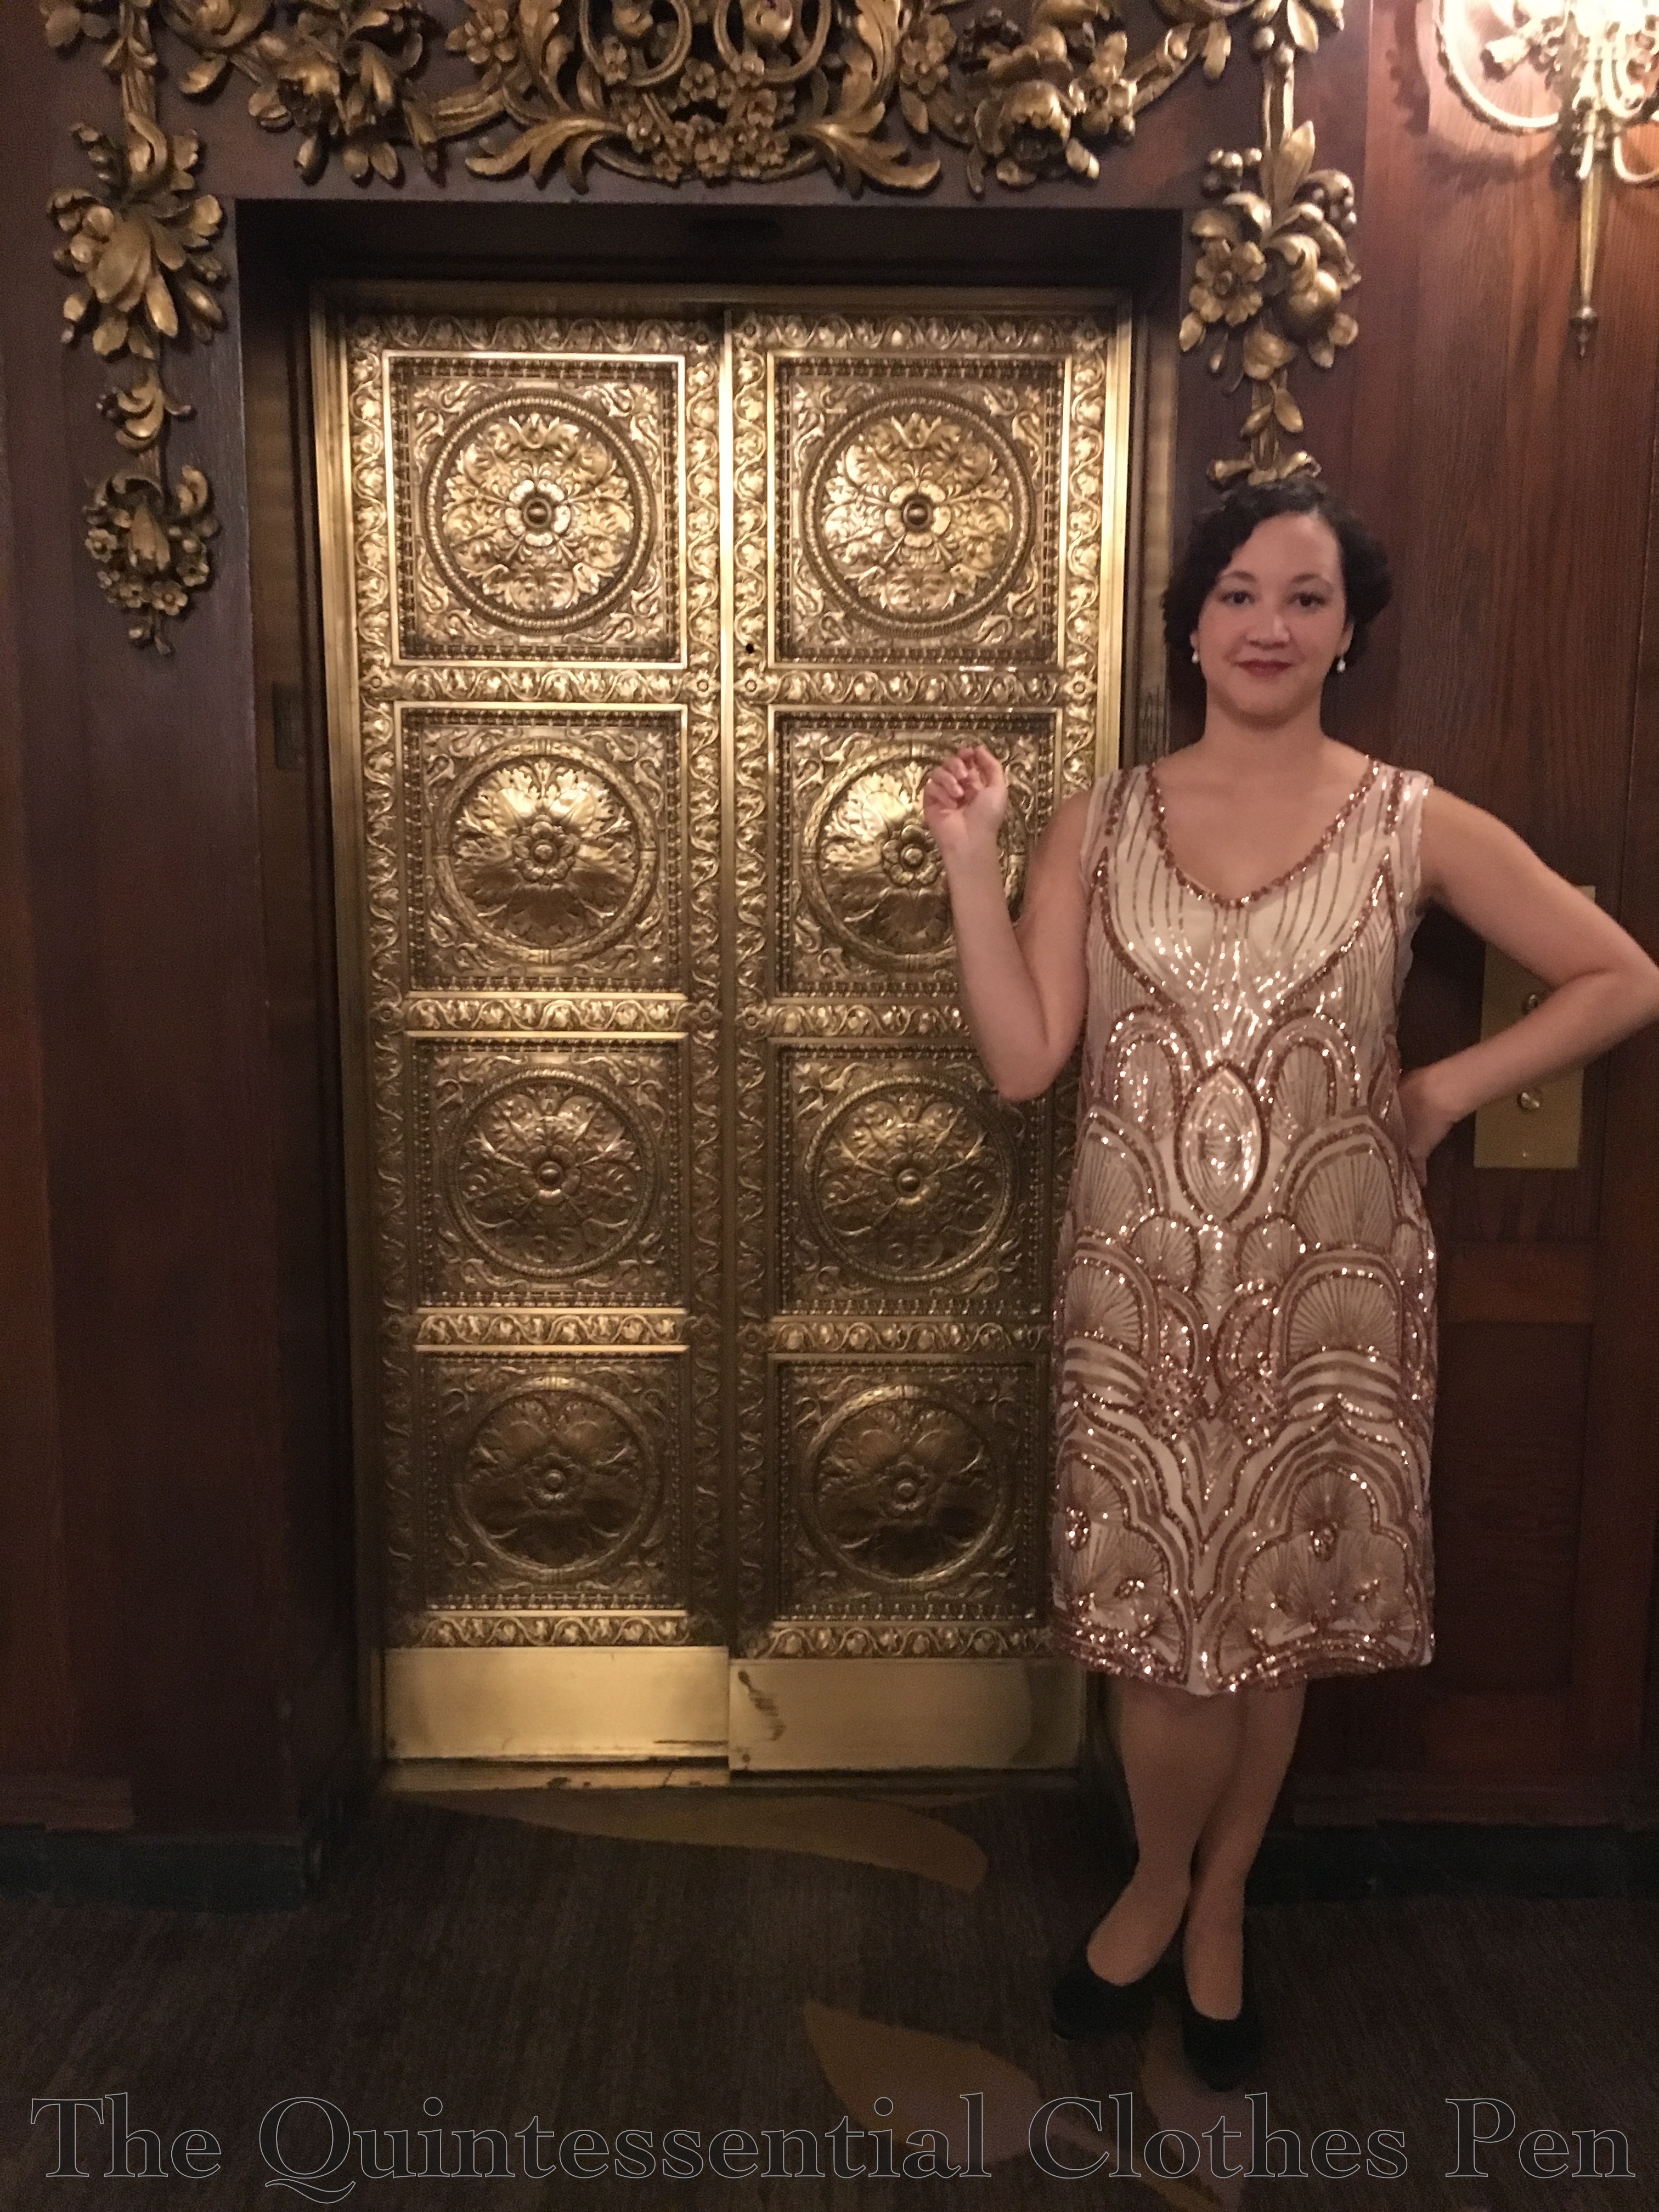
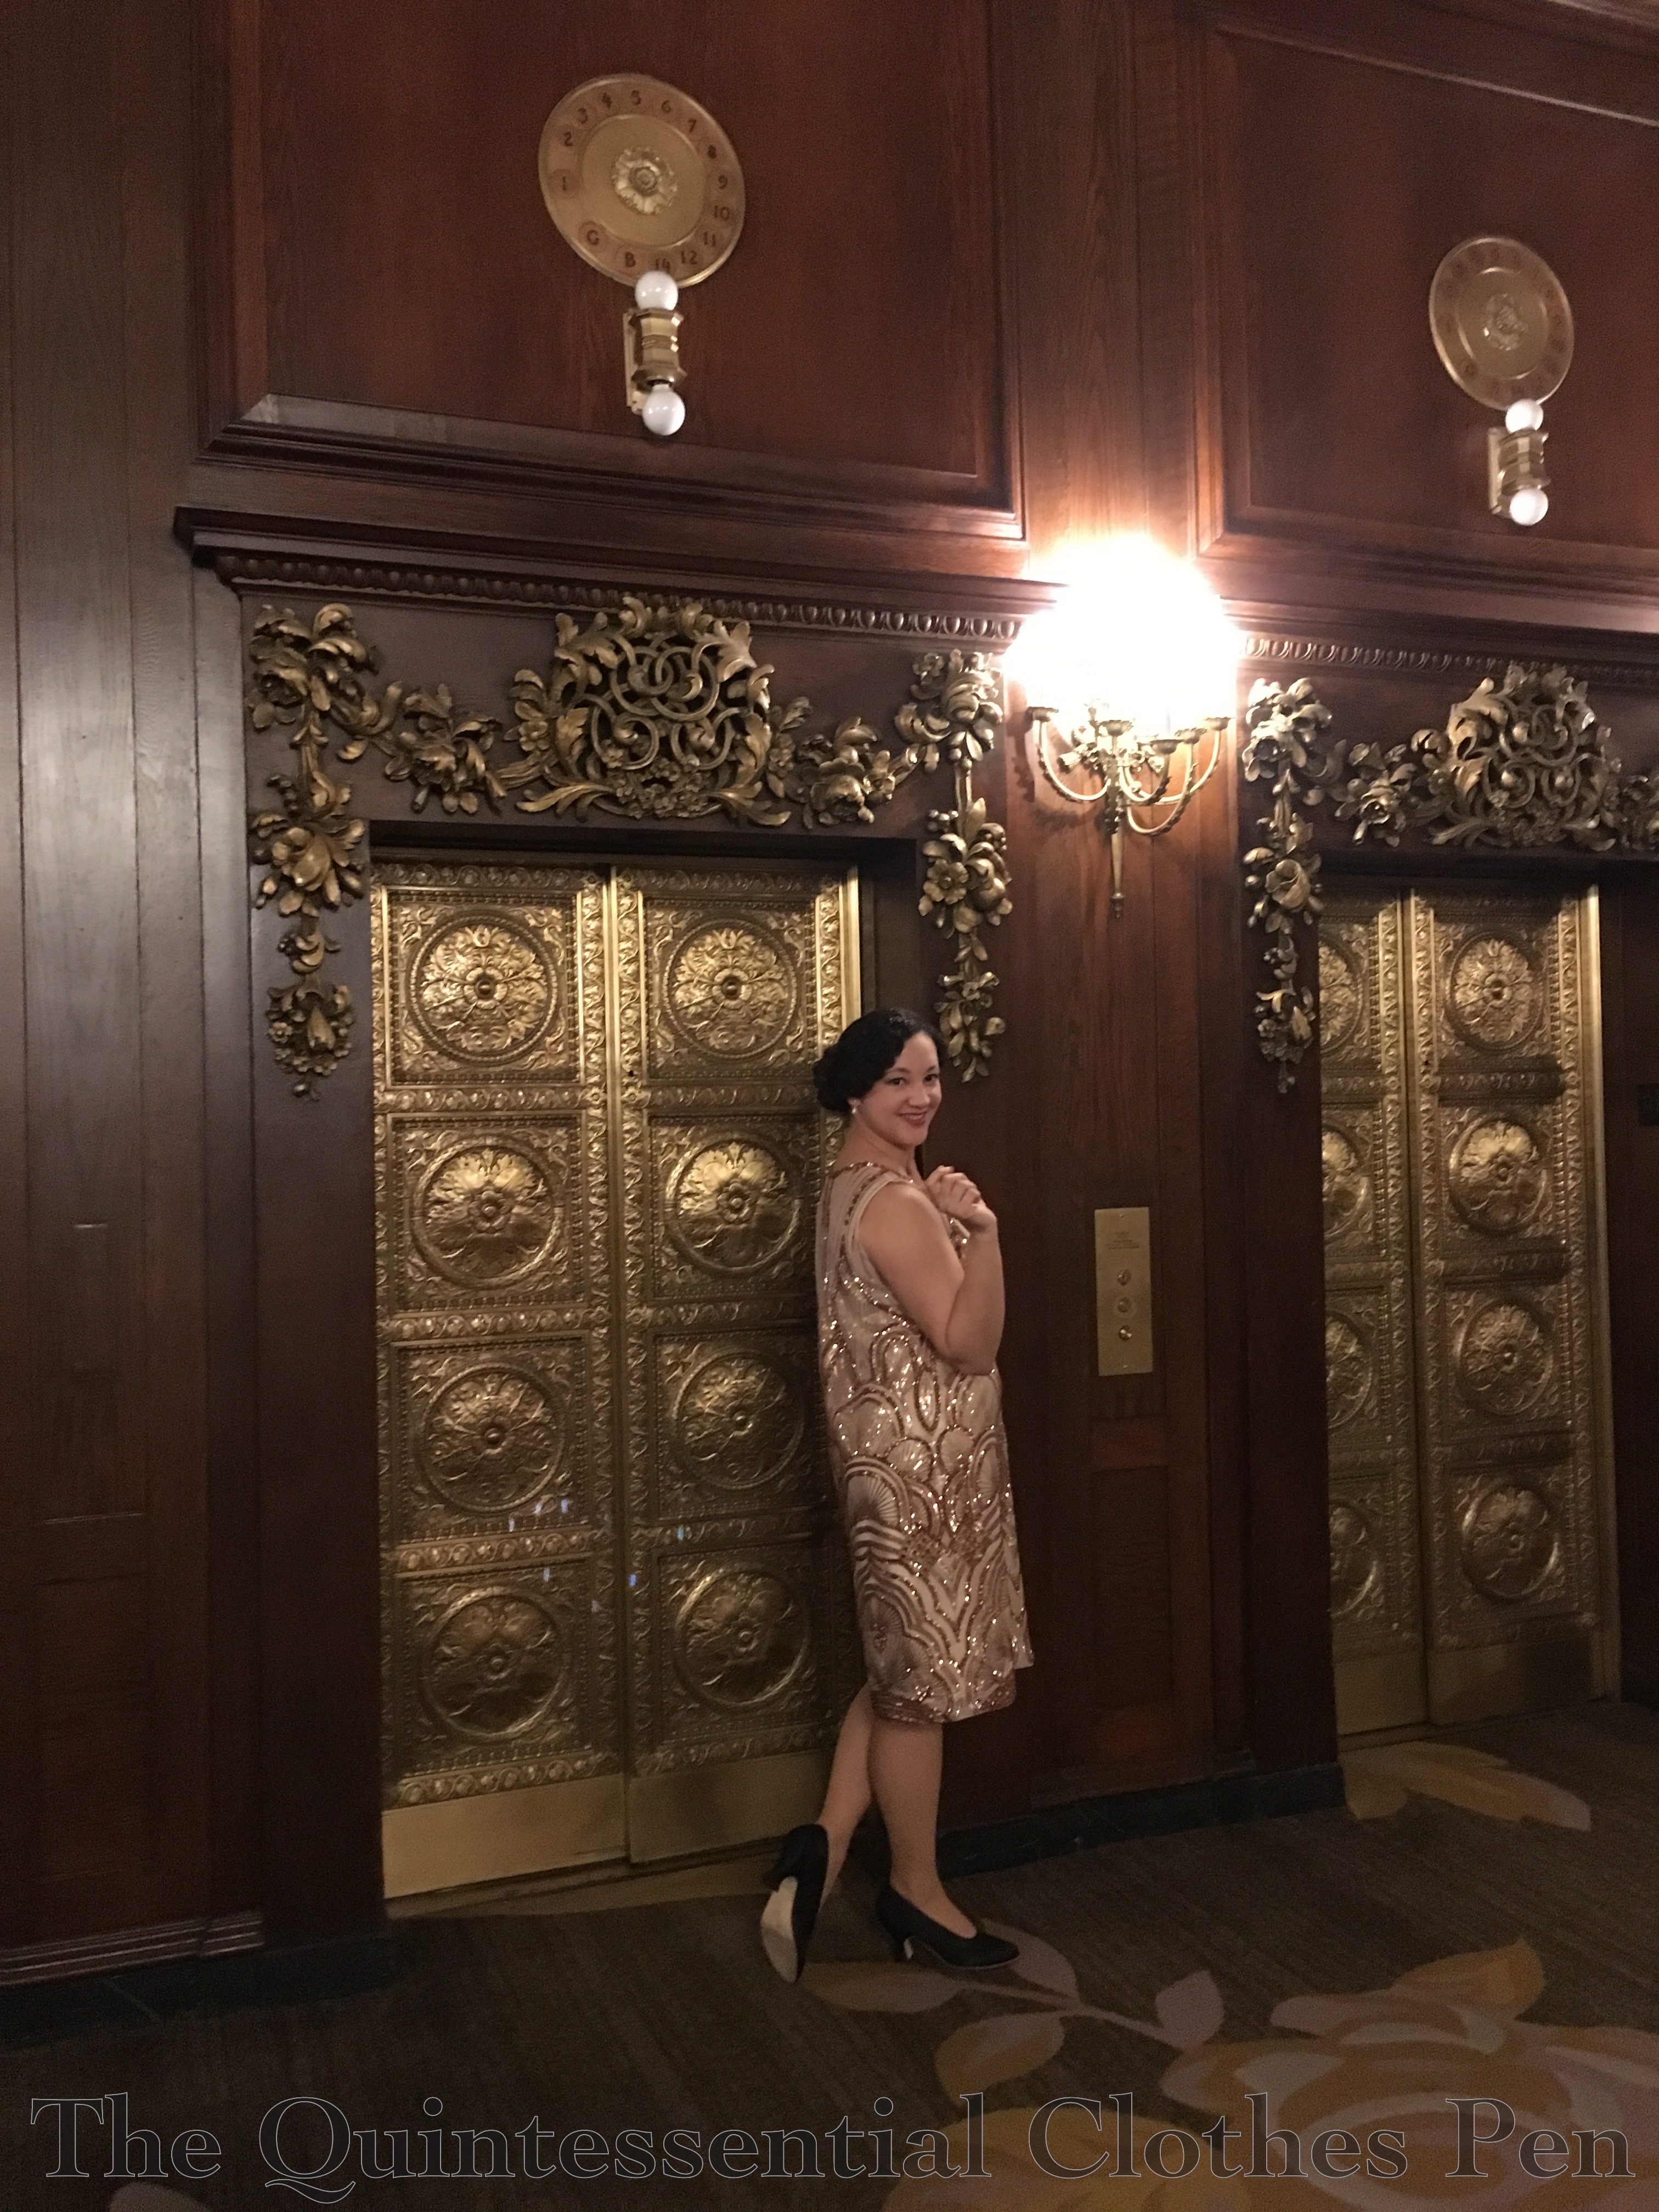
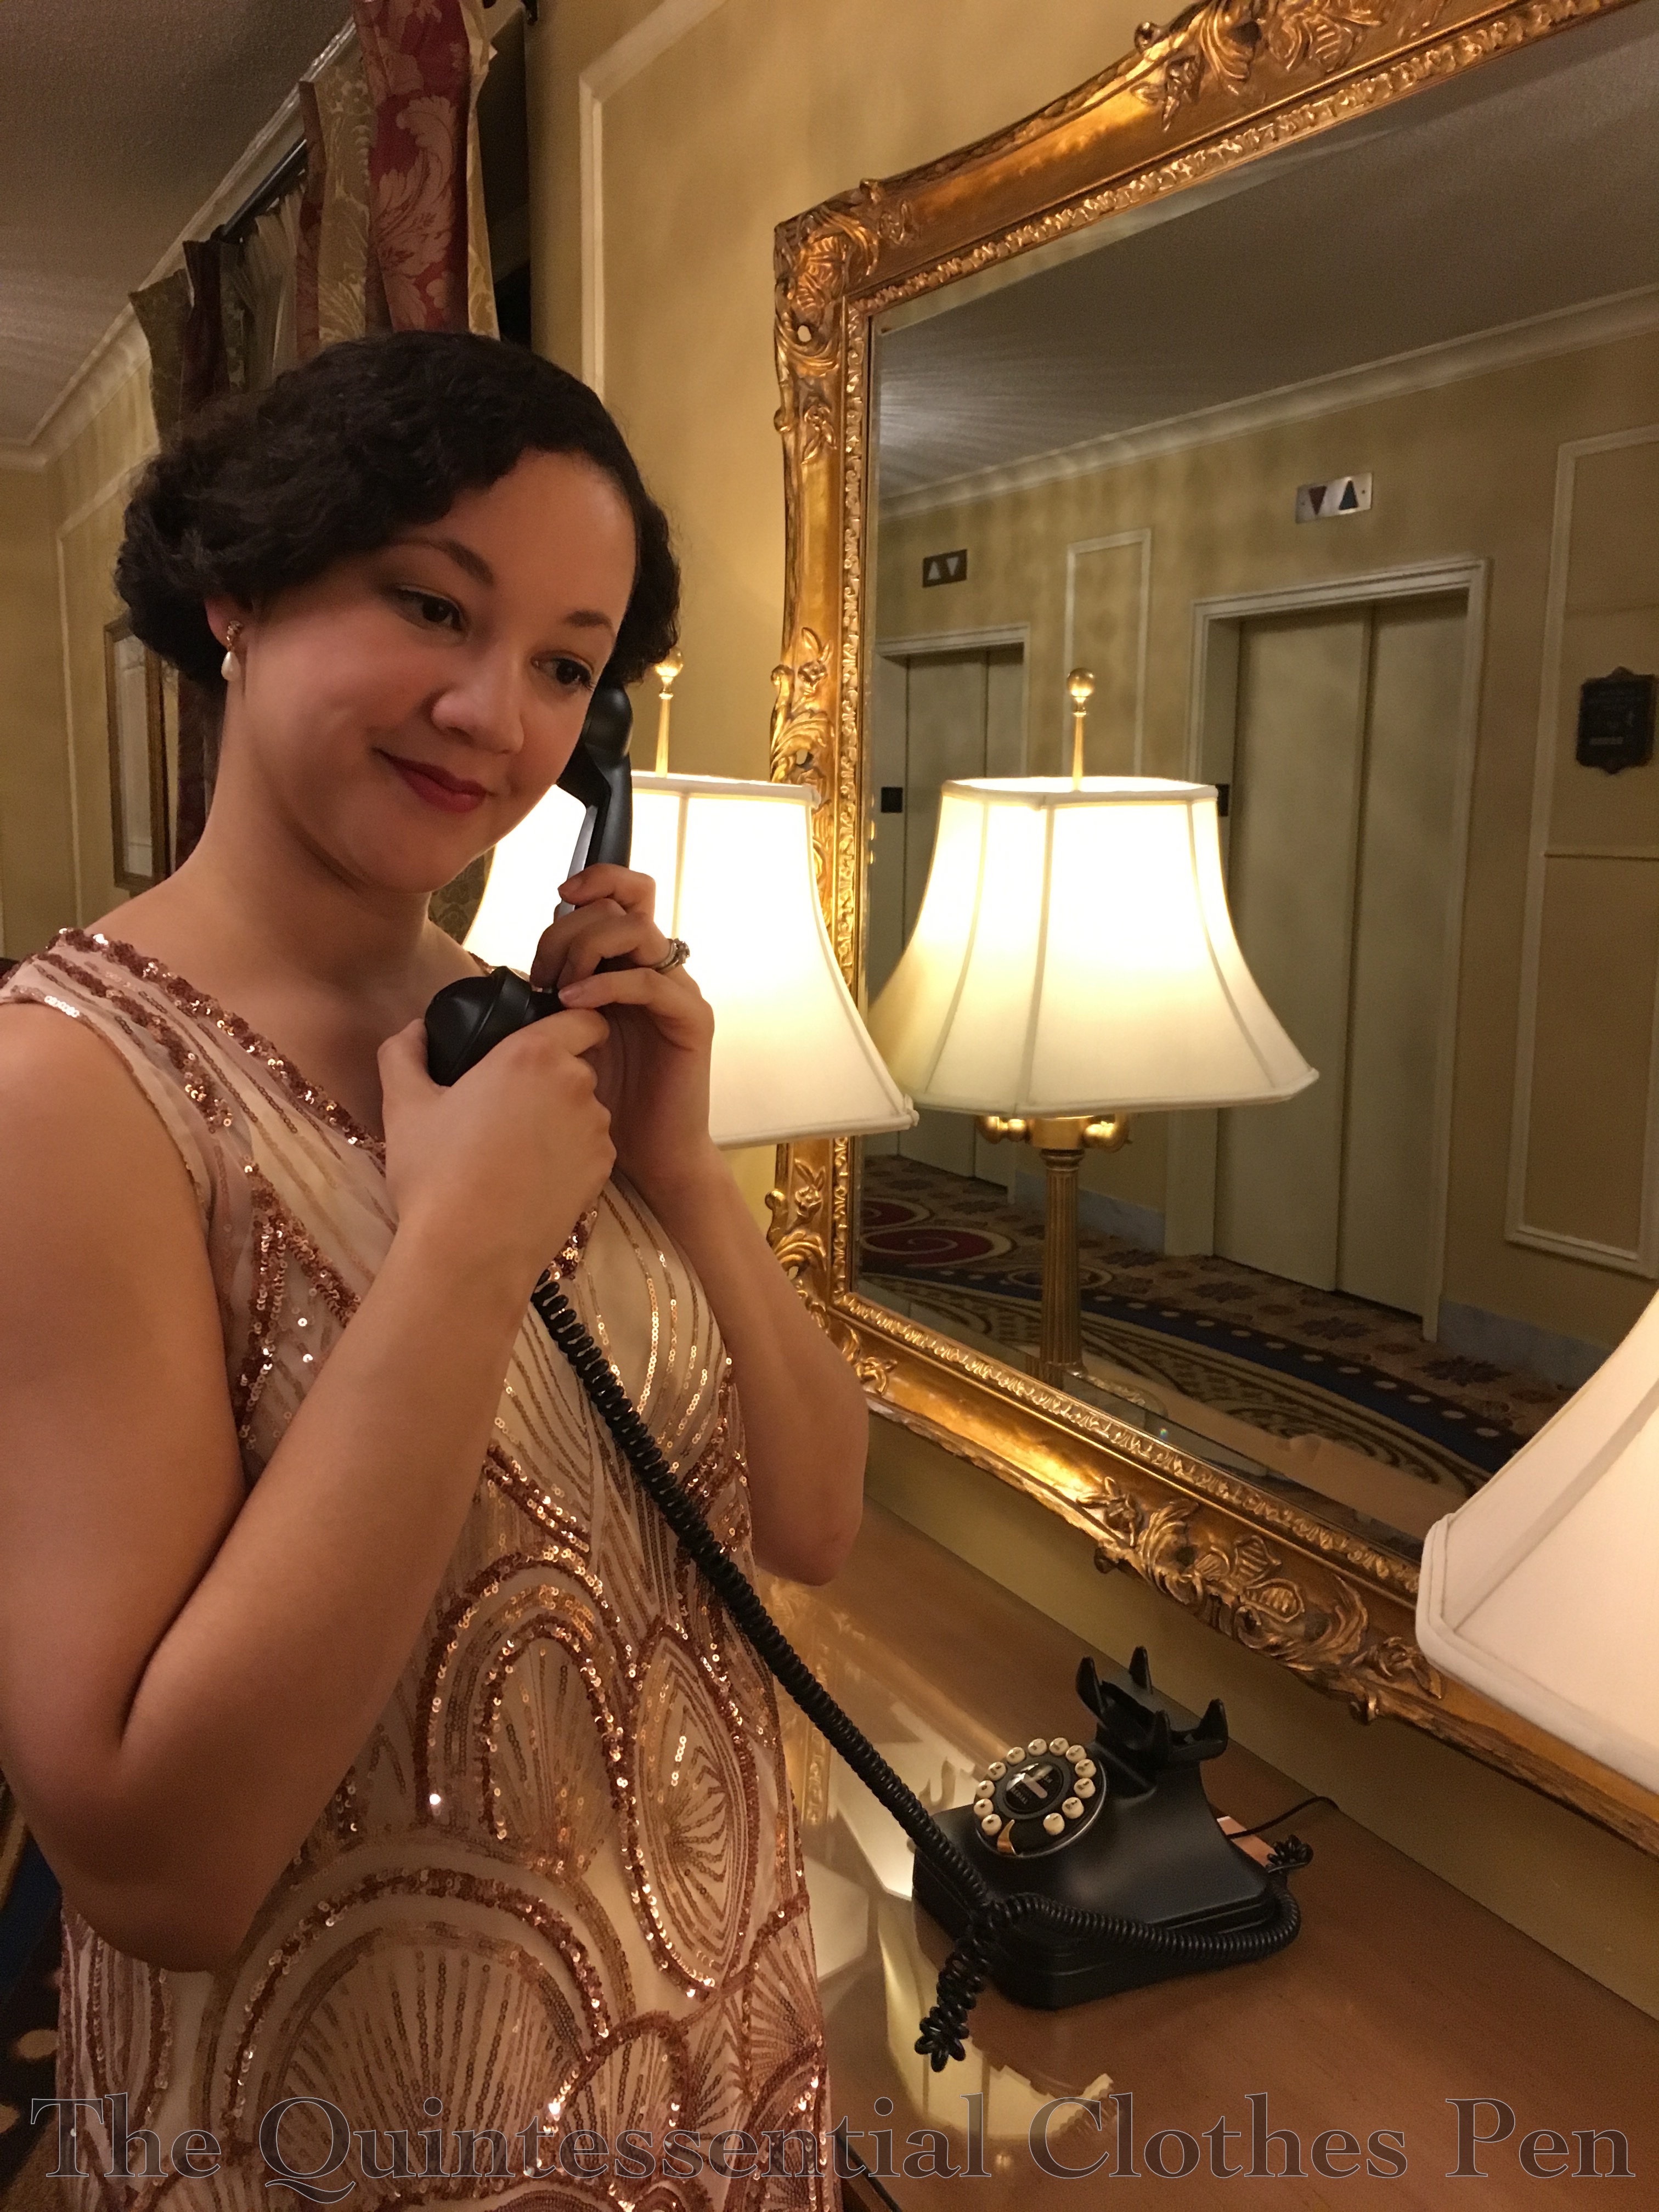
I was at the fabric store looking for other things… (the beginning of a lot of my fabric buying adventures) when two super sparkly fabrics caught my eye. They were screaming “1920s!” But the colors were somewhat costume-y 1920s and not often seen in my research of actual historical dresses from this period–red on nude net and black on nude net. A bit disappointed, I looked at the sparkly lace section some more and found the same fabric in blush on nude net! It was so sparkly and the pattern on it was so perfectly deco that I had to take some home with me. Luckily it wasn’t expensive and only cost $14 for 1.25 yards. Not bad!
The timing was perfect, because I had a 1920s event in January and just enough time to make the dress. I didn’t have a slip to go under it that was the right shape or color, so I also squeezed in making a bias cut slip.
For the pictures, I wore my American Duchess black Seaburys. They provided just the right 1920s shoe shape, encasing the front of my foot in a uniquely historical way that modern style shoes do not. You can see the shape more clearly in this post when I wore the shoes with my 1920s bathing suit in a beauty pageant look.
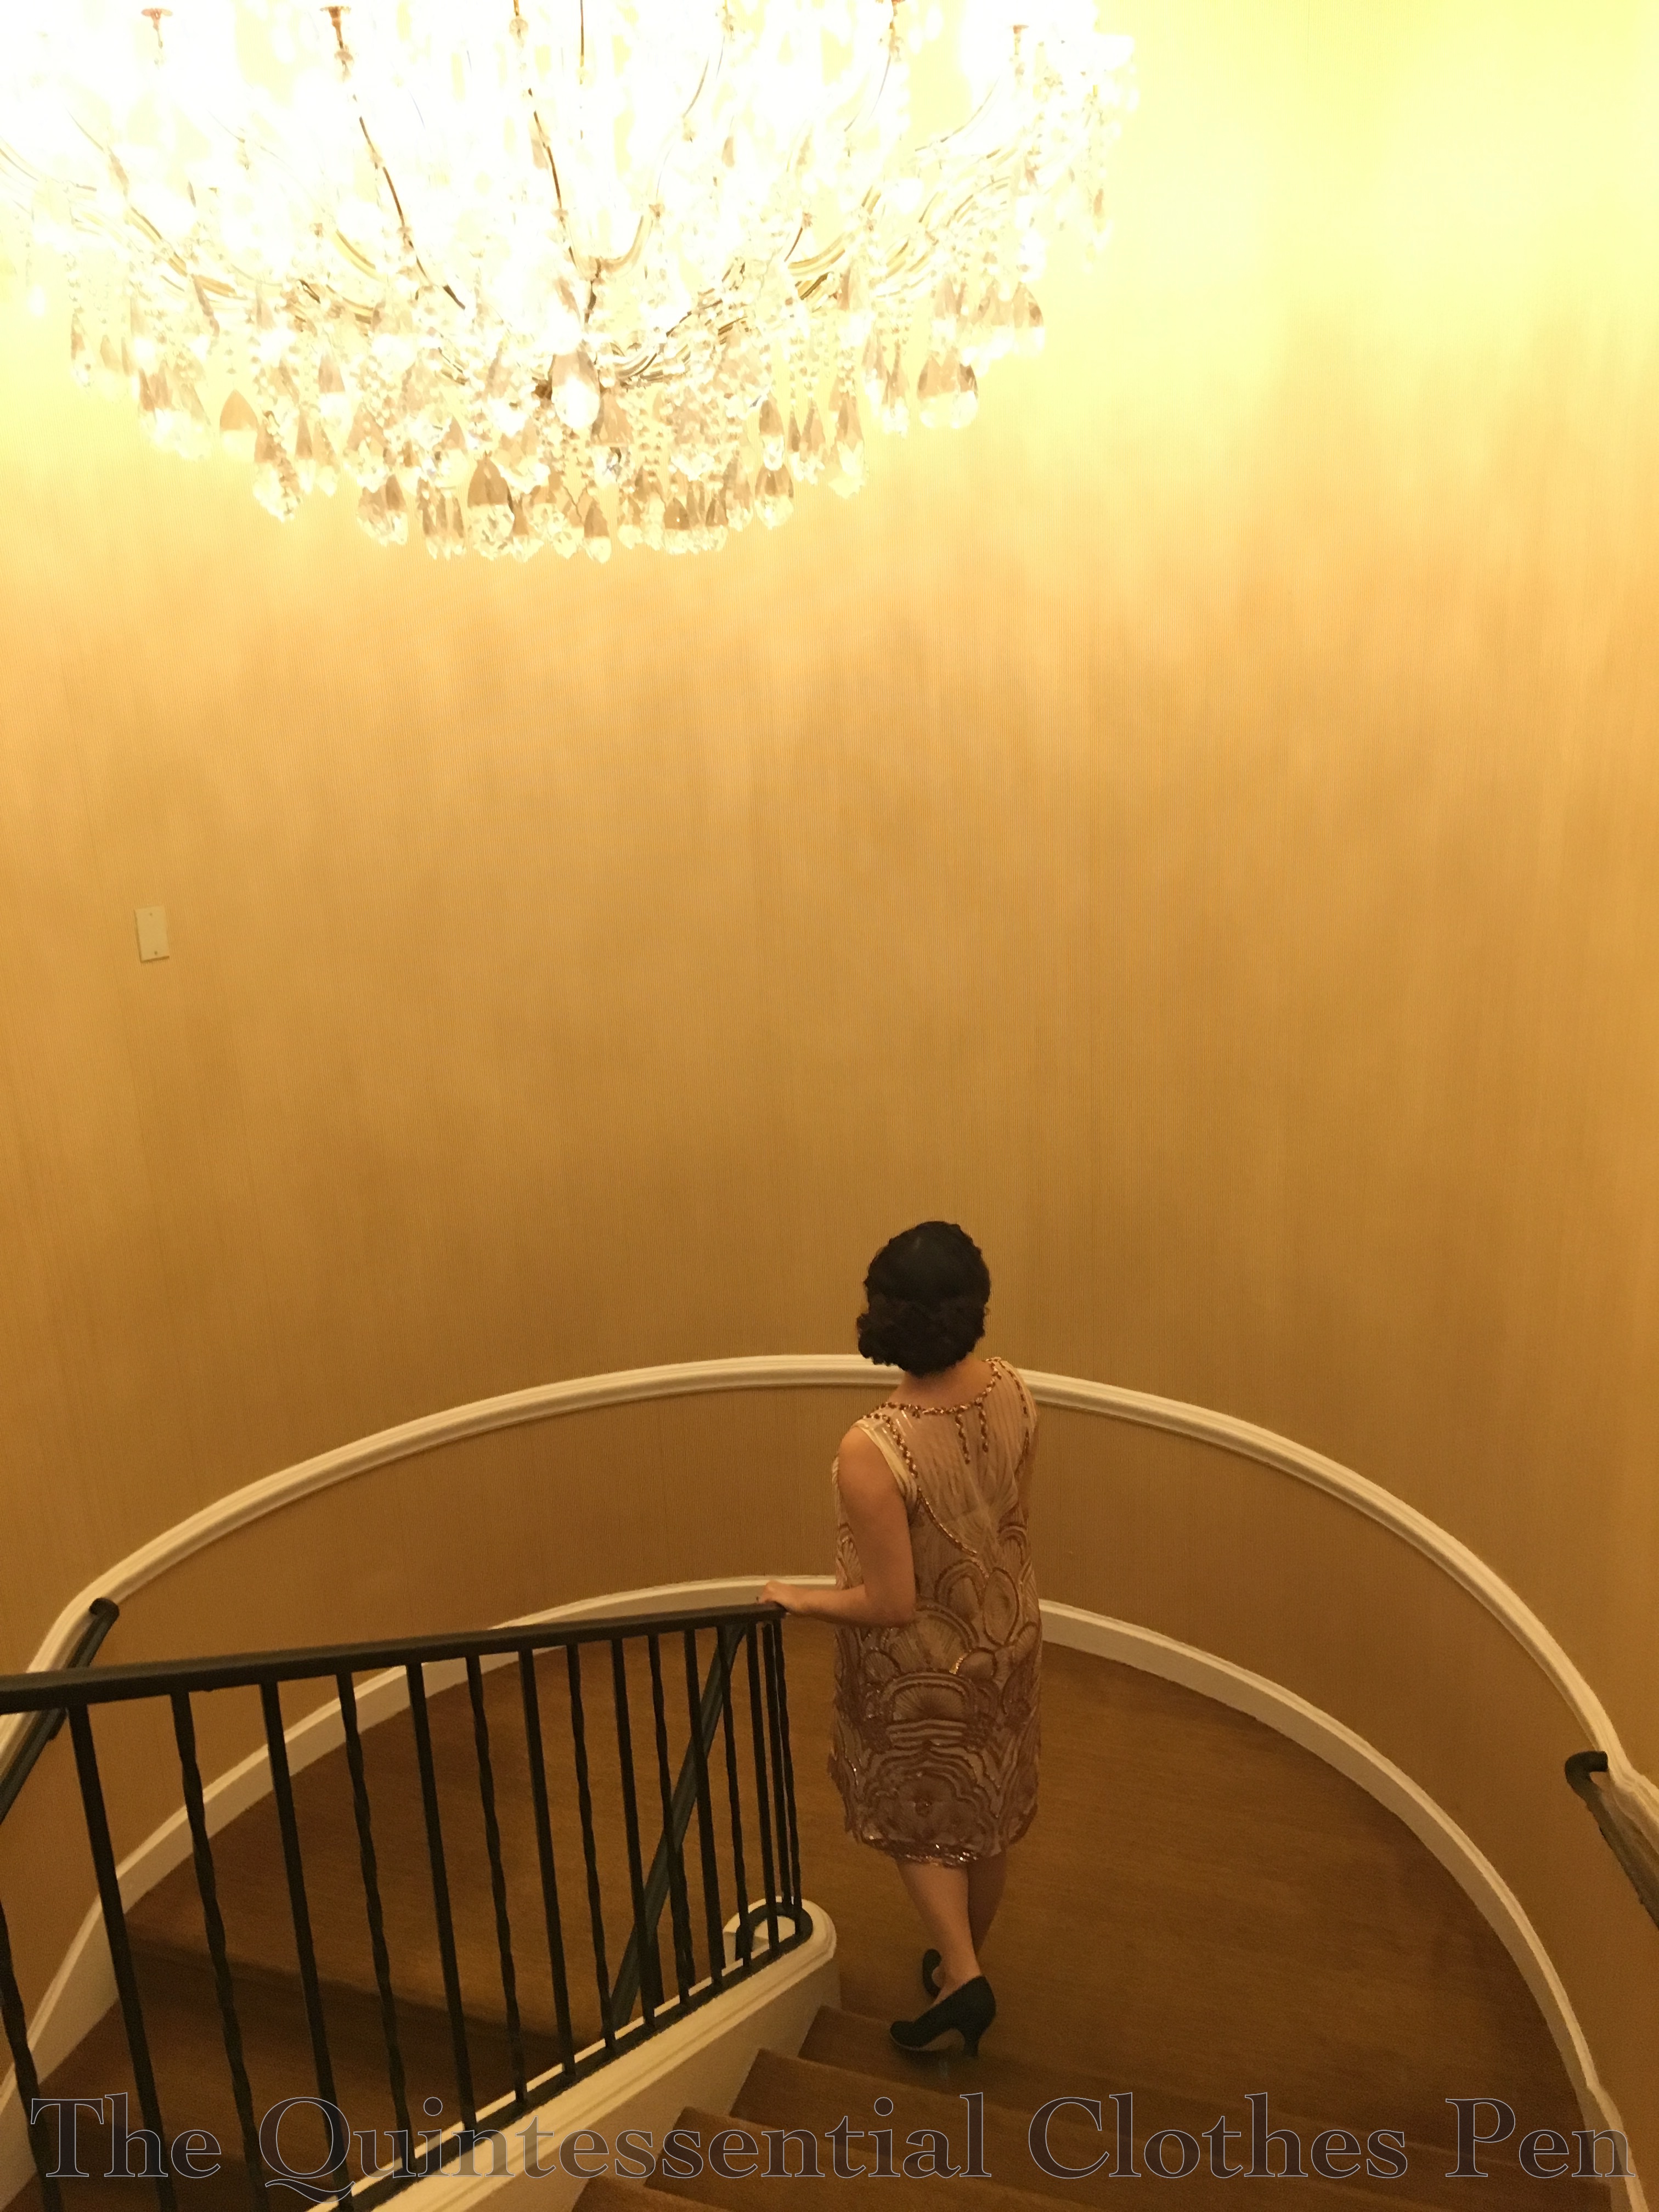
I was also incredibly lucky that the event was held in a historical hotel that provided fun backdrops for pictures! Those elevator doors are lovely! And look at this awesome phone–it had to be included in pictures!
Another neat place we took pictures was this stairwell. I love how different these two pictures are, despite being so similar. One is much more about the dress while the other shows off the chandelier and is a bit more artsy and mysterious.
I was so pleased with how my hair turned out! I tried a style similar to one I did last summer for a different 1920s event that I have yet to post about… oops! But here’s a teaser of just my hair. Soon I’ll post the details and it will bring some warm summer memories to my New England winter.
For the summer event I did my hair when it was wet, resulting in a similar style, but much smaller and closer to my head. For that version, I did all the back curls while my hair was still distinctly damp, making the curls much tighter and closer to my head.
For this event, I braided my hair in the morning while it was still damp (to help create waves on the top but curls on the bottom) and left it all day, meaning it was mostly dry when I took out the braid. Then, when doing my hair for the evening, I added small rats under the puffed bottom portion to add a bit more volume than just my own curls. I covered the rats with the length of my hair then carefully placed and pinned the curly ends to imitate having a sort of 1930s smooth-on-top-curly at the bottom style, like this. This style is a few years later than my new dress, but I think it works as a 20s style for someone with longer hair, like me. I have a lot of hair to hide in a 1920s style!
Both the dress and slip are entirely hand sewn, due to working on it away from home (I would have hand sewed the dress anyway because of all the sequins, but probably not the slip). The dress started out as a tube, but was more unflattering than I was willing to allow. It was fine from the hips down, but needed to be taken in above the hips. What I ended up with is a curved seam (or a long dart, depending on how you look at it–one side didn’t have a seam to begin with) allowing slight shaping from the torso to the skirt portion of the dress. 1920s dresses can be such bags, but after the extra shaping I am very happy with the still somewhat bag-like, skimming shape of the dress without feeling like it’s an absolute sack.
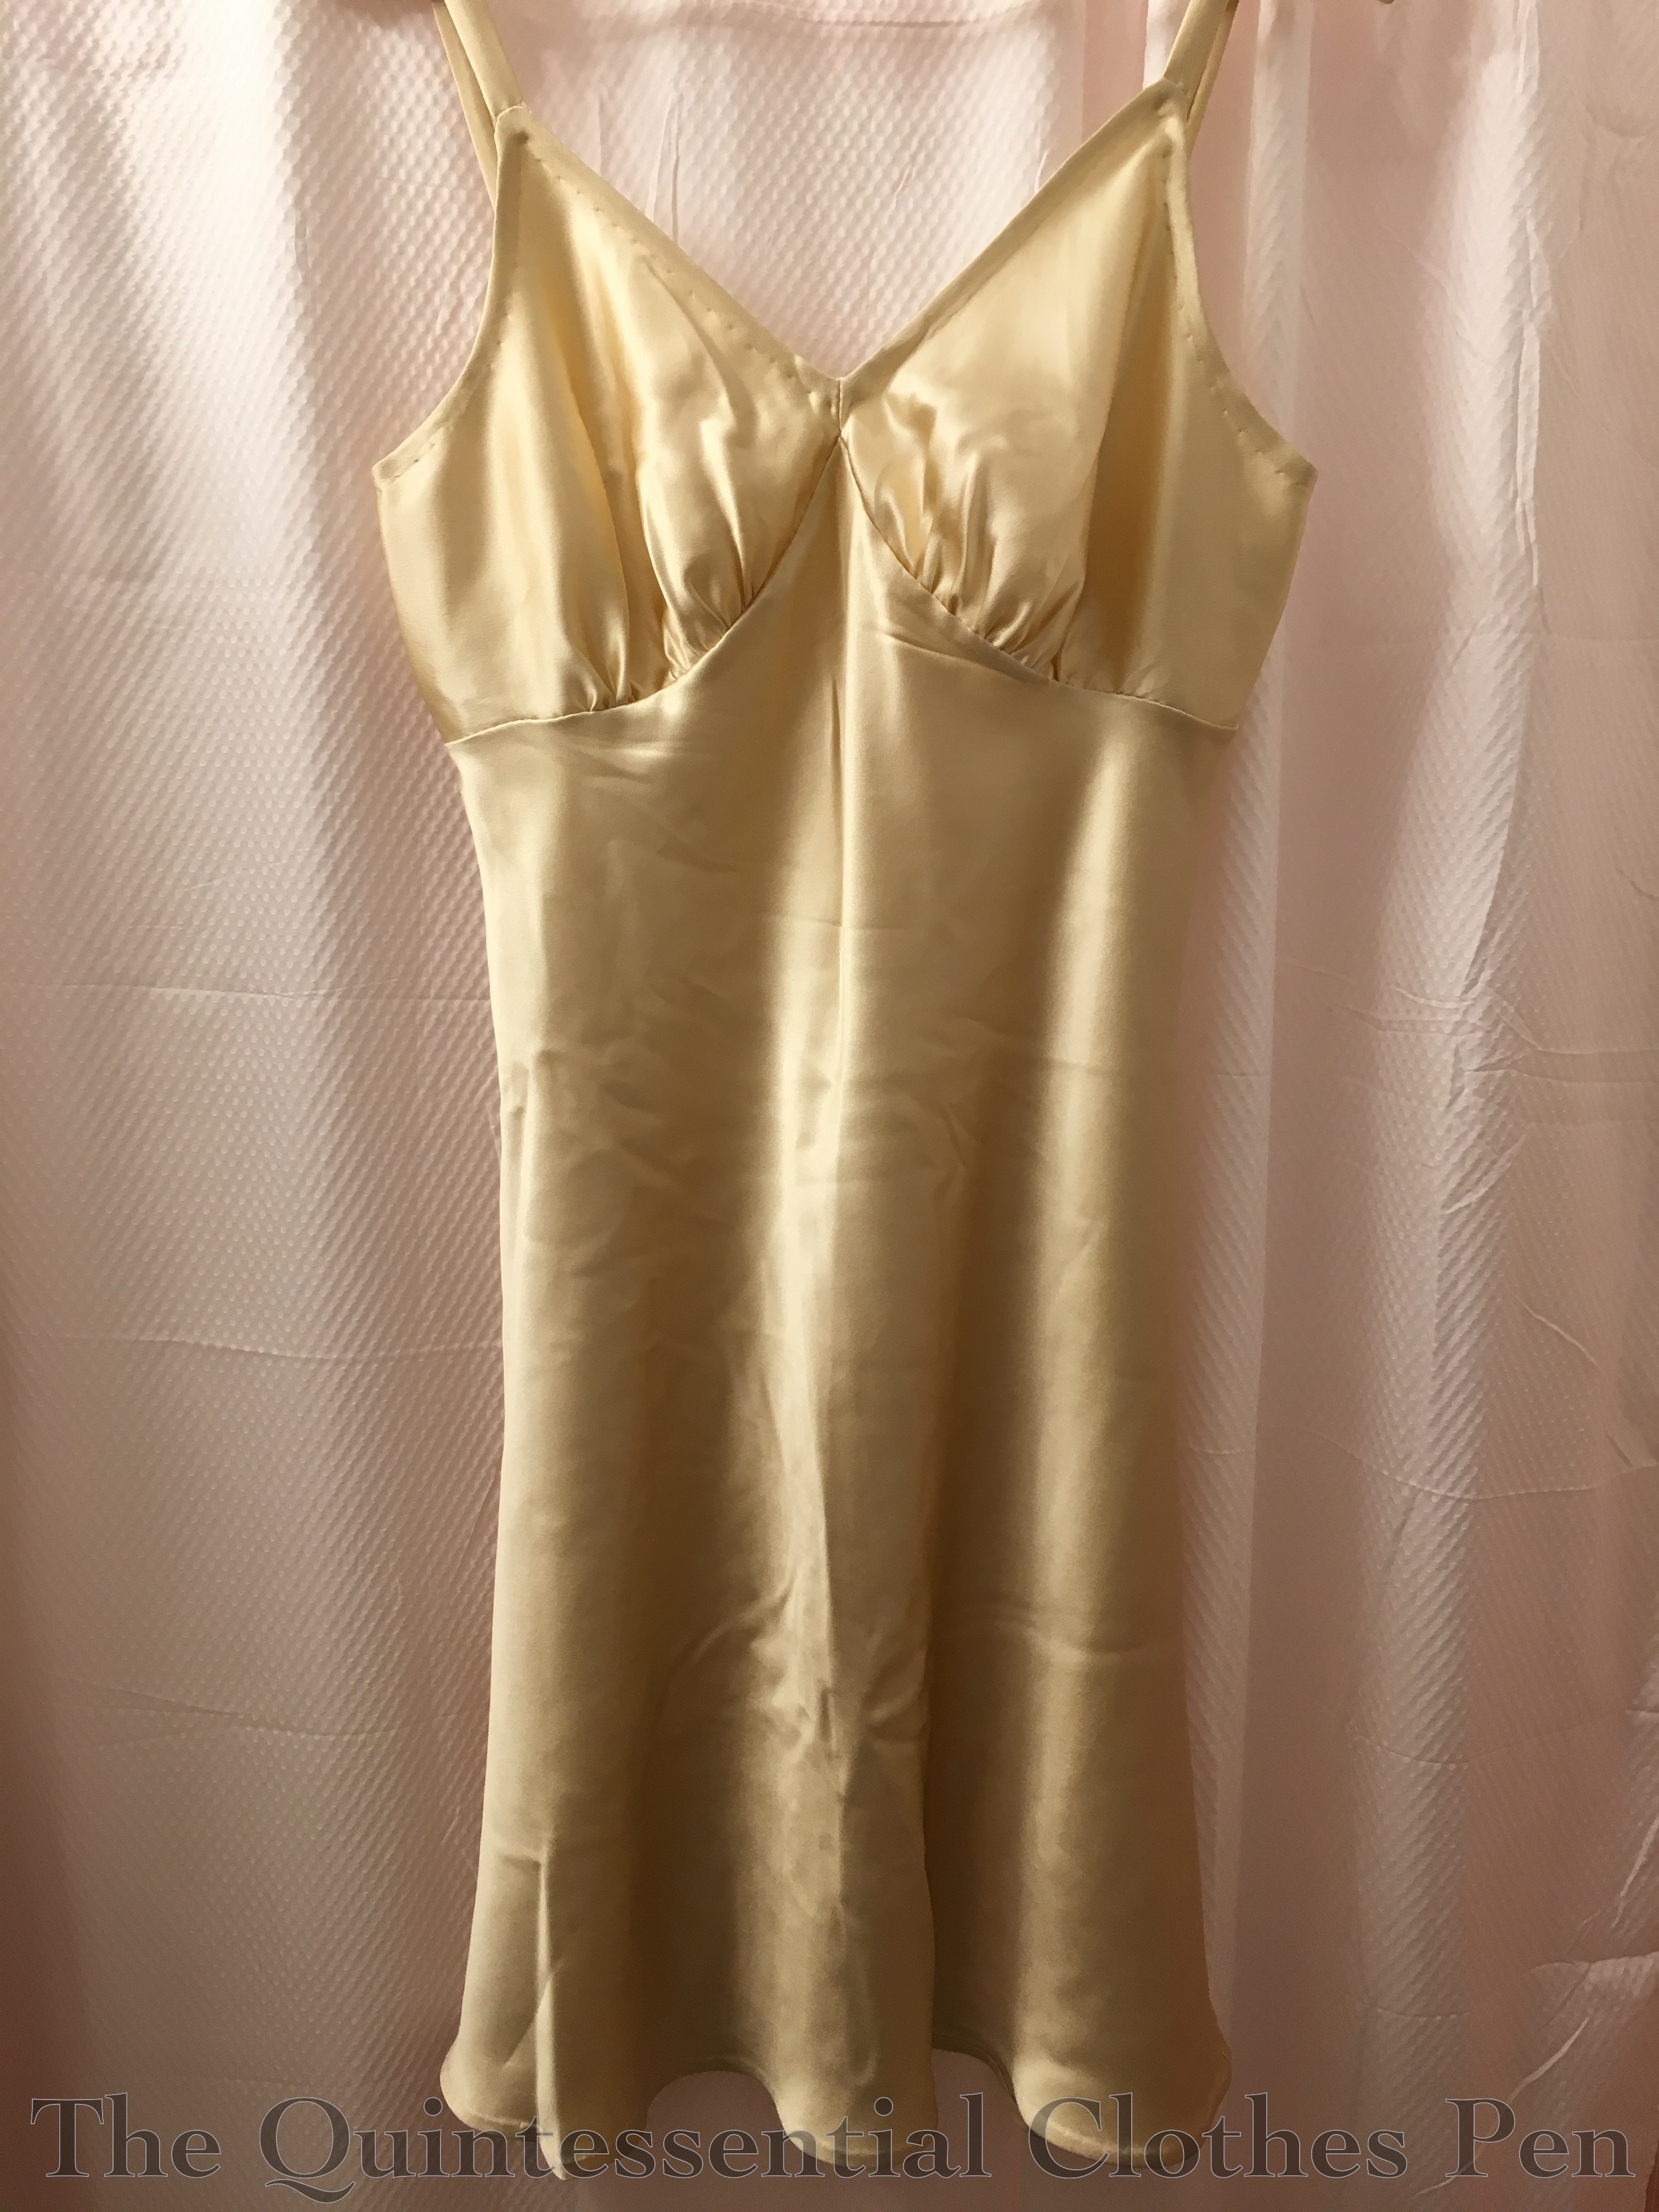
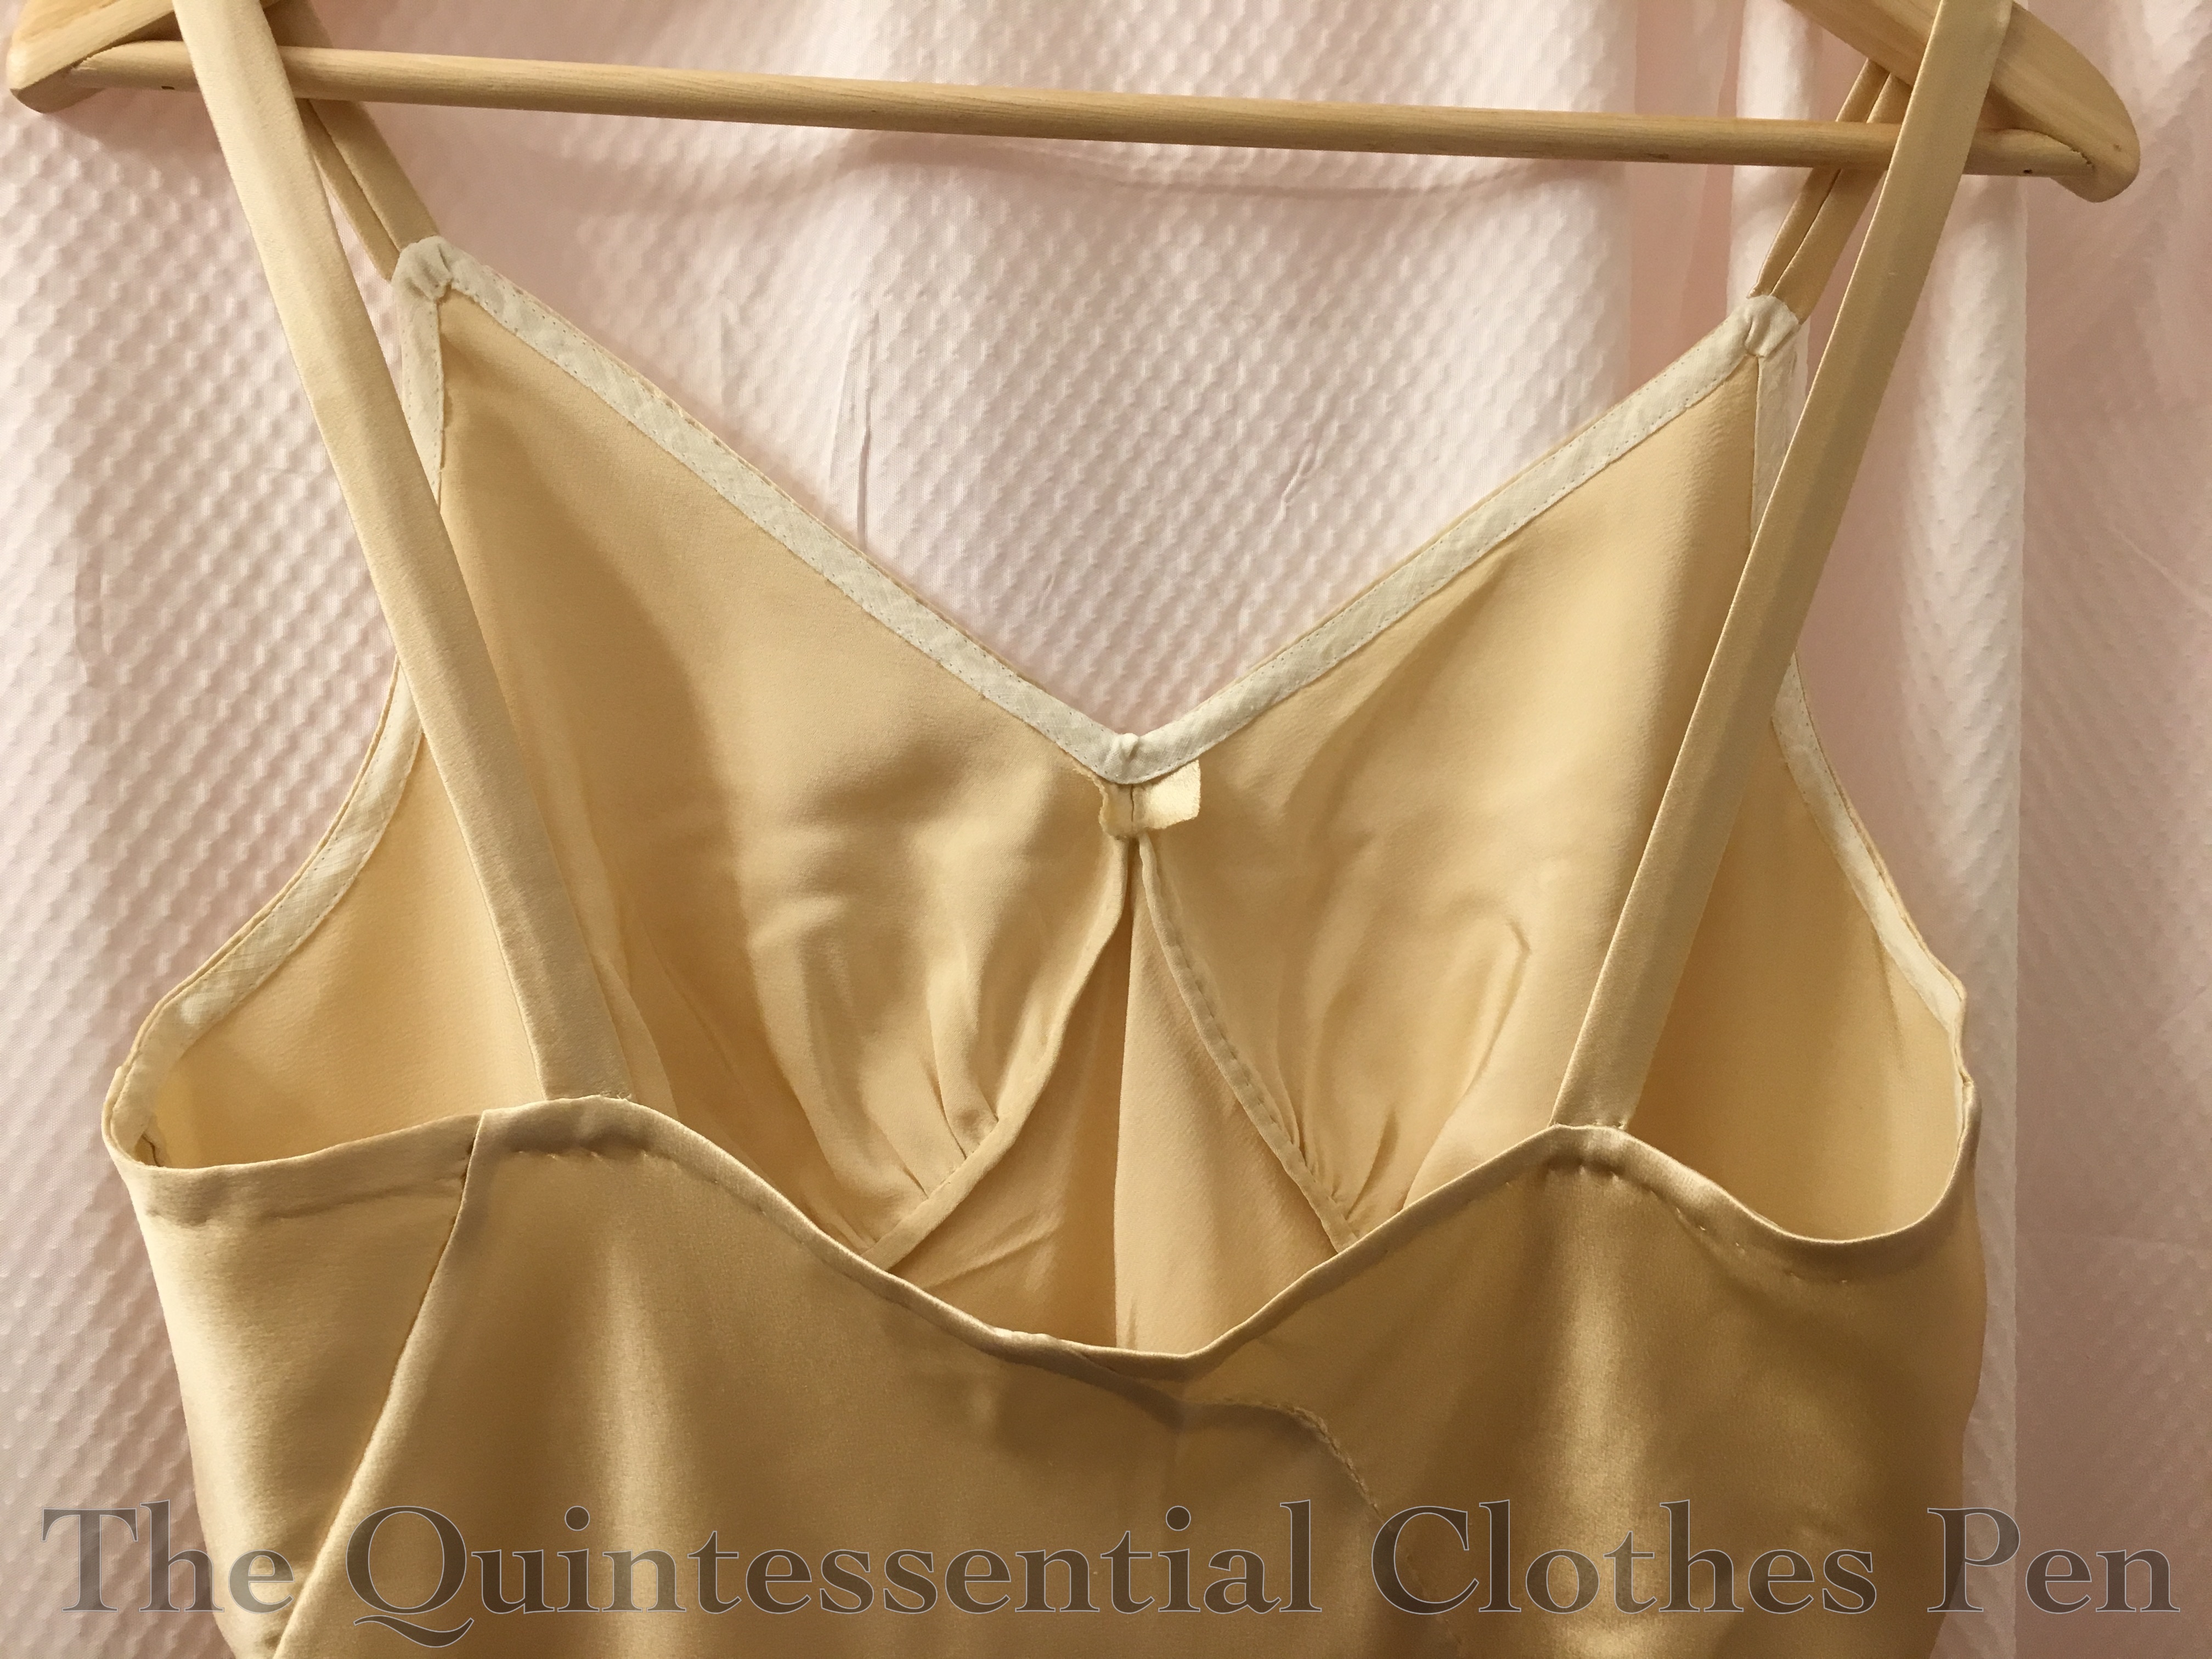
The slip was cut from a pattern I made a few years ago–perfect, since I didn’t have time to pattern something from scratch! I intentionally picked a 1930s pattern in order to have the addition of a perfectly fitting 1930s silk slip to my wardrobe, but also because the shape of the neckline was perfectly suited to the v-neckline I decided on for the sparkly overdress.
The slip has french seams on the sides. The under-bust seam allowance was trimmed away on the gathered piece and then the body piece seam allowance was turned over it and hand sewn to hide the raw edges. The top edge is mostly bound of with vintage cotton bias (which I removed from the top of the net petticoat I show in this post before shortening it. The piece wasn’t quite long enough to go all around the top edge of the slip, so the center back section is just turned twice and slip stitched, in the same way as the hem.
The slip fabric is left over from a project that I did about 7 years ago. It’s lovely silk crepe back satin with the perfect weight for making bias cut 1930s clothing. I thought I would have just enough to eke out the slip, but I came up a little short on the back piece and decided to piece it to make it work, as the fabric is so nice to wear and it was the perfect color. As a result, there are two random diagonal seams on the top of the back piece of the slip. Oh well! They add character!
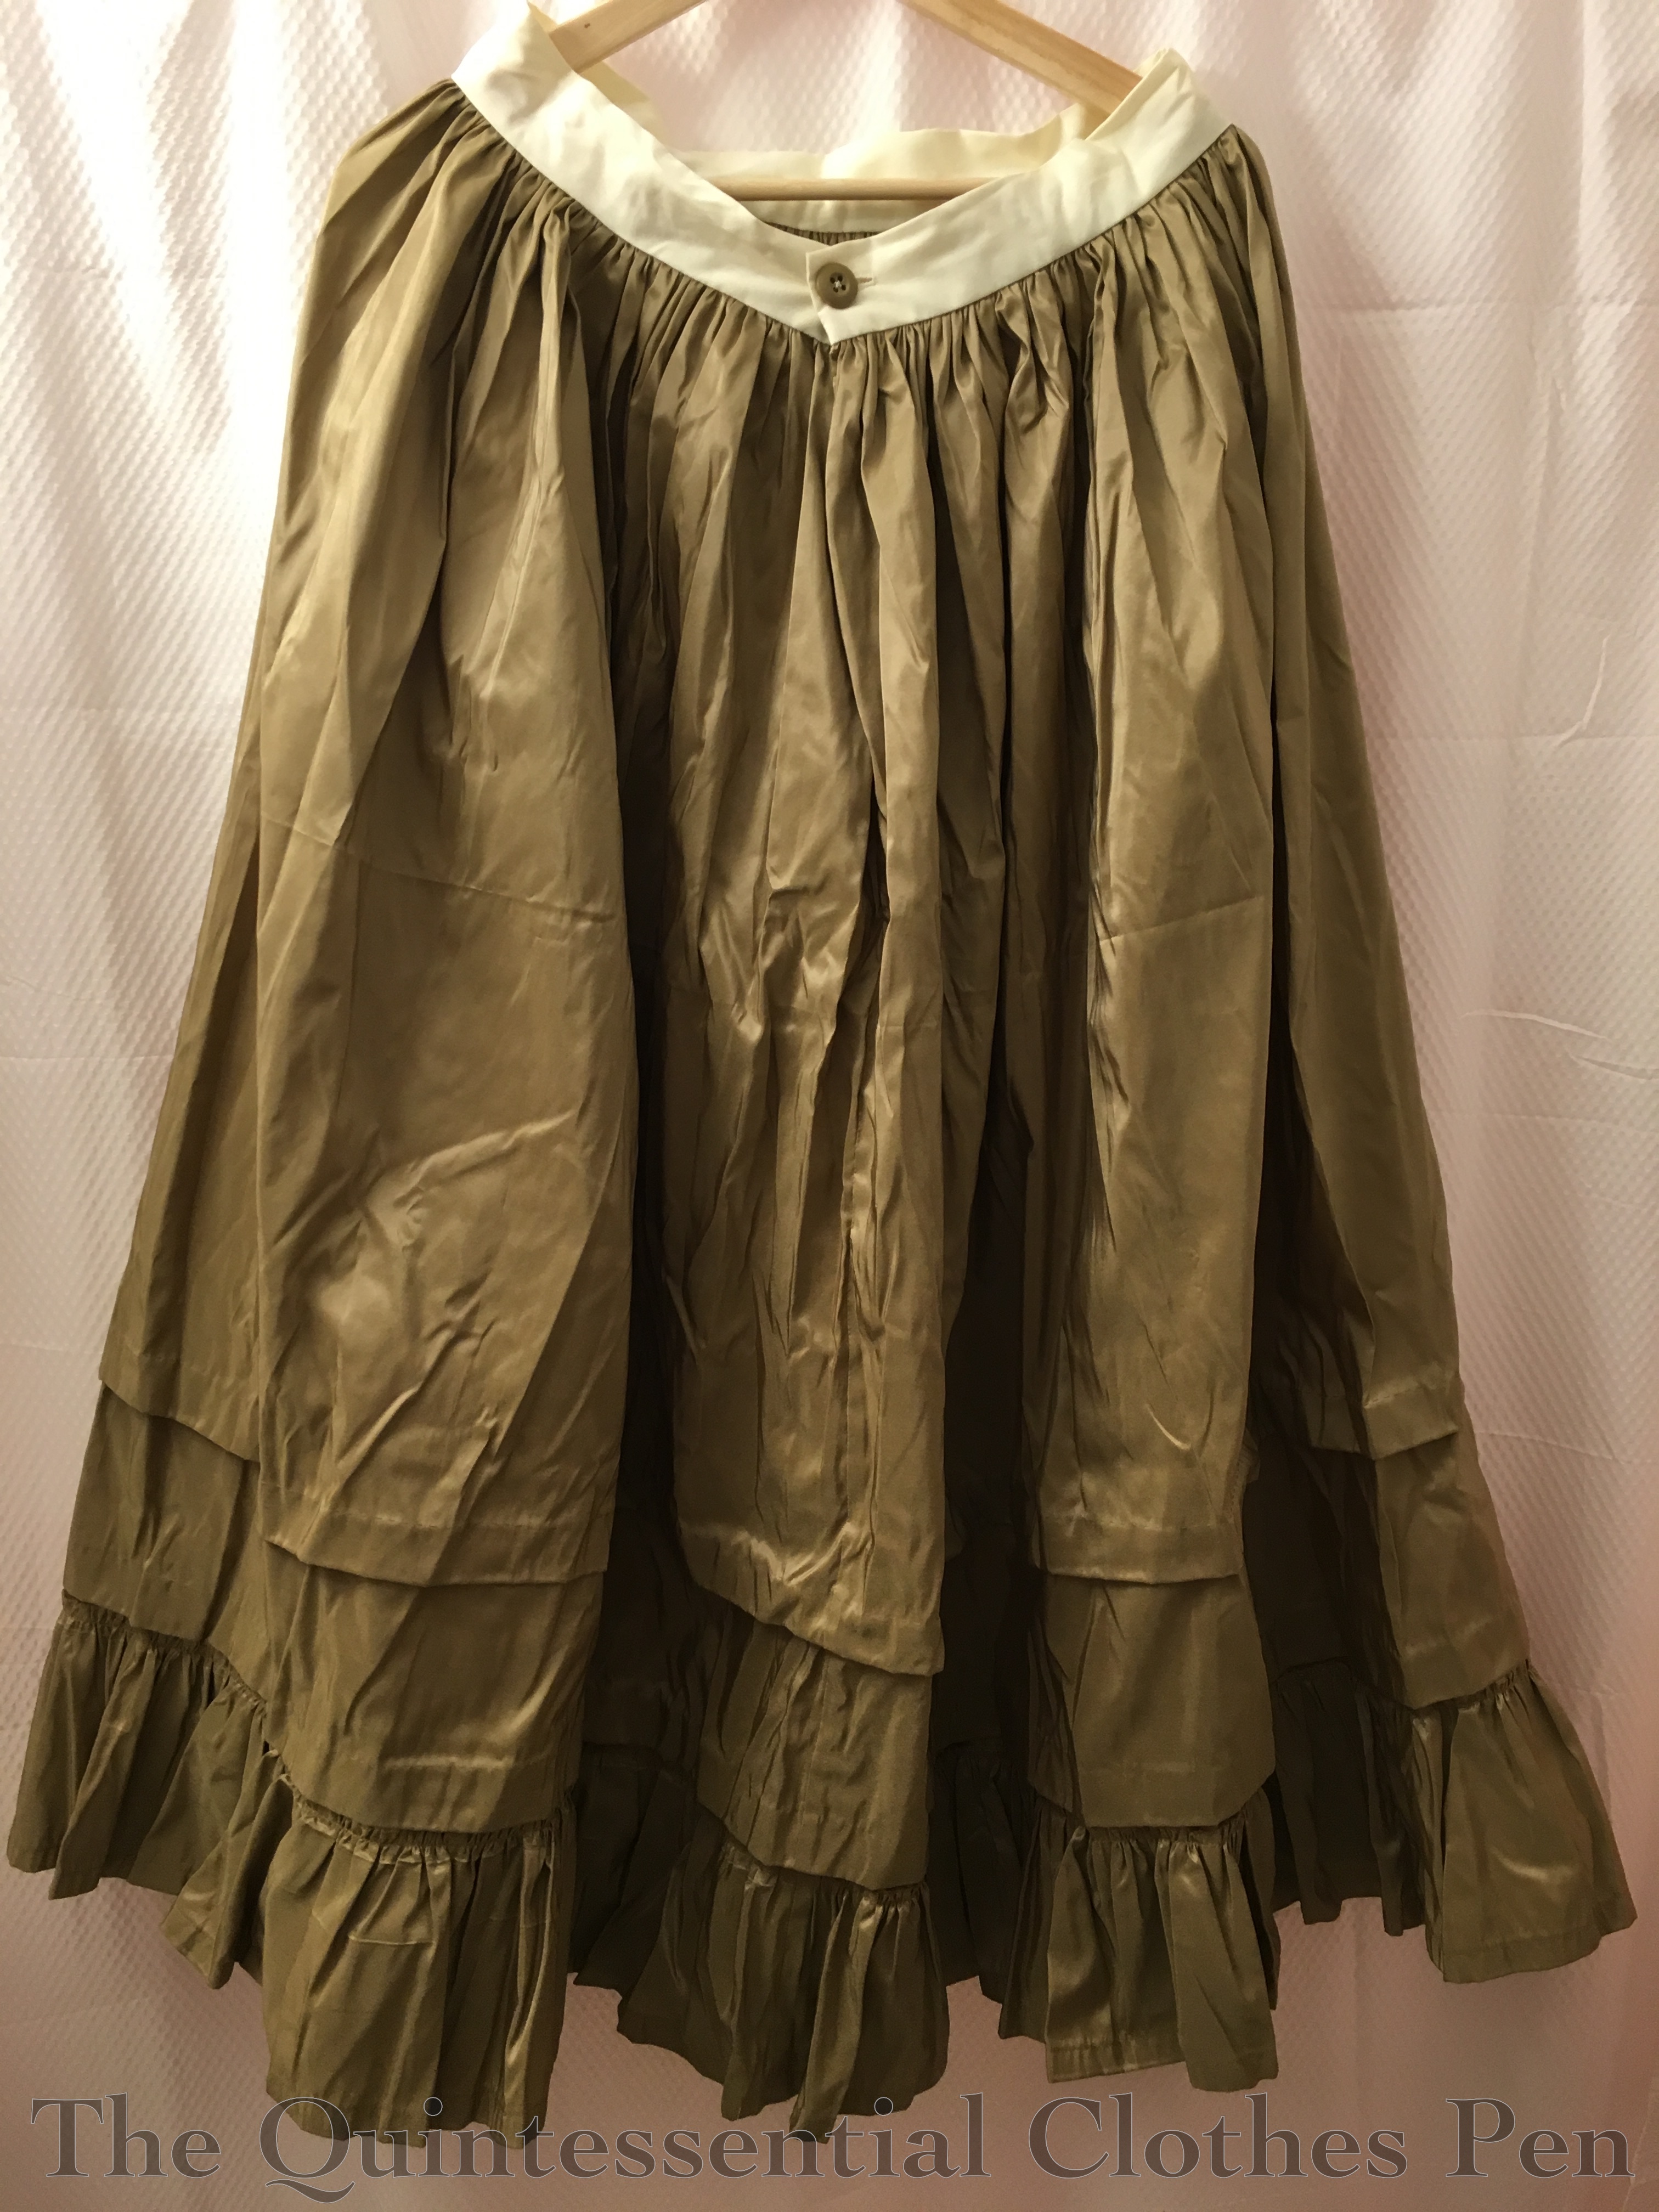
While making my 1832 velvet gown at the end of last year, I decided that a generic 1830s/40s petticoat might add to the silhouette, besides being elegant and fun to own. Silk petticoats remind me of Mammy, in Gone With The Wind, who is very excited (and a bit scandalized) about a red silk petticoat gifted to her by Rhett.
I had purchased this silk taffeta a number of years ago on clearance, but it was languishing in the stash due to its unflattering shade of brown. I had 3 yards, which was just right for a petticoat. And since the garment is never seen nor worn near the face, the color was perfectly suited to the project.
I made a tube of the yardage, then cut off the excess length and used that to make the ruffle. I had thought of making the ruffle twice as high, but realized that I needed to have more than a 1:1 ratio to gather… duh! I was sick while making this and clearly my head wasn’t working terribly well. Anyway, I cut my tall ruffle in half to make a 2:1 ratio and that was that.
The waistband is made of small bits of leftover cotton from some other project. There is evidence of quilted petticoats from the 1830s and 1840s having waistbands made of other fabrics, which was my inspiration (examples can be found here, here, and here). It was a perfect idea, as I was trying to make the best use of my fabric and I did not want to cut a waistband piece out of it.
Petticoats of this type also sometimes close with buttons (like this one), so I chose to close this petticoat in that way as well. It used up a single, random, khaki colored button from the stash and matches the fabric perfectly!
I added tucks to the petticoat after trying it on with the 1832 dress and realizing it needed to be shorter. Those are hand sewn, but the rest of the construction was done on a machine except for the buttonhole and sewing down the inside of the waistband.
This garment fits the first HSM challenge of the year, Firsts and Lasts (create either the first item in a new ensemble, or one last piece to put the final fillip on an outfit), as it was the start of the 1830s ensemble.
Just the facts:
Fabric: 3 yards brown silk taffeta.
Pattern: None. Just rectangles and math, sort of.
Year: 1830s/40s.
Notions: Thread, a button, and a cotton scrap.
How historically accurate is it?: I’m going to go with 95% on this one. The materials are good and so is the method. The only thing off is the machine sewing and the plastic button.
Hours to complete: Not many, for me. Maybe 10? It didn’t help that I was sick and not thinking straight.


