Making Beaded Snowflakes!

As part of my Snow Queen idea for The Footwork & Frolick Fairytale Ball I wanted to incorporate some snowflakes! In my brainstorming of materials I remembered that many years ago (twenty-ish, I think!) I had been gifted a whole bunch of beads and little trimming bits and bobs. I stored them for years and didn’t really find uses… but all of those pearls, silver, and blue beads would be perfect for making snowflakes!!

I actually started these in the middle of making my icicles. I was completely distracted! My thought was to put one snowflake on top of each of the black flower accents on the Elusive Blue 1899 Dress I made back in 2016 (visible in it’s original form below). There are 8 flowers total, so I would need 8 snowflakes.

I did a quick internet search for ‘beaded snowflake tutorial’. There are many! But this one, on Instructables, use beads similar to the types I had available, so that was my main inspiration. I laid out my beads in a few ways to see what would best approximate the pattern in the tutorial, as you can see below.

Then I dug out a spool of wire I had accumulated doing other craft projects. Honestly, I’ve probably had this wire for 20 years, too, and I have no idea what project I purchased it for… but it came in handy to have it on hand! Mr. Q contributed wire cutters that lowered my frustration by cutting the wire more effectively than my sewing pliers, and I was off!

I easily created the first snowflake, on the left in the image below!

No two snowflakes are the same, right? So I wanted variation and decided to make up my own design, which you can see on the right in the image above. Turns out I made it pretty complicated… and a triangle! I had a bit of a meltdown… Would a triangle snowflake make sense?? Are snowflakes always symmetrical?

There ARE triangular snowflakes! Here’s an article explaining how they form.

I went back to icicles for awhile and then over the next few weeks made more snowflakes. Some are similar, but no two snowflakes are the same.

It was fun! For me, it was also a perfectionist rabbit hole! I wanted to find eye catching designs for the beads I had, make sure the beads were tightly pulled on the wire, make sure each area of each snowflake matched the other areas… There were many conditions to be met!

It all turned out well, though. I decided to replace the black flowers with snowflakes, but saved the black flowers and took note of the placement so they could easily be switched out in the future. Next post I’ll share the finished effect of the icicle crown and snowflakes for my Snow Queen fancy dress outfit!

From Clamshell To Icicle Crown

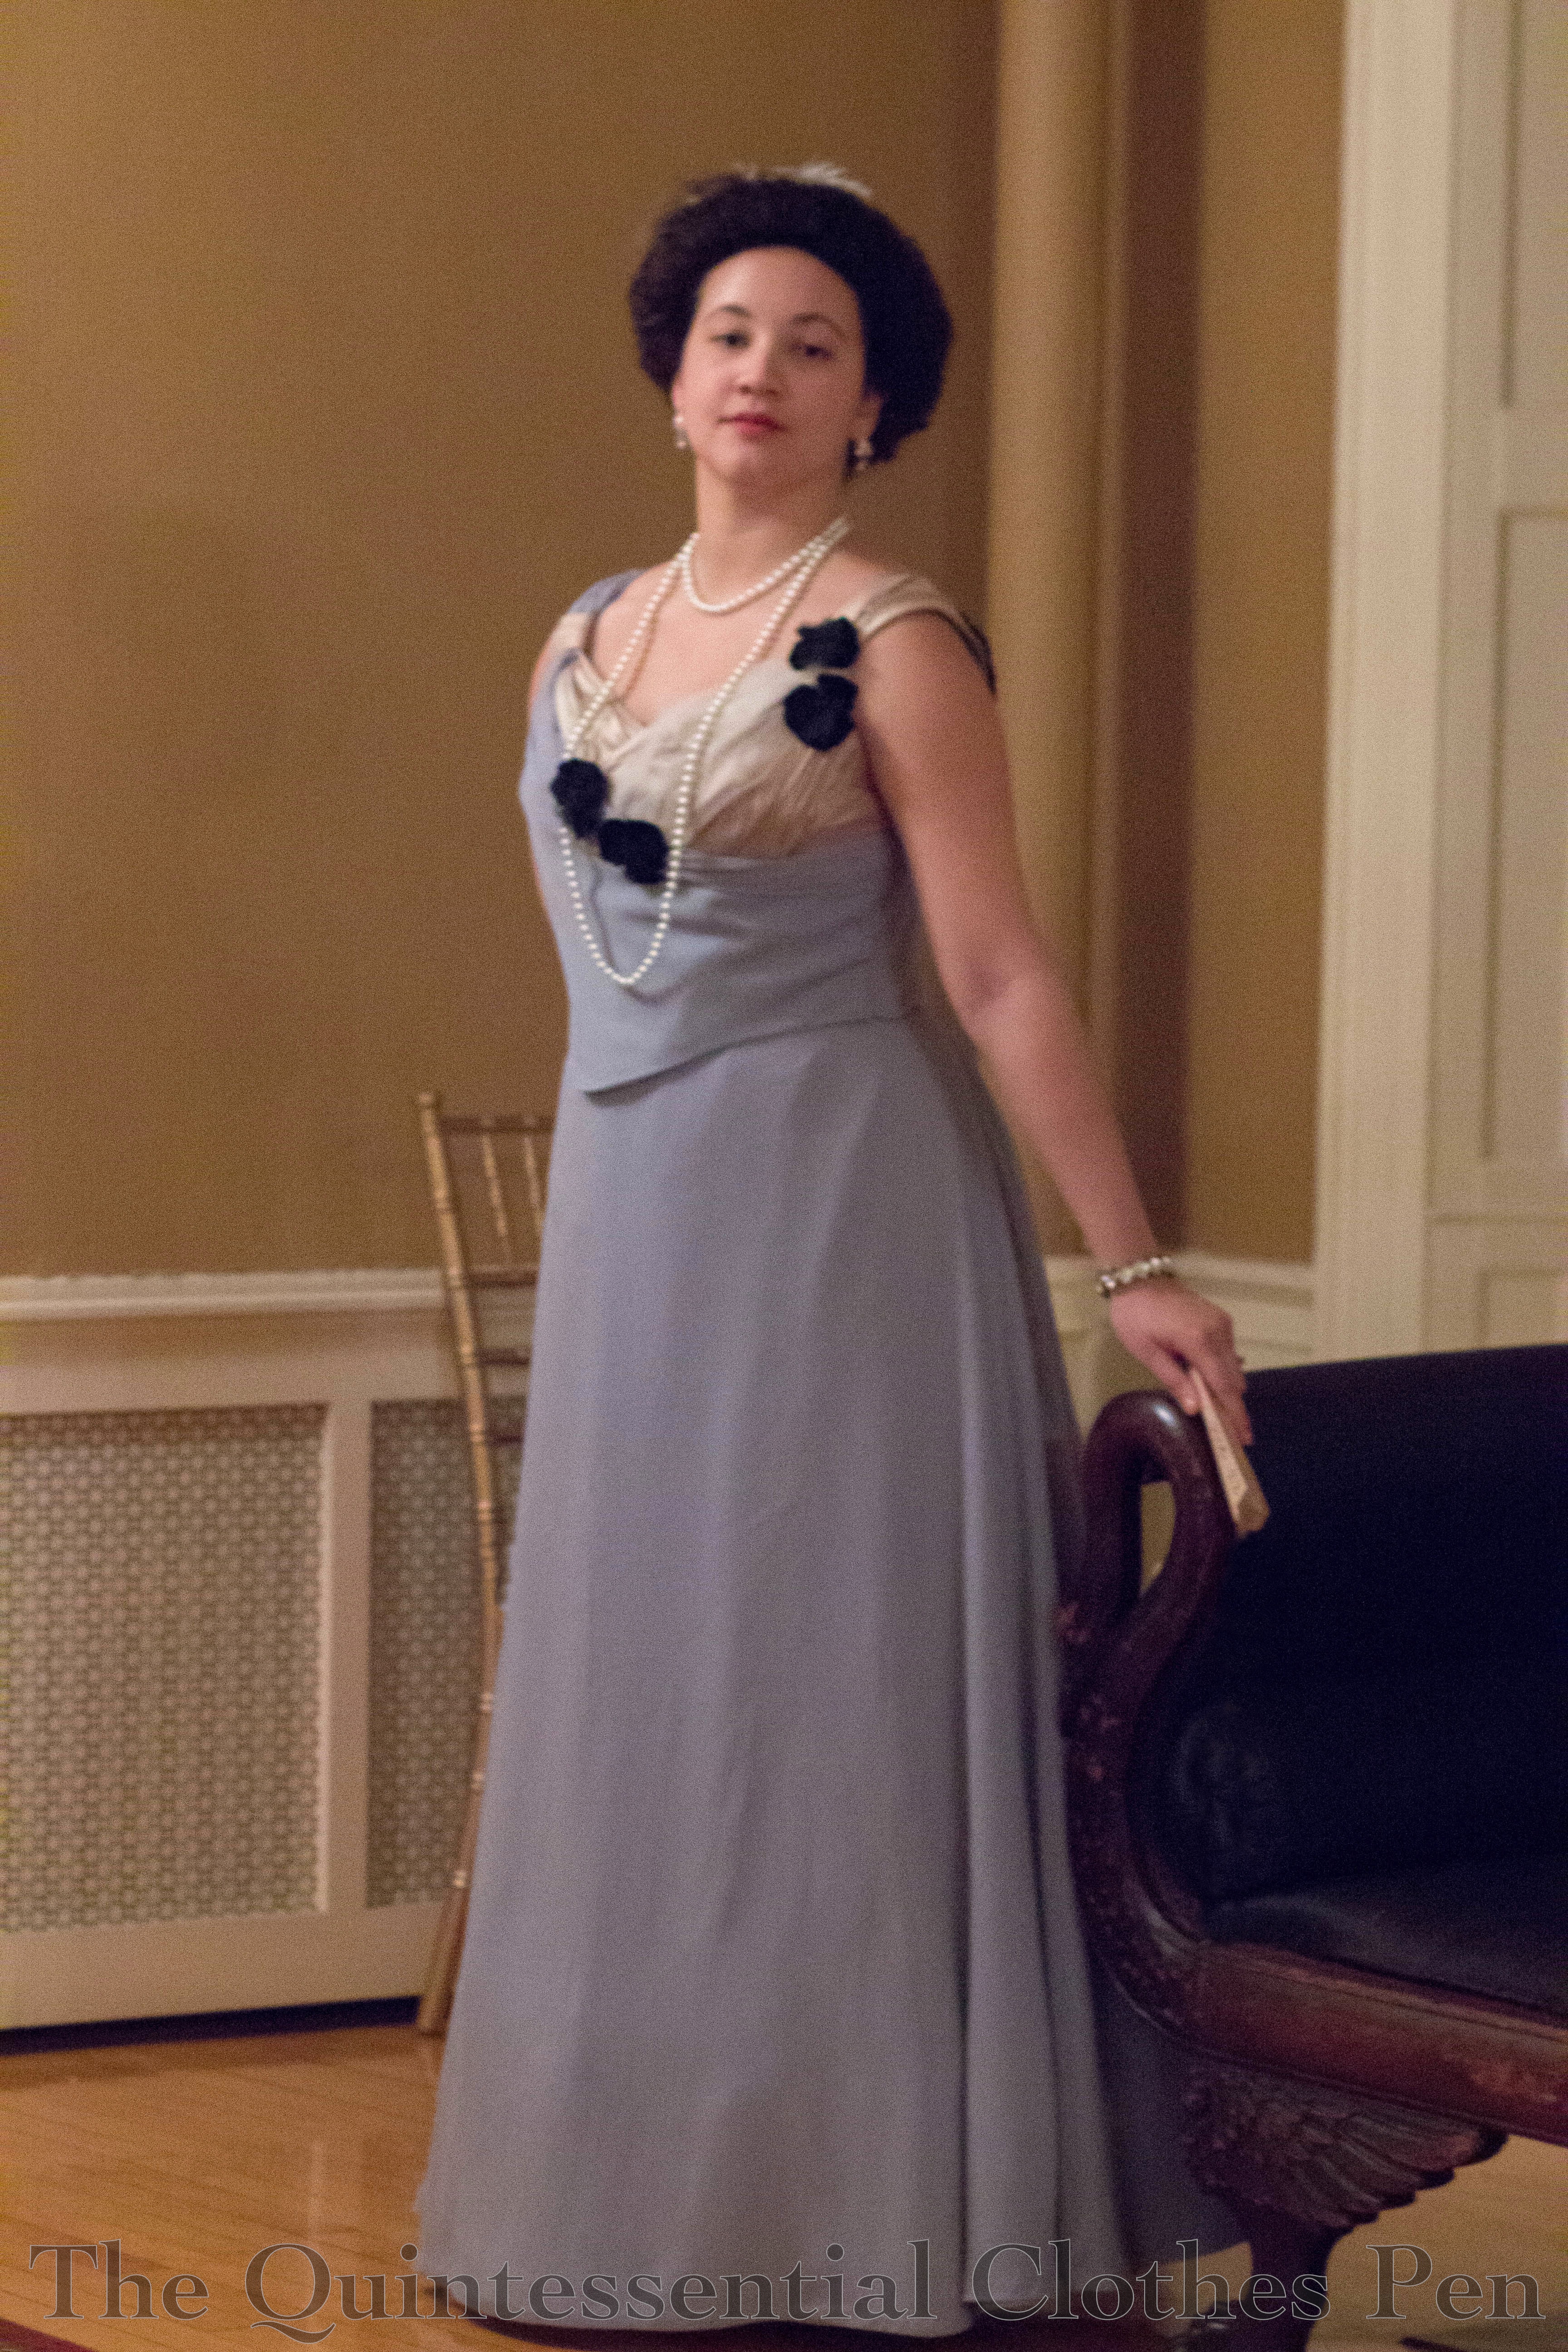
In October, The Footwork & Frolick Society hosted a fairytale themed late 19th century ball. I wanted to wear something fun from my historical wardrobe that I hadn’t worn in awhile and decided on my 1899 Elusive Blue dress. Once the outfit was decided on I had to figure out how that might fit the theme!

After a bit of thinking, I decided on a Snow Queen idea, inspired by Hans Christian Andersen’s character and story. The idea of a light blue, white, and silver dress seemed like it could be adapted to fit my chosen outfit with minimal additions.

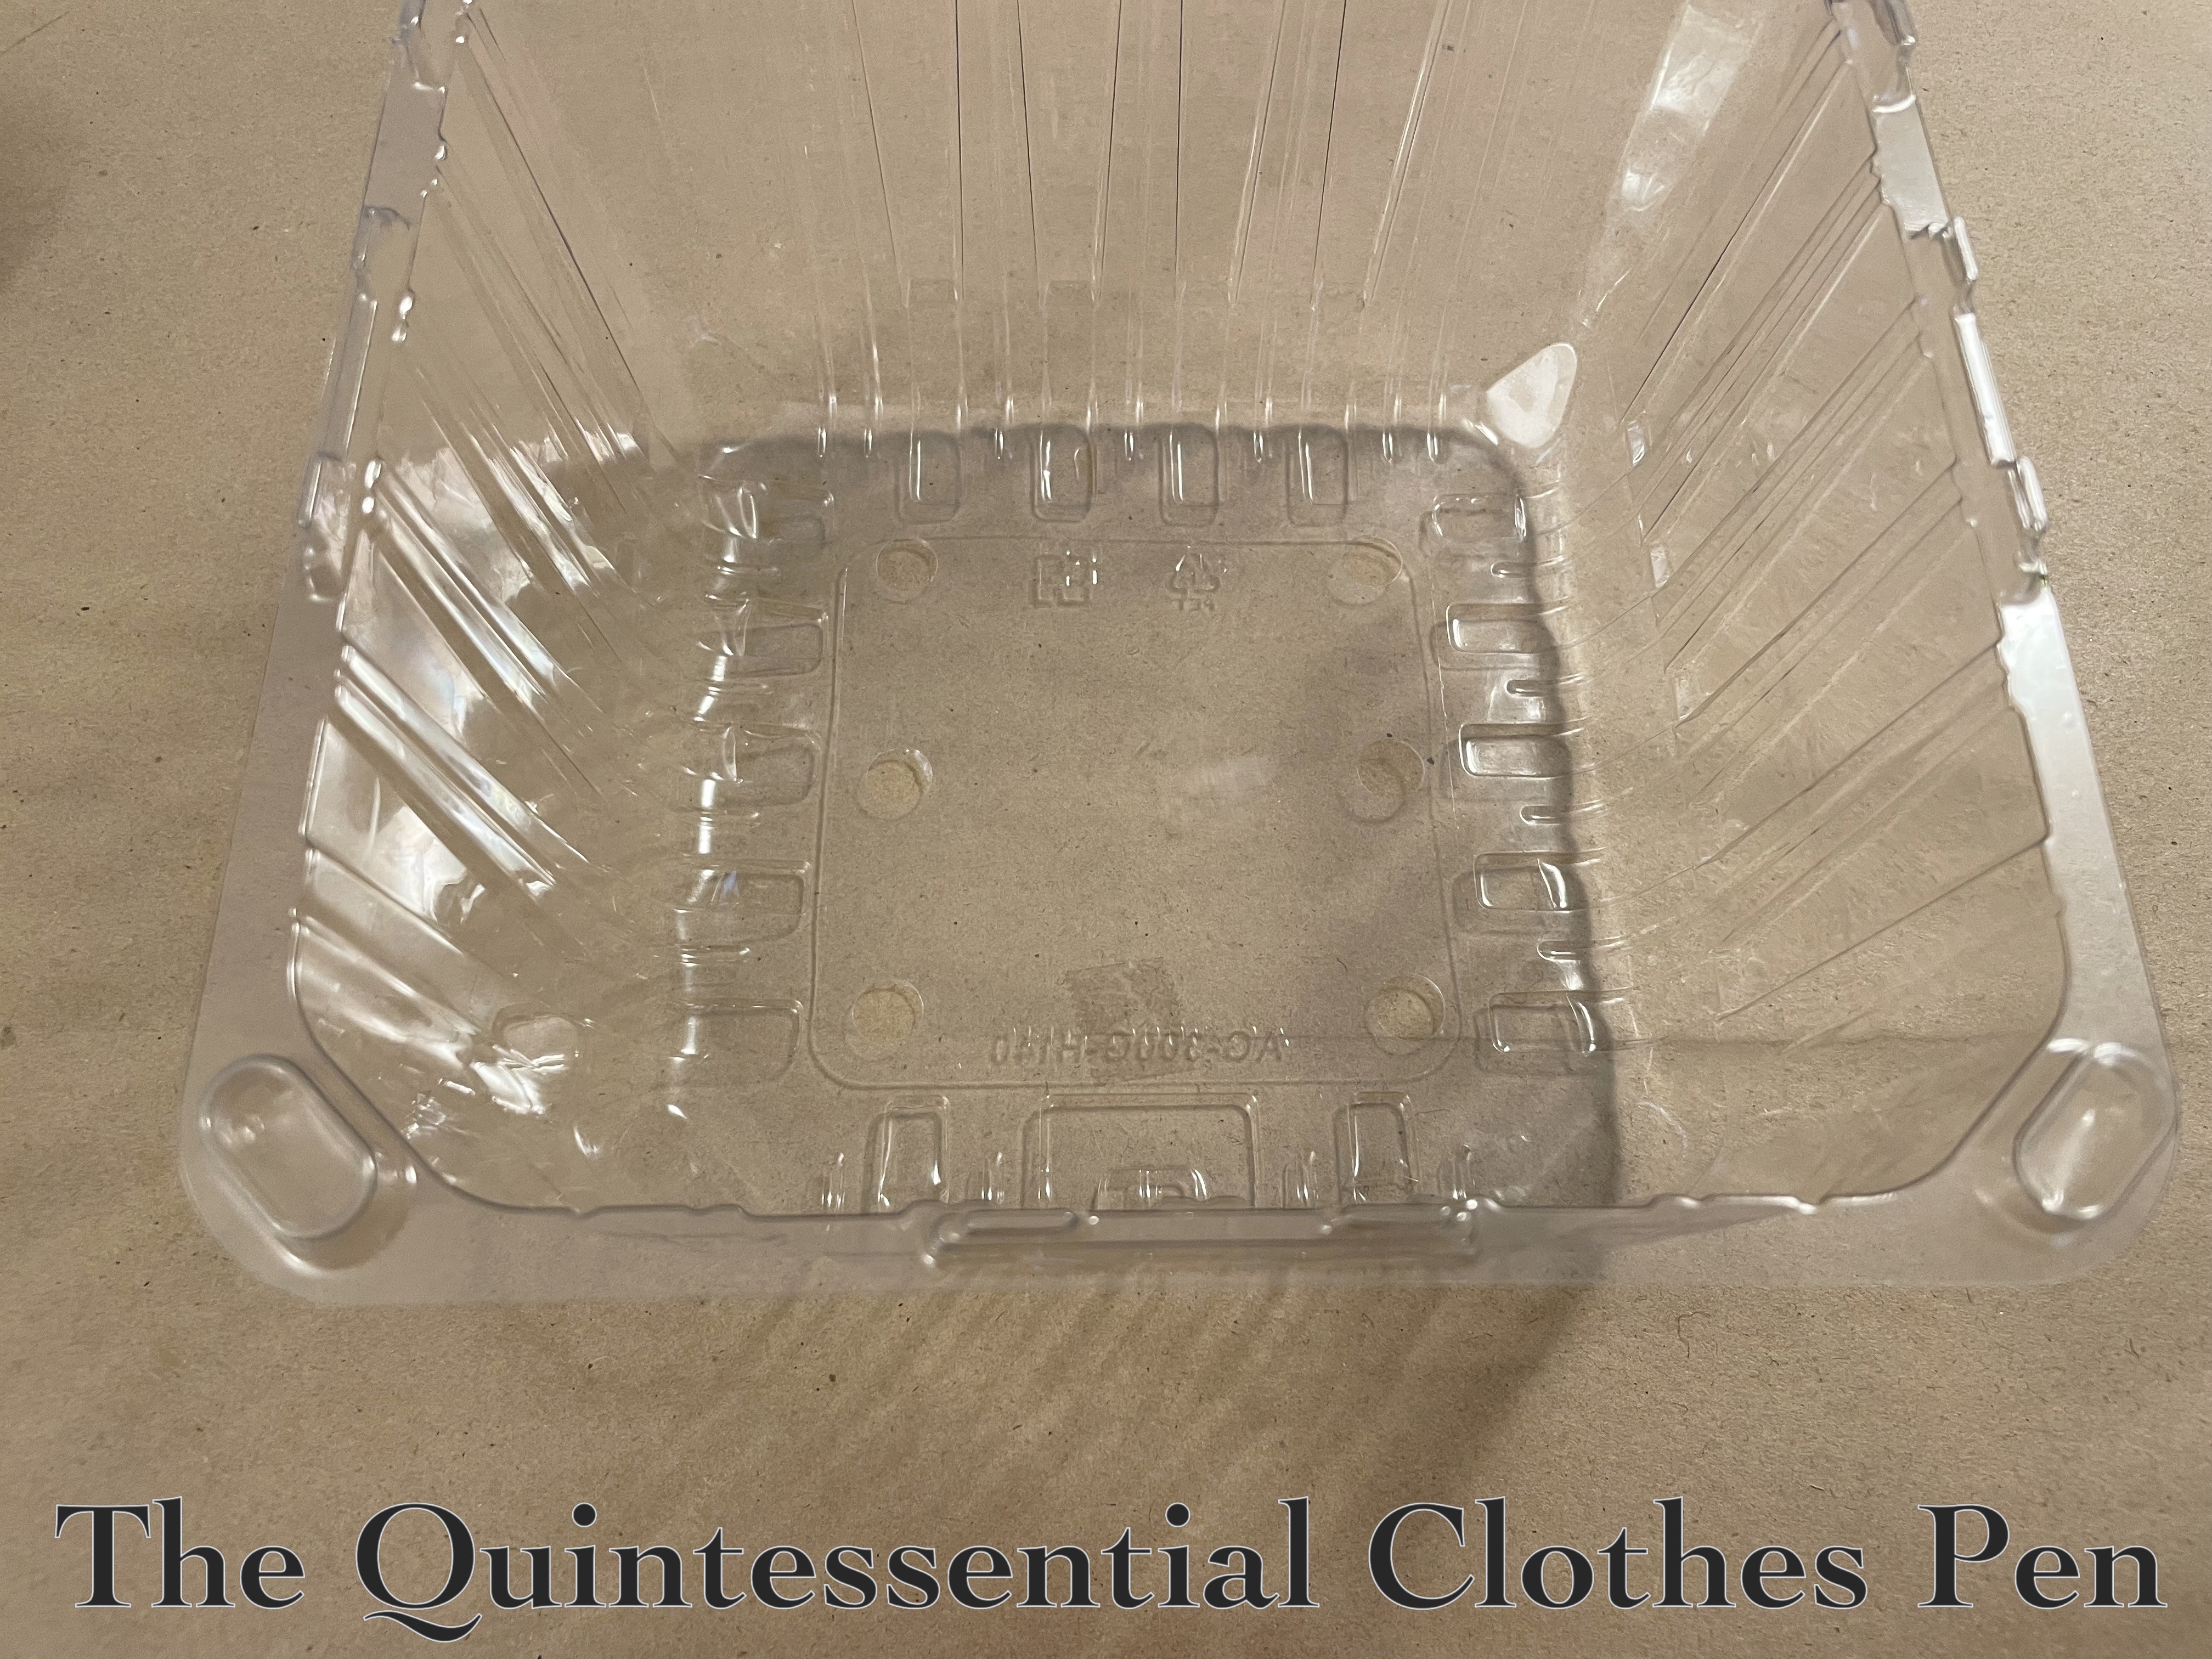
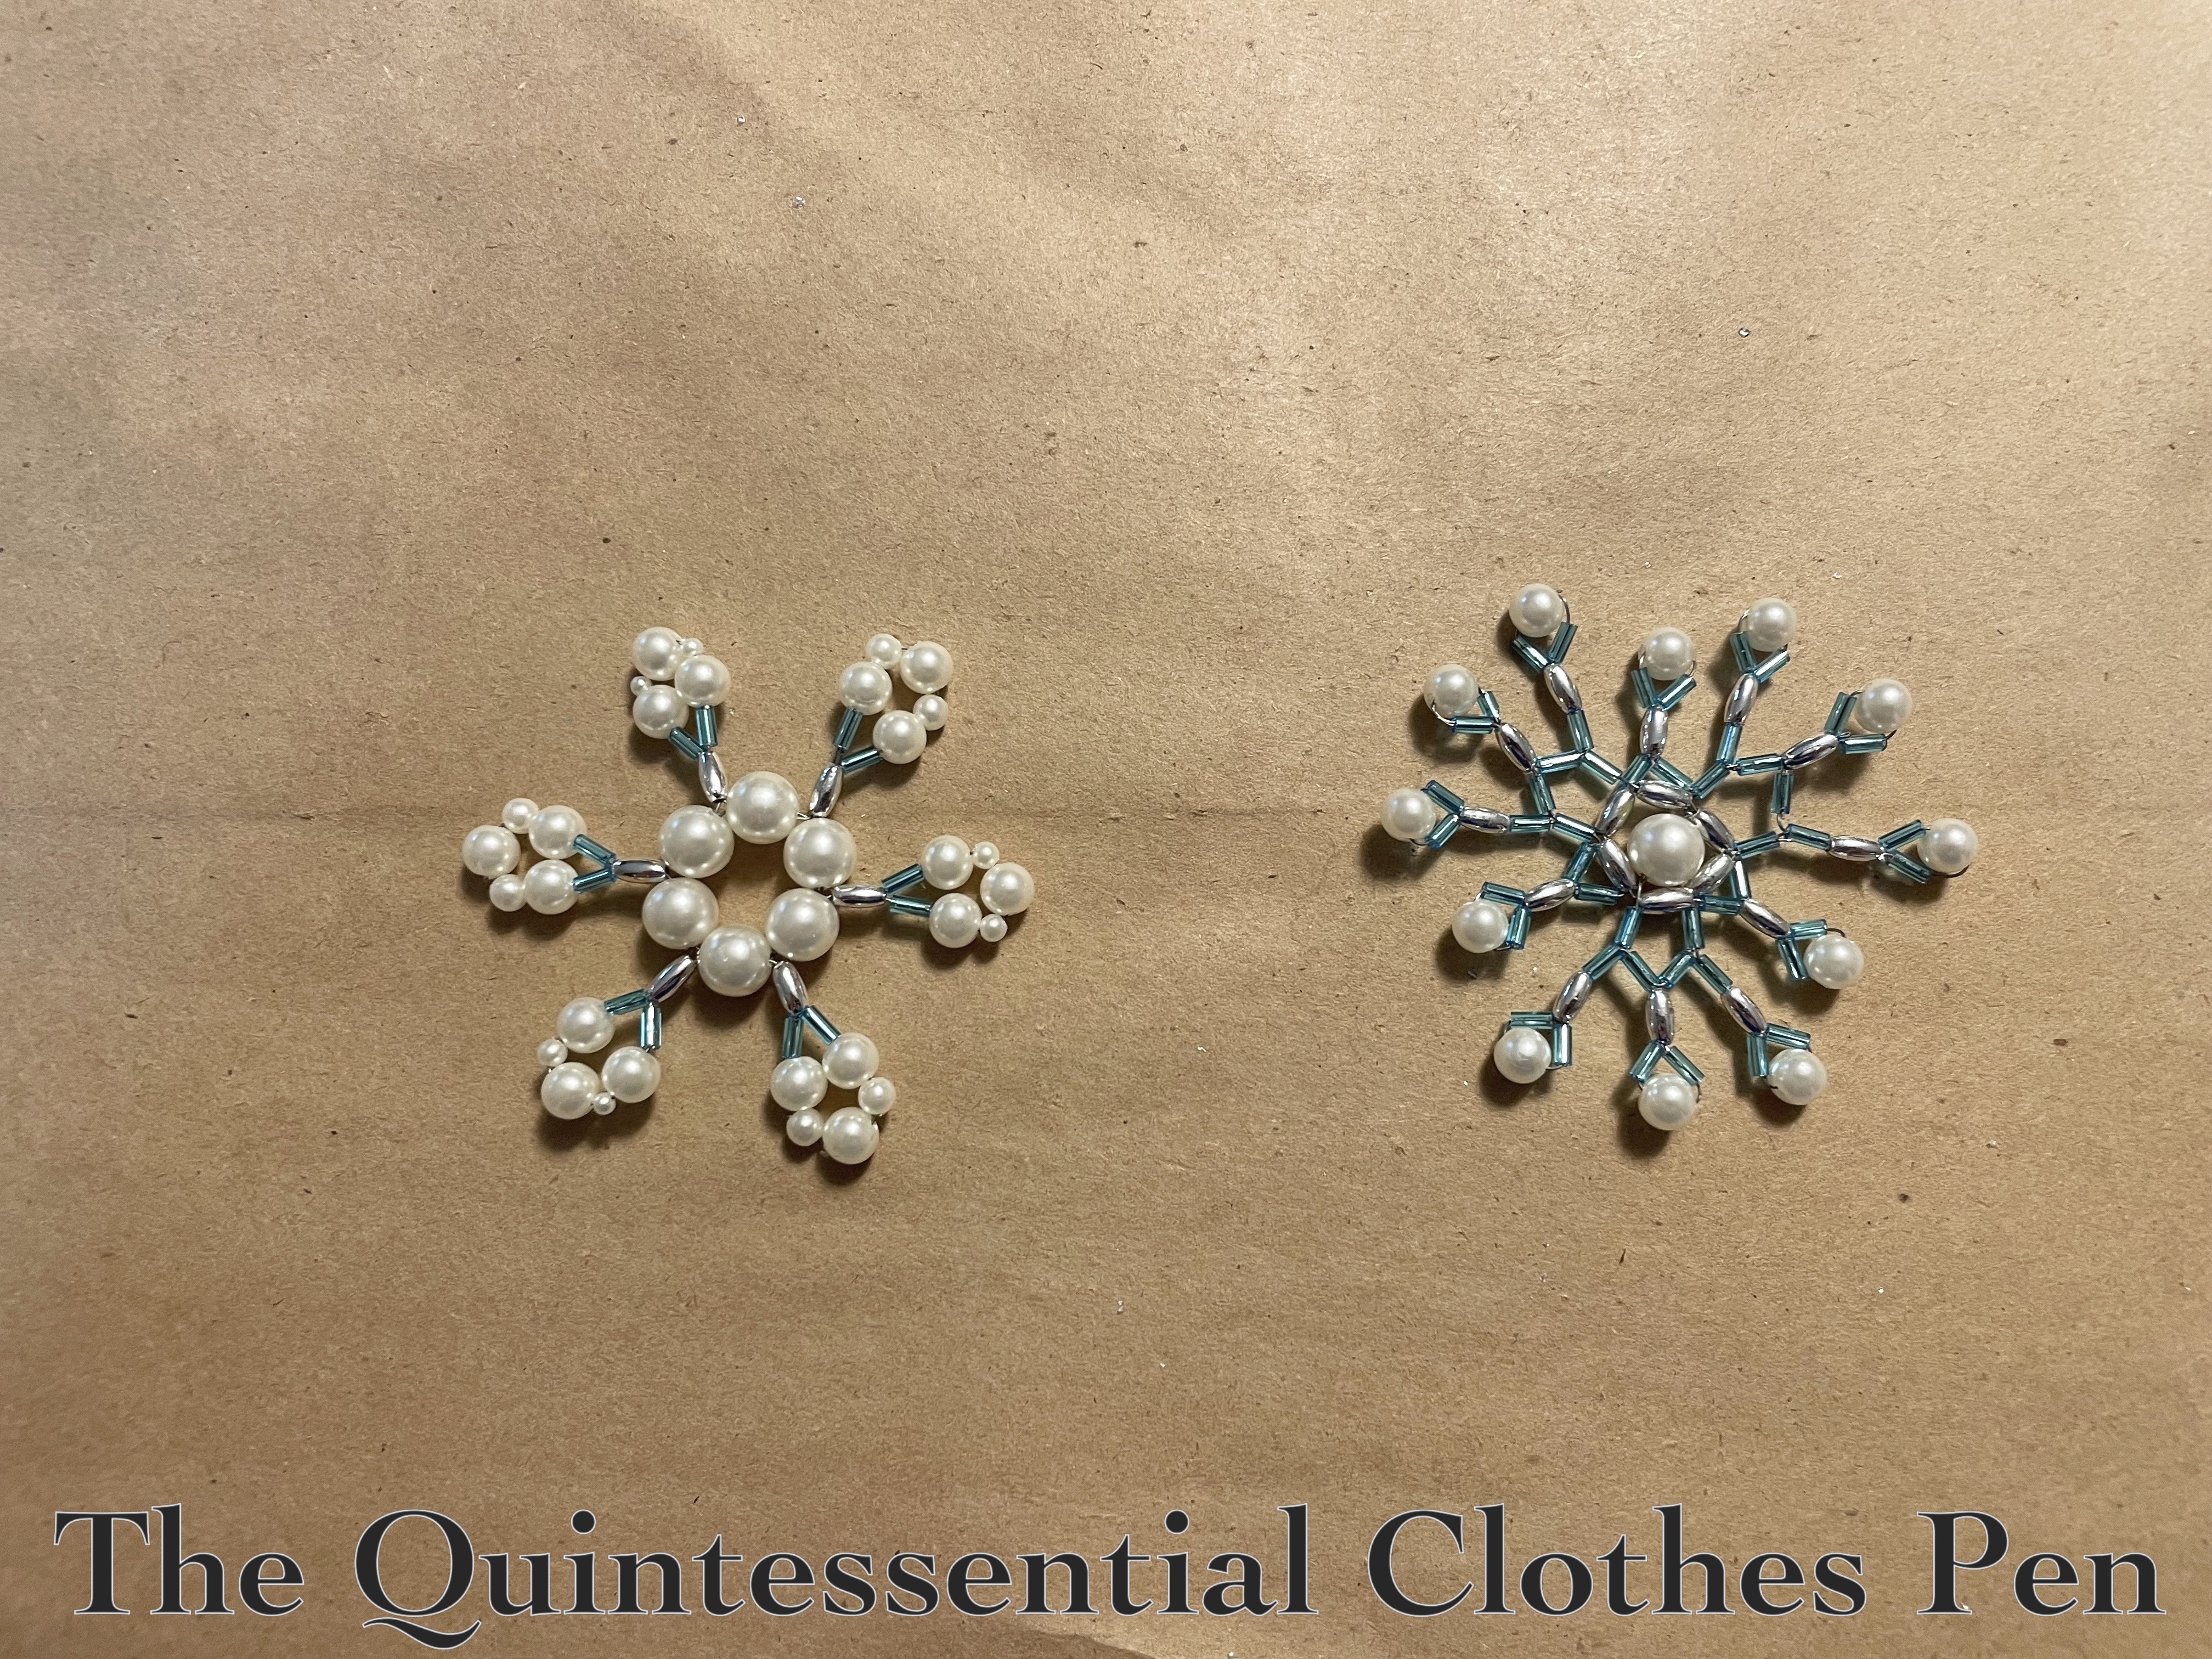
One of the essential accessories I wanted was an icicle crown! I’ve successfully made icicles using Worbla’s TranspArt product (a thermoplastic that can be heated, shaped, and then allowed to cool to become rigid), but I didn’t have any of this on hand. I wondered if I could use plastic grocery clamshells for a similar effect… and make use of my recycling in the process!

Spoiler: I was successful! But I don’t want to detract from Worbla’s products. They are much easier to use and more forgivable — easily flexing in all directions as well as easier to reshape and tweak. The clamshells only wanted to flex in a limited directions and were a bit fussy to tweak once I had the basic shapes made.

But this story is a transformation, from this:

To this:

Icicle Methods

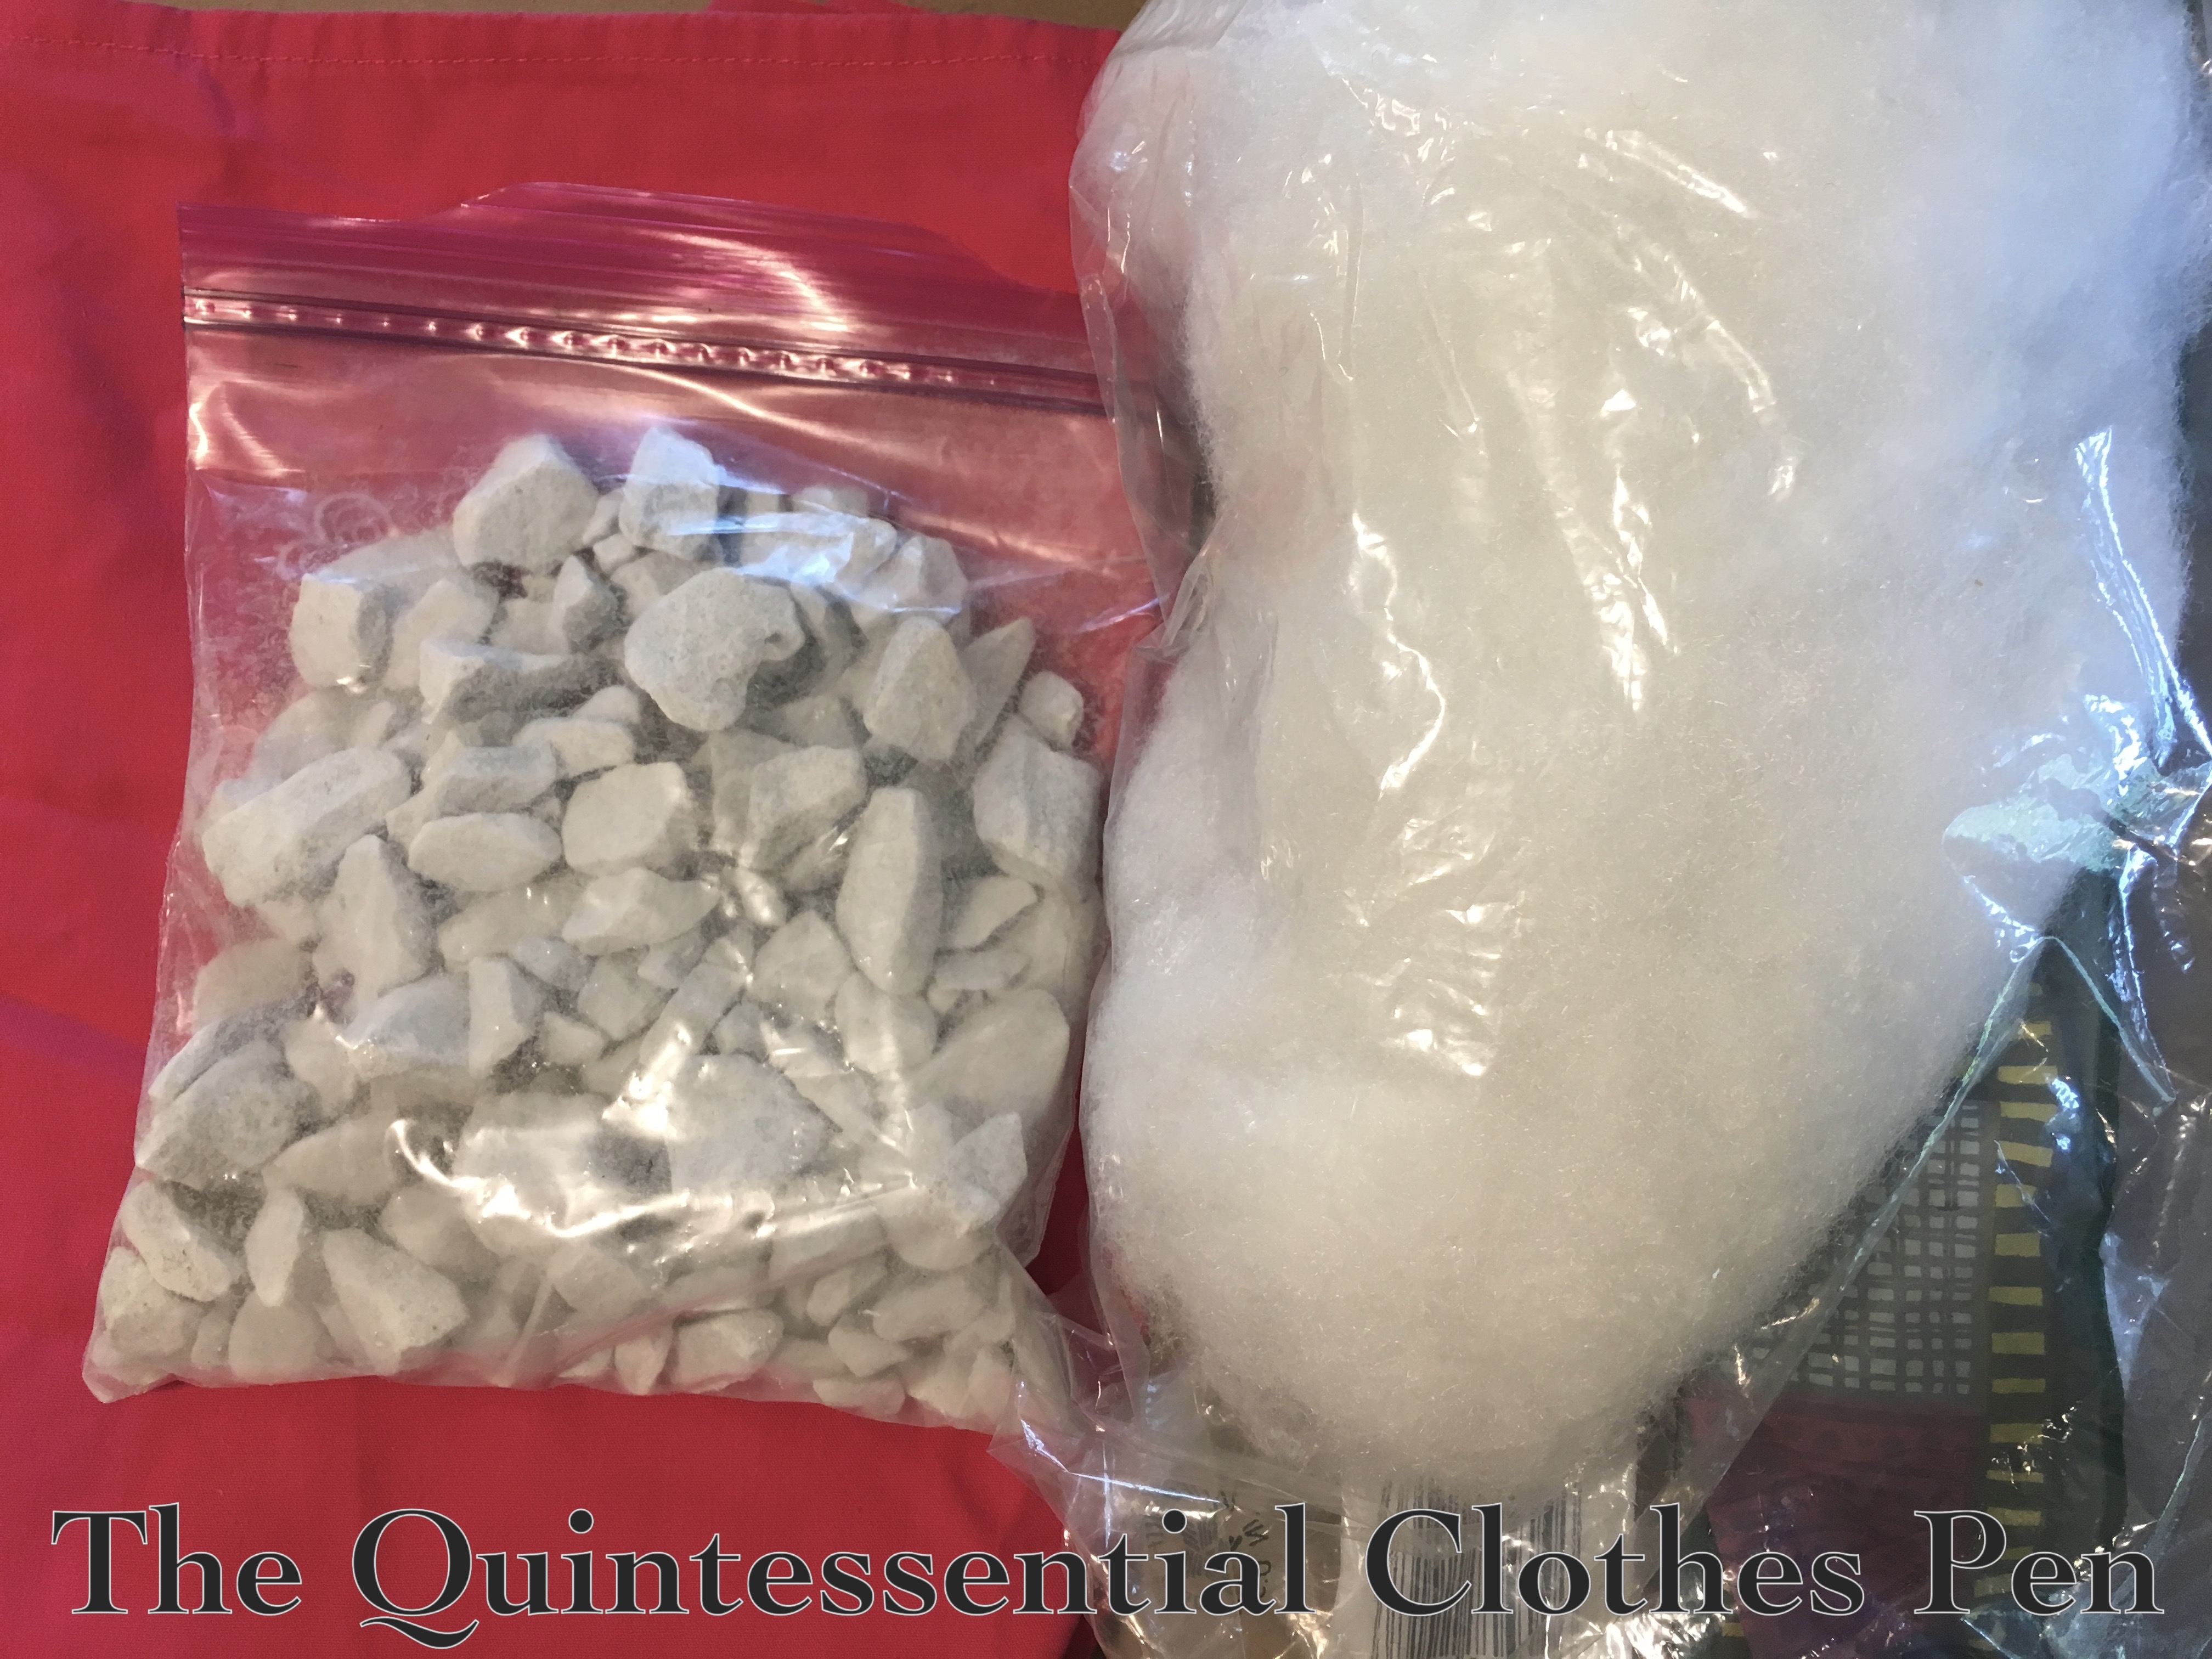
Once I had this idea, I spent a month or so saving plastic produce clamshell packaging from my everyday groceries: stone fruit, tomatoes, grapes, etc. If they had too many labels or not many mostly flat spaces they didn’t make the cut. But even with these guidelines, I accumulated quite a number of packages I could use for this project.

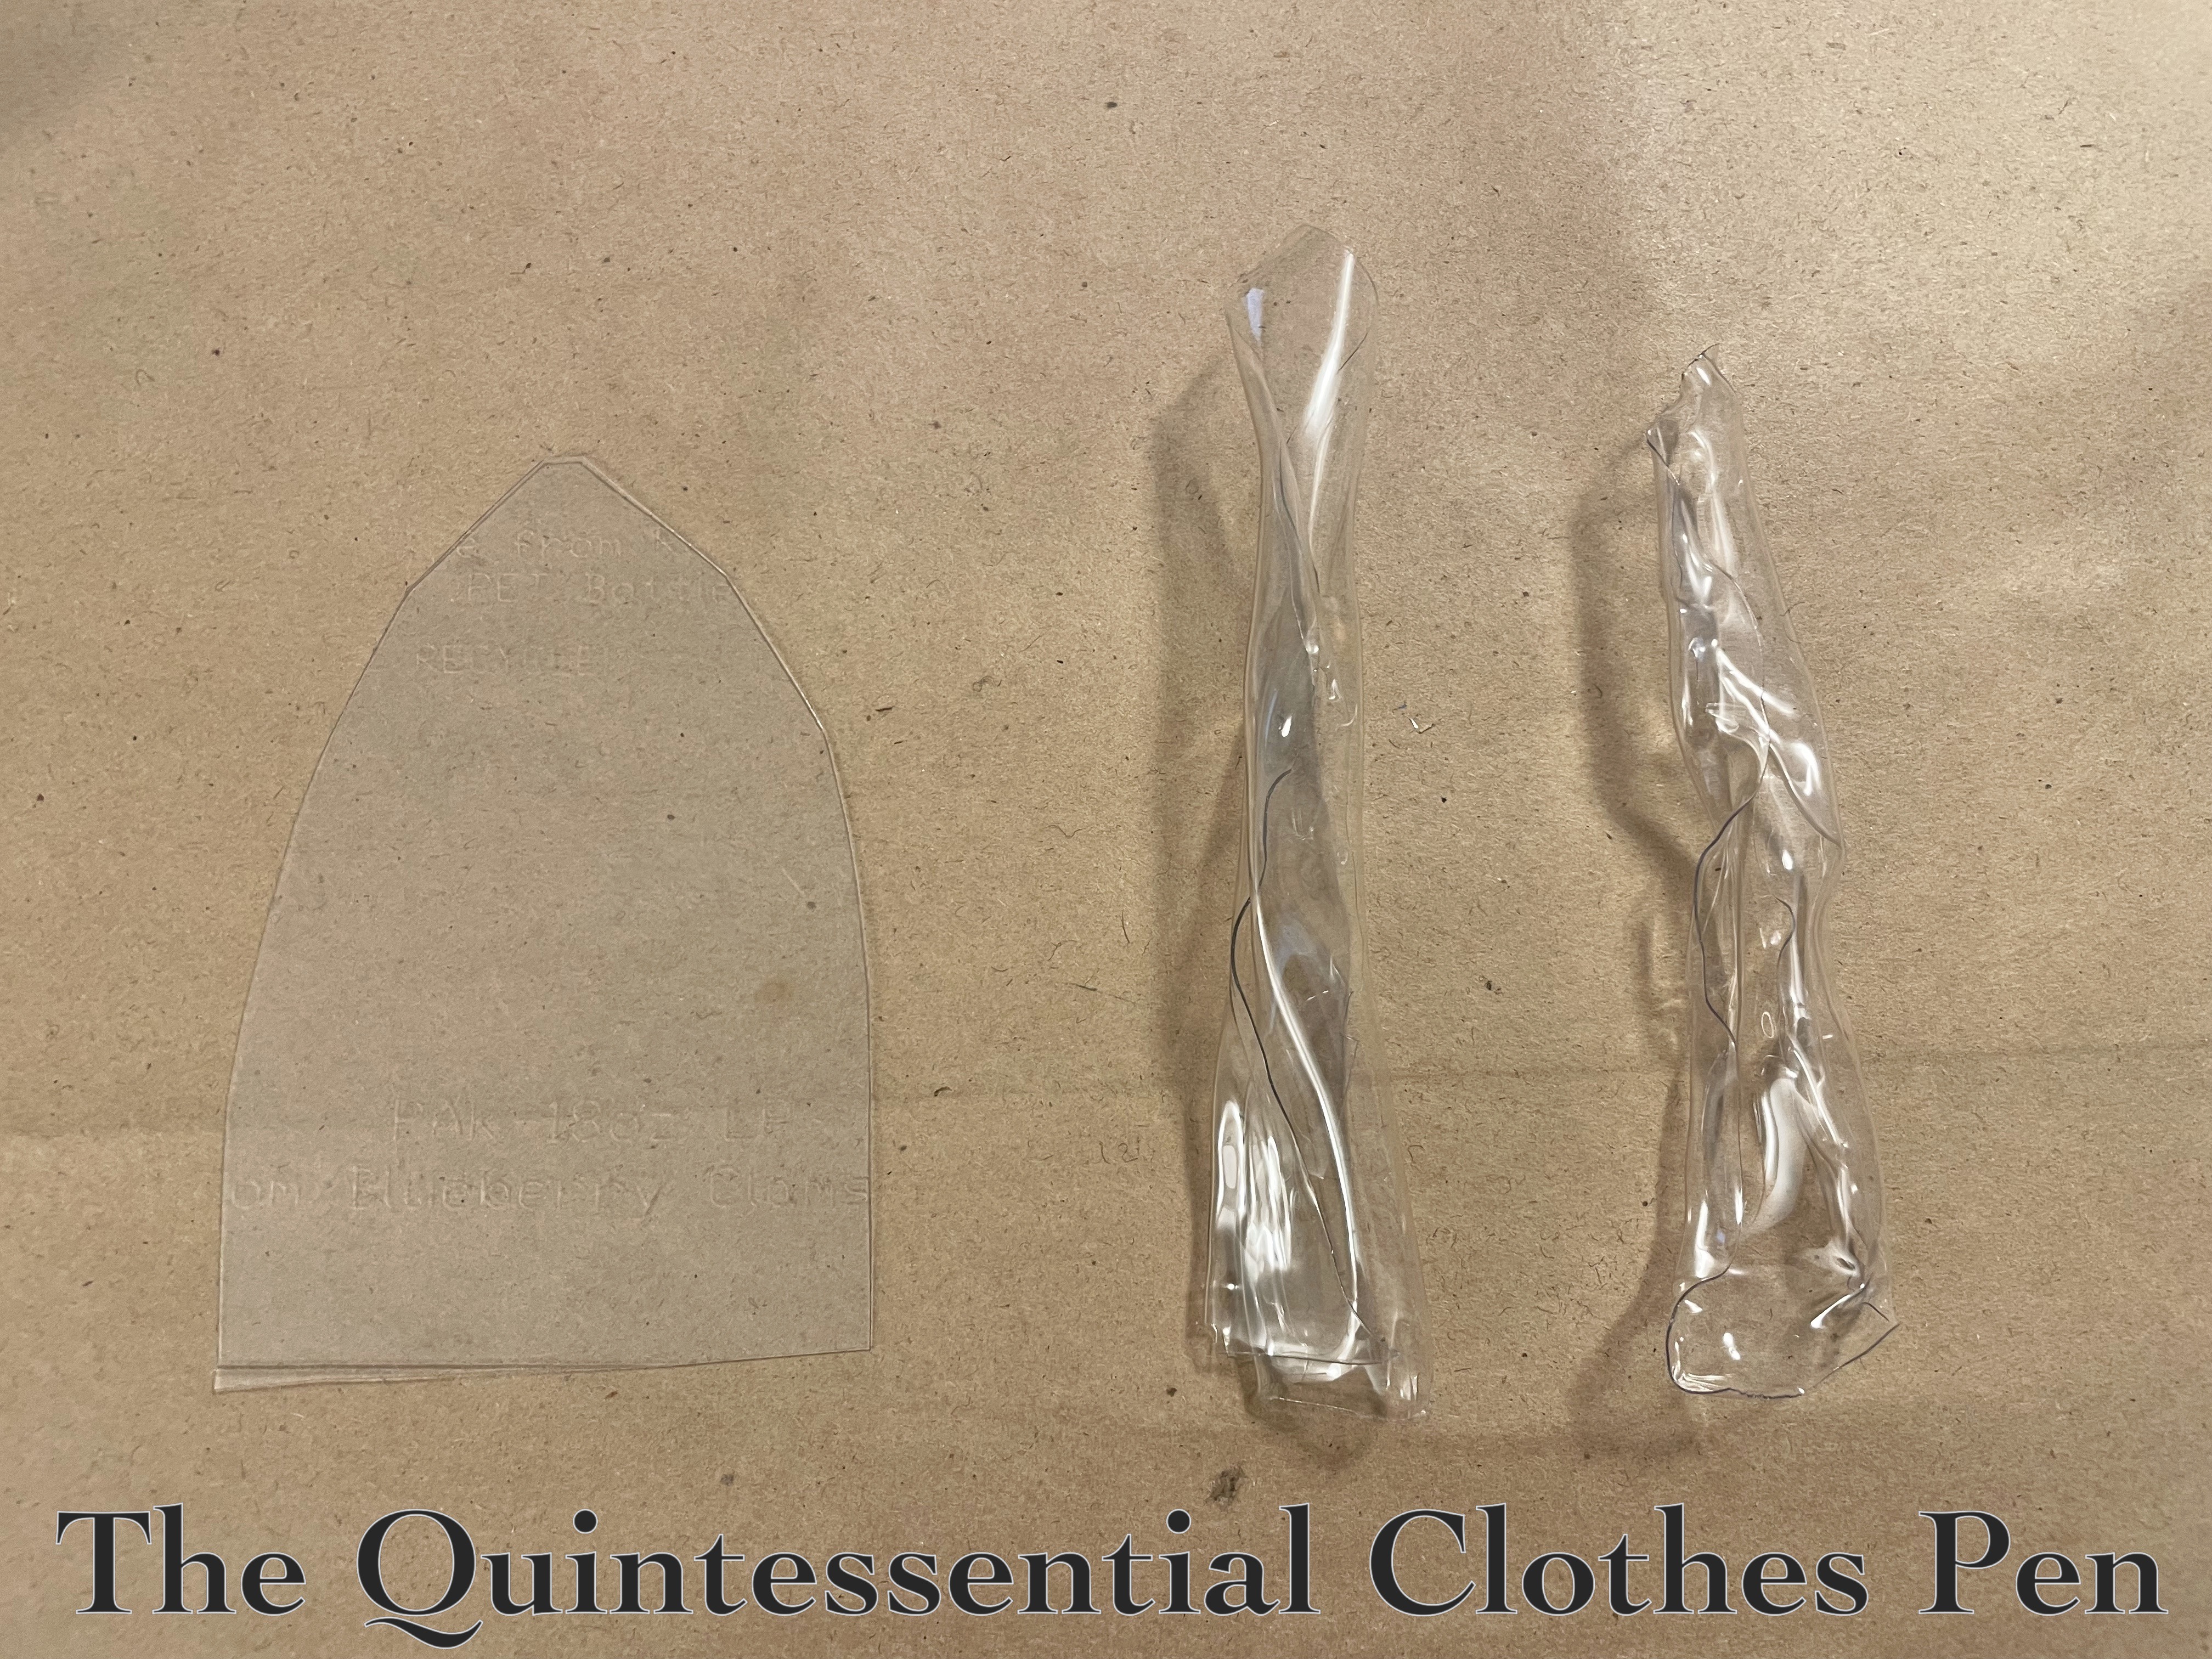
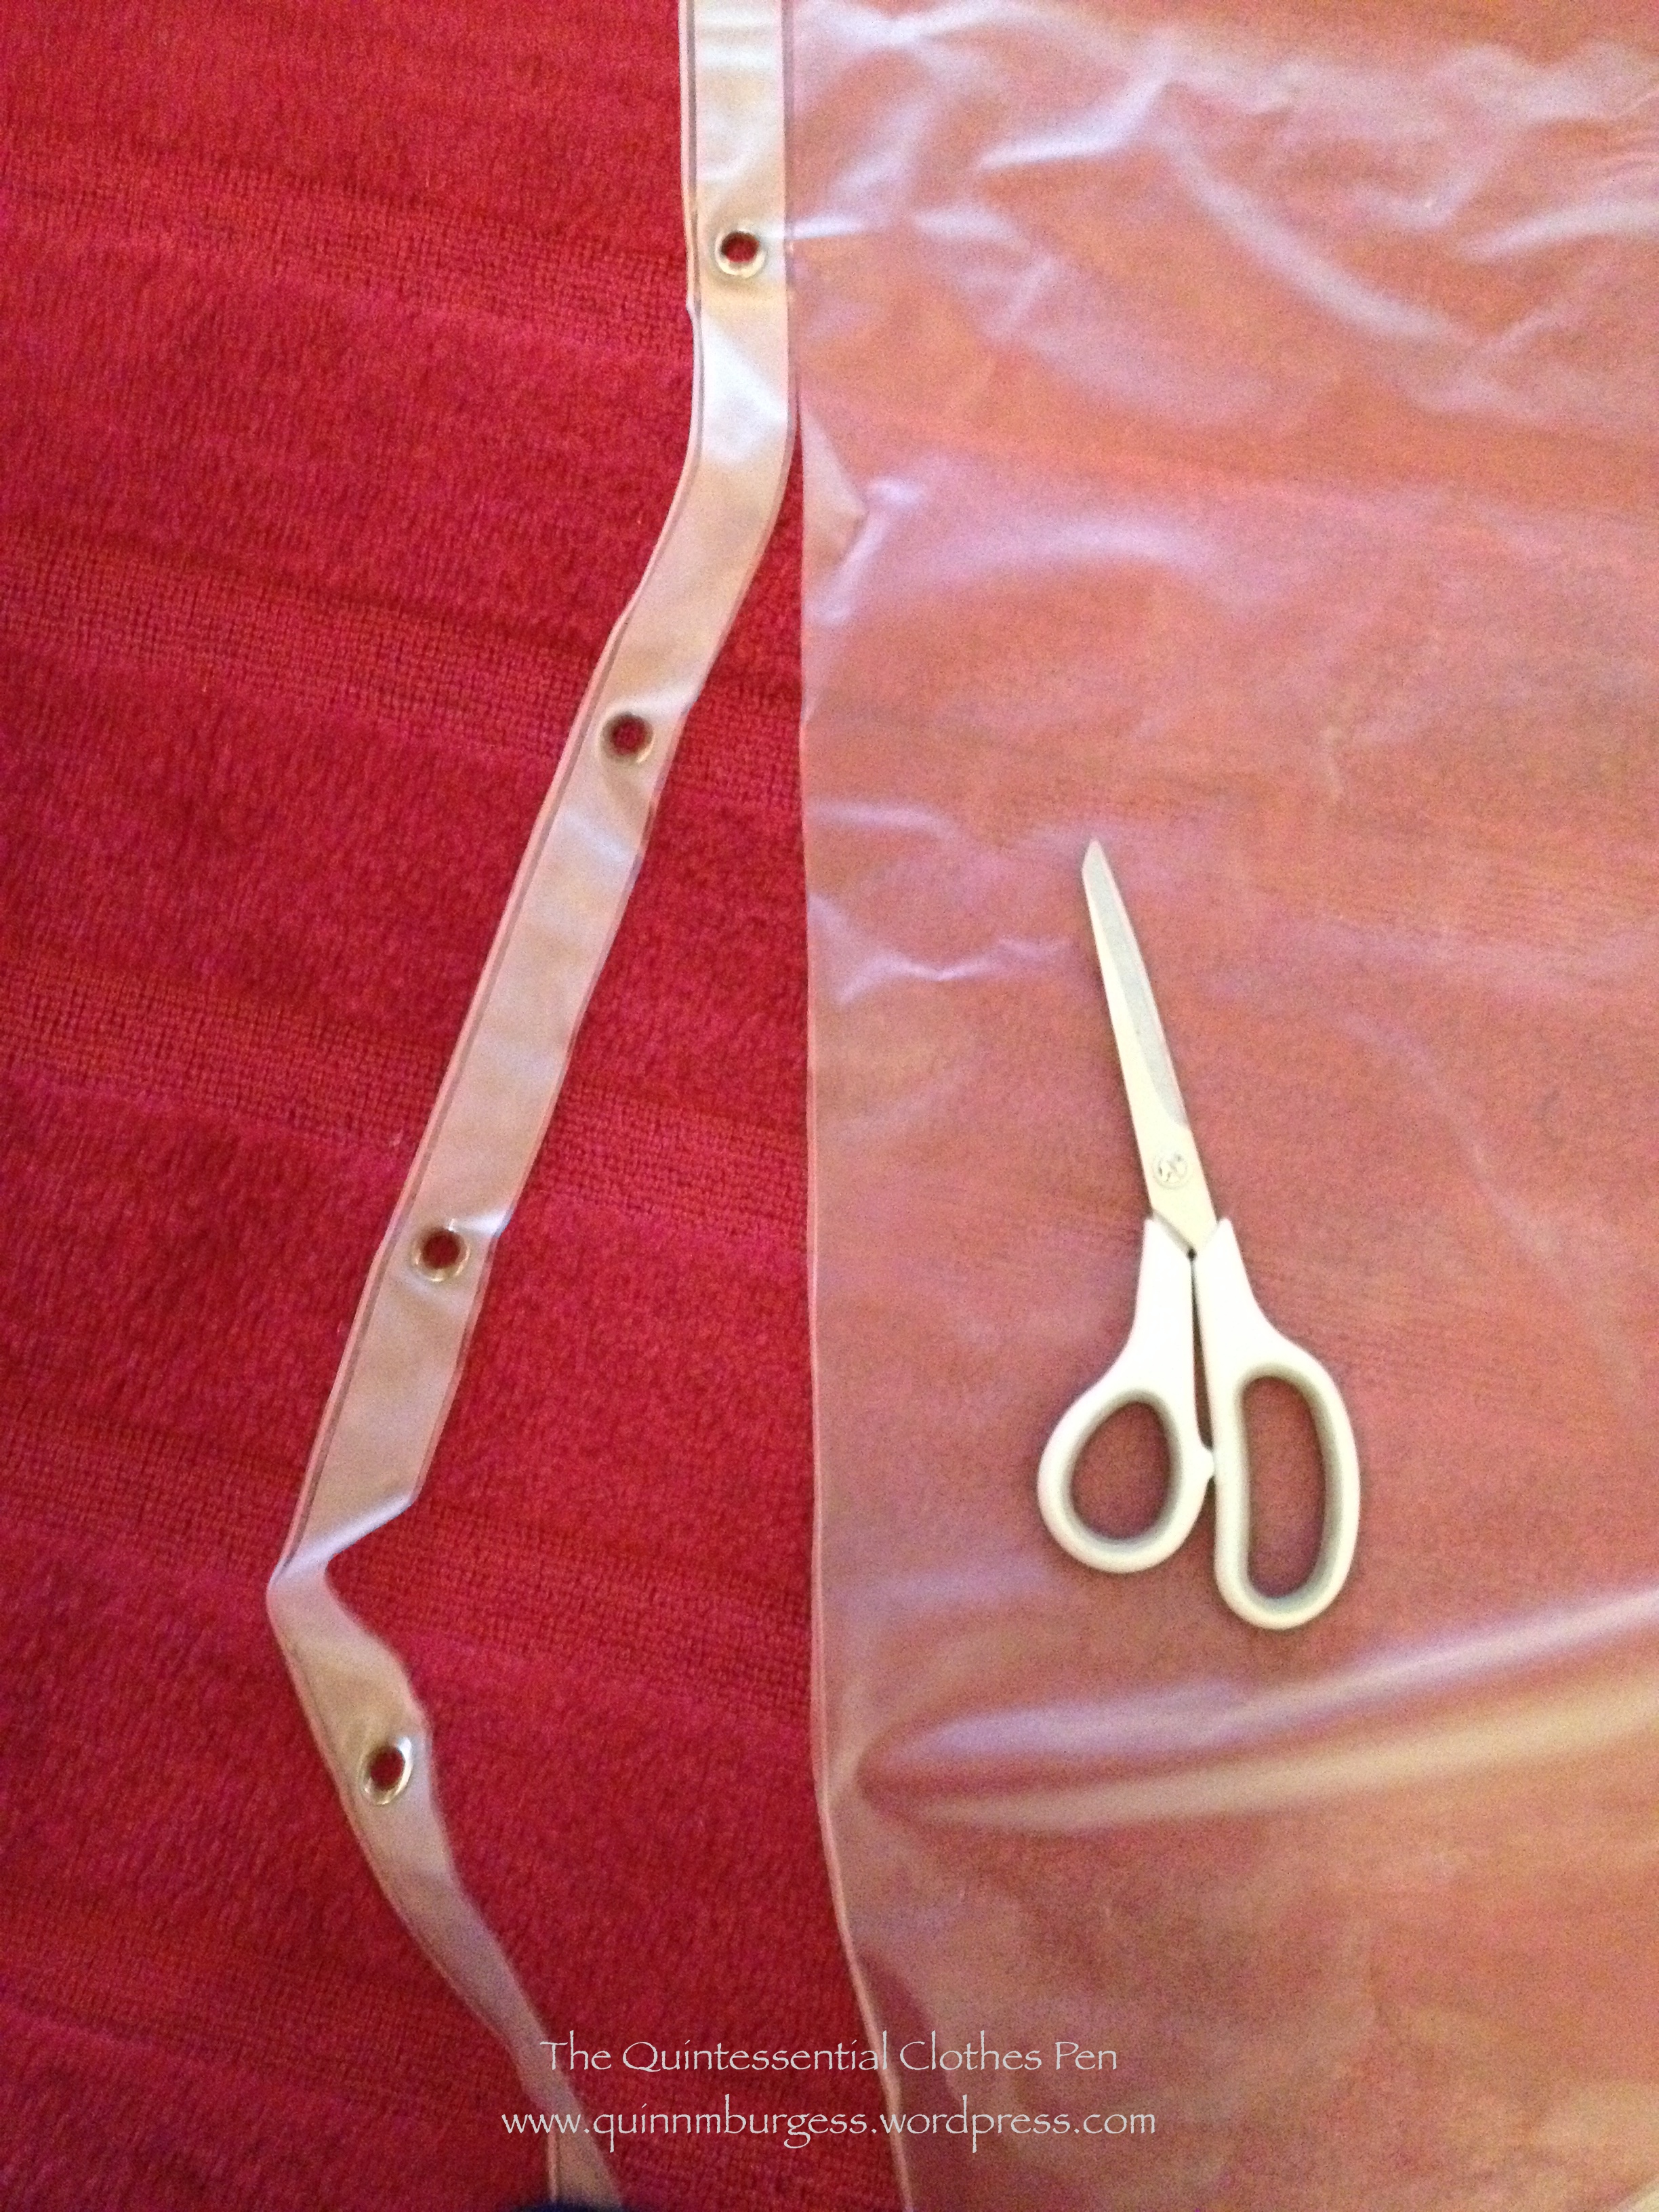
I started by cutting rough rounded triangles out of the clamshells I collected. The first two I tried using an area that was all plastic and one that had a label on it, just to see how they would behave and what they would look like.

I started by heating the plastic with a hair dryer (outside, for ventilation, and on a sturdy scrap piece of plywood that wouldn’t melt). The hair dryer was not powerful enough to warp the plastic, so I next tried a heat gun. I used an oven mitt to protect the hand holding the plastic. I found that medium heat from the heat gun worked well! My first two samples are below.

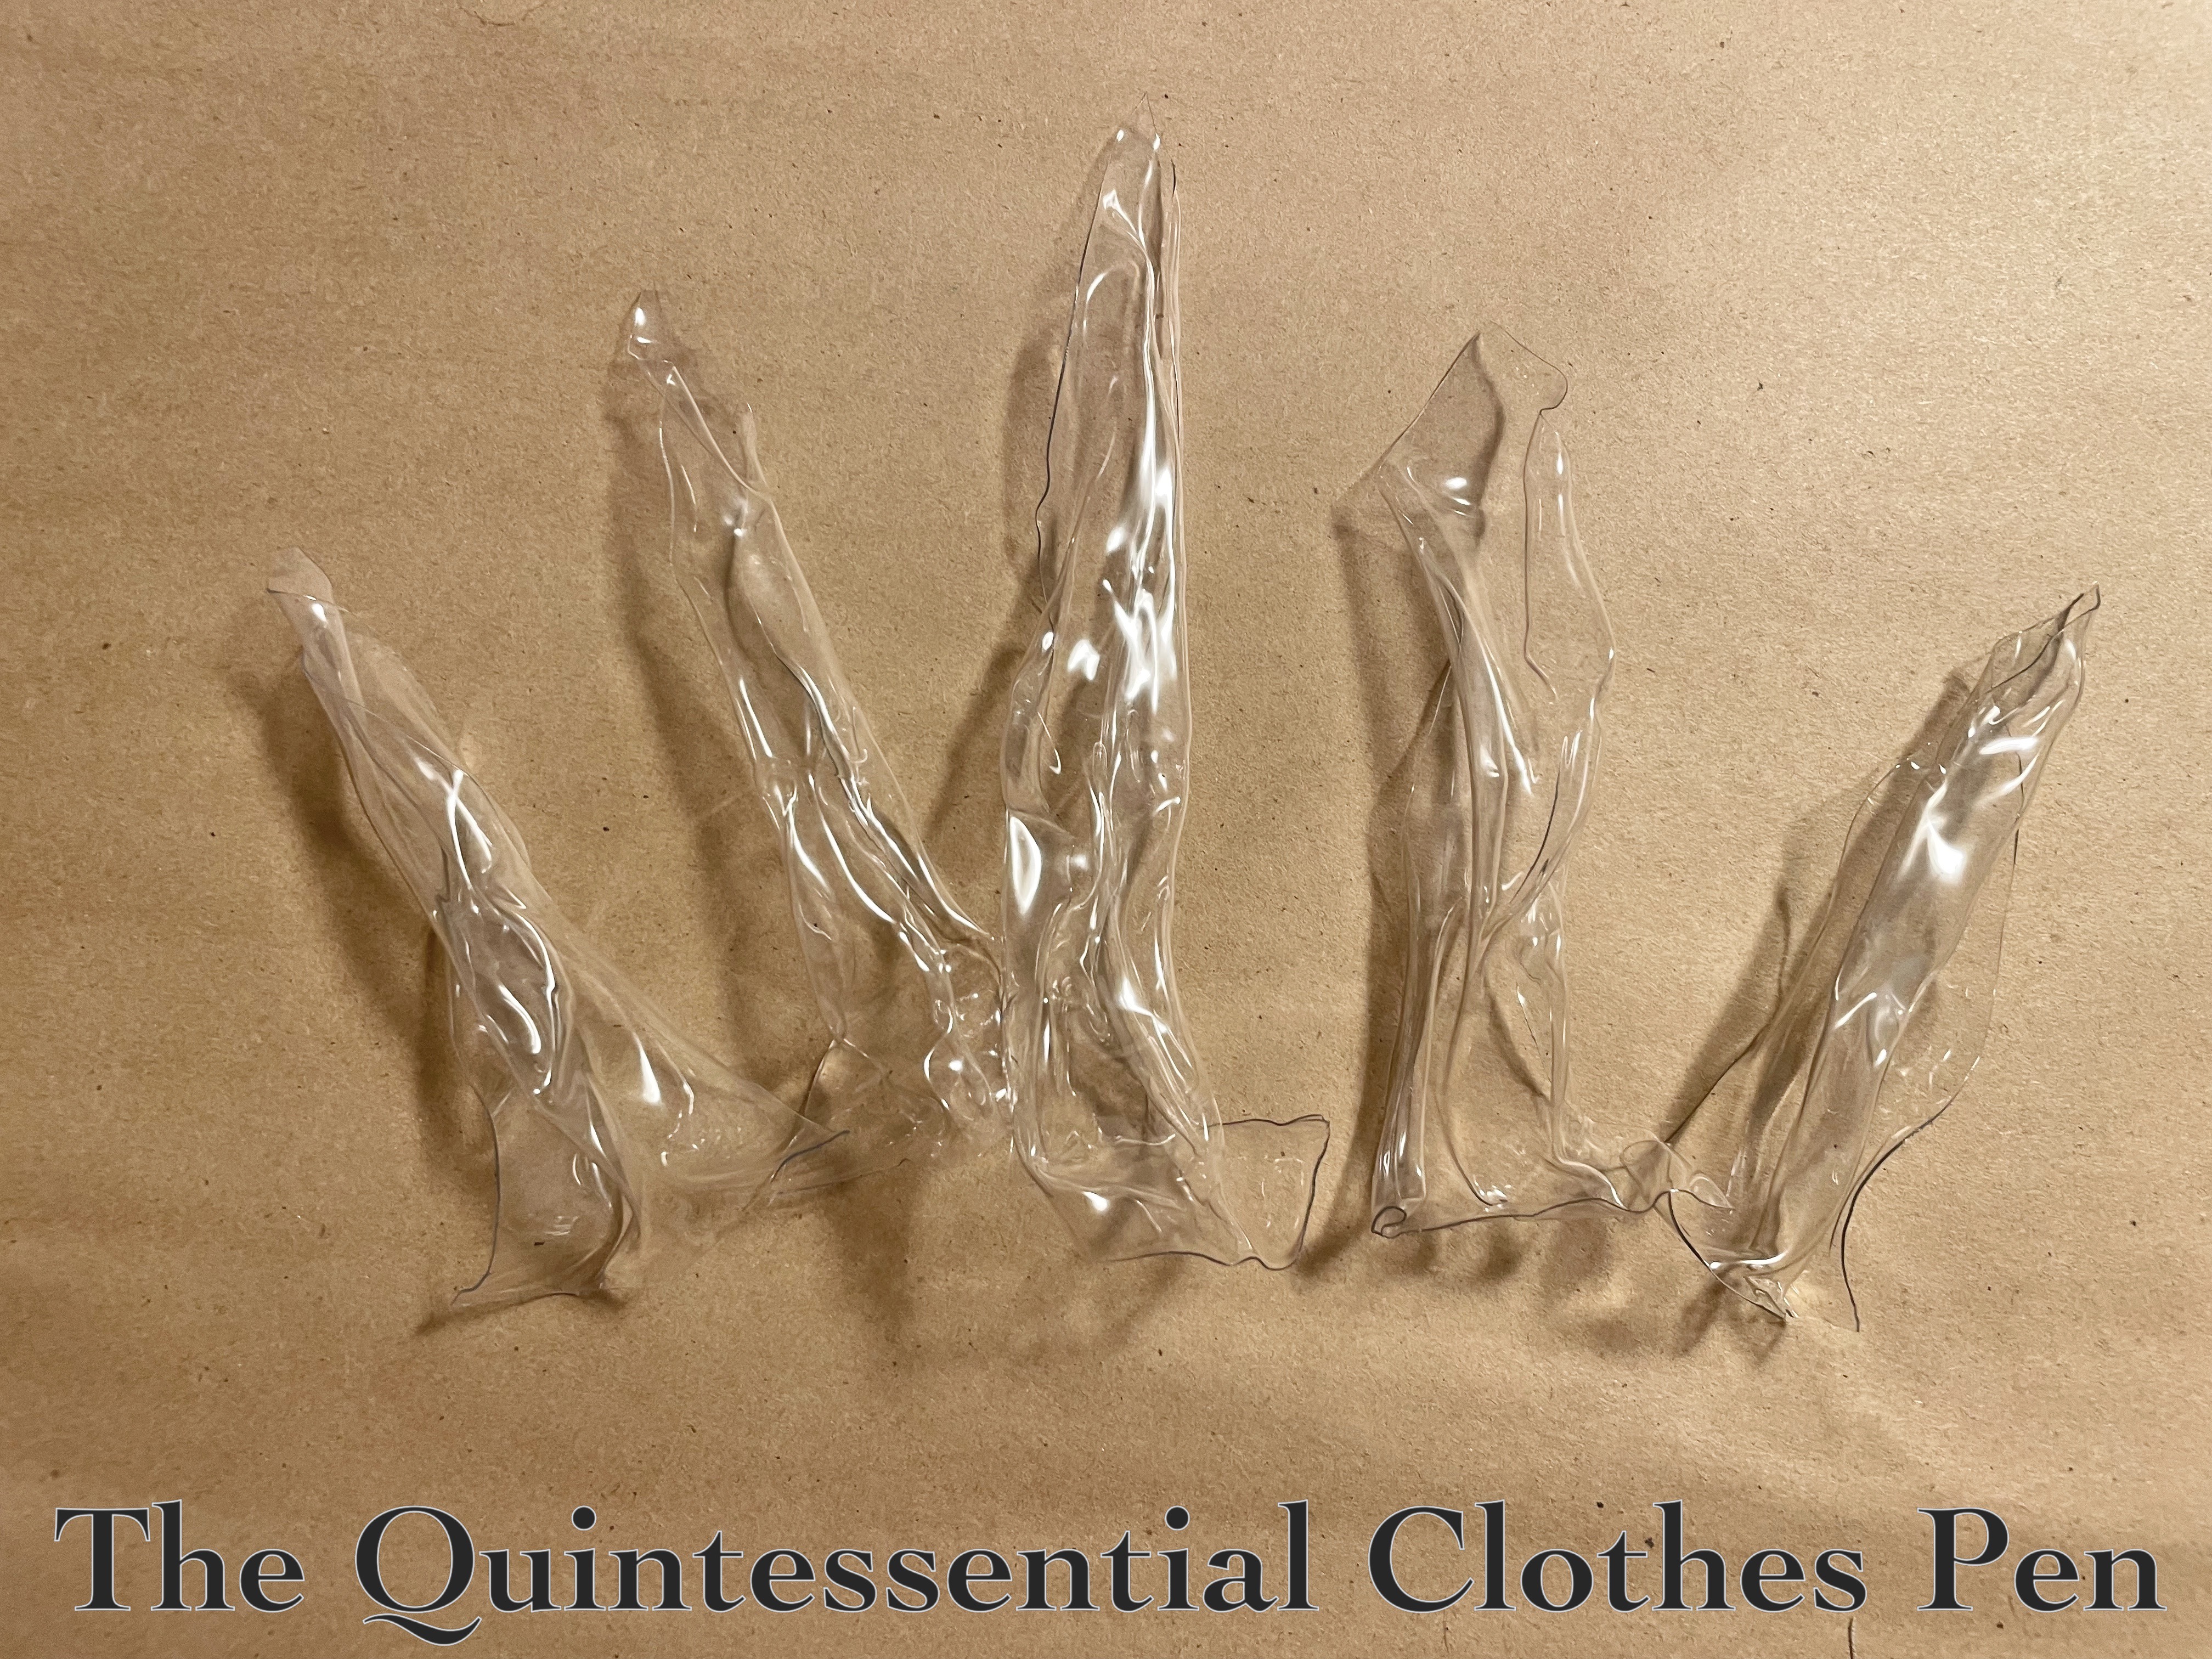
The one with the label looked not like an icicle and didn’t really want to shape well, so I ruled out that idea. But the all plastic one actually worked pretty well! After asking what I was up to, Mr. Q was not impressed and thought that this idea would not work… But I carried on. I cut more rough triangles in a few different lengths and shaped them with my heat gun. The flat shape and twisted icicles are pictured below.

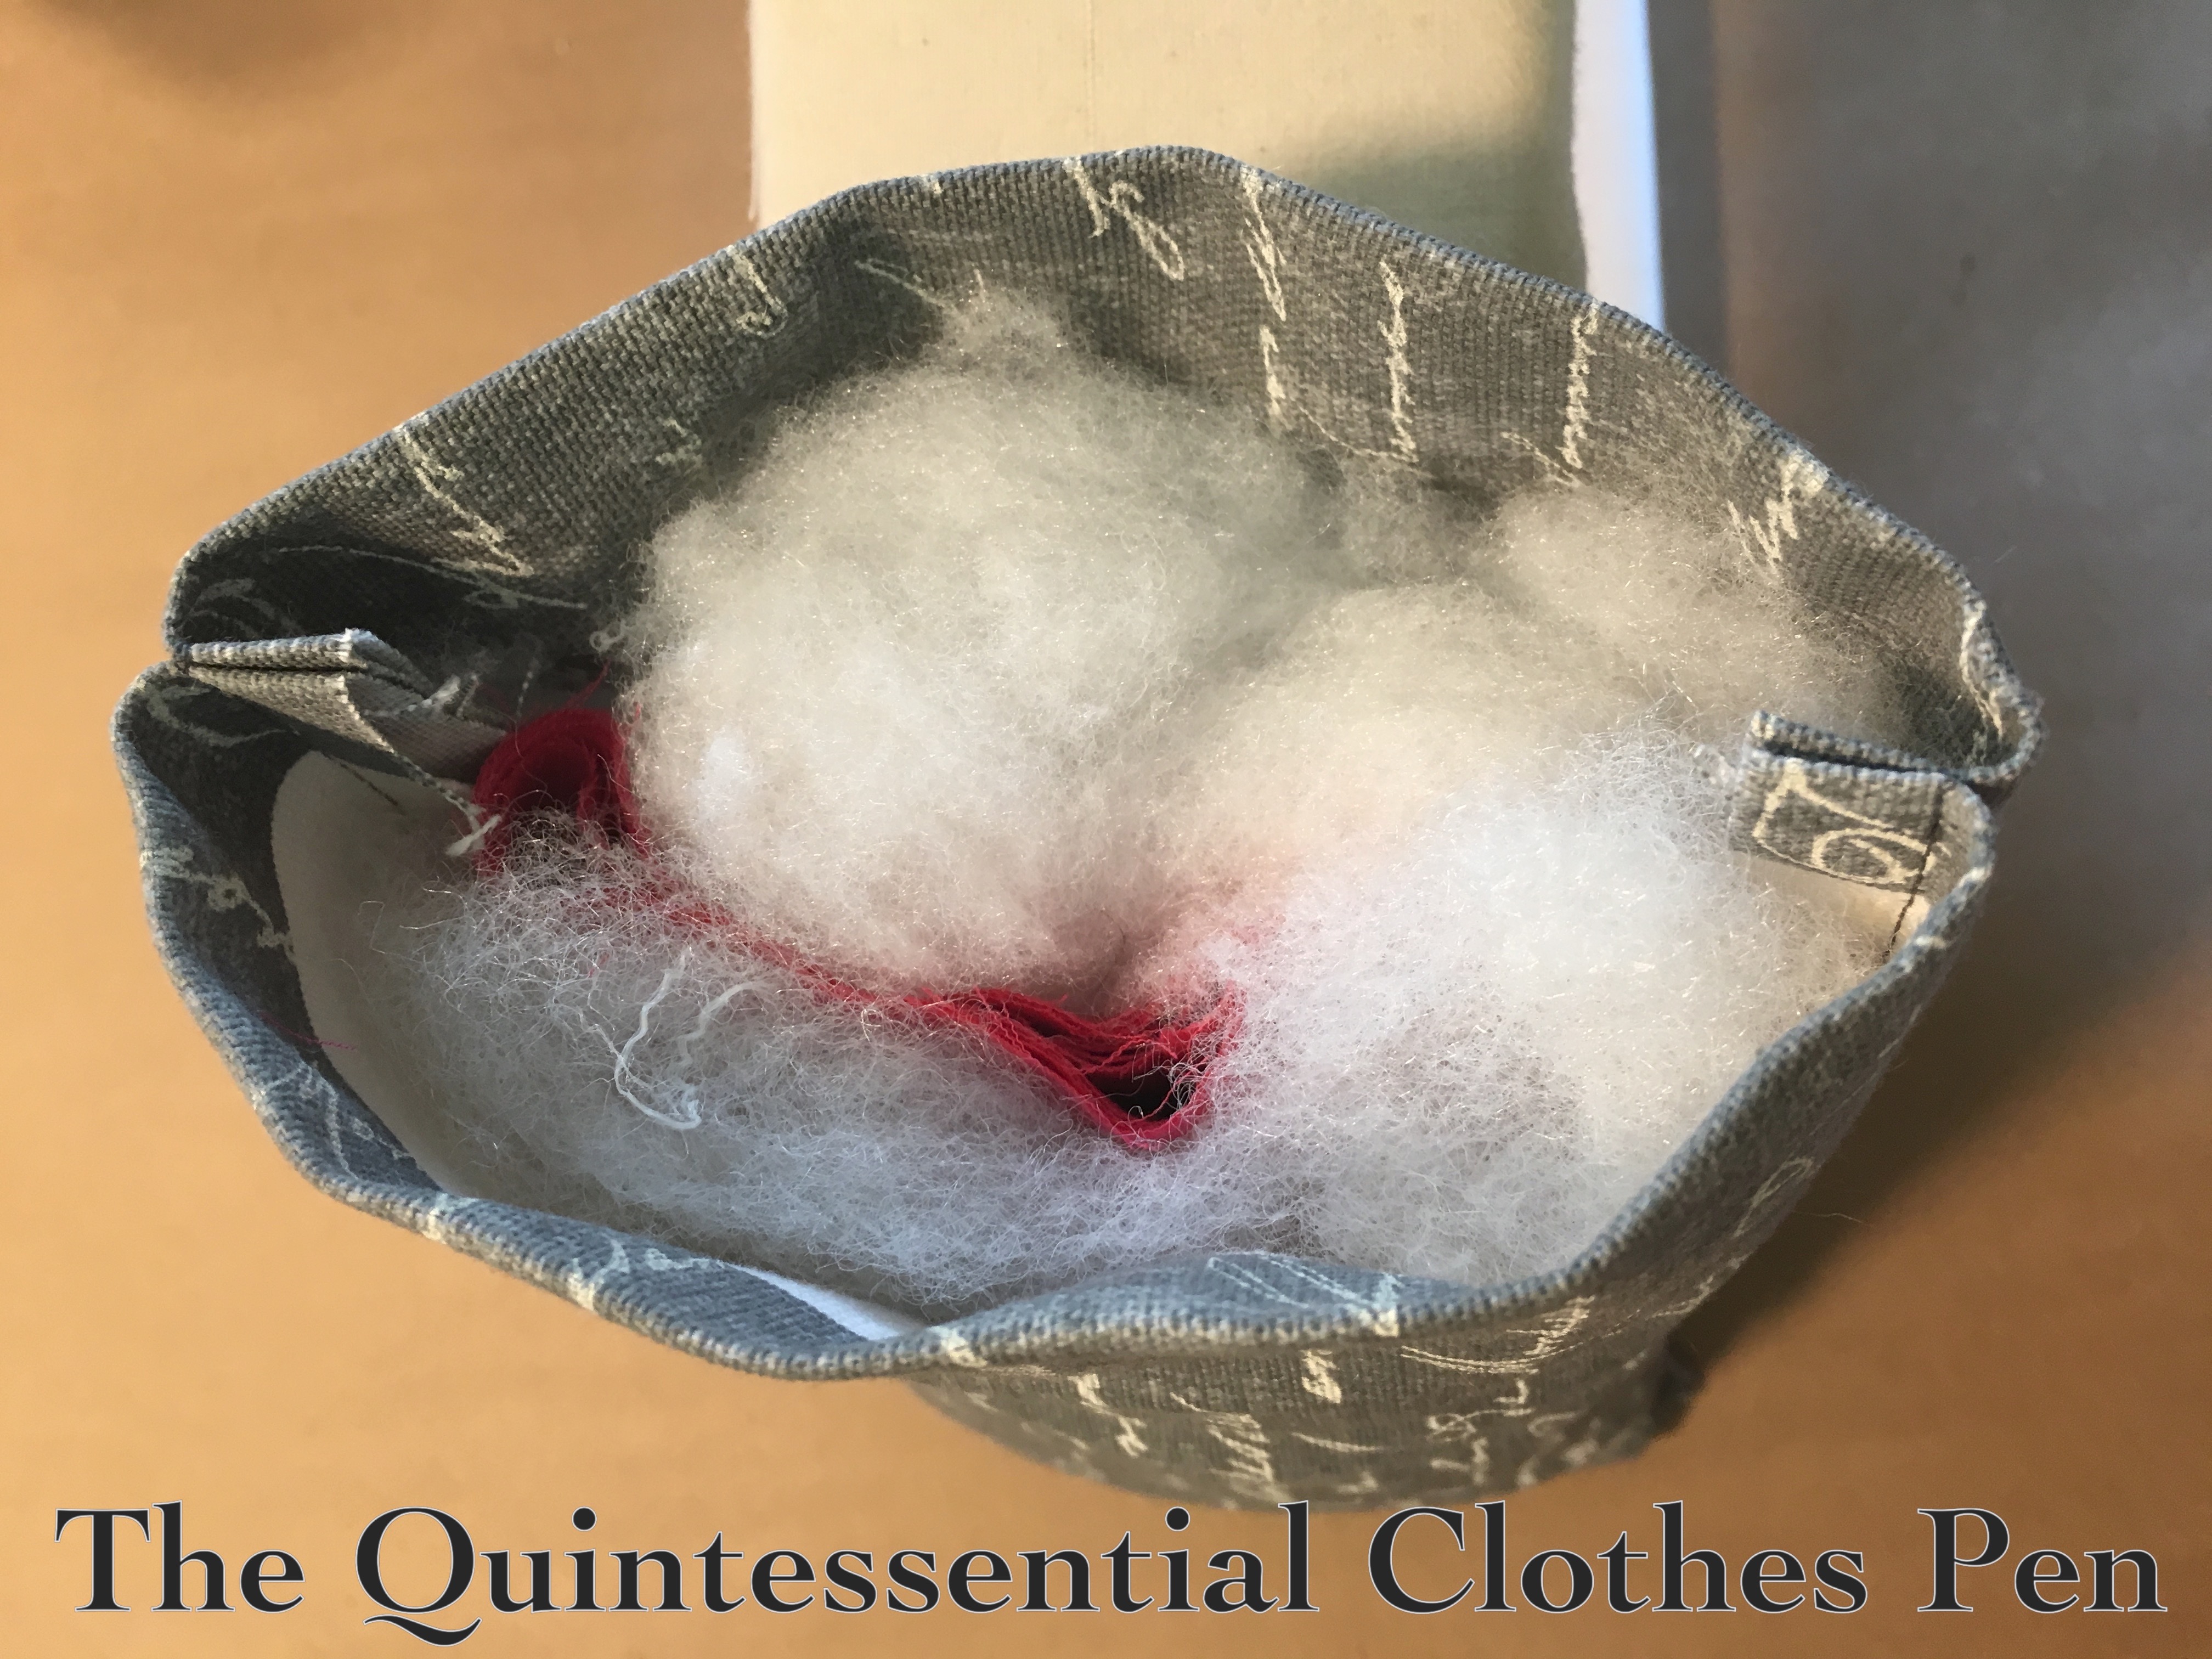
I decided I wanted five of them — a tall one in the center and slightly shorter ones to either side. I picked the best out of the 8 or so that I made and arranged them. That led me to go back and adjust a few to get better shapes. It was no problem to shape them with scissors or reheat them to change the shapes. I also softened the bottom of the chosen 5 icicles to flatten them out a bit to provide a way to have them stand up and attach to a base, as you can see below.

Crown Base

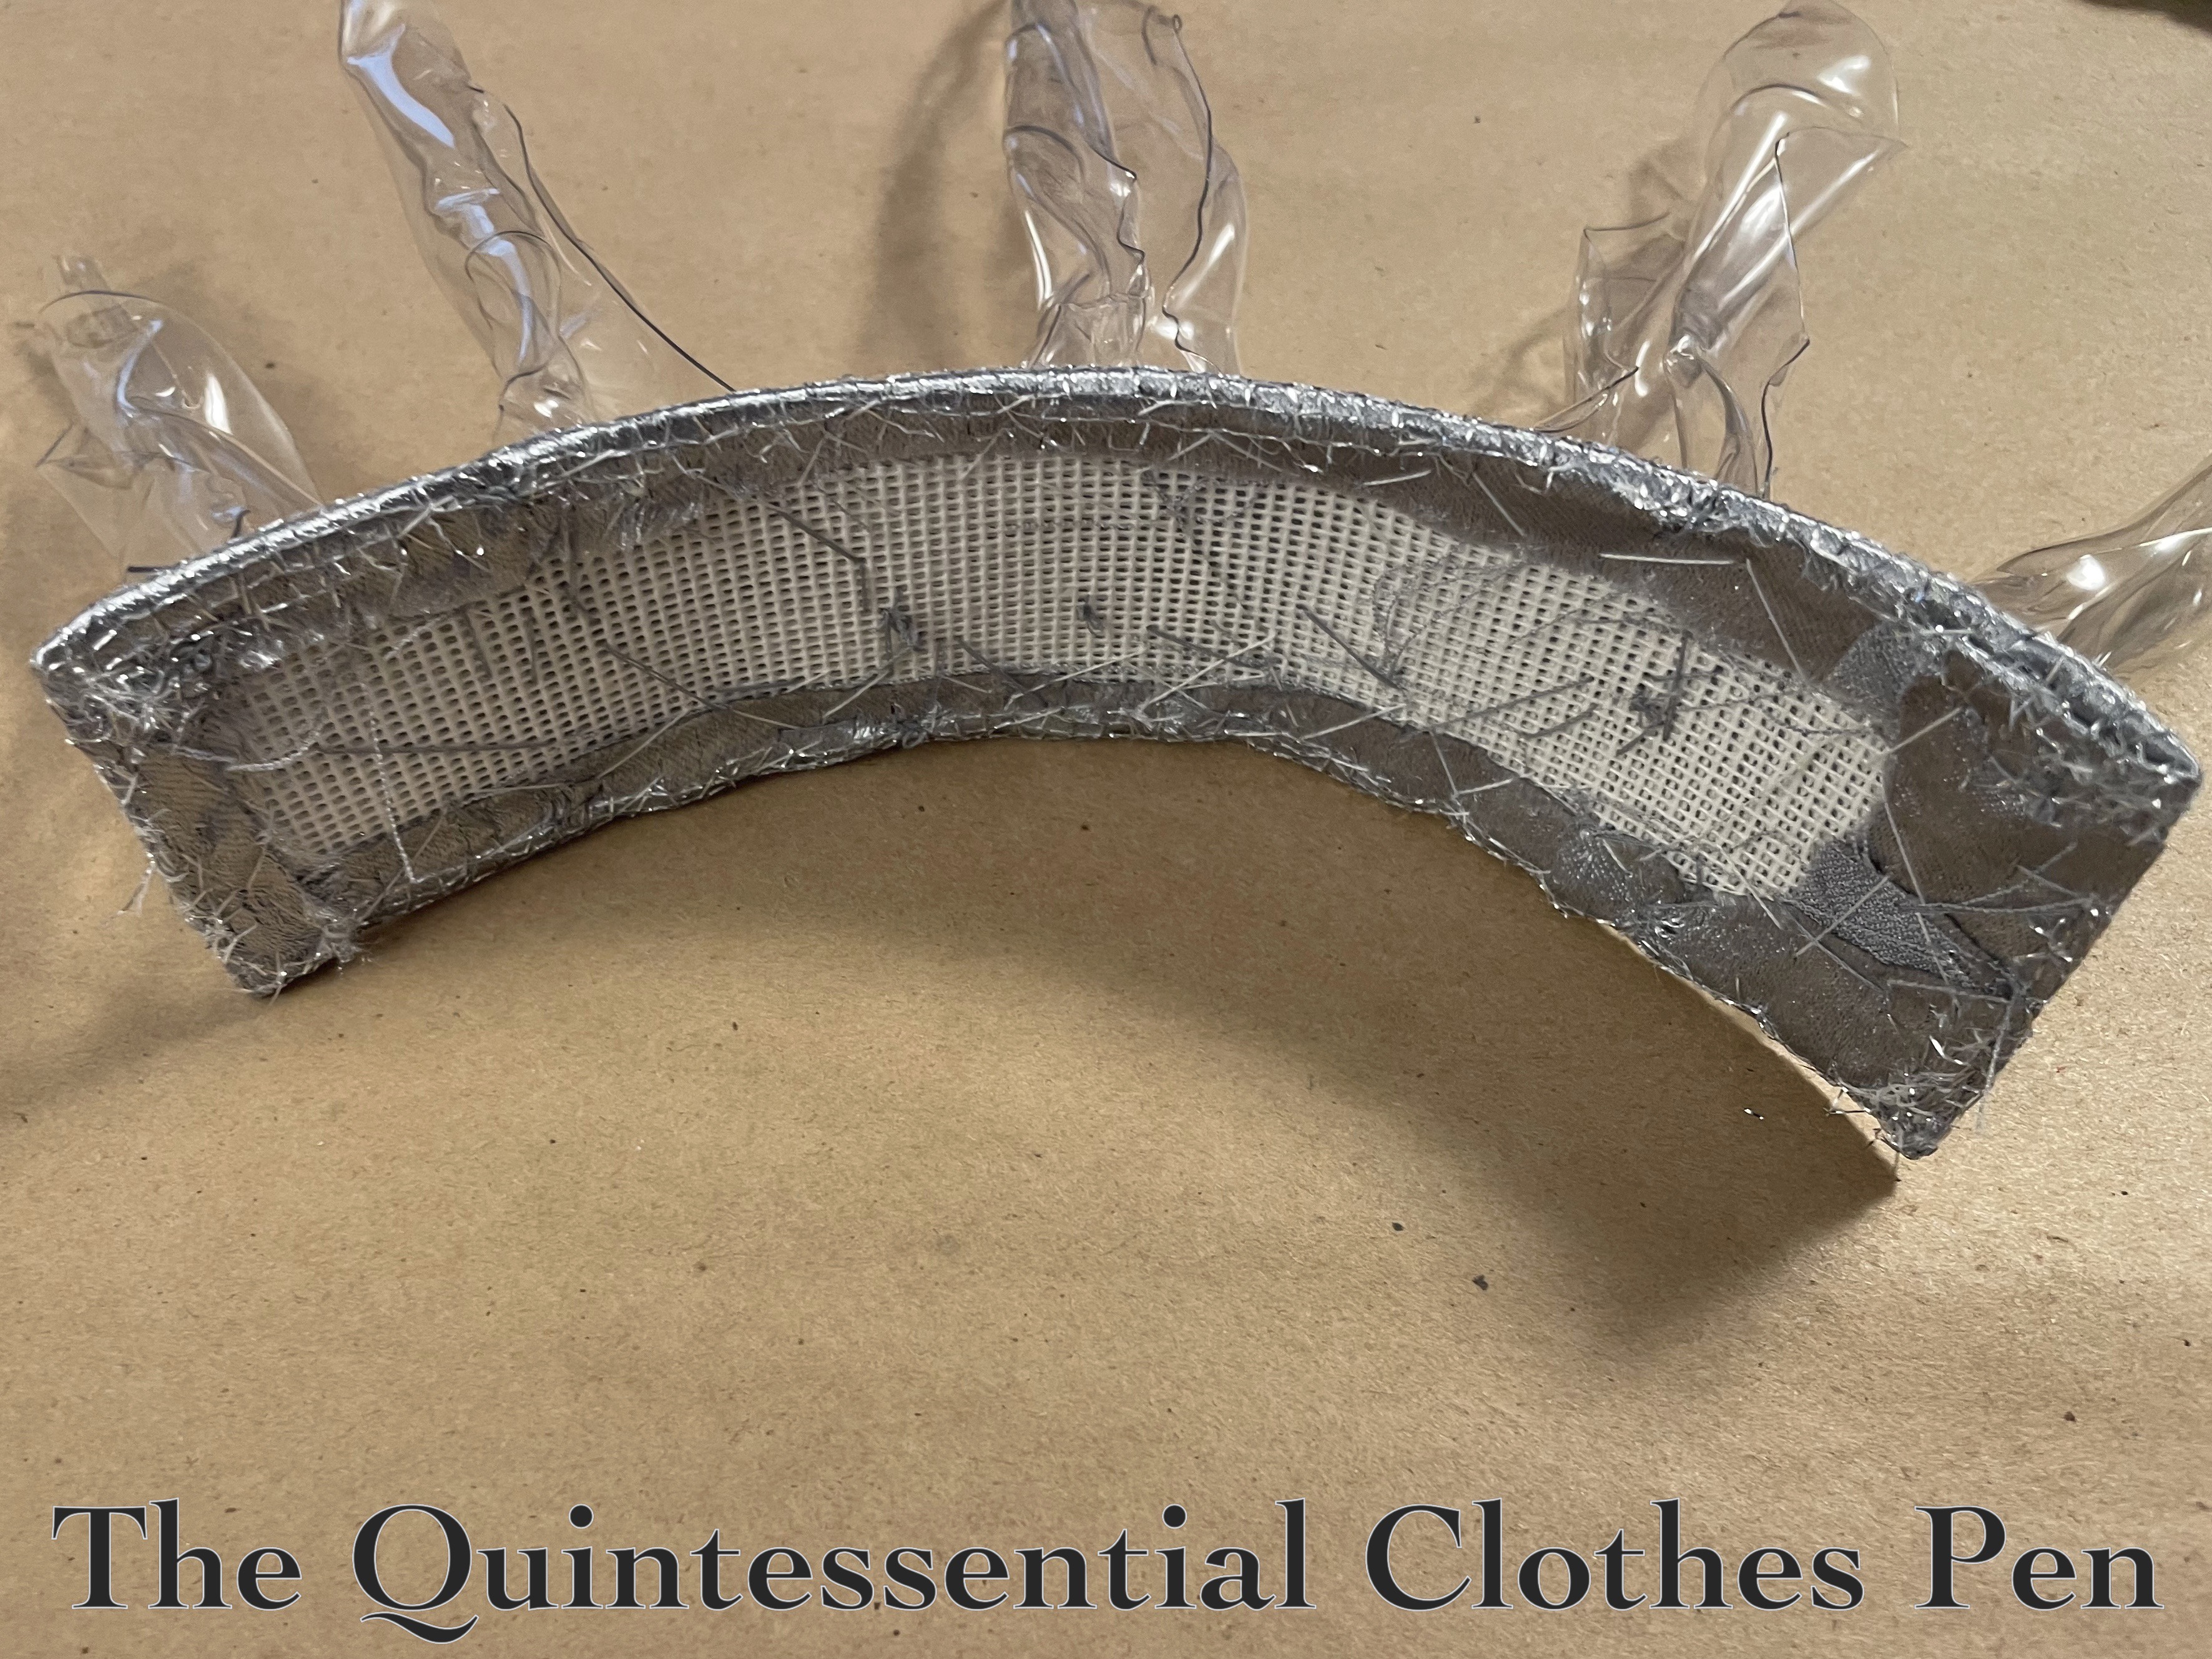
For a base of support, I pulled out my buckram scraps. I layered two of them and stitched them together around the edges. Then, I covered the buckram with scraps of two layers of silver fabric — a polyester satin and silver net. Below is a photo showing the underside of the buckram. My stitches are big, rough, and messy. They will be covered later.

The top of the crown base can be seen below. The silver fabric looks a bit like tinfoil. It was a bit shiny on its own, but made sense once the whole crown was complete.

Attaching The Icicles

Next, it was time to attach the icicles! I tried using the needle that I would normally use to sew, but it was a bit too weak to push through the plastic easily. I went to my needle stash and found a much larger (in length and diameter) sharp needle and used that to punch holes in the icicle bases that I could then easily sew through to secure the icicles to the crown base. This can be seen in the photo below.

Then, I sewed through the holes and the buckram base to secure the icicles in place. The underside of the crown is below. The grey thread I used isn’t really visible on the silver fabric covering.

You can see what the crown looks like from the top in the photo below. The stitches are completely hidden by the shine of the fabric and plastic.

The last step was to cover up all of my stitching with a nicely whipped backing of black felt. This not only makes the whole thing super tidy, but also provides some friction to help the crown stay in place on my hair. I added a few loops to the felt, as well, so that I would have something easy to bobby pin (and not have dark bobby pins showing on the silver fabric side). Below, a much tidier bottom of the crown!

I’m proud to say that Mr. Q said the finished product does, in fact, look like icicles despite his lack of confidence along the way about my clamshell idea! That sounds like a confidence problem on his part to me, amusingly, but nevertheless I’m pleased for the positive opinion!

Photos of the finished Snow Queen ensemble will be coming in a future post!

Snowshoe Pads

I’m staying in the winter spirit with this post!

One thing I discovered about snowshoes in my recently posted about winter adventure is that the crampons (the metal spiked bits that help with traction) on the bottom are pretty sharp (see the photo below). That’s useful when walking, but less useful for transport, especially in a packed trunk!

I wanted to make sure that my snowshoes don’t inadvertently scratch or mar anything, so I decided to make some pads to cover the crampons for storage and transport. I wanted to use as many items from my stash as possible.

I found a few fabrics that were perfect candidates for this project. Purple wool (or at least I thought it was wool until my iron melted it a little… so it’s definitely not 100% wool!) scraps gifted to me, green quilted cotton scraps from about 25 years ago (that I made an elf costume for Christmas out of when I was a child, an amusing memory, to be sure), lavender grosgrain gifted to me, and a bit of velcro left over from recovering my couches in 2020.

I measured the area of the crampons and cut two layers of my quilted fabric for each area (which just used up the scraps perfectly!). I used my overlock machine to attach the two layers and finish the edges at the same time. Then I cut two layers of the purple ‘wool’ to cover the entire crampon area on each snowshoe, sewed those, and turned them right side out. I finished the purple edges by top stitching them twice around all sides. Then I topstitched the quilted pads on in the appropriate spots.

The only thing left was a way to hold the finished pads in place! For that, I sewed lengths of the grosgrain on one side, finished the other ends of the ribbons, and added velcro. Then I sewed a corresponding piece of velcro onto the purple base. Below are the results of these efforts.

Success! Now I have easily removable pads to protect other things from being damaged by the crampons. And, bonus, the pads are cotton and can help absorb excess moisture after I wear the snowshoes!

DIY Weighted Pillow Doorstop Tutorial

In a departure from the usual clothing content on the blog, today I have a DIY weighted doorstop tutorial. The idea came about when I moved into a house whose doors were sometimes inclined to hit the wall.

There are hardware type solutions to the door-handle-hitting-the-wall problem, but those didn’t appeal to me. Instead, I looked around the internet for inspiration that had more character. I’m very amused by the idea of a llama doorstop and I really liked geometric shapes made from fabrics full of character in doorstops such as this and this. I decided that while the llama is amusing, in actual practice I wanted something with a little less character. And I have sewing skills and a lot of fabric, so why not make my own geometric doorstop?

In all honesty, I took all these photos and made my doorstops four years ago! They’ve been sitting and waiting for me to publish a blog post since then. My recent inspiration to write this up came from the fact that I decided to make another doorstop for friends. Looking at my notes and photos pushed me to want to finish off this idea by getting it up on the blog.

DIY Weighted Pillow Doorstop: Supplies Needed

Fabric (at least 28″ x 8″)
Thread
Weighted filling (I used small rocks from the hardware store)
Scraps of fabric
Batting (optional)

DIY Weighted Pillow Doorstop: Tutorial

Step 1: Cut fabric exterior to be 28″ x 8″ (this includes seam allowance).

Step 2: Press under 1 ½” on each short side of the exterior fabric rectangle.

Step 3: Fold the fabric the short way across the fabric. With right sides together, stitch the long sides of the rectangle with ½” seam allowances (keeping the pressed under short sides folded back towards the wrong side). Clip the corners closest to the fold.

Step 4: Turn the rectangle right side out.

Step 5: Fill a Ziploc bag with your weighted filling. Wrap the bag with scraps of fabric (I used old sheets, but old clothes or scraps from projects would work, too). Place the wrapped bag inside of the fabric exterior, then use batting to fill around the wrapped bag (you could also just fill your pillow with fabric scraps if you have a lot of them). This creates a soft pillow that has enough weight to stay in place while a door hits it regularly.

Step 6: Sew the opening of the pillow closed. I used a whip stitch with double thread. Ta da! A finished doorstop!

A few notes:

  • I thought of using rice or dry beans as a weight in the pillows, but thought better of that idea since it might attract unwanted critters over time.
  • If you use something as a weight that you want to be able to replace, you could sew velcro onto the short side opening so that the interior is more easily accessible.

Here is a completed doorstop in place. It has enough depth to keep the door handle from hitting the wall, is heavy enough not to move around, and is super durable. The doorstops are somewhat subtle in the grey fabric I used, though if you wanted to make more of a statement out of them you could use more exciting fabric.

Yay for using sewing skills for an everyday purpose!

1920s Star Fancy Dress

The theme recommendation for the evening soiree at Gatsby On The Isles earlier this year was a masquerade. I took that to heart and decided to adapt an existing dress in my closet to make it fancy dress. (It turns out that the majority of people who attended didn’t adhere to the guidelines, so I was a bit out of place, but I enjoyed my fancy dress regardless!)

My requirements for this outfit were: to use a dress as a base that was already in my closet, to not cost much, to not take much time, and to have the elements of fancy dress be easily reversible.

I looked through my 20th Century Fancy Dress Pinterest board and settled on the image below as my inspiration. (Unfortunately, I can’t find a source for the image that isn’t Pinterest. If anyone has information, please share.)

I thought the idea of stars would work well with my 1926 Silver Lace Robe de Style. I briefly considered creating the stars myself and then I remembered that I didn’t want this too take too much time and I started researching purchasable stars. I wanted something nice looking but not costly, remember, and I also wanted to stay away from glitter–the shedding! Ugh! While considering various metallic and cardboard style stars I realized that: 1- those may not travel well (I didn’t want bent stars!) and 2- they probably wouldn’t be comfortable to wear. So I started researching felt stars!

I decided on these felt stars. They were a good size, I liked the color, and they weren’t supposed to be too stiff. Not being stiff would be more comfortable to wear and also easier to sew through! I’d considered making garlands of the stars but I figured they would get tangled, so instead I opted to sew the stars directly onto the lace.

I started by placing the stars in a line diagonally across the top of the dress. The goal was to capture the feeling of my inspiration but didn’t feel the need to add as many stars as the drawing has, so I stopped with the one line. I liked the stars hanging from the hem, so I did those next–one star per each dip in the pattern of the lace.

After that I didn’t have many stars left! I used a scrap of metallic knit fabric to make a veil and put a star on each corner. The veil is a square, with one corner turned under, gathered, and stitched to a hair comb.

I also used some black felt scraps to cut a few stars by hand to accent the star at the waist. I thought this might tie in the metallic knit veil and also draw attention to the grey stars on the grey dress!

I added some sparkly shoe clips, pearl bracelets, and sparkly stars for my hair (reused from my 1885 Night Sky Fancy Dress) and the outfit was complete! It pays off to reuse themes for fancy dress, I guess!

Regency Shoe Revive (HSM #2)

Back in 2012, I happened upon an unusual pair of shoes in a small clothing store. They were quite flat, with little support or durable sole and a slightly square but still rounded toe. The price was great–$10 per pair. I thought the shoes would make excellent Regency dancing shoes, so I bought two pairs, an 8.5 and a 9. The 8.5 were a little tight on my feet which was perfect for dancing as they stayed on my heels even when I rose onto my toes, but the 9 also fit and was great for walking around.

I’ve kept the size 9 nice looking over the last eight years. They have a surprising mid-20th century vintage look in addition to the Regency look, so they are most often worn with 1950s inspired dresses (you’ll spot them with my vintage inspired Happy Clover Dress and 1953 Dot Dress, both pictured below).

But while the size 9 pair hasn’t been worn all that often, the size 8.5 pair have been worn almost anytime I’ve been dancing in Regency clothes for the last eight years. You’ll spot them in all of the posts below (with a few of those highlighted with photos, as well), but of course this is only a small portion of the times these shoes have been worn.

1817 Duchess Gown In Three Stylings
Regency Intensive Dance Weekend 2019
1817 Gold Stripes And Face Framing Curls
Regency Dance Weekend 2017
A Gown Worthy Of A Duchess
Regency Dance Weekend 2016
Regency Shoe Poms!
A Turban Fillet, 1811
Regency Dancing At The Salem Maritime Festival
Refreshing Proof (Chelmsford Regency Ball 2013)
Regency Dance Weekend Part IV: Reception
Lovely Clothes, Lovely Ball: Part I (Pride And Prejudice Ball 2013)
Regency Christmas Party At The Commandant’s House
1812 Guerriere Weekend Part IV: A New 1812 Gown

All that wear has caused the shoes to show their age. While still functional, the exteriors were cracking and peeling around the top and the toes/sides/back were worn and scratched.

But I’m not ready to let these shoes go! So I decided to revive them with a few touch up treatments.

The first touch up step was to glue petersham ribbon around the top edge to bind it off, as well as down the center back seam, for an additional historical touch. I wanted to be done quickly, so I used hot glue, but this really wasn’t the best choice of glue, as it is a bit lumpy under the ribbon in some places.

I purchased the grosgrain from The Sewing Place. They have a beautiful selection of colors, reasonable prices, and low shipping charges.

The second touch up was a bit of white Angelus leather paint to cover the scuffs. (Thinking back, I should have cleaned my shoes before painting them… But I didn’t. So, there’s that.) Again, I was just trying to be quick. I figure these shoes are going to get banged up again as soon as I wear them, so I didn’t need to be too fussy. The white paint didn’t perfectly match my shoes, so I did thin coats and buffed the edges with scraps of cotton to get them to blend. It’s not perfect, but it looks reasonable from standing height.

This was a simple project, but it qualifies for this year’s HSM challenge #2: Re-Use.

Use thrifted materials or old garments or bedlinen to make a new garment.  Mend, re-shape or re-trim an existing garment to prolong its life.

Just the facts:

Fabric/Materials:  1 pair of soft soled flats and white Angelus leather paint.

Pattern: None.

Year: c. 1810.

Notions: Approximately 1 yd of petersham ribbon.

How historically accurate is it?: 50%. In general, the silhouette and style works, but of course these shoes are not perfectly historical in style and the materials are modern.

Hours to complete:  1 hour.

First worn: November 23, 2019.

Total cost: If we’re only counting the revive and not the original cost of the shoes, then approximately $5 for the ribbon. (The glue and paint were in the stash.)

Here’s another view of the completed shoes.

It was my goal to revive these before this year’s Regency Dance Weekend (an annual event each April). I achieved that goal in terms of the date, though sadly the weekend was cancelled this year. But even though I didn’t get to use these for that event, at least now they’re ready for more years of adventure (and I can return them to the closet–they’ve been sitting out since last year to remind me to deal with them!). I’m quite pleased with the end result and the small amount of effort required to update these shoes.

Check out the following links if you’d like to see tutorial-like photos and descriptions of the painting and ribbon-ing process:

Lauren, of American Duchess, wrote a very helpful blog post tutorial back in 2012 showing how to paint shoes as well as the petersham ribbon edging.

Chelsea, of A Sartorial Statement, wrote a blog post about her freshly painted and ribbon-trimmed flats in 2019.

Making A 1933 Summer Hat

Last post, I shared my 1933 Sunshine Stripes dress with you. One of the accessories that I loved wearing with that dress was a modern sun hat that I remade into a 1930s shaped hat. Now I’d like to share how easy this process was. I hope it inspires you to try remaking something yourself!

I started with this modern ‘straw’ hat from eBay. I say ‘straw’ because the fiber is really plastic rather than any sort of natural material… but I digress. The price was good and I thought white would be a nice neutral for my 1920s summer wardrobe. But the crown on this hat was soooo tall! 5″! It came way down over my eyebrows and combined with the floppy brim it was not a great look nor was it historical. I think I tried to wear it a few years ago but was displeased with the shape. The only bonus is that it squishes well and pops right back into shape–that’s great for packing! (As a side note, in trying to find the link for the hat I realized I ordered this back in 2015… it only took me a few years to make it something I was really pleased with!)

While trying to decide what to accessorize my 1933 dress with, I looked at the hat in my closet and wondered if there was anything to be done to make it better. I figured the white would coordinate well with the white stripes in the dress fabric. I looked for hat inspiration on my 1930s sportswear Pinterest board and 1930s day wear Pinterest board and decided that the main problem with my hat was the tall crown. I wanted a hat that just perched on my head, so I needed to shorten the crown.

I started by ripping out the stitching on the lower part of the crown just above where it connected to the brim. Here’s the hat at this point with the shallower crown and brim still technically attached.

After determining that I liked the new crown height, I cut away the extra braid. Then I wrapped the loose ends around the crown and brim and stitched them down so I had two nicely finished parts.

Then I reassembled the two parts, carefully stitching them together while avoiding the inner hat band. I matched the stitch length to what was already on the hat (rather long, by my usual standards). Because the hat is so malleable it was easy to squash onto the sewing machine.

After stitching, the join blends right in! The only thing left was trim!

I decided on a simple brown band to trim the hat. I had the brown cotton in my stash and it matched my shoes well. It is nicely complimentary for the outfit without being match-y and it’s neutral enough that I can easily wear this with other outfits as well. The brown is carefully hand sewn around the crown with the ends spreading over the brim of the hat. Ta da! Elegant sun protection!

1830s Sleeve Puff Tutorial

Why make sleeve puffs, you ask? In order to keep the large sleeves of 1830s dresses from deflating, of course! Here’s an example of my 1832 dress without puffs (on the left) and with puffs (on the right). They make such a difference!

I chose to use a sewing machine for much of the assembly of my puffs, but you could easily hand sew all of these steps instead.

To make these sleeve puffs you will need the following materials:

  • Fabric: ¾ yard of 44″ wide or ⅜ yard of 60″ wide (cotton, linen, and silk are the most historical options, but you can use whatever is comfortable on your skin, just make sure it’s not too loosely woven or too heavy in weight)
  • Stuffing: I used scraps of stiff net and organza, but you could also use batting, tulle, down, etc.
  • Thread

To begin, you’ll need to cut out your pieces:

  • Two rectangles: 25″ wide x 13″tall
  • Two shaped bases: 18.5″ wide x 7.5″ tall at the center and curved down to 2.5″ tall at the sides
  • Four end caps (two for each end of your shaped base): use the shaped base as a pattern and cut the end caps so they are 2.5″ wide

Next, you’ll assemble your puffs:

Step 1: Lay your end caps on each end of the shaped base. Sew around the three exterior sides, leaving the side towards the center unstitched.

Step 2: Trim your seam allowances, corners, and clip through seam allowance close to the end of your stitch line on the shaped base.

Step 3: Turn each end cap so the right sides face out–the clip through the seam allowance allows the end caps to sit nice and flat on the shaped base.


Step 4: Run gathering stitches along each individual side of the four sides of each rectangle (not one long gathering line that turns the corners).

Step 5: Pull up your gathering stitches on the long sides and pin to the curved edges of the shaped base. You want to pin the rectangle to the side of the shaped based that does not have the end caps on it.


Step 6: Sew the gathered rectangle to the shaped base and turn it right side out.

Step 7: Now pull up the gathering threads on one short side of each rectangle. Turn the raw edge under and pin the gathers in place. Hand sew these gathers through all the layers, making sure to take small stitches and catch the gathers in many places. Leave the other side open for now.

Step 8: Stuff those puffs!

Step 9: Now pull up the gathering threads on the remaining short side of each rectangle. Turn the raw edge under and pin the gathers in place. Hand sew these gathers through all the layers as well, making sure to take small stitches and catch the gathers in many places. (This is the same as step 7.)

Step 10: Overlap the end caps about ¼” and sew them together.

Ta da! Now you have some sleeve puffs of your very own!

Extra tips:

I strongly suggest taking a look at extant puffs. As a starting point, I suggest this pair at the MFA and this pair at the V and A.

If you’re worried about keeping your puffs in place, ties can be added to the puffs which would be secured to additional ties in the armholes of dresses. Take another look at the those two pairs of extant puffs and you’ll see ties.

I also suggest looking at the puffs other people have made. It never hurts to see more methods of construction. I referenced Fresh Frippery and Stepping Into History when creating my puffs. Have you come across other 1830s puff making resources? If so, please share!

SaveSave

SaveSave

SaveSave

SaveSave

SaveSave

SaveSave

SaveSave

SaveSave

SaveSave

SaveSave

Project Journal: Versailles Sacque: Finished Shoes!

After the many coats of paint I shared about already, there was one final coat that I convinced myself had to be the last because I needed to move on and finish decorating my Kensingtons. After that I went ahead and put on a matte acrylic finisher as suggested by Lauren at American Duchess. I then made the holes for my buckles using this tutorial also from American Duchess. The shoe buckle tutorial was invaluable and made the process incredibly easy!

IMG_0849
Finished?

I told myself the shoes were done, but I still wasn’t entirely happy with them. I think perhaps I was not satisfied because I had painted my shoes a color I’ve only really seen in cloth shoes rather than leather. But I moved on… and then this shoe-remake popped up on Pinterest and I was captured by the idea of adding metallic lace trim to my shoes to finish them off.

And so I went on the hunt on eBay, settling on this. It was a reasonable price and arrived quite speedily. As in the inspiration re-make, I used hot glue to attach the lace to the shoes. It was easy to work with and is generally reversible if I decide to change the shoes sometime in the future (though that’s pretty unlikely…) I think the trim suits my dress fabric nicely and it was narrow enough to follow the curves of the shoe without too much hassle, even on the latchets (which were the trickiest parts).

I also considered creating a design for the toe box area of the shoe, but decided against the idea once I realized how tricky it would be to get something I like. The lace doesn’t do tight curves easily and all the ends would need to be finished if I used non continuous pieces of trim, so all the ideas I came up with were going to be time intensive or poorly executed. I decided on simplicity.

IMG_0858
Ta da!

Now when I look at my shoes I have a smile on my face. They finally feel done and like they make sense! Yay–cross that off the list!

  • Panniers
  • Petticoat
  • Robe a la francaise (with a subset of trimming)
  • Hair
  • Shoes
Product links in this post contain an affiliate code, which provides a small benefit to my shoe fund. This does not affect my impressions and reviews of this product.

SaveSave

Waterproof Picnic Blanket V. 1

I really don’t enjoy picnicking on wet ground, especially when it’s the sort of picnic with blankets, not chairs. I’d say that 80% of the picnics I attend are the sit on the ground sort, and I’d say the ground is at least a little bit damp at least 30% of the time.

I’d searched around a bit for a nice thick wool picnic blanket that would be generic enough to use for 19th and early 20th century picnics without looking glaringly modern, but found that the nice thick ones were more money than I wanted to pay. So I thought creatively and found a nice remnant of wool fabric to use as a picnic blanket. But it’s a little thin, and when the ground is damp the fabric doesn’t have much to defend itself.

So I thought about things some more and decided to make a non-period accurate waterproof blanket by backing my wool fabric with some waterproof modern material. I considered tarps, or a plastic-y tablecloth, or just waterproof fabric… but all of these things would cost money, even if not very much. But then I bought a new shower curtain liner for our bathroom, and I thought: “Ah ha! Now I’ll have an old already grungy large piece of waterproof plastic that I can use to back my picnic blanket!”

To make it, I first cut off the top few inches where the rusty grommets were and the bottom area where the rusty magnets were. Then, I cleaned it. (Of course, part of the point of buying a new shower curtain is that I didn’t really feel like giving the old one a really good scrub… irony!) I didn’t clean it as much as I would have if I planned to still use it in my shower, since after all the point is to put it on the dirt and grass, but I did clean it enough.

IMG_1060
Cutting off the top edge.

Once I had cleaned it, I laid my wool fabric piece over the plastic and cut it to be just a little smaller than the fabric. Then I used tacky glue to adhere the plastic to the back of the wool along the hems. (As a side note, Mr. Q thought I was crazy while I had all of this spread on the living room floor…)

IMG_1061
Gluing the plastic to the wool.

I did serge the edges of the blanket before hemming them. I figured that since I was adding inaccurate shower curtain plastic backing to my blanket a little serging couldn’t hurt!

At home, the plan seemed to be working out fine. Once the glue dried, I had a plastic-backed picnic blanket! But, in using it multiple times last summer I encountered a few flaws. #1: The plastic backing is bulky, making the blanket hard to fold/roll and take up a lot of space. #2: The tacky glue didn’t hold very well. The wool slides across the plastic when anyone sits on it, pulling at the edges. The tension has caused the two layers to detach in some places. Of course, I could have solved the second problem by sewing the layers together instead of gluing them, but I was trying to avoid sewing through plastic.

So, a partially useful solution to the waterproof blanket idea. Over the fall and winter I wasn’t super motivated to do anything with it, but perhaps now that picnic season has come again I might have to tackle the idea again and try Waterproof Blanket V. 2!

SaveSave

SaveSave