Over a year ago, I was reading this post on Miss Victory Violet’s blog and fell in love with her skirt. I decided then and there that I wanted one for myself a similar style, except in wool. So I went on the hunt and found a fabric I thought would do the job back in October. I was determined not to let is languish in the stash as many of my fabric purchases do and so over the Thanksgiving holiday weekend I made a skirt! I’m very pleased that I made something so shortly after the buying the fabric, especially a modern garment.
The fabric is brown and grey herringbone with a light windowpane in red, pink, and blue. As you can see, the colors blend into more of a subtle texture than you might think when viewed from a normal distance. It’s perhaps more grey than I was envisioning, but that just means a more true brown skirt needs to be in my future, right?
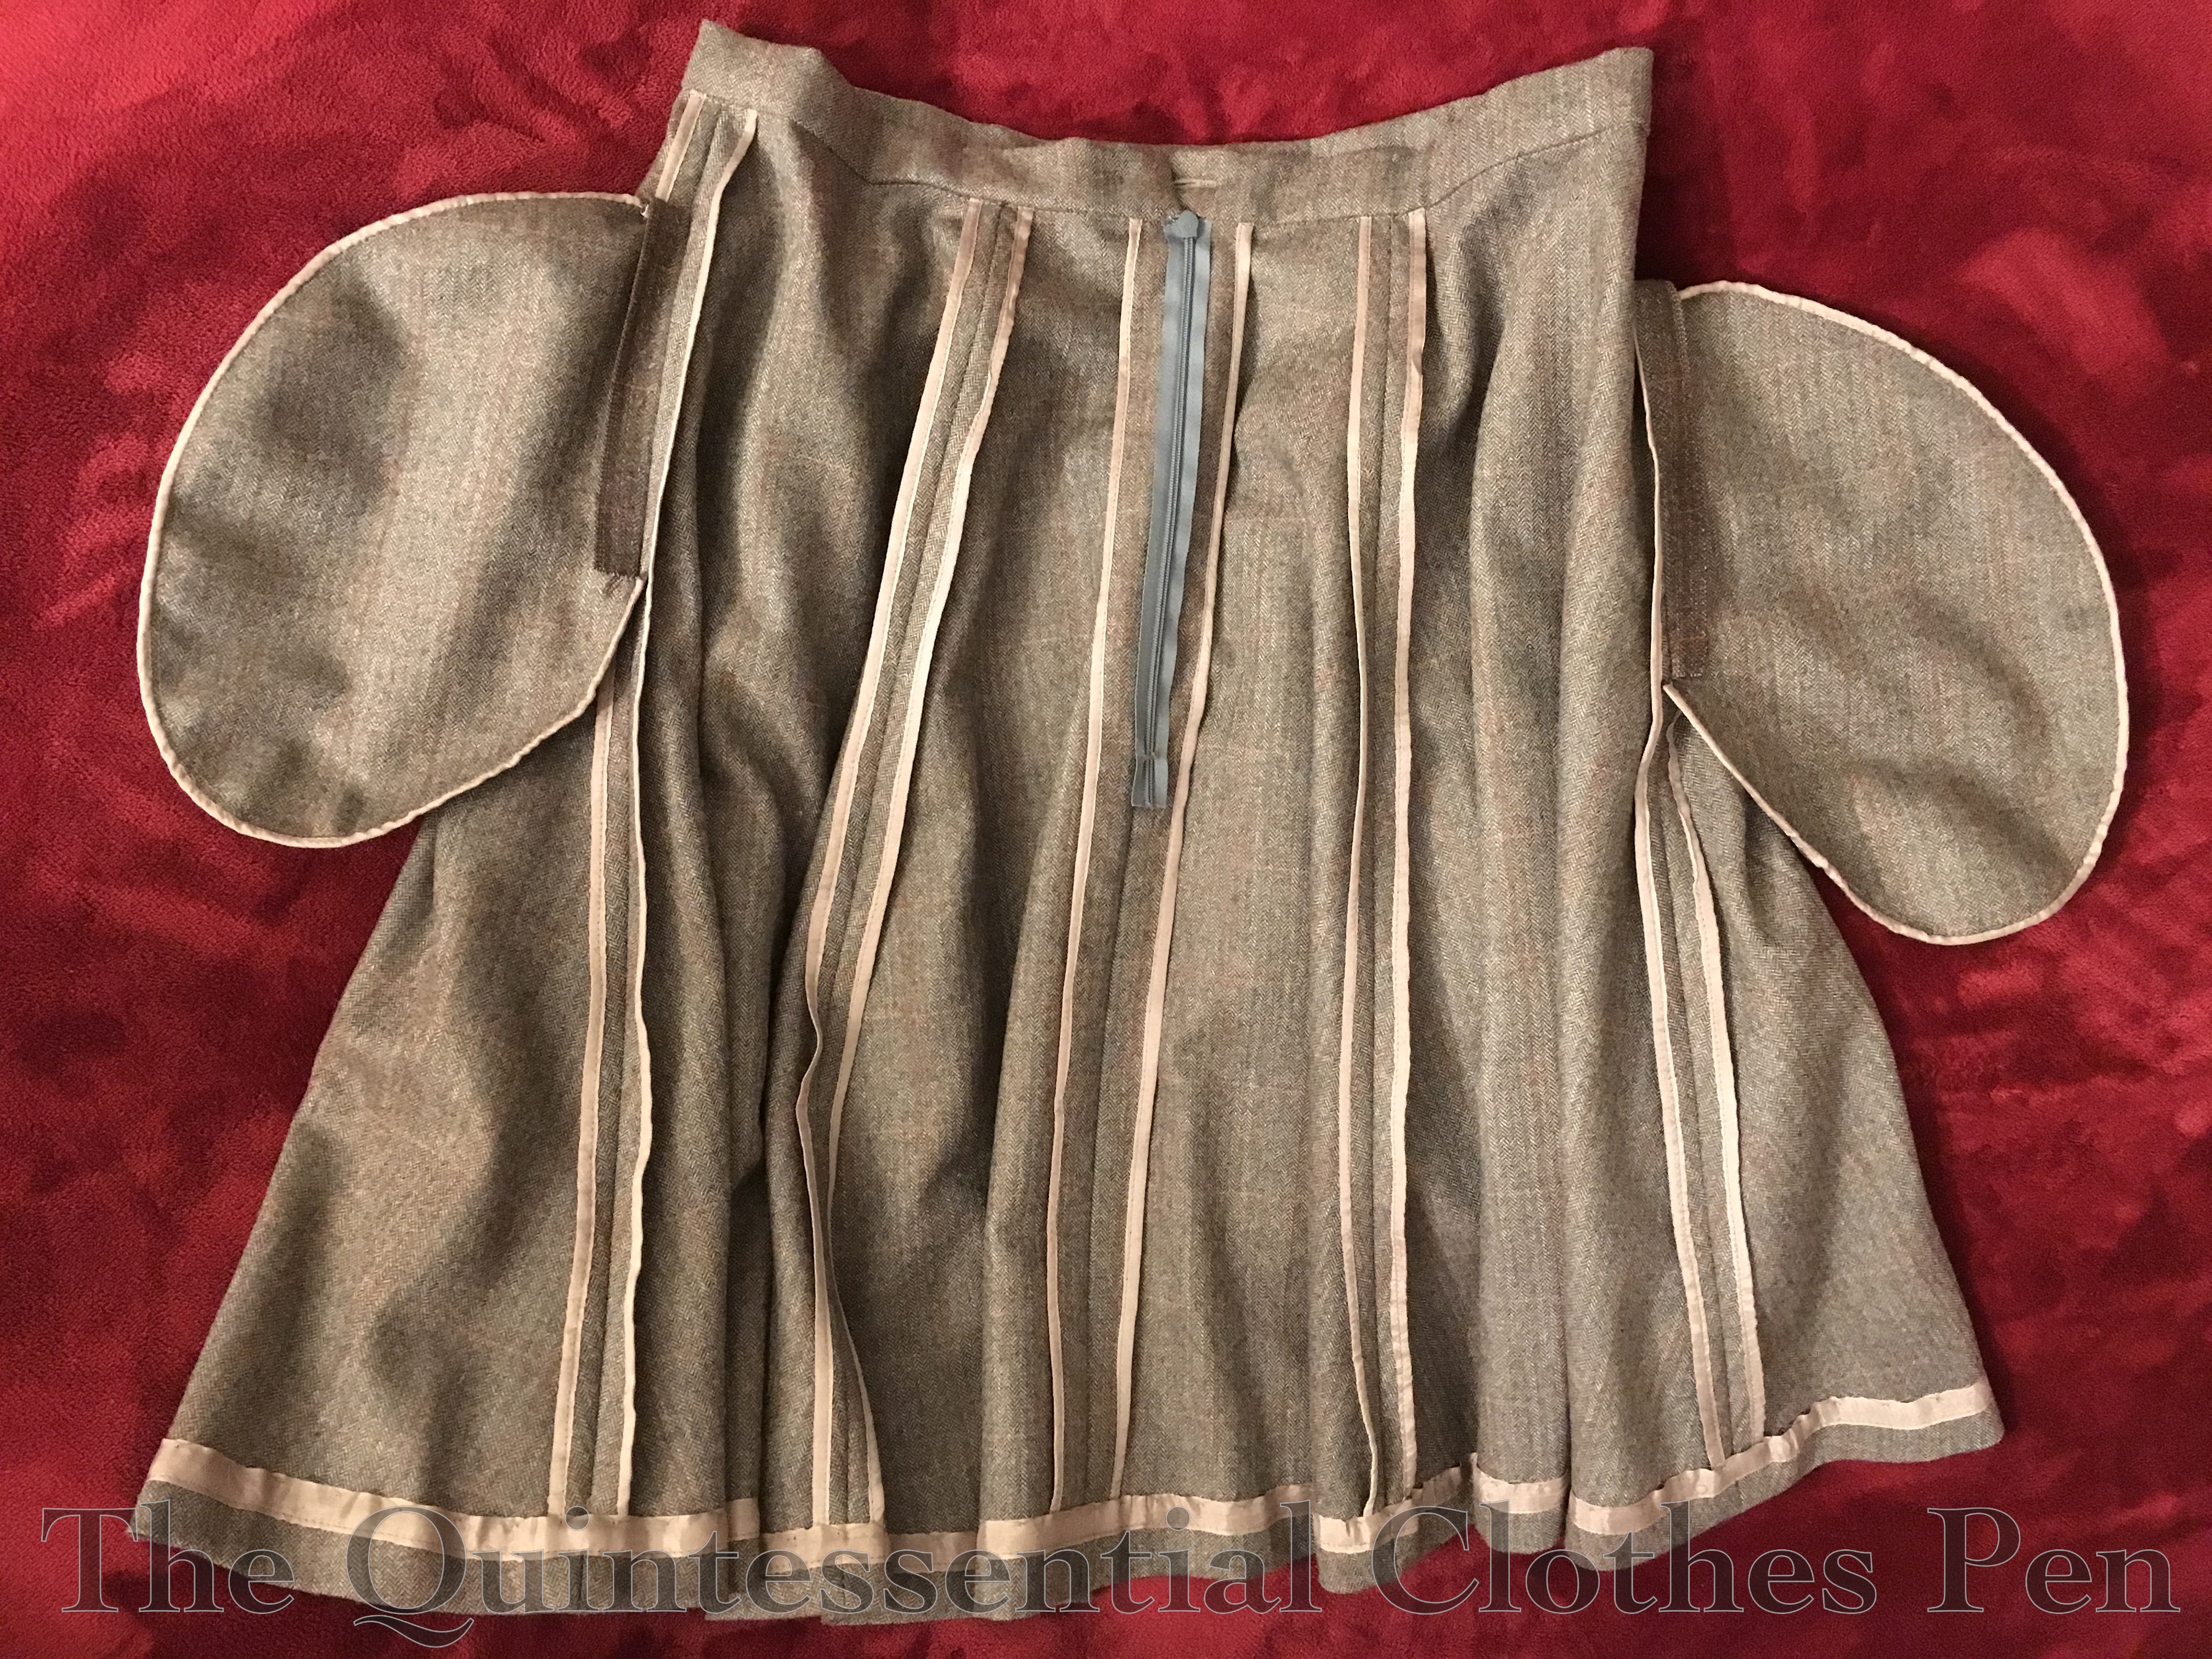
The skirt closes with an invisible zipper and a button tab on the waistband. I did a rather good job matching the pattern while cutting and sewing, I think!
The skirt is a full 3/4 circle, divided into six gores in order to keep the windowpane under control. I took the time to bind each edge with taupe hug snug, as well as the hem and around the pocket bags. It certainly added time, but makes for such a tidy interior!
Pockets! The skirt has lovely in seam pockets. I had to get a picture showing them off in use.
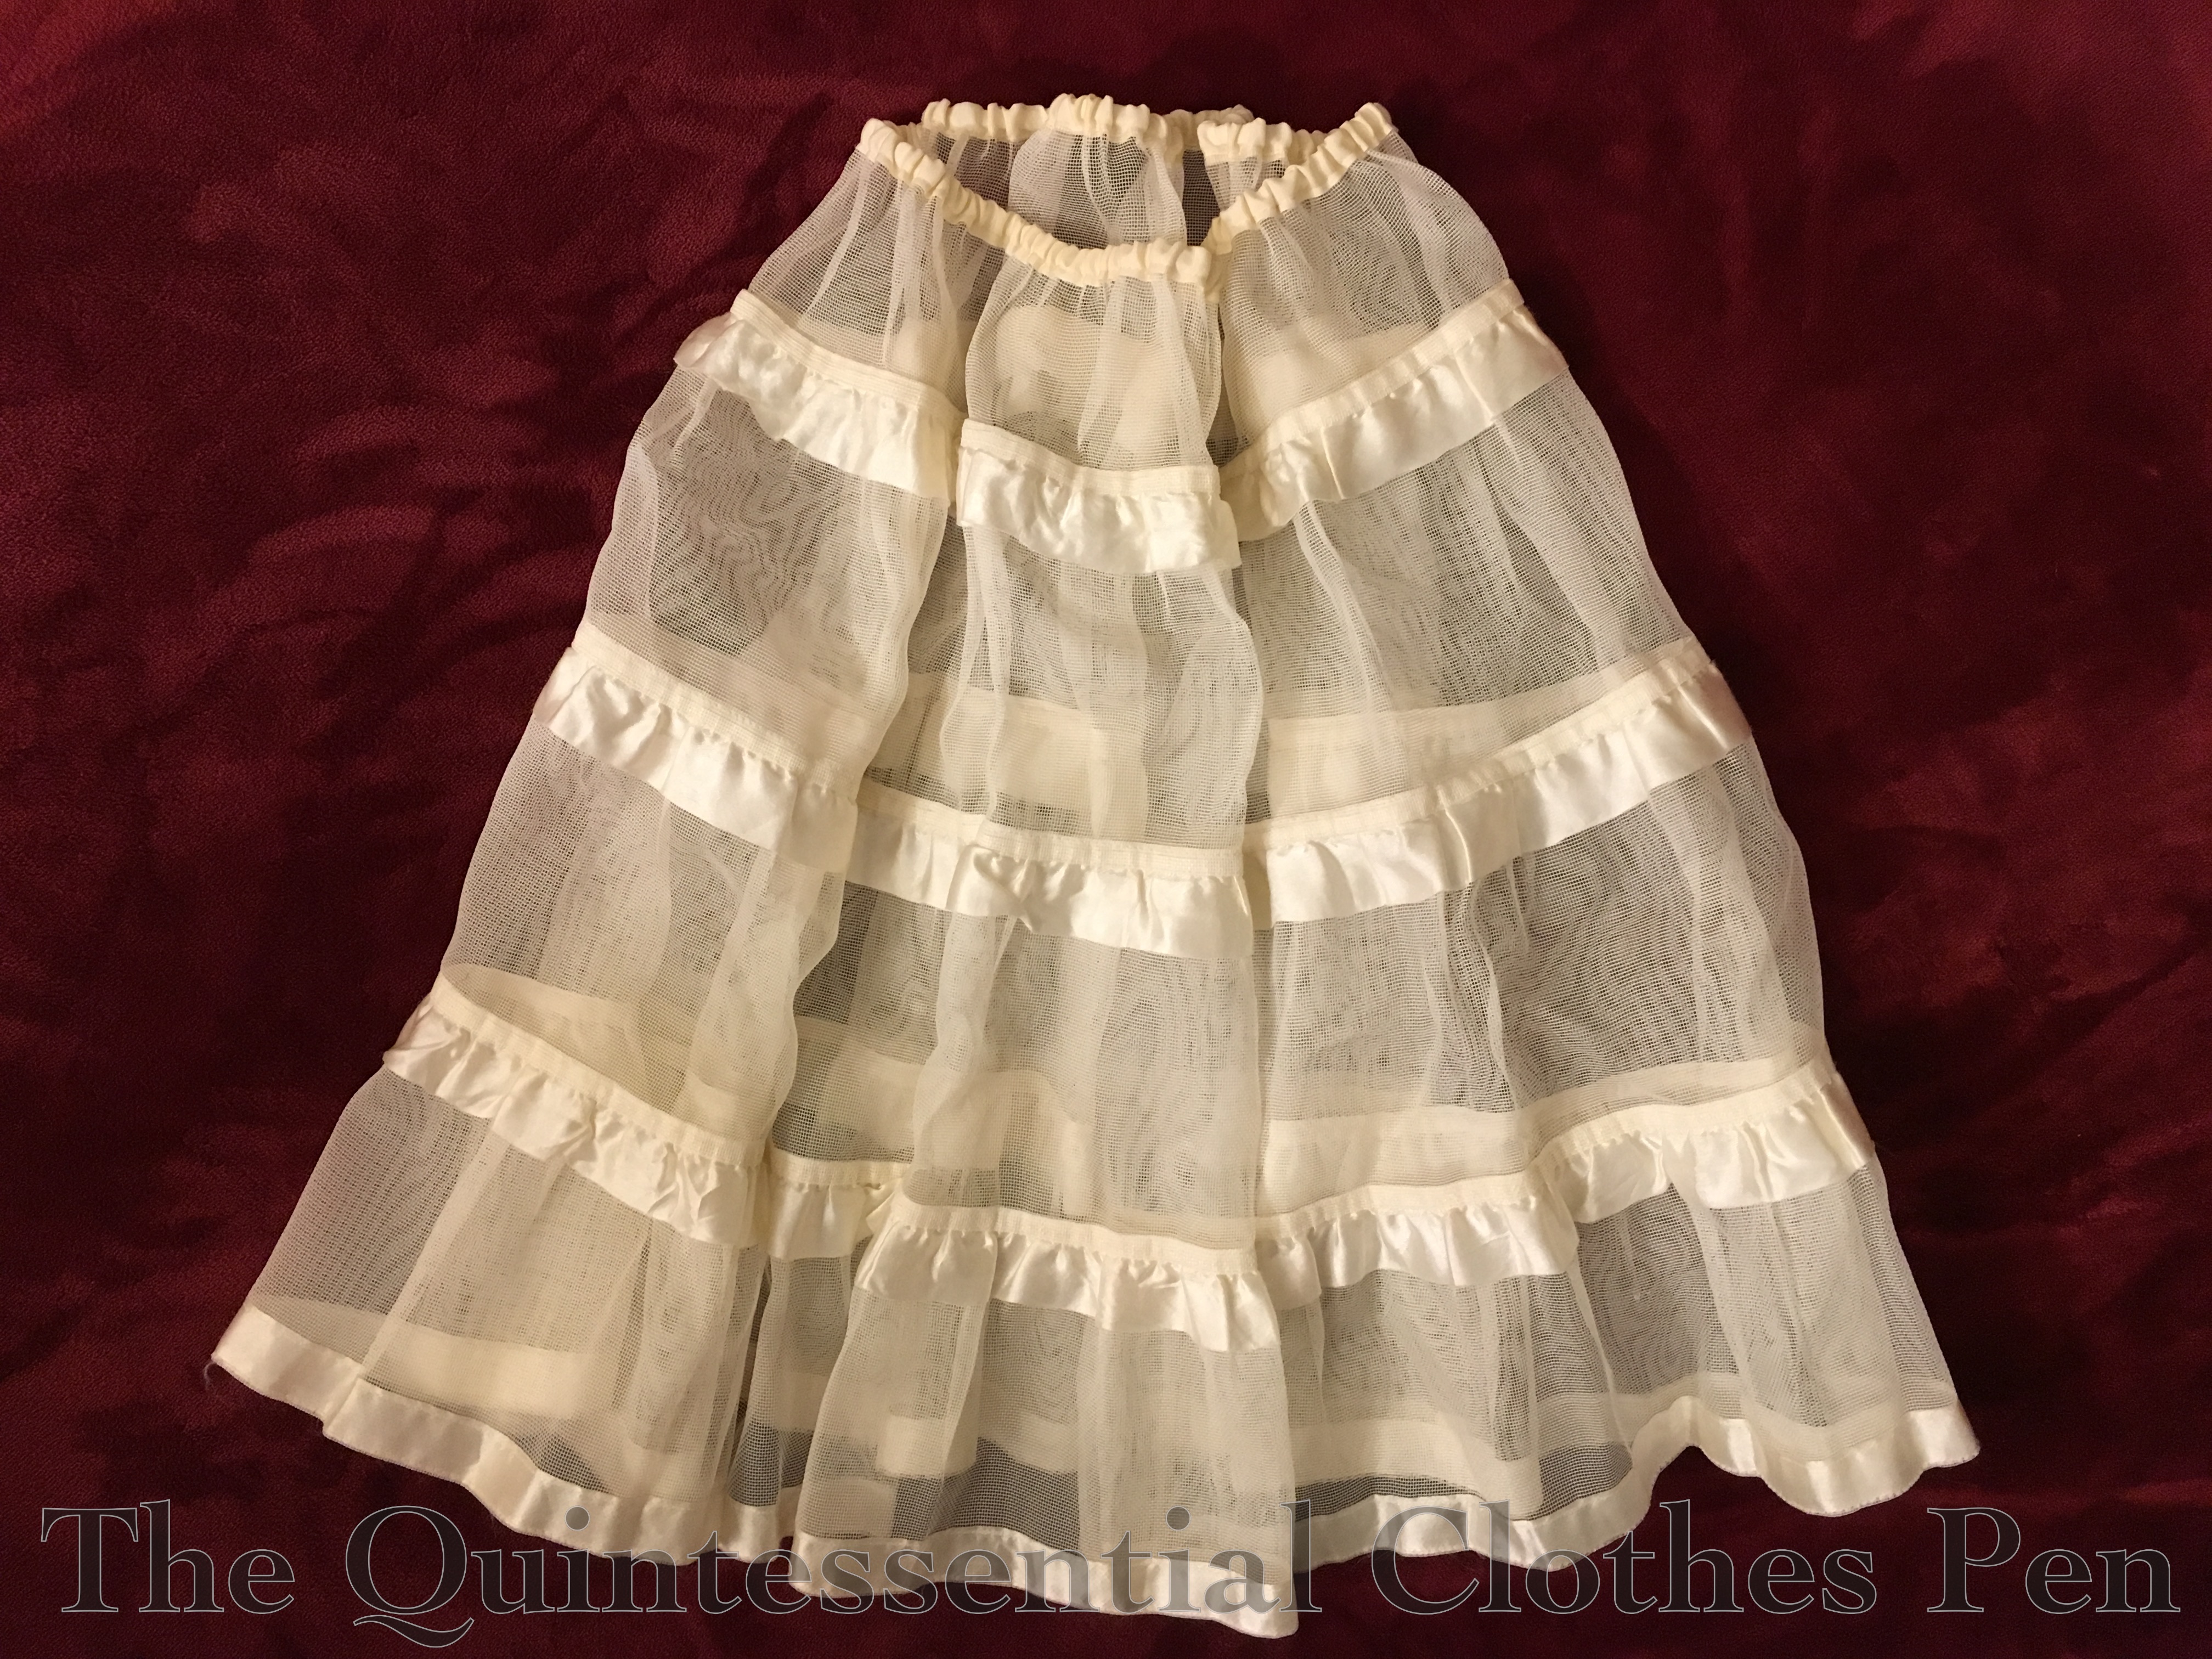
In order to help it keep the skirt keep an A-line shape, I’m wearing a recently acquired petticoat with it. I was inspired to get the petticoat after wearing my Bubble Dots skirt for modern life and feeling that the skirt was too limp. I had saved Lily’s petticoat comparison and went back to it to see what new inspiration I might have. I was re-inspired by her vintage petticoat and set off on a search to find my own for a reasonable price. There are actually sooooo many pretty vintage petticoats out there, but I stayed on track and only purchased the one, which is a slightly stiff netting. The elastic at the top was totally dead, but it was too small for me and too long anyway, so I cut off a few inches at the top, made a new casing, and inserted new elastic. Voila!
I’m very pleased with the subtle shape this petticoat provides. It’s enough to make my fuller skirts look A-line and more flattering, but not enough that a modern person would think that I’m wearing a petticoat!
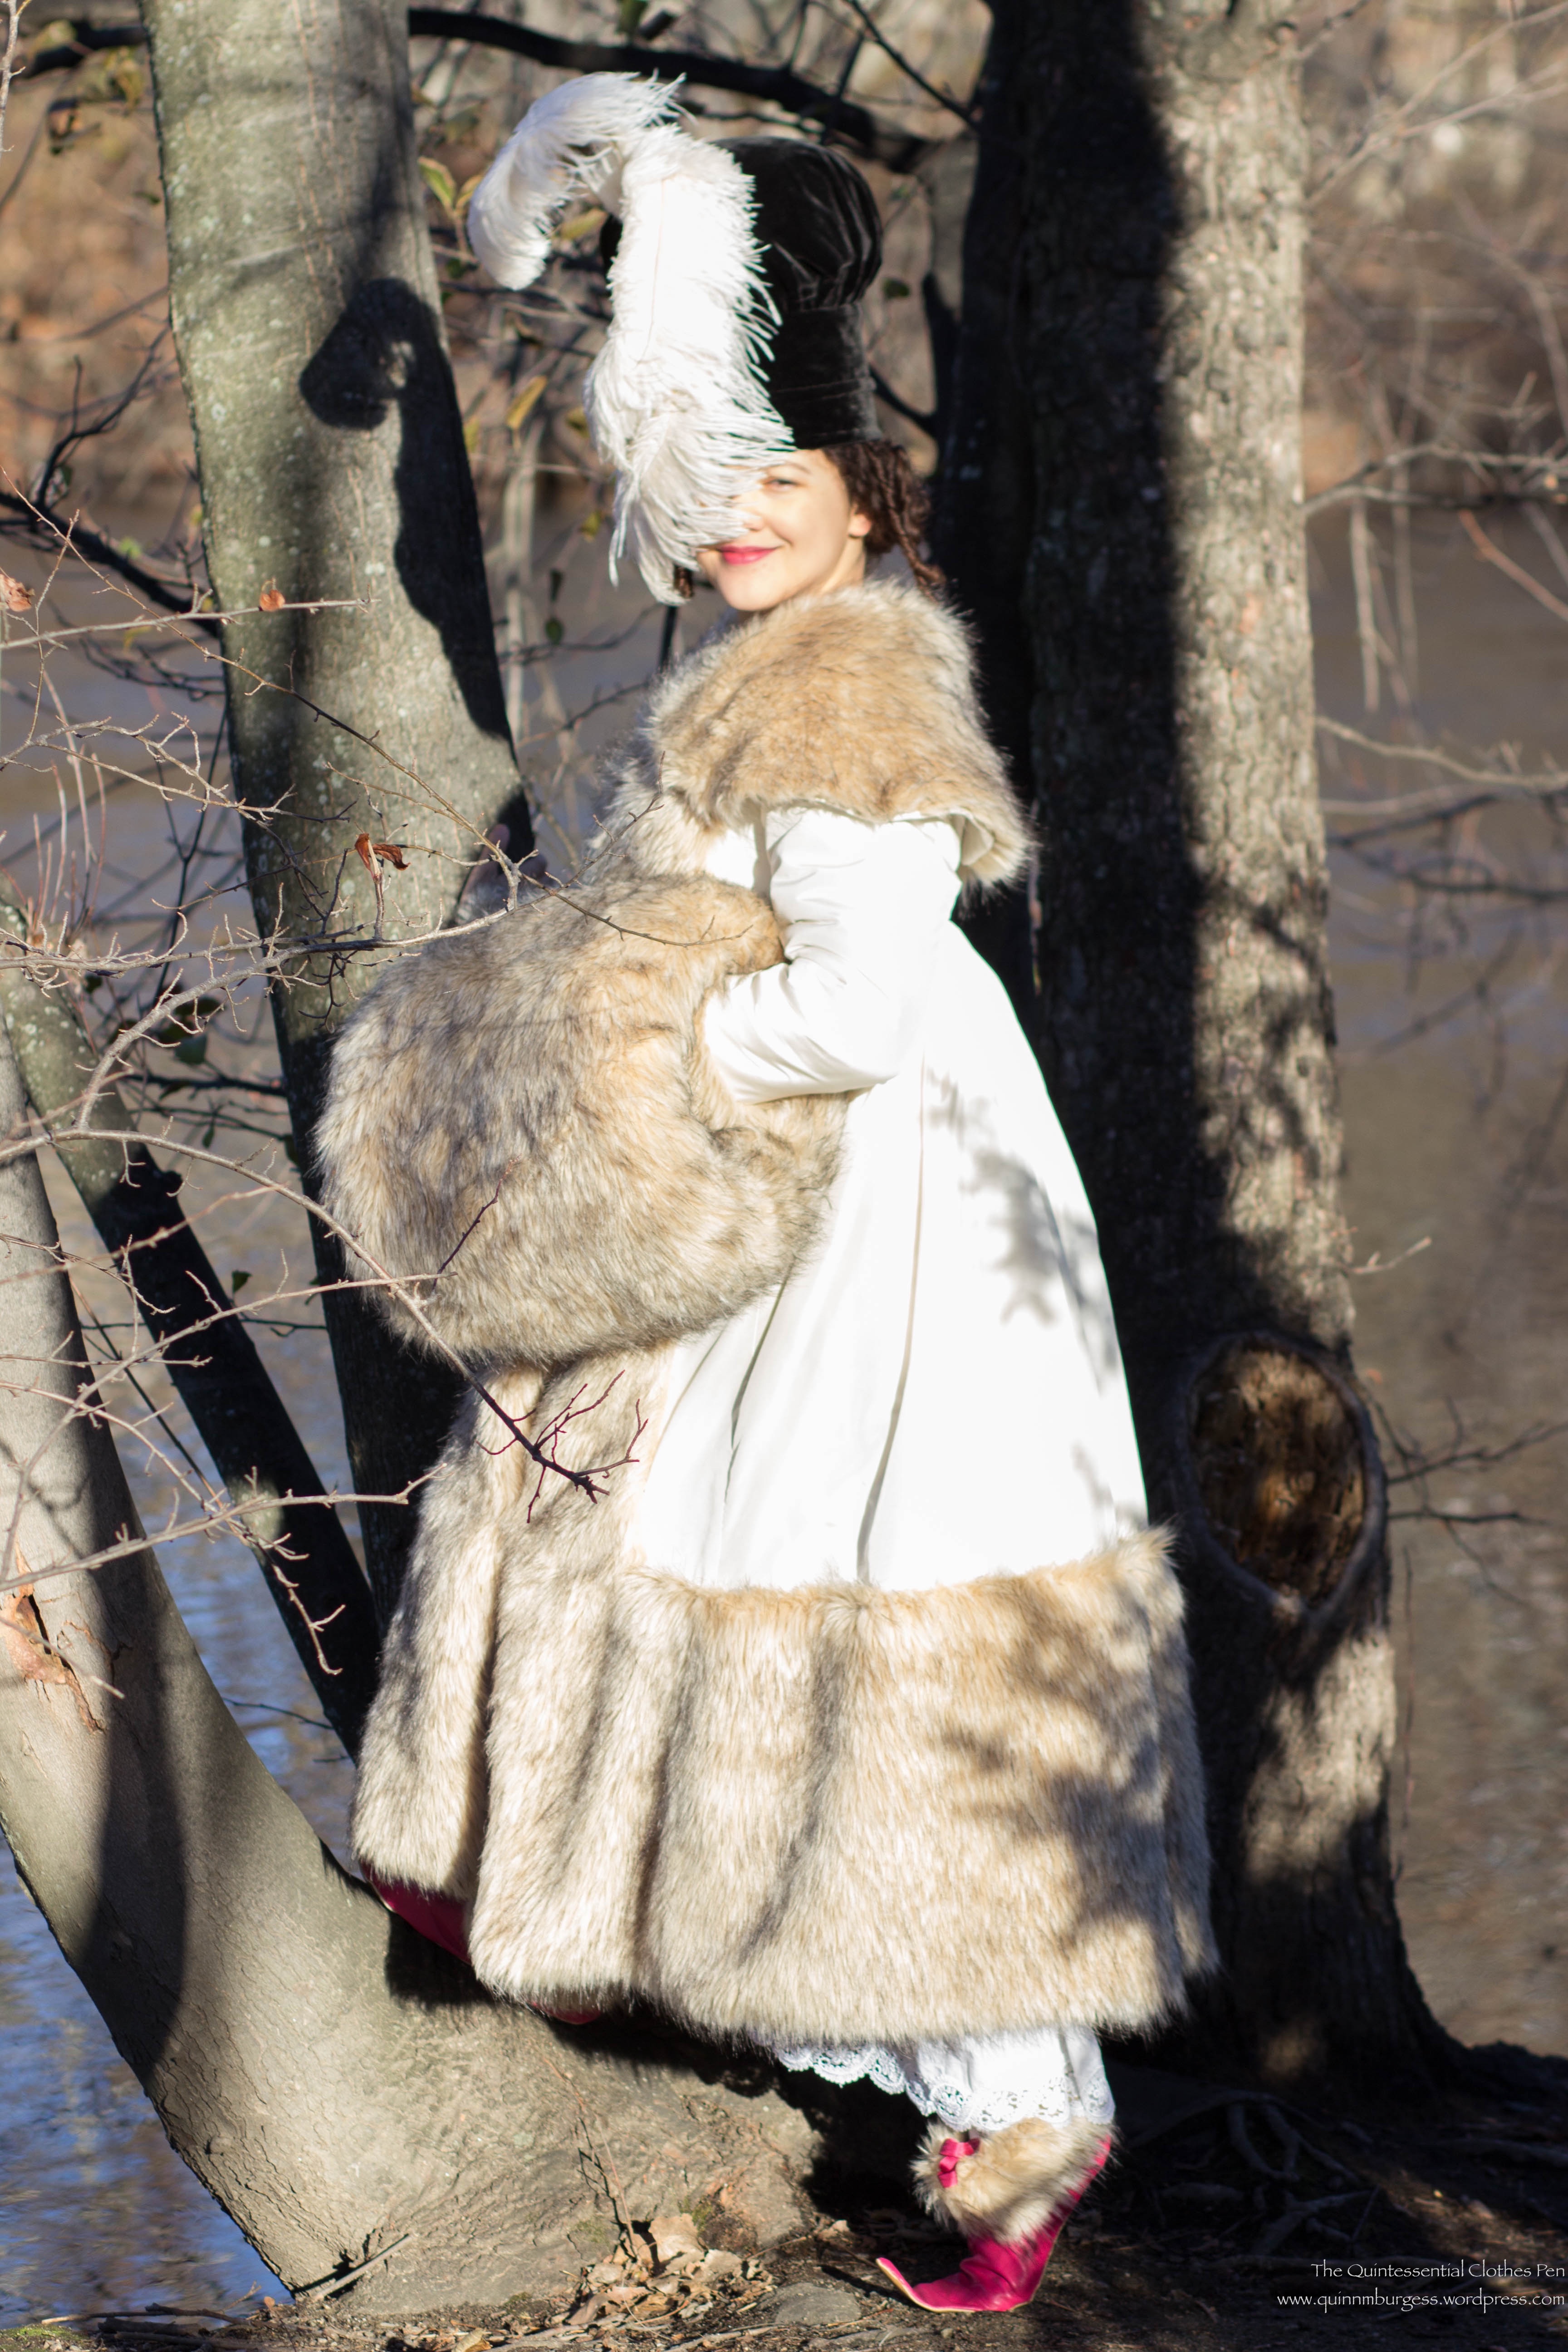
And the skirt? It’s great fun to wear. Such a nice, swishy shape. And it’s warm! Perfect for cold winter weather. Especially when worn with my somewhat new Victoria carriage boots! (They’re subtly making an appearance in the first picture and will be making more appearances. I’m wearing them pretty often!)
As the end of this year draws nearer, I feel the urge to complete my plan to share all the details of my 1814 Vernet Ensemble before the end of 2016. In order to do that, I have the smaller garments to discuss (petticoat and muff) and the witzchoura itself, which I know some people have had questions about for probably about a year. Sorry to keep you waiting!
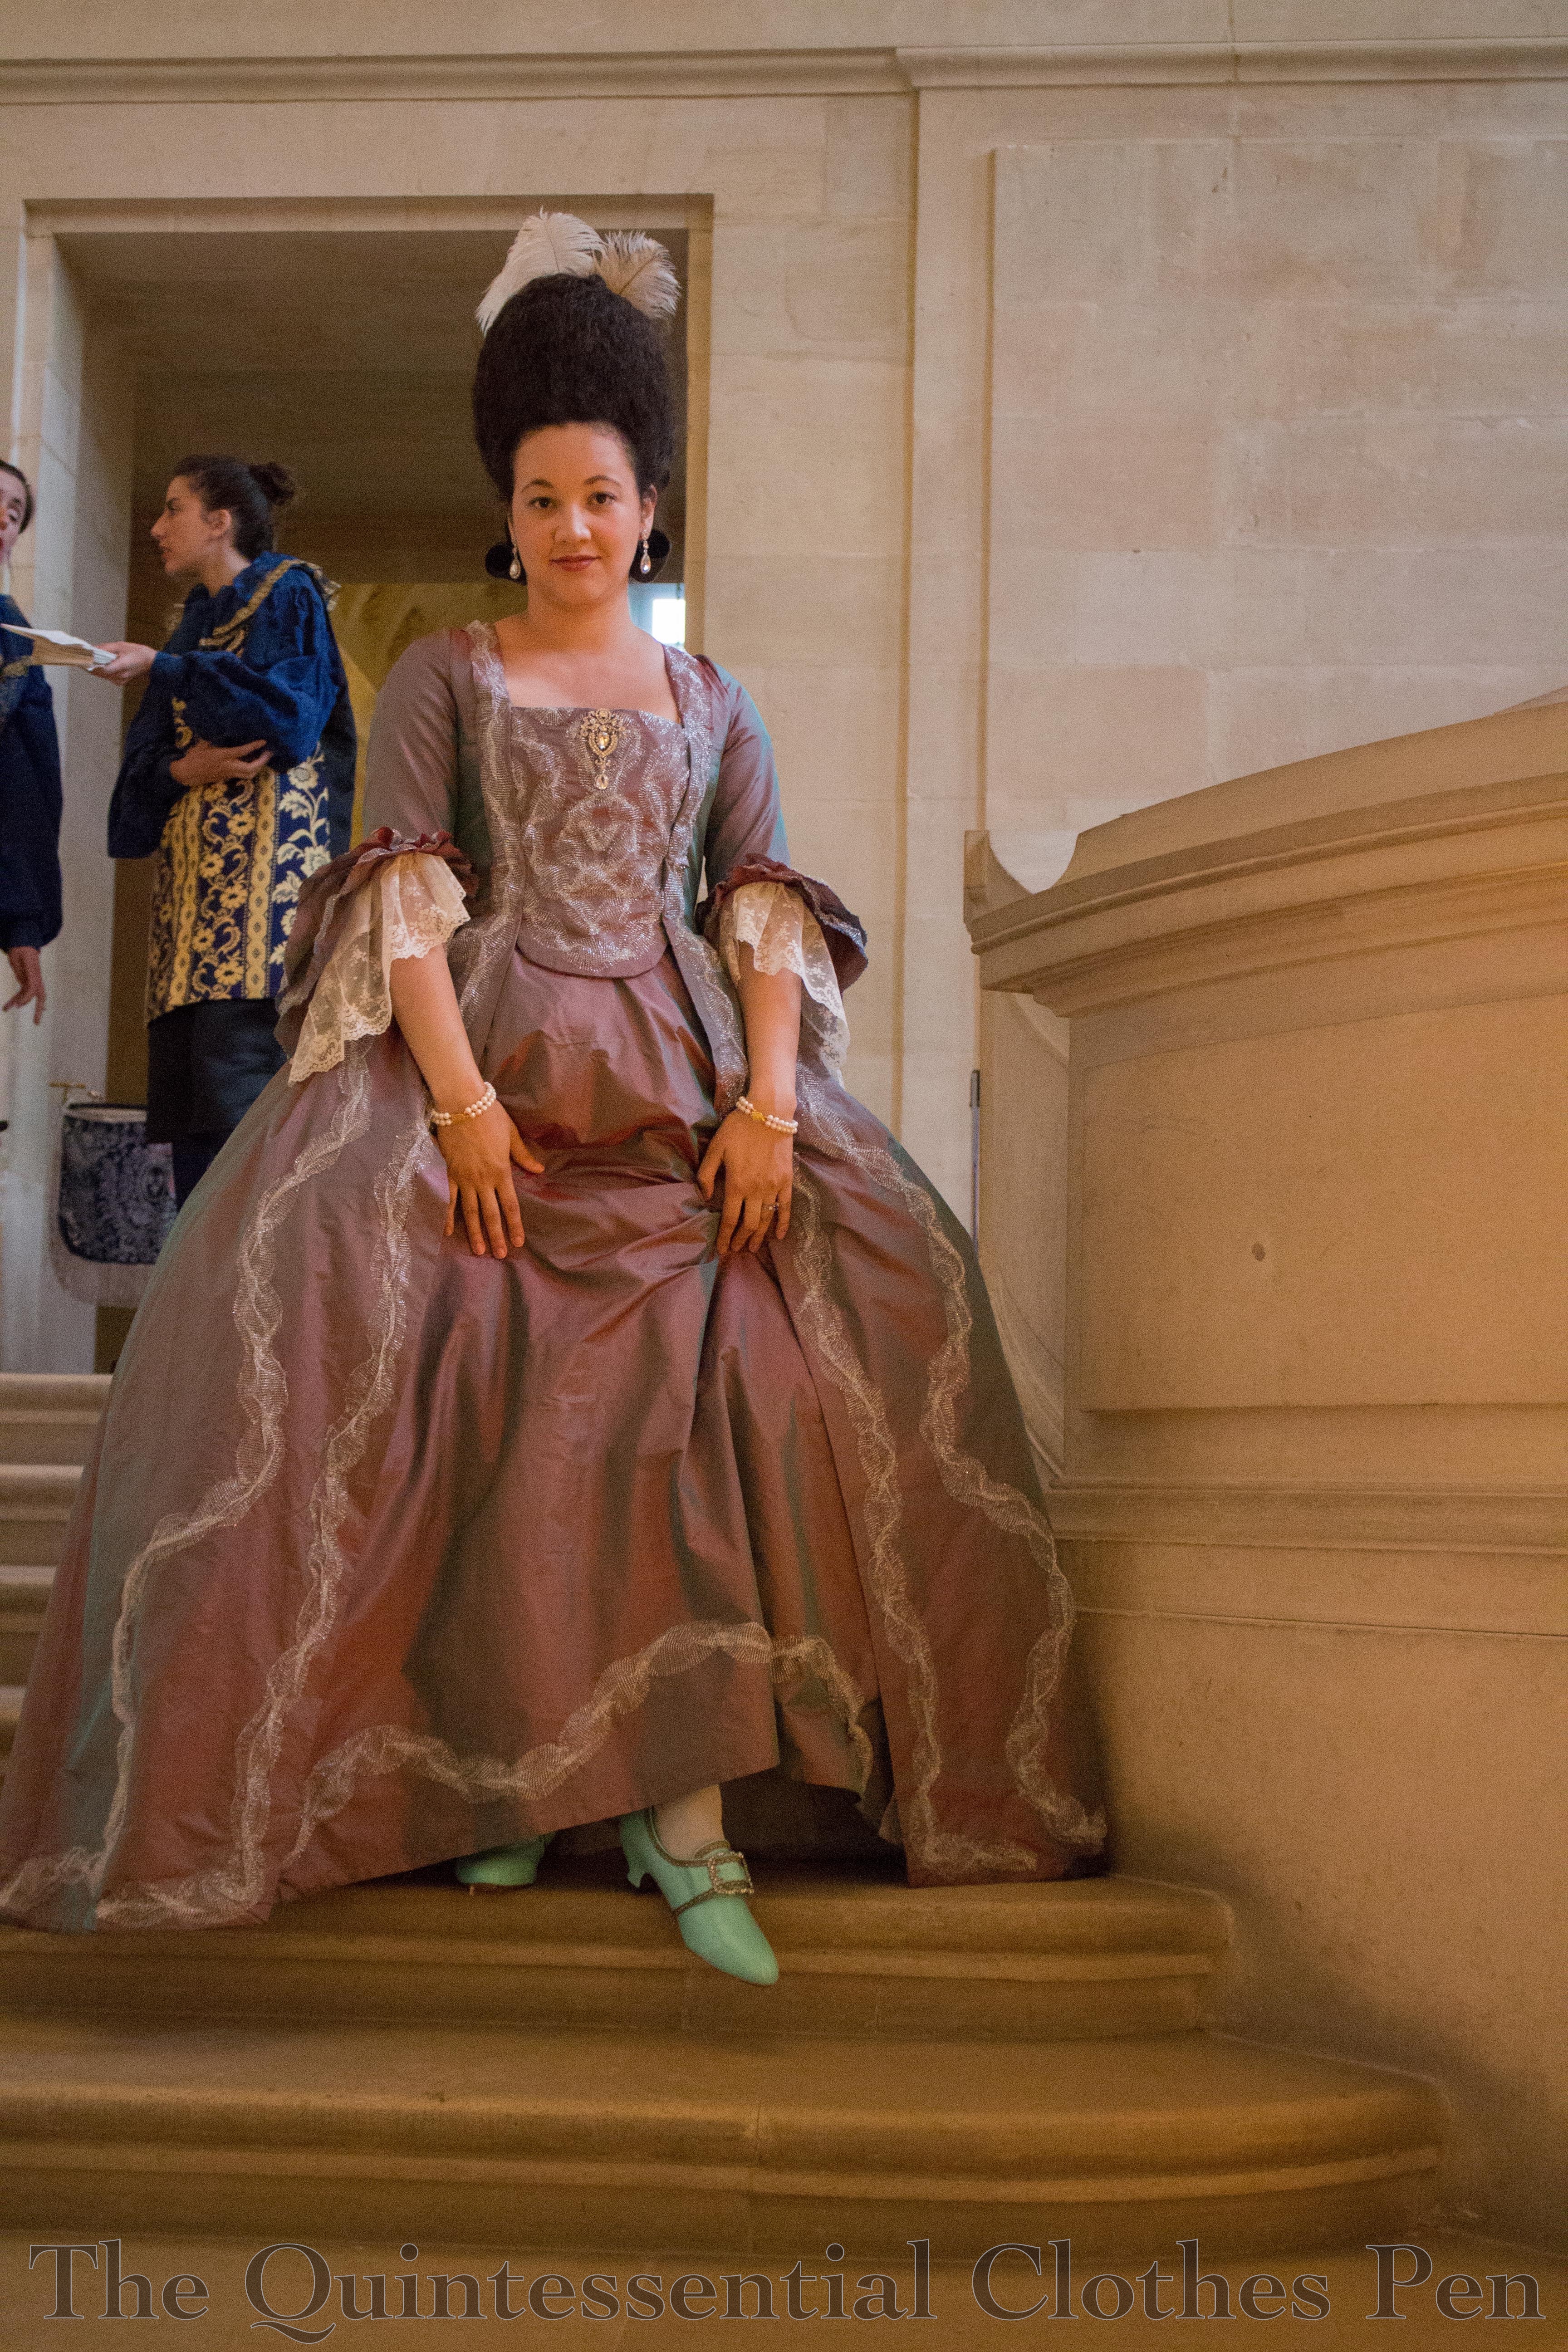
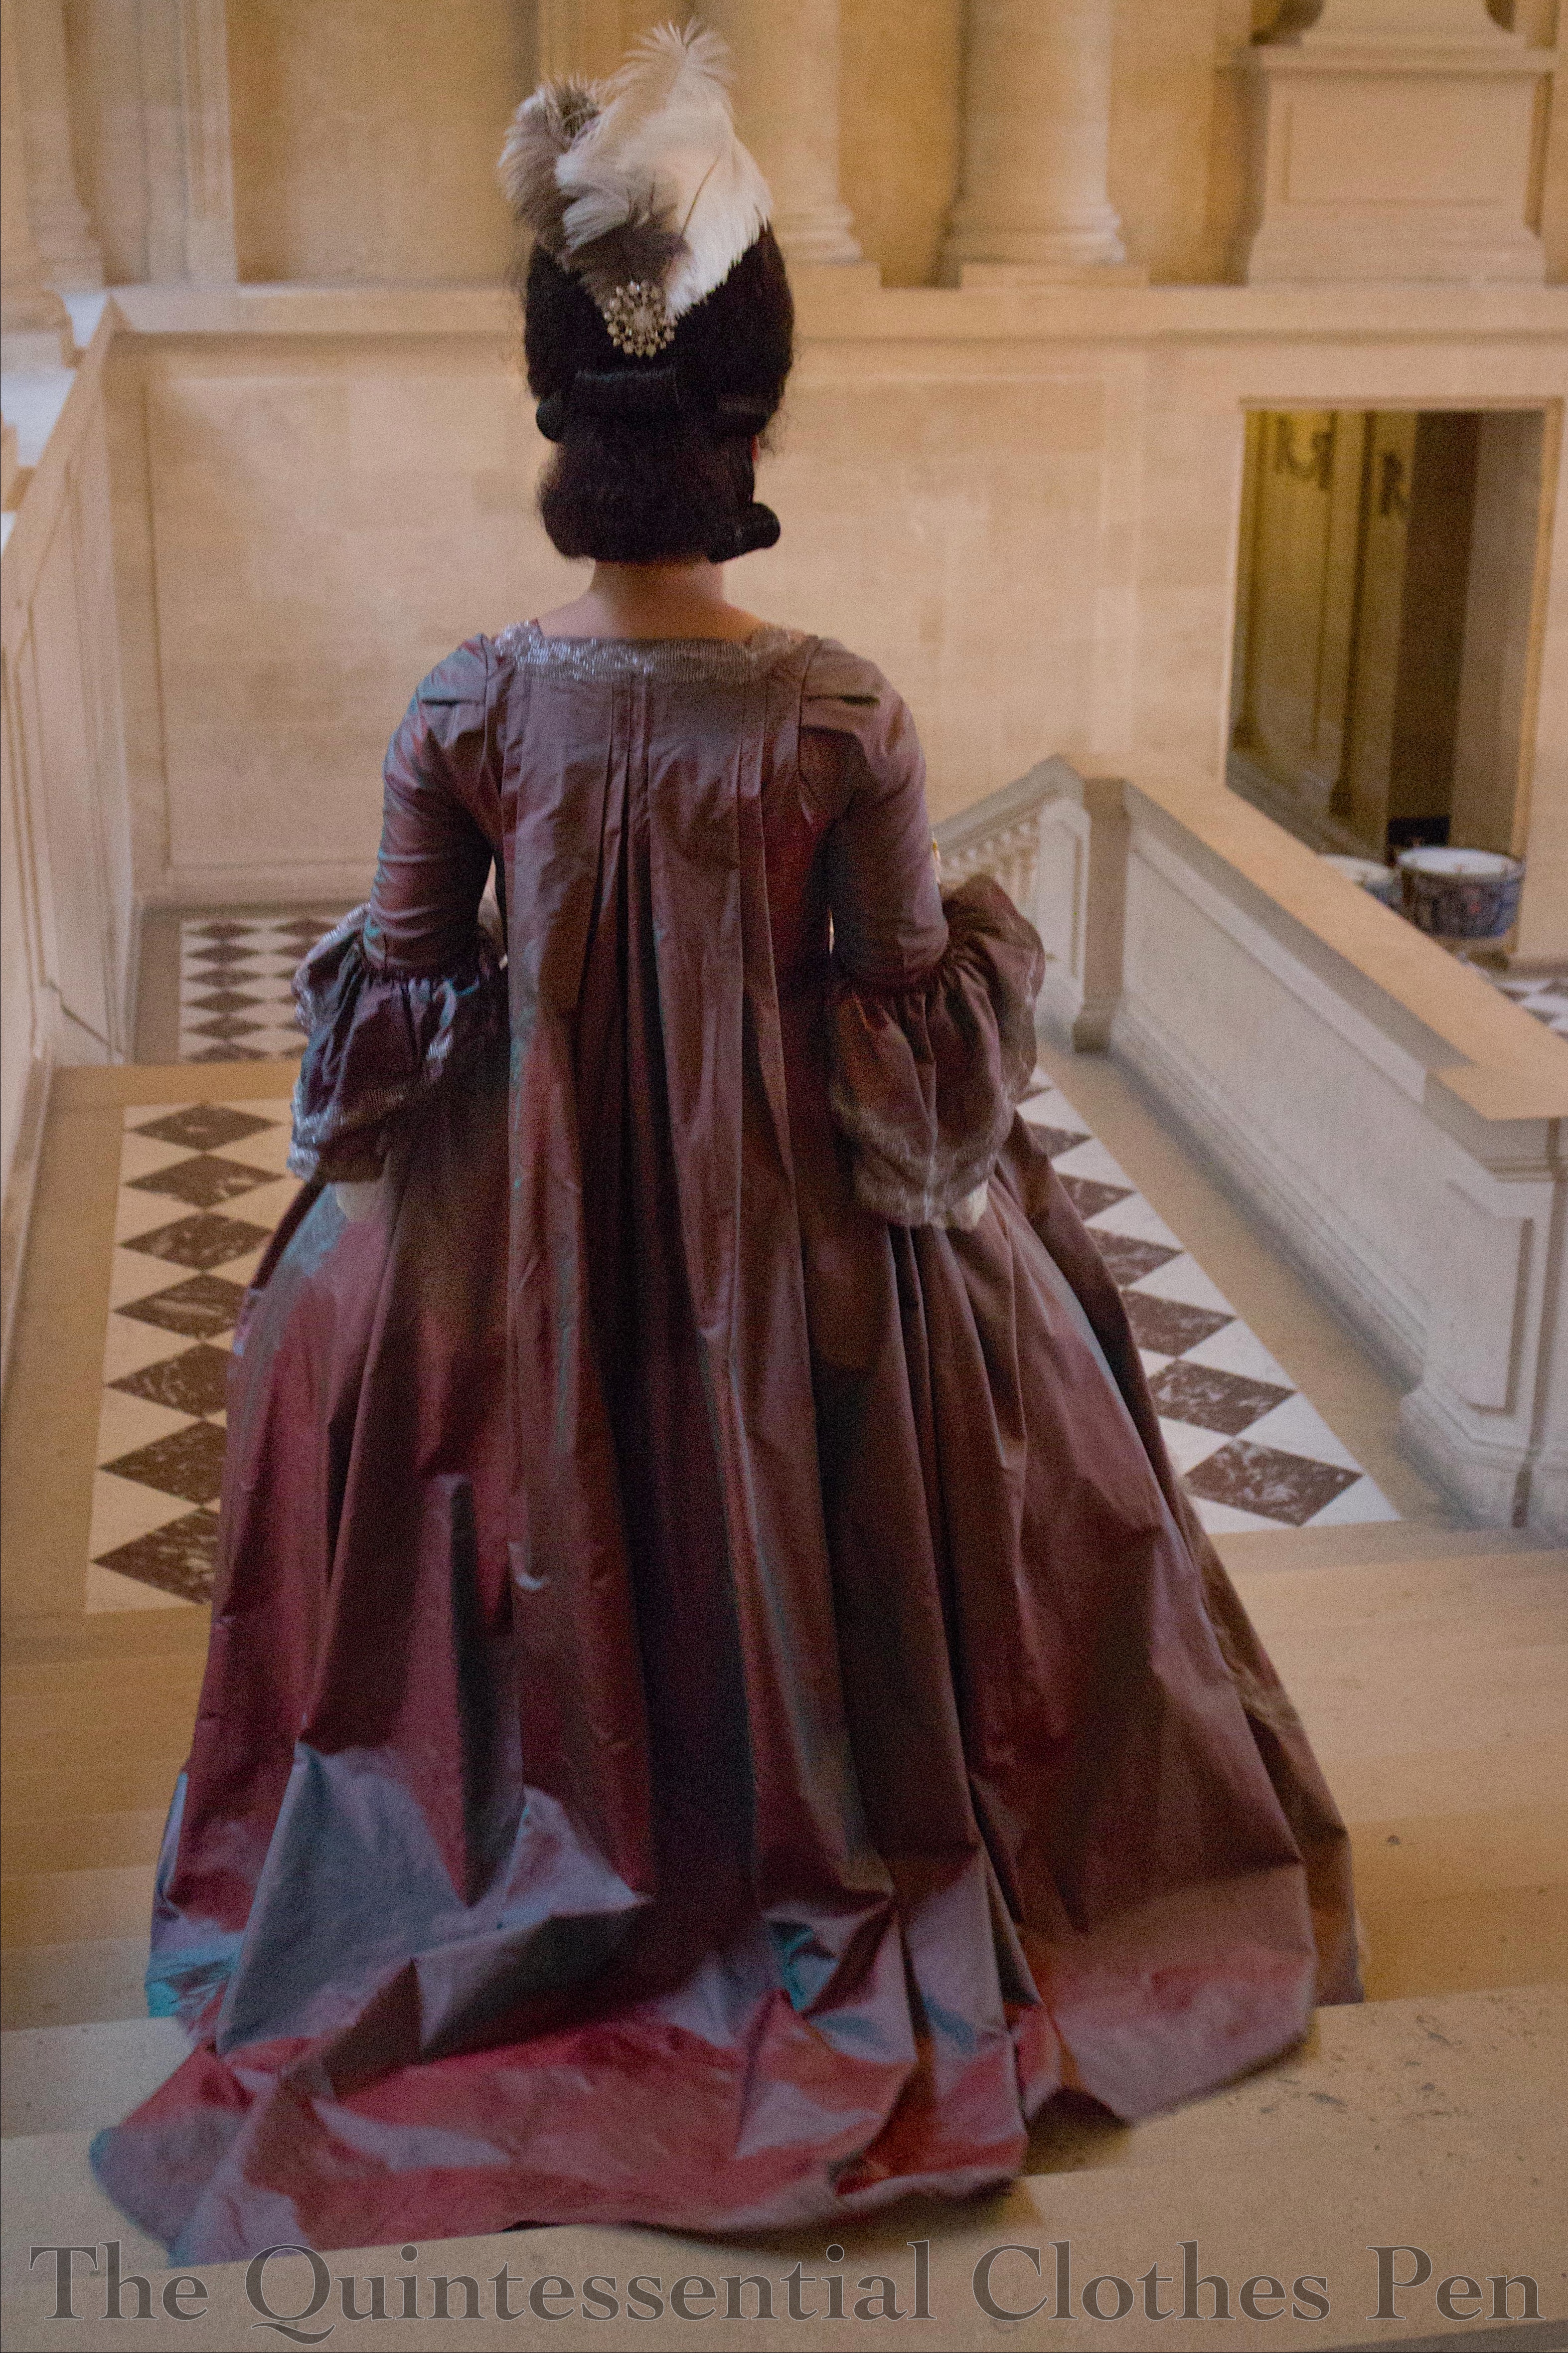
As I’m saving the witzchoura to be the grand finale, today I want to share some details about the petticoat and muff. First, here are some repeat pictures of the full ensemble in case you’ve started reading since this project was unveiled. Both of these pictures are from my Vernet Project photo shoot in 2015. They give you a good glimpse at the petticoat and the muff.
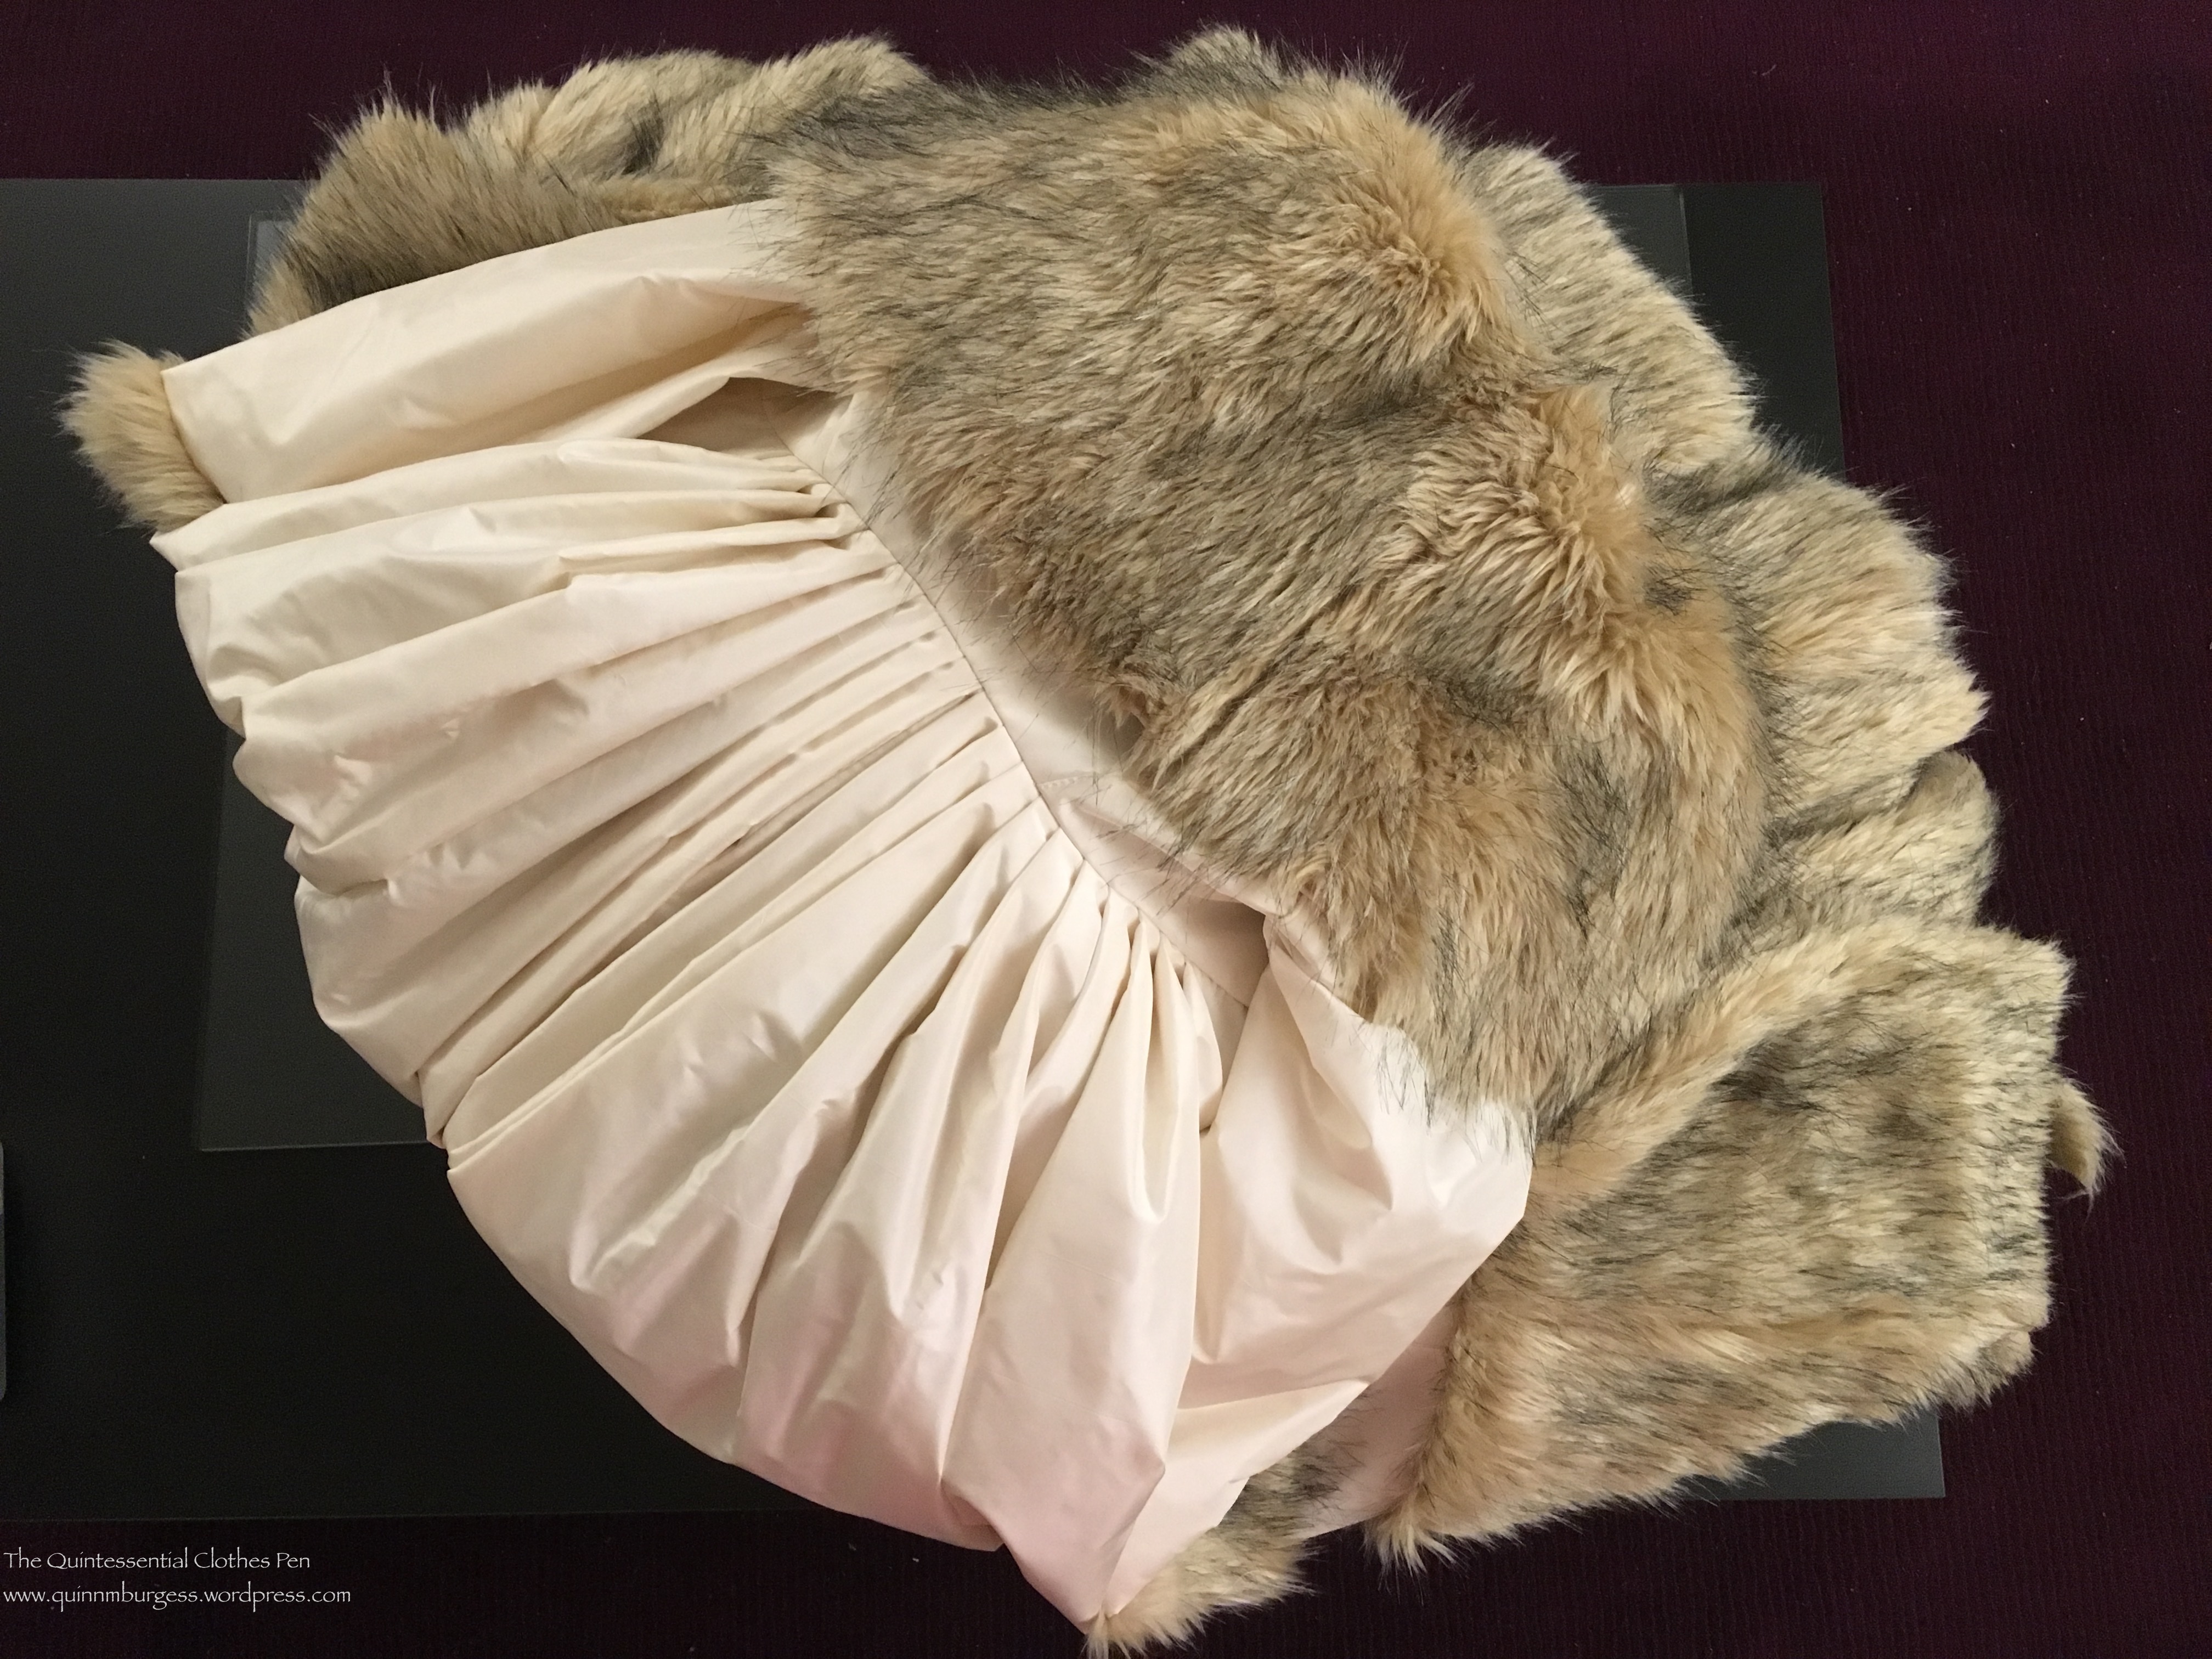
The muff exterior is the same faux fur as the trim on the witzchoura. The lining is an ivory cotton flannel, which feels warmer on the hands than a silk lining and which I don’t think is out of the realm of possibility in terms of historical reasonability (a theory I have tested out with multiple muffs over the last few years).
In order to get the distinctly Regency style of a beehive style muff, the inner flannel lining is substantially smaller in dimension than the exterior fur. Layers of high loft polyester batting fill in the shape and the fur actually wraps to the inside of the lining for a few inches on each side and is gathered to fit the smaller circumference of the lining. The result is a very large and very cozy muff. (This method is different than making the interior and exterior the same or similar in dimensions, resulting a muff that looks like my 1822 one. The blog post sharing details about that muff has lots of great images of both types of muffs from this period, if you want to see more. Also, it’s worth noting that polyester batting would not have been used to keep one’s hands warm in the early 19th century, but that I chose that materials because I had it on hand and it is not visible.)
The petticoat is the only piece of my Vernet project that existed before I agreed to participate. It started life as part of a dress, but was removed and languished for years. Turns out I had made it too narrow to dance in, which isn’t very useful in my life. On the bright side, I had just enough of the cotton fabric left to add another panel, thus making the hem circumference much more wearable.
The petticoat had an attached sleeveless bodice before the addition of extra fabric in the skirt, so after adding fullness I was able to simply reattach the bodice. The edges of the bodice are narrow hemmed and it closes at center front with a tie at the waist and a button and loop at the bust. This past blog post discusses extant sleeveless underdresses or petticoats such as this. As with everything else in this project, both this petticoat and the muff are entirely hand sewn.
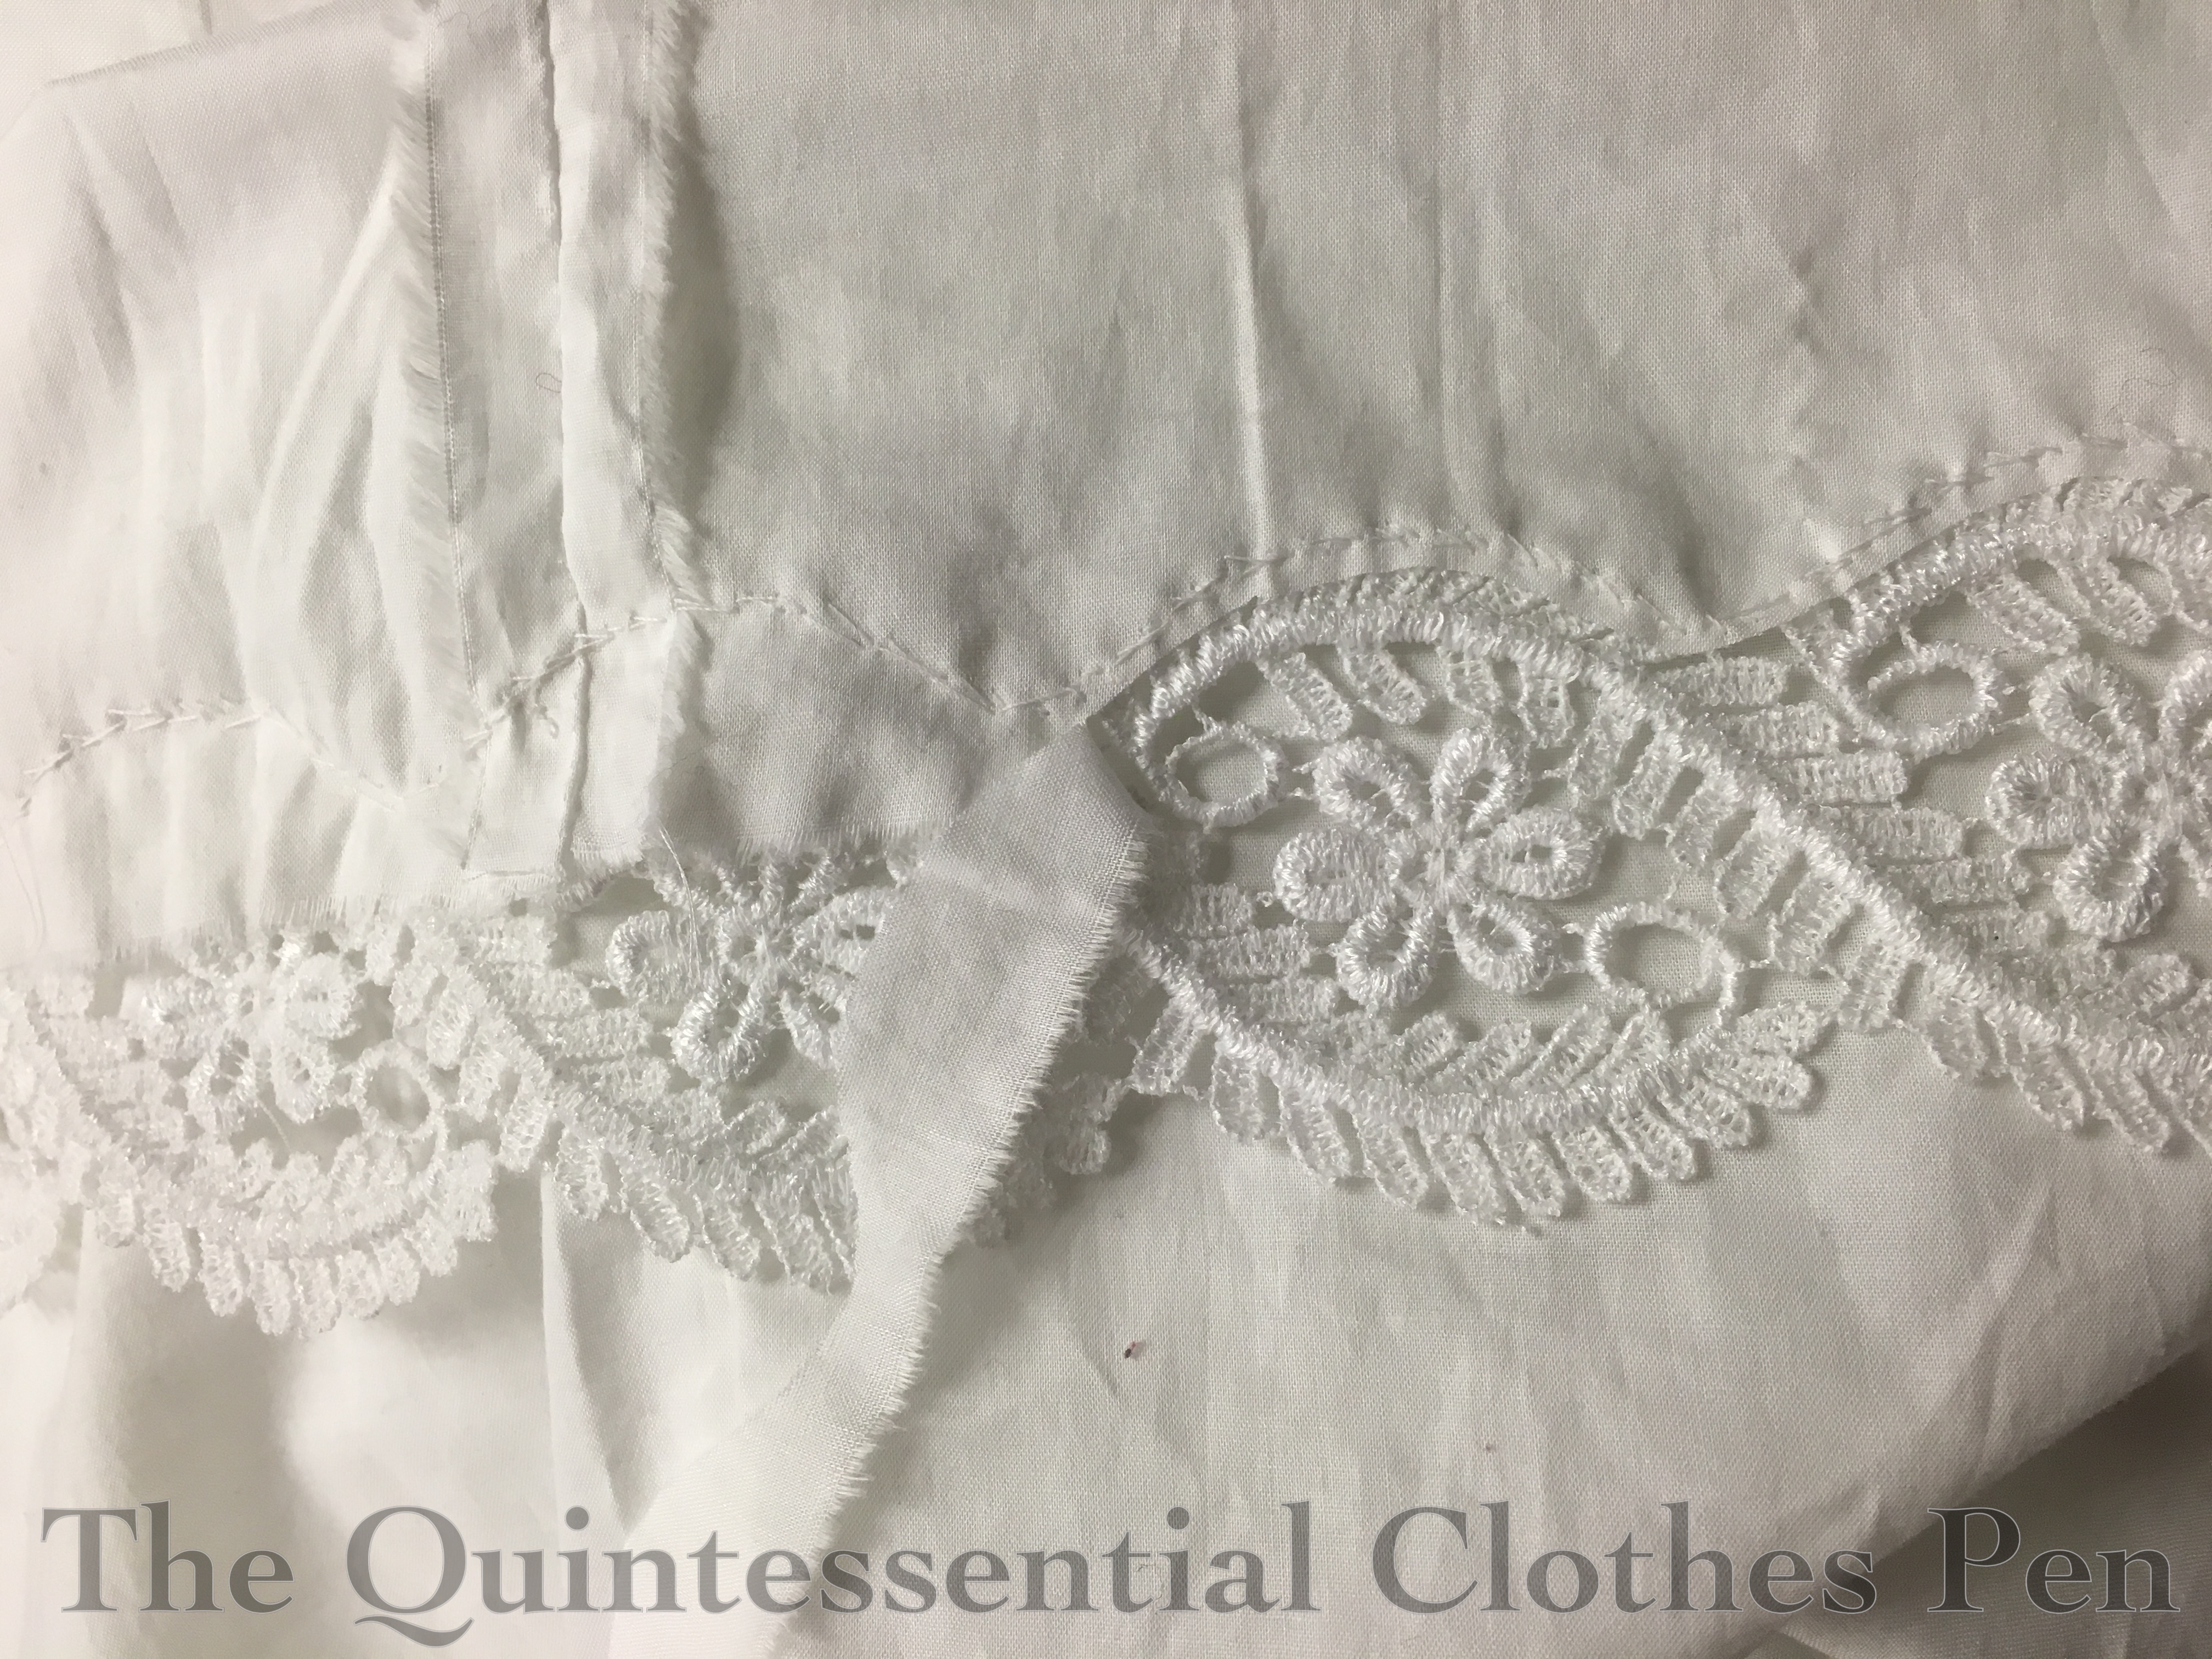
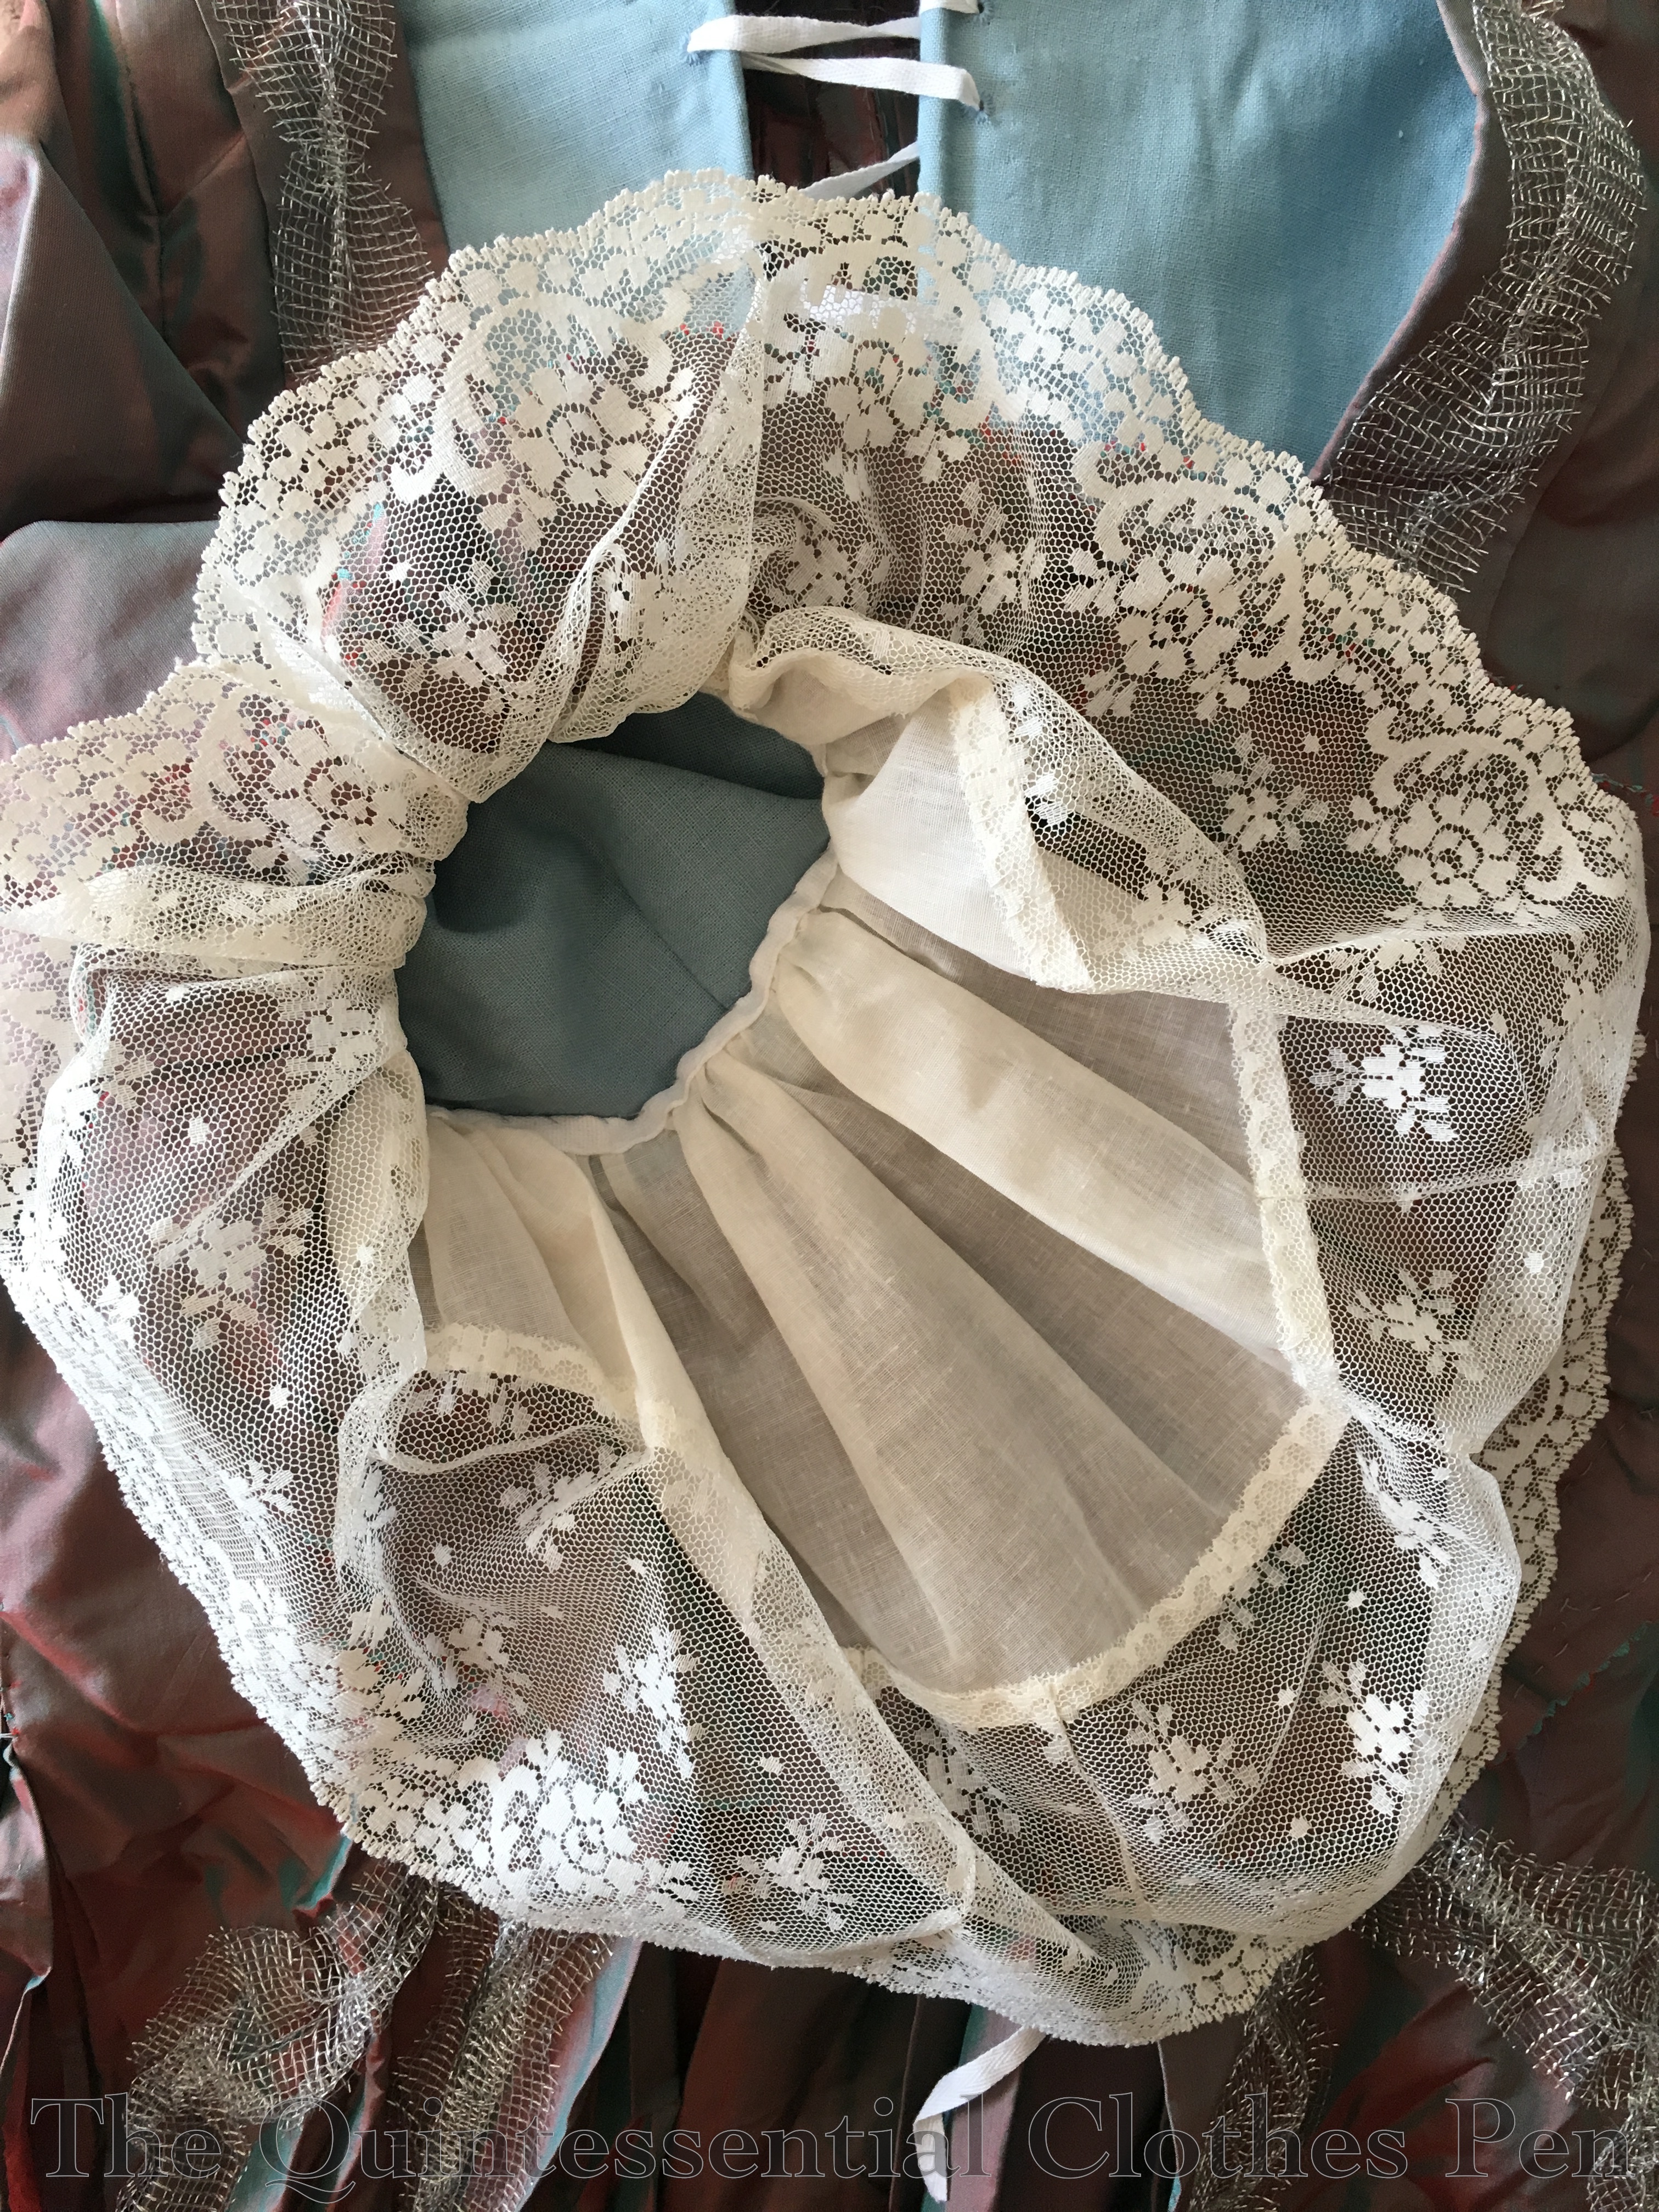
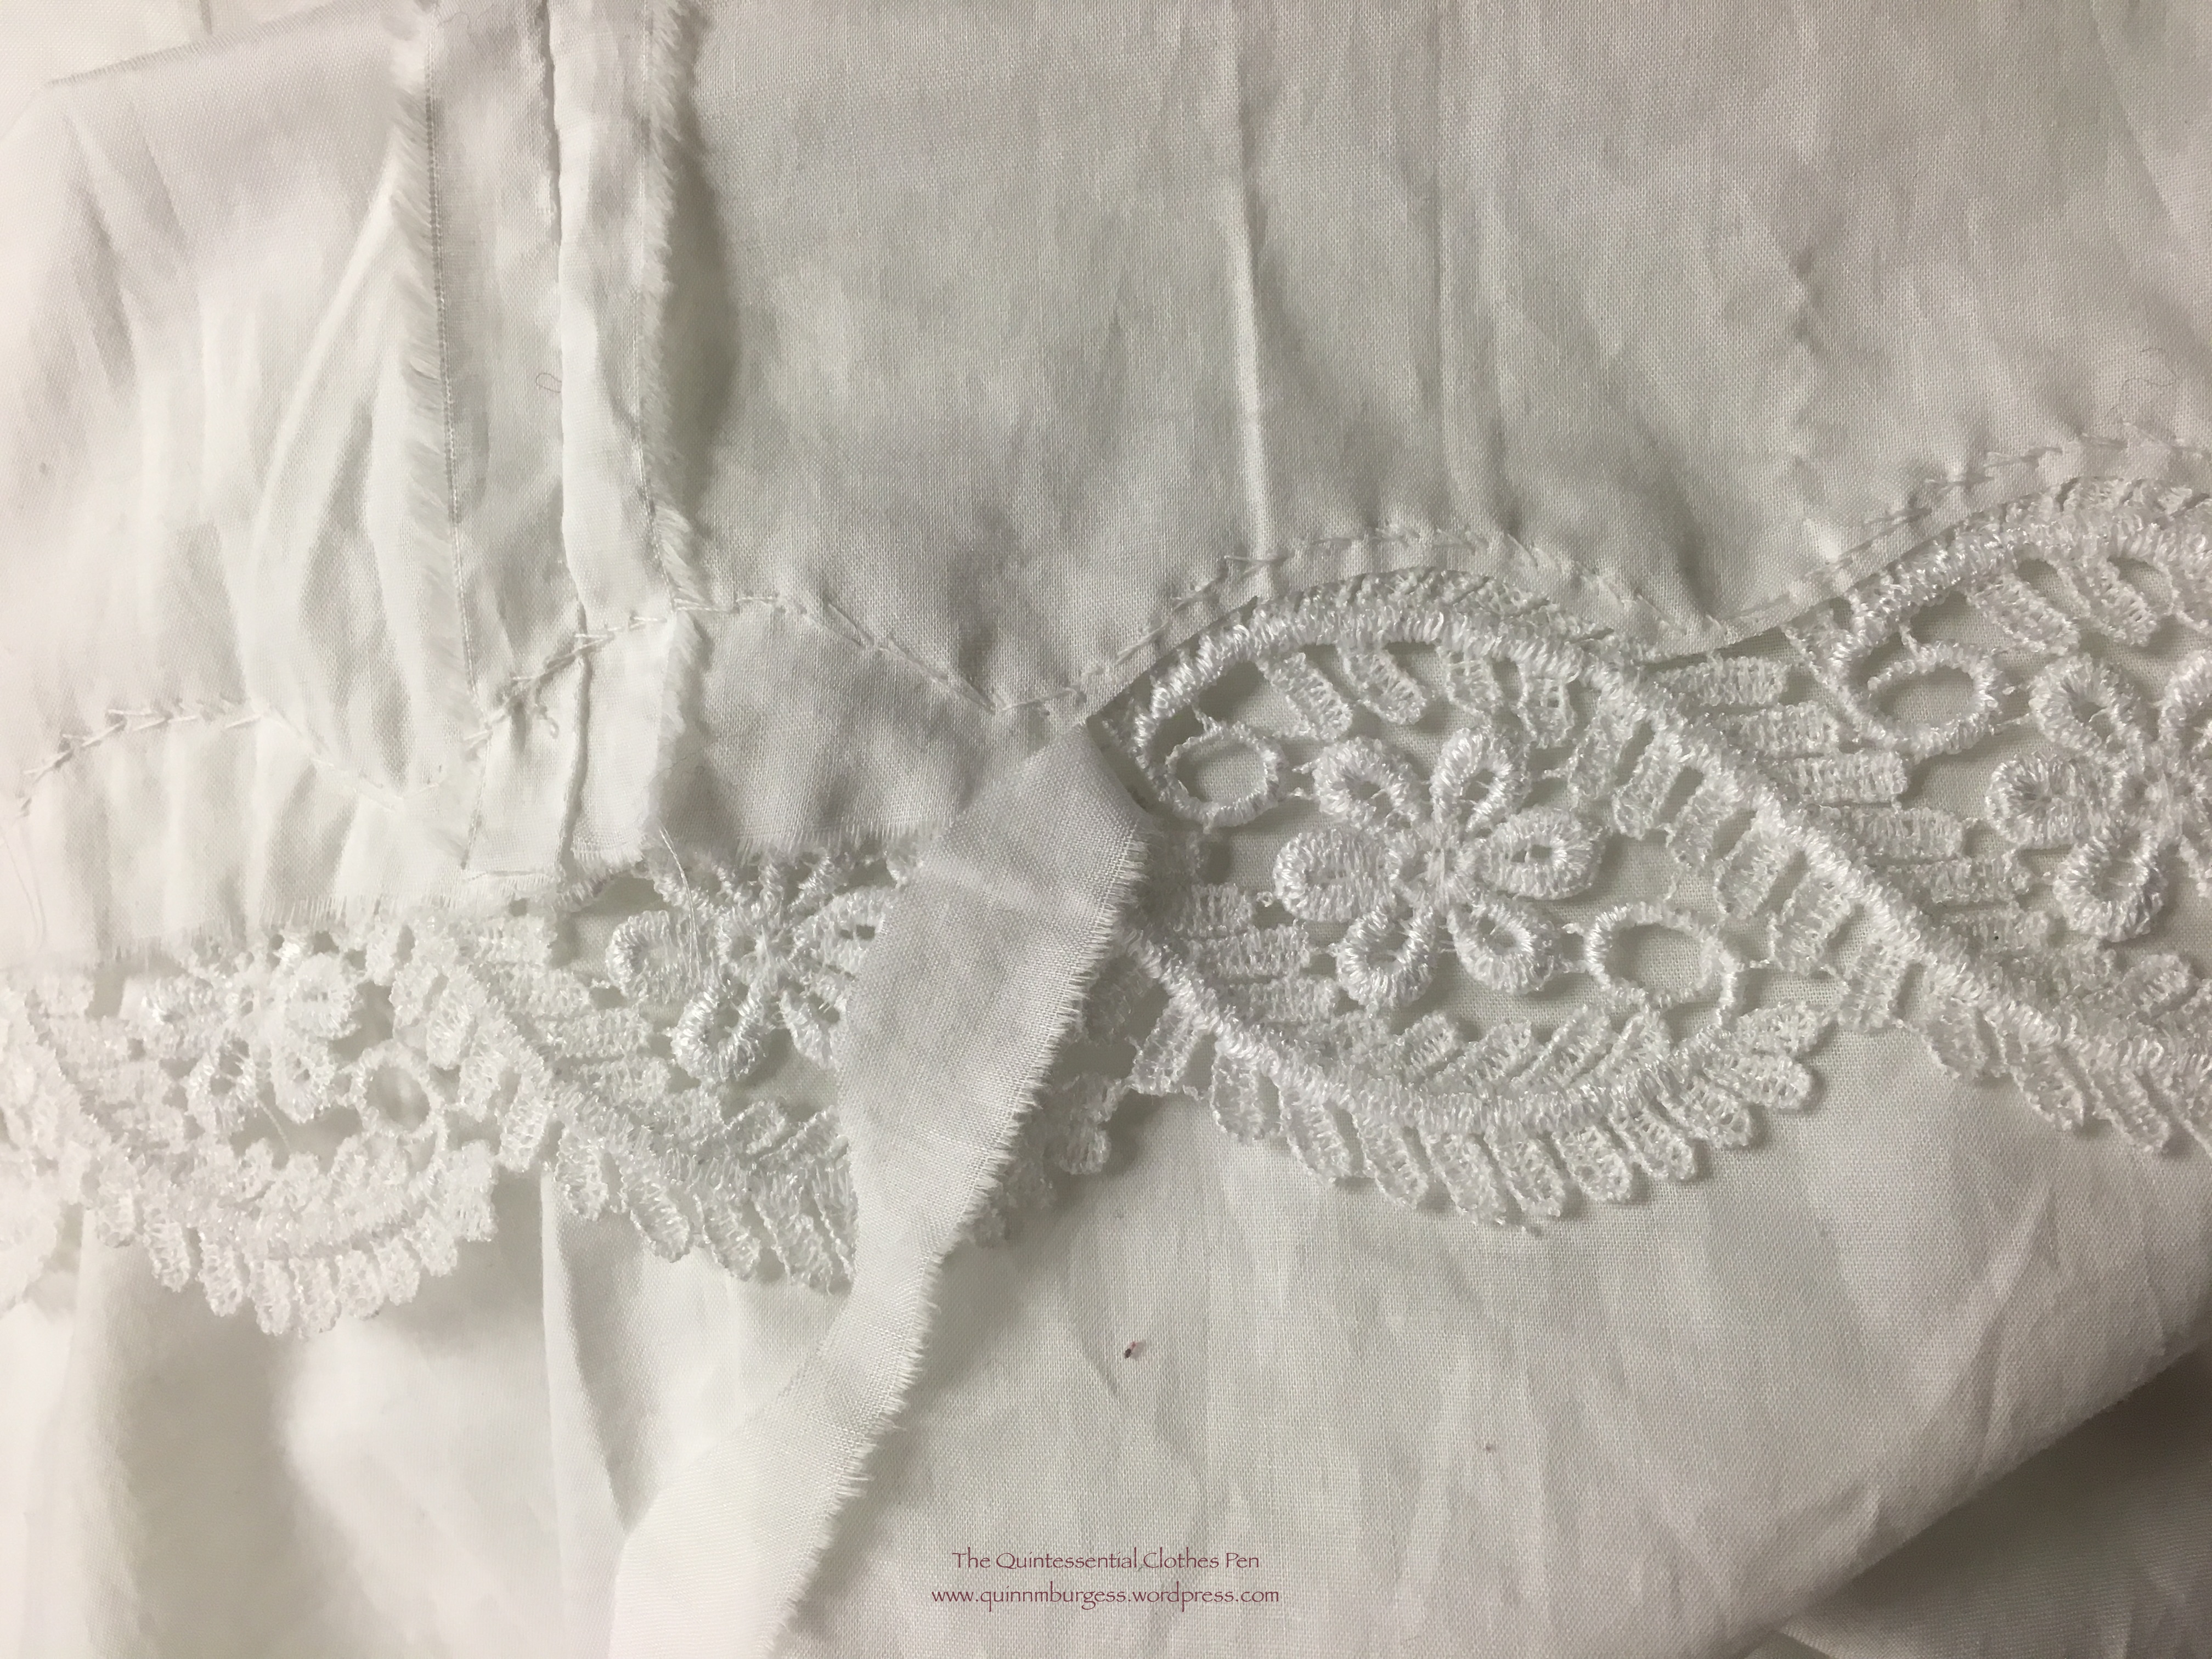
The only other changes I needed to make to the petticoat to use it for the Vernet Project were at the hem. I started by adding lace that mimicked the shape of the embroidery seen in my Vernet fashion plate. I whip stitched the lace on with small stitches and then cut away the fabric behind the lace, creating a lovely scalloped hem.
After trying on the petticoat with the finished hem, I decided it was too long and took a tuck above the hem to shorten it. You can see the tuck in one of the photo shoot pictures early in this post.
This final picture is from when I was hemming the witzchoura. While I had that garment on the dress form I also put the petticoat on to determine the placement of the lace on the previously hemmed petticoat.
And that’s it! Those two garments were minor in scale compared to the toque de velours, silly shoes, and the witzchoura itself, both in terms of materials and sheer volume of work involved.
The change in plan resulted in new fabric and a new plan. I stuck with the decade of the 1770s, but decided to make a robe a la francaise, or sacque, instead of a robe de cour as it seemed like a garment I might be more likely to wear again in the future. Accordingly, I found and ordered new fabric: 11 yards of a very lightweight changeable silk ‘lutestring’ from Burnley and Trowbridge. Luckily, the new fabric still worked with the metallic silver net I’d purchased for trim. It’s the same metallic silver net that is on my 1885 Night Sky Fancy Dress, just cut into strips.
Regarding the pattern, I found some of the directions to be confusing. For example, making the petticoat seemed way overcomplicated. You can read more details about how I made my petticoat here. Also, I found the directions for pleating the front robings/facing and the back pleats quite confusing. There, I was saved by this post written by AJ who also used the JP Ryan pattern, got confused, and posted about the confusing bits. Very helpful! Aside from the confusing directions, the gown pieces went together perfectly with no trouble. I did have to alter the front strap area to make the front sit flat against my body. Two friends who used this same pattern did not have to make that adjustment, so I chalk it up to differing body shapes but do not think it negatively affects the pattern.
The lining of the gown is made from a one yard piece of cotton/linen blend from my stash. Also from my stash and used inside the gown were a scrap of medium blue linen and a scrap of medium blue cotton twill used to interface the stomacher. These were all the bits left of those three stash fabrics–yay! I was also amused that all of the random non-silk fabrics in this gown and petticoat wound up being blue. I used my lining as my mockup, meaning that I had to take a dart in the front strap area, but was able to adjust the pattern to eliminate the dart before cutting out the silk.
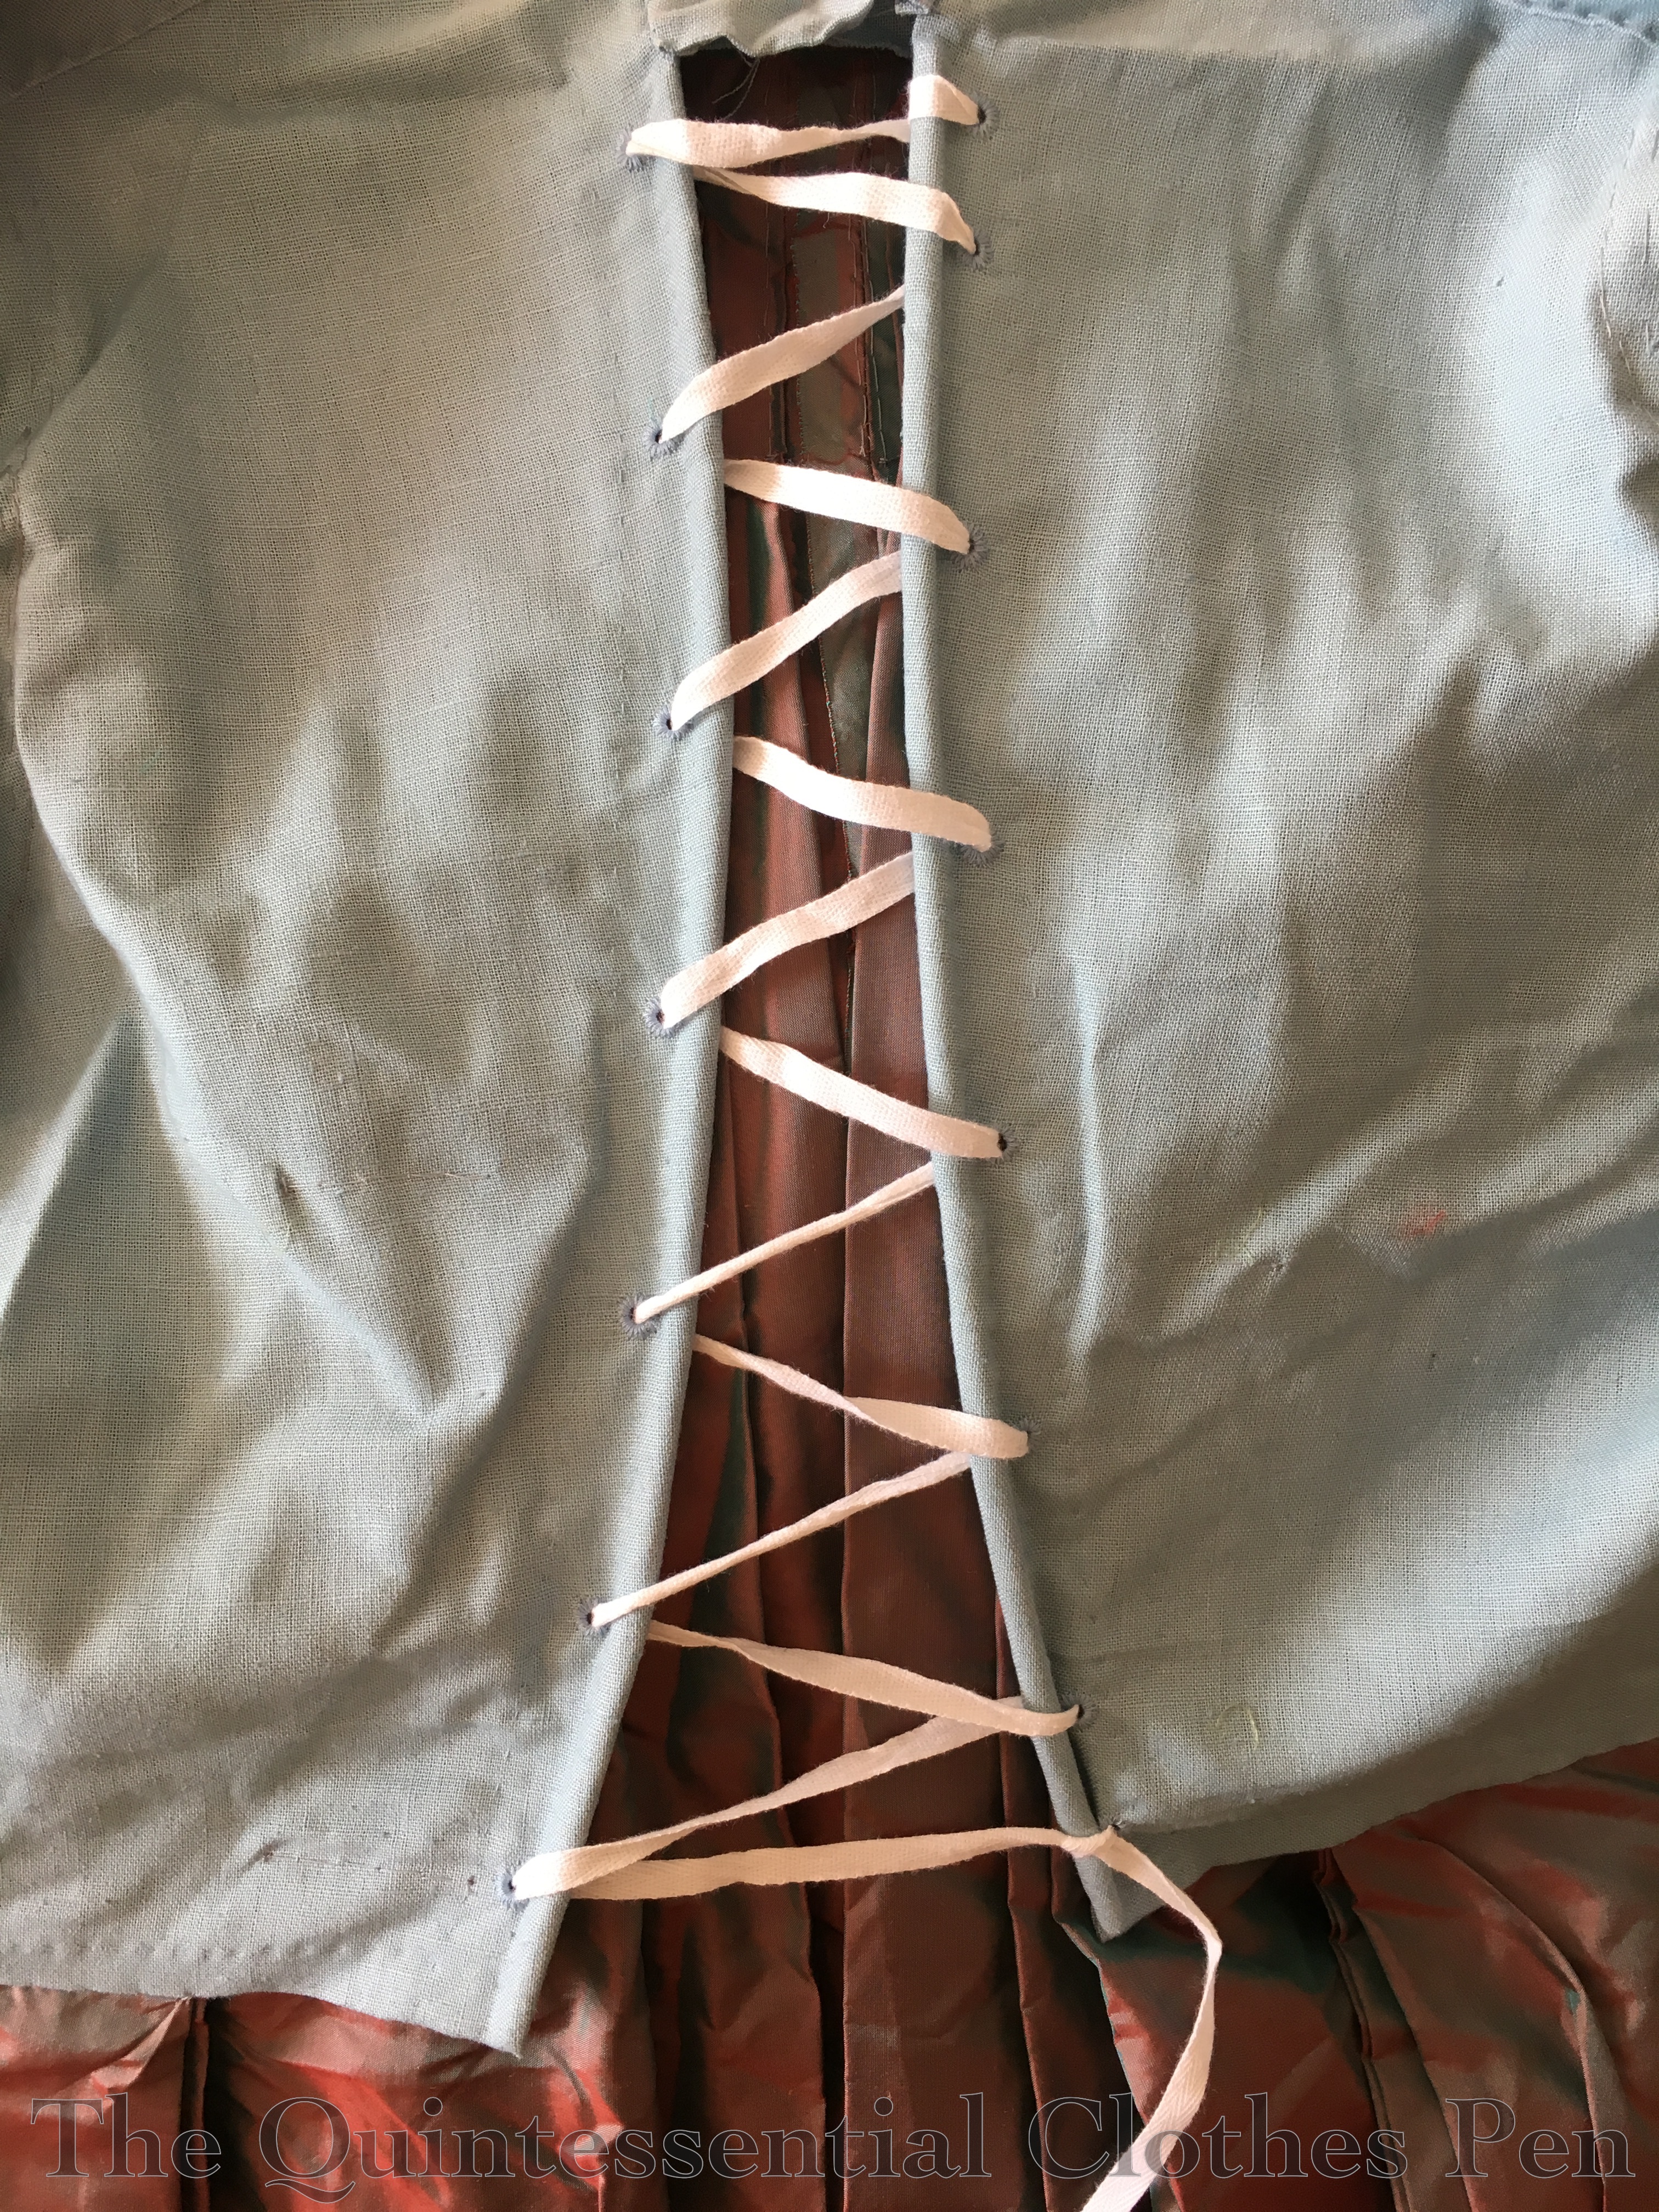
The back of the lining is adjustable using a tie threaded through eyelets. The edges are boned with reed. The pattern suggests ties, but you also see lacing in extant garments and this seemed easier to adjust and that it would use less length for the tie(s). There are examples of both ties and lacing on my Pinterest board for this project. The tie is a 1/4″ cotton twill tape. It’s not accurate, but did the job.
Underneath the decorative stomacher, the gown closes with lacing panels attached to the lining. Again, mine laces closed using twill tape.
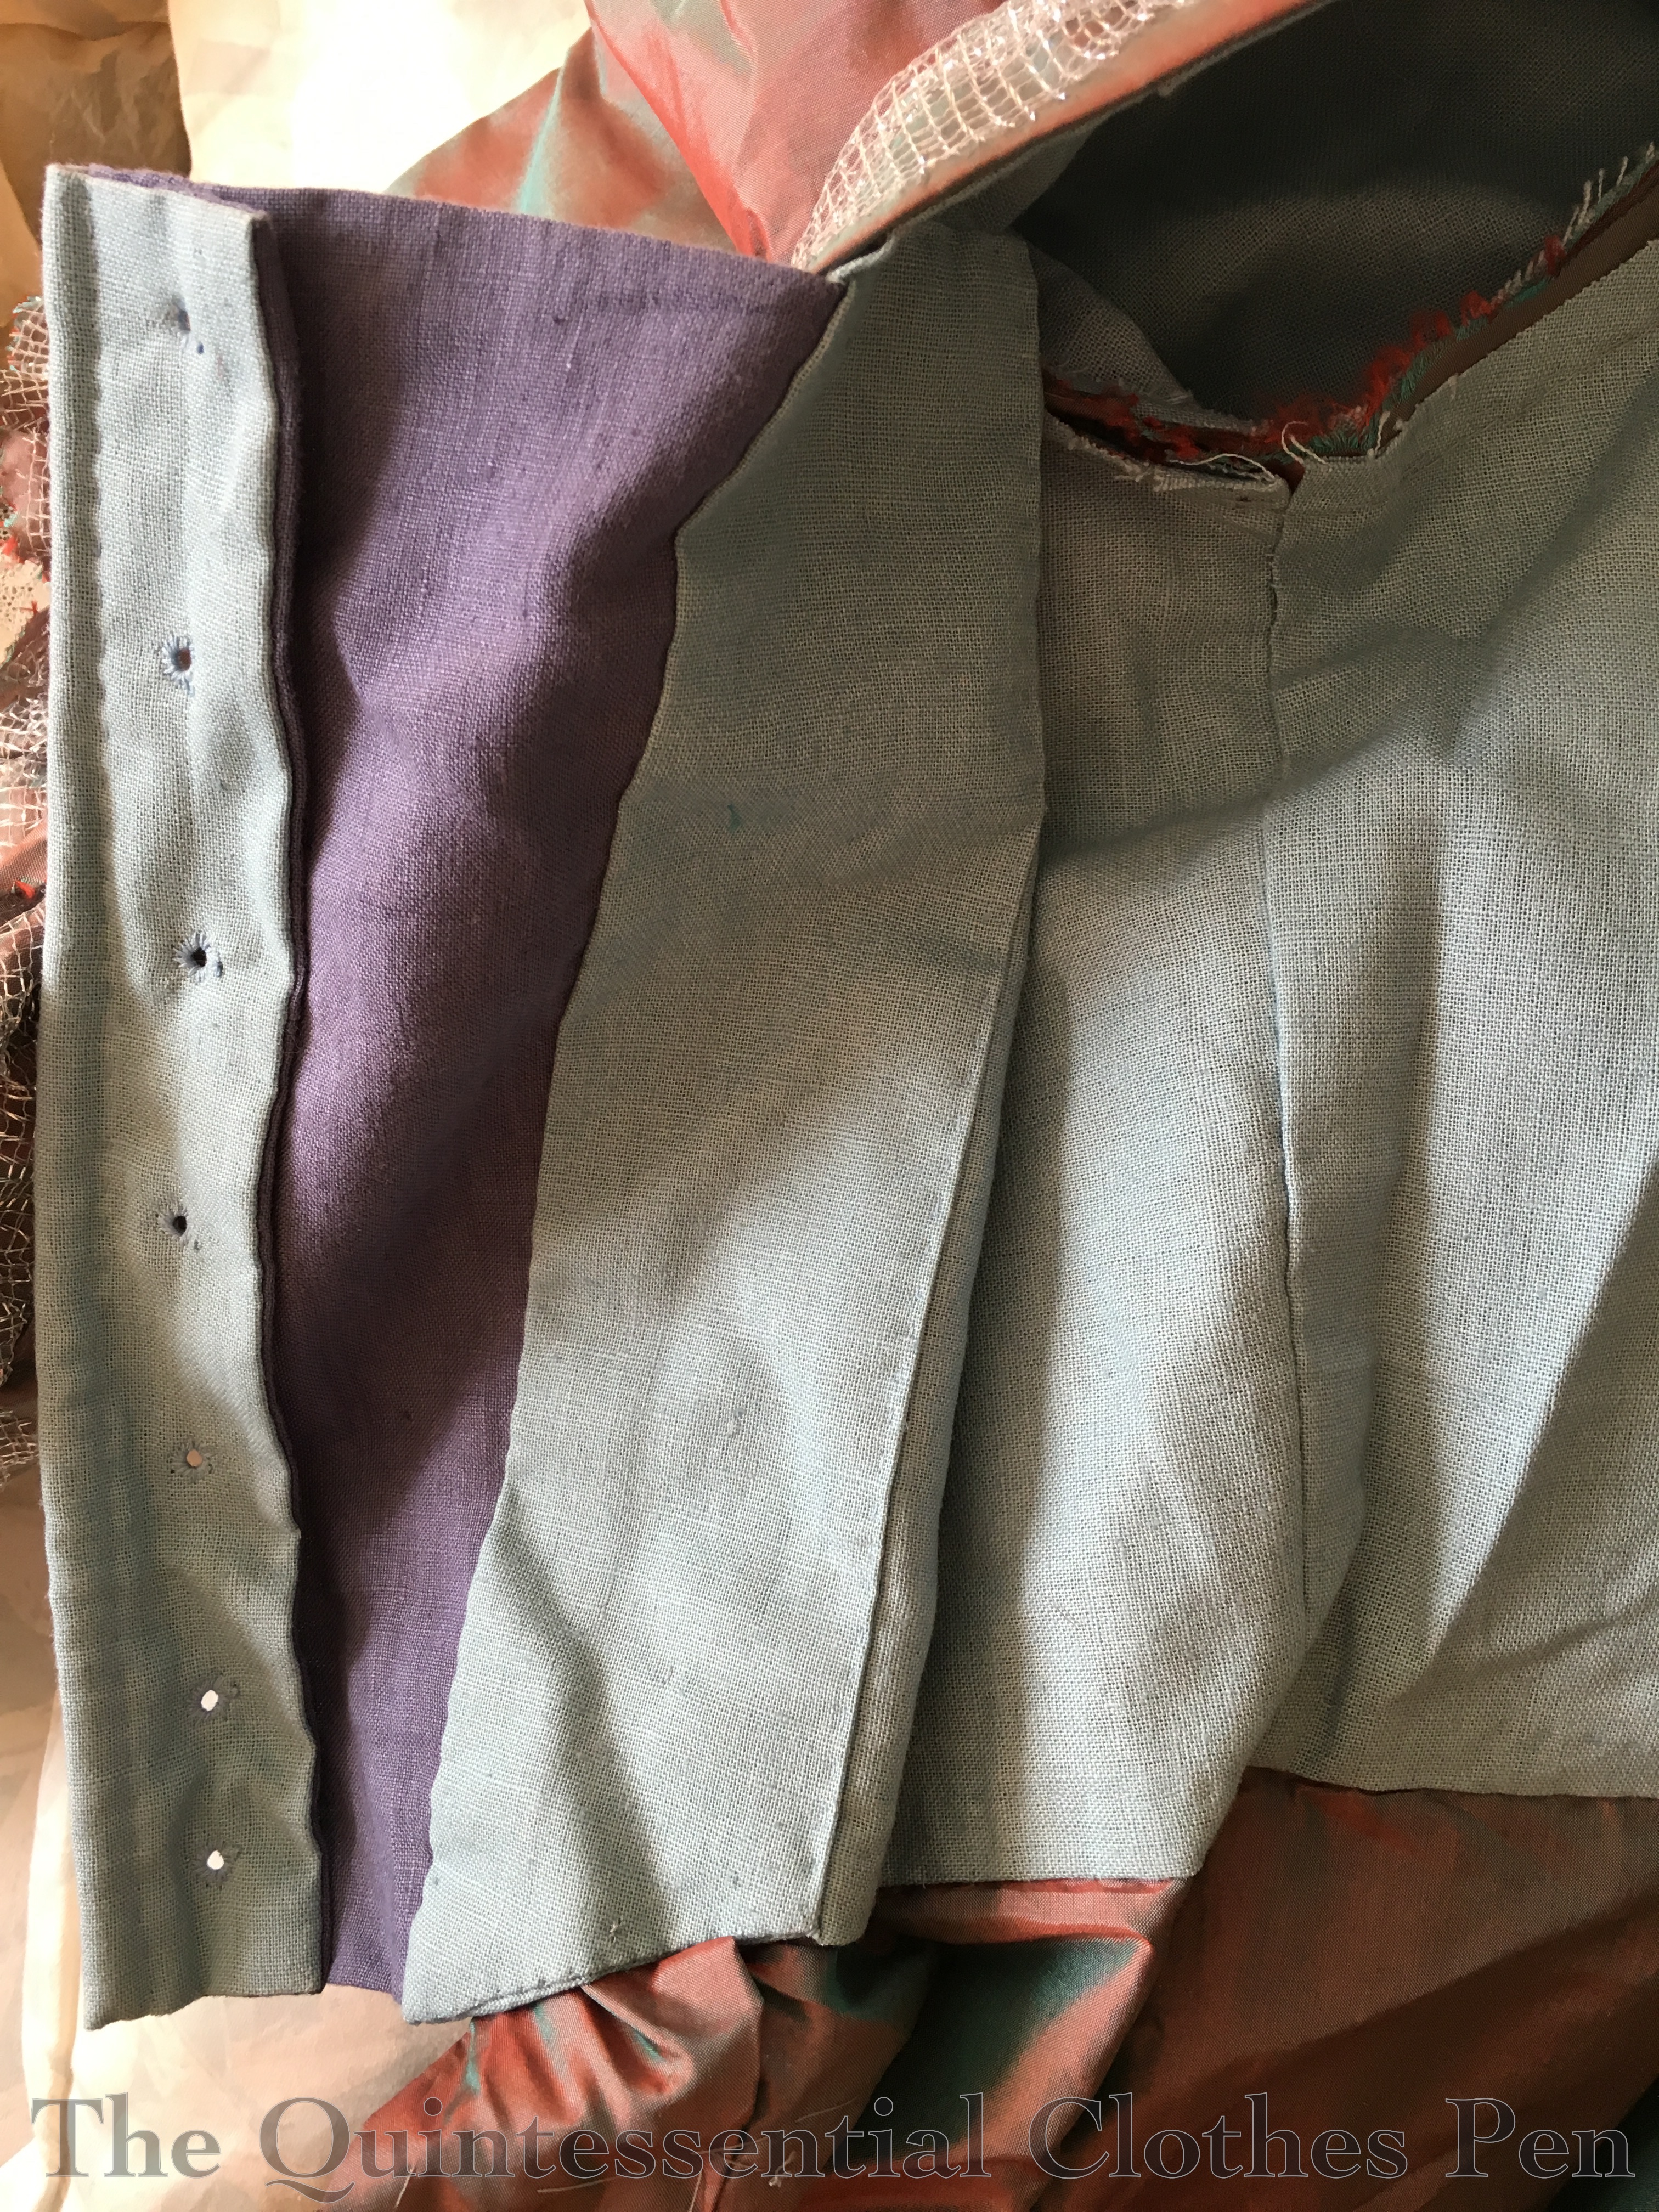
This is the inside of the front lacing panels. You can see the medium blue linen backing. I think I had run out of the cotton/linen blend at that point. As is usual with 18th century garments, the armhole is left unfinished.
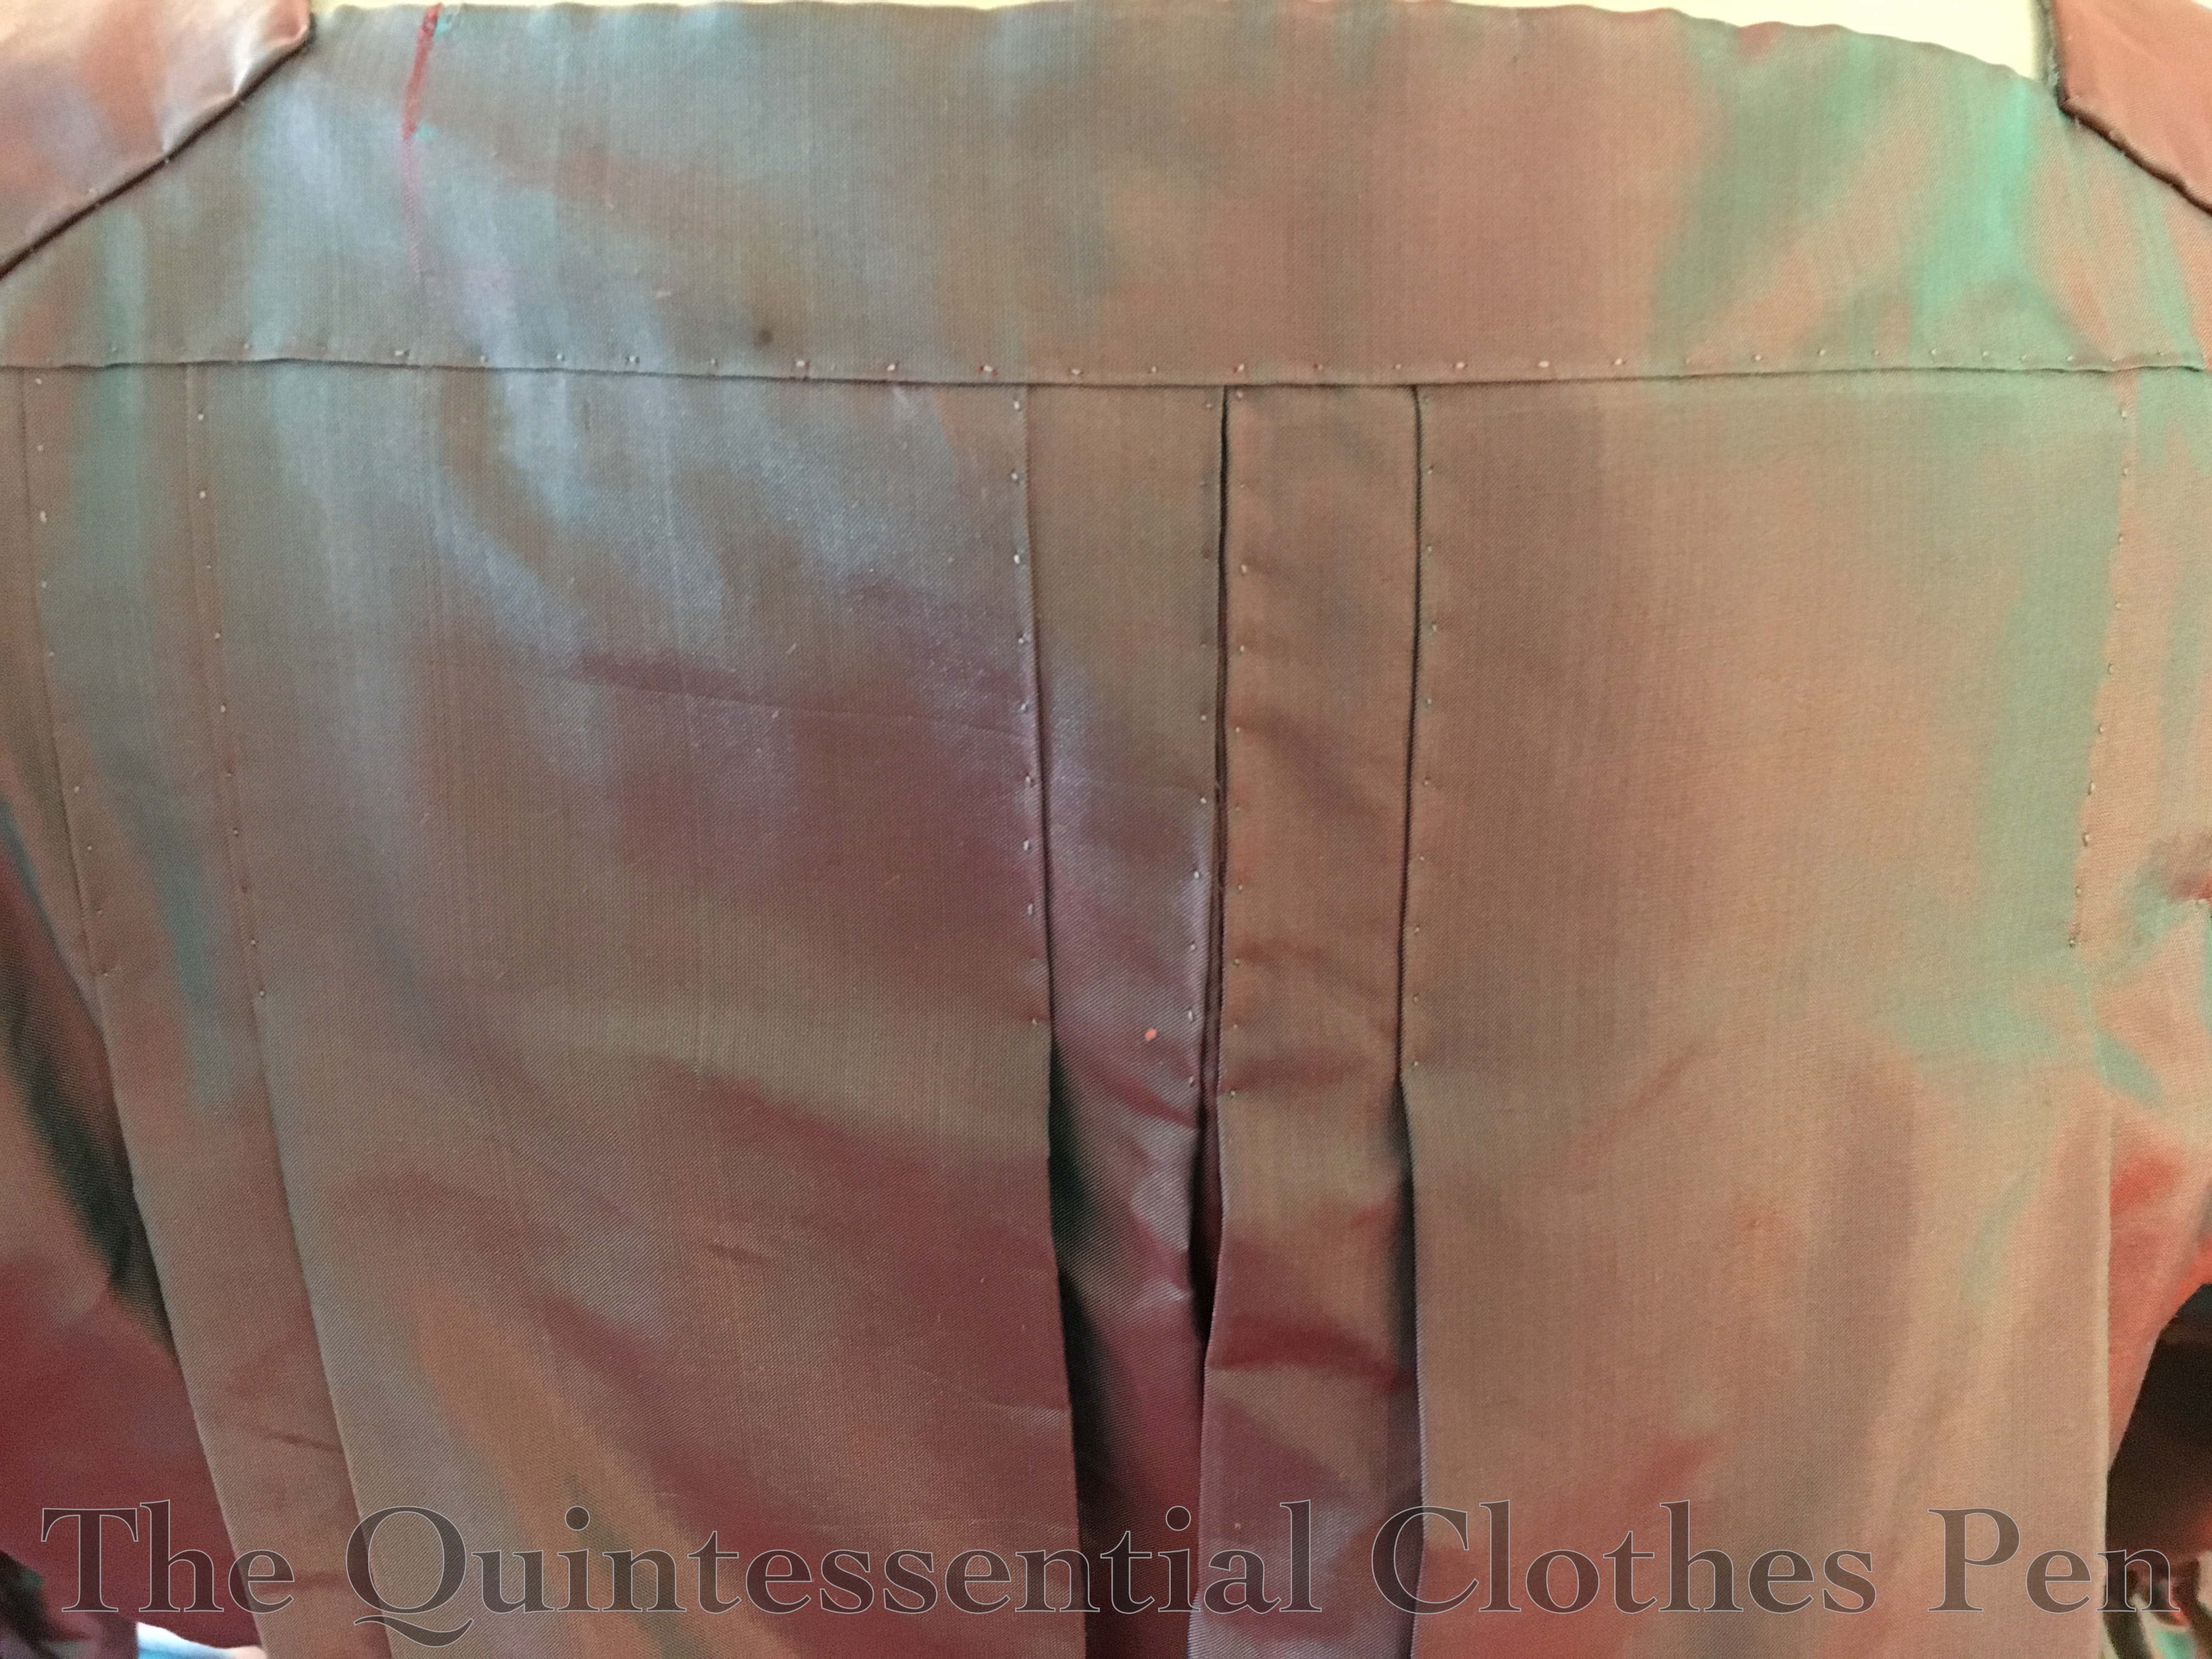
Here’s a close up of the back pleats. These are stitched all the way through to the lining. The directions for the pleats were slightly confusing, but made sense once I started fiddling with my fabric. It was important that I had transferred all the markings from the pattern to make the pleating easier to understand. The pattern uses another four pleats pleats, underneath these, that you can’t see to add volume to the back.
Due to the unexpected nature of the purchase of the silk fabric for this gown, I decided to do that fabric justice by hand sewing the entire garment. So in addition to the exterior stitching like that anchoring the pleats on the back, all of the interior seams are also hand sewn. I rather enjoy hand sewing and it makes a lot more sense given the way 18th century garments were constructed.
Here is the gown mostly sewn in its essential elements, but lacking trim. The sleeve flounces were individually gathered and sewn to the arm openings. They are pinked with scalloped shears on the top and bottom edges.
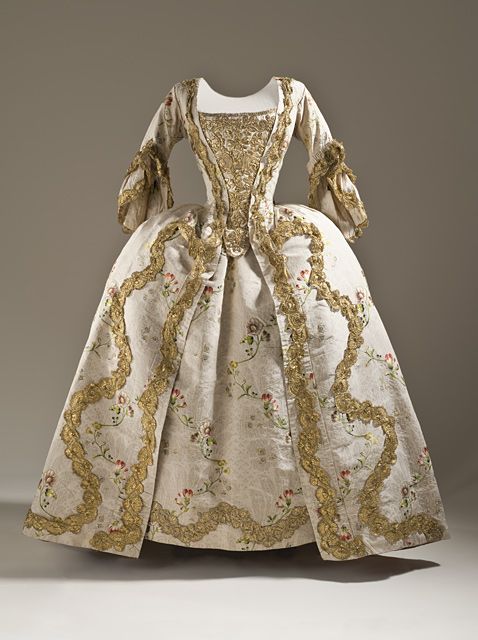
The following image is the gown that I followed in terms of trim placement. It took many more hours than I thought it would to pin the trim on. Those big waves are more complicated than they look, plus I had the challenge of creating the smaller scallops as I went along as well. All of the trim had to be sewn along both sides and tacked at each scrunch after it had been pinned.
Robe a la Francaise. 1765. LACMA.
You can see that I pressed my robings down all the way to the hem, though once the trim was applied on top it was really not very noticeable. I like the finished result, but I think it’s worth pointing out that this pattern is designed to have a wide stomacher. I was envisioning it coming out a little narrower at the waist. But I think adjusting the back opening enough to make a noticeable difference would only create awkward wrinkles under the arms.
The finished stomacher was covered in scalloped trim and finished off with a sparkly brooch. I went to France with an untrimmed stomacher and no clear idea about how I wanted to trim it except that I wanted it to be an all over metallic feast for the eyes. Luckily, early in the trip I was able to go see the 300 Centuries of Fashion exhibit at Les Arts Decoratifs. In addition to being amazing (I got to stand within 6 feet of Dior’s Bar Suit and see many garments I’ve only ever seen on Pinterest!), I also took a picture of a stomacher that was inspirational in terms of the overall wavy patterns and filler shapes. That picture is below.
Trimming the stomacher took place in the evenings in the few days before the special event. Here is the stomacher in progress. I took it specifically to show the amazing green color that the fabric can appear from some angles. I was hoping to get a picture of the finished gown looking this color, but had to be content with seeing shades of green in some of the pictures as we didn’t capture any where the whole gown was this color.
Another part of the dress that was finished in France were my engageants. The pattern includes flounces of two lengths to be made of silk and then one longer flounce for an under flounce or engageant. I sacrificed some lace I’ve been intending for another project, threw some darts in at the longest section to get the scalloped edge to be the right shape, and filled in the length with a bit of mystery ivory sheer. The resulting flounce was gathered and sewn to a cotton tape that was basted into the arm opening.
It sure sounds like a lot of work, recounting these bits of the process. It was! And it paid off. I’m very pleased with the gown. And very pleased that this picture captures some of the stunning green in the fabric!
The petticoat for my Versailles Sacque has been done for a few weeks now, but was waiting in the blog post queue to have its progress made public. It’s sort of boring to look at the whole petticoat, because it’s just a petticoat with longer sides than normal, so I’ve focused the pictures on the more interesting waistband section of the petticoat. (As you can see, this picture was taken before I ironed the front of the petticoat…)
In making the petticoat I referenced Katherine’s 18th Century Petticoat Tutorial and The Standard 18th Century Petticoat Tutorial at A Fashionable Frolick. The nice thing about Katherine’s tutorial is that it’s adjusted for a petticoat to go over pocket hoops, while the great thing about the tutorial at A Fashionable Frolick is that it has tons of detailed construction information like which stitches to use. Both tutorials are clear and very helpful.
When it came to pleating, I thought I might struggle as Mr. Panniers is larger than normal pocket hoops, but I found that once I put the petticoat on the dress form with Mr. Panniers underneath I could neatly arrange the pleats around the waist and not go into the extra complicated pleated needed for a very square and wide pannier shape (such as in Katherine’s court gown and Kendra’s court gown). Whew! I placed all my pleats off to the side (further than I would for a normal 18th century petticoat) to keep the front of the petticoat flat where the trim will be visible between the fronts of the sacque.
The front panel of my petticoat is the fashionable silk that my sacque is/will be made of. (Enjoy the sneak peak!) The back panels are the same blue mystery fabric that Mr. Panniers is made of. The ties are polyester ribbon to match the silk, because hey, I was already fudging the accuracy of materials with the mystery fabric but on the other hand the color compliments the silk very nicely!
Here’s what the inside looks like. The extra fabric at the top of the petticoat is turned to the inside, slit up the middle to accommodate the curved top edge, and left raw.
And here is the back. The petticoat is hand sewn. The center back seam is felled mostly because I am slightly obsessive with having nice insides and the other two seams are selvedges. For some reason the raw edges across the top don’t bother me. Go figure.
I’ve also been playing with hair styling. I’m not satisfied yet, so I don’t consider it done, but at least I’ve made a start! The sacque is coming along nicely, too!
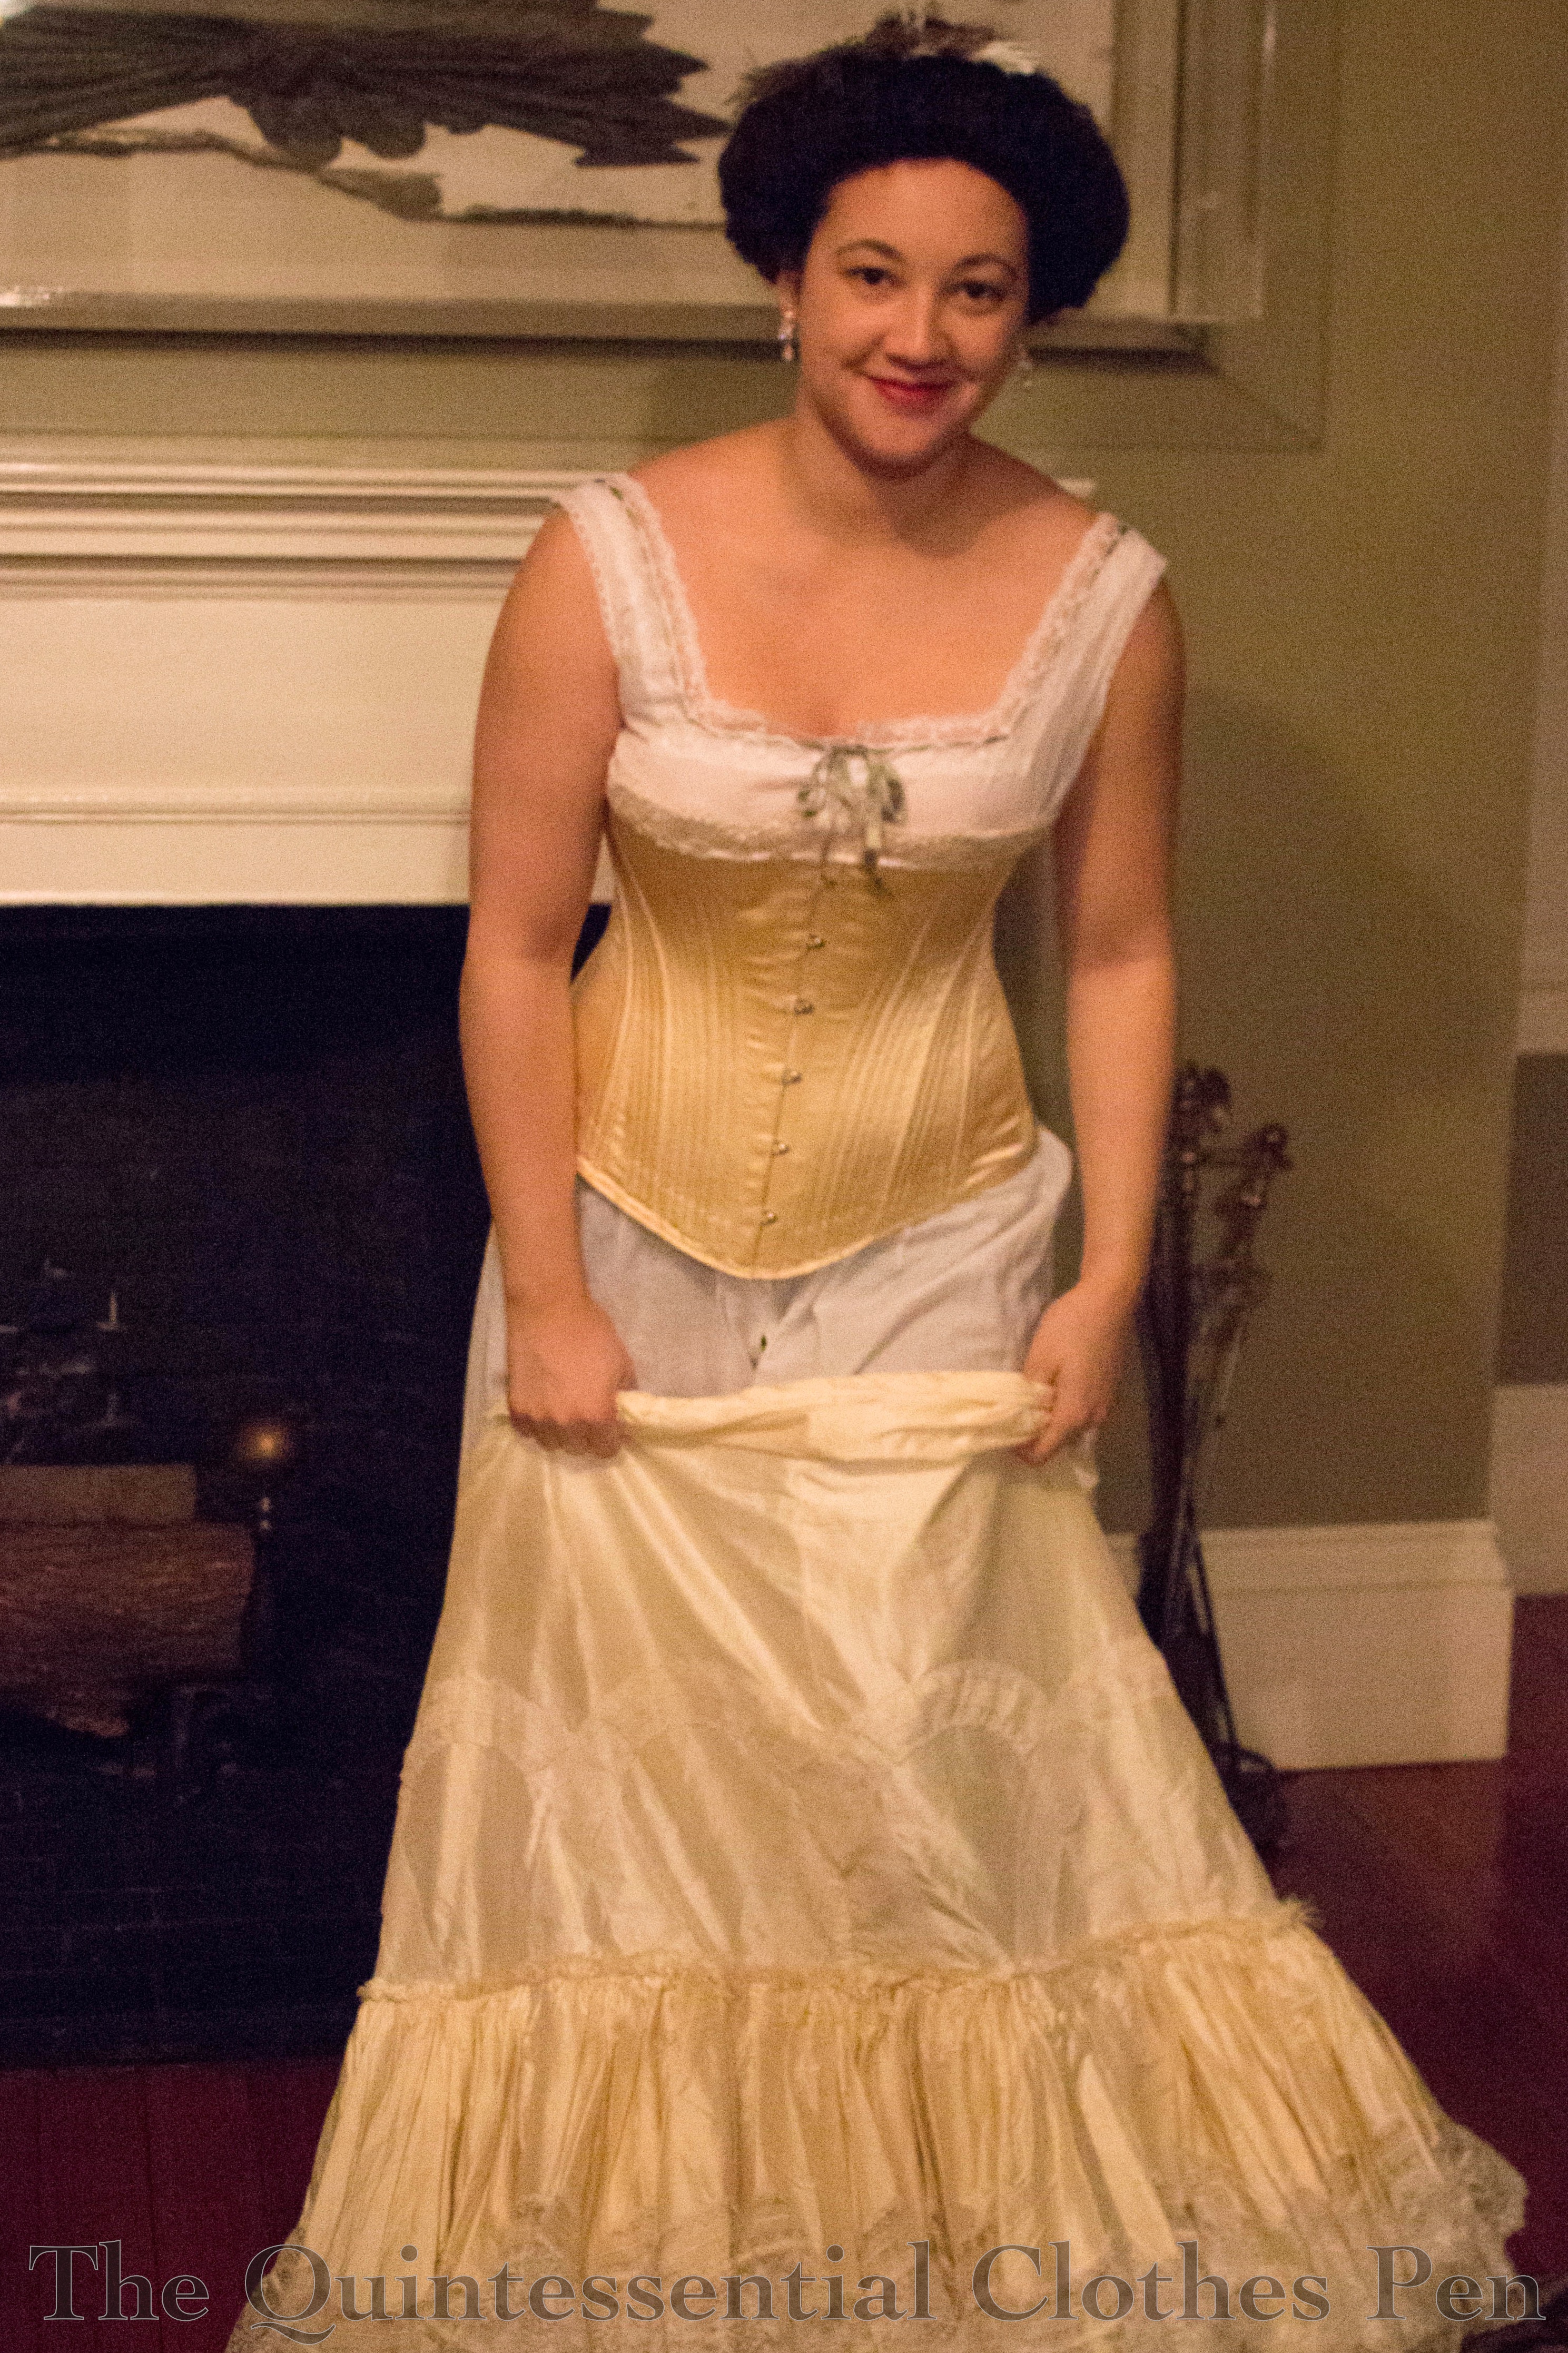
I’m excited that the 1880s corset I made last summer is finally, actually, finished! I got around to adding the finishing touches, lace and ribbon around the top, over the fall. Now there is nothing left to sew, and, after two wearings I can say with confidence that there are no little alterations I want to do! Yay!
The first wearing was in August last year, with my 1885 frills and furbelows dress. The second wearing was in January this year, under my new 1899 evening gown. Both times I found the corset to be extremely comfortable to wear. And in January, I was able to get pictures of the completely finished corset! So, without further explanation, here is the corset in its finished form. (If you didn’t get to read all the intricate details of the patterning, construction, and steaming process, you can see all past posts here, in the project journal.)
The super frilly petticoat was a great prop for these photos! (I’m much better at looking natural rather than awkward when I have props!). It’s from 1903 and was finished in 2011. I’ve worn it many times but have never taken photos of it on me. It’s entirely silk, with two layers of flounces, both made of multiple gathered circles and edged with wide lace in a scallop pattern. It closes with a silk ribbon that threads through the waistband in manner described in Authentic Victorian Dressmaking Techniques. It’s decadent to wear–it makes rustling sounds, has great body, and when you take it off it stands up on it’s own! I can’t remember how many yards of fabric went into this petticoat, but I know it was a lot, with all the circles in the flounces!
Awesome petticoat aside, this corset is pretty decadent to wear, also. Silk, tons of curvy seams and bones, perfectly fitted, lovingly, painstakingly, and beautifully sewn… what’s not to like!
Thanks to the usual camera toting culprit for doing a corset photo shoot with me in the midst of getting dressed for a ball! You know who you are.
(As a side note, it’s a challenge to take historical clothing underwear pictures that look reasonably like historical photos and images but don’t go into the modern lingerie photo direction. See the inspiration here and here? I tried this as well as the standing pose in the second link, but awkward really describes the outcome. But I think we did pretty well in the end. It’s amusing to feel these photos are revealing when I’m quite dressed by modern standards… Do you feel the same way about taking pictures in your historical underwear?)
Our group’s early December deadline to finish sewing our Vernet Projects is fast approaching! Thank goodness we’ve had all year to work on these–mine has been quite a project with all the hand sewing and patterning and learning new skills. Of my five pieces, one is totally done, two have less than three tasks left to be finished, and 2 are still about halfway completed. It won’t quite be furious sewing, but I do have to keep at it to get it done in time. For now, here is proof that I’ve been making progress!
Starting December 7th, you should check in often with the group on Facebook to see each recreation released side by side with the original Vernet fashion plate. It’s going to be really, really amazing to see these crazy and beautiful fashion plates in 3D form!
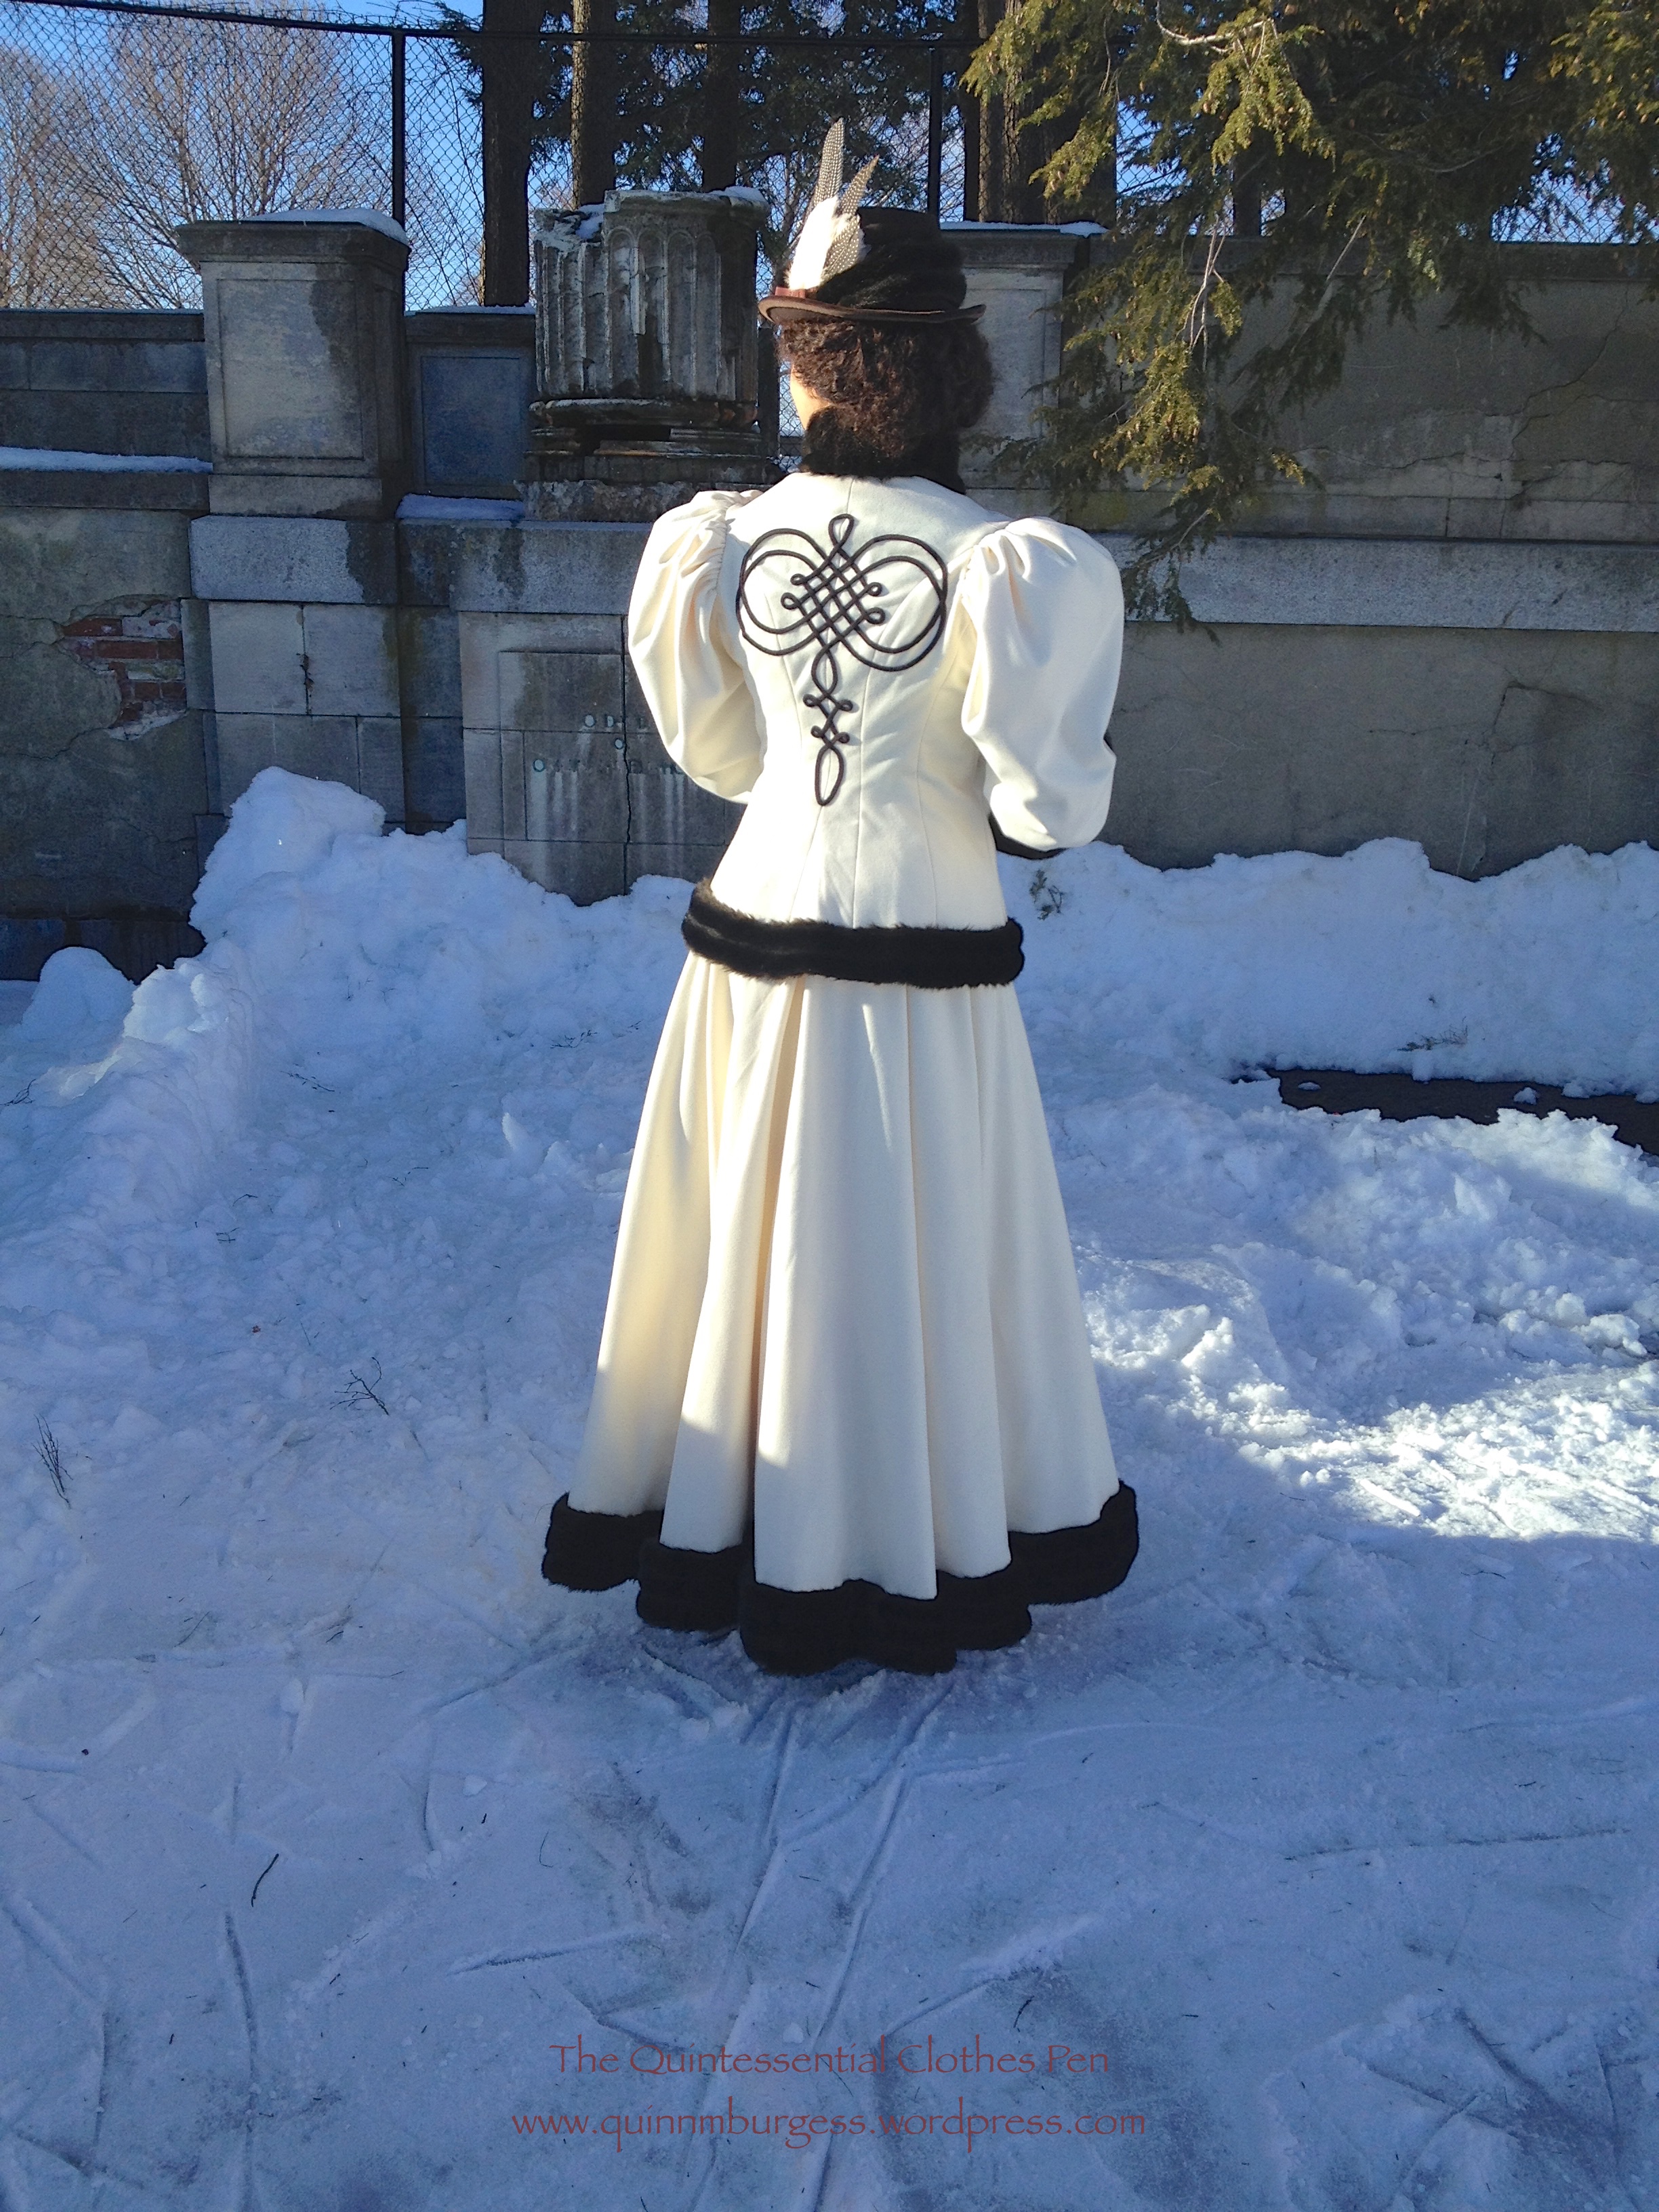
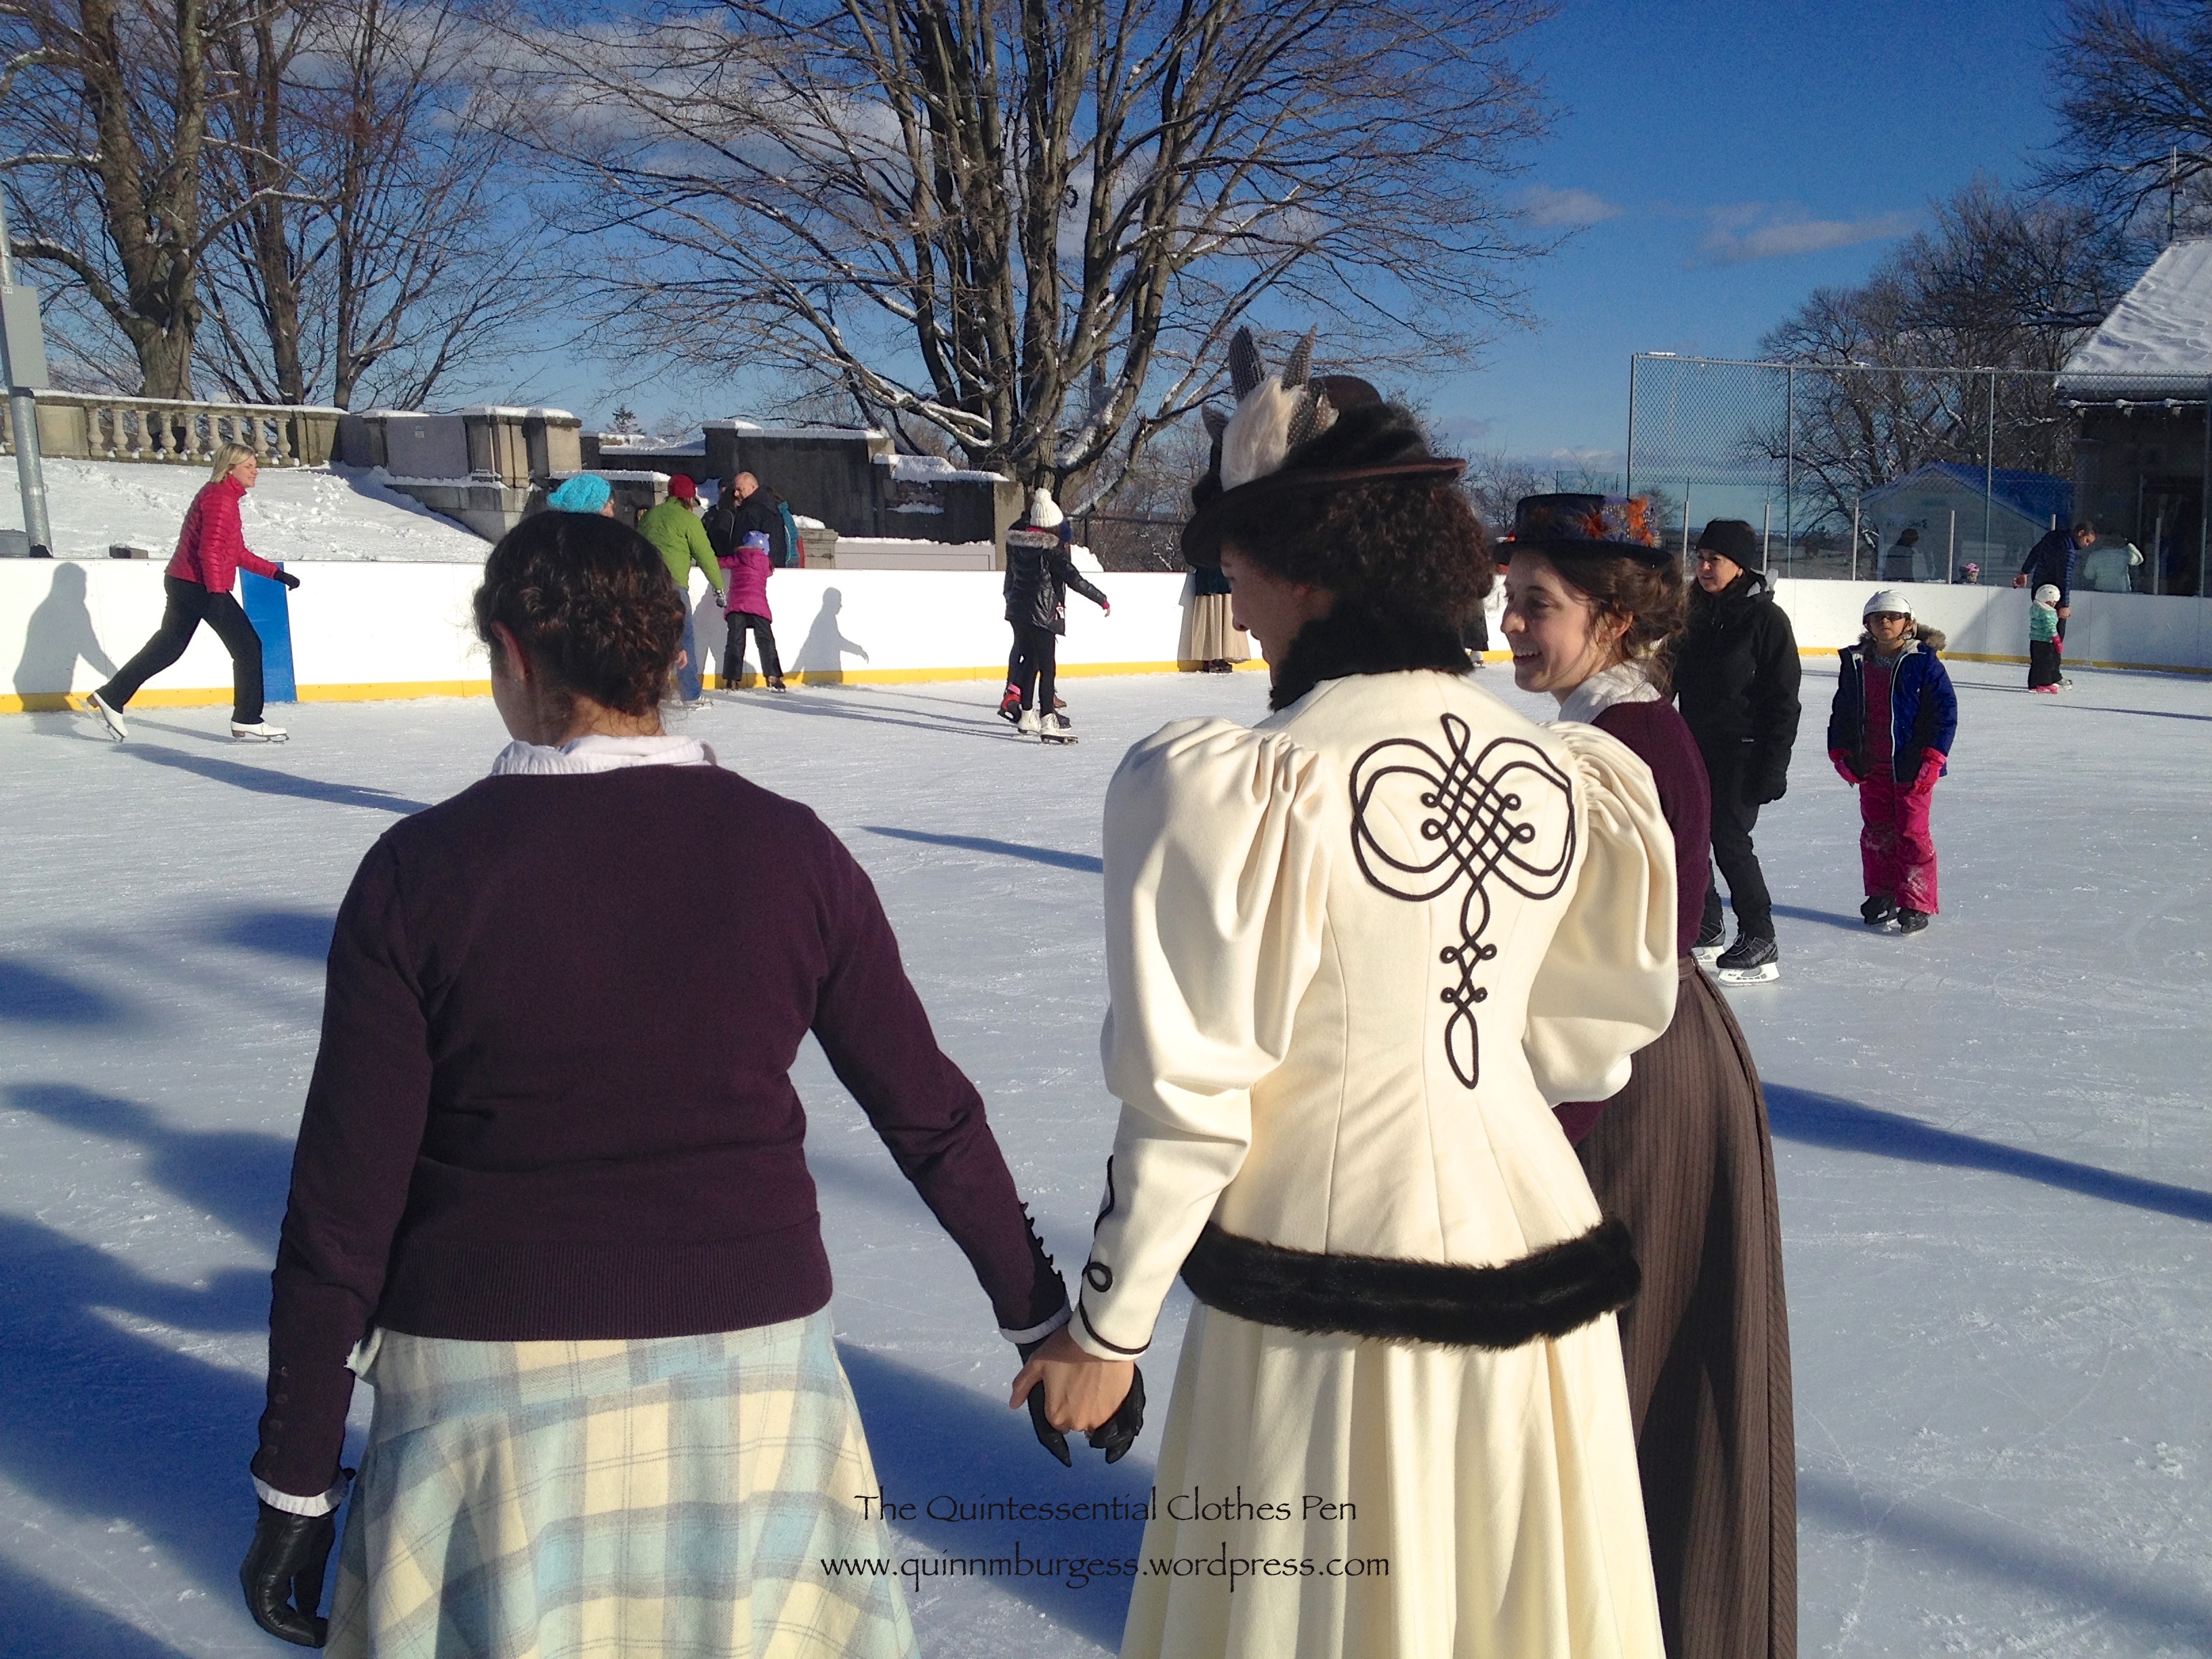
This is one of my favorite outfits of all time. I just want to hug myself, with all the fur, and I love the trim on the back! The whole thing is so cozy and so hug-able and the skirt has such a nice drape and the accessories work so well… and I actually got to go skating in it! I am just utterly chuffed (to use a British word) with the whole thing!
I was on the fence about whether this outfit would apply to the Historical Sew Fortnightly/MonthlyChallenge #1: Foundations, but then I read Leimomi’s teaser post about her foundation entry in which she reminds us about different interpretations of foundations and the intent of this challenge to create loose guidelines open to interpretation.
I was convinced (or pushed off the fence, if you prefer to think of it in that amusing way). I’m claiming my all new 1895 skating outfit for the first challenge of the new year! It does rather stretch the idea of foundations. Is the skirt a foundation because it is literally worn below the jacket, thus being a foundation as you would think of one in a building? Or is the bodice a foundation, because my direct inspiration is a lonely jacket without a skirt and therefore it is the foundation of the outfit because I wouldn’t have made the skirt without having the jacket? Either way, there is an element of a foundation in there.
Just the facts:
Fabric: 5 yds of ivory wool, about ⅓ to ½ yd of dark brown faux fur, probably about 3 yds of scrap muslin for flat lining the jacket, a bit of scrap canvas to stiffen the collar, and a bit of ivory flannel to line the inside of the collar.
Pattern: Made by me and based on my inspiration jacket as well as patterns published in Authentic Victorian Fashion Patterns (a Dover book).
Year: c. 1895.
Notions: 5 yds of brown braid, thread, a bit of high loft polyester batting to keep the sleeves puffed out, about 1 yd of ivory hug snug to finish the bottom of the jacket, hooks and bars for the skirt, and thread.
How historically accurate is it? Pretty darn good. Definitely recognizable by someone in the 1890s. The construction is accurate, aside from the use of hug snug instead of bias and faux fur instead of real fur. So, 95%.
Hours to complete: Um… As usual, I did not keep track. I definitely spent at least 15 hours the few days before the event sewing on my braid and fur trim… Plus full days of pattern making, fitting, cutting, and sewing. Maybe 30-40 hours? I care so much more about the finished project than the time it takes to get there! And I loved sewing this, so I didn’t mind that it took time!
Total cost: $75 for the wool, probably about $8 for the fur yardage I used for this project, $4 for the braid, and the rest from the stash = $87
My accessories were a matching fur muff that I made a few years ago and wore once for caroling (with my as-yet-undocumented 1860s winter cape) but more often with my 1917 winter ensemble and a revamp of my 1883 wool hat. I didn’t have time to make a new hat because of all the last minute fur and trim sewing, so I pinned a fur scrap around the 1883 hat and added some feathers to stand up a bit more like 1890s hats and called it good. My main inspiration (and the reason I feel it was an acceptable looking style to have the squashy fedora hat look in the 1890s) was this image.
For good measure, here’s my Pinterest board for the entire project. And here are pictures of us skating (with ice skates: all our snow and cold weather does occasionally come in handy here in Boston)!
Yes, we just crashed a local outdoor ice rink on a Sunday afternoon. One of the attendees even wore vintage skates! Turns out they can be hard to skate in because they’re not very supportive… but they looked fantastic! We got lots of comments from people asking what we were doing, why we were dressed up, and that we looked good. I was asked by multiple groups of young girls why I was dressed up and one group in particular asked what the swirly thing was that I had, which I got to explain was a muff to keep my hands warm!
Here’s our skating group. People came in a variety of late 19th century and early 20th century winter outfits as well as modern clothes.
With my skating ensemble I wore fleece lined tights (modern, but warm so I didn’t care), knee high bamboo socks (modern again), my 1903 silk petticoat (super useful for the 1890s, also), a modern tank top (instead of combinations, because I needed to go to work later in the afternoon and change out of my outfit in the back seat of my car without being indecent…), my 1895 corset, and a long sleeve modern waffle tee (mostly to shield my skin against the wool seam allowances and also for warmth). And I was perfectly warm wearing this out for skating on a day that was sunny and right around freezing. In fact, with the muff and wool hat I actually was too warm at times.
Pleased, chuffed, and smiling all afternoon! So fun! Maybe we will get to go skating again this winter!
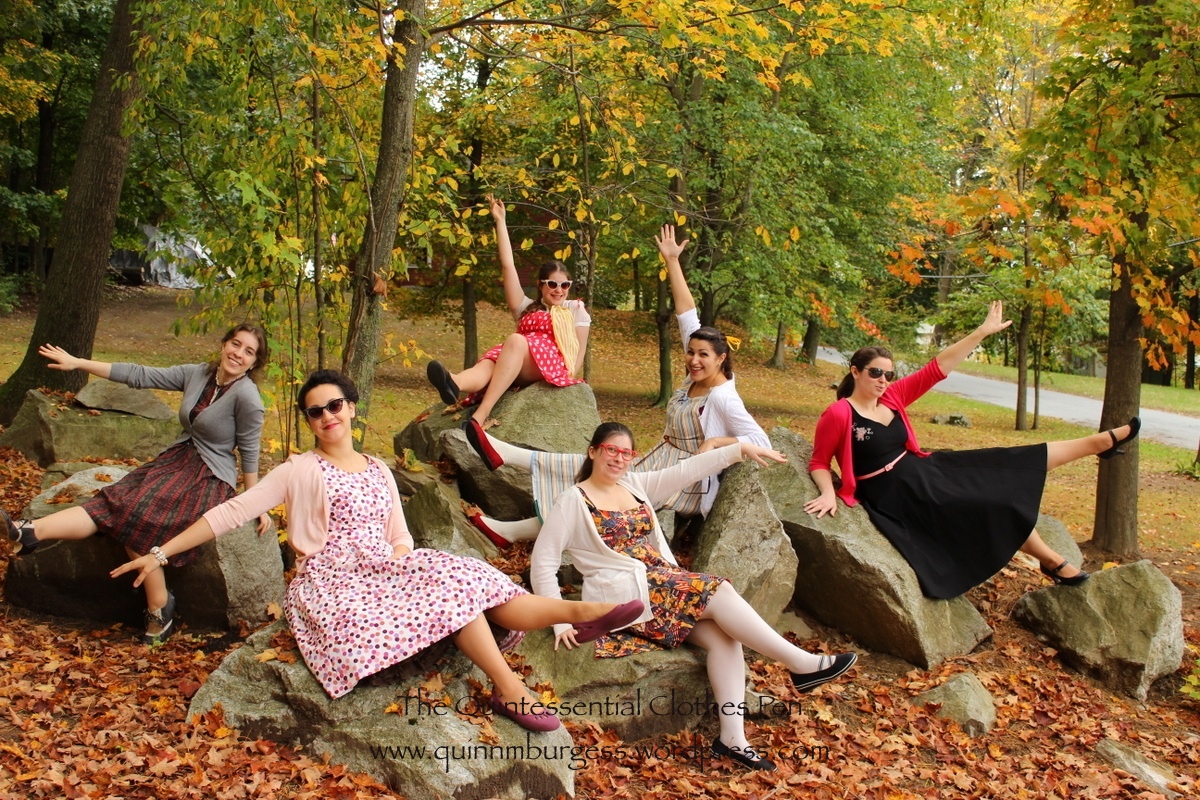
Back to 1950s adventures! I started the adventures with my previous post about the beginning of our day at a 50s themed diner. After leaving the diner we wanted to get some pictures with the beautiful New England autumn colors in the background, so we thought we’d find a place along the side of the road. We took a wrong turn over a bridge and got a little confused, but the confusion wound up with us driving past a lovely side road/private drive with lots of lovely trees and rock clumps. Rather impulsively, we pulled over a hopped out to take some pictures… and here are some of the results!
Autumn in New England!Striking a pose at the base of the road we stopped on.There’s a song that used to play on the Oldies radio station when I was young: “Secret Agent Man”–when I look at this picture I start singing that song in my head… “They’ve given you a number, and taken away your name… (instrumental: doo da doo da doo da doo da doo da doo…) Secret Agent Man!”This looks like it’s straight out of the autumn edition of a clothing catalog.We were playing pass-around-my-petticoat so no one would feel left out.Petticoat!There were so many fun places to take photos!Group shot on the rocks.Serious faces. It has since been determined that if we were to start a hipster band named Queens of Rock, this would be the cover of our first album “Colors of Fall.” Of course, we’d be super obscure and you wouldn’t have heard of us…The colors are so complimentary! And the glasses are cute.Showing off my more casual, modern footwear… purple crocs that match my dress!
So there you go. I hope you enjoyed all the leaves! Next stop is the roller rink…
Life! Is often great, but does rather get in the way of sewing plans sometimes…
This HSF challenge #11 had a due date of June 3rd. I actually finished sewing on June 18th, but I’ve been busy posting about other things so this has been even further delayed. Oh well, I had the best of intentions: to complete this 18th century petticoat for the Squares, Rectangles, and Triangles Challenge.
Description:
Many historical garments, and the costumes of many people around the world, use basic geometric shapes as their basis. In this challenge make a garment made entirely of squares, rectangles and triangles (with one curve allowed), whether it is an 18th century kimono, a flounced 1850s skirt, or a medieval shift.
Apricot (orange) 18th century under petticoat.
Pattern: None, but I referenced both of these tutorials on constructing 18th century petticoats. Katherine’s tutorial is for a petticoat with an uneven length (to go over panniers, or a bum roll, for example). Rebecca’s tutorial is for a petticoat with an even length (the same length all the way around, to be worn without extra supports). Both tutorials have construction information, Rebecca’s includes a bit more detail in terms of which stitches and methods to use.
Year: Loosely 1700-1790.
Notions: Thread, yellow polyester ribbon for ties.
How historically accurate?: I give it 70%. Accuracy gets knocked down because: 1- the color is a bit vibrant for the period (but it’s an under petticoat, and I wanted it to be fun!), 2- all unseen seams are machine sewn, 3- I used bright yellow polyester ribbon for ties, 4- I haven’t seen much research that shows cotton being used at this time for a single plain petticoat of this sort. On the other hand: 1- all finishing was done by hand, 2- the dimensions and method of creation are historically accurate.
Hours to complete: 6 or 7? I can’t really remember…
First worn: Well, Squishy wore it for pictures!
Total cost: $12 for the fabric. The ribbon is leftover from my childhood craft projects…
Side view.Front. See the yellow ribbon?Back. I love how the pleats fan out.
I chose to bind the top with self fabric and use polyester ties in a fun color for this petticoat, since I knew it wouldn’t be seen and I might as well use some of those things from my stash! The back half of the petticoat ties in front, then the front ties wrap all the way around to the front and also tie in front. That’s why you can see all the yellow ribbon crossing in the back. This method used a solid 3 yds of ribbon, though the ends I have to tie with are generous and could probably be shorter if I wanted to save on tie length.
Back tied in front before the front gets tied. There are hemmed pocket slit openings on each side.
I just love the color of this petticoat. It’s so bright and sunny and cheerful, especially with the yellow ribbons! There’s also a sneak peek in this last picture at what will likely be a future HSF item: the bum roll… more on that soon-ish.
Remember in my last post I promised pictures of the finished ball gown now known as Evie? The time has come! I had a hard time narrowing down the options (because of course I wanted to share ALL of the good pictures), but I’ve tried to limit myself to only the best of the best. This post will focus on the completion of my dress, Evie, but there are two more posts coming soon that will share some of the other photo series as well as pictures of the ball itself!
These photos are the idea of my friend with the camera. She wanted to take series of pictures of us in our modern clothes, 1860s undies, and then dressed in our 1860s ball gowns: all in the same location and the same pose. It’s a neat idea and the results are great, not only because it provided lots of pictures (yay!) some of which are of things I don’t have pictures of (like my 1860s undies), but also because you can see the time passing through the evening by looking at the light in the photos. They start in the afternoon, proceed to early evening, then finish at night. Not all the series are a complete set, but all around, it’s pretty cool. Which series do you like best?
Series 1: To The Right
To The Right: first layerTo The Right, second layerTo The Right, third layer
Series 2: What A Change
What A Change, first layerWhat A Change, second layerWhat A Change, third layer
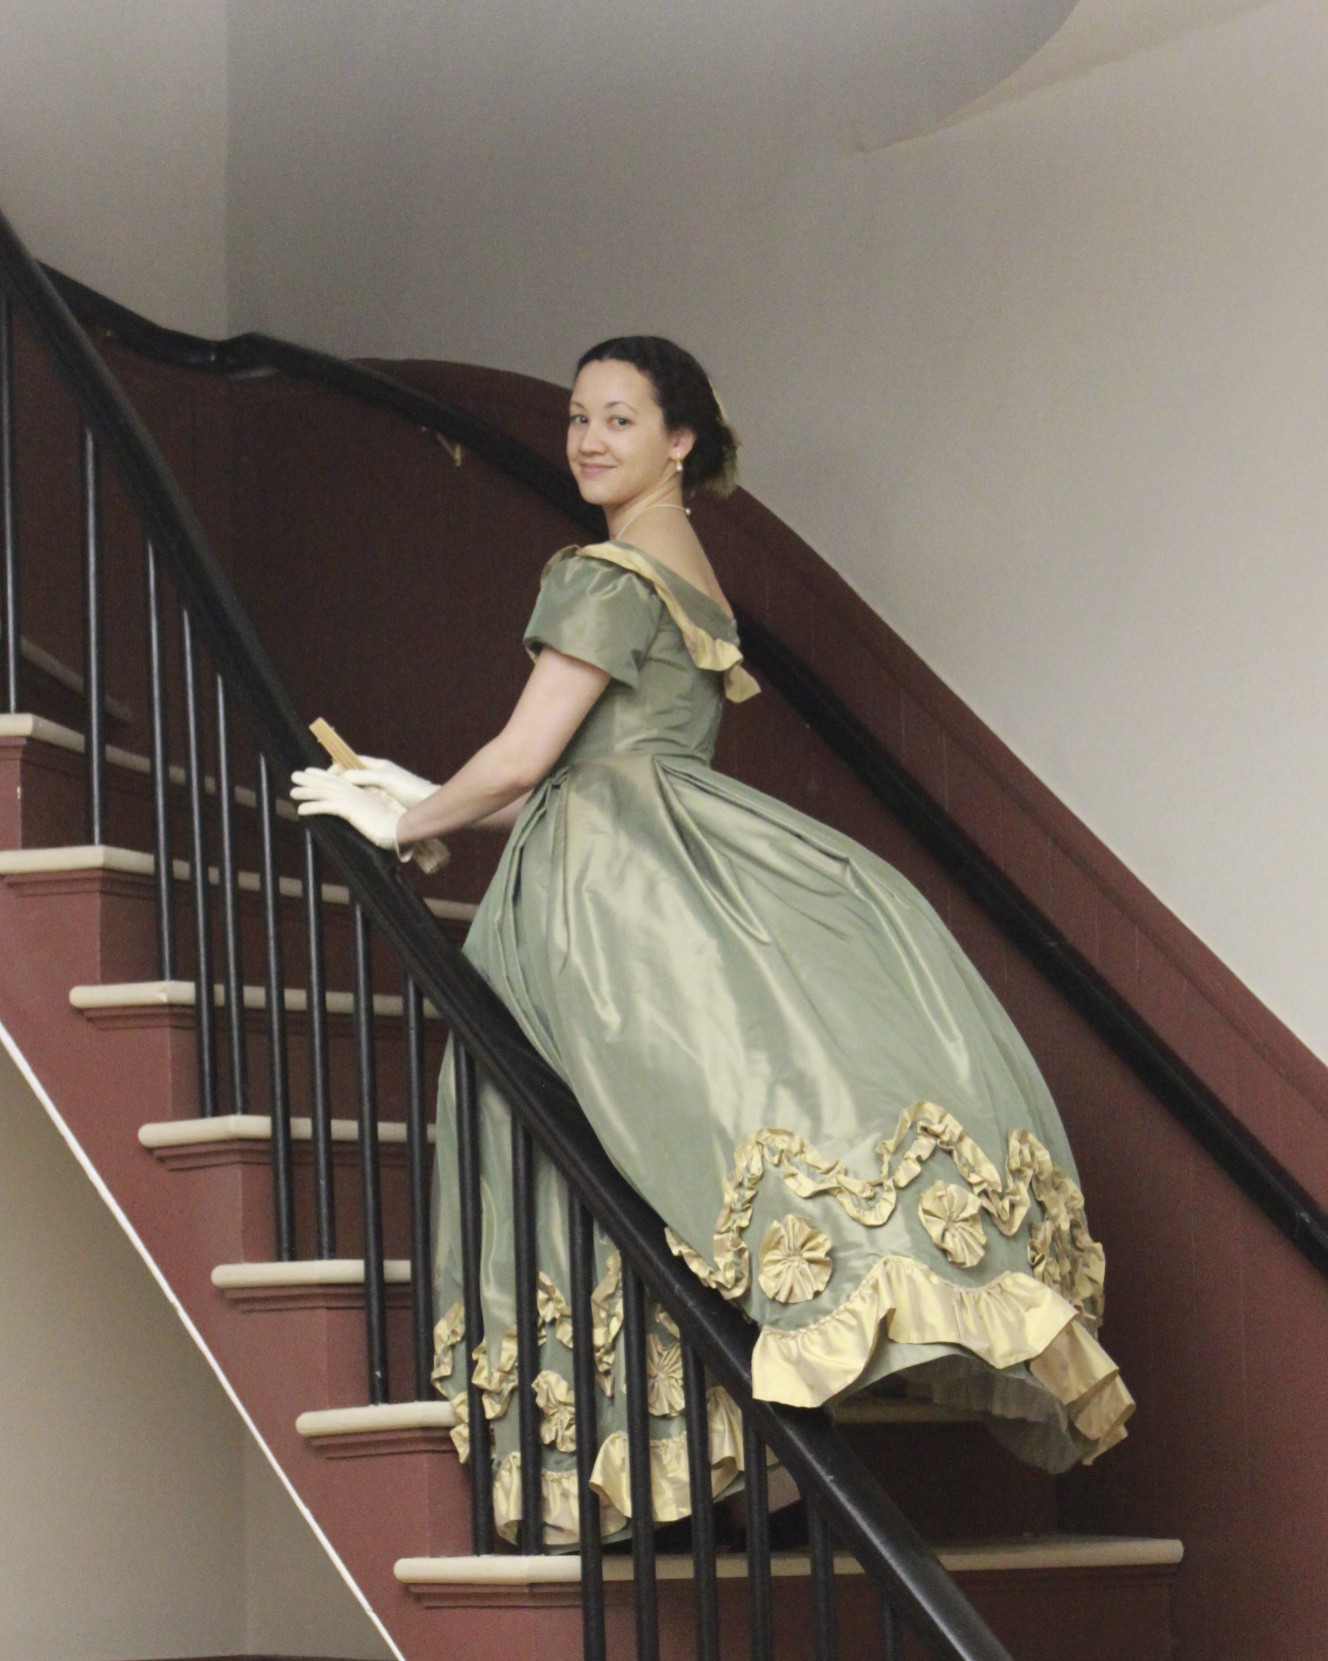
Series 3: On The Stairs
On The Stairs, first layerOn The Stairs, second layerOn The Stairs, third layer
I’ve never been able to get pictures of my 1860s undies before, so this is exciting! I’ve got a chemise, corset, drawers, cage crinoline, and petticoat (in addition to stockings, shoes, jewelry, hair wreath, gloves, fan, and gown). The crinoline is entirely hand sewn, except for the waistband. The measurements of the hoops are taken from an extant crinoline, and I believe the circumference of the bottom hoop is about 120″. The crinoline closes with a hook on the waistband. The other pieces are machine sewn and trimmed with lace, pin tucks, and ribbon. The chemise slips over the head and the drawers close at the back with a button and loop arrangement. (And that poor petticoat does need a press… but I threw it in the washer and dryer a while ago and since it doesn’t usually get seen I haven’t taken the time to press it.) The petticoat ties around the waist. As you can see, the crinoline stops mid-calf, so the intense petticoat ruffle really helps keep the shape for the skirt below that point, in addition to keeping my hoops from showing as horizontal lines through the skirt of the gown.
Want to be further amused? Look at the apparently changeable feathers on my hair wreath. Sometimes they’re brownish/gold and sometimes vivid green! They really do seem to change color depending on the light!
I don’t think I’ve mentioned it yet, but the basic pattern for this gown is essentially taken from Janet Arnold’s Patterns of Fashion 2. The trim however, is based on two things. Thing 1: the skirt trim is from the fashion plate I shared with you in the first post of this project journal. Thing 2 : the bodice trim is based on this gown, below. I went through a lot of phases trying to decide how to trim the bodice, since I didn’t really like the fashion plate bodice trim. In the end, I decided on this look: a graduated ruffle (just one, in my case, to match the one ruffle on the skirt) that gets longer toward center back, a triple pleated bertha that has a swoop towards center front rather than being straight, and a big trim thing right at the center (in my case, a rosette to match the skirt, rather than a bow). It’s pretty hard to see the front of my dress in these pictures I’ve shared so far, but there are some coming up in the next two posts which will show off the front of the gown better, so stay tuned for that!
A costume from the movie Il Gattopardo (1962, costume design by Piero Tosi). It’s lovely, despite the fact that it is not an extant gown from the 1860s.
While getting dressed we might have been making silly faces for the camera while the owner walked away…
Haha! Moose making companion! In case you don’t know, this is my favorite silly face to make. Don’t believe me? Look here and here!