1933 Dress & Hat In Green & Gold (HSM #10)

The summer was incredibly busy and the things I was making unfortunately didn’t fit into the HSM challenges, but I’m hoping to get back to it for the end of the year. In that spirit, I finished a dress that qualifies for the HSM Challenge #10: Out Of Your Comfort Zone. I’m a bit late posting about it because it took me two tries to have a successful photo shoot and then a bit of time to edit my photos, but nevertheless, the dress was completed within the deadline. It qualifies in that I’m expanding into 1930s daywear with the making of this dress.

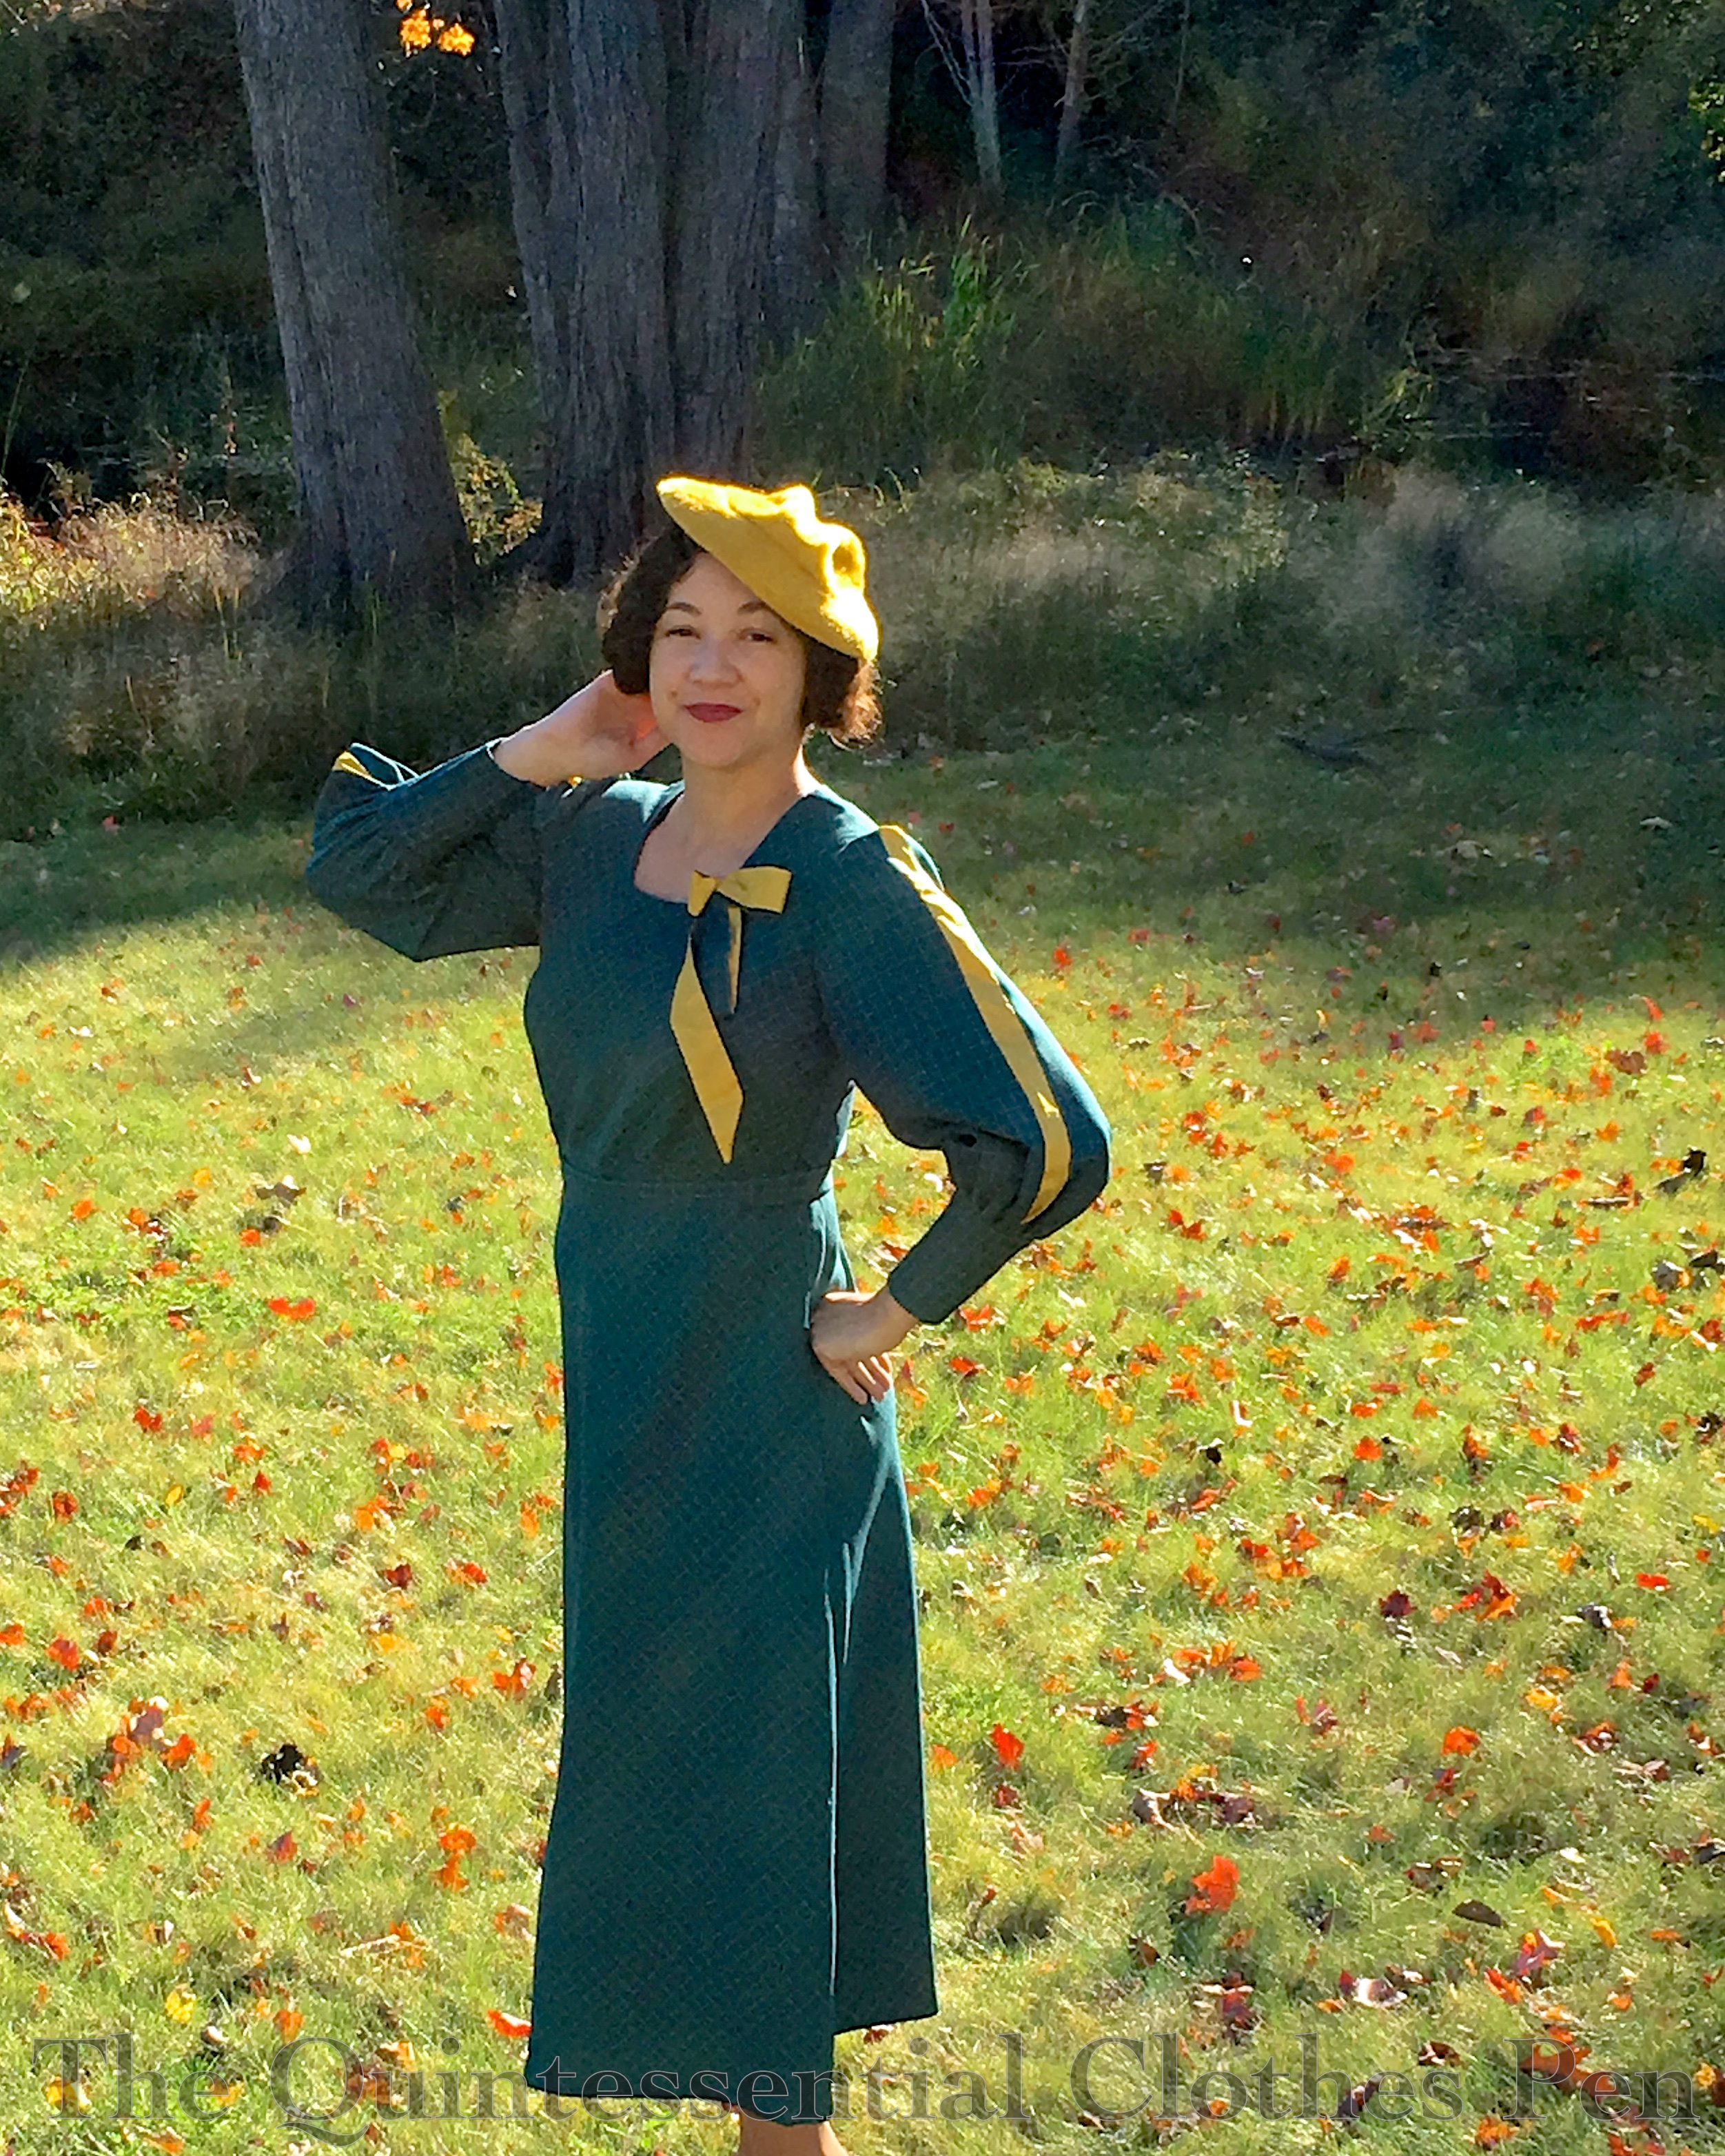
Unlike some garments I make which have a specific wearing in mind, this was different in that I was trying the idea out to see if this 1933 shape would be flattering on me. I do like the silhouette a lot and so hopefully I’ll make more similar dresses in the future. The years right around 1933 are a great mix of awfully silly, with their big neck frills/bows and unusual sleeves, and wonderfully elegant, with long hems that look especially flattering on those of us blessed with height.

The inspiration for this dress came from looking through many books of 1930s clothing. I wanted to try out the longer length bias skirt and I liked the bust spray detail I found along the way in 1930s Fashion: The Definitive Sourcebook (page 308). It’s not as crazy as some early 1930s neck frills, making it a good starting point for getting into this decade. (Look at these examples of neck bows from 1934, for example. They make my dress look subdued.) I did add some interesting sleeves though, based on a 1933 pattern for different sleeve types.

As I mentioned, I did two photo shoots for this dress. The first one failed pretty horribly, as I was out in public, pressed for time, and my phone camera wasn’t cooperating with me. But the second photo shoot was much more successful! It may have taken over 300 photos to get ones that I like, but because I was using a timer with burst photos on my camera I could run back and forth across my yard to my heart’s content, practicing all my best dramatic poses and facial expressions. Unfortunately, my phone camera isn’t outstanding enough to have taken great photos with the slanting afternoon sunlight. I’m calling it ‘artsy.’ (What I really need is an event to wear this to in a good-picture-background-setting, so that I can get better quality pictures…)

Anyway, here are the facts (just for the dress, as the hat doesn’t really qualify for the HSM):

Fabric: Green and gold small windowpane mystery (but likely polyester) fabric and gold silk scraps.

Pattern: My own. I draped the bodice and skirt pieces and referenced images to flat pattern the sleeves.

Year: 1933.

Notions: Thread, zipper, hooks, and hug snug.

How historically accurate is it?: Let’s say 95%. It’s entirely recognizable in its own time and made in a way that is straightforward and consistent with historic garments. The materials are not 100% accurate.

Hours to complete: 5-10 sounds likely, although I spread making this out over about a year, so it’s pretty hard to remember!

First worn: October 2017, for pictures.

Total cost: $1/yard for the fabric and all the notions from the stash, so let’s say $4. Win!

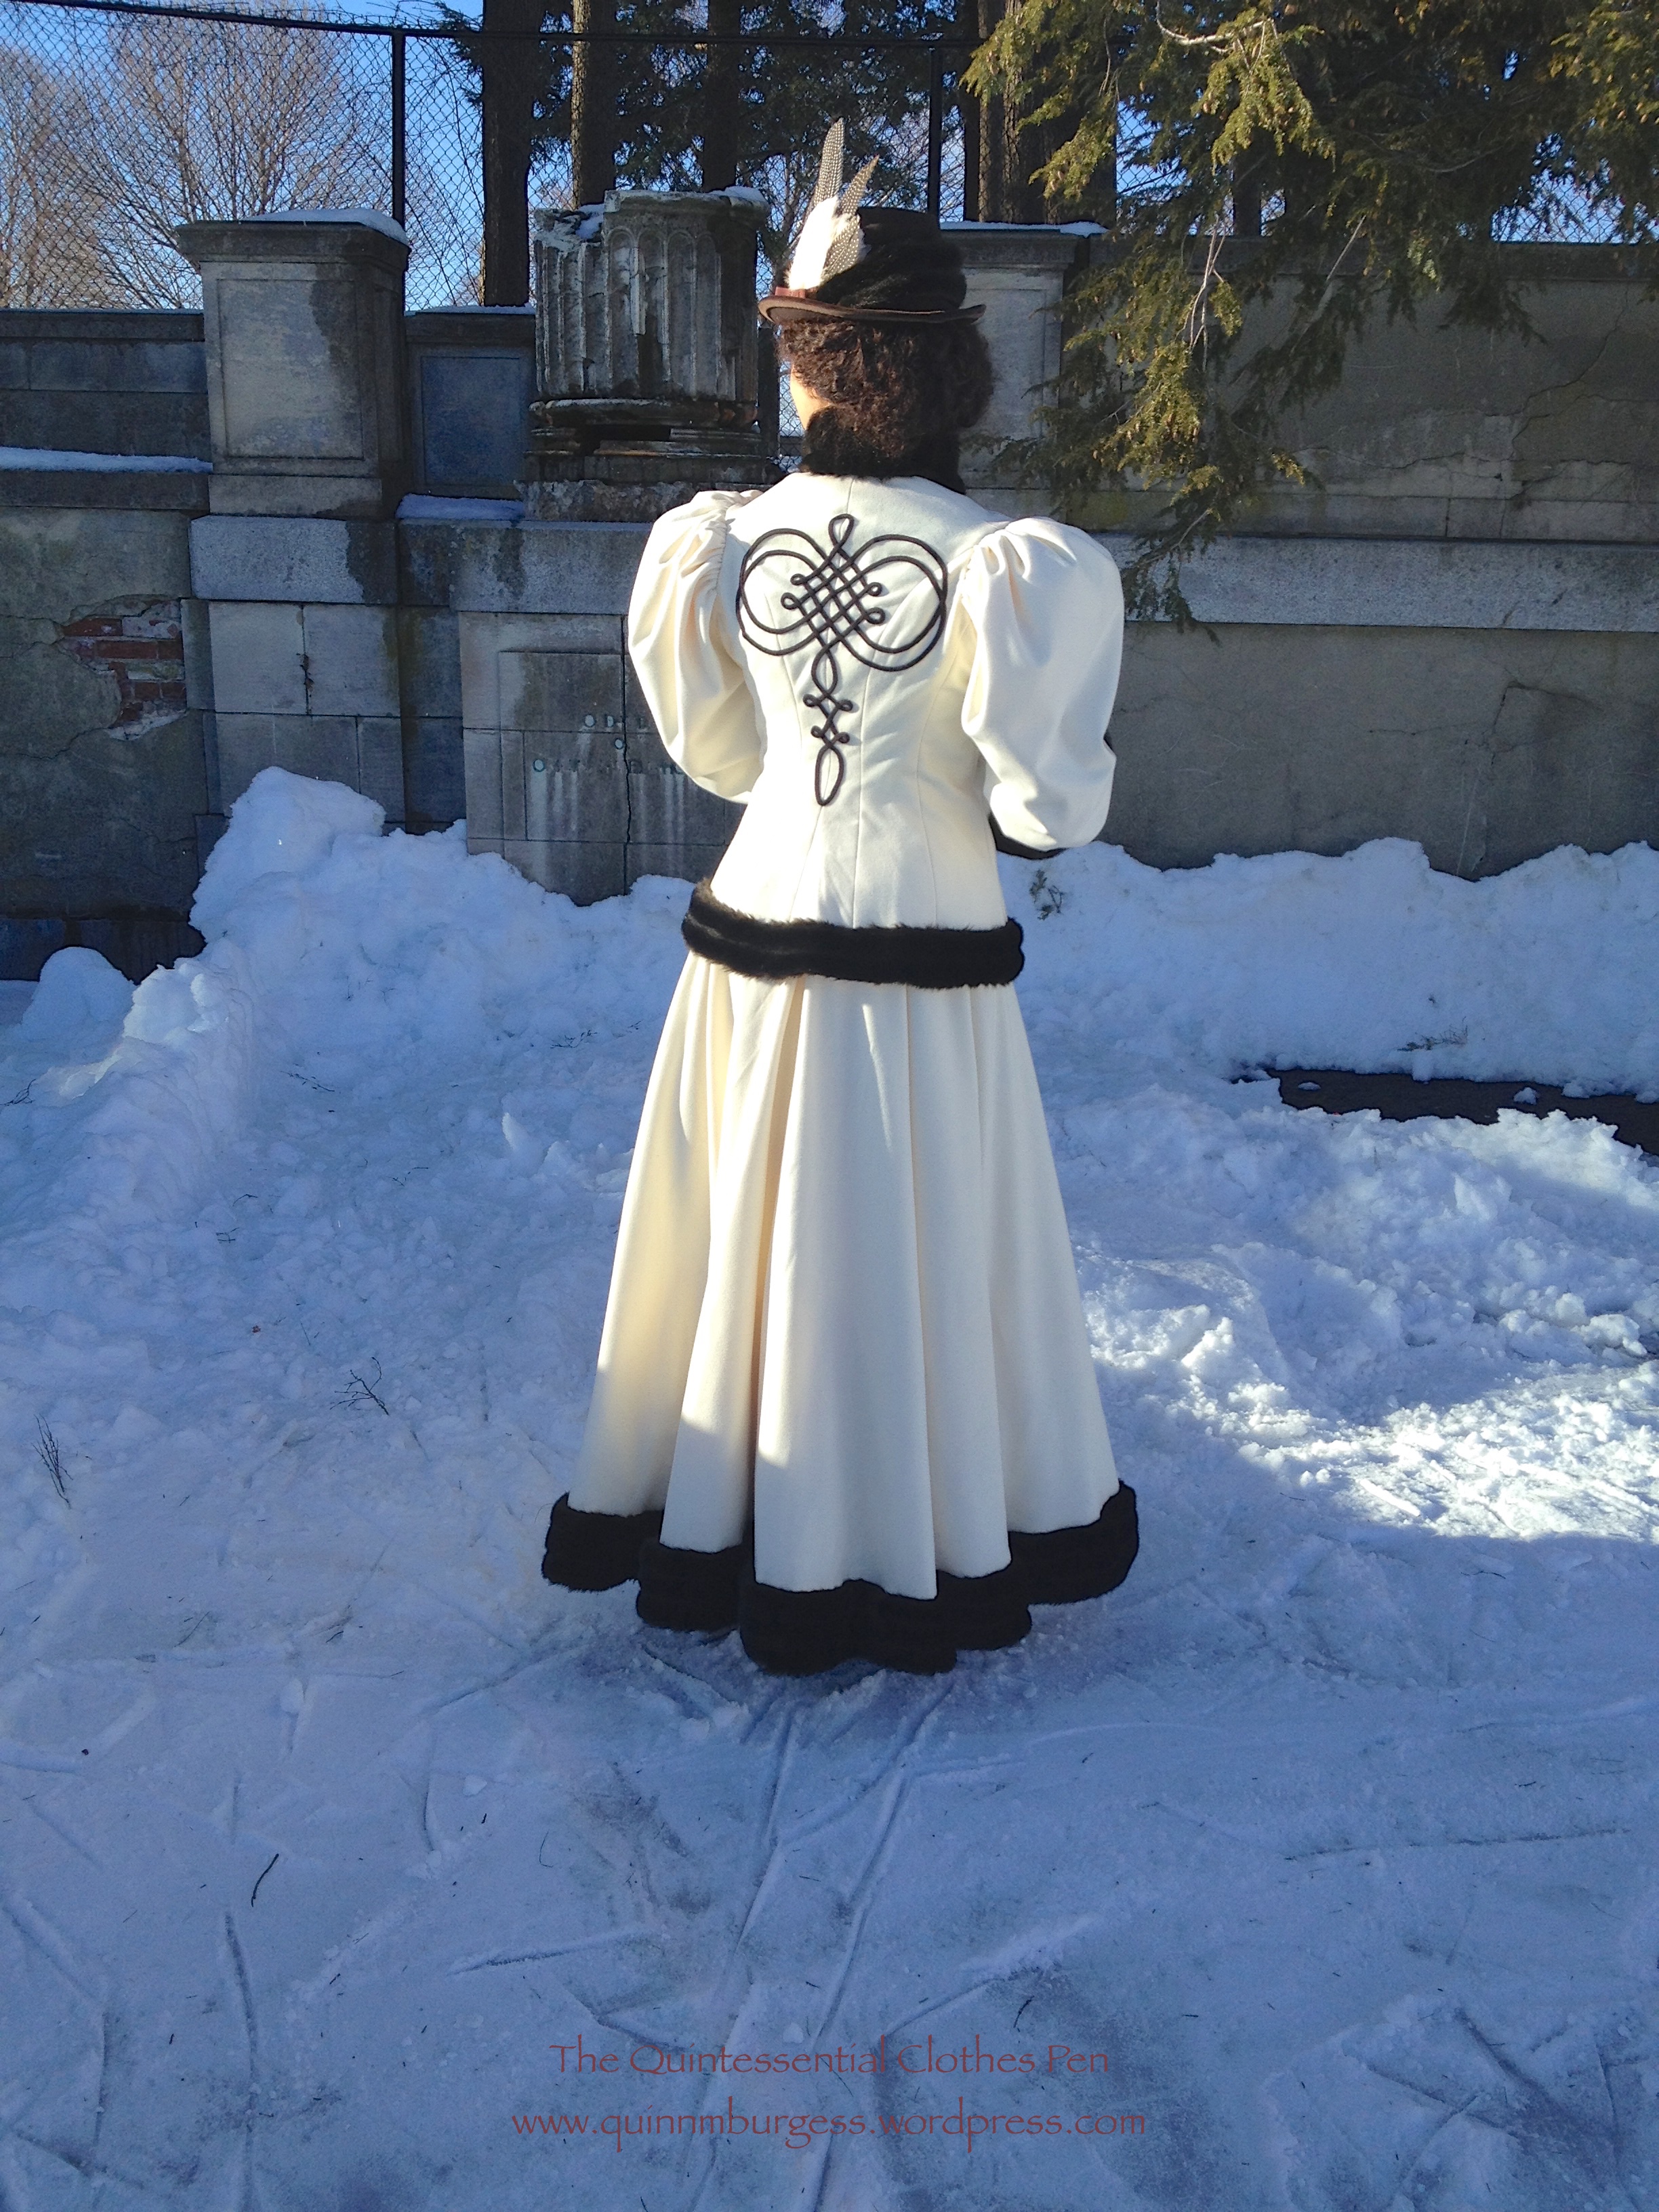
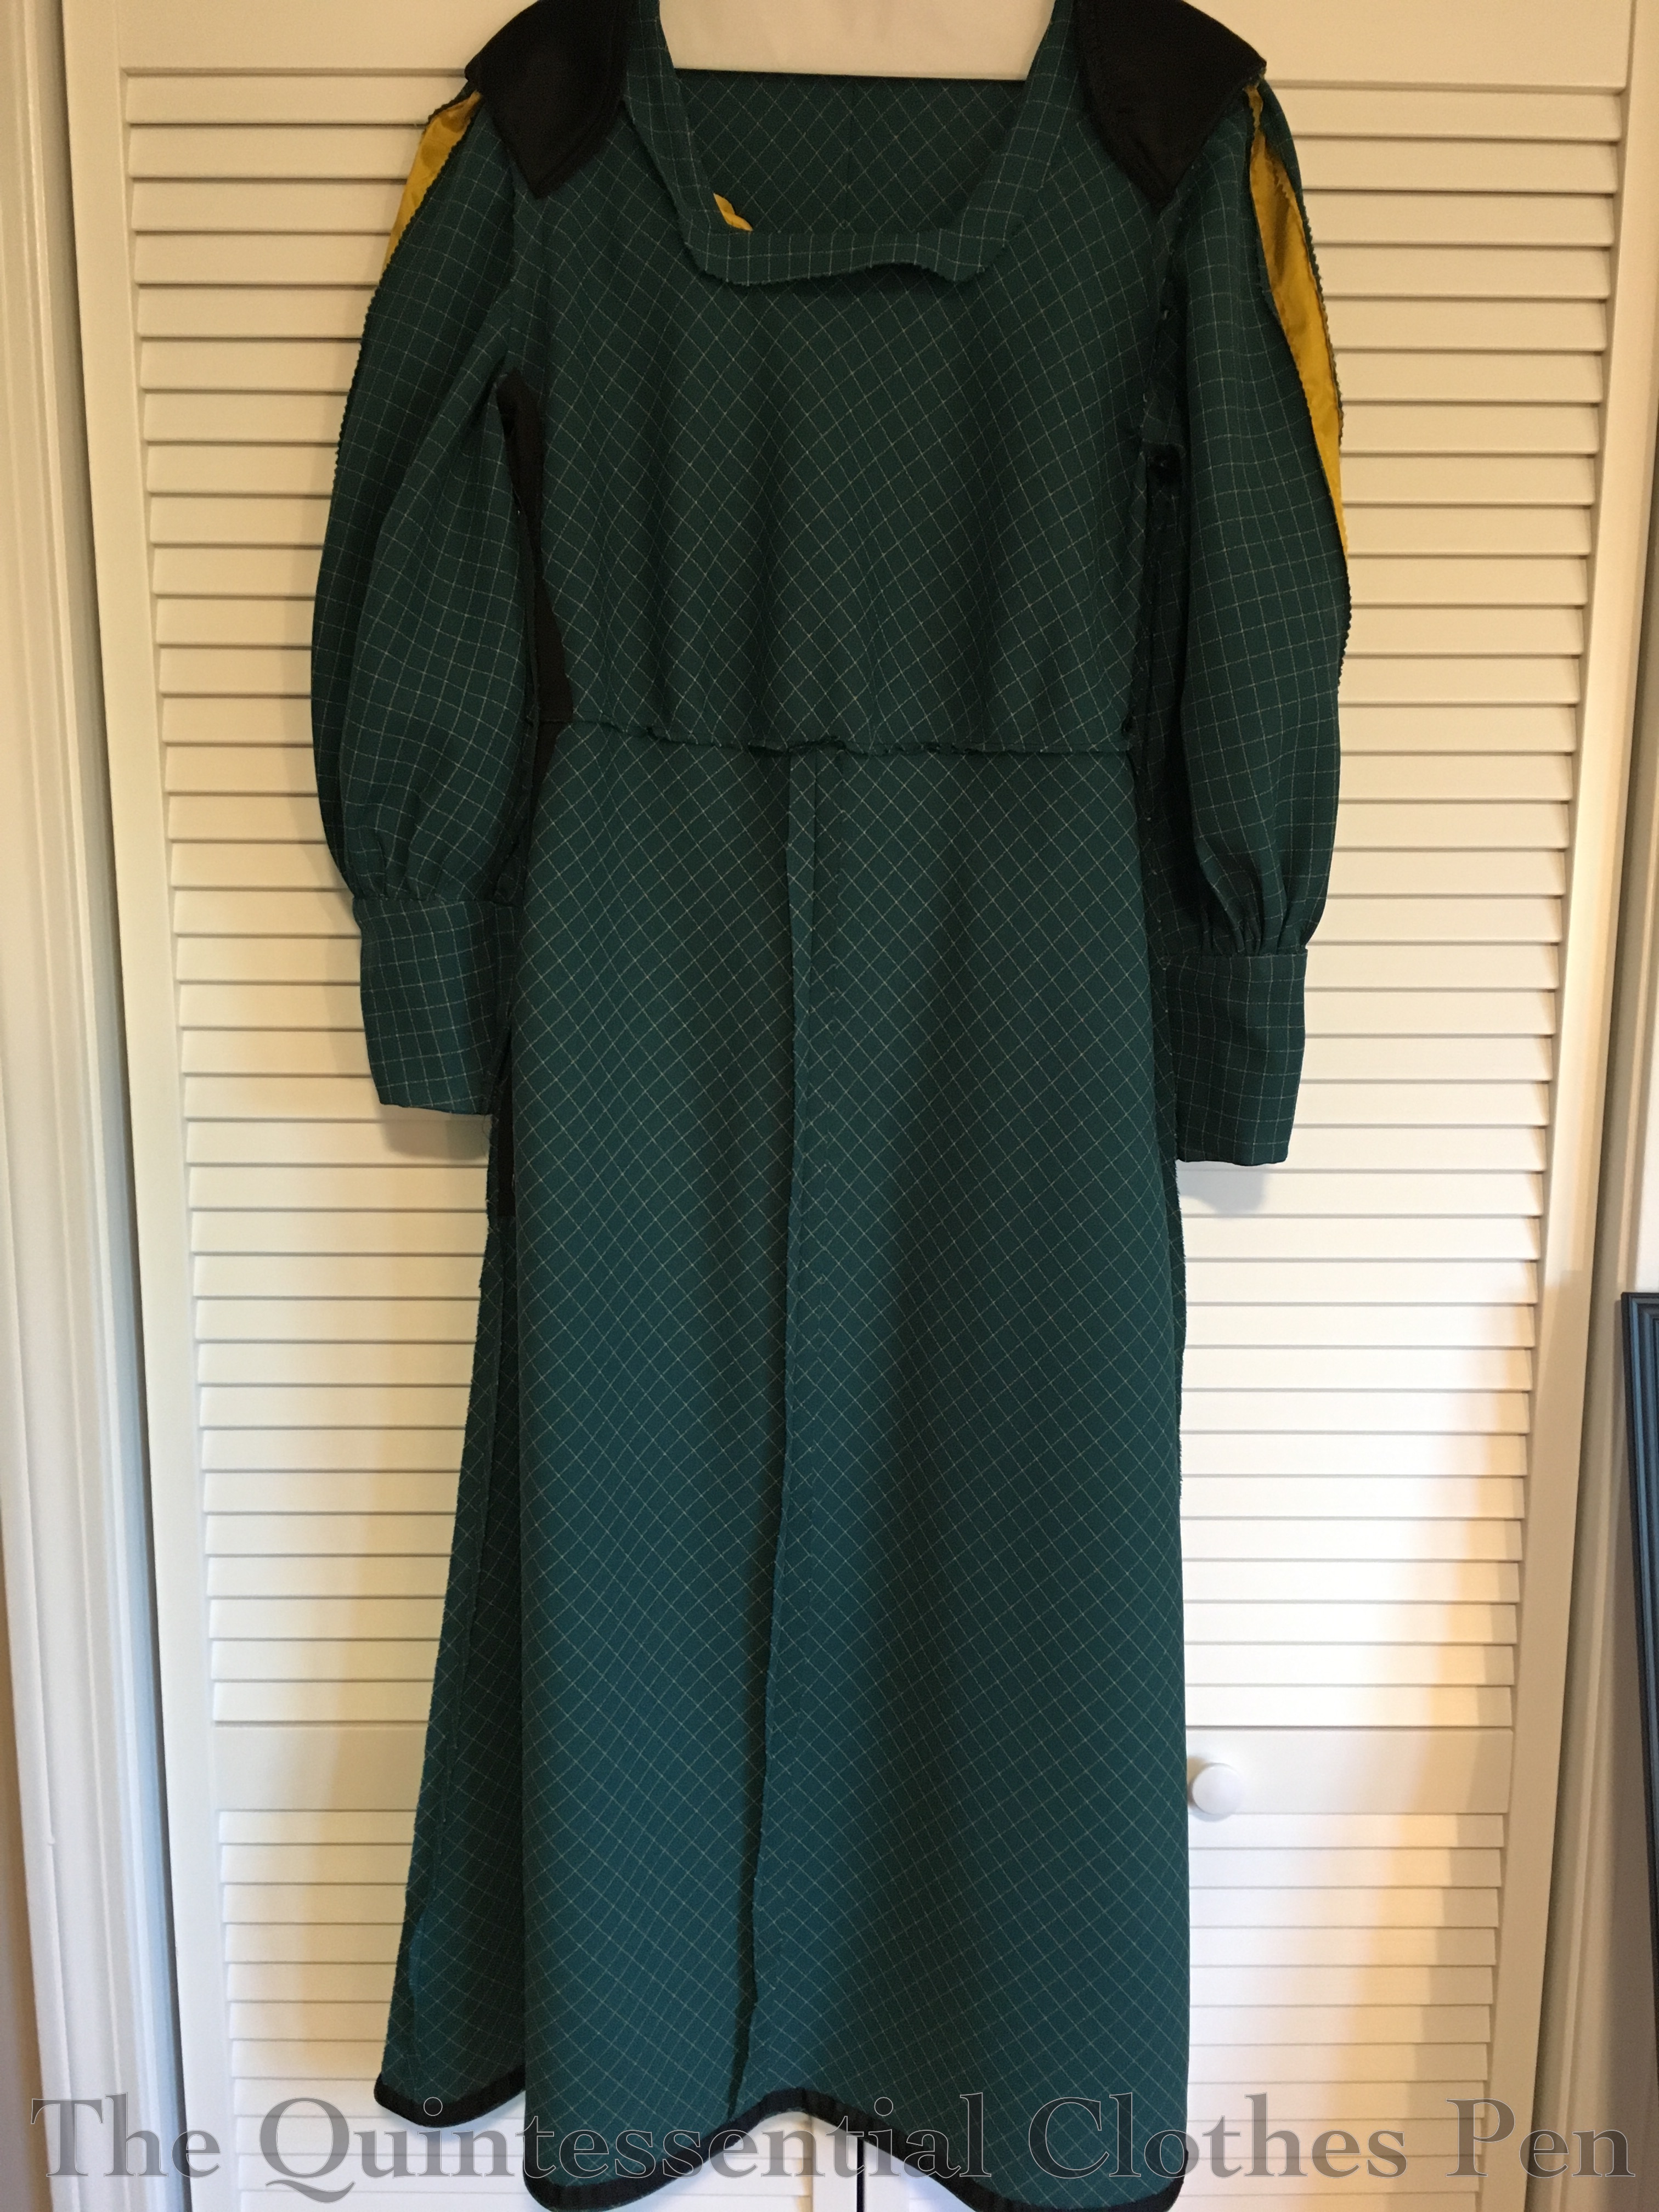
The back of the dress is pretty plain. All the interesting details are on the front. But here it is, for the sake of documenting all of the angles.

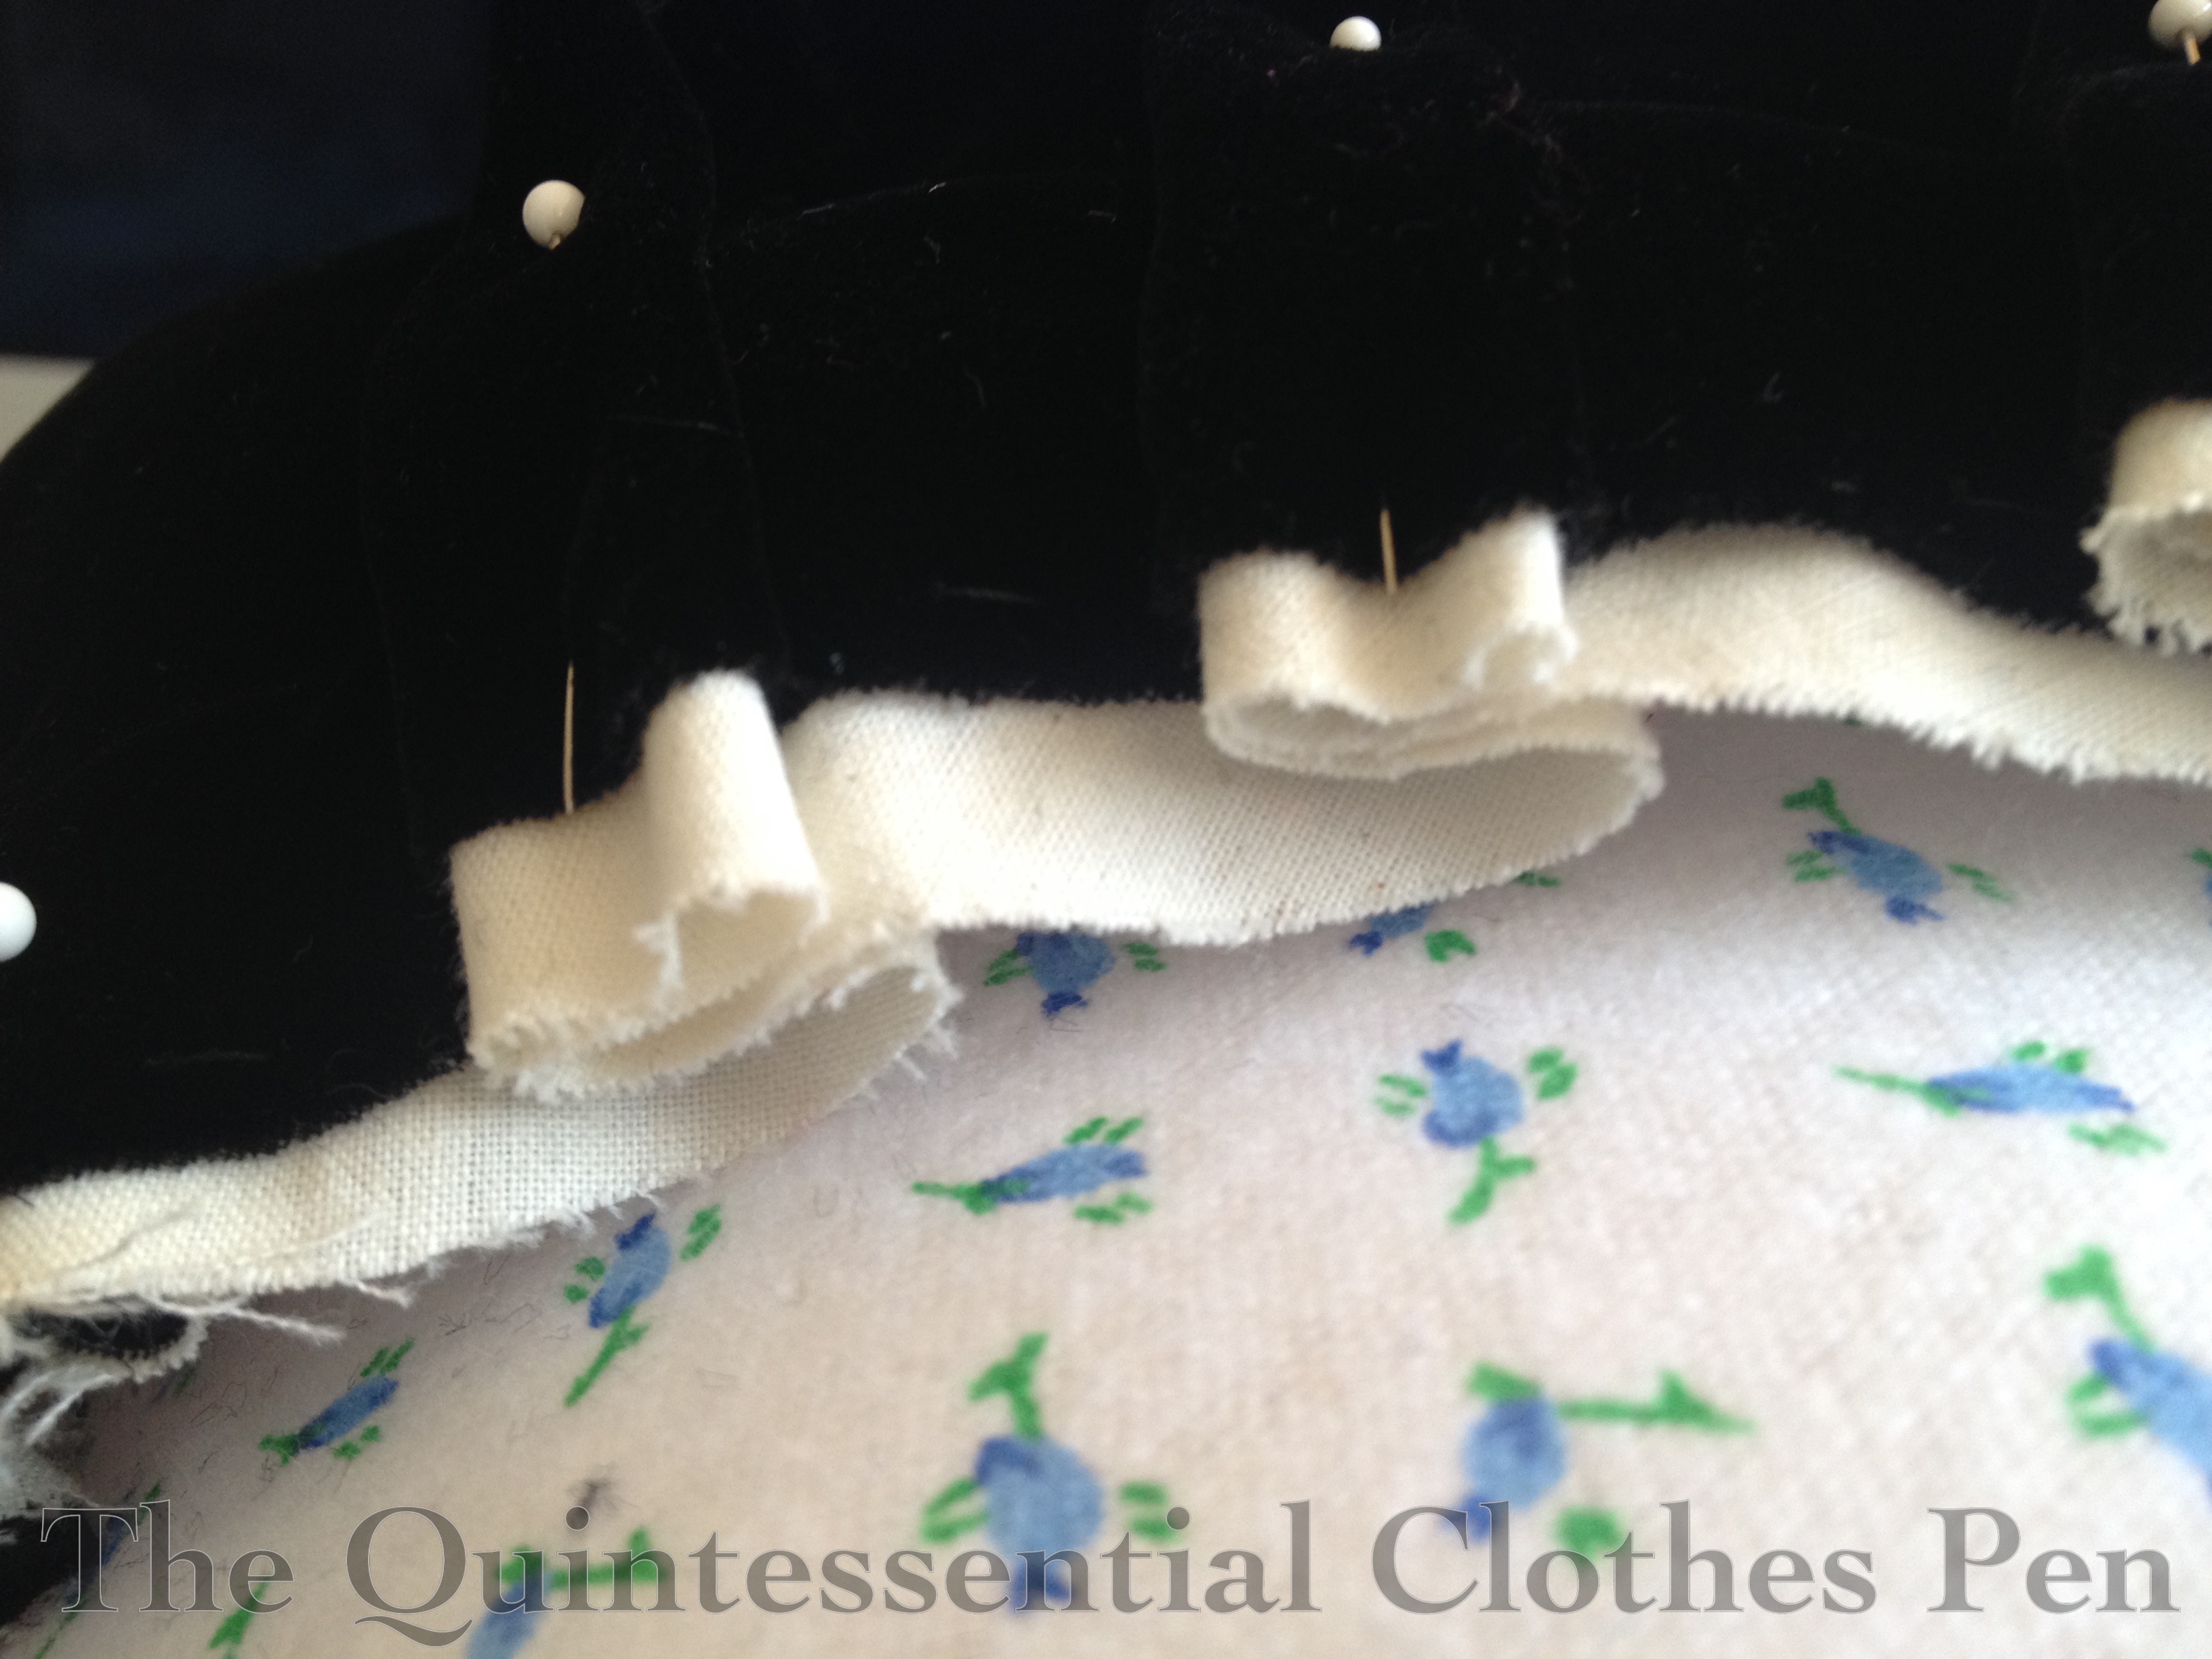
On the inside, the dress looks like this. The seam allowances are either left raw if they are on the bias or pinked if they are on the straight of grain. The neck is finished with a facing which is tacked in place. There are moderate shoulder pads to help achieve the correct silhouette. The bottom edge is finished with hug snug and an invisible hem. The dress closes on the side with a hand sewn zipper. There is a self fabric belt as well.

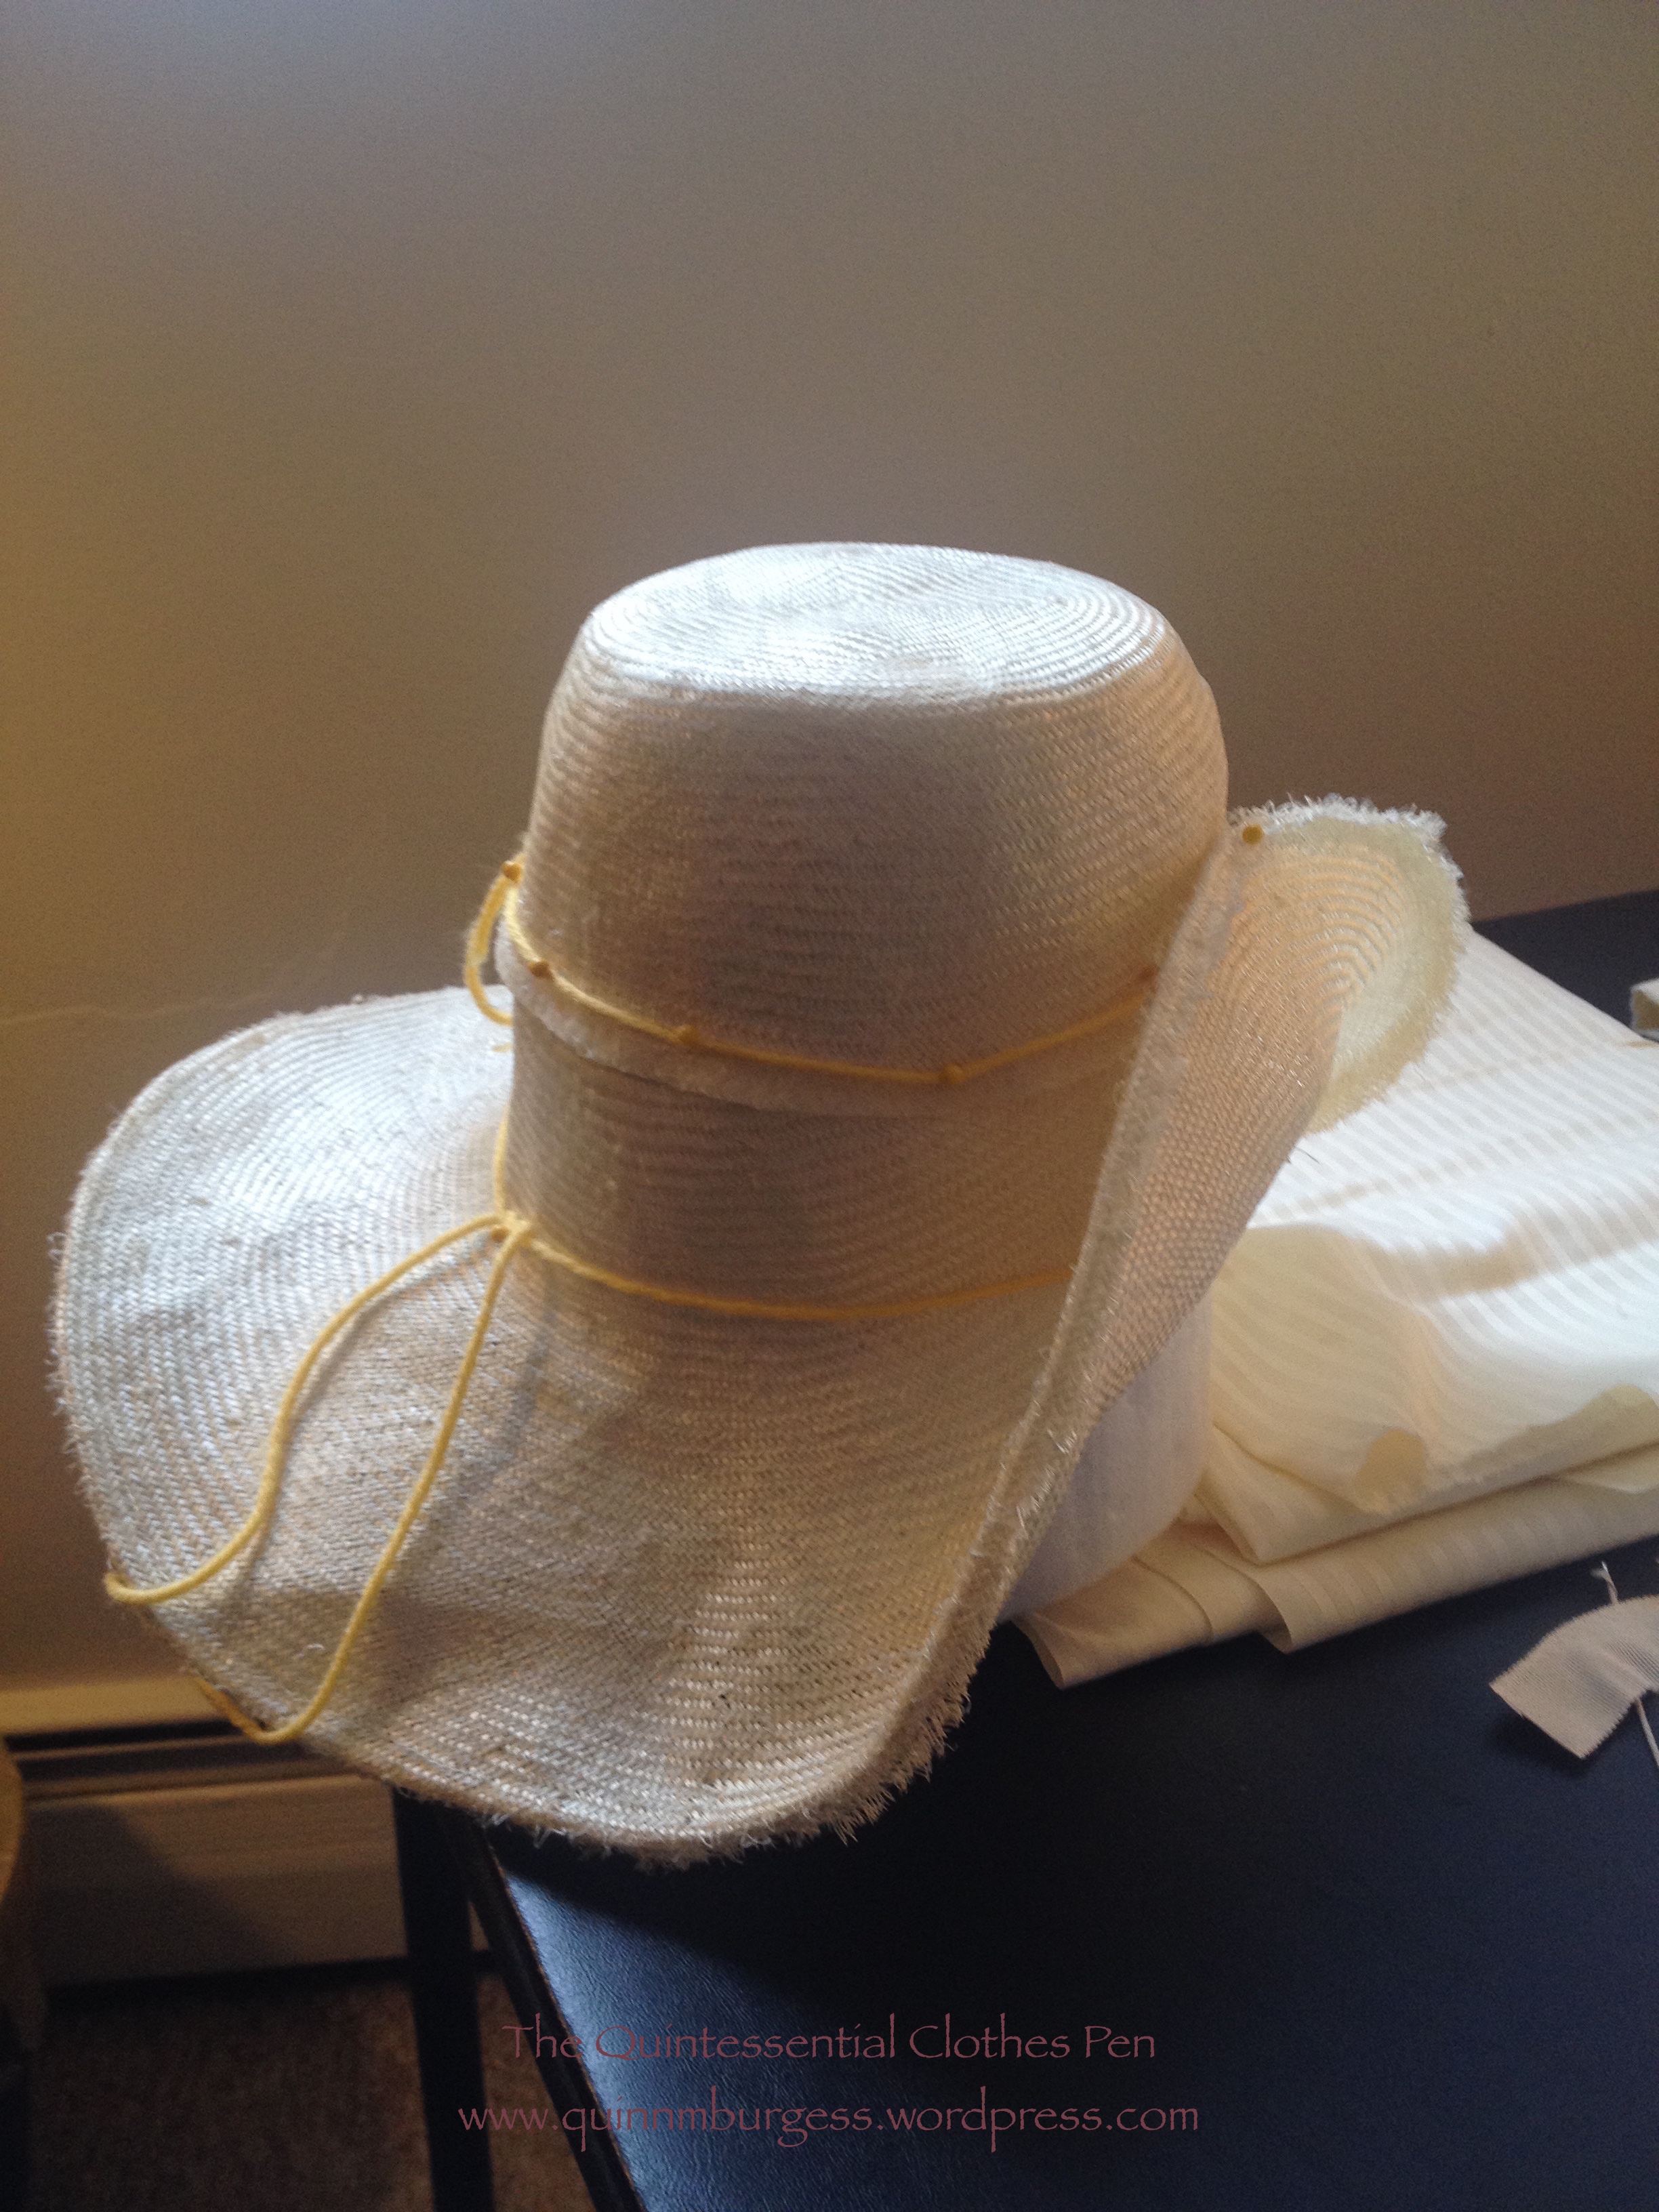
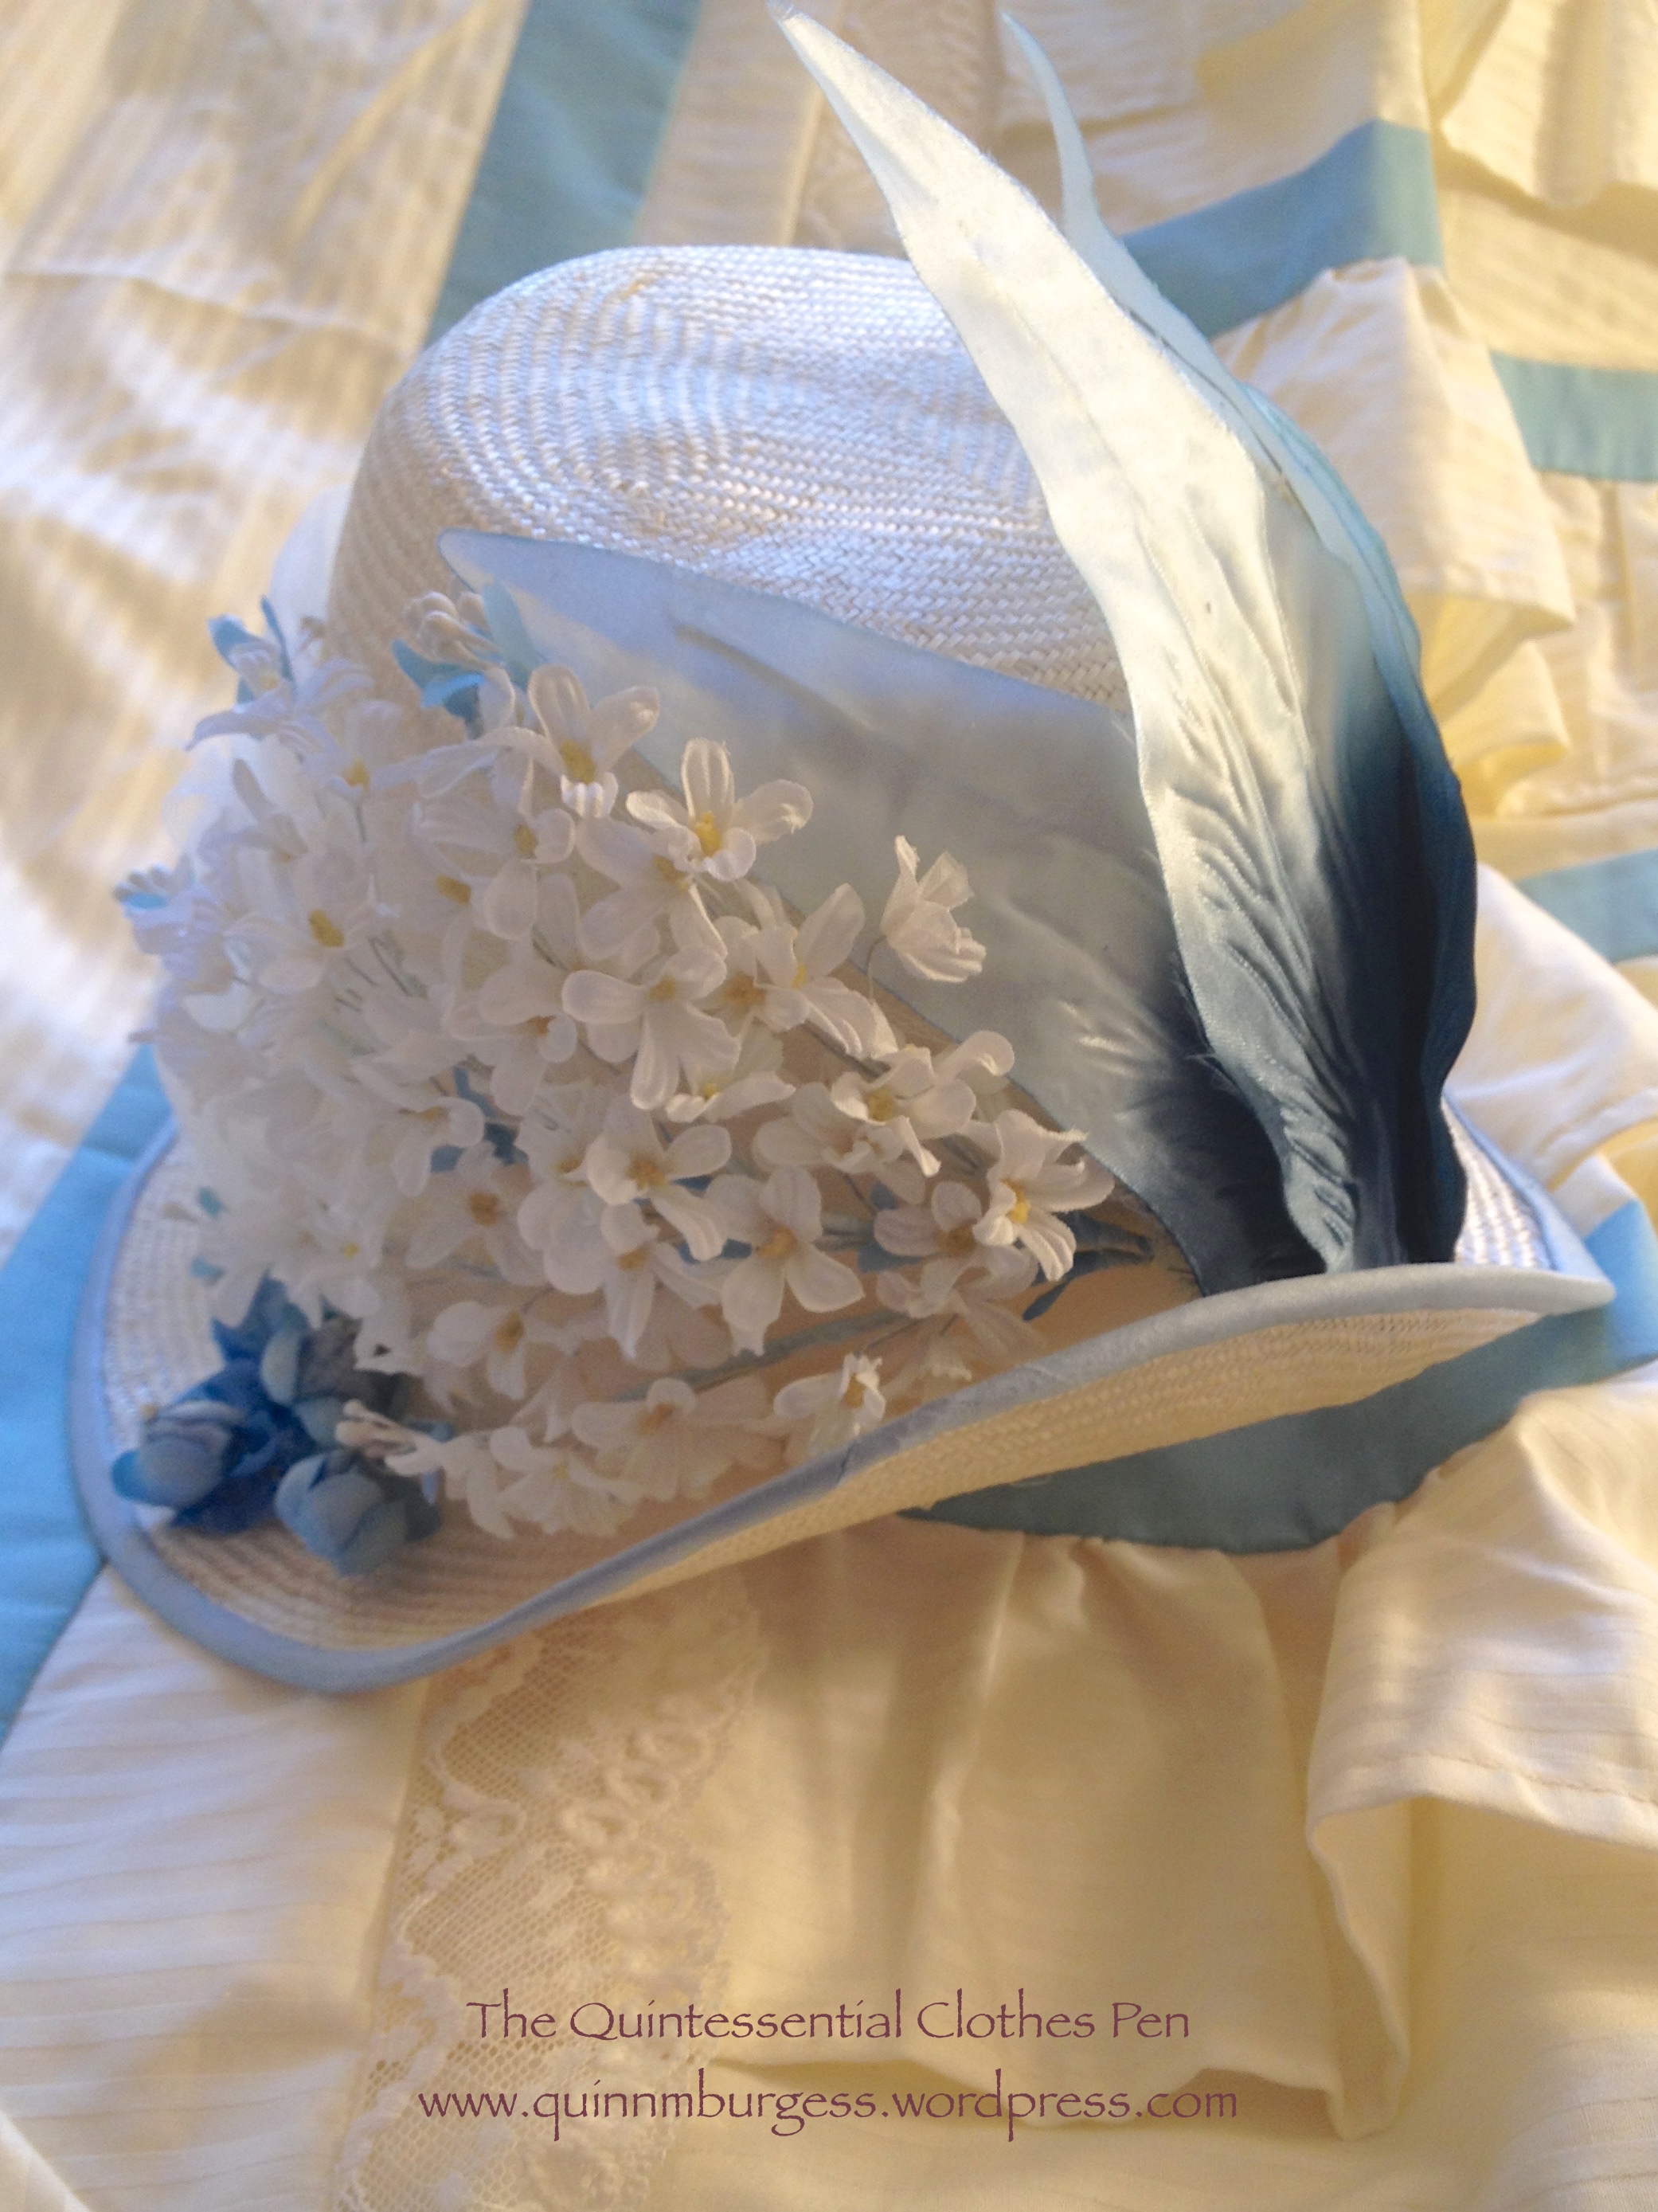
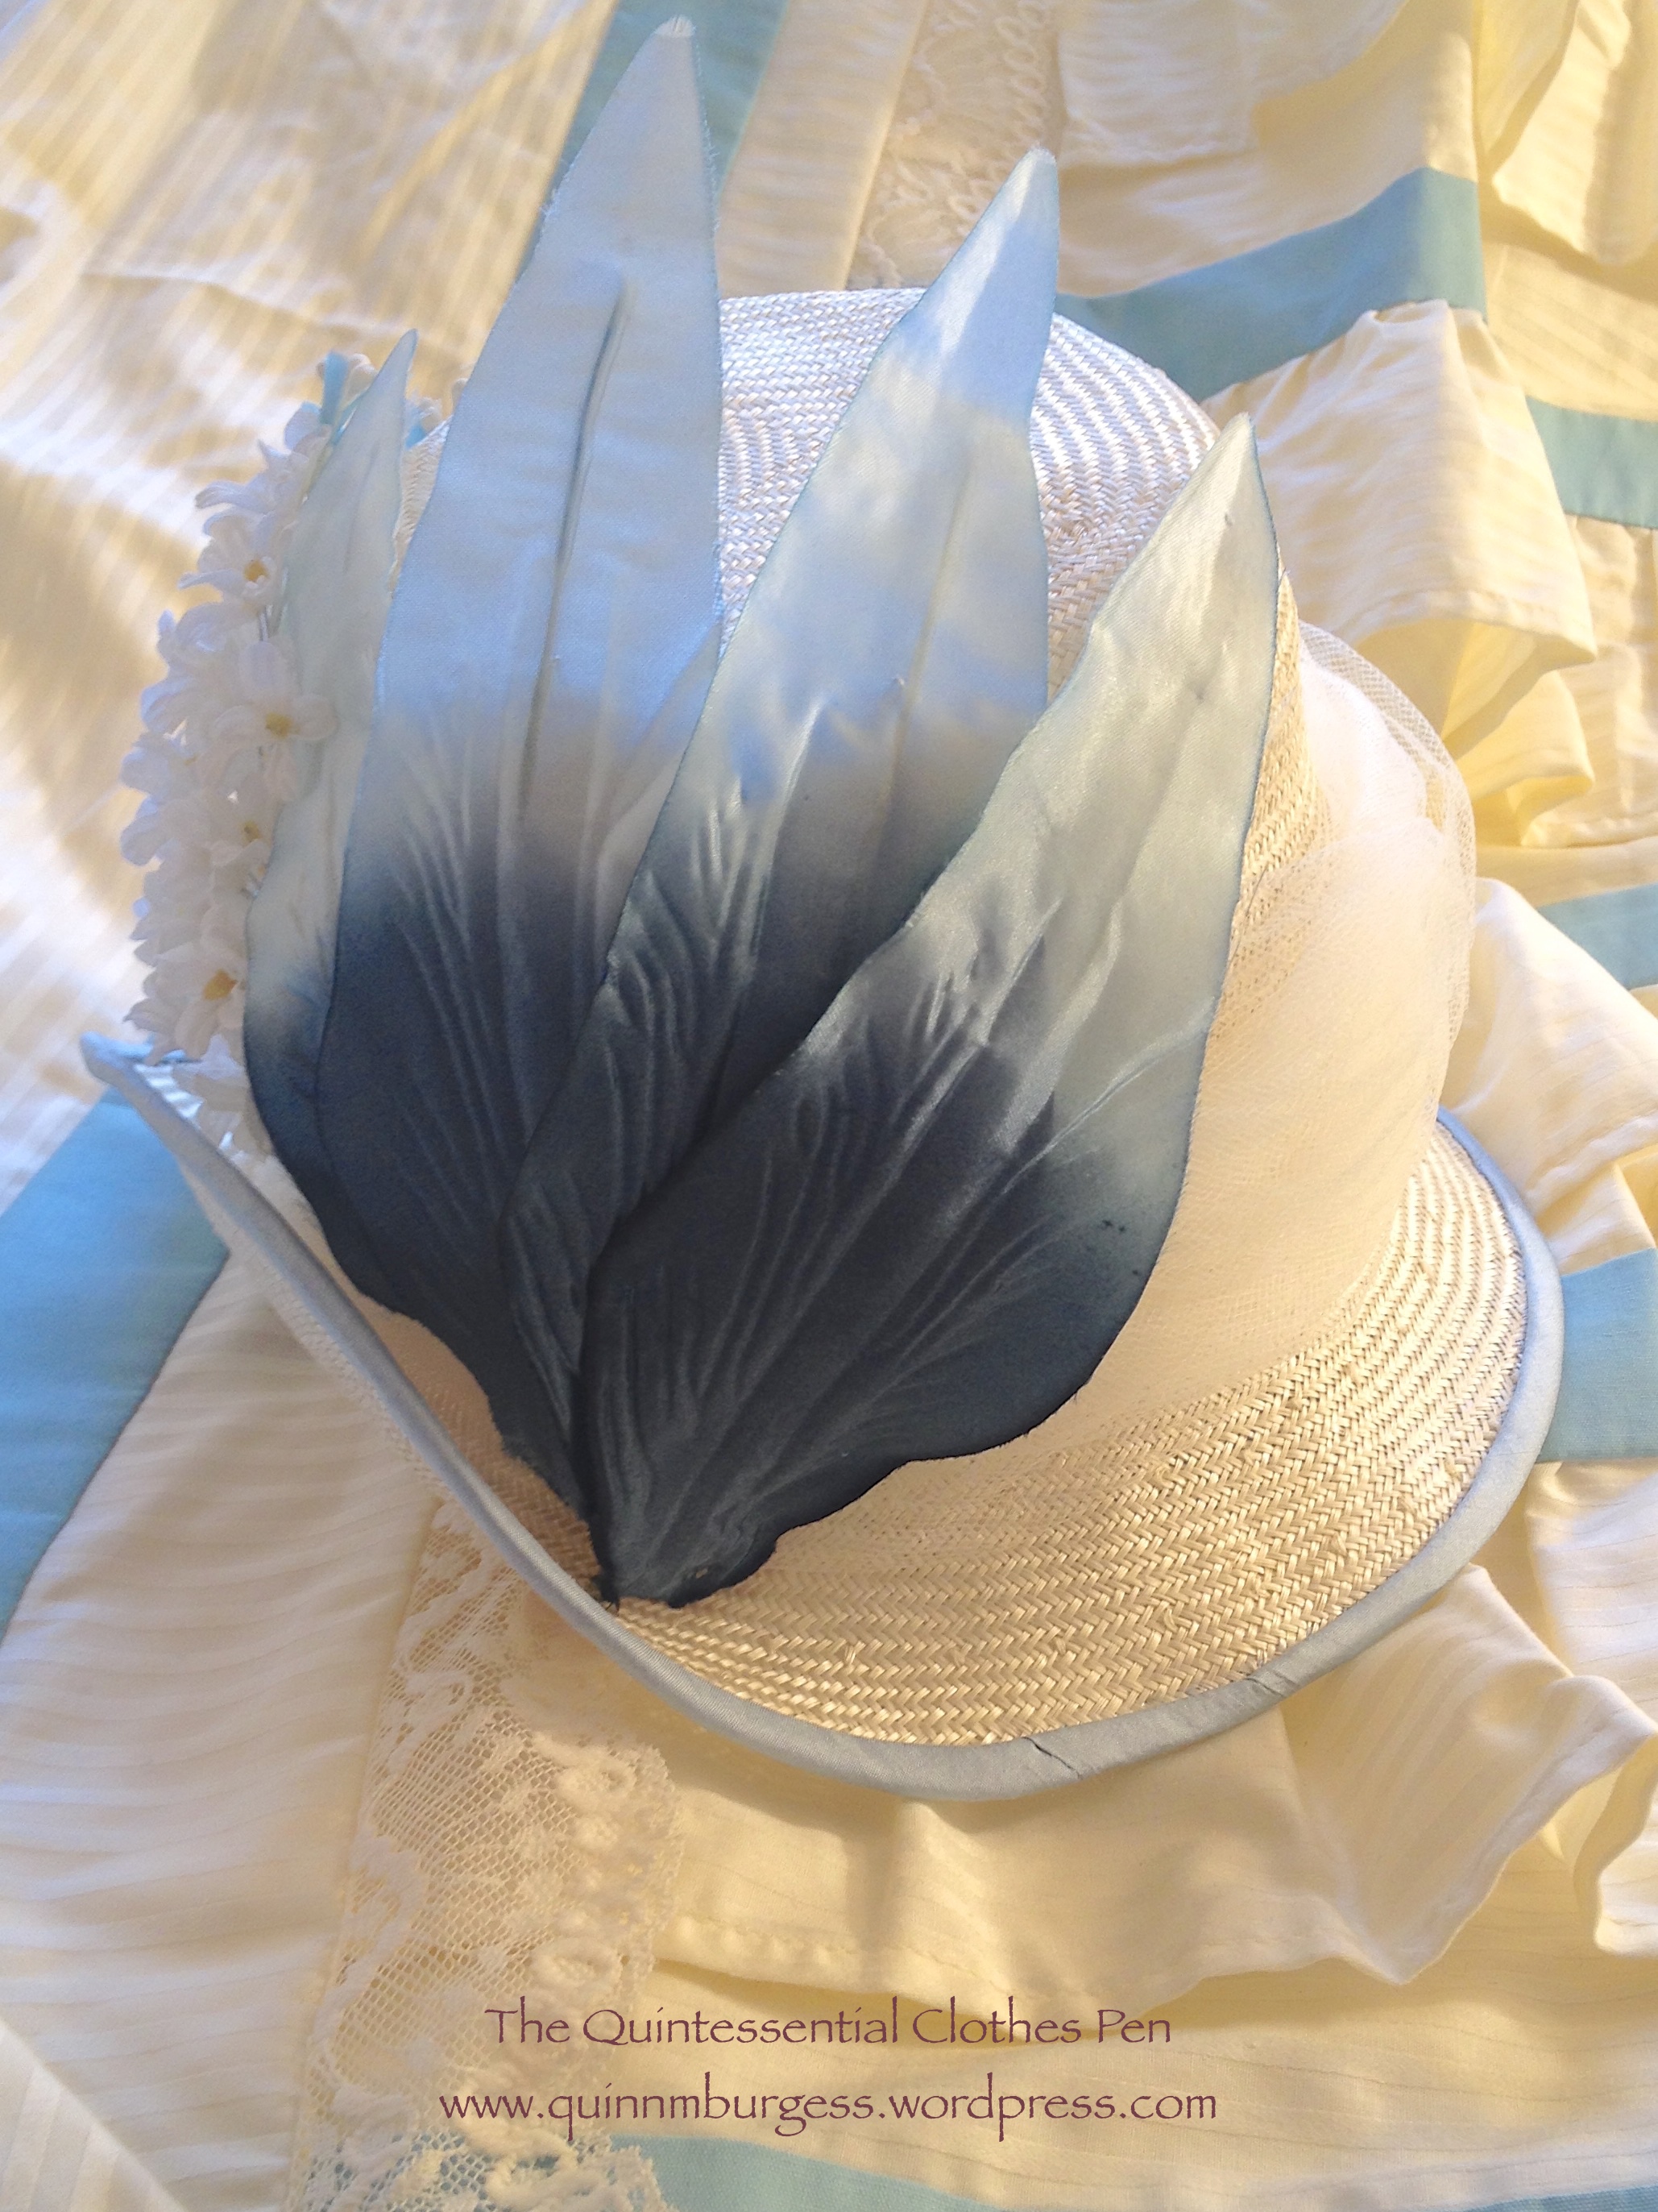
Now for a bit about my hat and hairstyle. First, the hat is a remake of a wool velour hat I purchased for $5 at a theatre sale. It was a bowler shape originally. I cut off the brim, cut down the crown, reattached the two, and then took some tucks in the crown to give it a more unique shape.

Hair-style-wise, I was going to do my usual close to my head 1920s/30s style (I explained and documented it in this past post) but it didn’t seem to compliment my hat, so I decided to try a more down around the chin, lightly curled bob style.

My method for this is as follows: I started with wet hair and a bit of Tigi Small Talk. I parted my hair on the side and added wave clips (3 on the longer side and 1 on the shorter side). Then I braided the rest of my hair to keep it damp while the front dried. A few hours later, I removed the wave clips and ran my fingers through the front sections to loosen them up a bit. To create the chin length look, I looped up large sections of my hair and pinned them to the top of my head. The hat hid all the pinned up bits nicely. My hair has much less volume when it’s damp (and even after it’s dried in a not-voluminous way if I don’t touch it at all), so the chin length curls had a nice close to the head look to them.

I’m pretty pleased with this hairstyle. It will definitely get tried out again someday. The outfit is fun, too! I love that the hat matches perfectly and ties the whole thing together. Plus, it reminds me of autumn, my favorite season.

SaveSave

1904 Anne Of Green Gables Inspired Ensemble

The Background Story

In 2012, I made and wore a c.1900 green skirt and straw hat at Newport Vintage Dance Week. I had plans to make a blouse as well with it but ran out of time and wore a 1913 blouse I already had instead. I wasn’t terribly pleased with the whole look, so I didn’t ever focus on it in a blog post, though I did include it in my overview of the dance week.

At Newport Vintage Dance Week in 2012.

Since then I’ve worn the skirt a few times, but haven’t been able to for the last few years because (and this shouldn’t be surprising given the subject of my last post) the waist was too small!

Thankfully, I had two things going for me that made changing the waist size quite simple. First, I had extra fabric. Second, when I’d originally made the skirt the waist circumference was a few inches too big for the waistband, so I took a tuck on each side of center back. Now all I had to do was let out the tucks and extend the waistband with my extra fabric!

Updated ensemble in 2017.

It took me years to finally get around to doing it, but I’m glad I did, because I really like this skirt and it’s fun to remember the lovely wading adventure we had back in 2012 while I was wearing it! What gave me the final push to do the change was the opportunity for an early summer picnic, for which I had clothes but really wanted to have something new. Who hasn’t experienced that desire?

More About The New/Updated Ensemble

Ducks (and baby ducks) at the picnic!

The picnic provided some lovely backgrounds to take documentation pictures of all the new and updated pieces that form my Anne-inspired ensemble! I ironed out all the wrinkles in the skirt ahead of time… and then sat on picnic blanket before taking pictures, so the back pictures have a rather wrinkly bum.

The Blouse Inspiration

In addition to wanting to update the skirt, I’ve also had that blouse to go with it on my to-do list for years. Instead of going back to the blouse plan from 2012, I started over with new inspiration. (Never fear, the unfinished blouse from 2012 is still in a box waiting for me to go back to it… someday.)

The new inspiration came directly from the scene in Anne of Green Gables when she’s walking down the lane with Gilbert and his horse (just before she gets mad and whacks him with her basket!). I’ve always love her silhouette and decided a blouse with a similar shape would suit the green skirt nicely.

Anne and Gilbert! (And the horse.)

I researched blouses from this period and decided on the year 1904 for my blouse. I was particularly inspired by this ivory c. 1905 blouse, this black c. 1905 blouse, and this blouse that The Met dates to 1899-1902. The idea to play with the direction of the stripes and to have curling lace trim (mimicking embroidery) was taken directly from this page from The Ladies’ Home Journal for April 1904 that Lauren of Wearing History kindly shared on her blog. Other views of some of these blouses as well as other inspiration are gathered on my Pinterest board for this project, here.

The Blouse Construction

My blouse is made of an ivory cotton that is woven with narrow stripes. In the center front panel the stripes are horizontal, while on the rest of the blouse they are vertical. The blouse is trimmed with lace appliqués in the same pattern as the Ladies’ Home Journal blouse from 1904. Unfortunately, all of the subtle ivory on ivory details are hard to photograph.

The blouse is mostly machine sewn and uses French seams except at the armholes, which are left raw. It is finished by hand and closes up the front with concealed hooks and thread bars. There is a twill tape channel for a drawstring at the waist to help control the fullness and the pigeon front.

The silhouette was looking a little deflated for a 1904 pigeon breast look, so I tacked ruffles down the front seams to help fill out the blouse. It’s subtle-but-useful method and was easy since I already had the circular ruffles in my stash.

The Hat Inspiration

The most direct inspiration for my hat was this image from 1903. While I decided against feathers, the general trim placement as well as the poofs under the back of the brim are present in my hat.

There are more inspirational hats here, on my Pinterest board for this project.

The Hat Construction

The hat in the 2012 version of this ensemble was an admirable idea in theory, but not execution. (I was displeased enough that it was remade into my 1885 Flower Pot Hat in 2015.) However, I had another of the same straw base that I decided to remake for the new Anne ensemble.

In 2012, I had used the second straw base to make a Regency bonnet, another project I wasn’t entirely happy with (this is not the right type of straw to get a good bonnet shape). All that needed to be done was removing the trimmings from the hat and taking out the stitching holding the wire around the edge… and I had a straw hat blank ready to be remade into a new hat!

For a hat block, I used a shallow glass bowl covered in tin foil and plastic wrap. I wet the straw base in the bathtub, then used a paintbrush to cover the straw with a layer of my sizing (a bit of elmer’s glue dissolved in water–no formula, I just winged it). I set the hat out in the hot sun to let it dry, holding the edges down with spice jars to keep it from blowing away. (Can you tell I just wandered into my kitchen to see what I had that would work to help me with this hat?)

Reshaped straw hat base next to my improvised hat block.

I tidied up the edges of the hat with scissors, bound the edge of the straw with narrow strips of tulle to keep the straw from fraying, and then reshaped my wire and resewed it around the edge of the hat. I covered these edge treatments with a binding of ivory silk satin, trimmed the hat, and I was done!

The tulle was sewn with a straight stitch. The wire was then stitched with a zig zag.

Sundries

In order to achieve my desired pigeon breast silhouette of 1904, I needed some omph in the back in addition to the ruffles inside the blouse in the front. I tried wearing a small bum pad (about 10″ wide), but then my hips looked sunken by comparison. I determined I needed a new bum pad that would fill in both my hips and backside to help create the illusion I was aiming for.

I also made a new belt to go with this ensemble. I wanted something a little more V shaped in front and a little less dramatic in terms of color. I actually reused the lining from the previous iteration of my new hat to make a new belt. The two shades of green don’t quite match, but they also don’t offend, so I’m pleased.

Instead of a traditional Gibson Girl hair style, I tried a style more like this, with a center part and poofs on each side. It was a bit squashed by my hat, but I was quite pleased with it overall. Unfortunately, I didn’t get any perfect shots of just my hair style. I’ll have to try it again someday and get hair pictures.

SaveSave

SaveSave

SaveSave

SaveSaveSaveSave

SaveSave

SaveSave

SaveSave

Orange Boven Hat, 1814 (HSM#4)

I am pleased to report that I made a garment which qualifies for the HSM challenge #4: Circles, Squares, and Rectangles! I wasn’t sure I had anything on the sewing list that would do, but then I remembered years ago when I started this hat and it was only two pieces, a circle for the crown and a rectangle for the binding. Perfect! (I’m not counting the triangular trim. That’s just the trimming!)

As you might guess from the photo, this hat is part of a matching ensemble: a pelisse and hat from 1814. I’ve got lots of details planned regarding the inspiration for this ensemble as well as more pictures of the finished outfit, but for now this teaser will have to suffice. It gives context to the rather silly hat.

Just the facts:

Fabric: Pale peach cotton and cream (likely) poly/cotton blend.

Pattern: My own based on my head measurements.

Year: 1814.

Notions: Thread, two ostrich feathers, and about 1 yard of vintage lace.

How historically accurate is it?: I’m going to go with 95% on this one. It’s entirely recognizable in its own time and made in a way that is straightforward and consistent with historic garments. The materials are not 100% accurate.

Hours to complete: If I’m only counting the hat, about 3 or 4, since it is entirely hand sewn.

First worn: April 9 for a Regency tea.

Total cost: About $8 for the hat without the pelisse.

Gibson Girl Vignette

In September, my friends and I had a last picnic of the season to take advantage of the summer weather before it faded into fall. Along with other picnics we’ve had in the past, we again met up in the Boston Public Garden with our picnic blankets, food, drink, and croquet set.

img_1882

We’d decided on a turn of the 20th century theme for our clothing and I took the opportunity to dig a 1903 outfit out of the closet that I don’t think I’ve worn since 2012, at Dress U and Newport Vintage Dance Week. It’s an orchid lawn skirt (and a bolero I didn’t wear this time) and a white silk and cotton lace blouse.

img_1879

This wearing, my hat had been re-trimmed in a more pleasing fashion than when I wore it in 2012 (in fact, all the lovely millinery flowers are only pinned on so it’s easy to change, not that I’ve bothered since I put the flowers on about two years ago) and I had practiced my Gibson Girl hair in January and now know how to achieve the look with minimal effort.

img_1889

I was very pleased with the result! Next time I plan to wear a hat with a Gibson Girl style I’ll put the opening of my hair pad at the top of my head rather than the bottom, and likely leave a little space to make the front a bit more flat so my hat doesn’t tilt up. Where’s the fun if I don’t learn something new every time I wear historical clothing?

Vernet Project: A Bit More Toque de Velours

In January, when I posted about my Vernet Project hat (the Toque de Velours), I missed including a few in-progress construction pictures I later discovered floating around my photo library. Now is as good a time as any to share them.

To remind you, this is my toque de velours.

IMG_1903

Here is the toque in the mockup stage, early in the process. I was trying to determine scale and proportions more than anything. For ease, I combined the bottom two vertical sections into one piece of paper for the mockup.

IMG_1394

Here is the actual toque in progress. You can see the floral cotton flannel mulling layer that is between the buckram base the the velvet exterior. You can also see that I used my mockup poof to flat line my velvet poof in order to help the light silk velvet hold its shape. This picture also shows the double, or stacked, pleating around the poof.

IMG_2924 (1)

This is the beginning of a renewed effort to post details about all the pieces of my Vernet Ensemble, so keep an eye out for posts about the petticoat, muff, shoes, and the witzchoura itself this fall.

Vernet Project: Toque de Velours

Today, I’m going to share more information about the unusual hat in my Vernet fashion plate.

IMG_1903

The caption reads “Toque de Velours.” I already had a rough translation in my head, basically “Hat of Velvet,” but thought I should double check the definitions before deciding on materials.

Toque:

1:  a woman’s small hat without a brim made in any of various soft close-fitting shapes

2:  tuque (a warm knitted usually pointed stocking cap)

3: a tall brimless hat worn by a chef —called also toque blanche

Velours:

1:  any of various fabrics with a pile or napped surface resembling velvet used in heavy weights for upholstery and curtains and in lighter weights for clothing; also  :  the article of clothing itself

2:  a fur felt (as of rabbit or nutria) finished with a long velvety nap and used especially for hats

Well, the hat does rather resemble a chef hat, doesn’t it? My rough translation was confirmed! Luckily, I had black silk velvet in my stash, which perfectly suited the project.

The hat base is buckram in the simple shape of an oval to fit my head with a flat tip on top. I don’t have pictures, but imagine the shape of a straight sided Lincoln-like top hat without the brim and you’ll have the right idea. The buckram is mulled with cotton flannel and wired around the head opening, tip, and partway up the side. The buckram support is about 8″ tall.

In addition, there is padding to support the poof on top. I chose to use polyester batting–it’s not at all accurate, but I had it on hand and it isn’t seen. There are concentric ovals on top that diminish in size with each layer as well as a few layers around the top of the buckram on the side to provide support for the tucks/pleats.

rolledpleats
The “stacked” pleat is on the right.

The poof is a large circle that is flat lined with a piece of muslin to help provide the support for the pleats. The pleats are about 1″ wide knife pleats that are then folded back on themselves to create a double pleat (this website calls this type of pleat a stacked pleat and is the source for the image). To determine the type of pleat, I played around with my fabric until I found a method that created an effect like the fashion plate, which is like fans or slices (you can see it in this post). Then I eyeballed how many to do, pinning and re-pinning until the pleats were evenly spaced and the poof fit into the side of my hat (no math here, I avoid it as much as possible most of the time).

The definition on the sides (at the head opening and about 1.5″ up from the head opening) was created by inserting “cording” under the velvet. My “cording” is actually modern acrylic yarn in sunshine yellow (like the batting, I made this choice because I had the materials on hand, it worked, and it will not be seen–but it is not accurate). I believe there are two or three lengths of yarn in each single section of “cording” to get the right thickness to show under the velvet.

IMG_1887
We took this photo specifically to capture the detail of the hat construction (usually the black all washes together, eliminating evidence of all the detail).

The rest is just sewing! The hat is entirely hand sewn, with the layers of velvet either tacked to the mulling or stitched through to the interior of the buckram base. Once I had finished the exterior sewing, I whipped up a lining of black silk  to tidy up the inside.

The last step was to trim the hat with the immense ostrich feathers depicted in the fashion plate. I ordered my feathers from Lamplight Feather, which I highly recommend (quick shipping, good quality, and great selection). The hat has 6 total feathers, each 17″-21″in length. Each plume is two feathers sewn together along the central stem before being shaped and sewn to the hat. The trickiest part was shaping the feathers to achieve the shape in the plate. Each plume is shaped so that it does an 180 degree turn (the plumes are attached to the hat standing up, but then are turned downward) in addition to the side sweep shape. As you can see, the wind occasionally blew lots of feather fluff into my face during the photo shoot, but it was totally worth it, to wear such lovely feathers.

IMG_1957
Feathers!

I constructed the hat such that it would sit almost horizontal across my head. It’s pretty light in terms of weight and is not uncomfortable to wear, being sized perfectly to fit my head. It also comes down far enough to be quite stable: even with the breeze and moving my head around there was no fear of it falling off.

As fun and silly as it is, I don’t really see a use for it in regular Regency wear. I will likely remove the feathers to use for another project someday (also partly because it would be hard to store the hat nicely with the feathers still attached). I’ve toyed with the idea of removing the poof (and maybe making a tam or turban or something out of it, or just sticking it back in my stash with the rest of the velvet) and using the buckram base with the velvet sides to make a shako style Regency hat. I have no immediate plans to put these ideas into action, except for removing the feathers, which I really should do soon, so I can put the hat away!

Vernet Project: Photo Shoot!

I thought I’d start the new year off with photos from my Vernet Ensemble photo shoot. (I’ll be doing separate posts with details about the construction of the ensemble as the year progresses.) I’m so incredibly pleased with my ensemble and with the quality of the pictures. I often have lovely pictures after events and when documenting sewing projects, but these are extra special in terms of the sharpness of the images, the clear colors, and the fun use of a historical lens.

Hopefully, you were following along with the release of finished ensembles in December, but in case you missed mine or haven’t figured out yet which fashion plate I was recreating, here it is.

Plate No. 20 “Toque de Velours. Witz-choura de Satin.”

164-0000-021 - Version 2

Below is the “official release” picture. I did my best to mimic the pose of the fashion plate, but it was really hard to wrap my brain around the left and right of things in my own pose relative to the fashion plate. Left was right and right was left, and in the end we did the best we could and called it done. I think we actually did it right, it’s just that I’m facing the camera at a different angle. It still boggles my brain to try and figure it out!

IMG_1915 blog

Unfortunately, there was no snow in November when we took these pictures and so I didn’t get ice skaters falling over behind me (also, I would have had to find ice skaters)… but I did get unfrozen water, and you’ll just have to imagine the ice and the skaters!

IMG_1903

IMG_1902

IMG_1936

IMG_1978

IMG_1963

IMG_1972

IMG_1985

IMG_2004

IMG_2020

These last few pictures with the blurred background were taken using a reproduction 19th century Petzval lens. You can read more about the lens and how it causes this effect here, at my photographer’s blog. 

IMG_1928

IMG_1922

IMG_1917

I am so incredibly blessed that to have a friend that joyfully enjoys practicing her photography skills with her nice digital camera (with fancy and historical lenses, to boot!) by taking pictures of my endeavors, amongst other things. She happily came over one afternoon in November just to accompany me for the photo shoot and take these absolutely gorgeous pictures. Thank you!!!

Belated HSF 2013 #13: 1885 Frills and Furbelows

For my 300th post on the blog, I thought I’d share a dress that makes me smile. This dress makes me smile because of the frilliness of it which reminds me of Anne of Green Gables, because of the fact that it was very enjoyable and comfortable to wear, because I love that it is a UFO from 2013 that is finally complete, and because of the stunning backdrop I had for the pictures of it, which also remind me of Anne of Green Gables.

IMG_2725

I wore this dress to the Nahant Vintage Dance Weekend Formal Tea and Seaside Promenade in August. It was also the first outing for the my new 1880s steam molded corset and my recently made 1885 straw hat. I am pleased to report that they were all comfortable garments and accessories to wear. Being heavily boned, the corset was very supportive and thankfully didn’t feel heavy, and because it is shaped exactly to my body it was super comfortable–smoothing my figure without squishing it uncomfortably. The dress was perfectly reasonable to wear, with the exception of sitting, which required a slight sideways perch that was a bit precarious. And the hat stayed in place perfectly with two hat pins, as you can see from the pictures where my head is tilted in various directions.

IMG_2699

IMG_2689

IMG_2698

This dress has an association in my head with the puffed sleeves that Anne wants in Anne of Green Gables. While being from the wrong decade, it seems exactly like the sort of dress covered in frills and furbelows that Marilla wouldn’t waste fabric on. And just like Anne, I would often rather have the ridiculous, fashionable styles in historical clothing than the plain and sensible ones!

MARILLA: I’m not going to pamper your vanity. These are good and sensible dresses. This one is for Sunday, and the others you can wear to school.

ANNE: I am greatful, but I’d be even more grateful if you’d made this one with puffed sleeves.

MARILLA: I cannot waste material on ridiculous looking frills and furbelows. Plain and sensible is best.

ANNE: I’ve always dreamed of going to a picnic in puffed sleeves. I’d rather look ridiculous with everyone else than plain and sensible all by myself.

IMG_2706

This dress was started in 2013. I had grand hopes of finishing it that summer for the Historical Sew Fortnightly challenge #13: Lace and Lacing

Lacing is one of the simplest and oldest forms of fastening a garment, eminently practical, and occasionally decorative.  Lace has been one of the most valuable and desirable textiles for centuries, legislated, coveted, at times worth more than its weight in gold, passed down from one garment to the next over centuries. Elaborate and delicate it is eminently decorative, and rarely practical.  Celebrate the practicality of lacing, and the decorative frivolity of lace, with a garment that laces or has lace trim, or both.

And while I did make significant progress on the skirt that summer (getting all of the trimming figured out, cut, and assembled, as well as getting the skirt base and side panels constructed), I didn’t get anywhere near far enough along to have a wearable outfit. So it sat in my “in-progress” sewing box with hopes to be worked on, but didn’t really make it to the top of my sewing list again until this summer. I had enlarged and sized a pattern from Janet Arnold in between 2013 and 2015, even cutting and assembling a mockup, but that had been waiting for a fitting because I wanted to wear my new specifically 1880s corset with the dress and the new corset didn’t get completed until June. Once I had the corset done, I set to work on the dress again, fitting the mockup bodice, finishing the skirt, and making the bodice, as well as a slight delay while I made the hat to match. It’s handy to make a hat part-way through the process of making the dress, because you don’t wind up running out of time at the end and not having matching accessories!

IMG_2772

The first inspiration for my dress was this white summer dress at the LACMA. The skirt was pretty much directly taken from the original, except for the back, which has a cascade of fabric instead of tucks as on the original–I figured there was already enough fluff for me on the front of the dress. I originally planned to edge all the front ruffles in lace as well, but ran out of lace. Running out of lace also made me rethink how I was going to trim the bodice. I went back to my inspiration boards and found these dresses with inspiring bodice treatments: a seaside ensemble and an afternoon dress with very different fabrics and intent, but I thought this could be adapted for my summery seaside dress. I had only a few yards of lace left when I got to working on the bodice and I decided to save some for edging the top of the 1880s corset because the shape of the lace is perfect, but that didn’t leave me much for the bodice. It turns out I had just enough to execute the final trimming plan I decided on.

IMG_2754

Since this was originally intended to be part of the HSF, here are just the facts:

Fabric: 7ish, I think, yards of cream satin stripe cotton, 1/3ish of a yard of blue polished cotton, and 1.5 yards or so of cream polished cotton for flat lining the bodice.

Pattern: Created by me, but the shapes are based on a dress in Janet Arnold.

Year: 1885.

Notions: 9 yards of ivory lace, hooks and eyes, scraps of white cotton for finishing off the bodice edges, and vintage ivory buttons.

How historically accurate is it?: As accurate as I can be using the research I’ve done and the materials that are available in 2015. It definitely passes Leimomi’s test of being recognizable in its own time.

Hours to complete: Tons over two years.

First worn: In August 2015.

Total cost: I bought the all the cottons for super cheap, probably $3/yard, the lace was probably about $8, the buttons were a few dollars, and the rest was from the stash, so around $30-$35.

There were so many good pictures it was very hard to limit myself for this post! So here’s some more, with a bit of commentary to go along with them.

We had a beautiful day for the Tea and Promenade. It had been very hot prior to this, but the day of the event was a little cooler and the stiff ocean breezes made for a temperature that felt perfect for me in my layers and ¾ sleeves. The formal tea part of the day was at Egg Rock on Nahant (the same location as the Formal Soiree I attended last August). There was a lovely concert inside the house as well as guests lounging around outside, including me, playing croquet. At that point the stiff breeze had me worried that my hat wouldn’t stay on without pulling at my hair, so I chose not to wear it for awhile. (Thank goodness I gave it a try later, though, because it is perfect with the dress and I wouldn’t have wanted to miss wearing the two together!)

IMG_2668

11866207_10153557263049588_8661903483348243128_n

After the concert and some refreshments, the guests assembled for the promenade. As you would expect, we stopped traffic, attracted stares, and received questions from the more brave souls who would talk to us rather than just making up stories in their heads about our unusual clothing. The promenade took us to East Point, former site of the 19th century Nahant Hotel. The hotel is no longer standing, but there were stunning views of the Atlantic and the rocky coast to clamber on!

IMG_2716

IMG_2721

IMG_2735

IMG_2737 (1)

IMG_2742

IMG_2750

IMG_2776

Not me, but such a gorgeous view and cute picture that I had to share it, too!

IMG_2766

Some of us decided to head back a little early so we could stop at a small beach we had passed on our way to East Point and go wading! After the walk, the cold Atlantic water felt quite good on our feet. Here I am with stockings and shoes off, ready to head into the water.

IMG_2785

And here I am, wading in my bustle dress!

IMG_2816

There’s this picture of two ladies in bustle dresses from 1885 who look like they are collecting shells. That’s what I had in mind when I took this next picture, although looking at the 1885 picture again I see that the ladies in the picture are still wearing their stockings and shoes… I guess I’m pretty scandalous for 1885 in my bare legs and feet!

IMG_2827

Here we are, the whole wading group. It was a pretty fun adventure. I don’t think I’ve been wading in historical clothing since Newport in 2012.

IMG_2789

IMG_2810

HSF/M #7: 1885 Straw Hat

This month’s HSF/M challenge is “Accessorize.” In preparation for the first wearing of a new 1885 outfit next month, I made up a hat to match.

IMG_2446

I chose to make a flowerpot shaped hat, a style that is quite common in the mid-1880s. You can see other examples of this style and others on my 1880s headwear Pinterest board.

The straw base of this hat has seen multiple previous shapes that failed in creating a look I was happy with. (You can see one of the old iterations in this previous post from 2012. And as a side note, I really need to wear the other clothes in that post again–it’s been awhile and they’re cute!) So I was happy to reblock the straw into a new shape (that I am very happy with!).

IMG_2398I made my hat block out of packing foam stuff that I masking taped around a lysol wipe container–make do with what you have, right? To begin, I wet the straw, then used a paintbrush to cover the straw with a layer of my sizing (a bit of elmer’s glue dissolved in water–no formula, I just winged it). In order to keep the straw in place while the hat was drying overnight I used yarn tied and pinned in strategic locations to keep everything in place. I wanted to use twine, but we’d run out, so I made do again. As you can see, there is a random seam in the middle of the hat crown, because in the past it had made sense to have a crown separate from a brim, but for this hat I needed some of the old brim to become the crown. (The seam was later covered by the tulle trimming.)

IMG_2396

My inspiration for the trimming of this flowerpot hat is this fashion plate. The lady on the left happens to be wearing an outfit in the same colors as my outfit and the fashion plate is dated only one year later. I used materials I had on hand, but was inspired in general by her trim placement and scale.

IMG_2449
Side view.
IMG_2450
Side back view.

Just the facts:

Fabric: A bit of blue silk shantung for binding and a length of 6″ wide tulle.

Pattern: None.

Year: c. 1885.

Notions: French crinoline for binding the straw edges, thread, millinery grosgrain for the inner hat band, elmer’s glue for sizing, and vintage millinery flowers.

How historically accurate is it?: As accurate as I can be using the research I’ve done and the materials that are available in 2015. It definitely passes Leimomi’s test of being recognizable in its own time.

Hours to complete: All hand sewn, so a few mostly on the brim binding. Then a whole lot of days debating over the placement of the flowers–actually sewing them on didn’t take very long.

First worn: Has not been worn yet, but I have plans to wear it in August.

Total cost: Free! All from the stash!

HSF/M #1: 1895 Hug-able Skating Costume

This is one of my favorite outfits of all time. I just want to hug myself, with all the fur, and I love the trim on the back! The whole thing is so cozy and so hug-able and the skirt has such a nice drape and the accessories work so well… and I actually got to go skating in it! I am just utterly chuffed (to use a British word) with the whole thing!

IMG_1952

IMG_1955

IMG_1956

I was on the fence about whether this outfit would apply to the Historical Sew Fortnightly/Monthly Challenge #1: Foundations, but then I read Leimomi’s teaser post about her foundation entry in which she reminds us about different interpretations of foundations and the intent of this challenge to create loose guidelines open to interpretation.

I was convinced (or pushed off the fence, if you prefer to think of it in that amusing way). I’m claiming my all new 1895 skating outfit for the first challenge of the new year! It does rather stretch the idea of foundations. Is the skirt a foundation because it is literally worn below the jacket, thus being a foundation as you would think of one in a building? Or is the bodice a foundation, because my direct inspiration is a lonely jacket without a skirt and therefore it is the foundation of the outfit because I wouldn’t have made the skirt without having the jacket? Either way, there is an element of a foundation in there.

Just the facts:

Fabric: 5 yds of ivory wool, about ⅓ to ½ yd of dark brown faux fur, probably about 3 yds of scrap muslin for flat lining the jacket, a bit of scrap canvas to stiffen the collar, and a bit of ivory flannel to line the inside of the collar.

Pattern: Made by me and based on my inspiration jacket as well as patterns published in Authentic Victorian Fashion Patterns (a Dover book).

Year: c. 1895.

Notions: 5 yds of brown braid, thread, a bit of high loft polyester batting to keep the sleeves puffed out, about 1 yd of ivory hug snug to finish the bottom of the jacket, hooks and bars for the skirt, and thread.

How historically accurate is it? Pretty darn good. Definitely recognizable by someone in the 1890s. The construction is accurate, aside from the use of hug snug instead of bias and faux fur instead of real fur. So, 95%.

Hours to complete: Um… As usual, I did not keep track. I definitely spent at least 15 hours the few days before the event sewing on my braid and fur trim… Plus full days of pattern making, fitting, cutting, and sewing. Maybe 30-40 hours? I care so much more about the finished project than the time it takes to get there! And I loved sewing this, so I didn’t mind that it took time!

First worn: To a skating party that was part of the Commonwealth Vintage Dancers‘ 1890s weekend in January.

Total cost: $75 for the wool, probably about $8 for the fur yardage I used for this project, $4 for the braid, and the rest from the stash = $87

My accessories were a matching fur muff that I made a few years ago and wore once for caroling (with my as-yet-undocumented 1860s winter cape) but more often with my 1917 winter ensemble and a revamp of my 1883 wool hat. I didn’t have time to make a new hat because of all the last minute fur and trim sewing, so I pinned a fur scrap around the 1883 hat and added some feathers to stand up a bit more like 1890s hats and called it good. My main inspiration (and the reason I feel it was an acceptable looking style to have the squashy fedora hat look in the 1890s) was this image.

For good measure, here’s my Pinterest board for the entire project. And here are pictures of us skating (with ice skates: all our snow and cold weather does occasionally come in handy here in Boston)!

IMG_1911

IMG_1903

IMG_1942

IMG_1949

IMG_1947

Yes, we just crashed a local outdoor ice rink on a Sunday afternoon. One of the attendees even wore vintage skates! Turns out they can be hard to skate in because they’re not very supportive… but they looked fantastic! We got lots of comments from people asking what we were doing, why we were dressed up, and that we looked good. I was asked by multiple groups of young girls why I was dressed up and one group in particular asked what the swirly thing was that I had, which I got to explain was a muff to keep my hands warm!

10906529_10203571494468255_4785896006596651774_n
Here’s our skating group. People came in a variety of late 19th century and early 20th century winter outfits as well as modern clothes.

With my skating ensemble I wore fleece lined tights (modern, but warm so I didn’t care), knee high bamboo socks (modern again), my 1903 silk petticoat (super useful for the 1890s, also), a modern tank top (instead of combinations, because I needed to go to work later in the afternoon and change out of my outfit in the back seat of my car without being indecent…), my 1895 corset, and a long sleeve modern waffle tee (mostly to shield my skin against the wool seam allowances and also for warmth). And I was perfectly warm wearing this out for skating on a day that was sunny and right around freezing. In fact, with the muff and wool hat I actually was too warm at times.

IMG_1920
Pleased, chuffed, and smiling all afternoon! So fun! Maybe we will get to go skating again this winter!