One of my recent projects lined up with an HSF challenge! I’m excited! My new hat qualifies for the HSF #15: The Great Outdoors. I enjoy making hats, partially because it is always nice to keep my hat making skills in use so I don’t forget them and also because I like putting those skills I’m practicing and remembering to use. The more you do things, the better you do them and the easier it is to remember how to do them!
c. 1920 wide brim sinamay hat
The crown of this hat was pulled over a wooden form and then liberally brushed with sizing multiple times before being removed. The brim is a circle, wired on the outside edge, covers with French elastic to keep the poky edge bits from being poky and then bound in bias cut sinamay. The brim is also well sized. There is an inner millinery grosgrain hat band which covers the join between the crown and brim. The exterior hat band is made from bias cut cotton scraps from my stash. The flowers are some of those I purchased awhile ago for super cheap.
Here is my only in progress picture, of the crown just after being removed from the hat block. The bottom edge was eventually trimmed off to make it even.
Fabric: ½ yd or so of sinamay* yardage.
Pattern: None.
Year: c. 1920.
Notions: Millinery wire, French elastic (½” wide bias cut tricot), millinery grosgrain, cotton scraps, faux flowers, and thread.
How historically accurate?: Let’s go with 90%. Sinamay has been produced for hundreds of years and was certainly known and used in America by the early 20th century. I don’t know for certain that it was used for hats at that point, but I have encountered images and extant examples of hats which certainly look like they could have been made from sinamay or some other similar looking material. The style of the brim and trimmings are consistent with the variety I’ve found in 1920s hats.
Hours to complete: 5ish, spread over about 3 months.
First worn: To the Crane Estate Lawn Party in Ipswich, MA at the beginning of August.
Total cost: Entirely a stash project, which makes it free! I probably paid about $5 for the amount of sinamay I used about six years ago when I bought it, but I used such small bits of all of the other materials that it is pretty hard to estimate how much they cost.
* Sinamay is a natural fiber woven from the processed stalks of the abaca tree, a banana palm native to the Philippines. It is woven in a variety of weights which produce a variety of qualities from rough to very fine, but regardless of the weight and quality it is always very strong. Historically, it was used to make twine, rope, and cordage because of its strength and resistance to salt water. More recently, it has been used for specialty items such as the production of tea bags, floor mats, and furniture, as well as for clothing, and hats!
This picture was taken using a Petzval lens, which produces the unique blurred effect.I shaped the wire to create the slight curve down on the sides which I’ve often seen in 1920s hats.
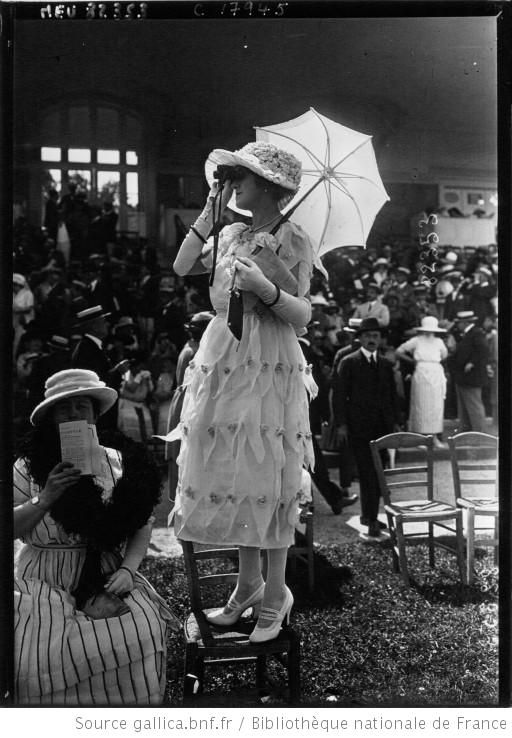
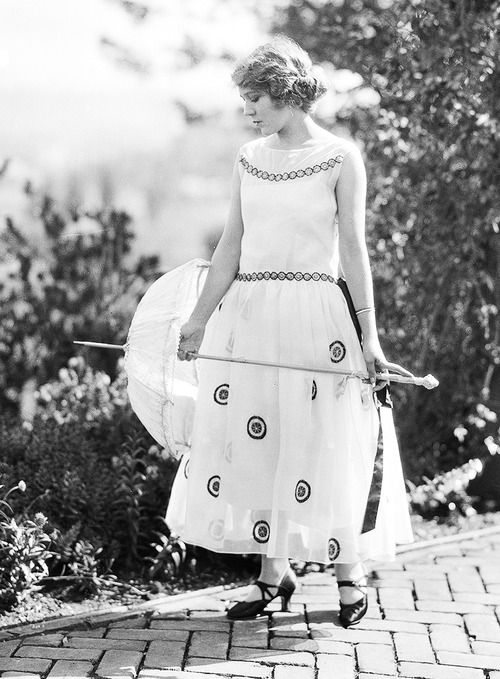
You can see some inspiration here, in this post about making my long handled parasol. And here are some more examples: c. 1920, c. 1925, and 1927. I’ve got more pictures of my whole ensemble, including my new long handled parasol, which will be coming soon!
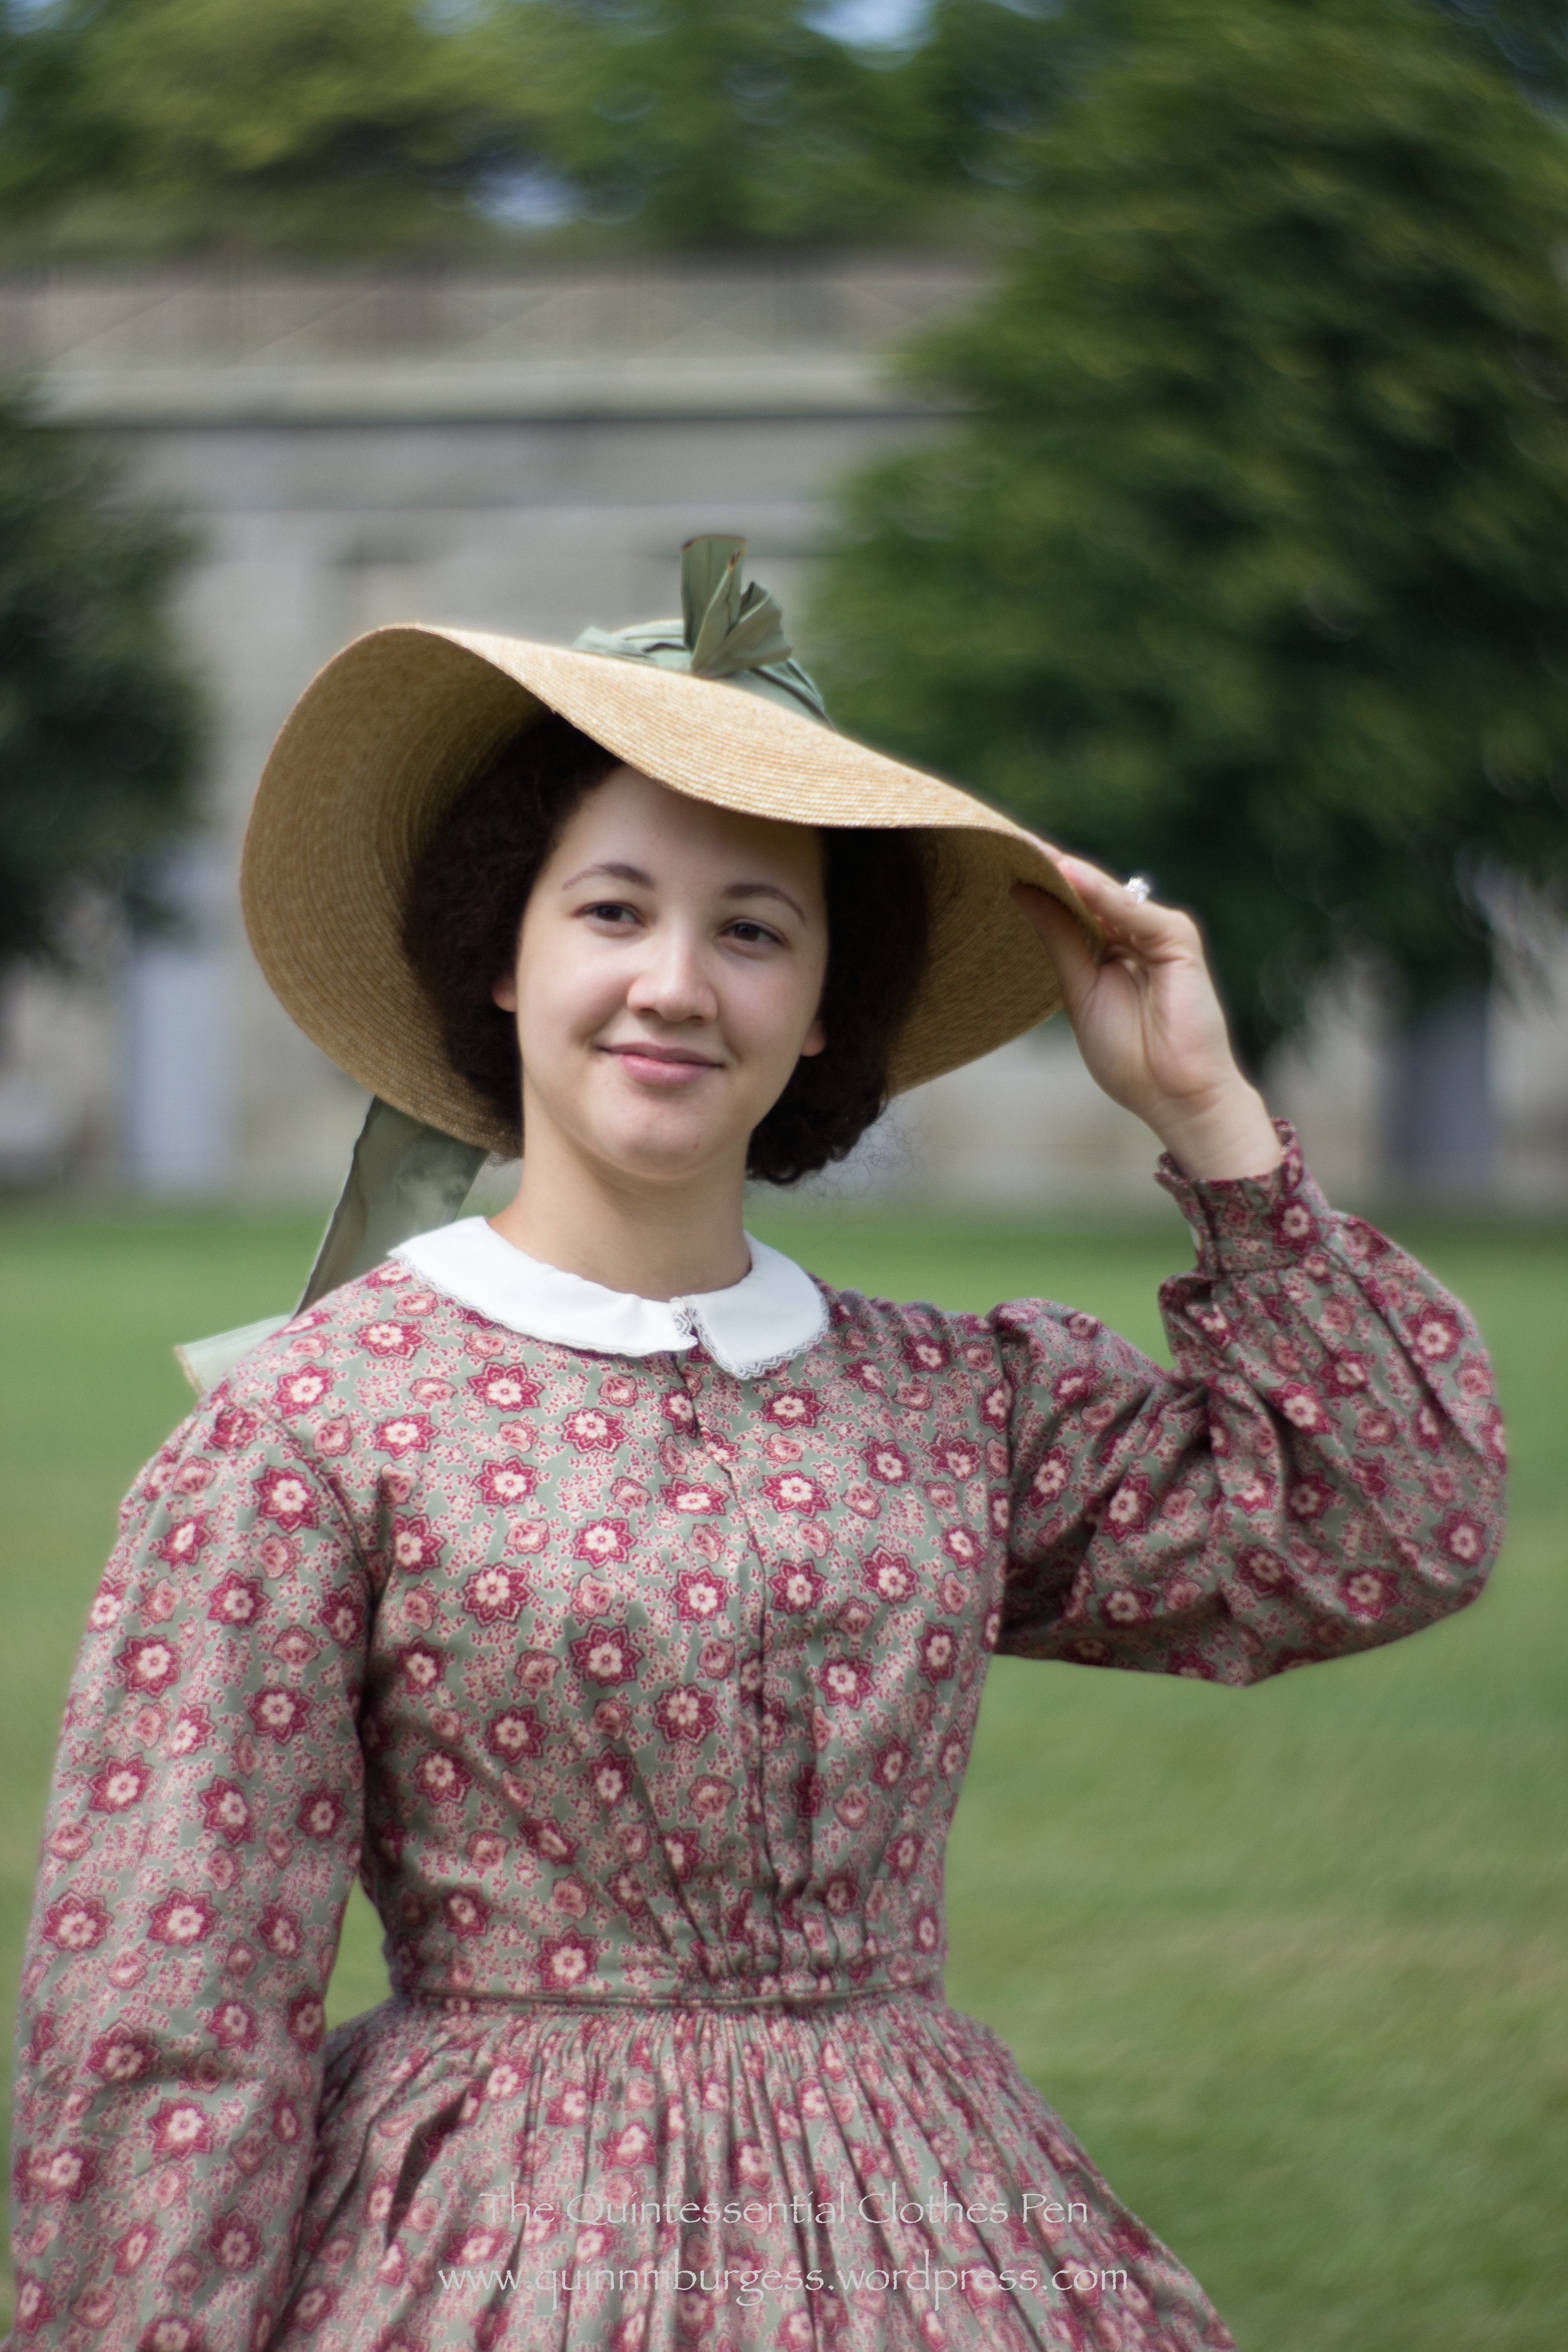
We performed on George’s Island again this year and were quite thankful that the weather was slightly cloudy and at least 15 degrees cooler than last year! It was a great opportunity for all of us to wear our cotton print day dresses again and it was neat to see the entire dance troupe all wearing cotton dresses with a pattern (no solids to be seen!).
I wore Georgina just as I did last year, the only difference being that I took a little bit of time to make a collar for this year. I had wanted to last year but ran out of time. It seemed more important to have the dress than to have a collar without the dress… But it was entirely feasible this year to add just the small item of the collar and I do think it really completes my outfit quite nicely.
New collar!
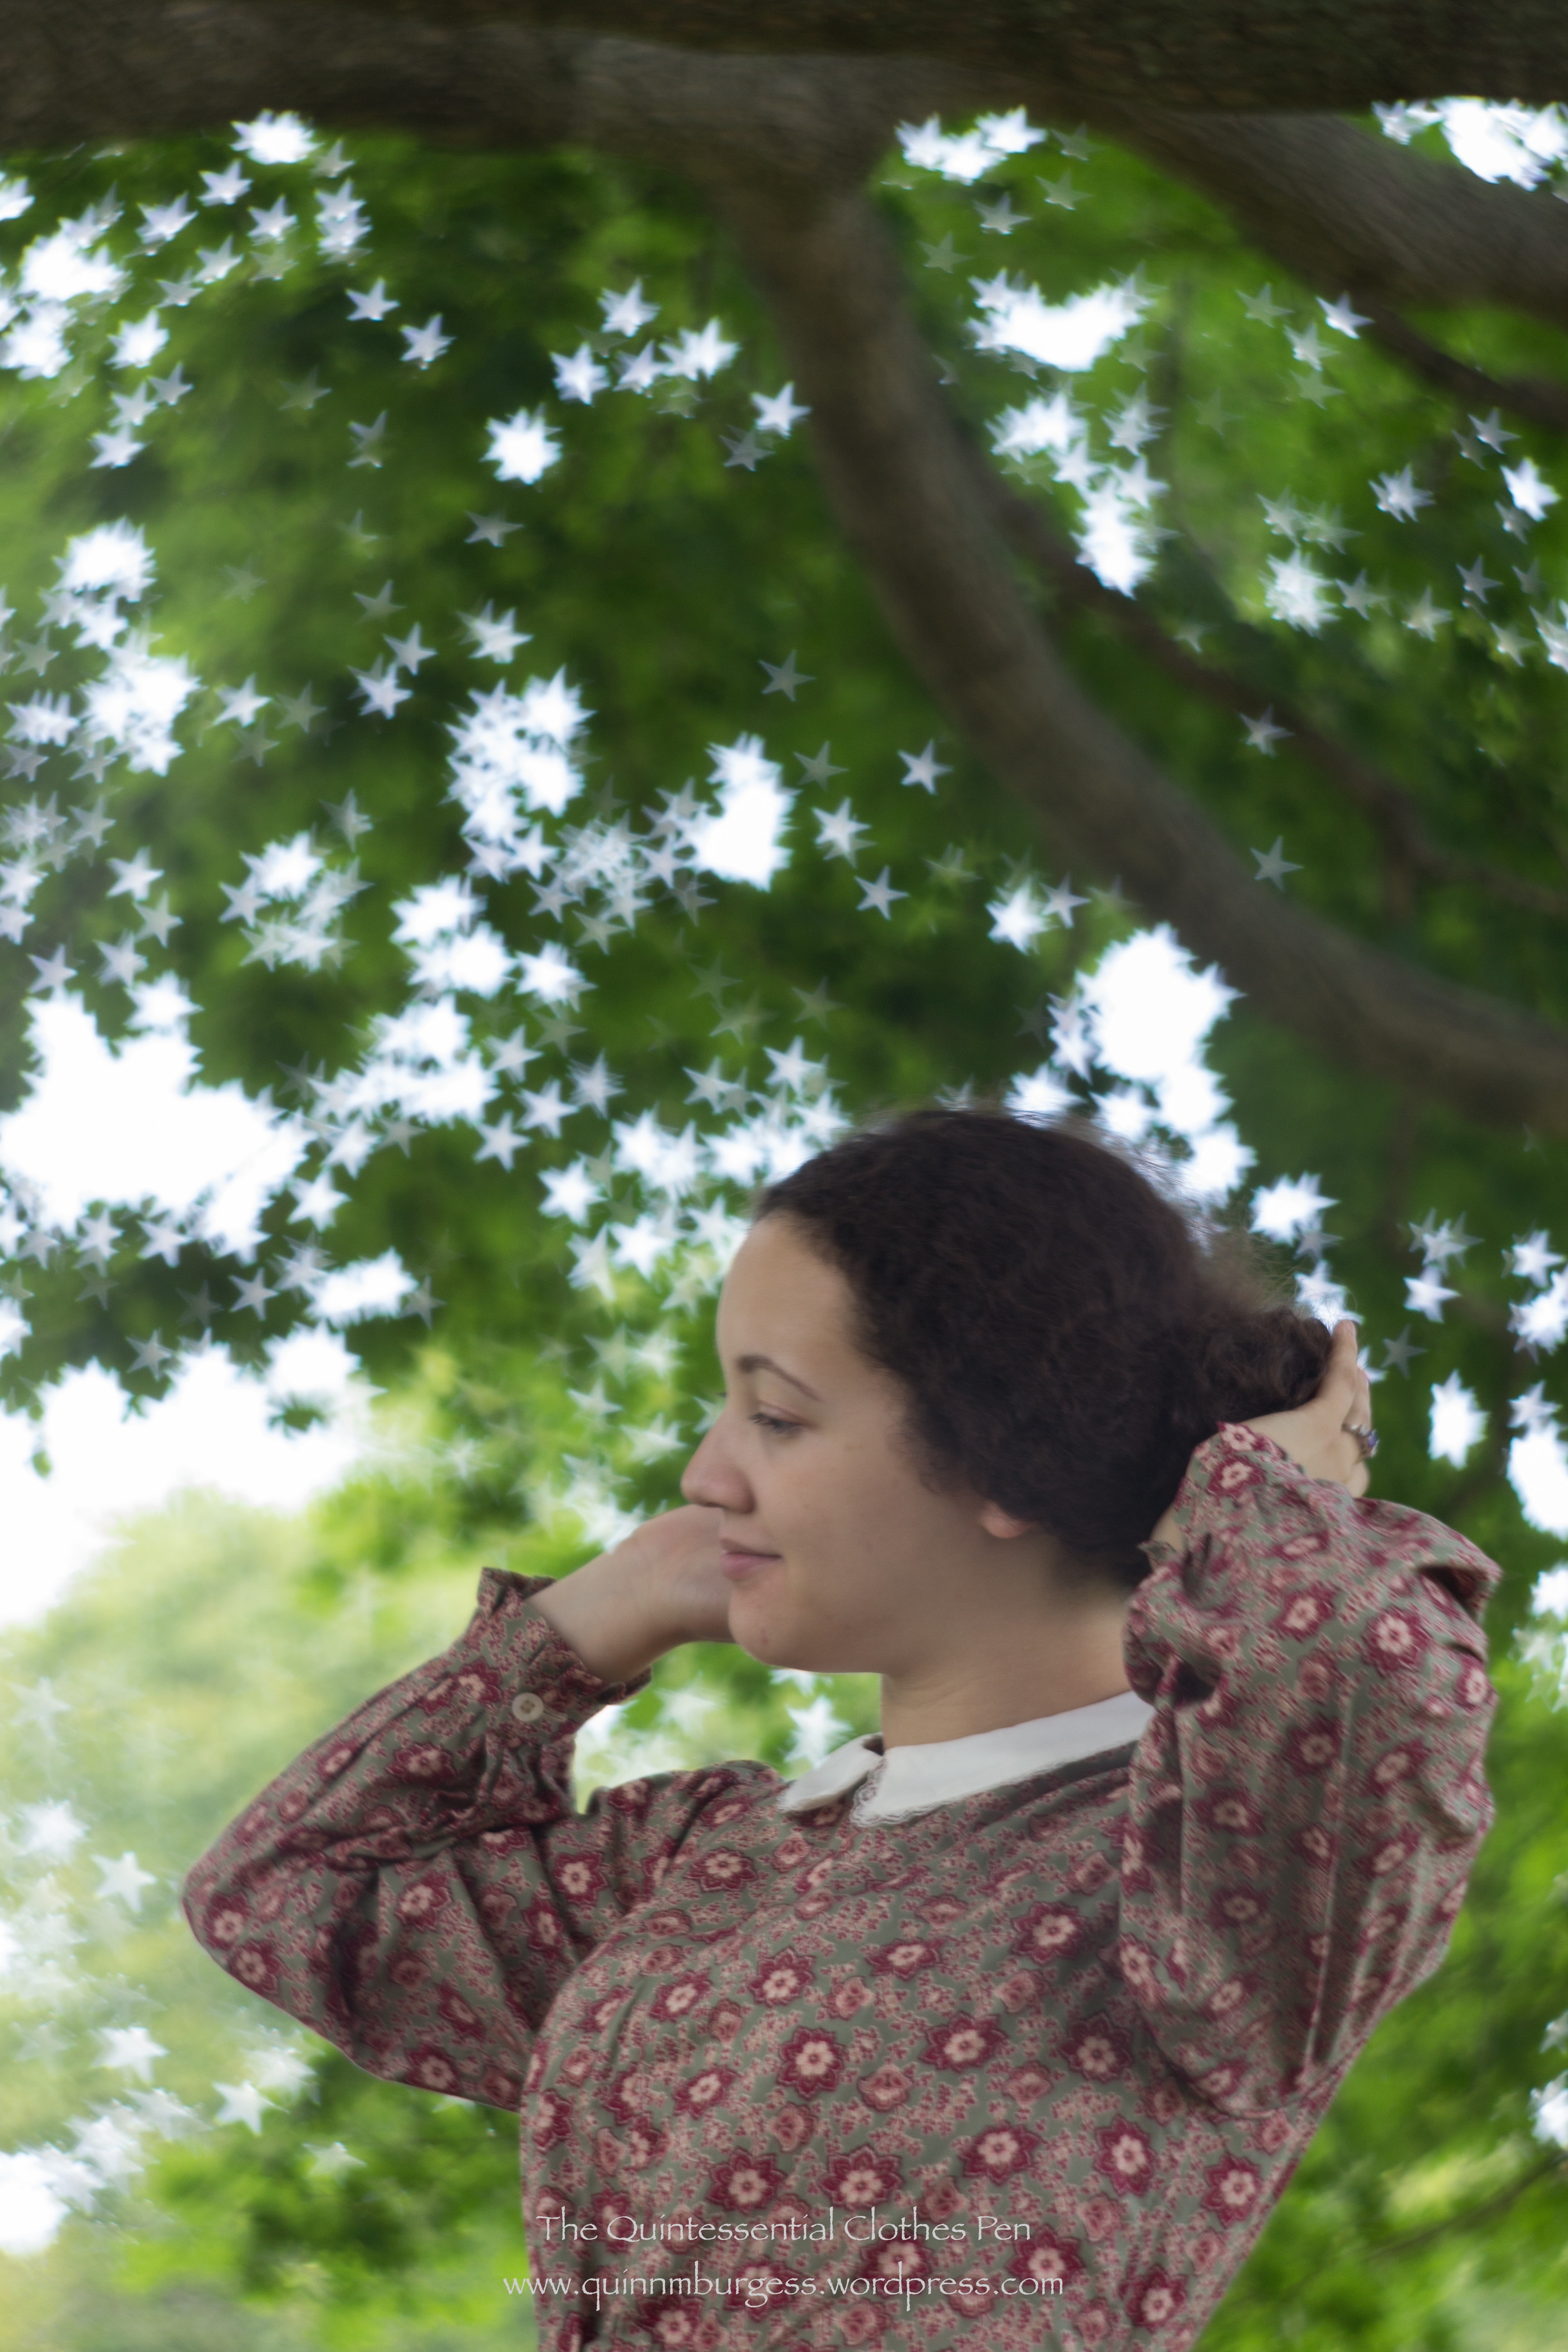
This year, our friend with the camera had purchased a new, special, Petzval lens (you can learn more about it and 19th century photography here at her blog). It’s a modern digital version of a historic lens. I love the pictures it produces! I’ve been told that the background is sort of swirled when the picture is captured, but to me it just looks nicely diffused and out of focus. It’s a lovely contrast to the foreground, which stays nicely in focus. All of these pictures were taken in color, but some of them are much more stunning in black and white.
This one captures the breeze and a bit of sun squint…This one a burst of joy and laughter…This one the tired desire for food during a picnic break…And this one just a simple stroll across the lawn.
This last one made use of a special part of the new lens. There is a piece which can be changed out and which creates the interesting background variations. All of the previous pictures were taken using the piece which blurs the background, but this last one was taken using the piece which causes the light in the background to be star shaped. Isn’t that neat?
Fixing my wind swept and straw hat frizzed hair… with stars in the leaves!
The collar is constructed from 2 layers of ivory cotton from my small bits stash (at least, it’s likely cotton… I don’t remember where it came from and there was the perfect amount, so I just went with it without knowing the details). It is edged with ivory lace. I made the pattern directly on Georgina’s day bodice so that it would fit the neck perfectly. It’s mostly machine sewn with hand finishing. It is lightly basted on to the piping at the neck edge of the bodice so that I can easily remove it if I want to in the future. I’m quite satisfied. I like the scale, the lace, and I think it adds a nice 1850s touch, completing the ensemble.
Over the last few months, I’ve been chipping away at creating accessories for this weekend’s upcoming 1920s Lawn Party. Today, I’m going to show you how I turned a standard ebay Chinese parasol into a long handled parasol. I’m curious to know what you think about it!
I started with a child size parasol. I picked it because I really liked the design (gold flowers on orange). I didn’t really want a plain color and I didn’t like the other design options as much. I also didn’t mind the smaller canopy size (adult size parasols are about ⅓ larger across the canopy).
Parasol as I received it.
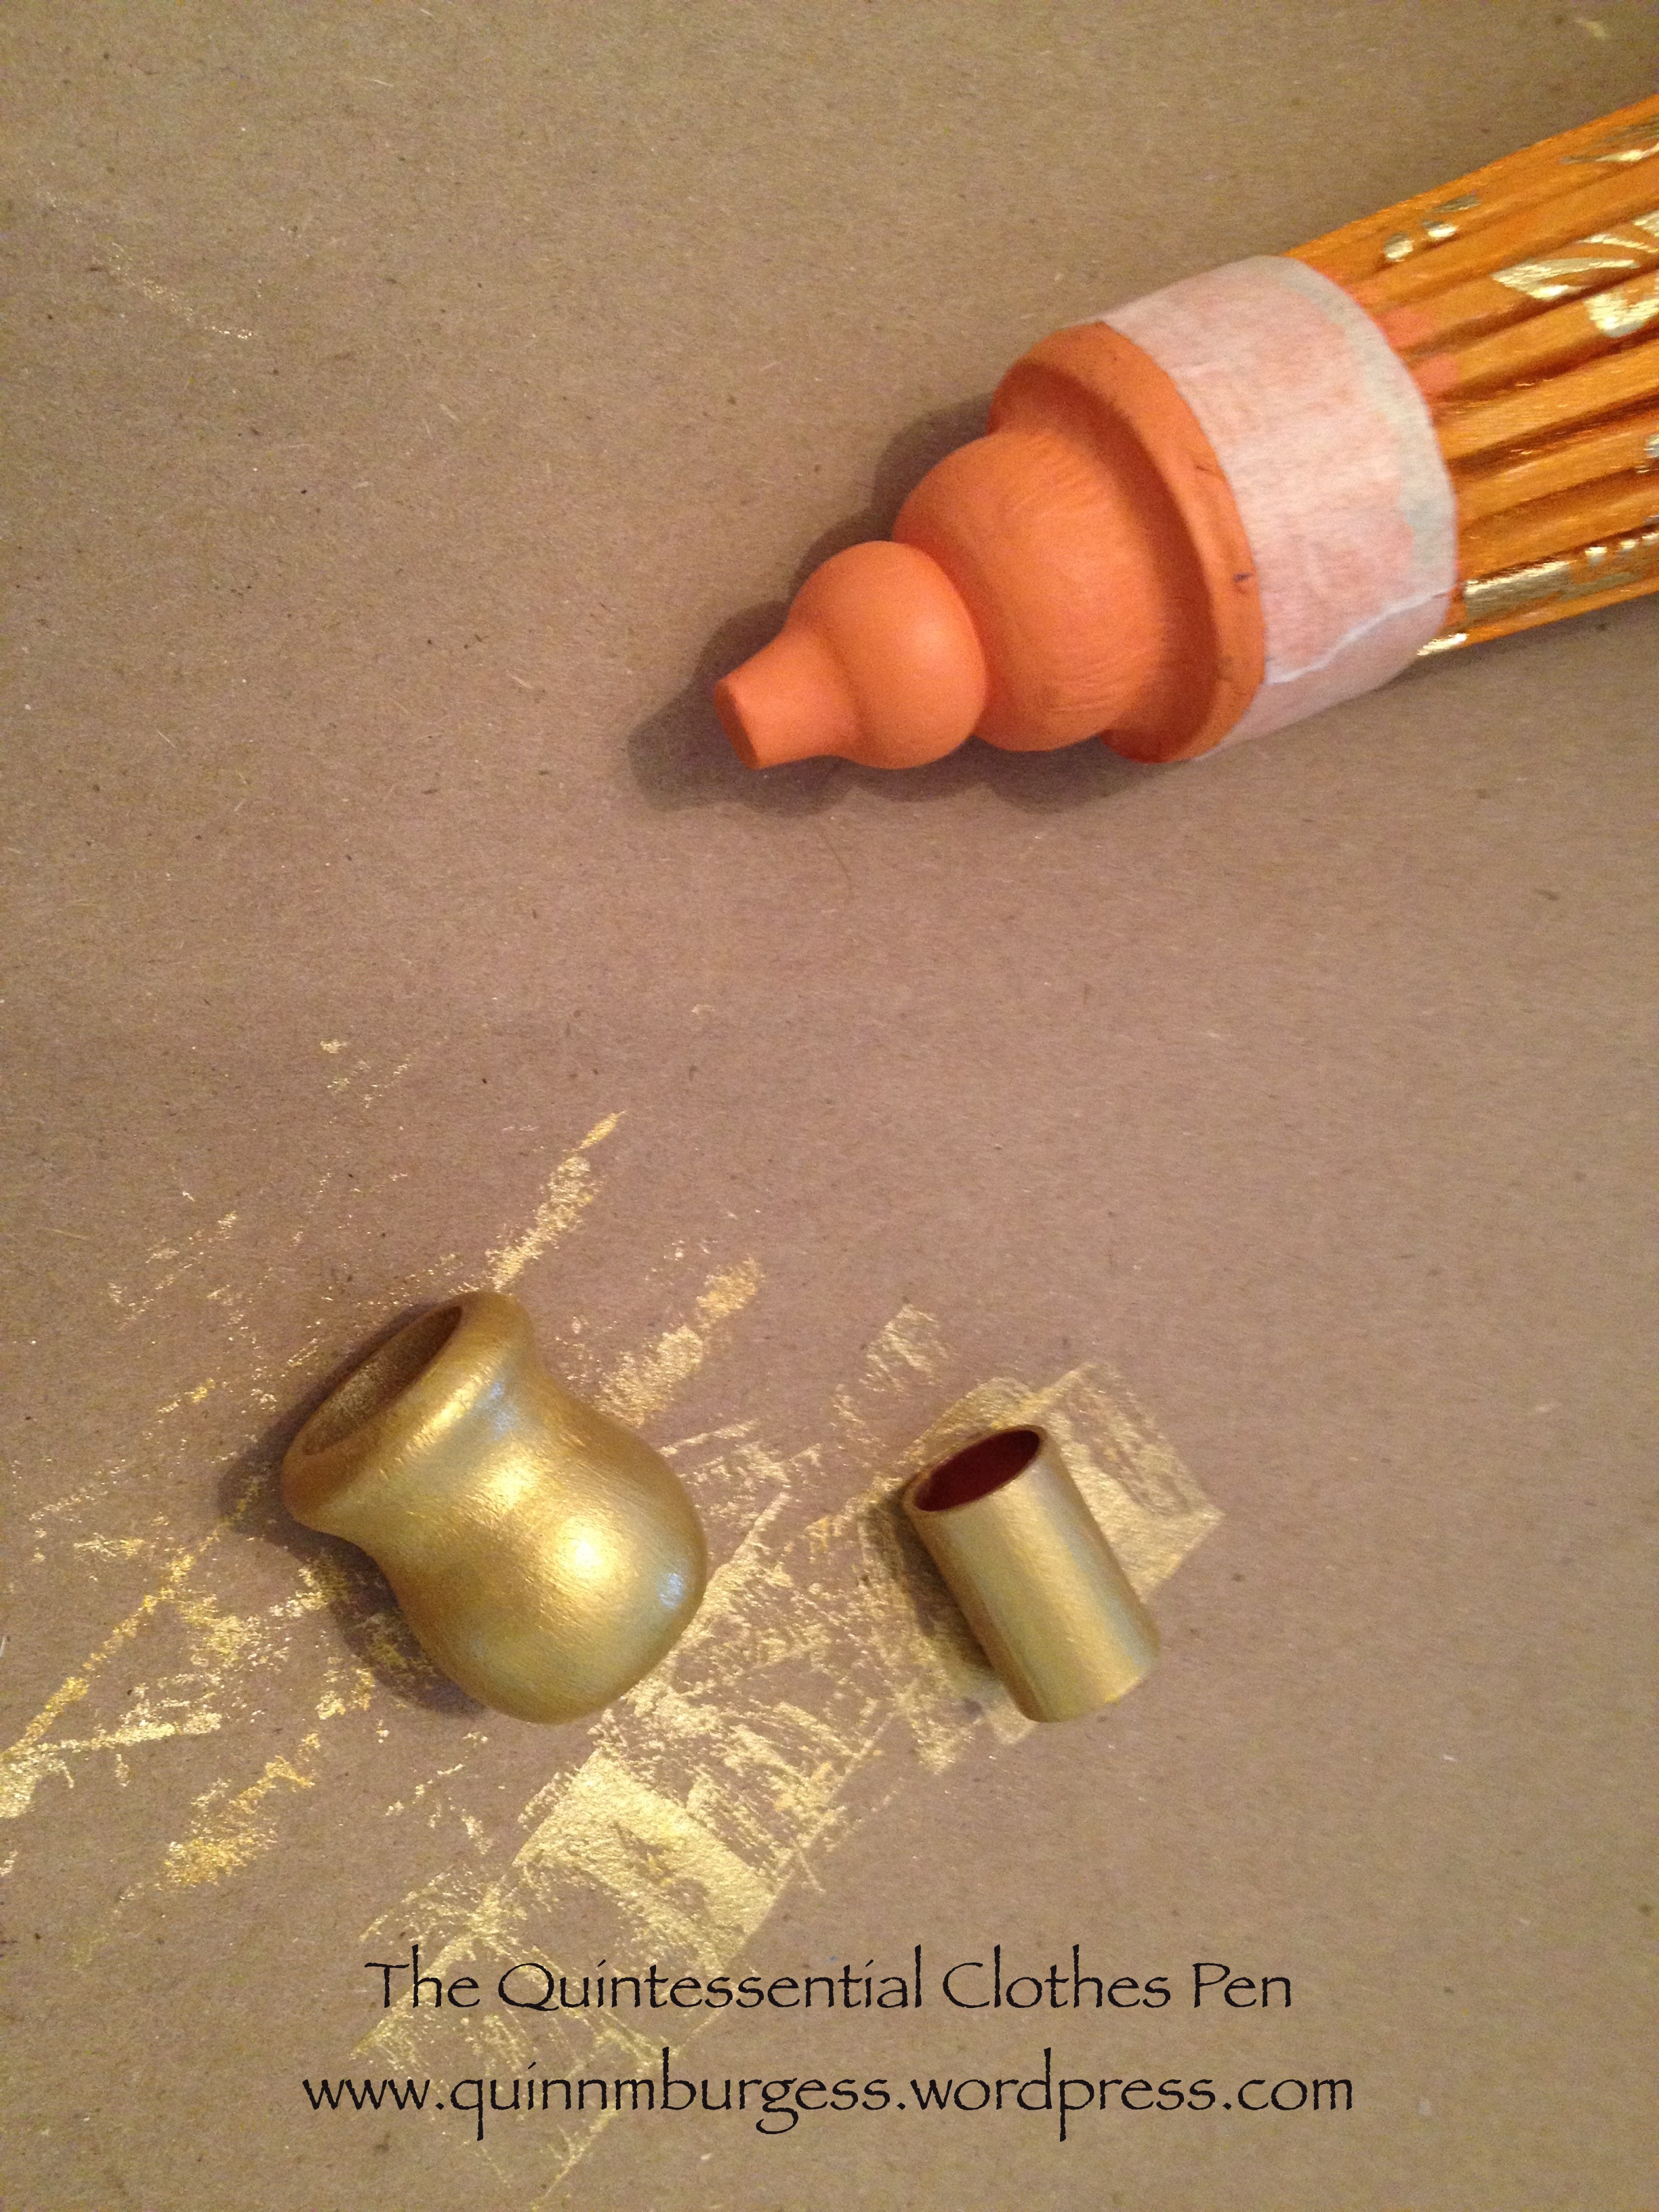
But… the handle was so short! And I really didn’t like the tassel on the end… but that was a small issue. “Haha,” I thought, “craft time! I’ll lengthen the handle!” First, I got Mr. Q to saw off the original orange handle. Turns out that the main part of the handle is actually bamboo, but I didn’t realize that at first, not that it matters. Second, I bought a new end piece and gold acrylic paint online for about $5 (I didn’t feel like driving around to craft stores and it fit in with other amazon things to make a full order with free shipping!). Then, I went to Home Depot and bought the supplies I didn’t already have at home. I already had Gorilla Glue, but I needed a dowel to make a longer handle and a piece of something to connect the two pieces. I also decided, while at the store, to get some wood stain to try to make my dowel look more like the bamboo of the original handle in terms of color.
I bought two different gold paints because I wasn’t sure which I would like better in person and they were about $1 each. You can see how light colored the dowel was when I bought it (this is before I used any stain). It really looked different than the bamboo. The two little pieces in the middle are the new end piece and the copper pipe that I used to join the dowel to the bamboo parasol handle.
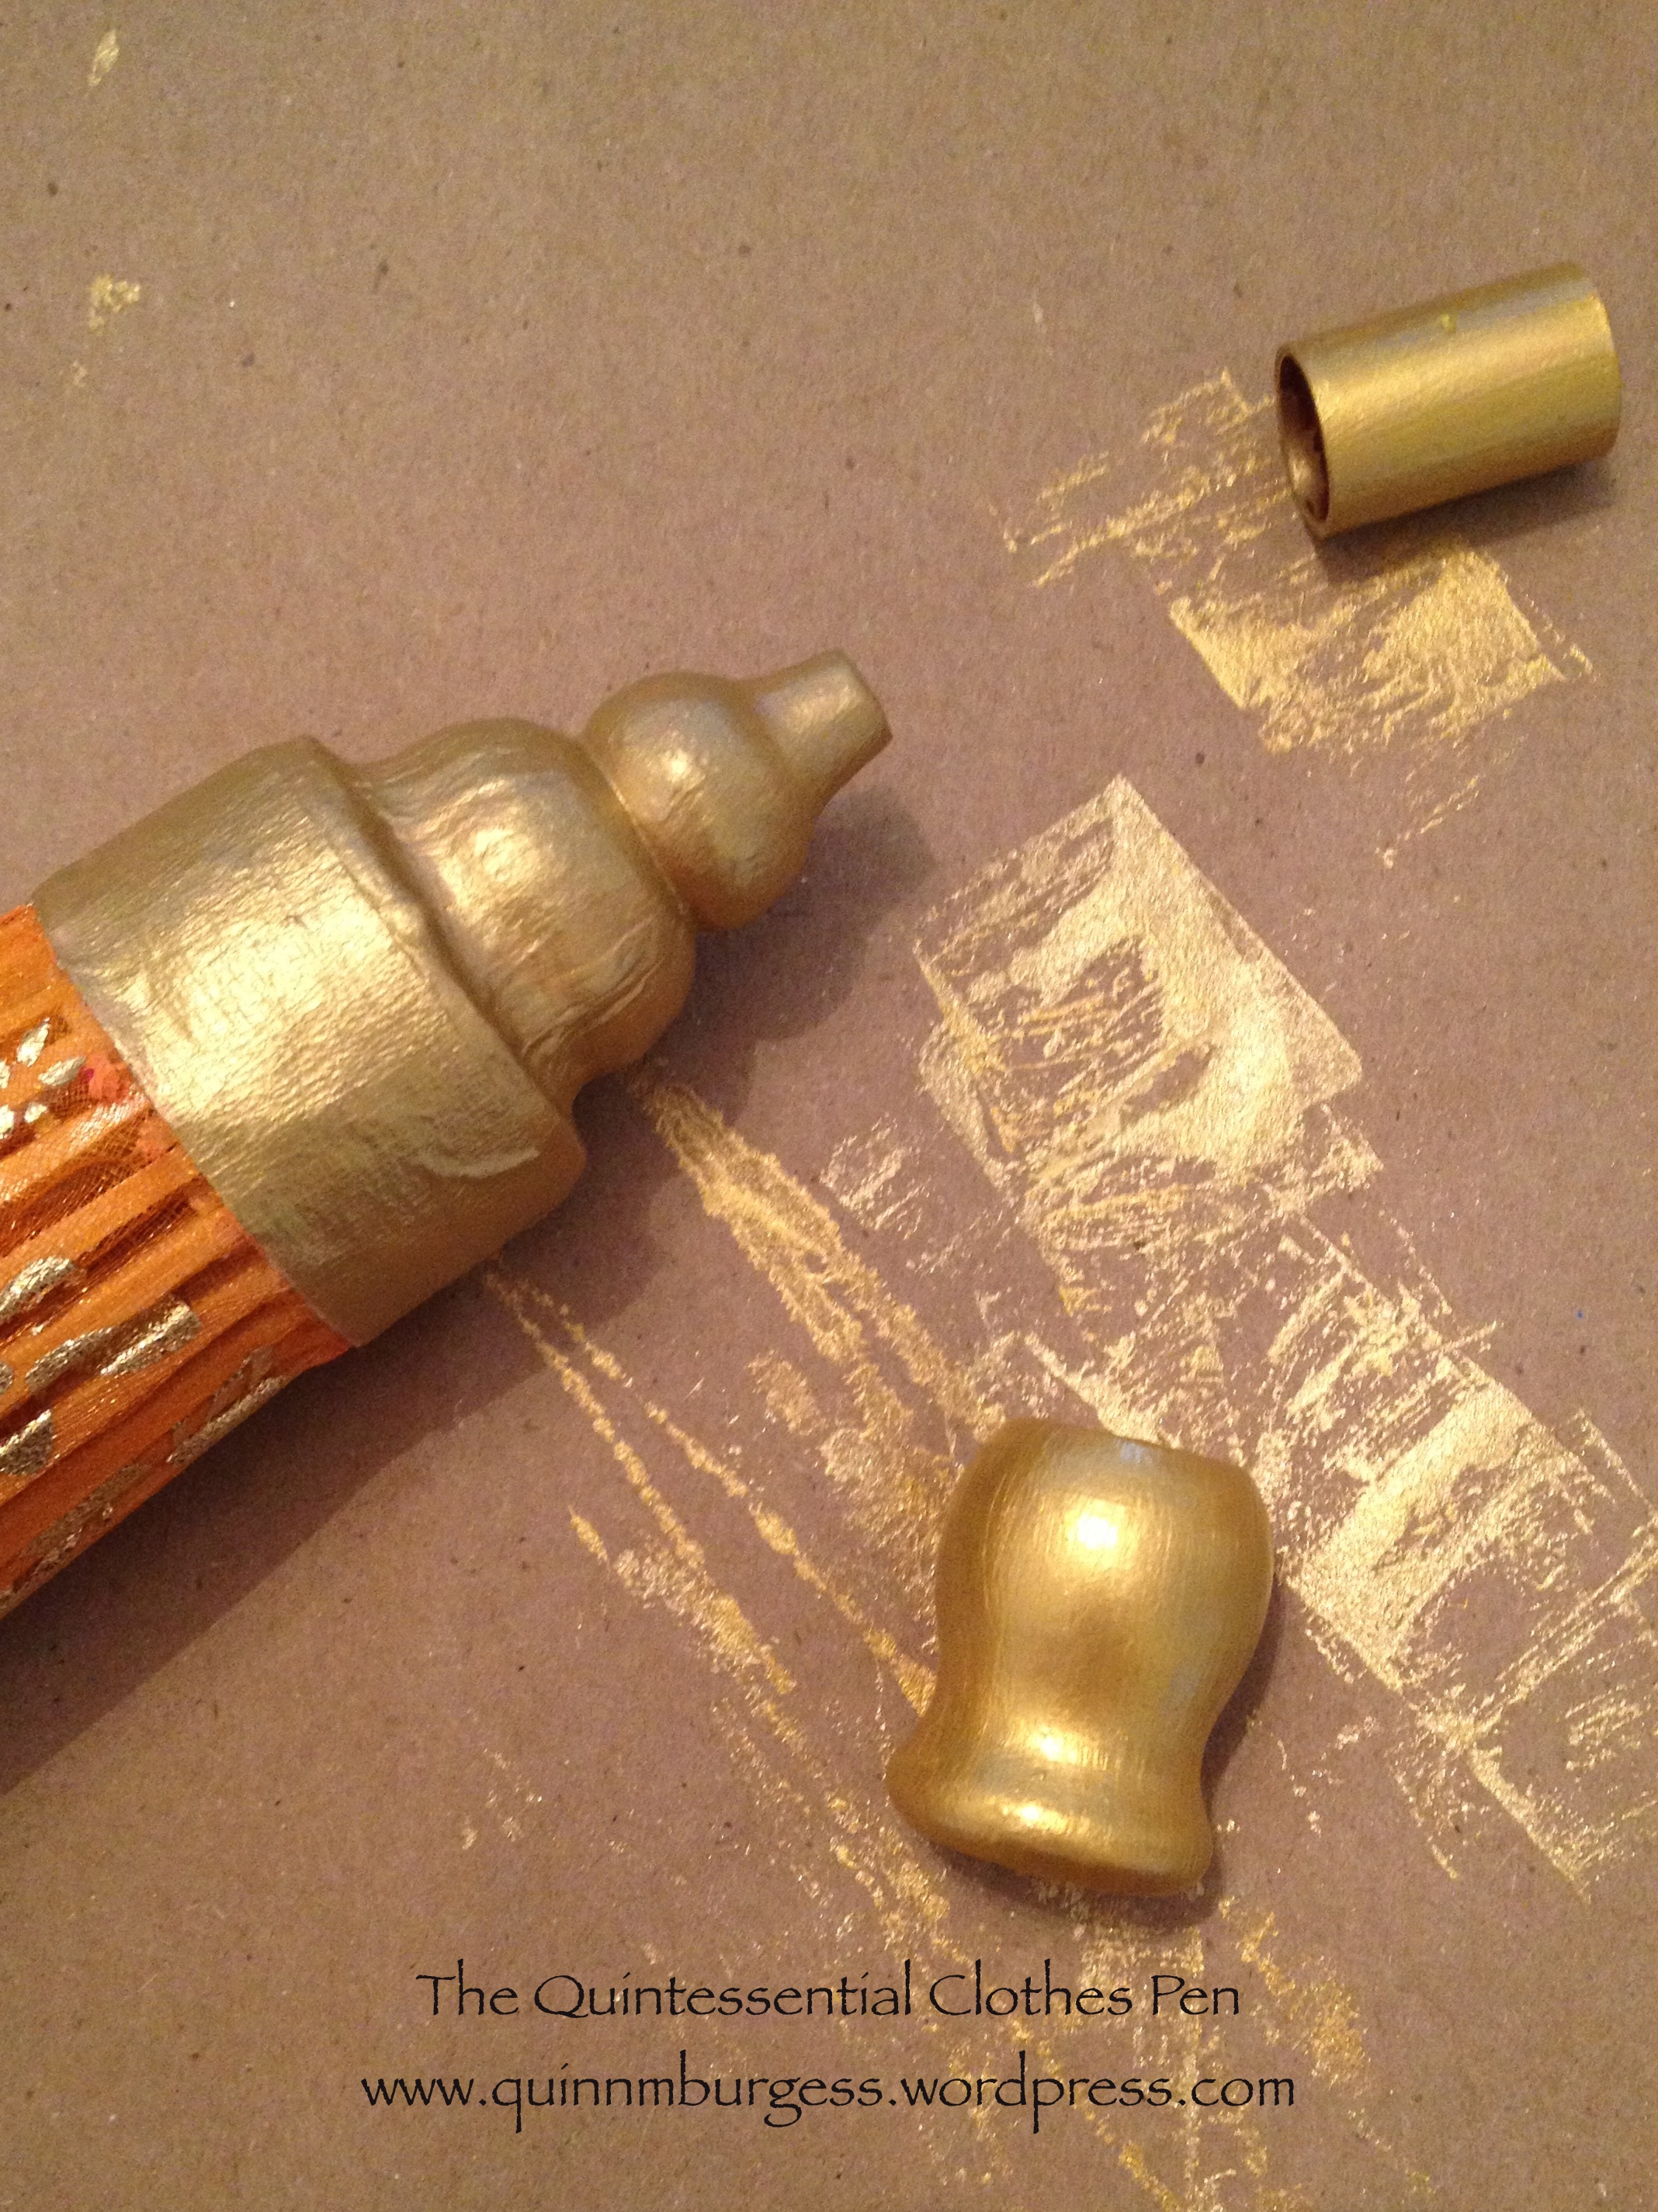
I laid out a paper bag for my work surface and started painting! First, I painted the end piece and copper piece gold. While those were drying, I started staining the dowel. I just used muslin scraps to apply the stain, which worked wonderfully. As I was going along, I decided to paint the top solid orange bit of the parasol gold, too, to match the other gold pieces and because the edges of it were starting to flake from when I opened the parasol all the way.
In order to keep the orange top part from continuing to flake off, I wrapped a piece of plain old masking tape right around the edge of the base before painting.
I decided to use both gold paints. First I used the more antique gold paint until I had a solid opaque surface, then I used the brighter gold paint lightly over top to really make the paint shine like the flowers on the parasol cover.
The three painted pieces after applying both shades of gold paint.
The final part was assembling the pieces. I used Gorilla Glue, which is super sturdy when dry. The thing to be aware of, though, is that Gorilla Glue bubbles and expands while it dries. In this case, that actually was very helpful. The first part I glued was the copper joiner onto the dowel. The copper piece was a bit roomy, so I put a ring of glue around the inside and let it partly dry so it had expanded, then added more glue and put the dowel in. It worked perfectly and when dry, the dowel had been solidly glued about to the halfway point of the joiner.
After that, I glued the end piece on the other end of the dowel. Turns out that the opening on the end piece is actually close to 1″ across but the dowel is more like ½” (you can see the difference in the picture with all the supplies laid out). I did a little bit of letting the glue expand, but I also took Mr. Q’s suggestion and stuck broken bits of yellow toothpicks (I only have colored ones in my house and yellow matched best…) on four sides of the dowel to keep it from wobbling in the hole. Again, it worked perfectly and once the glue dried it was super solid. I didn’t fill in around the toothpicks, actually, and if you look straight down the dowel you can see them, but one would assume that my hand would be there, or that whoever is looking at me is far enough away not to see such small details.
Finished!
And this is the result. The dowel and bamboo don’t match perfectly, but I spent enough hours painting, staining, and glueing that I don’t really care. I plan to have more pictures of this in the next few days, so you’ll see it again soonish, and from more angles. In the meantime, here are some inspiration images of long handled parasols in and around the 1920s.
Anna Q. Nilsson and Ethel Clayton – 1919Josephine Dunn – c. 1920c. 1920Mary Pickford c. 1920Anna Pavlova, Ivy House, c. 1927
Here are a few group pictures from the recent ball at which Georgina’s new evening bodice made her first appearance. As I mentioned before, it was a lovely ball with enthusiastic and elegant dancers. I had a fantastic time.
Four of us wearing cotton dresses. You might remember that the print dresses (Georgina, the green dress, and the purple dress) were all made from mid-19th century historic cotton prints and worn with day bodices last summer at our George’s Island performance.
And remember this picture, from Newport Vintage Dance Week back in 2012? Different time period, obviously, but The Next Generation of vintage dancers is still going strong, so we thought we’d take a TNG picture at this ball, too!
At Newport Vintage Dance Week in August 2012.A more recent group of TNG.
It’s very rewarding to be continuing the legacy of historic dancing in beautiful clothes with lovely companions and in stunning places. Next weekend, Georgina’s day bodice will be making another appearance on George’s Island for another vintage dance performance. I’m sure we’ll have pictures!
A few months ago, I had a master plan to use the leftover yardage from Georgina, my 1858 cotton print day dress, to make an evening bodice in addition to her current day bodice for versatility and washability. Luckily, I was able to complete the bodice and a new hair crescent before my life exploded in June and I was smothered under an immense amount of work. I am pleased to have work, don’t get me wrong, but I was so exhausted by the end of the month all I could do was sleep and be disoriented! I’ve just come back from a vacation and feel like I can peer out from under my rock and join the world again! So, to celebrate constructing historic clothing for myself rather than other people, here is a post about a really neat addition to my historic wardrobe! And it fits into the current HSF challenge #13: Under $10, a bonus since the HSF challenges haven’t lined up very well with a lot of my projects this year.
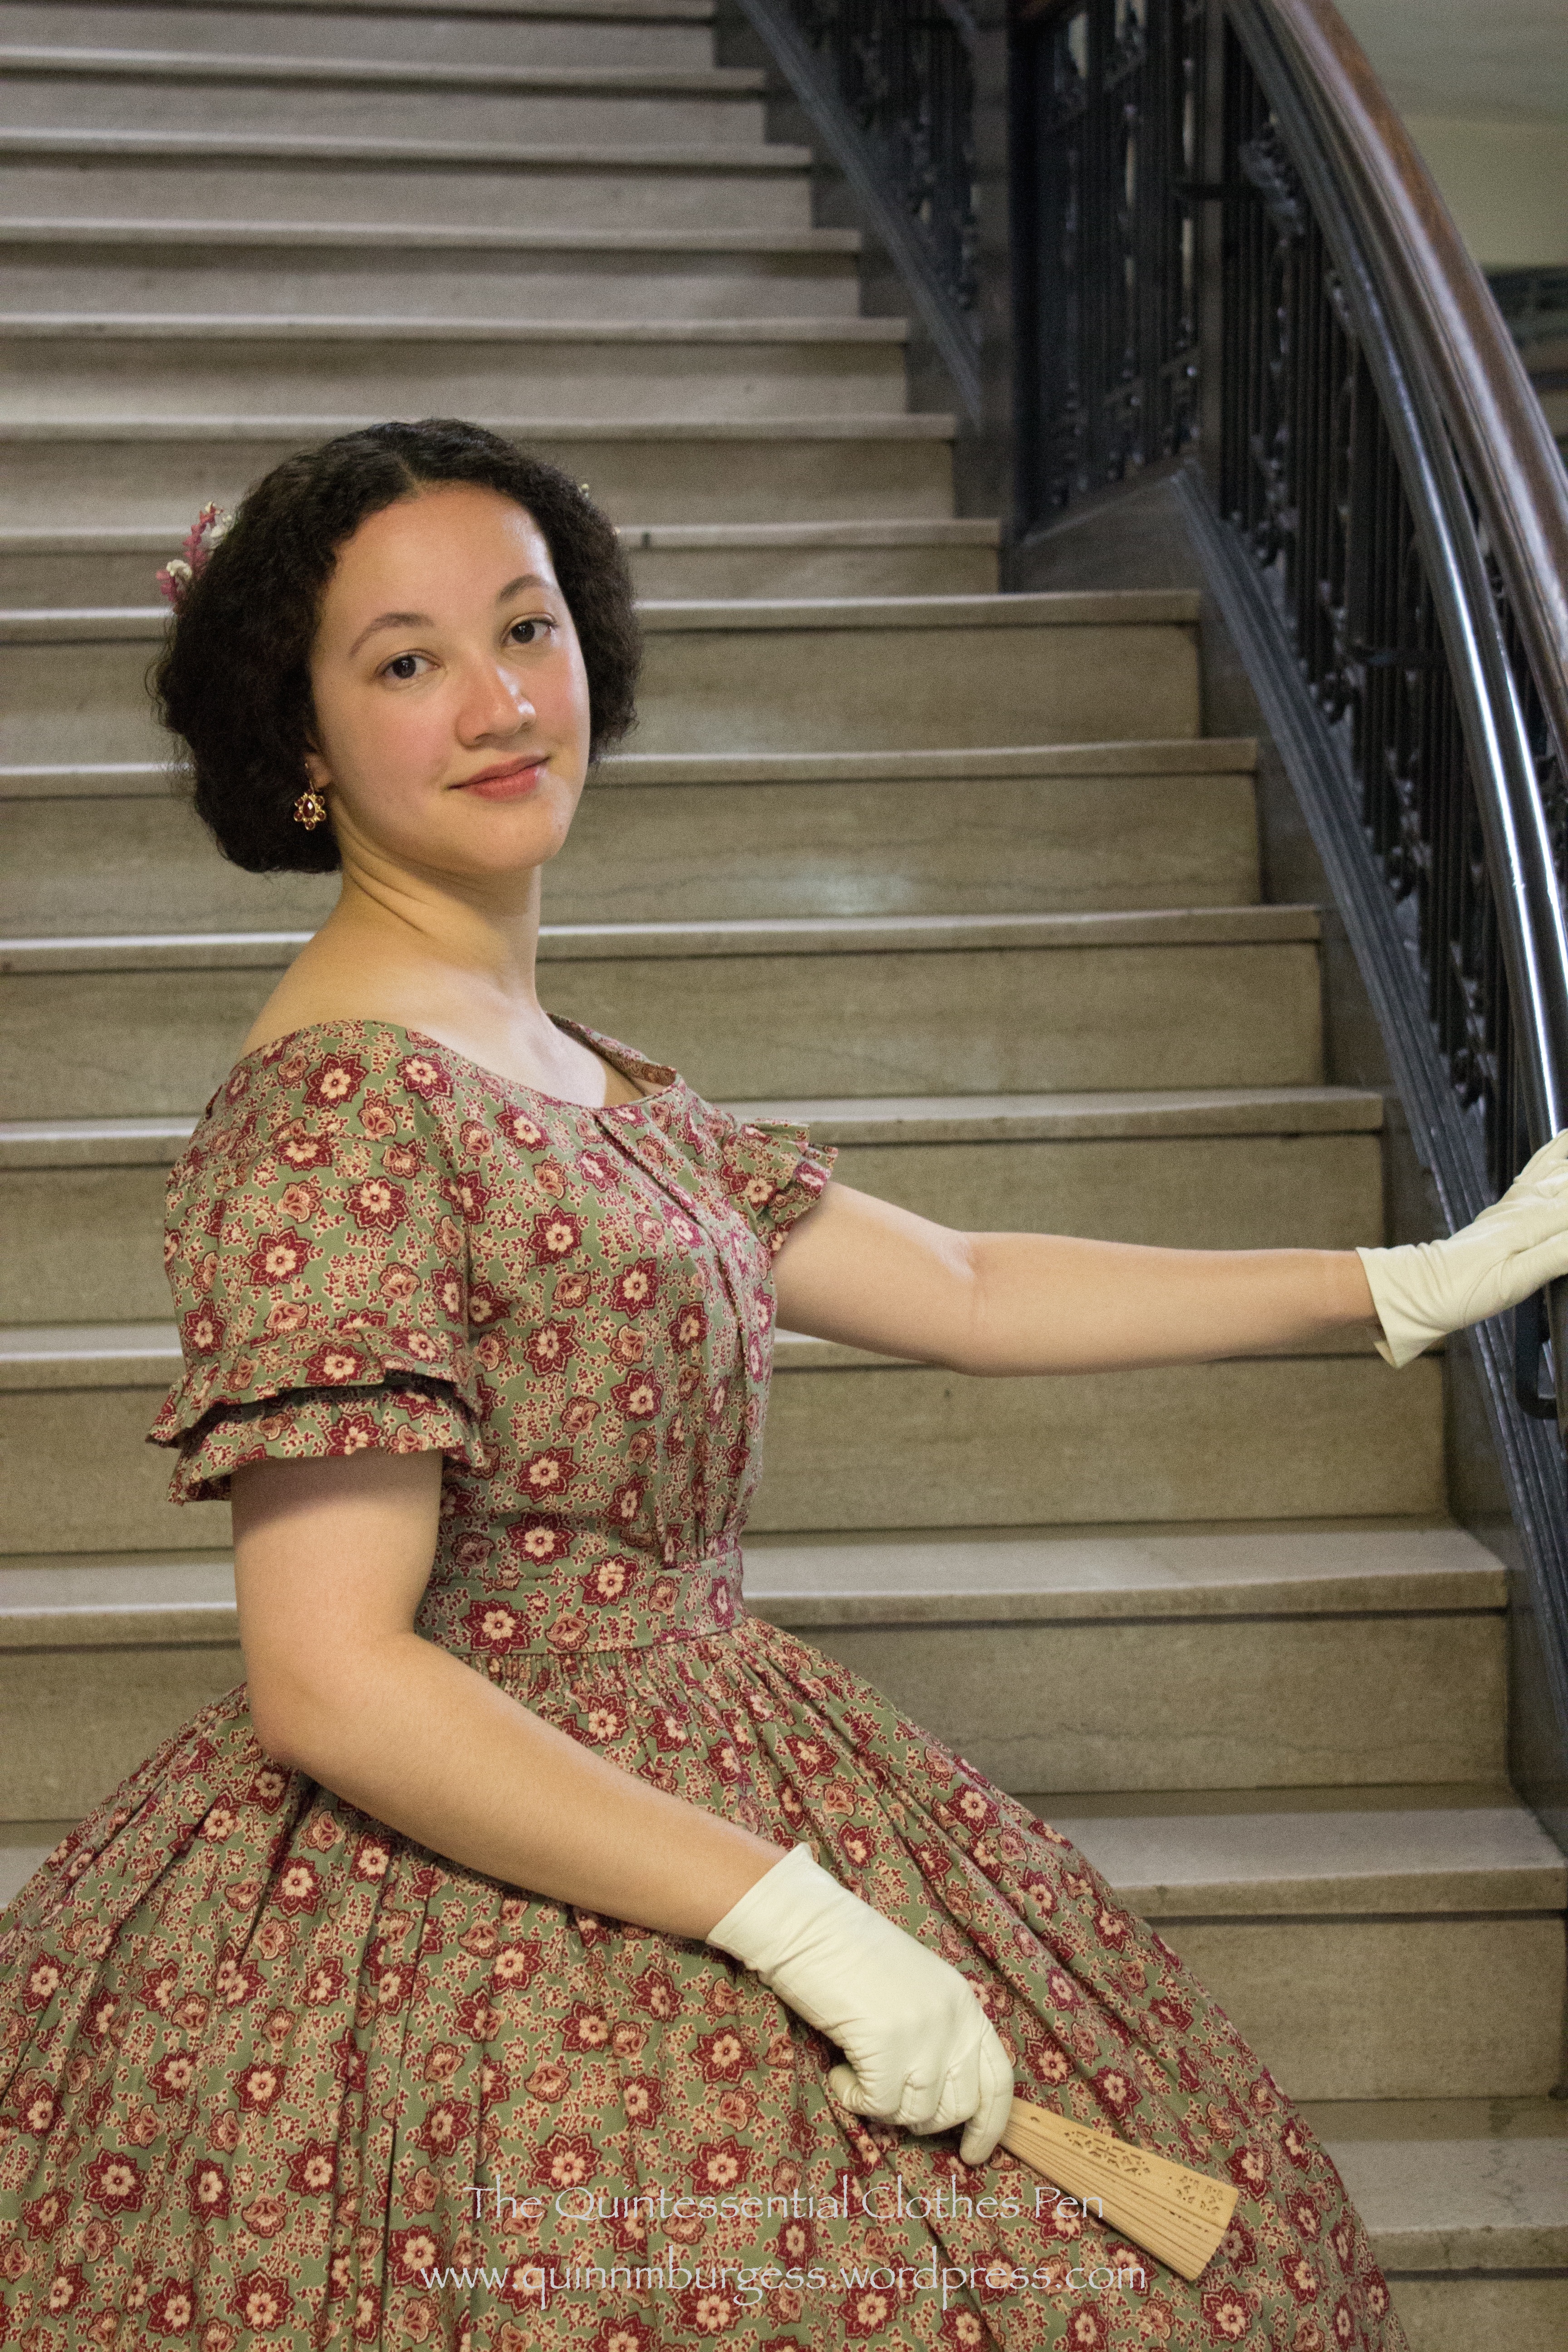
c. 1855 new evening bodice, with previously constructed skirt. Worn with all the usual underpinnings (chemise, my new corset, drawers, stockings, hoops, and petticoat) and accessorized with gloves, fan, earrings, and a new hair crescent. Oh, and I’m wearing burgundy velvet shoes! No picture of that, though.
Pattern: I began with Past Patterns #701 but altered it extensively to fit me, to have pleats and gathers on the exterior, and to have an evening neckline. The sleeve pattern was drafted by me.
Year: c. 1855
Notions: Thread, plastic wire ties for boning, hooks and eyes, and cotton cording.
How historically accurate?: Based off of historic examples, constructed with accurate details… I think the only compromise is the plastic boning, which I used because I didn’t have the right length in metal, and because plastic is easily washable (and I want this to be a garment that can be washed easily–that’s part of the goal in having a cotton evening bodice!).
Hours to complete: I have no idea… 32 hours maybe? I really didn’t keep track at all on this project.
First worn: To a mid-19th century ball in June (one of the few moments of respite in my crazy month).
Total cost: About $3 for approximately 1 yard of historic cotton print and a lot of stash materials, which count as free, since I have no idea what I paid for them at this point! Let’s call the total about $8.
Inside of the bodice.
As you know, I like things to be tidy. All of the seam allowances are either hidden between the layers of fabric or nicely finished. There are plastic bones in the darts and the side seams. The bodice is machine sewn and hand finished. (One amusing mistake is that I cut the lining with a center front opening for fitting purposes (and left lots of seam allowance, as you can see) but then forgot to leave seam allowance in the back… So the lining doesn’t extend all the way to the folded edge of the print, but it’s all covered up so no one will ever know and it fits just fine… it’s just one of those amusing things!)
From the back with the right side flipped open.
The bodice closes with hooks and bars. I wanted to use metal bars but make sure they wouldn’t been seen, so I let about ¼” of the print extend past the points of the hooks to create an overlap. I also left extra print extended past the bars, in addition to all the seam allowance, in case I want or need to adjust the size of the bodice in the future. The bars are especially hard to spot on the print, but if you look carefully on the left you can see them. The neck and armsceyes both have very narrow cording.
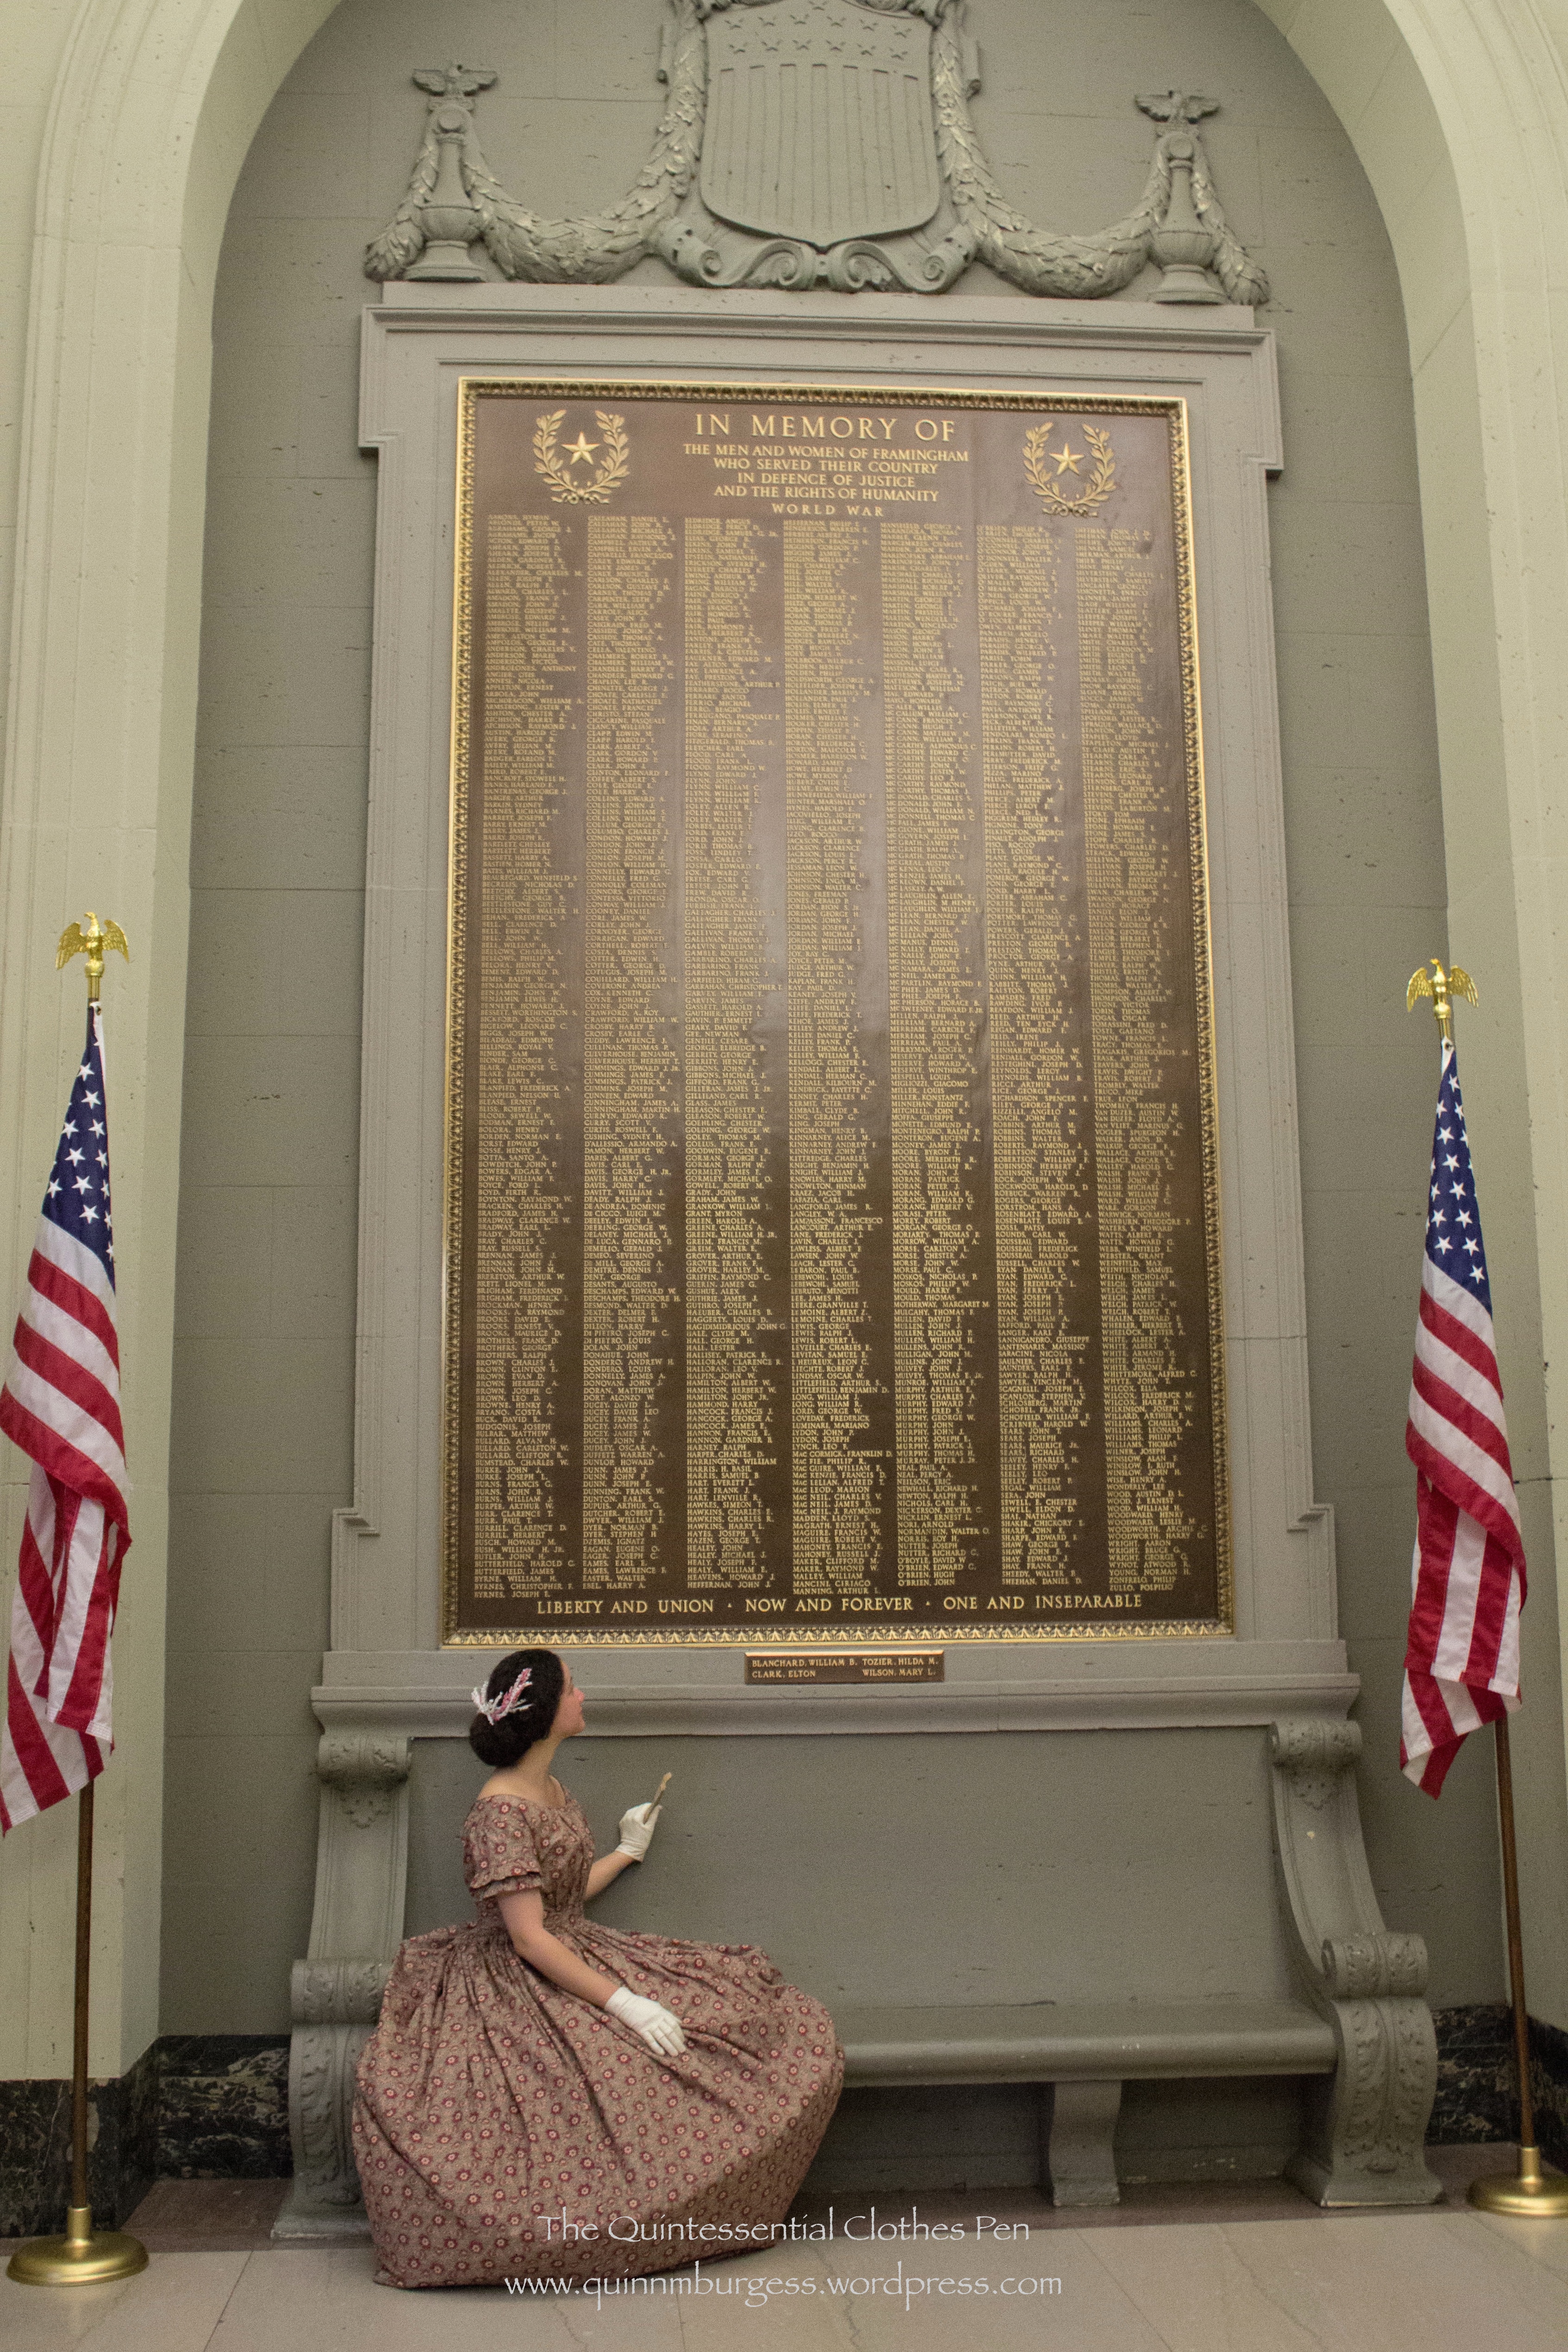
Appreciating those who have served our country. The ball was held in a local town hall which had lists for all the 20th century wars. I don’t think they have 19the century war plaques, but we thought it was a nice photo opportunity.
The defining design details were obviously the low neck and short sleeves, but there were other common details as well, such as double puffs or pleats to trim the sleeves, tubular sleeves without very much fullness at the top or bottom, 1.5″-2″ waistbands sitting on the outside of the skirt waistband, and gathered or pleated fullness on the fronts and backs (no darts on any of these cotton bodices). Some of the bodices have a yoke around the top so that only the bottom portion of the bodice is gathered, but this look says “young girl” not “grown woman” to me, so I opted for a bodice without a yoke.
In terms of construction, to have enough fabric in the print for the pleats and gathers on the print fabric, I first constructed and fit the lining. Then I separated one side of the lining to use as a pattern and added width to have space for the pleats I had planned. Once I had cut the print, I reassembled the lining and mounted the pleated print on top. From there on I treated the two layers as one.
Bodice closeup and a nice view of my successful 1850s round hair style!
As I’ve looked at 1850s images and fashion plates in comparison to early 1860s, especially, what I’ve noticed is that the 1850s really attempted to make a woman’s head look round or wide, whereas by the early 1860s the styles begin to grown upward and become vertically elongated. Here are some great examples of the round 1850s hair look: from 1851-53, c. 1855, from 1857, another 1857, yet another 1857, one more from 1857, and one from 1859. Here’s a super wide 1850s style and here is an example of the different shape of the early 1860s. The very round shape is what I was attempting to complement my 1850s bodice.
How? Well, I put gel right at the roots of my hair while it was still wet and then encouraged it to stand up from my head rather than being pulled back. I let it dry like that and it stayed all day. Later in the day, I styled it for my 1940s Anne Adams dress photos by brushing it out (and brushing my hair when it’s dry makes it big!!!). There was lots of added hair spray for that style, so when I went to restyle it there was plenty of fullness and air in my hair. I puffed the fronts and pinned them up and behind my ears then did a big roll with the rest.
The finishing touch was a new hair crescent that I made specifically to complement the colors in the cotton print. The crescent is made up of fully wired millinery flowers in ivory, some of which I dyed to be pinkish. Each extension is a singular stem and I just twisted them together until I liked the result. Lastly, I sewed a hair comb in the center to help attach it to my head and stabilize the wires. Each side also has a bobby pin to secure it to my head so the extended bits don’t flap around while I’m dancing.
Back view, and new hair crescent.
I’m super pleased with the end result: the bodice, the hair style, and the hair crescent! Oh, and the pictures (thanks!). And I had a marvelous time at the ball–it was one of the class of events which makes me feel radiant and at which I really enjoy myself (compared to those when I’m grumpy and grouchy at the world). And all the smiling and dancing gave me a lovely natural rosy glow in the pictures. The aloof face is my attempt at a 19th century portrait face (it took a long time to capture a picture then, which is my rationale for why everyone has a generally serious face!). You had to pick something you could keep still for a long time, and a big smile is hard to maintain without movement or looking staged.
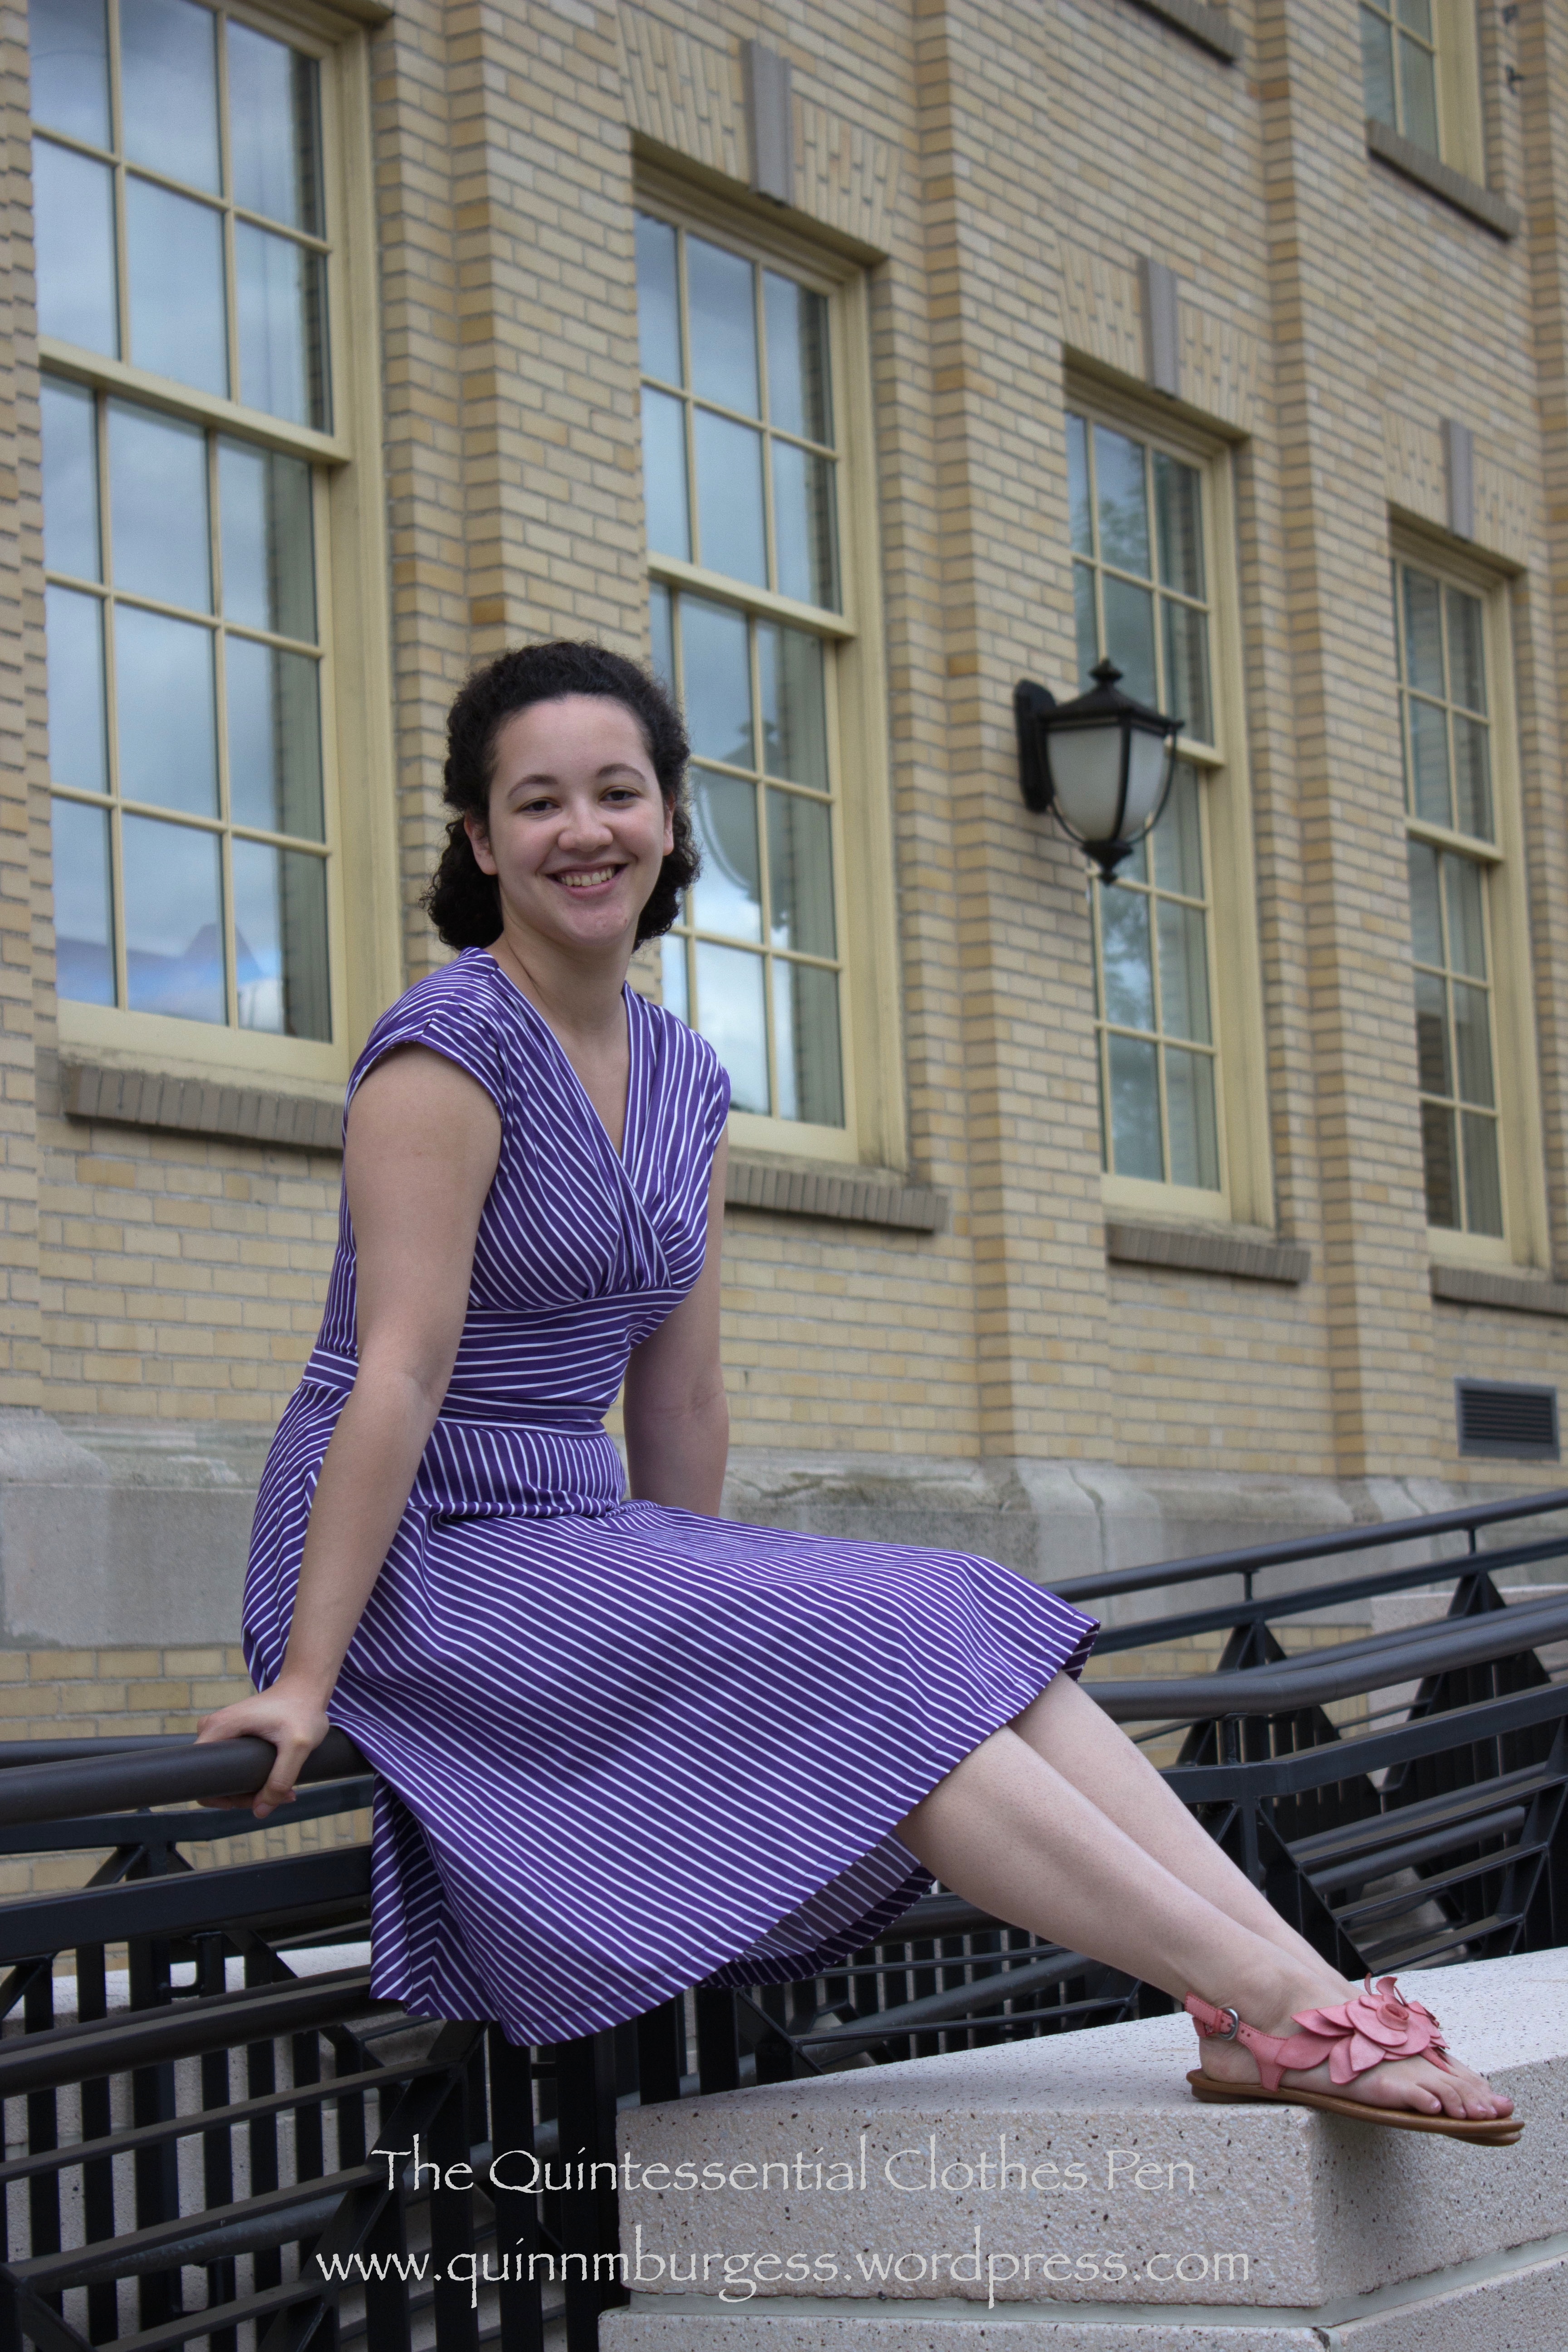
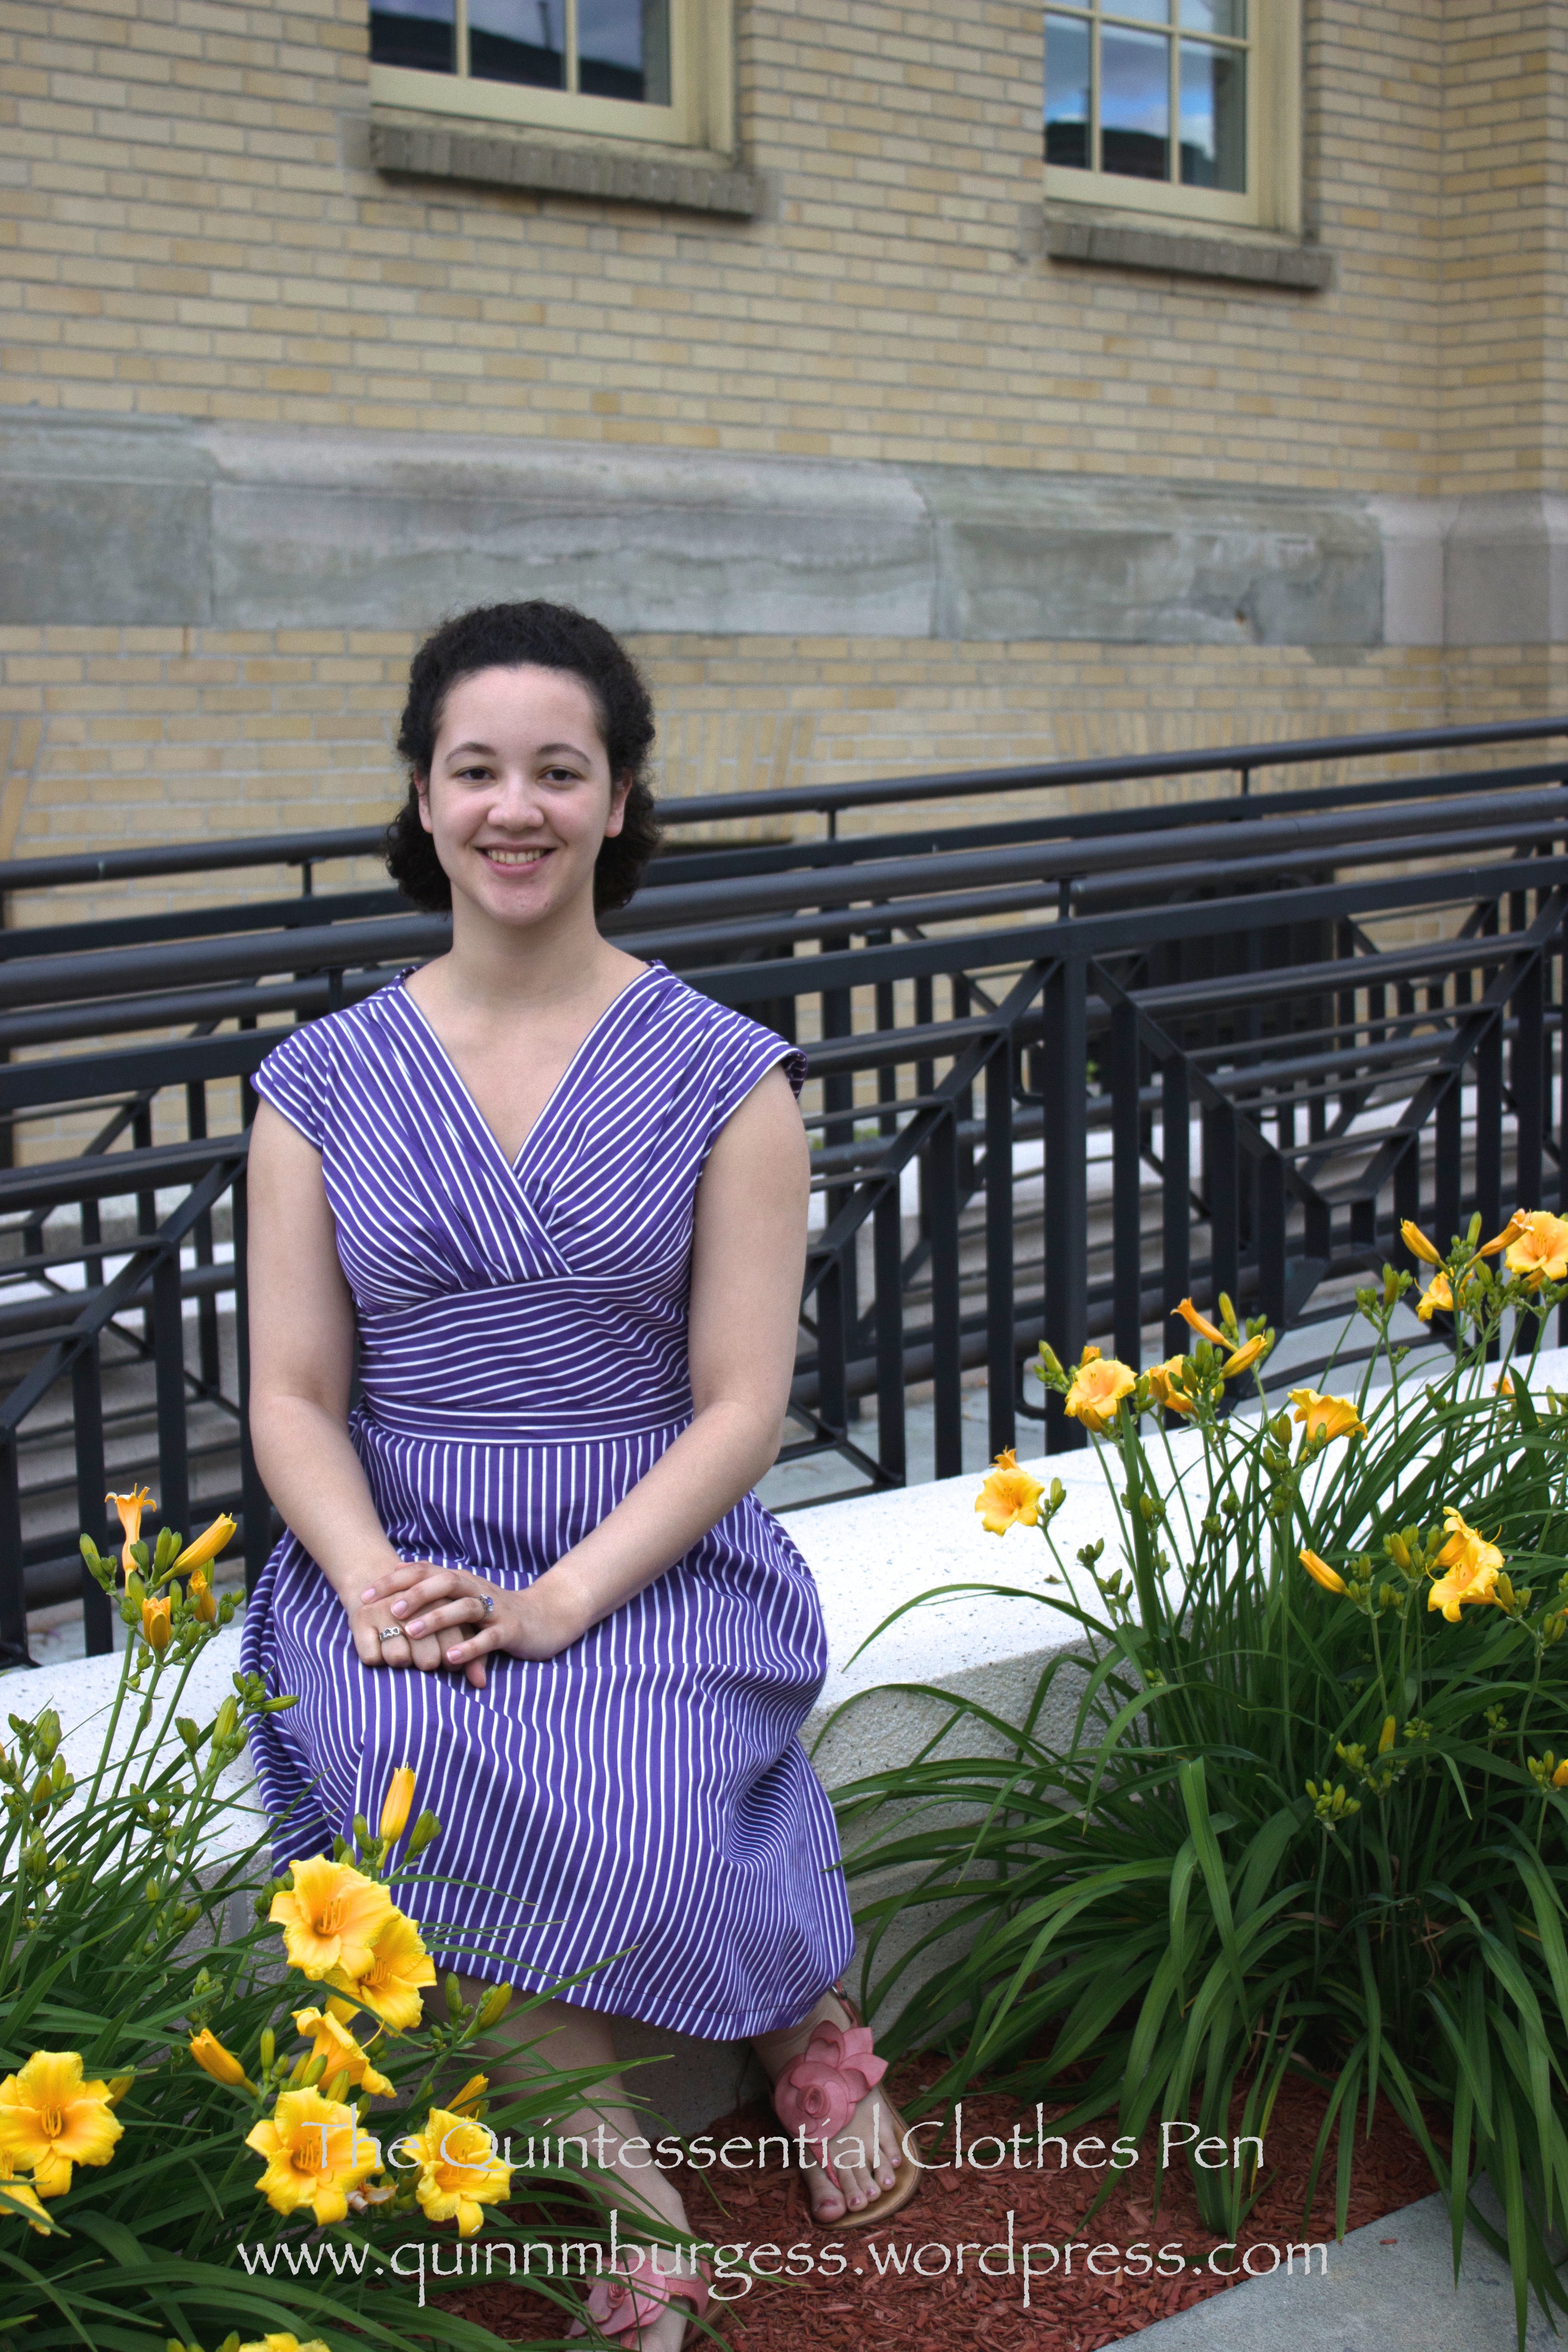
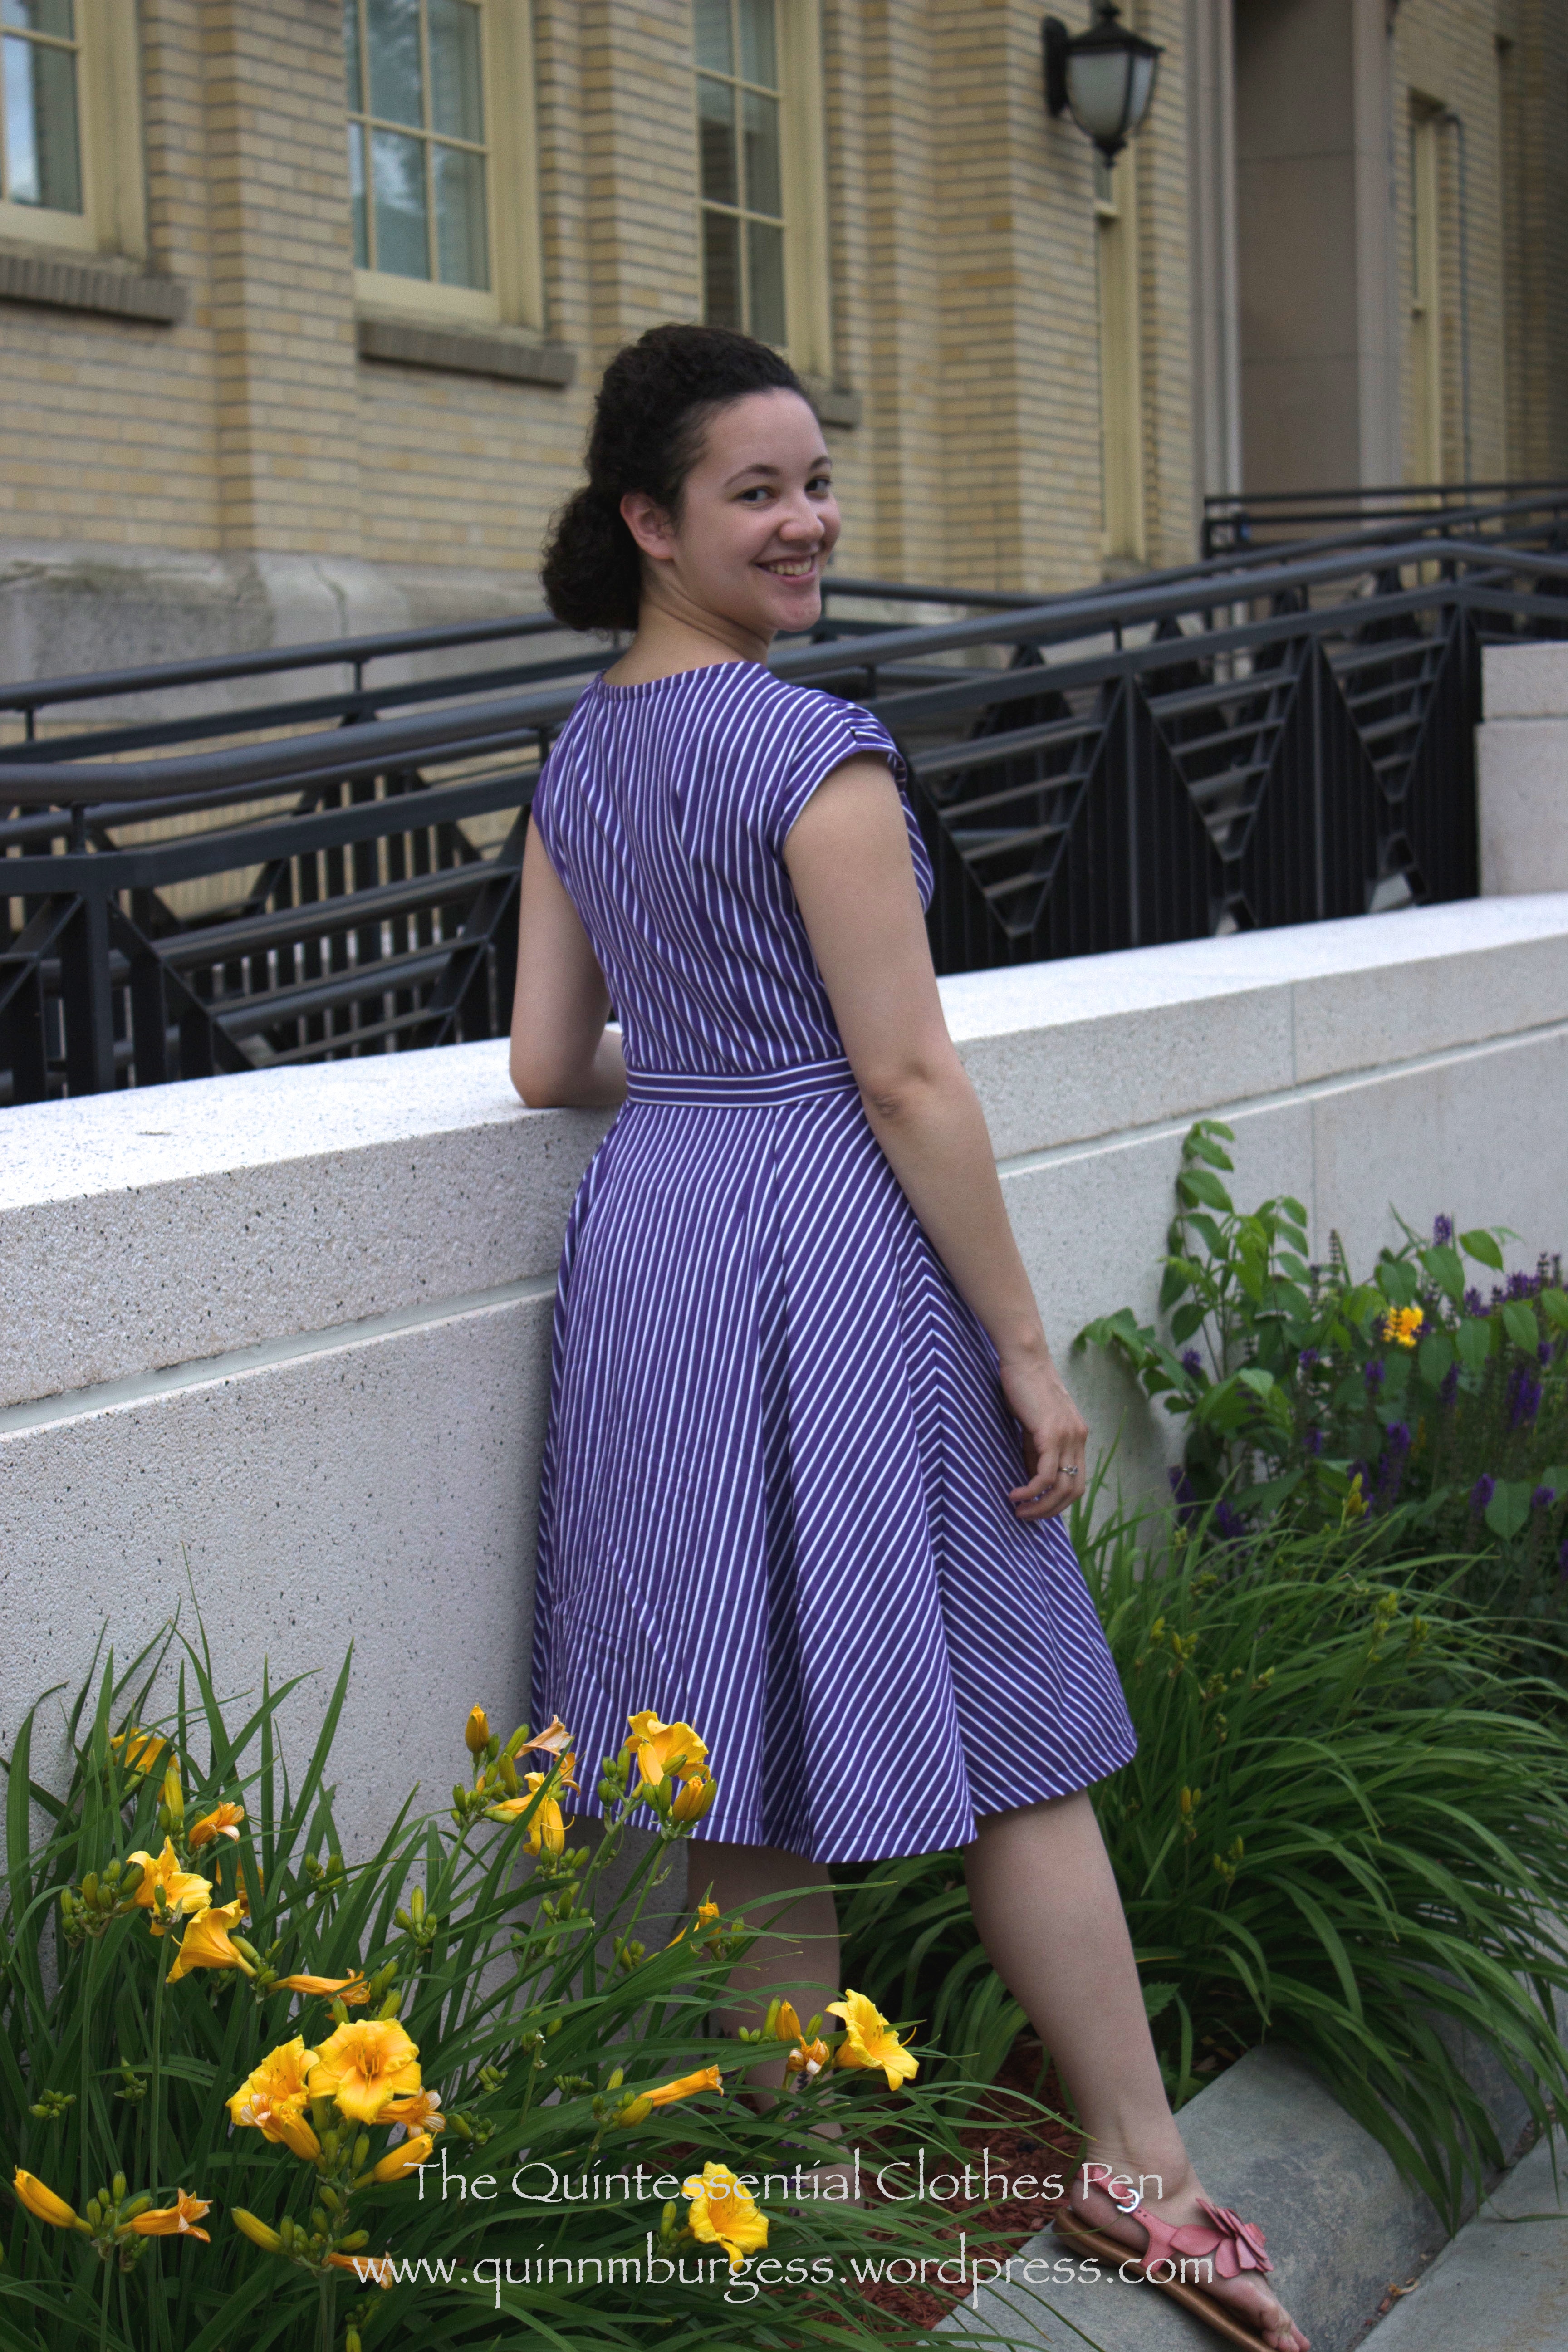
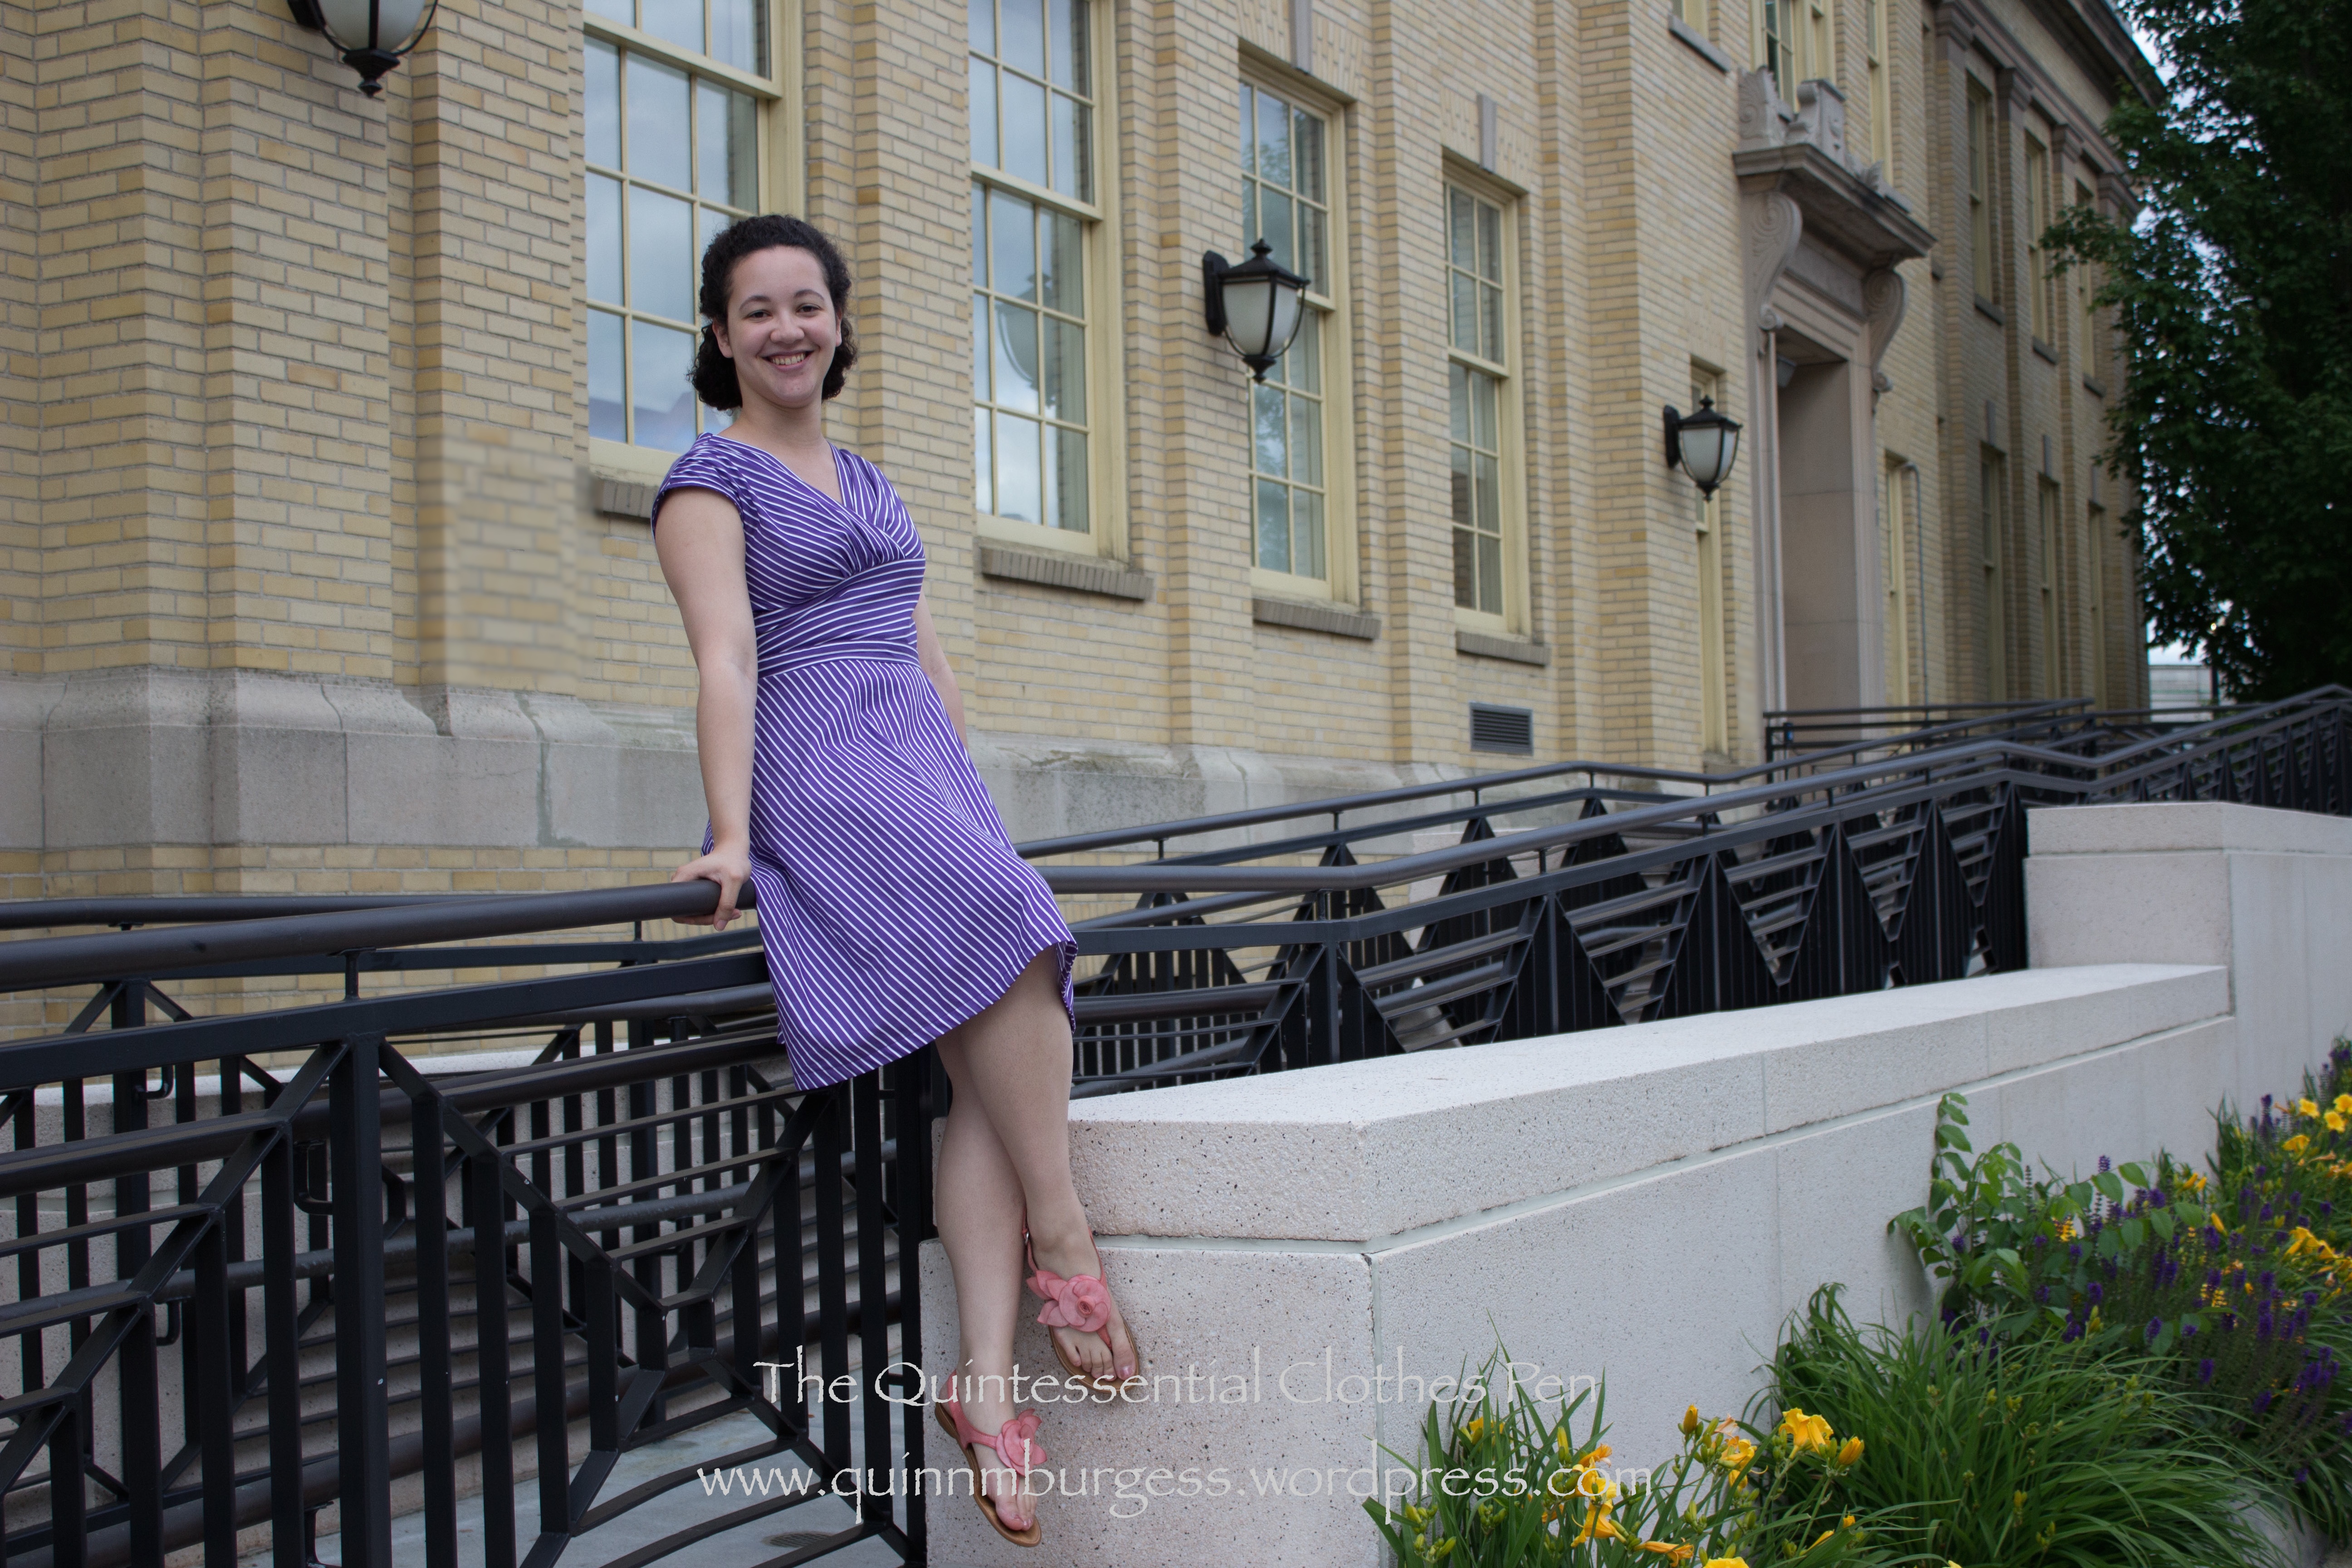
Summer is here, and I’ve been wearing dresses a lot lately. I’m trying to expand the number of dresses in my wardrobe and trying to incorporate more garments that make use of a pattern of some sort rather than just being a solid color. This new dress is… well, a dress, and it has a pattern! And, it’s purple with a wide skirt. What is not to like?
The inspiration is this Anne Adams dress pattern #4752 from the 1940s.
I love it, and really wanted to make a dress just like it. But then, I also wanted a nice full skirt just like another dress I bought from H & M years ago and wear often. Turns out that the full skirt made the angled stripes on the skirt totally impossible to pull off. I tried! It was sad looking, though, and in the end I decided I’d be much happier with the dress if I adjusted the design to accommodate my more-full-than-1940s skirt. Good decision, because I love the dress just as it is! I wouldn’t mind some day making the dress with a skirt that has less fullness and a more 1940s silhouette and trying the stripes as they are in the inspiration, but it wasn’t fated to be for this iteration.
See? Because the skirt is full it’s a curved piece, which meant that the striped panel had to have darts to fit, which wrecked the line of the stripes.
Once I decided to go for the Modern-Does-1940s look I also decided not to bother with the buttons on the bodice. My dress does have topstitching like the pattern image, though you can’t really see it with all the stripes going on.
The dress is constructed from a medium weight cotton I found on the remnant table at my local fabric store for $3ish/yard. Love that price! The armholes and hems are finished with self fabric bias. The dress closes up the left side with a purple lapped zipper. If you’re going to be purple, why not be PURPLE? (Maybe I should call this the Purple People Eater Dress?)
The bodice is a little different than the inspiration, because I wanted to make it fit my body. Thus, both sides of the bodice are gathered into the angled waist piece to create space for the bust (in the inspiration the dress is drawn with the proper left side being flat… but that would mean also being flat chested on that side…). The other thing is that I have a shoulder seam in my dress, and I wound up gathering the front pieces at the shoulders to make the whole thing sit correctly on my body. You can see in the picture with the dress on the mannequin that it started out with no gathers on the shoulders, but it wasn’t fitting me in a flattering way, so I gave up and altered it to be comfortable.
The back bodice has darts and corresponding tucks in the skirt. The tucks were unintentional, added only because the skirt had stretched out and was bigger than the waistband when I went to attach them. That’s what happens when you cut corners and don’t stay stitch… But see the perfect chevrons on the side seam? They make me happy!
I’m wearing modern summer sandals, but I did attempt to do a nod-at-the-1940s hair style for the photos. I don’t mind the style, but clearly I need some more practice (and likely a different hair type without so much frizz) to really get a 1940s style going.
Thanks so much to my wonderful friend photographer, who is so willing and excited to document the things I make so I can share them on my blog! Of course, the trade off is that she gets to practice photography skills on a willing model… Works out well for both of us!
I thought I’d share a couple of extant round reticules that bear some similarity to the one I recently made and posted about here. These both have a gathered or pleated outer circle surrounding a decorated inner circle. The bottom one uses the same cord as the ties are made of to circle the inner circle. Both reticules have an opening that is gathered to close, though the bottom one’s gathering direction is more unusual and unexpected. I like both, and think they are fun! Do you have a favorite between these?
A cotton reticule that the Met dates to the 1st quarter of the 19th century.A silk reticule that the MFA dates to the early 19th century.
I’ve recently finished another Regency reticule (I say another, because not too long ago I posted about a new red and gold reticule). This one is circular!
I love the round shape.
I was inspired by an image and directions found in The American Girl’s Book: Or, Occupation For Play Hours, which can be viewed here, on google books (the directions for the circular reticule are found on page 262). I was particularly encouraged by having already gathered silk strips left over after adjusting my brown fur muff at the end of last year. In addition to the leftover gathered silk strips, I used some pink silk scraps backed with coutil for the center of the circles, a bit of peach cotton for the lining, pink poly ribbon for the handles (it was the best color, even though it wasn’t silk), and, for the beading, 2 buckles I picked up for $1 each.
I didn’t really follow the directions, instead I just made up my own order of events. I started by cutting out the center circle and basting the coutil to the silk. Then I placed the buckles on these circles and pinned the gathered silk around the edges After that I sewed the edges. The next step was to sew the two finished sides together, then sew a lining of two more circles of the cotton. The last thing was to sew on the ribbons and whip stitch the top edges of the silk to the lining.
Looking down into the lining.
I decided not to have my ribbons gather the opening, because I so like the look of the circle and really didn’t want to ruin the effect. Plus, the reticule just perfectly fits my phone right now, and if the top was gathered it might not fit! Yay for a relatively quick project that’s entirely hand sewn. It’s exciting to have more reticule options!
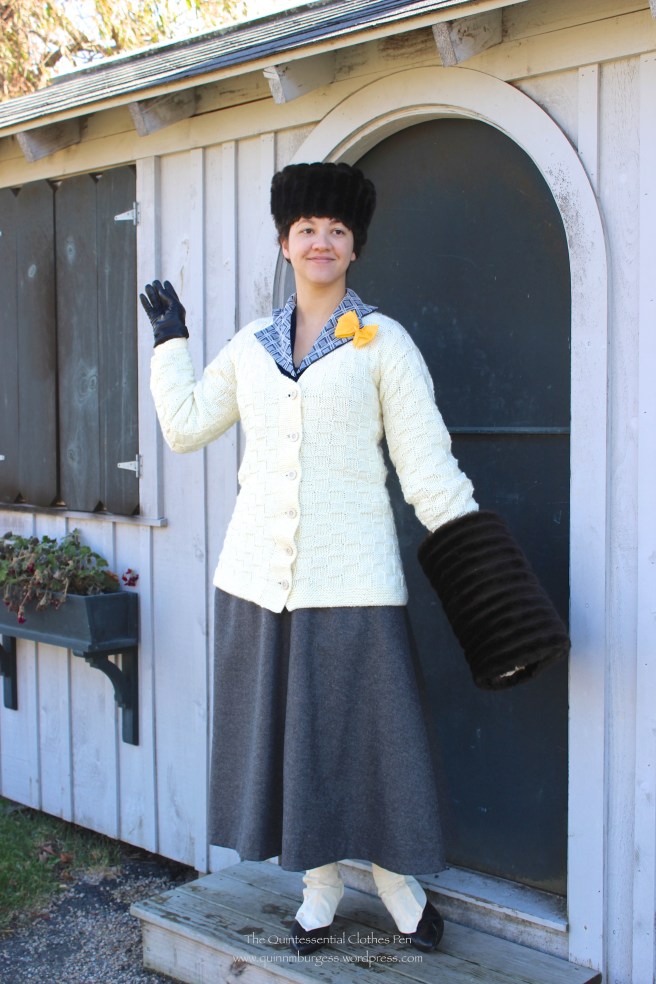
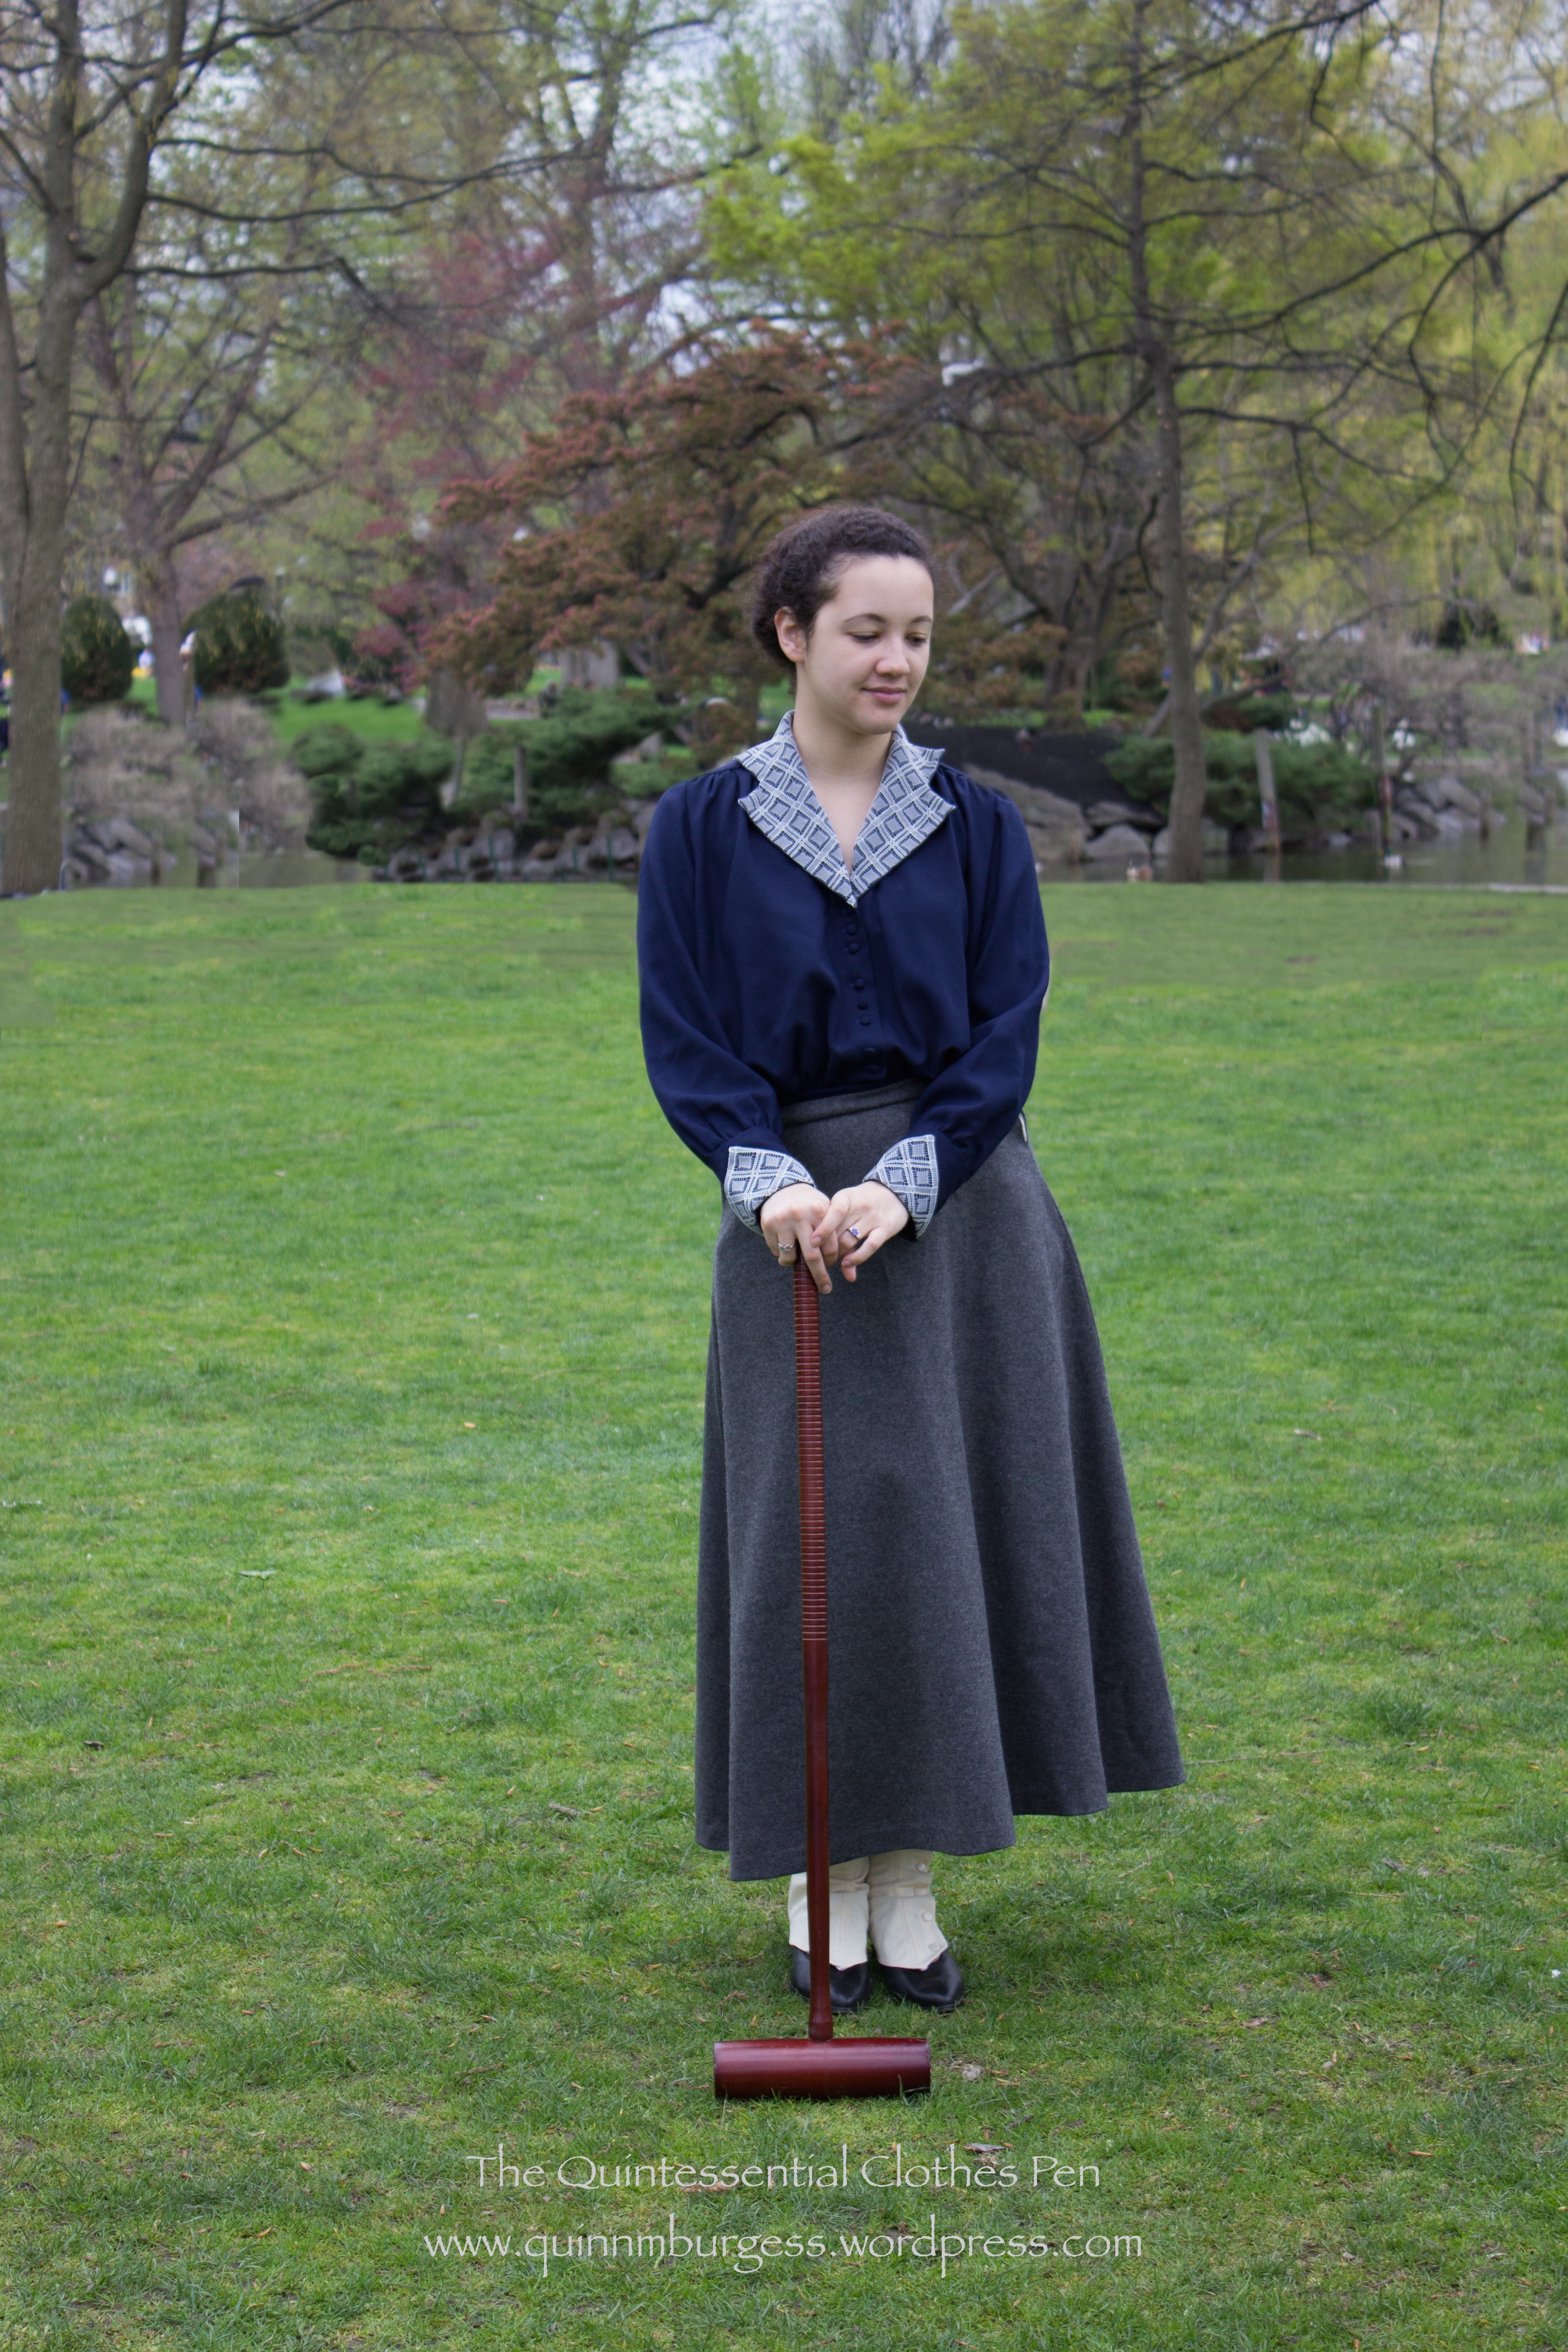
I finally put finishing touches on the navy crepe waist I made last November! A few weeks ago, I was inspired at the very last minute to attend an early 20th century picnic and decided to wear my 1917 outfit because it was still a little chilly out and I wanted to wear something practical for walking around. So, literally the night before the picnic, I embarked on buttons and buttonholes because despite the best of intentions I hadn’t actually sewn them in the months since November. I also added a yoke around the bottom of the waist to keep it from untucking itself while being worn. It untucked itself often when I wore it November, but it didn’t matter because I was wearing my 1917 sweater of Angorina over it. But for the picnic I expected to be wearing the waist without the sweater and I didn’t want to worry about it staying tucked in.
Wearing the waist and coordinating ensemble in November 2013.Same ensemble without the sweater and fur accessories.
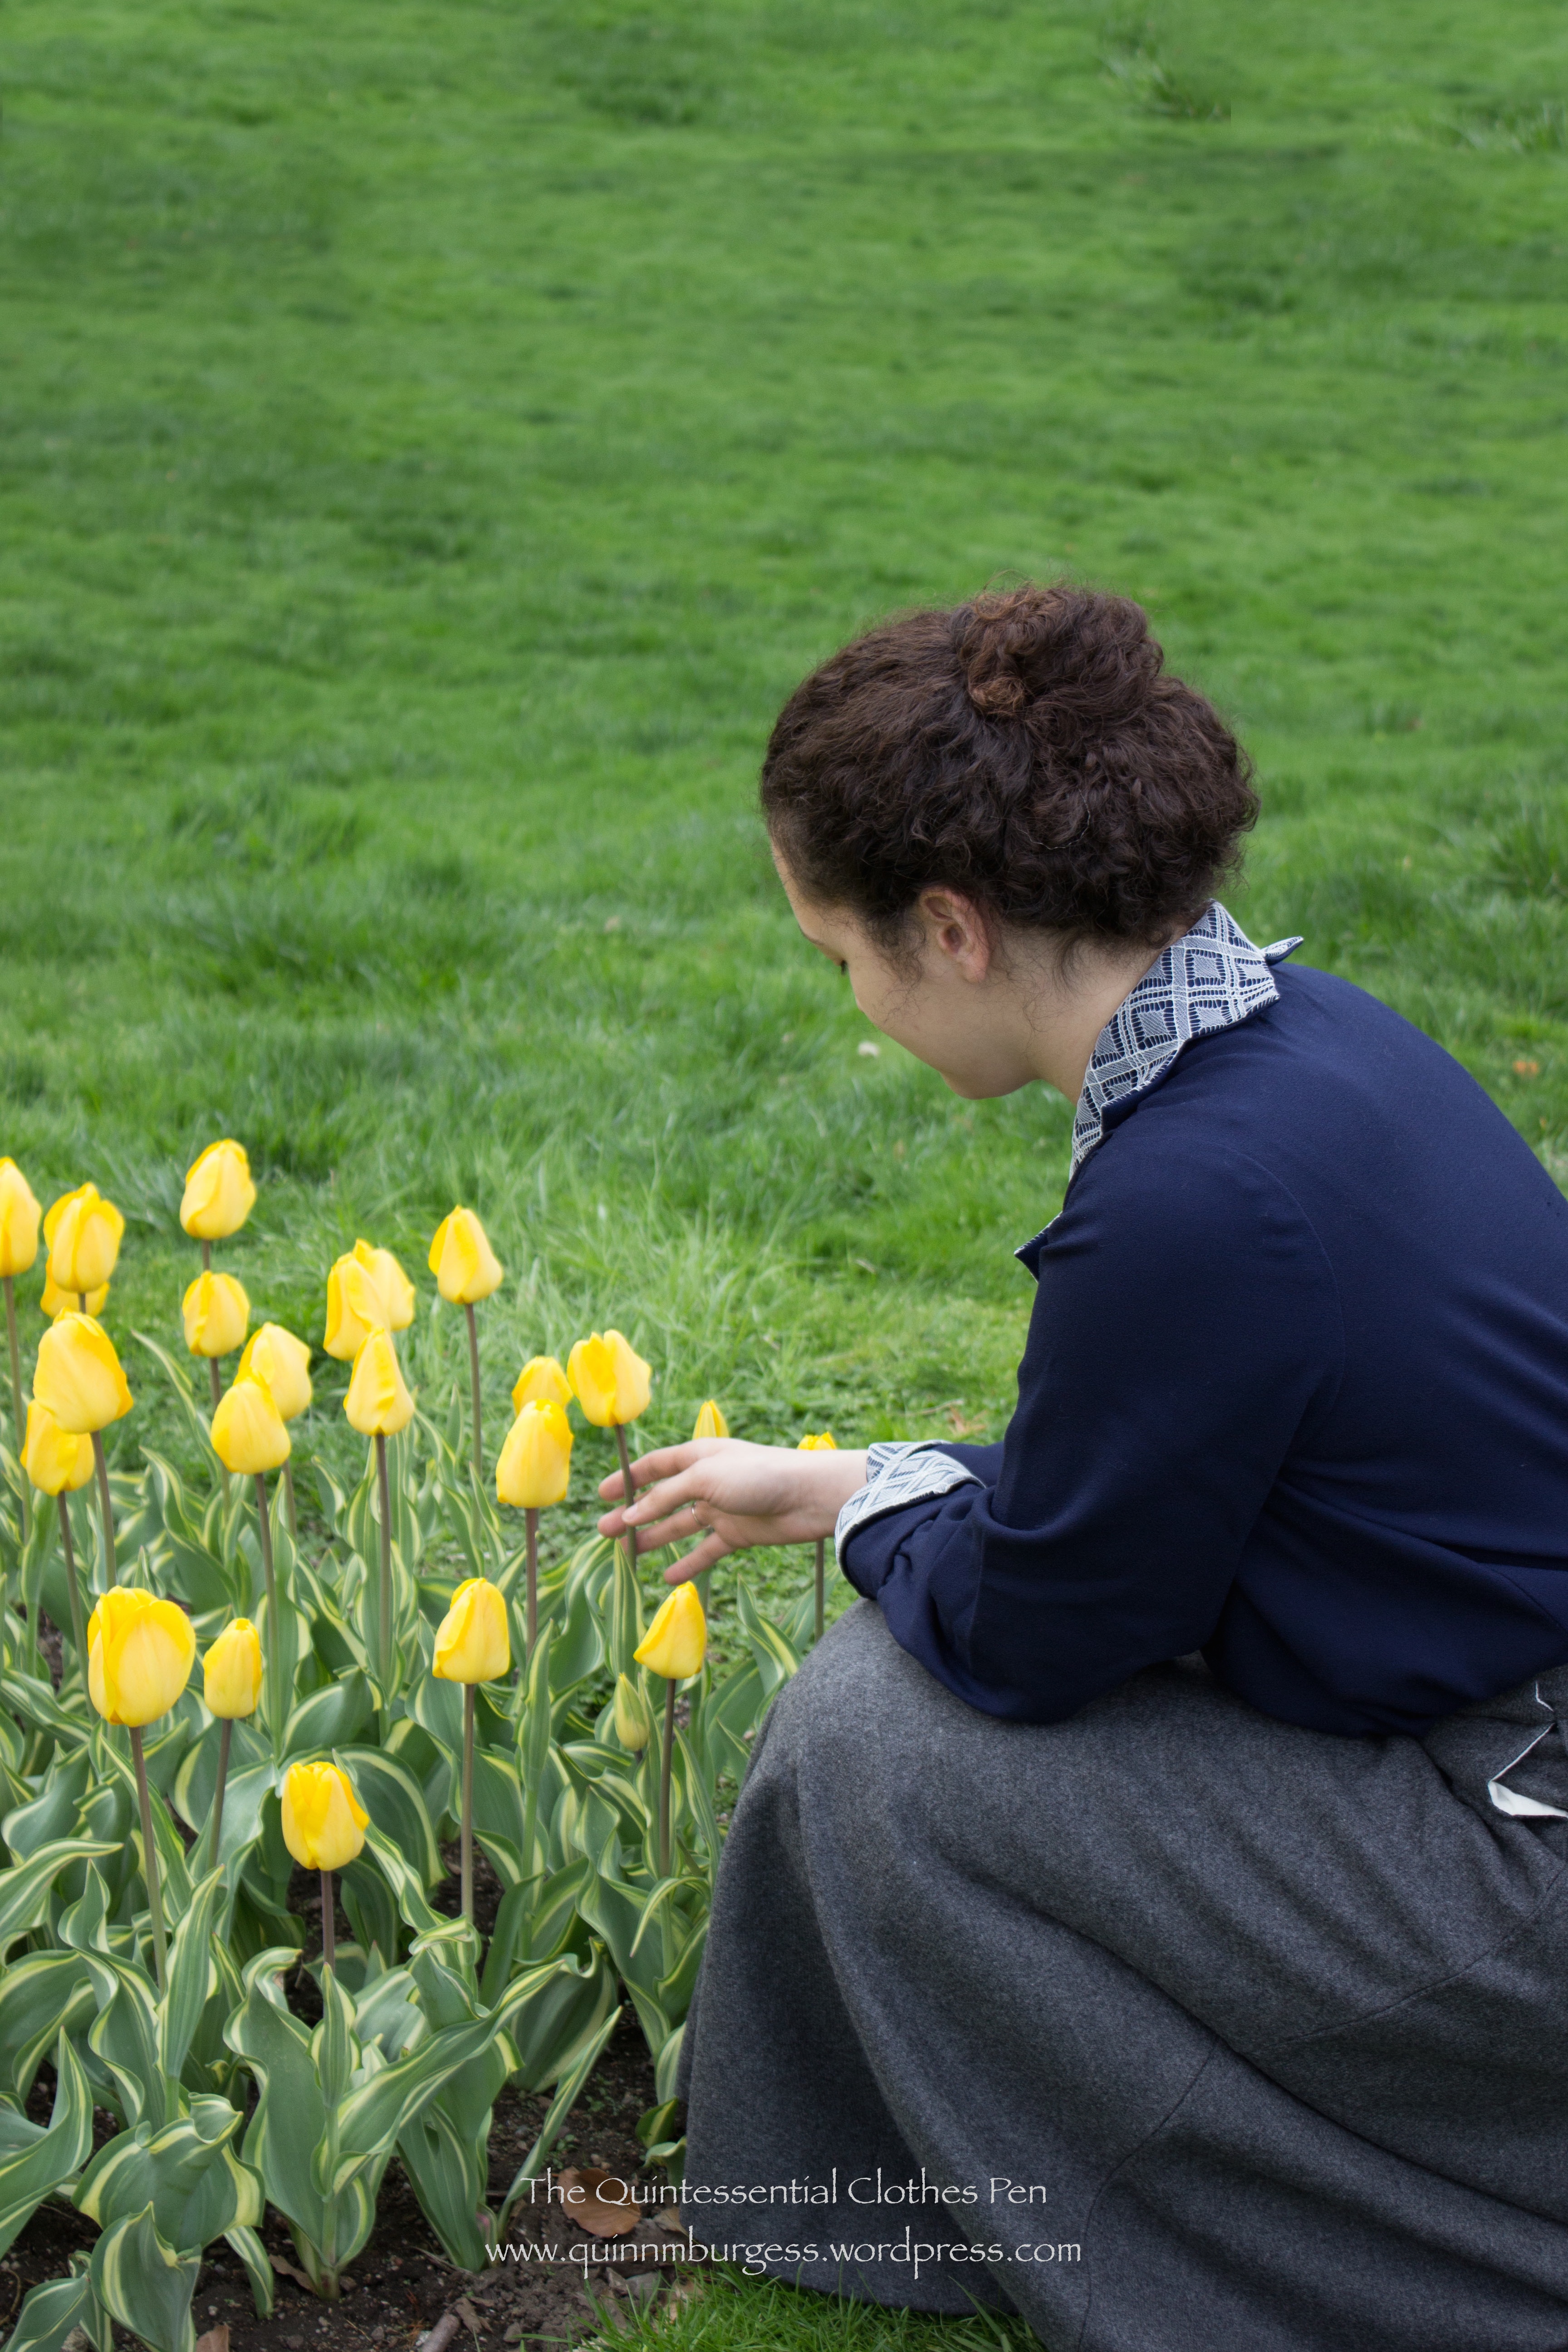
This is a candid shot, not posed, but I like how thoughtful it is, especially with the natural light filtered by the cloudy sky. You can see the collar with its interesting points which follow the diamond shapes on the lace, as well as the turn back points on the cuffs, which also follow the diamond shapes on the lace. If you look really closely you can also see the buttons down the front, clustered in groups of three rather than being evenly spaced (a detail I pulled from this 1916 image). (Oh, and I added little extensions to the back of my gaiters so that they would stop popping up over the back of my shoes! I didn’t get a picture, but the change made a huge difference in terms of ease of wearing!)
The points on the collar continue around the back neck, a detail which I love, because it makes an otherwise boring collar much more interesting! Also, my hair was surprisingly cooperative that day, and the natural highlights really stood out in the muted lighting!
The waist was made using Past Patterns #9025, which was originally published by The New Idea Pattern Company. “Waist” is the word that was used in the early 20th century to describe the garment we would now call a blouse. Past Patterns lists the date as c. 1915, but the pattern actually has a specific date stamp on it: ” Nov. 19, 1917.” How cool is that? It’s perfect for my 1917 outfit! You can see that I mixed and matched elements from both pattern views, and that I adapted the collar shape to suit the lace that I used for it. The pattern is intended for at 36″ bust (which I am) but it’s pretty roomy. I wouldn’t mind the front being a little bit less full if I decided to make another similar garment one day.
Past Patterns #9025: Ladies’ Waist c. 1915
As a bonus, here are some other picturesque images from the picnic.
As usual, playing croquet caused lots of onlookers to stop and watch our fabulous picturesque-ness. I suppose I might stop, too, if I was totally unused to seeing us…We couldn’t resist taking this perfectly un-posed shot!Bunny ears! Hee hee hee…
The skirt isn’t quite finished yet, as I still have closures and some decorative buttons to sew on. So for now I’ll leave off posting details about it. Hopefully, I’ll finish it soon and get pictures… sometime? It’s going to be too warm to wear a wool skirt soon!
As promised last post, here are a few pictures from the two balls at April’s Regency Intensive Dance Weekend. Hopefully, you remember my descriptions of this weekend as being full of amazing learning opportunities and lovely memories with amiable people. Indeed, both balls left me with a feeling, expressed by Elizabeth Bennet in Pride and Prejudice, of being at a very pleasant house party or private ball, though indeed these events are open to the public.
Dancers displaying their waltz at Saturday’s informal ball.
“It is your turn to say something now, Mr. Darcy. — I talked about the dance, and you ought to make some kind of remark on the size of the room, or the number of couples.”
He smiled, and assured her that whatever she wished him to say should be said.
“Very well. — That reply will do for the present. — Perhaps by and by I may observe that private balls are much pleasanter than public ones. — But now we may be silent.”
From Pride and Prejudice by Jane Austen, in Chapter Eighteen.
Looking into Sunday evening’s formal reception, which included a balcony for the musicians (see them in the mirror?).The formal ball included lavish and delicious refreshments.Taking a break from dancing to munch on some super yummy syllabub.
Indeed, we were dancing so often at the formal ball that we really didn’t get many pictures of the dancing in action, so you’ll just have to believe me when I express the elegance of the dancing and the ballroom scene.
You can read more about Sunday afternoon’s imaginary visit to Mansfield Park in this post and more about the new ball gown that I made for the Sunday evening ball in this post. You can read more about the entire weekend here, at Plaid Petticoats blog post about the weekend.