A Dress Suited For Eve

I know I promised pictures of the two balls at the Regency Intensive Dance Weekend in my last post, and I still promise that those are coming, but we’re going to take a quick detour before we get to ball pictures, to look at…

IMG_8442
“A Dress Suited For Eve” (Elusive blue ball gown, 1811)
When dressed for the evening the girls nowadays
Scarce an atom of dress on them leave;
Nor blame them; for what is an evening dress
But a dress that is suited for Eve?
-1818
Quoted from page 42 of C. Willett Cunnington’s Fashion and Women’s Attitudes in the Nineteenth Century.

I came across this quote as I was either planning or starting this dress and I so enjoyed the curmudgeonly generation-gap thoughts expressed in it that it has stuck in my head as a sort of motto. I should explain that this quote occurs as Cunnington is discussing the new Classical style of gowns between the years 1800-1820. These dresses are usually not quite as scandalous to our modern sensibilities as they would have been to people at the time, especially those of older generations. Interestingly, this quote is from 1818 although in my opinion the often sheer muslin dresses from 1800-1810 are generally more revealing than those from 1810-1815, and especially more revealing than those from 1815-1820. Regardless, the idea of these dresses being so revealing that one is dressed as Eve would have been (i.e., wearing nothing!) is amusing to me.

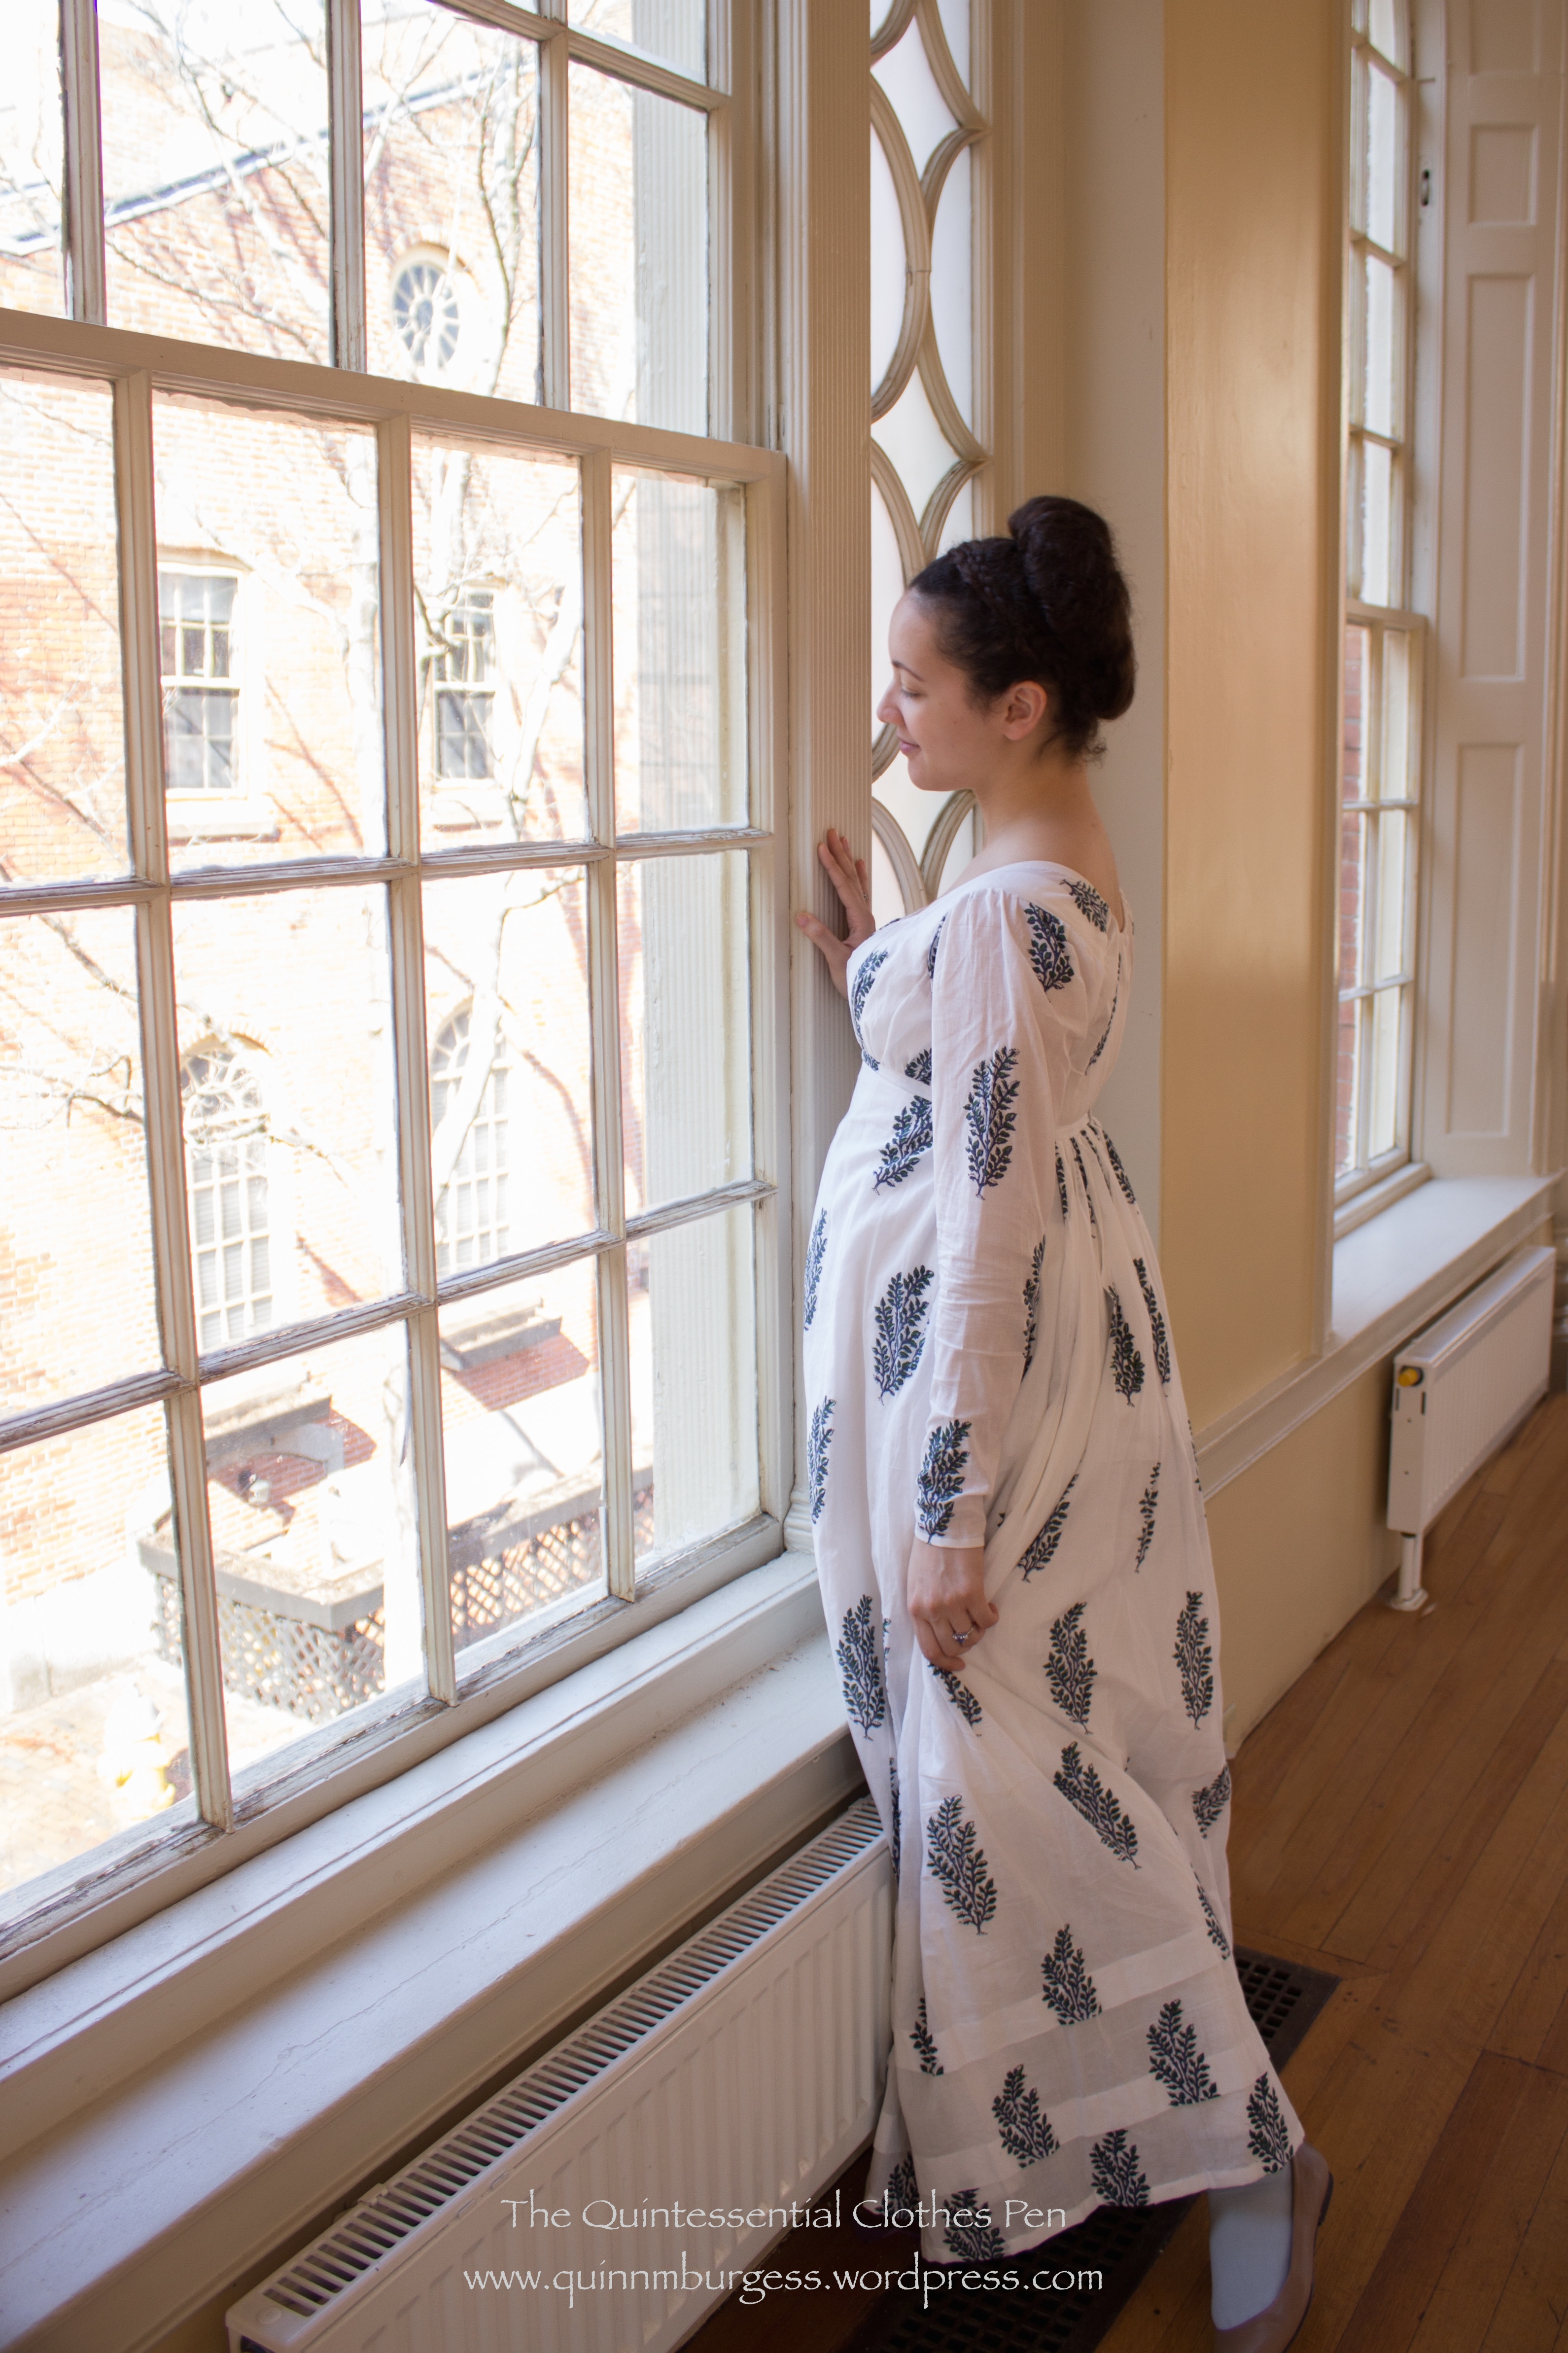
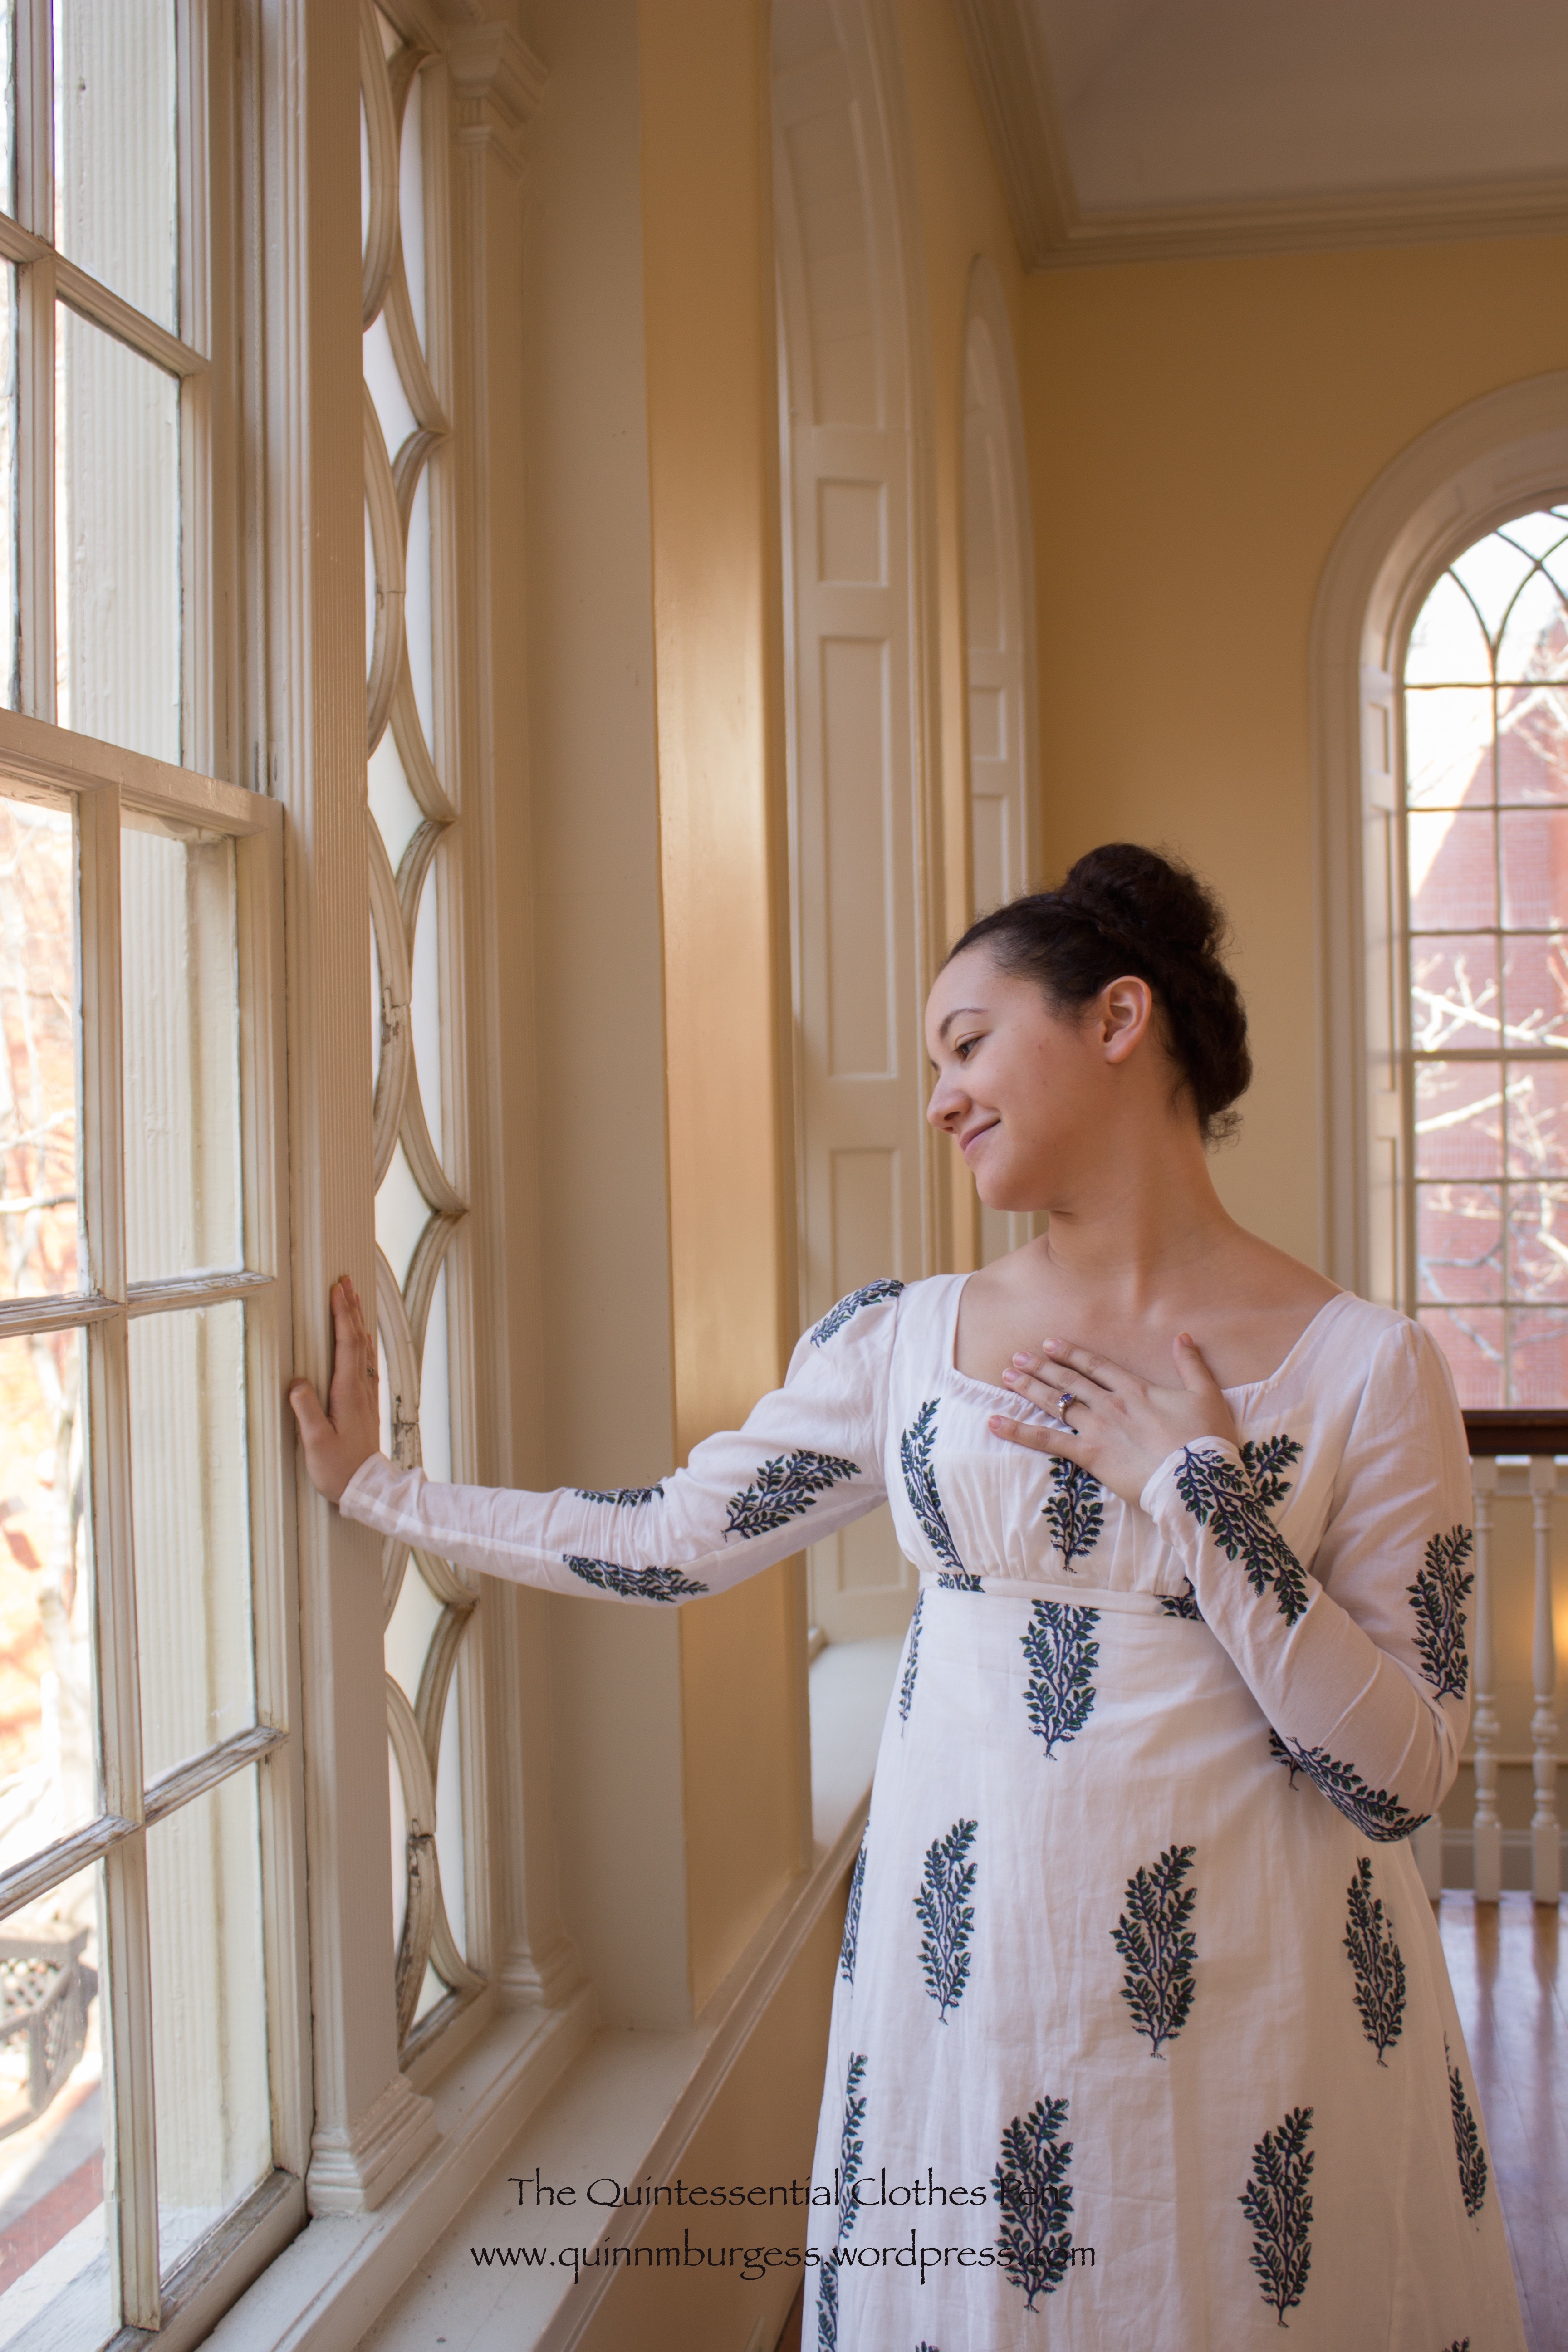
This new gown is actually two separate gowns: a dark blue sleeveless underdress and a lightweight sleeved overdress in a color I call “elusive blue.” Both dresses are a mixture of hand and machine sewing, though all the finishing was done by hand on both pieces.

The underdress is simple and without a waist seam: it is gathered to a yoke in the back and gathered by a drawstring in front. The waist is created by tying the overdress. The overdress, however, is more complicated. The skirt is a simple rectangle with rounded front corners (two widths of fabric wide: there’s a seam at center back), but the bodice has front pieces, shoulder straps, and an interestingly gathered back piece, as well as sleeves. In addition to having more pieces, the overdress is edged all around with lace and faux pearls, as well as having puffs edged with lace and trim sewn on to the sleeves.

IMG_8465
Back view (you can see the gathers on the back bodice piece).

I did indeed sew all the pearls on by hand, individually, and good thing, too! You see, if each pearl is sewn on individually then if the thread breaks you might loose a few pearls, but you won’t have your entire pearl job go spilling all over the dance floor (that could be catastrophic for the dancing and your hard work!). I did wear this to the Grand Ball on the Sunday evening of the Regency Dance Weekend, and by the end of the night I had lost a very small section of pearls along the back hem of my dress. Thanks to all my fastidious pearl sewing, that was all I lost and there were no comical/catastrophic scenes with pearls spilling on to the dance floor! If you look closely at the wavy lines you can see that they get a little wobbly at times, but I did do my best to be symmetrical despite the wobbles. I also did my best to estimate the wavelength of the pearls and replicate it as best I could while eyeballing as I went along. (In fact, I think my wavy lines of pearls are actually more regular than those on my inspiration dress.)

My dress is a direct interpretation of the ball gown at the Met from 1811 (pictured below). The most obvious difference is the colors I chose to use (partly because I found the fabulous elusive blue overdress fabric in the perfect light weight fabric for $1/yard!). I’m sure there are other small differences, too, but I did my best to follow the construction methods I gleaned from the zoom feature when making my dress. (The zoom feature on most of the Met’s pictures is so amazing! I love it.)

C.I.66.38.1ab_F
Ball gown, 1811, the Met.

As is usual with the first wearing of a new garment, there are things I am unsatisfied with and want to change. There are also things that didn’t quite get completed and need to be addressed.

First, the sleeves. My sleeves didn’t quite turn out like the ones in the inspiration photo, but they also didn’t get completed before I wore the dress (if you look closely, you’ll see that my sleeves are just raw edges on the bottom!). I ran out of time, but I also wasn’t sure that I would like how my sleeve puffs look and I didn’t want to spend time completing the sleeves if I was going to wind up disliking them in the end. Each puff is edged in the narrow bit I cut off of the wide edging lace and then also edged in a bit of trim that perfectly matches the elusive blue fabric (and that I purchased for about $2!). I don’t think my puffs look quite as elegant as the original, but they were a lot of work and I don’t have any more of that elusive blue trim to change things up. Also, if you look closely at the sleeves of the dress on the Met you’ll see that they are not displayed in the same way. I prefer the sleeve that is more puffed up (on the right), but I examined the pictures really closely and I think that it is just caught up on the mannequin and is intended to look like the other sleeve (on the left). So I have to decide, and that will help me determine how to finish the bottom of my sleeves.

Other things that bothered me were the length of my underdress (seems to have a similar length ratio to the inspiration, but I think I want my underdress to be about 2″ longer), the fact that I realized after sewing on all the lace that I had put in on with the wrong side facing out (oops! but I am absolutely not changing that!), and the fact that the blue underdress is a super bag without the overdress holding it in (I think part of the problem is my skirt shaping–I tried something new and it did not work–but the skirt kept wanting to poof out from between the fronts of the overdress, which I didn’t like). I’d like to address the underdress problems, but I’m not going to bother with that lace problem!

IMG_8446
The lighting in this photo captures the colors of the dress much better than in the other photos.

I tried a new thing with my hair for this event which I think was quite successful. The poof is normal, but in front of it and my pearl hair “tiara” (it’s really a necklace!) are two narrow braids, one coming from each side of my head. I managed to hide the ends under the braids and my natural highlights allowed the braids to stand out from my front hair, in the right light (as with the picture, above). The only odd thing was covering up the points where the braids started. I liked it and I think I’ll try it again sometime. I also was able to wear some new earrings: green gems with little fake diamonds set around the edge of the teardrop shape. Despite not matching exactly, I think they suited the dress.

Ok, now the next post in this series really will be about the balls themselves!

Imagine An Afternoon At Mansfield Park

This April, I was again blessed to be able to take a weekend and step out of my modern, incredibly busy life to join other like-minded individuals for a Regency Intensive Dance Weekend hosted by the Commonwealth Vintage Dancers. Here is the link to all of last year’s posts, which describe a weekend just as wonderful as this year’s turned out to be.

Saturday consisted of lots of dance class, followed in the evening by an informal ball. Sunday’s schedule had a little bit of dance class in the morning followed by a low-key afternoon of Regency non-dance activities and finished up with a reception and grand ball in the evening.

We took fewer pictures this year than last year, but we still captured the amazing essence of this wonderful event: Saturday’s ball really felt like an immersion into an intimate house party rather than a public ball, Sunday’s afternoon events were wonderfully relaxed and felt like an afternoon one might have while visiting Mansfield Park, and Sunday’s grand ball was amazing to behold and be a part of in terms of exquisite refreshments, companionable company, and excellent dancing.

Having so few pictures of the Saturday evening informal ball, I’ve decided to just include them in a second post which will have pictures from both balls. So then this post will be about Sunday afternoon’s event. Activities included sword demonstrations, playing various period card games, participating in or watching a “theatrical,” listening to a short and impromptu piano interlude, and delighting in the delicious refreshments and tea. Of course, there was also lively conversation, as you would expect! (We had hoped to have some outdoor actives, too, such as playing graces in the park and taking a walk, but unfortunately it was raining all morning and things were wet, so we decided to stay inside. In the end, it turned out to be just fine and we still had a lovely time!) 

IMG_8324
Cards and counting chips laid out and ready to participate in a game.

The “theatrical” was staged for us by a group of interested and theatrically inclined ladies. They only had perhaps a portion of an hour to prepare a few scenes from The Rivals for us (a play first performed in 1775 and written by Richard Brinsley Sheridan). It was highly enjoyable and, we, the audience laughed a lot! Indeed, The Rivals is one of the plays that is dismissed by the party in Mansfield Park when they are thinking of putting on a play (hence why I’ve specifically mentioned that the afternoon felt like visiting Mansfield Park!). In the book, they decide on another play in the end (Lovers’ Vows, from 1798), but it was neat to see scenes from one of the plays mentioned in the book!

“All the best plays were run over in vain. Neither Hamlet, nor Macbeth, nor Othello, nor Douglas, nor The Gamester, presented anything that could satisfy even the tragedians; and The Rivals, The School for Scandal, Wheel of Fortune, Heir at Law, and a long et cetera, were successively dismissed with yet warmer objections.” From Mansfield Park by Jane Austen, in Chapter Fourteen.

1558456_10152056657054327_3929073447392027700_n
Small props had been thought of ahead of time and provided extra amusement: the hat, cravat, and beard were a few of these amusing things!
984026_10152056657274327_5601943787191074466_n
Really, the scenes were amusing and acted with conviction.
10014634_10152056656819327_8573363852811564478_n
Delicious refreshments (we had a variety of scones, cookies, and cucumber sandwiches). Tea is being poured out in the background.
988470_10152056656939327_9019217807155517566_n
A portion of the party enjoying card games, conversation, and refreshments.

Our venue was built around 1816-1817 and provides a wonderful environment for Regency activities especially: beautiful windows, high ceilings, a lovely dance floor that lends itself to Regency style dancing, etc. I also like the creamy butter yellow walls with lovely white trim.

IMG_8416
I wore my tree gown. I’m attempting to look pensively out the window hoping that Mr. Darcy will come by…
IMG_8418
I’ve seen him! Be still my heart!

Yes, I know I’m mixing my books here. Perhaps I should have thought of myself as Fanny Price waiting to see a glimpse of Edmund Bertram out the window. Ah, but I don’t identify with Fanny so much as Elizabeth Bennet, so you’ll have to cope with my mixing of books!

HSF #8: Red/Gold Regency Reticule

It’s been a little while since I completed a challenge for the HSF 2014. I’ve either been too busy to sew (sad!) or I’ve been sewing things that haven’t remotely lined up with the HSF challenges as they came along (also sad!). This time, though, I found a little bit of time to finish up a partially completed Regency reticule, which perfectly fits challenge #8: UFOs and PHDs (click through the link if you don’t know what those acronyms mean in sewing-land!).

IMG_0791
Red/Gold Regency Reticule

I was inspired by this Regency reticule pattern which is available on Etsy. I just made up my own pattern based on the image. I didn’t quite get the proportions right so mine is more elongated and a little less round, as well as not bunching up very tightly at the top due to the fabric I chose, but I’m happy with it nonetheless. Perhaps some day, I’ll try making it in a lighter weight fabric and see if I can get a more round shape and a tighter gather at the top (on the other hand, this one does hold its shape nicely… and a lighter weight fabric may not do that for me).

The facts:

Fabric: Polyester upholstery fabric for the exterior and gold polyester taffeta for the lining.

Pattern: Made up by me.

Year: c. 1810

Notions: 1 tassel, gold and burgundy thread, and about 1 yd of gold silk ribbon.

How historically accurate?: Accurate in style but not in materials or use of a sewing machine… Let’s say 50%.

Hours to complete: Not many, though I didn’t really keep track since I worked on it in small bits of time.

First worn: Has not yet been used.

Total cost: Free (all stash materials)!

Support 10·38

On October 30, 1938, Orson Welles broadcasted a radio adaptation of War of the Worlds. “In a 40 minute show, Welles and other actors from his Mercury Theater company recreated what was supposed to be an alien invasion from the planet Mars. Thousands of radio listeners thought it was true and a wave of mass hysteria seized New York. For many, that night was hell on earth, but for one man, it was heaven.”

1d3e9a000c1056159b66b9763c4e318b
Orson Welles broadcasting War of the Worlds in 1938.

Intrigued? This is the plot of a short film titled “10·38: A Broadcasted Dream,” a project which is currently in the funding stage.

The goal is $20,000 and the campaign is about half way funded on kickstarter, but it’s all or nothing and the funding won’t go through unless the end goal is reached in the next two weeks. And if the project is fully funded and all everything gets approved, I will be designing the costumes (and I’m hoping that includes building a few of them)!

So, throw in some old time radio (which I actually do listen to, it’s fabulous!), some historic fashions from 1938 (obviously, you know I love historic clothing), and some monsters (ok, maybe I’m not such a fan of monsters!)… and you can help support the production of a film that can transport viewers to another time and place, just as old time radio broadcasts like War of the Worlds used to do. So please, if you’re at all interested this supporting this project, consider sharing it  with others and supporting it!


Returning From Silence

This past month was absolutely busy! So busy, in fact, that something in my life had to give. Unfortunately, the thing that gave was my time spent sewing historic clothing and documenting it here on the blog. I say this by way of apologizing for my unintended and unannounced silence. I’m sure you understand how busy life can be and that you’ll forgive me!

While I was away, I was kindly awarded the Liebster Blog Award by Asa at Fashion Through History blog. Here is a rather belated “thank you!” I’ve actually been nominated for this award once before, and in turn nominated other blogs, so I’m going to skip that this time and just take some time to answer the 10 questions that Asa has asked as part of the nomination.

#1: When and how did you get into sewing?

My grandmother taught me how to quilt when I was in elementary school, but I didn’t really learn how to sew clothing or use a sewing machine until part way through my undergraduate studies when I took a Costume Construction course.

#2: What was your very first garment (historical or other)? And what did you learned from it?

Well, I “made” things for playing dress up when I was young, but I don’t think those quite count. So, let’s call the first garments those I made in that first Costume Construction class. They were almost entirely failures, in the sense that I would never wear them in public despite the fact that they were finished garments. I learned that fabric choice makes a huge difference in having a garment that’s wearable! Also, you learn and practice skills with every garment, even if it isn’t one you are happy with, so there’s those things, too.

#3: Do you have a dream project? And what it is? (Picture?)

I have a lot of dream projects! There’s so many I really can’t pick one, or even a few! They’re mostly dresses, but also include accessories, outerwear, and occasionally separates. Here are links to some of my pinterest boards of “future project” ideas: 1820-1850, 1851-1869, 1870-1899, 1900-1929, and 1930-1960.

#4: Which of your costumes are your favorite and why? (Picture?)

Favorites are hard…

I do really like my 1815 Tree Gown, because it is super comfy to wear, has a fantastic silhouette, and the fabric is just so perfect and fabulous!

IMG_0791

My 1819 spencer is pretty fabulous, too. It’s got such fun details and fits well!

IMG_0751

Evie, my ball gown from 1864 is a favorite because she’s entirely hand sewn and stunning.

IMG_5809

I really love my outfit from 1917. The style is actually quite flattering, I’m impressed that I knitted my own sweater, I love my spat boots, and my fur accessories are just so pet-able! (Plus, my blouse has neat lace details on the collar and cuffs.)

IMG_6948

If I only allow myself one more favorite, it’s my 1953 dot dress. It’s grown up polka dots in shades of pink! And it’s super cute and comfortable.

#5: What will be your next big project?

Hopefully, working on my 18th century court gown for Kendra’s sew along over the next few months.

#6: What part of costuming do you enjoy the most (the planning, patternmaking, sewing, details etc.)?

Oh, I do love the planning… Picking out an inspiration image is just so fun! I also absolutely enjoy sewing and adding details.

#7: And what part would you rather not do?

I have to be in the right mood to enjoy patterning. Sometimes it’s just drudgery! And I really don’t enjoy cutting.

#8: Do you have a costuming role model or muse (historical, fellow blogger or other)?

No, can’t say that I have a singular role model or muse. There are lots people I find to be inspiring out there, though, whom have completed amazing and lovely projects.

#9: What’s the reason you decided to start your costuming blog?

I was trying to figure out who I am and what I do in terms of my interest in historic costume research, construction, and wearing. I was encouraged to share that with others and a blog was one way to do that.

#10: What is your best advice for anyone wanting to get into historical costuming?

Get involved with local groups so you have a place to wear your clothes and people who love the hobby and will encourage you. It can be hard to find those groups, sometimes, though, so reading the blogs of people in your area might clue you in as to what they are. Don’t be afraid to comment on blogs, too! You’re invisible until you comment!

A Floral Headband For Annabelle (Returning Heroes Ball 2014)

Not too long ago, I was again able to be part of the annual Returning Heroes Ball hosted by The Commonwealth Vintage Dancers. I decided to wear Annabelle again this year, even though I’d worn her last year, because I’d just worn Evie and Belle at the 1860s Dance Weekend in November.

IMG_7853
Annabelle at Returning Heroes Ball 2014.

Each time I’ve worn Annabelle, I’ve been slightly disappointed with the various incarnations of flower hair wreaths I’ve attempted to match her: the first wreath and the giant mass of flowers. So this year I decided to try again to see if I could get something I like. There are quite a number of evening dresses decorated with flowers right about 1860 and many of them are depicted in fashion plates and portraits with matching flowers in the hair. Here are some examples: 1859 fashion plate, another 1859 fashion plate, a third 1859 fashion plate, 1861 fashion plate, 1861 portrait, 1862 fashion plate, and 1863 fashion plate. For this new incarnation, I decided to try a different style from what I have for my other two evening dresses (Belle has a crescent and Evie has a hair wreath).  The style I settled on I’m calling a headband. It creates a halo around the face and extends down towards the ears, but does not connect across the back of the head. Instead, the hair must be interestingly arranged to fill in the back of the head. Here’s an example of the headband style using flowers that match the dress from 1862. And here is the fashion plate that Annabelle is based on which shows a headband style hair wreath worn with the dress.

IMG_7827
Here is Annabelle’s new floral headband. 
IMG_7953
Back view of my hair style. I needed something dramatic to fill in the base of my head. I wanted to do a sideways oval surrounded by rolls, but that didn’t work out and this is what I ended up with. I was dubious at first, but I think it worked. (It’s hard to see, but there’s one big central roll/puff and one smaller one above and below that.)

In addition to my new headband, I was also able to wear my new ca. 1860 corset and my still rather new purple paste jewels (a matching collet necklace and drop earrings) from Dames a la Mode. They worked wonderfully with my outfit (of course, I did pick the purple knowing it would match multiple outfits…!) and I enjoyed wearing them again.

The ball was lovely, as usual, and filled with well dressed people and more uniformed gentlemen than we have seen in recent years. The dancing was well executed and the intermission boasted a lavish spread of refreshments that both looked and tasted scrumptious.

IMG_7809
Bowers, during the Grand March.
IMG_7930
Bowing at the end of a polka.
IMG_7848
One small portion of the refreshments table.
IMG_7937
Looking lovely and dashing.

You can see more pictures of the event at Raven’s Plaid Petticoats blog post about Returning Heroes.

Ca. 1860 Corset Intense Details

This is a follow-up post to my last post: ca. 1860 Corset For Me! (HSF #4)That post has a short background on my reasons for building the corset, but it doesn’t mention other details, so that’s what this post is for!

IMG_7441
My new ca. 1860 corset.

So let’s start with more background, since this post is all about intense amounts of details! We’ll start with the pattern I made for this corset: you’ll notice it has bust and hip gores as well as that curved piece on each side of the front. The bust gores aren’t so unusual for a modern 1860s corset recreation, but I don’t see too many corsets made (and certainly not many corset patterns) with hip gores and I’m not sure I’ve ever seen anyone reproduce an 1860s corset with that curved piece in front. I found these details intriguing and wanted to make this style for two reasons: 1, because it’s a style I haven’t seen recreated, but which I have multiple examples of in my research, and 2, because it seemed like it would fit into a new thought I absorbed a few months ago.

50.180.3_CP2
1865-1867 corset, The Met

First, a discussion about the style. It seems like a lot of modern ca. 1860s corsets are cut with vertical seams that run from top to bottom of the corset to create shaping, sometimes with the addition of bust gores. (The corset on the right is an example of one from the 1860s that uses this style of seaming to create shape.) These corsets are cut with shaping in the seams to create space for the bust and hips, but an alternative to this is to use bust and hip gores to achieve shape for the body. The interesting thing is that hip gores do not seem to be very commonly used in historic corsets made by modern people, despite their use in historic clothing. I attribute this to the fact that shaped seams are easier to execute than inserting gores of any type, but especially gores that are not in a seam (like the gores in my corset). Also, I would think that pattern companies have an easier time grading patterns using the shaped seams, because the gores (particularly hip gores) really need a lot more individual adjustment and fiddling on a body than shaped seams do.

Second, about this new thought that I absorbed. While reading Merja’s most recent blog posts about corset construction, I was rather surprised by a simple statement that makes so much sense but which I haven’t necessarily followed in corset making  in the past (here are Merja’s gusseted 1870s corset, which has the sentence which mentions this magical new thought, as well as her 1880s purple corset and 1860s white corset with seaming like the Met corset, above, which exhibit the thought without it being explicitly stated). Essentially, she says that she always makes adequate space in the corset for bust and hips, so that the corset is only constraining her waist. Duh! A related thought is that when you tighten your corset you displace some bits to your bust and hips, so your corset really does need adequate room there to accommodate the normal and the extra. That makes so much sense and sounds so much more comfortable than having a corset that digs into your hips or pushes your bust around uncomfortably. I made the goal to take this approach for the new corset and all future corsets! and this new corset was my first attempt at really following this sound piece of information.

So given that the style I set out to make is one that I haven’t ever seen a pattern for, where did I get mine? Well, it’s loosely based off of one in Corsets and Crinolines by Norah Waugh (the pattern is ca. 1873, pg. 80). I say loosely, because I started there, but then began combining pieces and changing the shape of them to suit my measurements and the seam placement that I wanted (most importantly the hip gore and that curved front piece). Interestingly, Waugh notes on a different corset pattern (ca. 1860, pg. 78) that the 1860s style of corset without bust or hip gores (more like what I seem to see in modern made ca. 1860 corsets like the one from the Met at the top of this post) was a style preferred in France. The English preferred the style of corset I am making with gores. (Merja’s white 1860s corset I mentioned in the pervious paragraph uses this French corset pattern in Waugh, if you’d like to see what it looks like made up.)

I wound up making two mockups to get the pattern the way I wanted it even after adjusting the pattern from the beginning (and still made a few alterations before cutting out my real fabric). The original pattern in the book had a waist that was much too small and a bust that was a little large relative to my measurements. Despite my changes, the first mockup was too short waisted, needed bigger and longer bust gores, smaller hip gores (I had overestimated how much ease I needed there), and a little bigger waist. The second mockup was still a little short (I added another ½” to the top), the hip gores were still just slightly too big, and the lacing gap between the back pieces was wider than I wanted it to be by about 3″. Ugh! I actually determined that last fact after cutting out and sewing up my actual fabric. Turns out my shoulder blade area is bigger than I thought. I had an inner struggle about if I wanted to take out the small stitch size flat felled seam to insert a piece or if I wanted to just let it go. Adding a piece won in the end, because I figured that I was spending so much time on the corset that I really wanted to be pleased with it and not have nagging doubts for the next number of years until making a replacement. (The piece I added is between the front and back pieces. You can see it easily in the first picture in this post. It’s a v shaped piece that extends from top to bottom.) Adding the piece actually wasn’t so bad, despite all my inner complaining and I’m very pleased I did it, because I am happy with the result.

2010EE8233_jpg_l
1864 corset, The Victoria and Albert Museum.

That’s all the aspects of choosing the pattern and executing it. Now I can move on to my inspiration for creating it. This blue corset at the V and A is the most thoroughly photographed piece of inspiration (click through, there are lots of different angles of the corset, and close up pictures!). As you can see, the blue corset has bust gores, that curved front piece, (and if you look at the pictures of the back…) hip gores, as well as useful close up construction photos showing the flossing, how the busk is sewn in, how the binding is sewn on, etc. You can also see great detail for things like how to sew the points of the bust darts and the tops of the hip gores: they are overcast near the tips of the bust gores and tops of the hip gores before being machine sewn with topstitching to the binding. I used this method in my corset, sewing the overcasting by hand. I found that it was very useful on the bust gores (since mine are set into a slit in the fabric, not a seam) because the amount of seam allowance near the points is negligible (like, less than ⅛”) and that would have been extremely frustrating to try and machine sew! Also, the overcasting kept the edges from fraying as I was working with them. It also adds an extra measure of stability and sturdiness to those areas.

CI38.23.10b
1839-1841 corset, The Met.

Other very useful images to me were this orange 1860s corset front and side views (with generally similar lines as the blue V and A one) and this 1862 Godey’s image of a corset (with very similar lines as the blue V and A one). (As a side note: Does anyone know what collection houses the orange corset? I’ve only been able to find images, but no real source.) These corsets provide a nice end date range for my corset pattern, because in the 1870s the corset begins to change shape. But to determine a good start date for my corset I had to look elsewhere. The Met has a corset dated 1839-1841 with similar hip gores and the front curved piece (great zoomable pictures including an interior view, click through the image!), but it does not have separate bust gores (they are cut in one with the front pieces as is usual for 1840s corsets) and it does not have a front opening busk (those weren’t in general use until 1849). The 1839-41 corset is more curvy than the 1860s ones, as you would expect from an 1840s corset, but it still looks like a forerunner to me! Waugh has an 1844 corset pattern (pg. 77) that has similar lines to the 1839-41 Met one, with bust gores but without hip gores or the curved front piece. These 1840s corsets are useful for determining the start point of my date range, which seems to safely be the 1850s. Thus, my corset is dated ca. 1860, which is just a shorter way of saying 1850-1870. That makes sense looking at the silhouette of the dresses from these decades, as well, since neither the 1850s or 1860s require the curvy shape of 1840s or 1870s corsets.

EDIT: The orange corset mentioned above is in the collection of the Manchester Art Gallery via this link.

I used all of these different images to look for construction details to use in my corset. Specific things I was looking for include: stitch size, width of the binding, method of sewing the binding, placement of bones, design of flossing, seam placement, method of setting bust and hip gores, location of topstitching, placement of eyelets down the back, finishing of the interior of the corset, and length of the busk. Some of these things can be determined by looking at the extant corsets I’ve shared in this post, but others required other helpful research. Specifically, the gusset construction method I used came from this image that Merja shared in her 1870s corset post. It’s from 1872, but is still relevant for my corset, because if you look at the blue and orange corset pictures you will see it used on the overcasting at the bust and hip gores. This image, from 1868, shows similar methods as well (and has a selection of mostly French and a few English style corsets if you’d like to see more examples of those).

And now, here are the close up construction details of my corset that I promised.

IMG_7452
An interior view of my corset. It’s important to me that the inside of garments is as nicely finished as the outside, as you can see. It’s a little hard to see, but the grommets near the waist are set closer together than the ones a the top and bottom.
IMG_7449
Details: Hand sewn overcast stitches at the bast of the bust gore and machine top stitching above that. Machine sewn button holes for the busk hooks (I’ve found this method to be much sturdier than leaving a gap in a seam on the edge).
IMG_7444
Details: The busk is top stitched around the top curve to keep it from moving. There is flossing at the top of the boning channels (every boning channel is flossed at the top and bottom). Machine sewn top stitched binding.
IMG_7454
Details: The top hook of my busk is a few inches below the top of the corset, so I added a hook and thread loop at the top to keep it closed. I used coutil cut on the straight of grain for my boning channels: the edges are pressed under and then they are topstitched into place and into the proper number of channels (keeps the inside tidy and doesn’t require extra notions!). The seam allowance of my bust gores is turned under and flat felled by hand with a whip stitch that only catches the coutil. The curved front piece is flat felled by machine.
IMG_7456
Years of use have caused my busk to have a bend in it at my waist line. See how it curves up from the table in the middle? Impressive, really, that my body can permanently change the shape of metal.

I’m hoping to get pictures of the corset on me this weekend at its first ever wearing. Hopefully I’ll be able to share those in the near future!

Ca. 1860 Corset For ME! (HSF #4)

Unfortunately, I’m a few days late completing my project for the HSF Challenge #4: Under It All. I tried really hard on this one and was definitely motivated to keep working consistently by the fact that I wanted to get it done for the HSF challenge. I was held up by a severe cold that took me out for about a week and other dealing with life things. So while I’m late, I’m super glad and excited to be done with this project (especially because the last two days have included a lot of flossing, and my fingers/hand muscles are so done with that for awhile)!

The last ca. 1860 corset I built for myself was made in 2006 or 2007 (you can see it in this post). It’s been worn more times than I can count and has stood up to the test of time and tension well, especially considering it was the first corset I ever made! But the time has come for a new corset for this period–one that is made to fit me using all the skills in pattern making and construction that I’ve gained over the last 7 or 8 years.

I realized while working on this corset that aside from building my first corset to fit me in 2006 or 2007, the only other stays or corsets I wear with my historic clothes that were made to fit me are my 18th century stays, my short Regency stays, and my c. 1825 long stays. I wear other corsets from 1895 (hm, I don’t think there are pictures of this on the blog), 1903, and 1913 but none of them were constructed to fit me (though I did construct them beautifully!). I’ve made them work and they sort of fit me, but all of them have problems because they were made to fit other people: a busk that’s too long, being a little small, especially in the hips, or being too big and needing a tuck. So it occurred to me that I should probably invest in making a few more corsets made to my measurements for the Victorian and Edwardian periods. Sounds obvious, but it was a revelation to me when I sat down and thought about it!

So that’s what this project is: a ca. 1860 corset made to fit me!

IMG_7441
Hard to see the details in this picture, I know. There will be detail shots and lots of commentary in an upcoming post!

I have lots of other thoughts and inspiration to share with regard to this project, but I expect it to be lengthy, so I’ll be writing it up in a separate post. Plus, I want to post about my completion of the challenge as soon as possible. So for now, the very much condensed details.

Fabric: 1/2 yd ish of white herringbone cotton coutil and ½ yds ish of slightly slubby pale pink silk satin.

Pattern: Created by me, though I began with a corset pattern in Norah Waugh’s Corsets and Crinolines and made lots of changes to it.

Year: c. 1860.

Notions: Metal boning, metal grommets, a recycled metal busk from my old ca. 1860 corset, regular weight ivory thread, and heavy weight ivory thread for flossing.

How historically accurate?: Pretty darn accurate, I’d say. I wanted to create a corset using the seam lines found in extant garments, but which don’t seem to be much recreated. I used construction methods that are accurate as far as I know. Let’s say 90% because you can’t ever quite make it to 100% if it’s modern, can you?

Hours to complete: A lot. I didn’t keep track, but I’ve been working on this for  at least 2 or 3 weeks, and some of those days have been a full day’s work on the corset, not just evenings.

First worn: Has not been worn yet, but will be worn to a ball in March.

Total cost: Free (all stash materials)!