Returning Heroes Ball 2017

A few months ago, I had the privilege of being present once again at the Commonwealth Vintage Dancers’ annual Returning Heroes Ball. It was a lovely evening full of dancing, admiring the well turned out ladies and gentleman, chatting…and lots of dish washing (that’s what happens behind the scenes at these things–someone has to do all of the dishes.)

Here are two very similar views of the ballroom. I thought I’d include both because you see different dresses in each one and that’s one of the things that I greatly enjoy about attending historical events!

I didn’t spend all my time watching, however. Here I am participating in a quadrille. I wore my most recently constructed mid-19th century dress, Eleanor. I was grateful that the only change I needed to make after the first wearing was shortening the hem one turn so I didn’t step on it while dancing.

I made my refreshing apron a few years ago, but since then others have joined me in my apron endeavors (they really are quite practical when doing dishes, filling punch bowls, and setting out refreshments!). Aprons in a row!

1814 Orange Boven Pelisse

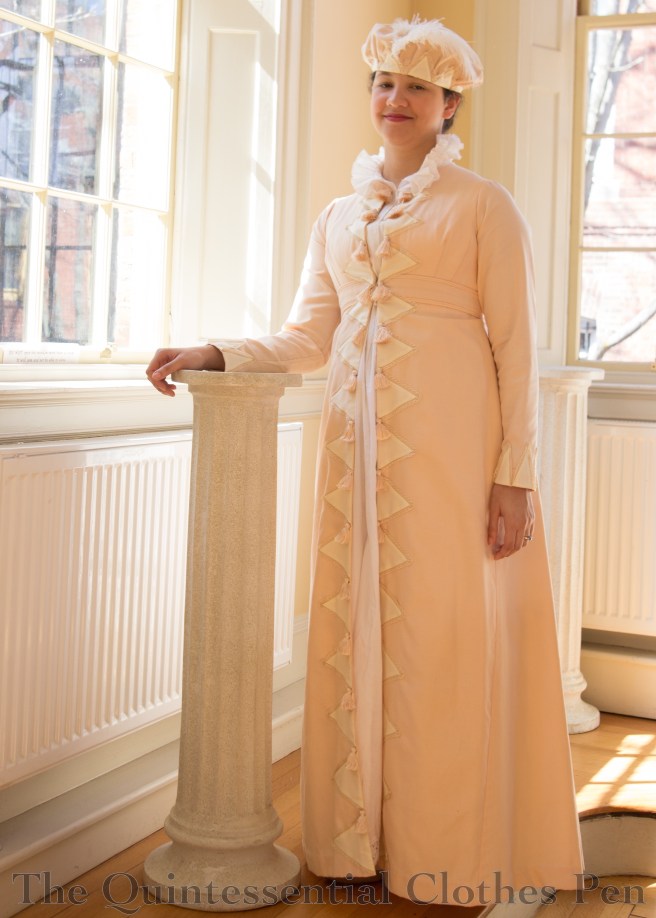
At least three years ago I was inspired by a fashion plate, as one often is, and started working on a Regency pelisse following the design in the image. I got really far along, finishing the construction and even part of the trimming, but then stalled and let the ensemble languish for years before determining to pick it up and finish it off this year or else! I’m excited to have finally reached a ‘done’ point in this project so I can remove it from the UFO list!

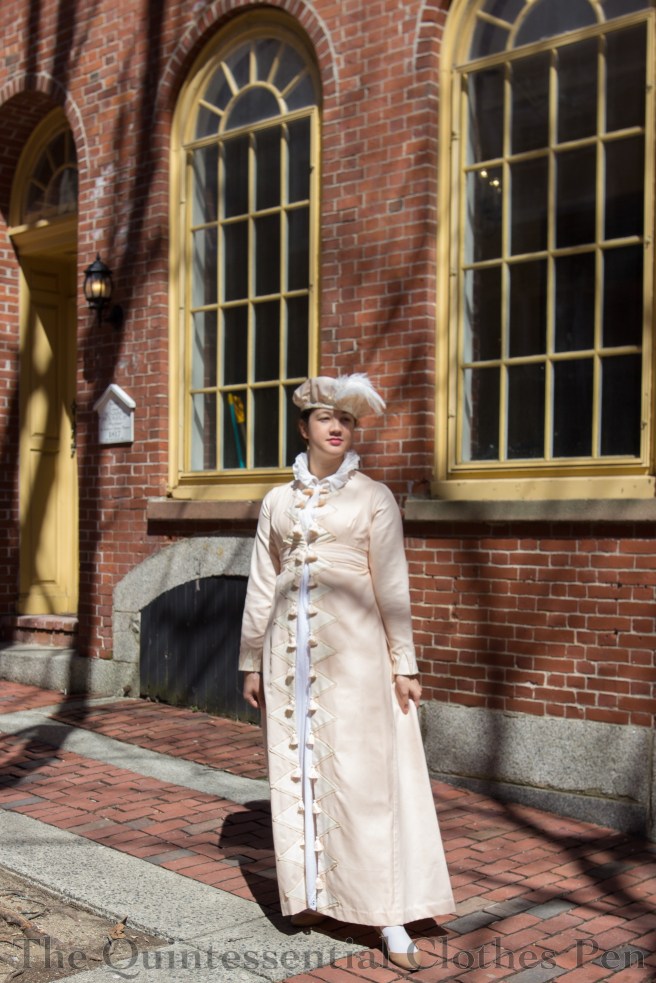
The pelisse (and hat) are directly inspired by the following fashion plate, which can be seen here with slightly different coloring and here in black and white. In the first of those two links, the garment is labeled as a dinner dress, but I thought the design would make excellent pelisse trimming and so I adapted it.

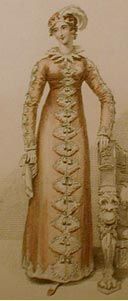
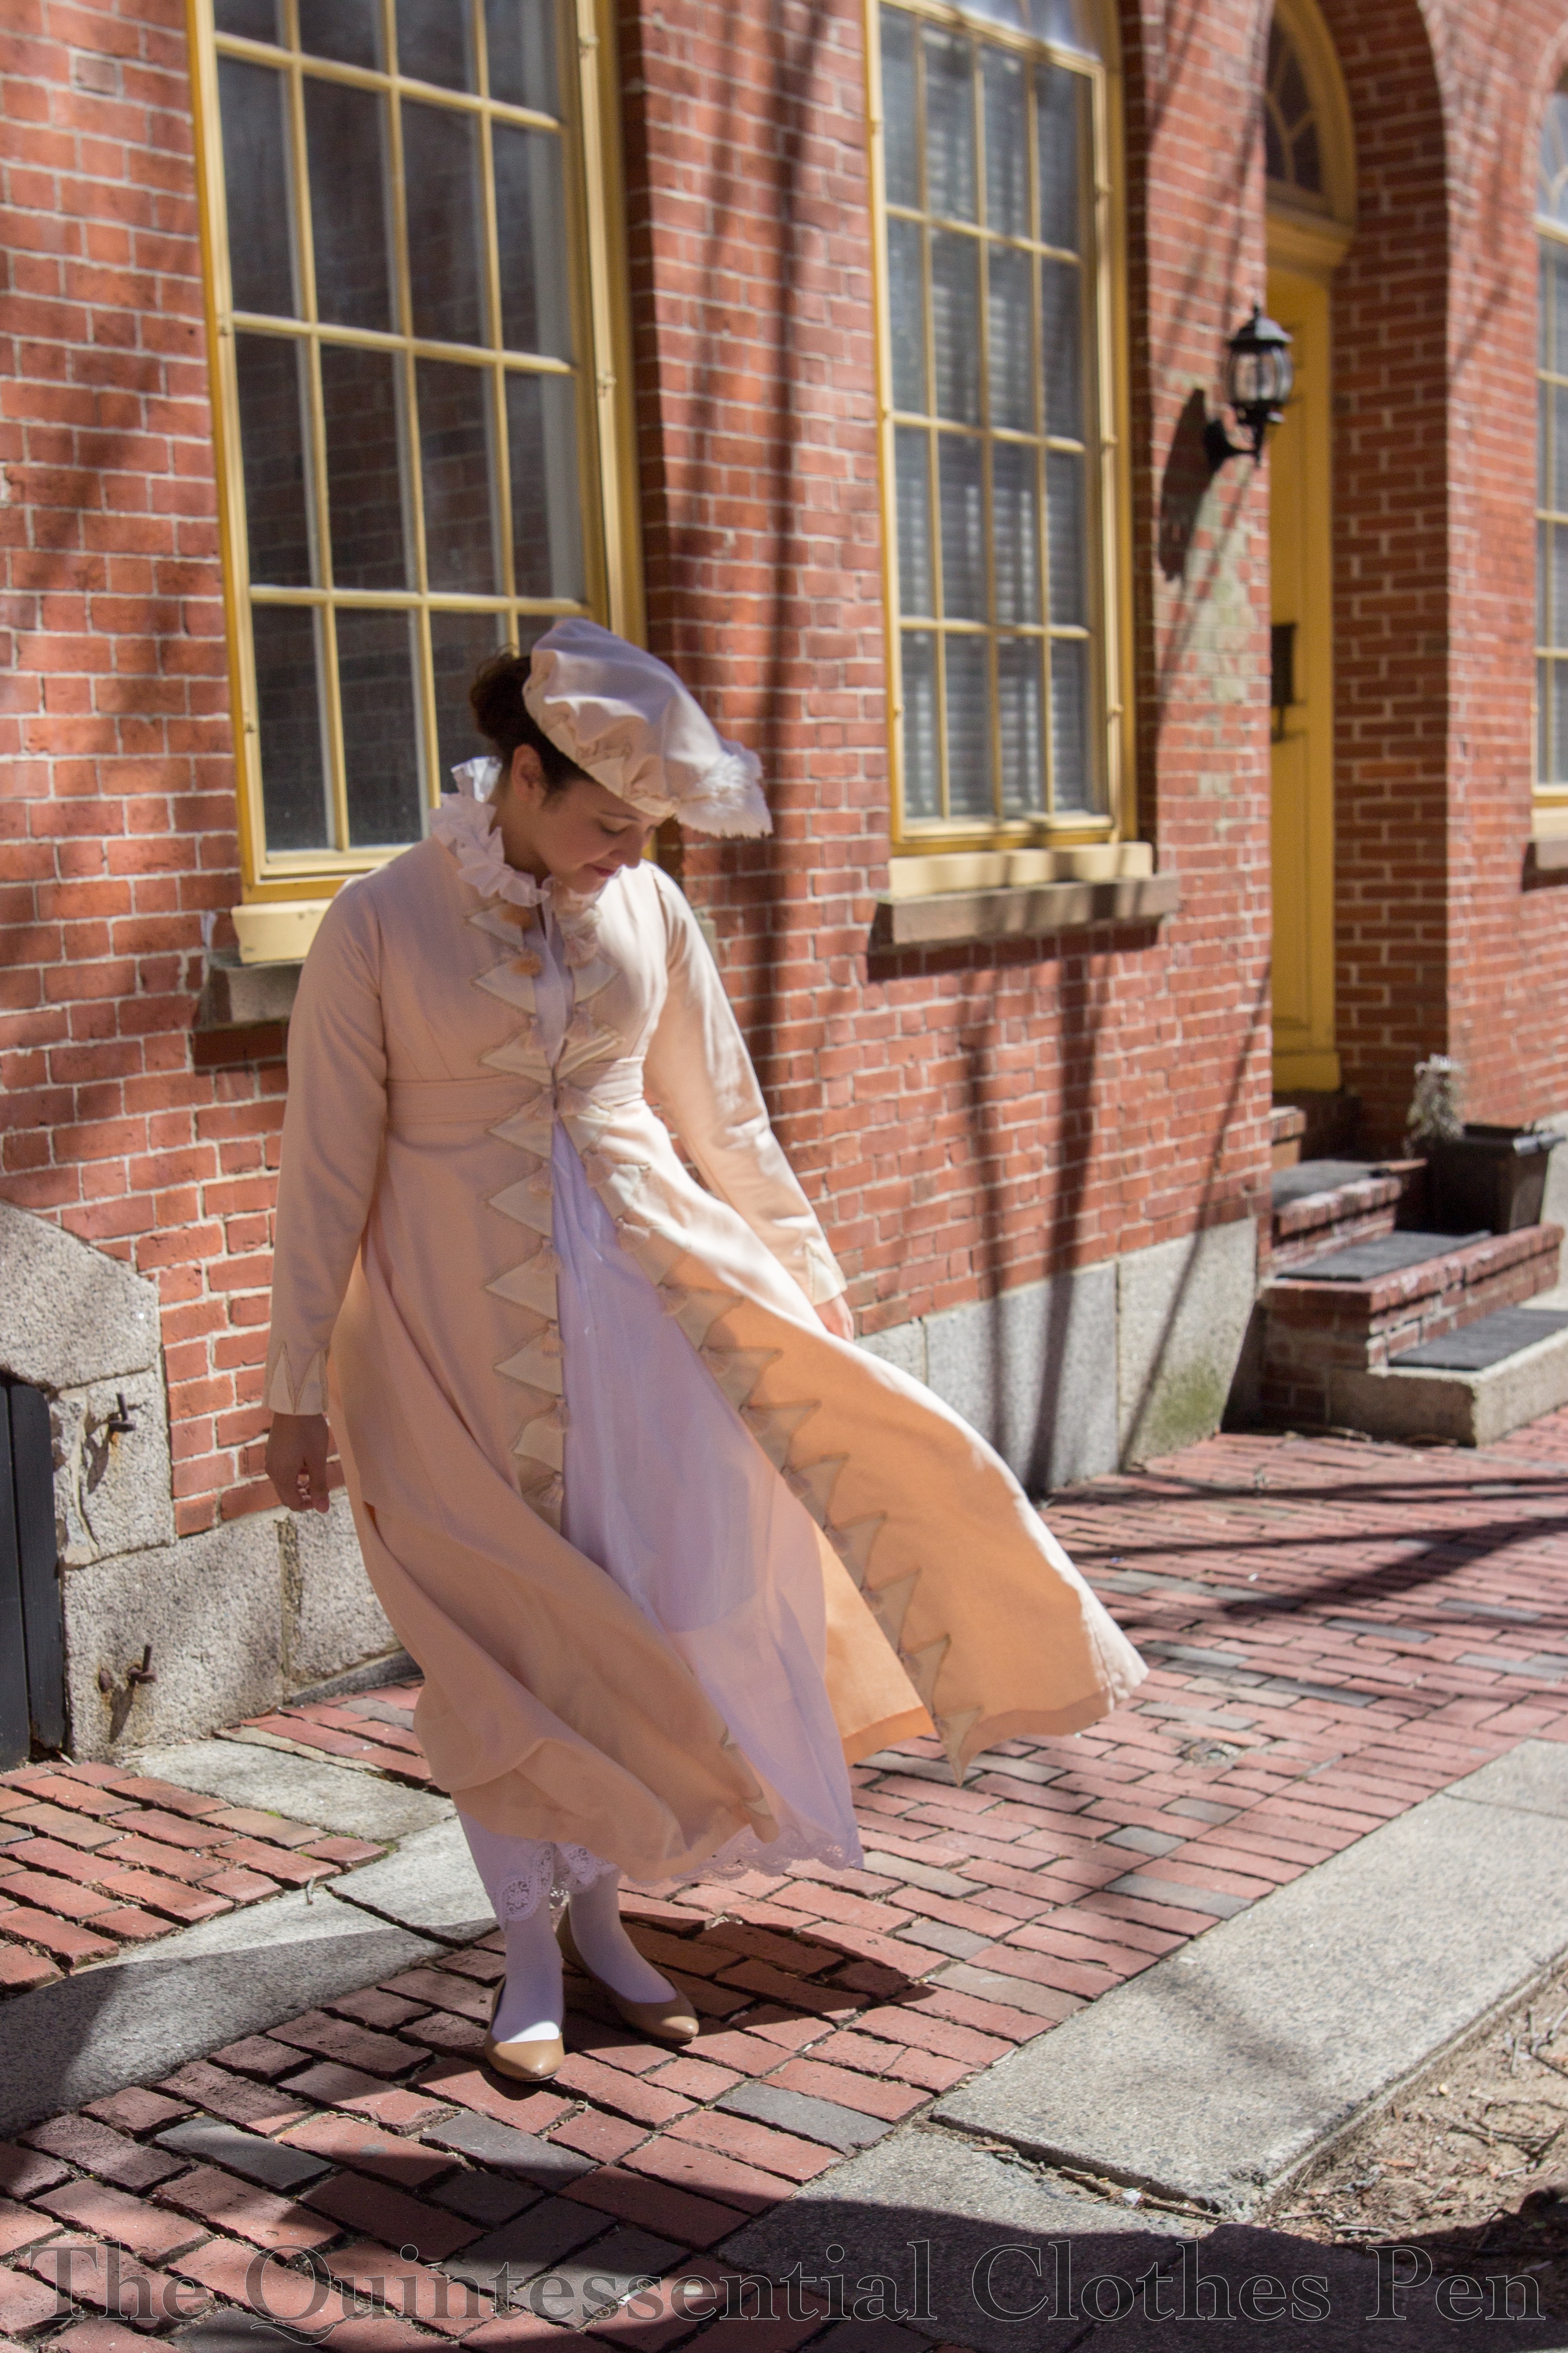
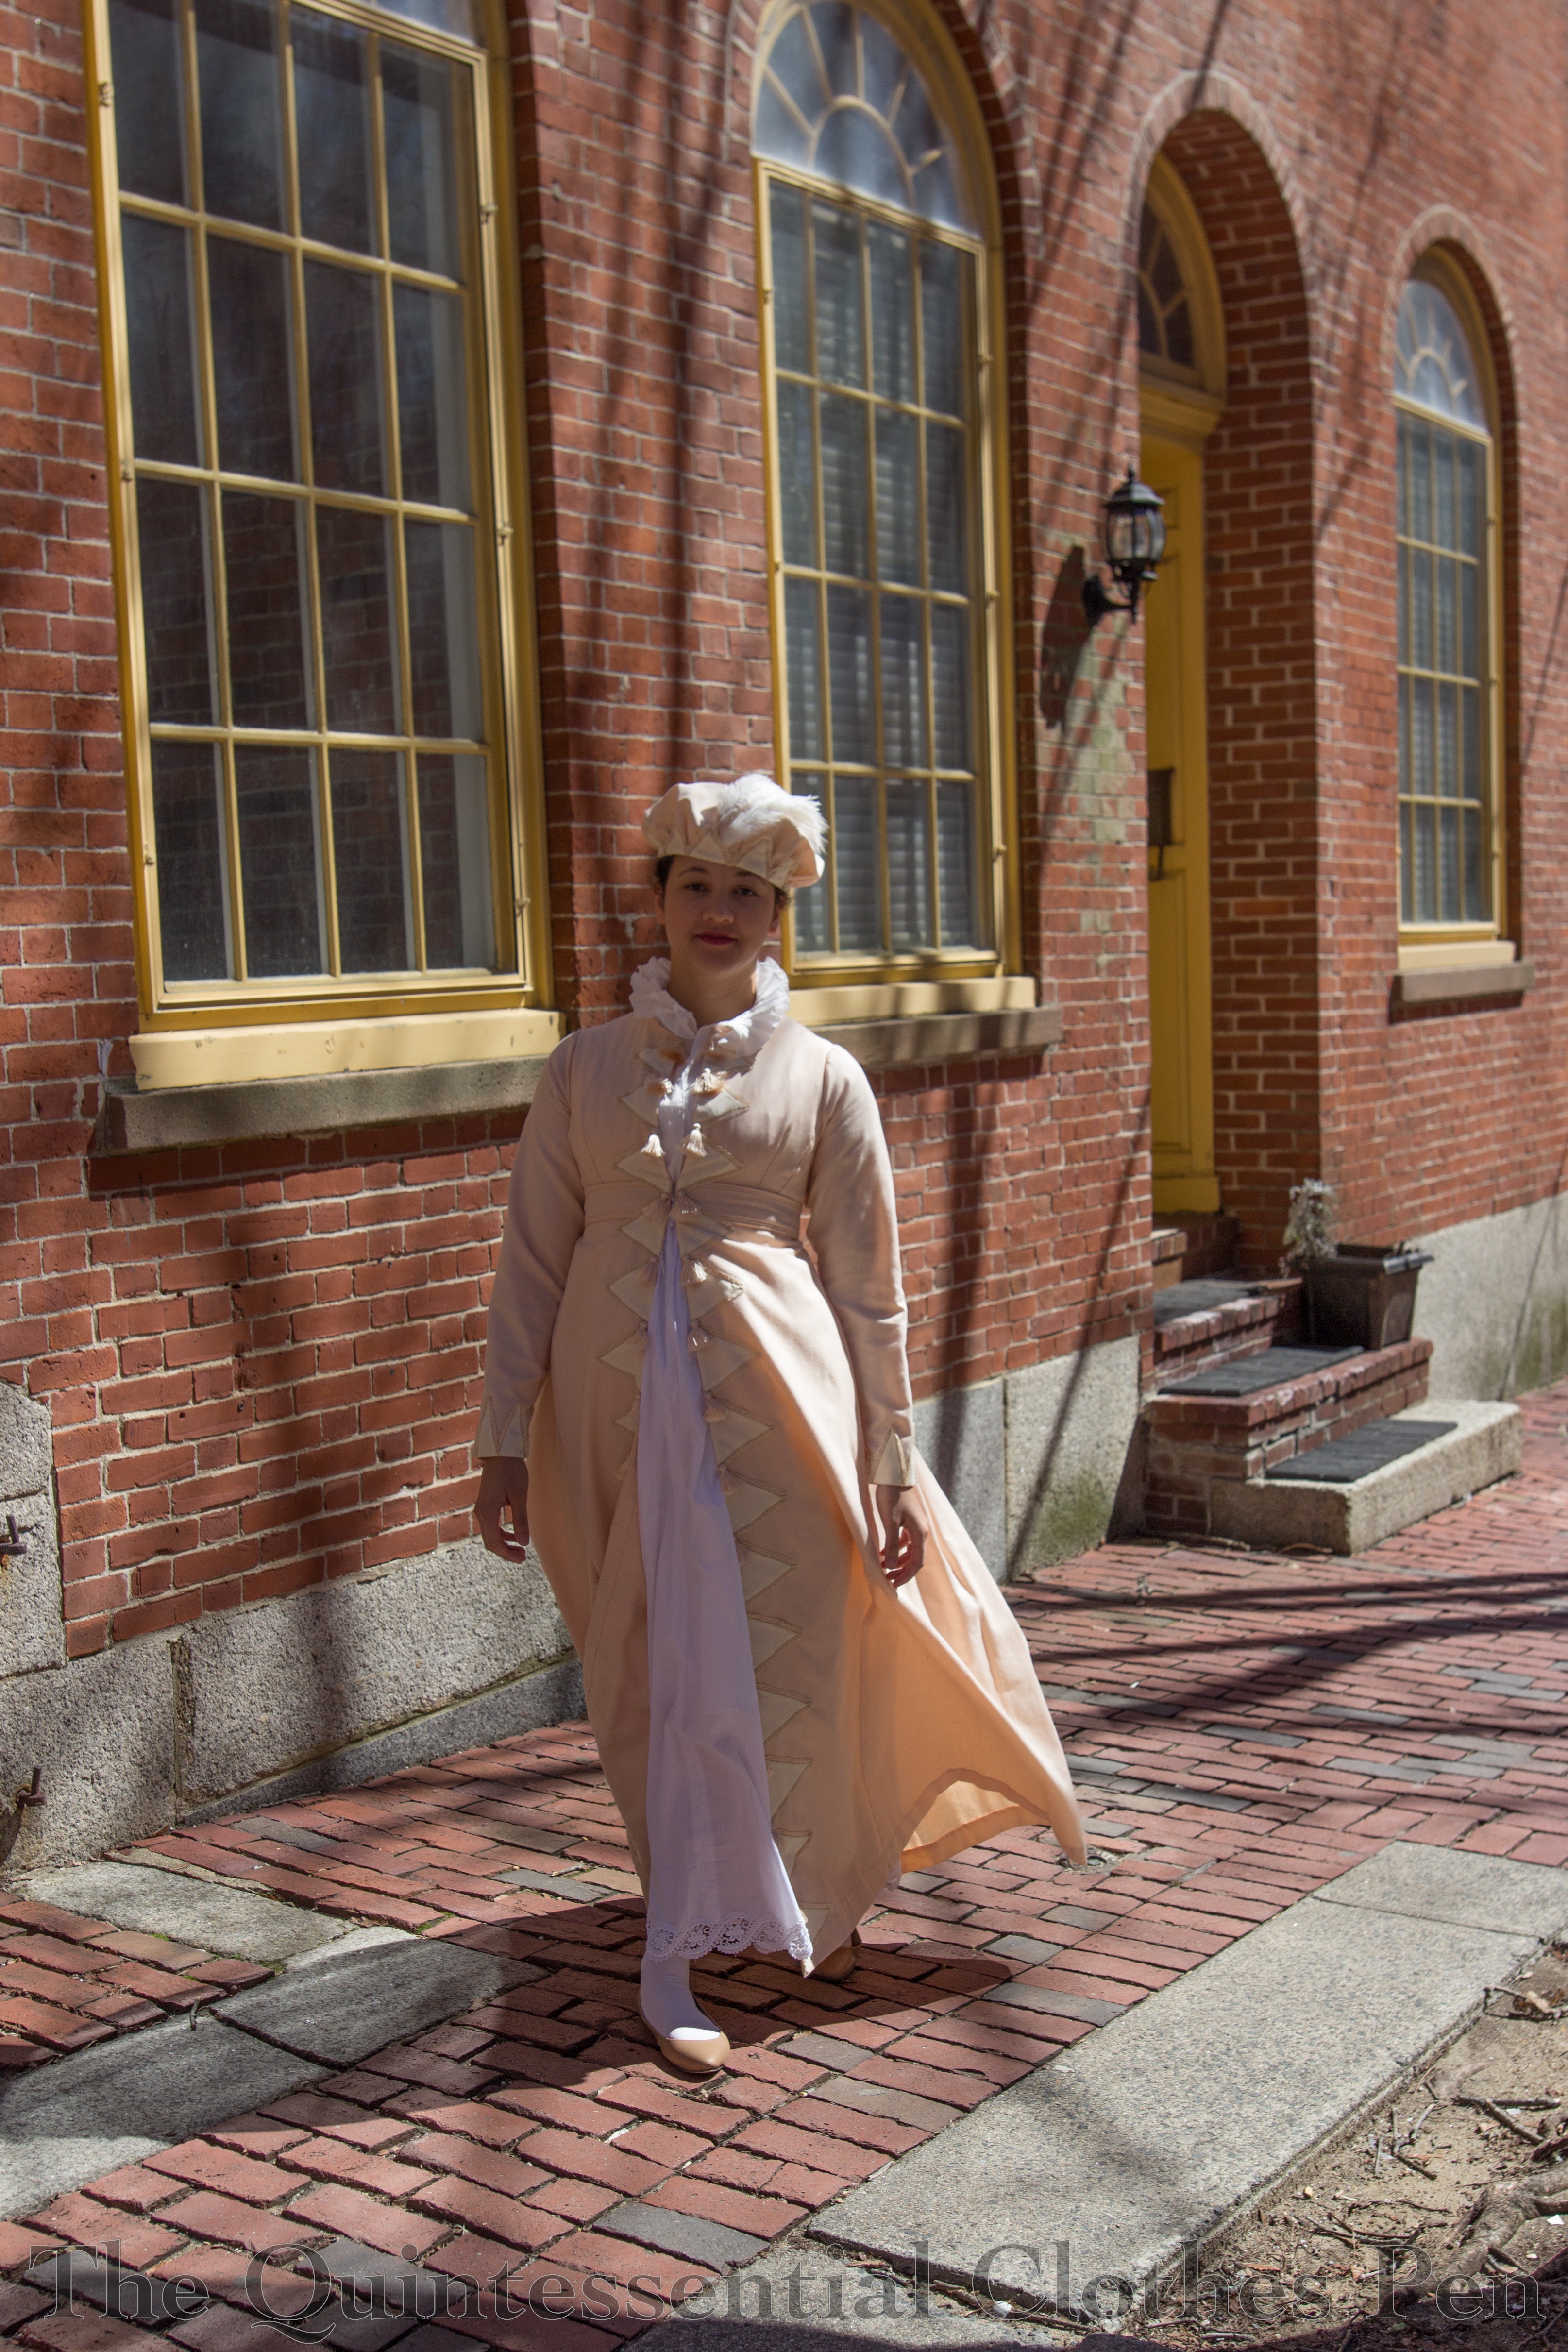
You’ll notice, perhaps, that the finished pelisse does not have as much trim on it as the inspiration image. Early in this project, before it languished, I cut out all of the appliqués for the neck, sleeves, and hem as well as the front edges. I pressed under a 1/4″ on each side of each piece, too. And then, as I was finishing all that triangle trim on the front earlier this year, two things happened:

#1- I lost steam and really just needed to be done with this project.

#2- I decided I liked the simplicity of the pelisse without the extra trim. It’s so easy to draw lots of details, but then in a real garment the details don’t always translate. For example, the triangles around the neck just looked bad and awkward (plus, I wonder if that is a chemisette collar and not trim on the dress itself?) and the sleeves just looked too crowded. I was also afraid that putting all that work into triangles around the hem would just get dirty and not be a good use of many more yards of the vintage lace I used to edge the triangles.

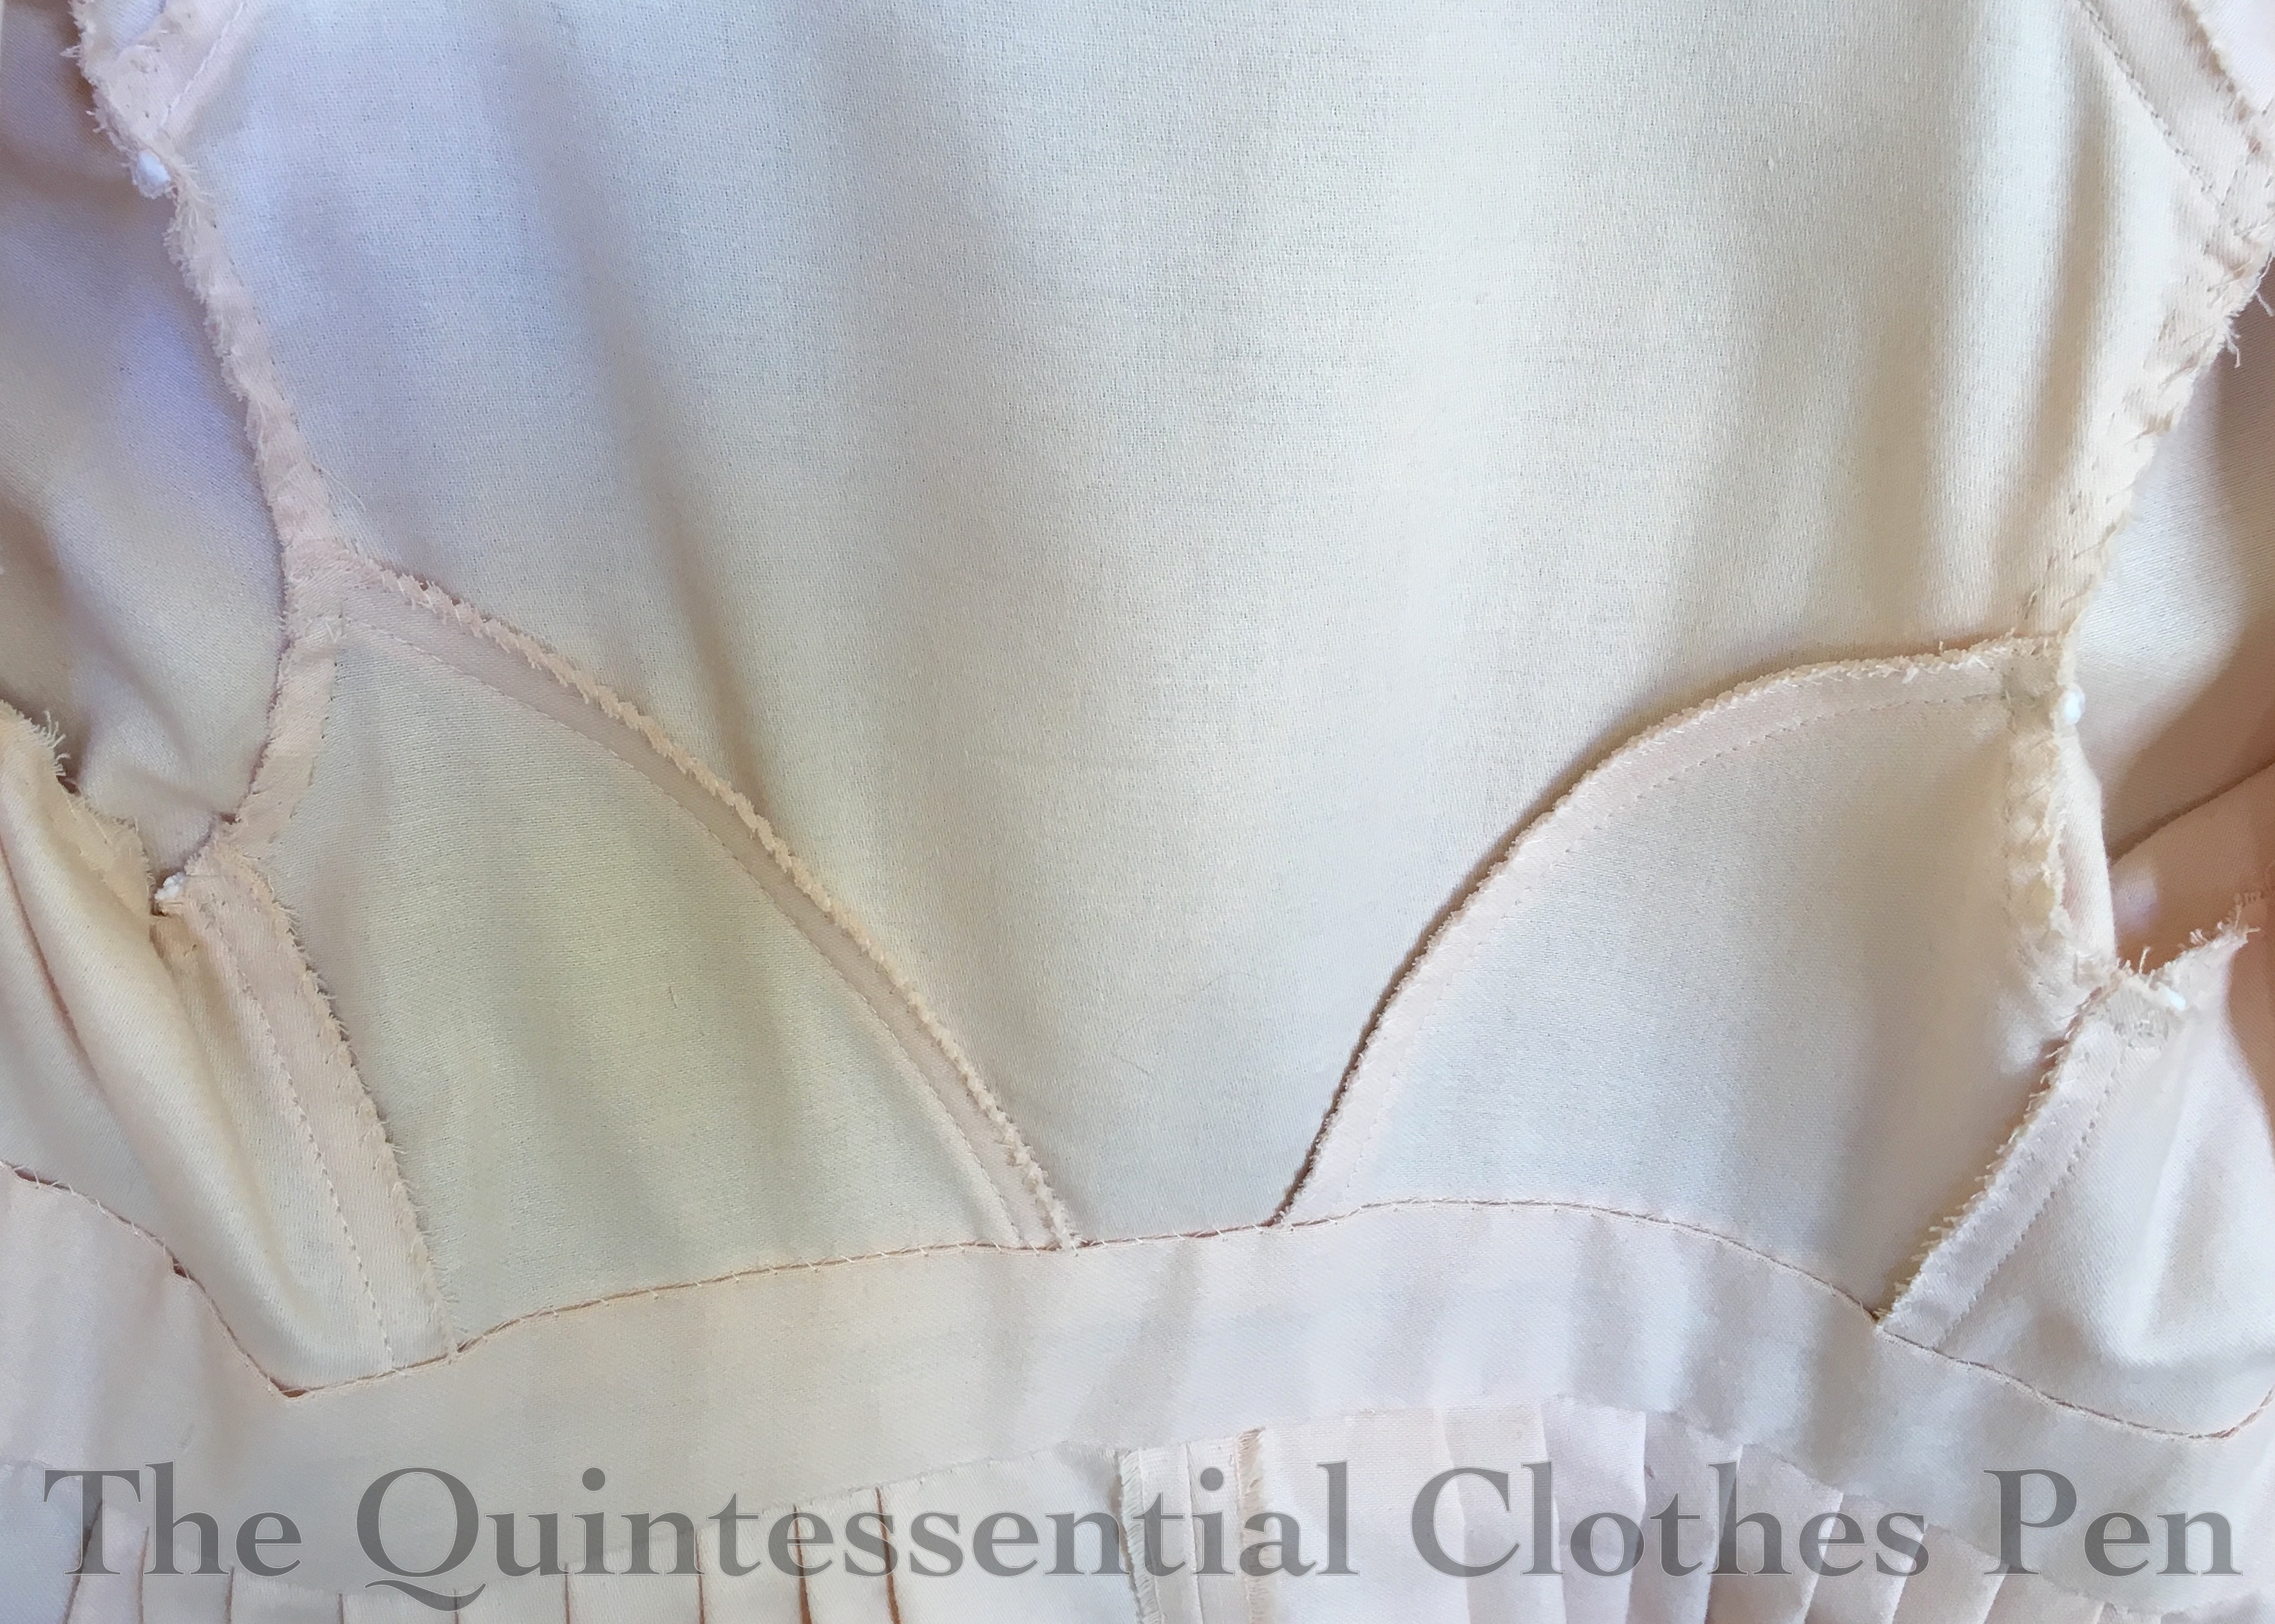
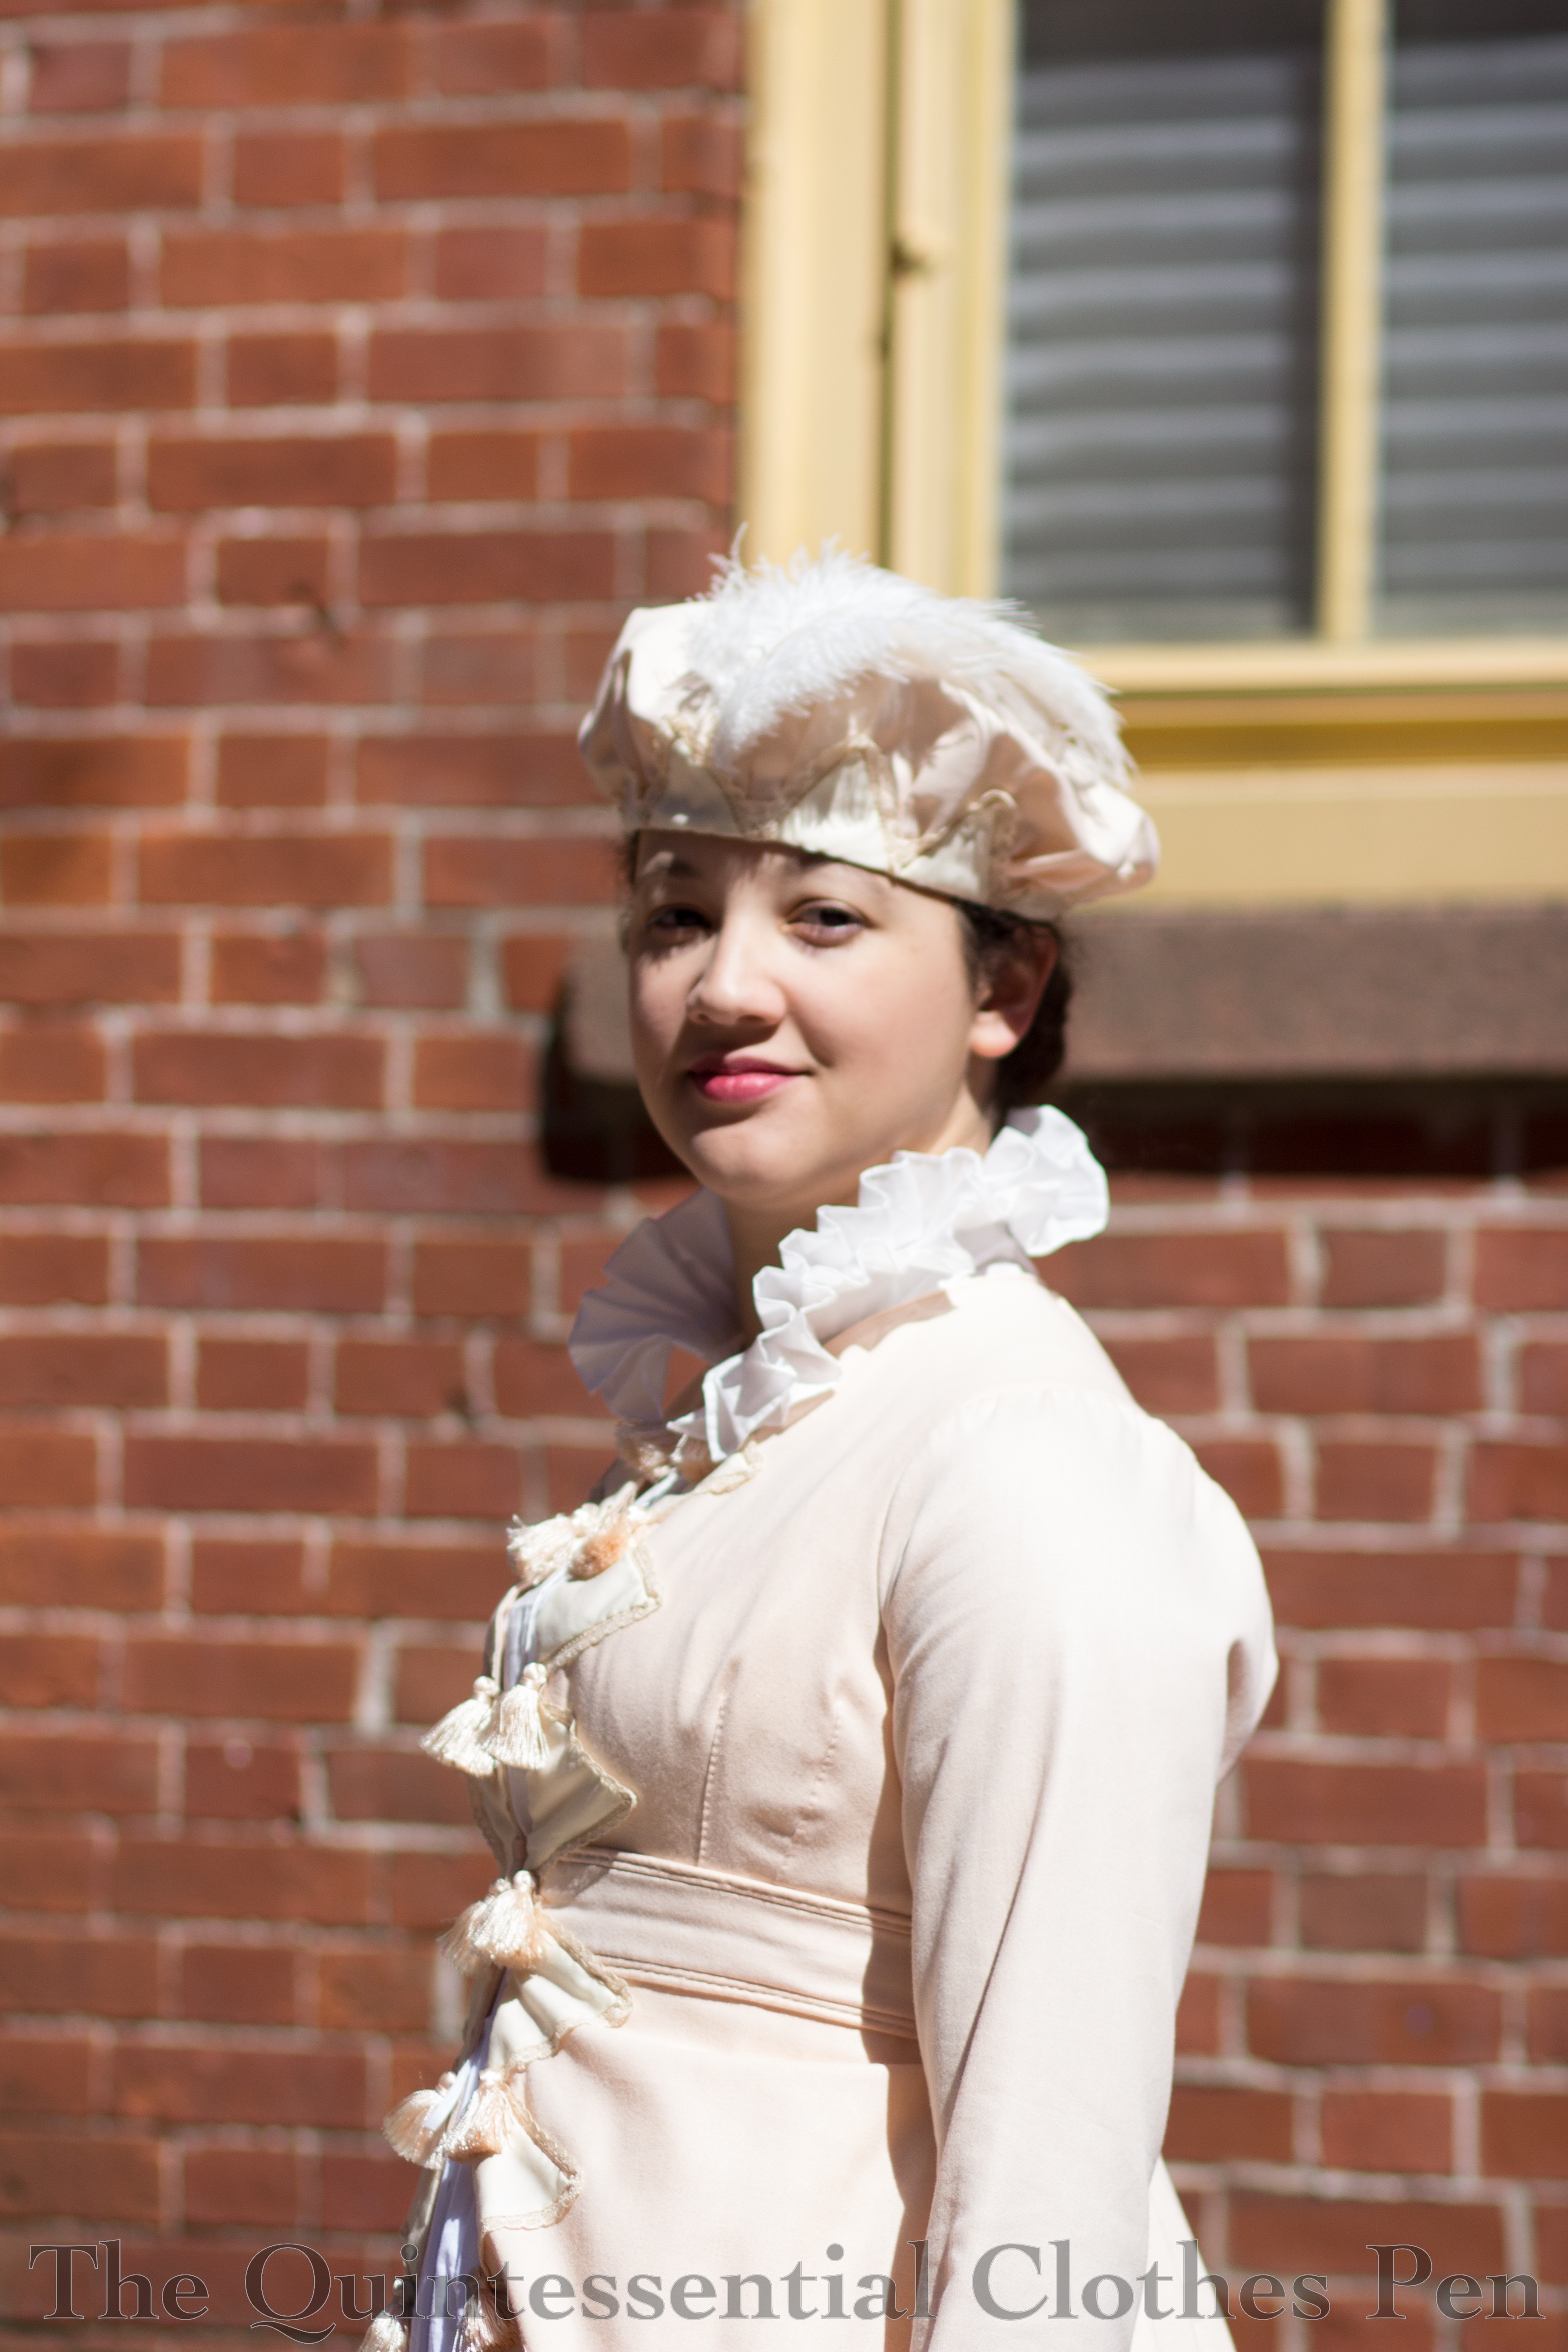
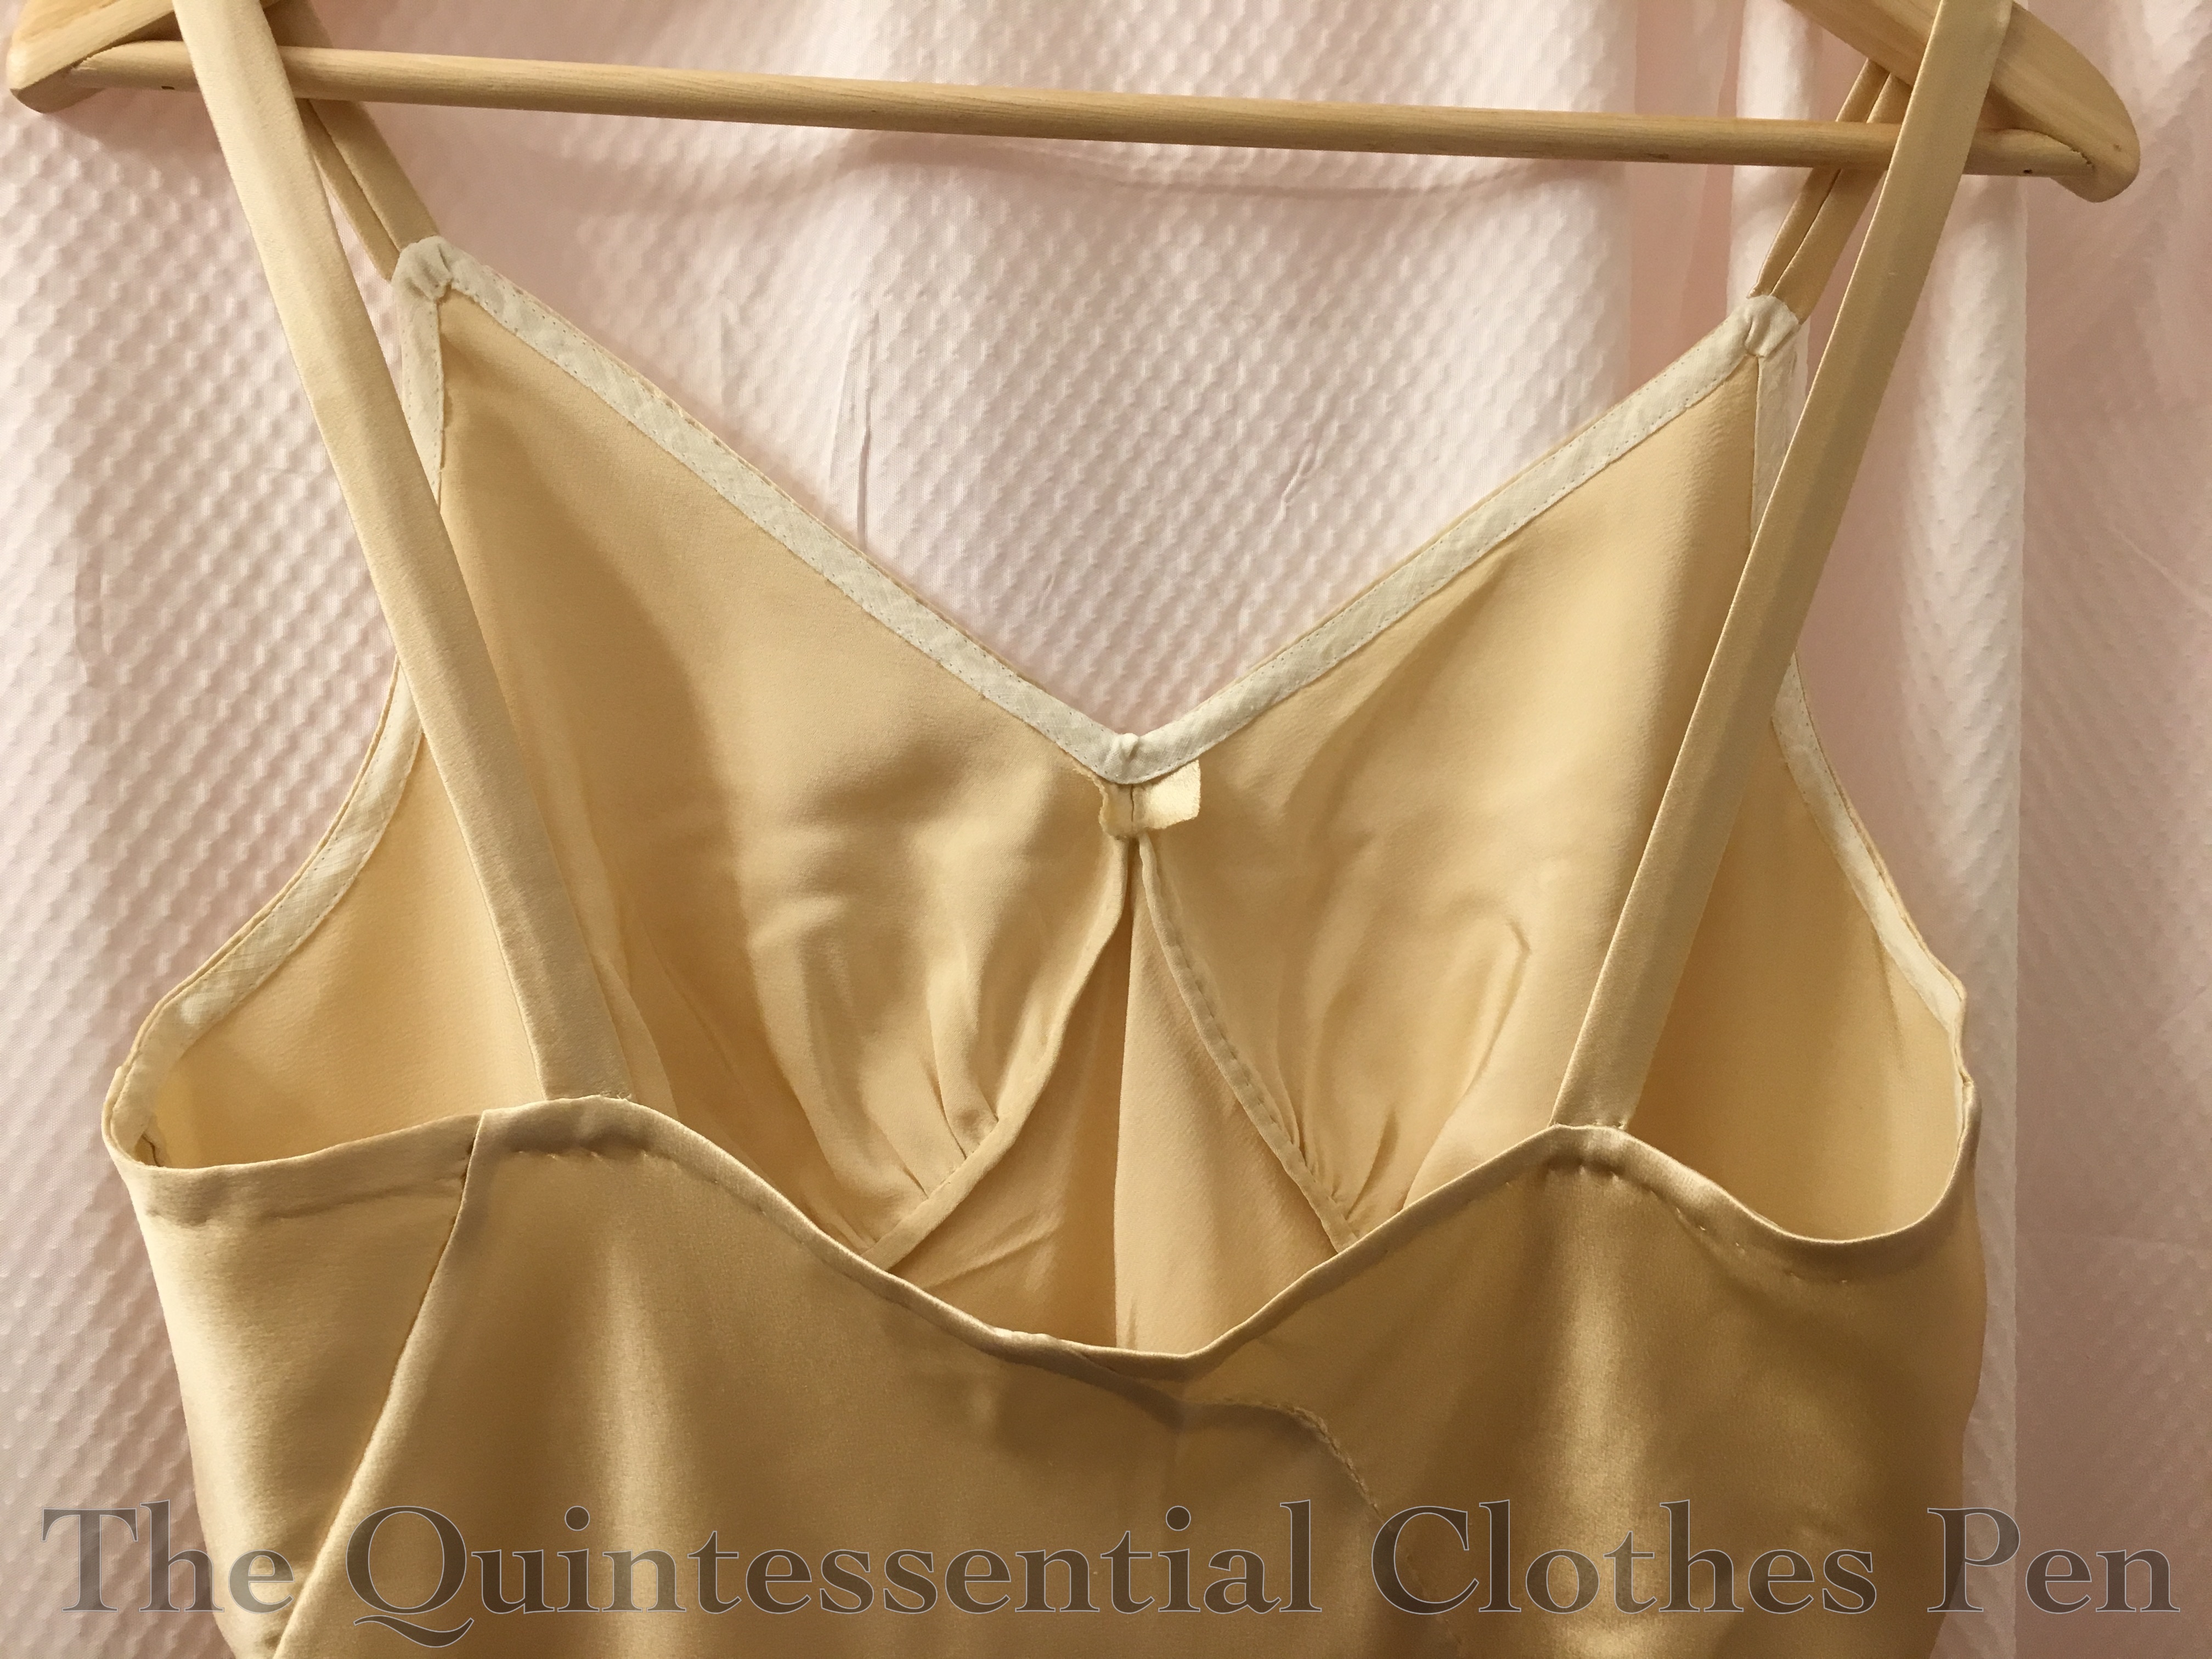
In fact, despite the somewhat-simplified trim, there are actually a lot of details in the construction of the pelisse. Each back seam is piped and the belt has double piping above and below it. The neck is bound with piping, which is sewn with small, invisible stitches around the neck to hold the seam allowance to the inside. Also, the skirt is knife pleated into the back, allowing for a nice silhouette from all sides.

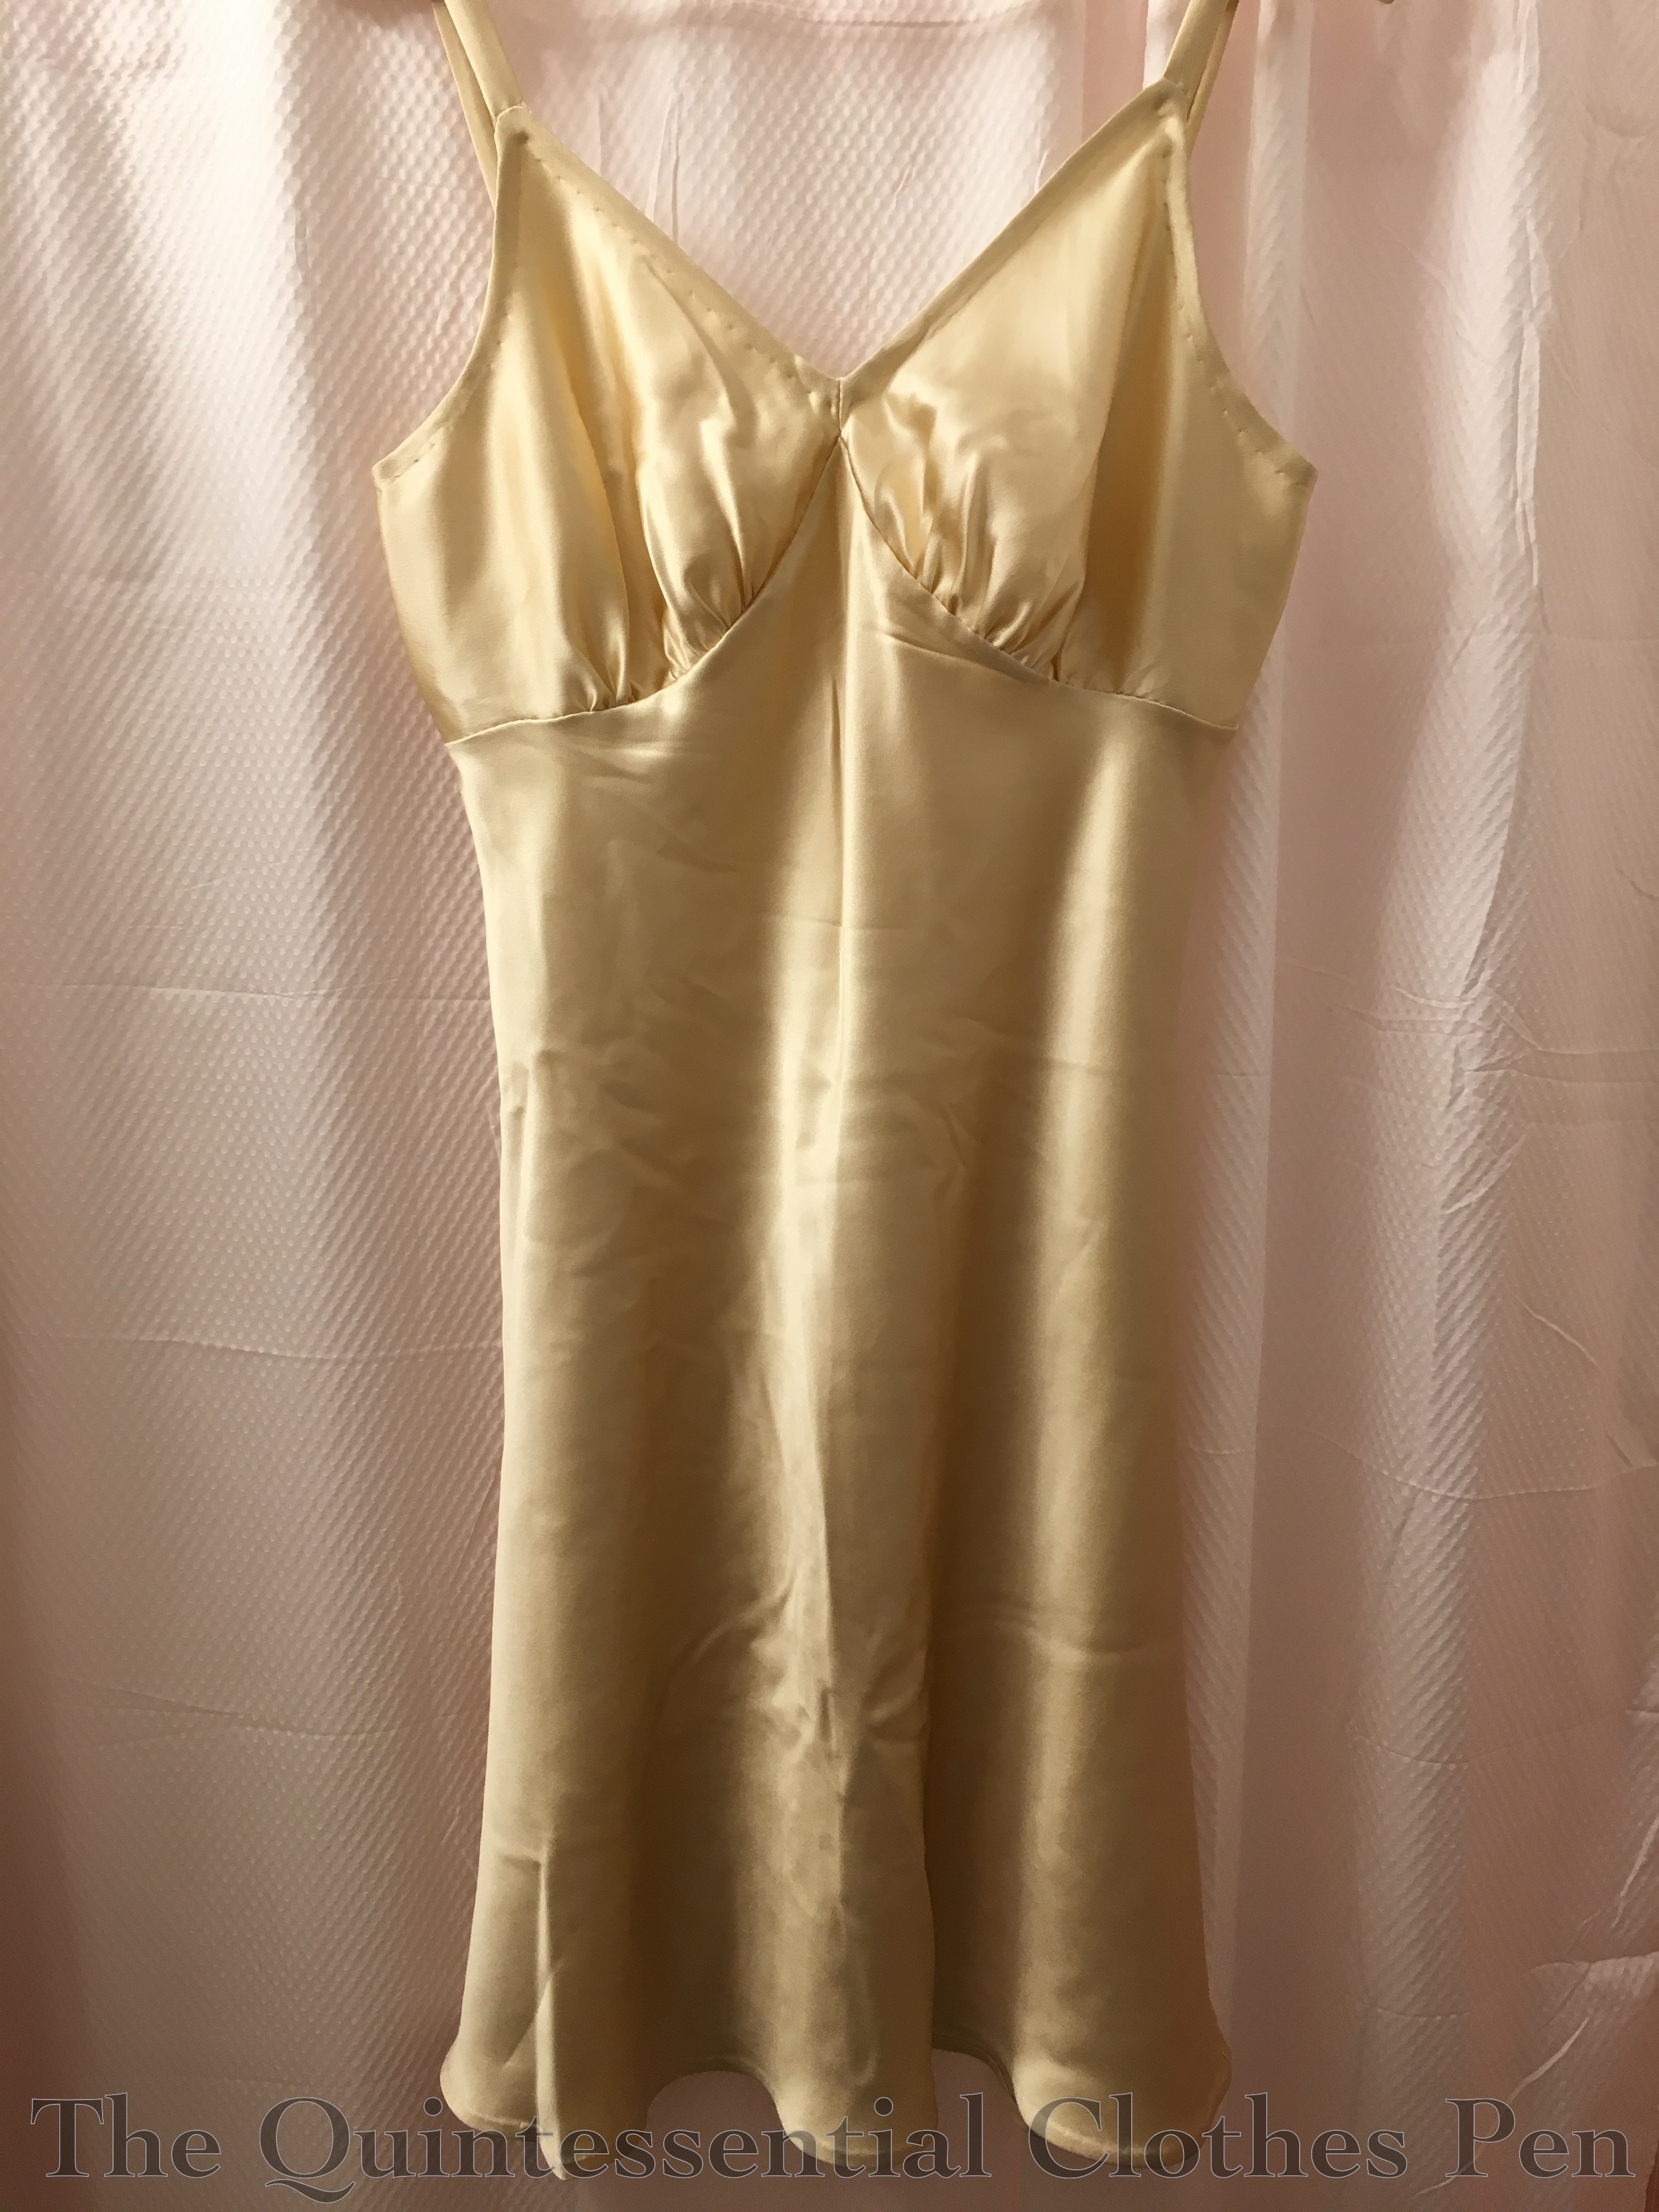
The pelisse is made entirely from peach colored cotton. It is unlined, except on the belt, where it is lined in order to hide the raw edges. The other seam allowances are whip stitched to keep them tidy. Here is an inside view of the bodice section. I do like my insides to be tidy!

The trim fabric is a cream colored poly/cotton blend. Each triangle is edged in very light tan vintage lace. Then, to top it all off, there are peach tassels on each triangle down the front as well. The peach tassels were removed from a length of upholstery trim that happened to be a perfect color match!

The pelisse is machine sewn on the interior seams and hand finished, including the hem, neckline, seam allowances, and all that trim. The darts are also sewn by hand with a small running stitch, a detail I picked up from looking at extant pelisses, though of course it’s been so many years now that I can’t find a specific example. I like how the top stitched darts at a little extra interest.

The pattern for this pelisse is of my own design. I’m pretty sure it was based on my 1819 spencer, but adapted slightly for a different fit. It’s hard to remember since it’s been so many years since I made the pattern! The skirt is a large rectangle–two panels of fabric seamed at center back.

I’m wearing the pelisse with the following garments: a chemise and my short stays, my Vernet petticoat , my recently finished chemisette, and the hat that matches the whole ensemble. I’m excited to have found a use for the Vernet petticoat that shows off the trim at the hem! I did take out the tucks that made it the right length for my Witzchoura so that it would be the right length for the pelisse, but that’s what tucks are for, right? On picture day there was a nice breeze blowing everything around and showing off all the layers nicely.

I was lucky to take these photos in and around some of the Regency period buildings in Salem, MA. You can’t beat buildings from the right period for a suitable backdrop for a garment like this!

Now I have my first pelisse. More outings will hopefully arise in the future so I can wear it again. I’m so glad I’ve decided it’s finished and that it was a comfortable garment to wear, though I maintain that the hat is a bit silly.


Orange Boven Hat, 1814 (HSM#4)

I am pleased to report that I made a garment which qualifies for the HSM challenge #4: Circles, Squares, and Rectangles! I wasn’t sure I had anything on the sewing list that would do, but then I remembered years ago when I started this hat and it was only two pieces, a circle for the crown and a rectangle for the binding. Perfect! (I’m not counting the triangular trim. That’s just the trimming!)

As you might guess from the photo, this hat is part of a matching ensemble: a pelisse and hat from 1814. I’ve got lots of details planned regarding the inspiration for this ensemble as well as more pictures of the finished outfit, but for now this teaser will have to suffice. It gives context to the rather silly hat.

Just the facts:

Fabric: Pale peach cotton and cream (likely) poly/cotton blend.

Pattern: My own based on my head measurements.

Year: 1814.

Notions: Thread, two ostrich feathers, and about 1 yard of vintage lace.

How historically accurate is it?: I’m going to go with 95% on this one. It’s entirely recognizable in its own time and made in a way that is straightforward and consistent with historic garments. The materials are not 100% accurate.

Hours to complete: If I’m only counting the hat, about 3 or 4, since it is entirely hand sewn.

First worn: April 9 for a Regency tea.

Total cost: About $8 for the hat without the pelisse.

1920s Island Escapade In Black And White

Here are a few more photos from my 1920s island weekend last August. These first few were taken with the same modern camera as all the photos in my previous post about the weekend.

This last photo shows other photographs taken with a friend’s vintage film camera. I don’t think the camera is as old as the 1920s, but I think it’s a least from the mid-20th century. Though I do remember the days of film cameras, I’m so used to digital cameras these days that a film camera is quite the novelty.

A 1920s Island Escapade

I’m terribly delayed in writing about a lovely event I attended last summer… Gatsby On The Isles was a 1920s weekend getaway to a coastal island, including a ferry ride, picnic, clambering on the rocks and in the water, lawn games, dancing, card games, and napping in rocking chairs on the large porch of the grand hotel. A fabulous live jazz band played great music throughout the weekend. It was very much like having a soundtrack to my own personal movie!

It was quite hot last August, so the strong breeze on the ferry and some parts of the island was quite welcome, as was wading and hiding under my parasol. (Had I not had a sturdy grip, my parasol would surely have been blown away during these pictures.)

I wore my 1930s beach ensemble for travel to the island and the afternoon picnic. I am always pleased with how the (polyester, ahem) pants don’t wrinkle, even with heat and sweat and sitting, and how gloriously cool and comfortable I am while wearing it.

Partway through the afternoon I changed into my 1925 bathing suit in order to go wading. Again, a very comfortable and fun item of clothing! I can now report that wearing a wool bathing suit in the heat is no different than wearing a modern suit. I certainly wasn’t any warmer than I would have been in a more modern style.

Getting to the water at this part of the island required some clambering over rocks, but also made a great backdrop for pictures!

Dinner was a casual affair, for which I changed into my 1926 sailor dress. An unplanned wardrobe similarity required picture documentation.

For the evening dance, I changed into my 1924 Golden Robe de Style. The parlor of the hotel had some fabulous couches that called for lounging and sultry faces. Despite being hot, it was fun to dance the night away to wonderful music, with breaks to sit out on the porch with a 1920s cocktail.

The next day was low-key. I explored the island, played cribbage, and took an unexpected nap in a rocking chair on the porch. I decided to be slightly old fashioned and wore my 1919 Ivory Eyelet Dress, another comfortable summer ensemble, with my 1920s Sinamay Hat.

I tried a forward thinking 1930s inspired hairstyle for the weekend. I did it early Saturday morning before hitting the road and then wore it all weekend without a change. It went from day to evening with no problem and stayed in place through wind, hats, and sleeping. (This is the same hairstyle I hinted about in the post about my 1927 Blush Sparkle Dress.)

In order to keep the frizz down, I did my hair while it was still wet, using Tigi Small Talk as setting lotion to help the waves and curls stay in place. The front and crown were shaped with wave clips while the rest of my hair was massed lower on my head in tight curls. There were TONS of bobby pins hidden in there and it was very secure. I was very pleased with the security of the style and with how well it lasted without frizzing!

It was a very fun escape to the past and I’m so pleased to have great pictures to document it all. What a different scene and temperature than these last four or five months of winter!

A Chemisette (HSM #3)

I’ve wanted a Regency chemisette to complete my daytime looks since 2012, even going so far as to purchase a specific tool with the intent on using it for a chemisette ruffle. (Unfortunately, my cast iron crinkle cutter has been a very useful doorstop for the last few years but hasn’t been used at all for its actual purpose! To be fair, it still hasn’t been used for its actual purpose, but at least I know now that I have a chemisette pattern that fits, which makes me more likely to try it out for a more finely pleated collar version in the future.)

I’m so happy with this chemisette! I had sized up a chemisette pattern from Janet Arnold years ago, but it didn’t fit me as is, so for this I used the pattern for a pelisse I’m working on as a starting point for fit and the Janet Arnold pattern as a reference for grain lines and overall shape.

The fabric is ‘silky cotton voile’ from Dharma Trading. I used it for Annabelle, one of my mid-19th century dresses and had the perfect long straight scraps left for cutting out a chemisette! The weight of the fabric is lovely and so comfortable to wear and it’s nice and sheer just like a chemisette should be. Plus, it behaved so well, finger pressing as I did the seams and the pleats on the two collar layers.

I decided to add this garment to the list of Regency things I’m trying to get together for an event in April rather at the last minute. I was going on vacation with a very long travel time ahead of me and decided that having a hand sewing project would suit me very well. I found the time to cut the pieces and then hand sewed most of it while I was away, using nail clippers as my scissors. (I didn’t want to get in an argument with TSA about how the length of the blade on my thread snipping scissors actually is within their regulations.)

The chemisette uses a combination of running, whip, and slip stitches for the seams and narrow hems. It ties below the bust using a 1/4″ cotton twill tape. I thought of putting a closure at the neck, but decided against it as there are images of chemisettes being worn open at the neck (like this) and I really like that look on me rather than the head-on-a-platter look of it closed (see a mix of styles including that here). If I had closures but decided to wear the chemisette open at the neck you would see them and I don’t love that idea.

March’s HSM challenge is The Great Outdoors and I’m calling this chemisette a fit for the challenge, as I intend to wear it with a pelisse for an outdoor promenade. Plus, chemisettes are useful for protecting the skin from the sun (which of course you are so much more likely to be exposed to while outdoors!).

So, here are just the facts.

Fabric: Leftover bits of silky cotton voile from another project.

Pattern: Based off of my own, but referencing those in Janet Arnold.

Year: c. 1810.

Notions: Thread and 1/4″ cotton twill tape.

How historically accurate is it?: I’m going to go with 100% on this one. The materials are good and so is the method.

Hours to complete: I didn’t pay attention because I was leisurely sewing this while on vacation. Maybe 8-10?

First worn: Will be worn in April.

Total cost: All from the stash! Free!

1950s Super-Petticoat

This is a follow-up to my previous post, in which I shared more about this dress and the masquerade event I wore it to last year. While that post was about the dress itself, this one is about the petticoat that I wore under the dress.

img_2060-1

In order to help my dress achieve such a perfect 1950s silhouette, I put together a super-petticoat. It started with an organza petticoat from eBay, which I had worn before but been disappointed in. It just wasn’t big enough! Also, the elastic waistband was a bit tight for comfort.

img_2114
Layers of the super-petti: tulle, organza, and lining.

To upgrade the petticoat, I took off the waistband, replacing it with a yoke of cotton (inspired by Lily, who has done similar things to her petticoats) finished at the top with bias tape. I cut off the tulle ruffles from a full length bridal-type petticoat that I’d purchased for $5 due to its sad condition (a few rips in the tulle, a broken zipper–easily cut off and discarded) and attached those to the yoke over the organza.

img_2116
The top of the yoke with tulle attached.

And ta da! Super-petticoat!

img_2113
The finished super-petti!

This is the same petticoat I wore to the Tiki Party I posted about last year as well. It’s funny how the shape and weight of the skirt over the petticoat produces different silhouettes: a cupcake shape with the bubble dot skirt on top at the Tiki Party and a more angled silhouette with this heavier 1950s dress. But of course the super fluffy-ness of the petticoat is what allows the 1950s dress to maintain a nice shape even with the heavier black dress on top of it. I’m very pleased!

Masquerade! Paper Faces On Parade…

Masquerade!
Hide your face so the world will never find you!
Masquerade!
Every face a different shade…
Masquerade!
Look around there’s another mask behind you!

I’ve always wanted to attend a masquerade. This wasn’t quite the masquerade of The Phantom Of The Opera, not having sweeping orchestral music and head-to-toe colorful costumes, but it was nonetheless fun and a bit surreal in the masks-plus-fabulous-location-ness (I think a bit of a surreal experience is what makes a masquerade a unique experience, so this is entirely a positive description here).

Digressions about masquerades aside, back in November of last year I had the good fortune to attend such an event myself. The theme was 1960s, but I had recently acquired a 1950s dress that fit me so perfectly that it just HAD to be worn, so I opted to be a bit old fashioned for the theme of the party.

img_2086-1

The event was held in a very nice downtown hotel. We had a series of rooms including the ballroom, its foyer, and a parlor-type space far enough away from the music to easily chat and lounge. It was quite elegant feeling!

img_2040-1

Usually I don’t wear vintage or historical garments. I’d prefer to use them for study and don’t want to damage them. But I made an exception in this case and did my best to be gentle with the dress. I carefully mended it before wearing and then again after, as the delicate lace was pulling apart at the seams under the arms when I received the dress as well as after wearing it. My second version of the mend was to put gussets under the arms, using a tiny bit of leftover fabric I had from shortening the sleeves (I wanted to do this during the pre-wearing mend, but ran out of time). I think the sleeves were full length on the original owner, but they came down to an awkward mid-forearm length on me, so I shortened them to be a nice 3/4 length. I know! It was a hard decision to make, changing the dress, but I think it is in keeping with the period the dress is from and it allowed me to better fix the underarm problem, so I’ve come to terms with the choice.

Here’s a slightly clearer view of the bodice. The lace is backed by nude net and there is a silk faille band around the waist. The entire skirt is faille with an overlay of the same lace and horsehair around the hem for stiffening.

img_2048-1

For my hair, I decided it was go big or go home, so I used my largest bun form (part of the base of my Versailles hairstyle) to create a giant poof-bun-thing on top of my head that’s a nod to the 1960s beehive. I think it was balanced out well by the feathers on my mask. Plus, in general I’m pretty good at making big hair work.

I put the mask on a stick so that it wouldn’t irritate my face and so that something like an elastic wouldn’t squash my huge hair. A bonus is that I could peek out from behind it, as in this picture.

img_2052-1

With this ensemble, I wore the same sparkly earrings I wore to Versailles and my silver American Duchess Seaburys with silver rhinestone shoe clips to make the ensemble even more bling-y!

img_2038-1

The event included food and dancing and chatting. I had a great time that was even better than I was expecting, though I think that was due to being tired after a long week of work and not really sure if the event would be a hit or not.

img_2110-1

My friends and I did lots of silly 1960s dances–the monkey, the swim, etc. (Are these really 1960s? I don’t know for sure, but in my mind they are…) These pictures of my dancing in the lobby are some of my favorite, partly because swishing around in my 1950s dress was so much fun!

img_2095-1

img_2098-1

img_2107-1

1927 Blush Sparkle Dress

img_2353-1

I was at the fabric store looking for other things… (the beginning of a lot of my fabric buying adventures) when two super sparkly fabrics caught my eye. They were screaming “1920s!” But the colors were somewhat costume-y 1920s and not often seen in my research of actual historical dresses from this period–red on nude net and black on nude net. A bit disappointed, I looked at the sparkly lace section some more and found the same fabric in blush on nude net! It was so sparkly and the pattern on it was so perfectly deco that I had to take some home with me. Luckily it wasn’t expensive and only cost $14 for 1.25 yards. Not bad!

The timing was perfect, because I had a 1920s event in January and just enough time to make the dress.  I didn’t have a slip to go under it that was the right shape or color, so I also squeezed in making a bias cut slip.

img_2349-1

For the pictures, I wore my American Duchess black Seaburys. They provided just the right 1920s shoe shape, encasing the front of my foot in a uniquely historical way that modern style shoes do not. You can see the shape more clearly in this post when I wore the shoes with my 1920s bathing suit in a beauty pageant look.

I was also incredibly lucky that the event was held in a historical hotel that provided fun backdrops for pictures! Those elevator doors are lovely! And look at this awesome phone–it had to be included in pictures!

img_2340-1

Another neat place we took pictures was this stairwell. I love how different these two pictures are, despite being so similar. One is much more about the dress while the other shows off the chandelier and is a bit more artsy and mysterious.

img_2329-1

img_2327-1

img_3151-1I was so pleased with how my hair turned out! I tried a style similar to one I did last summer for a different 1920s event that I have yet to post about… oops! But here’s a teaser of just my hair. Soon I’ll post the details and it will bring some warm summer memories to my New England winter.

For the summer event I did my hair when it was wet, resulting in a similar style, but much smaller and closer to my head. For that version, I did all the back curls while my hair was still distinctly damp, making the curls much tighter and closer to my head.

For this event, I braided my hair in the morning while it was still damp (to help create waves on the top but curls on the bottom) and left it all day, meaning it was mostly dry when I took out the braid. Then, when doing my hair for the evening, I added small rats under the puffed bottom portion to add a bit more volume than just my own curls. I covered the rats with the length of my hair then carefully placed and pinned the curly ends to imitate having a sort of 1930s smooth-on-top-curly at the bottom style, like this. This style is a few years later than my new dress, but I think it works as a 20s style for someone with longer hair, like me. I have a lot of hair to hide in a 1920s style!

img_2332-1

Both the dress and slip are entirely hand sewn, due to working on it away from home (I would have hand sewed the dress anyway because of all the sequins, but probably not the slip). The dress started out as a tube, but was more unflattering than I was willing to allow. It was fine from the hips down, but needed to be taken in above the hips. What I ended up with is a curved seam (or a long dart, depending on how you look at it–one side didn’t have a seam to begin with) allowing slight shaping from the torso to the skirt portion of the dress. 1920s dresses can be such bags, but after the extra shaping I am very happy with the still somewhat bag-like, skimming shape of the dress without feeling like it’s an absolute sack.

The slip was cut from a pattern I made a few years ago–perfect, since I didn’t have time to pattern something from scratch! I intentionally picked a 1930s pattern in order to have the addition of a perfectly fitting 1930s silk slip to my wardrobe, but also because the shape of the neckline was perfectly suited to the v-neckline I decided on for the sparkly overdress.

img_2374

The slip has french seams on the sides. The under-bust seam allowance was trimmed away on the gathered piece and then the body piece seam allowance was turned over it and hand sewn to hide the raw edges. The top edge is mostly bound of with vintage cotton bias (which I removed from the top of the net petticoat I show in this post before shortening it. The piece wasn’t quite long enough to go all around the top edge of the slip, so the center back section is just turned twice and slip stitched, in the same way as the hem.

img_2378

The slip fabric is left over from a project that I did about 7 years ago. It’s lovely silk crepe back satin with the perfect weight for making bias cut 1930s clothing. I thought I would have just enough to eke out the slip, but I came up a little short on the back piece and decided to piece it to make it work, as the fabric is so nice to wear and it was the perfect color. As a result, there are two random diagonal seams on the top of the back piece of the slip. Oh well! They add character!

Pass It On

It never hurts to recognize other people for the good they put into the world. For me, reading about the exciting events that other people attend, seeing pictures of their fabulous creations and outfits, and sometimes just sharing with their struggles brings joy. I appreciate being connected to other people who share my passion and sometimes I just want to escape and look at lovely things or share my own fun experiences and creations. Along those lines, I wish to thank Kelly, (who writes the blog Seam Racer) for recently gifting this blog a Blogger Recognition Award.

blogger-recognition-award-logo

As these awards usually go, there are rules that each recipient tries to follow. They are:

  • Thank the blogger who nominated you and provide a link to their blog.
  • Write a post to show your award.
  • Give a brief story of how your blog started.
  • Give two pieces of advice to new bloggers.
  • Select 15 other bloggers you want to give this award to.

The story of my blog…

I started my blog as a place to share the historical clothing creations I was making. I was just starting to attend vintage dance (and other historically clothed) events and I wanted to be able to share that fun with others. The blog was a great way to chronicle the awesome clothing I was creating as well as the amazing events I was able to attend. It also became a way of preserving memories in words as well as images–there are so many details of events that I’ve written out in blog posts but put aside in my head. It’s so nice to have a solid bank of memories to be able to review at will in such detail!

My advice to new bloggers…

#1: Find a way to incorporate pictures into all your posts–or at least most of them. It makes them less dense to read and more interesting to us visual types. Take the time to take pictures that are clear and go through them so you can include pictures that really tell a story. Of course there are exceptions–when you’ve made a beautiful thing and all your pictures are stunning, for example. Or perhaps you’ve had a very silly photoshoot and the pictures aren’t clear but they tell a great story.

#2: Comment on other people’s blogs. Express your excitement, ask questions, appreciate hard work, or maybe just let the author know you read their blog and enjoy it. You’d be amazed how much it can feel like you know someone when you’ve been blog-commenting back and forth but might have never met them in person. It helps feel like you’re part of a community, and if you ever get to meet those people in person, think about how much easier it will be to talk to them!

Passing on the award…

I greatly enjoy reading all of the blogs on my RSS feed list. It was hard to choose only 15 to pass this award along to! However, I eventually had to make decisions so I could get this post up. So here are the blogs that I would like to pass this award along to:

A Sartorial Statement

Beauty From Ashes

The Dreamstress

Dressed In Time

Emily’s Vintage Visions

A Frolic Through Time

Kleidung Um 1800

Mode de Lis

The Modern Mantua Maker

My Happy Sewing Place

Plaid Petticoats

Polka Polish

Rococo Atelier

Ruby’s Rags

The Shadow Of My Hand

Yay!

img_1415