1950s Queen Of Hearts

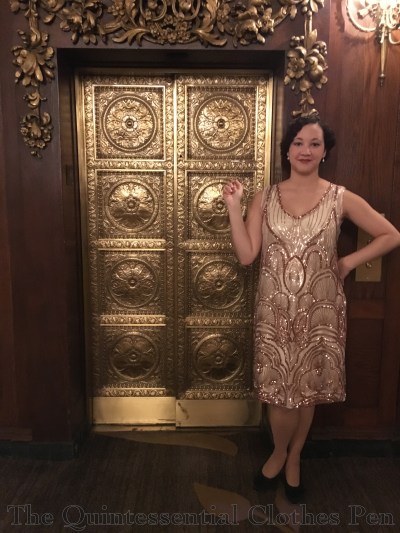
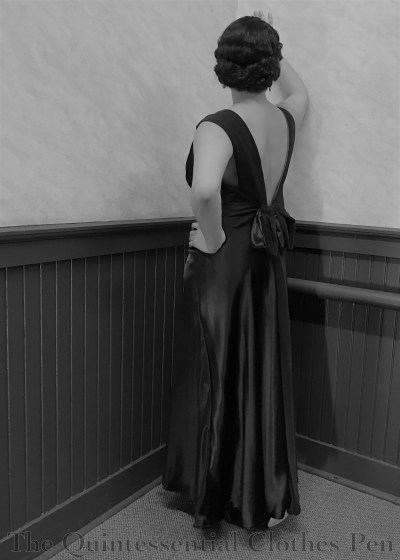
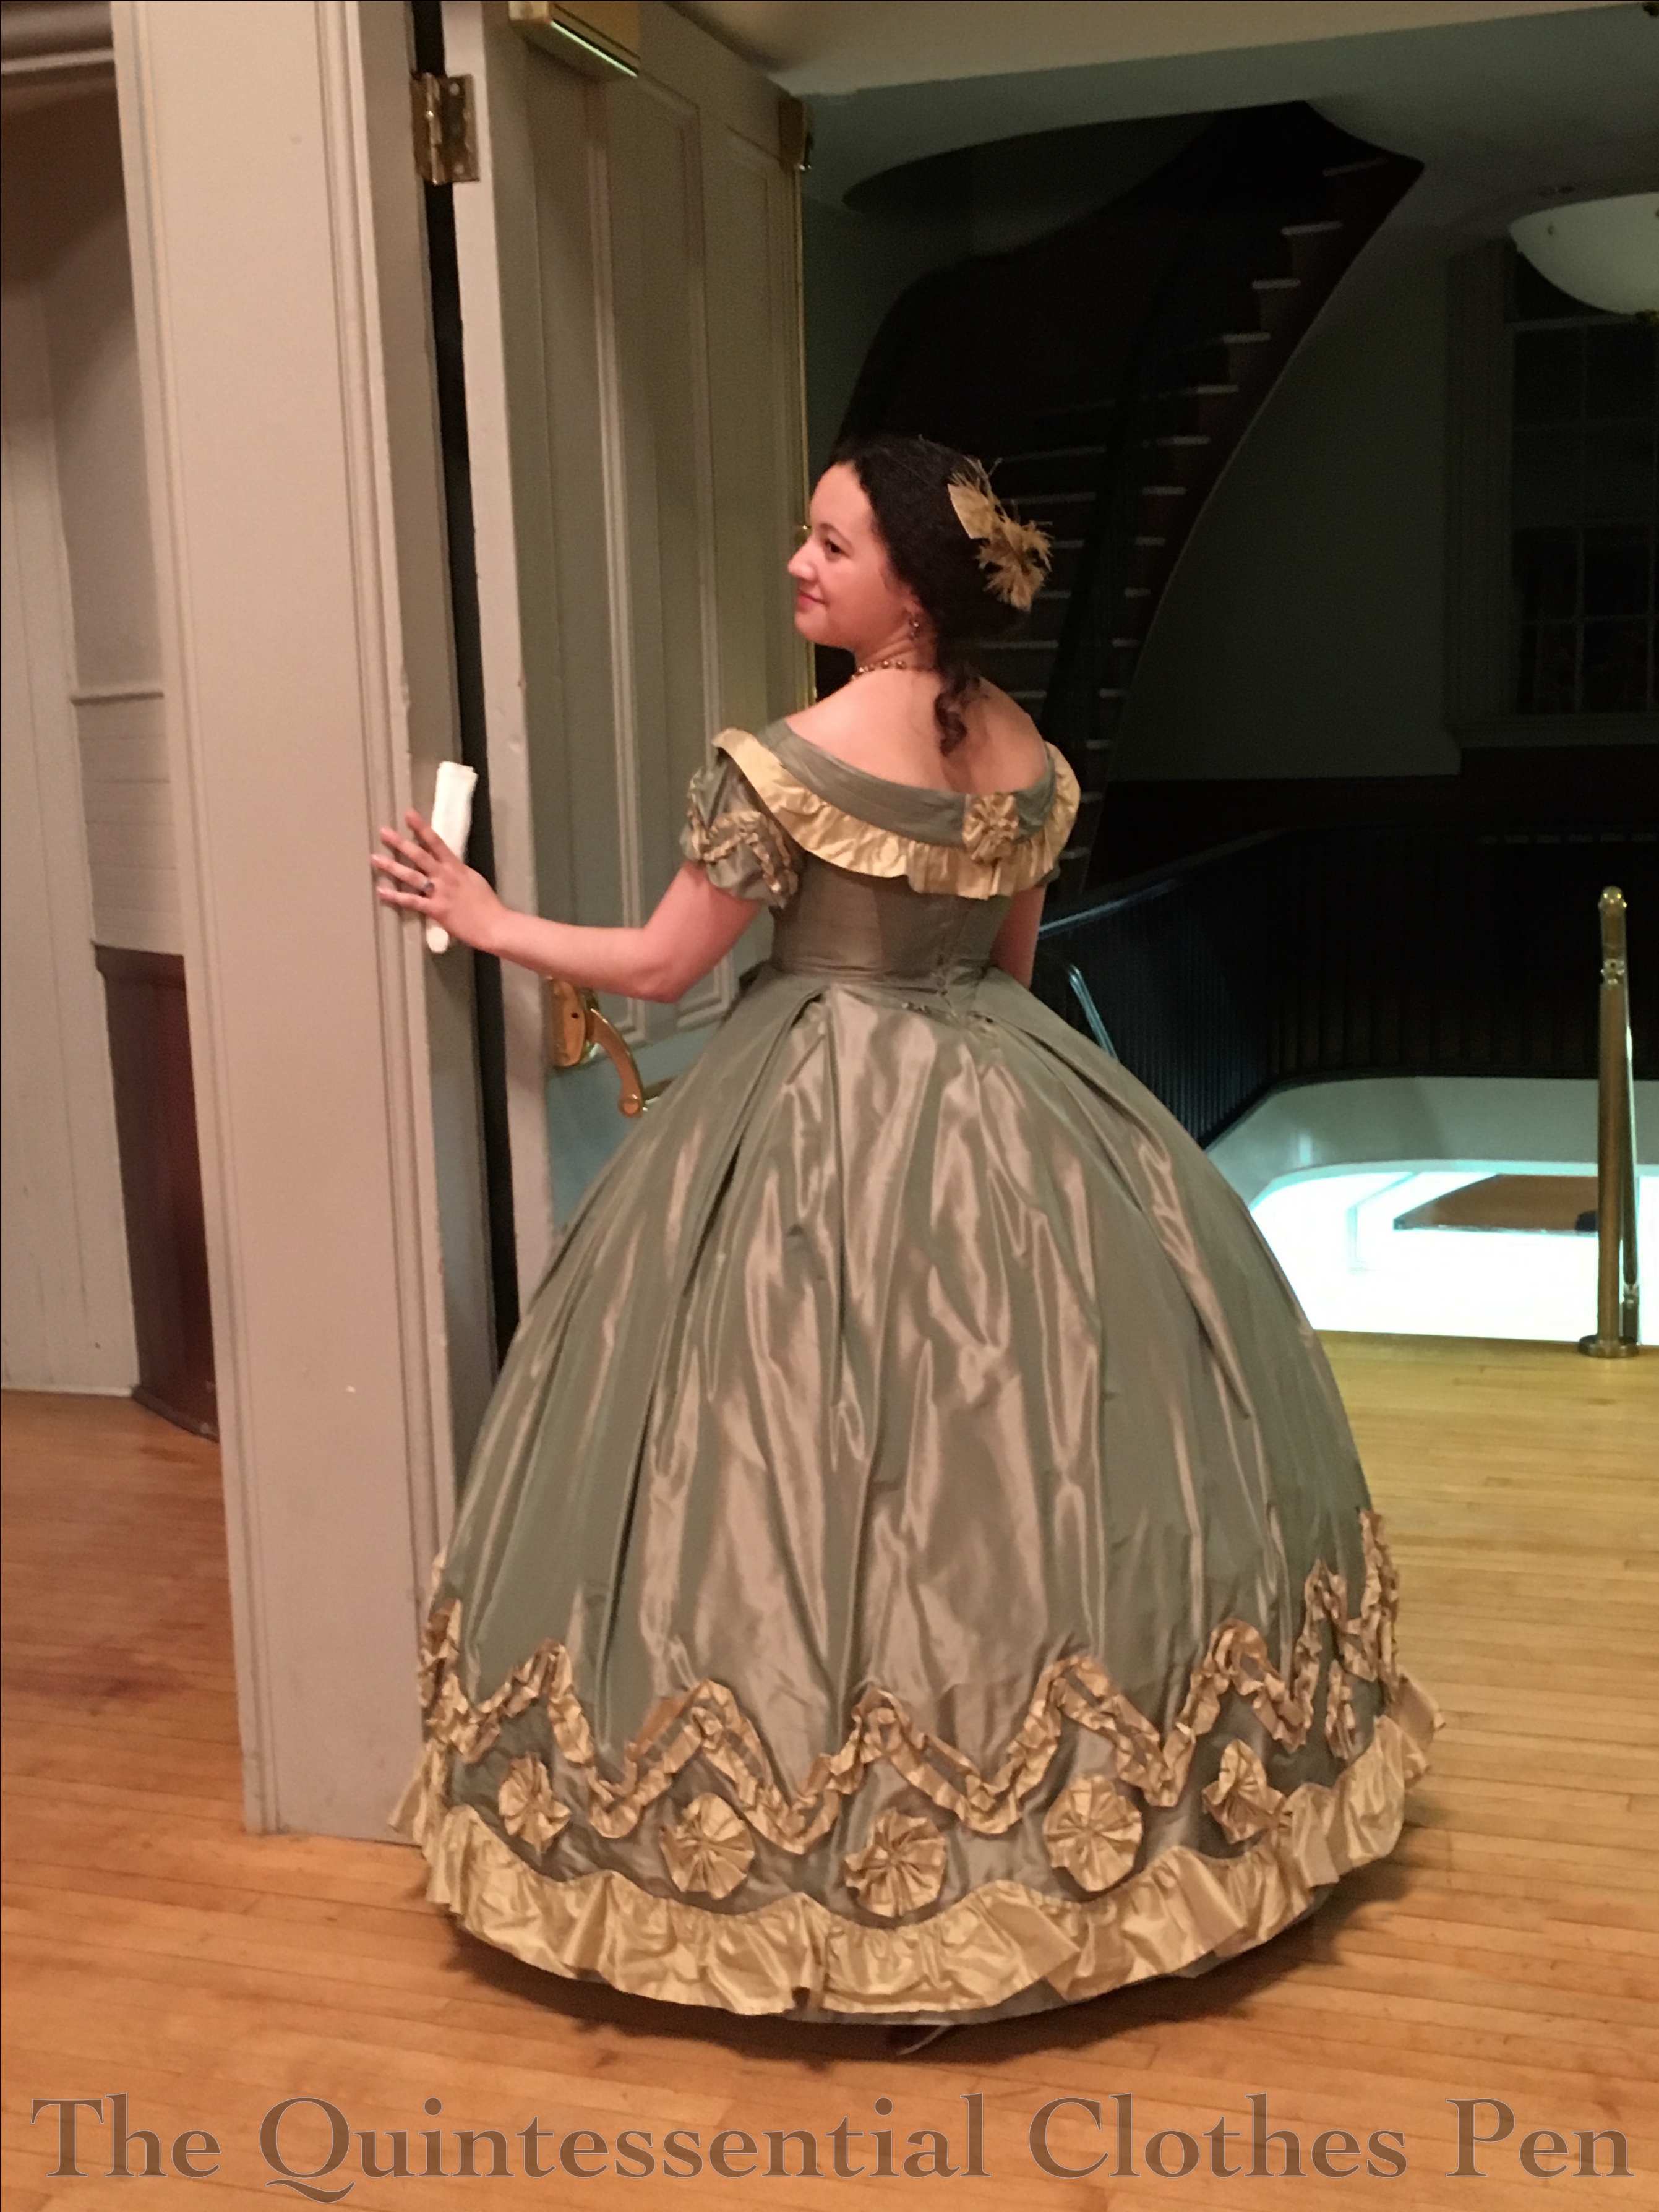
At the same sale that I purchased the base of my 1950s super-petticoat and the hat that I refashioned into a 1930s style I also purchased a rather sad 1980s style evening dress. I liked the brocade fabric and had an idea that I could remake the dress into a cocktail length 1950s style dress by removing the sleeves, changing the neckline, and shortening the hem.

I also had this dress in mind. I love the massive decorative butt bow and this remade dress seemed like a great opportunity to put the idea to use. The red had to wrap around the waist as well as making the bow, in order to cover up the original gold waistband, but I had a remnant of cherry silk in my stash that was nicely complimentary in terms of color and just the right size for the job!

From the front I feel generally ok about the dress, but from the back, I love it! Plus, that’s two things checked off the to-do list: I remade the 1980s dress into a wearable 1950s style and I put the butt bow inspiration into action. Plus the fact that I used up a fabric from the stash, which is a bonus!

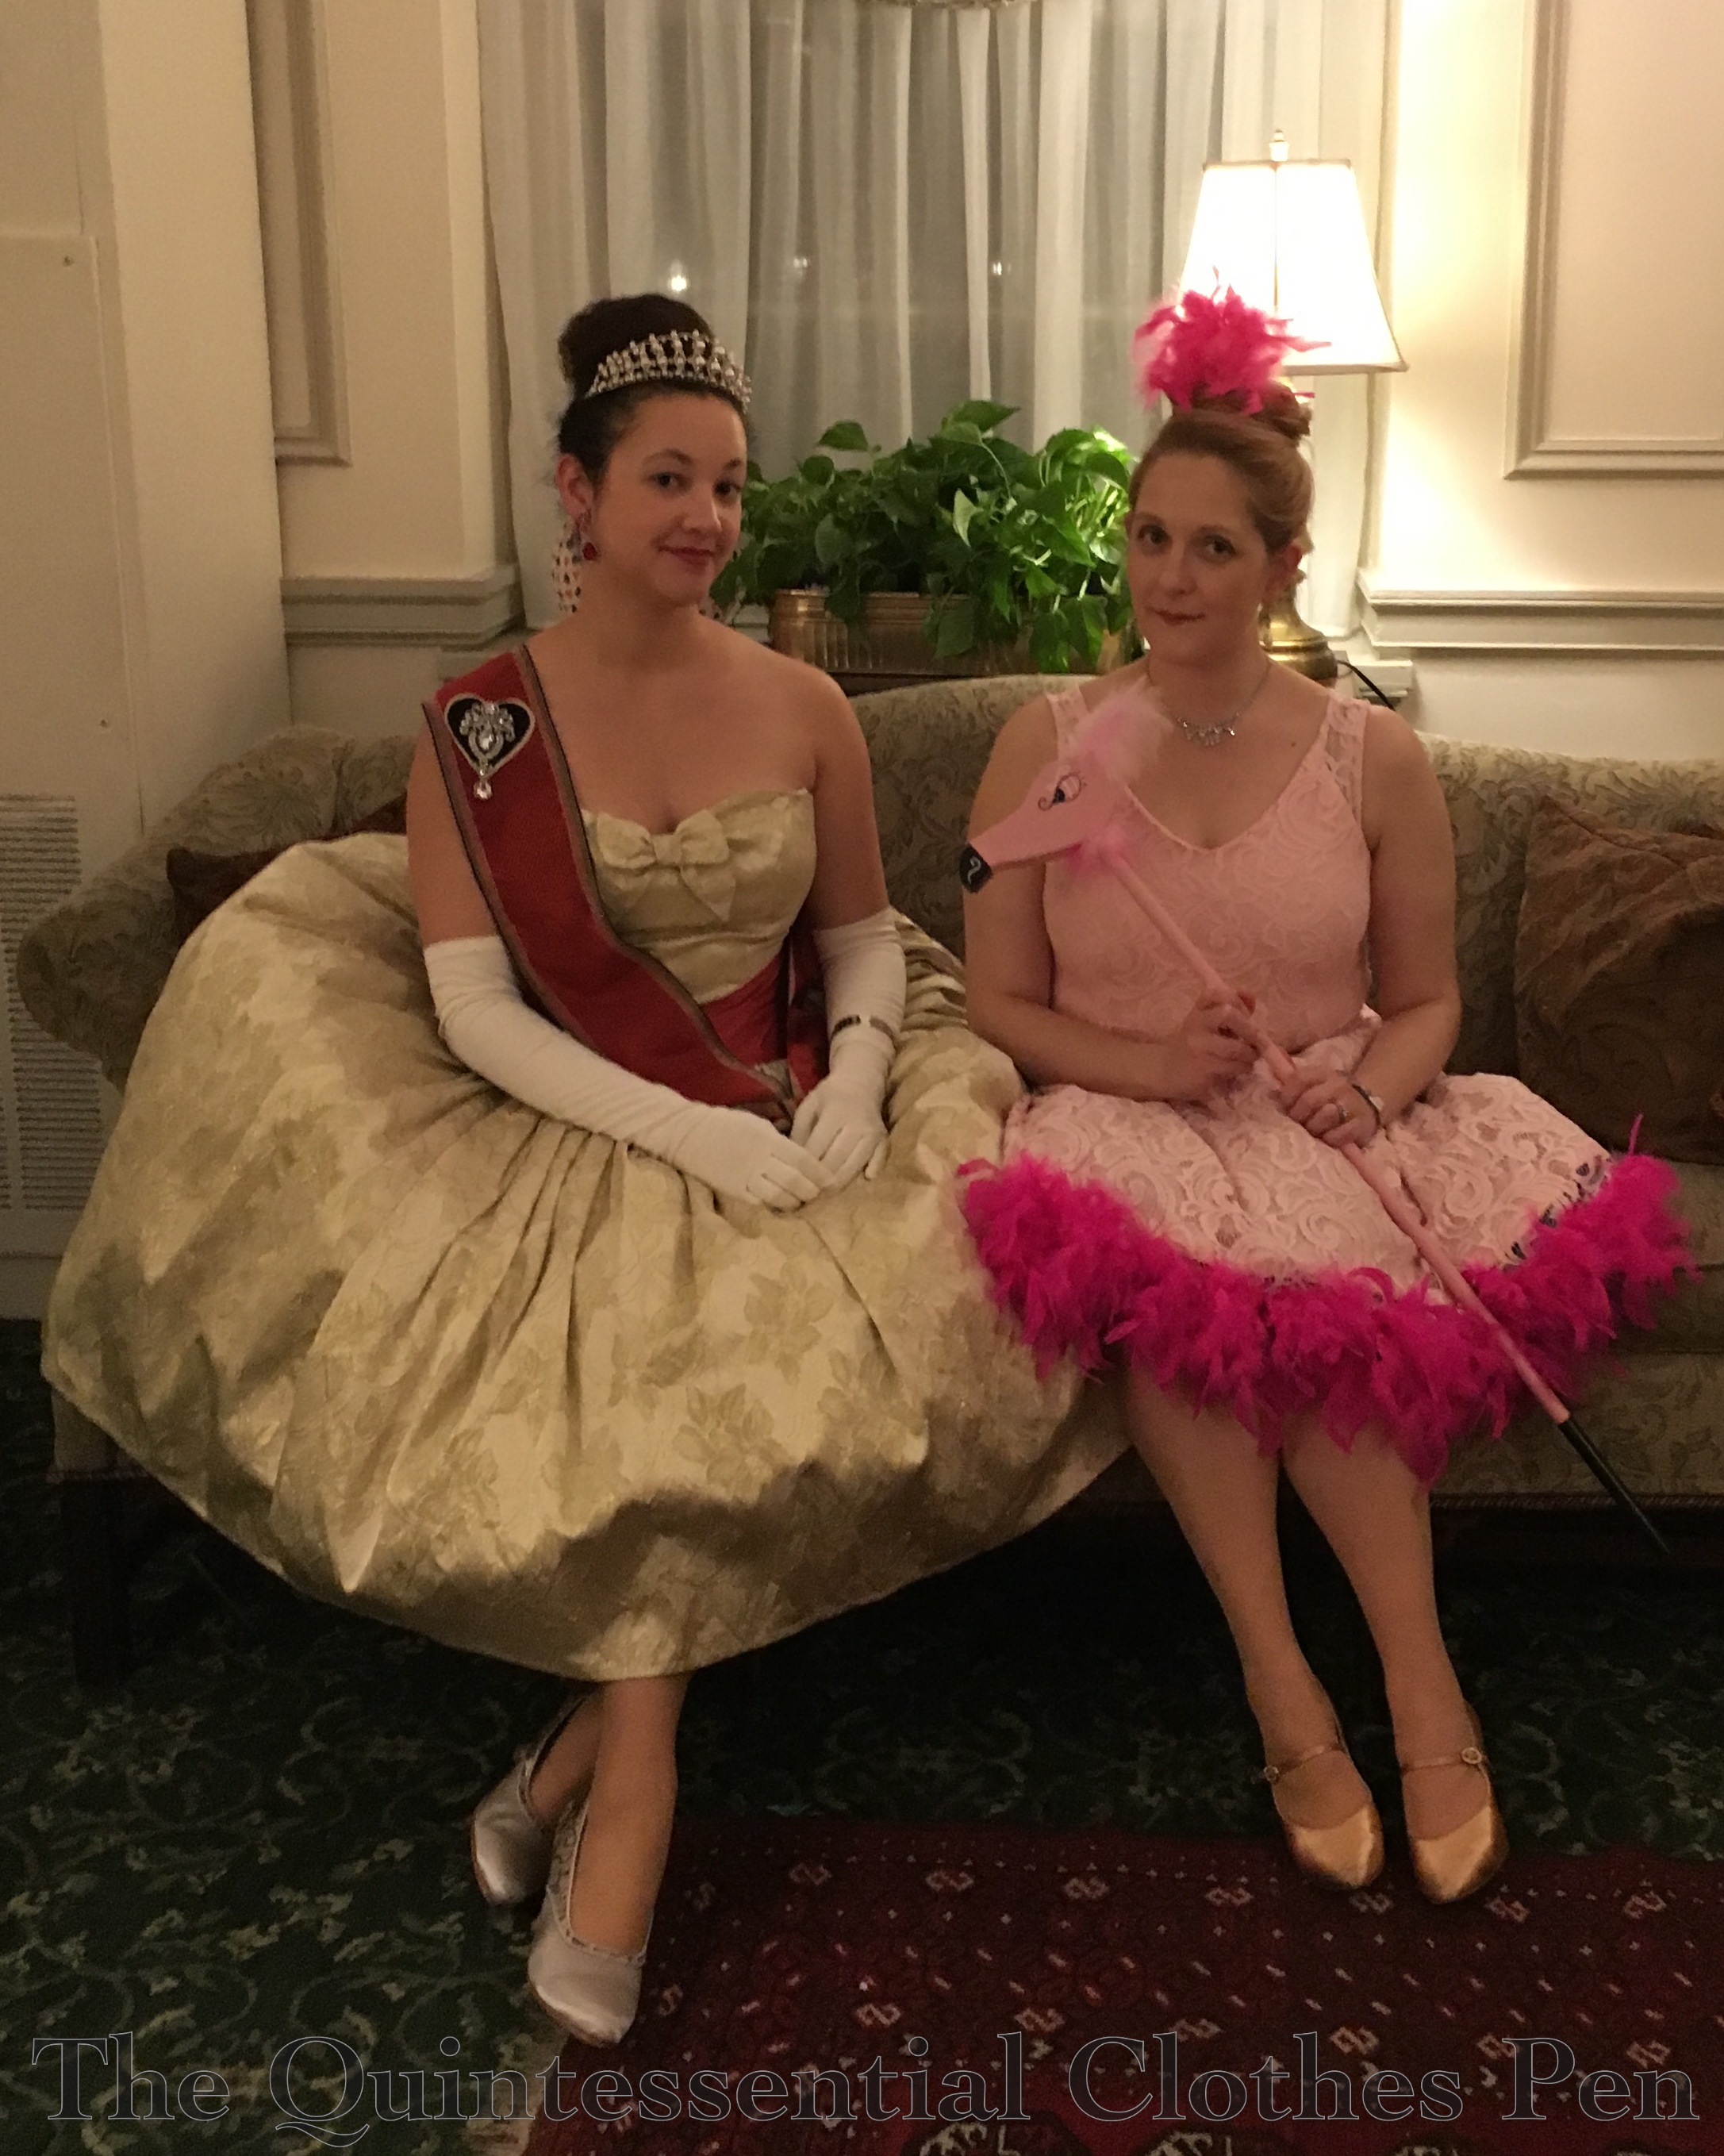
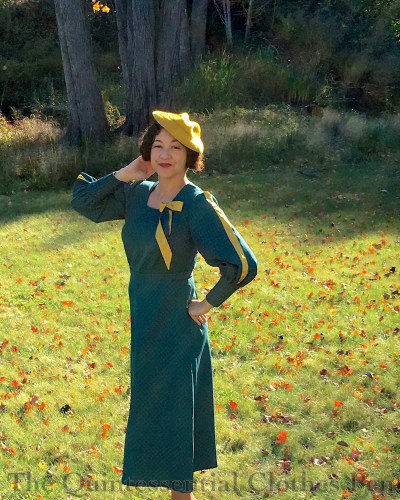
But why the Queen of Hearts? I decided this was a dress I wanted to wear to an Alice In Wonderland themed event that I recently attended so I had to fit the dress into the theme. I decided on the idea of an elegant 1950s historical nod to Queen Elizabeth in The Crown (which I might have been watching right around the time I was looking for inspiration…). Aloof queen looks are totally my jam, so that works really well.

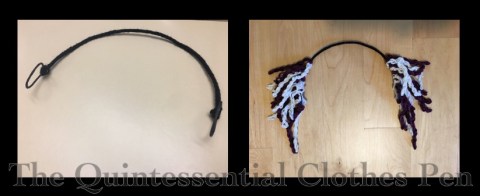
As long as I was going with a queen look, I decided that a royal order sash would be an easy way to say royalty and hearts all at the same time while also being easy to remove from the dress itself. I did some royal order sash research and decided I liked a sash with a narrow border of a contrasting color. Of course, mine needed to be made in Queen of Hearts colors: black, red, and gold seemed perfect. I pinned heart appliqués behind my shoulder brooch and on the bow to play up the Queen of Hearts theme.

It was fun to accessorize the dress and sash with long gloves, red drop earrings, a tiara, and my silver American Duchess Seaburys (the gold brocade fabric that makes up the back of the shoes complimented the gold brocade dress very nicely!). I think I like the butt bow with the sash even better than the butt bow by itself!

To make the sash, I googled ‘royal order sash’ and looked at lots of images to decide on a design. Mine is made of two rectangles, with an angled shoulder seam and tucks behind the bow loops for shaping. It’s made of red polyester with woven-in tiny black stripes and edged with sheer gold ribbon. For more detailed sash making information, Gina posted very detailed tutorial for making royal sashes that would probably be quite useful if you’re thinking of making one for yourself.

I’ll leave you with this silly shot of the Queen of Hearts with a flamingo. Croquet, anyone?

SaveSaveSaveSave

SaveSave

SaveSave

SaveSave

SaveSave

SaveSave

SaveSave

If At First You Don’t Succeed… (HSM #1)

I made this 1928 evening dress and first wore it in 2012. Back then it was simple, with just a small cascade of fabric and no sash or bow (I show the construction in detail in this past post). Three years later, I decided to add the sash, bow, and extra cascade of fabric (and wrote a post about it). I liked the effect but wasn’t pleased with the slippery silk moving all over and sliding around. The armholes were also a bit high under the arms from the beginning, causing the trim to dig in a bit which wasn’t very comfortable.

Due to these issues and the addition of other 1920s evening dresses to my wardrobe I hadn’t worn this dress in a few years. But for an event this January, I decided to give it another go. Luckily, the dress still fit and didn’t cling in unwanted places! The first HSM challenge of 2018, Mend, Reshape, Refashion, was the perfect complement for the updates I wanted to complete.

To be specific about the updates, this time I lowered the armholes about 1″ and then pieced in extra trim to fill in the gap, sewed the sash/bow in place, and added an interior waistband that supports the weight of the bow and keeps the dress from pulling down on one side.

Our hotel room had a bonus vanity table and stool that was a perfect prop for photos…

I did my hair like I did last year but added a gold hair comb I recently discovered at my parent’s house. I’m pretty sure my mom gave it to me when I was a child or maybe a teenager… It’s just been sitting there waiting for me to put it to use again!

Just the facts:

Fabric: The only new fabric was a scrap of tightly woven polyester for an inner waistband.

Pattern: My own, based on measurements.

Year: 1928.

Notions: Extra trim to piece under the arms, thread.

How historically accurate is it?: Let’s say 95%, with points lost for the polyester.

Hours to complete: The updates took about 4 hours. I felt like hand sewing most of it so I could watch Netflix!

First worn: With the updates in January, 2018.

Total cost: Free!

I love how this dress looks and fits now! Yay! It only took three tries… It’s a good lesson: if you don’t succeed the first time, try again! And keep trying…! Third time is the charm on this one!


SaveSave

Summary of 2017: Looking Forward To 2018

It’s that time of year: to reflect on last year and think ahead about this year. It’s helpful to look back and see my accomplishments as a group. I seem to always make more things than I remember having worked on in that year!

Projects I completed in 2017:

January: 19th Century Brown Silk Petticoat (HSM #1)

January: My Favorite Winter Things Skirt

February: 1927 Blush Sparkle Dress

March: A Chemisette (HSM #3)

April: Orange Boven Hat (HSM #4)

May: 1814 Orange Boven Pelisse

June: 1817 Gold Regency Duchess Dress

July: 1904 Anne Ensemble

August: Happy Clover Dress

September: 1933 Evening Gown

September: 1943 Mauve Print Dress

October: 1850s Chenille Headdress

November: 1933 Dress & Hat In Green & Gold (HSM #10)

November: 1830s Sleeve Puffs (HSM #11)

November: Skirt Puffer

In February I was honored to be awarded the Liebster Blog Award by Plaid Petticoats! In August, I was excited to be able to take a fantastic trip to Denmark focused on learning 19th century dancing and including multiple balls. I haven’t posted about that trip yet… but I hope to early in 2018!

I participated in my fifth year of the Historical Sew Monthly. This year I completed 5 challenges. It was a busy year in other ways, so I feel happy about my completion of those 5 challenges.

In terms of events this year, I attended 11 balls, 10 other events (teas, picnics, outings etc.), and 2 vintage dance performances, for a total of 23 events (plus all that dance practice I had in Denmark!). Not quite as busy as other years, but respectable when I consider all the other life things that happened this year as well!

Looking at last year’s ‘definitely do’ list, I’m pleased to report that I exceeded my goals by not only making all the things on the list but actually exceeding it by altering two Regency dresses instead of just one. There were 8 things on the ‘maybe’ list and I completed 4 of them, though not all of those have had pictures taken yet.

For 2018, my  ‘definitely do’ list is unusually short:

  • update my 1928 green evening dress to fit better with less hassle
  • make a 1950s-British-royal-inspired Queen of Hearts sash

On the other hand, the ‘maybe’ list feels extensive, probably due to the lack of projects on the ‘definitely do’ list:

  • 1884 plaid wool day dress
  • 1880s wool mantle
  • 1790s stays
  • 1790s petticoat
  • 1790s dress
  • finishing a modern floral cotton summer dress
  • as many as four modern dresses
  • vintage inspired winter wool skirts

I’m looking forward to another year of research, sewing, spending time with old friends, and hopefully making some new friends, too! I hope for sunshine for all of us in 2018.

SaveSaveSaveSaveSaveSave

SaveSave

SaveSave

1830s Sleeve Puff Tutorial

Why make sleeve puffs, you ask? In order to keep the large sleeves of 1830s dresses from deflating, of course! Here’s an example of my 1832 dress without puffs (on the left) and with puffs (on the right). They make such a difference!

I chose to use a sewing machine for much of the assembly of my puffs, but you could easily hand sew all of these steps instead.

To make these sleeve puffs you will need the following materials:

  • Fabric: ¾ yard of 44″ wide or ⅜ yard of 60″ wide (cotton, linen, and silk are the most historical options, but you can use whatever is comfortable on your skin, just make sure it’s not too loosely woven or too heavy in weight)
  • Stuffing: I used scraps of stiff net and organza, but you could also use batting, tulle, down, etc.
  • Thread

To begin, you’ll need to cut out your pieces:

  • Two rectangles: 25″ wide x 13″tall
  • Two shaped bases: 18.5″ wide x 7.5″ tall at the center and curved down to 2.5″ tall at the sides
  • Four end caps (two for each end of your shaped base): use the shaped base as a pattern and cut the end caps so they are 2.5″ wide

Next, you’ll assemble your puffs:

Step 1: Lay your end caps on each end of the shaped base. Sew around the three exterior sides, leaving the side towards the center unstitched.

Step 2: Trim your seam allowances, corners, and clip through seam allowance close to the end of your stitch line on the shaped base.

Step 3: Turn each end cap so the right sides face out–the clip through the seam allowance allows the end caps to sit nice and flat on the shaped base.


Step 4: Run gathering stitches along each individual side of the four sides of each rectangle (not one long gathering line that turns the corners).

Step 5: Pull up your gathering stitches on the long sides and pin to the curved edges of the shaped base. You want to pin the rectangle to the side of the shaped based that does not have the end caps on it.


Step 6: Sew the gathered rectangle to the shaped base and turn it right side out.

Step 7: Now pull up the gathering threads on one short side of each rectangle. Turn the raw edge under and pin the gathers in place. Hand sew these gathers through all the layers, making sure to take small stitches and catch the gathers in many places. Leave the other side open for now.

Step 8: Stuff those puffs!

Step 9: Now pull up the gathering threads on the remaining short side of each rectangle. Turn the raw edge under and pin the gathers in place. Hand sew these gathers through all the layers as well, making sure to take small stitches and catch the gathers in many places. (This is the same as step 7.)

Step 10: Overlap the end caps about ¼” and sew them together.

Ta da! Now you have some sleeve puffs of your very own!

Extra tips:

I strongly suggest taking a look at extant puffs. As a starting point, I suggest this pair at the MFA and this pair at the V and A.

If you’re worried about keeping your puffs in place, ties can be added to the puffs which would be secured to additional ties in the armholes of dresses. Take another look at the those two pairs of extant puffs and you’ll see ties.

I also suggest looking at the puffs other people have made. It never hurts to see more methods of construction. I referenced Fresh Frippery and Stepping Into History when creating my puffs. Have you come across other 1830s puff making resources? If so, please share!

SaveSave

SaveSave

SaveSave

SaveSave

SaveSave

SaveSave

SaveSave

SaveSave

SaveSave

SaveSave

Christmas Cheer (Fezziwig’s Ball 2017)

While it’s still holiday season I want to share a few pictures from The Commonwealth Vintage Dancers’ 2017 Fezziwig’s Ball. This year we had snow on the day of the event. It made for some slippery driving, which unfortunately caused a number of people to not be able to make it, but the bright side was that Salem was enchantingly draped in snow.

It was a bit colder than it has been in some previous years, so it was necessary to wrap up warmly for outdoor caroling. The easiest (and warmest) option that would fit over my gigantic 1830s sleeves was my 1860s wool cape (it is lined in flannel and has thick batting so it is quite soft and warm!). It was great to make use of its amazing warmth since I hadn’t worn it in years, though I have yet to get actual documenting photos of it. I always seem to be wearing it when it’s dark outside! We did get this nice picture though. The stars of light are made using a special Petzval lens (you can read more about this special lens in this past post). The cape plus a muff did a good job of keeping everything but my head warm. There’s no easy way I know of to cover a big hairstyle without mussing it while also keeping your head warm…

As I’ve mentioned in previous posts, I wore last year’s 1832 dress again, but with bigger and better underpinnings, so you’ll likely recognize one of these images from my comparison of 1830s pouf.

Super puffed sleeves, a little more skirt volume, and ribbons on my shoes are the notable changes from last year’s wearing.

I basically styled my hair the same way as last year. I really liked what I came up with and there seemed to be no need to reinvent the wheel!

After vigorous dancing to lovely holiday music it is always a treat to partake of the lavish refreshments, which provided a perfect outing for my refreshing apron. It does a wonderful job of keeping my dresses clean!

Happy holidays!

I hope you’ve had a joyous December so far, full of laughter and blessings!

SaveSave

SaveSaveSaveSave

SaveSave

SaveSave

A Comparison Of Pouf

Last year, I made and wore an 1832 dress to the annual Christmas ball, but was disappointed with the silhouette as I didn’t have the time to make all of the supporting garments to really get it right. This year, I made the supporting garments to fill out last year’s dress so I could get the silhouette just right. Are you as curious as I am to compare the silhouette from one year to the next? Wait no more! (I even managed almost the exact same pose!)

I’m especially pleased with my sleeves! I have to confess that my sleeves were brushing up against things as I wasn’t used to how large they were! It was great! And the skirt is ever so slightly more full as well, which helps to balance the rather enormous sleeves.

I’m also pleased with the subtle difference of having laces on my shoes. Last year, I tried using masking tape to attach the laces inside the shoes, but pressure from walking pulled them right off. This year, I sewed the ribbons to lining of the shoe. That part worked great, but the ribbons would not stay tied and it was rather a challenge to bend over in a corset and tie the bows behind my ankles on a regular basis. It was great for looks but not for practicality!

SaveSave

New 1830s Underpinnings: Sleeve Puffs & Skirt Puffer (HSM #11)

I made an 1832 dress last year for the annual Christmas ball. I was very happy with the dress itself, but a bit saddened by the silhouette due to the fact that I didn’t have time to make all the accessories to help give the dress just the right silhouette. This year I’m wearing the same dress again for the Christmas ball but I’ve taken the time to create two different underpinnings that will really help the shape.

There are two areas where I was disappointed with last year’s silhouette. The first was my sleeves. The dress I made has large beret sleeves but without anything inside to keep their shape they became deflated as the night wore on. The solution: a pair of 1830s sleeve puffs! The one below, from the V and A, is just one example (and what I used as direct inspiration for creating mine).

Conveniently, these fit this month’s HSM challenge perfectly!

HSF Inspiration: “One of the best things about the HSF is seeing what everyone else creates, and using it to spark your own creativity. Be inspired by something that has been made for the HSF over the years to make your own fabulous item.”

Sleeve puffs have been made by multiple people over the years of the Historical Sew Fortnightly/Monthly, though most recently a pair was submitted for Challenge #10: Out of Your Comfort Zone in 2017.

Here are my sleeve puffs!

So, just the facts:

Fabric: Soft cotton twill, polyester organza and stiff net for stuffing.

Pattern: My own, based on measurements and looking at extant puffs.

Year: 1830s.

Notions: Thread.

How historically accurate is it?: Let’s say 95%. It’s entirely recognizable in its own time. The exterior is plausible fabric, the stuffing is not.

Hours to complete: Perhaps 2?

First worn: Not yet! Will be worn in December.

Total cost: Free! All the fabrics are from the stash.

I took in progress pictures of the puffs as I made them, so eventually I’ll post a detailed tutorial for how exactly I made these. But for now, let’s talk about the second area that I was disappointed with my 1832 silhouette last year: the skirt fullness. I had hoped to create a nice round shape, but my silk petticoat alone wasn’t enough. I whipped up a puffer of stiff net gathered onto a waistband, but it didn’t add enough oomph either.

Of course, a corded or starched (or both) petticoat would be the ideal way to fix this problem. I didn’t devote the time to making either of these for this particular dress (and don’t already have them as part of my wardrobe.) Another idea one of my friends had was to use a fluffy many tiered organza petticoat from eBay to get a nice 1830s silhouette. I, however, was inspired by Lauren’s ‘ugly puffer’ (she made it for the 18th century, but the idea can be used to fill out skirts from many different eras) to try and get a better silhouette this year.

I actually used the same net puffer I used last year, but added a gathered layer of pre-quilted cotton from the stash. I hemmed the edges to help add stiffness and used up the small scrap that I had (only about ¼-⅓ of a yard), which amounted to about a 2:1 ratio of gathering.

That, plus giving my silk petticoat a shake out to get the ruffle at the bottom more full and less squashed from storage, seems to help, at least when I tried it on at home. We’ll see how these two underpinnings help at the ball. I’ll have to do comparison pictures between this year and last year!

How do you get an 1830s silhouette? Do you have any creative ways to get the right look?

SaveSave

SaveSave

SaveSave

1933 Dress & Hat In Green & Gold (HSM #10)

The summer was incredibly busy and the things I was making unfortunately didn’t fit into the HSM challenges, but I’m hoping to get back to it for the end of the year. In that spirit, I finished a dress that qualifies for the HSM Challenge #10: Out Of Your Comfort Zone. I’m a bit late posting about it because it took me two tries to have a successful photo shoot and then a bit of time to edit my photos, but nevertheless, the dress was completed within the deadline. It qualifies in that I’m expanding into 1930s daywear with the making of this dress.

Unlike some garments I make which have a specific wearing in mind, this was different in that I was trying the idea out to see if this 1933 shape would be flattering on me. I do like the silhouette a lot and so hopefully I’ll make more similar dresses in the future. The years right around 1933 are a great mix of awfully silly, with their big neck frills/bows and unusual sleeves, and wonderfully elegant, with long hems that look especially flattering on those of us blessed with height.

The inspiration for this dress came from looking through many books of 1930s clothing. I wanted to try out the longer length bias skirt and I liked the bust spray detail I found along the way in 1930s Fashion: The Definitive Sourcebook (page 308). It’s not as crazy as some early 1930s neck frills, making it a good starting point for getting into this decade. (Look at these examples of neck bows from 1934, for example. They make my dress look subdued.) I did add some interesting sleeves though, based on a 1933 pattern for different sleeve types.

As I mentioned, I did two photo shoots for this dress. The first one failed pretty horribly, as I was out in public, pressed for time, and my phone camera wasn’t cooperating with me. But the second photo shoot was much more successful! It may have taken over 300 photos to get ones that I like, but because I was using a timer with burst photos on my camera I could run back and forth across my yard to my heart’s content, practicing all my best dramatic poses and facial expressions. Unfortunately, my phone camera isn’t outstanding enough to have taken great photos with the slanting afternoon sunlight. I’m calling it ‘artsy.’ (What I really need is an event to wear this to in a good-picture-background-setting, so that I can get better quality pictures…)

Anyway, here are the facts (just for the dress, as the hat doesn’t really qualify for the HSM):

Fabric: Green and gold small windowpane mystery (but likely polyester) fabric and gold silk scraps.

Pattern: My own. I draped the bodice and skirt pieces and referenced images to flat pattern the sleeves.

Year: 1933.

Notions: Thread, zipper, hooks, and hug snug.

How historically accurate is it?: Let’s say 95%. It’s entirely recognizable in its own time and made in a way that is straightforward and consistent with historic garments. The materials are not 100% accurate.

Hours to complete: 5-10 sounds likely, although I spread making this out over about a year, so it’s pretty hard to remember!

First worn: October 2017, for pictures.

Total cost: $1/yard for the fabric and all the notions from the stash, so let’s say $4. Win!

The back of the dress is pretty plain. All the interesting details are on the front. But here it is, for the sake of documenting all of the angles.

On the inside, the dress looks like this. The seam allowances are either left raw if they are on the bias or pinked if they are on the straight of grain. The neck is finished with a facing which is tacked in place. There are moderate shoulder pads to help achieve the correct silhouette. The bottom edge is finished with hug snug and an invisible hem. The dress closes on the side with a hand sewn zipper. There is a self fabric belt as well.

Now for a bit about my hat and hairstyle. First, the hat is a remake of a wool velour hat I purchased for $5 at a theatre sale. It was a bowler shape originally. I cut off the brim, cut down the crown, reattached the two, and then took some tucks in the crown to give it a more unique shape.

Hair-style-wise, I was going to do my usual close to my head 1920s/30s style (I explained and documented it in this past post) but it didn’t seem to compliment my hat, so I decided to try a more down around the chin, lightly curled bob style.

My method for this is as follows: I started with wet hair and a bit of Tigi Small Talk. I parted my hair on the side and added wave clips (3 on the longer side and 1 on the shorter side). Then I braided the rest of my hair to keep it damp while the front dried. A few hours later, I removed the wave clips and ran my fingers through the front sections to loosen them up a bit. To create the chin length look, I looped up large sections of my hair and pinned them to the top of my head. The hat hid all the pinned up bits nicely. My hair has much less volume when it’s damp (and even after it’s dried in a not-voluminous way if I don’t touch it at all), so the chin length curls had a nice close to the head look to them.

I’m pretty pleased with this hairstyle. It will definitely get tried out again someday. The outfit is fun, too! I love that the hat matches perfectly and ties the whole thing together. Plus, it reminds me of autumn, my favorite season.

SaveSave

When The Dress No Longer Fits (Mid-19th Century Edition)

A few months ago, I had a post with the same name that focused on two Regency dresses that had experienced closet shrinkage. The post was centered around what I did to make them wearable again. Around the same time I was battling the Regency closet shrinkage, I encountered the same problem with two of my older mid-19th century dresses as well. Boo!

It took me awhile to do anything about the problem and even longer to post about it, but here we are.

There was a time when the back edges of Evie’s bodice met from top to bottom. In fact, if you look at the pictures in this post from 2013 you’ll see that there was even excess fabric around the waist (yikes, but that does mean my waist has expanded a fair bit!); however, by February 2016, the bodice looked like this:

Uh oh! That wasn’t going to do for wearing at a ball! So I brought my corset and bodice (plus the other bodice I’ll mention shortly), got all laced up, and had a friend measure the gap between the back bodice edges and take pictures for documentation (so I wouldn’t forget the measurement, because let’s face it, my memory is pretty terrible sometimes).

Then I pondered my options. There was no way to let out the seams on this bodice, as the fabric has scarred at every point the needle and thread passed through. Plus, I didn’t leave much seam allowance anyway. Given my limited options, I decided that a placket was the best way to go. Many extant dresses using lacing as the method of closure on bodices and I’m sure that ladies in the 19th century changed sizes, too. I went on a hunt and couldn’t find an example of a bodice with a placket showing between the lacing, but museums have the benefit of being able to put their collections on forms rather than real people, which allows for easier adjustability to have the lacing edges touching. (If you know of any examples of a bodice laced with a placket under the gap, please let me know!) Anyway, I don’t think it’s unrealistic to assume that some ladies in the 19th century used the same method I did to allow adjustability in their bodices.

In addition to the placket, I also had to extend the bertha to bridge the gap. For that I was able to unfold my seam allowance, respace my gold ruffle, and cover the remaining gap with a rosette of gold like the one on the front of the bodice (another instance of the benefit of saving all the scraps from a project–this finished off the gold bits I had leftover from the original construction). Thankfully, these changes worked. I wore Evie to a ball in March 2016 and was happy as a clam. The placket was hardly noticeable and now the dress is much more adjustable!

The second bodice was for the dress named Annabelle, which was made in 2011 (and worn again later in 2011). This bodice also closed all the way down the back when it was made. Well, that’s not the case any more. Actually, a few years ago I’d already converted the closure from being hooks and eyes with folded over seam allowance to lacing with less seam allowance folded over in order to eek out a little more space, but that just wasn’t enough. By 2016, here’s how we were looking. It was time for a more drastic update.

I did the same thing I did for Evie, adding a placket and regathering the bertha to make it span the lacing gap. It took me about two years to get to it, but the result is that I was able to wear Annabelle to a recent ball in October, with a back that looked like this.

Not bad! The only thing I want to change is making that top edge actually stay matched rather than the one side riding up. But that’s a minor change. Overall, I’m pleased to be able to continue to wear this dress!

There we are–two more examples of how to fix the-dress-no-longer-fits problem! It was incredibly lovely to receive comments on the Regency post that other people also experience closet shrinkage and have already adapted their clothing to deal with it or are now inspired to do so. It is my hope that continuing to post about this topic will encourage others come to terms with their own changing size as well as ideas for how we can all deal and move forward while still being able to wear our finery.

SaveSave