

I’m very excited to share the details of my (somewhat) new 1884 Plaid Wool Dress! It’s ‘somewhat new’ because I actually finished it 8 months ago, but at that point it was July and the temperature was absolutely not acceptable for wearing a wool dress for photos! Instead of putting the dress away, I kept it out, waiting for colder weather and the opportunity for a photo shoot. I was hoping for snow… and this winter, I got it!

This dress is entirely inspired by the dress on the right in the fashion plate below from La Mode Illustree. I love the relative simplicity of the overall design and the waterfall of folded fabric on the skirt. Unfortunately, I don’t have an official source of the fashion plate or the year it is from, though my best guess is 1884.
I thought the design would be a great use of the tan and plaid wools that have been in my stash since 2012 (wow… that’s longer than I remembered!). In addition to those, a small piece of plain purple wool had made its way into my stash over the last eight or nine years and when I started this dress in November 2017 I decided it would be a nice addition to the tan and plaid wools in the form of trim. While not an exact match to the purple in the plaid, I think it helps to perk up the plaid and bring out the non-tan tones (the green and purple).

Skirt Construction
I started the process of this dress with the skirt. I wanted the fabric to hang just like the fashion plate, so I decided to drape a custom pattern as opposed to starting with anything that already existed. The only exception to that (in the skirt) is a base of drab greyish-brown cotton. The base pieces were adapted from a Janet Arnold pattern.
I used the skirt base for the front and side areas, in order to have something for the wool layers to be attached to. In the back of the skirt there is nothing but the tan wool.
Here is a look at the inside of the finished skirt. You can see the tan waistband along the top and the drab cotton base with tacking stitches all over it. The tacking stitches are holding the plaid fabric in place–you can just see the plaid selvedge poking out on the right side.

The pleats in the plaid aren’t part of the original fashion plate, which instead has a draped apron-type front. I tried that, putting my plaid with a vertical grain and a tan apron over top, but I really hated how it looked in wool–too heavy and rather unattractive. I played with the fabrics until I settled on the bias plaid. I hinted at the draping in the fashion plate by adding tucks to the plaid to help it drape just slightly rather than just being flat. You can see the resulting folds pretty clearly in the next photo.
The various overlapping pleats of the plaid front, waterfall side, and back were complicated. I was trying to achieve a back that looked like this dress held by the Met, in addition to the various lovely folds shown in the fashion plate.
It’s easy to draw things, but sometimes they don’t really work in actual fabric… I found that with the waterfall, especially. There’s actually an added loop of fabric tucked between the folds that isn’t part of the side piece at all! It’s just a little fake bit to help create the look of the fashion plate. I couldn’t figure out any other way to do it!

Given these various challenges and lots of other things to keep me busy in life, this poor skirt sat in a half finished state on the dress form in my sewing room for at least a year. I couldn’t remove it without marking everything… and I couldn’t make up my mind about what I wanted! (I say poor skirt, but it was sort of poor me, as I definitely reached a point of wanting the dress to get put away!)
Eventually, I did make up my mind and remove the skirt, but the partially finished skirt still sat around for ages before I finished it. Part of marking the skirt also meant figuring out the facings of the waterfall bits, because the fully finished edges had to be set into the waistband. Mr. Q actually asked at one point after the skirt was off the dress form whether I had intended it as decoration in my sewing room because it was there for so long… Nope!
All the various pleats on the skirt wound up making for a rather thick layer of things to sew through for the waistband. Here’s what the side with the waterfall trim looks like on the inside. I count at least 9 layers of wool in one spot! Given that, I decided to cut the inner side of my waistband on the selvedge of the fabric and leave it hanging down into the skirt instead of turning the seam allowances up as you would normally do for a waistband.

Setting the hems on the skirt was another challenge, though this was due to the fact that I did it by myself. It involved dressing in my corset, bustle, petticoat, and skirt, twisting and contorting while putting pins in the hem to mark the floor, then standing to look in the mirror to see if they were even, then adjusting… many times!
I eventually had everything marked to my satisfaction and could move on with the sewing. All sections of the hem are finished with wide bias strips of the drab cotton, the goal being to make the hems durable and less likely to catch on twigs, etc. than if they had more textured wool exposed (and I can say, after romping about the woods in this dress, that the hems did an admirable job!).

After using the drab cotton for both my 1896 Bicycling Ensemble and to line my 1863 Apricot Evening Gown I was starting to run low for this project. I cut the skirt base pieces, cut the bodice lining pieces, and then used pieced scraps to make the wide bias to hem the skirt. As you can see in the above photo, some of my bias pieces were only 6″ or so in length. And in the photo below, you can see the only bit of wide bias that was leftover when I was finished!

The final skirt detail to share is a hidden patch pocket! The skirt opens on the side front, along one side of the plaid, and underneath that opening is a pocket, perfectly sized to fit a cell phone and keys. The pocket is oddly low, near the knees, but that is because I wanted to make sure that any bulk from items in the pocket would press in towards my legs and not make an unsightly bulge on the exterior of the dress.
The photo below shows the pocket, as well as some of the hooks and thread loops that allow the tan fabric to attach to the plaid wool.

Bodice Construction
In addition to this rather complicated skirt, there was also a bodice to be made! The bodice is actually pretty straightforward. The pattern is adapted from the one I used for my 1885 Frills and Furbelows summer dress which in turn was adapted from a Janet Arnold pattern.
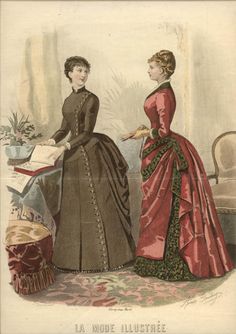
The bodice is completely flat lined in the drab cotton. There is a ribbon waist tape to help keep the back of the bodice tight against the body and to keep the bodice from riding up while being worn.

The bottom and front/neck edges are finished with bias strips of the drab cotton. The seam allowances are unfinished. The bodice closes in front with hooks and loops.
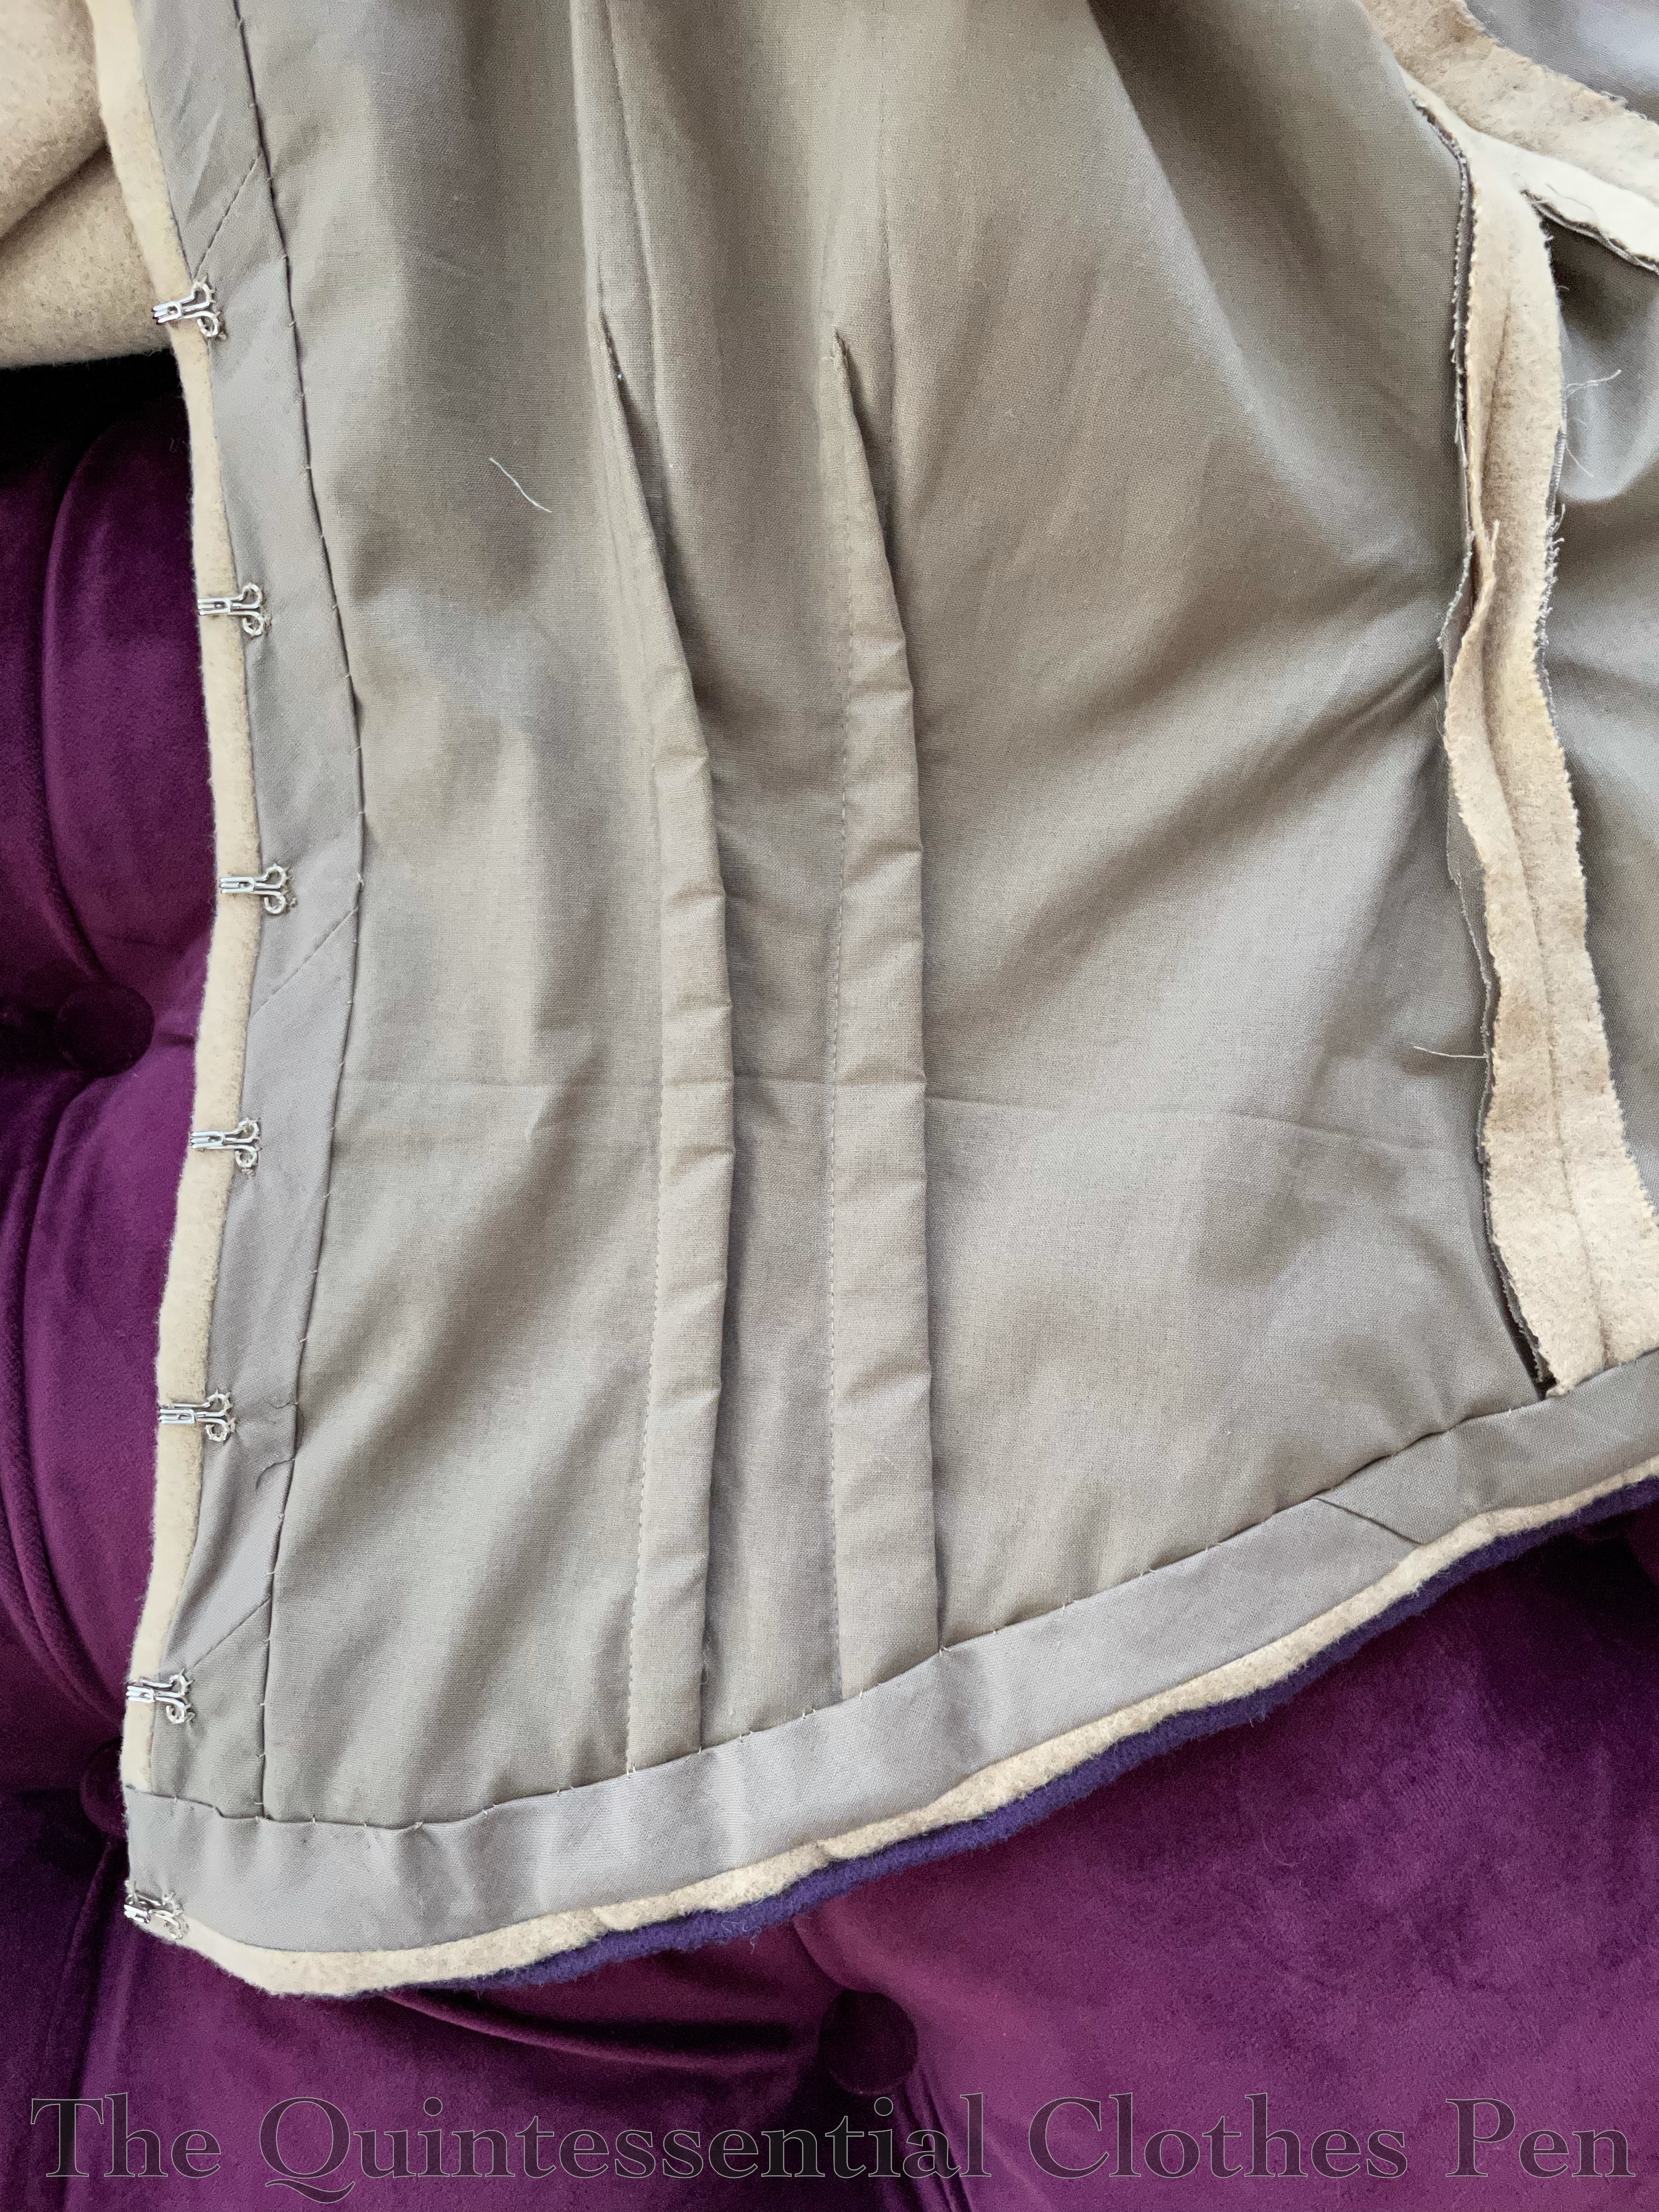
There are two other details I want to discuss, as well. First, there are the bust pads! I came across these in this c. 1885 extant dress and decided I wanted to give them a try to see if I could get that really exaggerated bust to waist ratio in my inspiration fashion plate (here’s the link to it again).
Turns out… no. I did not achieve that bust to waist ratio… but I think that’s more a factor of my waist size than anything. (It’s not as small as it was 10 years ago…) To keep the proportions of the fashion plate I would drastically need to increase the bust size. Perhaps in another dress.
In the meantime, this dress tried out the bust pads. They are made from cotton scraps with shaped batting layers inside. Below you can see the steps to creating the pads. Once sewn, these were tacked inside the bodice to keep them in place.
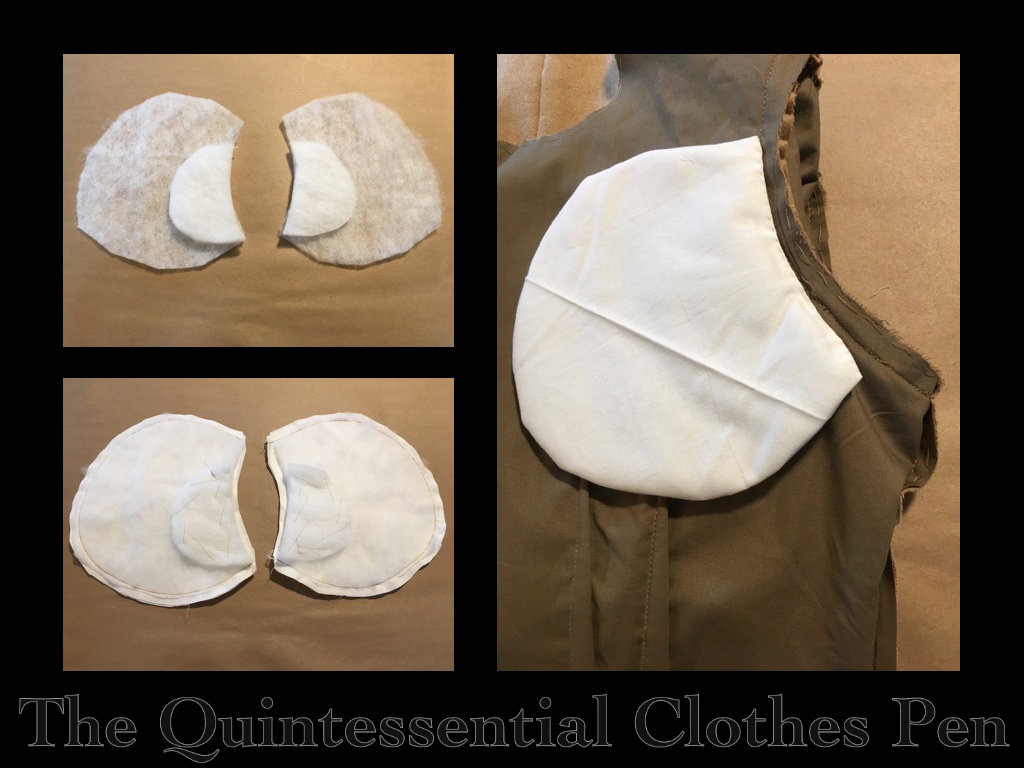
The second detail still to discuss is the neck ruffle. I finished this dress shortly after completing my 1875 Reception Dress last summer and I had my antique fluting iron on the brain. After pondering the fashion plate neck and sleeve ruffles for awhile I decided to use my fluting iron to ruffle some cotton to use for my dress’s neckline and cuffs.
I was well practiced by this point, having fluted lots of silk for the 1875 dress, so away I went! The cotton strips are cut on the grain and folded along the long edge–no hemming required!

Attached to the neckline the trim looks like this. The waves are a little crushed where they are tacked down, but the folded edge maintains a nice wavy shape. I found that my cotton frayed more than I wanted it to, so I went back and whip stitched over the raw edge to keep it tidy.
I used the same cotton for small ruffles on each cuff, as well. Like the neck ruffle, these are hand sewn inside the finished sleeve openings.
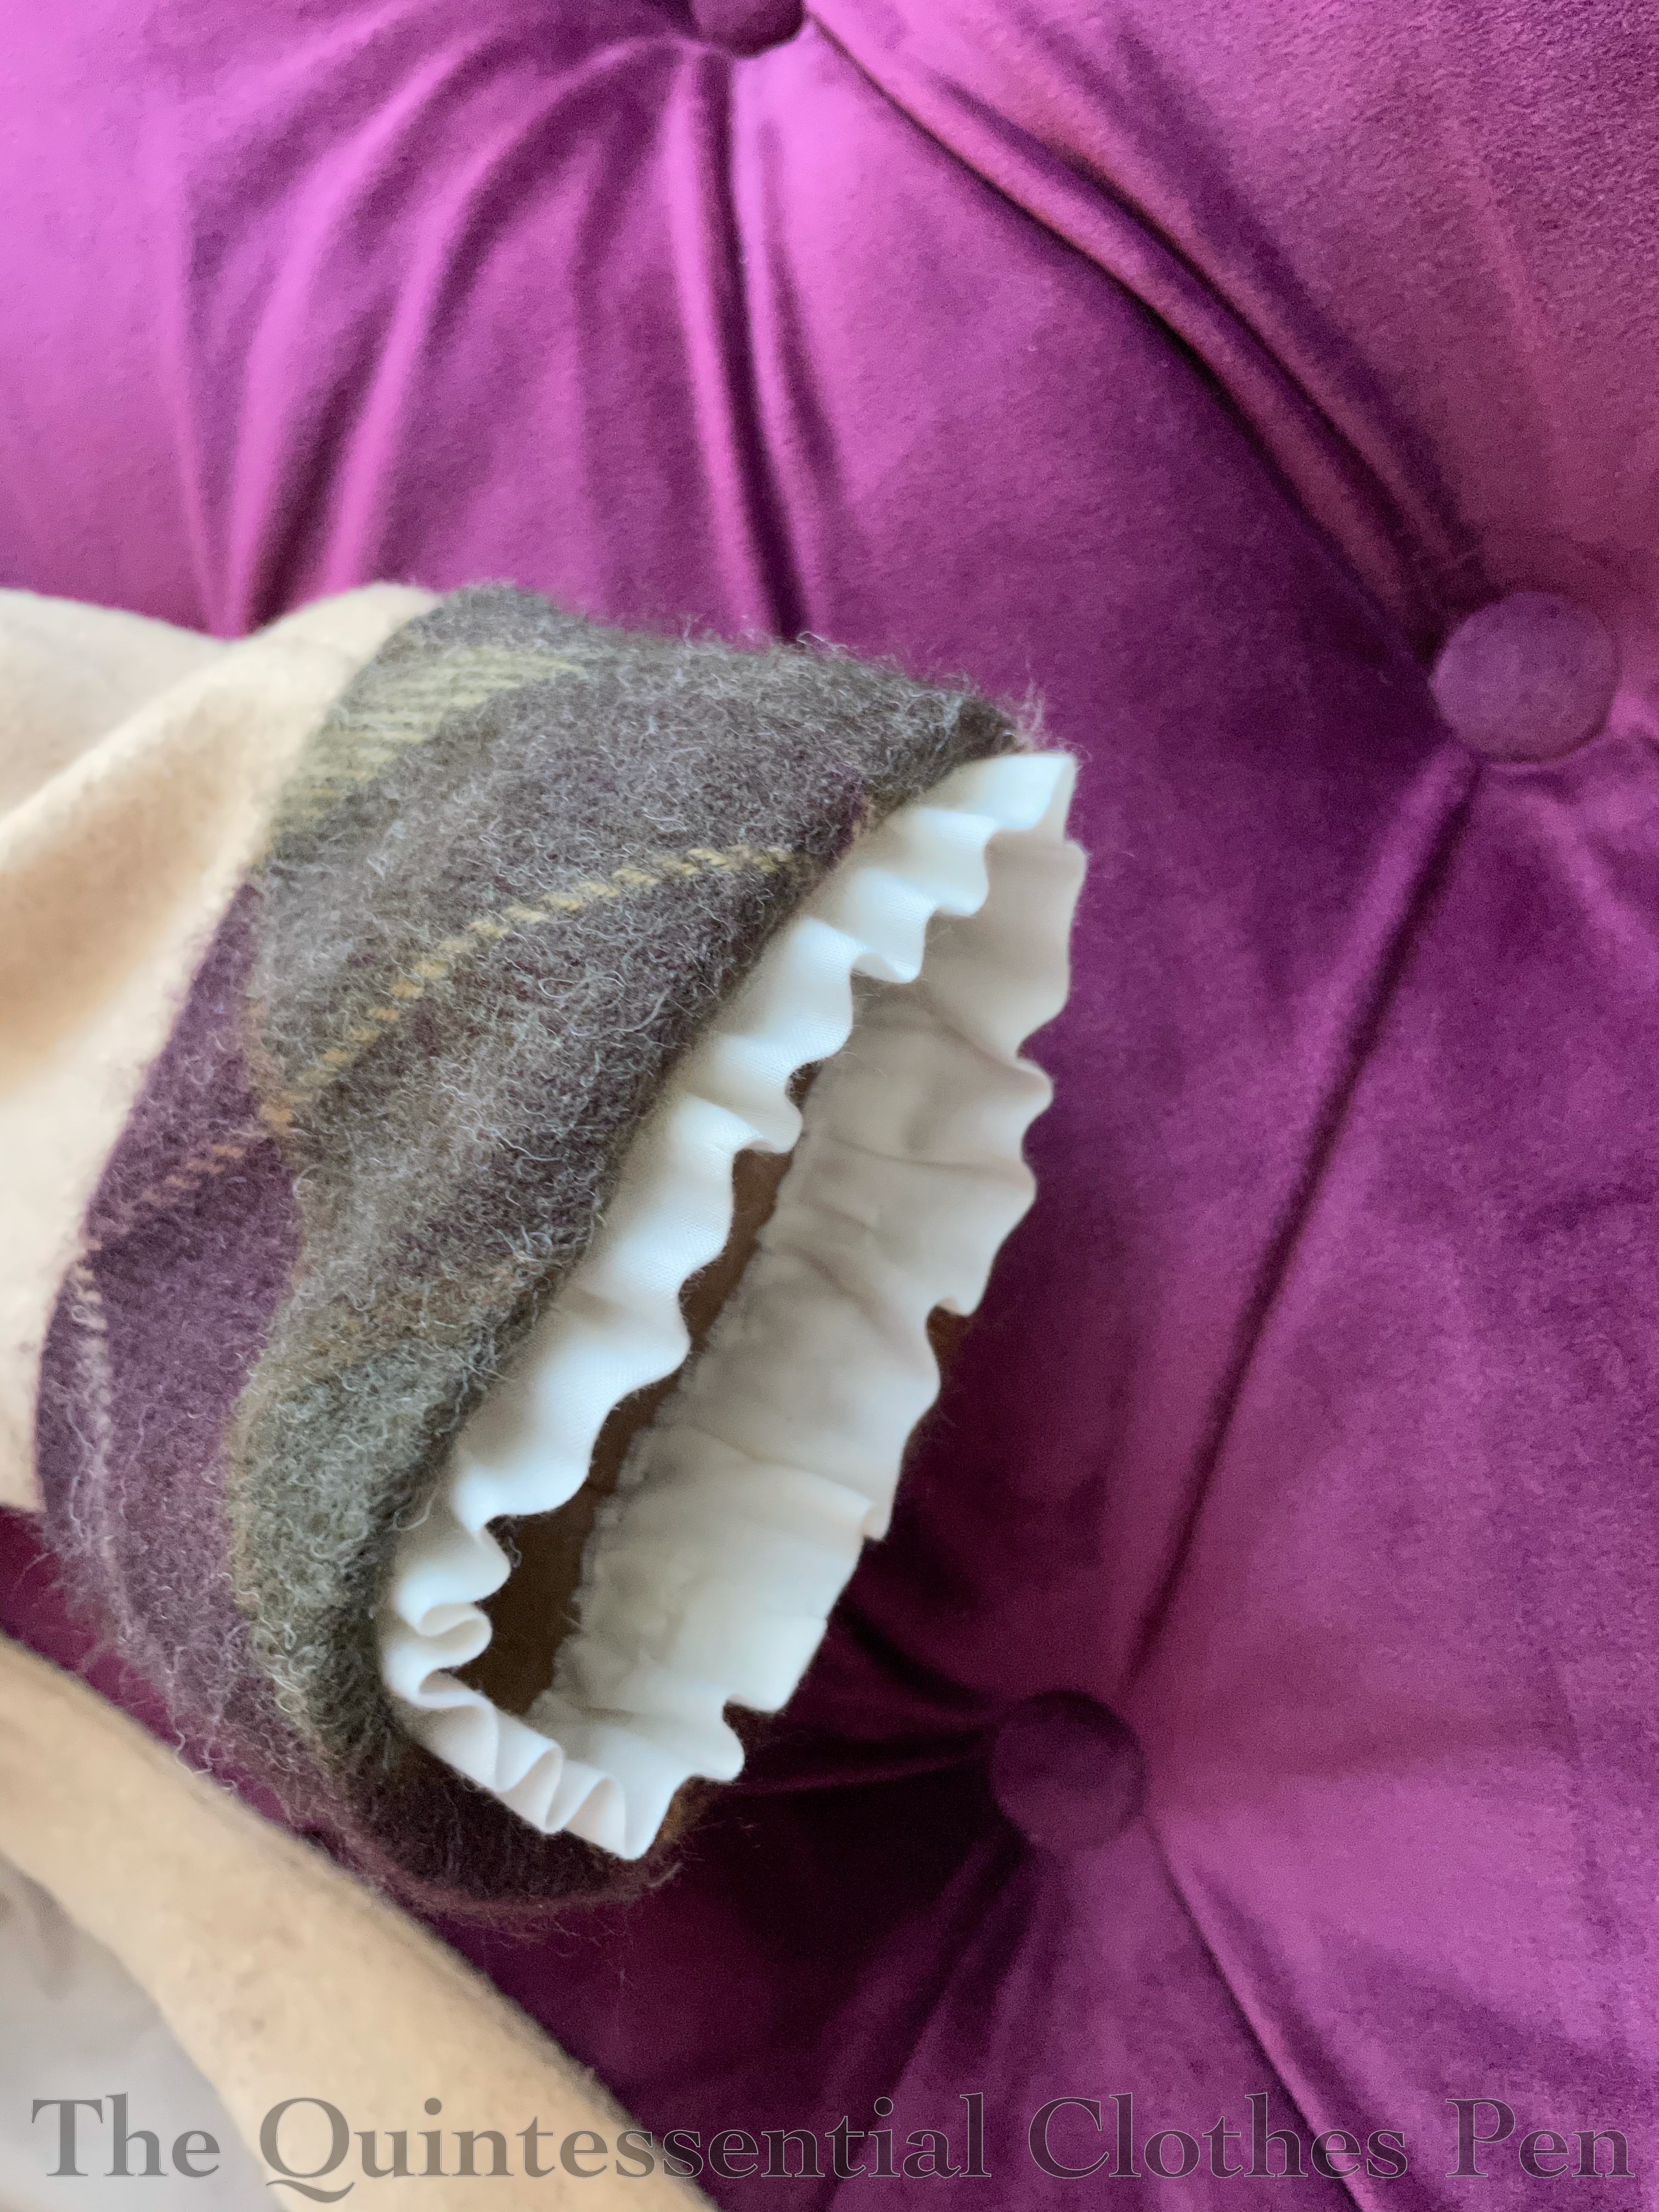
You can see the finished effect of the ruffles in the next photo! Subtle, but adding a nice edge finish.
While the ruffles are sewn to the inside of the finished bodice, the purple bodice trim and plaid cuffs are sewn similarly but on the outside of the finished bodice. I didn’t want them to add bulk by turning all the way under into the bias edging, so they have the raw edges turned under and then they are hand sewn to the outside of the bodice.
I decided the purple trim around the neck wasn’t quite interesting enough and so I added a narrow fold of bias cut plaid to help transition between the two solid colors. This also helps the bodice to feel that it belongs with the skirt, so that the only plaid isn’t just on the skirt front and cuffs.

Final details
Both skirt and bodice are mostly assembled by machine with hand finishing, including trimming, hemming/facing, closures, etc.
I used about 8 yds of the different wools and drab cotton for the ensemble. These materials, plus notions etc., cost just under $30. This was definitely helped by the fact that most of the fabrics were purchased for just $3 per yard at the local discount fabric store!
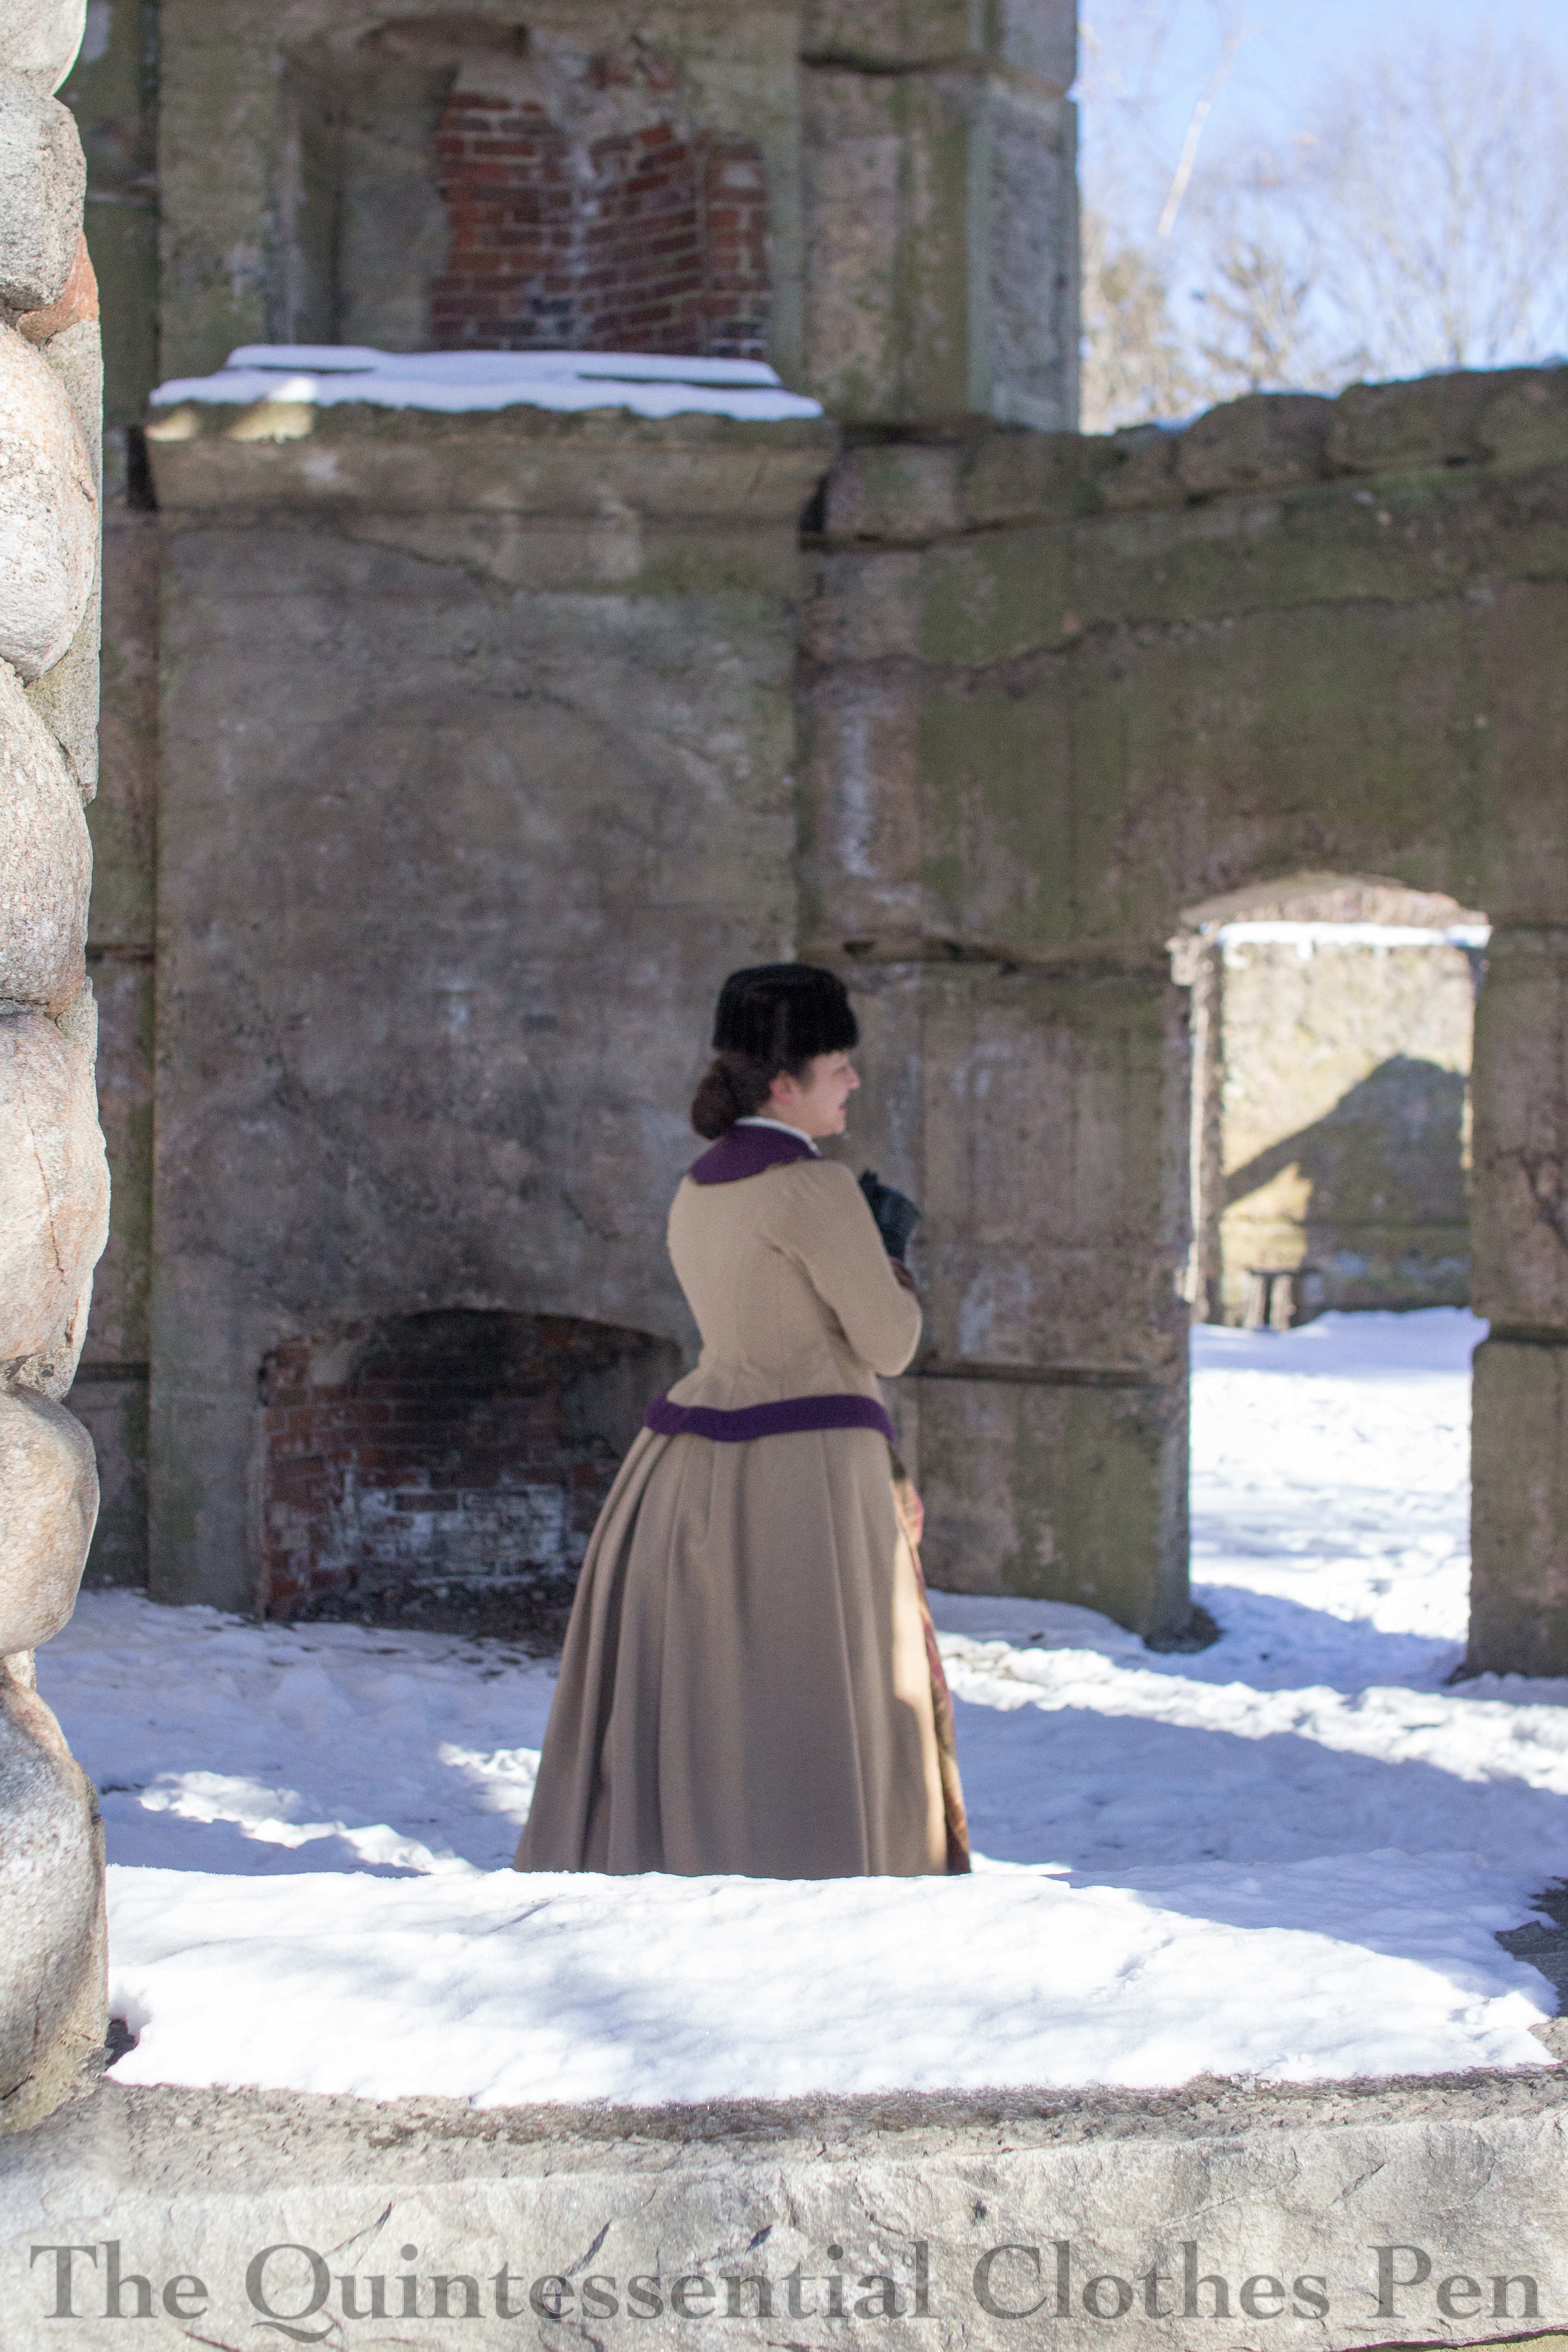
The skirt is a bit heavy, being made of about six yards of wool and cotton, but it’s not unreasonable. And, it’s quite warm! I was perfectly warm in the approximately 20 degree Fahrenheit cold for all of these photos except for my nose, chest, and hands. Never fear, though, I was wearing the additional layers of my newly completed mantle and muff except for during these photos! (And there will be posts coming up about them as well, with lots more photos!) With all my layers the only part of me that was cold was my nose!
In the end, I’m more pleased with the overall dress than I expected to be! I was always excited about the skirt and the purple swoop of the upper bodice trim, but once I started making the dress in wool I was worried the bodice might be too plain and maybe even boring… but I like the fit and shaping very much (especially in the back!) and I think that helps balance out the relatively simple style. It makes sense for a wool dress to be well tailored but more simple in decoration and style than its silk counterparts.
Also, I’m very pleased that my idea from 2012, to use these fabrics for a bustle dress, has finally been achieved! I think there’s still a yard or so of tan wool in my stash, but I’ve sewn my way through a good 8 yards of it. That’s great stash busting!

Dear Quinn,
You’ve succeeded in persuading me that 1880s fashion can be wonderful, and this gown did it. It’s beautifully tailored and it feels so +real+. Wool works so well for the draping the decade was obsessed with and it has the period’s gravity of design, too.
No wonder you didn’t want to wear it in summer weather…it would be perfect for a drafty house or carriage!
Where were the photos taken, might I ask? The house is a ruin but it’s still grand and the setting reminds me of a castle bathed in that winter so-clear, so-pale light.
Hoping springtime is breathing sweetly on your locale. It certainly is here; the snowdrops and crocus popped out just after all the ice melted, as if they’d been on springs and now the daffodils are nodding and I am weeding, weeding, weeding. Hence little costume progress here.
Very best to you and yours,
Natalie
Dear Natalie,
So wonderful to hear about your spring! Spring has arrived here in the form of daffodils pushing green stems up towards the sun and the beginnings of buds on flowering shrubs and trees. We’ve had a few days at 70 degrees, which is bit confusing, though lovely! Also some soaking springtime rain… hopefully it encourages the flowers!
I didn’t realize that 1880s fashion needed persuading to be appreciated. 😉 I find the decade to be wonderfully endearing in its oddities that it doesn’t occur to me that others might not see it favorably! I truly appreciate the compliment that this dress was persuasive in that regard! I am in agreement about the qualities of the wool and the types of places where a dress of this weight makes sense to be worn!
You are spot on with your thought about the photo location! The location is actually named Bancroft’s Castle. 🙂 It’s on the top of a hill in Groton, MA. The house was built in the early 20th century and was gutted by fire just a few decades later. It’s now available as public land and is usually quite crowded with families and visitors, but in the snow we mostly had it to ourselves, which was perfect! The only bits left are the stone walls and chimneys, standing strong against the encroaching vegetation. In the winter the vines and trees aren’t noticeable, but in the summer there is a curtain of green that turns the castle into a different type of magical place–more forest/woodlands/fairy feeling. I like both, though I especially like how empty it was during winter!
Best,
Quinn
Quinn,
Absolutely gorgeous! I think this and your apple picking outfit are my all time favorites of your creations. You can’t tell in the photos that the purple doesn’t match exactly. It looks perfect. I would love to know about the hat!
Frankie
Thank you, Frankie! Both of those outfits are great, though I have a hard time picking favorites, myself! 🙂
Thanks for asking about the hat! You anticipated some content in my next post. 😉 It’s actually a hat I made in 2013 to go with a 1917 outfit. Until the next post, you can read about the original inspiration in this past post: https://thequintessentialclothespen.com/2013/12/01/hsf-24-1917-fur-hat-and-revised-muff/
Were you simply looking for the full plate, including the text, to complete the documentation? If so, you should be able to see it here:
At any rate, you were spectacularly correct about the date! You have adapted a creation of Mme Bréant-Castel from LMI 1884, No. 7.
Thanks for sharing the full plate, David! The extra information at the bottom is informative and great to see.
I’m also hoping to someday be able to attribute the fashion plate to a source like a museum or collection. Some reverse image searching hasn’t yet yielded that information to me. 🙂
This is lovely! And what a great setting for your photo shoot.
Thank you, Laurie! It was so fun to have an unusual, exciting, interesting background for photos, to have just the right amount of snow to walk around in but not be overwhelmed by, and to have the location to ourselves!
So pretty and warm looking! Thanks for showing what the bust pads look like. I’ve wondered what shape they needed to be.
Ooo, yay! It’s wonderful that you appreciated that detail! Thanks for letting me know that and for the compliment!
WoW!! Stunning. Love the dress profile & the person in it. Love you. ~ Mom
Thank you! 🙂
Yay! Seeing these photos made me smile 🙂 And the little line of plaid on your bodice is my favorite part of this I think – neat that it was a last-minute addition when it seemed so thoughtful! 😉
-Raven
Yay for smiles! Thanks for enjoying the details with me. 😉 It’s fun to know what your favorite parts of the dress are. 🙂
Have you considered compiling your blogs into a book? In college many years ago II took a course in “Flat Pattern” and I would have enjoyed reading about your creative ideas and projects. Maybe there is a company that would sponsor it!