HSF #13: Cotton Print Evening Bodice For Georgina

A few months ago, I had a master plan to use the leftover yardage from Georgina, my 1858 cotton print day dress, to make an evening bodice in addition to her current day bodice for versatility and washability. Luckily, I was able to complete the bodice and a new hair crescent before my life exploded in June and I was smothered under an immense amount of work. I am pleased to have work, don’t get me wrong, but I was so exhausted by the end of the month all I could do was sleep and be disoriented! I’ve just come back from a vacation and feel like I can peer out from under my rock and join the world again! So, to celebrate constructing historic clothing for myself rather than other people, here is a post about a really neat addition to my historic wardrobe! And it fits into the current HSF challenge #13: Under $10, a bonus since the HSF challenges haven’t lined up very well with a lot of my projects this year.

9357
c. 1855 new evening bodice, with previously constructed skirt. Worn with all the usual underpinnings (chemise, my new corset, drawers, stockings, hoops, and petticoat) and accessorized with gloves, fan, earrings, and a new hair crescent. Oh, and I’m wearing burgundy velvet shoes! No picture of that, though.

Fabric: Reproduction mid-19th century cotton print, also used for a day bodice, and plain white cotton.

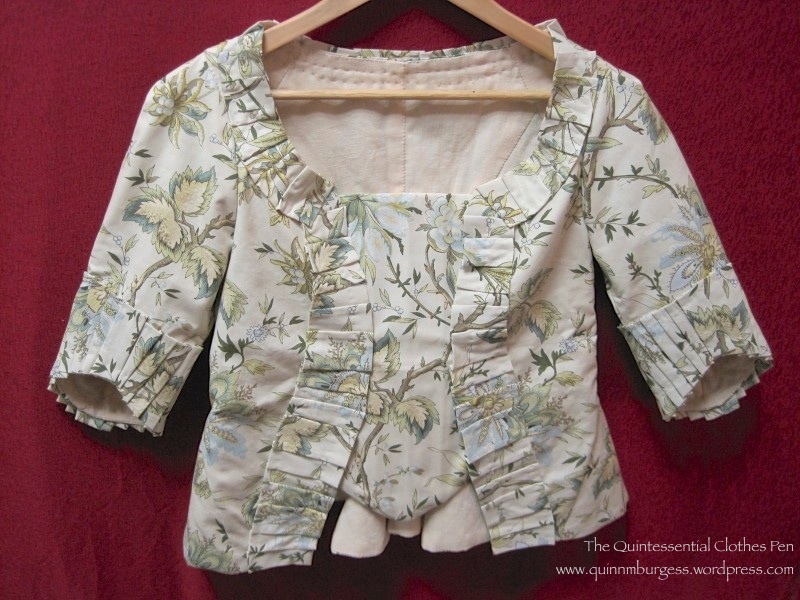
Pattern: I began with Past Patterns #701 but altered it extensively to fit me, to have pleats and gathers on the exterior, and to have an evening neckline. The sleeve pattern was drafted by me.

Year: c. 1855

Notions: Thread, plastic wire ties for boning, hooks and eyes, and cotton cording.

How historically accurate?: Based off of historic examples, constructed with accurate details… I think the only compromise is the plastic boning, which I used because I didn’t have the right length in metal, and because plastic is easily washable (and I want this to be a garment that can be washed easily–that’s part of the goal in having a cotton evening bodice!).

Hours to complete: I have no idea… 32 hours maybe? I really didn’t keep track at all on this project.

First worn: To a mid-19th century ball in June (one of the few moments of respite in my crazy month).

Total cost: About $3 for approximately 1 yard of historic cotton print and a lot of stash materials, which count as free, since I have no idea what I paid for them at this point! Let’s call the total about $8.

IMG_0951 (1 of 1)
Inside of the bodice.

As you know, I like things to be tidy. All of the seam allowances are either hidden between the layers of fabric or nicely finished. There are plastic bones in the darts and the side seams. The bodice is machine sewn and hand finished. (One amusing mistake is that I cut the lining with a center front opening for fitting purposes (and left lots of seam allowance, as you can see) but then forgot to leave seam allowance in the back… So the lining doesn’t extend all the way to the folded edge of the print, but it’s all covered up so no one will ever know and it fits just fine… it’s just one of those amusing things!)

IMG_0953 (1 of 1)
From the back with the right side flipped open.

The bodice closes with hooks and bars. I wanted to use metal bars but make sure they wouldn’t been seen, so I let about ¼” of the print extend past the points of the hooks to create an overlap. I also left extra print extended past the bars, in addition to all the seam allowance, in case I want or need to adjust the size of the bodice in the future. The bars are especially hard to spot on the print, but if you look carefully on the left you can see them. The neck and armsceyes both have very narrow cording.

9347
Appreciating those who have served our country. The ball was held in a local town hall which had lists for all the 20th century wars. I don’t think they have 19the century war plaques, but we thought it was a nice photo opportunity.

I had very specific inspiration for this dress, since you don’t see too many cotton ball gown bodices. Here the specific examples which I referenced: sheer white bodice, sheer peach bodice, blue and white striped bodice, yellow and white bodice, floral print bodice, and purple print bodice (this last has a matching separate pelerine shown worn over the bodice, but the “off the shoulder neckline” in the description tells us that underneath is an evening bodice).

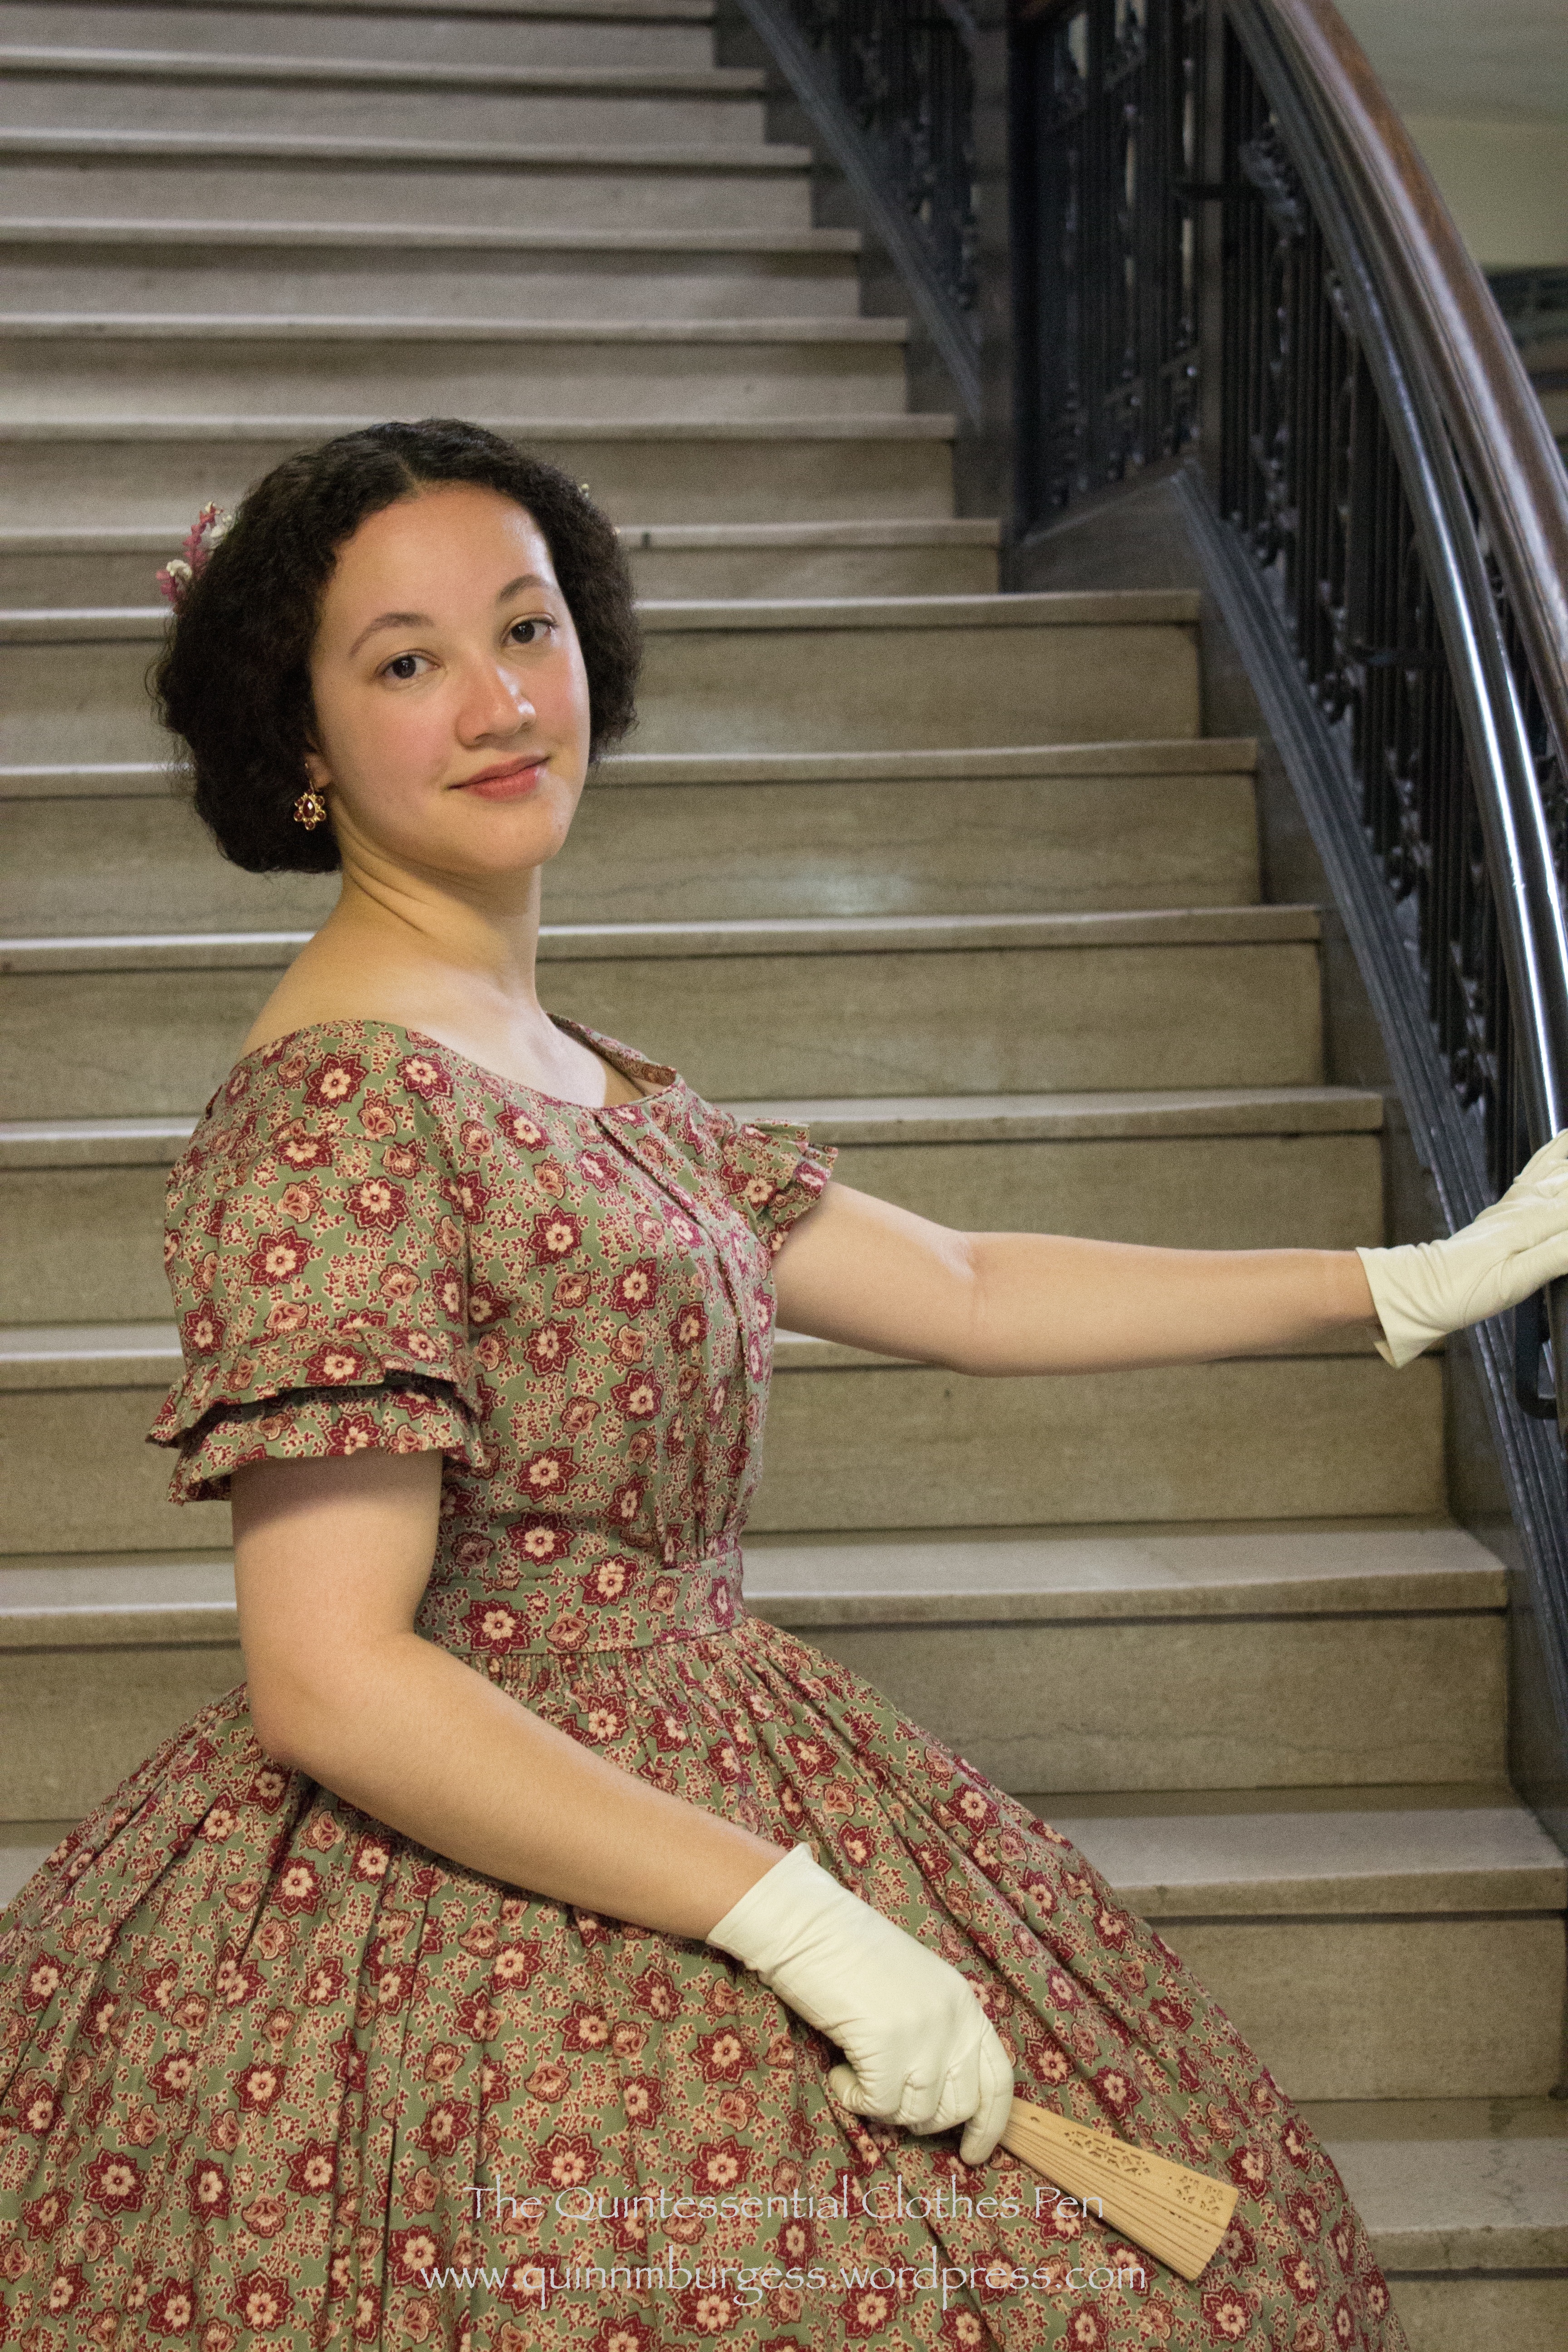
The defining design details were obviously the low neck and short sleeves, but there were other common details as well, such as double puffs or pleats to trim the sleeves, tubular sleeves without very much fullness at the top or bottom, 1.5″-2″ waistbands sitting on the outside of the skirt waistband, and gathered or pleated fullness on the fronts and backs (no darts on any of these cotton bodices). Some of the bodices have a yoke around the top so that only the bottom portion of the bodice is gathered, but this look says “young girl” not “grown woman” to me, so I opted for a bodice without a yoke.

In terms of construction, to have enough fabric in the print for the pleats and gathers on the print fabric, I first constructed and fit the lining. Then I separated one side of the lining to use as a pattern and added width to have space for the pleats I had planned. Once I had cut the print, I reassembled the lining and mounted the pleated print on top. From there on I treated the two layers as one.

9359
Bodice closeup and a nice view of my successful 1850s round hair style!

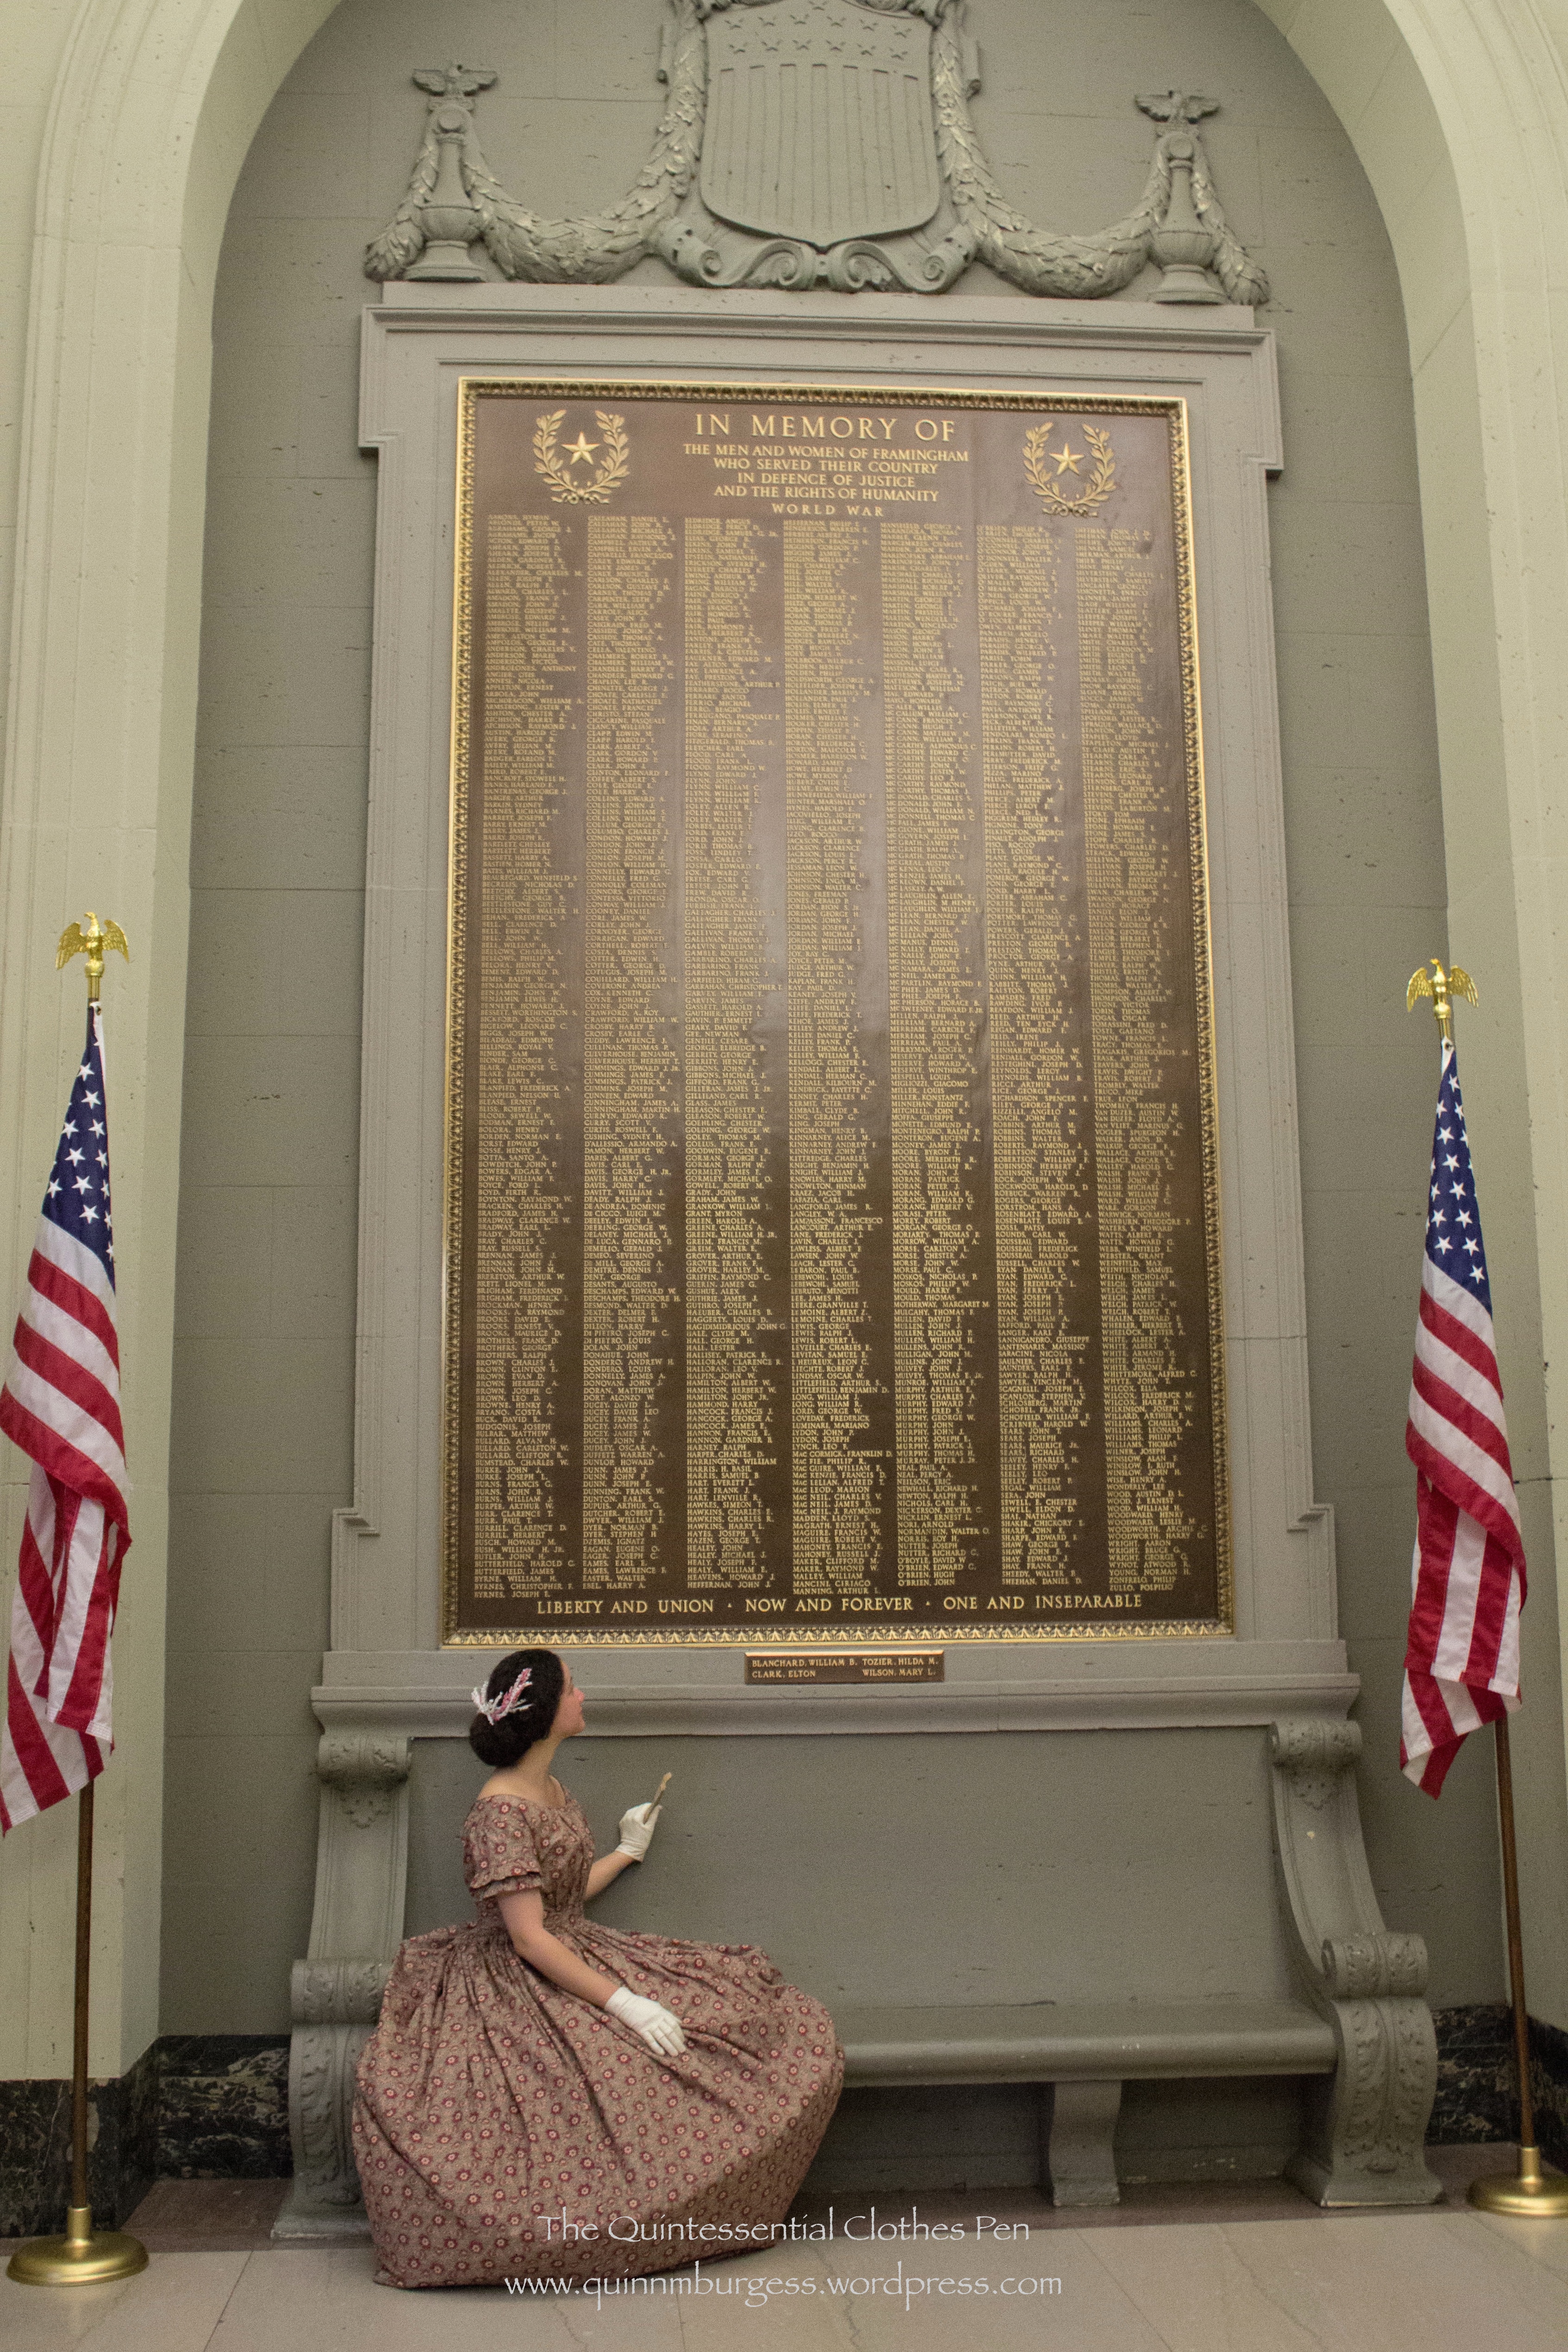
As I’ve looked at 1850s images and fashion plates in comparison to early 1860s, especially, what I’ve noticed is that the 1850s really attempted to make a woman’s head look round or wide, whereas by the early 1860s the styles begin to grown upward and become vertically elongated. Here are some great examples of the round 1850s hair look: from 1851-53, c. 1855,  from 1857, another 1857, yet another 1857, one more from 1857, and one from 1859. Here’s a super wide 1850s style and here is an example of the different shape of the early 1860s. The very round shape is what I was attempting to complement my 1850s bodice.

How? Well, I put gel right at the roots of my hair while it was still wet and then encouraged it to stand up from my head rather than being pulled back. I let it dry like that and it stayed all day. Later in the day, I styled it for my 1940s Anne Adams dress photos by brushing it out (and brushing my hair when it’s dry makes it big!!!). There was lots of added hair spray for that style, so when I went to restyle it there was plenty of fullness and air in my hair.  I puffed the fronts and pinned them up and behind my ears then did a big roll with the rest.

The finishing touch was a new hair crescent that I made specifically to complement the colors in the cotton print. The crescent is made up of fully wired millinery flowers in ivory, some of which I dyed to be pinkish. Each extension is a singular stem and I just twisted them together until I liked the result. Lastly, I sewed a hair comb in the center to help attach it to my head and stabilize the wires. Each side also has a bobby pin to secure it to my head so the extended bits don’t flap around while I’m dancing.

9360
Back view, and new hair crescent.

I’m super pleased with the end result: the bodice, the hair style, and the hair crescent! Oh, and the pictures (thanks!). And I had a marvelous time at the ball–it was one of the class of events which makes me feel radiant and at which I really enjoy myself (compared to those when I’m grumpy and grouchy at the world). And all the smiling and dancing gave me a lovely natural rosy glow in the pictures. The aloof face is my attempt at a 19th century portrait face (it took a long time to capture a picture then, which is my rationale for why everyone has a generally serious face!). You had to pick something you could keep still for a long time, and a big smile is hard to maintain without movement or looking staged.

HSF #8: Red/Gold Regency Reticule

It’s been a little while since I completed a challenge for the HSF 2014. I’ve either been too busy to sew (sad!) or I’ve been sewing things that haven’t remotely lined up with the HSF challenges as they came along (also sad!). This time, though, I found a little bit of time to finish up a partially completed Regency reticule, which perfectly fits challenge #8: UFOs and PHDs (click through the link if you don’t know what those acronyms mean in sewing-land!).

IMG_0791
Red/Gold Regency Reticule

I was inspired by this Regency reticule pattern which is available on Etsy. I just made up my own pattern based on the image. I didn’t quite get the proportions right so mine is more elongated and a little less round, as well as not bunching up very tightly at the top due to the fabric I chose, but I’m happy with it nonetheless. Perhaps some day, I’ll try making it in a lighter weight fabric and see if I can get a more round shape and a tighter gather at the top (on the other hand, this one does hold its shape nicely… and a lighter weight fabric may not do that for me).

The facts:

Fabric: Polyester upholstery fabric for the exterior and gold polyester taffeta for the lining.

Pattern: Made up by me.

Year: c. 1810

Notions: 1 tassel, gold and burgundy thread, and about 1 yd of gold silk ribbon.

How historically accurate?: Accurate in style but not in materials or use of a sewing machine… Let’s say 50%.

Hours to complete: Not many, though I didn’t really keep track since I worked on it in small bits of time.

First worn: Has not yet been used.

Total cost: Free (all stash materials)!

Ca. 1860 Corset For ME! (HSF #4)

Unfortunately, I’m a few days late completing my project for the HSF Challenge #4: Under It All. I tried really hard on this one and was definitely motivated to keep working consistently by the fact that I wanted to get it done for the HSF challenge. I was held up by a severe cold that took me out for about a week and other dealing with life things. So while I’m late, I’m super glad and excited to be done with this project (especially because the last two days have included a lot of flossing, and my fingers/hand muscles are so done with that for awhile)!

The last ca. 1860 corset I built for myself was made in 2006 or 2007 (you can see it in this post). It’s been worn more times than I can count and has stood up to the test of time and tension well, especially considering it was the first corset I ever made! But the time has come for a new corset for this period–one that is made to fit me using all the skills in pattern making and construction that I’ve gained over the last 7 or 8 years.

I realized while working on this corset that aside from building my first corset to fit me in 2006 or 2007, the only other stays or corsets I wear with my historic clothes that were made to fit me are my 18th century stays, my short Regency stays, and my c. 1825 long stays. I wear other corsets from 1895 (hm, I don’t think there are pictures of this on the blog), 1903, and 1913 but none of them were constructed to fit me (though I did construct them beautifully!). I’ve made them work and they sort of fit me, but all of them have problems because they were made to fit other people: a busk that’s too long, being a little small, especially in the hips, or being too big and needing a tuck. So it occurred to me that I should probably invest in making a few more corsets made to my measurements for the Victorian and Edwardian periods. Sounds obvious, but it was a revelation to me when I sat down and thought about it!

So that’s what this project is: a ca. 1860 corset made to fit me!

IMG_7441
Hard to see the details in this picture, I know. There will be detail shots and lots of commentary in an upcoming post!

I have lots of other thoughts and inspiration to share with regard to this project, but I expect it to be lengthy, so I’ll be writing it up in a separate post. Plus, I want to post about my completion of the challenge as soon as possible. So for now, the very much condensed details.

Fabric: 1/2 yd ish of white herringbone cotton coutil and ½ yds ish of slightly slubby pale pink silk satin.

Pattern: Created by me, though I began with a corset pattern in Norah Waugh’s Corsets and Crinolines and made lots of changes to it.

Year: c. 1860.

Notions: Metal boning, metal grommets, a recycled metal busk from my old ca. 1860 corset, regular weight ivory thread, and heavy weight ivory thread for flossing.

How historically accurate?: Pretty darn accurate, I’d say. I wanted to create a corset using the seam lines found in extant garments, but which don’t seem to be much recreated. I used construction methods that are accurate as far as I know. Let’s say 90% because you can’t ever quite make it to 100% if it’s modern, can you?

Hours to complete: A lot. I didn’t keep track, but I’ve been working on this for  at least 2 or 3 weeks, and some of those days have been a full day’s work on the corset, not just evenings.

First worn: Has not been worn yet, but will be worn to a ball in March.

Total cost: Free (all stash materials)!

HSF #3: A Pink Regency Belt Style Sash

My project for the HSF Challenge #3: Pink is a silk belt style sash for my square neck 1812 gown. It’s a small project because I’m working on multiple other bigger projects (two different Regency dresses and a new 1850-1870 corset–more on those in the upcoming months) and I didn’t want to distract myself. Part of my decision to make a belt style sash came from the discussion with friends that led to my previous post on adding variety to Regency sash styles (this post explains what I mean by a belt style sash, in addition to explaining other Regency sash styles).

And now, as usual, on to the facts:

Fabric: None.

Pattern: None.

Year: c. 1810

Notions: About 1 yard pink silk ribbon, some unknown yards of 28 gauge wire, maybe 2 yards grayish blue hug snug, a hook and bar, and thread.

How historically accurate?: Silk is an accurate material, but nothing else is for this time frame. So… maybe 80% for looks and 40% for materials.

Hours to complete: More than it should have because I made the buckle from scratch. Let’s say 4.

First worn: To a vintage dance performance in January.

Total cost: Free (all stash materials)!

IMG_0673
I didn’t have a non-sparkly buckle in the right size, so I decided to make one from wire. At first I thought that it might be cute with the scallops around it, but it didn’t look solid enough from a distance. So I experimented with weaving ribbons through and around the scallops. I tried gold silk ribbon first but it ended up looking like straw. In the end I decided on the hug snug because I liked the color.
IMG_0678
A closeup of the finished buckle. It wound up looking rather braided.
IMG_0675
The finished effect.

For the performance, I sewed the belt to the dress even though I also sewed a hook and bar to the belt. The idea is that I can wear it with another dress in the future if I want to!

HSF #1: The Make Do Shift

The first challenge of the Historical Sew Fortnightly (HSF) 2014 is Make Do And Mend. At the start of January, none of my in-progress projects qualified, unfortunately, and while I wanted to get started on the right foot for the HSF 2014 and not miss the challenge, I also didn’t want to make something just to make something. I don’t need more stuff with no purpose and it’s hard to stay motivated on a project if you’re doing it “just because.” So I racked my brain trying to think of what would work for the challenge and be useful, without taking too much time. I settled on the idea of turning a gifted partially finished linen man’s shirt into an 18th century shift suitable for the mid-to-late 18th century. That just happens to be the period my 18th century court gown will be from at some point this year. Useful! I made an 18th century shift a few years ago, but it’s actually late 18th century/Regency, with short sleeves, which really isn’t appropriate for the rest of the century. This new shift will sort of work for the entire century, though the sleeves aren’t really full enough to be entirely accurate for the first half.

IMG_0672
1750-1790 shift

All of the seams are flat felled. The neck is narrow hemmed. It’s pretty accurate, though I did have to add center front and center back seams, which is not usual for these garments. Those seams are due to the fact that the shift was super wide after I cut it out because I had to deal with the neck opening of the partially sewn shirt, and that was gathered into the neck, so was super full. There was just way more fabric than was needed, so I seamed it and kept the extra with the other scraps I had. I’m sure they’ll get used someday! It’s very nice, light linen.

The facts:

Fabric: Linen reused from a partially completed man’s 18th century shirt.

Pattern: I used Mara Riley’s 18th century shift draft to cut my pieces, though I had to make some adjustments given that I didn’t start with fabric yardage.

Year: Loosely 1750-1790.

Notions: Thread.

How historically accurate?: It’s 100% hand sewn using 18th century stitches and cut in the manner of an 18th century shift, so lots of points for that. I probably should loose a few points for using polyester thread. The only other odd thing is that I have seams up center front and center back, but they did piece a lot in the 18th century, so it’s not totally out of the realm of possibility, given that this challenge is Make Do and Mend. I give it 90%.

Hours to complete: 10-15 maybe? I didn’t really keep track.

First worn: By the hanger. I probably won’t wear this until I have more things to wear with it!

Total cost: Free!

HSF #26: Curtain Along Jacket, Finally!

The theme of the final HSF challenge of 2013 is “Celebrate”:

Make something that is celebration worthy, make something that celebrates the new skills you have learned this year, or just make something simple that celebrates the fact that you survived HSF ’13!

This challenge gave me the inspiration to finally finish my Mineral Felicite jacket!

Here’s the story… I bought the fabric over a year ago, but didn’t really start thinking about the project until this summer. I made a mock-up of my chosen 1760s pattern and thought I’d sorted out the fitting issues, but after I’d cut and sewn the real fabric I had many more unexpected problems! I was discouraged, but recieved some really wonderful opinions about what I should do to proceed from you lovely readers. I decided to go with a stomacher front jacket with self fabric pleated trim around the neckline/front opening and around the cuffs on the sleeves, like this jacket at the Met. Then, back in September, the HSF inspired me to make a stomacher to match my jacket for challenge #19. After that, my jacket languished, because I really wasn’t very excited about finishing the sewing for the other decisions I’d made and the alterations that needed to be done to make the jacket the way I wanted it. But I really wanted to finish the jacket in this calendar year. And that brings us to the present, with the jacket finally completed. Yay! I am SO ready to celebrate that this jacket is finally done!!!

IMG_7431
Front. The pleated trim easily hides the pins used to attach the stomacher!
IMG_7432
Back. It’s wrinkly and without a waist on the hanger. You’ll just have to believe that it looks better on a body!

The facts:

Fabric: Almost 2 yds Waverly Mineral Felicite printed cotton and 1yd (I think) peach linen

Pattern: Heavily altered, but I started with the 1760-1790 jacket pattern in Janet Arnold.

Year: Well… 1760s is what I was aiming for in the beginning.

Notions: Thread and cane boning.

How historically accurate?: 60%. This definitely falls in the historic costume category of my wardrobe. The Waverly fabric is in the spirit of the 18th century, but not accurate, though the linen is accurate as are the methods of construction. The trim is based on extant garments but not specifically reproduced. The jacket is 100% hand sewn.

Hours to complete: So many! With all the problems and alterations and re-sewing I completely lost count.

First worn: Has not been worn yet.

Total cost: $30 maybe? I don’t remember exactly what I paid for the fabrics.

Hopefully, I’ll get some more pieces of an 18th century ensemble done at some point and get pictures of the jacket on me. Don’t hold your breath, though, it could be awhile!

HSF #25: Spat-Boots, Or Gaiters

IMG_6934
Spat-boots! WIth my 1917 ensemble.

It’s time for the details about my entry for HSF challenge #25: One Metre. I prefer saying I’m wearing “spat-boots” though the actual items I’m really wearing are shoes and “gaiters.” Spat-boots has more of a ring to it, I think.

IMG_7193
Close up of my spat-boot look.

The gaiters very effectively turn my sort-of-1910s-but-more-1920s American Duchess Gibsons into very 19-teens spat-boots! If you look at the first black and white image of suffragists in this previous post you can clearly see some similar spat-boot styles. And if you look at the images on my Sewing Project: 1917 Blouse and Accessories Pinterest board you can see multiple examples of the spat-boot style. Some boots, like these from 1917 at the Met, were made in two different colors of leather. That’s the look I was trying to imitate, except that I was doing it with a separate garment rather than as a part of my shoe. The Met actually has quite a number of early 20th century gaiters, made out of leather and cotton. If you’d like to see these examples, I’ve pinned many of them to my Early 20th Century Accessories Pinterest board.

The facts, you ask?

Fabric: Scraps of heavy unbleached cotton.

Pattern: Created by me.

Year: 1917.

Notions: Thread, black elastic, cotton twill tape in various widths, and plastic buttons.

How historically accurate?: 90%. The look is right but the materials are a mix and match of right and modern.

Hours to complete: 6-8? Took a few fittings to get them ready to sew. Then finishing and sewing on buttons took awhile.

First worn: At a Thanksgiving event in Plymouth.

Total cost: None. The fabric was left over from a grad school mock up and the notions were all from my stash. (See that odd marking in the middle of the center piece? That’s blue sharpie that soaked onto this part of the fabric from notes I wrote on the mock up… There was a lot of blue sharpie, and I couldn’t cut around it and still have enough fabric. Doesn’t show on the outside though!)

IMG_0626
Here’s an inside view of one of the gaiters. You can see that I’ve used three different kinds of twill tape to bind the seams and the edges. All of the sewing was done by machine except sewing on the buttons.

There are a few things that I would change consider changing if I made these again in some other reality. #1: Having my buttons spaced closer together, as the extant gaiters and boots do. But in this case I only had a limited number of buttons to work with! #2: Potentially putting a strap with a buckle to go under the foot rather than elastic, since the buckle method is what extant gaiters have. But the elastic worked so well and you really couldn’t see it… so I probably wouldn’t actually change this, especially since I don’t have the right sort of buckles in my stash. #3: Making the back part that comes down over my heel longer. I was aiming for a nice swoop up from the part held down by the elastic, but the back of the gaiters kept popping up over the edge of my shoes, which was a little uncomfortable. I spent a lot of time during the day I wore these pulling the back of the gaiters down.

IMG_6965
Like a flamengo, I’m standing on one leg and pulling down the back of my gaiter, which had popped up over the back of my shoe.
IMG_7195
Overall, I’m super pleased. These were quite successful. You should try some yourself!
Product links in this post contain an affiliate code, which provides a small benefit to my shoe fund. This does not affect my impressions and reviews of this product.

SaveSave

HSF #24: 1917 Fur Hat (And Revised Muff)

The theme of this HSF challenge is Re-Do, in which you re-do a previous challenge for a second time or you re-do a challenge you didn’t complete the first time around.

IMG_6968
The muff and hat are super soft. In addition to keeping my hands in the muff, I also spent a fair amount of time hugging and patting it.

I’m using my recently completed 1917 fur hat and recently revised matching muff as my entry for this challenge. I think the hat and muff best qualify for a re-do of Challenge #20: Outerwear, which I did complete with my 1822 Walking Dress (so this would be a re-do of a challenge I already completed). So, the facts:

Fabric: About 1/4 yd of faux fur and about 1/4 yd cotton flannel.

Pattern: Created by me.

Year: 1917.

Notions: Thread, polyester batting.

How historically accurate?: 90%. Tall round hats of this sort were popular in 1917, though they were likely made of real fur rather than faux fur. The revised muff has a great shape for lots of periods, including this one, and is pretty accurate, aside from the fact that it is also faux fur. Oh, and neither hats nor muffs were insulated with poly batting… but it is so warm! And no one will know except me, and those of you reading this!

Hours to complete: Unknown. I was pretty tired while working on the hat, so I know it took longer than it should have. The muff was quick (like 2 hours) but that’s just the revision. I don’t remember how long it took to make it originally.

First worn: At a Thanksgiving event in Plymouth.

Total cost: None, since I bought the fur and the flannel specifically for the muff over two years ago I count it as a stash project.

Here’s my inspiration for the hat. I was aiming for the exaggerated shape on the right. I don’t think I quite achieved that, unfortunately. I did actually spend a lot of time patterning the hat so it would look right sitting at an angle rather than straight. I think I was so cold when I was wearing it that I pulled it down to cover more of my head and thus pulled it off of its angle. Sad! But also, the thick fur rather obscures the shape anyway. I chose not to do the sticky-up bit, partly because I ran out of time, and partly because I just didn’t know what to make it out of, since the hat was already fur. Oh well. I really like that middle hat, too…

638f173724a14b7943037d74c9ef21bb
1915. In the collection of the NYPL.

I originally made the muff for an 1860s event a few years ago. I had a plan to use gathered silk for the two ends, but it turns out it looked cooler in my head than when I executed the plan. Also, the muff was a little longer than I liked, so I decided that for this event I would shorten the muff by taking off the silk ends and folding the fur over to cover the ends. Here’s my Pinterest board of inspiration for this project. You’ll see that there are various shapes and sizes of muffs c. 1917. Mine is somewhere in the middle in terms of size and shape.

IMG_7369
This is sort of what I was envisioning with the silk on the ends, but it is a little underwhelming. You can see the cotton flannel lining in the middle. It holds body heat, so it doesn’t feel cold when you put your hands in!
IMG_7371
This is the other side. It’s pretty twisty and sad.

But as I said, I took the silk off, folded the fur down over the ends, and sewed it directly to the flannel. (I have plans to use the silk for a Regency reticule at some point in the future… yay recycling!) You can see the results in these next few pictures. I’m quite happy with the results! The muff is about 3″ shorter and I like the look of the fur on the sides.

IMG_6958
See the fur on the sides? That used to be the silk part.
IMG_7221
This was our silly shot and it shows off the new muff end well.
IMG_7225
Another silly shot, just for fun. I think maybe I was trying to keep my face warm?

1917 Knitted Sweater Of Angorina Annotated Pattern

In the spirit of the HSF #23: Generosity and Gratitude, I thought I’d share an annotated version of my altered 1917 Knitted Sweater Of Angorina pattern. Who knows, maybe you’re thinking of knitting this sweater or something similar right now, and this version of the pattern and these notes will come in super handy as you knit your own sweater?

The original:

knisweofangpic1-1
“Knitted Sweater of Angorina” from the Star Needlework Journal 1917.

My version:

IMG_7359
“Knitted Sweater of Angorina”

Here’s the pattern. I’ve put original directions in [brackets] if I’ve changed them, and included my version before the original version, so you can compare. My version of the pattern and any notes that I have added are in italics.

One of the major reasons I adjusted the pattern in places was in attempt to make it to my measurements (40″ hips, 30″ waist, and 36″ bust). On size 5 needles I was knitting 10 stitches in 2.5″, which was 2 squares of the pattern, and knitting 1″ vertically every 6 rows, which was 1 square of the pattern. If I had knit the sweater with this gauge and the original directions I would have had a sweater body that would be too big: about 12″ too big around and 3″-5″ too long in length.

ABBREVIATIONS: K – knit, P – purl.

MATERIALS: 6 skeins of probably acrylic yarn (of medium weight and unknown length, though on the smallish side, as modern skeins go (and I could have used 7!)); 5mm and 3mm knitting needles; 6 plastic buttons.

[17 balls of THE AMERICAN THREAD COMPANY’S Article 200 “Angorina” Fluffed Cotton, size 4; two long celluloid knitting needles No. 5 and two shorter celluloid knitting needles No. 3; 6 buttons.]

DIRECTIONS:

For the Basket Stitch pattern: Cast on a number of stitches divisible by 10 and 2 over for the edge stitches. (So the 10 is the repeat of two squares of the pattern, and the 2 extra are for the edges.)

lst Row: Slip the first stitch (this is the edge stitch) , * then knit 5, and purl 5, repeat from * to the end of row ending with P 6, turn (the last stitch is the edge stitch).

2nd, 3rd, 4th, 5th and 6th rows: Same as first Row.

7th Row: Slip the first stitch, * then P 5, and knit 5, repeat from * to the end of Row, ending with K 6, turn.

8th, 9th, 10th, 11th and 12th Rows: Same as 7th Row.

These twelve rows form the pattern, which is knit throughout the sweater.

Sweater

Cast on 82 [112] stitches on the long celluloid needles No. 5 and begin to K at the bottom of the sweater,

FOR THE BORDER: K plain back and forth for 14 rows or 7 ridges (2 rows of plain knitting back and forth form a ridge).

Now begin to knit the pattern as directed above.

K 12 [14] rows, then begin to decrease 1 St at the beginning and end of every third row until 10 stitches have been decreased at each end.

There are now 62 [92] stitches left in the row and 42 rows of pattern K.

Continue knitting the pattern for 120 [138] more rows or until 15 patterns or 180 patterns are K in all. (That last section of directions about 15 patters and 180 patterns confused me, so I just sort of ignored it…)

This completes the length of the back.

Next Row: Slip the first stitch, then knit 5, and P5 for 21 [31] stitches (this is for the right shoulder), bind off 20 [28] stitches for the back of the neck, the next 21 [32] stitches left on the needle are for the left shoulder.

Now put the first 21 [32] stitches on to a spare needle or thread (and I added one stitch to make it 22, so I would have a 20 stitches for the repeat of the pattern and one for each end), and continue knitting the left front as follows: K the pattern for 8 rows pattern (this is for the shoulder), then begin to increase 1 stitch at the beginning of every second row, this is at the neck – until 20 stitches have been increased.

There are now 42 [52] stitches in the row.

K the pattern without increasing for 84 [104] rows, then begin to increase 1 stitch every 3rd [7th] row at the outer edge (the outer edge was the end of each 2nd row for me) (the front edge must be straight) for 10 [5] times (that means I knitted in this fashion until I had increased 20 stitches), then K 12 more rows without increasing. (I chose not to knit the final 12 rows: I just ignored that direction.)

16 patterns of 192 pattern rows are now K for the length of, the front. (Again, I was confused by this direction and just ignored it.)

K 7 ridges plain back and forth for the border. (7 ridges equals 14 rows.)

Bind off loosely, break the thread. Now K the right front to correspond with the left front, then sew up the underarm seams (this is the length of 10 ½ patterns or 126 pattern rows from the bottom of the sweater up). (I waited to sew up my seams until I was entirely finished knitting the sweater. As before, I ignored the confusing direction about the number of patterns and pattern rows.)

Repeat the directions from right after “This completes the length of the back…” for the right front of the sweater. I’ve repeated them here, with the changes I made for knitting the right side instead of the left. 

Next Row: Slip the first stitch, then knit 5, and P5 for 21 [31] stitches (this is for the right shoulder), bind off 20 [28] stitches for the back of the neck, the next 21 [32] stitches left on the needle are for the left shoulder.

Now put the first 21 [32] stitches on to a spare needle or thread (and I added one stitch to make it 22, so I would have a 20 stitches for the repeat of the pattern and one for each end), and continue knitting the left front as follows: K the pattern for 8 rows pattern (this is for the shoulder), then begin to increase 1 stitch at the beginning of every second row, this is at the neck – until 20 stitches have been increased.

There are now 42 [52] stitches in the row.

K the pattern without increasing for 84 [104] rows, then begin to increase 1 stitch every 3rd [7th] row at the outer edge (the outer edge was the beginning of each 2nd row for me) (the front edge must be straight) for 10 [5] times (that means I knitted in this fashion until I had increased 20 stitches), then K 12 more rows without increasing. (I chose not to knit the final 12 rows: I just ignored that direction.)

16 patterns of 192 pattern rows are now K for the length of, the front. (Again, I was confused by this direction and just ignored it.)

K 7 ridges plain back and forth for the border. (7 ridges equals 14 rows.)

Bind off loosely, break the thread.

FOR THE SLEEVES (The following directions are what I used for my first attempt at a sleeve for this sweater… I didn’t like the resulting sleeve and chose to take it apart and try again. I’ll include my revised sleeve pattern following these directions for the sleeve I didn’t like. You can read more about why I changed my sleeve pattern and see pictures of the before and after, in this previous post.):

Cast on 72 stitches, and K the pattern for 3 rows, then begin to decrease 1 stitch at the beginning and end of every second row until 5 stitches have been decreased at each end.

There are now 62 stitches left in the Row.

Knit 120 rows of pattern. [K 9½ patterns or 114 rows without decreasing.]

Now slip the stitches on to the No. 3 needles, and K plain back and forth for 18 ridges for the cuff, bind off, and sew up the seam.

Place the sleeve in the armhole, so that the sleeve seam and underarm seam meet. (I waited until all of my pieces were knit before sewing any seams.)

(So now, here is my revised sleeve pattern):

Cast on 72 stitches (I added a single plain knit row, as a transition), and K the pattern for 3 rows, then begin to decrease 1 stitch at the beginning and end of every second row until 5 stitches have been decreased at each end.

There are now 62 stitches left in the Row.

Knit 60 rows of pattern without decreasing. Knit 60 rows, decreasing 1 stitch at the beginning and end of every 4th row. [K 9½ patterns or 114 rows without decreasing.] (Again, I ignored the first part because it is confusing.)

Now slip the stitches on to the No. 3 needles, and K plain back and forth for 10 [18] ridges for the cuff, bind off, and sew up the seam.

Place the sleeve in the armhole, so that the sleeve seam and underarm seam meet. (I waited until all of my pieces were knit before sewing any seams.)

This second sleeve pattern worked much better for me, so I repeated it for my second sleeve.

FOR THE BANDS: Cast on 12 [16] stitches on the No. 3 needles. K plain back and forth for 2 1/2 [4] inches (25 rows), then make a buttonhole as follows: K 4 [7] stitches. bind off 4 [6] stitches, K 4 stitches (this leaves 4 [5] stitches at each side of the 4 [6] stitches bound off).

In the next Row cast on the 4 [6] stitches bound off, thus forming a buttonhole.

K back and forth for 3 1/2 [3] inches (35 rows), then make the next buttonhole.

Continue knitting plain back and forth making 4 more buttonholes so that there are 6 in all, always leaving an interval of 3 1/2 [3] inches (35 rows) between each buttonhole.

(I calculated these measurements and row lengths between buttonholes to fit into the length of the front of the sweater before the V neck starts… in my case, that length was 21″. If your gauge is different you might want to consider changing these directions to suit you.)

(At this point I became very worried about running out of yarn. I wish I would have had enough to make the bands as wide as the original pattern called for… but I had to make them narrower, so my revised pattern will reflect that. If you have enough yarn you should keep the band wide and only adjust for length.)

K 1/2 [1] inch (5 rows) after the sixth buttonhole then begin to decrease 1 stitch at the beginning of every second row until 8 stitches have been decreased.

There are now 8 stitches in the row. Knit for awhile… turns out I knit plain for 45 rows. Begin to increase 1 stitch at the end of every 2nd row until 8 stitches have been increased… in theory that was my plan, but since I was running out of yarn, I just slowly decreased until I ran out of yarn. [K plain for 18 inches or long enough to go around the neck, then increase 1 stitch at the beginning of every second Row until 16 stitches are on the needle again.]

K plain for 21 inches or as long as the wider part of the band with the buttonholes, bind off loosely.

Sew the buttonhole part of the band on to the right front, the narrow part around the neck and the plain wider part to the left front, this should be done very carefully, then sew on the buttons.

Whew! At this point I just need to sew up my seams and sew on the buttons. Yay!

HSF #23: 1917 “Knitted Sweater Of Angorina”

IMG_7359
My “knitted sweater of Angorina.” (Thanks to Mr. Q, who consented to take pictures of me with no hassle on my first ask!)

And here’s the image from the pattern, for comparison.

knisweofangpic1-1
“Knitted sweater of Angorina” from the Star Needlework Journal 1917.

This is my entry for the HSF Challenge #23: Generosity and Gratitude. This challenge “is not about a particular item or aesthetic, it’s about celebrating the generosity of spirit and willingness to help others that makes the historical sewing community great, and giving credit and thanks to those who have contributed to our collective knowledge without expecting payment in return.”

My special thanks goes out to the person, or people, who took the time to put this knitting pattern out there on the internet, for free! I wouldn’t have been able to complete this project with the pattern, obviously. Thanks!

As it is, I’m really pleased to be done knitting and putting together this sweater. I’ve been using my sew time to knit, which has been a nice change and fun, but I do miss sewing! So now it will be back to sewing, which is good, because I have a lot of projects I’m working on!

Also, this sweater was a bit stressful… It started out on a relaxing note, but after completing the front, back, and one sleeve, I realized that it was taking way more yarn than I expected and I started to get worried I might run out before finishing the sweater! So as I was knitting my brain kept trying to think of ways to conserve yarn and wondering if there would be enough. I actually wound up completing unraveling one sleeve in order to knit it with less yarn… and thank goodness I did, because I barely had enough yarn to get as far as I did, and that was still with alterations to the original pattern to accommodate my dwindling yarn pile. You see, after knitting the front, back, and the two sleeves, there’s still the buttonhole/neck/button band to be knit, and you need enough yarn to stitch the seams! The sweater is quite long, so these things take more yarn than you might think. I used up literally almost all of the yarn I had…

IMG_5014
The first sleeve before it was unraveled and re-knit.
IMG_5015
The new sleeve shape with alterations to the pattern.
IMG_5019
Sewing up a side seam. The front, back, sleeves, and band are all knit separately, and flat, and then seamed together, creating side seams, armsceye seams, underarm seams, and a seam to join the band to the front/neck opening.
IMG_7364
These are literally the only pieces of yarn I have left… The longest is about 6″!

Here are the facts:

Fabric: 6 skeins, of unknown length, of probably acrylic yarn.

Pattern: 1917 Knitted Sweater of Angorina.

Year: January-March 1917. Here’s a blog post about the history of knitting in WWI that explains why the months are so specific.

Notions: Heavy thread to sew on the buttons, and 6 plastic buttons.

How historically accurate?: Acrylic wasn’t invented until 1941 and as fas as I know plastic buttons of the sort I used weren’t in use in 1917, but as a historic costume I’d give myself 95% on looking right, even if the materials aren’t 100% historically accurate.

Hours to complete: Oh goodness… mounds. It took me the entire month of October, and that was working on the sweater for 2-4 hours almost every day.

First worn: For pictures! Hopefully I’ll get to wear it later this month for an event.

Total cost: $2.50 for the knitting needles, $3 for the yarn, $1.50 for the buttons… total = $7! Now that is a project total I’d love to have more often!

Things I’m proud of in this sweater? #1: It’s the first sweater I’ve ever knit! #2: I was really careful to keep the pattern perfectly knit, sometimes taking out 5-10 rows after noticing I had made a mistake, so I could go back and fix it (let me just say that un-knitting, like seam ripping, is not nearly as exciting as knitting or sewing!). The end result is that the pattern is perfect everywhere… yes, I’m a perfectionist. #3: I did a really good job sewing up the seams, especially on the front band. #4: I learned out to knit a button hole! It’s not that hard, really, just casting off one row and on the next, but it does take your brain a little bit to figure it out. As I went along my button holes became neater and neater, as you would expect. #5: The band fits nicely around the neck opening and is a lovely way to finish off the sweater edge.

IMG_0596
Where front meets front band. See that seam? Nope, you don’t, because it looks like I knit it all at once! (ooo, and see my button holes?)

Things that make me call this sweater “wonky” or “original” or perhaps just simply “hand knit”? #1: That I had to cut corners because I was running out of yarn. The part of the band that goes around the neck is not as wide as the pattern calls for. And the part of the band that should have the buttons sewn to it is, well, non-existent. I literally ran out of yarn. #2: Because the button part of the band is non-existent, the neckline isn’t actually symmetrical… the side with the buttons doesn’t widen to be the same width at the button hole side. So the neck V doesn’t quite want to center, and the buttons/button holes wind up being slightly off center, too. (Honestly, though, I don’t think other people would notice those things if I didn’t point them out…) #3: Even with my sleeve alts, the sleeve is still rather large around (can you imagine if I hadn’t re-knitted them?!?) and they are a little long, even with a cuff. #4: Now that it’s finished, the sweater is rather heavy and prone to sagging some in places like the sleeves. Oh well!

IMG_7365
See the side with the buttons? Yup, no band there!
IMG_7361
Looking at my slightly loose, and rather long, sleeve.

For a first try at knitting a sweater, and using a historic pattern, I’m calling this one a  success!