

In the spirit of the HSF #23: Generosity and Gratitude, I thought I’d share an annotated version of my altered 1917 Knitted Sweater Of Angorina pattern. Who knows, maybe you’re thinking of knitting this sweater or something similar right now, and this version of the pattern and these notes will come in super handy as you knit your own sweater?
The original:

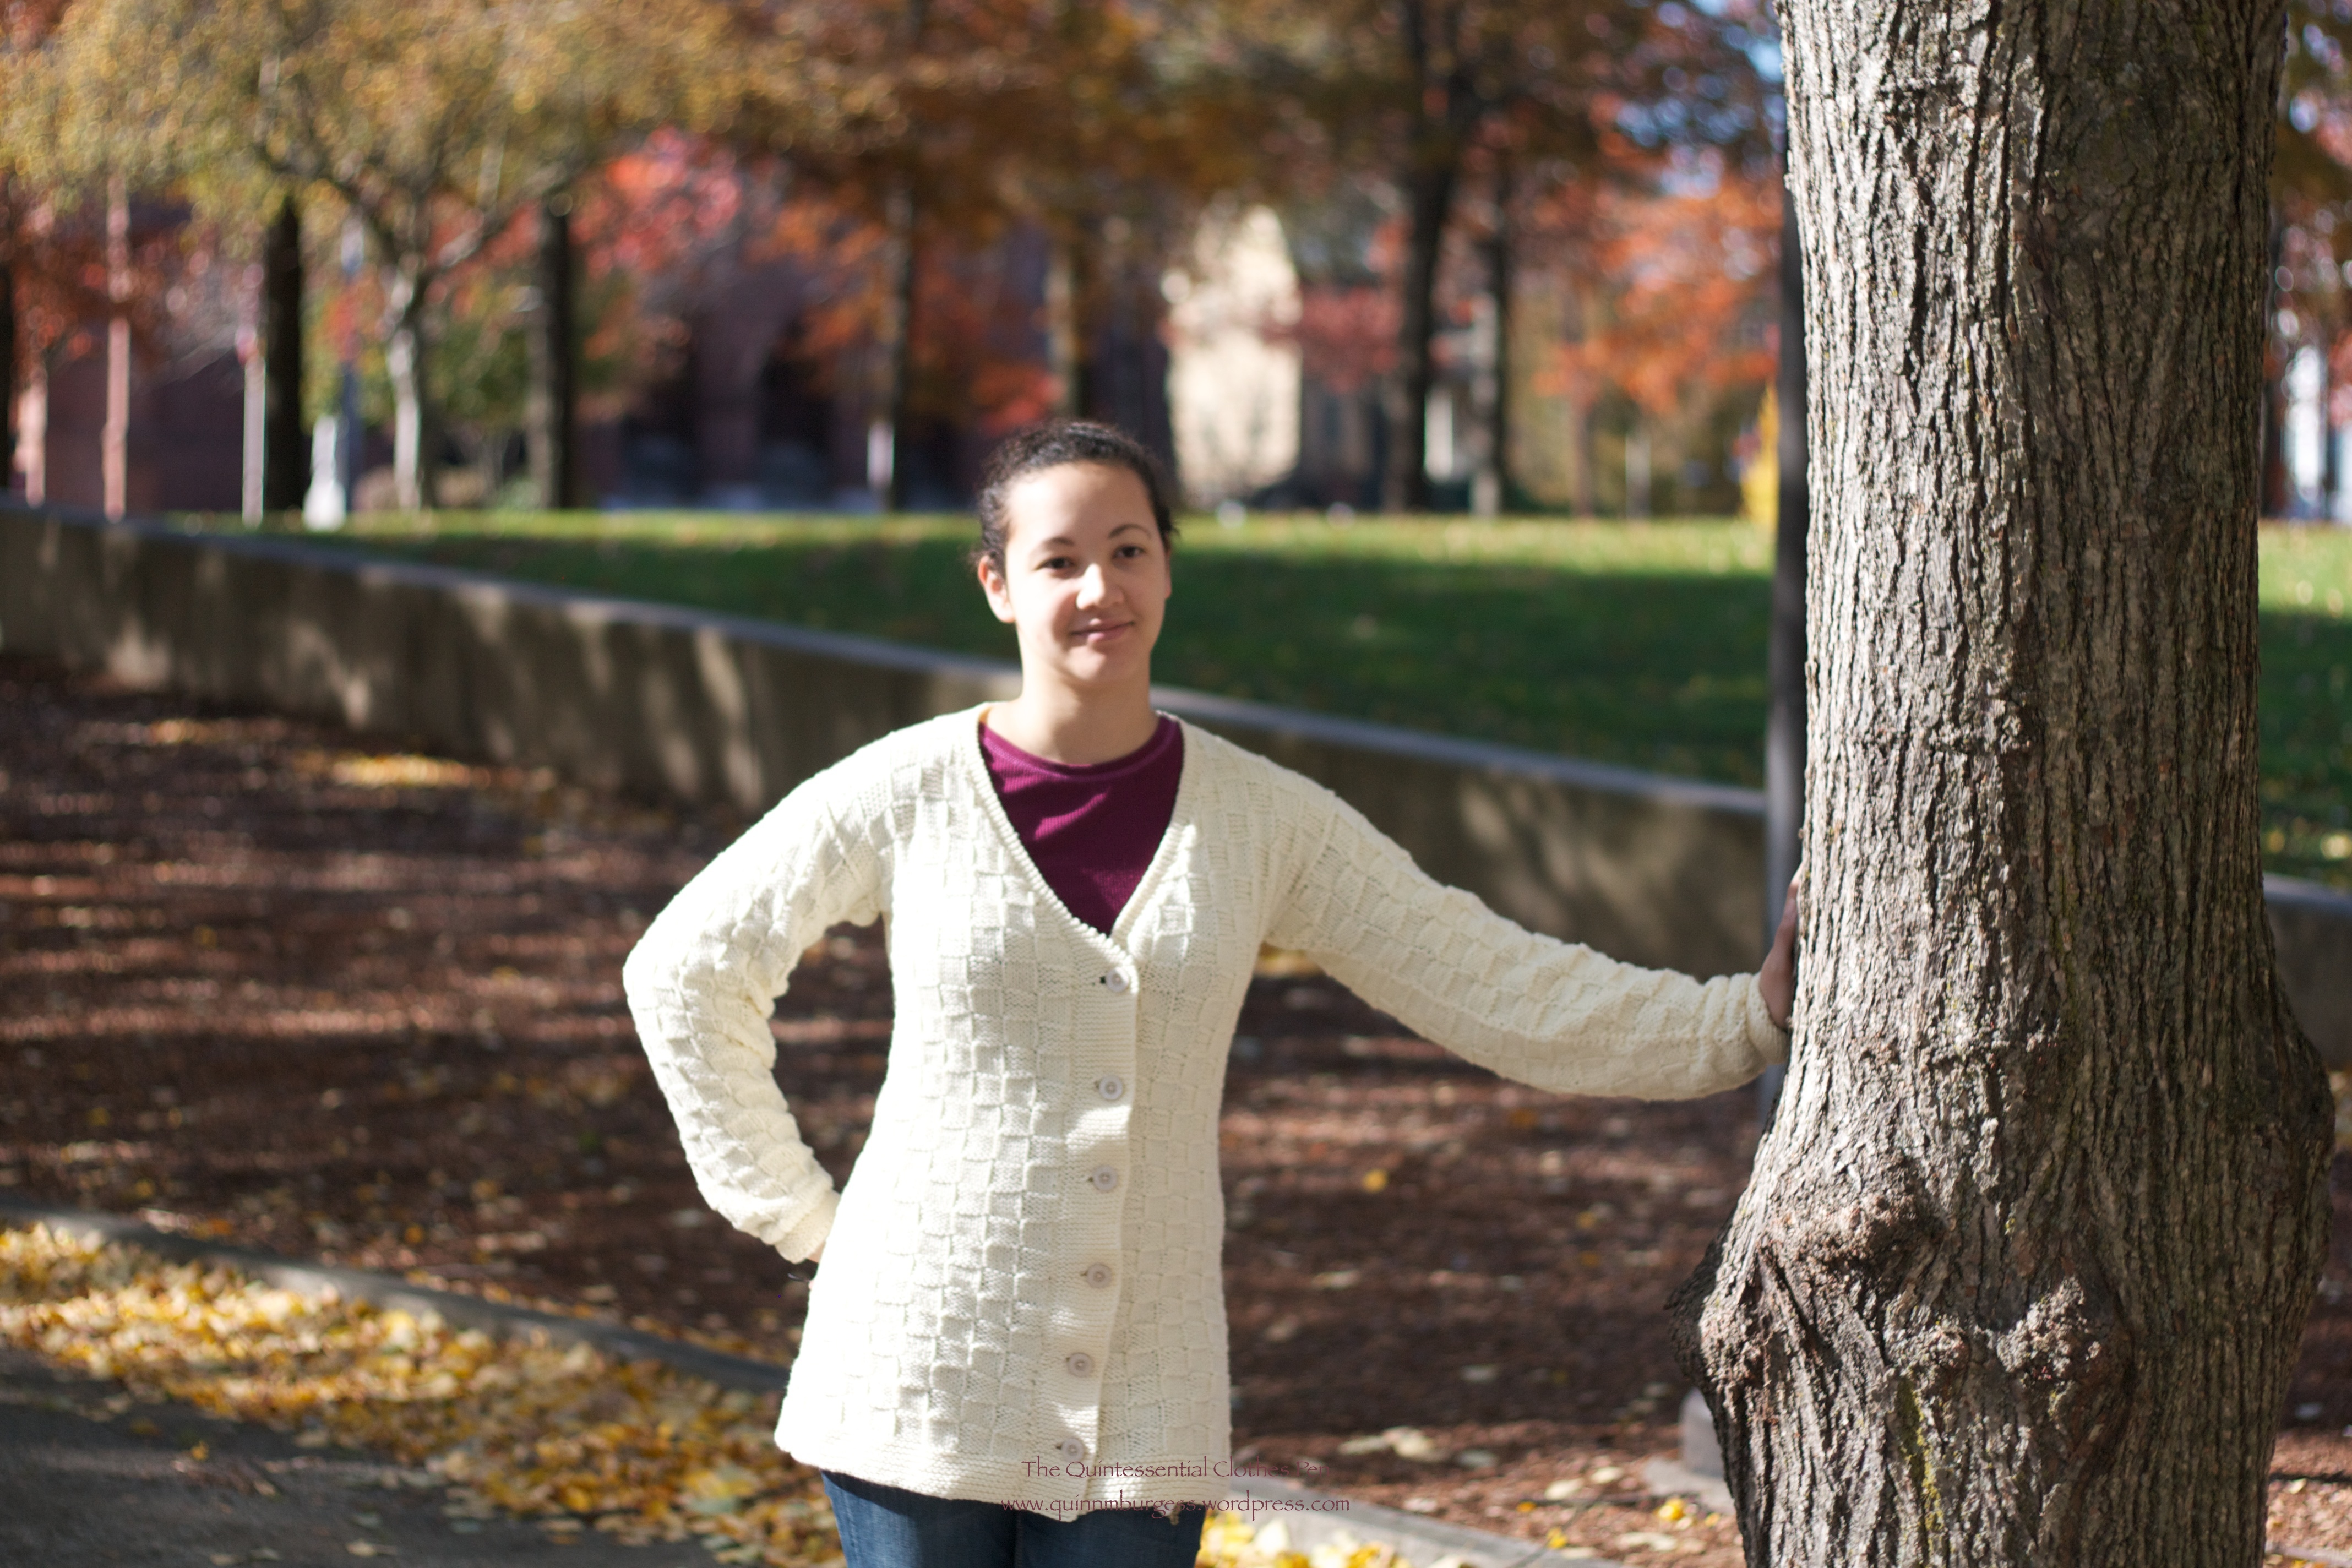
My version:
Here’s the pattern. I’ve put original directions in [brackets] if I’ve changed them, and included my version before the original version, so you can compare. My version of the pattern and any notes that I have added are in italics.
One of the major reasons I adjusted the pattern in places was in attempt to make it to my measurements (40″ hips, 30″ waist, and 36″ bust). On size 5 needles I was knitting 10 stitches in 2.5″, which was 2 squares of the pattern, and knitting 1″ vertically every 6 rows, which was 1 square of the pattern. If I had knit the sweater with this gauge and the original directions I would have had a sweater body that would be too big: about 12″ too big around and 3″-5″ too long in length.
ABBREVIATIONS: K – knit, P – purl.
MATERIALS: 6 skeins of probably acrylic yarn (of medium weight and unknown length, though on the smallish side, as modern skeins go (and I could have used 7!)); 5mm and 3mm knitting needles; 6 plastic buttons.
[17 balls of THE AMERICAN THREAD COMPANY’S Article 200 “Angorina” Fluffed Cotton, size 4; two long celluloid knitting needles No. 5 and two shorter celluloid knitting needles No. 3; 6 buttons.]
DIRECTIONS:
For the Basket Stitch pattern: Cast on a number of stitches divisible by 10 and 2 over for the edge stitches. (So the 10 is the repeat of two squares of the pattern, and the 2 extra are for the edges.)
lst Row: Slip the first stitch (this is the edge stitch) , * then knit 5, and purl 5, repeat from * to the end of row ending with P 6, turn (the last stitch is the edge stitch).
2nd, 3rd, 4th, 5th and 6th rows: Same as first Row.
7th Row: Slip the first stitch, * then P 5, and knit 5, repeat from * to the end of Row, ending with K 6, turn.
8th, 9th, 10th, 11th and 12th Rows: Same as 7th Row.
These twelve rows form the pattern, which is knit throughout the sweater.
Sweater
Cast on 82 [112] stitches on the long celluloid needles No. 5 and begin to K at the bottom of the sweater,
FOR THE BORDER: K plain back and forth for 14 rows or 7 ridges (2 rows of plain knitting back and forth form a ridge).
Now begin to knit the pattern as directed above.
K 12 [14] rows, then begin to decrease 1 St at the beginning and end of every third row until 10 stitches have been decreased at each end.
There are now 62 [92] stitches left in the row and 42 rows of pattern K.
Continue knitting the pattern for 120 [138] more rows or until 15 patterns or 180 patterns are K in all. (That last section of directions about 15 patters and 180 patterns confused me, so I just sort of ignored it…)
This completes the length of the back.
Next Row: Slip the first stitch, then knit 5, and P5 for 21 [31] stitches (this is for the right shoulder), bind off 20 [28] stitches for the back of the neck, the next 21 [32] stitches left on the needle are for the left shoulder.
Now put the first 21 [32] stitches on to a spare needle or thread (and I added one stitch to make it 22, so I would have a 20 stitches for the repeat of the pattern and one for each end), and continue knitting the left front as follows: K the pattern for 8 rows pattern (this is for the shoulder), then begin to increase 1 stitch at the beginning of every second row, this is at the neck – until 20 stitches have been increased.
There are now 42 [52] stitches in the row.
K the pattern without increasing for 84 [104] rows, then begin to increase 1 stitch every 3rd [7th] row at the outer edge (the outer edge was the end of each 2nd row for me) (the front edge must be straight) for 10 [5] times (that means I knitted in this fashion until I had increased 20 stitches), then K 12 more rows without increasing. (I chose not to knit the final 12 rows: I just ignored that direction.)
16 patterns of 192 pattern rows are now K for the length of, the front. (Again, I was confused by this direction and just ignored it.)
K 7 ridges plain back and forth for the border. (7 ridges equals 14 rows.)
Bind off loosely, break the thread. Now K the right front to correspond with the left front, then sew up the underarm seams (this is the length of 10 ½ patterns or 126 pattern rows from the bottom of the sweater up). (I waited to sew up my seams until I was entirely finished knitting the sweater. As before, I ignored the confusing direction about the number of patterns and pattern rows.)
Repeat the directions from right after “This completes the length of the back…” for the right front of the sweater. I’ve repeated them here, with the changes I made for knitting the right side instead of the left.
Next Row: Slip the first stitch, then knit 5, and P5 for 21 [31] stitches (this is for the right shoulder), bind off 20 [28] stitches for the back of the neck, the next 21 [32] stitches left on the needle are for the left shoulder.
Now put the first 21 [32] stitches on to a spare needle or thread (and I added one stitch to make it 22, so I would have a 20 stitches for the repeat of the pattern and one for each end), and continue knitting the left front as follows: K the pattern for 8 rows pattern (this is for the shoulder), then begin to increase 1 stitch at the beginning of every second row, this is at the neck – until 20 stitches have been increased.
There are now 42 [52] stitches in the row.
K the pattern without increasing for 84 [104] rows, then begin to increase 1 stitch every 3rd [7th] row at the outer edge (the outer edge was the beginning of each 2nd row for me) (the front edge must be straight) for 10 [5] times (that means I knitted in this fashion until I had increased 20 stitches), then K 12 more rows without increasing. (I chose not to knit the final 12 rows: I just ignored that direction.)
16 patterns of 192 pattern rows are now K for the length of, the front. (Again, I was confused by this direction and just ignored it.)
K 7 ridges plain back and forth for the border. (7 ridges equals 14 rows.)
Bind off loosely, break the thread.
FOR THE SLEEVES (The following directions are what I used for my first attempt at a sleeve for this sweater… I didn’t like the resulting sleeve and chose to take it apart and try again. I’ll include my revised sleeve pattern following these directions for the sleeve I didn’t like. You can read more about why I changed my sleeve pattern and see pictures of the before and after, in this previous post.):
Cast on 72 stitches, and K the pattern for 3 rows, then begin to decrease 1 stitch at the beginning and end of every second row until 5 stitches have been decreased at each end.
There are now 62 stitches left in the Row.
Knit 120 rows of pattern. [K 9½ patterns or 114 rows without decreasing.]
Now slip the stitches on to the No. 3 needles, and K plain back and forth for 18 ridges for the cuff, bind off, and sew up the seam.
Place the sleeve in the armhole, so that the sleeve seam and underarm seam meet. (I waited until all of my pieces were knit before sewing any seams.)
(So now, here is my revised sleeve pattern):
Cast on 72 stitches (I added a single plain knit row, as a transition), and K the pattern for 3 rows, then begin to decrease 1 stitch at the beginning and end of every second row until 5 stitches have been decreased at each end.
There are now 62 stitches left in the Row.
Knit 60 rows of pattern without decreasing. Knit 60 rows, decreasing 1 stitch at the beginning and end of every 4th row. [K 9½ patterns or 114 rows without decreasing.] (Again, I ignored the first part because it is confusing.)
Now slip the stitches on to the No. 3 needles, and K plain back and forth for 10 [18] ridges for the cuff, bind off, and sew up the seam.
Place the sleeve in the armhole, so that the sleeve seam and underarm seam meet. (I waited until all of my pieces were knit before sewing any seams.)
This second sleeve pattern worked much better for me, so I repeated it for my second sleeve.
FOR THE BANDS: Cast on 12 [16] stitches on the No. 3 needles. K plain back and forth for 2 1/2 [4] inches (25 rows), then make a buttonhole as follows: K 4 [7] stitches. bind off 4 [6] stitches, K 4 stitches (this leaves 4 [5] stitches at each side of the 4 [6] stitches bound off).
In the next Row cast on the 4 [6] stitches bound off, thus forming a buttonhole.
K back and forth for 3 1/2 [3] inches (35 rows), then make the next buttonhole.
Continue knitting plain back and forth making 4 more buttonholes so that there are 6 in all, always leaving an interval of 3 1/2 [3] inches (35 rows) between each buttonhole.
(I calculated these measurements and row lengths between buttonholes to fit into the length of the front of the sweater before the V neck starts… in my case, that length was 21″. If your gauge is different you might want to consider changing these directions to suit you.)
(At this point I became very worried about running out of yarn. I wish I would have had enough to make the bands as wide as the original pattern called for… but I had to make them narrower, so my revised pattern will reflect that. If you have enough yarn you should keep the band wide and only adjust for length.)
K 1/2 [1] inch (5 rows) after the sixth buttonhole then begin to decrease 1 stitch at the beginning of every second row until 8 stitches have been decreased.
There are now 8 stitches in the row. Knit for awhile… turns out I knit plain for 45 rows. Begin to increase 1 stitch at the end of every 2nd row until 8 stitches have been increased… in theory that was my plan, but since I was running out of yarn, I just slowly decreased until I ran out of yarn. [K plain for 18 inches or long enough to go around the neck, then increase 1 stitch at the beginning of every second Row until 16 stitches are on the needle again.]
K plain for 21 inches or as long as the wider part of the band with the buttonholes, bind off loosely.
Sew the buttonhole part of the band on to the right front, the narrow part around the neck and the plain wider part to the left front, this should be done very carefully, then sew on the buttons.
Whew! At this point I just need to sew up my seams and sew on the buttons. Yay!

Interestingly, I probably could have worn the larger size. :-). I don’t knit. The sweater is beautiful on you and I am sure those who knit will enjoy the directions for the alternate pattern,
Love you,
Aunt Doris
Sent from my iPad
I love this sweater, it looks great, just like the original picture! I wish I was better at knitting so I could knit this!
I might have to try this sometime.