12 Bells Ringing! (1832 Velvet Gown & Hair, HSM #12)

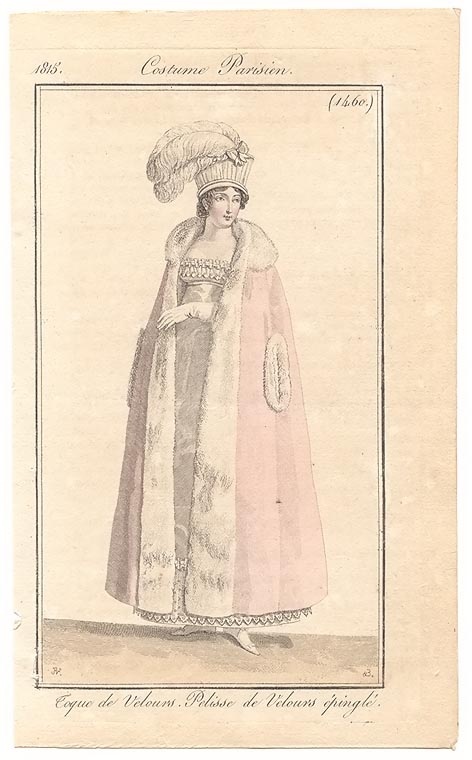
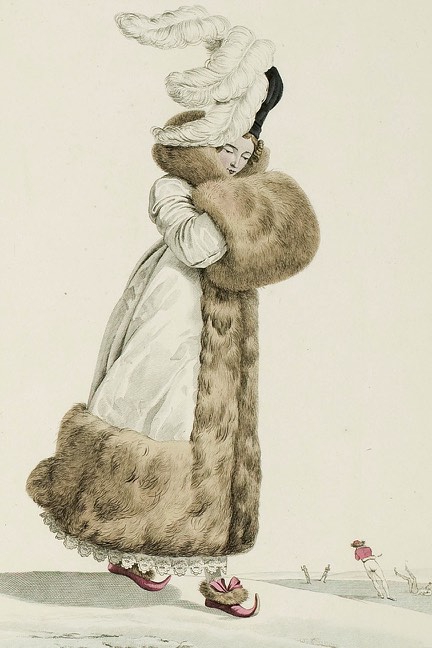
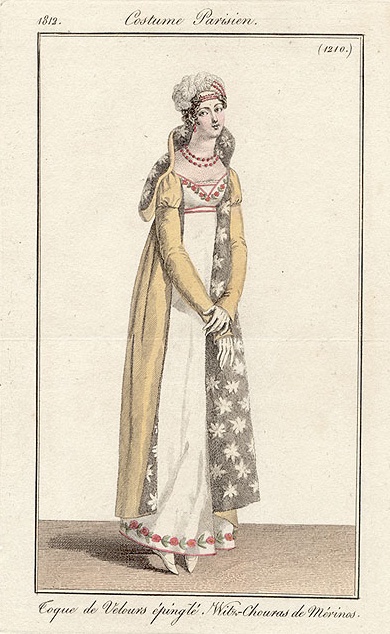
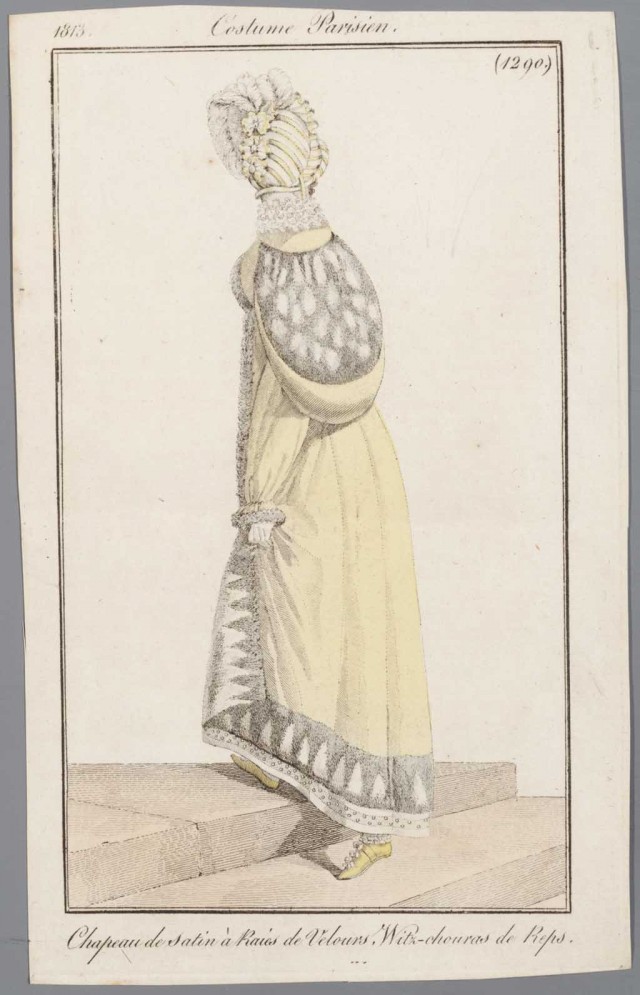
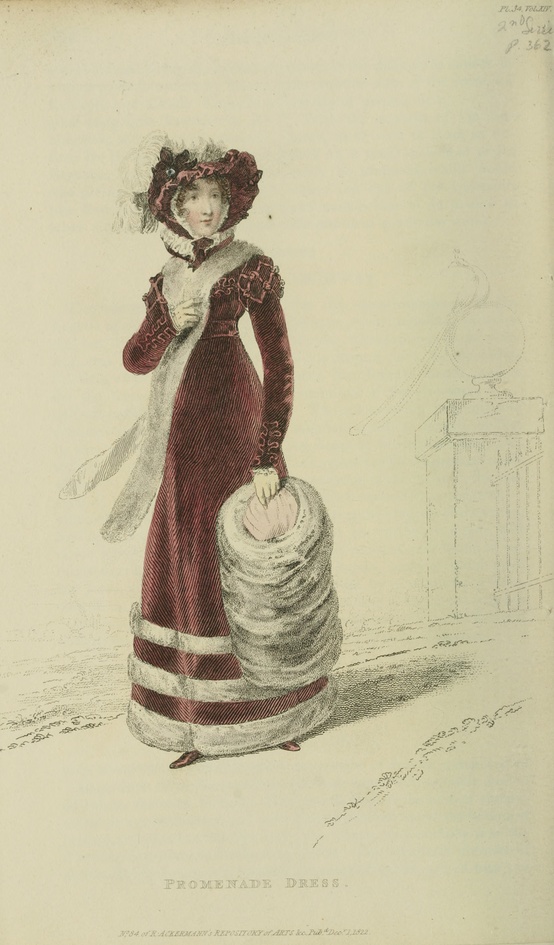
I’ve had my eye on this fashion plate for years. Then earlier this year, I came across a reasonably priced, lightweight polyester velvet and thought it would be just the thing to recreate this gown. I don’t get too many opportunities to wear clothing from this period, but the annual CVD Fezziwig’s Ball, with a general ‘life of Charles Dickens’ timeframe, was the perfect opportunity to try it out. Plus, I’ve worn my green appliqué 1823 ball gown for the last few years, which has been lovely, but I was ready for a change. And, this fashion plate is from the month of December, which makes it even more perfect for wearing to a December event!

96ef3fb9a4ce77724b44e3a4ff1b3dc1
Royal Ladies’ Magazine, December 1832

Also, this dress fits the last HSM challenge of 2016 (Special Occasion: make something for a special event or a specific occasion, or that would have been worn to special event or specific occasion historically)! A ball gown is certainly a garment that would have been worn to a special event in the 19th century.

img_3694

Just the facts:

Fabric: About 5 yards polyester velvet.

Pattern: Adapted from Past Patterns #702, 1850s-1863 Dart Fitted Bodices (this is the same pattern I recently used to create Eleanor). The sleeve is a beret sleeve from Janet Arnold and the skirt size is based on information from Janet Arnold as well.

Year: 1832.

Notions: Thread, hooks and bars, two tier lace, pleated ribbon, muslin, narrow yarn for cording, and a brooch.

How historically accurate is it?: I’m going to go with 80% on this one. The materials leave something to be desired, though they have the right look.

Hours to complete: Too many, this dress was finicky!

First worn: December 10 for a ball.

Total cost: About $50.

I put a fair bit of work into this dress, but I don’t feel in love with it, as I often do with my creations. It’s finished (thankfully!) and it was fun to wear, but it was annoying and finicky to sew which made for a not fun process. Actually, the velvet fabric itself wasn’t the problem, even though I started out thinking it might be. I was able to do most of the seams on the machine without an issue despite having a fine layer of burgundy fuzz on everything. So the construction went together pretty quickly. I flat lined the bodice with muslin, sewed up the seams, and made cording on the machine. I did have to sew the piping on by hand at the neck, back, sleeves, and on the belt to get it to behave, as well as setting the sleeves by hand.

img_3690

Then I knife pleated the skirt, which was more annoying than that process generally is, and hand sewed it to the bottom of the bodice. I also whip stitched the bottom edge and the bodice seam allowance edges to keep them contained.

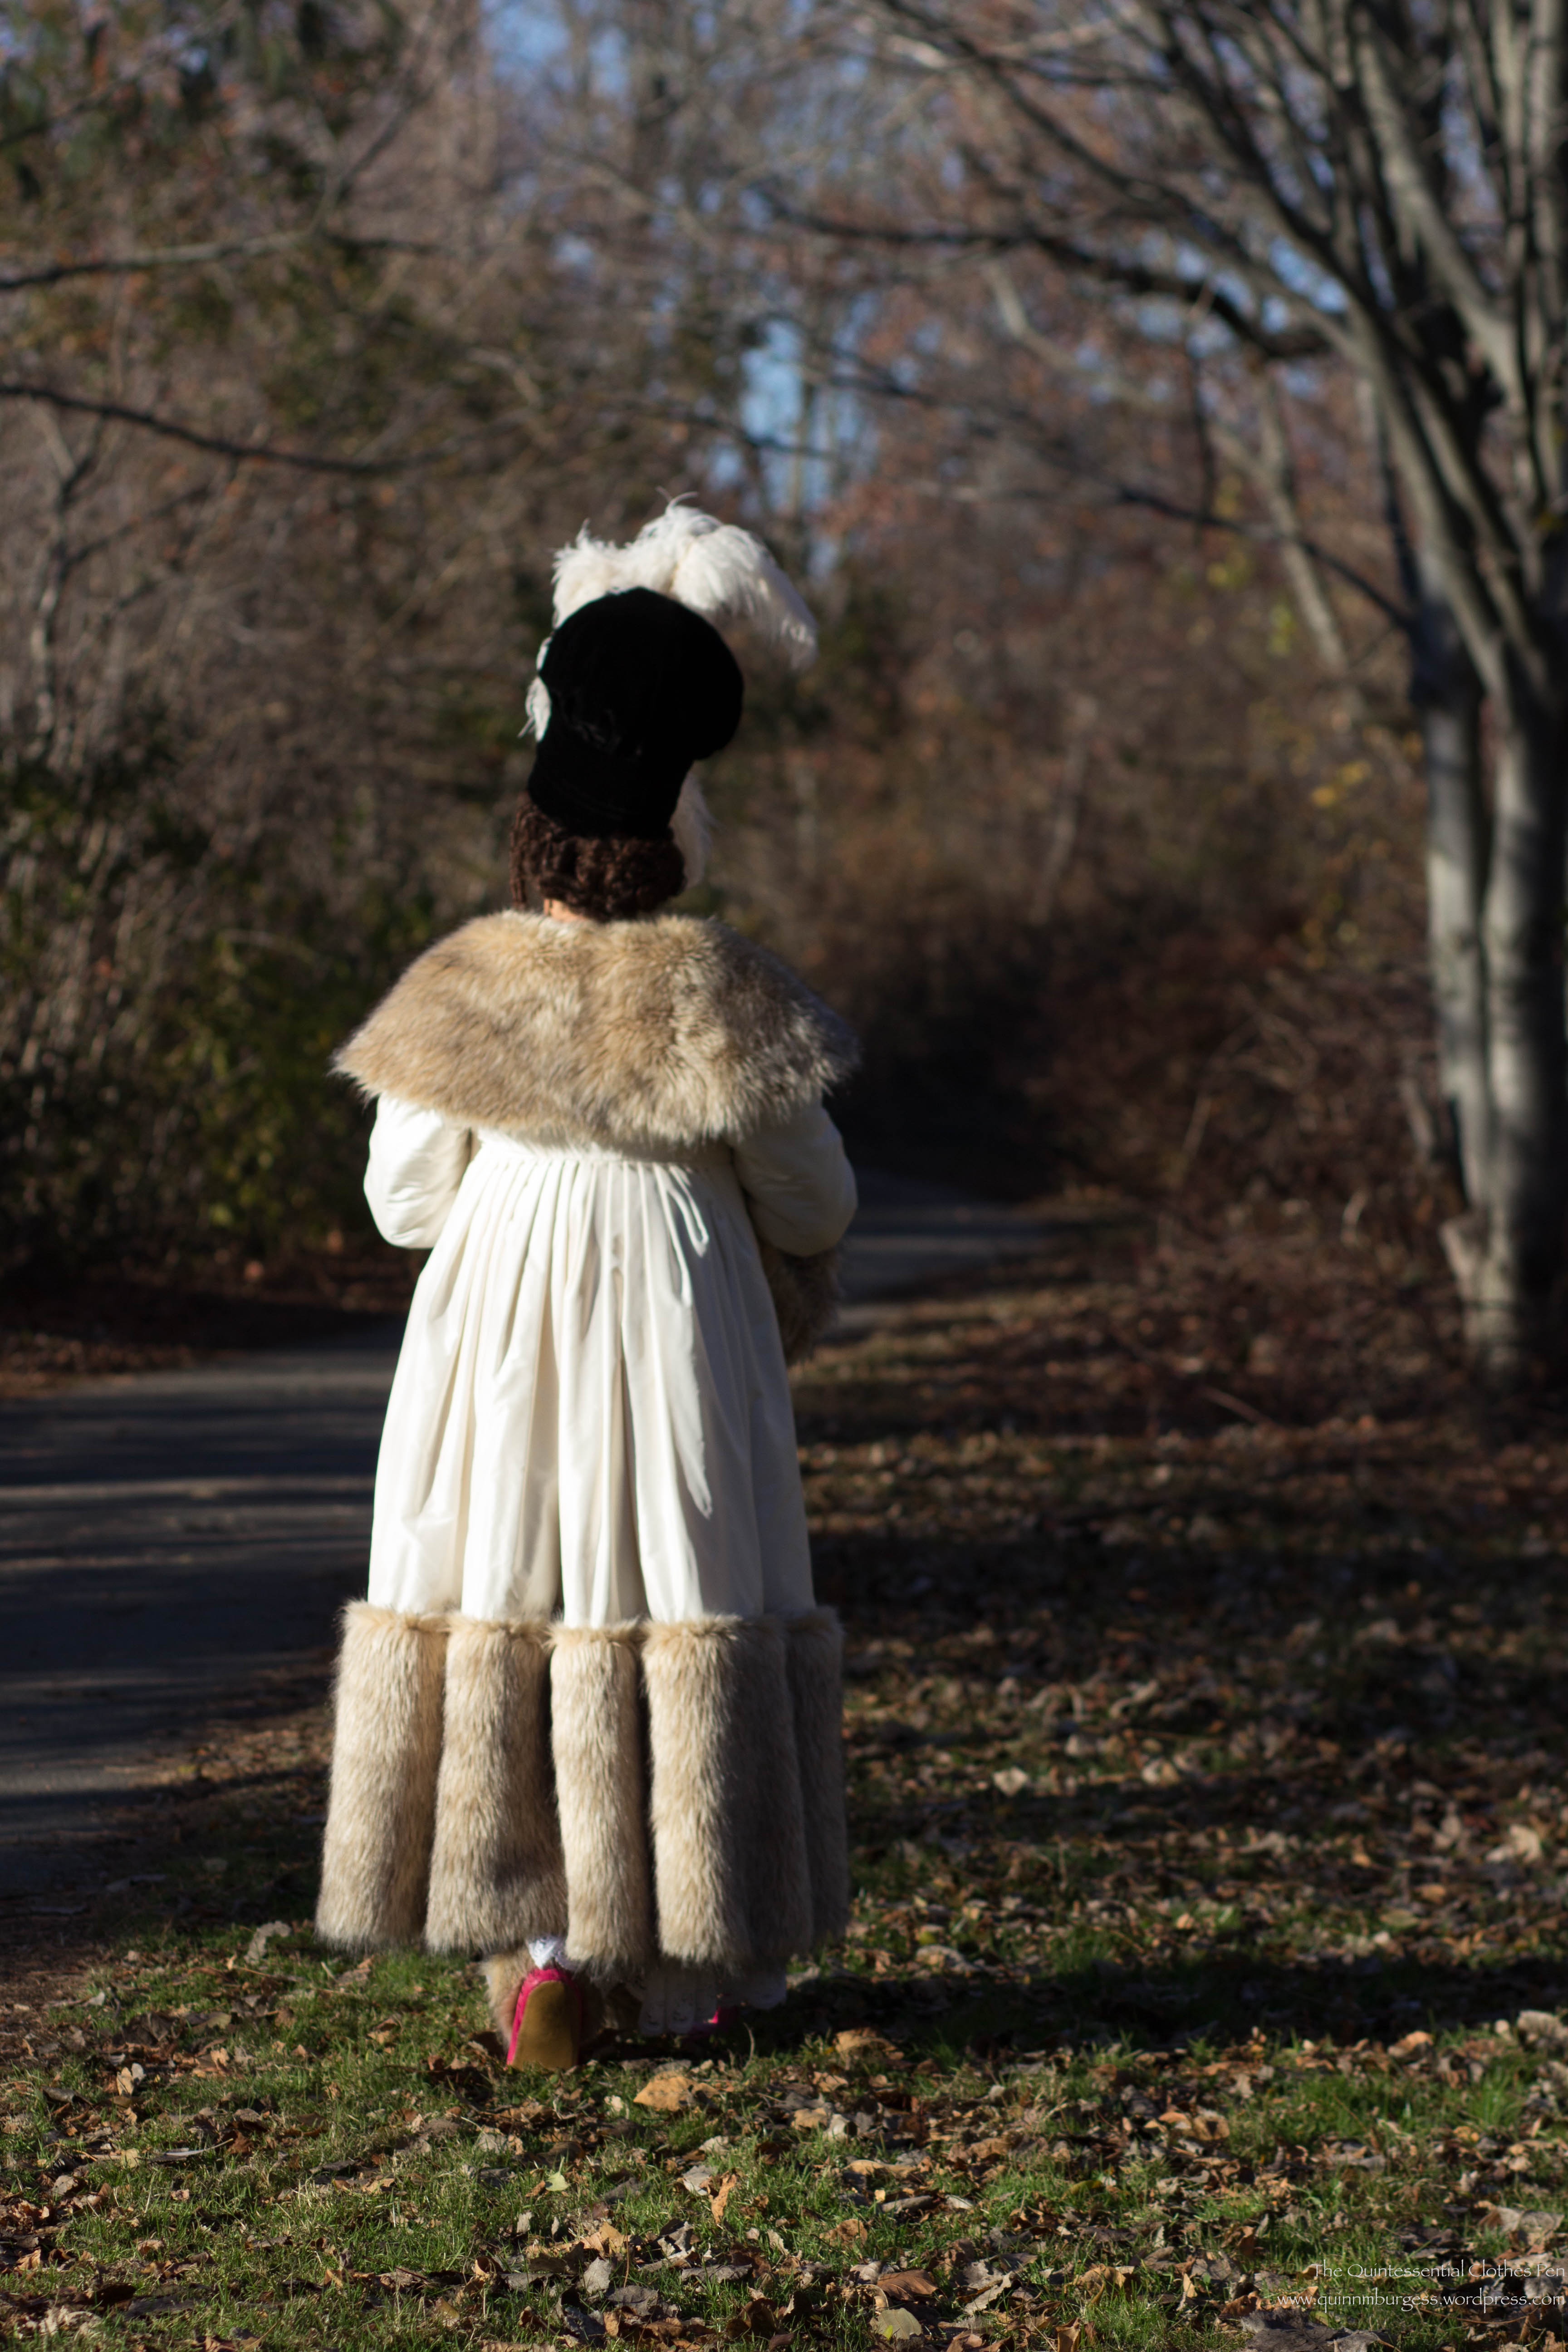
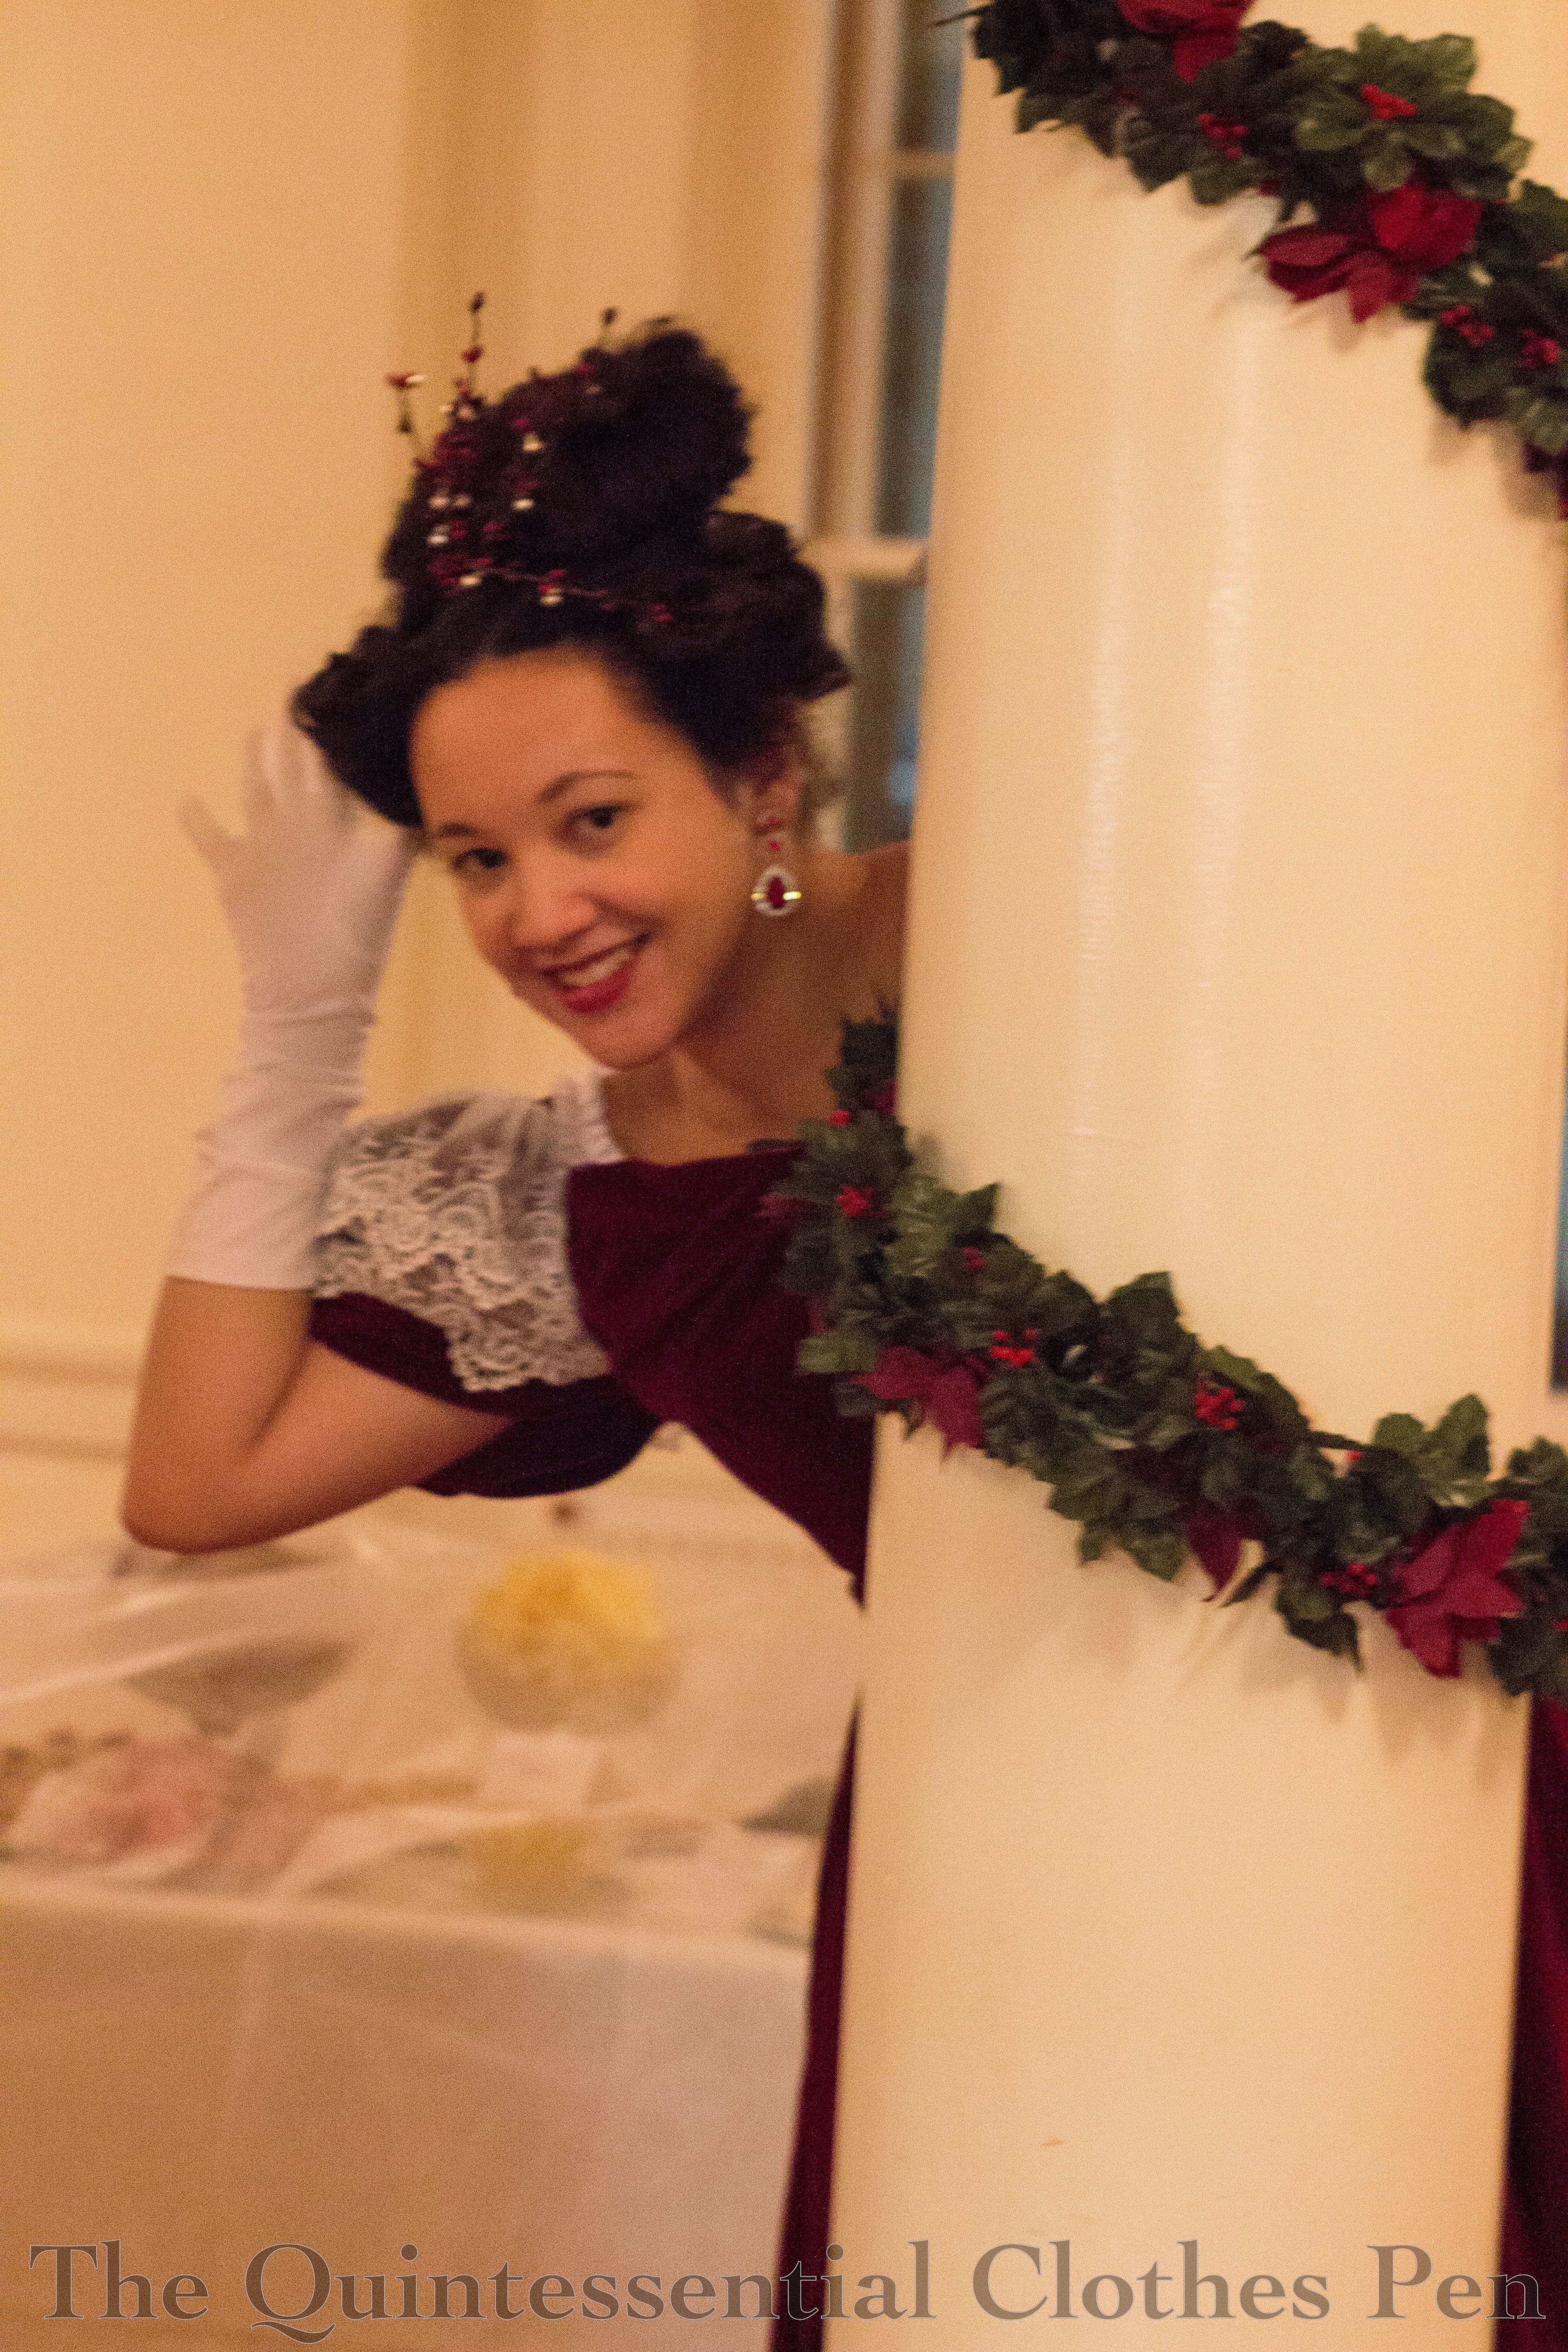
Next came the fiddly trim bits, which I usually enjoy. But… the belt wound up being too short, the placement of the fabric scrunched bit on the front was absolutely one of the most annoying dress construction processes I’ve had in years, and I couldn’t put the ribbon around the neck until the bust fabric bit was done. I wrangled the bust fabric into submission eventually, but with a lot of frustration. I solved the belt problem (because I was NOT going to be making another one) by adding a butt bow to fill in the gap, after looking at other 1830s dresses and their trims and being inspired. Actually, I really like the bow as I think it makes the plain back of the dress rather more interesting!

img_3687

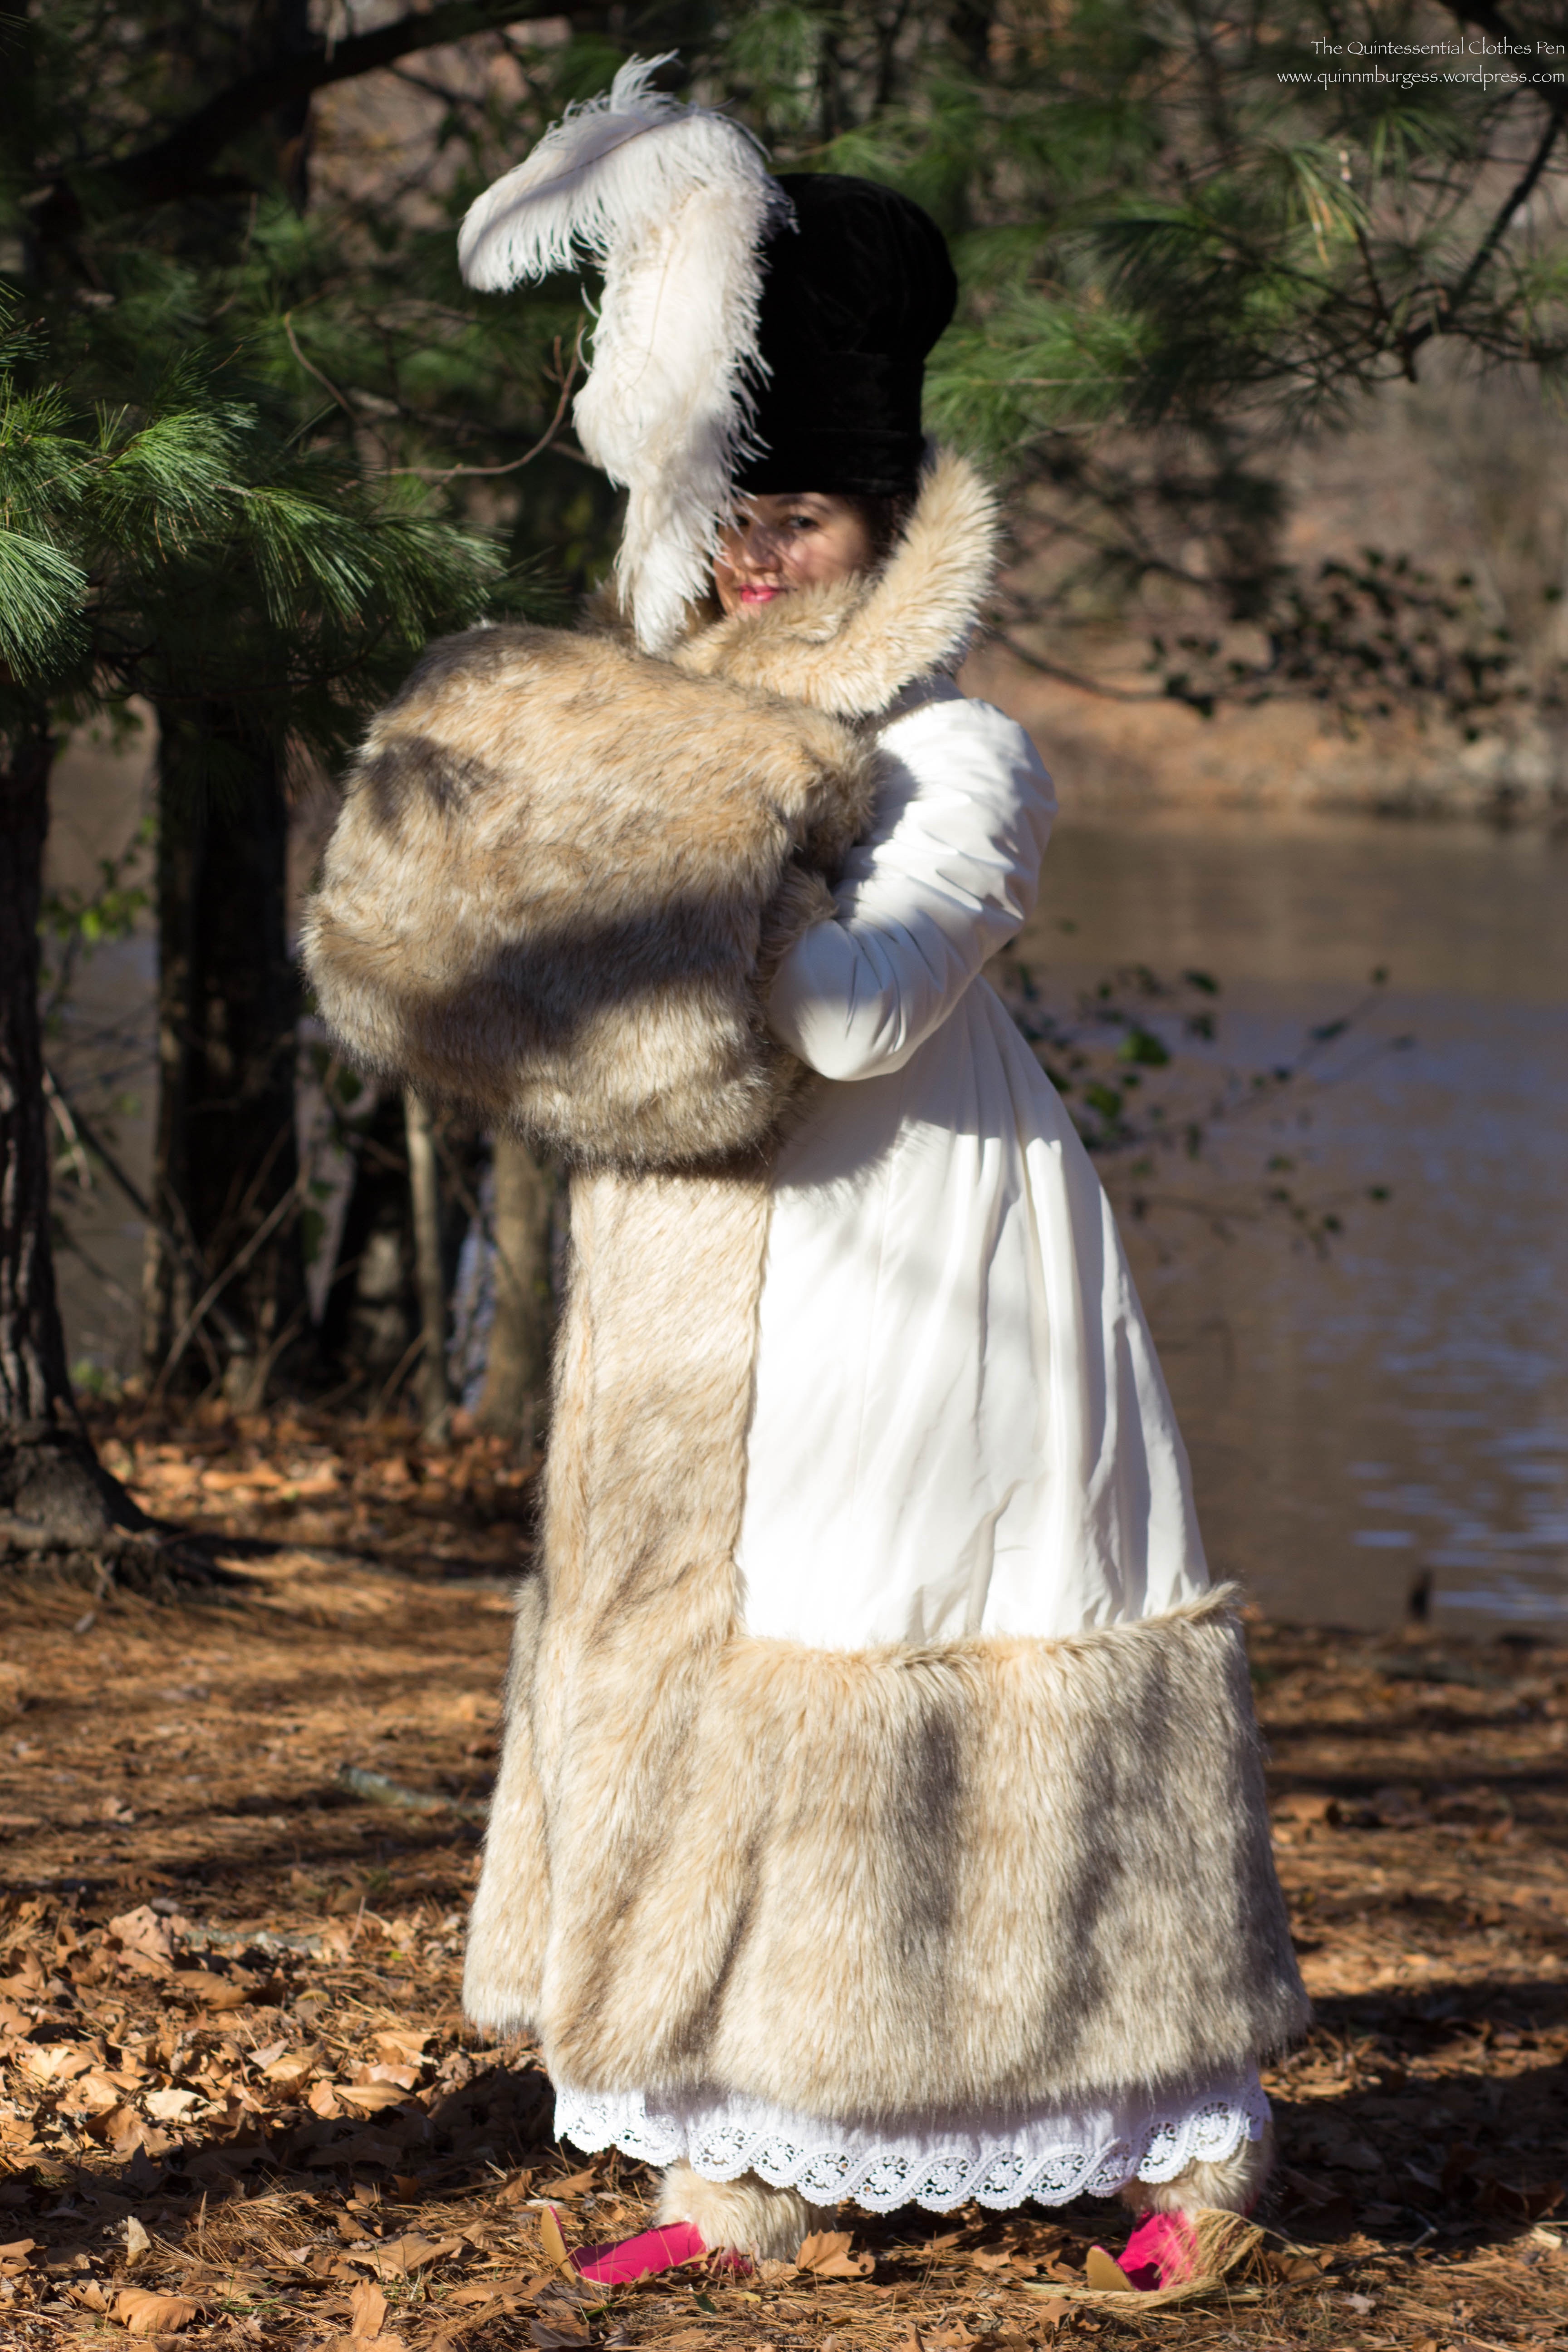
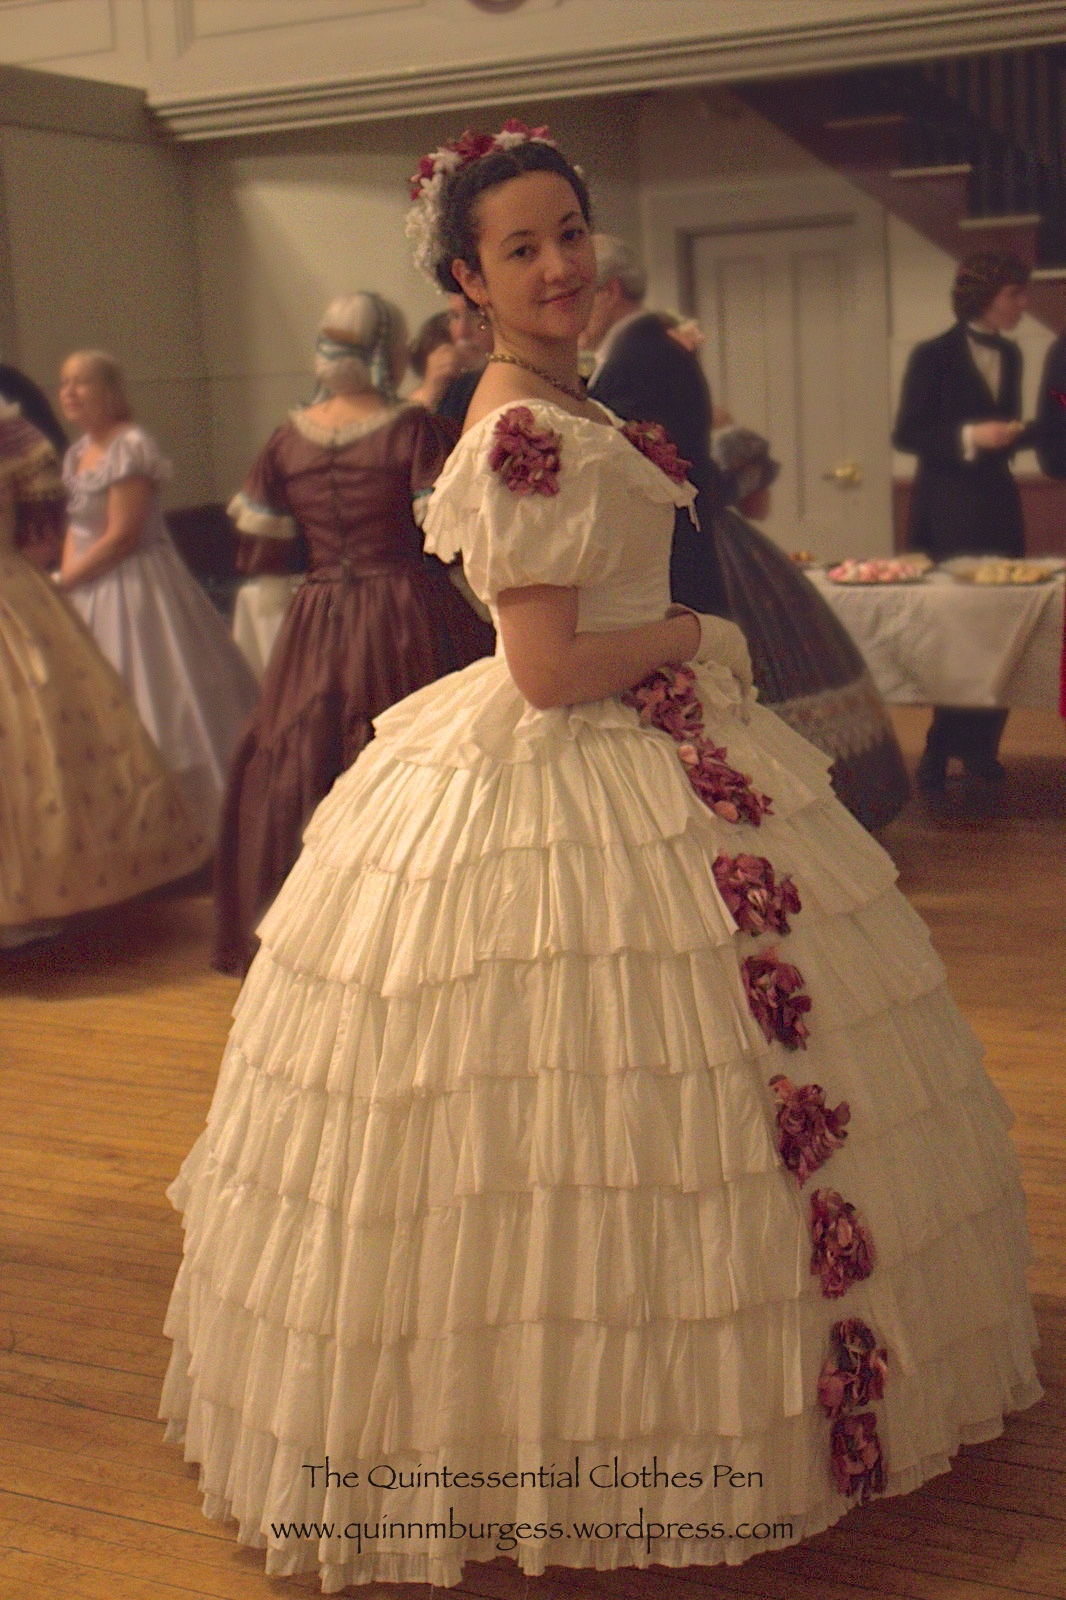
I was so grateful to be done sewing the thing that I didn’t bother doing anything to keep the sleeves poofed. Looking at pictures, I think some sleeve poofing would help for a next wearing. I’m also a bit disappointed by the skirt silhouette. I made a new silk petticoat to help fill out the skirt (more on that later), and a super quick stiff net ruffle for my waist, but I don’t think they did the job well enough. This picture, with the skirt in motion, is a better than when I’m standing still. Also, I had high hopes to make handmade slippers to wear with this dress, but abandoned that idea after making one, realizing that they were not looking the way I wanted, and that I really didn’t have time.

However, I really wanted the laces across my feet, so I tried used masking tape to attach black ribbons to my modern flats that tied around my ankles. It would have worked for pictures, but I danced before pictures and they fell off mid-dance… That was exciting. I was peering through all the dancers to keep an eye on the ribbons on the floor so I could recover them while hoping that no one would trip… Luckily, no one did! And I recovered the ribbons. I’ll have to try again next time.

img_3693

Then there was my hair. 1830s hair is ridiculous, but I was inspired and had a plan. I wanted those silly smooth loops of hair that are often seen in fashion plates. I tried them in fake hair and achieved something–but not what I wanted. And then I ordered false hair bangs to make the side curls, but in a comedy of errors they didn’t arrive until the day of the ball and I didn’t have time to curl and arrange them. All in all, I have concluded that these hair styles are harder than they look and frustrating to achieve! In the end, I resorted to using my own hair, with only a rat on each side to plump up the curls.

img_3703

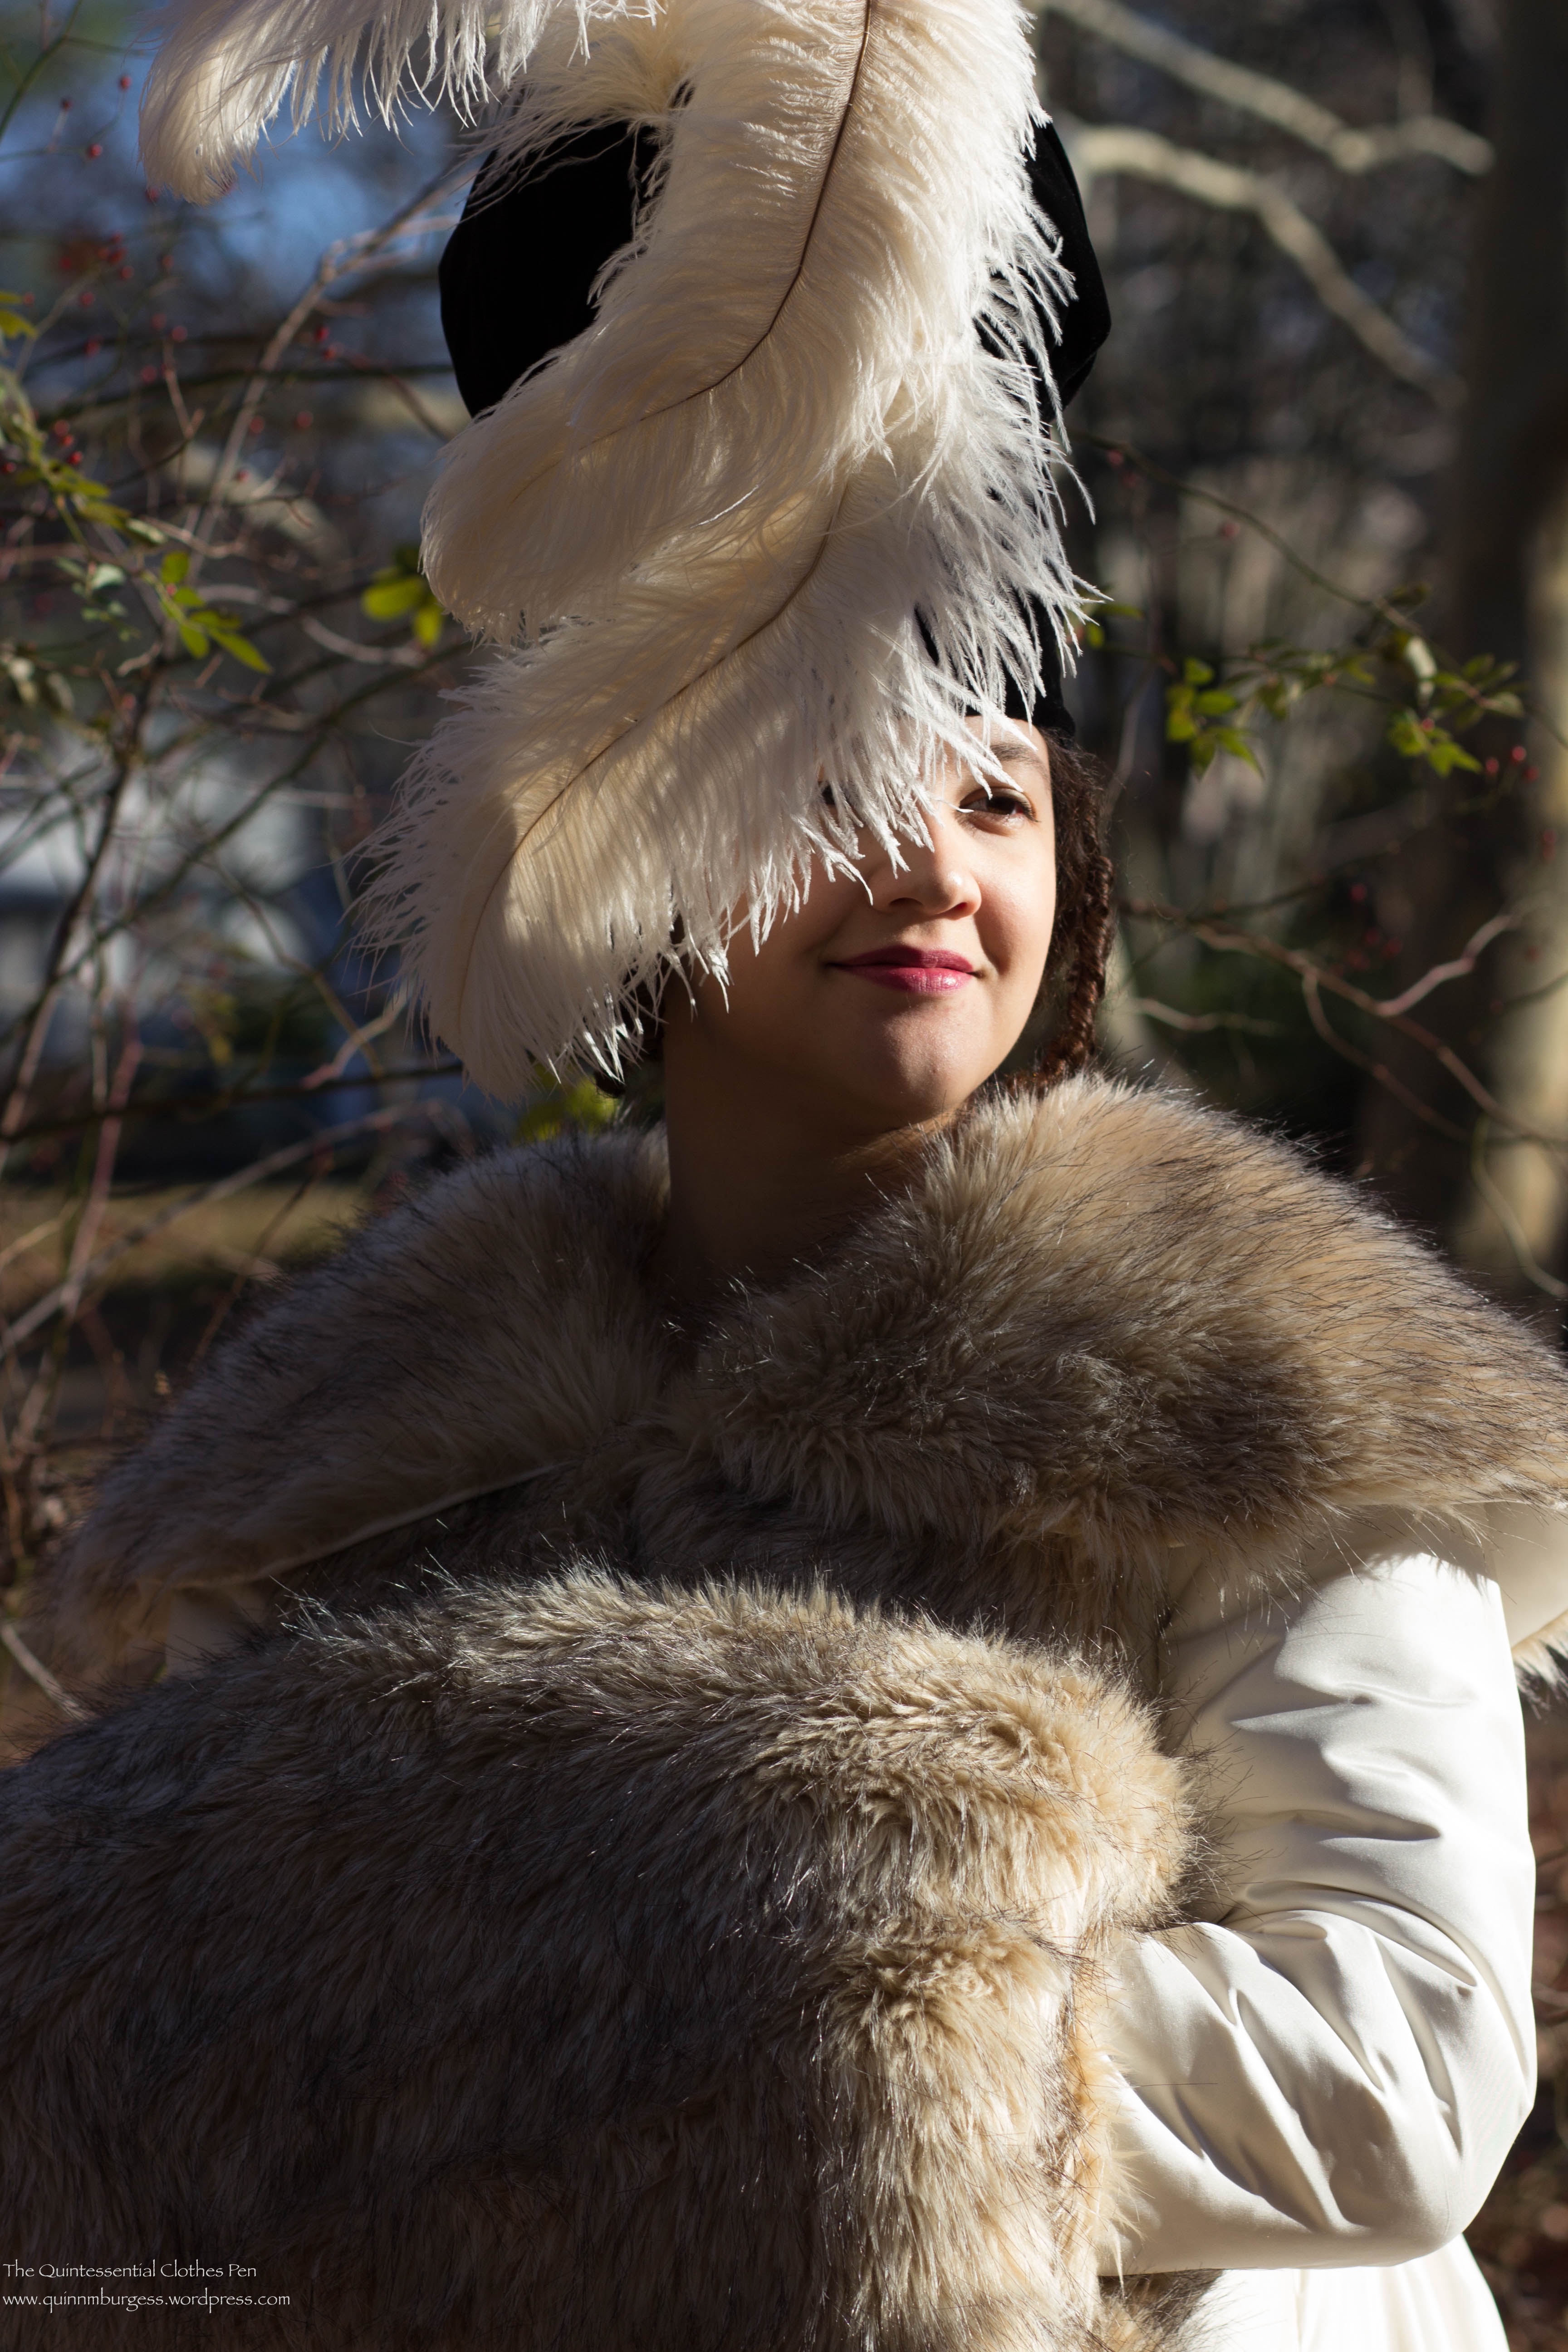
Once I decided to go with the looser floppy loops of hair on my head, as in my fashion plate inspiration, I knew my own hair would do the trick. I wish I’d been able to get them to stand up just a bit more, but overall I like how the hair turned out. I certainly have enough hair to achieve all the different parts of this style. I think my favorite part is the unusual backwards V part in the front, which I saw on multiple images from the 1830s. It’s so unusual, but makes so much sense given the sections of hair needed for this style.

img_3706

My hair decoration is wired springs of berries bearing tiny jingle bells! I decided on this because of a mention of putting something from the 12 Days of Christmas in 1830s hair. There are no berries or bells in the modern version of the song, but Wikipedia suggests that in the 1840s the lyrics were ‘twelve bells ringing.’ I was intrigued and decided it would be a fun, silly thing to do. I was also worried that the bells were going to be very noisy! They provided a lovely tinkling sound when I moved, but couldn’t be heard from more than a few feet away and so therefore were not a distraction as I feared they might be.

I wore the gown with my 1860s chemise and corset, as well as the other skirt supports previously mentioned. I added white gloves for dancing and wore red and crystal earrings. Unfortunately, I couldn’t find a necklace that I liked, so I decided to go without instead.

img_3656

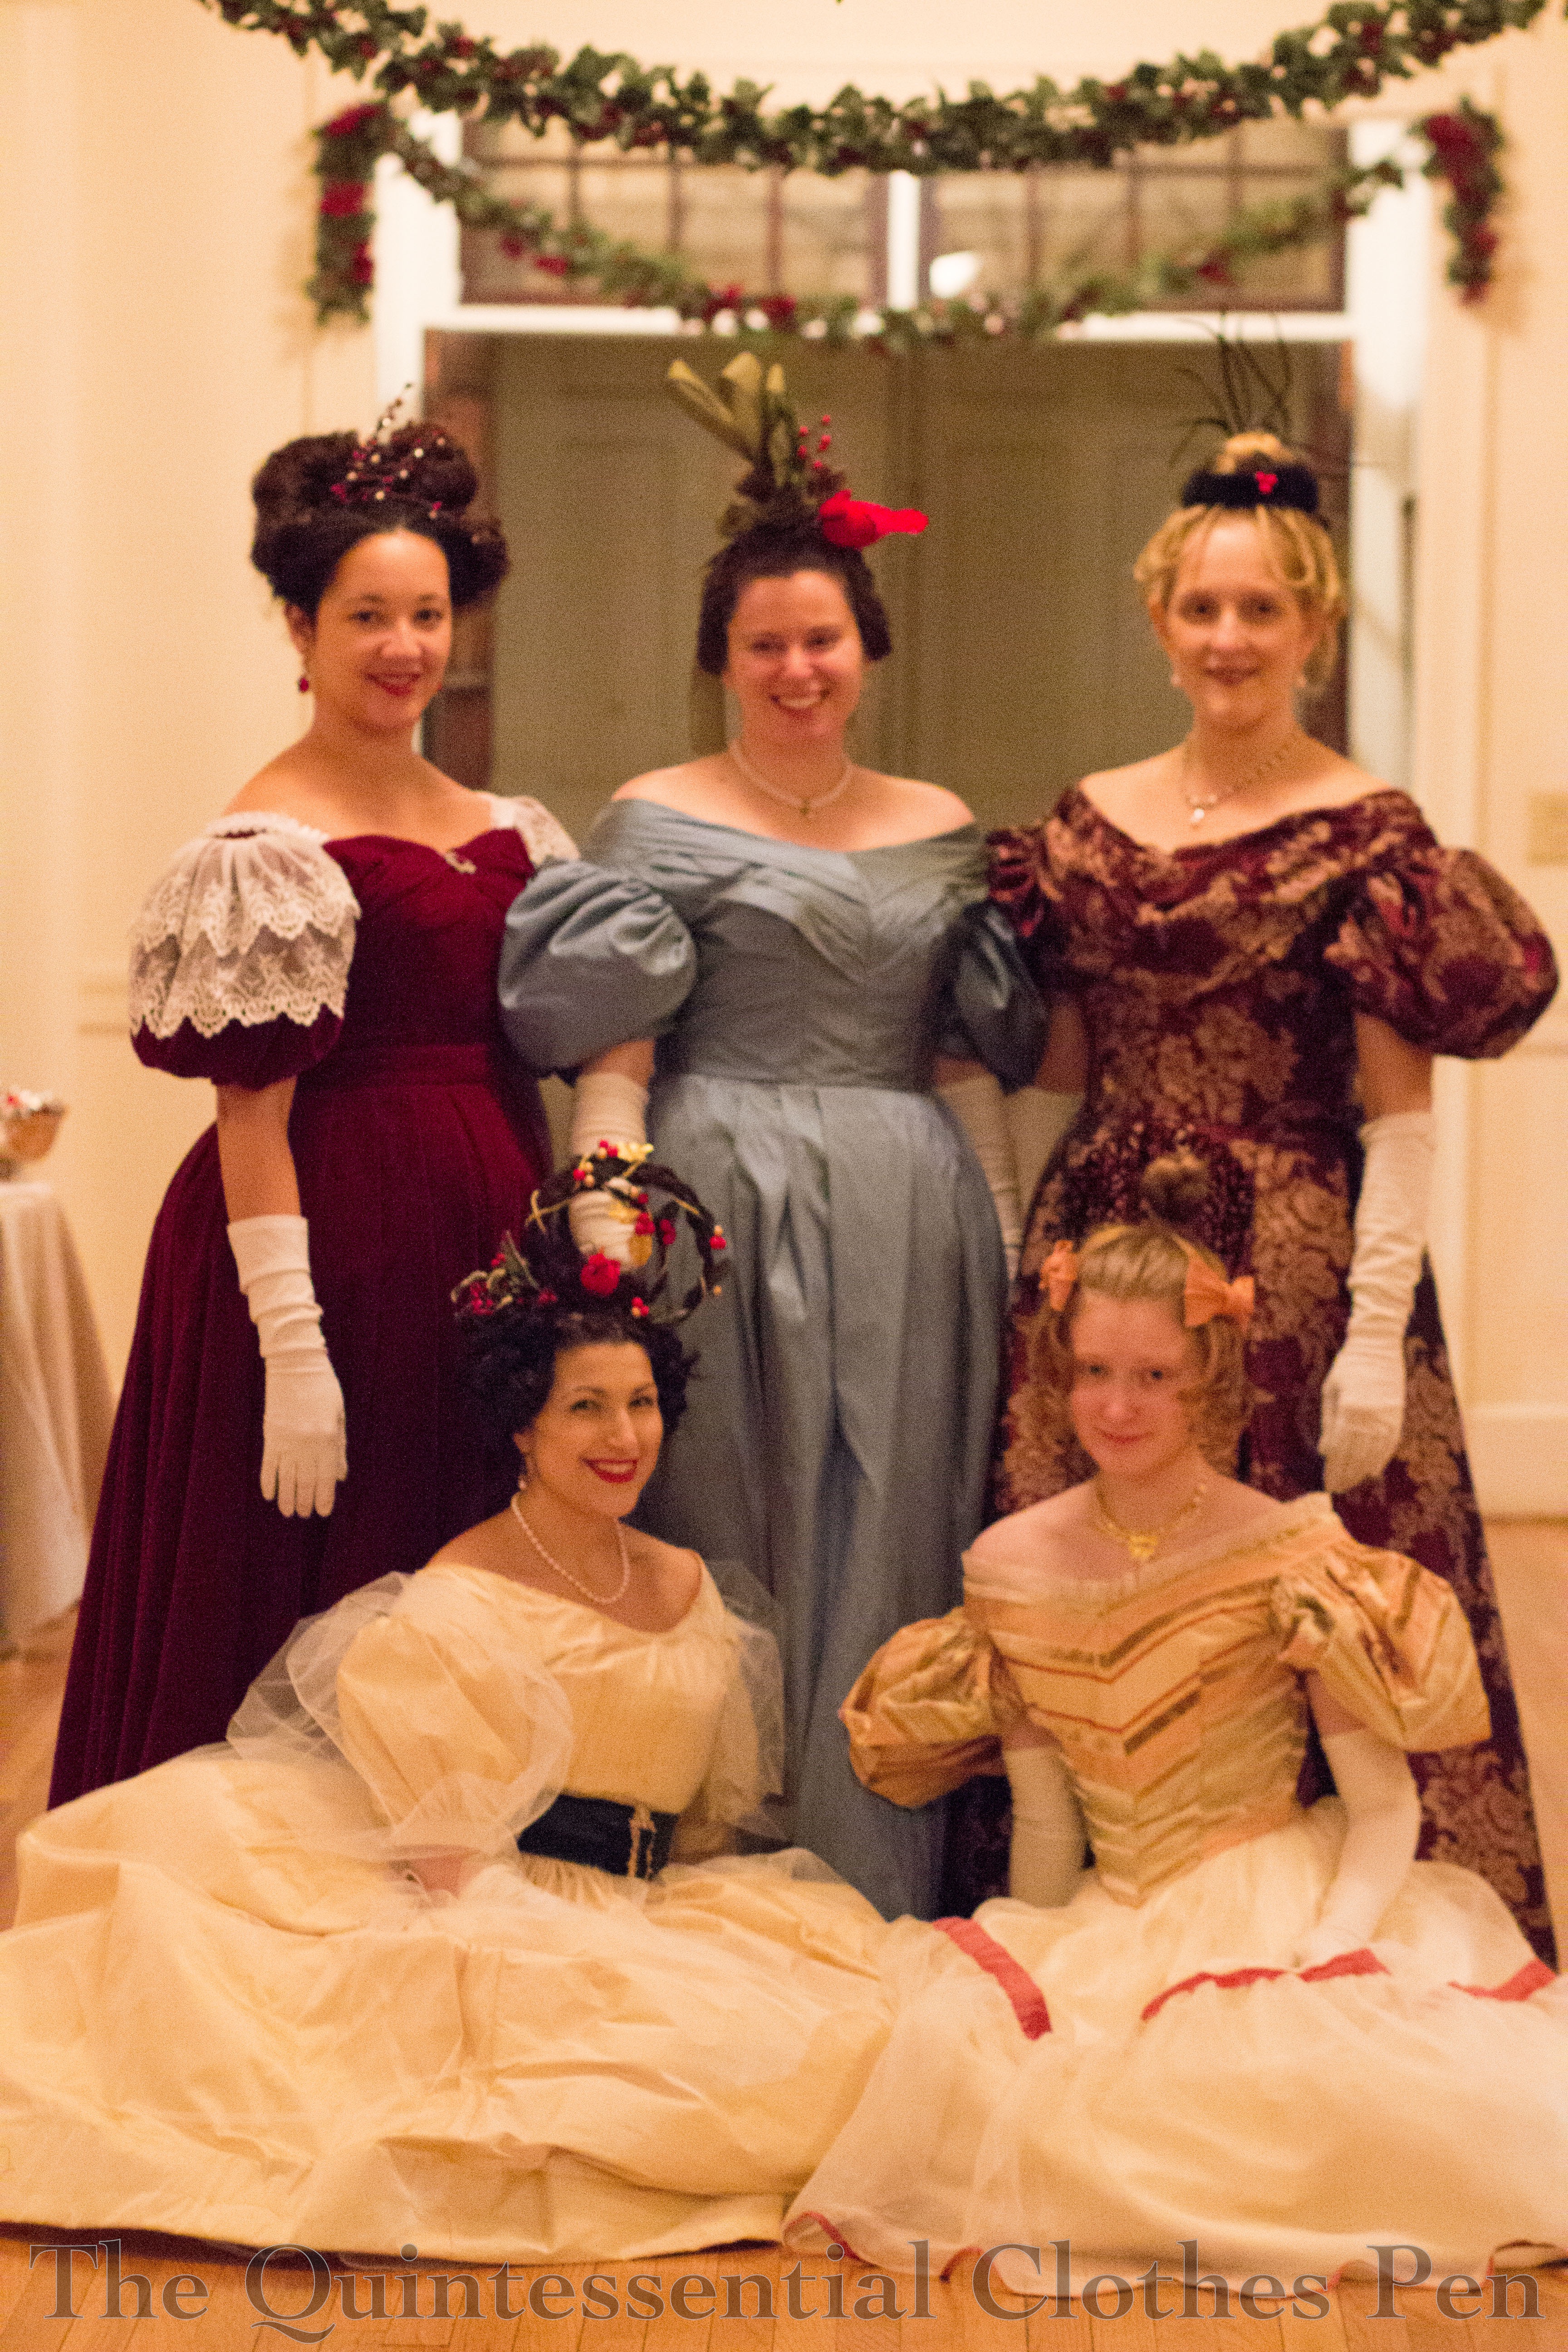
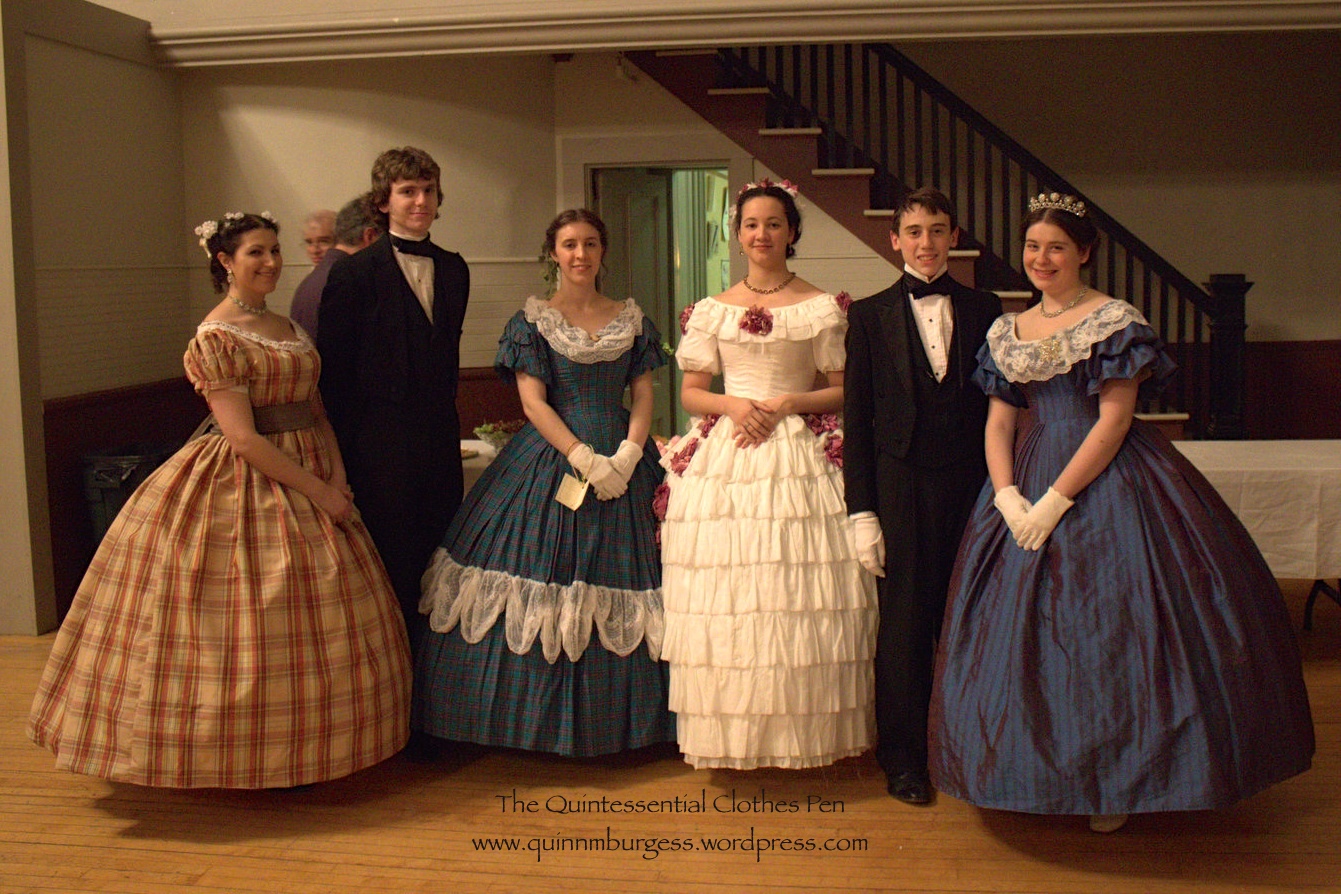
Moose hands! It was fun to be part of a rather large clump of women wearing 1830s to the ball this year. It’s such an odd period and one looks less out of place if others are wearing equally as ridiculous garments and hair as well!

img_3645

Vernet Project: A Witzchoura Tangent

I started this post soon after joining the Vernet Project, so I think it must have been in my drafts for close to two years at this point. I didn’t want to leave it in the drafts folder forever, though, so I thought I’d include it as I’m wrapping up my Vernet posts.

Throughout my research, I’ve looked through many hundreds of pins on my Pinterest boards from the 1810s, 1820s, and 1830s and have found only a handful of plates that show outerwear specifically labeled as witzchouras (these can be seen in this past post showing examples). There are a much larger number of other, similar, types of outerwear.

(If you’ve missed out, this post explores the origins and qualities of a witzchoura, while this past post explores witzchouras in even more depth, with multiple excepts from the first part of the 19th century mentioning them.)

Examples of garments similar to witzchouras

Common garments in this category are labeled using words such as pelisse and pardessus. Then there are also carriage dresses (example), promenade dresses (example), and redingotes (example) trimmed in fur, but it seems clear in the fashion plate descriptions that these garments were not considered witzchouras.

ac27bb830f63f1673e45316d0e18f87d
Fashion plate showing a Pardessus from 1811.

Here is another similar garment, a Russian mantle, described in The Ladies Pocket Magazine in 1838 under the chapter English Fashions and Novelties: Remarks On The Prevailing London Fashions.

content

Descriptions of garments similar to witzchouras

In 1849, La Belle Assembleé addresses this for us (while also mentioning yet another type of outer wear, a burnous. The Dreamstress defines and explores this garment specifically as it relates to historical fashion, which is excellent and full of images!). The author of this reflection of fashion specifically mentions the weight of a witzchoura and how that compares to the weight of a pardessus, as well as the types of outings that these garments would have been worn for. Interesting that they would be worn for carriage dress, when, alternatively, one could also wear a ‘carriage dress’.

content

This next excerpt, from La Belle Assembleé in 1825, tells us one distinctive quality of a pelisse which is that the arms were not encased in the garment and could be freely moved about.

content-1

a94e6fc37e3582c81ab22797c3c06b78
Example of a Pelisse from 1815, showing the armholes that would allow movement.
004c2dc3370c00425fcfd044369a9d53
A slightly later example of a Pelisse in a similar style. This is from 1821.

Examples of out of the ordinary witzchouras

Then there are garments labeled as witzchouras, but which are odd in a variety of ways. For example, take a look at the interesting witzchoura mentioned in The Lady’s Monthly Museum in 1817, seen below.

content

I’m not really sure what qualities allow a witzchorua to keep one’s dress from being rumpled, but what strikes me as odd is that the witzchoura mention is lined with silk and that is has a chapeau bras attached! Also in 1817, La Belle Assembleé mentions this exact garment twice! The first is a description of the garment. The second is about the inventor, Mrs. Bell, who, if you care to read more, has a long list of other interesting things that she supplies.

content

content-1

In this next case, the witzchoura is described as being lined with sarsnet (a fine plain or sometimes twill weave usually silk fabric) and only trimmed with fur rather than being lined entirely with fur. Haven’t we seen conclusively that a witzchoura should be lined and trimmed in fur? This witzchoura is also interesting because of its colors. It is quite likely a garment made for the general mourning of the death of Queen Charlotte, who passed away in November 1818.

“For out-door costume nothing can be reckoned more completely elegant than the Witchoura pelisse of black velvet lined with white sarsnet, and trimmed with real ermine.”

La Belle Assembleé  in January 1818

Finally, there is this fashion plate at the LACMA which is labeled as being a witzchoura but with nothing witzchoura-like about it! A mistake perhaps? This looks like a summer garment, not a heavy winter garment.

What a rabbit hole of obscure information the witzchoura is. I’m rather glad to say that I’ve now exhausted my currnet list of historical references to the witzchoura!

Vernet Project: Photo Shoot!

I thought I’d start the new year off with photos from my Vernet Ensemble photo shoot. (I’ll be doing separate posts with details about the construction of the ensemble as the year progresses.) I’m so incredibly pleased with my ensemble and with the quality of the pictures. I often have lovely pictures after events and when documenting sewing projects, but these are extra special in terms of the sharpness of the images, the clear colors, and the fun use of a historical lens.

Hopefully, you were following along with the release of finished ensembles in December, but in case you missed mine or haven’t figured out yet which fashion plate I was recreating, here it is.

Plate No. 20 “Toque de Velours. Witz-choura de Satin.”

164-0000-021 - Version 2

Below is the “official release” picture. I did my best to mimic the pose of the fashion plate, but it was really hard to wrap my brain around the left and right of things in my own pose relative to the fashion plate. Left was right and right was left, and in the end we did the best we could and called it done. I think we actually did it right, it’s just that I’m facing the camera at a different angle. It still boggles my brain to try and figure it out!

IMG_1915 blog

Unfortunately, there was no snow in November when we took these pictures and so I didn’t get ice skaters falling over behind me (also, I would have had to find ice skaters)… but I did get unfrozen water, and you’ll just have to imagine the ice and the skaters!

IMG_1903

IMG_1902

IMG_1936

IMG_1978

IMG_1963

IMG_1972

IMG_1985

IMG_2004

IMG_2020

These last few pictures with the blurred background were taken using a reproduction 19th century Petzval lens. You can read more about the lens and how it causes this effect here, at my photographer’s blog. 

IMG_1928

IMG_1922

IMG_1917

I am so incredibly blessed that to have a friend that joyfully enjoys practicing her photography skills with her nice digital camera (with fancy and historical lenses, to boot!) by taking pictures of my endeavors, amongst other things. She happily came over one afternoon in November just to accompany me for the photo shoot and take these absolutely gorgeous pictures. Thank you!!!

Vernet Project: Check Out The Finished Ensembles!

Photos of each recreation of one of Vernet’s Merveilleuses and Incroyables fashion plates start to be released tomorrow (December 8) on the group Facebook page! One fashion plate per day will be shared right next to a photo of the recreation, right up through the 31st of December (my plate will be on the 21st). Check it out! It will be a fun way to end 2015!

10394822_835881046430902_3846149313268917321_n

I’ve seen some of the finished ensembles ahead of time, and let me just reiterate how wonderful, weird, and wacky they are! Further posts with more images and specifics about construction, etc. will be released by participants in 2016, so don’t forget to check back to see updates on the ensembles that most capture your fancy.

(You can see all my posts from this past year relating to this project here, and I’ll be sharing more in 2016!)

Vernet Project: Witzchoura Images

As a quick recap, I started my witzchoura research journey here, being confused about how the word was spelled. After sharing that with you, I moved on to look at basic witzchoura definitions and then further witzchoura references, but I haven’t really shared images of witzchouras with you yet, so that’s what this post is going to focus on.

Out of the thousands of pins on my historic clothing Pinterest boards, the images below are the only ones I could find that specifically mention that they show a witzchoura. (Never fear, I’ll be looking at not-quite-witzchouras in a future post.)  If you know of any other images that specifically name the garment shown as being a witzchoura please let me know!

I find it interesting that two are yellow and two are blue. Also interesting that all the furs that are depicted are textured or downright weird (like the first one with the flower-fur… what is that?). However, in terms of materials there is variation: one of merino (wool), one of reps (could be wool, silk, or cotton, according to the OED), and two of velvet (fabric content unknown, though wool, silk, or cotton would seem to be likely).

b2e293cd8d6787e52979911acc6c3539
Costume Parisien, 1812
pictura2009%5Cs_a_55466_000
Costume Parisien, 1813
49a82ad6569f70e121aebe638e857efd
Costume Parisien, 1818
1ec484b324c9135cf9d6934f28eb8dfd
Costume Parisien, 1820

A Turban Fillet, 1811

A while ago now, during the Journal Journey Into La Belle Assemblee series, Natalie over at A Frolic Through Time brought two similar ball/evening hair styles to my (and her other readers’) attention. These styles for October 1811 were pointed out by Natalie as being perfect for someone to attempt for a Regency event and I thought “Oh! These are neat! And they would go so well with my pearl trimmed 1811 Elusive Blue gown. Perfect!” So I saved the link to the post and have been meaning to go back to it for the last few months.

After returning to that inspiration earlier this year and comparing the two styles in Natalie’s post, I decided on a turban fillet (see end of post for a definition). February’s HSF/M Challenge #2: Blue was the perfect kick I needed to get to work. While I technically submitted finishing the trim on my elusive blue dress for the challenge, I also finished my turban fillet slightly after the deadline. I enjoyed having a small project: it was a nice change from the usually long and complicated projects I often take on and am constantly in the midst of.

Here, then, is the fashion plate to which I am referring.

october-1811-evening-dress-bassemblee-hern
No. 1. EVENING DRESS. A sea-green crape dress, vandykcd round the petticoat, and ornamented with large beads; a full drapery over the shoulders, and confined in to the back with a pearl band, ornamented round the neck and down the back with beads. A full turban fillet tapered, worn on the head. Pearl necklace, white kid gloves and shoes.

And here is the finished result of my labors.

IMG_2195
Side.
IMG_2198
Back.
IMG_2176
And the full ensemble.

I attempted to follow the detail of the hairstyle from La Belle Assemblee, down to the curls around my face (lots of extra work since all my hair is long!) and the little braid on the side. It was a puzzle to figure out and enjoyable to wear.

The question is, how did I get the turban fillet to stay in place on my head? Well, I thought of making a gathered tube wound with pearls, as Natalie proposes below, but decided to make my turban fillet have a flat back instead for multiple reasons. #1: there has to be a seam somewhere, so why not hide it intentionally? #2: I only had so many pearls, and winding them all around a sample tube used them up far too quickly so that I would never have reached the end and still been able to have pearls. #3: the angle of the pearls when winding them around was very challenging and I couldn’t figure out how to arrange them pleasingly. #4: “why waste pearls against my head?” I thought, when they’re going to be slightly uncomfortable and slippery there anyway?

So here is what I came up with: a length of fabric about 40″ long, wrapped around a strip of hi-loft poly-fill batting (not period, I know, but easy and free!), turned under and sewn down on the back, gathered across the top, with rows of pearls sewn on at intervals, and finished with loops on the back every few rows of pearls in order to secure the whole thing to my head. The entire thing is hand sewn. I have no idea how you would use a machine to assemble this the way I did!

IMG_2199
The top is the front of the turban fillet and the bottom is the back.

And yes, I was able to wear this to a Regency ball in April!

* Natalie notes the following about the description “turban fillet”. Please check out her post to see both fashion plates she refers to.

Turban fillet. For a change, just what you might imagine: a “fillet” is normally a narrow ribbon or wire wound round or encircling the head, while a turban is a, well, a turban. In this month’s evening dress hairstyle, we have a length of fabric well gathered to make a narrow, round, gathered tube, wound round the head. The turban is wound with pearls for extra measure. Handsome and I hope that someone will take up this style for a ball before long! The ball dress plate uses a similar design; it encircles the head more like the fillets we remember from Medieval fairy tales, but ironically, the effect is more turban-like to my eyes than the evening dress example, yet isn’t called a turban. Fashion, fashion.

Vernet Project: Merveilleuses & Incroyables

Really exciting things are secretly brewing amongst an international group of historical seamstresses, tailors, and costumers. They are strange, beautiful, unusual, fun, just plain weird, and detailed… and they are coming to life in 2015!

10394822_835881046430902_3846149313268917321_n

Join us on Facebook and look forward to more tantalizing posts here and around the historical clothing and costuming blog-world as we research, sew, and prepare to unveil this amazing project in December 2015. Do you Vernet?

A Floral Headband For Annabelle (Returning Heroes Ball 2014)

Not too long ago, I was again able to be part of the annual Returning Heroes Ball hosted by The Commonwealth Vintage Dancers. I decided to wear Annabelle again this year, even though I’d worn her last year, because I’d just worn Evie and Belle at the 1860s Dance Weekend in November.

IMG_7853
Annabelle at Returning Heroes Ball 2014.

Each time I’ve worn Annabelle, I’ve been slightly disappointed with the various incarnations of flower hair wreaths I’ve attempted to match her: the first wreath and the giant mass of flowers. So this year I decided to try again to see if I could get something I like. There are quite a number of evening dresses decorated with flowers right about 1860 and many of them are depicted in fashion plates and portraits with matching flowers in the hair. Here are some examples: 1859 fashion plate, another 1859 fashion plate, a third 1859 fashion plate, 1861 fashion plate, 1861 portrait, 1862 fashion plate, and 1863 fashion plate. For this new incarnation, I decided to try a different style from what I have for my other two evening dresses (Belle has a crescent and Evie has a hair wreath).  The style I settled on I’m calling a headband. It creates a halo around the face and extends down towards the ears, but does not connect across the back of the head. Instead, the hair must be interestingly arranged to fill in the back of the head. Here’s an example of the headband style using flowers that match the dress from 1862. And here is the fashion plate that Annabelle is based on which shows a headband style hair wreath worn with the dress.

IMG_7827
Here is Annabelle’s new floral headband. 
IMG_7953
Back view of my hair style. I needed something dramatic to fill in the base of my head. I wanted to do a sideways oval surrounded by rolls, but that didn’t work out and this is what I ended up with. I was dubious at first, but I think it worked. (It’s hard to see, but there’s one big central roll/puff and one smaller one above and below that.)

In addition to my new headband, I was also able to wear my new ca. 1860 corset and my still rather new purple paste jewels (a matching collet necklace and drop earrings) from Dames a la Mode. They worked wonderfully with my outfit (of course, I did pick the purple knowing it would match multiple outfits…!) and I enjoyed wearing them again.

The ball was lovely, as usual, and filled with well dressed people and more uniformed gentlemen than we have seen in recent years. The dancing was well executed and the intermission boasted a lavish spread of refreshments that both looked and tasted scrumptious.

IMG_7809
Bowers, during the Grand March.
IMG_7930
Bowing at the end of a polka.
IMG_7848
One small portion of the refreshments table.
IMG_7937
Looking lovely and dashing.

You can see more pictures of the event at Raven’s Plaid Petticoats blog post about Returning Heroes.

Variety Please: Regency Ribbon Sashes

In modern interpretations of Regency costume, there is a widespread use of what I am going to call the “ribbon sash.” By this I mean a length of ribbon, in a contrasting color to the dress and not used to trim any other part of the dress, tidily tied or sewn under the bust, and terminating with long hanging ends. I understand that this style provides an easy way to adorn a dress of any color or add color to a white dress, but I believe that the style is much too often used relative to the occurrences we see of them being worn in portraits, fashion plates, and built into extant gowns. I would like to encourage all of us to have variety in the ribbon sash styles we wear with Regency clothing.

When looking at portraits, fashion plates, and extant gowns, you do find the sort of ribbon sash I described in the beginning of this post, but you don’t find them in anywhere near the same proportion with which they are used today. You do see these types of sashes, but it is a small proportion of the styles worn and you see a variety of other sash styles, too. I would like to share a variety of ribbon sash styles with you and encourage you to pick one of these less used styles if you decide to wear a ribbon sash yourself or if you have the influence to encourage others in their own ribbon sash wearing. By expanding the styles of ribbon sashes worn, hopefully we can all more accurately represent clothing worn in the Regency period.

Generally speaking, there are 4 large categories of ribbon sash styles. I’ve included an example image of each style underneath the accompanying description and I’ve included links to other good examples (below the four sash style descriptions) so you can look at them for more ideas.

1: The Ribbon Sash (as described in the beginning of this post): a length of ribbon, in a contrasting color to the dress and not used to trim any other part of the dress, tidily sewn or tied under the bust, and terminating with long hanging ends approximately 24″-36″. It is very rare to see this style used in a fashion plate or painting with the termination of the sash in any location other than center back.

f718f40238cfc85cf02418565c440a52
Henri François Mulard, Portrait of a lady, circa 1810

2: The Short Sash: a length of ribbon, in a contrasting color to the dress and not used to trim any other part of the dress, tidily sewn or tied under the bust, and terminating with short hanging ends approximately 6″-18″. I have seen this style with the termination of the sash in center back, center front, and  occasionally off to one side of the front.

39b5c0d0d643bba771d16242bc7cd001
Costume Parisien, 1817

3: The Belt Sash: a length of ribbon, in a contrasting color to the dress and not used to trim any other part of the dress, tidily sewn or tied under the bust, and with very short hanging ends or without hanging ends at all. This style is sometimes plain or sometimes adorned with a buckle or bow. The buckle or bow with short ends is often at center front.

bf13efcf8156d526622fc6126c7b045b
Portrait de Laure de Berny ca. 1810 by Henri-Nicolas Van Gorp

4: The Trim Sash: a much more common variant of any of the first three sash styles. Any of the first three sash styles can fall into this category if the sash matches and coordinates, in a harmonious fashion, with trim elsewhere on the dress (neckline, sleeve openings, or hem).

6d79a16093d852e426ea43901059fa9c
Costume Parisien, 1812

All of these sash styles are seen with different styles of termination. I’ve most often seen a variety of bows as well as tidy arrangement of loops. Often, the belt style seems as though the belt sash is actually sewn to the dress, but for the sake of options, I can easily see a ribbon sash made with a closure such as hook and eyes so the sash can be easily added or removed from any outfit. It’s worth noting that there are a substantial amount of images showing ladies from the front who appear to be wearing a ribbon sash of some sort. The trouble is that we often can’t see what’s going on in the back, so we can’t know with certainty what style of ribbon sash is actually being represented, though we can make educated guesses.

Here are more examples of each of the sash styles shown above:

1: The Ribbon Sash

Portrait of a lady, ca. 1810: ribbon sash on a white dress (ties in back)

Costume Parisien, 1813: ribbon sash on a white dress (ties in back)

2: The Short Sash

Auguste-Amalie de Baviere, ca. 1815: short sash (ties in front)

Costume Parisien, 1817: short sash (ties in back)

3: The Belt Sash

Laure de Berny, ca. 1810 (bow in front)

A young woman wearing gloves in a park, 1813

Anna Maria Magnani, 1814 (bow in front)

Woman knitting in a blue dress, ca. 1819 (bow in front)

4: The Trim Sash

Dress, ca. 1810, The Met: belt sash

Dress, ca. 1810-1811, Gemeentemuseum Den Haag: belt sash

Costume Parisien, 1812: belt sash

Costume Parisien, 1812: belt sash

Dress, ca. 1810-1815, Rijksmuseum: belt sash

Family Portrait, 1813: short sash (ties in front)

Of course, these are only a starting point. My pinterest boards have hundreds of pins from the 1800s and 1810s that you are welcome to look at for other ideas. Keep the contrasting ribbon sashes in mind, but don’t forget that you can make sashes out of your dress fabric, too (see below). Sashes made from self fabric are quite common. Look around and see what you can find that inspires you. This Regency Portraits board has a lot of great images showing all sorts of sashes as well.

Here are some great examples of dresses with sashes made from self fabric (meaning that fabric used in the dress was also used to create a ribbon sash look):

Désirée Bernadine Eugénie Clary, ca. 1810: long sash

Costume Parisien, 1810 short sash (ties in front)

Costume Parisien, 1811: short sash (ties in front)

Costume Parisien, 1811: short sash (ties in front)

Costume Parisien, 1812: short sash (ties in front)

Costume Parisien, 1814: short sash (ties in back)

Costume Parisien, 1817: short sash (ties in back)

In looking at my pinterest board covering 1800-1809, I do find that there are some very cute sashes then, too, that are relevant for a potential sash look. In  this period it seems that most sashes match the trim used on the dress, though it is not an absolute rule. I’ll include a few examples of this sort below, so you can look if you’re curious.

Costume Parisien, 1799: short sash (ties in front)

Costume Parisien, 1800: short sash: (ties in front)

Costume Parisien, 1800: trim ribbon sash with long ends

Young Woman Drawing, 1801: short sash (ties in back)

La Belle Assemblee, 1807: trim ribbon sash with long ends

Costume Parisien, 1808: belt sash

Felicite de Durfort von Merry, 1808: belt sash

Charlotte Bonaparte, 1808: belt sash

For the record (and because I always forget!), the official “Regency” is referring to England during the years 1811-1820, following the Prince of Wales being named regent for George III in 1810. In France, the Napoleonic Empire spanned the years 1804-1814. So there is some overlap between Empire and Regency, but not a whole lot. (And just to add another date to the mix, the Federal period in America roughly spanned the years 1780-1830.) For the purposes of this post, I’m using the word Regency to specify the 1810s, but my points about variety in sash styles are relevant for the first decade of the 19th century as well.

As a final note, let me encourage you to use color in Regency dresses (color in trim as well as color in the fabric), especially in those dresses intended to represent the 1810s rather than 1800s. By the 1810s, not all dresses were in white tones, as they were much more predominantly in the first few years of the 19th century. Colors were used often, some of the colors even being rather vivid in tone (don’t get too carried away with very bright colors, though, because chemical dyes weren’t invented till the middle of the 19th century). Check out these great resources that describe and show colors used in the Regency:

Colours used in the Regency and Georgian eras

Regency Colors and Fabrics

HSF #20: Finally Finished 1822 Walking Dress

…It’s only been a year! Or pretty close to a year. I posted an overview of my early 1820s project last November. The project included a petticoat, 1824 ball gown, 1822 walking dress, muff, tippet, bonnet, and chemisette. Some of these things are still in the UFO pile or on the to do list, but I’m super pleased that this post is about the completion of the 1822 walking dress!

The image below is my inspiration for the now complete walking dress. I wore it last December to go caroling outside before Fezziwig’s Ball, but at that point my time had run out and though the construction was complete there was no trim. Below the image of my inspiration is an image of the walking dress as it looked last December with no trim. And below that is an image of the now completed walking dress with trim! It certainly fits me better than the hanger, but you’ll have to wait a few months to see it on me.

19562579602401776_TvaRkZoN_c
Promenade Dress. Ackerman’s Repository. December 1822.
IMG_4083
December 2012. Unfinished early 1820s ensemble.
IMG_4889
Yay! All the trim is on!

Before I share some close ups of the trim and construction, let me share the facts:

Fabric: 4-5 yds of dark pink wool, 4-5 yds of ivory super soft and thick cotton twill, 1/2 yd-ish of lavender polyester velvet, 1/2 yd-ish of lavender silk shantung,  and a bit of canvas for the collar.

Pattern: Adapted from my 1822 green ball gown pattern, I think. It’s pretty much exactly the same except that it has a higher back, collar, and sleeves. The ball gown pattern is based off of a pattern in Janet Arnold.

Year: 1822.

Notions: Pink and lavender thread, polyester batting in the hem, and hooks for the waist.

How historically accurate?: Very, having used modern materials and a few very nice looking modern fabrics . The pattern is from Janet Arnold, so you know it is good on accuracy and the trim scale and pattern is taken from a fashion plate from 1822. As a historic costume I give it 98%.

Hours to complete: Oh goodness… I’m sure the main construction took at least 40 hours and the trim took probably 50ish hours to cut, press, and hand sew. I didn’t keep track at all on this project.

First worn: To Fezziwig’s Ball in December 2012, though with trim it will debut at Fezziwig’s Ball in December 2013!

Total cost: $40 perhaps?

Ok, now for the trim and construction shots.

IMG_4892
Top of the sleeve. First I had to sew the bias into a tube so the raw edges would be finished and the bias could “float” without having to be sewn down all along the edges. Then I tacked the bias tubes in a zig zag then crossed and tied other zig zags to get the finished pattern.
IMG_4891
The front. The pattern looks very much like an oak leaf to me. The bias is stitched in a tube with the raw edges showing on the back, then the edges are stitched down all around to create the pattern.
IMG_4890
The sleeve. The bias is stitched on the same way as it is on the front. The motifs are sewn on the front of the arm rather than the outside.

I actually had forgotten that I’d taken these construction shots. In fact, I had totally forgotten the method I had used to construct my sleeves until I saw the picture again! These pictures where the wool looks more pink than maroon show the color best. It’s really much more vibrant, and much less brownish, than some of the pictures make it look.

IMG_3946
The canvas pad stitched into the collar before sewing the pieces together.
IMG_3949
The top of the sleeve before the gathered sleeve top was sewn on. I didn’t want to waste wool where it wouldn’t be seen, so it stops part way up the lining, then the gathered cap is sewn on and hides the raw edge of the wool.
IMG_3951
The lining is stab stitched to the wool at the cuff.

And just in case you want to read more about my entire project from the early 1820s, here’s a link to that category of entries on my blog. As I continue to finish up other bits and pieces I’ll keep adding them to that category, and it’s neat because the category filters only those posts so there’s a nice continuity.