

Recently, I’ve been hinting about my new 1875 reception dress. We’ve looked at the hat that I made to accompany it as well as how the hat was made. Now, I’d like to share focused details about the construction of the bodice of the dress.
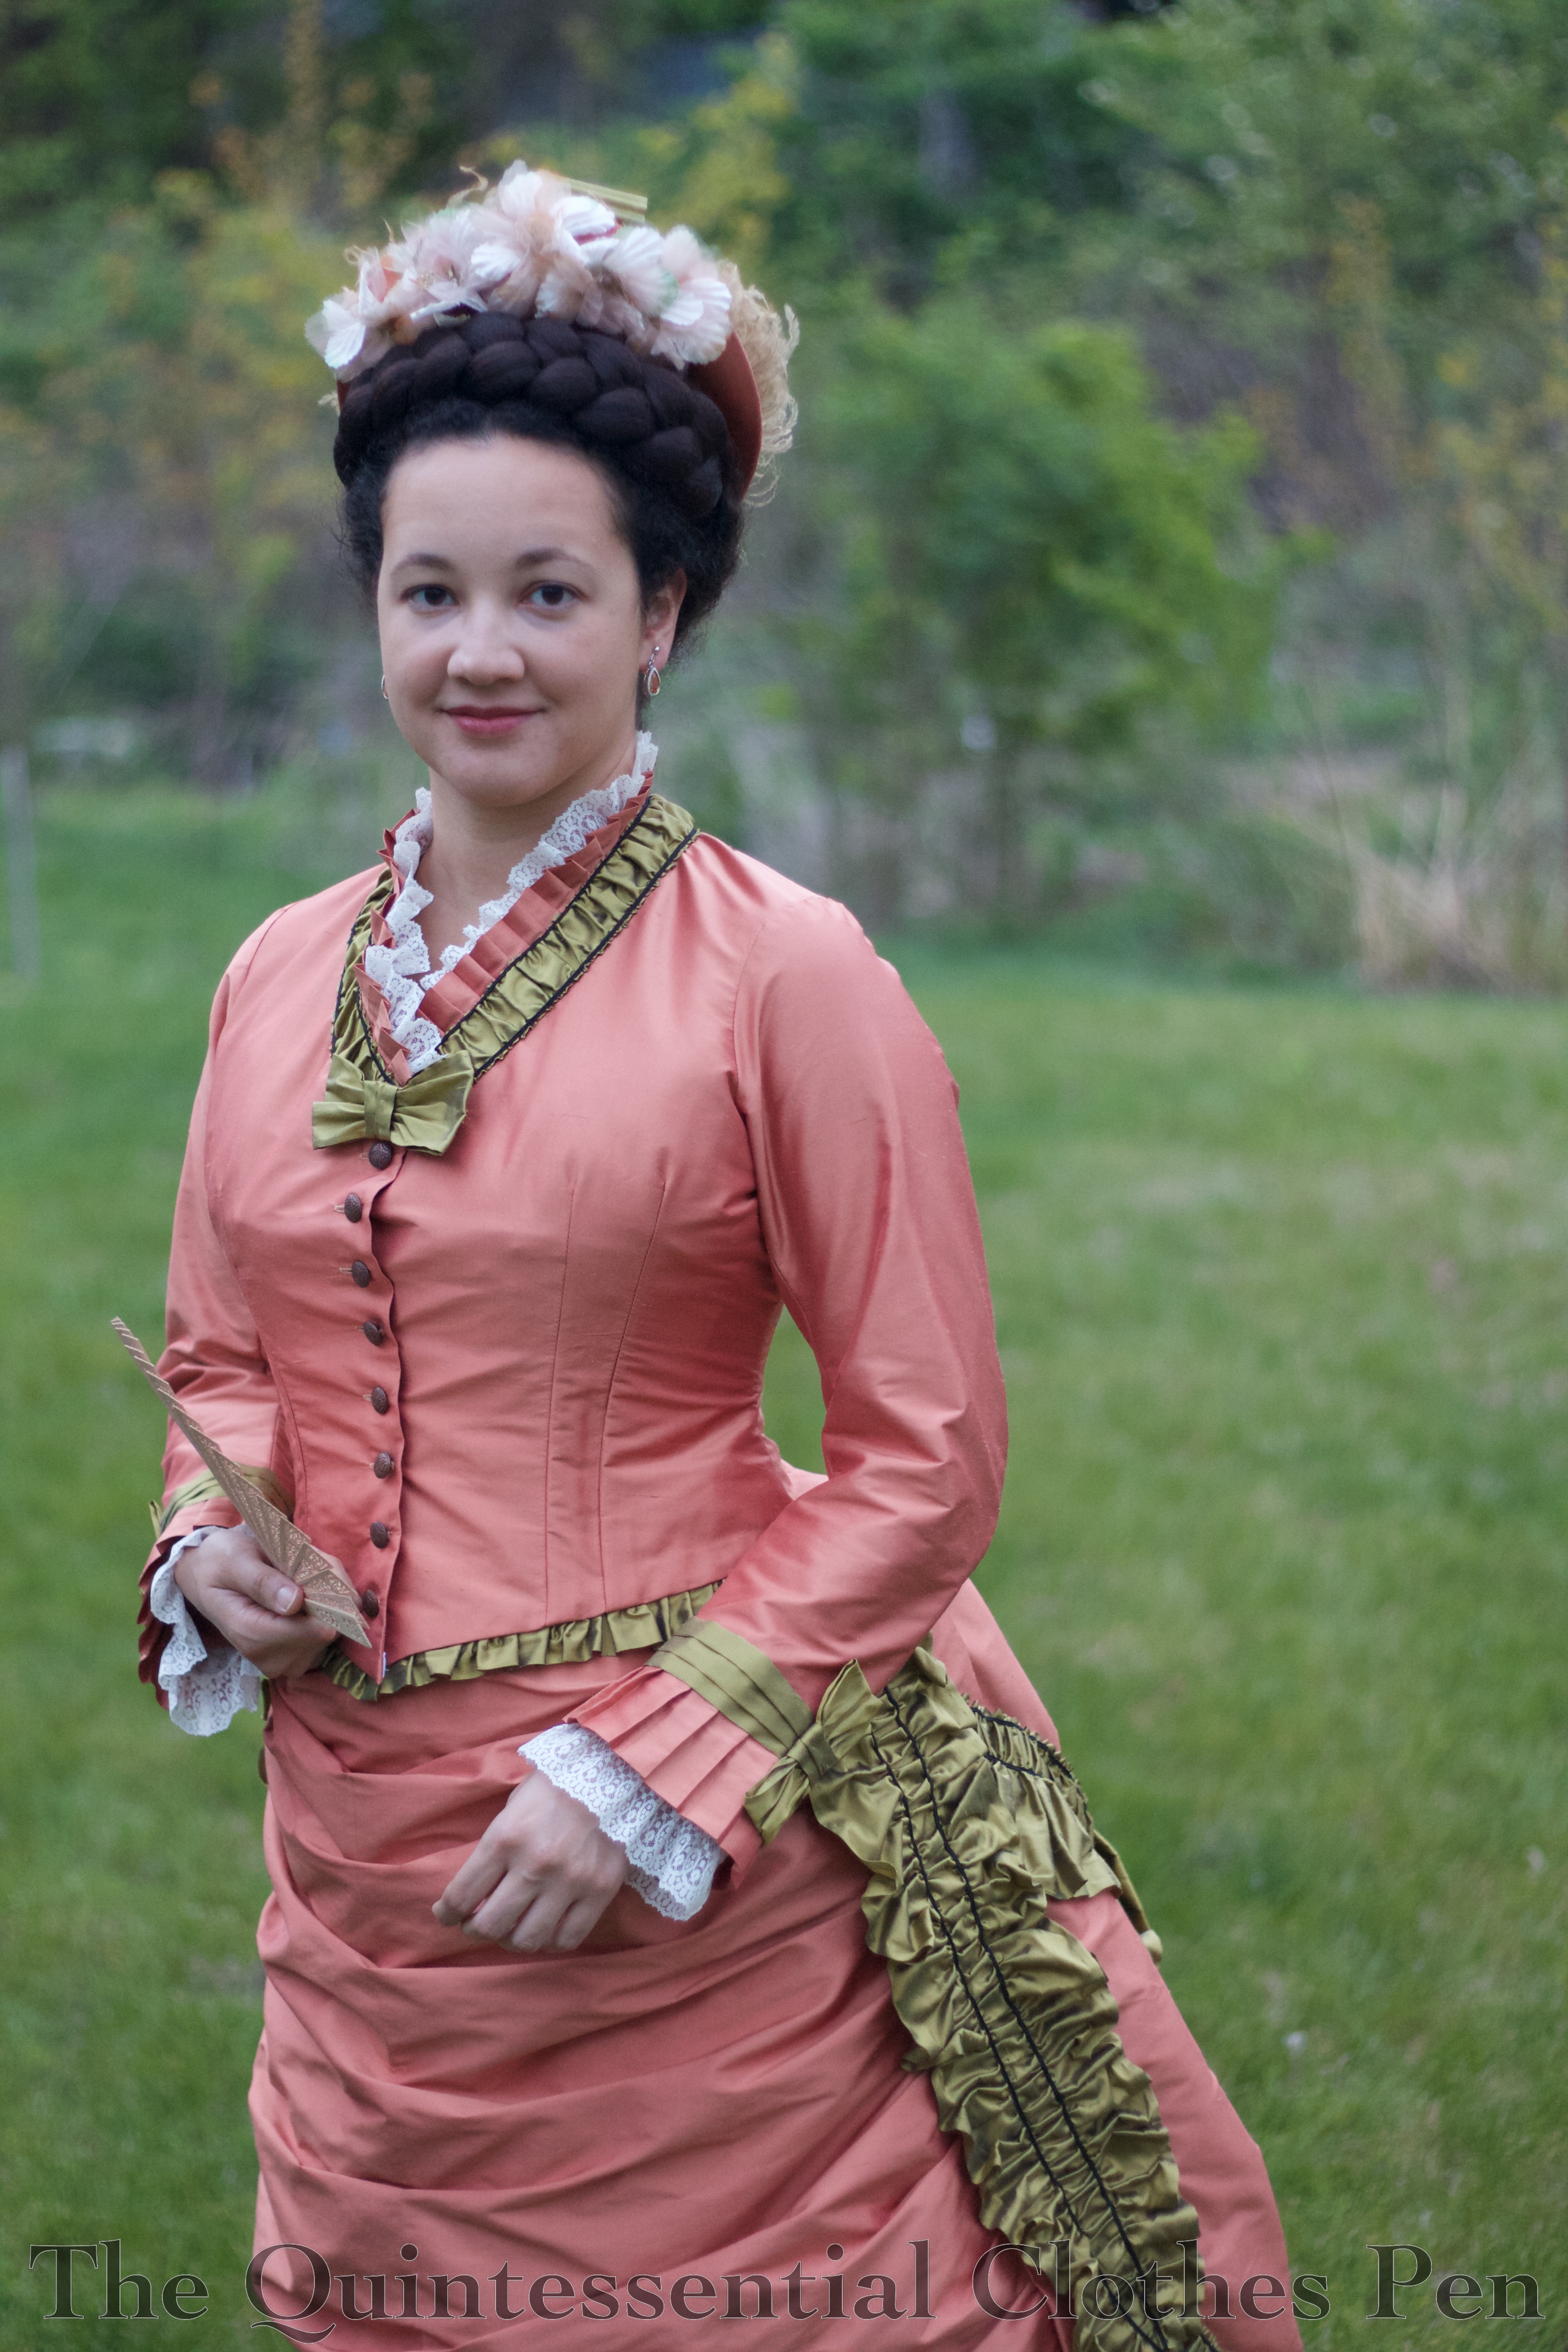
Here is the finished bodice!
I did a lot of Pinterest scanning to choose a style for the dress (as one does, of course!). There are a number of dresses from 1875/76 that appeal to me, with their swags of fabric, elaborate trimmings, and sweeping trains, but I decided on the fashion plate below partly because I had fabrics in my stash that I thought would work in terms of yardage as well as complementing each other in terms of colors.

If you’re looking carefully, I imagine you’ll notice pretty quickly that my finished bodice does not have the pleated sleeve trim and large cuff shown in the fashion plate. I ran out of fabric! Oops. So I decided to eliminate these details and focus on all the other trimmings on the dress. For example, if you look at the neckline and hem of the finished bodice you will notice that those two edges have similar treatments as in the fashion plate. However, not using the sleeve style in the inspiration fashion plate left me with a style decision to make. How to trim, or finish, the sleeves? Back to Pinterest!
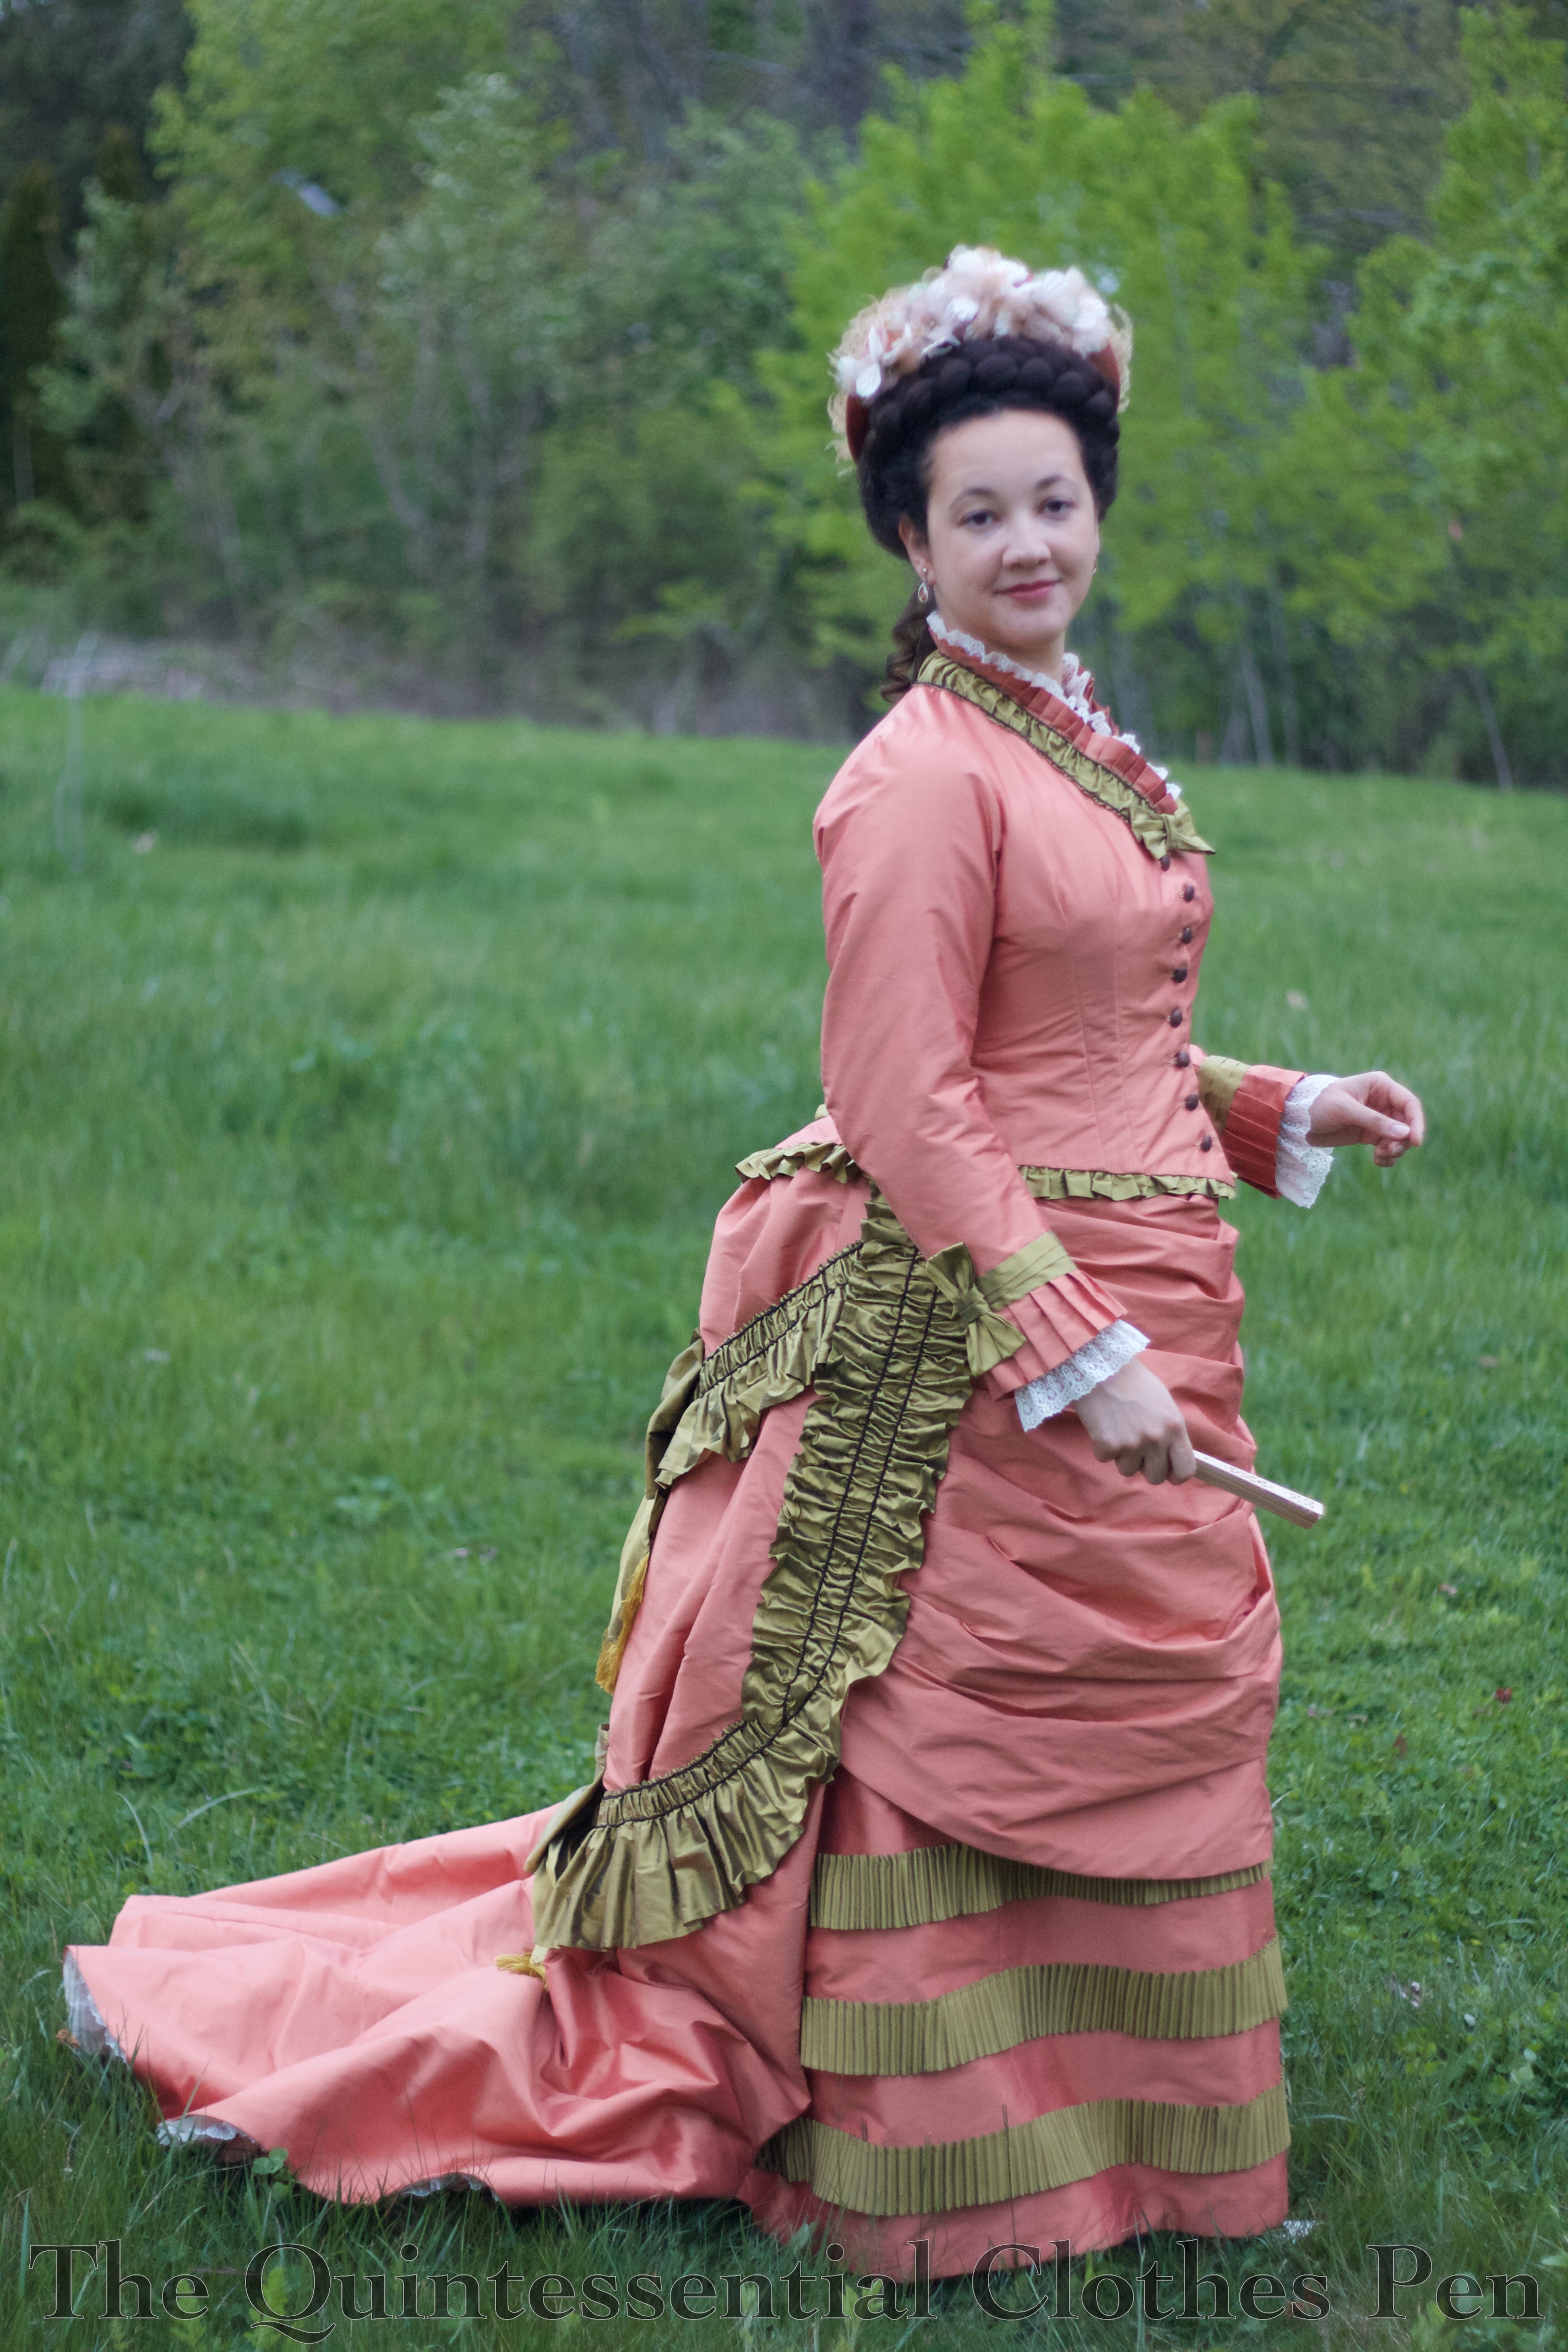
I settled on the sleeve style of the fabulous burgundy and tan dress on the right. This would use less fabric but maintain a similar feeling as other parts of the dress.

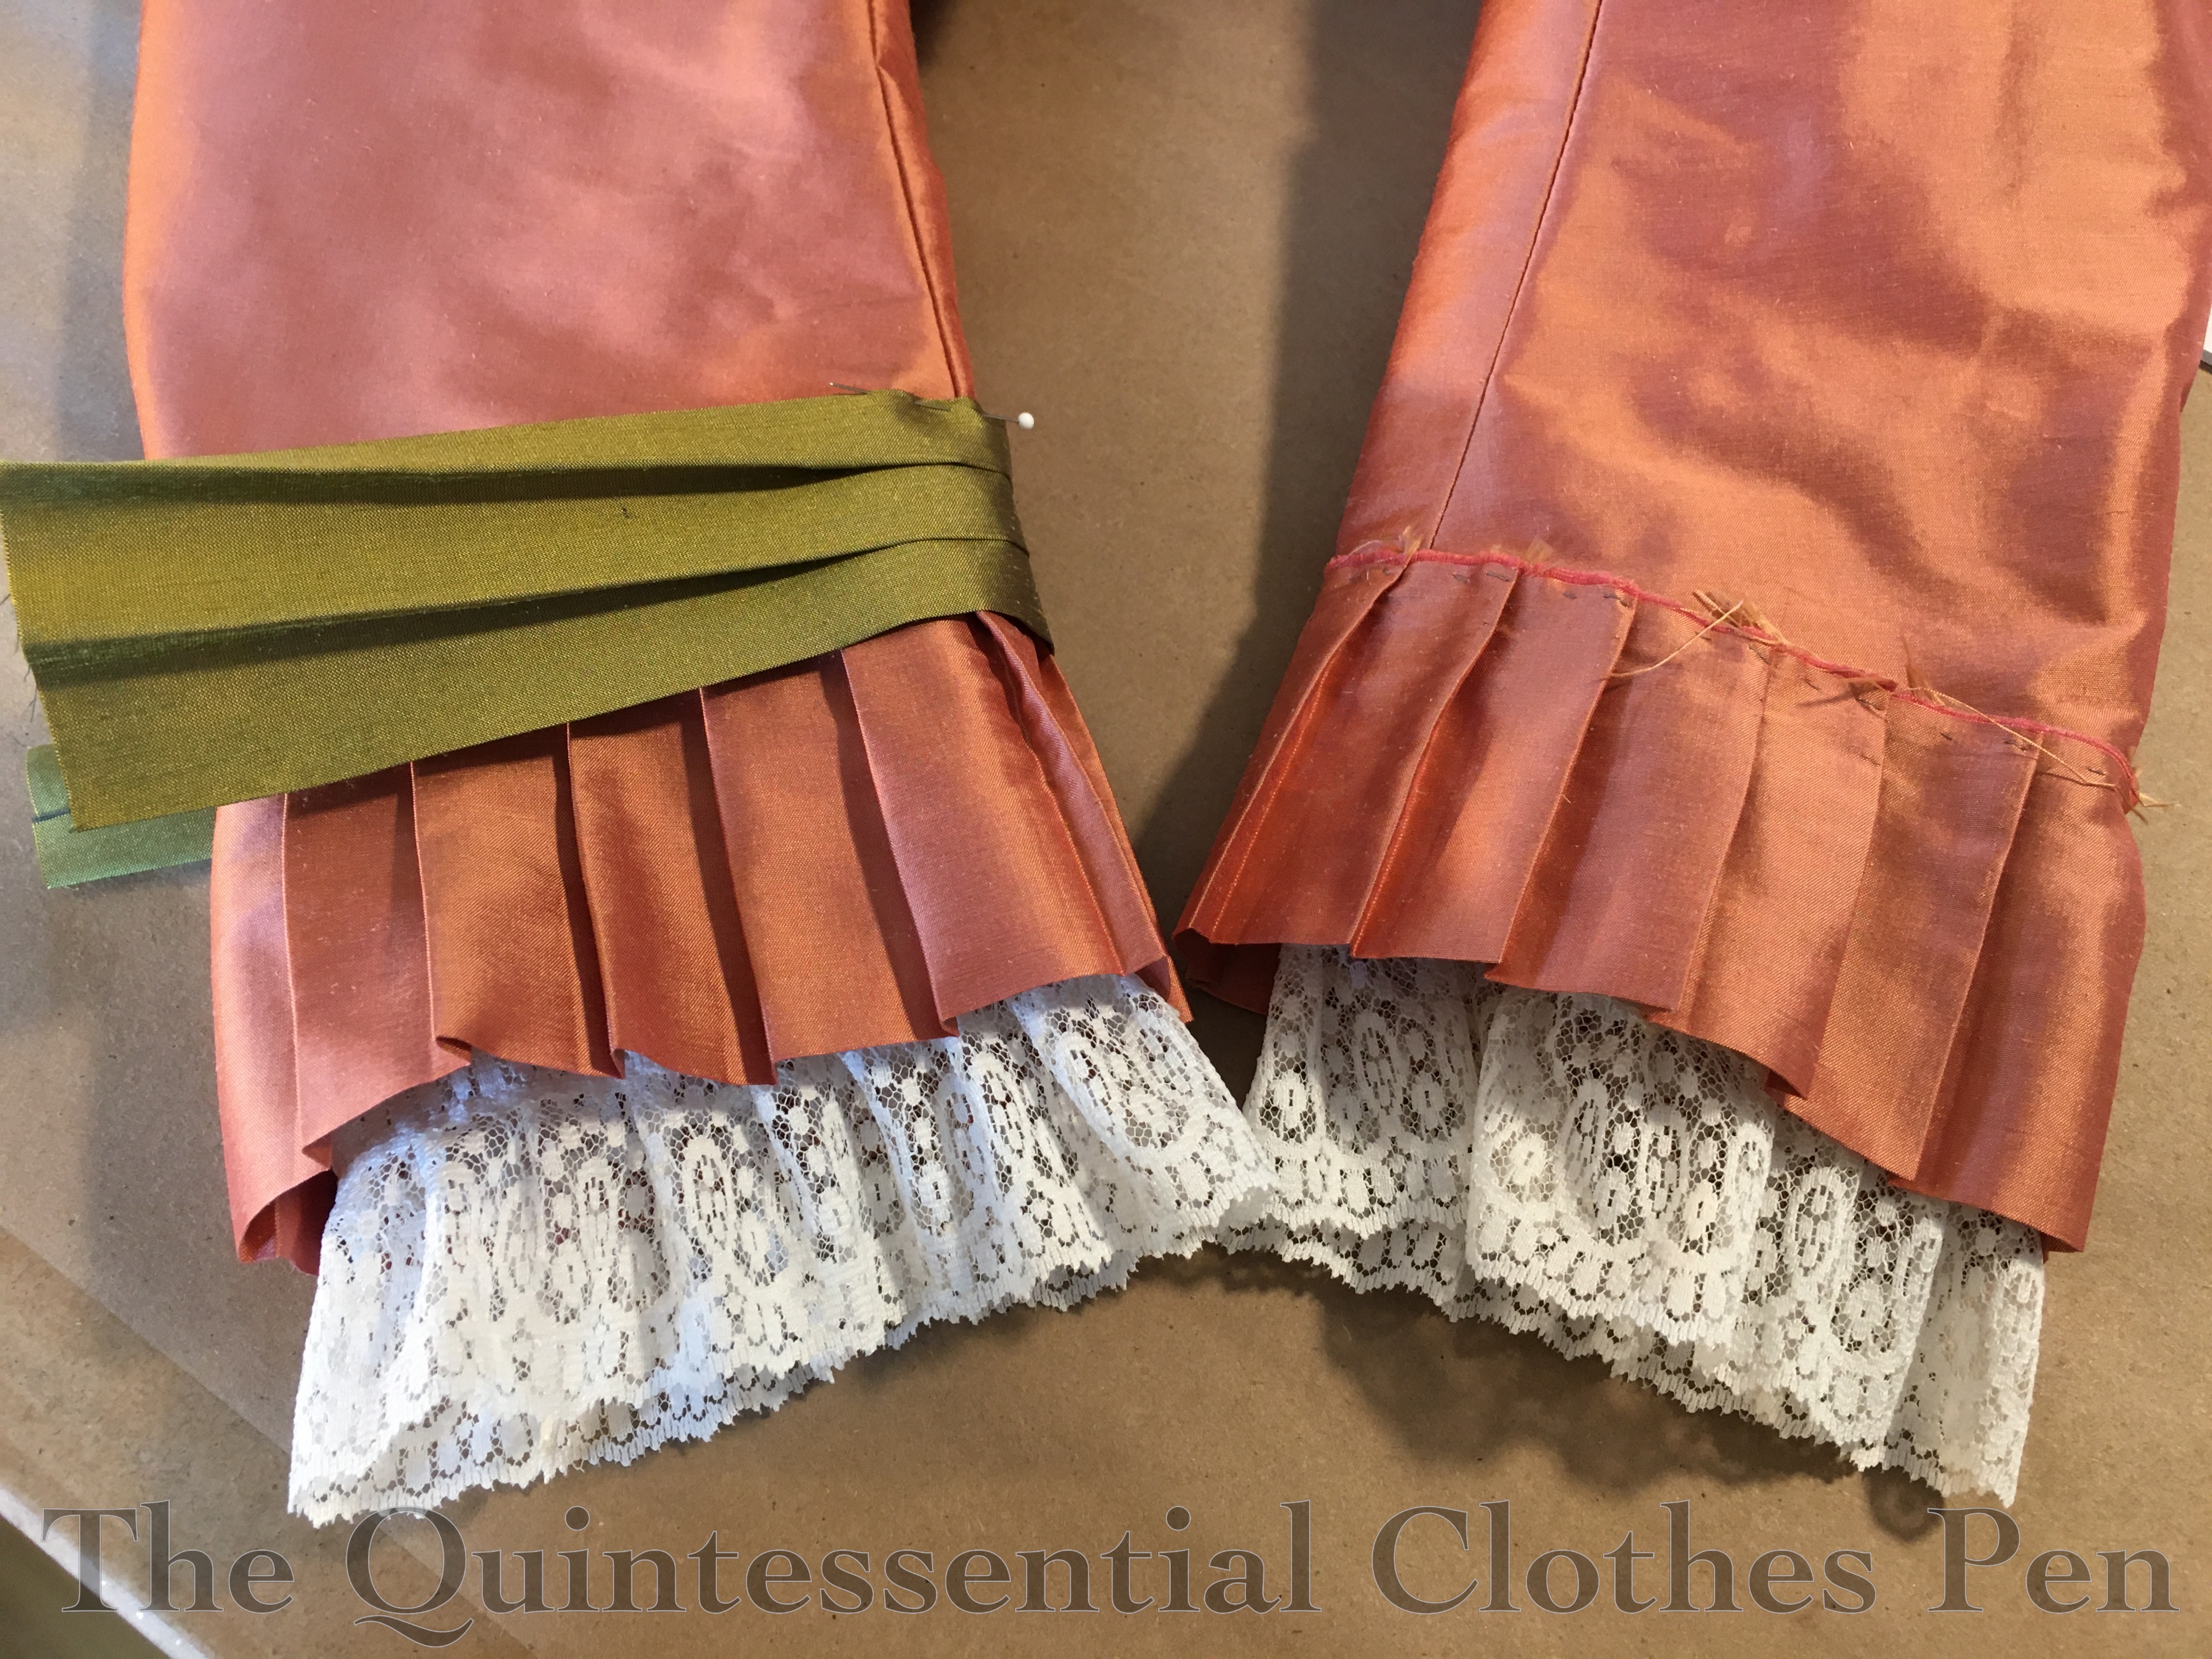
Below are my partially finished sleeves.
I started by cutting them off at a length that made sense with the addition of the pleats and hemming them. The pleats are pressed in the center so that no hemming is needed and the top edges are left raw. These raw edges are then covered by the green pleated bands. The lace is actually two rows of lace (to make the lace twice as wide) that are gathered and then sewn into sleeves. The final step that you can’t see here is a green bow to finish off the back sleeve seam area. The bow covers the raw edges of the green pleated band.
The bodice pieces of silk are flat lined with muslin. The seam allowances are whip stitched to keep them tidy. The bottom edge of the bodice is finished with self bias. The bodice is boned–at the point of this photo only the center back seam has a bone stitched in.

In addition to the center back, I added bones to the side back seams as well. I also added a waist stay. That is the grosgrain ribbon that is stitched to the boning channels. This helps to keep the bodice anchored around the waist if I raise my arms and to keep the back tight against my body. It also takes some strain off of the buttons.
At this point you can also see the green ruffle has been added to the bottom of the bodice. Like the pleats on the sleeves, the ruffle is pressed in half so that no hemming is needed. The top raw edge is hidden by the twill tape.

Here’s another view of the inside of the bodice that shows the green ruffle a little bit more. It also shows the bones on the side seams and a hint of the lace around the neck opening, the edge of which is also covered with ribbon–in this case, petersham. I found the lace too scratchy against my neck on it’s own, even though it feels relatively soft against my hand.
The photo below also shows the bust pads. These are graduated crescents of batting that are stitched together and then covered with cotton. They help to fill out the area just in front of the arm, which often has a natural dip without assistance of this sort. Filling the dip in creates a fashionable rounded shape. Adding the pads is an experiment I was trying out. (Here is an example of a c. 1885 extant dress that has bust pads.)

Here’s an up close shot of the seam allowances of the bodice, also showing the lace and petersham around the neck a little more. You can just barely see the armsceye seam allowances, which are trimmed and whip stitched to keep them tidy.

Finally, here is a view of the front of the bodice in a half finished state.
The two front darts have boning channels stitched into them. All of the ‘bones’ in this bodice are plastic zip ties. The front zip ties are split in half to make them narrower.
This photo also shows the pleats around the neck opening (finished as with the sleeves and bottom ruffle). There are facings on the front edges. This photo was taken before I stitched the buttonholes. They were eventually machine sewn.

After all the internal construction was complete, I added the buttons (they are rubbed bronze looking plastic shank buttons) and the green trim around the neck. The neck trim is a strip of silk that has the long edges pressed under and gathered. The long edges are tacked to the neckline and then black soutache is sewn on top to cover the machine stitching lines. The finishing touch is the bow at center front.
Ta da! Next time, I’ll do an in depth post about the skirt construction, including back views that show off the giant bows, which are probably my favorite part of the skirt.

Quinn ~ Wonderful post. Exquisite dress!! Amazing–just like you. Love you. ~ Mom
Beautiful!!! I love the explanations. I learn so much.
Love
Aunt Doris
What a lovely outfit! So glad I don’t have to dress like this in the heat of summer! Personally, I think the simpler sleeves are more elegant and work very well with the outfit. How long does such a dress take you? And what machine(s) do you use? It looks like there is a bit more handwork in the finishing – no serging – than some others use in their costume remakes.
Thank you! I’m glad I’m not wearing this in summer heat, too! Thankfully, I was able to take these photos in May, when the temperature was reasonable. 🙂
I agree with your assessment of the sleeves. In addition to running out of fabric, I feel that the pleated sleeves with large cuffs in the fashion plate just don’t harmonize with the overall style of the dress, so I’m rather glad I decided not to do them.
This dress took me 80 hours to make. The seams are sewn with a modern Singer sewing machine, as are some of the gathers. Aside from that, everything else is hand sewn, so yes, a bit of handwork! 🙂
I’m happy to use sergers for modern garments or theatrical costumes, but when I’m making historical garments for myself not only I enjoy hand sewing, but also greatly enjoy replicating the finishing methods seen on extant garments (as you hinted, those methods do not include serging). I often use my garments for historical dressing presentations and allow my audience to look at the insides of the garments, so having historical looking finishing is important to me for that reason, as well.
Of course, that’s my personal choice. Other people have other goals–finishing a garment faster so they can wear it sooner, saving wear and tear on their hands, etc.
Thanks for such as lovely reply! I think it’s great that you enjoy spending the time handstitching. Handwork is rewarding. As well,. if you think about it, many clothes in the 1870s on were probably a combination of sewing machine and handwork. No sergers then! So your doing both is historically accurate.
I totally enjoy your blog, and while I will never pursue outfits like you do, I like more modern clothes (Edwardian on), the fact people still make them is a delight. Probably the oldest thing I will ever copy would be a chemise!
Of course! Thank you for the thoughtful engagement via comments. I’m so glad you enjoy my blog and take the time to like and comment on posts.
You make an excellent point about how clothes would have been constructed. It’s neat to be able to construct similar things in similar ways! 🙂
I agree completely! And, you, too, are welcome!
Oh, it’s beautiful! Such a lovely color and the details just pop! I really like the interplay of different textures with the ruffles and the pleats against smooth silk. Also, the interior shots are so valuable to folks like me who haven’t ventured far into Victorian daywear, so thank you for including that!
Hi Anna! Thank you for the compliments, and for reading and commenting! I’m always excited to hear that people enjoy very detailed construction posts. I enjoyed your description of the different textures on the dress!
Wow! This is excellent work!
Thank you for the compliment–and for reading and commenting!
This is sensational! You’ve captured the silhouette and draping, then piled on the decoration at truly period scale.The apron folds came out perfectly.
The self-fabric fringes on the bows are a very clever touch. They introduce one more variation in scale, color and finish, just the way the Victorians liked it.
I wonder if you were planning to take one more pass at the fluted trim across the skirt some day. It levitates a bit, in contrast to the rest of the trimmings. In the plate you chose, the pleats seem to be anchored along the top, I think by a strand of that black soutache braid.
Huge compliments.
Thanks many times!
You’ve hit on a feeling I’ve also had about the fluted trim in your comment. I also feel that it floats a bit instead of being grounded, and I think you’re right that the fashion plate shows the black soutache trim along the top of the pleats.
I tried that with the fluted trim and wasn’t happy with the look. I think I would like it better if I had knife pleats, which are much more flat than the fluted trim. So… will I go back and change it? Perhaps, but probably not anytime soon…
Thanks for your detailed look at the inspiration, the images, and your thoughtful comments about the overall effect!