Project Journal: 1863 Apricot Evening Gown Part IX: Braided Crown Hairstyle Details

I am very pleased with how my hairstyle turned out for the first wearing of Genevieve, the 1863 dress I’ve been blogging about for the last few months. I took the idea directly from my inspiration drawing, though I changed the hair decoration that accompanied the style.

I’ve used false hair to have braided crown styles before (here’s an example of the same braid used for a Regency hairstyle), but that old braid is only about 1 ½” wide, which is a bit subtle for the look I wanted for this dress. It’s also long enough to wrap around my head about 1.5 times, which is longer than what I wanted for the new hairstyle.

So I decided to buy some new false hair and make a new, fatter braid. I used this hair in dark brown. It’s intended for African style braid extensions, so it has a texture that’s great for matching my curly hair–I don’t think it would work well for someone with straight hair. I also bought these black hair nets.

I used one bundle of the false hair for this braid. The hair comes braided already, but I took it out and re-braided it a little tighter than how it was originally. Then I cut the elastic on one of the hair nets so that it would stretch out to be as long as my braid.

I laid the braid on top of the hair net and wrapped the hair net around to the back side of the braid. Then I used large whip stitches to secure the net to the braid. You can see one of those stitches mostly centered in the next photo. Covering the braid with a hair net helps keep all the frizzies from making the braid look messy. (My old braid isn’t covered in a hair net, so it looks very organic, like my real hair… nice and frizzy!)

The final step was to go back and stitch the hair net down in the dips between each section of the braid. In the photo above you can see the hair net traveling between braid bumps, but in the finished photo below those are mostly sewn down and much less visible.

For the actual hairstyle, I secured the braid to my head behind the sections near my face that get swept back over my ears. (I also pinned the braid to the top of my head to keep it in place while dancing. Those pins were put into the back side of the braid (to keep them hidden) and secured into the roots of my hair.) After securing the braid I was able to arrange the front sweep sections on either side of my face. I made sure to cover the ends of the braid with these sections.

Then I arranged the back of my hair. I wanted to keep it simple to showcase the braid and the velvet bow, so I arranged the back of my hair into a low puff. It continues the ring of the braid around my head while being more unobtrusive than the braid itself.

The final step was the bit of lace and the velvet bow. I opted for those instead of the lace framing the braid in the inspiration image. I wasn’t sure how I would accomplish that without essentially creating a cap… and that’s not the look I wanted. So I made up something else!

The bow is one I was able to make after my bow disaster. I think it adds a nice touch of color on my dark hair. I wasn’t sure what I was going to do with it and the lace until the ball, so I bobby pinned each piece in place for that first wearing. Then one of my after-the-ball tasks before I could put this away was to sew these two pieces together and add a comb so that it is now an official accessory that will be easier to put in my hair the next time I wear this dress.

Here’s a side view of what all of that amounts to. I intentionally placed the bow and lace off-center on my head in order to pick up on the asymmetrical bow on the skirt of the dress.

When I did a quick trial with the braid in modern clothes it felt very large and I was worried it would be too big, but once dressed in Genevieve I think the scale of this new braid is great–an excellent hair crown size and length, and the hair net keeps it looking super tidy and frizz free!


1920s Beaded Bag (HSM #11)

The November Historical Sew Monthly Challenge was Purses and Bags (you’ve got your arms covered in July, your hands in September, now make something amazing to dangle from them). Late in the month I realized this was a great poke to finish an idea I’ve had for about six years. It was a bit of a challenge to complete my project before the end of the month, but I just slipped in, finishing it on November 30.

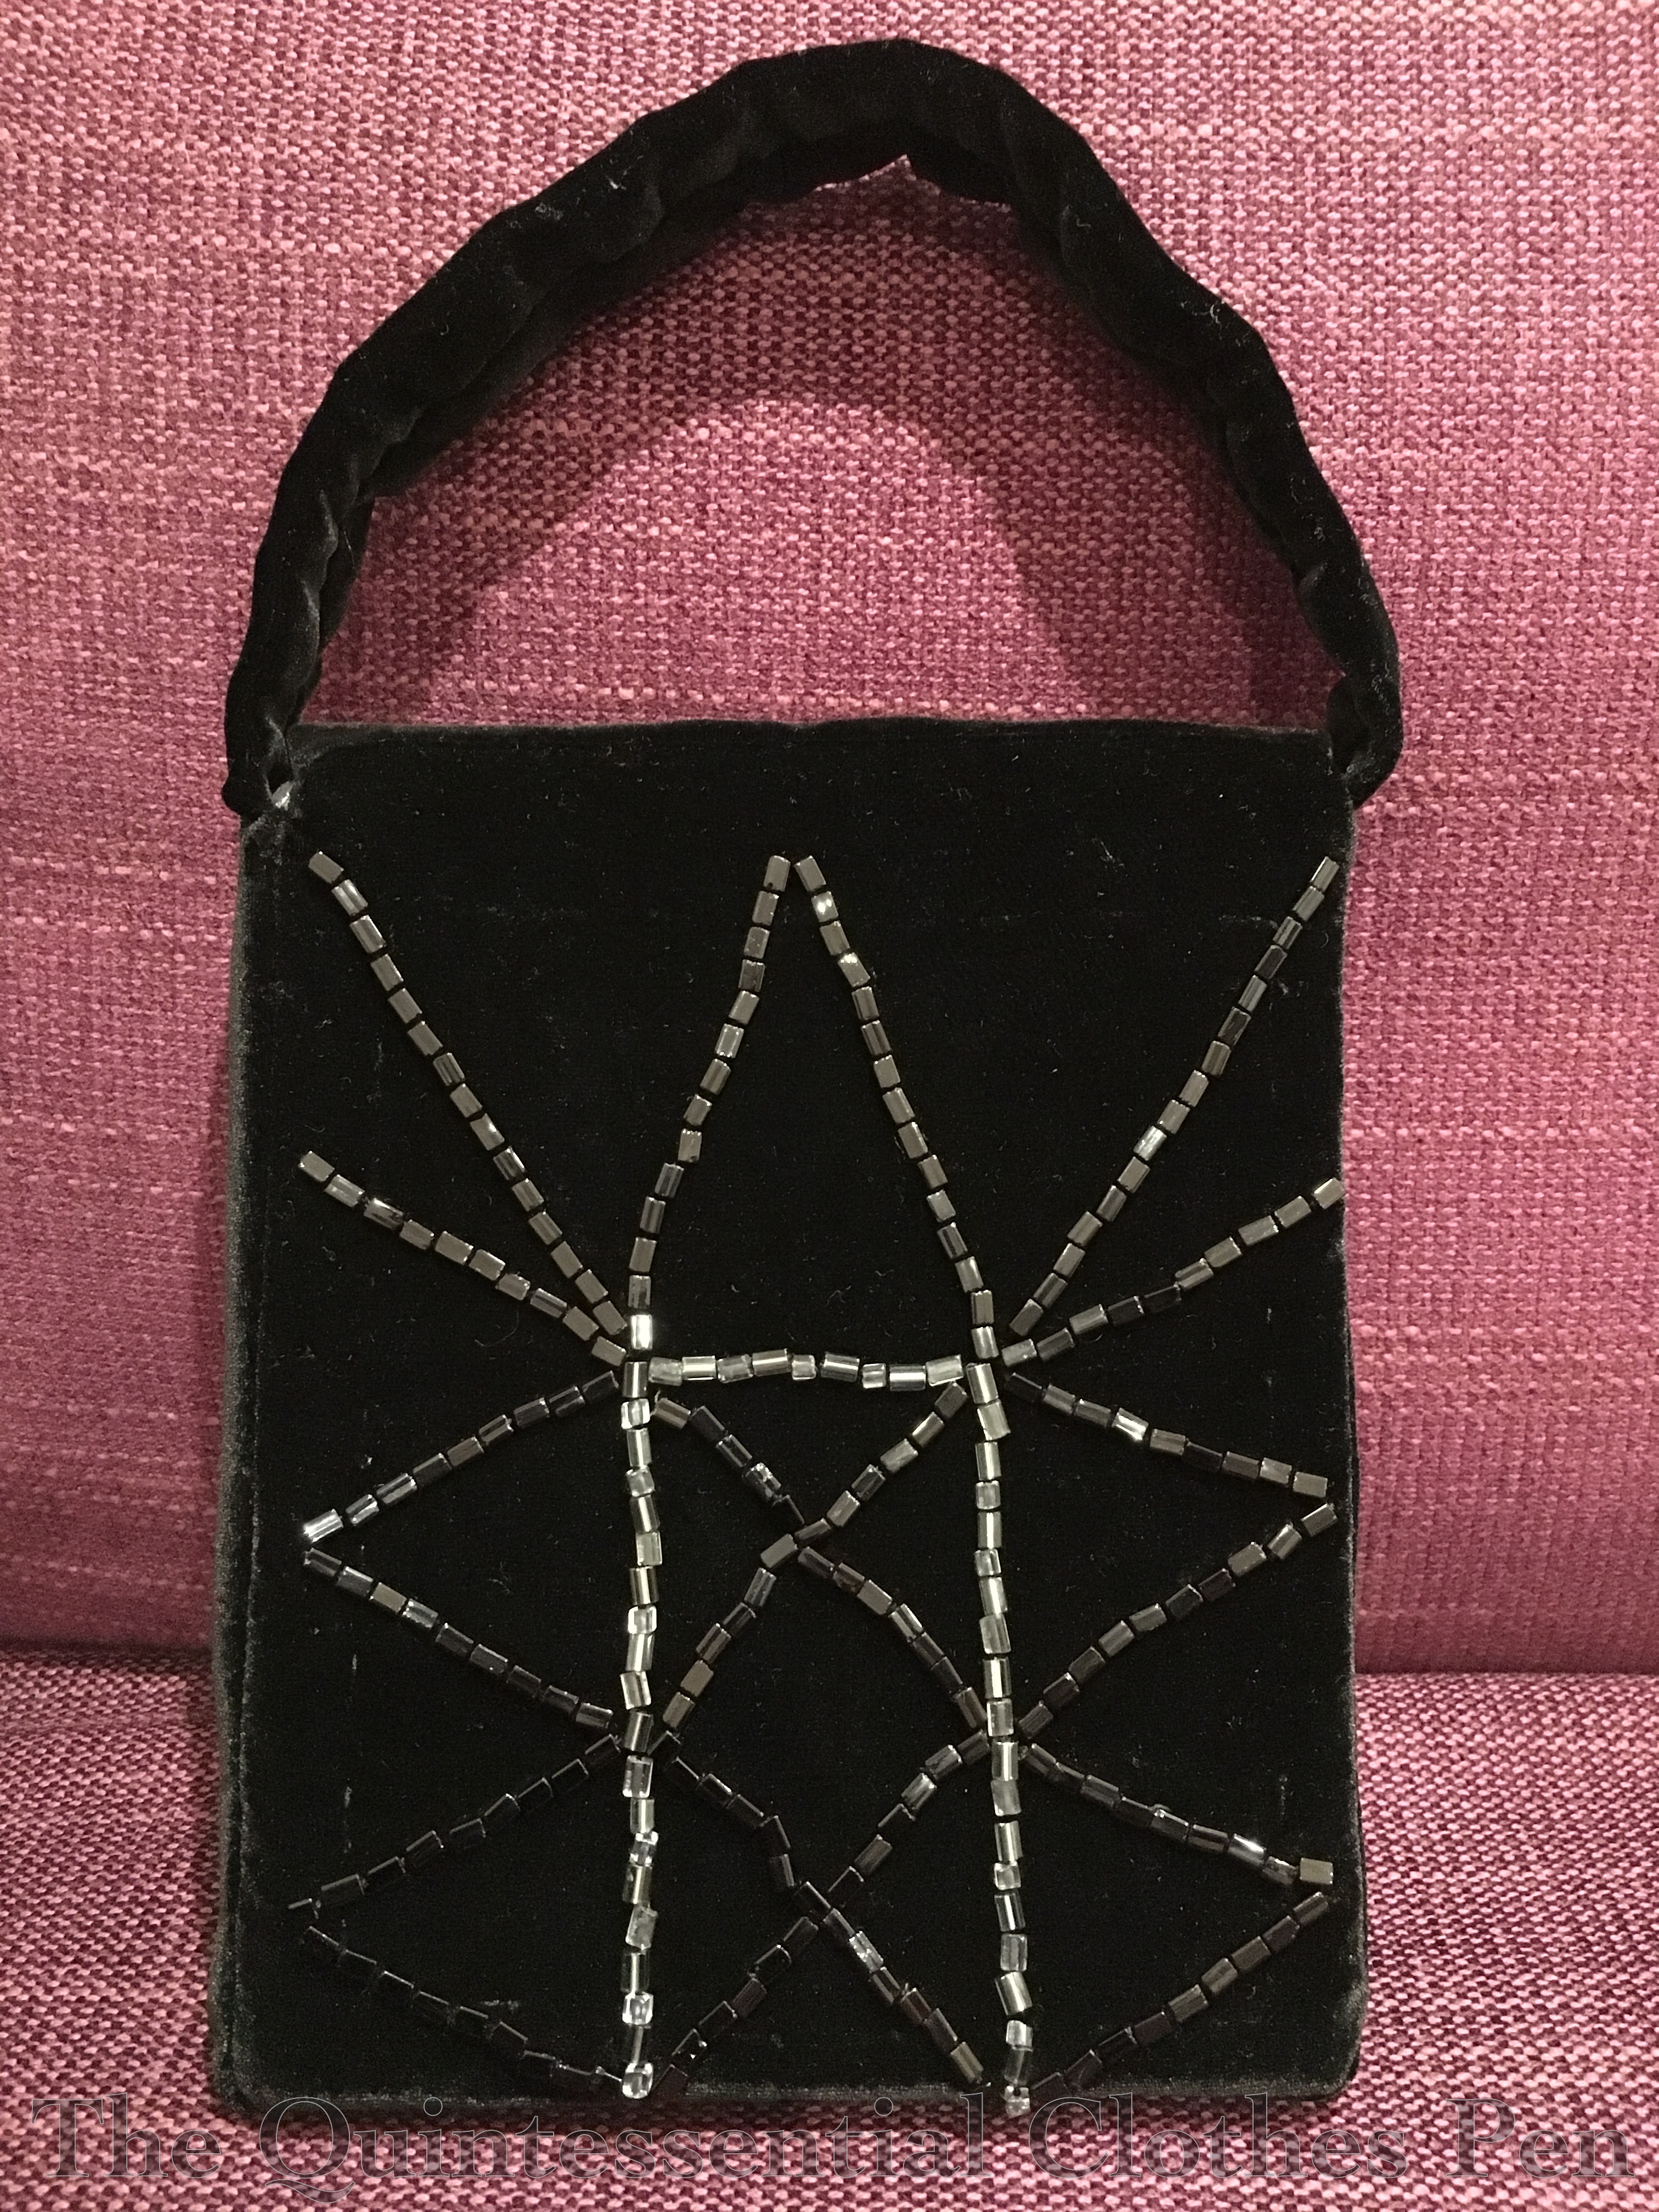
The idea came from my 1912 Tea Gown. I had intended it to have elaborate beading, but decided not to do that for a variety of reasons detailed in that past post. However, I had already beaded one panel that I decided not to use. I’ve been holding on to it waiting for the opportunity to put it to use in some other way. And so, I decided to turn it into a handbag.

Saving your scraps comes in handy on projects like this, because I had plenty of velvet to cut the additional pieces I needed for the bag. I looked through my stash to find a lining and came up with grey silk shantung as the best option. This was also a piece of fabric that I only had scraps of. It was originally used for the boning channels on an 1883 corset I made way back in 2011 (you can see it in this rather old post).

My inspiration is this page showing handbags from 1922 (source). It inspired me to go in a more structural direction rather than a gathered top bag, which was my initial thought.

I had the idea in mind, but I was restricted in the shape of the bag based on the beading that already existed on the main piece. So I cut out another rectangle the same shape as the beaded piece, a long strip for the outside edges of the bag, a strap piece, and a triangle piece to make a flap that would close the top.

Along the way I realized that interfacing wasn’t going to stiffen the bag enough for what I was envisioning. I cast about for ideas of what to use for stiffening and settled on cutting up a shoe box that was in my recycle bin. It was a great weight of cardboard–not too thick, not too thin, and not too bendy. There are cardboard pieces on each flat side, along the bottom, and a strip along the top edge to keep the flap nicely shaped. The pieces on the sides and bottom are (shhh…) masking taped together to create a flexible but stiff foundation for the bag. The piece in the top is stitched into a channel that is only sewn through the interlining so it doesn’t show on the velvet or the lining.

I assembled my pieces, thinking hard about which part to leave open to set in the lining, and struggling a bit with the shifty velvet. I wanted to sew most of the seams on the machine for speed, but sewing it by hand would probably have been more pleasant. I wrangled it mostly into submission, only needing to restitch a few sections as I went along. The only hand sewing came when I needed to close up the lining after putting all the pieces together. Things had become a bit wonky with seam allowances and shifting velvet, so I did my best, figuring that the seam would be on the inside and I really just wanted to finish the darn thing.

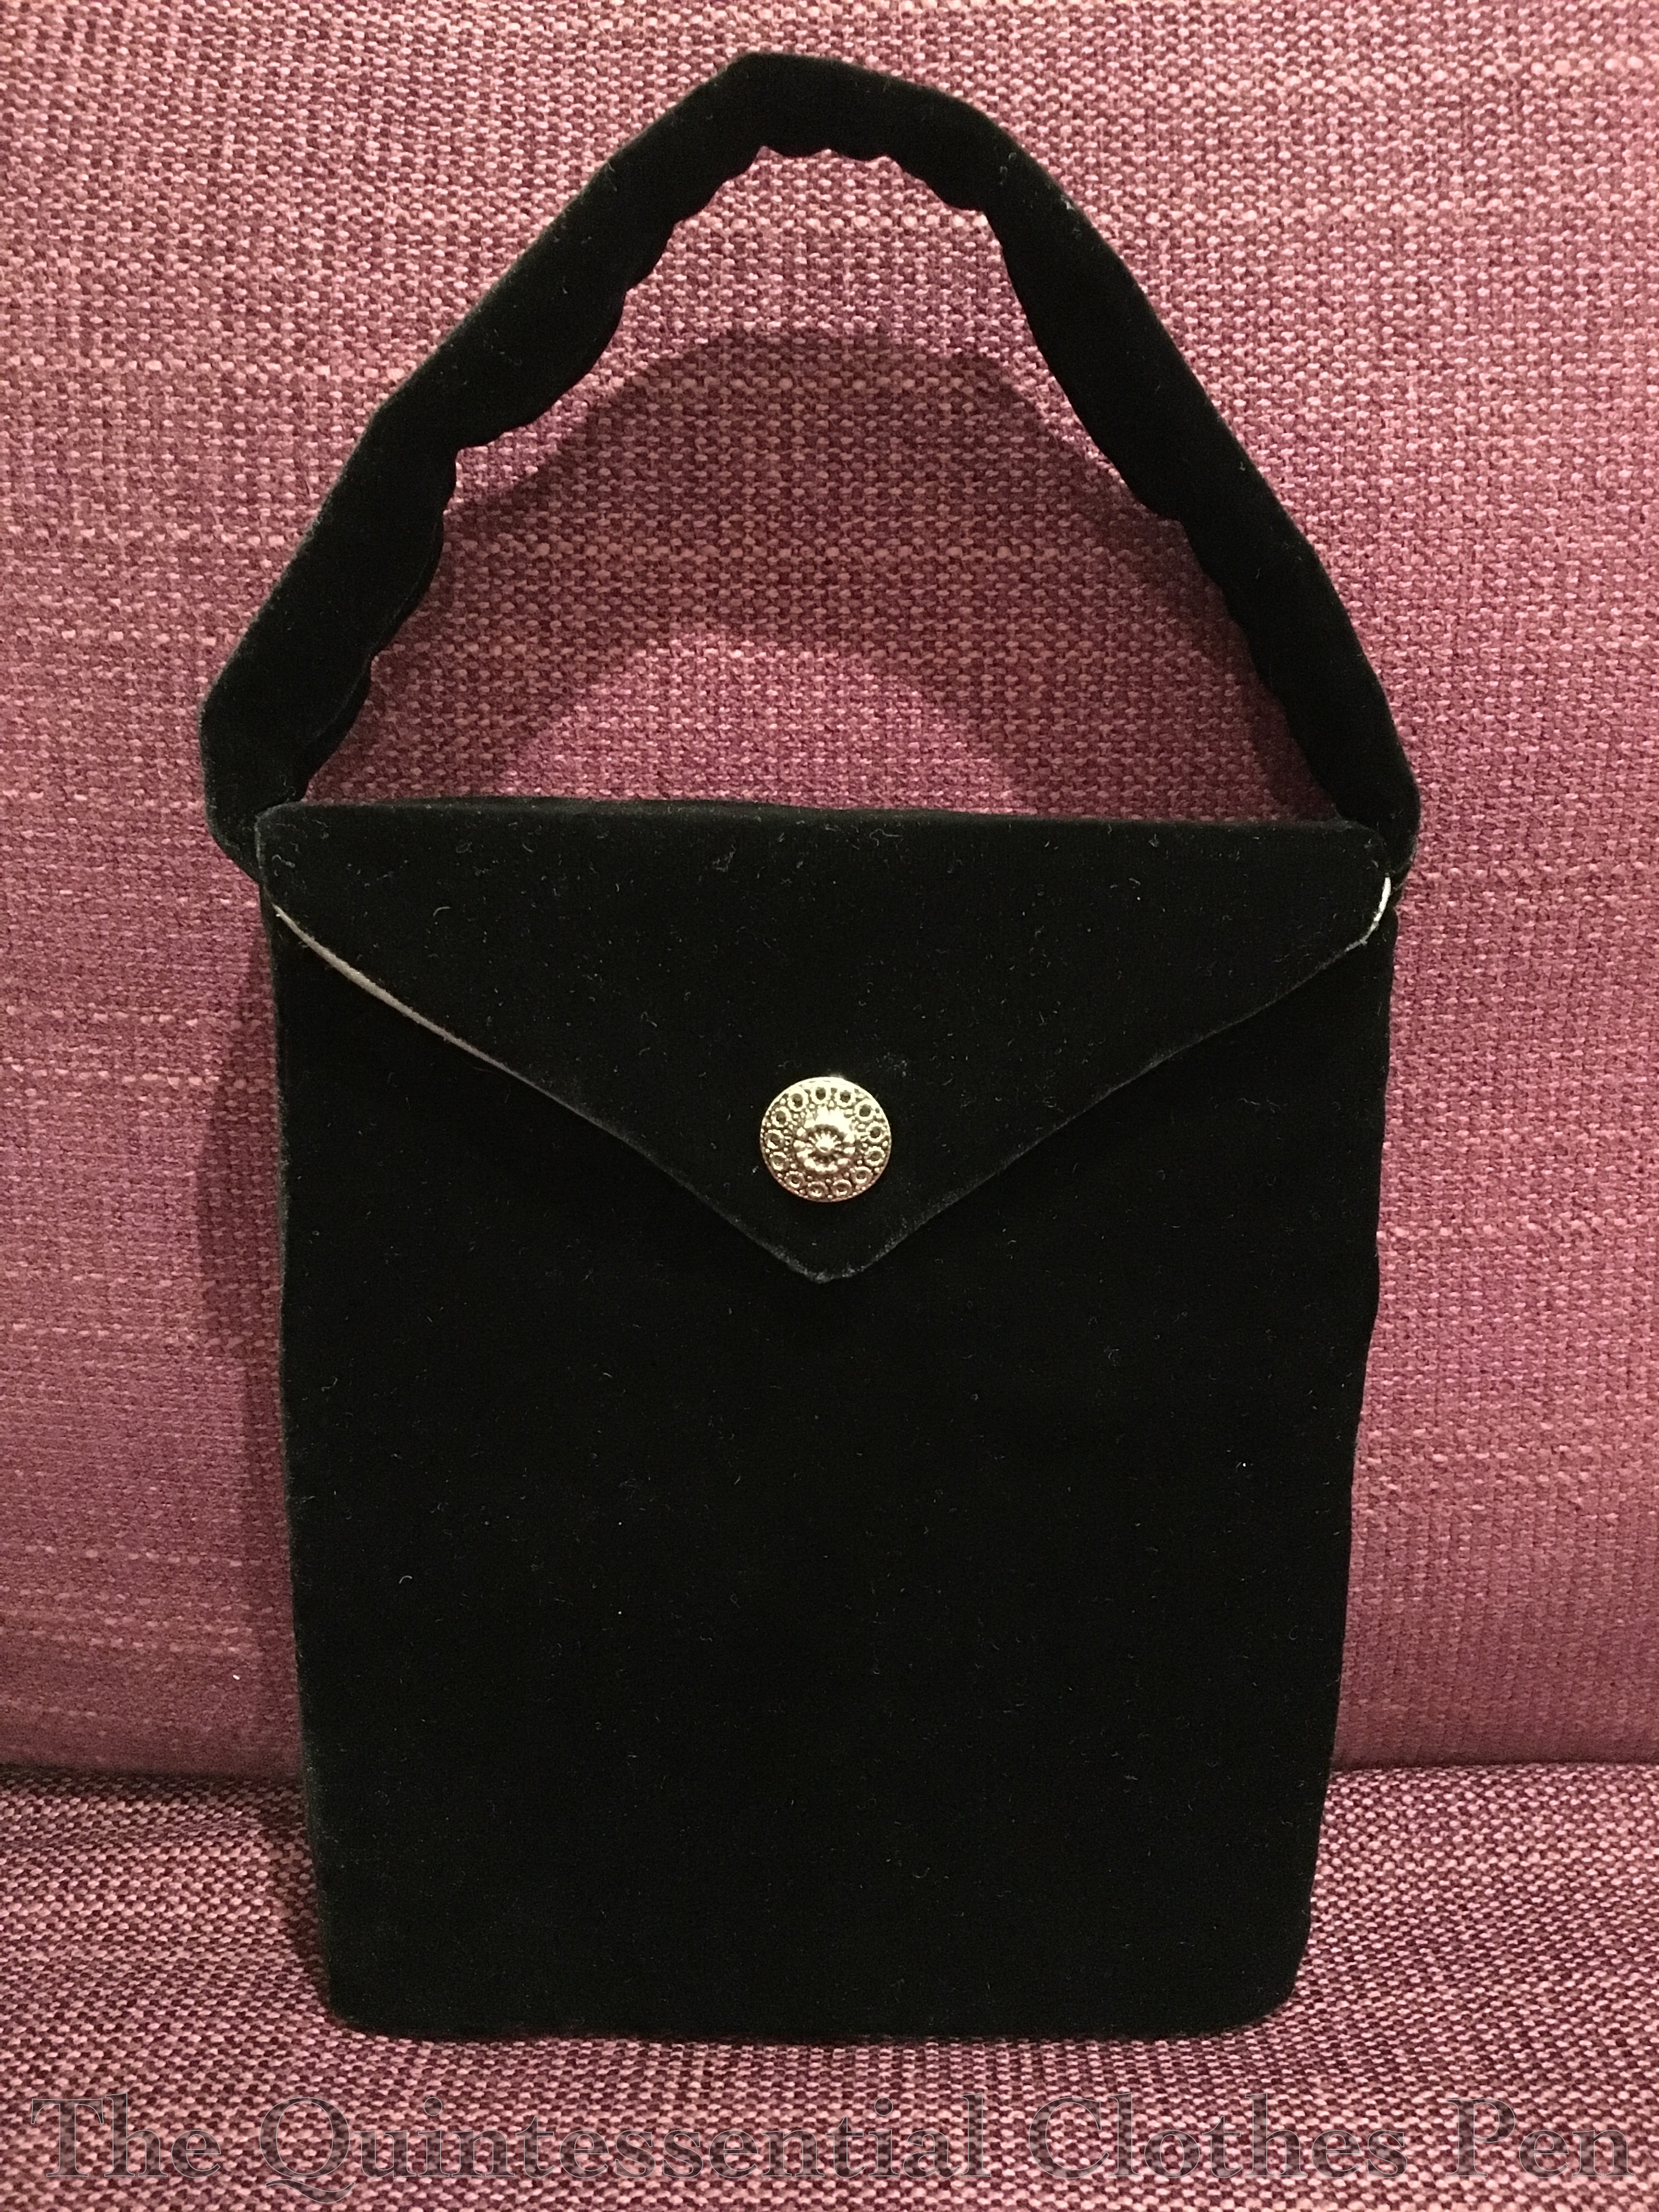
After that seam, the only thing left was a closure. I decided on a simple hook and bar. Not quite as classy as a real purse, but it gets the job done and I had it on hand. On the outside is a decorative button.

And that’s it, except the facts!

Fabric: Scraps of silk velvet, silk shantung, and cotton canvas.

Pattern: My own.

Year: c. 1925.

Notions: A shoe box, thread, beads, and a button.

How historically accurate is it?: 60%? The silhouette and fabrics are plausible, though the cardboard probably isn’t. The beads are certainly too big and the method of closure is unlikely unless the item was made at home.

Hours to complete: Not counting the beading, approximately 3 hours.

First worn: Not yet!

Total cost: Free! All of the materials and notions came from my stash.

June Fabric Stash Additions

Twice recently I’ve wound up at the local low-priced fabric store not needing fabric, but finding fabric that I knew wouldn’t be there if I went looking for it again in the future. Those trips resulted in three new dress lengths of fabrics for the stash.

The first two were from the first trip, when a friend and I stopped by the fabric store so she could get some supplies… I didn’t need anything…

IMG_1489
Fabrics 1 and 2: rayon velvet and good imitation silk

But I bought the gorgeous burgundy rayon velvet specifically to make an 1830s evening gown I’ve been thinking of for the last year or so. It’s nice and lightweight and won’t weigh down the silhouette!

And the icy pink shot imitation silk I also purchased. I’ve used this fabric in other colors in the past multiple times, in my 1813 Regency dress and my 1811 Regency dress. It’s a little poofy, but looks like silk. I also have it in gold, which has been sitting in my stash for a few years. I have no current plans for this fabric, but I finished off the bolt so I have enough to make a dress from just about any decade in the 19th century I eventually decide on.

IMG_1529
Fabrics 3 and 4: very slightly slubbed silk and figured purple lightweight silk

The lovely pumpkin silk is a color I’ve been dreaming of having a dress made out of, but it’s one of those colors you don’t often find. I carried it around the store for probably an hour before purchasing it. I’ve thought specifically of an 1820s dress, but really this color could be used for many decades in the 19th century. I also finished off the bolt on this one with hopefully enough yardage for any project I eventually decide on.

In addition, I found a lovely figured silk online at Blackbird Fabrics that I also knew was a fabric I wouldn’t find if I went looking for something similar in the future. That’s how fabric shopping often is, at least near me. You have to buy great things when you see them because if you go looking for specific and similar things you’ll likely not find them. Is it like that near where you live?

The purple color is so very 2nd-half-of-the-19th-century-chemically-dyed and it’s figured. It’s hard to find good silks these days for a reasonable price that aren’t just solid. I’m eventually planning a new 1890s gown, though who knows when. Maybe when another 1890s ball pops up on my calendar?

For now I need to get back to using up stash fabrics for my summer projects instead of adding to the stash!

Project Journal: 1815-1820 Regency Ensemble Part V: Completed Spencer (Massachusetts Costumers Regency Holiday Tea)

In the greenhouses at the Regency Holiday Tea.

Despite the long name of this post… Here it is! My (almost) finished 1819 Regency Ensemble! The ensemble includes an early 19th century white linen chemise, 1815-1820 pink cotton corset, 1815-1825 ivory cotton gown, 1819 brown velvet Spencer, 1819 straw bonnet, and mid-19th century fur muff (ok, so it’s not quite as giant and droopy as a Regency muff… but it was cold outside!). You can click on the links to see more about each piece. There is more to come on the gown and bonnet.

Right now I want to focus on the completed Spencer and its details. Please click on the link above to see my research for the Spencer: it is based off a Spencer at the Metropolitan Museum of Art. You can see pictures of the mockup Spencer here. The Spencer is constructed of brown cotton velvet that is flatlined with white cotton. It is trimmed with green cotton cording, vintage brown lace, and green tassels to match (Aren’t the tassels so adorable?).

1819 Spencer
Back of the 1819 Spencer

I wore this Spencer to the Massachusetts Costumers annual Regency Holiday Tea. This year, in addition to having tea, we visited the Lyman Estates Greenhouses, which were built in 1804 and added to in 1820, 1840, and 1930.

On to see more of the greenhouses
Ornaments hanging from a tree!
Picture time!
Admiring the decor
So many beautiful things to look at

The tea was lovely and I do believe that my Spencer turned out wonderfully! Spencers are so adorable and varied. I hope to make more in the future… but there are other things to do before I go back to Spencers. The next big push is going to be Edwardian outfits for Titantic evens in April!

Bolero jackets of the 20th century: 1900-1909

A few posts ago, we took a look at Bolero jackets from the mid-19th century. Let’s look at them  in another context: Boleros from the early 20th century, with a hint of information from the 1890s as well.

1904 Dress with Bolero

What exactly is a Bolero jacket? The Oxford English Dictionary defines it as “A short jacket, coming barely to the waist; worn by men in Spain; applied to a similar garment worn  by women elsewhere, usually over a blouse or bodice.” This definition condenses the influence and origination of the Bolero down quite eloquently (of course, it is the job of the OED to eloquently distill all words down to a concise definition… but still, I do like this definition). The men’s style Spanish Bolero, with elaborate braiding and bright colors, influenced the style of women’s Boleros from the Victorian period. The following quotes from the OED provide more insight into the history of the Bolero (they also mention other styles of short jackets including the Zouave and the Eton).

“1892    Daily News 14 Nov. 6/3   The Zouave is as great a favourite as it has been for some seasons, and though it varies in form—being sometimes a bolero, sometimes a toreador, and sometimes a cross between an Eton jacket and a Zouave.
1893    Daily News 1 Apr. 2/4   The Zouave is quite as popular as it was last year.‥ Sometimes it is pure bolero.
1893    Lady 17 Aug. 178/1   Zouave Bodices are a feature of autumn gowns. (in the Zouave definition)
1899    Westm. Gaz. 6 July 3/2   Robbing the coat of its basque has created‥the bolero corsage, really an actual bodice, though appearing a bolero coat and skirt.”

The flared skirt and small waist silhouette of women’s clothing during the first decade of the 20th century was well suited to the style of Bolero jackets, as they could help to visually balance the figure by adding just a small amount of width across the chest and shoulders.  Here are a few Boleros from the Metropolitan Museum of Art. One is silk velvet, elaborately trimmed. The other is lace. Can you imagine the dresses that would have accompanied these Boleros? Clearly, they were intended for different purposes. Perhaps the first was intended for evening wear and the second for an afternoon stroll or visiting friends?

c. 1905 Bolero from the Metropolitan Museum of Art
c. 1907 Bolero from the Metropolitan Museum of Art

Bolero and Zouave jackets of the mid-19th century

Throughout the 19th century, civilian clothing for men and women imitated all sorts of military uniforms in cuts, trim styles, and names. Let’s look at some women’s styles from the the mid-19th century inspired by military wear.

First: the Bolero style jacket

From Peterson's Magazine August 1865

Popular during the mid-19th century, the Bolero is simply a short jacket, usually worn open in front, often fastened at the neck. In the mid-19th century Bolero jackets were worn in all sorts of colors and with all sorts of trim; however, they were often seen in military uniform colors and with trimming styles reminiscent of military trimming, especially braiding.

1863 Bolero from the Metropolitan Museum of Art
c. 1860 Dress with Bolero Jacket and braid trimming

Second: the Zouave style jacket


From December 1859 Godey’s Lady’s Book

The Oxford English Dictionary defines a Zouave jacket as follows: “A woman’s short embroidered jacket or bodice, with or without sleeves, resembling the jacket of the Zouave uniform.” The following quotes are included in the OED definition:

1859    Ladies’ Treas. Sept. 285/1   One of the most decided novelties of the present season is the Zouave jacket.
1859    Ladies’ Cabinet Dec. 335/1   Nothing can be prettier for the interior than the little oriental jackets which we call to-day Zouaves.

During the 19th century, this style gained the most popularity during the 1850s, when French Zouaves were fighting in the Crimean War, and during the American Civil War in the 1860s. You can see a few images of Zouave uniforms by looking at this post from a few weeks ago.

The description of the above image from Godey’s is as follows: “Morning-dress for young ladies, of plain merino or cashmere; the skirt trimmed by an inserting of velvet, several shades darker than the dress, with a row of buttons passing through it, and bordered by a rich braid pattern, known as the Greek. The Zouave jacket, which we have before spoken of, forms the waist. It is modelled from the Greek jacket, and has a close vest, with two points; the jacket, itself, rounding over the hips, and fitting easily to the figure. A Gabrielle ruff, and neck-tie finish it.”

Further information about this style was included in the Chitchat section of the same issue of Godey’s: “The Zuoave jackets may be made in black cloth or velvet, for home wear, with skirts whose waists have “outlived their usefulness.” They are especially suitable with dark silks, and a waist of this kind with a black silk skirt will do any amount of street service. Black silks are trimmed with a combination of black and crimson, black and purple, etc. when intended for dress occasions.”

c. 1862 Dress with Bolero from the Metropolitan Museum of Art

Given the description (above)  from Godey’s about the Zouave jacket fashion plate, I think this c. 1862 dress from the Metropolitan Museum of Art falls into the category of a Zouave jacket rather than a Bolero. Clearly, this yellow dress has a jacket with a double pointed vest silhouette, rather than the Bolero style of the jacket with a blouse underneath. Regardless, this dress is quite fabulous! The pattern matches the trimmings exceptionally well in terms of style, and the whole ensemble is quite wonderful (including the crisscross braiding and tassels!).

The quotes are from the digital Godey’s excerpts at the University of Vermont, which can be viewed here.

Project Journal: Victorian Women’s Tailoring Part VIII: 1883 Gallery

Oh my goodness my 1883 tailored bustle dress and undergarments are finally finished!!! YAY! Let’s glory in the beautiful pictures and the fabulous clothes… Since I can’t decide which pictures I like best, you get to see more than a few.

1883: Wool skirt and jacket with velvet trim. Wool hat trimmed with velvet and feathers.
1883 Bustled Skirt
1883 Bustled Skirt
1883 Skirt and Jacket
1883 Jacket and Hat
1883 Undergarments: Petticoat and Corset Cover.
1883 Undergarments: Bustle!
1883 Undergarments: Chemise and Corset

Project Journal: Victorian Women’s Tailoring Part V: Fitting 1883 Tailor Made Suit

As you saw in my last post, the undergarments for my 1883 look are complete. The understructure, especially the corset and bustle, is essential to the creation of the silhouette in 1883: without these pieces the exterior garments would crumple and sag. The thing is, the exterior garment is tailored to fit this exact shape: if that silhouette is not created by the undergarments then the exterior garments just don’t fit!

Let’s take a look at the exterior garments. First, the skirt. This skirt is many layers: the one you can see now I call the “foundation skirt.” It is the part of the skirt that hangs from waist to floor without any draping on it. In reality, the foundation skirt is actually made of two layers. The first layer is the one you can see with the velvet knife pleats along the hem–the knife pleats are 10″ high (ending just above the tabs in the wool)–but don’t be fooled, the knife pleats are attached to a cotton underskirt that extends up to the waist. Why? Multiple reasons: 1-this skirt is already super heavy with just one layer of wool and the velvet trim, and I haven’t even added the drapery yet; 2-the skirt is already super warm as well, it would be too warm with velvet all the way to the waist; 3-the Victorian mindset was to not waste precious money on beautiful fabrics that weren’t seen, so this technique of using cotton underskirts edged with fancy trim is very common; 4-velvet rather than cotton would add more bulk  to the circumference of the waist, and the goal is to make the waist as small as possible. You can’t see the pins, but I did have to make alterations at the waist, since the bottom edge was already finished. There are more skirt layers coming: a gathered and draped “back drape,” and an asymmetrically pleated “front drape.”

The jacket is the other exterior garment. This garment is actually a really good example of the alterations I almost always have to make before I am able to finish a garment. The left side is how the garment fit when I put it on my model. On the right side you can see all my safety pins moving and adding darts to make the jacket fit better. Although it looks wrinkly, once I stitch all those alterations it will actually allow the jacket to fit smoothly over the torso. You can also see my mockup collar on this jacket.

What comes next? Well, because I needed to basically take out all my front darts and seams and move them, I had another fitting with my model before starting to finish the garment. Unfortunately, I forgot my camera! I’ll try to finagle pictures, but they’ll be coming later. After the second fabric fitting I move on to finishing my garments completely!