These photos are rather belated in being posted, as they are from a Regency event that occurred last September, but better late than never, right? The event was a promenade, for which we had beautiful weather with temperatures that were just right for this type of event. It’s a bit cloudy today, so these blue skies look extra beautiful to me.
I took the opportunity to wear my 1814 Orange Boven pelisse ensemble (which includes the pelisse and matching hat as well as the chemisette and my Vernet petticoat). I also carried the red & gold reticule I posted about back in 2014. It was only the second wearing of this finished ensemble and the first one where I actually wore it to promenade in outdoors rather than being indoors. I’m happy to report that it’s great for its purpose–comfortable, suitably warm, and with the ability to blow in the wind nicely, as you can see.
It was lovely to meet some new people at the event. We had lots to chat about as we wandered down towards this lighthouse: sewing, clothes, accessories…
It was quite an enjoyable afternoon. I believe this event will be held again this year, so I hope to have an equally lovely experience in a few months.
I attended a small Regency ball last weekend. It was charming and not nearly as packed full of people as I have grown accustomed to at these events in recent years. The smaller crowd made for a much more subdued (but still pleasant) evening than I was expecting.
The only downside was that the hall was exceptionally cold and not being full of people did not warm up very quickly! Few of us had planned for the situation and we were mostly scrambling to find any scarves or sweaters to wrap ourselves in. Many of us were resorting to items that we’d worn to keep ourselves warm outside, sacrificing fashion for warmth (it’s been below freezing here in Boston for at least the last three or four weeks consistently). I, for example, wrapped up in my pink cashmere scarf despite wearing a red dress. I thought it looked odd, though I was told that the colors looked good together. But there were a few lucky solutions that were both fashionable and warm: a large paisley shawl and a plaid scarf/wrap that looked very Scottish were the two most fashionable looks in my opinion. After some dancing and about midway through the evening, many had warmed up enough that scarves were being discarded, though I do believe I kept my scarf wrapped over my shoulders and chest throughout the entire evening.
Elegant, fashionable lounging during the refreshment break.Delicious refreshments alluringly laid out.
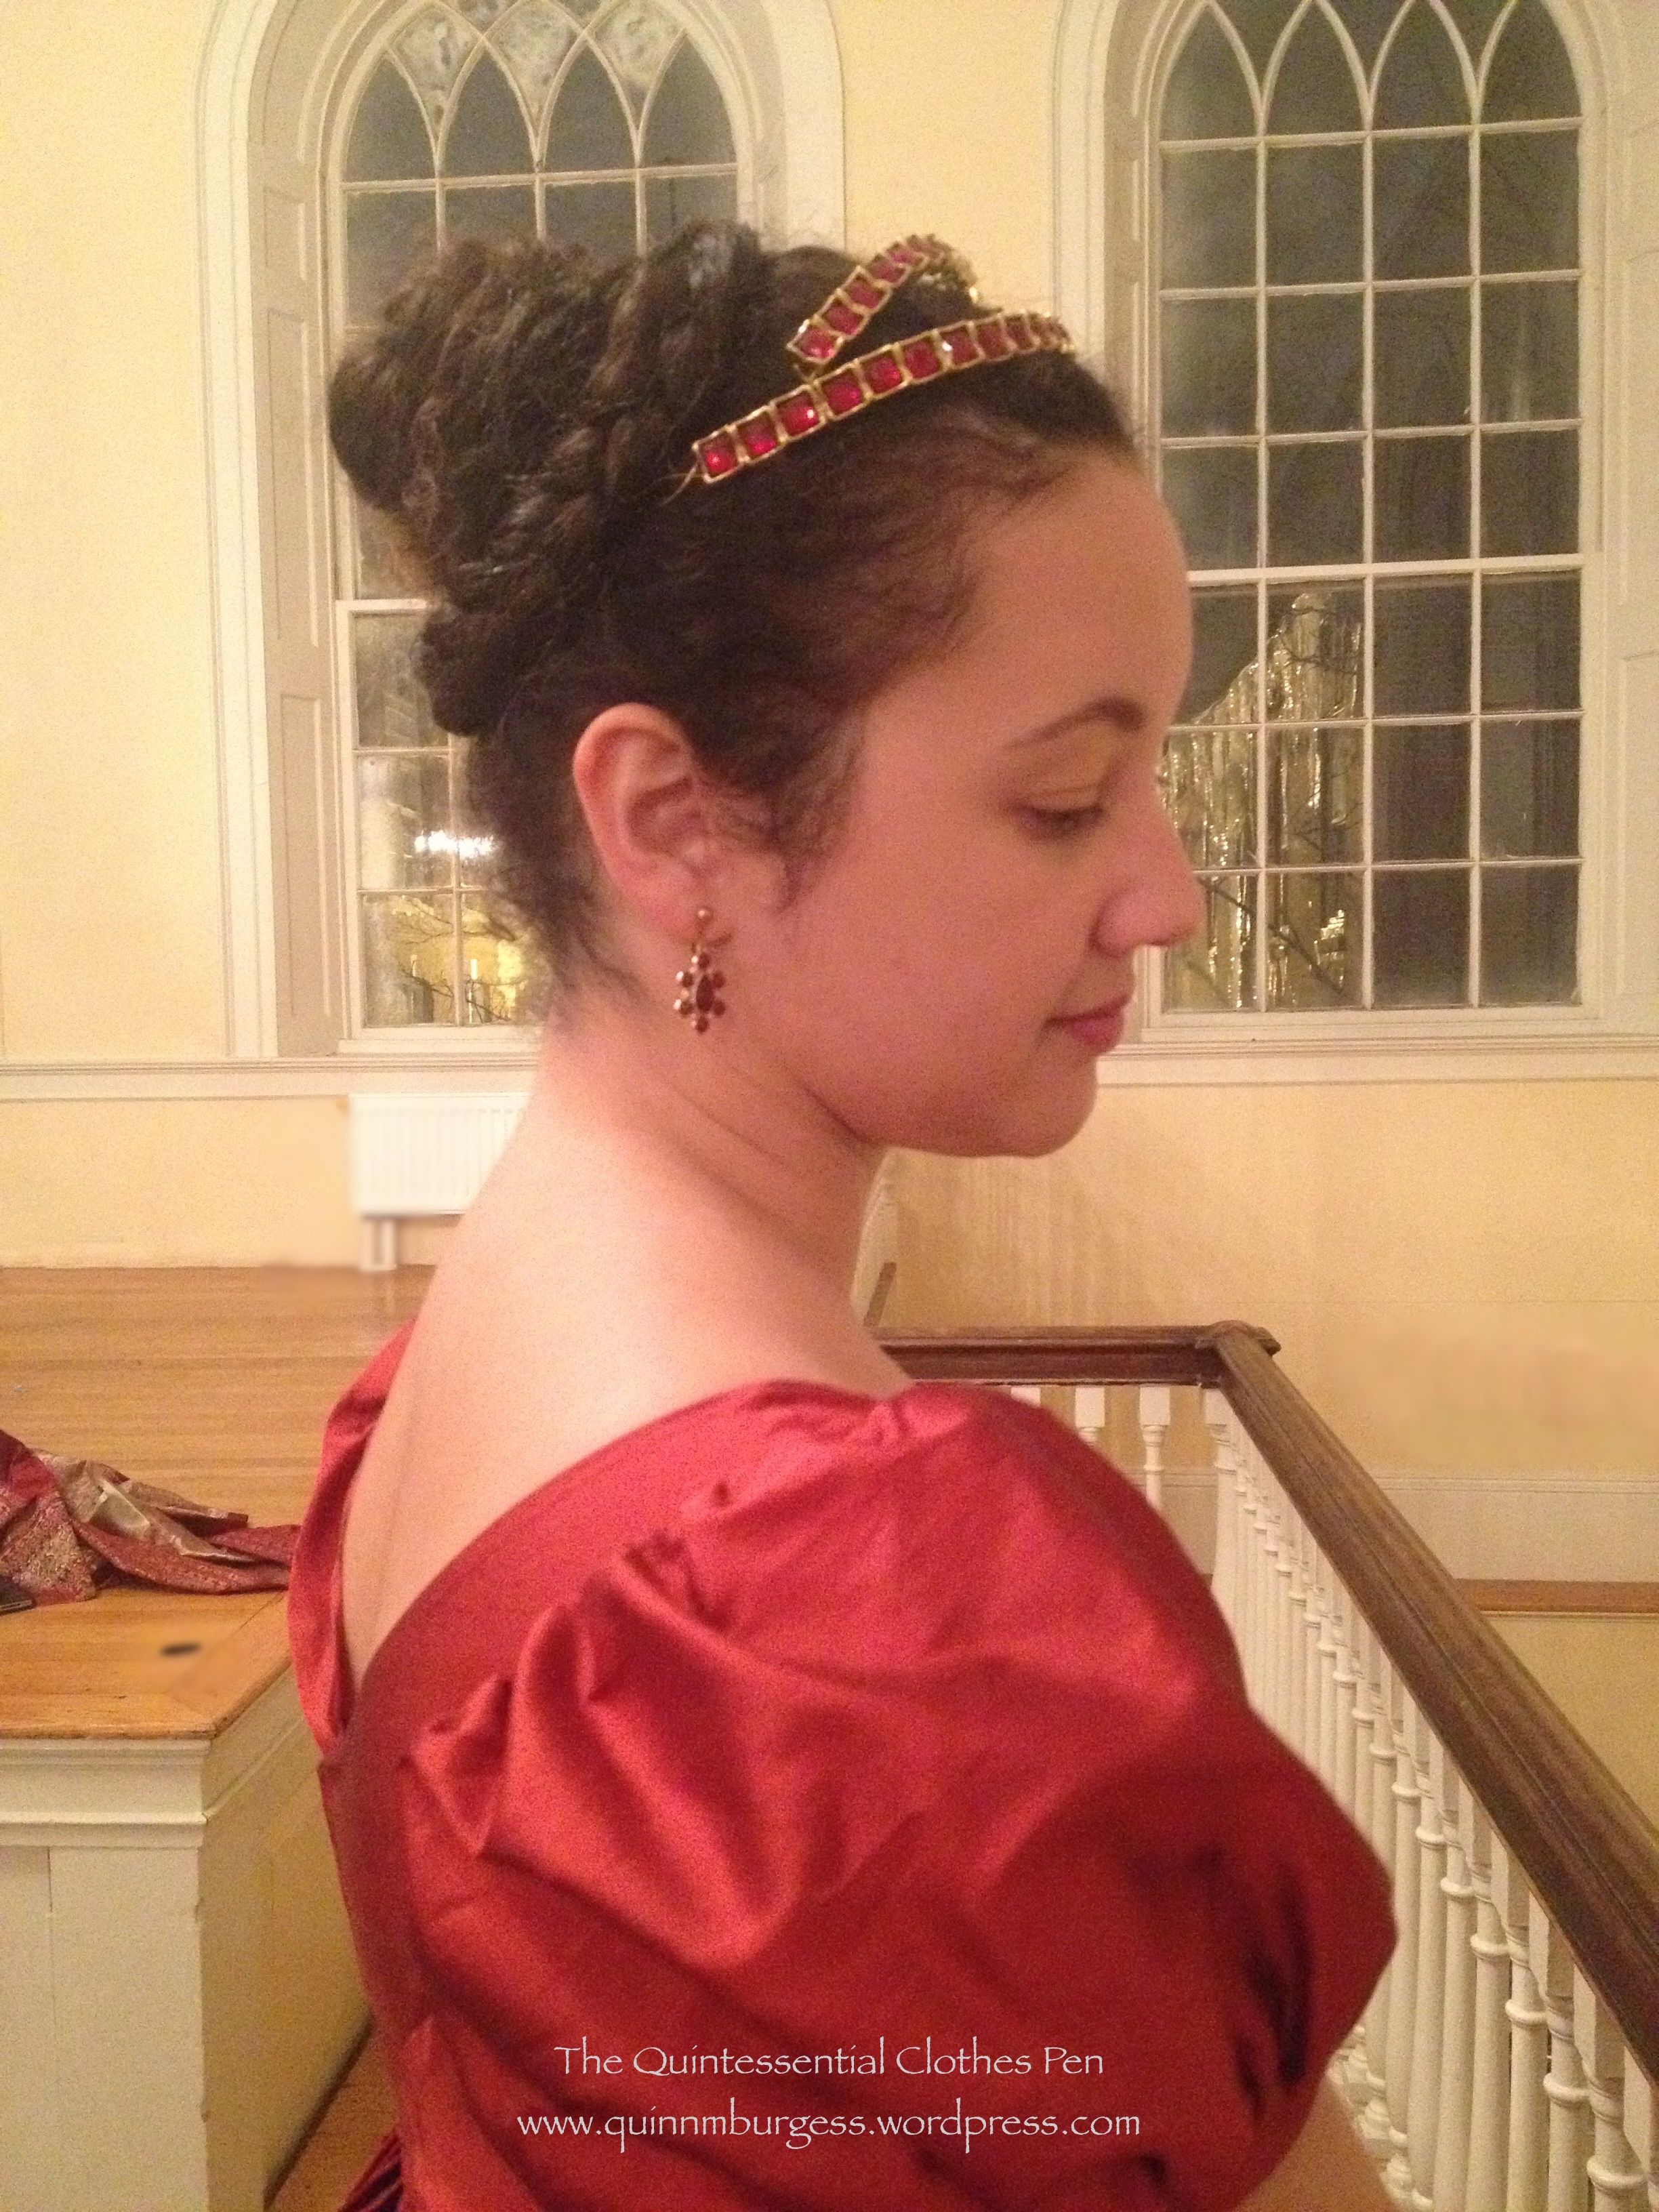
I wore my red 1813 evening gown and my homemade red and gold tiara. (I had hoped to finish and wear my 1811 elusive blue evening gown, but I would have had to do a lot of last minute sewing to finish it in time and after my recent skating costume last minute sewing adventure I was not inclined to do so again so soon. It is very satisfying to have a closet of options for an event, especially when plans to complete something new go awry.) I also brought along my red and gold reticule, because it matches the outfit so perfectly (although the only thing I kept in it was my phone… which is the reason for the slightly blurry, grainy photos).
All the red and gold Regency pieces in my wardrobe put together in one outfit!It was so cold getting dressed that I was not inclined to do a complicated hair style. Heeheehee, fake hair to the rescue! I just put my hair in a pony tail, braided it, and wrapped it around itself. Simple! The big braid is what makes it look complicated, but it is pre-braided fake hair. I think it completes the style perfectly and has a bit of a “chinoise” look to it, too.
What do I mean by “chinoise”? The word itself is from the French adjective meaning Chinese. In terms of fashion, there are scarce references to “chinoise” styles in Regency fashion plates (compared to the abundance of Regency fashion plates showing other styles). Here are a few examples. This Merveilleuse from 1814 has a “Coeffure Chinoise,” this lady from 1812 has a “Coeffure a la Chinoise,” and this fashion plate shows “La Toilette Chinoise.” (I do sort of wonder how some of these attributes, and the hairstyles in particular, said “Chinese” to people during the Regency, but of course the world was perceived very differently then and people had access to vastly different quantities and types of information than I do today.)
I’ve often noticed that “chinoise” hairstyles make use of braids that wrap around the head. In addition, there seems to often be a vertical emphasis to the hair and to a bun, if one is present in the style. It is these attributes that say “a la chinoise” when I look at my own coiffure from last weekend. Sometime, I’ll have to try to make a more exaggerated “chinoise” style with a very tall and flyaway bun such as the Merveilleuse from 1814 has. I’m pretty sure my hair will have no trouble with that since it is naturally curly and wanting to fly away!
I thought I’d share a couple of extant round reticules that bear some similarity to the one I recently made and posted about here. These both have a gathered or pleated outer circle surrounding a decorated inner circle. The bottom one uses the same cord as the ties are made of to circle the inner circle. Both reticules have an opening that is gathered to close, though the bottom one’s gathering direction is more unusual and unexpected. I like both, and think they are fun! Do you have a favorite between these?
A cotton reticule that the Met dates to the 1st quarter of the 19th century.A silk reticule that the MFA dates to the early 19th century.
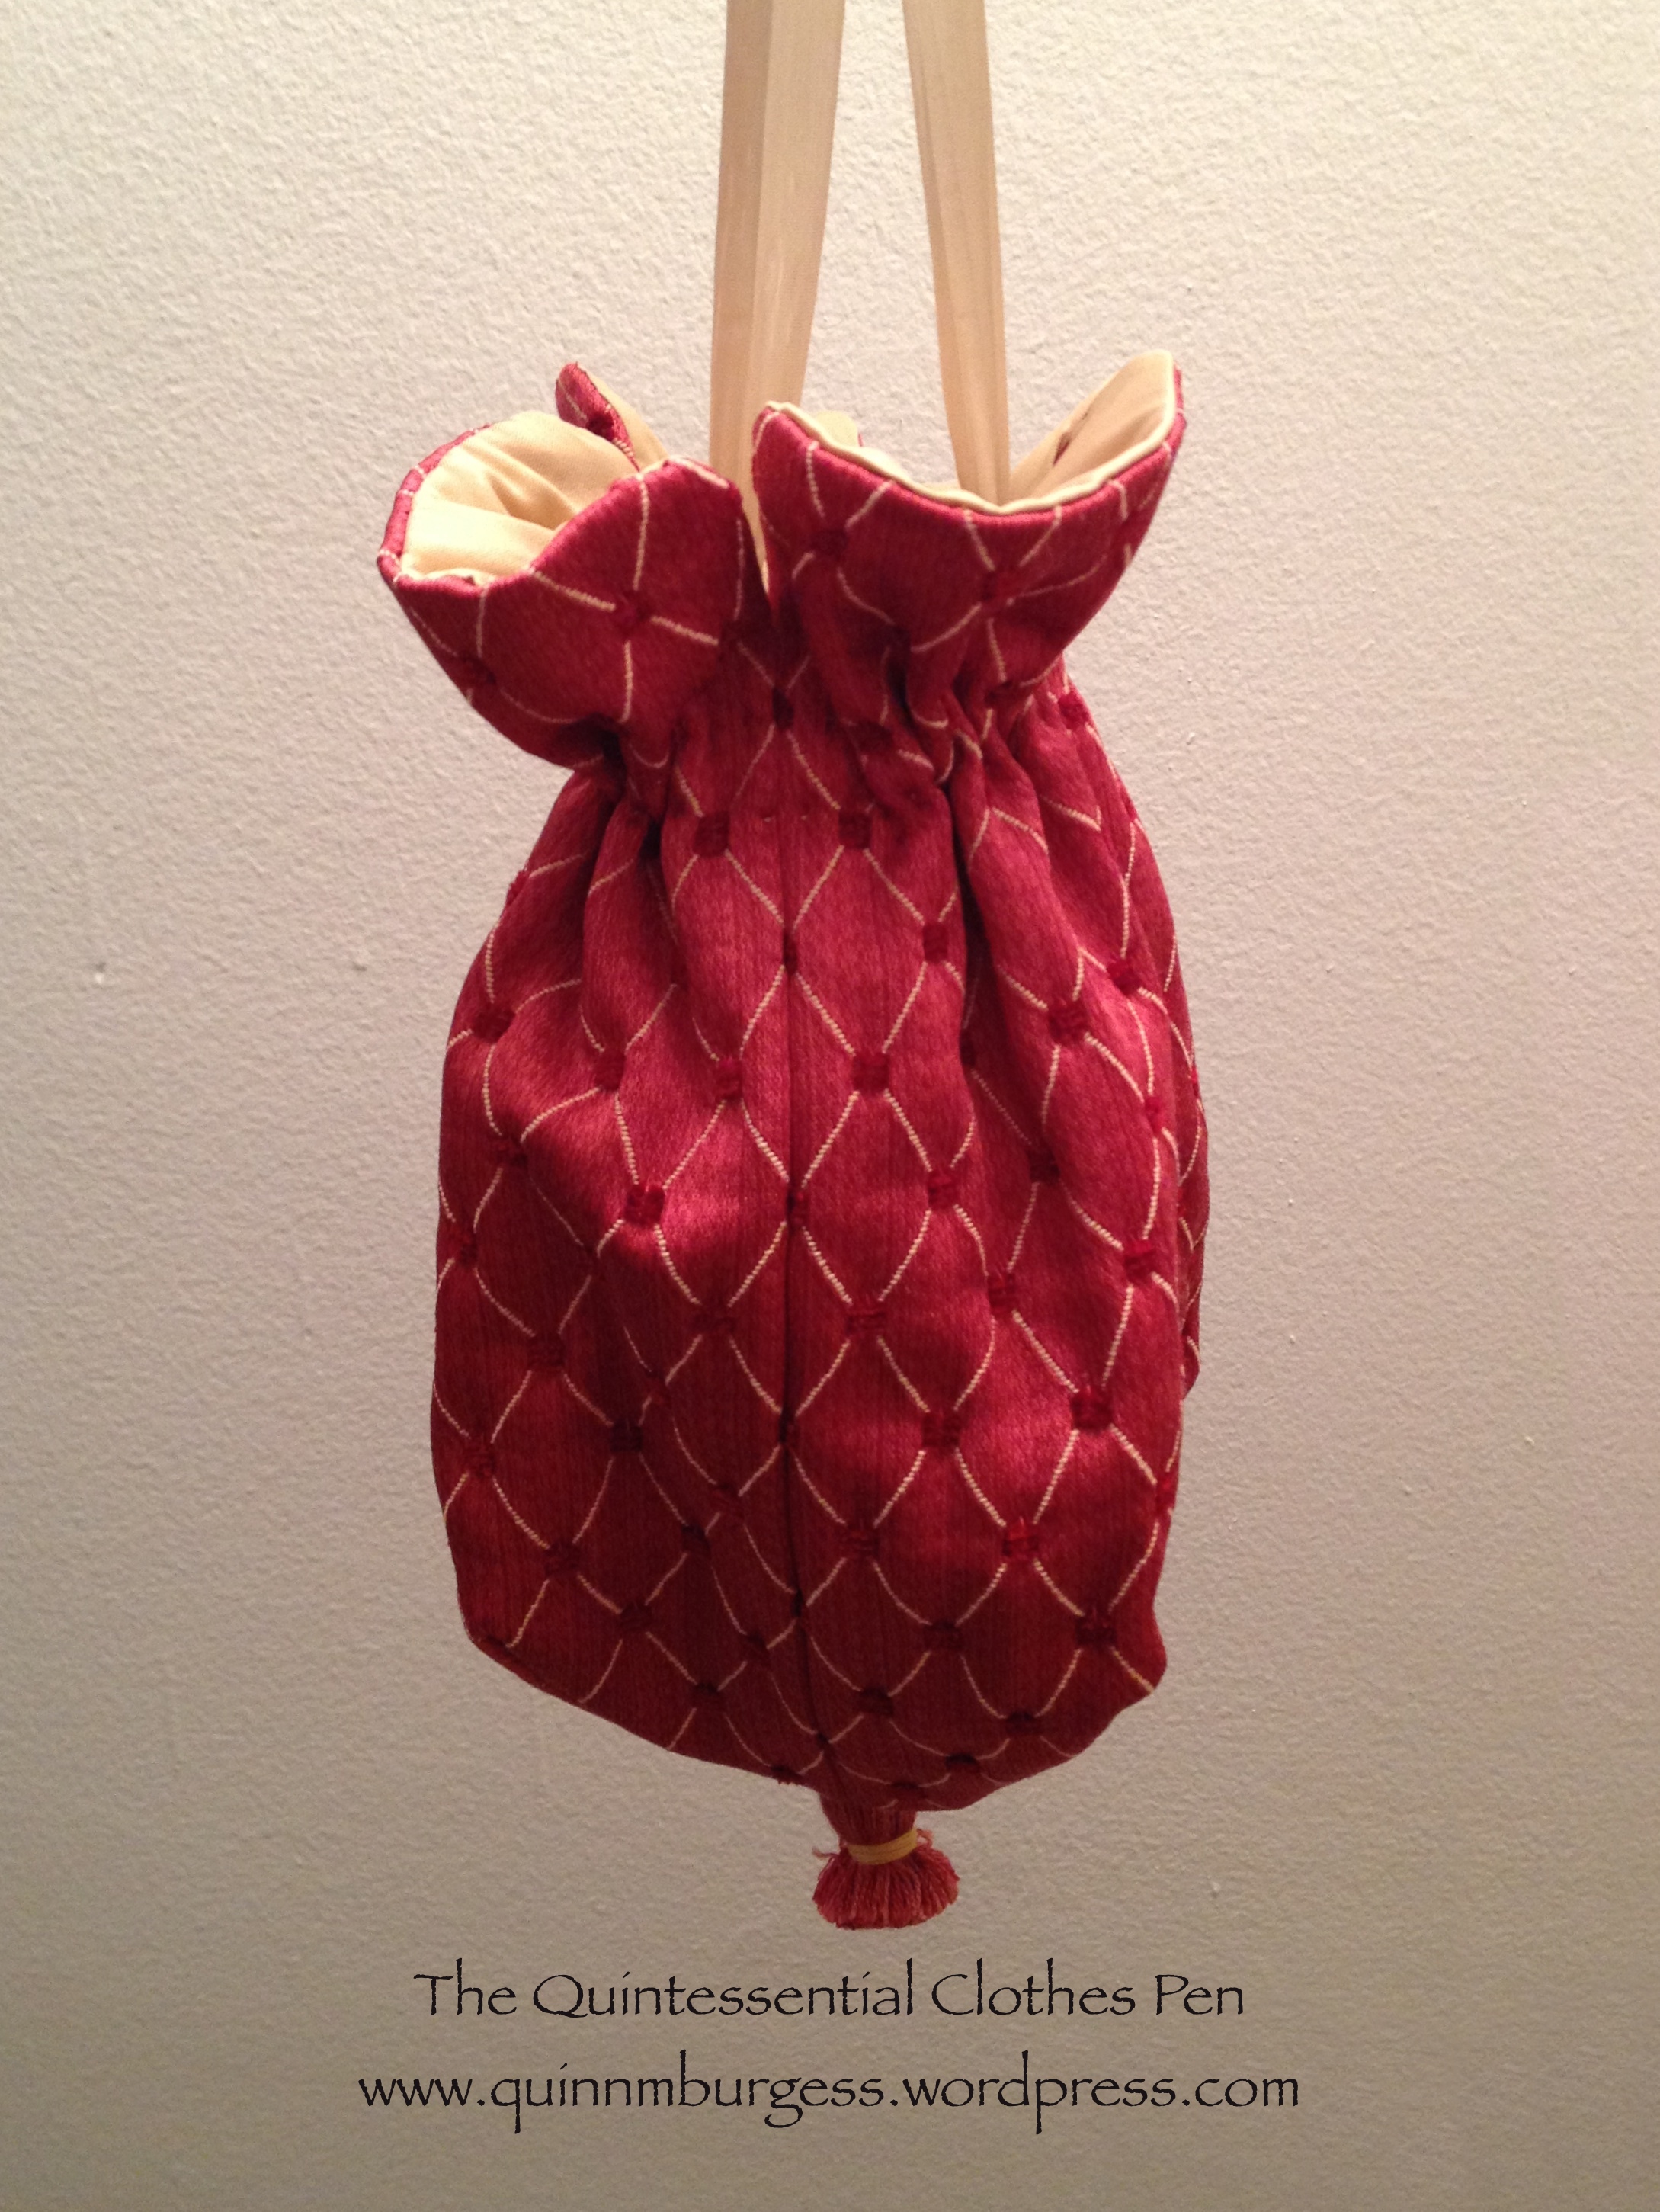
I’ve recently finished another Regency reticule (I say another, because not too long ago I posted about a new red and gold reticule). This one is circular!
I love the round shape.
I was inspired by an image and directions found in The American Girl’s Book: Or, Occupation For Play Hours, which can be viewed here, on google books (the directions for the circular reticule are found on page 262). I was particularly encouraged by having already gathered silk strips left over after adjusting my brown fur muff at the end of last year. In addition to the leftover gathered silk strips, I used some pink silk scraps backed with coutil for the center of the circles, a bit of peach cotton for the lining, pink poly ribbon for the handles (it was the best color, even though it wasn’t silk), and, for the beading, 2 buckles I picked up for $1 each.
I didn’t really follow the directions, instead I just made up my own order of events. I started by cutting out the center circle and basting the coutil to the silk. Then I placed the buckles on these circles and pinned the gathered silk around the edges After that I sewed the edges. The next step was to sew the two finished sides together, then sew a lining of two more circles of the cotton. The last thing was to sew on the ribbons and whip stitch the top edges of the silk to the lining.
Looking down into the lining.
I decided not to have my ribbons gather the opening, because I so like the look of the circle and really didn’t want to ruin the effect. Plus, the reticule just perfectly fits my phone right now, and if the top was gathered it might not fit! Yay for a relatively quick project that’s entirely hand sewn. It’s exciting to have more reticule options!
It’s been a little while since I completed a challenge for the HSF 2014. I’ve either been too busy to sew (sad!) or I’ve been sewing things that haven’t remotely lined up with the HSF challenges as they came along (also sad!). This time, though, I found a little bit of time to finish up a partially completed Regency reticule, which perfectly fits challenge #8: UFOs and PHDs (click through the link if you don’t know what those acronyms mean in sewing-land!).
Red/Gold Regency Reticule
I was inspired by this Regency reticule pattern which is available on Etsy. I just made up my own pattern based on the image. I didn’t quite get the proportions right so mine is more elongated and a little less round, as well as not bunching up very tightly at the top due to the fabric I chose, but I’m happy with it nonetheless. Perhaps some day, I’ll try making it in a lighter weight fabric and see if I can get a more round shape and a tighter gather at the top (on the other hand, this one does hold its shape nicely… and a lighter weight fabric may not do that for me).
The facts:
Fabric: Polyester upholstery fabric for the exterior and gold polyester taffeta for the lining.
Pattern: Made up by me.
Year: c. 1810
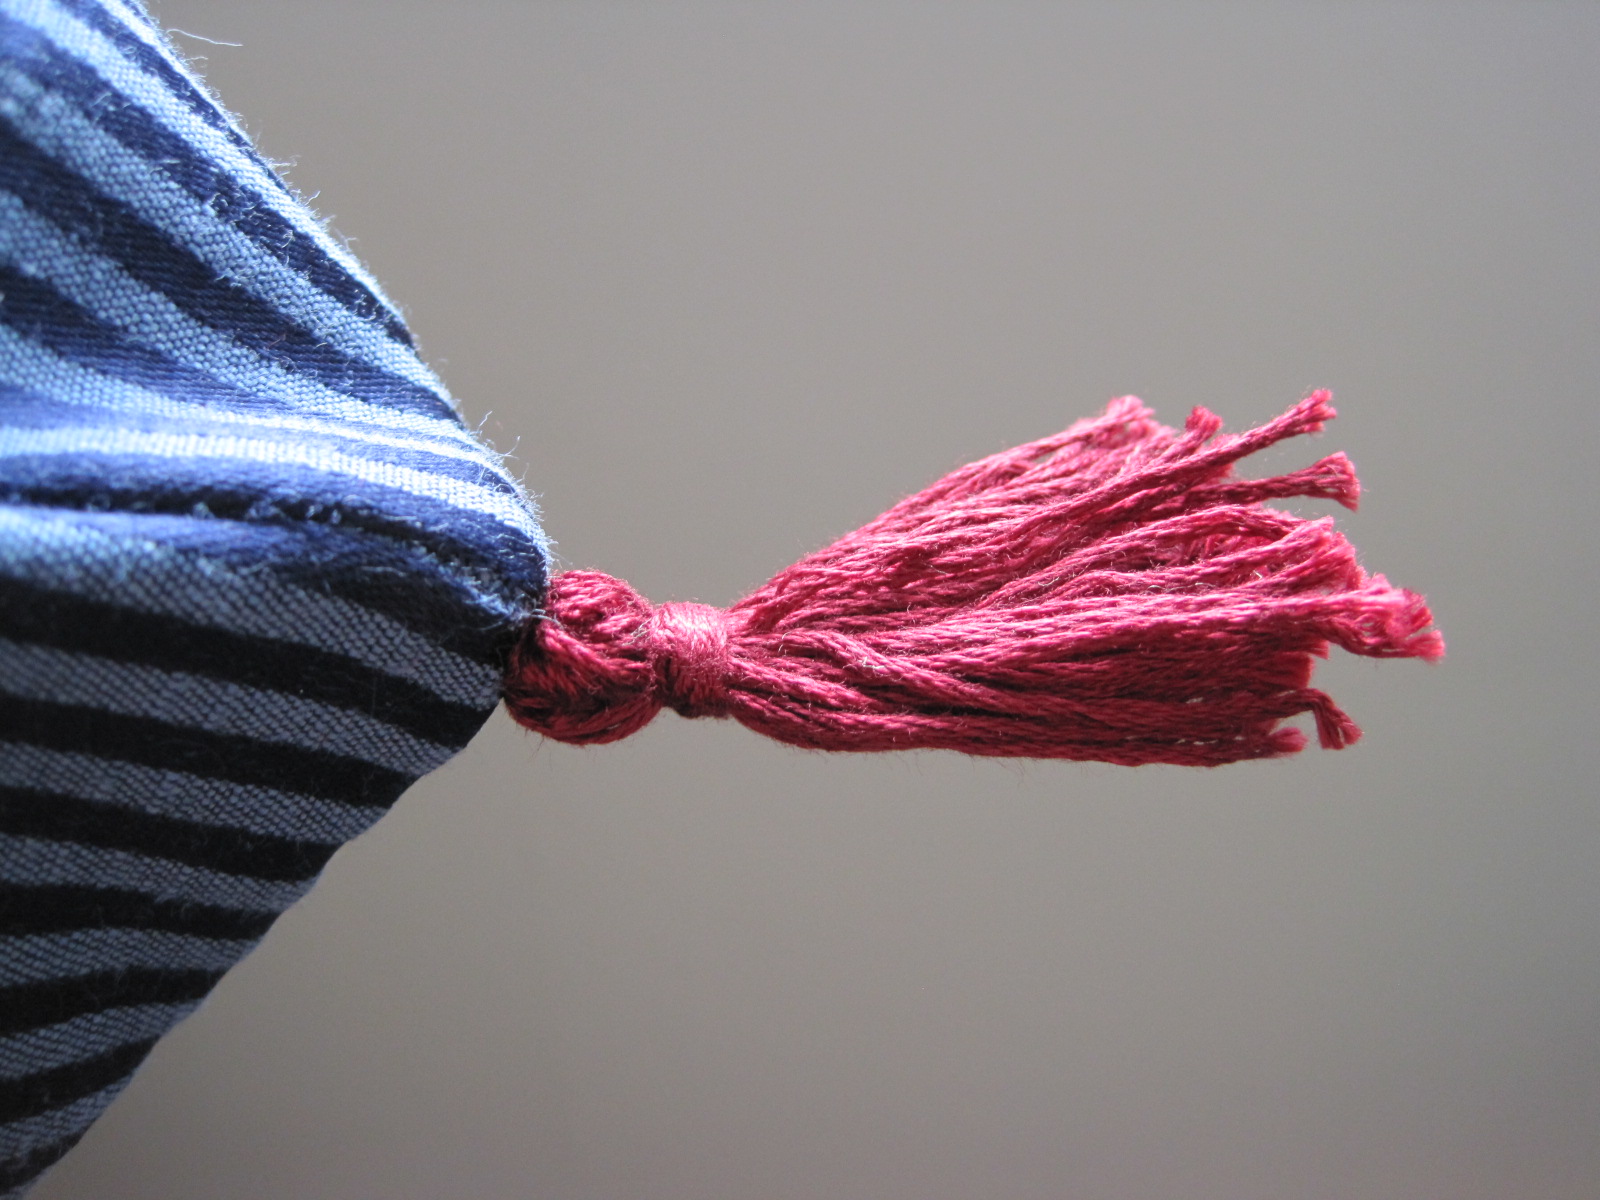
Notions: 1 tassel, gold and burgundy thread, and about 1 yd of gold silk ribbon.
How historically accurate?: Accurate in style but not in materials or use of a sewing machine… Let’s say 50%.
Hours to complete: Not many, though I didn’t really keep track since I worked on it in small bits of time.
I intended to complete this reticule for the HSF Challenge #6: Stripes this past week, but as the deadline approached and I reread the fine print, I realized that the challenge was supposed to be fulfilled by a garment. Whoops! I don’t think I can convince myself that a reticule is garment, let alone other people. So I put the project on hold while working on other things (like Evie, my 1864 ball gown, and the completion of my purple ballroom competition dress), but finally got back to it and finished it off towards the end of last week.
Lucky for me, this reticule does fulfill the MpRSW Goal #4: Accessories (due April 8th: I’m early!). (If you’re paying attention, I did fail to post about the MpRSW Goal #2: Evening Gown… I might have fallen off the wagon on that one and not managed to fix the rip in my gown on time. But luckily, the MpRSW is motivating me to complete that repair this week, even if I am delayed!)
Tassels!
Trust me, this is not a historically accurate reticule. The fiber content is questionable… (probably a blend including polyester), the ribbon is polyester, and the tassels are cotton embroidery floss. But it’s cute and functional and has the general look of the period, so I’m happy. This will get packed for the Regency weekend coming up in April!
Inside the reticule: french seams and a cotton canvas purple (woohoo, extra fun on the inside!) layer whip stitched to the inside of the bottom to provide stability and help keep the triangular shape. The seams are hard to spot because the stripes blend into each other so much, but they’re there!
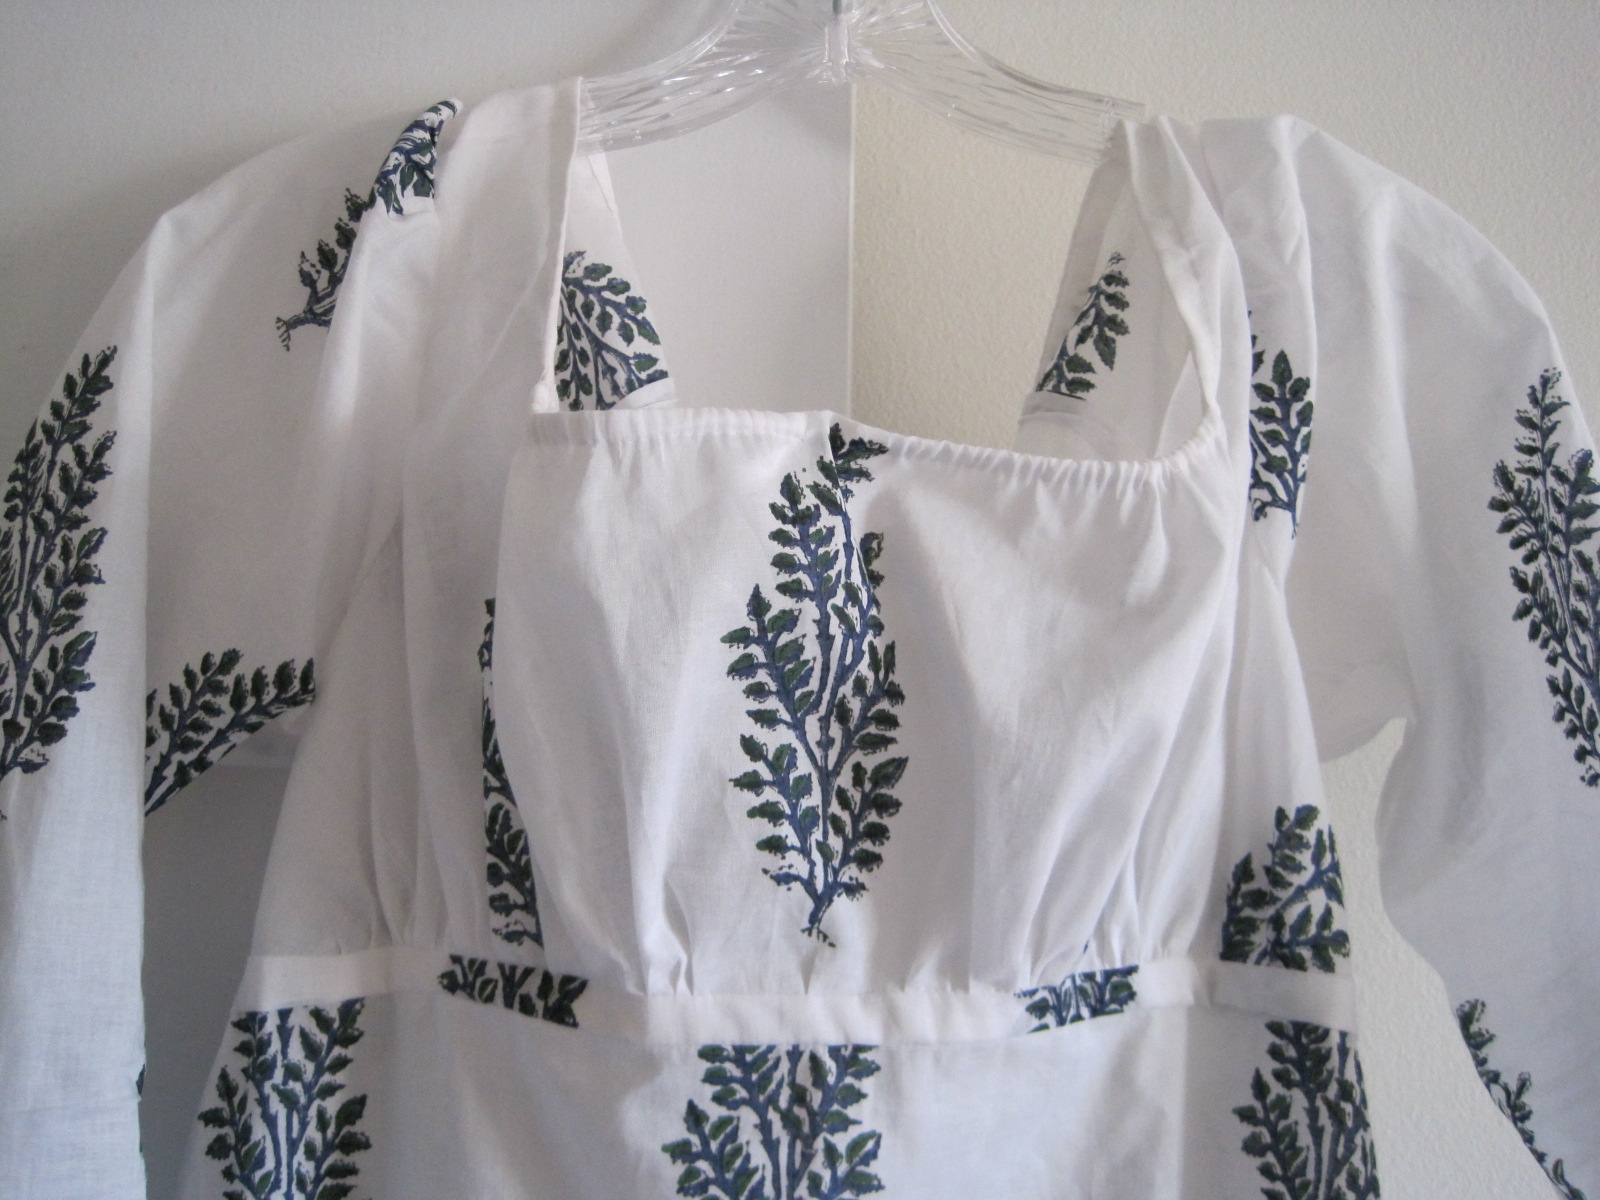
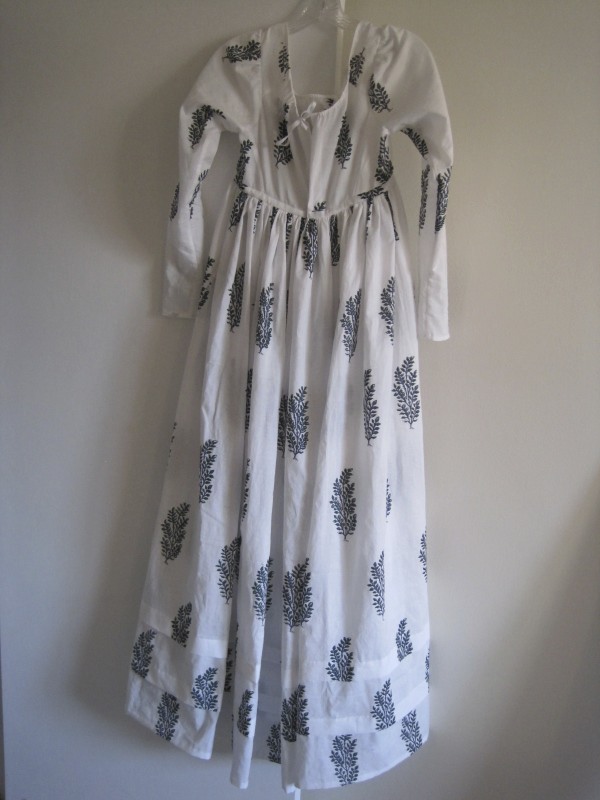
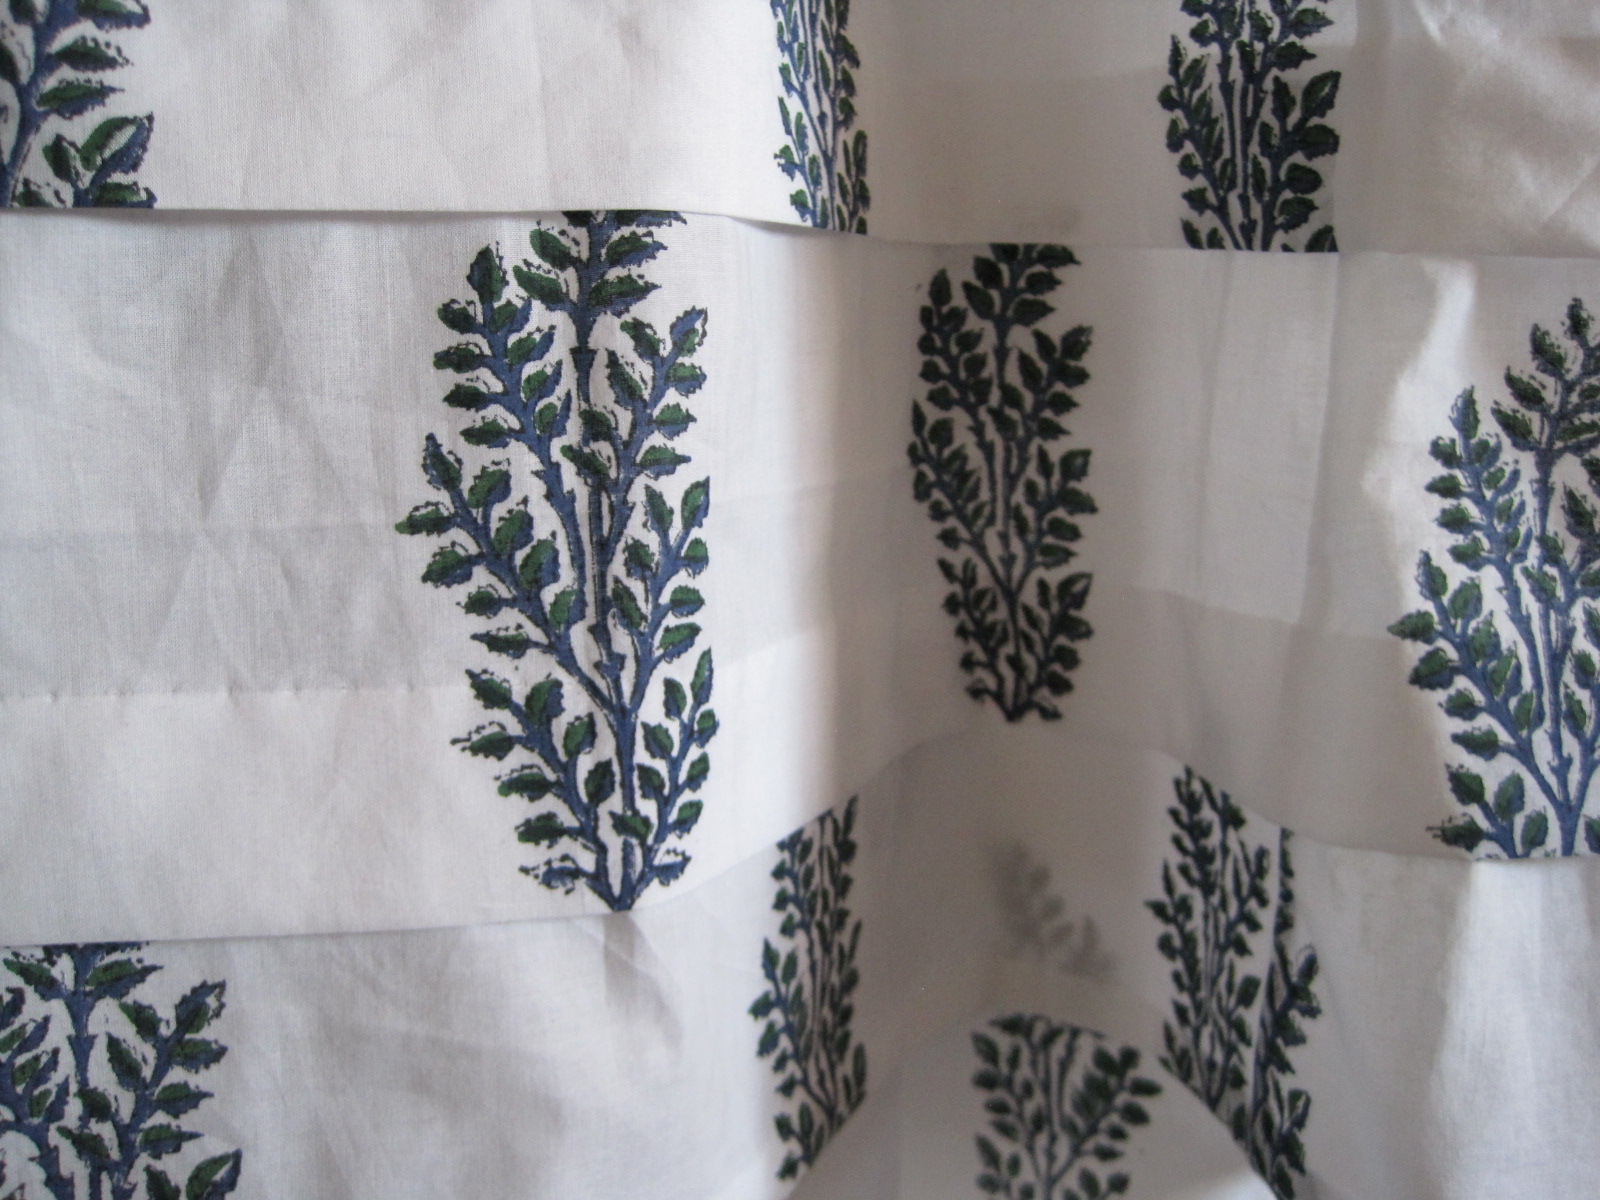
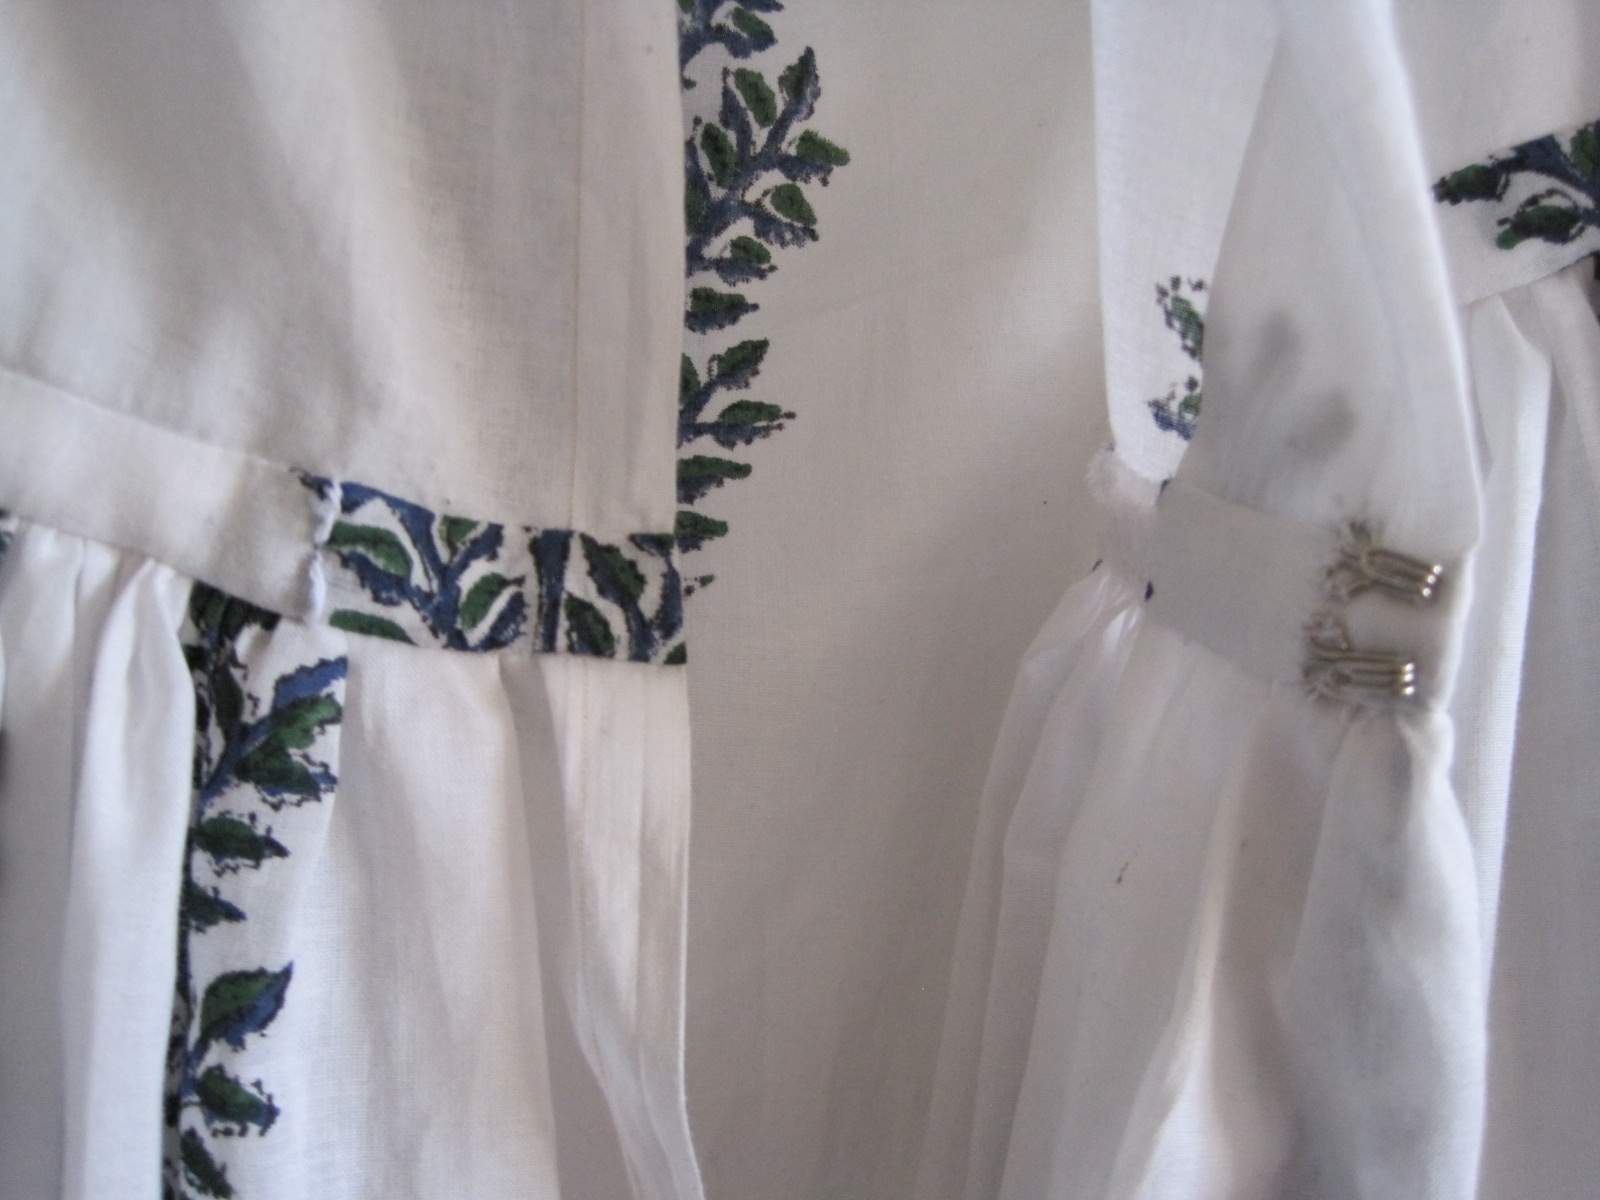
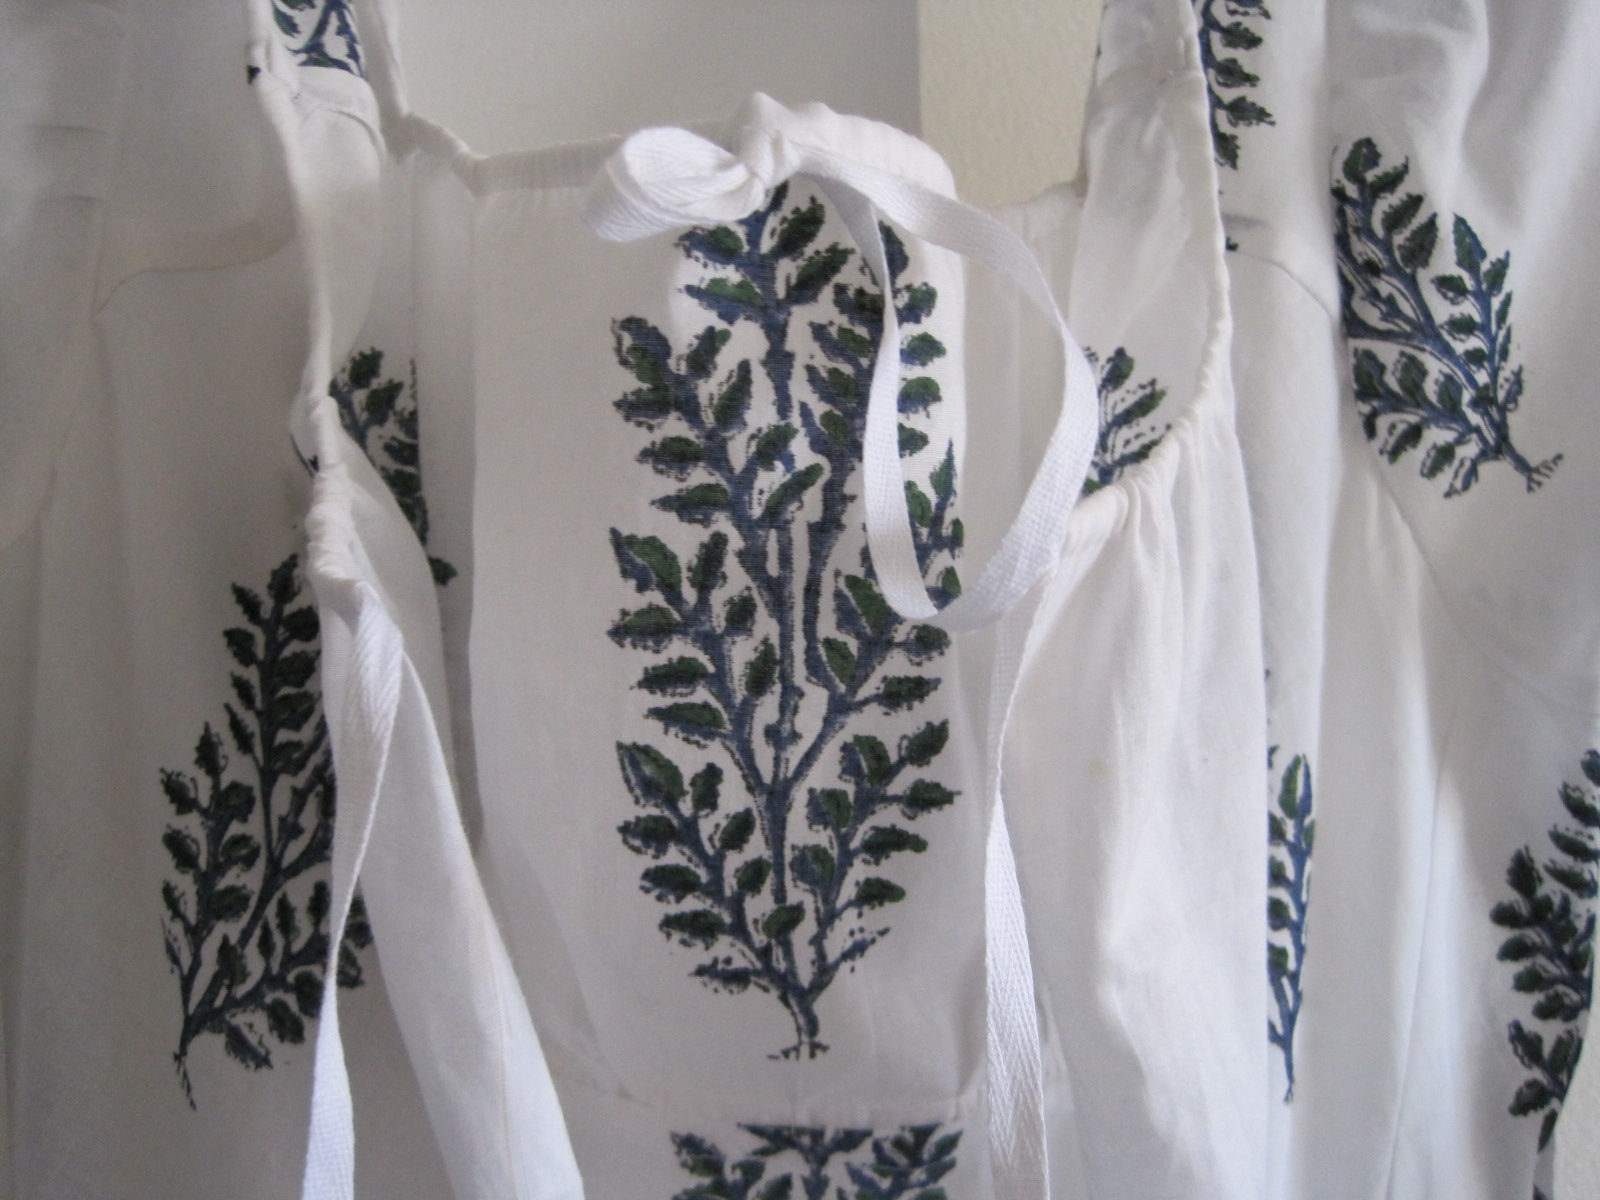
What you saw in the first picture (behind the reticule) was a first glimpse of my latest Regency gown! This new block printed cotton gown, from 1815, is “The Tree Gown” in my head because the motif reminds me of trees (or shrubs perhaps, but I like the sound of The Tree Gown better than The Shrub Gown). This gown fulfills the MpRSW Goal #3: Day Wear! It’s due today, so I’m right on time. The gown is machine sewn on all of the non visible seams, and hand finished on the visible sections.
Center front. This gown has a mostly squared neckline with a drawstring across the bust, like my 1812 white striped gown.Unlike previous Regency gowns in my possession, this gown has long sleeves! (This is a back view.)There are two 1 1/2″ tucks around the hem of this gown, for decoration.The gown closes at center back with two hooks on the waistband (see the thread loops?) and a tie at the top of the back.The tie at the top of center back is a drawstring that continues to the shoulder seam, allowing the back to gather slightly. The bow in the middle is the drawstring for center front.The fullness at center back is gathered. This gown has french seams and the waistband seam allowance is just whip stitched together to keep it tidy.The inside of the neck opening. The area over the shoulder is reinforced with an extra bit of fabric cut on the straight of grain to keep it from stretching.
This gown below is my main inspiration for this dress: the tucks at the hem, the sleeves, the pattern for the skirt, the gathers on the bodice, the mostly squared neck in front, the tie at the back of the neck… I omitted the extra sleeve puff (partly because I didn’t have enough fabric, partly because I wanted this dress to be more streamlined) and the tie at the back waistband. I love the super zoom on the Met’s website because you can see so many great details!
For example, I could see where the center front skirt panel ended and the angle of that seam (as well as the angle of the back panel). Using that information, I determined that my front panel should be a rectangle (it’s 21″ across in my dress given my proportions) and that the back panels should be cut straight at center back, but with an angle on the side seams that goes up toward center back making an elongated trapezoid. There is a seam at center back, so the hem of each back piece is 45″, but each top narrows to 31″. I’m curious to see how that style of skirt fits me. I certainly like the look of the skirt on the dress in the museum!
1810-1815 dress at the Metropolitan Museum of Art.
This gown also fills the HSF #9 Challenge: Flora and Fauna, so you’ll be seeing another post about it with some more details (and pictures of it on a body!) coming up in a few weeks (after the Regency Weekend in April, you know!).