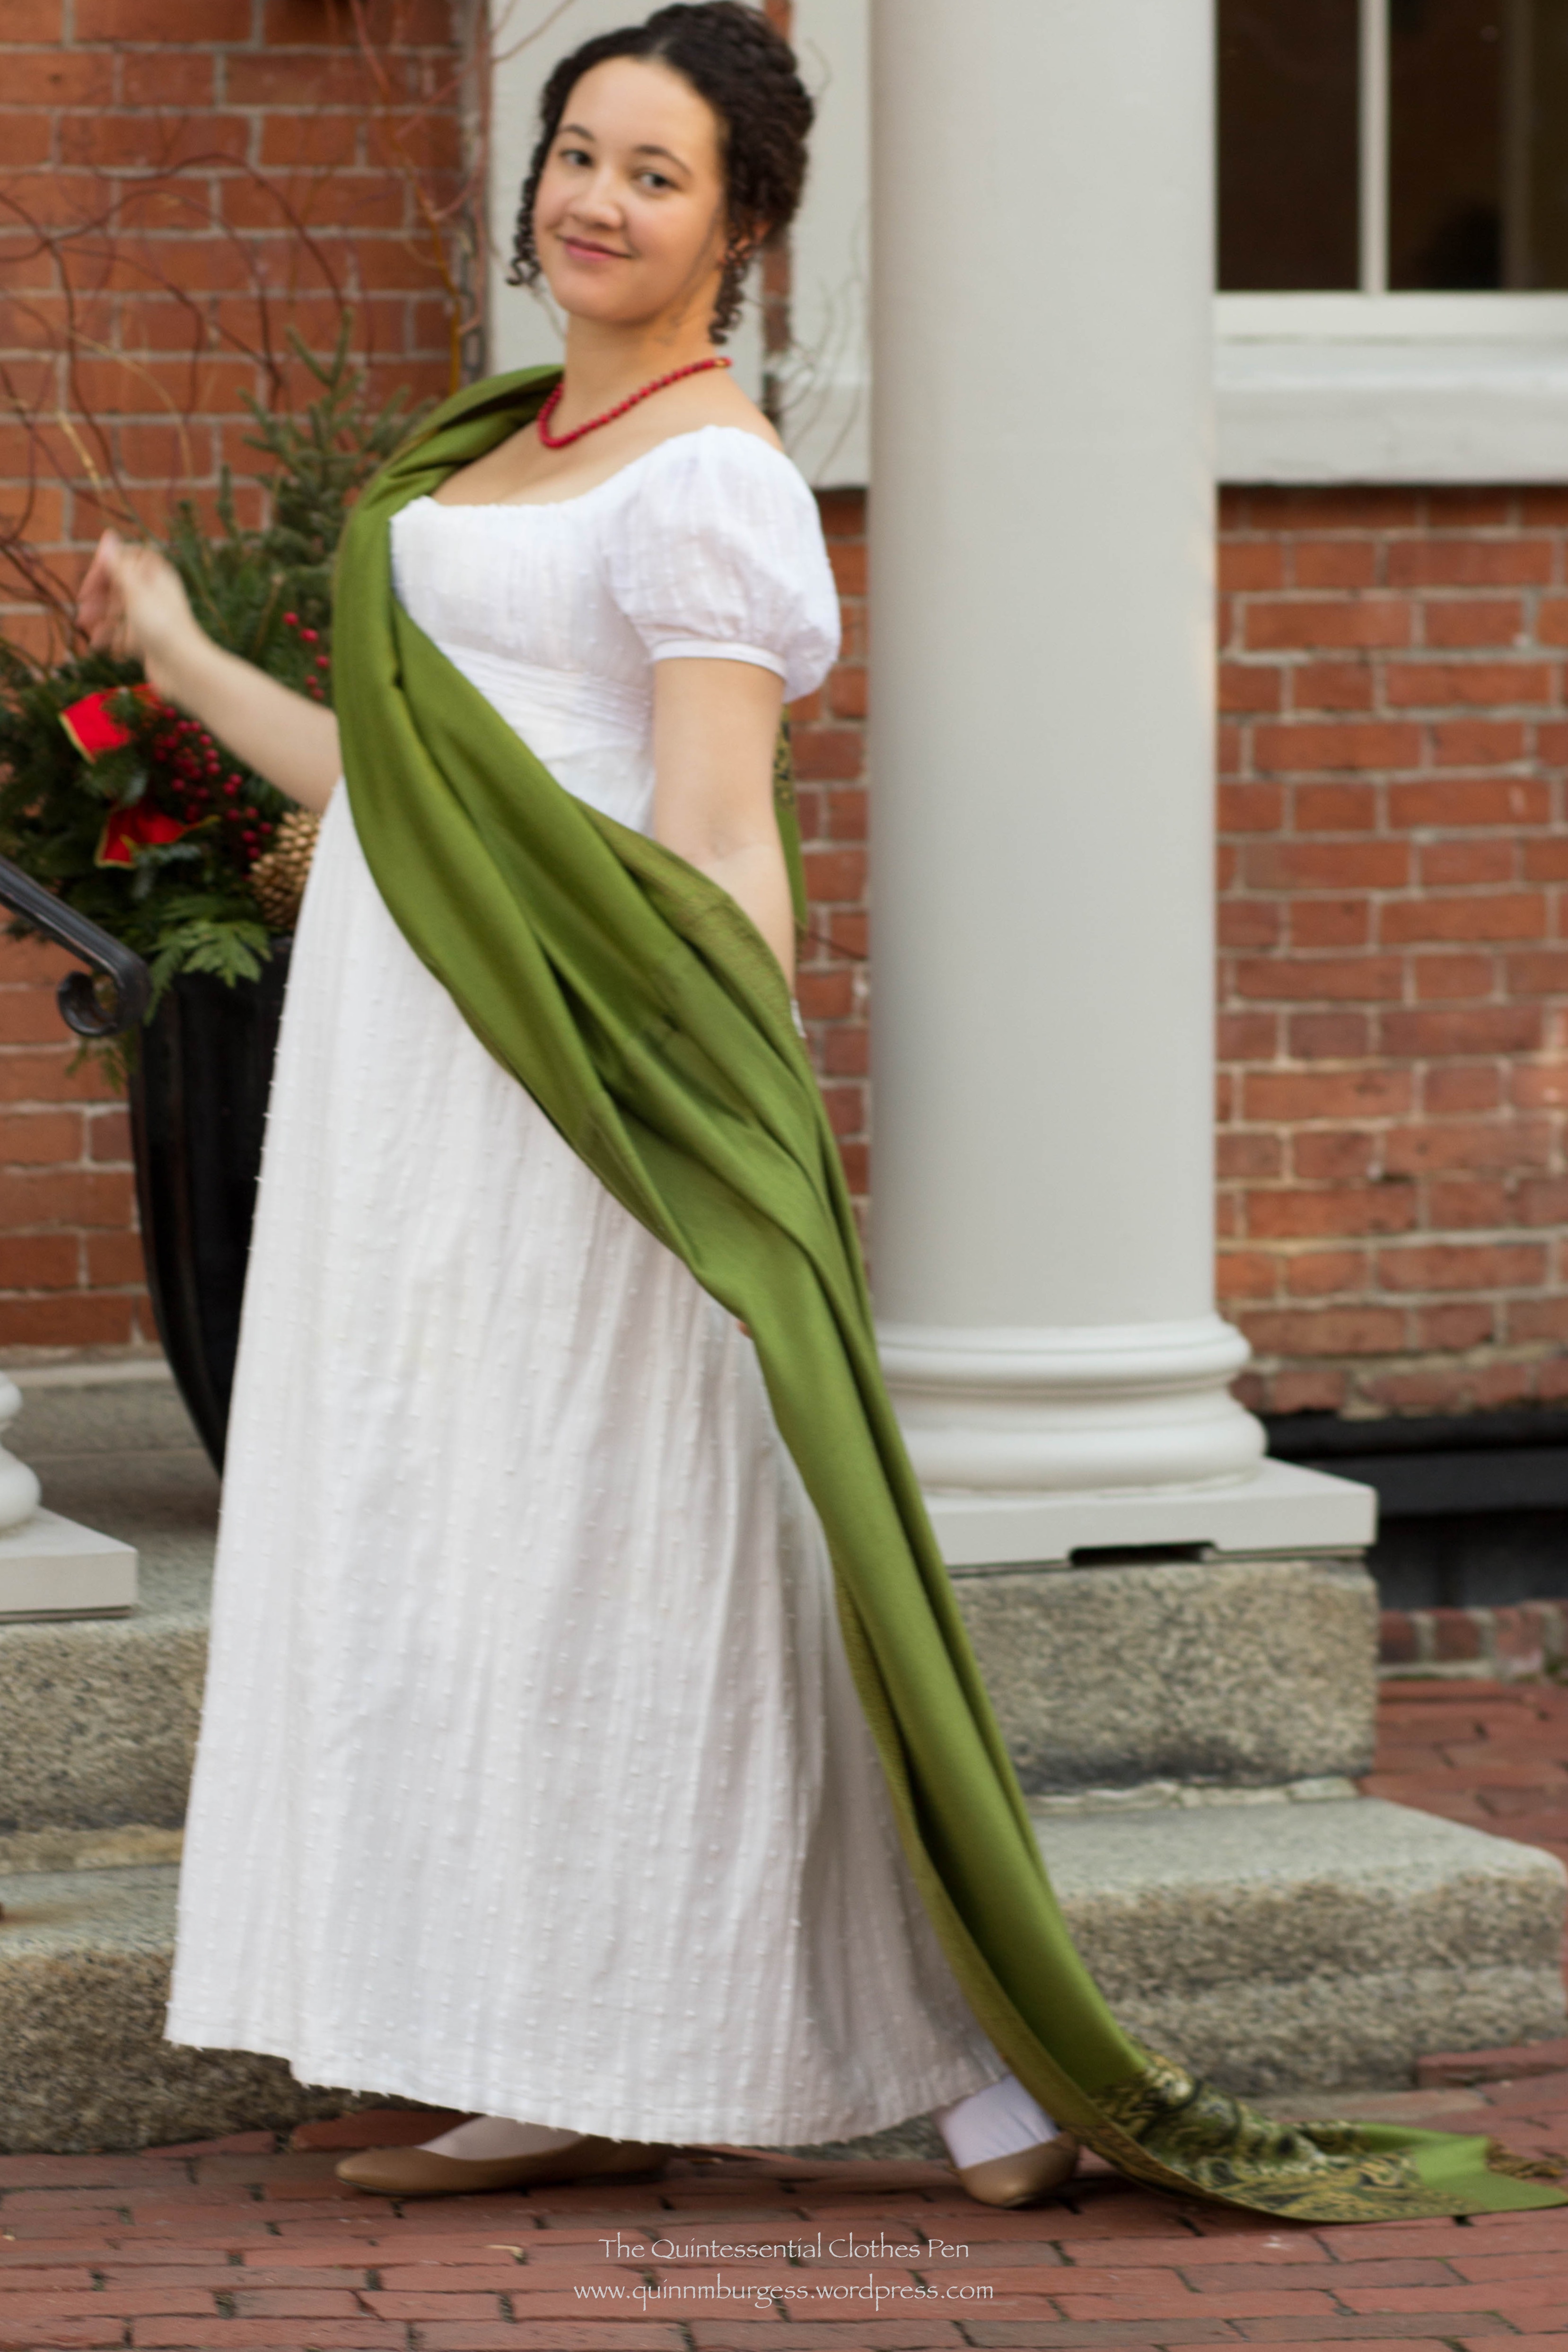
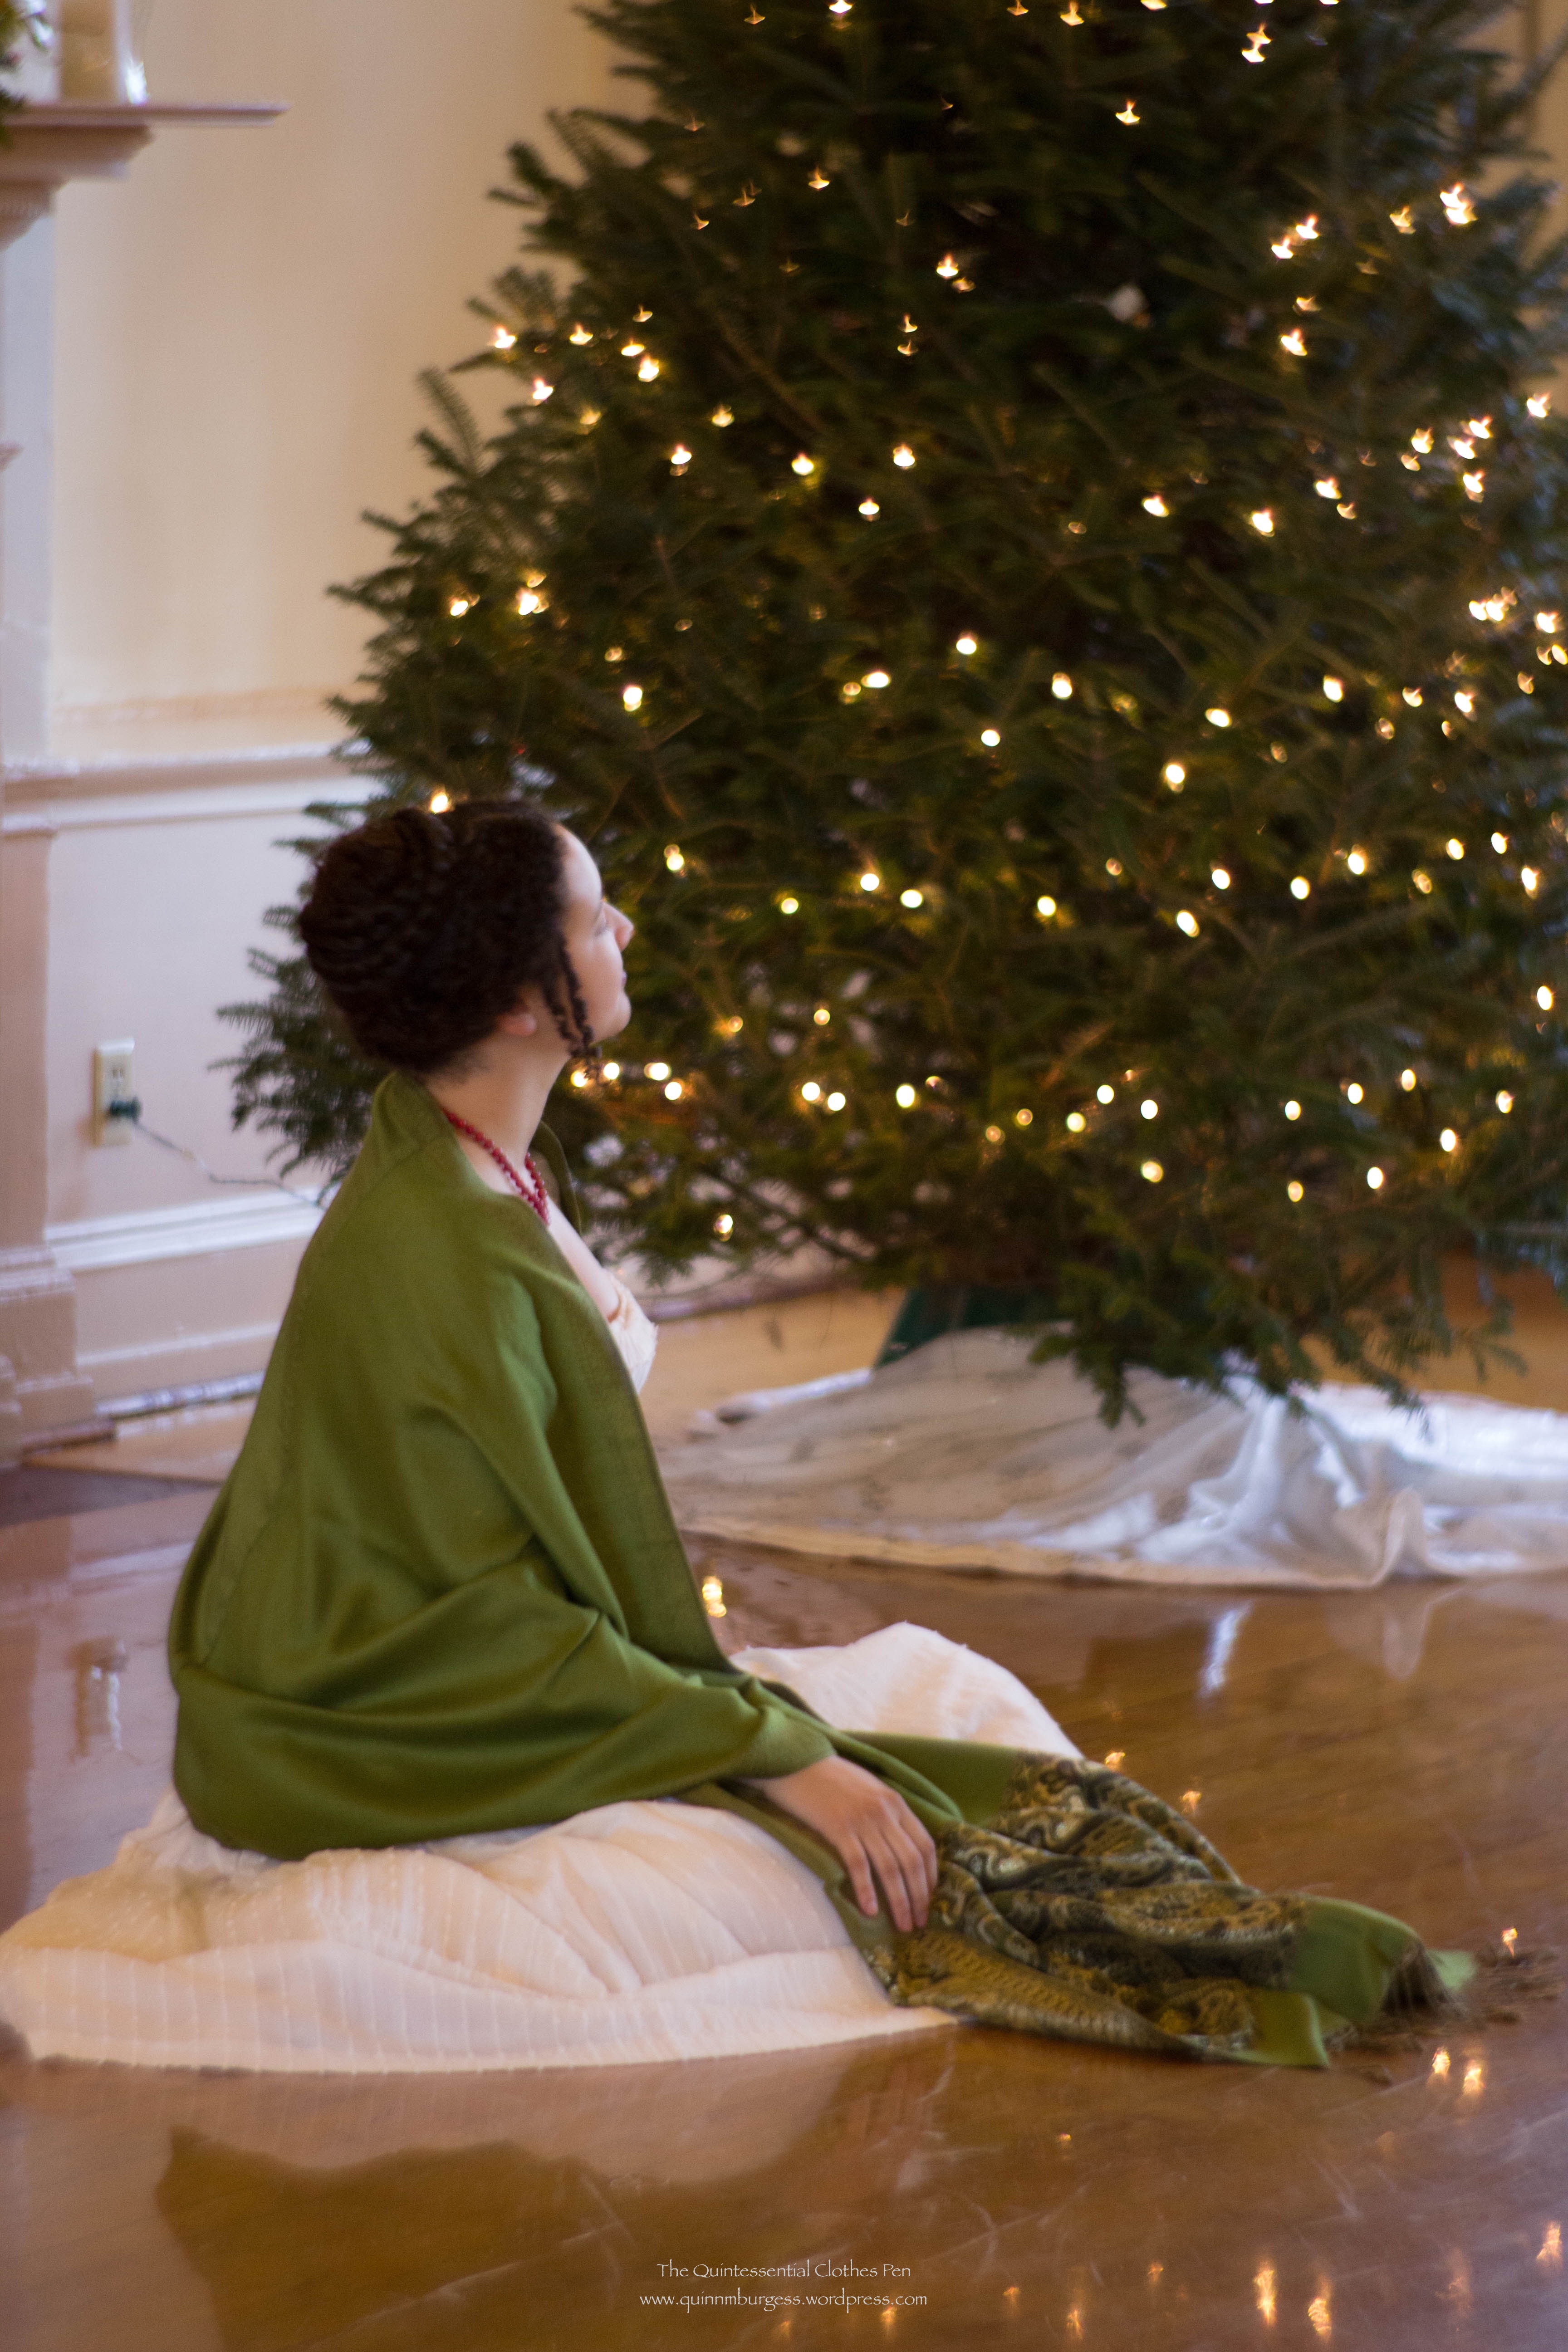
Remember this post from last December about my green Regency shawl and the photoshoot for my Vernet project?
From the wearing of my green Regency shawl.
For both of those Regency period hairstyles I took the time to create narrow curls to frame my face and I’ve been meaning to share how to achieve these perfect curls ever since, but am only just getting to it. However, I can’t take credit for the idea myself. I was inspired by Sanna and Noora during the Vernet project. I believe we had a conversation about it in the Vernet seamstress group but I can’t find the content at this point, so you’ll just have to take my word for it. (They both used straw curls for their hairstyles in this post of Sanna’s and this post by Noora, if you’d like to see how this technique can turn out on other hair types.)
From my Vernet project photo shoot.
The secret to getting really lovely corkscrew curls? Drinking straws used as rollers. This works for shorter length hair to create the oft-seen small curls around the face, but it also works just as well for longer hair. Have you heard of using straws for curls before?
The look is achieved by rolling wet hair around a drinking straw (with or without product–I’ve tried it both ways and have achieved good results) and letting the hair dry. Sanna and Noora reported that after rolling hair around the straws they knotted the ends of the straws, pinned the rolls to keep them in place, and left them in overnight. My method was slightly different. I cut my straws in half, rolled my hair around the shorter straws, pinned them in place, used a hair dryer on them until they were dry, and then took them down.
You could also use this technique to create curls for other time periods. The ‘hedgehog’ styles of the later 18th century are one possibility. What types of hairstyles have you created (or do you now want to try!?!) using this method?
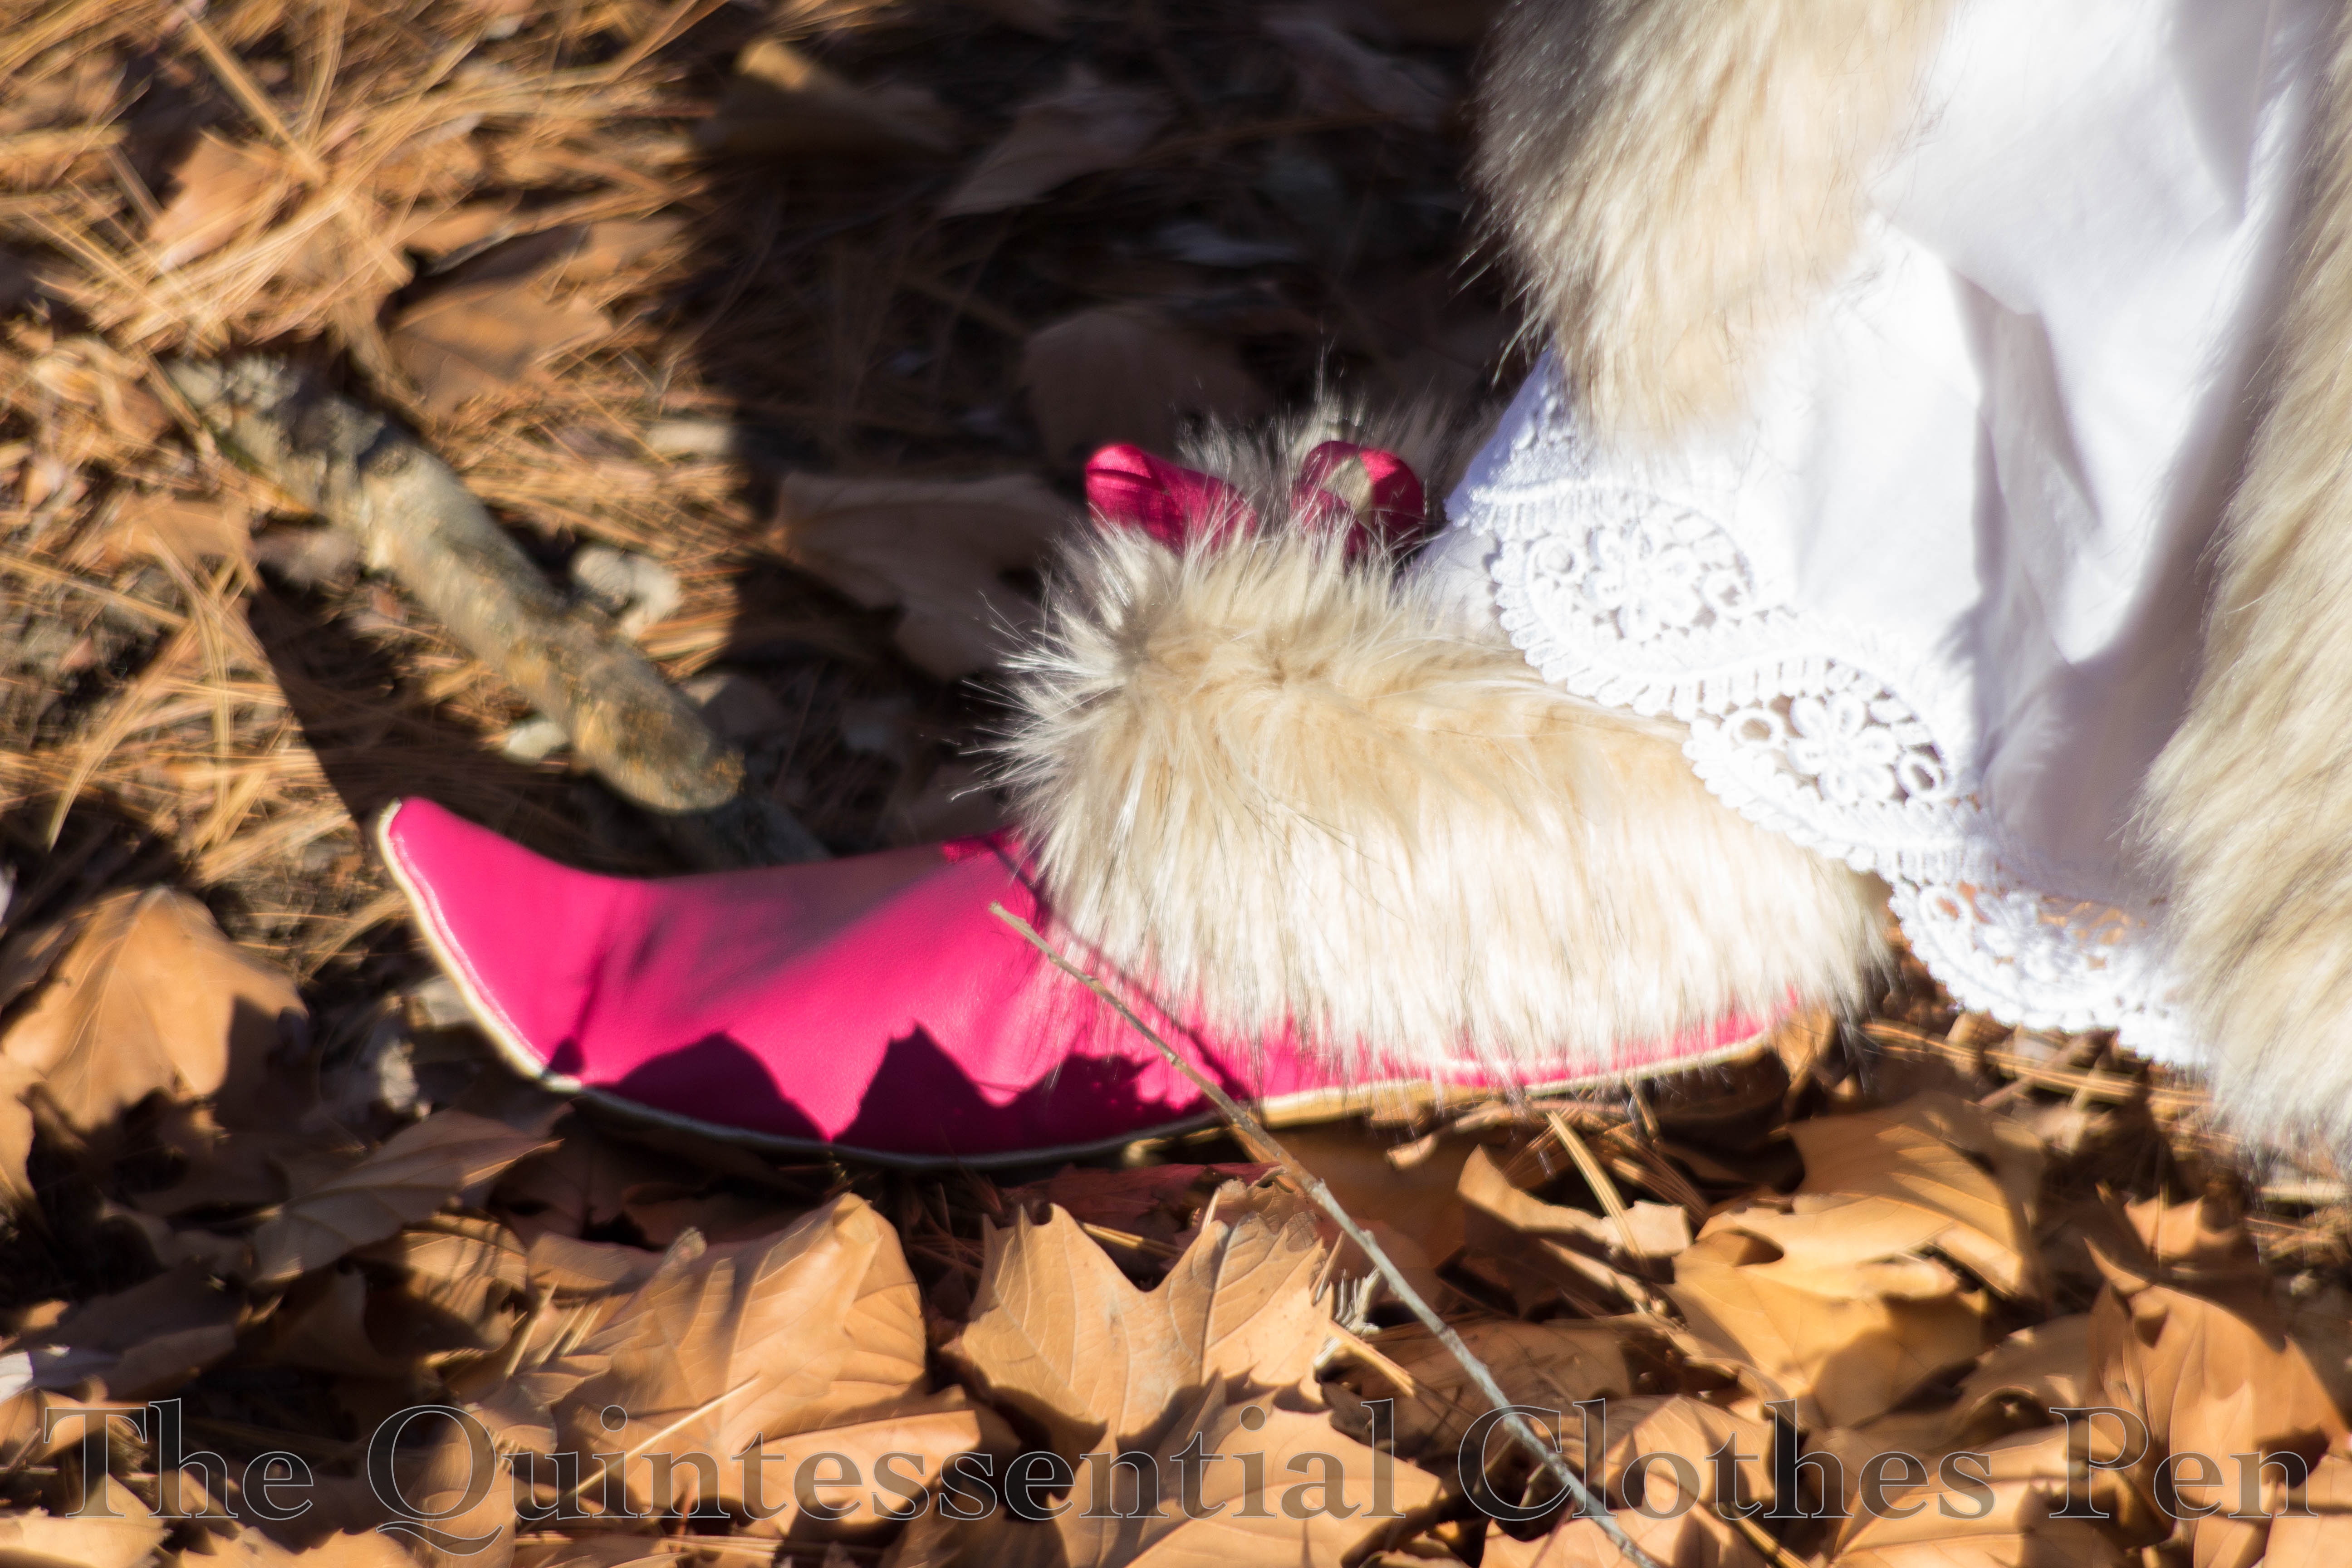
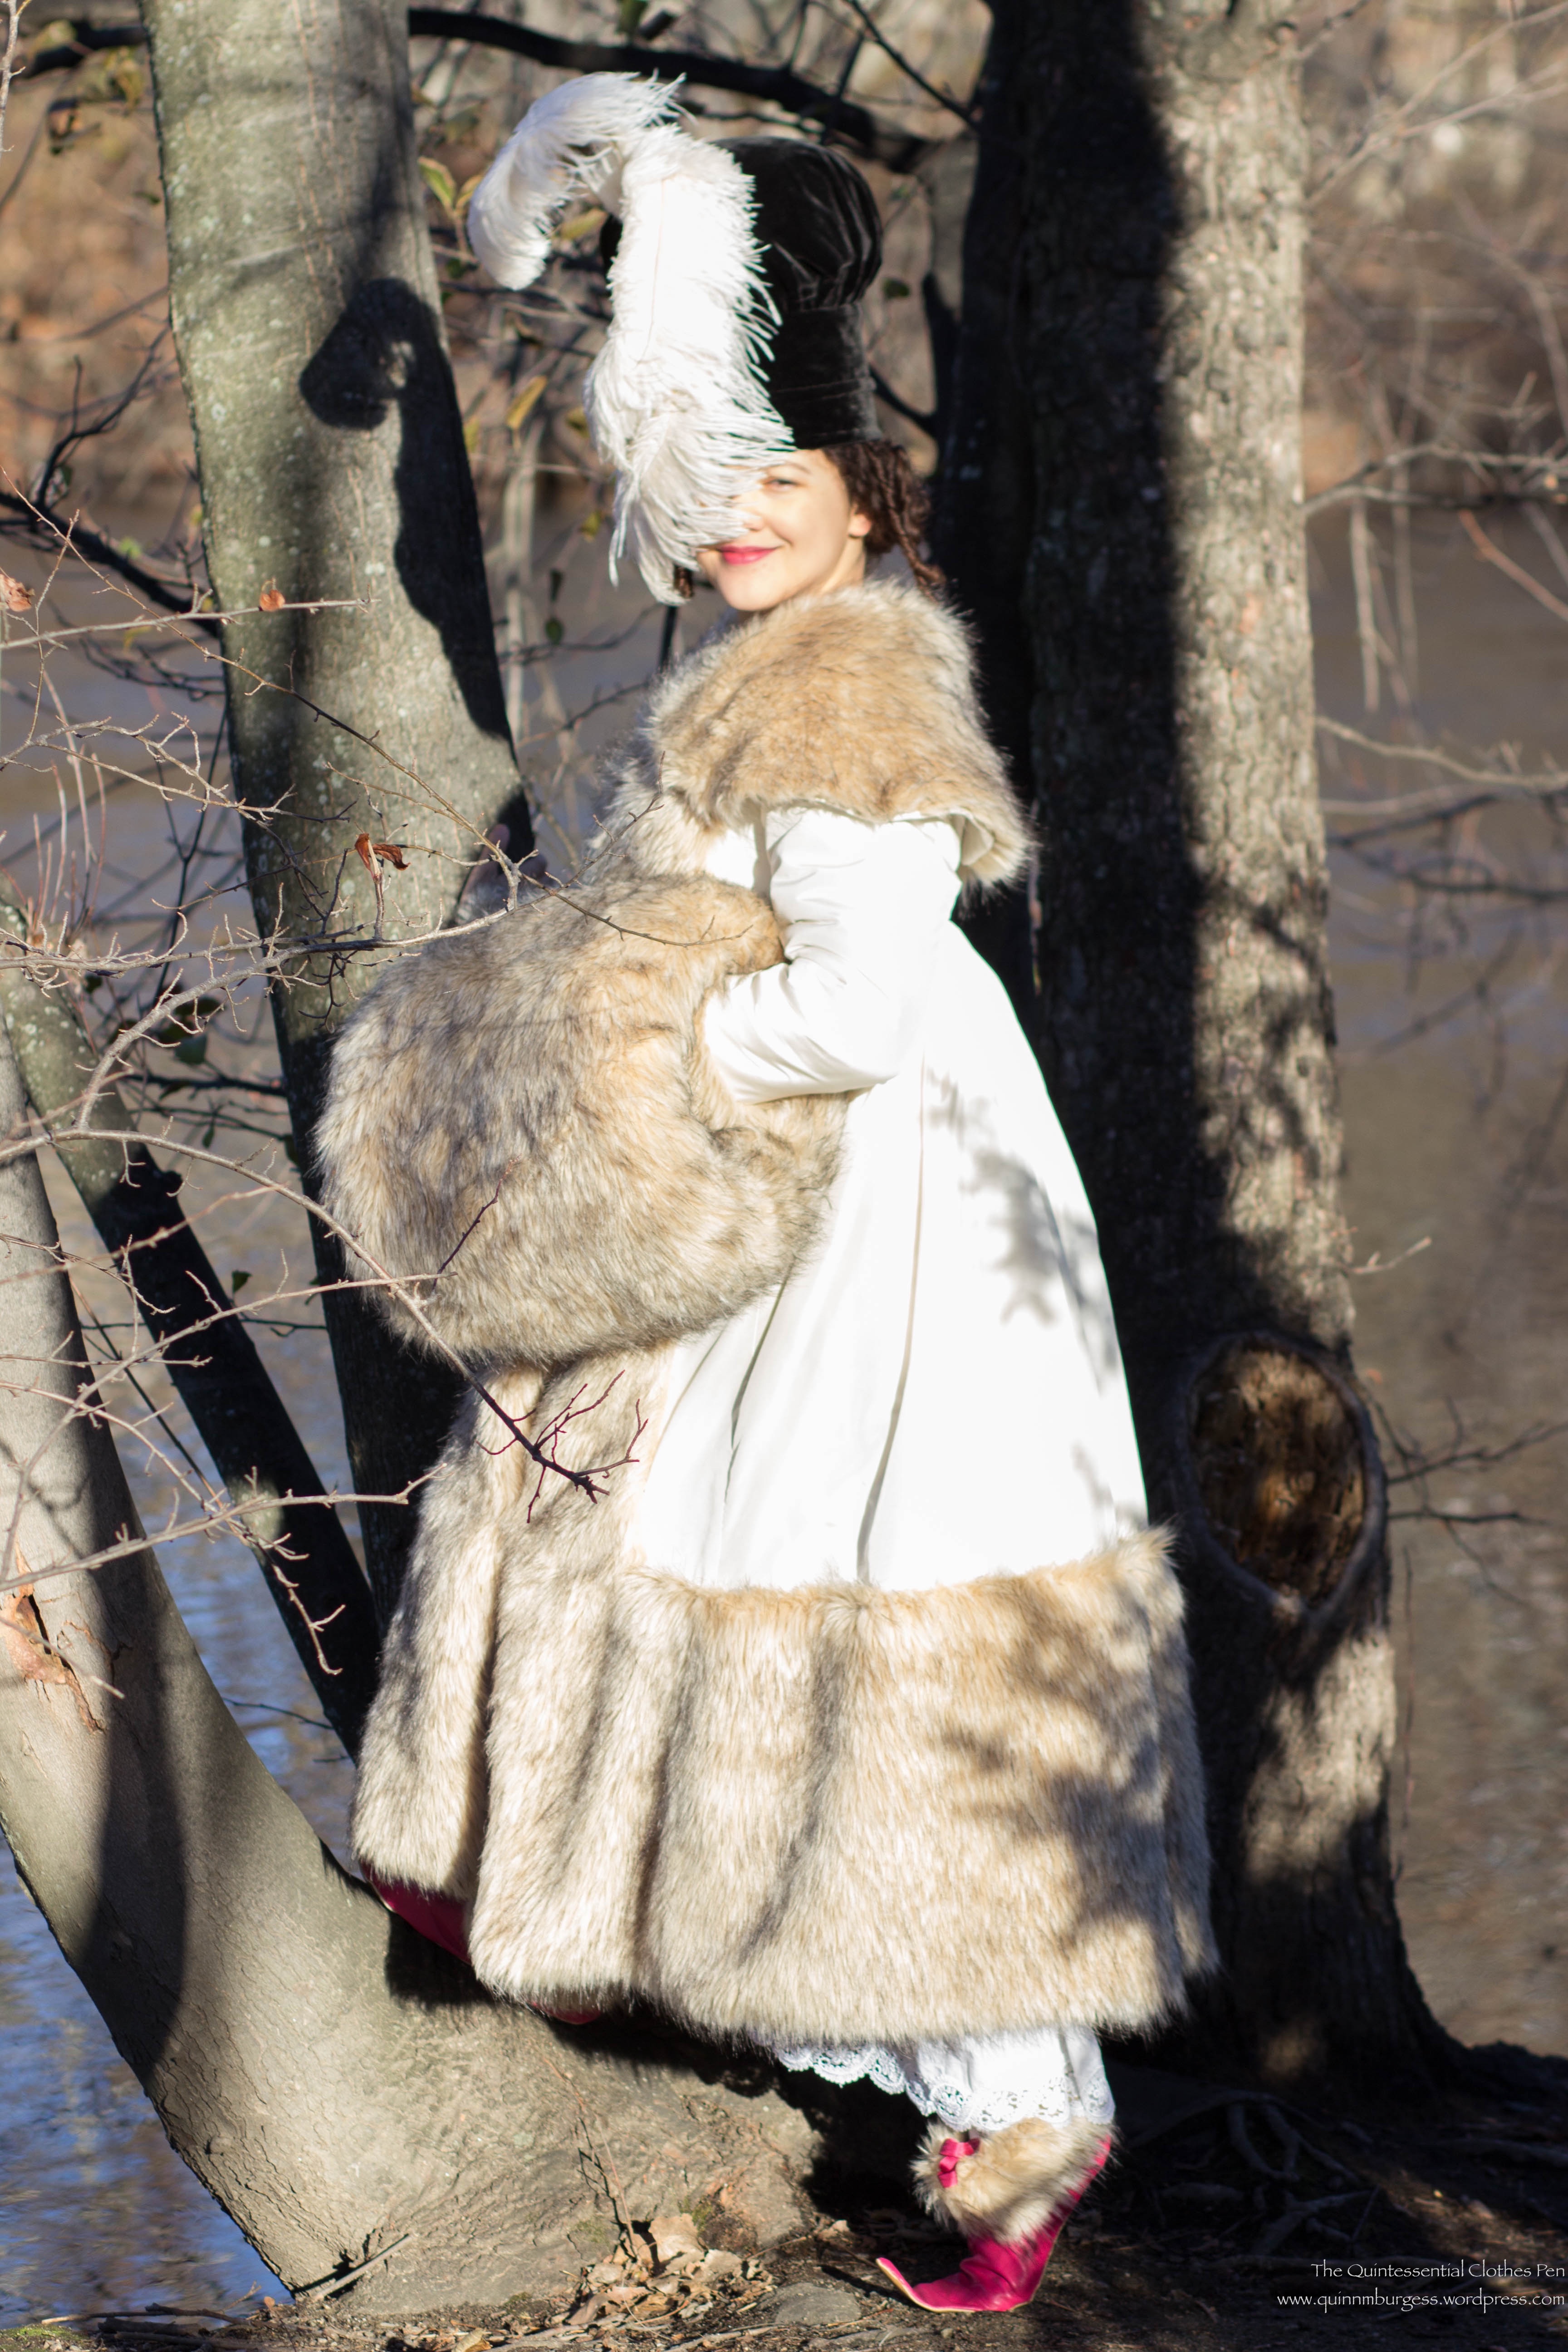
One of the five pieces of my Vernet Project was creating the silly up-turned-toe elf shoes in the fashion plate. Clearly, these are not shoes that could be purchased, as they are so specific in style, so I set out to make my own!
In the beginning, I was thankful to have another Vernet project maker’s experience making her boots before mine to work from. Jenni posted a two part tutorial showing how she made her boots as well as sharing information behind-the-scenes with project participants earlier in the process (Part 1 and Part 2). She closely referenced Every Lady Her Own Shoemaker, published in 1855 (a little late relative to the date of the project, but still useful for construction advice), for construction methods and carefully documented her process. In fact, she did a much better job at documenting the actual sewing than I did… I also read Anna’s information about making mid-19th century shoes multiple times to help get my mind acquainted with the project (again, a little later than the period of the project, but still helpful). She also has lots of great construction pictures.
I started by creating a pattern for my shoe using patterns in Every Lady Her Own Shoemaker. Given that my shoe has the unusual turned-up-toe, I necessarily needed to make adjustments to the general slipper pattern. Here is my shoe at the mockup stage. The upper pieces fit pretty well! I adjusted the width of the sole as well as the shape of the turned-up section before moving on to cut out the final pieces.
Here are all of the final pieces cut out and ready to assemble. The soles have three layers: heavier tan leather for the outer sole, cardboard for the inner sole structure, and white linen to cover the cardboard insole. The uppers have two layers: lightweight raspberry leather for the exterior and white linen for the interior. Later in the process I also added a faux fur cuff.
To help the shoes keep their turned-up-toe shape I soaked the leather soles in water, taped them to a lysol wipe container, and let them dry. You can see the results below. Not perfectly curved up, but still helpful. I also tried boiling leather soles to thicken them before shaping, but found that the leather shrank unevenly which created soles that wouldn’t work for this project. I did save them, though, and hopefully will get to use them for a future shoe making endeavor. I repeated the soaking and shaping for the cardboard insoles before gluing the linen to them. There’s a picture of the insoles at this stage in this past post.
After shaping the soles it was time to construct the uppers. I did the interior and exterior separately, then basted them together around the top opening and around the bottoms. Then I sewed the bottom edges of the uppers to the soles, using the slanting stitch through the side of the sole that Jenni shows in Part 2 of her tutorial. She used all sorts of nifty leather tools as well as a wooden last during construction. I purchased the nifty leather tools but found that they didn’t work for me and a simple non-leather needle worked just fine. (I think my leather was too thin and soft for these to be needed). As for the last, I looked online for a wooden one, never found one in my size foot, and eventually decided to give it a go without one, especially since I had to do the turned-up toe. In the end, I don’t think it was a problem not to have a last.
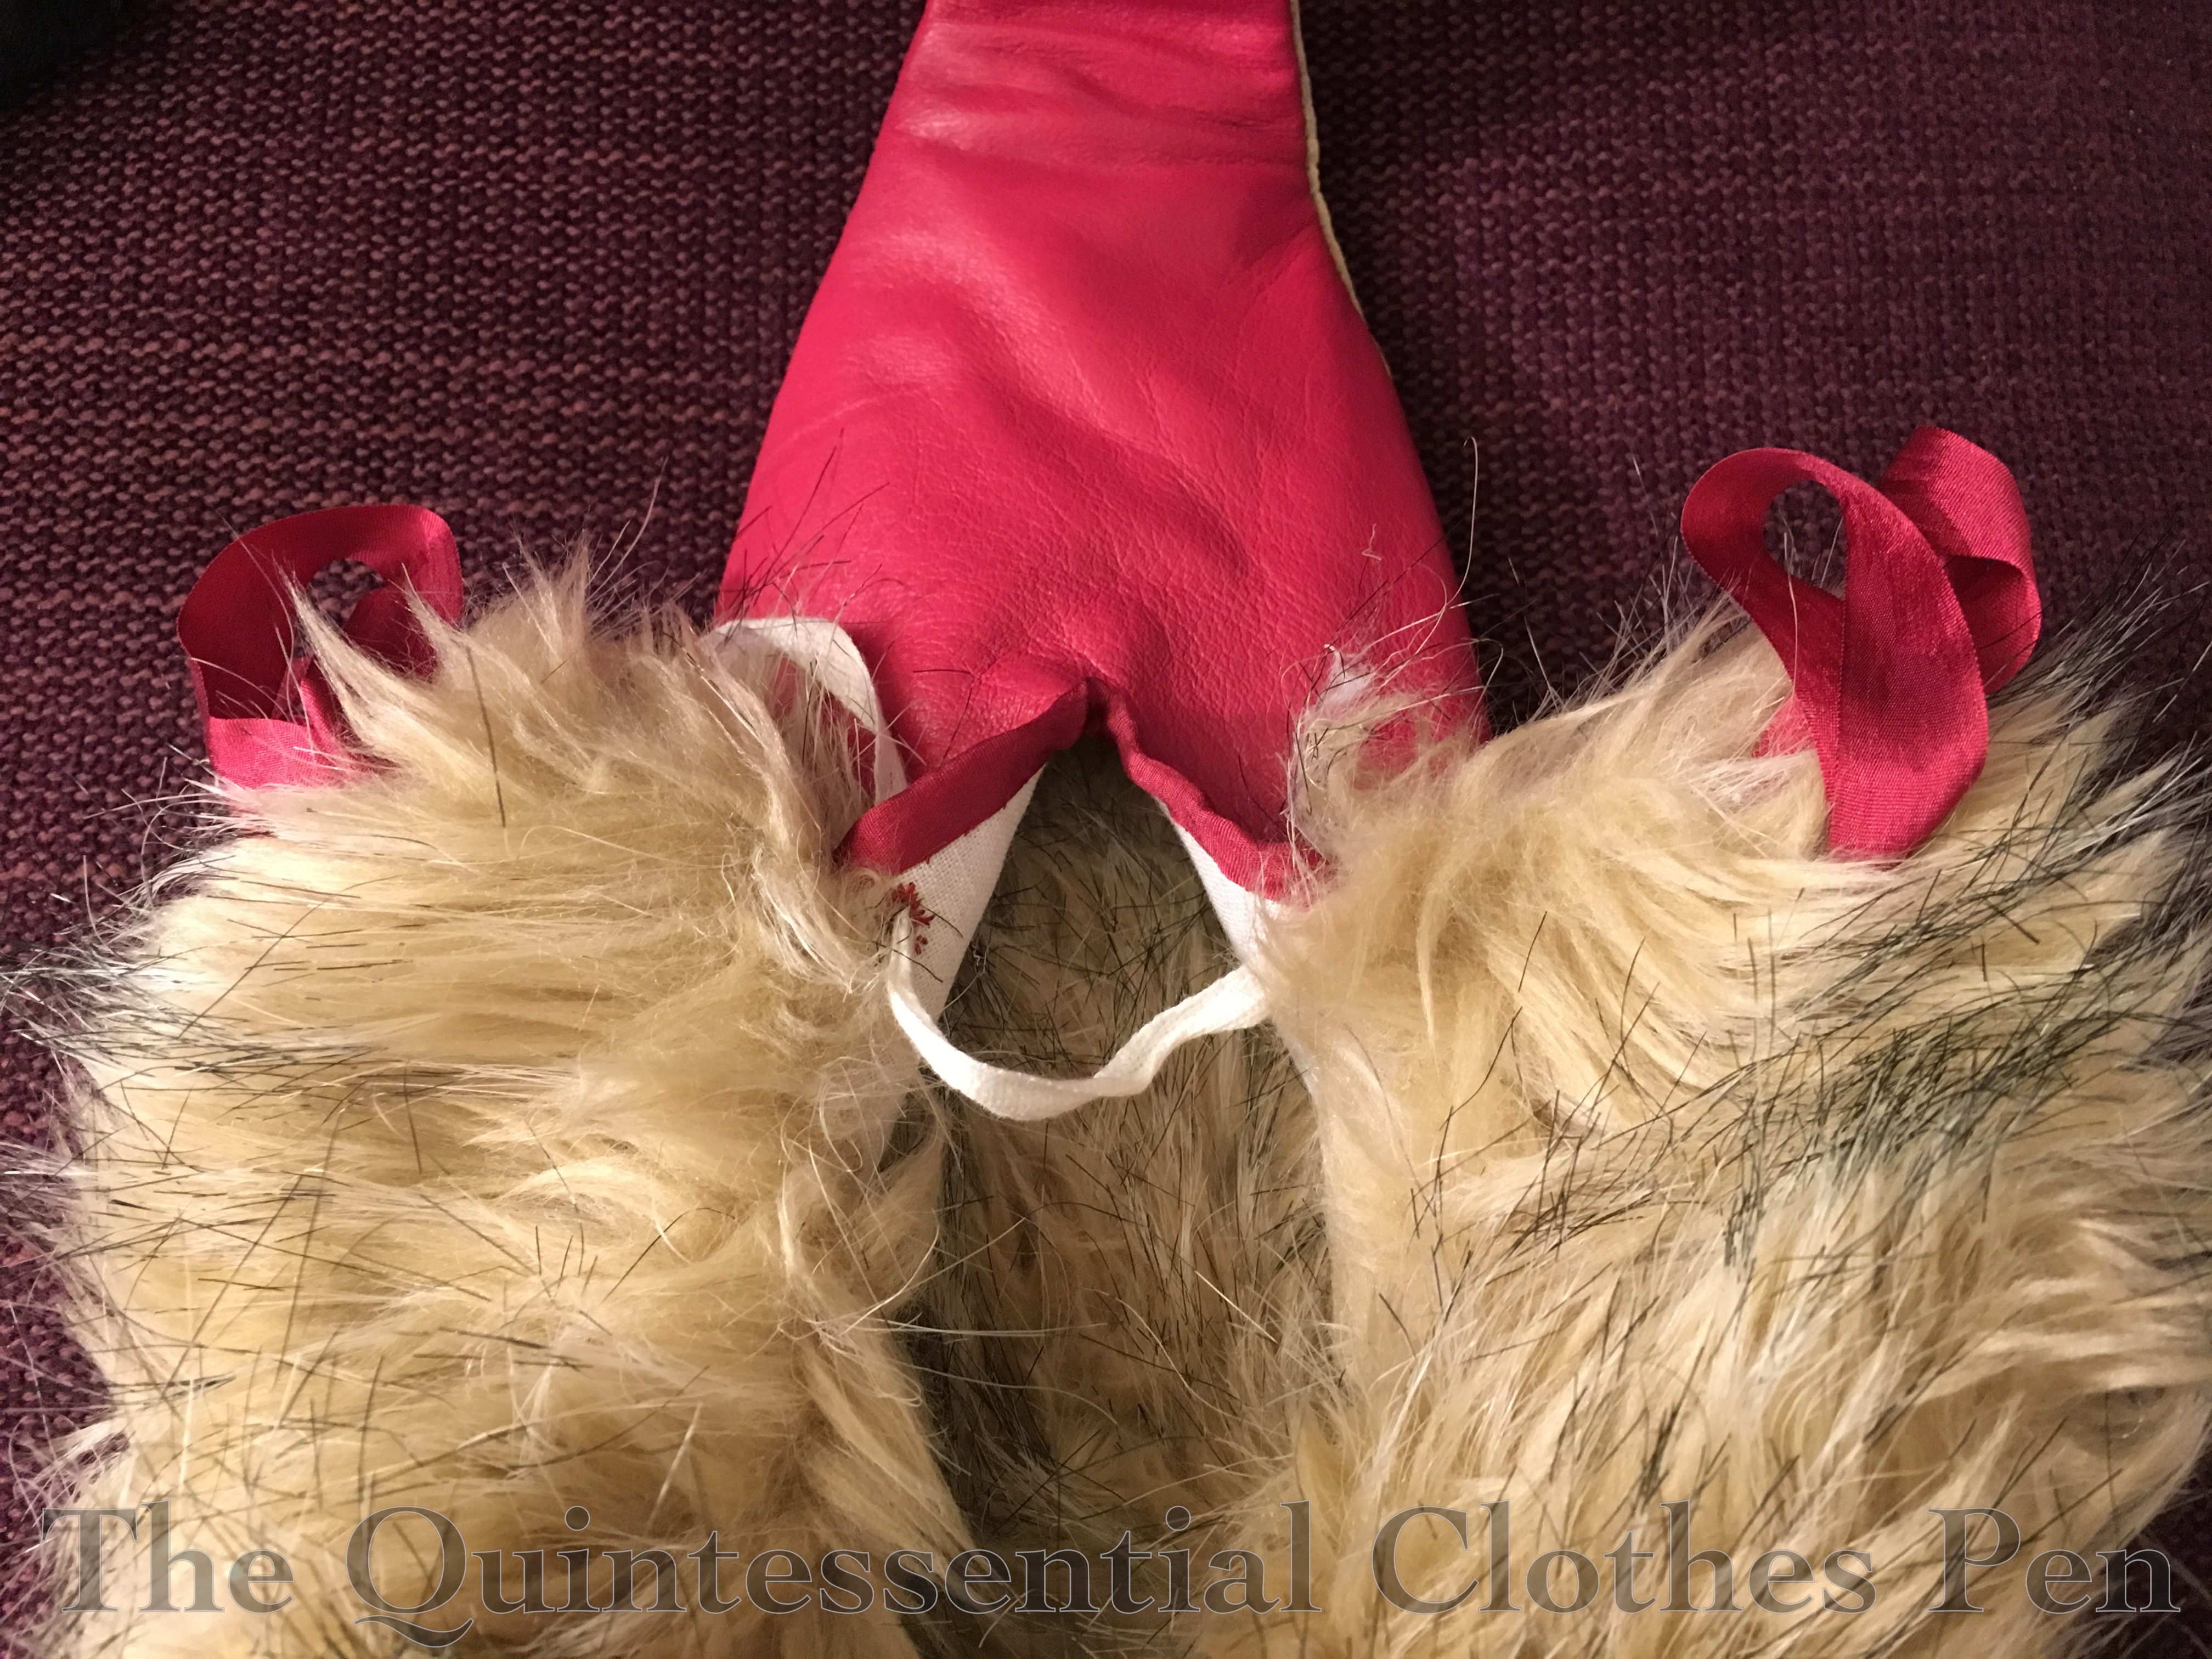
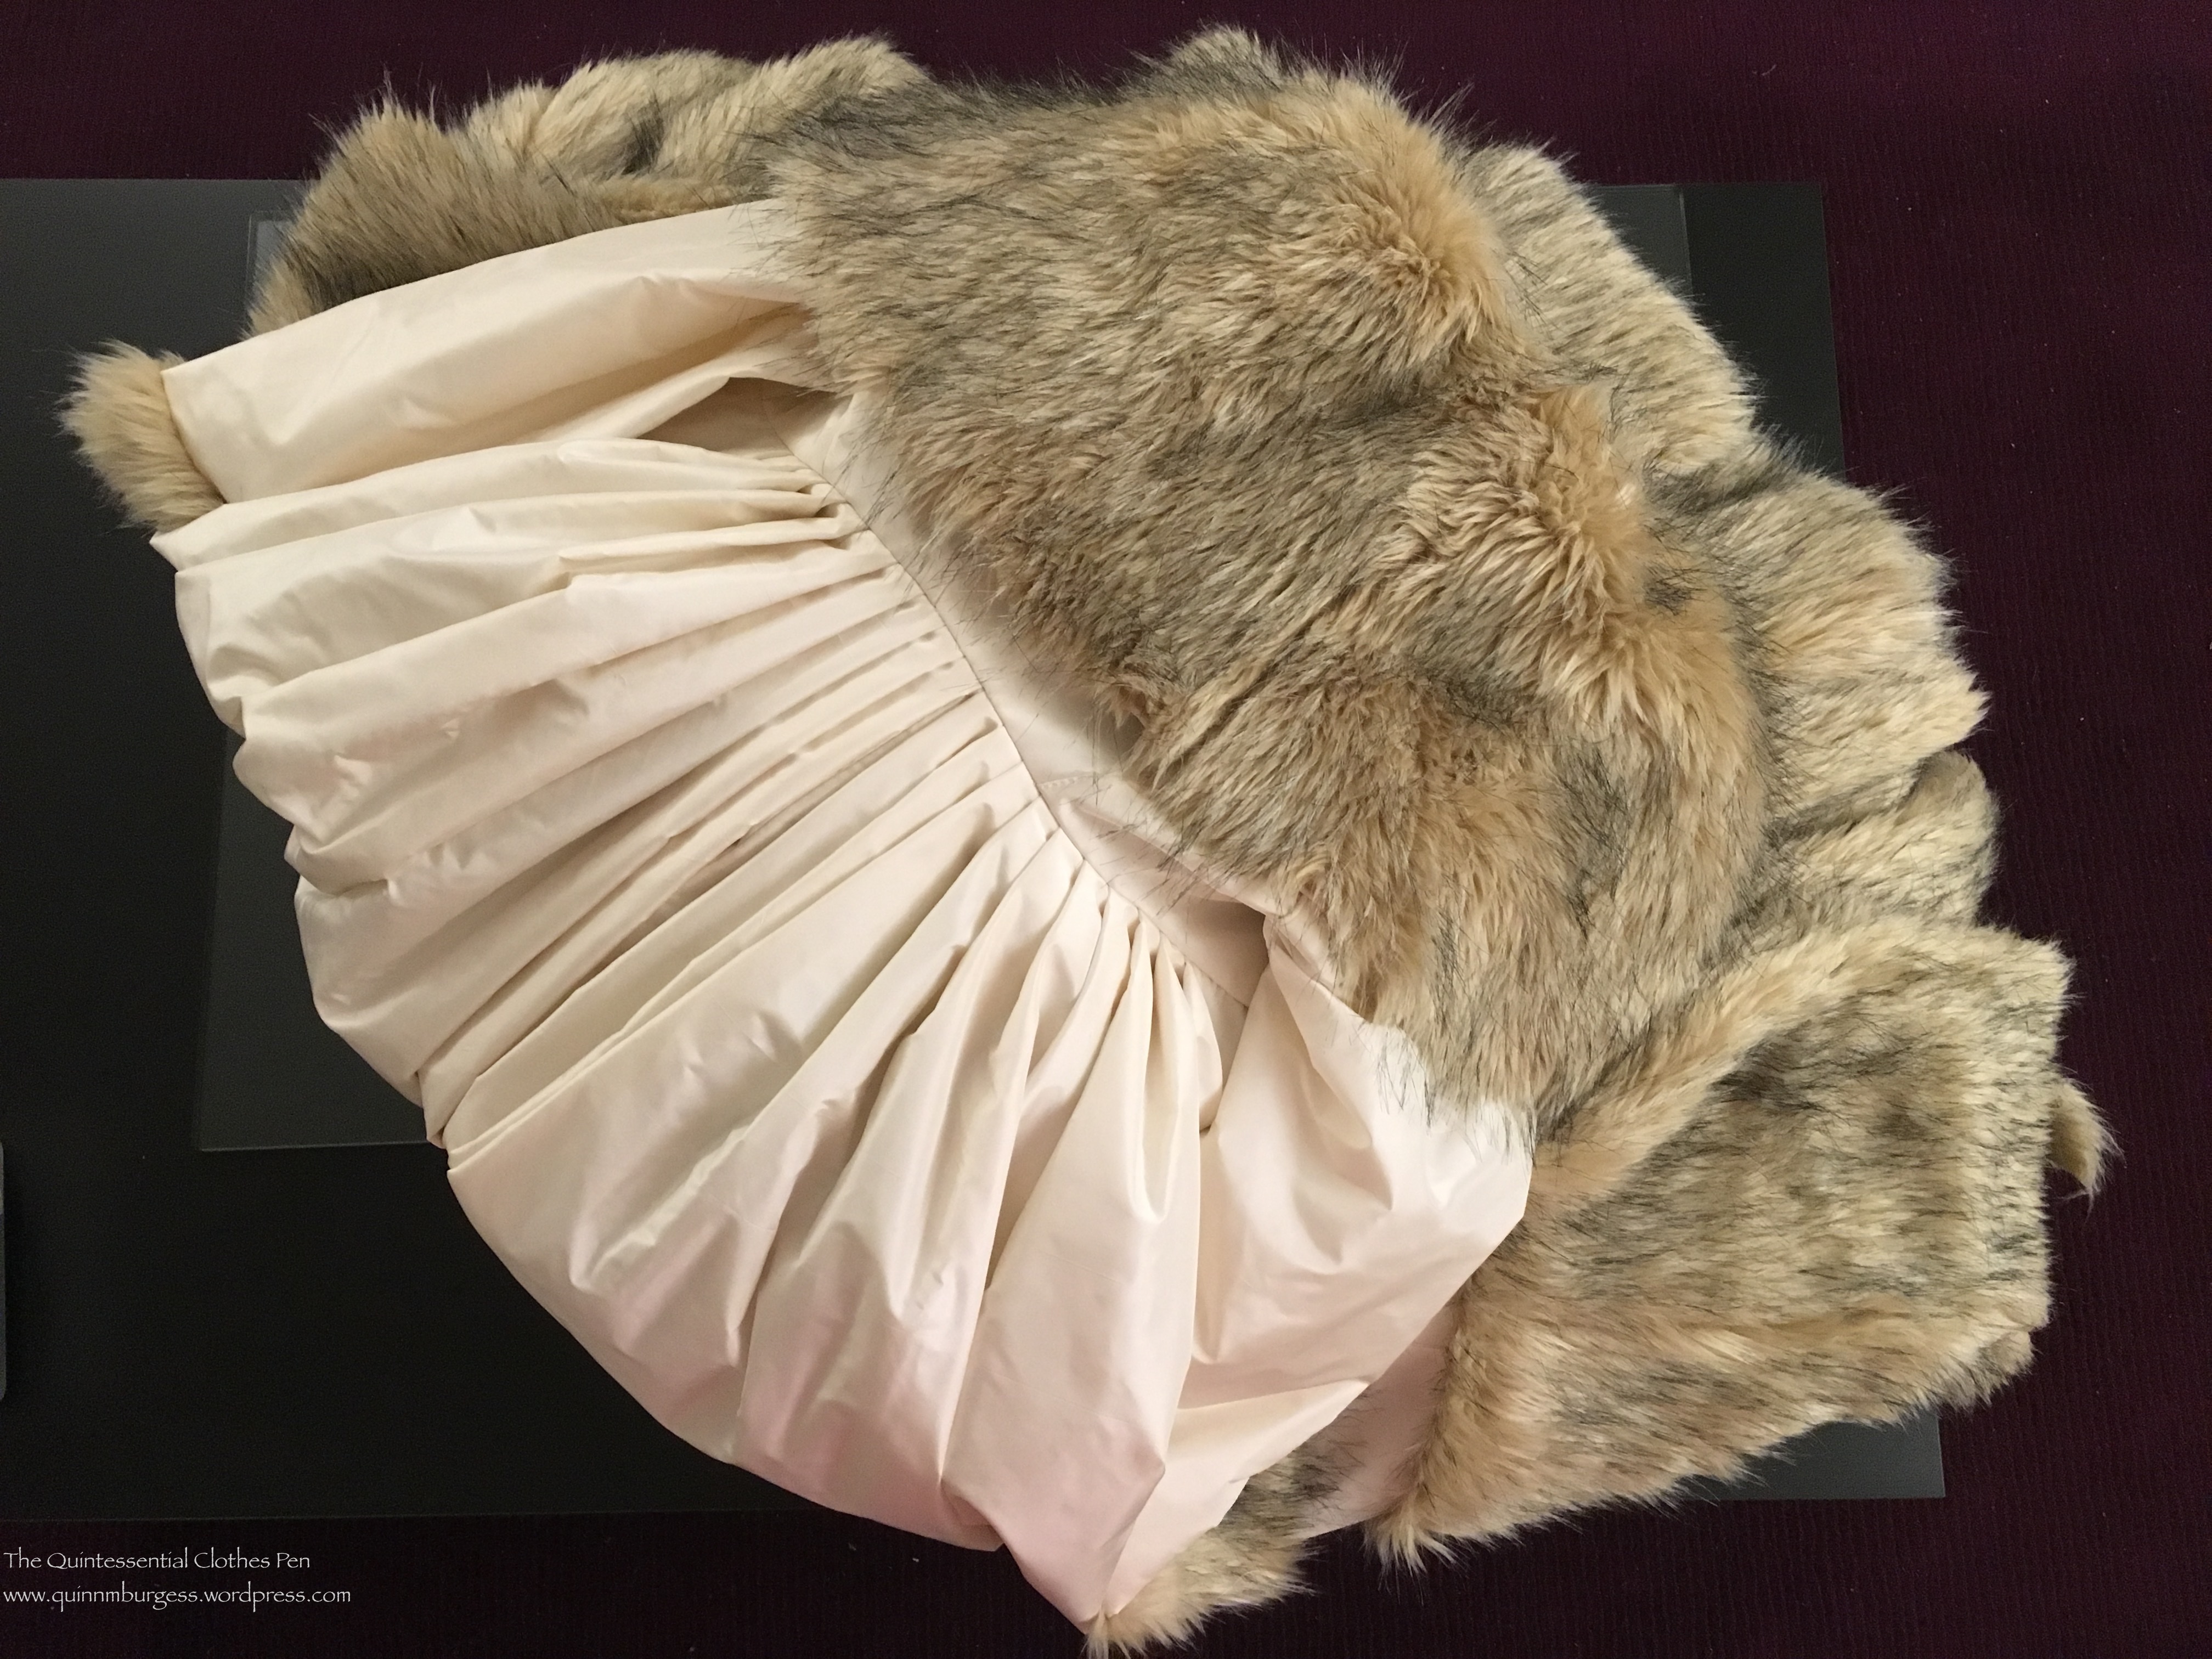
Once the soles were attached, I bound the front slit with matching silk ribbon. Then I cut a piece of faux fur for each shoe that went around just the top of the foot opening and could double over on itself. There are non-functional silk ribbon loops that are sewn to the front of the fur that encases the top edge of the shoe. The shoes actually close with a twill tape threaded through hand sewn eyelets on each side of the opening.
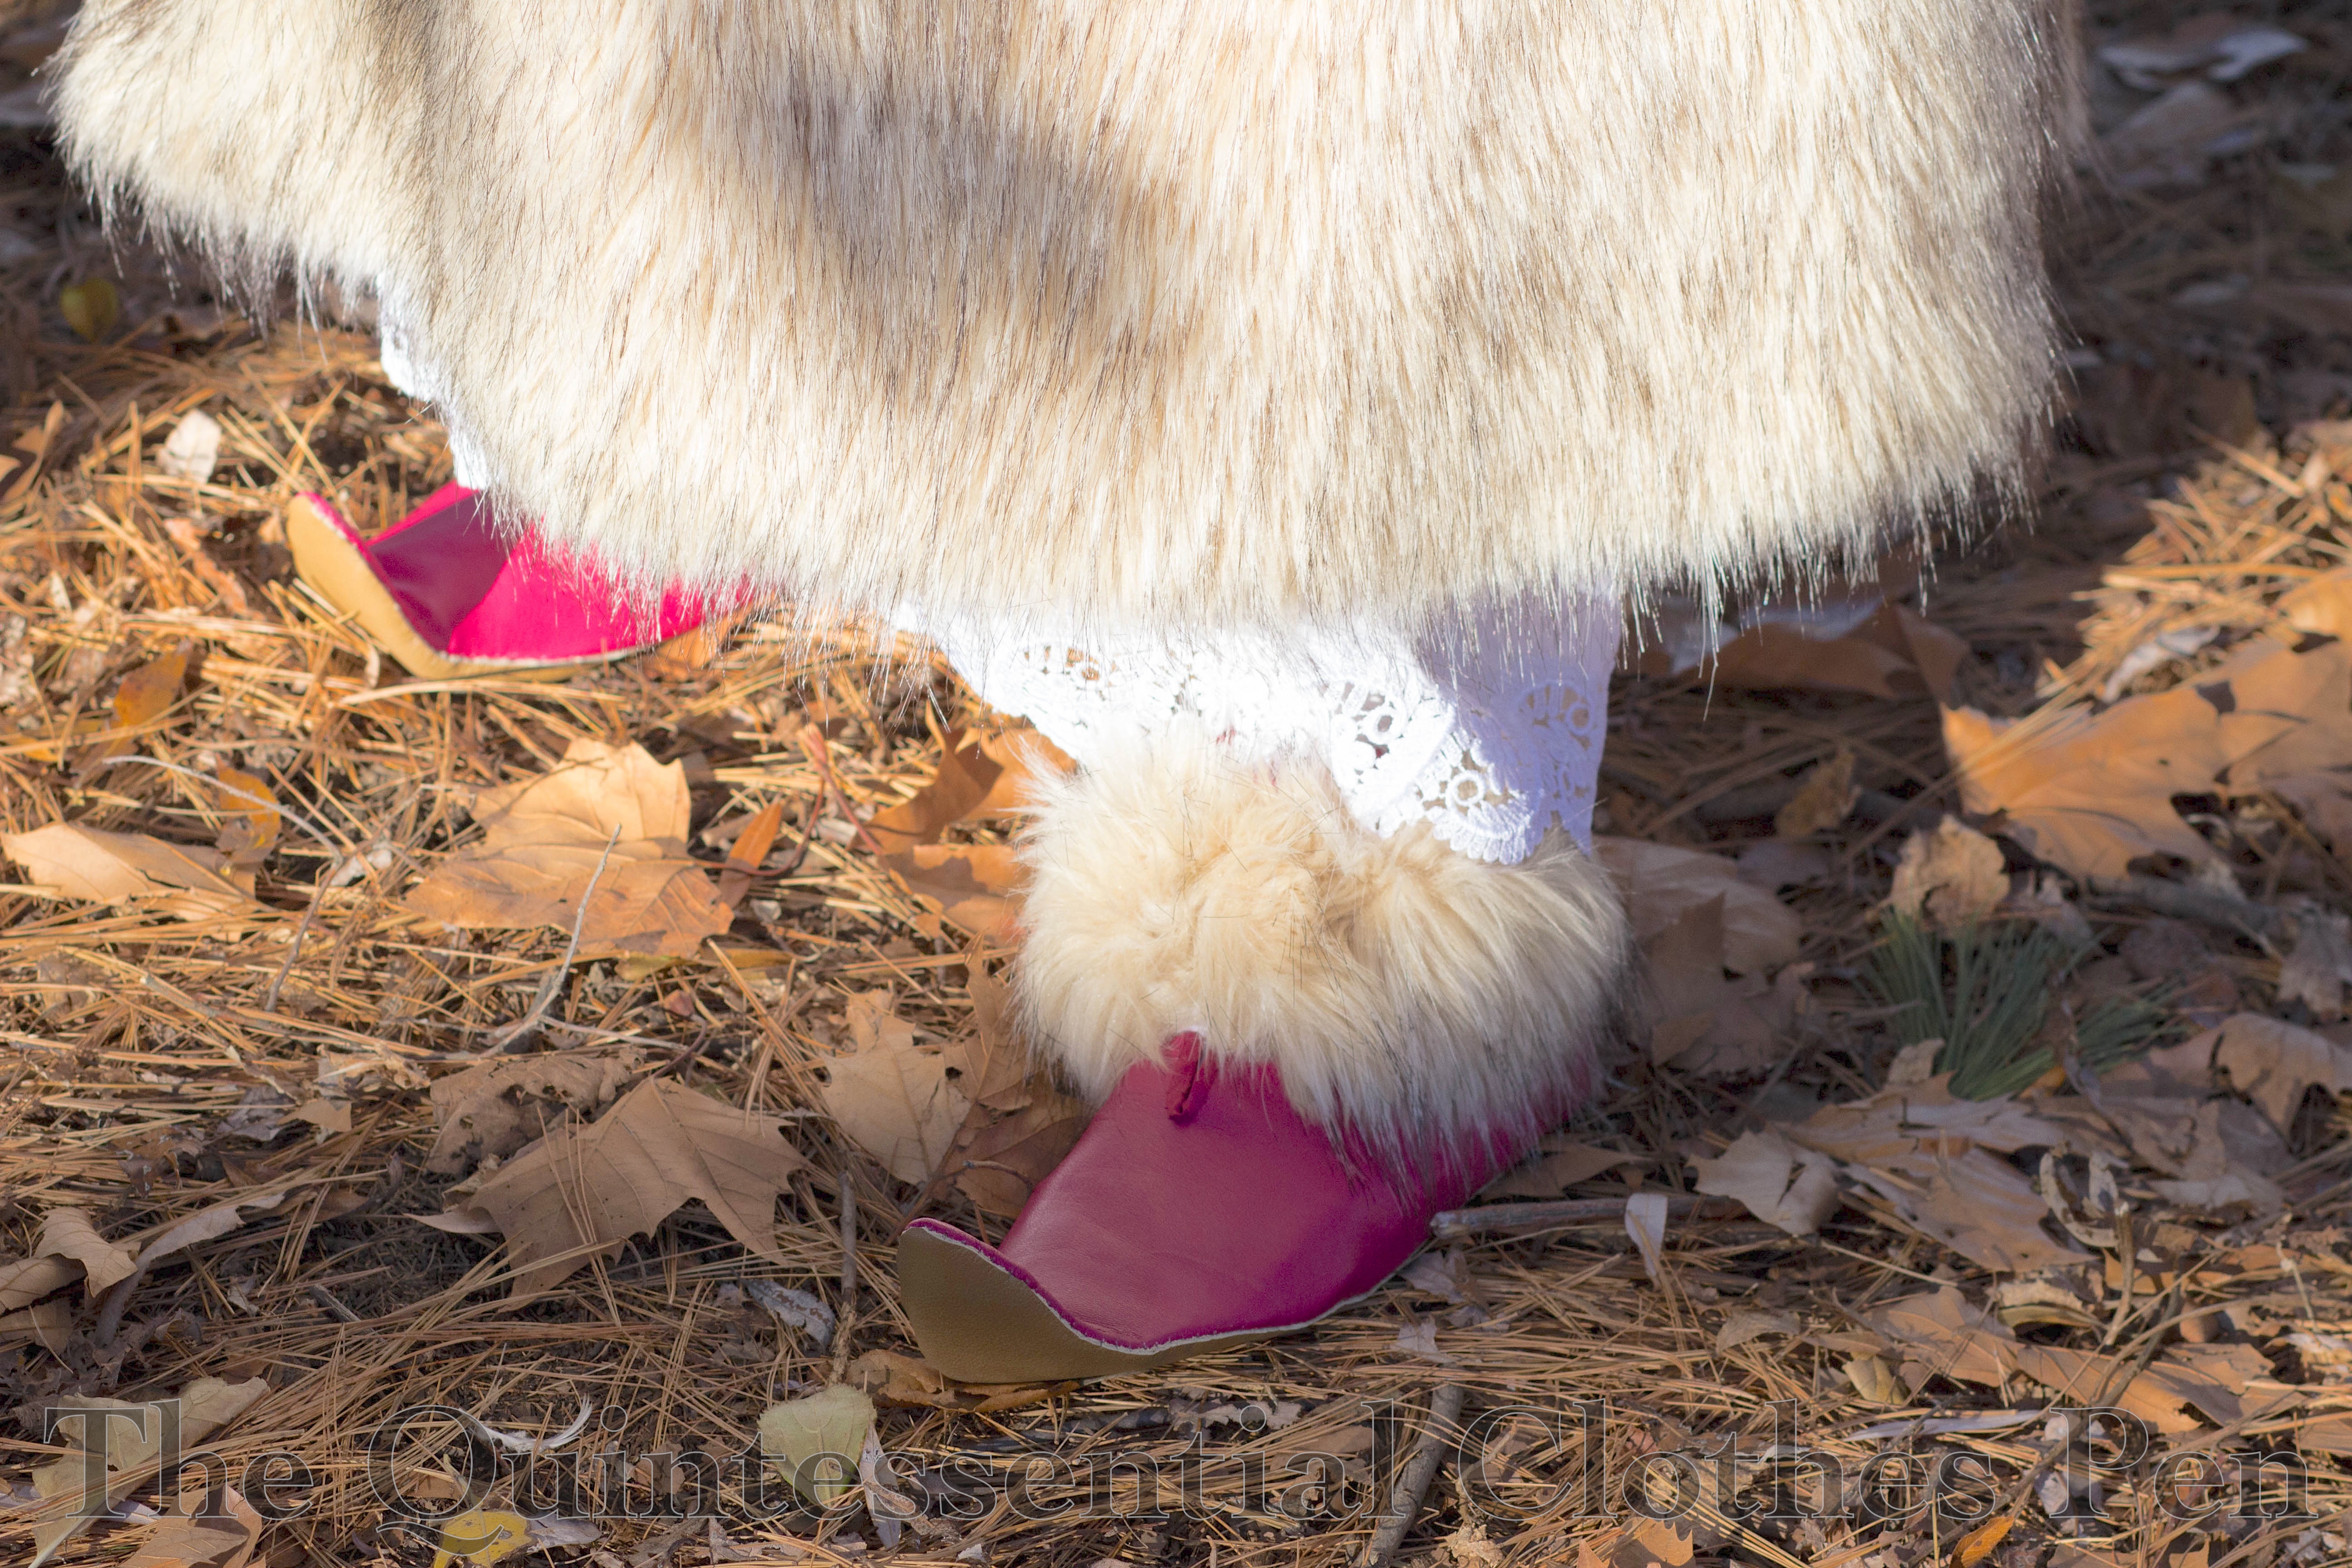
They’re actually quite comfortable for walking around in. I have very flat feet, so don’t really need arch support to be comfortable. The only thing is that my feet did get cold during our photoshoot due to the freezing ground only separated from my feet by a few thin layers of fabric. So, for the second wearing, while caroling at Christmastime, I added a faux fur insole. Problem solved! They were toasty and even more comfortable!
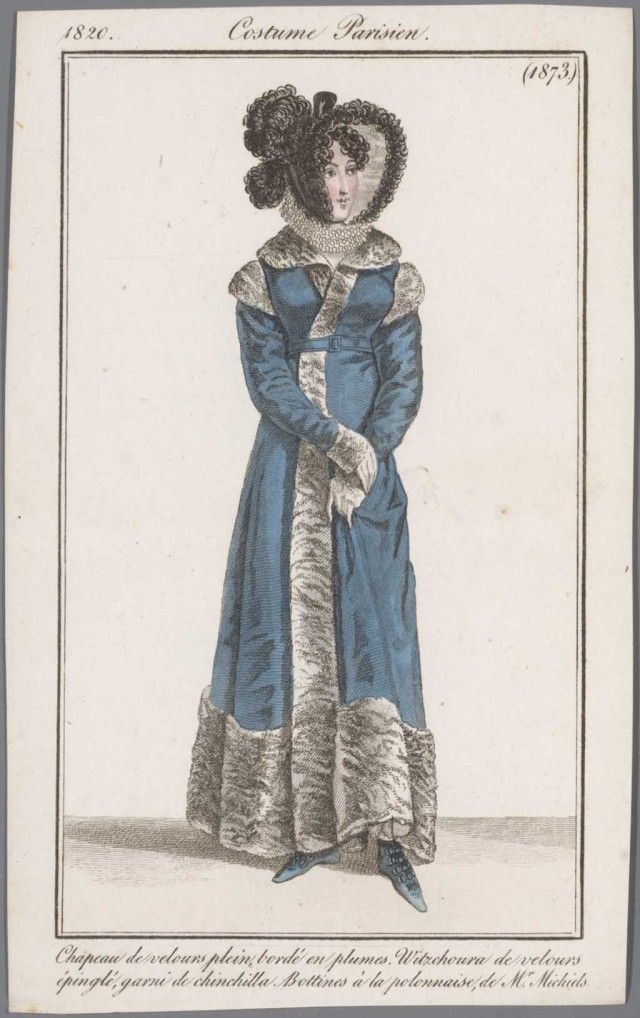
Interestingly, witzchouras are mentioned as being popular in Paris during the year 1827 by La Belle Assembleé, after a mention of other popular pelisses and mantles (well worth checking out!), and are are described as being worn with boots laced in front and with fur around the leg.
Doesn’t that description sound oddly familiar? It reminds me so very much of the Vernet fashion plate and my silly shoes!
In January, when I posted about my Vernet Project hat (the Toque de Velours), I missed including a few in-progress construction pictures I later discovered floating around my photo library. Now is as good a time as any to share them.
To remind you, this is my toque de velours.
Here is the toque in the mockup stage, early in the process. I was trying to determine scale and proportions more than anything. For ease, I combined the bottom two vertical sections into one piece of paper for the mockup.
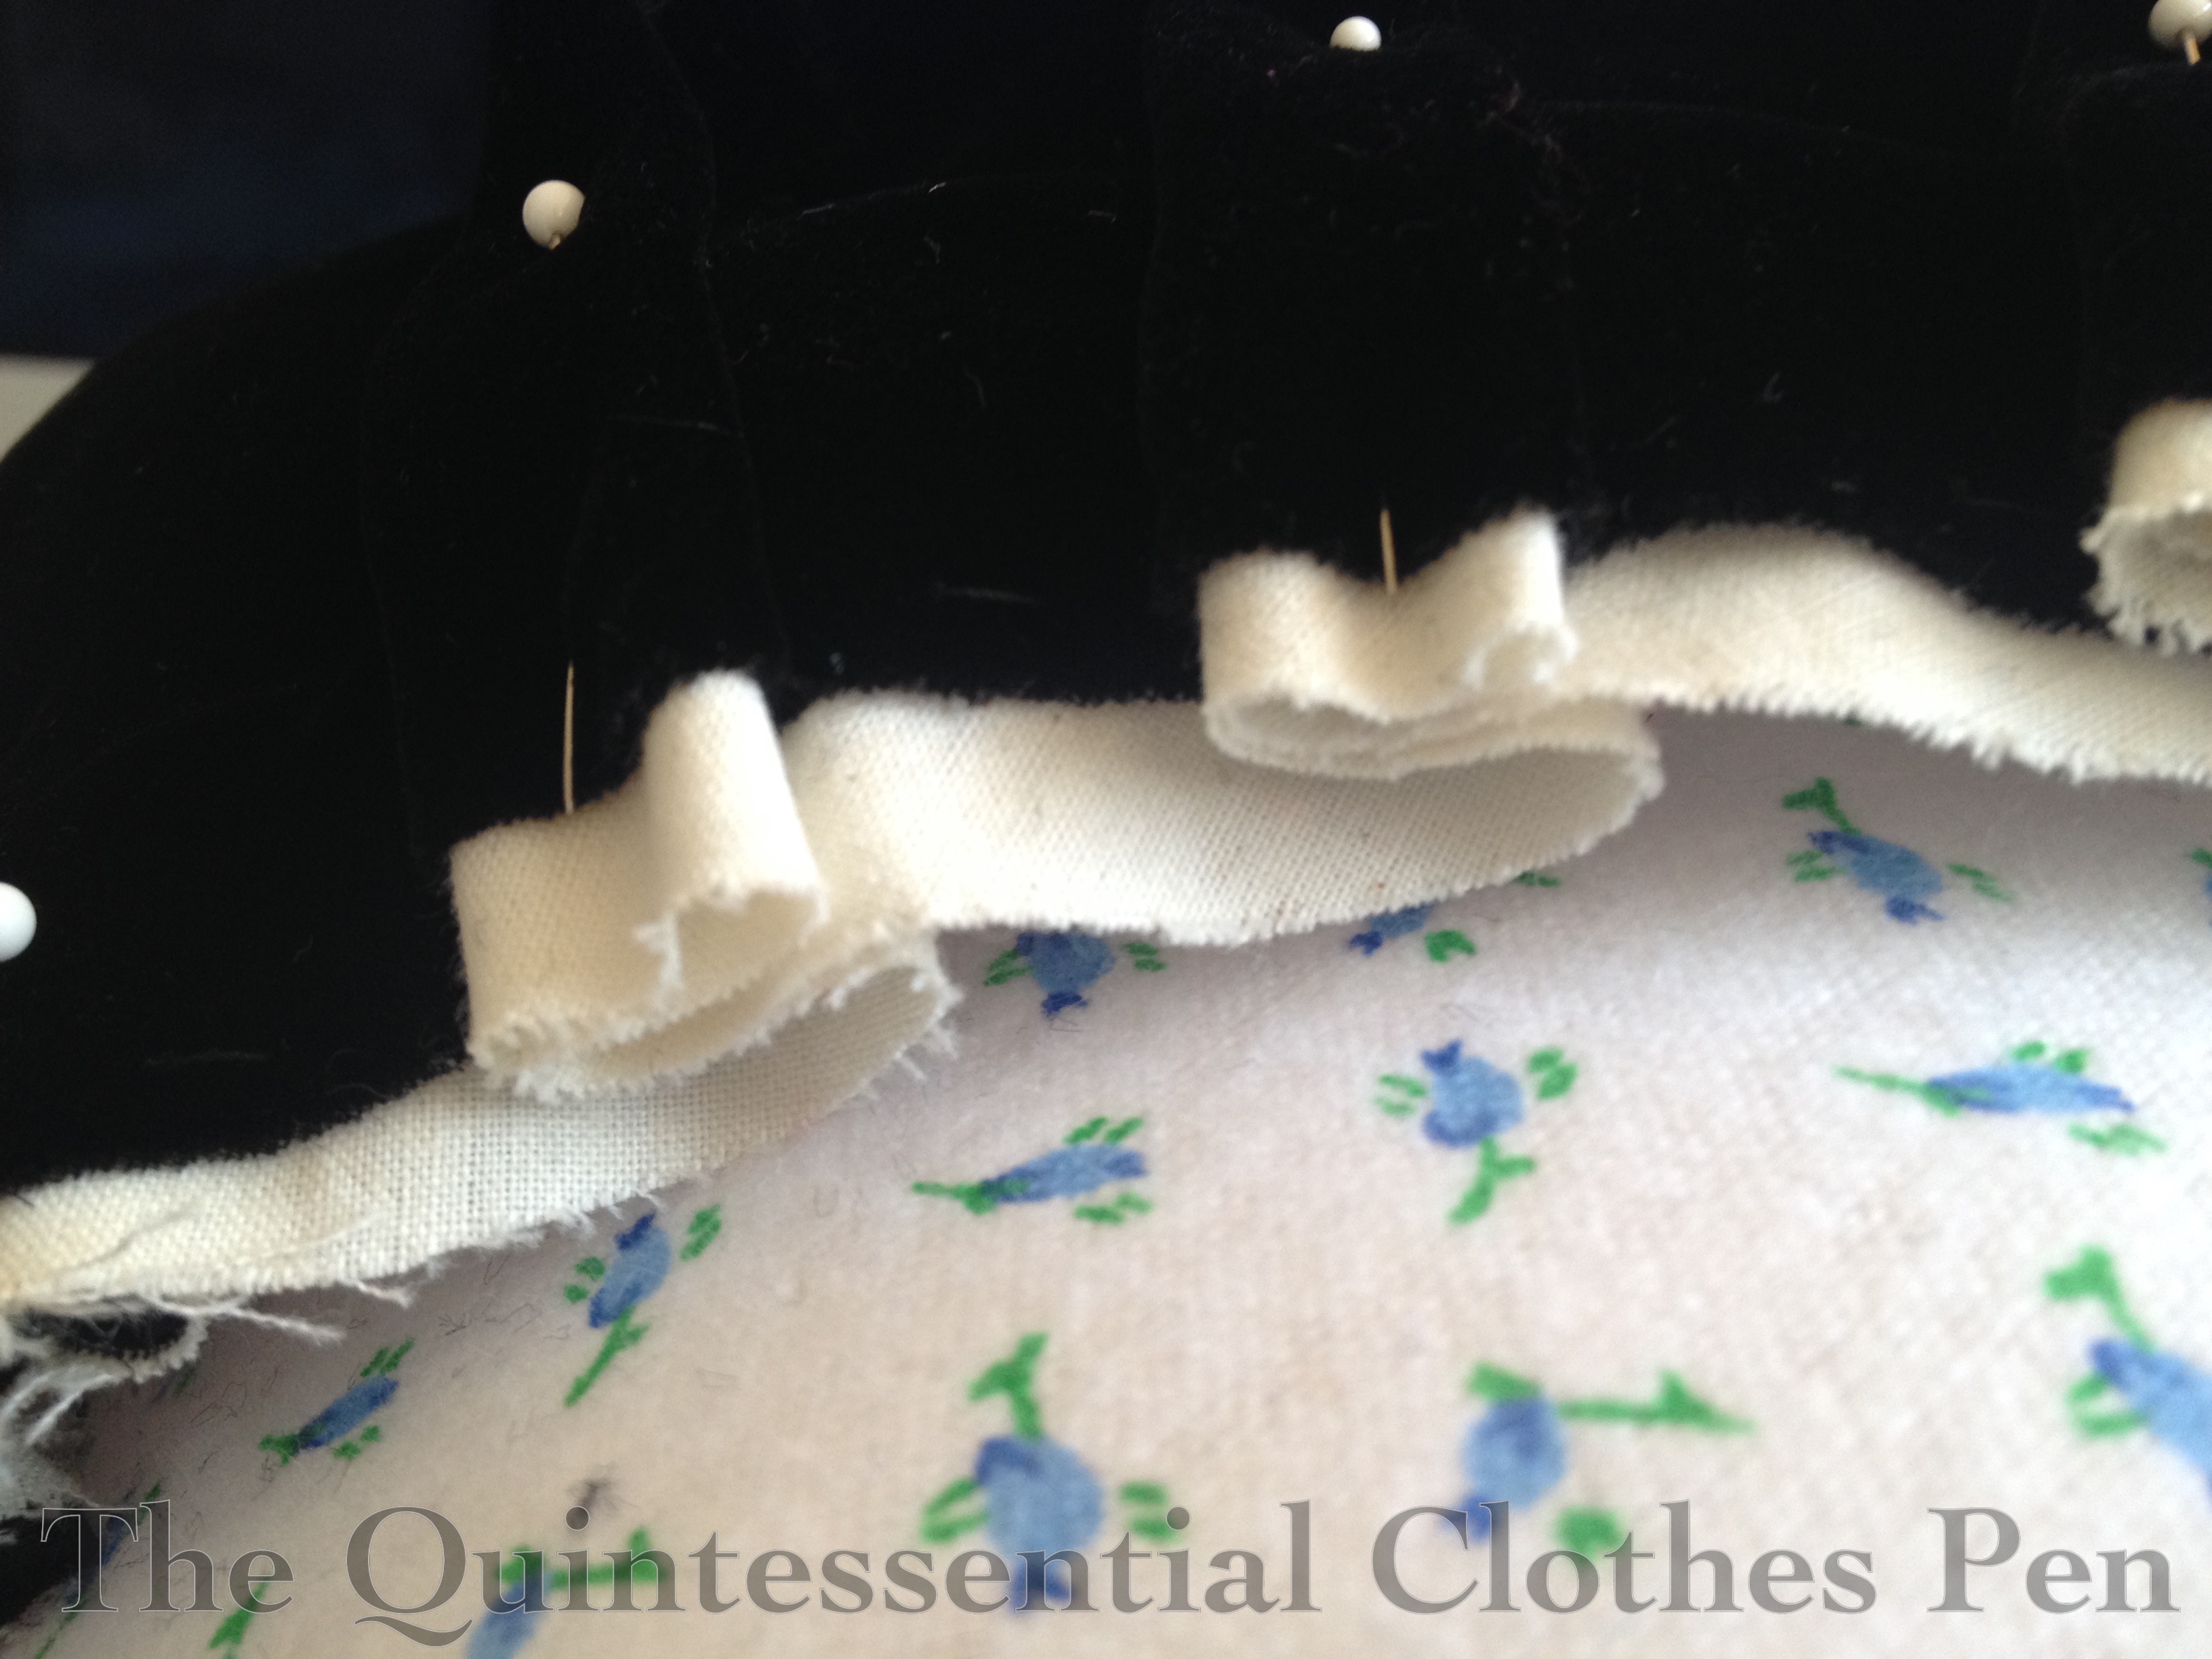
Here is the actual toque in progress. You can see the floral cotton flannel mulling layer that is between the buckram base the the velvet exterior. You can also see that I used my mockup poof to flat line my velvet poof in order to help the light silk velvet hold its shape. This picture also shows the double, or stacked, pleating around the poof.
This is the beginning of a renewed effort to post details about all the pieces of my Vernet Ensemble, so keep an eye out for posts about the petticoat, muff, shoes, and the witzchoura itself this fall.
I was very excited when Gina posted a tutorial for making shoe pom poms in September 2014. I decided then and there, while reading the post, that I needed some of my own. It only took me about 18 months to get around to it… but I am happy to report that in April 2016, I finally used Gina’s tutorial to finish making my very own!
What prompted me to really go ahead with making the poms is that I wanted to have something to spruce up an older outfit I wore to the 4th Annual CVD Regency Dance Weekend, but didn’t have the time to create a new dress, as the Versailles sacque and 1885 Fancy Dress were all consuming. I suppose what I should really say is that what prompted me to finish the poms is the opportunity to wear them. I think I actually started them in late 2015.
Let me start by saying that Gina’s tutorial is clear and easy to follow. I highly recommend it!
My issues were all self inflicted… I carefully followed Gina’s instructions, got partway through the process and realized that the scale was much bigger than I remembered and that I didn’t like it at all on top of my foot. Oh no! (But in going back to link to Gina’s tutorial for this post I have realized that of course her poms are not the scale I wanted, because her poms are bigger than I ever intended! Oops! Totally my fault!)
The only solution I could see at the time was to cut off the ends of each pieces and re-fray the silk ends! UGH! It was not a fun process to fray the ends and I could not face the idea of doing it again. So I refused to work on the poms for months because I was so frustrated. Then, in March or April, I had the brainstorm to make the pieces shorter by cutting out the middle so I wouldn’t need to re-fray the ends. Duh! From there it was smooth sailing to finish up the poms.
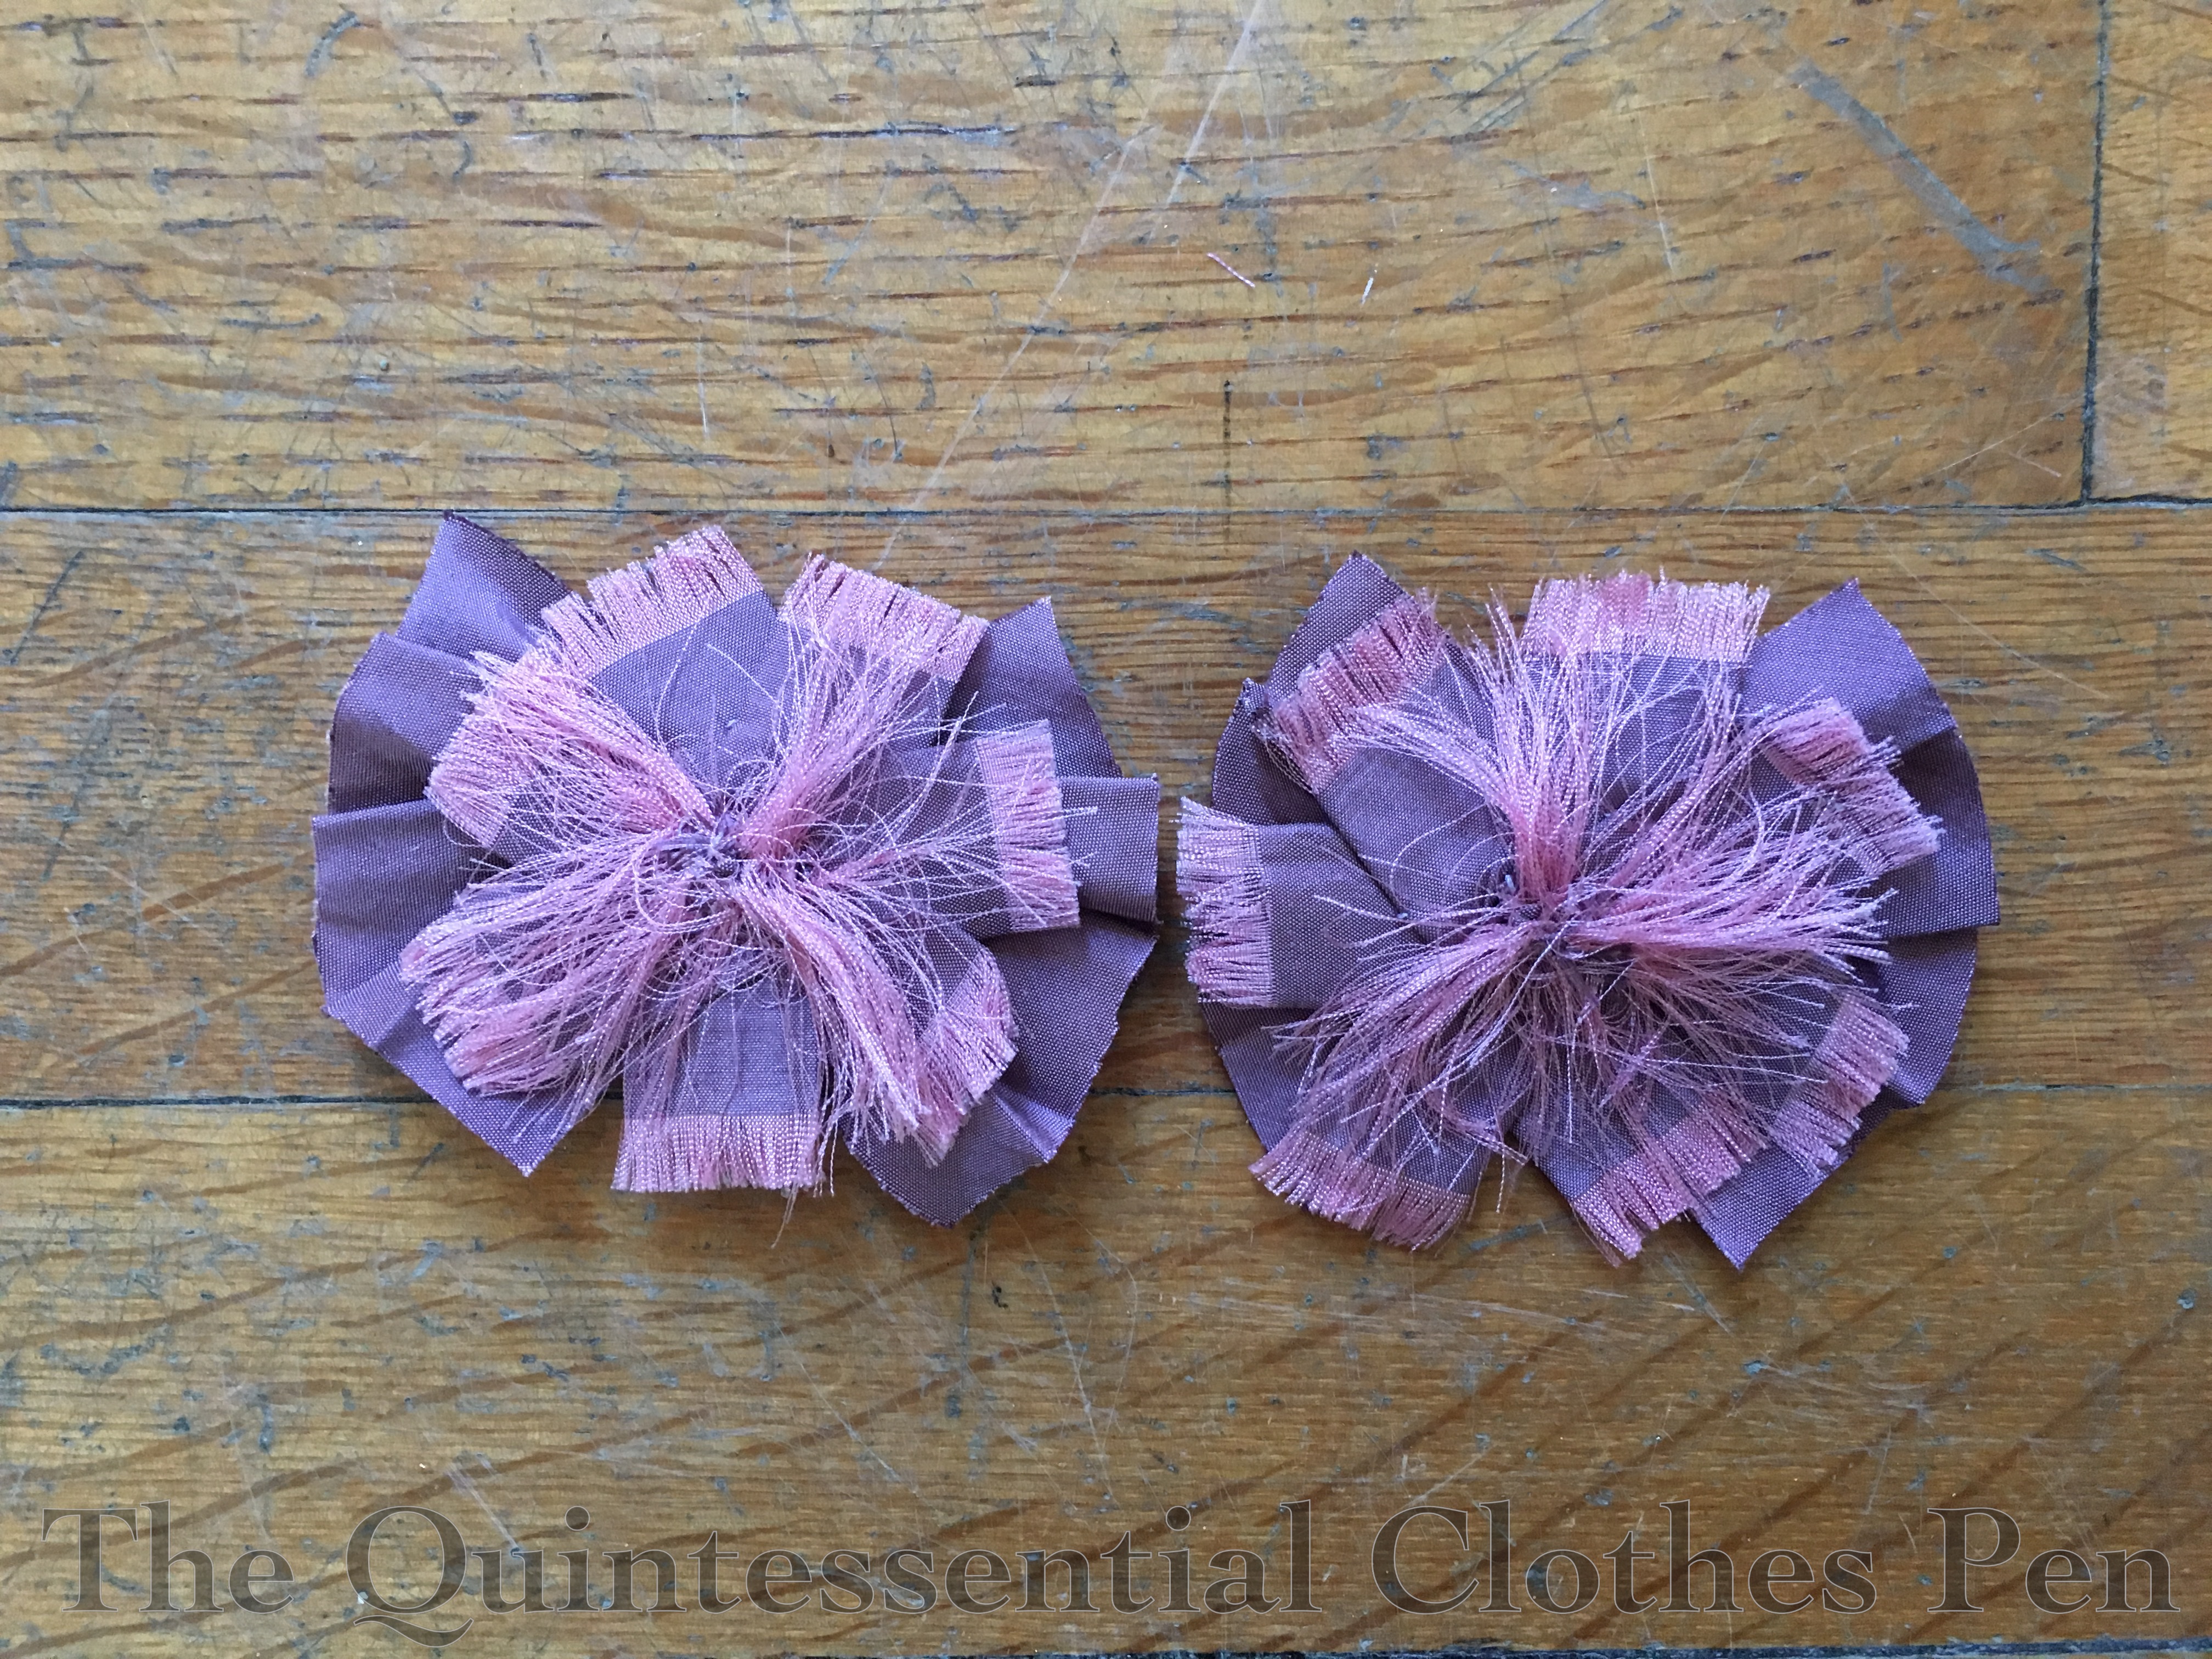
Partially finished pom on top (using Gina’s original dimensions). My completed pom on the bottom (smaller in scale). The pin is for scale.
I used a purple silk shantung from my stash for this project so it would match my other purple accessories. The back of the poms have American Duchess shoe clips attached so that I can easily clip the poms to any shoes.
I was inspired by extant shoes with poms on the toes, such as these. You can also take a look through my Pinterest board to spot more pom-like shoe decorations.
Poms in action! I really like the look of the neutral dress with the purple accessories.
Today, I’m going to share more information about the unusual hat in my Vernet fashion plate.
The caption reads “Toque de Velours.” I already had a rough translation in my head, basically “Hat of Velvet,” but thought I should double check the definitions before deciding on materials.
1: any of various fabrics with a pile or napped surface resembling velvet used in heavy weights for upholstery and curtains and in lighter weights for clothing; also: the article of clothing itself
2: a fur felt (as of rabbit or nutria) finished with a long velvety nap and used especially for hats
Well, the hat does rather resemble a chef hat, doesn’t it? My rough translation was confirmed! Luckily, I had black silk velvet in my stash, which perfectly suited the project.
The hat base is buckram in the simple shape of an oval to fit my head with a flat tip on top. I don’t have pictures, but imagine the shape of a straight sided Lincoln-like top hat without the brim and you’ll have the right idea. The buckram is mulled with cotton flannel and wired around the head opening, tip, and partway up the side. The buckram support is about 8″ tall.
In addition, there is padding to support the poof on top. I chose to use polyester batting–it’s not at all accurate, but I had it on hand and it isn’t seen. There are concentric ovals on top that diminish in size with each layer as well as a few layers around the top of the buckram on the side to provide support for the tucks/pleats.
The “stacked” pleat is on the right.
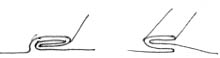
The poof is a large circle that is flat lined with a piece of muslin to help provide the support for the pleats. The pleats are about 1″ wide knife pleats that are then folded back on themselves to create a double pleat (this website calls this type of pleat a stacked pleat and is the source for the image). To determine the type of pleat, I played around with my fabric until I found a method that created an effect like the fashion plate, which is like fans or slices (you can see it in this post). Then I eyeballed how many to do, pinning and re-pinning until the pleats were evenly spaced and the poof fit into the side of my hat (no math here, I avoid it as much as possible most of the time).
The definition on the sides (at the head opening and about 1.5″ up from the head opening) was created by inserting “cording” under the velvet. My “cording” is actually modern acrylic yarn in sunshine yellow (like the batting, I made this choice because I had the materials on hand, it worked, and it will not be seen–but it is not accurate). I believe there are two or three lengths of yarn in each single section of “cording” to get the right thickness to show under the velvet.
We took this photo specifically to capture the detail of the hat construction (usually the black all washes together, eliminating evidence of all the detail).
The rest is just sewing! The hat is entirely hand sewn, with the layers of velvet either tacked to the mulling or stitched through to the interior of the buckram base. Once I had finished the exterior sewing, I whipped up a lining of black silk to tidy up the inside.
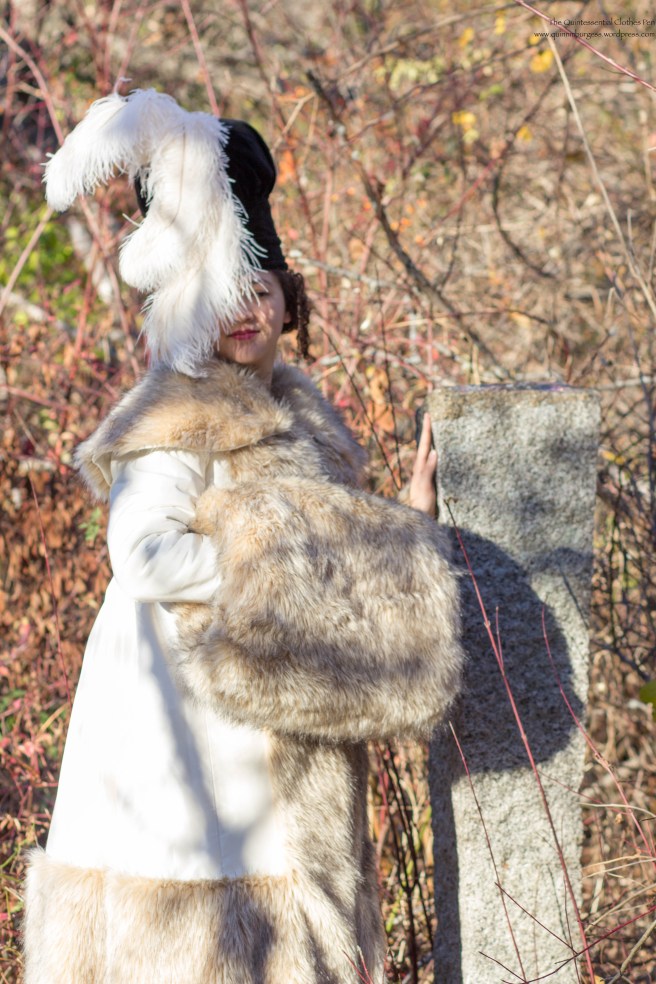
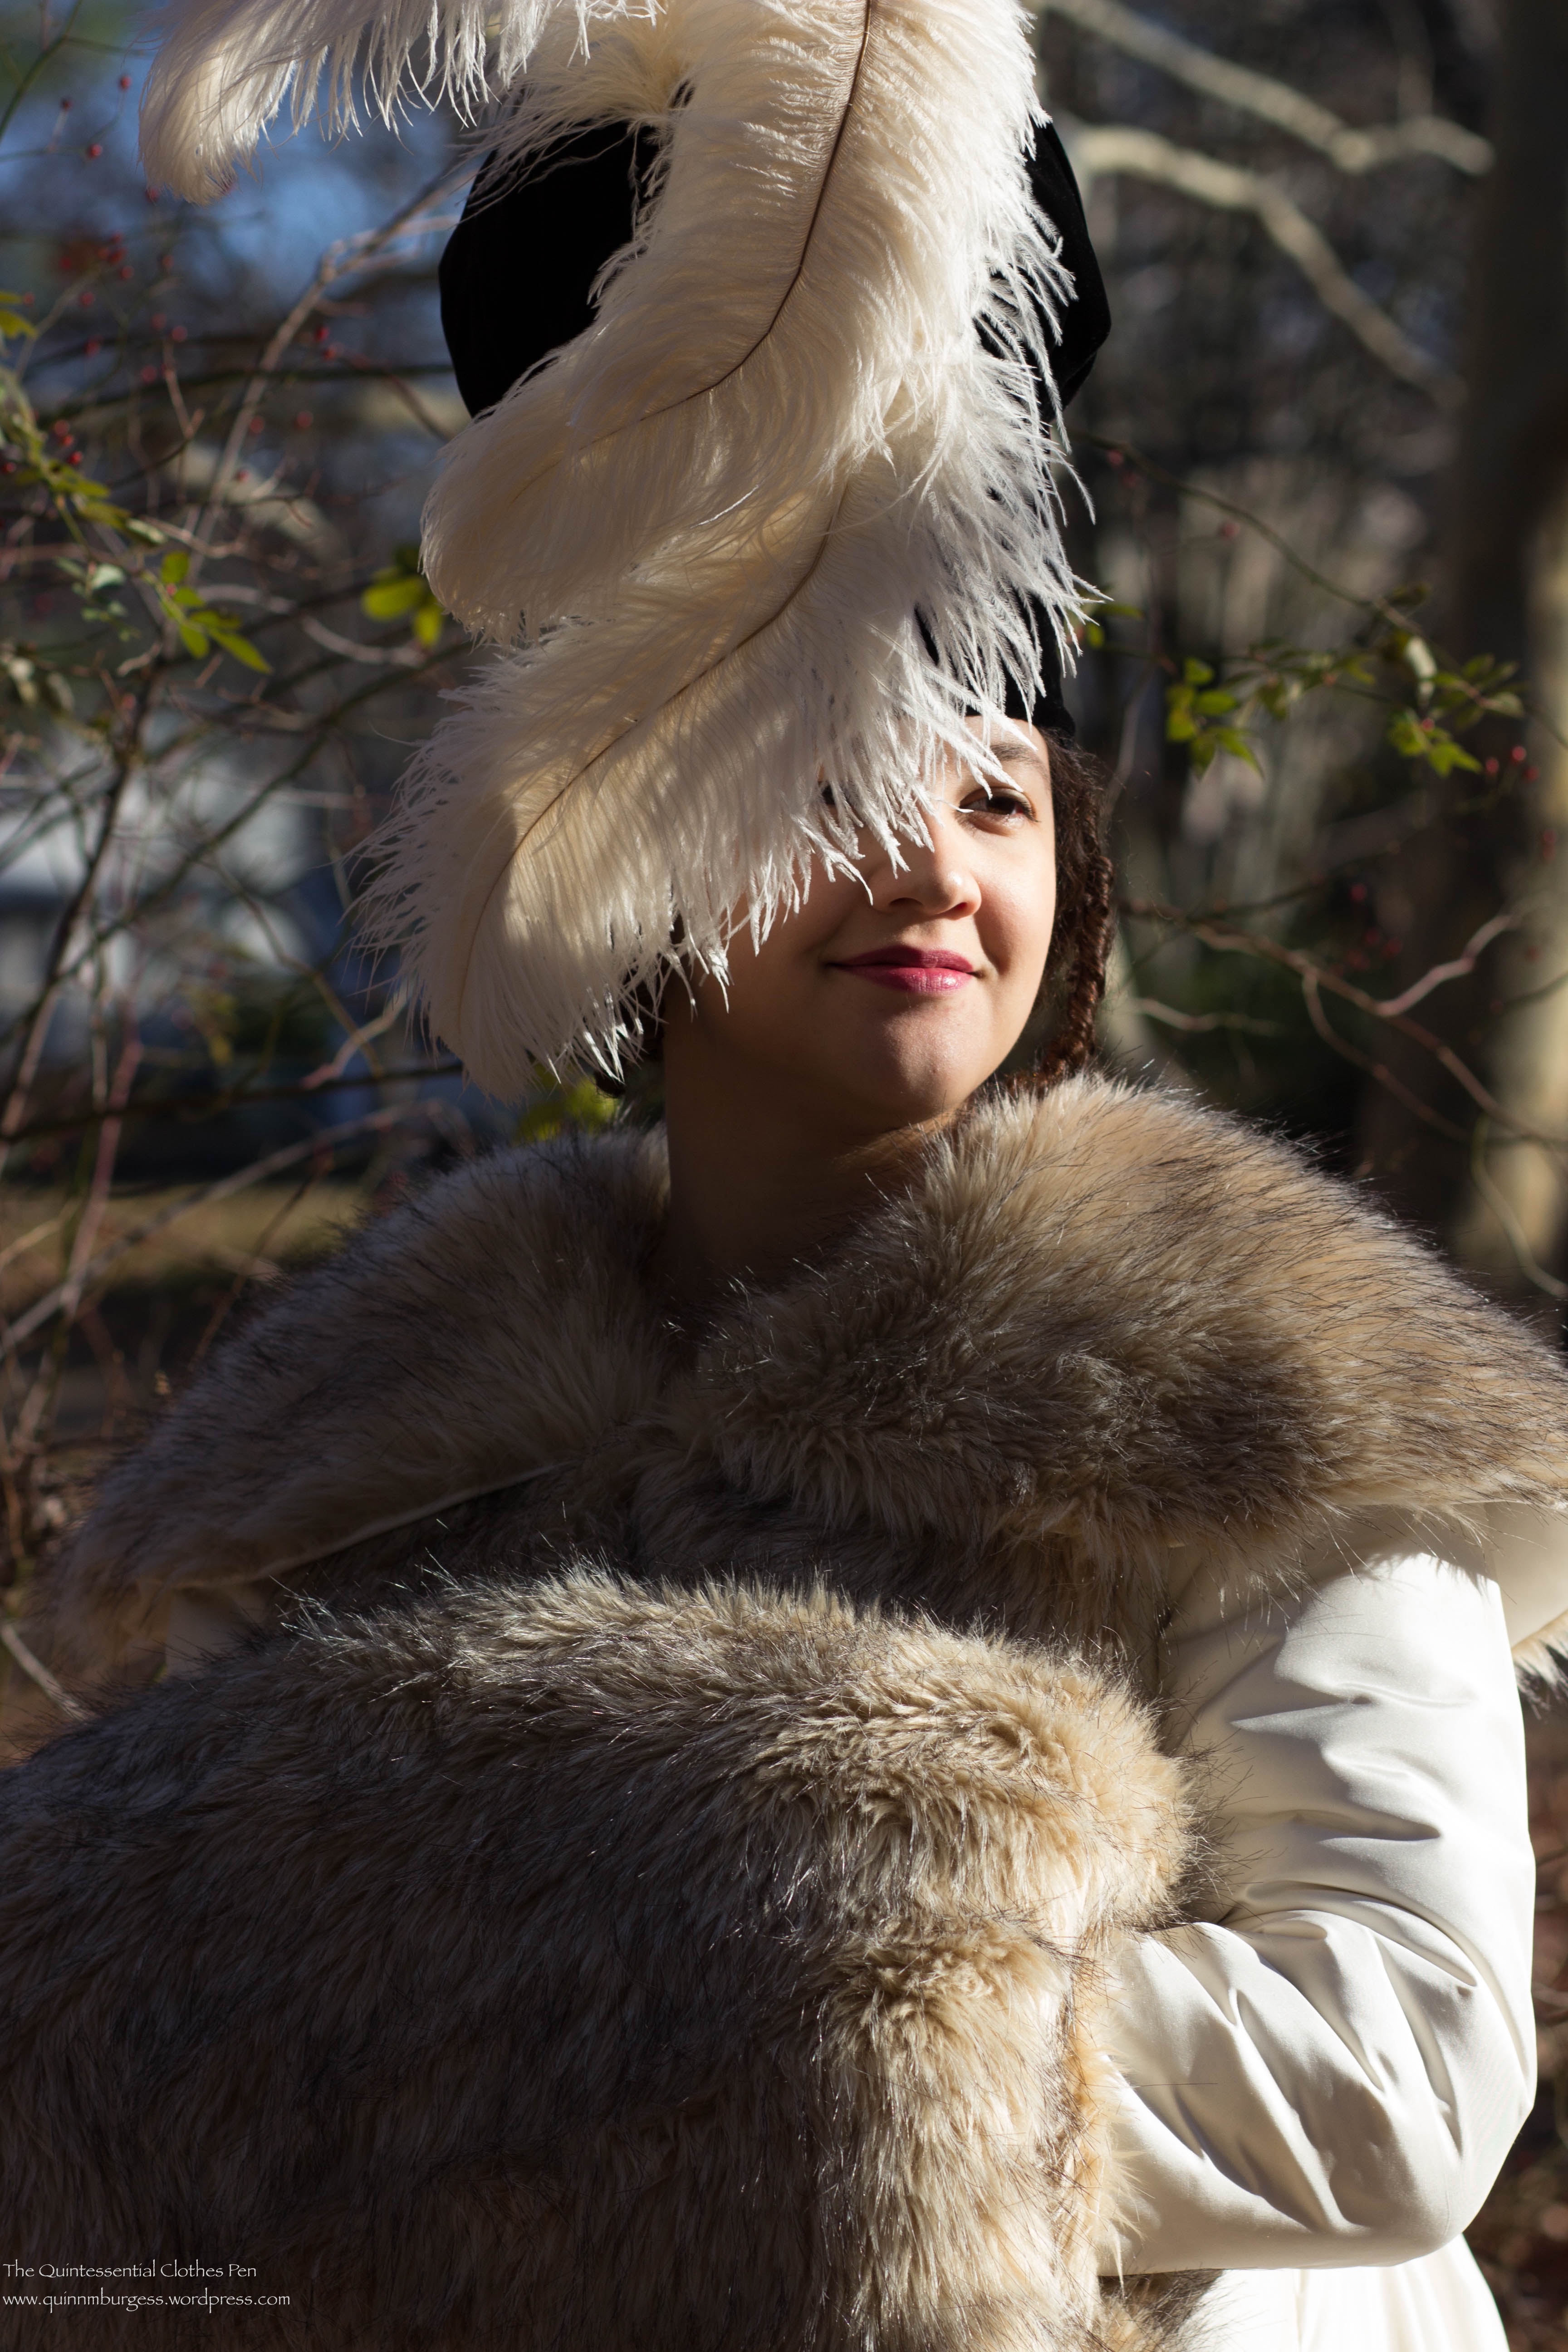
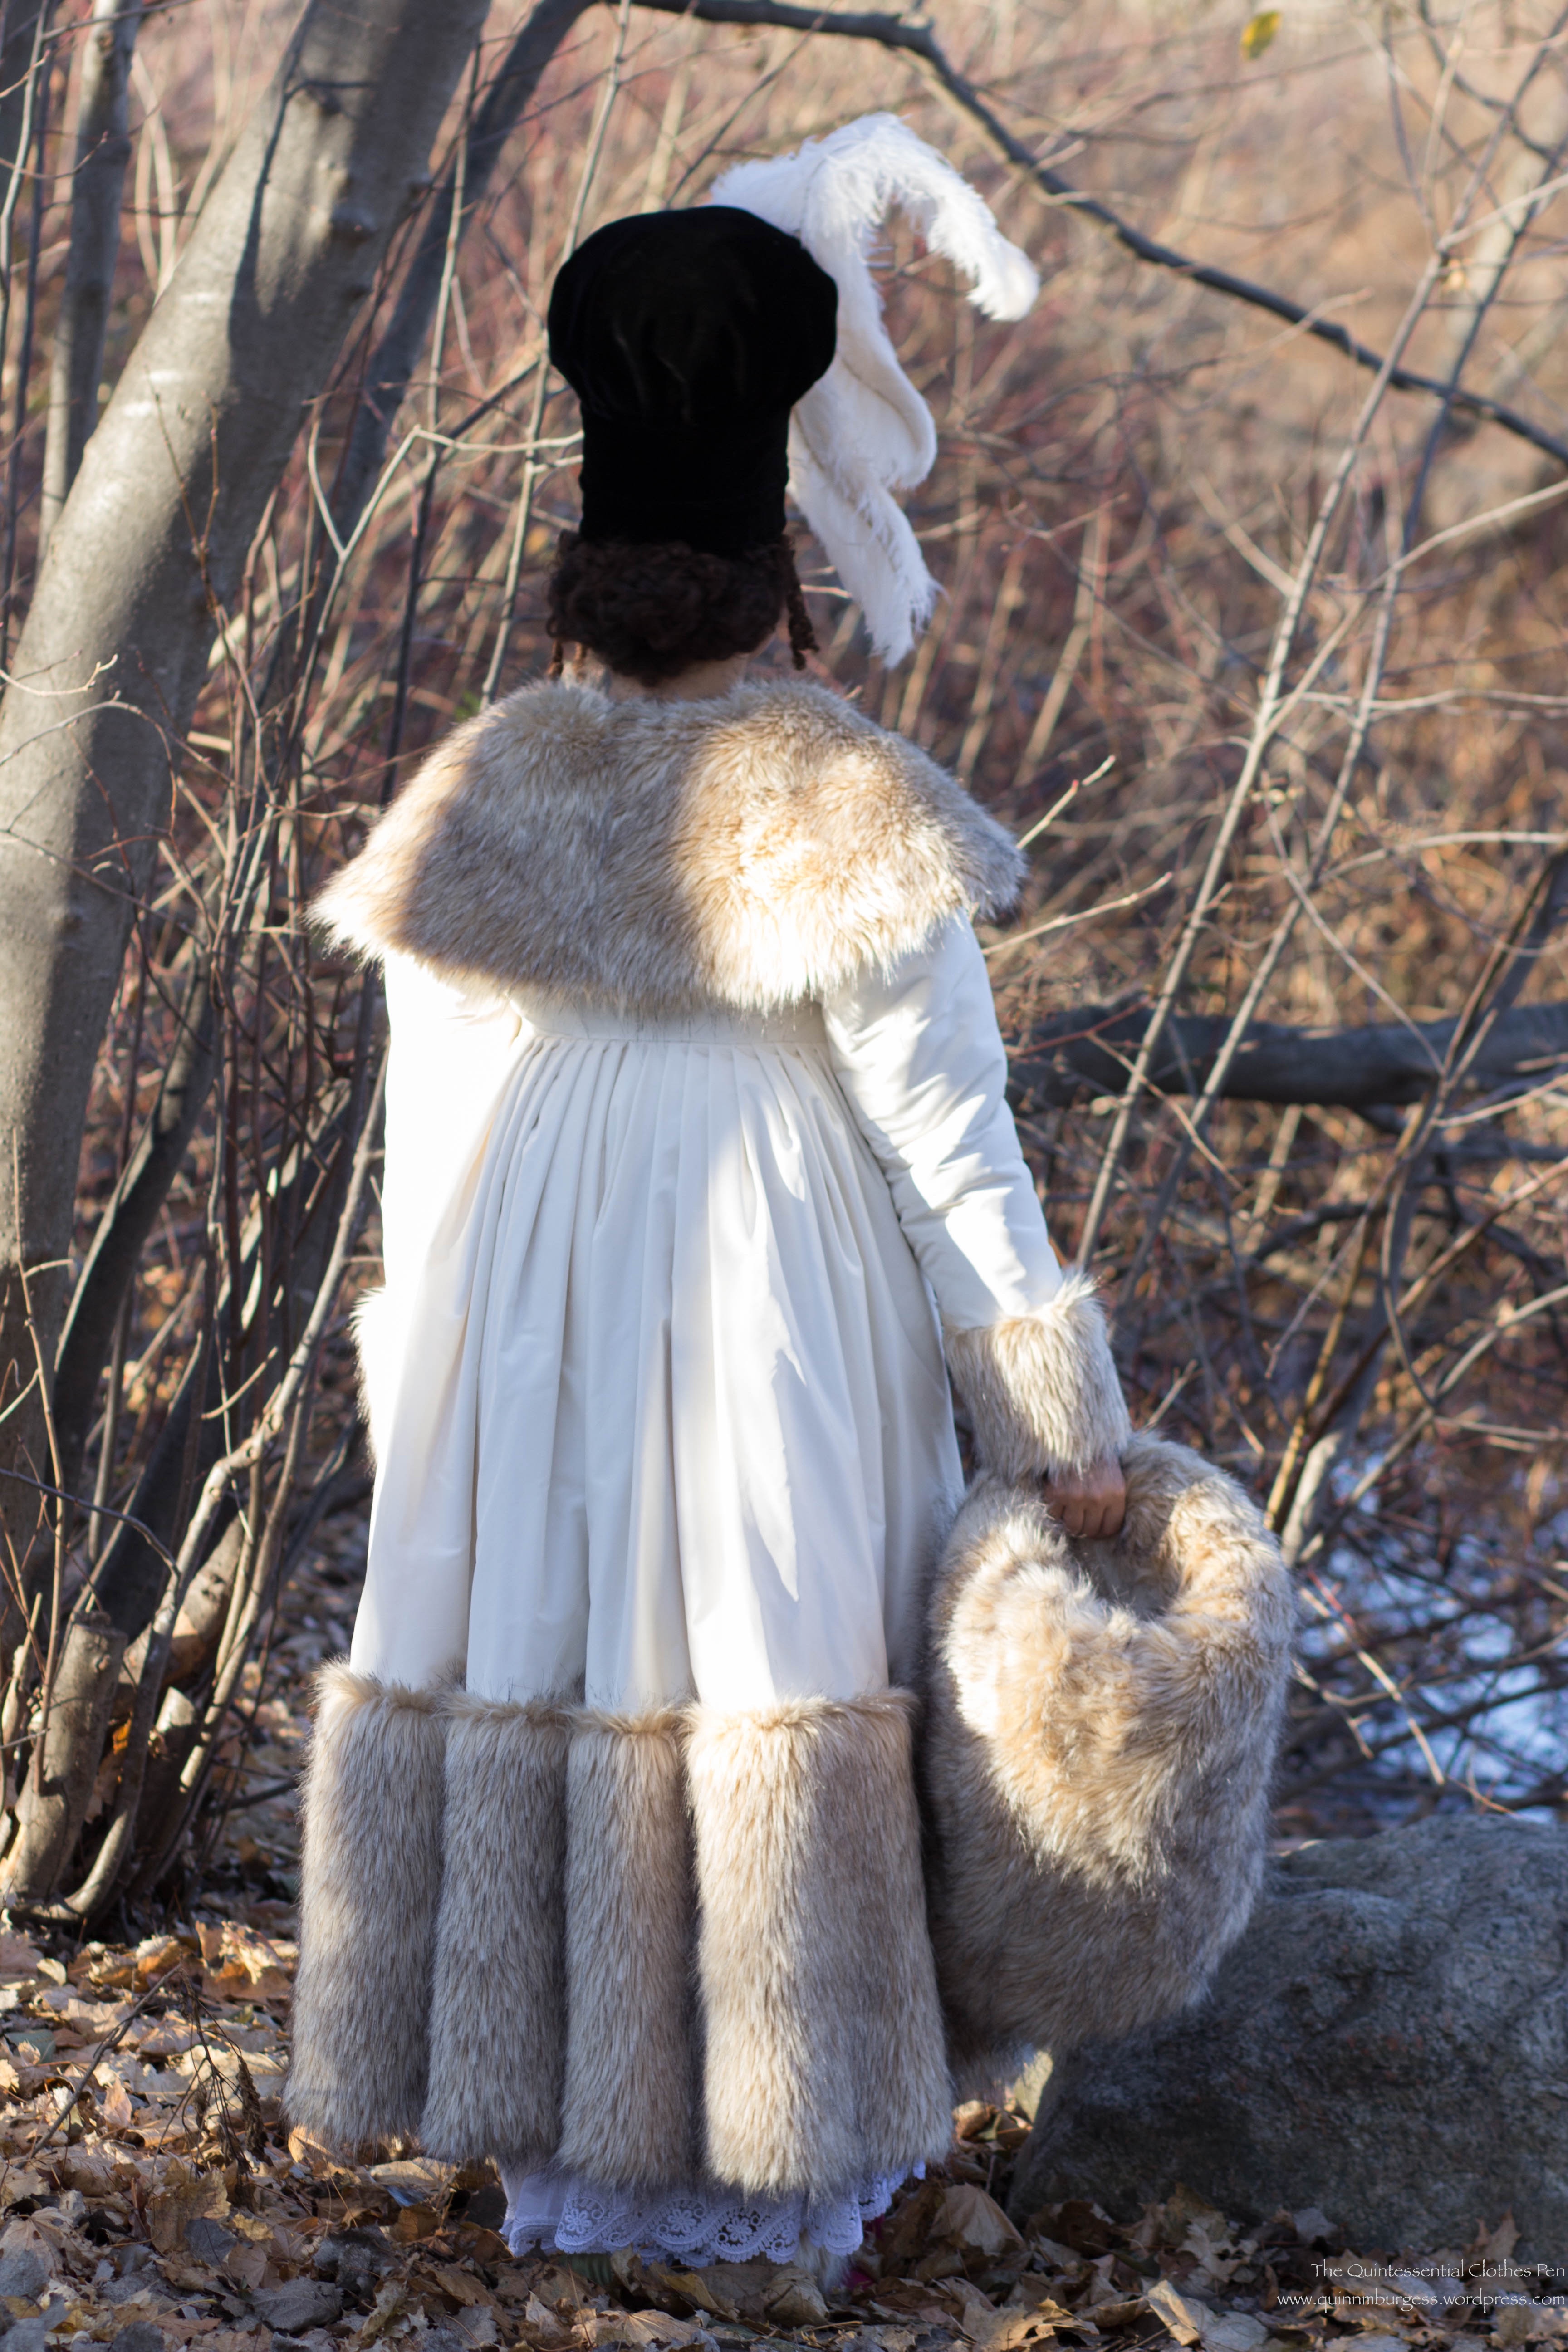
The last step was to trim the hat with the immense ostrich feathers depicted in the fashion plate. I ordered my feathers from Lamplight Feather, which I highly recommend (quick shipping, good quality, and great selection). The hat has 6 total feathers, each 17″-21″in length. Each plume is two feathers sewn together along the central stem before being shaped and sewn to the hat. The trickiest part was shaping the feathers to achieve the shape in the plate. Each plume is shaped so that it does an 180 degree turn (the plumes are attached to the hat standing up, but then are turned downward) in addition to the side sweep shape. As you can see, the wind occasionally blew lots of feather fluff into my face during the photo shoot, but it was totally worth it, to wear such lovely feathers.
Feathers!
I constructed the hat such that it would sit almost horizontal across my head. It’s pretty light in terms of weight and is not uncomfortable to wear, being sized perfectly to fit my head. It also comes down far enough to be quite stable: even with the breeze and moving my head around there was no fear of it falling off.
As fun and silly as it is, I don’t really see a use for it in regular Regency wear. I will likely remove the feathers to use for another project someday (also partly because it would be hard to store the hat nicely with the feathers still attached). I’ve toyed with the idea of removing the poof (and maybe making a tam or turban or something out of it, or just sticking it back in my stash with the rest of the velvet) and using the buckram base with the velvet sides to make a shako style Regency hat. I have no immediate plans to put these ideas into action, except for removing the feathers, which I really should do soon, so I can put the hat away!
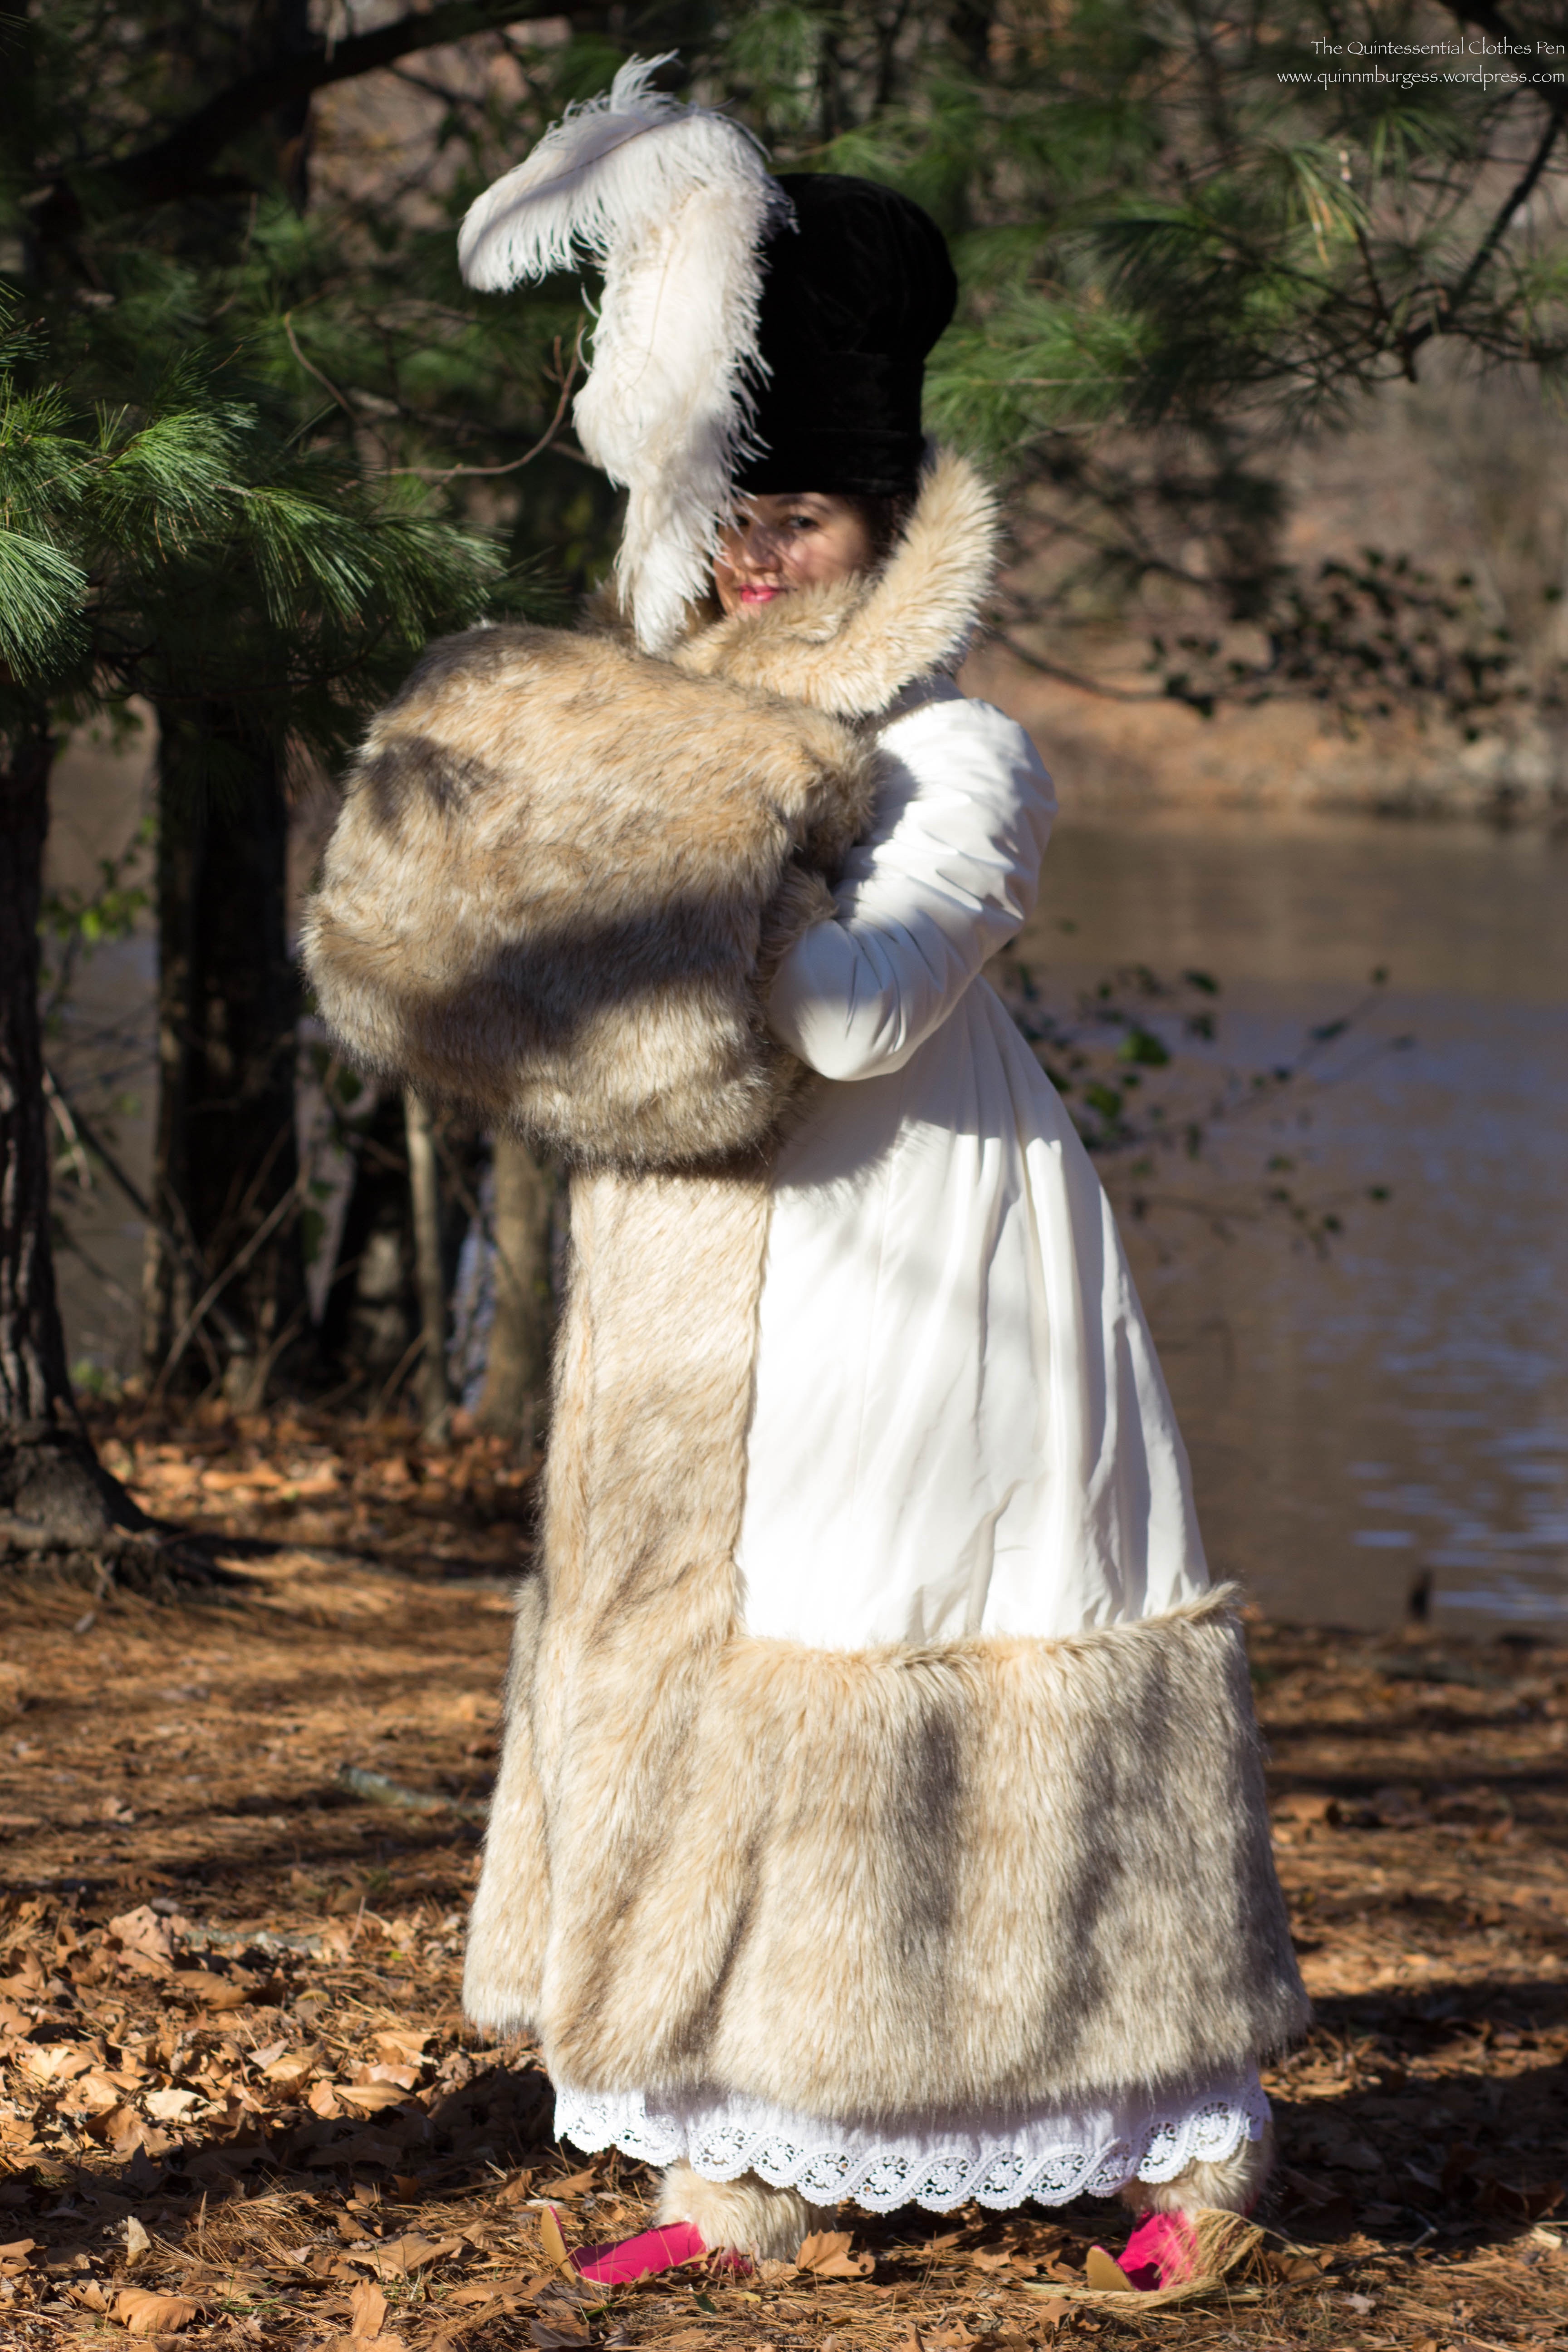
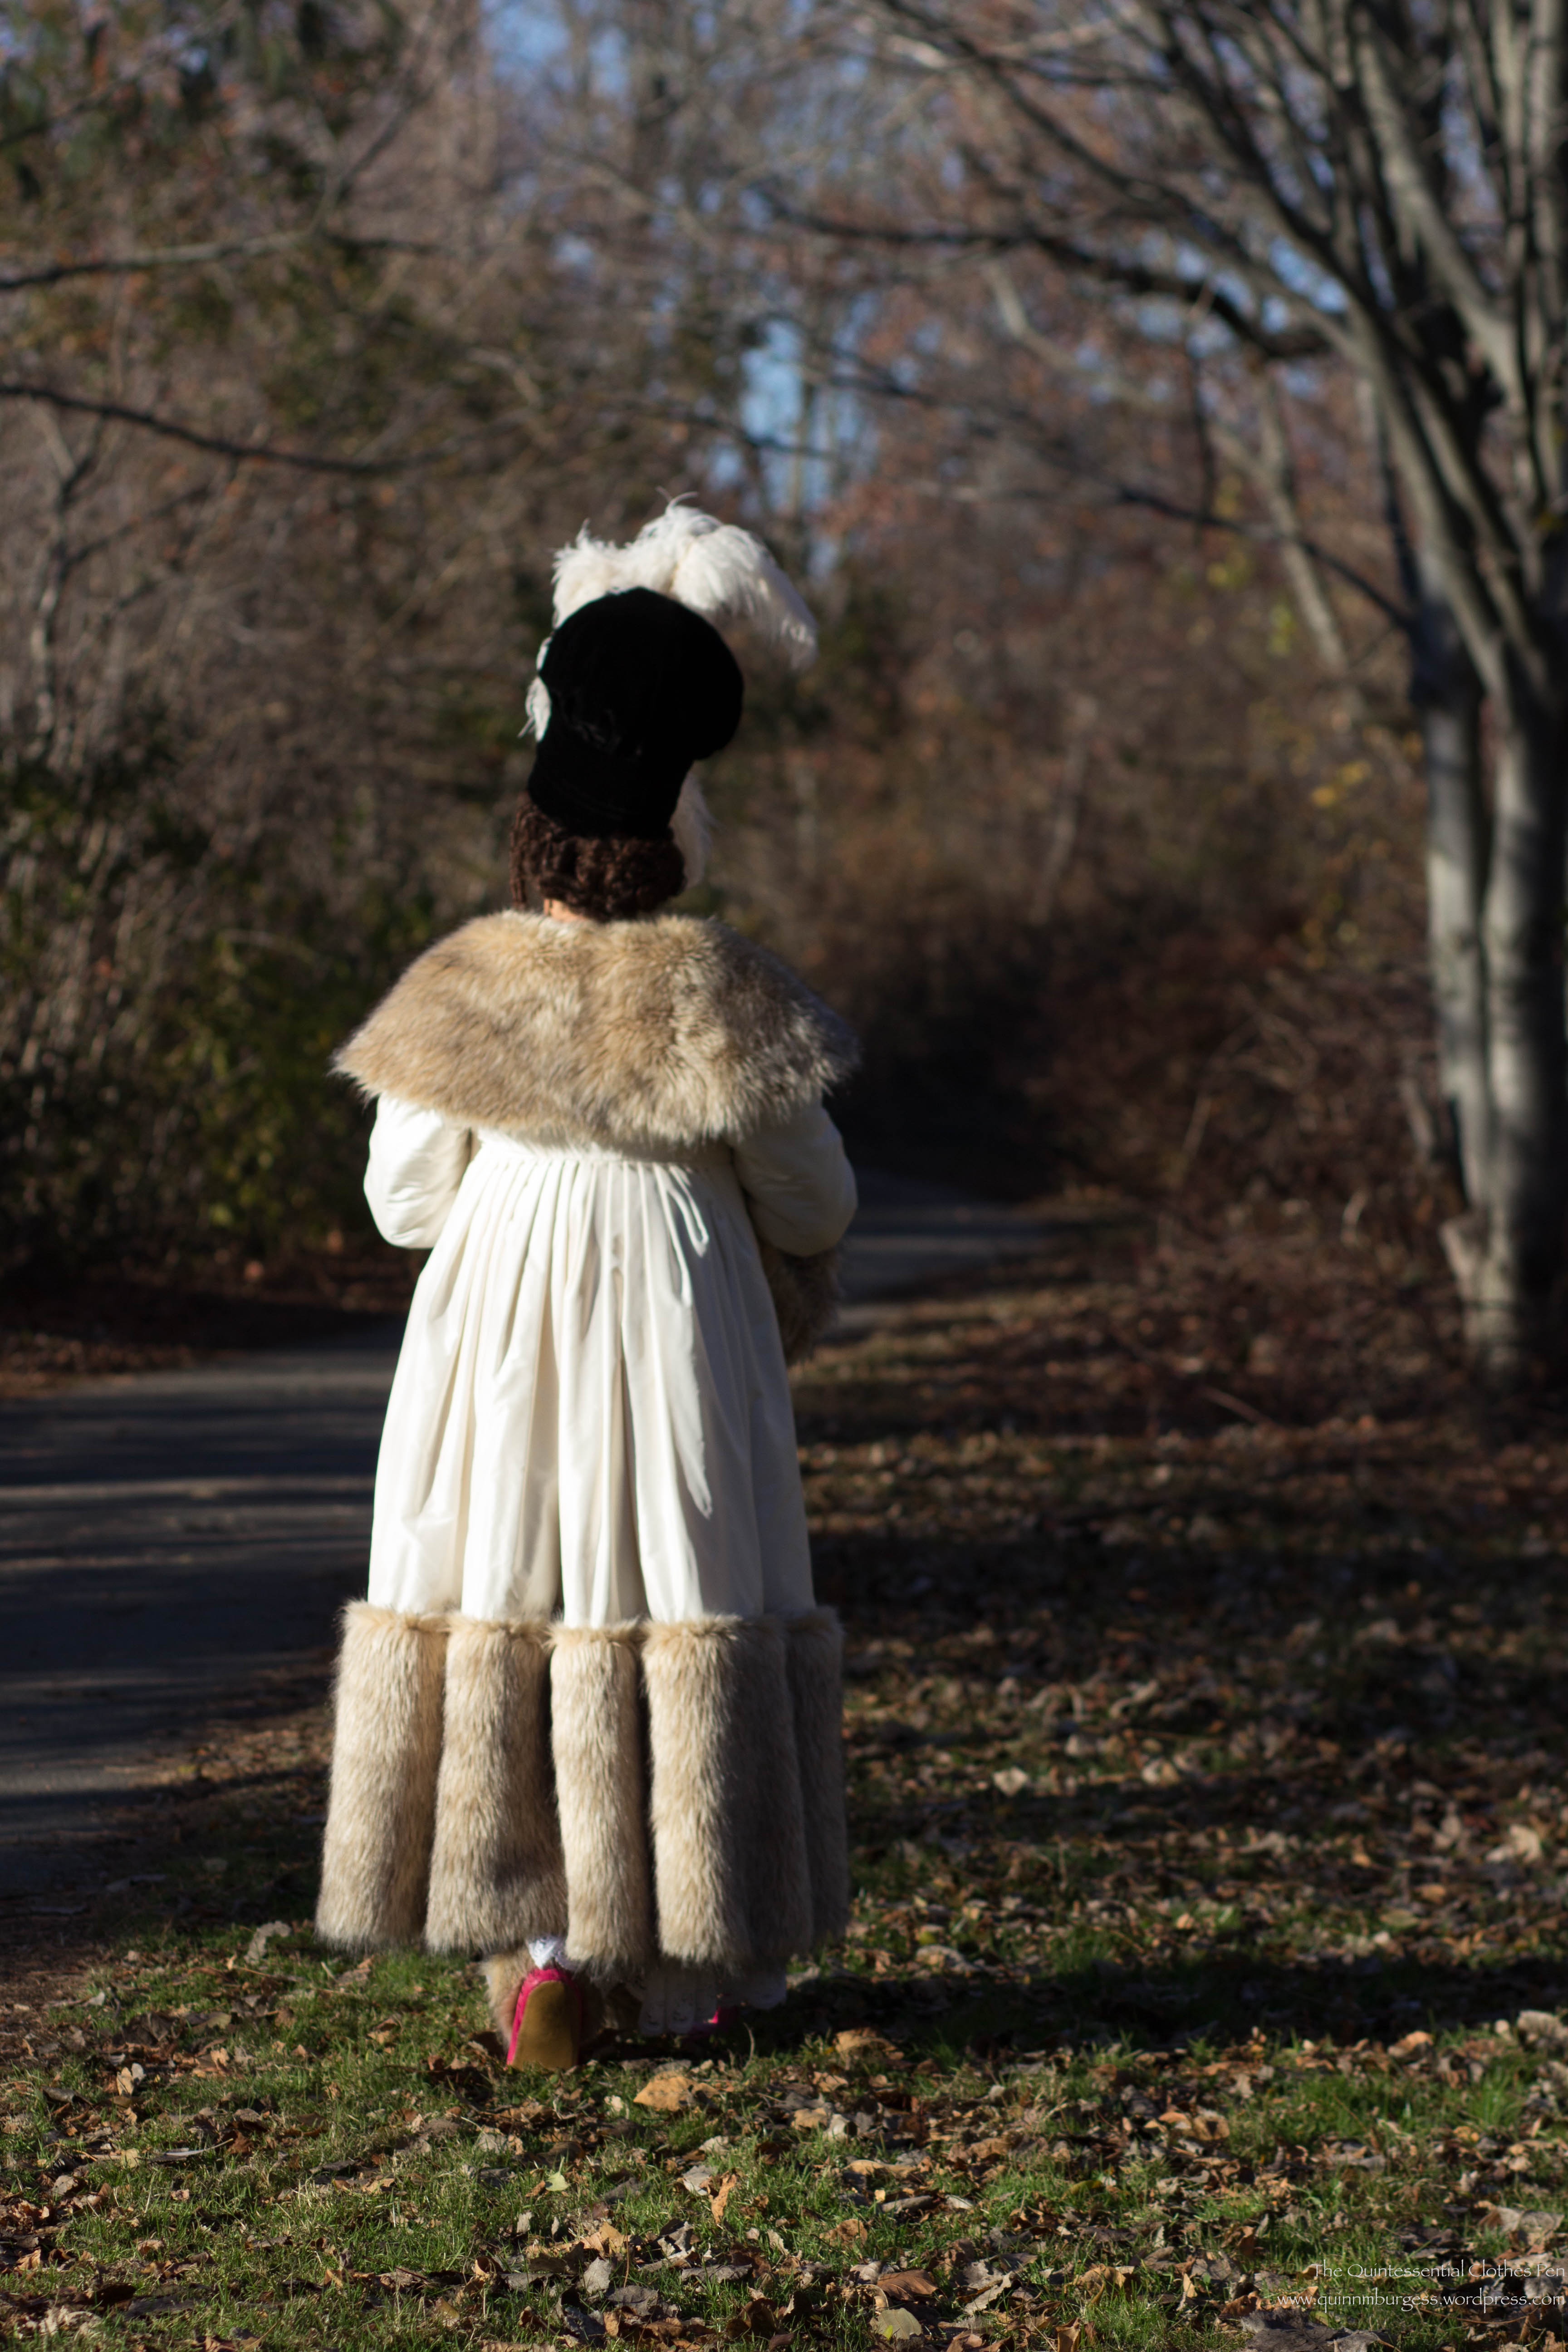
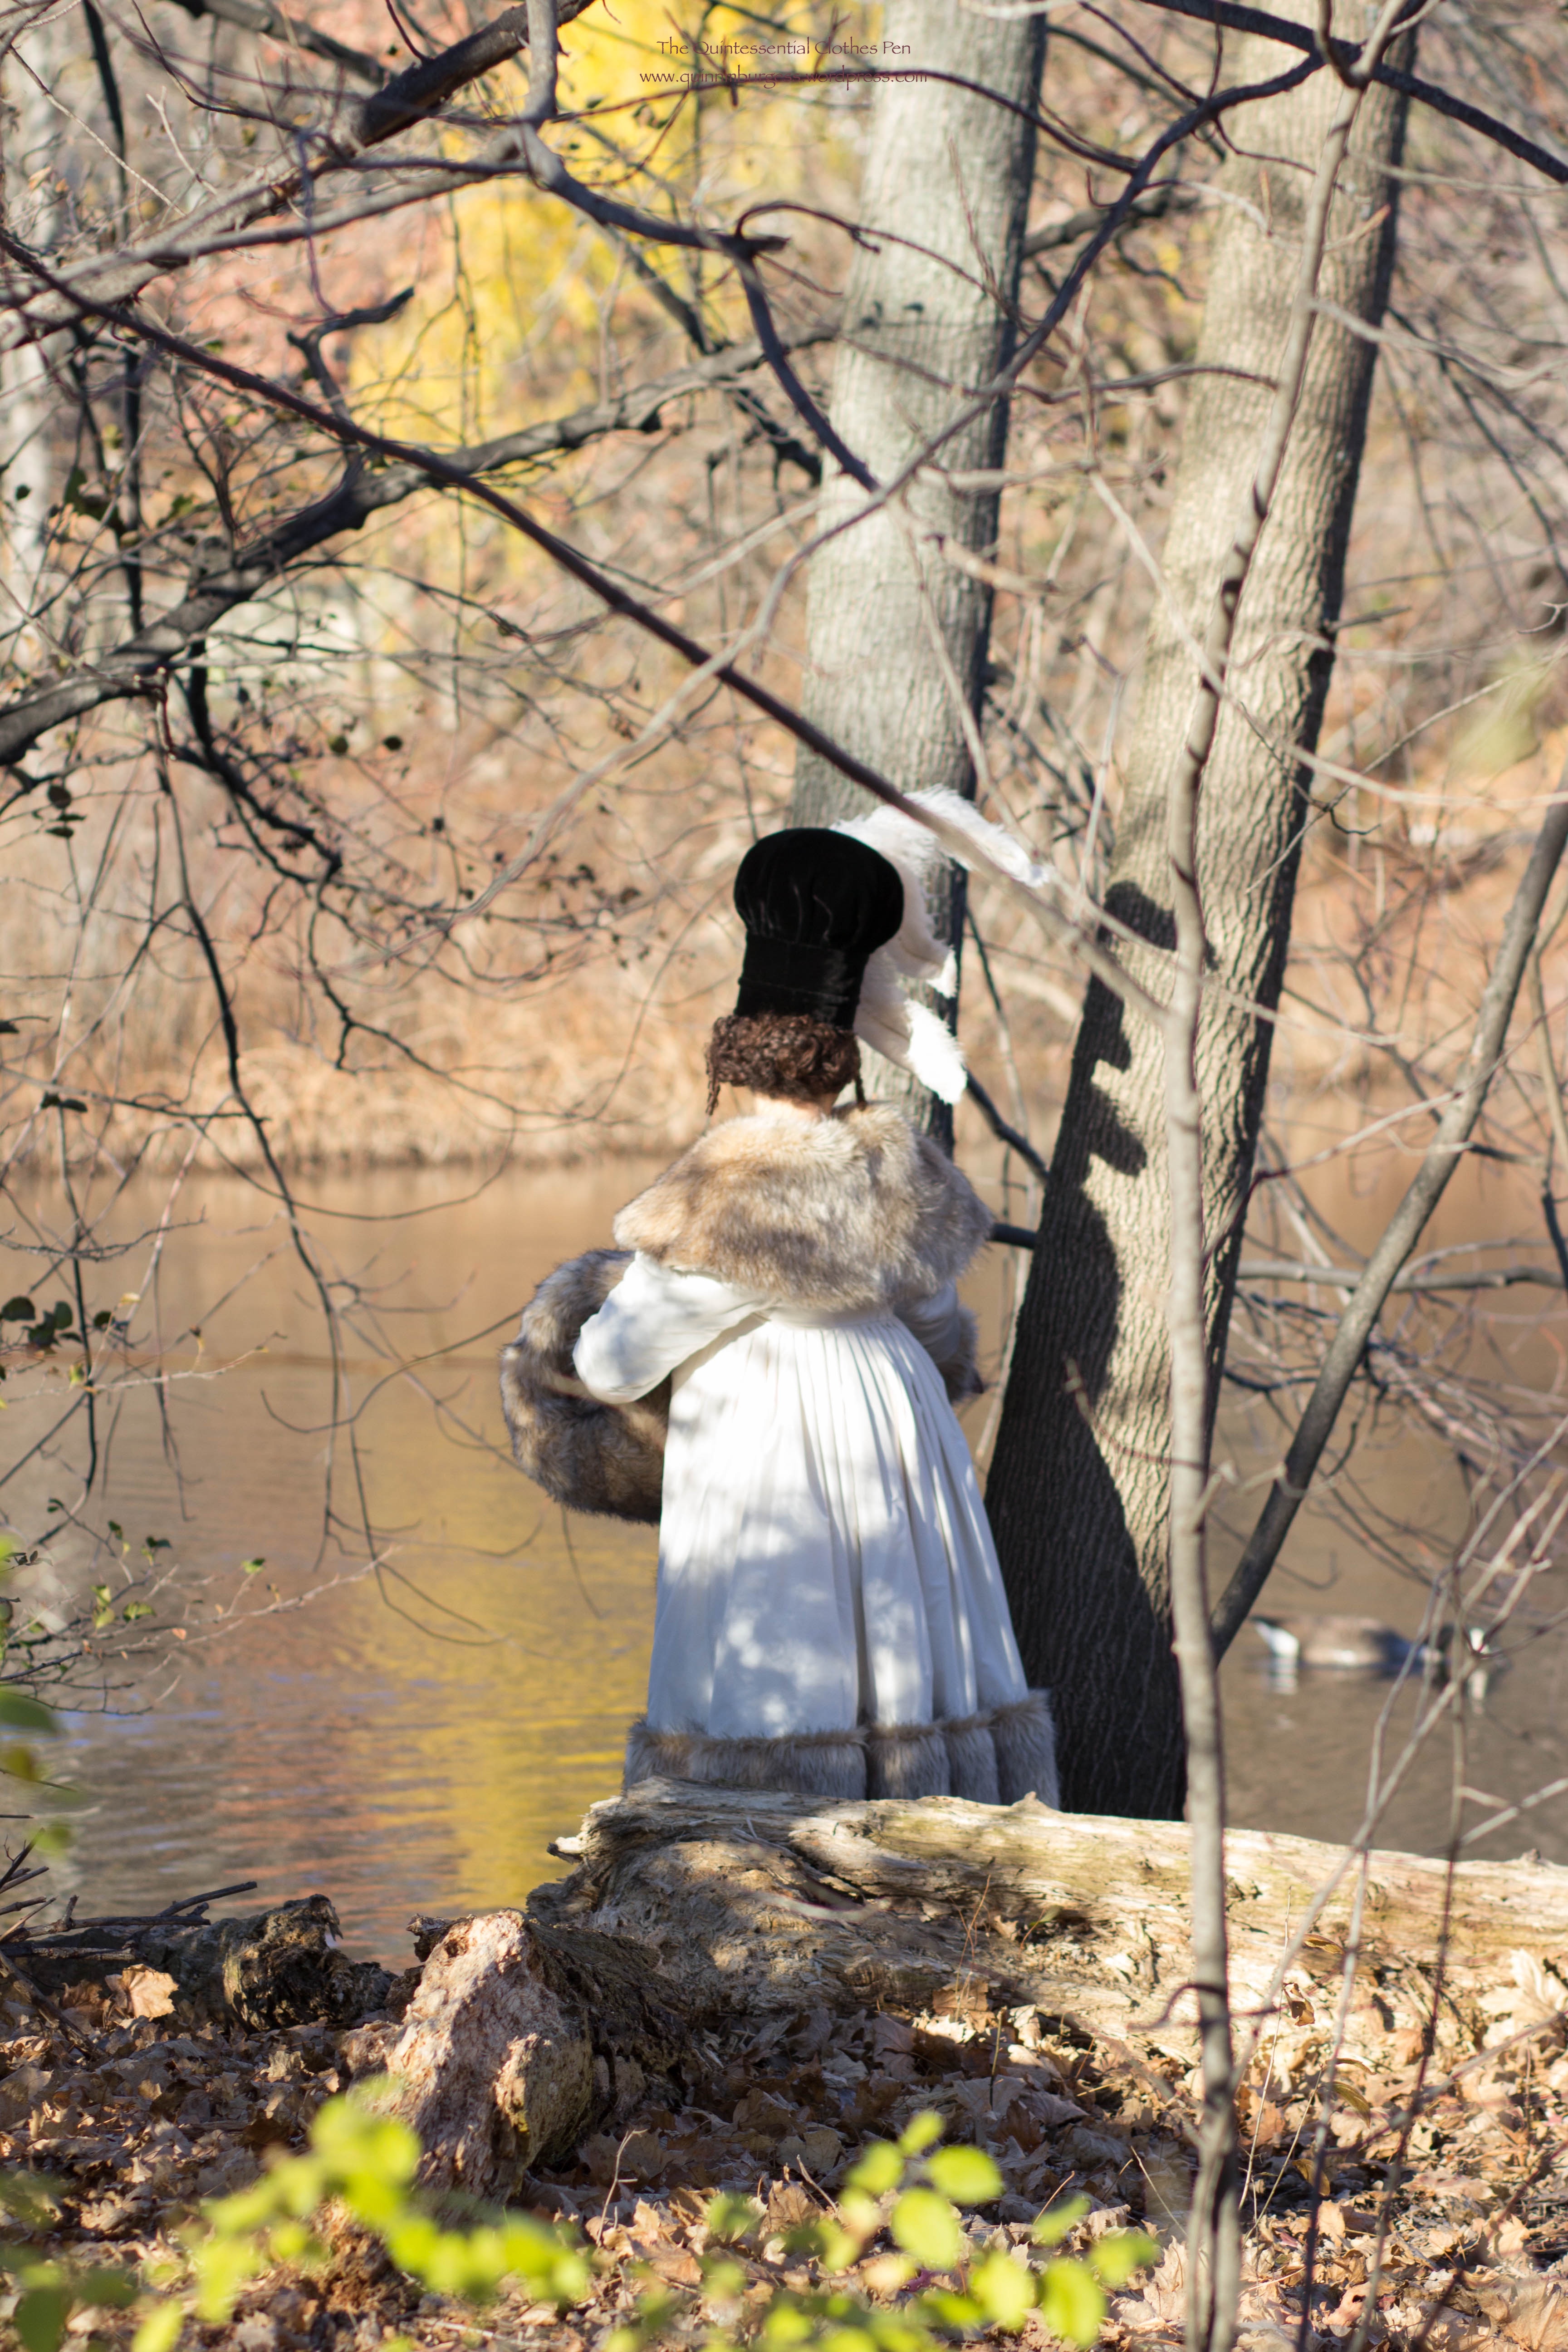
I thought I’d start the new year off with photos from my Vernet Ensemble photo shoot. (I’ll be doing separate posts with details about the construction of the ensemble as the year progresses.) I’m so incredibly pleased with my ensemble and with the quality of the pictures. I often have lovely pictures after events and when documenting sewing projects, but these are extra special in terms of the sharpness of the images, the clear colors, and the fun use of a historical lens.
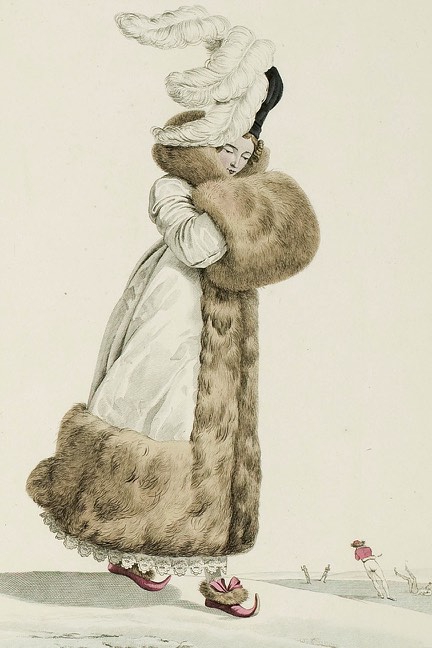
Hopefully, you were following along with the release of finished ensembles in December, but in case you missed mine or haven’t figured out yet which fashion plate I was recreating, here it is.
Plate No. 20 “Toque de Velours. Witz-choura de Satin.”
Below is the “official release” picture. I did my best to mimic the pose of the fashion plate, but it was really hard to wrap my brain around the left and right of things in my own pose relative to the fashion plate. Left was right and right was left, and in the end we did the best we could and called it done. I think we actually did it right, it’s just that I’m facing the camera at a different angle. It still boggles my brain to try and figure it out!
Unfortunately, there was no snow in November when we took these pictures and so I didn’t get ice skaters falling over behind me (also, I would have had to find ice skaters)… but I did get unfrozen water, and you’ll just have to imagine the ice and the skaters!
These last few pictures with the blurred background were taken using a reproduction 19th century Petzval lens. You can read more about the lens and how it causes this effect here, at my photographer’s blog.
I am so incredibly blessed that to have a friend that joyfully enjoys practicing her photography skills with her nice digital camera (with fancy and historical lenses, to boot!) by taking pictures of my endeavors, amongst other things. She happily came over one afternoon in November just to accompany me for the photo shoot and take these absolutely gorgeous pictures. Thank you!!!
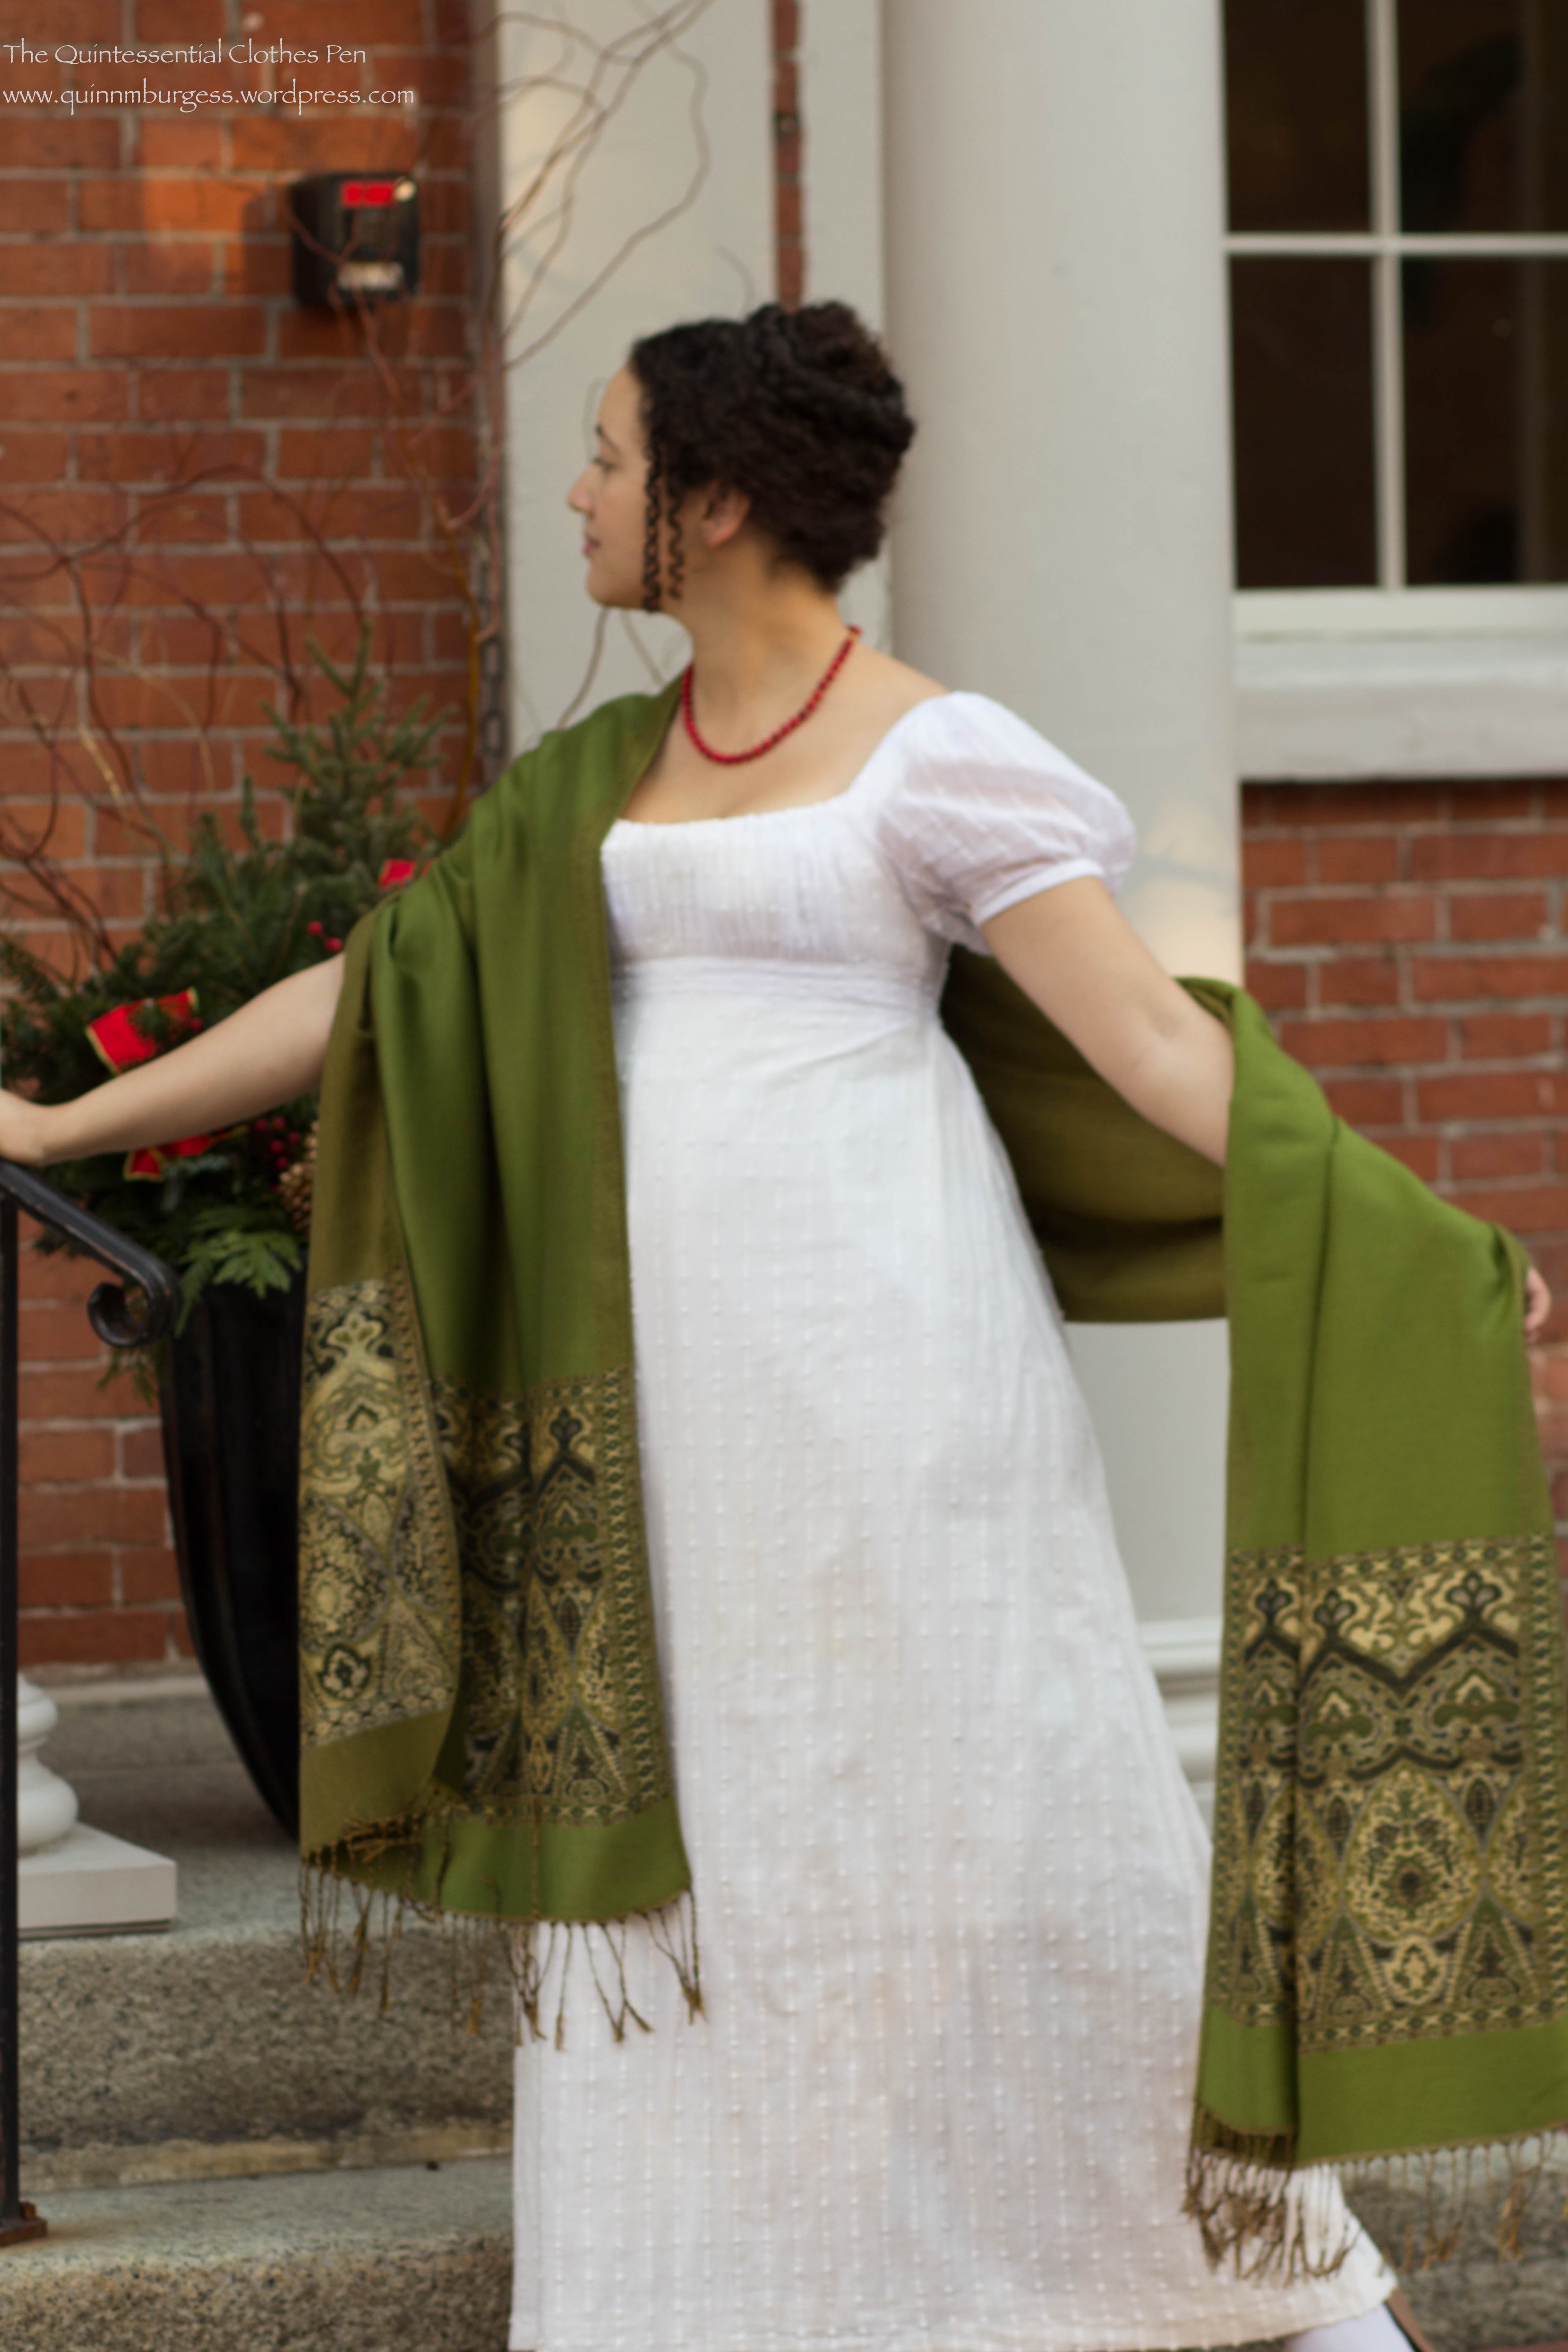
I was inspired this fall to make an extra long Regency shawl. Others around the blog world have done this before–it’s certainly not a new idea I came up with so I can’t take credit for the creativity of sewing two pashminas together to make one longer one.
I started by looking at my Pinterest boards to see what colors popped up often in fashion plates and extant shawls so I could pick a reasonably Regency color for my own creation (this board has a number of fashion plates and extant shawls). Common colors I saw were cream, dark red, grassy green, and dark blue. Occasional other colors included vibrant autumnal orange and rich yellow.
The second step was to consider the colors in my current Regency wardrobe so I could pick a color shawl that would harmonize with my outfits. Lastly, I looked at what was available on eBay for available color options and with sufficiently wide borders around all the edges to have the look of a Regency shawl. I found a few that matched my research but the color that best fit all of my criteria was grassy green. This shawl from the Met is a very similar in color to mine and was an inspiration in terms of border proportions.
How historically accurate is it?: It definitely passes Leimomi’s test of being recognizable in its own time in general and in terms of the color and border trim proportions, but most shawls would have been silk or wool, which mine is not. Also, since it is two shawls sewn together, it has an inaccurate seam down the back. So we’ll sway 75%.
Hours to complete: Less than 1.
First worn: December 5, 2015.
Total cost: About $10-$15.
I was dancing in a Regency period hall in December and it was the perfect opportunity to get some of the classic Regency shawl pose pictures. (The hall was decorated for the holidays, which matched my accessories perfectly!) It’s always amusing to me how the shawls are often depicted halfway off the wearer or draped artfully but with no apparent desire to keep warm.
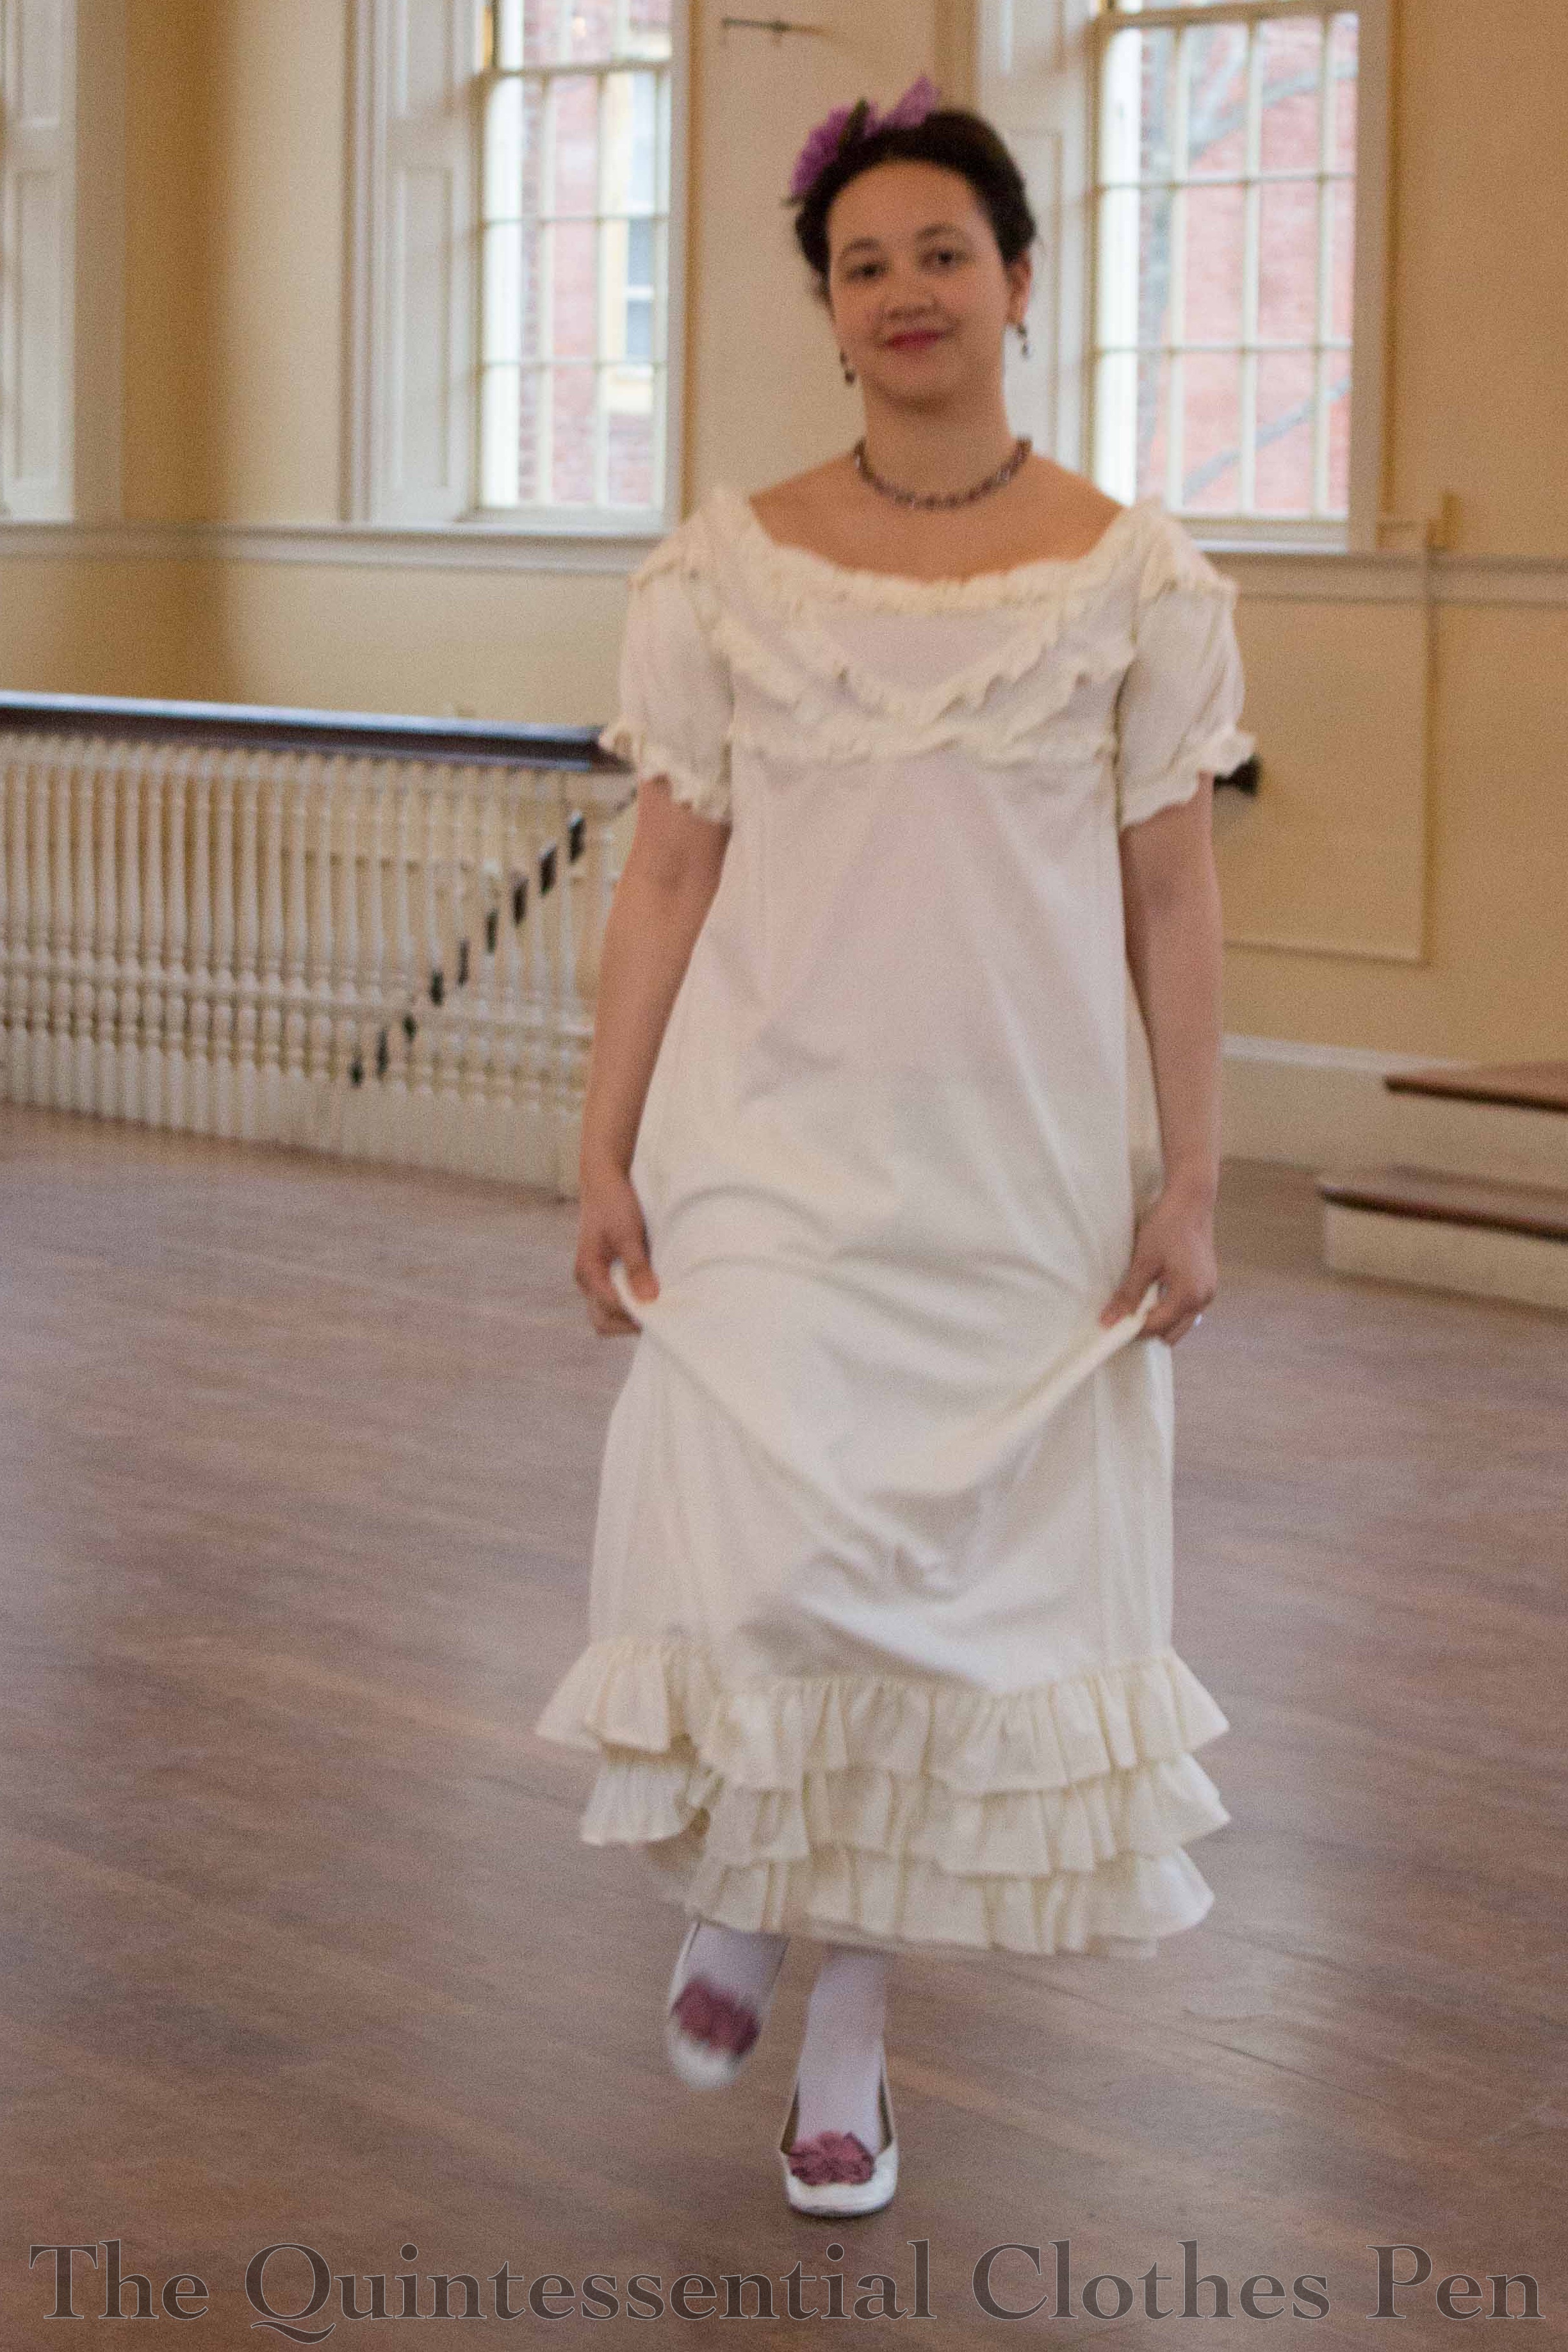
I wore my 1812 square neck dress but removed the pink sash that I’ve had on it for the last two years or so. It was nice to go back to a plain white dress for a change. It’s not plain at all with the new shawl!
I took the time to create a fun hairstyle with small diameter face framing curls and an extra braid of fake hair. I was very pleased with the overall shape and silhouette. (I’ll be sharing more about how I made the curls at some point in 2016 when I post more information about my Vernet ensemble and the photo shoot of the completed outfit.)
I had a blast dancing all day in such a beautiful space. When I cooled off between dances the shawl was great to keep me warm. And I love how festive it looks with the red necklace! I hope your holidays are full of fun, joy, and blessings!
Photos of each recreation of one of Vernet’s Merveilleuses and Incroyables fashion plates start to be released tomorrow (December 8) on the group Facebook page! One fashion plate per day will be shared right next to a photo of the recreation, right up through the 31st of December (my plate will be on the 21st). Check it out! It will be a fun way to end 2015!
I’ve seen some of the finished ensembles ahead of time, and let me just reiterate how wonderful, weird, and wacky they are! Further posts with more images and specifics about construction, etc. will be released by participants in 2016, so don’t forget to check back to see updates on the ensembles that most capture your fancy.
(You can see all my posts from this past year relating to this project here, and I’ll be sharing more in 2016!)
Our group’s early December deadline to finish sewing our Vernet Projects is fast approaching! Thank goodness we’ve had all year to work on these–mine has been quite a project with all the hand sewing and patterning and learning new skills. Of my five pieces, one is totally done, two have less than three tasks left to be finished, and 2 are still about halfway completed. It won’t quite be furious sewing, but I do have to keep at it to get it done in time. For now, here is proof that I’ve been making progress!
Starting December 7th, you should check in often with the group on Facebook to see each recreation released side by side with the original Vernet fashion plate. It’s going to be really, really amazing to see these crazy and beautiful fashion plates in 3D form!
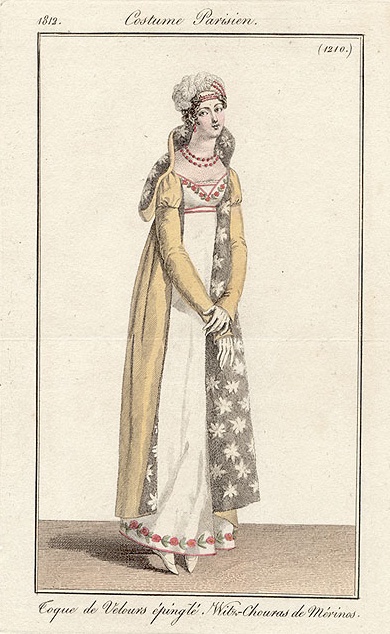
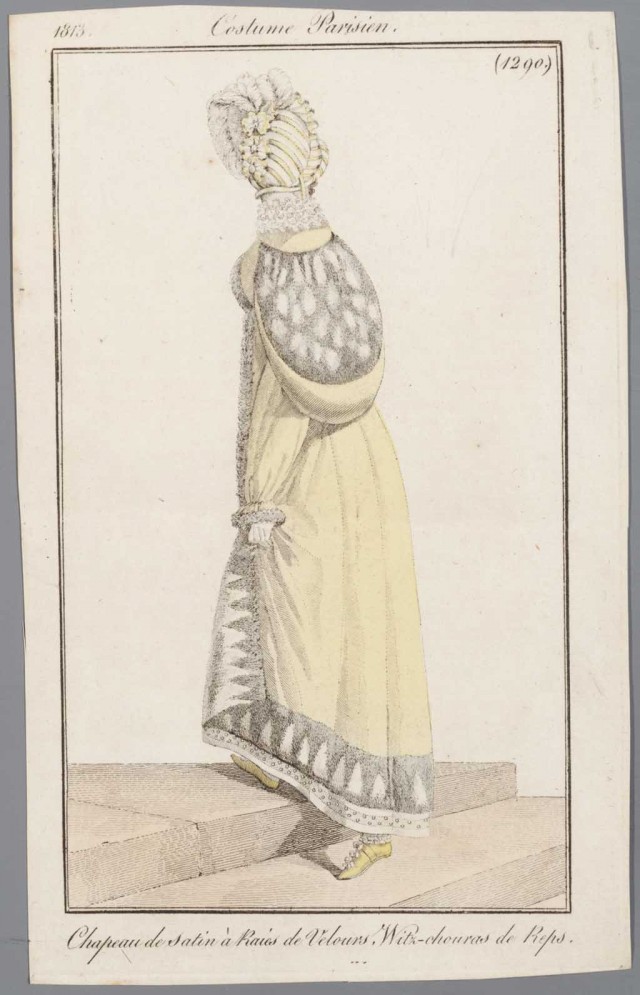
As a quick recap, I started my witzchoura research journey here, being confused about how the word was spelled. After sharing that with you, I moved on to look at basic witzchoura definitions and then further witzchoura references, but I haven’t really shared images of witzchouras with you yet, so that’s what this post is going to focus on.
Out of the thousands of pins on my historic clothing Pinterest boards, the images below are the only ones I could find that specifically mention that they show a witzchoura. (Never fear, I’ll be looking at not-quite-witzchouras in a future post.) If you know of any other images that specifically name the garment shown as being a witzchoura please let me know!
I find it interesting that two are yellow and two are blue. Also interesting that all the furs that are depicted are textured or downright weird (like the first one with the flower-fur… what is that?). However, in terms of materials there is variation: one of merino (wool), one of reps (could be wool, silk, or cotton, according to the OED), and two of velvet (fabric content unknown, though wool, silk, or cotton would seem to be likely).