1885 Night Sky Fancy Dress

It has been a goal to make a specifically fancy dress outfit for years, but particularly since I made a makeshift 1860s flower basket fancy dress outfit in 2015. This May I had the perfect opportunity in the form of a fancy dress ball!

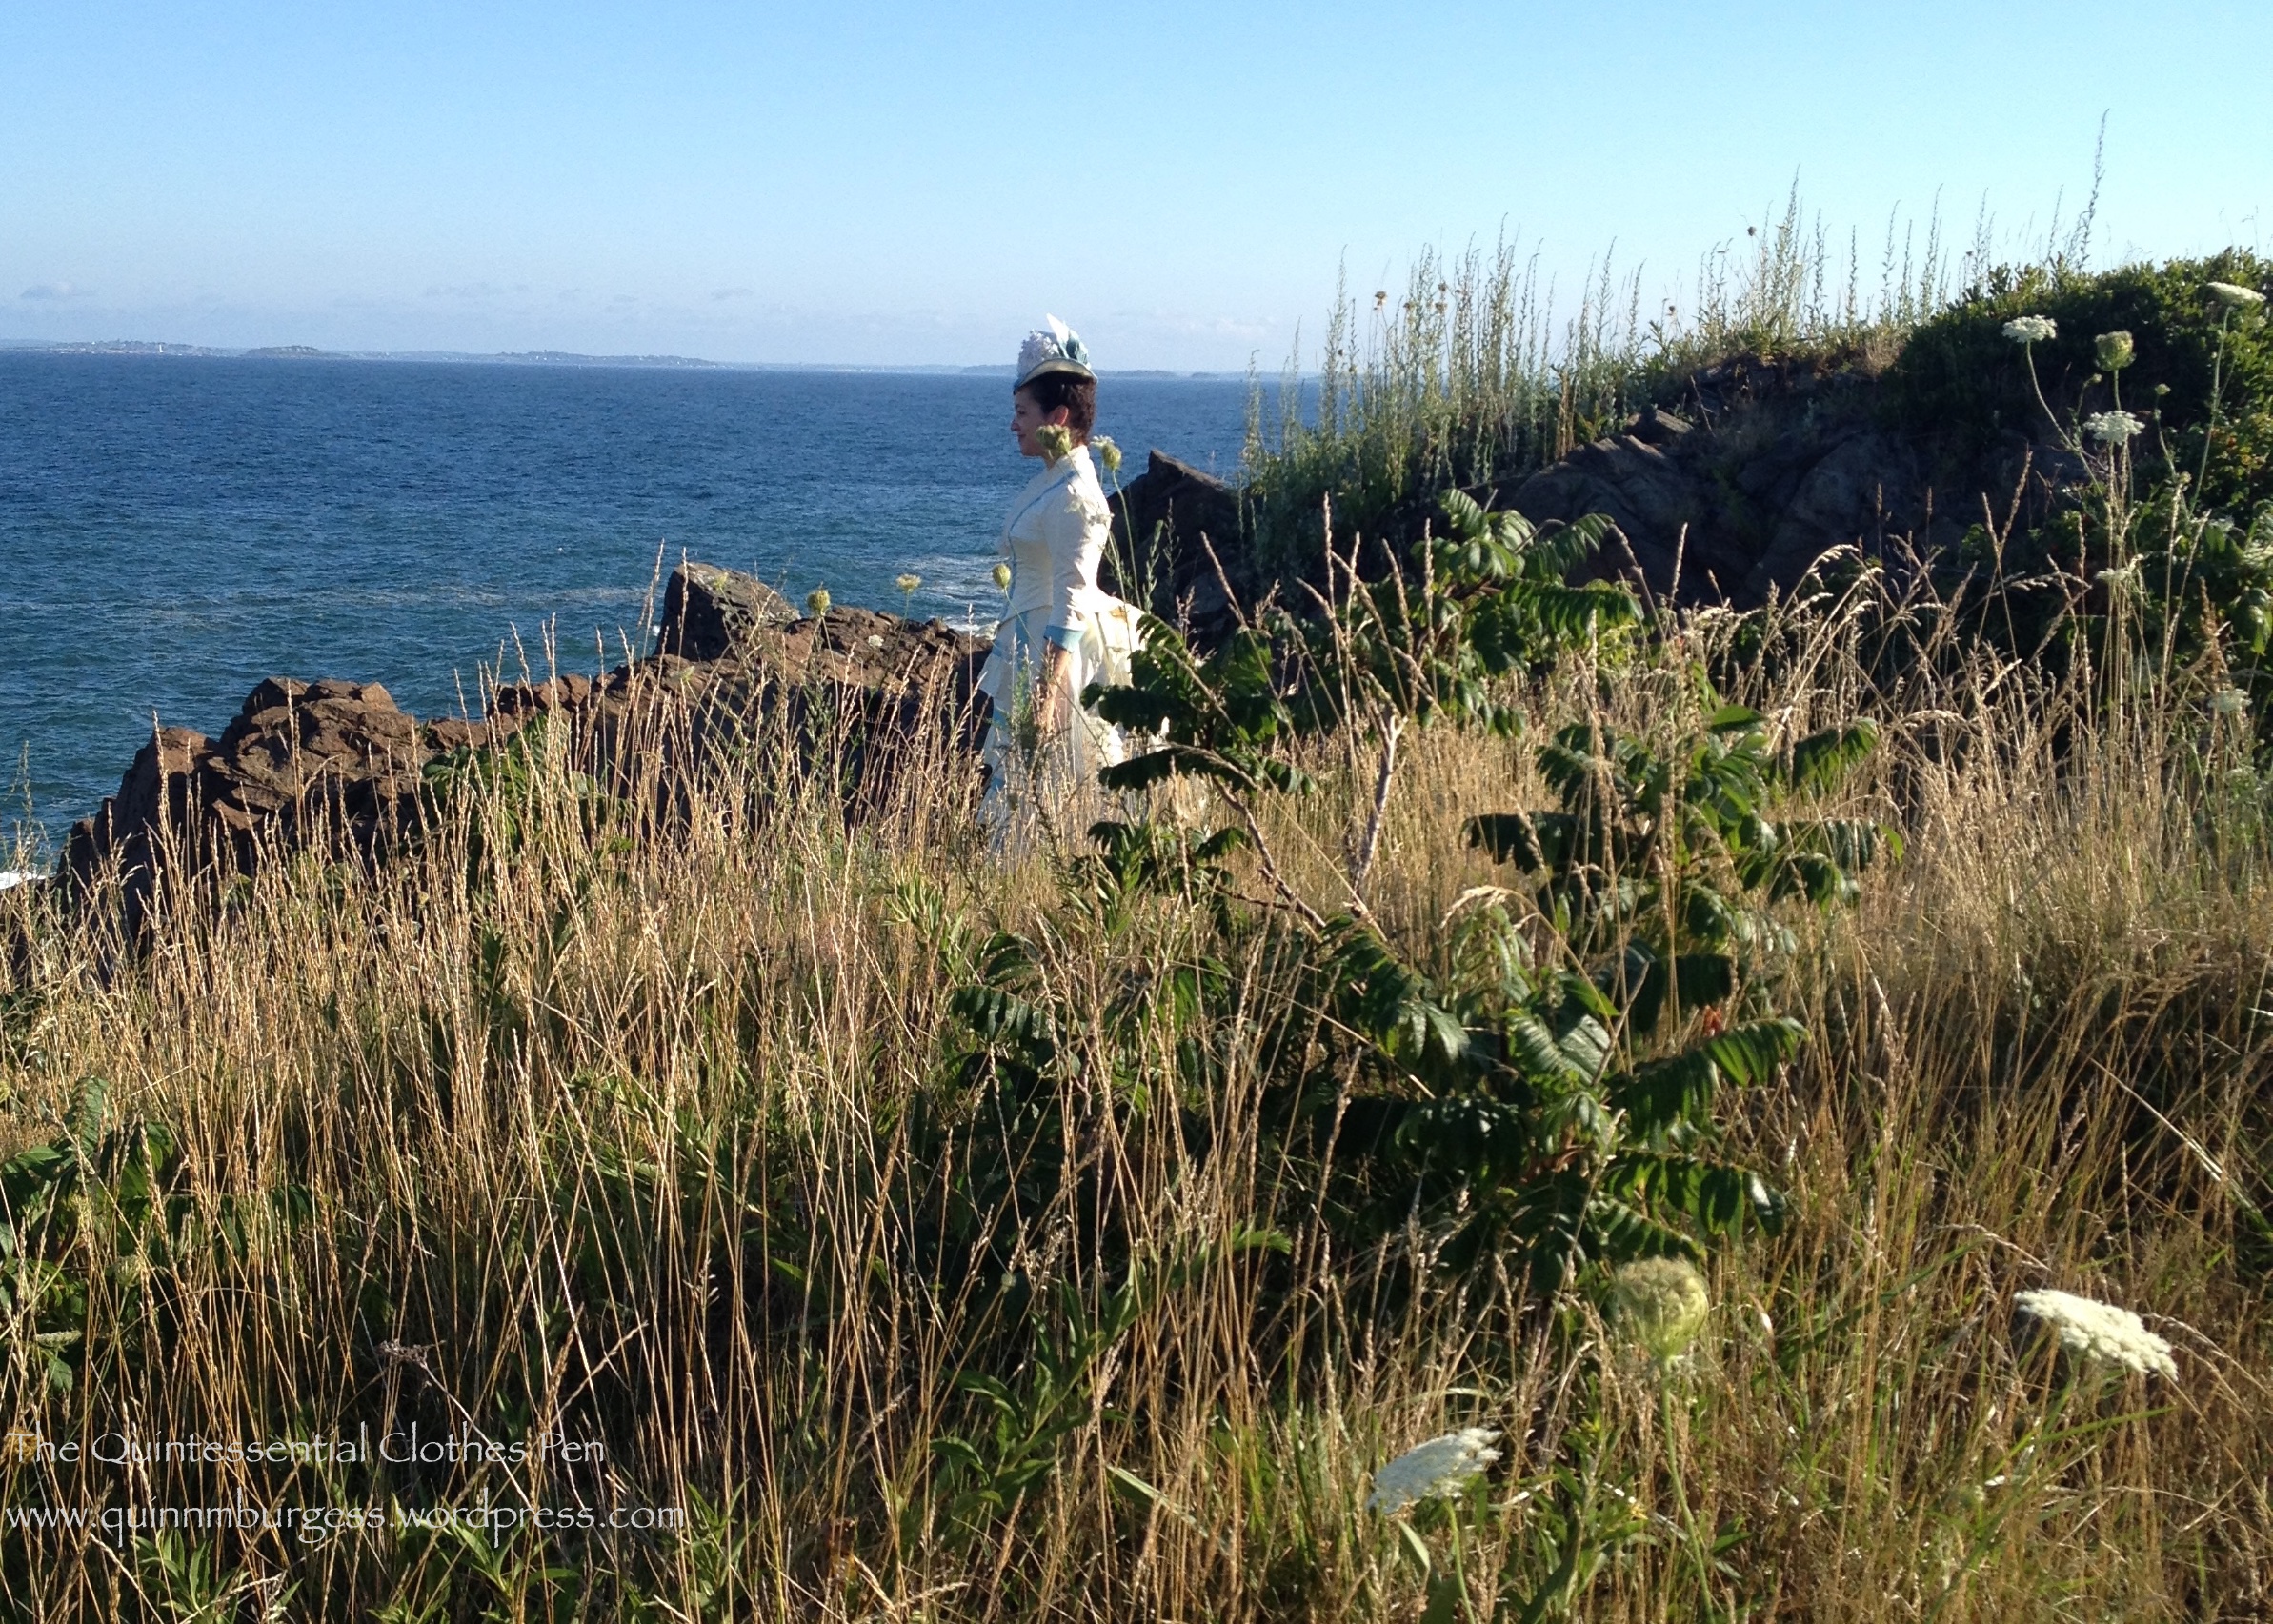
I decided to make an 1880s bustle dress because I already had all the undergarments, including my still-new-feeling 1880s steam molded corset, and because it’s a period of dress that I rarely wear, especially for dancing. I wanted to experiment with dancing in a bustle to see how it worked and what it felt like.

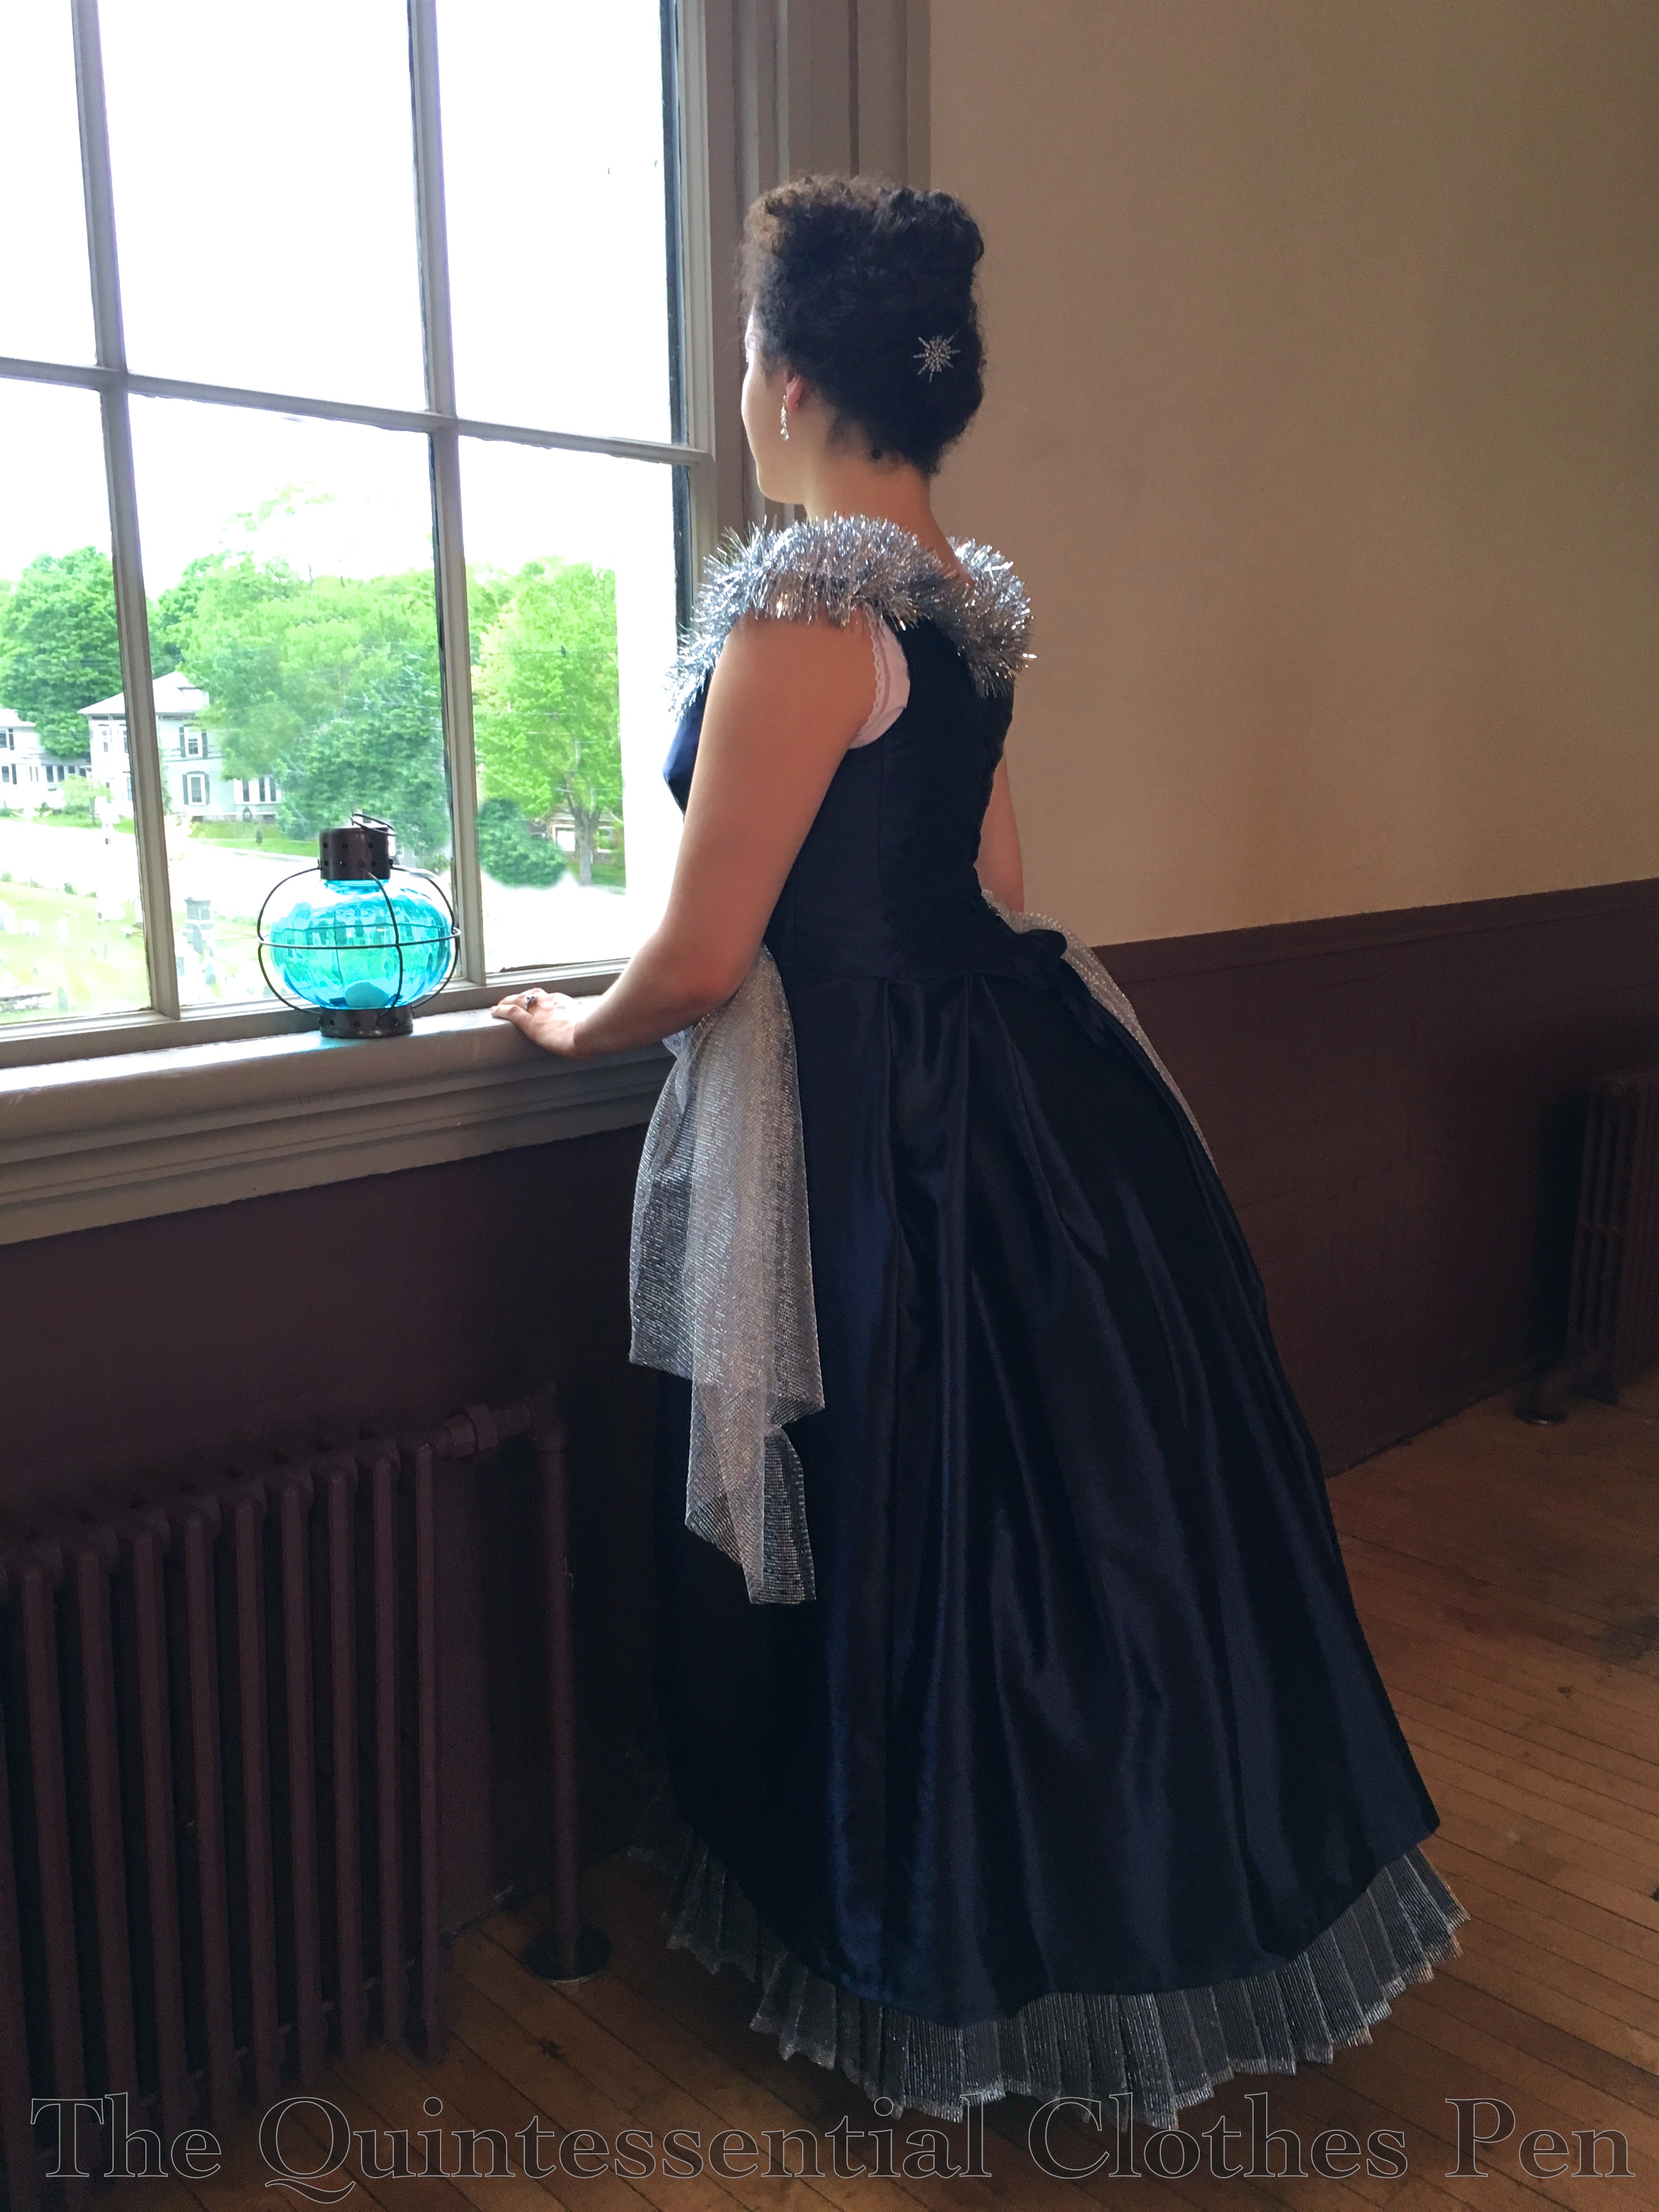
Design-wise, I was inspired by Mrs. Alice Gwynn Vanderbilt’s Electric Light fancy dress outfit made by Worth in 1883, but wanted to adapt the idea to fabrics I already had on hand. Since the fabric I came up with was navy blue, I decided on Night Sky as my inspiration.

2753c5268e0e74e0fc49e0c0d77e3053
Mrs. Alice Gwynn Vanderbilt’s Electric Light fancy dress outfit, 1883

I started my outfit in January and worked on it over the next four months or so, but despite all that preparation time I was still working on it right up until the day before the event. Luckily, I did the vast majority of the work of cutting, sewing, and fitting before March and April when I became super busy. Tasks left at that point included finishing the bodice edges, trimming, and closures.

IMG_0999 (1)

In addition to the Mrs. Vanderbilt’s inspiration I also looked at other 1880s skirts for draping ideas and other 1880s fancy dress outfits for trimming ideas. You can see the most inspiring images and extant garments on my Pinterest board for this project here.

For ease of documentation, I’ll do the facts as with the HSF:

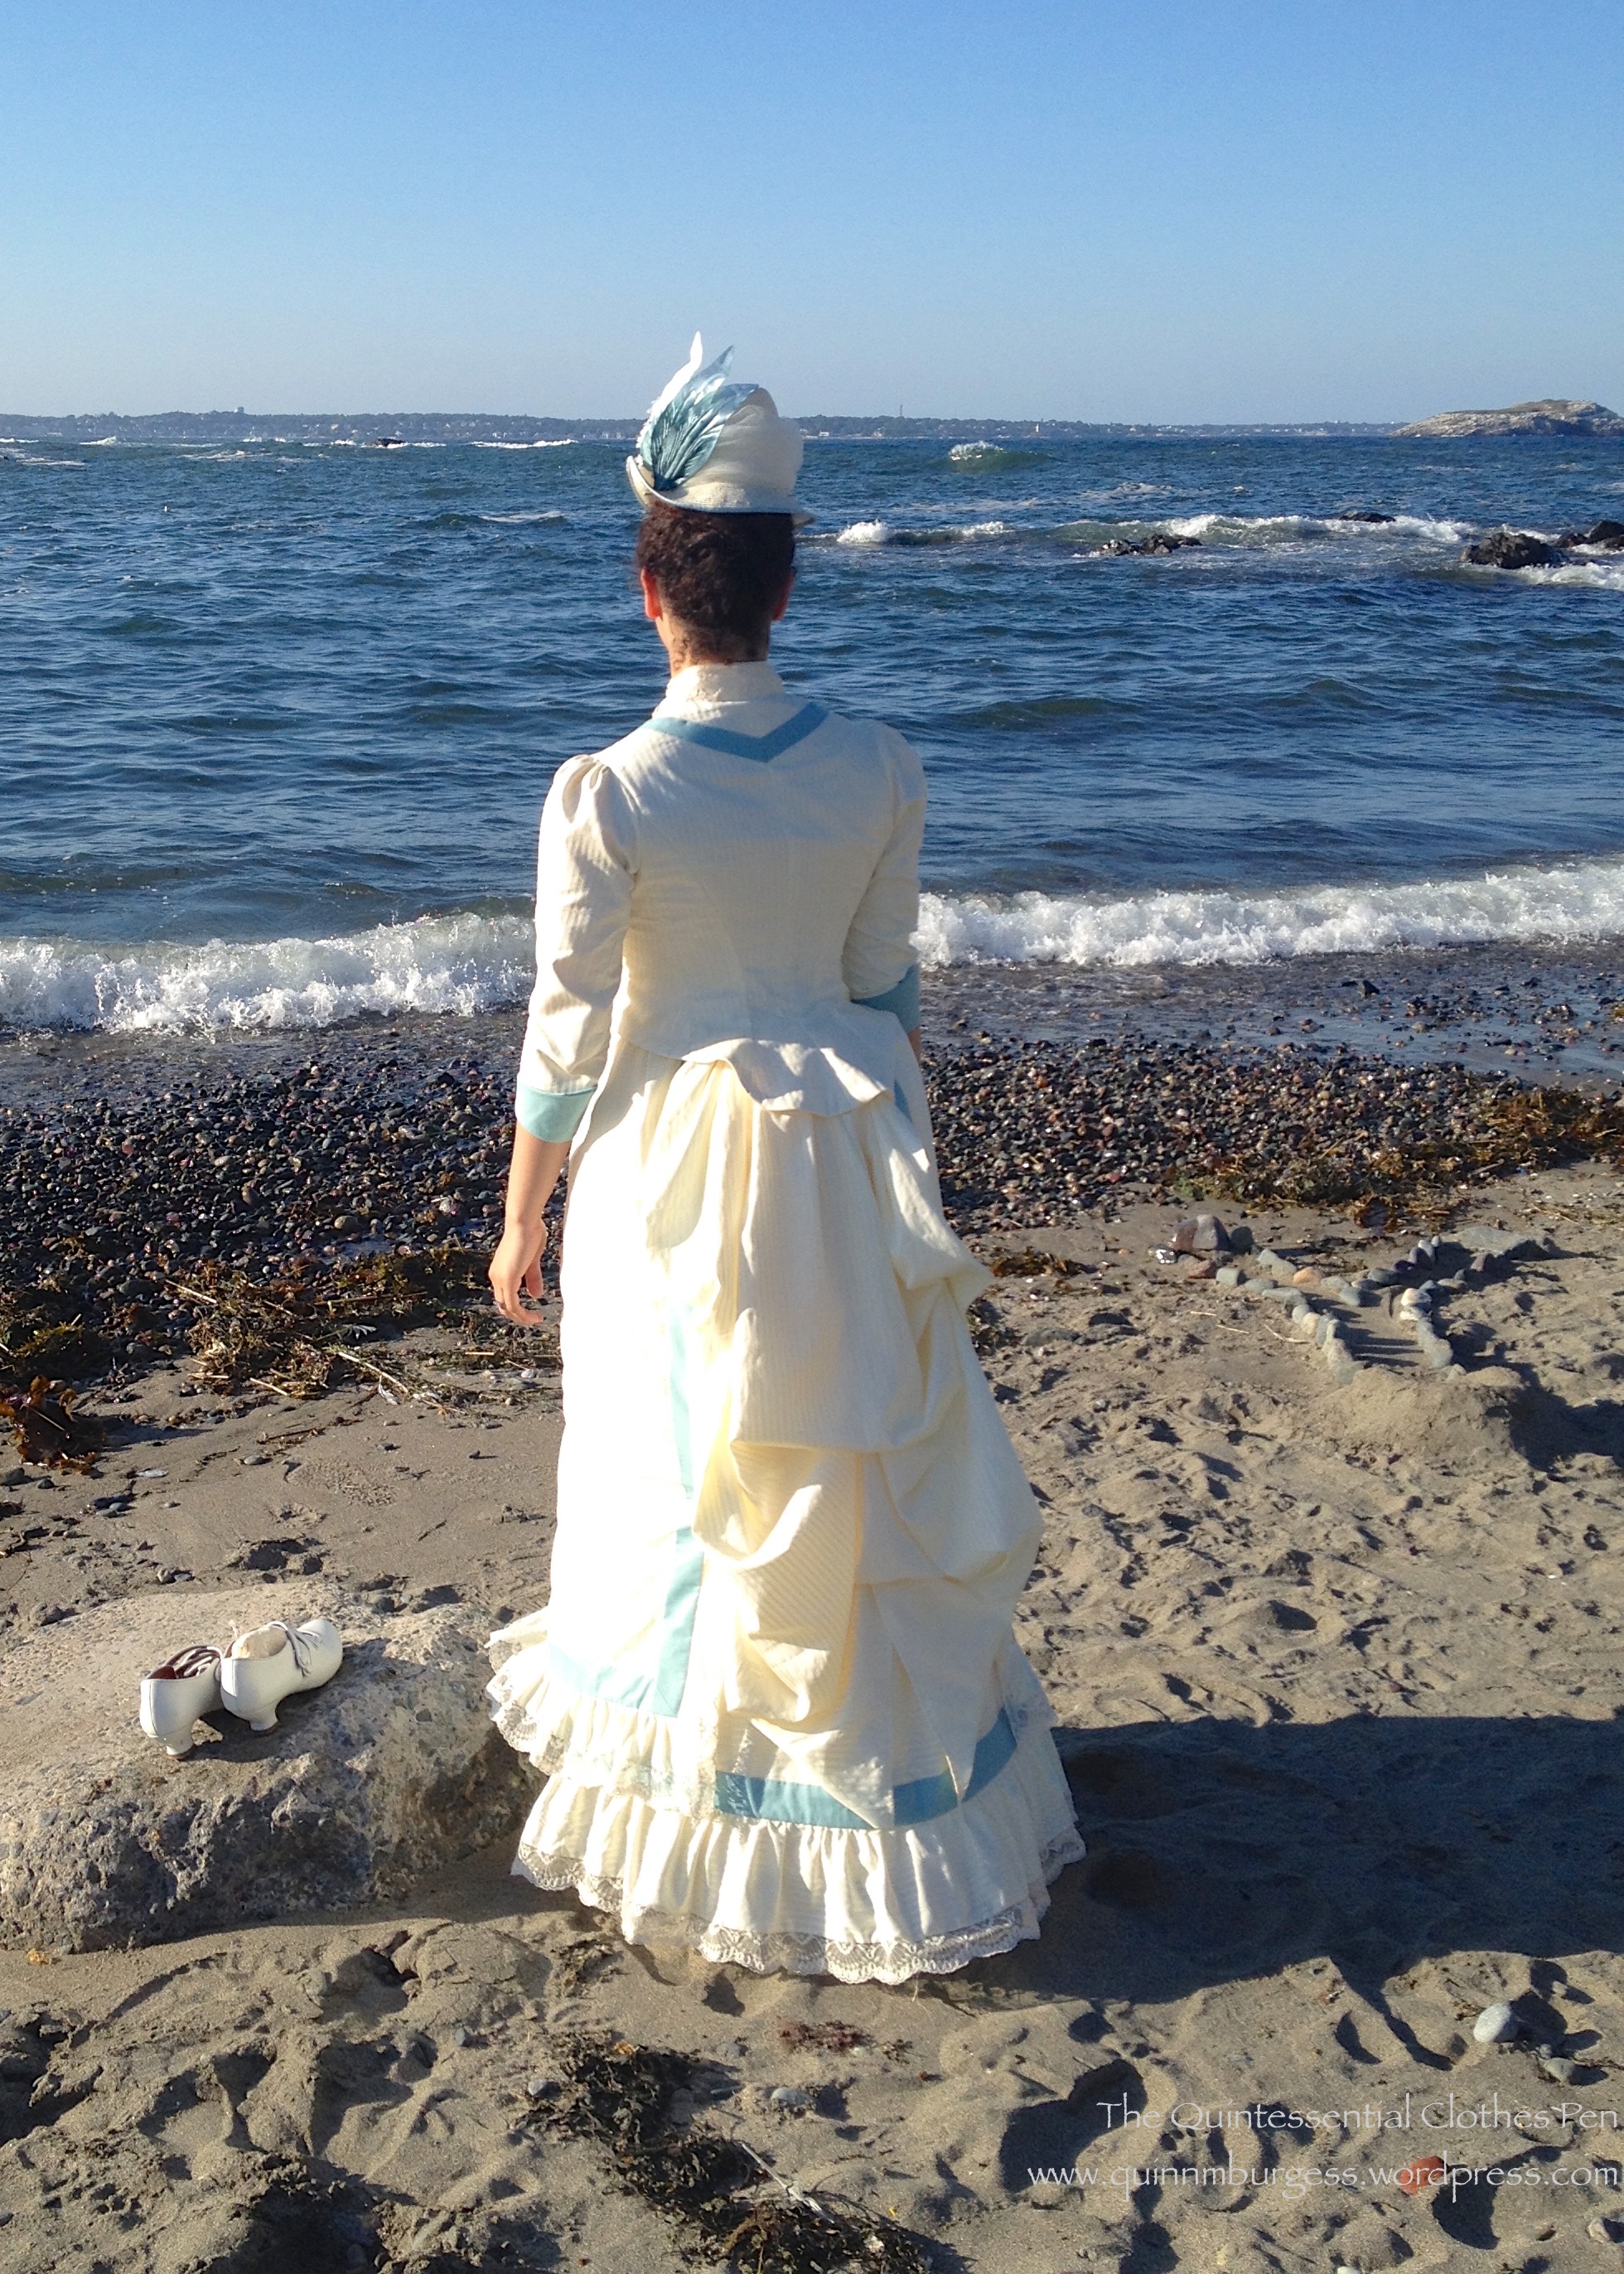
Fabric: 2-3 yards of navy blue cotton twill for underskirt, 6ish yards of navy blue polyester charmeuse, 1ish yard of pink cotton twill for flat lining, and 1-2yds of silver net.

Pattern: My 1885 Frills and Furbelows Bustle Dress pattern, adapted for evening and for the style of skirt desired.

Year: 1885.

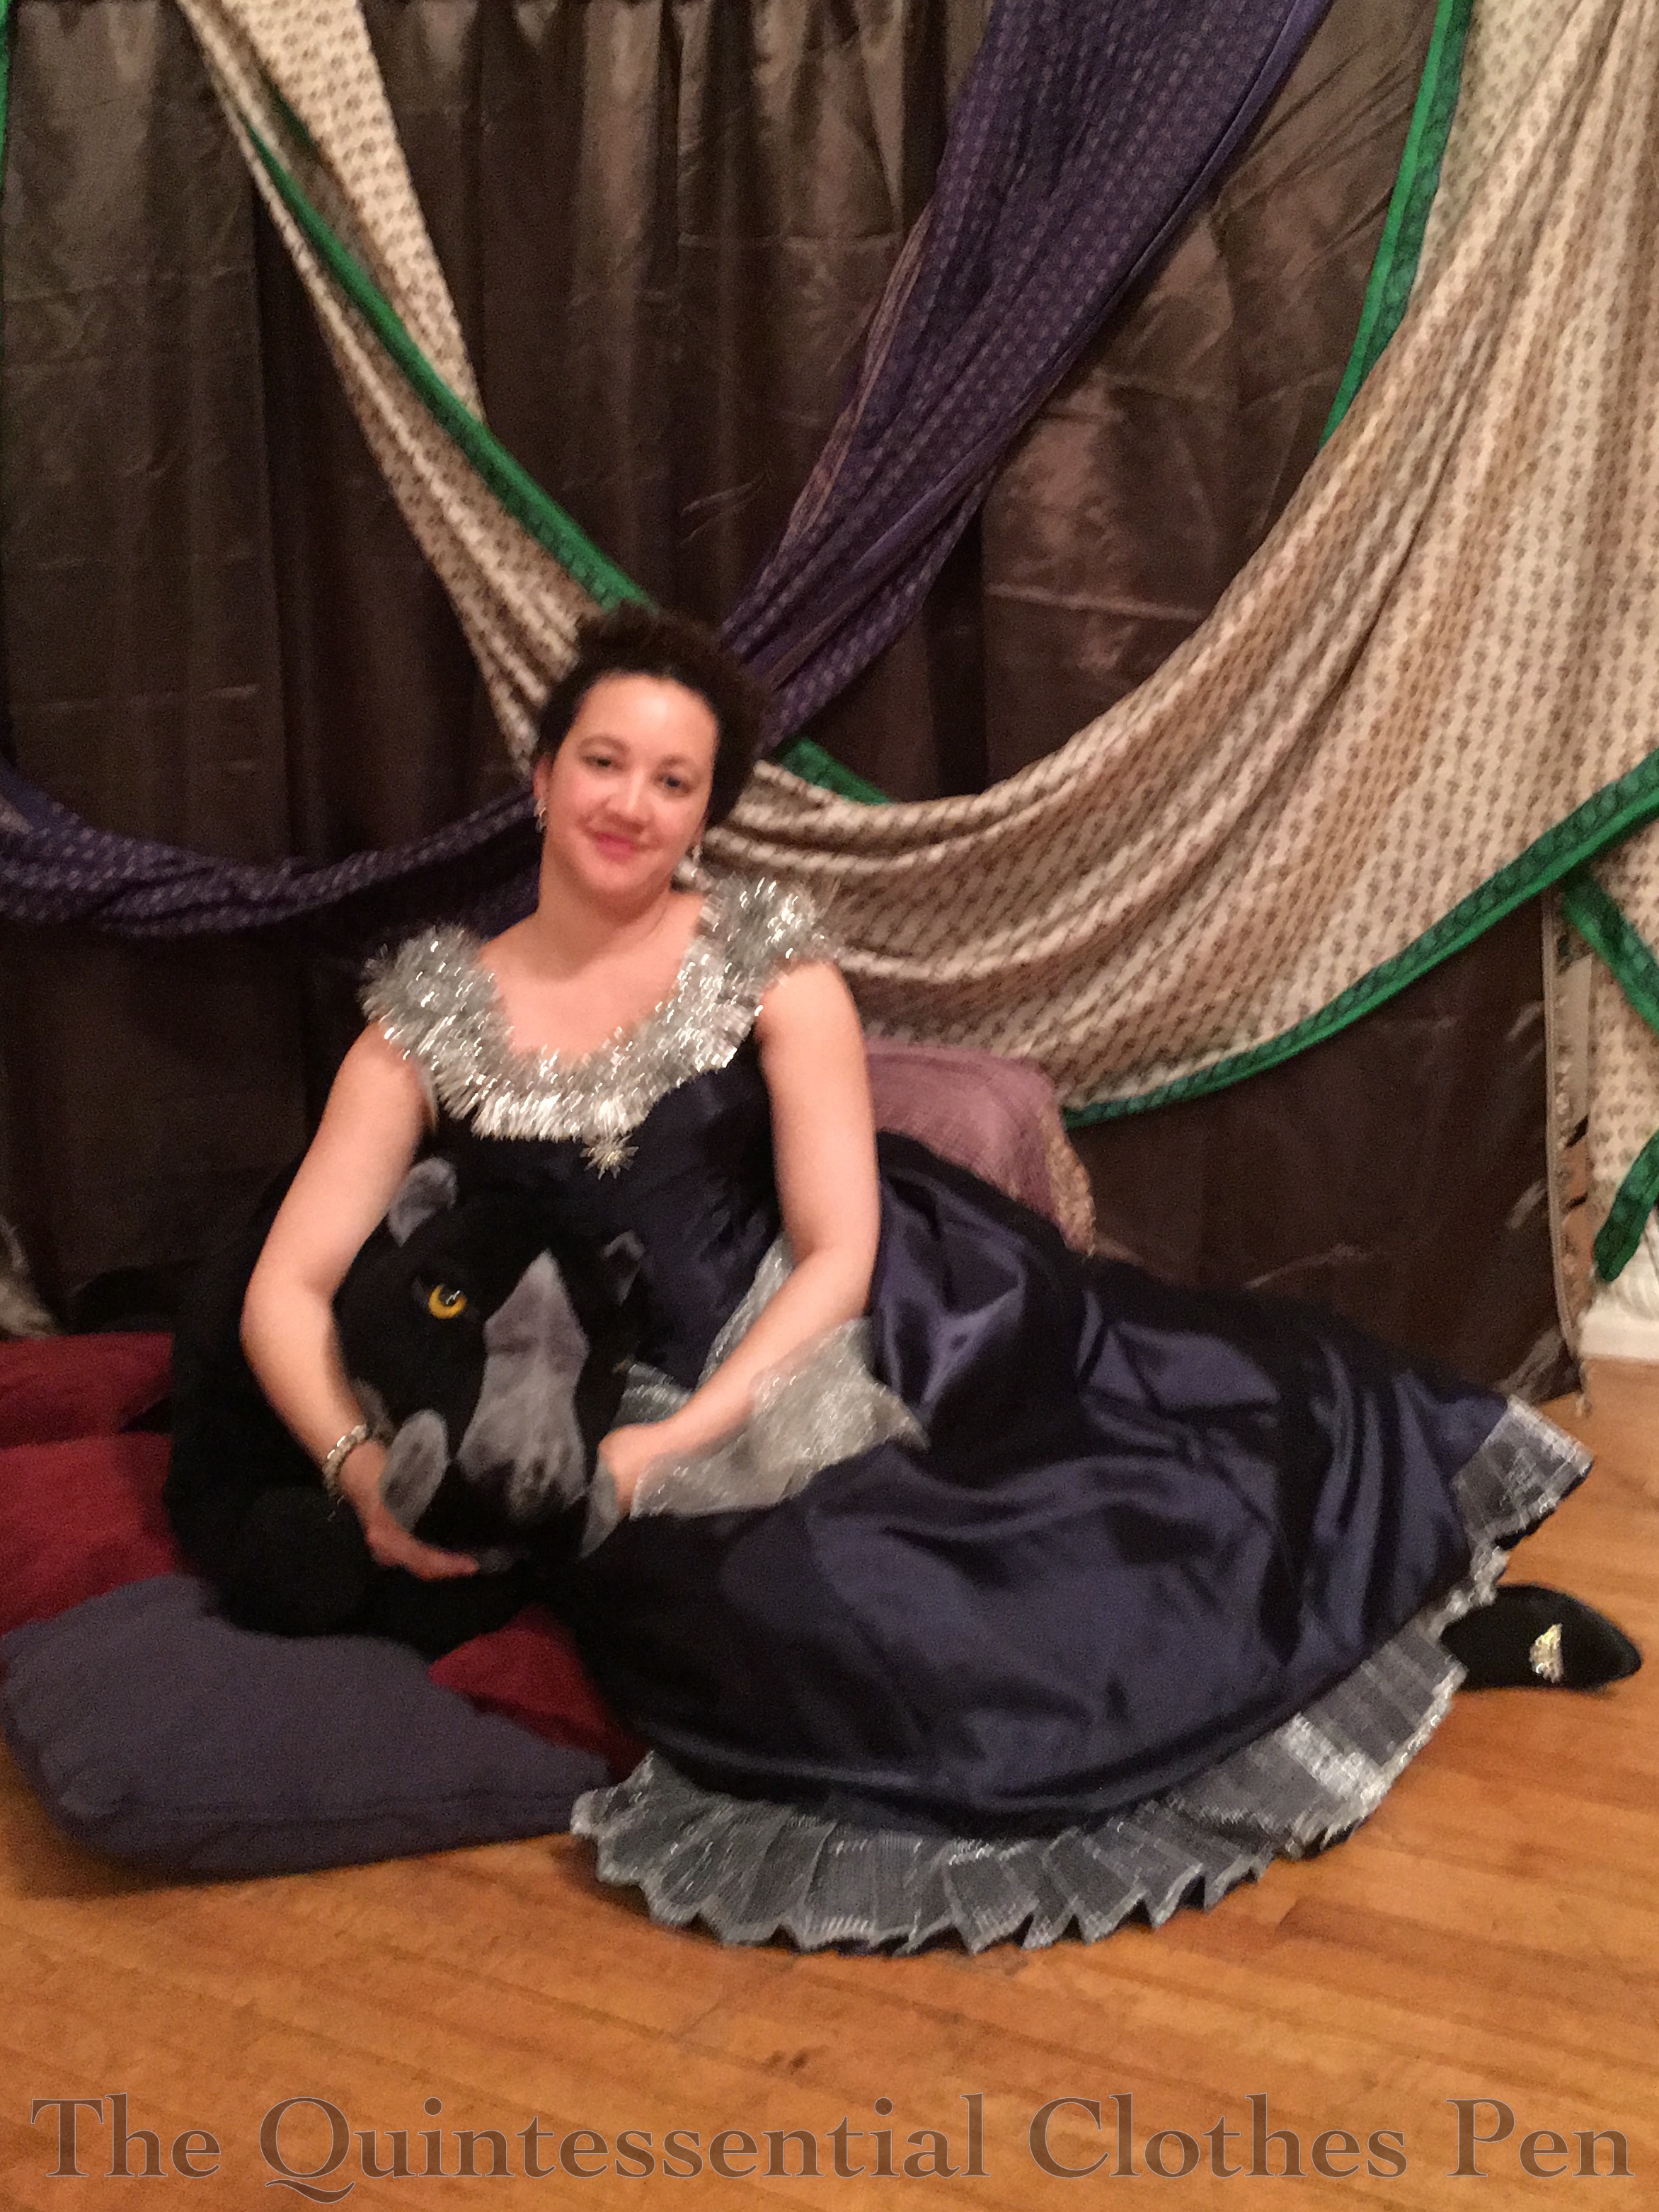
Notions: A 3yd tinsel garland, 6 star brooches, 3yds of navy polyester ribbon for lacing, hook and bar closures for the skirt, and thread.

How historically accurate is it?: 90%. Recognizable in it’s own time, certainly. Reasonable construction, certainly. Materials, not so much. It was much more important to use what was on hand than to purchase new fabrics, especially since this is an outfit that I don’t see getting a lot of use.

Hours to complete: Tons. I didn’t keep track. Bustles are fussy and require lots of time with a dress form to achieve an elegant drape.

First worn: May 21.

Total cost: Most of the fabrics were in the stash with the exception of the silver net and most of the notions were purchased cheaply on eBay. Let’s say $20.

IMG_1011 (1)

For the photos I wore the dress with my black Seaburys and the new rhinestone shoe clips that I purchased in March. It was quite sparkly and elegant, but for dancing I changed into navy blue velvet flats. They were just as cute but did not get the special treatment of being shown off in photos.

I had the grand idea to use my curly hair ends flipped up on top of my head like the curled fringe popular in the 1880s. It’s also long enough that I was able to make the bun shape on the back also using only my natural hair. I pinned in star brooches to match those on my dress as decoration.

IMG_1034 (1)

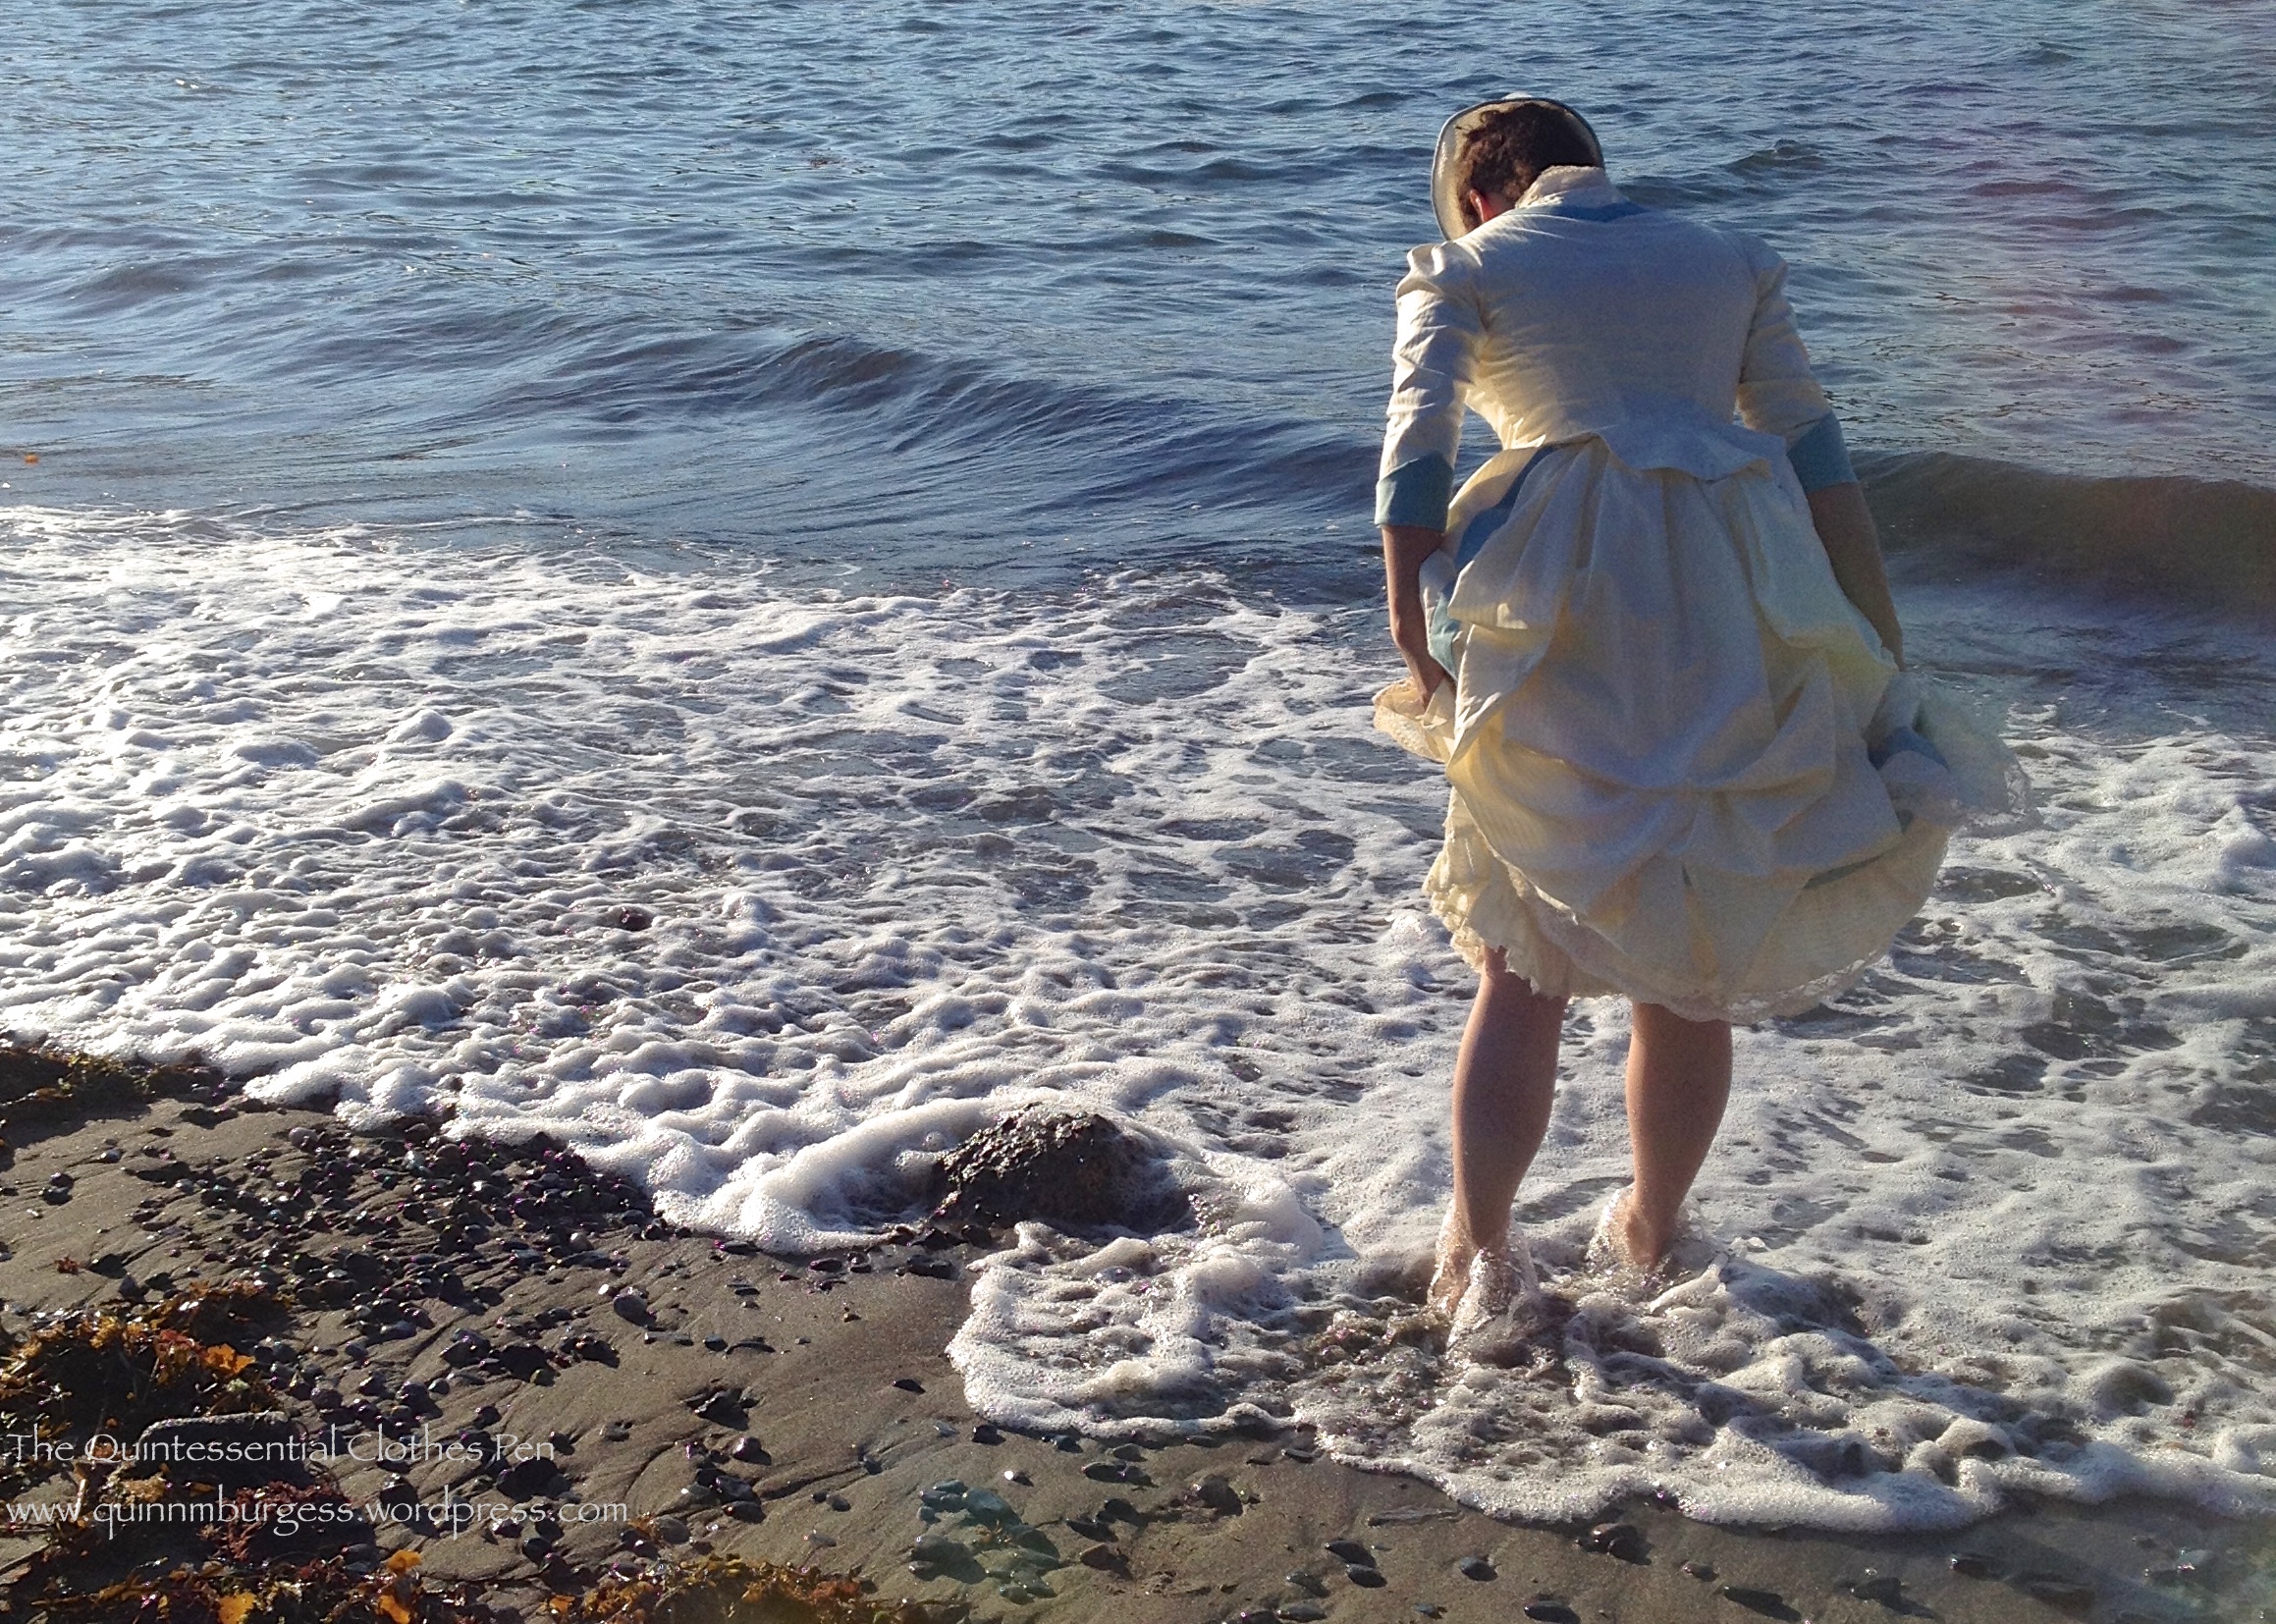
All in all I’m quite happy with the final result! Dancing in the bustle was just as easy as any other Victorian style. The differences were that all the extra fabric was behind me making some movements more challenging due to space such as during a quadrille, and that the bustle and layers of fabric on the back gathered a fair bit of momentum when turning, creating quite a swish!

Construction wise the only change I would like to make after one wearing is to bone the center back edges so that the back lies flat when laced onto my body and to sew in a matching fabric piece behind the lacing holes to hide any white from undergarments that wants to peak out. I’ll also need to wear a different chemise or tuck the top down so there’s not white cotton poking out at the armholes. However, these are minor changes and I’m not sure when I’ll have the opportunity to wear this again so it might be awhile before they happen.

IMG_1023 (1)

For this ball we set up a double sided picture backdrop, one side of which you’ve already seen. The other side included a large stuffed jaguar/panther I dubbed Jaggy for the night. You often see backdrops in regular Victorian photos as well as fancy dress photos. Unfortunately, with my heels on I was too tall for them! Oops! Being too tall inspired me to take some fun sitting photos.

IMG_1094 (1)
Hanging out with Jaggy.
IMG_1097 (1)
Tired after a night of dancing.

For decoration out of the ordinary, we had the lucky and unexpected use of the fabulous blue and turquoise lanterns in many of the pictures as well as multicolored paper lanterns with lights inside. We put the lanterns around the room in glass vases as bouquets. First, a picture from the set up part of the evening. Second, a picture with some lanterns creeping into the photo.

IMG_0973 (1)

IMG_1080 (1)

Fancy dress outfit, check!

Belated HSF 2013 #13: 1885 Frills and Furbelows

For my 300th post on the blog, I thought I’d share a dress that makes me smile. This dress makes me smile because of the frilliness of it which reminds me of Anne of Green Gables, because of the fact that it was very enjoyable and comfortable to wear, because I love that it is a UFO from 2013 that is finally complete, and because of the stunning backdrop I had for the pictures of it, which also remind me of Anne of Green Gables.

IMG_2725

I wore this dress to the Nahant Vintage Dance Weekend Formal Tea and Seaside Promenade in August. It was also the first outing for the my new 1880s steam molded corset and my recently made 1885 straw hat. I am pleased to report that they were all comfortable garments and accessories to wear. Being heavily boned, the corset was very supportive and thankfully didn’t feel heavy, and because it is shaped exactly to my body it was super comfortable–smoothing my figure without squishing it uncomfortably. The dress was perfectly reasonable to wear, with the exception of sitting, which required a slight sideways perch that was a bit precarious. And the hat stayed in place perfectly with two hat pins, as you can see from the pictures where my head is tilted in various directions.

IMG_2699

IMG_2689

IMG_2698

This dress has an association in my head with the puffed sleeves that Anne wants in Anne of Green Gables. While being from the wrong decade, it seems exactly like the sort of dress covered in frills and furbelows that Marilla wouldn’t waste fabric on. And just like Anne, I would often rather have the ridiculous, fashionable styles in historical clothing than the plain and sensible ones!

MARILLA: I’m not going to pamper your vanity. These are good and sensible dresses. This one is for Sunday, and the others you can wear to school.

ANNE: I am greatful, but I’d be even more grateful if you’d made this one with puffed sleeves.

MARILLA: I cannot waste material on ridiculous looking frills and furbelows. Plain and sensible is best.

ANNE: I’ve always dreamed of going to a picnic in puffed sleeves. I’d rather look ridiculous with everyone else than plain and sensible all by myself.

IMG_2706

This dress was started in 2013. I had grand hopes of finishing it that summer for the Historical Sew Fortnightly challenge #13: Lace and Lacing

Lacing is one of the simplest and oldest forms of fastening a garment, eminently practical, and occasionally decorative.  Lace has been one of the most valuable and desirable textiles for centuries, legislated, coveted, at times worth more than its weight in gold, passed down from one garment to the next over centuries. Elaborate and delicate it is eminently decorative, and rarely practical.  Celebrate the practicality of lacing, and the decorative frivolity of lace, with a garment that laces or has lace trim, or both.

And while I did make significant progress on the skirt that summer (getting all of the trimming figured out, cut, and assembled, as well as getting the skirt base and side panels constructed), I didn’t get anywhere near far enough along to have a wearable outfit. So it sat in my “in-progress” sewing box with hopes to be worked on, but didn’t really make it to the top of my sewing list again until this summer. I had enlarged and sized a pattern from Janet Arnold in between 2013 and 2015, even cutting and assembling a mockup, but that had been waiting for a fitting because I wanted to wear my new specifically 1880s corset with the dress and the new corset didn’t get completed until June. Once I had the corset done, I set to work on the dress again, fitting the mockup bodice, finishing the skirt, and making the bodice, as well as a slight delay while I made the hat to match. It’s handy to make a hat part-way through the process of making the dress, because you don’t wind up running out of time at the end and not having matching accessories!

IMG_2772

The first inspiration for my dress was this white summer dress at the LACMA. The skirt was pretty much directly taken from the original, except for the back, which has a cascade of fabric instead of tucks as on the original–I figured there was already enough fluff for me on the front of the dress. I originally planned to edge all the front ruffles in lace as well, but ran out of lace. Running out of lace also made me rethink how I was going to trim the bodice. I went back to my inspiration boards and found these dresses with inspiring bodice treatments: a seaside ensemble and an afternoon dress with very different fabrics and intent, but I thought this could be adapted for my summery seaside dress. I had only a few yards of lace left when I got to working on the bodice and I decided to save some for edging the top of the 1880s corset because the shape of the lace is perfect, but that didn’t leave me much for the bodice. It turns out I had just enough to execute the final trimming plan I decided on.

IMG_2754

Since this was originally intended to be part of the HSF, here are just the facts:

Fabric: 7ish, I think, yards of cream satin stripe cotton, 1/3ish of a yard of blue polished cotton, and 1.5 yards or so of cream polished cotton for flat lining the bodice.

Pattern: Created by me, but the shapes are based on a dress in Janet Arnold.

Year: 1885.

Notions: 9 yards of ivory lace, hooks and eyes, scraps of white cotton for finishing off the bodice edges, and vintage ivory buttons.

How historically accurate is it?: As accurate as I can be using the research I’ve done and the materials that are available in 2015. It definitely passes Leimomi’s test of being recognizable in its own time.

Hours to complete: Tons over two years.

First worn: In August 2015.

Total cost: I bought the all the cottons for super cheap, probably $3/yard, the lace was probably about $8, the buttons were a few dollars, and the rest was from the stash, so around $30-$35.

There were so many good pictures it was very hard to limit myself for this post! So here’s some more, with a bit of commentary to go along with them.

We had a beautiful day for the Tea and Promenade. It had been very hot prior to this, but the day of the event was a little cooler and the stiff ocean breezes made for a temperature that felt perfect for me in my layers and ¾ sleeves. The formal tea part of the day was at Egg Rock on Nahant (the same location as the Formal Soiree I attended last August). There was a lovely concert inside the house as well as guests lounging around outside, including me, playing croquet. At that point the stiff breeze had me worried that my hat wouldn’t stay on without pulling at my hair, so I chose not to wear it for awhile. (Thank goodness I gave it a try later, though, because it is perfect with the dress and I wouldn’t have wanted to miss wearing the two together!)

IMG_2668

11866207_10153557263049588_8661903483348243128_n

After the concert and some refreshments, the guests assembled for the promenade. As you would expect, we stopped traffic, attracted stares, and received questions from the more brave souls who would talk to us rather than just making up stories in their heads about our unusual clothing. The promenade took us to East Point, former site of the 19th century Nahant Hotel. The hotel is no longer standing, but there were stunning views of the Atlantic and the rocky coast to clamber on!

IMG_2716

IMG_2721

IMG_2735

IMG_2737 (1)

IMG_2742

IMG_2750

IMG_2776

Not me, but such a gorgeous view and cute picture that I had to share it, too!

IMG_2766

Some of us decided to head back a little early so we could stop at a small beach we had passed on our way to East Point and go wading! After the walk, the cold Atlantic water felt quite good on our feet. Here I am with stockings and shoes off, ready to head into the water.

IMG_2785

And here I am, wading in my bustle dress!

IMG_2816

There’s this picture of two ladies in bustle dresses from 1885 who look like they are collecting shells. That’s what I had in mind when I took this next picture, although looking at the 1885 picture again I see that the ladies in the picture are still wearing their stockings and shoes… I guess I’m pretty scandalous for 1885 in my bare legs and feet!

IMG_2827

Here we are, the whole wading group. It was a pretty fun adventure. I don’t think I’ve been wading in historical clothing since Newport in 2012.

IMG_2789

IMG_2810

Project Journal: Victorian Women’s Tailoring Part XI: Time to celebrate!

As a finishing touch to my Women’s Tailoring Project, I thought I’d share some silly pictures from my photo shoot with you! We received many strange looks and even had strangers whipping out their cameras to snap photos… I’m sure they were very confused about what was going on!

How many people fit behind a bustle???
Can a bustle hide behind a tree???
Waiting to cross the street...
Squeezing between cars (...I mean carriages...)
Let's all promenade!
Laughs are good, too!
Wait for me!
Strike a pose!
Don't forget to smile!
Trading hats and looking great.
Cut! I DID IT!!! Time to celebrate!

Project Journal: Victorian Women’s Tailoring Part IX: 1903 Gallery

Well, we just got to see my 1883 tailoring project. Now let’s enjoy taking a mental stroll with my 1903 tailored look! Again, there are lots of pictures to see!

1903: Wool jacket and skirt trimmed with cotton velvet. Velvet covered buckram Hat.
1903 Skirt and Jacket
1903 Blouse
1903 Skirt and Blouse
1903 Undergarments: Corset Cover and Petticoat
1903 Undergarments
1903 Corset Cover
1903 Undergarments: Combination and Corset
1903 Corset

Project Journal: Victorian Women’s Tailoring Part VIII: 1883 Gallery

Oh my goodness my 1883 tailored bustle dress and undergarments are finally finished!!! YAY! Let’s glory in the beautiful pictures and the fabulous clothes… Since I can’t decide which pictures I like best, you get to see more than a few.

1883: Wool skirt and jacket with velvet trim. Wool hat trimmed with velvet and feathers.
1883 Bustled Skirt
1883 Bustled Skirt
1883 Skirt and Jacket
1883 Jacket and Hat
1883 Undergarments: Petticoat and Corset Cover.
1883 Undergarments: Bustle!
1883 Undergarments: Chemise and Corset

Project Journal: Victorian Women’s Tailoring Part V: Fitting 1883 Tailor Made Suit

As you saw in my last post, the undergarments for my 1883 look are complete. The understructure, especially the corset and bustle, is essential to the creation of the silhouette in 1883: without these pieces the exterior garments would crumple and sag. The thing is, the exterior garment is tailored to fit this exact shape: if that silhouette is not created by the undergarments then the exterior garments just don’t fit!

Let’s take a look at the exterior garments. First, the skirt. This skirt is many layers: the one you can see now I call the “foundation skirt.” It is the part of the skirt that hangs from waist to floor without any draping on it. In reality, the foundation skirt is actually made of two layers. The first layer is the one you can see with the velvet knife pleats along the hem–the knife pleats are 10″ high (ending just above the tabs in the wool)–but don’t be fooled, the knife pleats are attached to a cotton underskirt that extends up to the waist. Why? Multiple reasons: 1-this skirt is already super heavy with just one layer of wool and the velvet trim, and I haven’t even added the drapery yet; 2-the skirt is already super warm as well, it would be too warm with velvet all the way to the waist; 3-the Victorian mindset was to not waste precious money on beautiful fabrics that weren’t seen, so this technique of using cotton underskirts edged with fancy trim is very common; 4-velvet rather than cotton would add more bulk  to the circumference of the waist, and the goal is to make the waist as small as possible. You can’t see the pins, but I did have to make alterations at the waist, since the bottom edge was already finished. There are more skirt layers coming: a gathered and draped “back drape,” and an asymmetrically pleated “front drape.”

The jacket is the other exterior garment. This garment is actually a really good example of the alterations I almost always have to make before I am able to finish a garment. The left side is how the garment fit when I put it on my model. On the right side you can see all my safety pins moving and adding darts to make the jacket fit better. Although it looks wrinkly, once I stitch all those alterations it will actually allow the jacket to fit smoothly over the torso. You can also see my mockup collar on this jacket.

What comes next? Well, because I needed to basically take out all my front darts and seams and move them, I had another fitting with my model before starting to finish the garment. Unfortunately, I forgot my camera! I’ll try to finagle pictures, but they’ll be coming later. After the second fabric fitting I move on to finishing my garments completely!

Project Journal: Victorian Women’s Tailoring Part IV: Fitting 1883 Undergarments

I’ve put together my actual fabrics! First to fit is my 1883 undergarments. These garments are essentially finished and ready to be worn.

The first layer is a cotton chemise with intersecting zigzag pattern lace insertion at the hem and simple lace edging around the neck opening and armholes. The tie is navy silk ribbon.

The corset is blue cotton twill flatlined with coutil for stability and grey silk shantung boning channels. The top is edged with black lace and off white silk ribbon. The bust also features cording across the front panels as well as flossing at the top of the boning channels.

It’s hard to see the corset detail in the first picture, so here’s a close-up. You can actually see the cording in this picture. The waistband is decorative as well as helping to cinch in the waist. The top and bottom of the corset are bound in bias silk shantung.

Here’s a small back view as well. It looks like I could have laced the bottom half a little tighter!

The next layer is the cotton corset cover with pin tuck decoration and navy silk ribbon threaded through lace around the neck. The front closes with pearl buttons down the front. You can see the corset cover detail in the two pictures below

After the corset cover is the bustle itself! It is constructed of off-white striped cotton with hoop steel bones inserted into the horizontal channels. The bottom is finished off with a nice box pleat.

Back bustle view on the left!

On the right you can see the pin tuck detail on the corset cover.

After the bustle comes the petticoat! It is constructed of cotton with lace edging. Here’s a front and side view. You can also see the pin tuck detail on the corset cover in the front view bustle picture.

Project Journal: Victorian Women’s Tailoring Part III: Mockups

I reached a point where all my patterns were complete! The next step was to make a mock-up, or toile, of each garment. My mock-ups are made out of muslin: their goal is to determine what changes I need to make to my patterns so that the garments will fit well before I cut and sew the garments out of my fashion fabrics.

By eliminating major fit issues in my mock-ups I am able to achieve a better fit in my final garments with fewer alterations. In these photos you can see the pins that mark the areas of the garments that I need to go back and change on my patterns so that the fashion fabric garments will fit better.

Look 1: 1883. In my brain this is the “bustle dress.”

1883 mockups--including the bustle!
1883 mockups.
My inspiration "cheat sheet" for this look.

Look 2: 1903. This is the pigeon breast dress.

1903 mockups.
1903 mockups.
1903 garment inspiration "cheat sheet."

Look 3: 1913. This is the tubular suit look.

1913 mockups.
1913 mockups.
1913 "cheat sheet" for garments.

Yay! My project is on its way to becoming actual garments. There’s still more work to do, but it’s inspiring to see it beginning to take shape!

Project Journal: Victorian Women’s Tailoring Part II: Patterns

The first step of this women’s tailoring project was to research what exactly I wanted to recreate. That being finished, I embarked on the next task: to create patterns for each of the garments I would be building. Each look is made up of about 8 separate garments: a chemise/combination, corset, corset cover, petticoat, blouse, skirt, jacket, and hat (the 1883 look also includes a bustle). To create the patterns for these garments I used a combination of the methods mentioned below.

Basic Sloper: a starting point for patterning

The simple undergarment patterns such as the chemises and corset covers were drafted using my models’ measurements. Pattern Drafting for Fashion Design, by Helen Joseph Armstrong, was a great starting point for creating these shapes.

The corset patterns were adapted to fit my models from the book Corsets and Crinolines by Norah Waugh.

The petticoat patterns were created using a combination of methods. For all of them I found an image I wanted to recreate, then I either used the drafting method I used for chemises and corset covers, or I used a historic pattern that was lifted from a historic garment like the patterns for the skirts and jackets (mentioned below). The images came from a wide variety of books, including The History of Underclothes by C. Willett Cunnington, Everyday Fashions, 1909-1920, as Pictured in Sears Catalogs edited by JoAnne Olian, and Victorian Fashions and Costumes from Harper’s Bazaar, 1867-1898 edited by Stella Blum.

For the outer garments (skirts and jackets), I used patterns from historic garments that were resized to fit the models who will be wearing the garments. The patterns are lifted from historic garments and printed in books such as Patterns of Fashion 2: Englishwomen’s Dresses and Their Construction C. 1860-1940 by Janet Arnold, Turn of the Century Fashion Patterns and Tailoring Techniques by S. S. Gordon, and The Cut of Women’s Clothes: 1600-1930 by Norah Waugh.

In addition, I also consulted a variety of books to get more background information about the fabrics and colors, method of construction, and look, name and use of each garment. Other helpful reference books include, but are certainly not limited to, English Women’s Clothing in the Nineteenth Century: A Comprehensive Guide with 1,117 Illustrations by C. Willett Cunnington, Underwear: Fashion in Detail by Eleri Lynn, and Authentic Victorian Dressmaking Techniques edited by Kristina Harris.

For the hats, I found an image I liked and then used millinery reference books to get more information. Millinery books included From the Neck Up: An Illustrated Guide to Hatmaking by Denise Dreher and Edwardian Hats: The Art of Millinery by Anna Ben-Yusef, edited by R. L. Shep.

More coming soon! Next, a look at my mockups of these garments!

Project Journal: Victorian Women’s Tailoring Part I: Overview

My current historic sewing project is reproducing three tailor-made garments and their undergarments from the end of the 19th century. The project aims to show the development of women’s tailoring from the 1880s to the 1910s–essentially the turning point between a tailored dress and a suit.

Look 1: 1883.

This garment is characterized by its bustle. The bustle goes in and out of use, changing shape and size, throughout the 1870s and 1880s. In 1883 the bustle is at a point where I call it the “shelf bustle,” extending from the back at an almost ninety degree angle once being covered by the voluminous skirt layers. During the 1880s, in particular, “tailor-made” garments were fashionable, but these were essentially dresses, not suits.

Look 2: 1903.

This garment is characterized by its romantic figure, featuring “pigeon breast” blousing and gracefully flaring skirts. The foundation of this shape is the new corset design introduced at the turn of the century, augmented by extra padding at the bust and rear. Tailored looks of this period separated jackets from skirts, but still these do not qualify as suits.

Look 3: 1913.

This garment stands between the corseted Victorian woman of the 19th century and the independent, working woman of the 20th century. Just a few years after this the rigid corset disappears in favor of new, lighter undergarments such as brassieres, knickers, camisoles, and girdles. Clearly, this garment is a suit, not a dress, but its undergarments remain in the past where dresses, not suits, were what women wore.

More journal entries will be coming with more information about each look as well as updates on the actual construction of these garments. Stay tuned!

Sources of Images:

1883. http://www.digitalchangeling.com/sewing/periodResources/Delineator-July1883/

1903. http://people.virginia.edu/~sfr/enam312/fashindx.html

1913. http://www2.uvm.edu/landscape/dating/clothing_and_hair/1910s_clothing_women.php