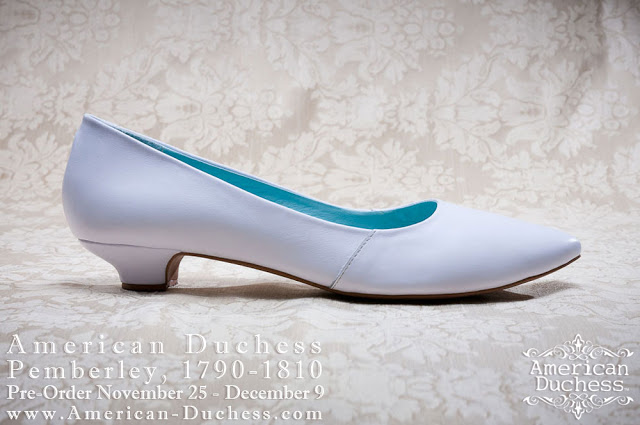
I’m sure many of you have read about the Pemberley shoes being offered by American Duchess… but in case you have not seen yet, or in case you need a reminder… American Duchess is now offering a Regency style, historically accurate shoe! The shoe is available for pre-order today (November 25 through December 9) and at least 100 orders must be placed for the shoe to be produced. Let’s make it happen!
Also, given that it is the holiday season (which is a time for wishes, you know), I would like to wish that a higher heel Pemberley shoe would one day be produced by American Duchess… I envision a shoe with a 1 1/2″ – 2″ heel that can be worn with late 19th century clothing, like the styles below…
I have a whole list of projects to work on during this Thanksgiving period: I need to reinforce some trim and closures on various gowns that will be worn during the next few months, I need to build a flowered hair accessory (I hesitate to say wreath) to match my blue 1860s ball gown, Belle, and I need to construct a Regency corset! I’ll pass over the stitching of the trim and closures (because, really, I don’t think that would be an exciting post) and save the hair ornamentation post for later. That leaves us with one more topic… The Regency corset.
I don't have very many good pictures of this gown (I'll have to get some!) but I'm on the far right. Click on the link to the left to read more about this ball!
Here’s the background on this plan: I have a Regency dress that I built last February. At the time, I could not build the undergarments that would accompany this gown at that time. (You can read the story of the dress here.) Now I have time and so I plan to backtrack to this project and make the right undergarments! I have a chemise which will work (you can see it under my 1780s corset in the photos in this post) because chemise styles were unvaried from the late 18th century through the first quarter of the 19th century; however, I do not currently own a Regency period corset!
First of all, what is the Regency period? The term brings to mind Jane Austen books and films and general ideas of the early 19th century, but upon closer inspection Regency is actually more specific than I was thinking. I’ve got two relevant definitions for you from the Oxford English Dictionary.
Noun: Senses relating to government or rule by a regent. Usu. with capital initial. The period during which a regent governs; spec. the period in France from 1715 to 1723 when Philip, Duke of Orleans, was regent, or in Britain from 1811 to 1820 when George, Prince of Wales, was regent.
Designating a style of architecture, clothing, furniture, etc., characteristic of the British Regency of 1811–20 or, more widely, of the late 18th and early 19th centuries, featuring neoclassical elements often with Greek and Egyptian motifs.
Regency is a more specific period of time than that of the overarching Georgian period, which includes the reins of George I, George II, George III, and George IV of Great Britain. The Georgian period is from 1714-1830 and sometimes includes the years 1830-1837 as well. 1837 marks the beginning of Queen Victoria’s reign, which is where the term Victorian comes from.
Upon reflection I realized that I had forgotten the year my dress is from! Certainly it is Georgian, but is it really Regency? I had made the gown in a rush and so I had to retrace my steps and really think about what specific span of years the gown fits into to answer that question. It turns out that the gown is, in fact, from the Regency period: it is from 1816-1819! Whew!
Once that information was determined, I could move forward and research the corset shapes and patterns of that specific period (that is, 1816-1819). It turns out that patterns in Norah Waugh’s Corsets and Crinolines jump from the late 18th century to the 1820s; however, I did find images of extant corsets from the first part of the 19th century. “Oh well,” I thought, and used the images and the 1820s pattern in Corsets and Crinolines to drape a pattern.
Here are some of the research images from the Metropolitan Museum of Art. I’ve included a wide span of years so you can see the development of the corset shape over time. Note the bust and hip darts as well as the beautiful quilting that begins to define the waist by the 1840s.
c. 1811 Cotton Corsetc. 1811 Cotton Corset Back1815-1825 Corset (I really like the simple lines and straight forward color combination in this garment: this is my most inspiring image. It is interesting that the lines of this corset are so simple, relative to these other examples. This corset seems to be lacking hip darts or an inward angled front panel plus side panel.)1820-1839 Cotton and SIlk Corset (the embroidery on this corset is great)1820-1839 Cotton and Silk Corset Back (I especially like the back)1830-1835 Cotton Corset1830s-1840s Corset
I am including these last ones because I think they are lovely, even thought they are not from the period I need to build. I’ll have to keep them in mind for future!
1820 Corset (this is in the Collection of the Kyoto Costume Institute)1830-1839 Cotton Corset
Next year, 2012, is the 100th anniversary of the sinking of the Titanic. So expect to see an increase in passing mentions of the event as well as reproduction dresses being built by costume historians and seamstresses. There will also be lots of 1912 themed events coming up. Anyway, I want to start the season by sharing this fabulous 1912 dress with you from the Diary of a Mantua Maker. Enjoy!
1912 gown
This gown has a related post on the blog Diary of a Mantua Maker. In short, the dress uses the pattern in Janet Arnold’s 1860-1940 pattern book to create a unique version of the gown. I encourage you to visit the post to read the description for yourself and see more photos! I think it was quite a success.
The Salem Light Infantry Levee and Ball was an event hosted by The Commonwealth Vintage Dancers and Salem Light Infantry in October 2011.
In 1861 the members of the Salem Light Infantry
held a ball on their return from service in the Civil War.
For a brief moment,
before joining other units and returning to battle,
they celebrated friends and fellowship.
This event was held in Hamilton Hall in Salem, Massachusetts, in the hall where the original event was held 150 years ago.
You can click here to see the event announcement. If you are interested in learning more about the Salem Zouaves you can view their website by clicking here. You can also read one of my older blog posts to learn about Civil War Zouaves in general: A waltzing Zouave?.
First, let me share with you a video of the Salem Zouaves performing a military drill during the course of the evening.
Second, let me share with you some photos of the evening. It was quite lovely!
Waltzing back in time on a fine October eveningDancers at the ballTaking a rest from dancingI met another young lady who also took a break from dancingSalem Light Infantry ZouavesWatching the Zouaves
I constructed this 1780s ensemble to wear to various 18th century events. If you remember, I decided in the beginning of September to construct a robe a la anglaise and accompanying undergarments. Most of my commentary can be confined to captions (which also allows me to include more photos, so that is exciting!). Enjoy!
I attended the Sudbury Colonial Faire with friends: Carly and KatyWe found a nice woodsy background to take pictures of our outfitsAnd it’s imperative that you look at the camera sometimes!We took in the sights (mostly that meant watching the fife and drum units)The vendors were also dressed in period clothing, but most of the spectators were not: we were asked many times to have our photo taken with random people (and then even more random people snuck in to take cell phone pictures that they didn’t ask permission to take!)Ooo, this is a good one because you can see the pleated trim on my bodice(warning: inside joke coming) Jenny, you will appreciate my pumpkin picture! Happy fall and happy birthday!We found this really adorable garden that was so inspirational for more pictures!The garden has a bench that is perfect for a quick break and a few photosWe traded cameras so that we would get pictures of ourselves on our own cameras! Genius!Then we saw this lovely section of the garden and had to take more picturesThere was this great dried branch on the ground that was a perfect picture prop!I made friends with the bust on the brick wall and he was accessorized with the dried leavesI really enjoy shadow pictures, but this is especially great because you can see my silhouette!We were lured out of the garden by a glimpse of this fabulous pond!And upon closer inspection, the pond had a picture perfect bench just waiting for us!So of course we all had to take turns being picturesque on the benchIt was a lovely setting!We finished up the evening by joining more friends at a ball
Wohoo! My 1780s stays are complete! I think they turned out quite well. They certainly resembles my inspiration image. You can see that image and read more about the construction of these stays by reading this previous post.
Finished frontI used 1/4" linen tape for the lacingThe lacing holes are hand sewn eyeletsSide viewSide front view
I made the chemise as well. It is just a simple linen tee shape without set in sleeves. It is mid calf length and has a low neckline in front and back.
Soon I’ll post pictures of the finished 1780s exterior garments as well!
This Etsy shop (empireroom) has wonderful vintage lace for sale by the yard! The prices are very low and even better for bulk lace (over 20 yards). The seller, Jayne, has been quite helpful in providing me with information about bulk pricing and quantities. The only down side is that she is in Australia, so shipping is slightly expensive. But you should check out her selection anyway!
I have found other lace sources that have lower prices, but not for vintage lace! Usually the low prices are only for modern made lace, which means that a distinct measure of discernment is needed to choose lace that is the right scale, color, and pliability for the project.
Most of the lace listed on this site would work very well for a reproduction 19th century garment, I think. I can especially envision an Edwardian skirt or blouse embellished with some of this lace as edging or insertion, but I can also envision the lace being used to trim undergarments such as petticoats or chemises.
I thought I would just quickly share with you this 1812 Tailcoat Pattern. You can find it in the pattern section of Wm. Booth, Draper. The pattern actually has a wider date range on it than strictly 1812: it is listed as a tailcoat pattern 1800-1820. This is the description:
This tailcoat pattern is the first well made civilian tailcoat pattern specific to the first two decades of the 19th century. The pattern comes with three sizes: Medium, Large and XLarge. There are two options for the collar, comprehensive directions and documentation.
And here is the information about the quantity of fabric needed, etc. (the underlined sections are other items that Wm. Booth, Draper carries):
As I mentioned in my last post in this Project Journal, I decided to make a pair of stays like the one to the right. I like the unique features of these: specifically the use of colorful fabric, the fact that this is fully boned, and the cording in each seam as well as the absence of shoulder straps and tabs. I adapted a pattern from Corsets and Crinolines by Norah Waugh. The pattern I started with had straps and tabs but I eliminated those elements to reproduce the pattern of these inspirational stays.
Cane boning
I decided to use cane boning for these stays for a few reasons: 1) I wanted to try a new material for boning 2) cane boning is period correct for the 1780s 3) given the amount of boning needed for a fully boned pair of stays the cane boning was much more cost effective (you can see the quantity on the left–it was about $15 from Wm. Booth, Draper) and 4) the cane boning seemed like it would be super easy to manipulate and, most importantly, to cut (and it was! normal scissors easily cut the correct lengths needed and it was easy to round the ends a little bit as well!). I actually only wound up using approximately half of the cane boning that I bought, so that means that I have plenty to use for another future project!
The silk that I decided to use as my exterior fabric is a fabulous damask. I originally thought about stitching my boning channels through the exterior fabric (as in my inspirational piece) but decided against that idea on this fabric, because it would really have just been way to much going on with the pattern and so many stitch lines. You can see the silk pattern a few pictures father down.
Stitching the boning channels
I didn’t want to stitch boning channels through my silk so I started the construction process by stitching the boning channels through two layers of cotton. You can see that I drew lines on the fabric so I could make nice, straight lines. The nice this about this is that I covered the pencil marking side with the silk, so on the inside of the finished corset all you can see is the stitching with no indication of pencil lines!
You can see the pencil guide lines on this side of the corsetOn this side there are no pencil lines!
I did want my silk to roll around the center back opening on each side and then be included in the seam attaching center back to the next piece, so I stitched those silk pieces into the seams of the cotton. I just kept the silk out of the way while sewing the boning channels. Then, once the boning was complete, I stitched the remaining silk pieces to the flapping center back pieces and turned the whole thing so that the silk was on the outside with the seams facing the side of the cotton that had the pencil lines drawn on. Thus, the silk is just a covering for the cotton, it is not actually attached into the seams of the cotton except on the inside at the side back seam. You can see what I mean in the pictures below.
Stays with the boning channels sewn (you can see that only the center back silk pieces are attached at this point)Stays with the cane boning inserted, before the silk is sewn onThe silk has been attached (you can see the cording and the pattern on the silk in this picture)
At this point the stays are almost finished! The last few tasks are to bind the edges (I’ll be using bias strips cut from the same cotton as the cording and lining) and work hand sewn eyelets along each side of center back. More pictures to come!
Quinn, taking a short break from dancing at Ochre Court
Well, I am exceptionally delayed in posting about this event (it was in August), but I was inspired today to remember how fabulous this was and to reminisce… So here we are! I was able to wear Annabelle, my latest 1860s dress to this event. You can read more about this dress by clicking on this link. I have to say, I did receive one comment that I looked “like Scarlett O’Hara.” Whee! That is really a dream come true for me… you know she does wear a white flounced gown in the movie… I intentionally did not make a gown just like hers (for one thing, mine does not have red trim).
The mid-18th century ball at Ochre Court was just one event hosted by the Commonwealth Vintage Dancers during Newport Vintage Dance Week 2011 in Newport, Rhode Island. And yes, that is the Newport of fabulous historic mansions! (Newport Vintage Dance week was included in the New York Times’ Evening Hours by Bill Cunningham on August 21, 2011. Click on this link to see Mr. Cunningham’s wonderful pictures of various Newport Vintage Dance Week events!)
Aside from repeating (many, many, many times) how absolutely fabulous this event was, I don’t have a whole lot of commentary. Thus, my commentary will be confined to captions, so that way I can include a lot of pictures! Yay! I hope that you are able to look at these and be transported to this historic mansion full of hoop-skirted ladies, distinguished gentlemen, and elegant music.
This photo comes courtesy of my friend, Carly. This is the main ballroom at Ochre Court.Front stairs at Ochre Court.Ascending the red carpeted stairs to the upper levels.Ochre Court main ballroom upper levels and ceiling... Beautiful!!!Looking down on the main ballroom at Ochre Court.Oh look! There I am, watching the dancers below!Look! There's someone taking pictures! (Look at the fabulous detail around me!)Ah, now you can really appreciate the intricate detail!Time to descend the stairs and dance!And here are Terri and Carly, also descending the stairs!Dancers at Ochre Court.More dancers at Ochre Court.Dancers in the dining room at Ochre Court.Strike a pose by one of the enormous fireplaces!Carly in front of the fireplace.Taking a breather in the library at Ochre Court.Would you care to dance? Ochre Court main ballroom.One more scene at Ochre Court.Saying good bye to Ochre Court at the end of a fairytale night.