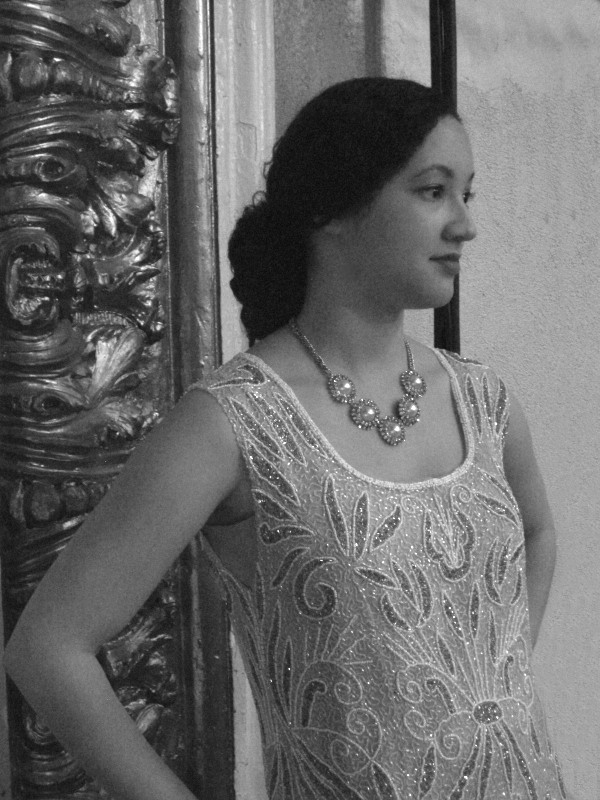
I think I like them better as pictures, though perhaps not as much for showing off the dress. They really have more of a 1920s feel to them, don’t you think?
Well, it’s June now, and that means summer to me. I’ve been slow to post about my kite making adventures because I was busy posting about other things, but it seems fitting for this post to be the first one of June–summery, somehow.
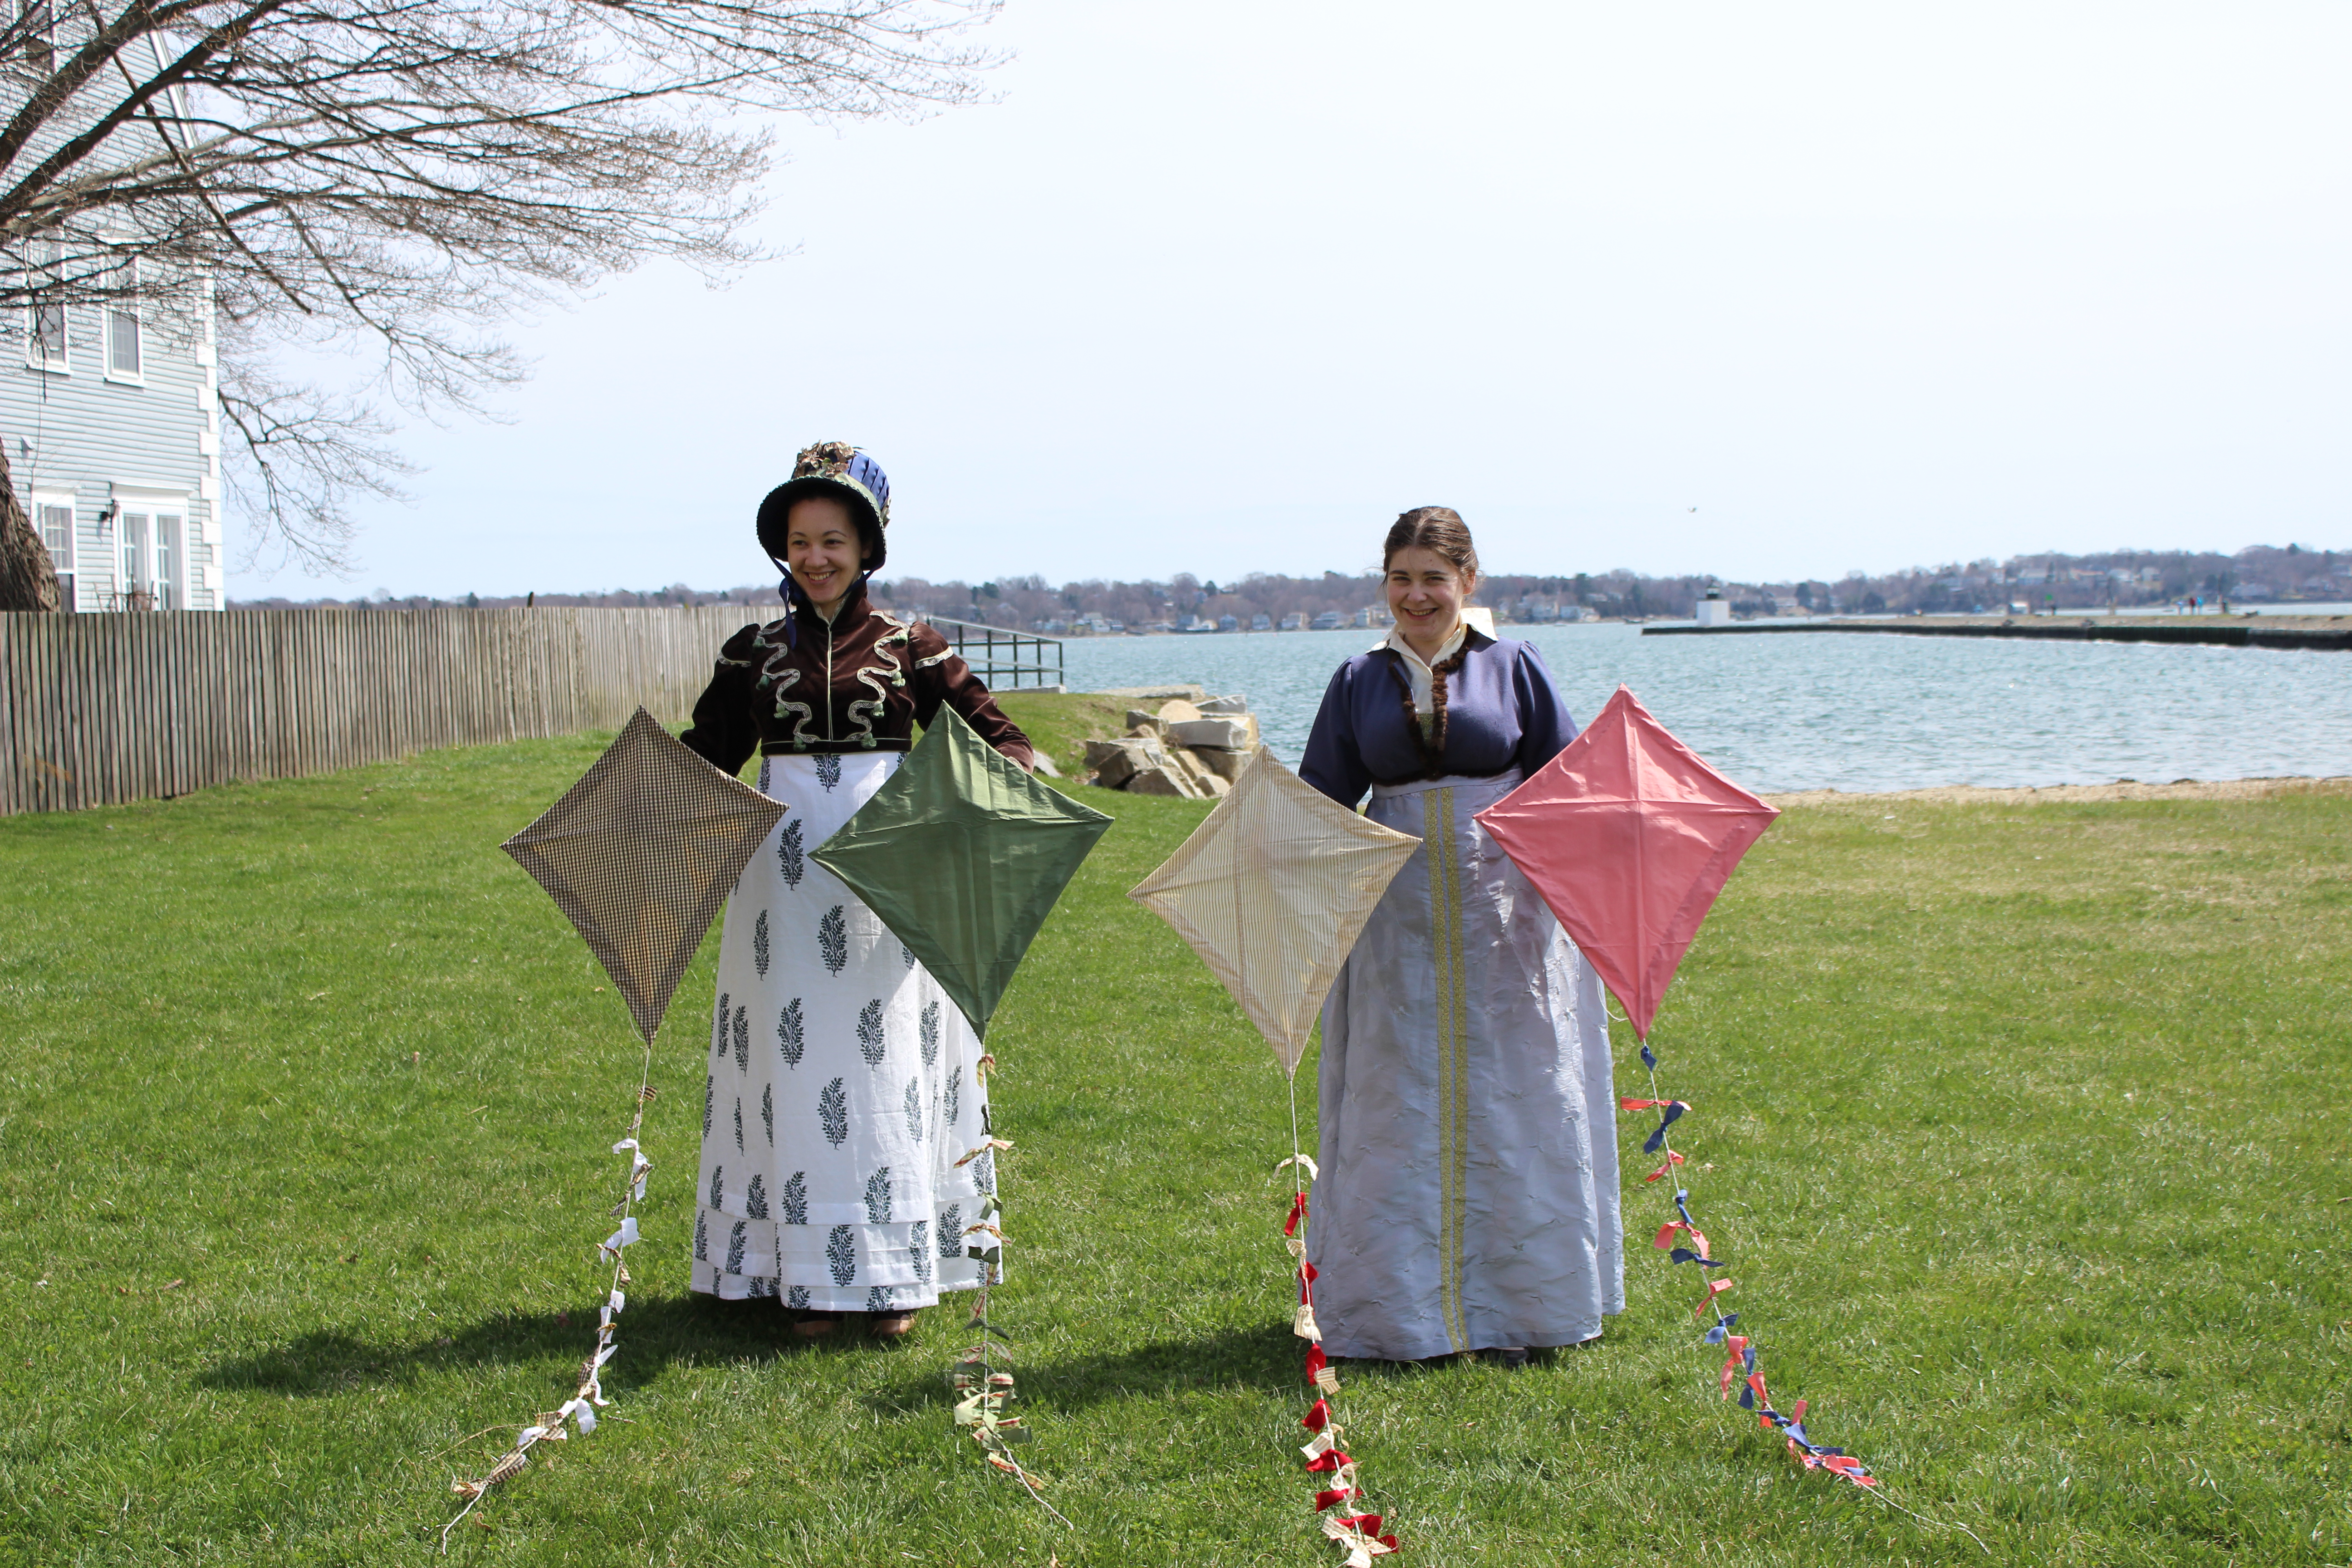
After the official end of the Regency Dance Weekend I’ve been posting about recently, my friends and I stayed in the Salem area to relax a bit and have some further Regency adventures. We had been brainstorming about what sort of activity we might engage in that was outside of our usual occupations and had settled on the idea of flying kites!
I did some research into Regency kites and spent some of my evening time during the weekend sewing these four silk kites with some help from friends.
Plaid, green, striped, and pink.
I didn’t find much to go on with the kite making. The best source I found was Jen’s post about Georgian Toys on her blog Festive Attyre. The post includes a link to this kite making how-to as well as a link to this 18th century extant kite. Unfortunately, I couldn’t find more information on the extant kite than that which is on that one page. Jen’s post is great and includes fun information about other Georgian toys as well as kites. The how-to link is a good one as well, though I did sub out modern methods for more period ones. For example: there is no tape to be found, instead there are stitches.
Making the kites was fun. I went to Home Depot to buy the dowels for the kite frames. They were cheap and luckily you can saw the lengths to be what you need while you’re in the store (good for me since I don’t own a saw!). I also bought twine there. It’s a poly-cotton blend (boo), but it’s smooth on the hands, so that’s worth it! The kite tails are bits of the main fabric and a contrasting fabric just tied around the twine. Instead of notching the ends of the dowels after they were cut (I tried, and it failed, because the dowels just wanted to splinter) I just wrapped the twine around the ends enough times that it wouldn’t move. The method definitely worked and sometimes that’s all you need.
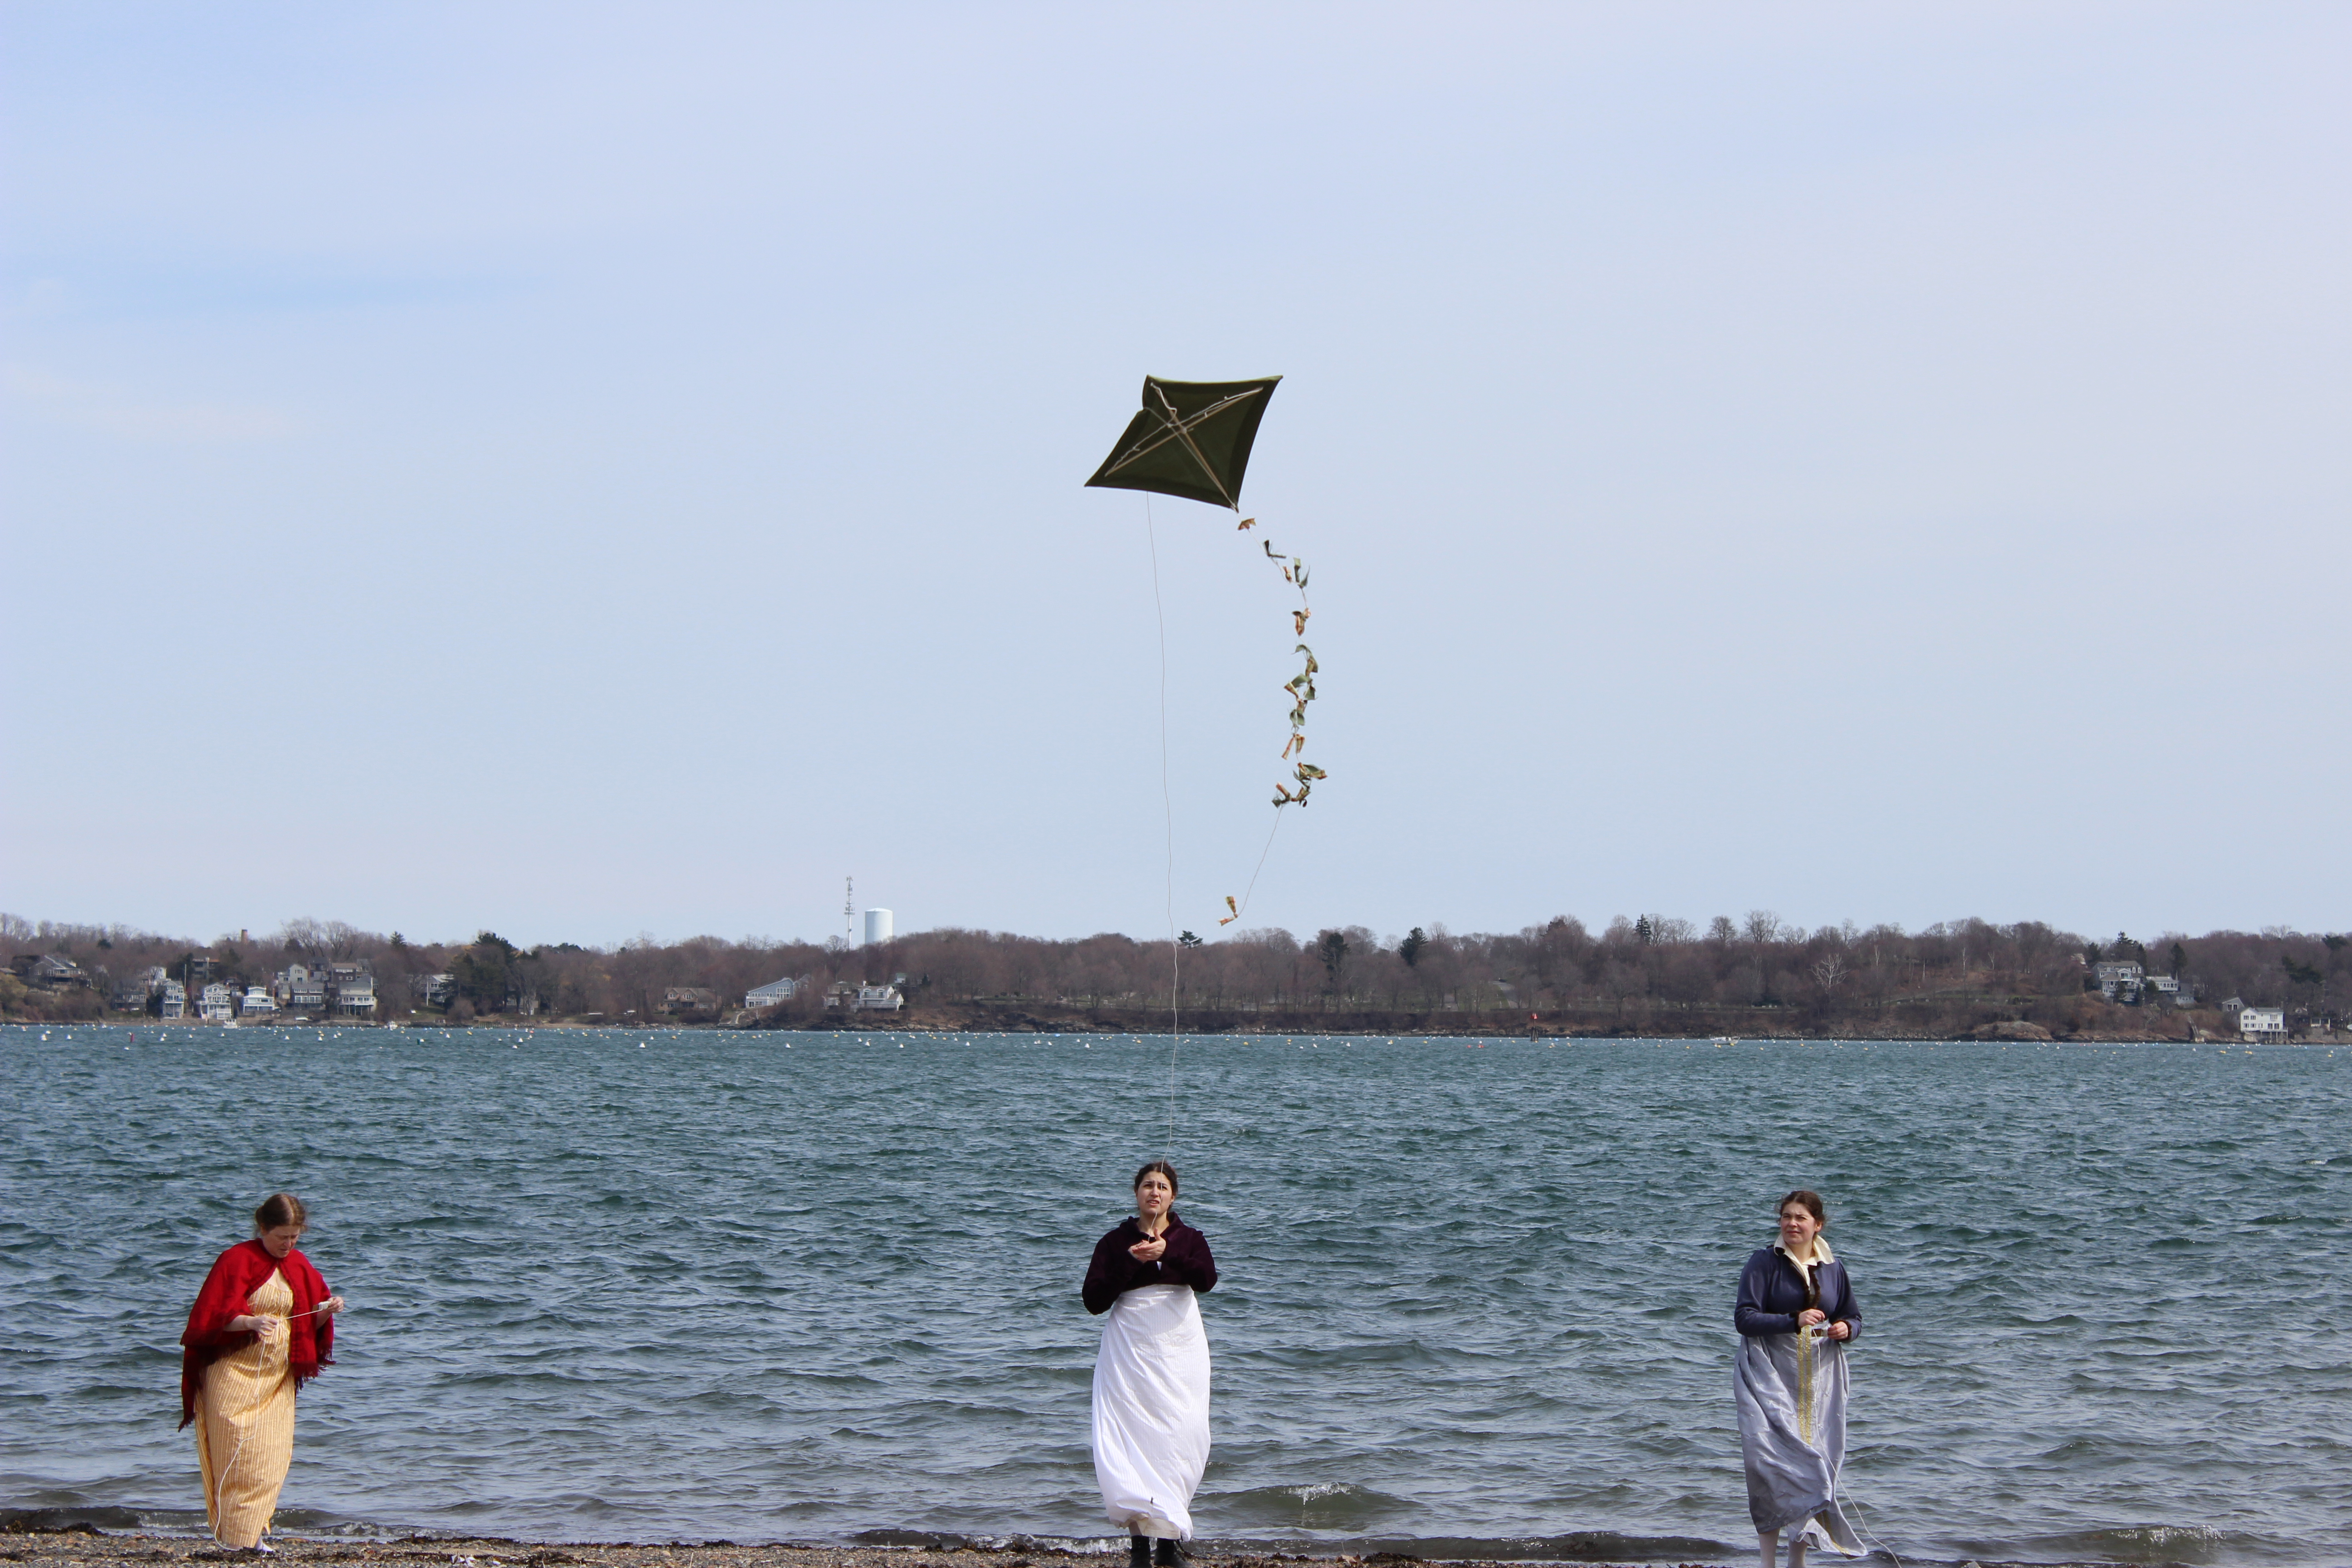
Despite the fact that it was super windy by the water, we had trouble getting the kites to stay in the air. I’ve surmised that my kite engineering skills are not super outstanding, because the kites did lots of circles near our head height and then dove into the ground… over and over and over again… It was a bit frustrating. These pictures capture the few times we got the kites up in the air. Trust me when I say they didn’t stay up very long!
Perhaps a running start?Perplexed but still trying.Clearly this kite did not want to go up.Triumph! (If only for the moment!)This kite had the best luck at staying in the air.Another successful moment.
There were some adjustments and kite injuries along the way. One of the dowels in the pink kite broke, so I have to figure out how I’m going to fix that. The other kites had things like alternate bridles made and pennies sewn into the edges to try to add weight. Some of those things seemed to work. I guess I just need to do some research about what makes kites stay up. I’m not sure the tails worked very well, either. They tangled easily and were hard to sort out again. If you know anything about kite making and have tips, I’d love to hear them!
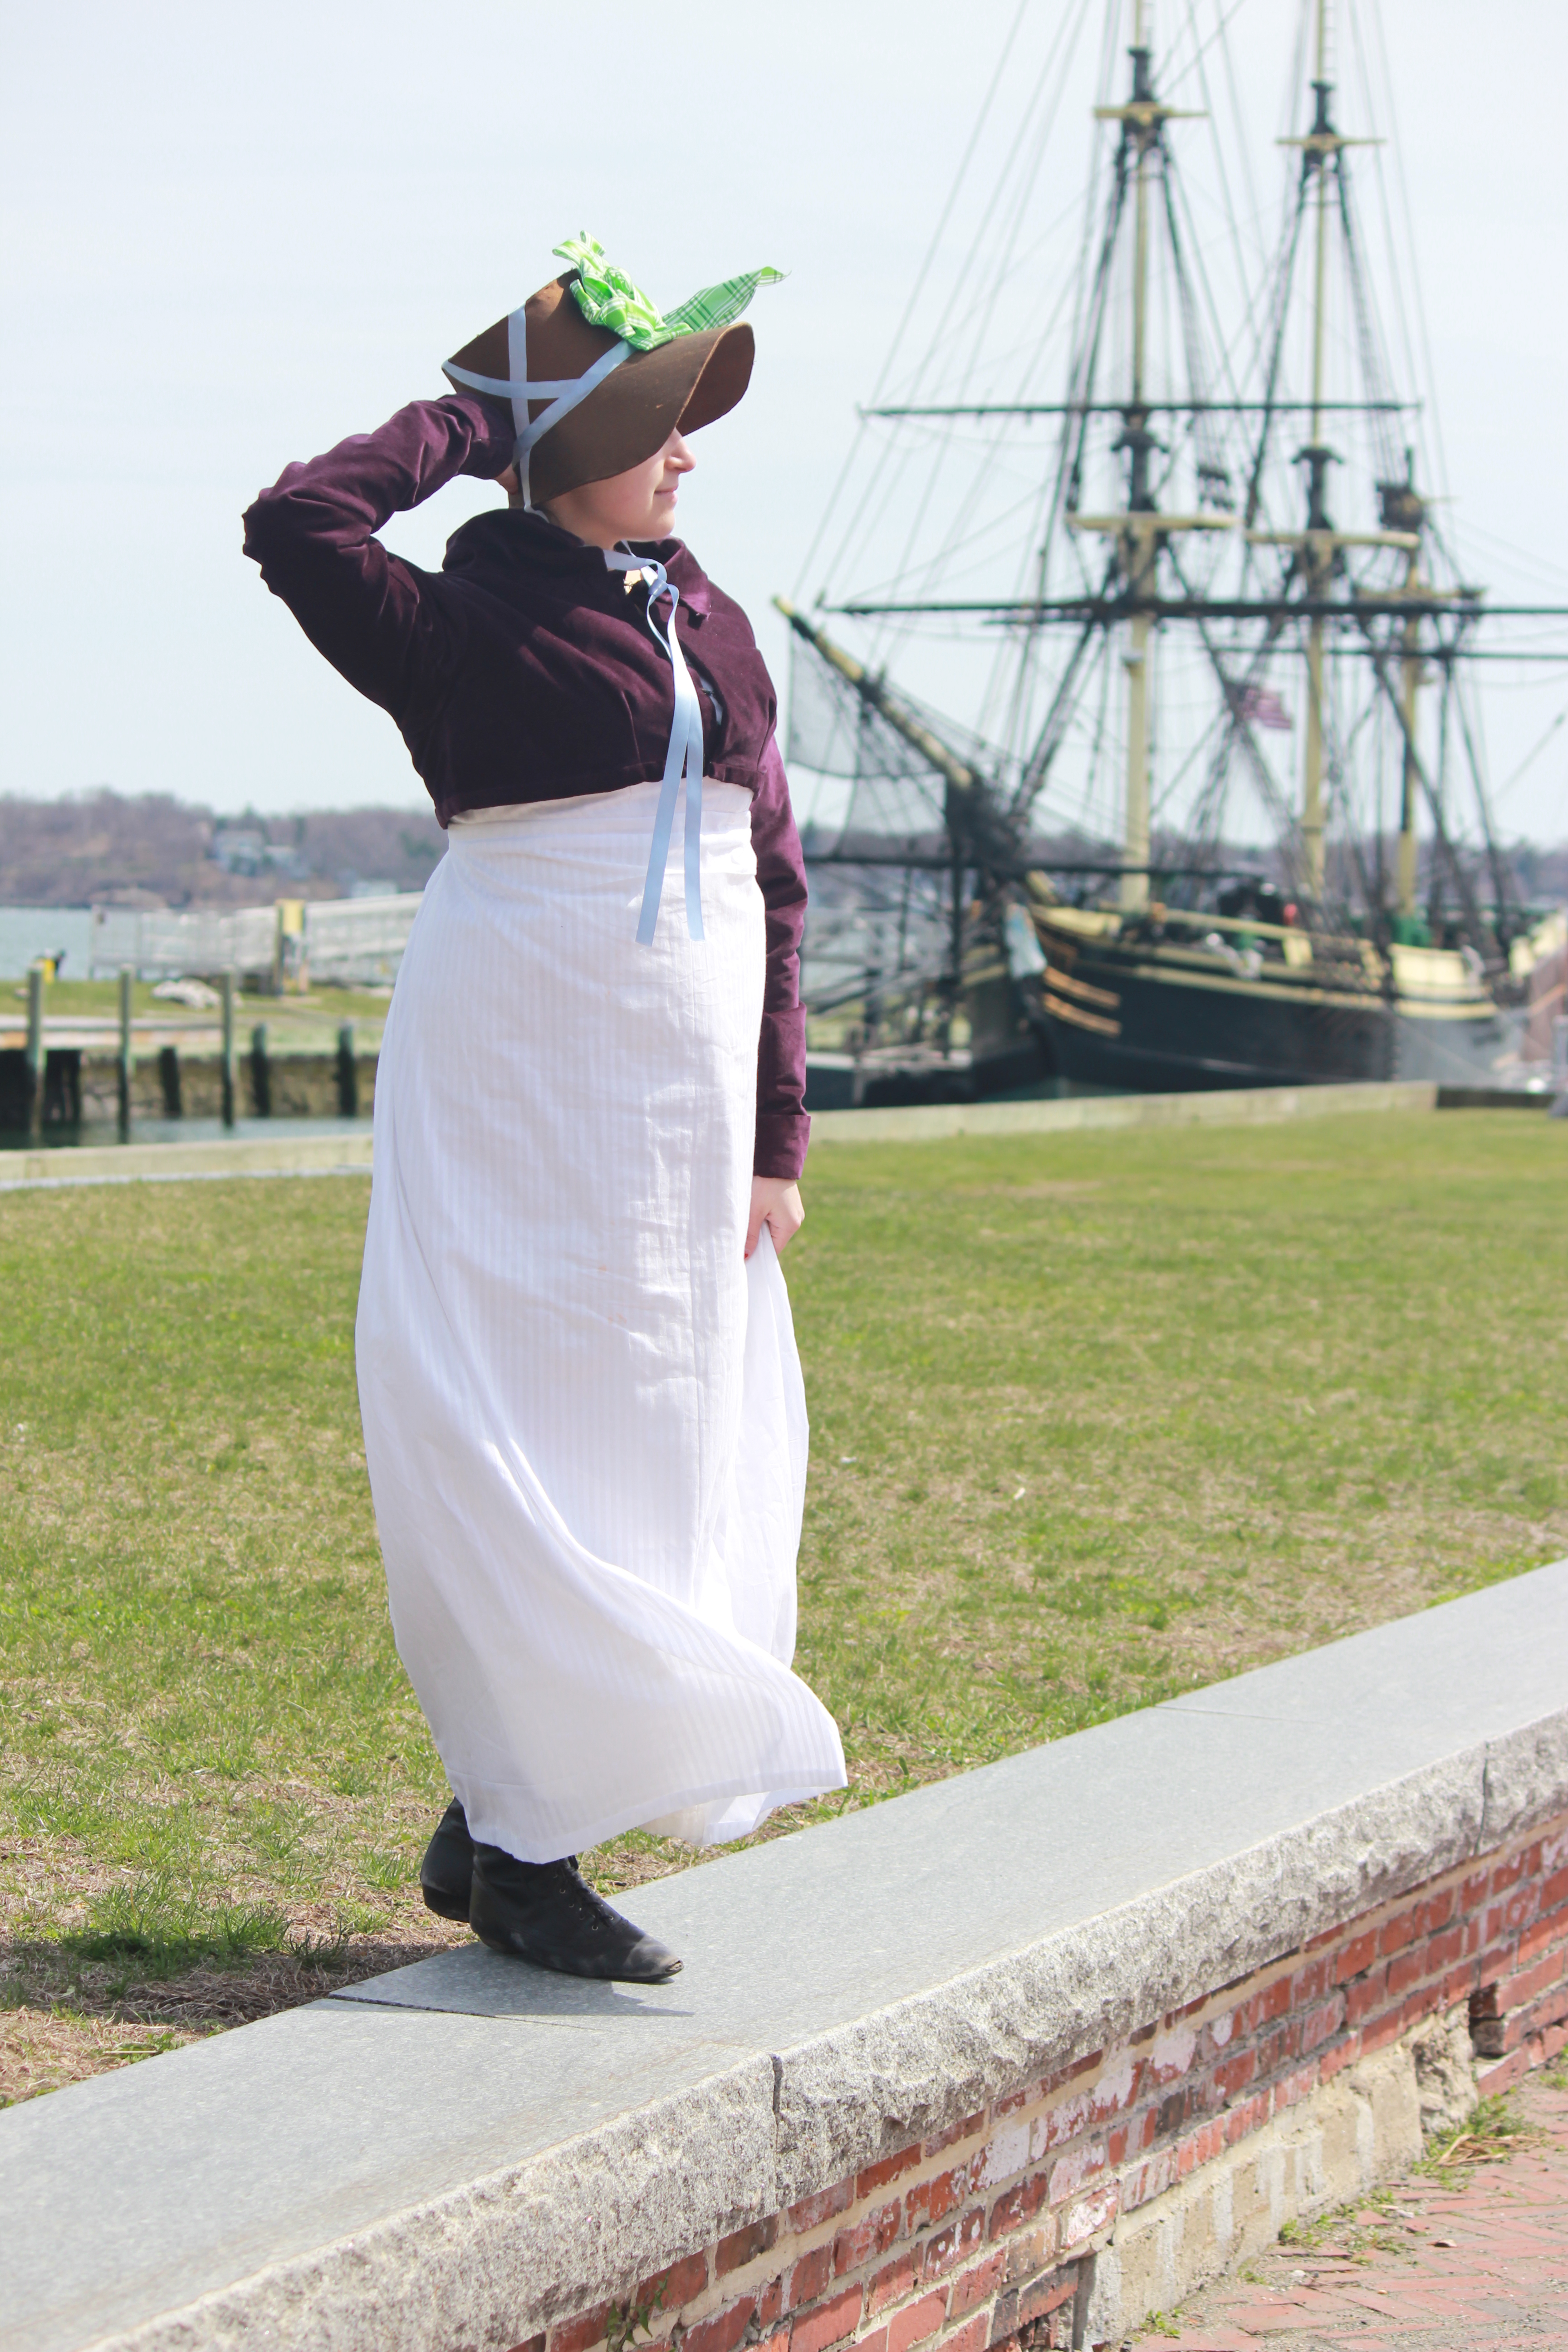
This is definitely something I plan to work on and try again. Perhaps at a summer picnic? We’ll see. It was a fun endeavor, despite the diving kites (and I had the opportunity to wear my new Tree Gown again!). Plus, there were pretty places nearby to take pictures!
Perfect photo opportunity.It was pretty windy, so hat holding was totally necessary!
In my opinion, it looks like a furry animal (goat, sheep, elk???) got entangled with a fringe machine. All those shades of brown are not pleasing together, to my eye. I imagine this must be very heavy.
What do you think? I’d love to hear from you if you have a differing opinon.
Recently, I’ve been doing lots of thinking about and planning for a variety of summer sewing adventures. Whenever new projects begin there is a lot of research into the silhouette, cut, and fabrics. I’ve got my oft-referenced books, but the internet contains caches of great (and trustworthy) information as well, if you look in the right places and are wary of the information that is untrustworthy.
Here is one new information source you probably haven’t come across in your internet travels: the Commercial Pattern Archive at the University of Rhode Island. “CoPA-Online contains over 50,000 scanned images (garments & pattern schematics) from 42,000 commercially produced patterns, dating back to 1868 and is growing daily.” Here is the background on this great resource:
The Commercial Pattern Archive database, CoPA, provides a unique tool for researchers and designers to recreate or date clothing from 1868 to 2000. There are several collections from the States, Canada and the UK represented in the database which functions like a Union Catalog of pattern collections. The cornerstone of CoPA is the Betty Williams Collection. Betty Williams, a theatrical costumer in New York City, pioneered research on commercial patterns in the early 1980s. She became a leader in the field, establishing a major personal pattern collection and encouraging others to actively participate in the collection and storage of patterns. Betty passed away in 1997 leaving a wealthy legacy of research, and an extensive pattern collection now housed at the University of Rhode Island. The Williams Collection is combined with the URI and Joy Spanabel Emery Collections in the Commercial Pattern Archive in URI Library Special Collections.
One of my students shared this resource with me a few months ago and I have only just started digging into all the wonderful information that is available. You have to subscribe to see all of the patterns in the collection, but there is a free sample search that brings up a limited amount of patterns. I’ve just been using the free sample search and have found lots of fabulous patterns. Some of the patterns just show the envelope front images, but a lot of them also contain an image of the construction pieces. It’s great, because you can see lots of patterns and layouts for different silhouettes from different periods. The archive includes clothing patterns for men, women, and children, nightwear, underwear, swimwear, outwear… a huge variety of patterns and information! It is also possible to arrange to visit the archive in person.
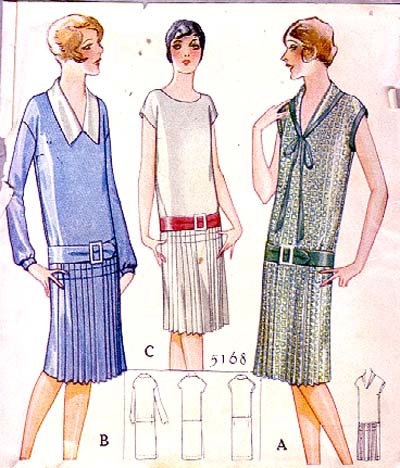
Coming up in my sewing queue for the summer are garments from the 1760s, 1860s, 1880s, 1920s, and 1950s. Ooo, exciting variety, right? You never know in what period I’m going to turn up next! (Except that in the past it was pretty likely to be between 1810-1930… but I’m pushing the boundaries now on both ends!) So far I’ve accessed CoPA to find resources for the 1880s and 1920s. Here are some examples:
1885 Beatrice Bodice Pattern at CoPA.1927 Slip On Dress with Pleated Skirt Pattern at CoPA
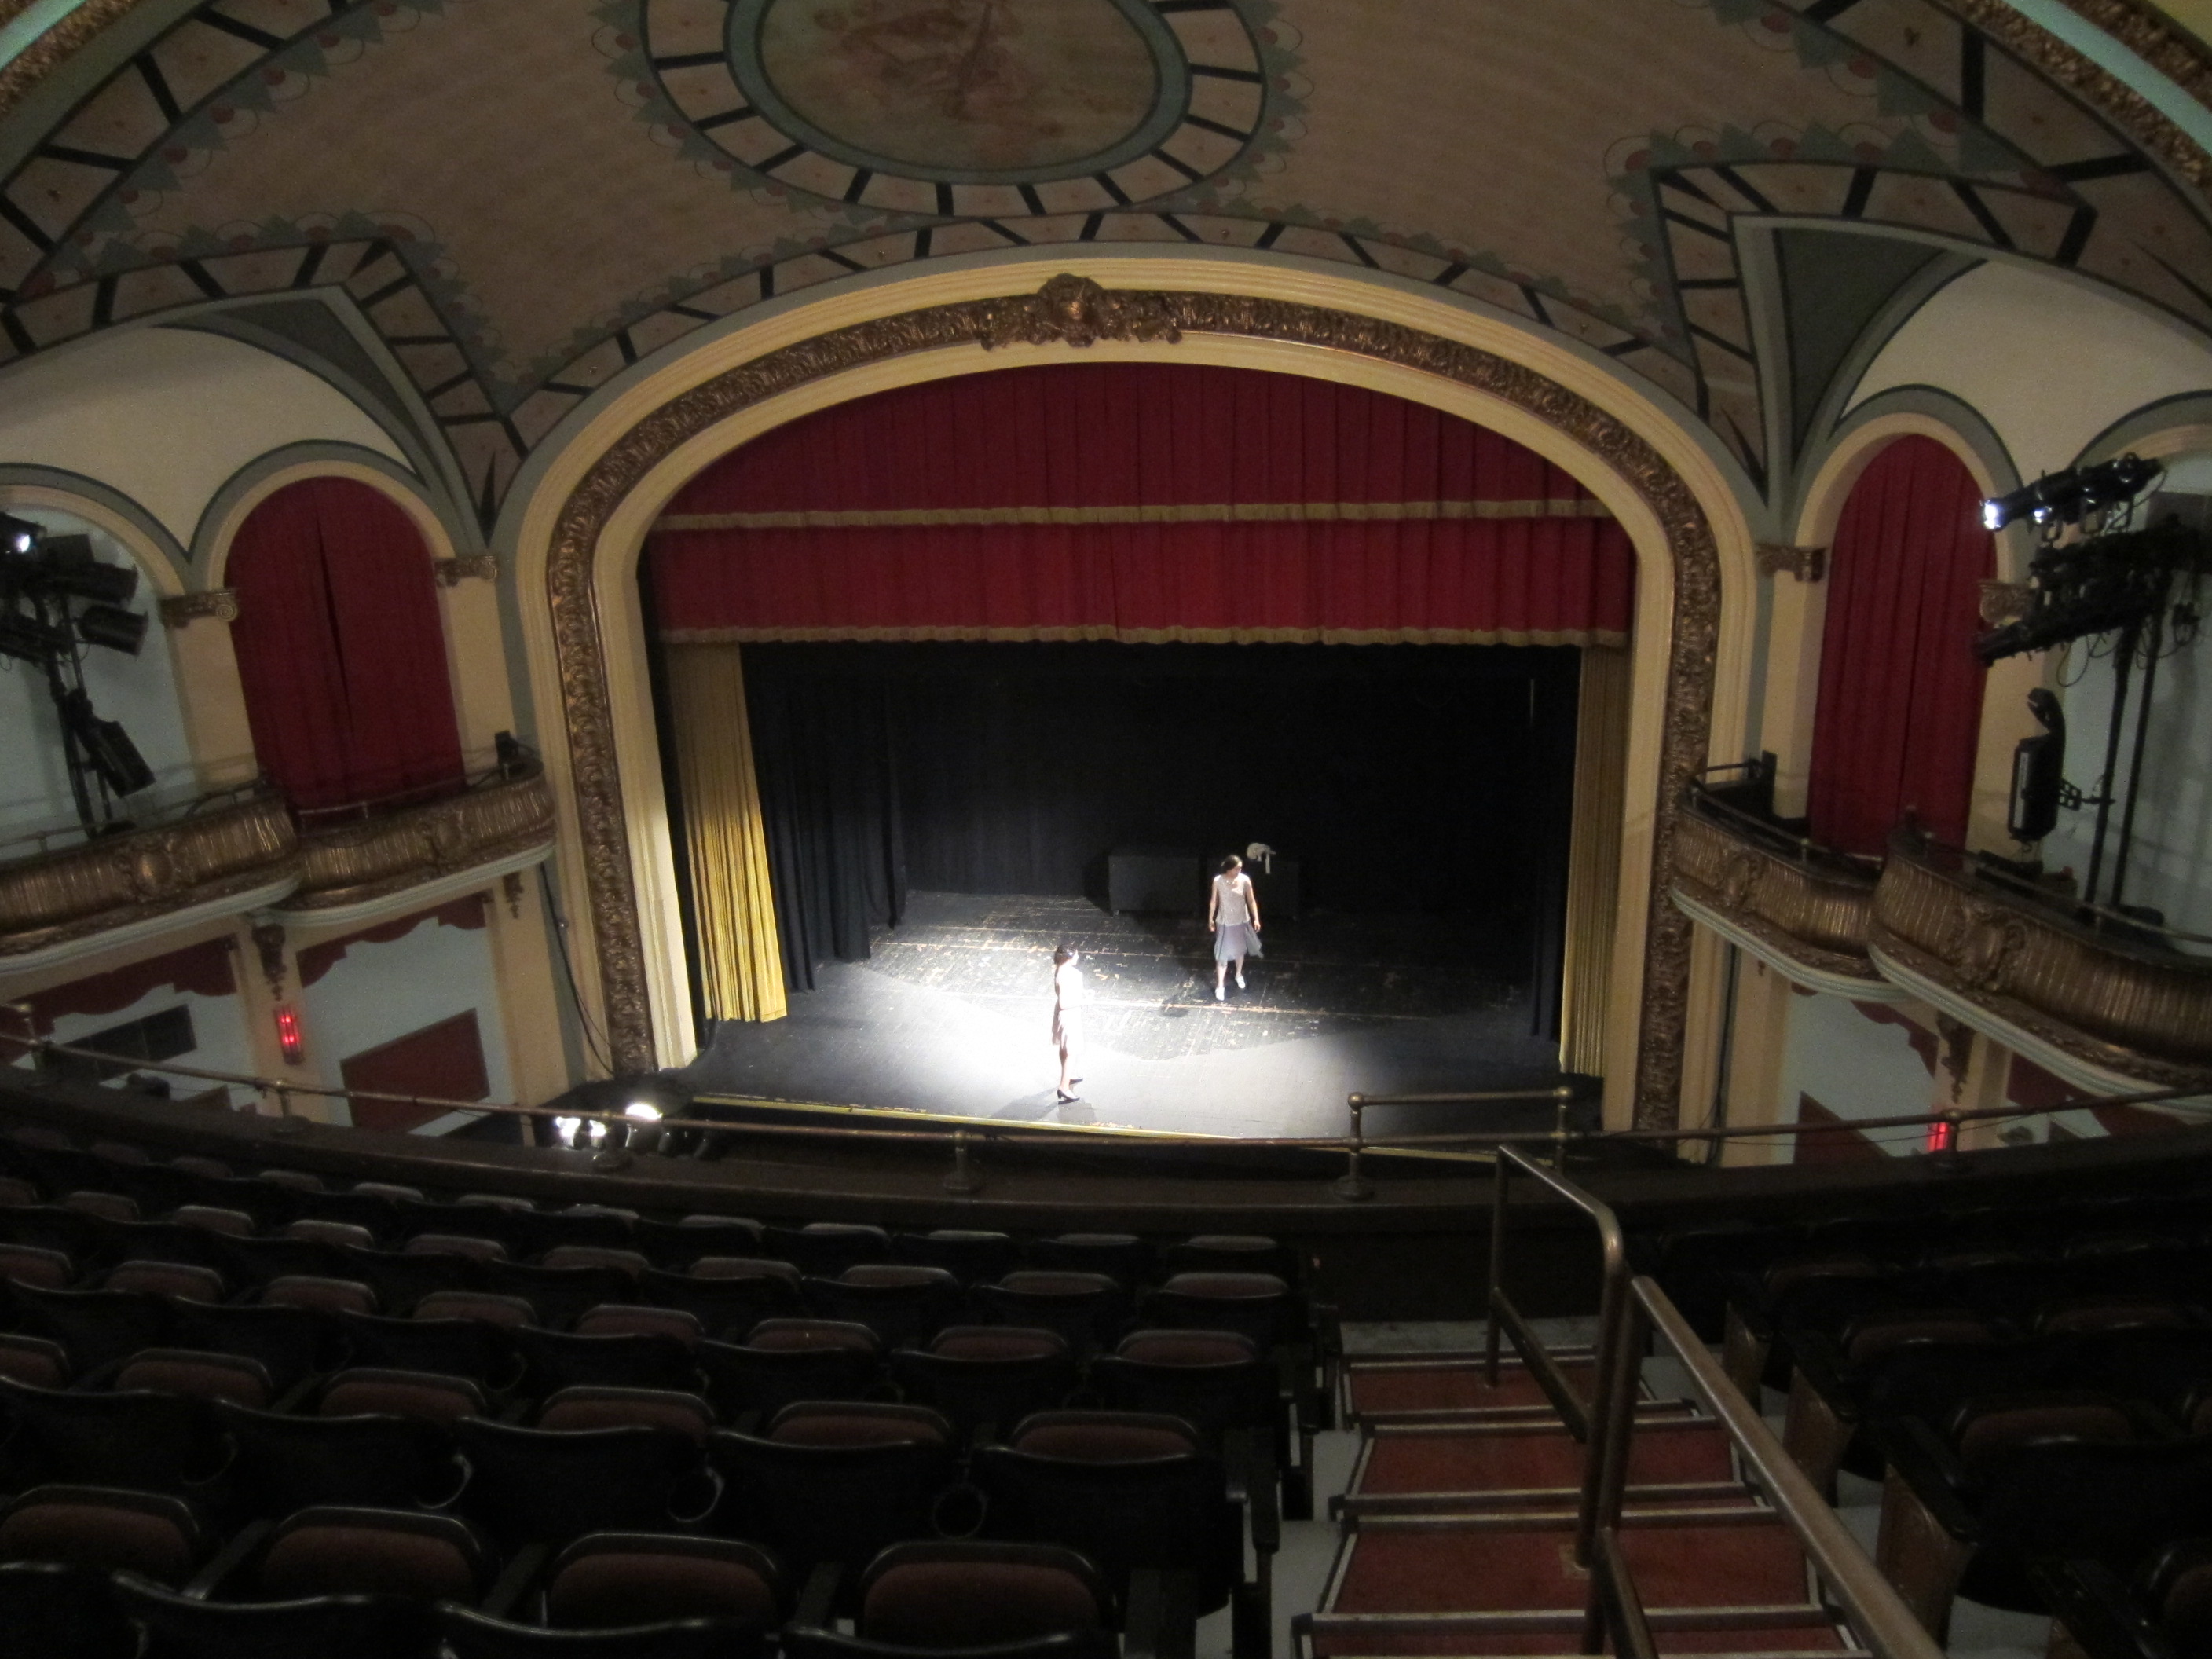
View from the balcony. It’s quite grand and those curtains on the stage are functional!
I never did like reading The Great Gatsby and I didn’t enjoy the movie much either (especially all the modern music! I don’t think it worked!), but it was still fun to be there with my friends having a good time and looking great.
Standing around during our rehearsal.
The stage was a fun place to take pictures, and you know we always like to take lots of pictures of ourselves!
Some people are much better at making picture faces than I am!
We performed a one-step, a tango, a foxtrot, and two Charlestons! One Charleston was a silly silent-video-like story of a girl trying to teach a guy how to Charleston and ending with the two of them plus an extra five ladies doing Charleston-in-a-line. (You can see some pictures of Charleston in a line from last year when we went to Newport.) The other Charleston was five ladies facing the audience and doing various Charleston things in a row.
The best pictures I have are from the five lady Charleston. We danced to the song Egyptian Ella, which you can hear in this video (there is a 30 second-ish introduction first). Our version was a little faster but this gives you the idea. I strongly recommend that you listen to the song while you look at these pictures: it makes them to come to life! (The lyrics are pretty amusing, too!)
Charleston basics to start.Moving on to fancy steps. Each of us did different solo bits.This is my favorite! Hard to see what’s going on in a still picture… It’s a kick to one side, then the second, then twice on the first side figure. As your leg comes in to kick your arms cross, and then they uncross when you kick. I don’t actually know what it’s called, but it’s super fun! Each kick has only one beat, so it’s pretty fast.Final pose! It is EGYPTIAN Ella, after all!
We’ve got more Jazz Age things coming up soon, so there will be more opportunities to Charleston! In addition to some performances, there will also be a Prohibition Ball in Chelmsford, MA in July. If you’re in the area you should consider coming! If you’re not in the area, I’m sure I’ll have lots of pictures and you can live vicariously through them. Maybe you’ll also be super inspired and go find people in your area to Charleston with!
Since there will be more Charleston-ing in my life, I’ll have to learn more Charleston steps! Lauren, at American Duchess, posted some great Charleston videos awhile back. Some of them include some steps I just might have to learn and dance… who knows, maybe some of them will make it into our next performance, too! In the meantime, I hope you enjoyed the pictures.
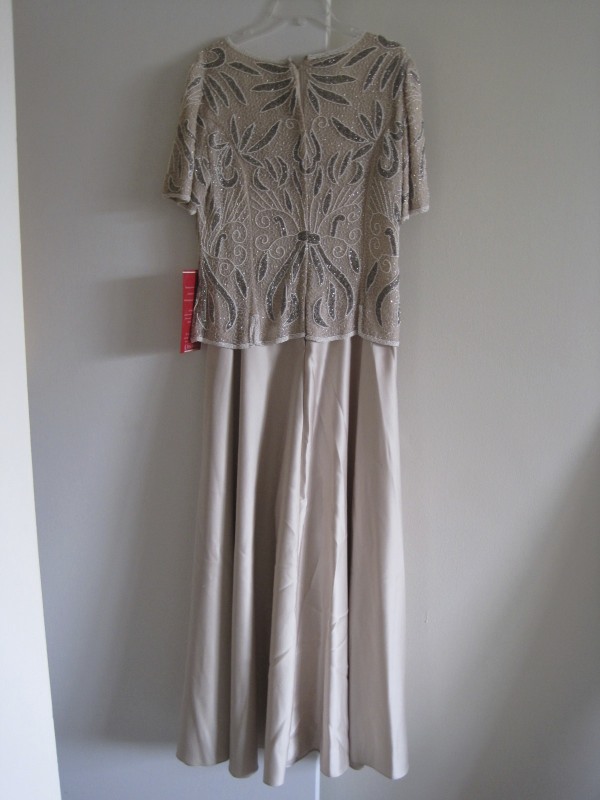
During the swap and sell at last summer’s Newport Vintage Dance Week, I came across a rather awful 80s or perhaps 90s evening gown while browsing. I had been considering trying to hand bead my own gown for the Gatsby Ball during the dance week, but had determined that I was not devoted enough to the 1920s and had settled for a less time intensive green silk gown. This 80s/90s dress, though, got my brain going. What if I used the beaded section to make a beaded 1920s evening gown? No hand sewn beading required! I dithered about the decision for maybe 20 or 30 minutes and asked for lots of opinions from my friends (none of whom were very decisively helpful, I must say), but then I hurried back to buy the dress before someone else did! It was only $10 or $15, not bad, for not having to bead it myself!
Size 14 beaded evening gown with princess seams and a giant zipper.Full length glory.
The whole thing was rather bleh colored with the pale lining. I decided that when I remade the dress it would need more color than the original, but I wanted to keep new fabrics in line with the beading colors so they wouldn’t look out of place. I picked grey for the skirt to bring out the beading and I picked pink for the slip to add some color under the grey but not distract from the beading.
First thing was to cut off the skirt. I kept it because I hate throwing things away, but it’s heavy and polyester… My thought is that one day I might need some sort of petticoat base or lining for a dress that is so great on the outside that this skirt won’t detract from it if it’s not seen. In the meantime, it’s taking up space in my stash. Oh well. After the skirt was cut off I removed the sleeves. They really were contributing to the dowdy look of the beaded section and they did not add to the sleeveless 20s evening dress look I was going for. I kept those too… I have no idea what I’m going to do with them! Beaded evening bag one day, perhaps?
No sleeves! It’s getting better already.
I debated for awhile about taking out the zipper (because it would add work, you know). In the end I decided I really didn’t want to see the lap of the zipper in the back, especially since it was pulling the beading around and making it not match up symmetrically. I also removed the nude lining in the bodice to expose just the silk gauze with the beads. I’m so glad the beading was done on silk! It really adds to the look. Of course all those interior seams were french seamed and I didn’t want to actually take apart all those seams in the silk gauze. So I carefully cut the lining away along the seams then was able to pull out the lining seam allowance because it would just fray where the stitches are. That part wasn’t super fun…
Cutting away the lining to expose the beaded silk gauze, then pulling out the lining seam allowance.
But I was left with a sleeveless top of beaded silk gauze! There was more hand sewing required to get it looking nice (there was no way to get a machine in there with all those beads!): I whip stitched the arm and neck openings; sewed up the back seam where the zipper was; whip stitched all of the seam allowances down on the inside; whip stitched the seams on the outside to close up un-beaded gaps on the seams so the princess seam lines weren’t so visible… Not all of this sewing was necessary to make the top wearable, but it was necessary to make it durable. I want to be able to wear this dress for a long time and not have problems with the beading or the silk gauze, so durability was important.
Completed beaded top.
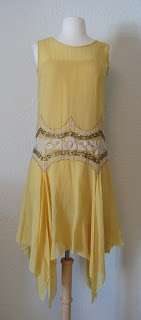
After getting the top finished up nicely I had to figure out a pattern/plan to make the grey skirt. I scoured my 1920s pinterest page to look for ideas. I liked the idea of an uneven hem and a skirt with extra fullness at certain points. This lovely yellow dress was my main inspiration.
1920s. Pictured on All The Pretty Dresses blog.
My points aren’t quite as long as this, though I wanted them to be… I didn’t have quite enough fabric for that. I had the added challenge of making sense of those little cut ups in the bottom edge of the beading in conjunction with the skirt. I didn’t want to sew those cut ups closed because the edge beading continued up them and it looked weird, so I had to figure out a way to work them into the skirt.
I think the yellow dress had rectangle pieces that are just left free at the dippy points. My skirt, however, has four a-line panels at front, back, and sides with diamond shaped pieces in between that go up into those cut ups. The skirt pieces are french seamed by machine. The hem was serged and then turned and topstitched by machine. The finished skirt was then attached to the beaded top by hand. First I sewed it along the beaded edges, then I turned the raw edge under on the inside and whip stitched that in place to keep the skirt from fraying.
After I replaced the zipper in the back with a seam I was able to get the beading to match up really nicely! The skirt hem with the serged edge turned inside and topstitched.Attaching the skirt to the bodice. Running stitches on the edge of the beading and then the raw edge turned under and whip stitched. (These are those cut ups in the bodice I was talking about!)
For the slip, I measured my waist and bust to determine the trapezoidal shape I would need to use. I just guessed at a length (which turned out to be about 6″ too long!). I added a few inches of ease to the waist and bust measurements to make sure I could easily put on and take off the slip without any closures. The side seams of the slip are french seamed by machine. I made tubes for the straps and machine sewed those on. The neck and hem were finished by hand because I had time and didn’t feel like pulling out my machine.
A pretty boring slip.
While wearing the slip I noticed it was showing at the underarms and front neck. The underarms were expected and I’m totally ok with that. But I didn’t want to see the slip at the front (I think part of it is because the beaded section is heavy and pulls down in front when I move), so I bunched it down with a safety pin. Will I ever sew it for real? Probably not. Sometimes safety pins are your friends.
Now i know which way is front on the slip! Not that it matters, since it’s the same front and back aside from the safety pin…
Ready for some more facts?
Fabric: ~1yd pink polyester medium weight crepe, ~1.5 yds grey polyester chiffon, and the beaded silk gauze section of an old evening dress.
Pattern: none.
Year: 1925.
Notions: thread.
How historically accurate?: I give it 85%. Polyester was definitely not in use in the 1920s and the princess seams on the bodice aren’t really accurate for these dresses either as far as I know.
Hours to complete: 20-25. Lots of hand sewing or it would have been faster.
First worn: To the opening of the Great Gatsby, old sport! I was part of a dance performance before the movie. More on that soon!
Total cost: $18-$23 depending on what I paid for the original dress, which I can’t remember!
This is the description for this HSF challenge:
The written word has commemorated and immortalised fashions for centuries, from the ‘gleaming’ clothes that Trojans wore before the war, to Desdemona’s handkerchief, ‘spotted with strawberries’, to Meg in Belle Moffat’s borrowed ballgown, and Anne’s longed for puffed sleeves.In this challenge make something inspired by literature: whether you recreate a garment or accessory mentioned in a book, poem or play, or dress your favourite historical literary character as you imagine them.
Oh wait, did I mention that my literary inspiration for this is The Great Gatsby?
Woo! 1920s beaded dress!
It was super fun to wear this to the opening of the Great Gatsby and dance in it. I was able to wear my ivory American Duchess Astorias (not for dancing, but for walking around) which made me happy, as well as a necklace recently given to me by my mom! And in the end, it’s great that the original dress was a size 14, because it gives the top that roomy/boxy/no waist 20s style on me!
This link contains an affiliate code, which provides a small benefit to my shoe fund. This does not affect my impressions and reviews of this product.
I’ve got these two related final notes:
The safety pin was patented by Walter Hunt on April 10, 1849. “Hunt’s pin was made from one piece of wire, which was coiled into a spring at one end and a separate clasp and point at the other end, allowing the point of the wire to be forced by the spring into the clasp. It was the first pin to have a clasp and spring action and Hunt claimed that it was designed to keep fingers safe from injury – hence the name.” From about.com’s entry on Walter Hunt as an inventor.
Serging/overlocking/merrowing was invented by the Merrow Machine Company in 1881. From wikipedia’s entry on ‘overlock’. It has been used to finish seams since at least the 1920s, according to the Vintage Fashion Guild (they’ve got a whole page of neat vintage clothes dating information that has good dates for when different sorts of construction styles and methods came into use!).
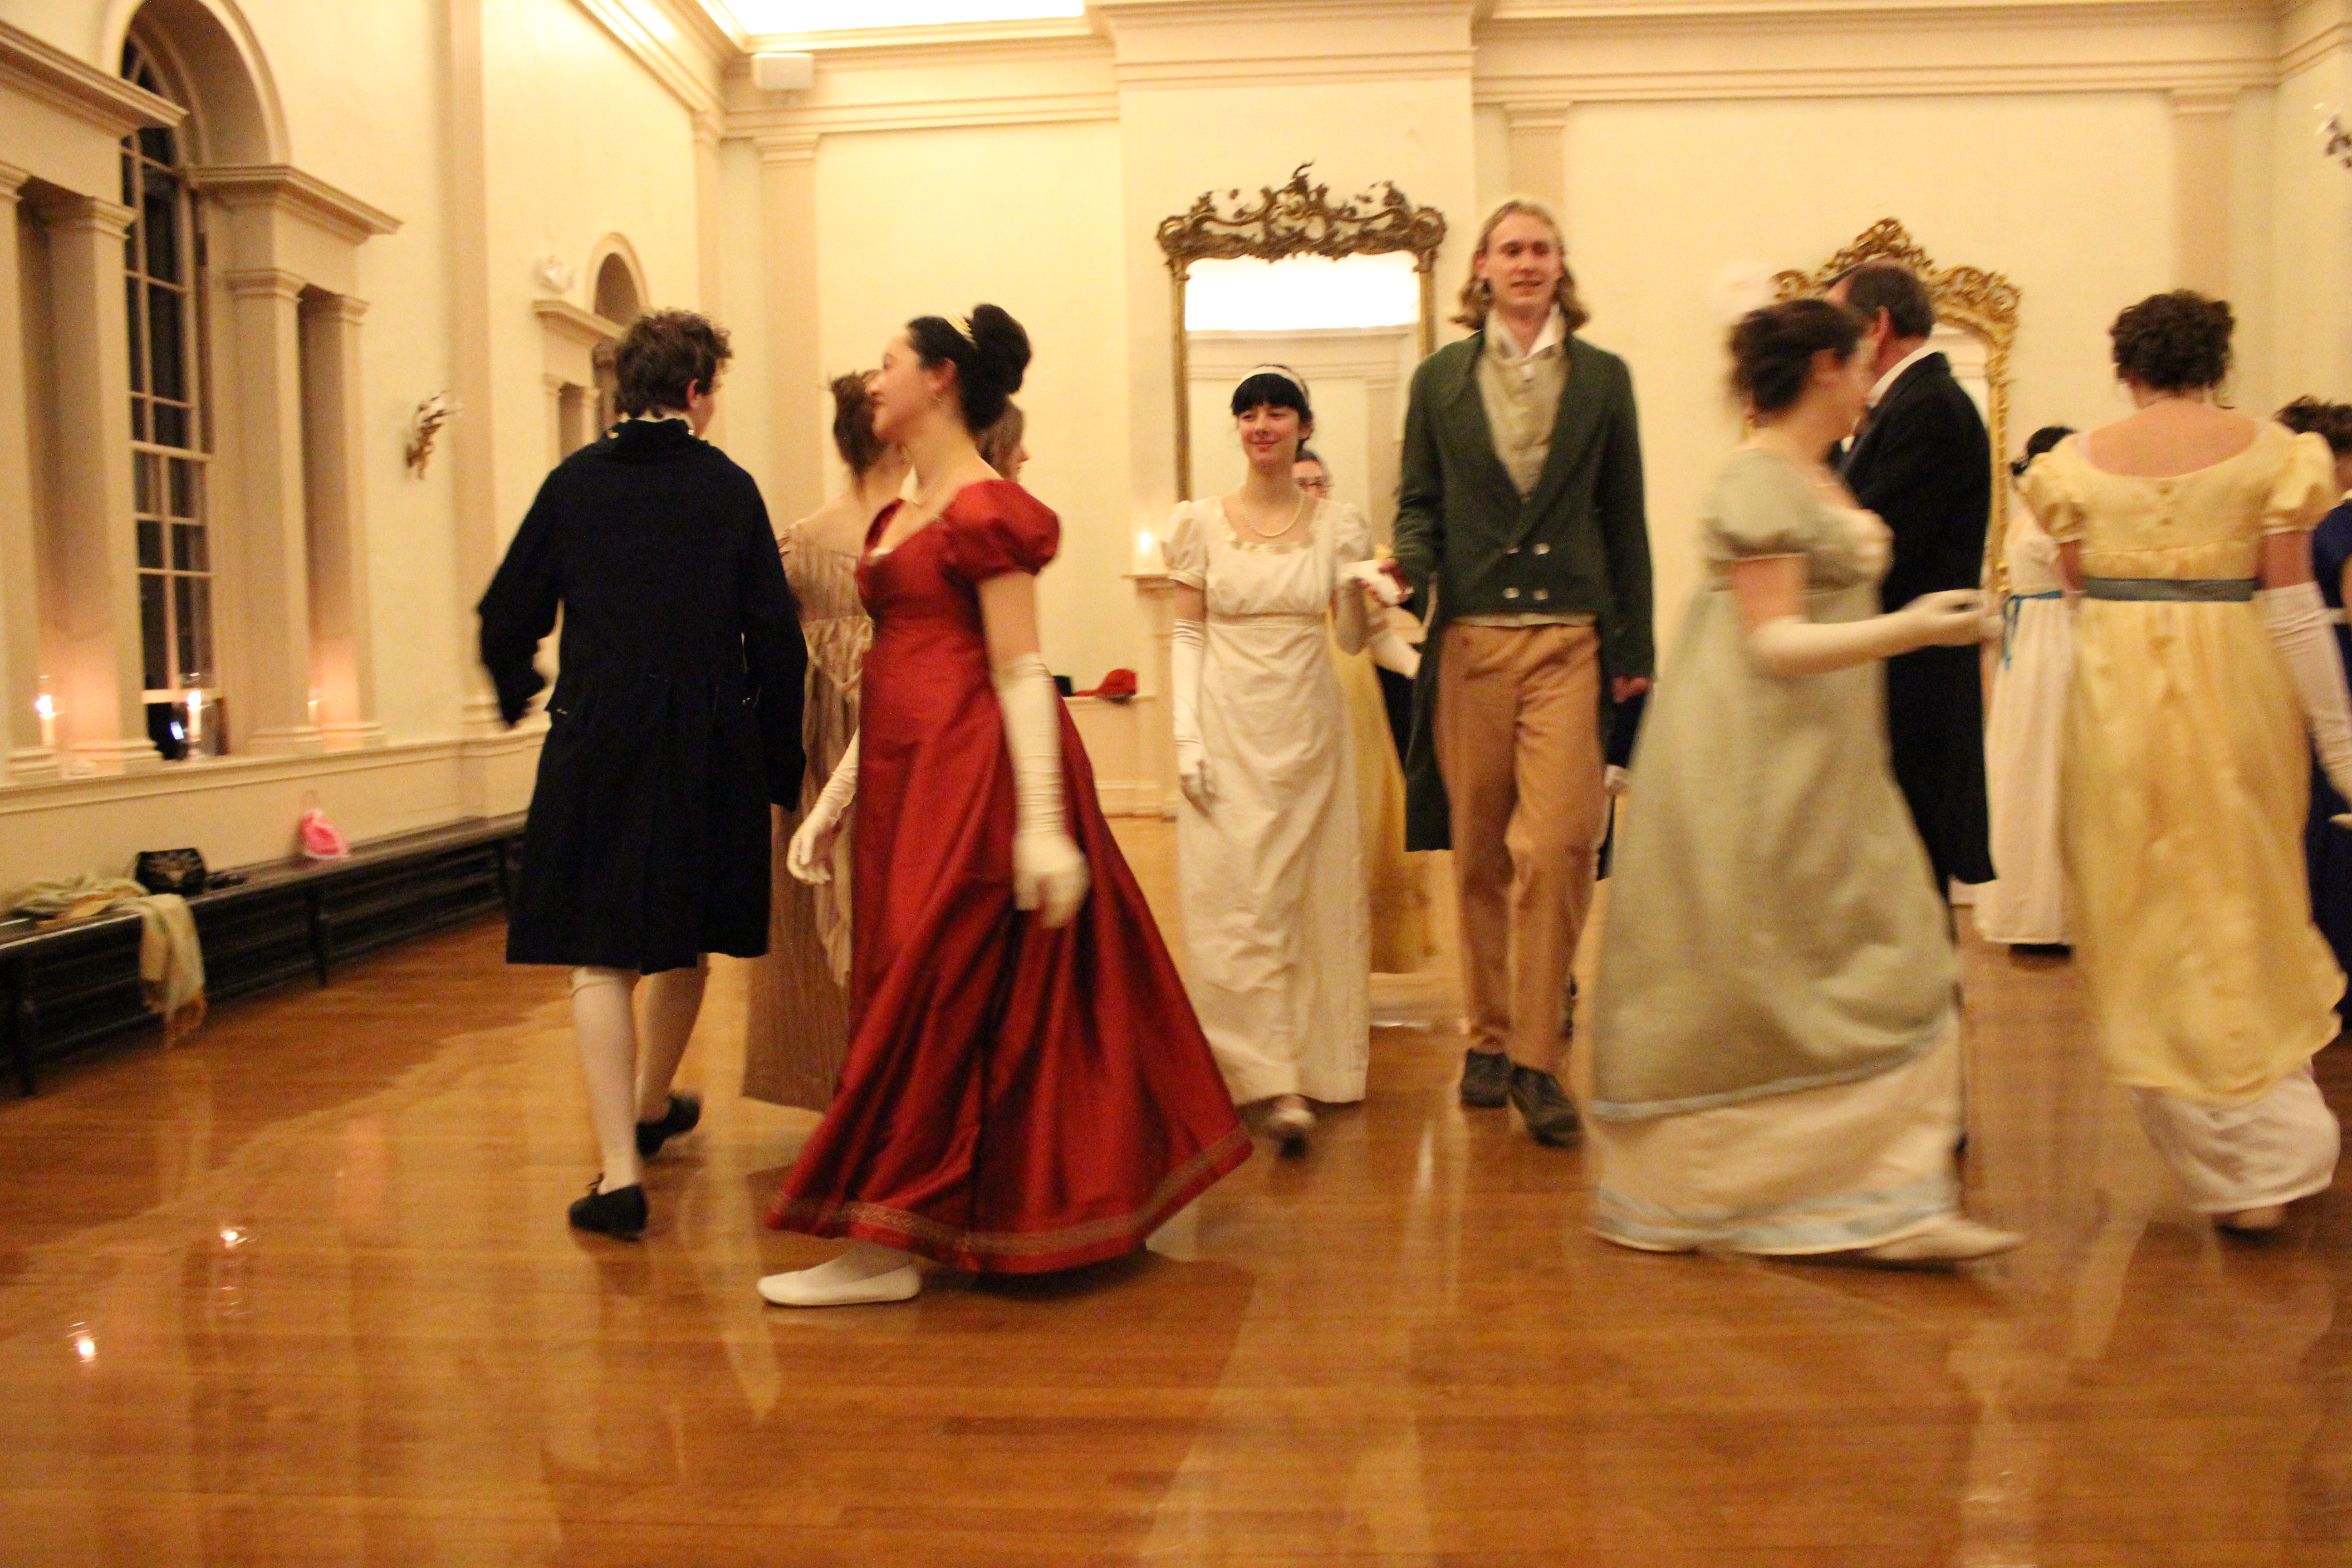
The time for dancing has arrived! You’ll remember that I recently shared pictures of the reception on the Sunday evening of the Regency Dance Weekend as well as the sharing of the train at that same reception? I’ve been promising to share ball pictures and finally, the time has come. Without further ado…
The Grand March. We had a good quantity of people this ball and because of our practice during the daytime classes all of the figures looked really good!
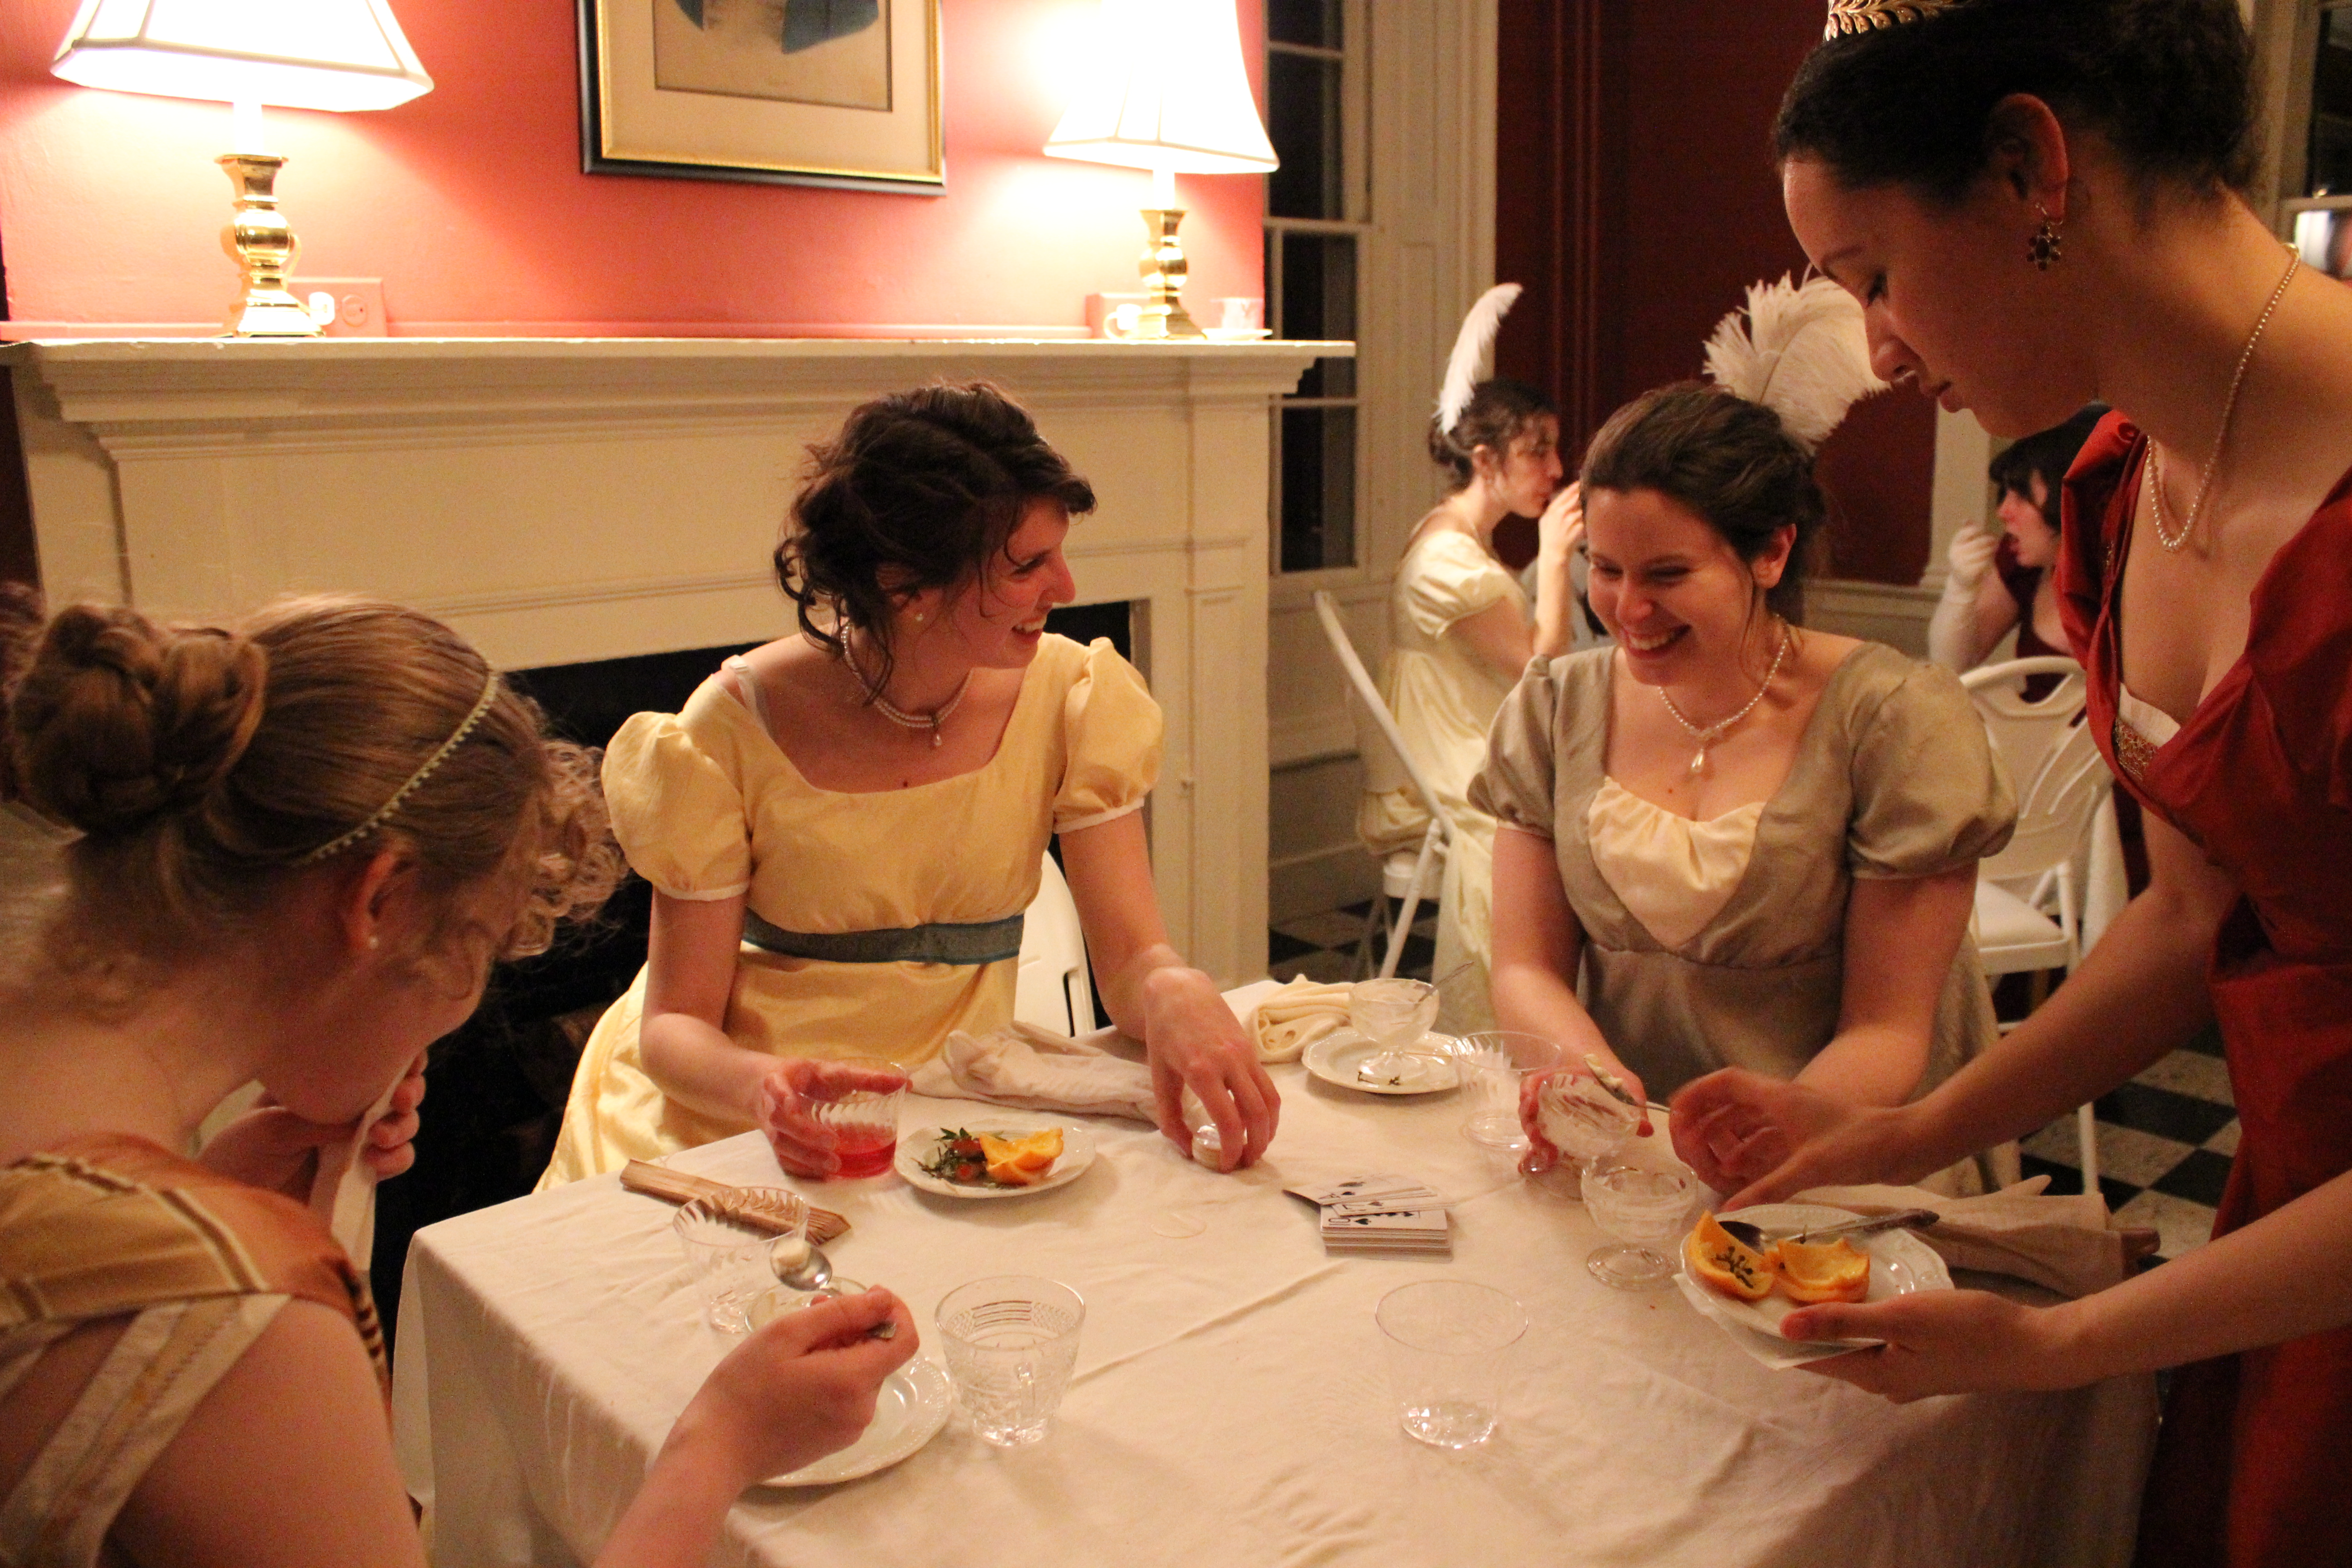
The Grand March was followed by a good number of country dances and figured waltzes. It was an amazing experience to have a room full of people who had already learned the dances and were able to dance them without instruction. We were able to complete dance after dance after dance and it wasn’t long before it was time for some refreshment.
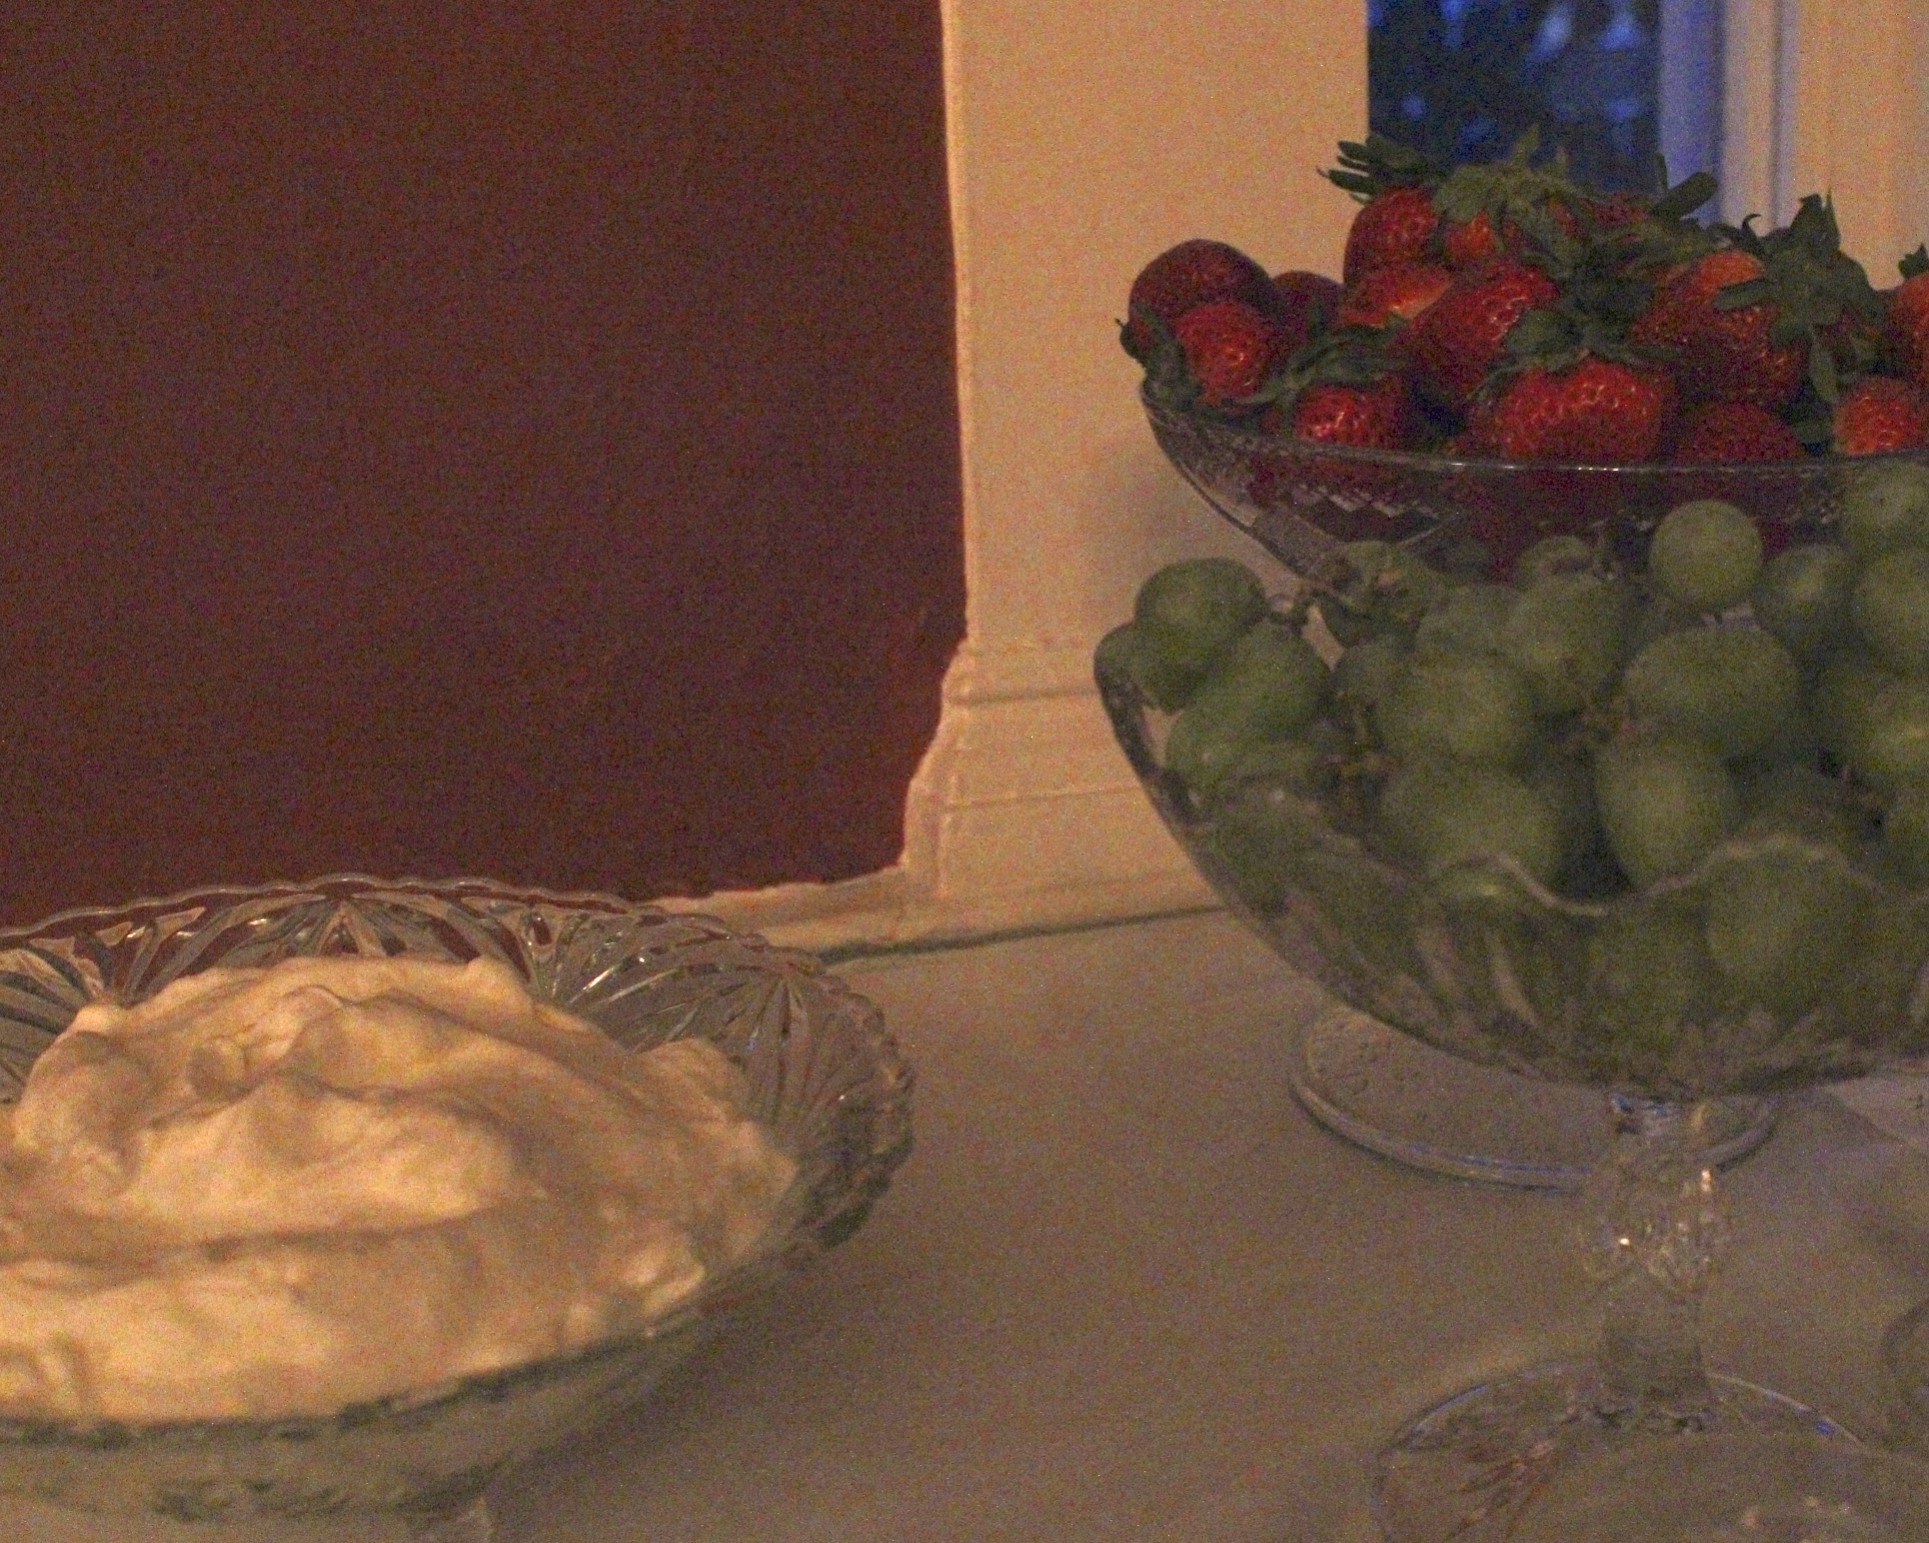
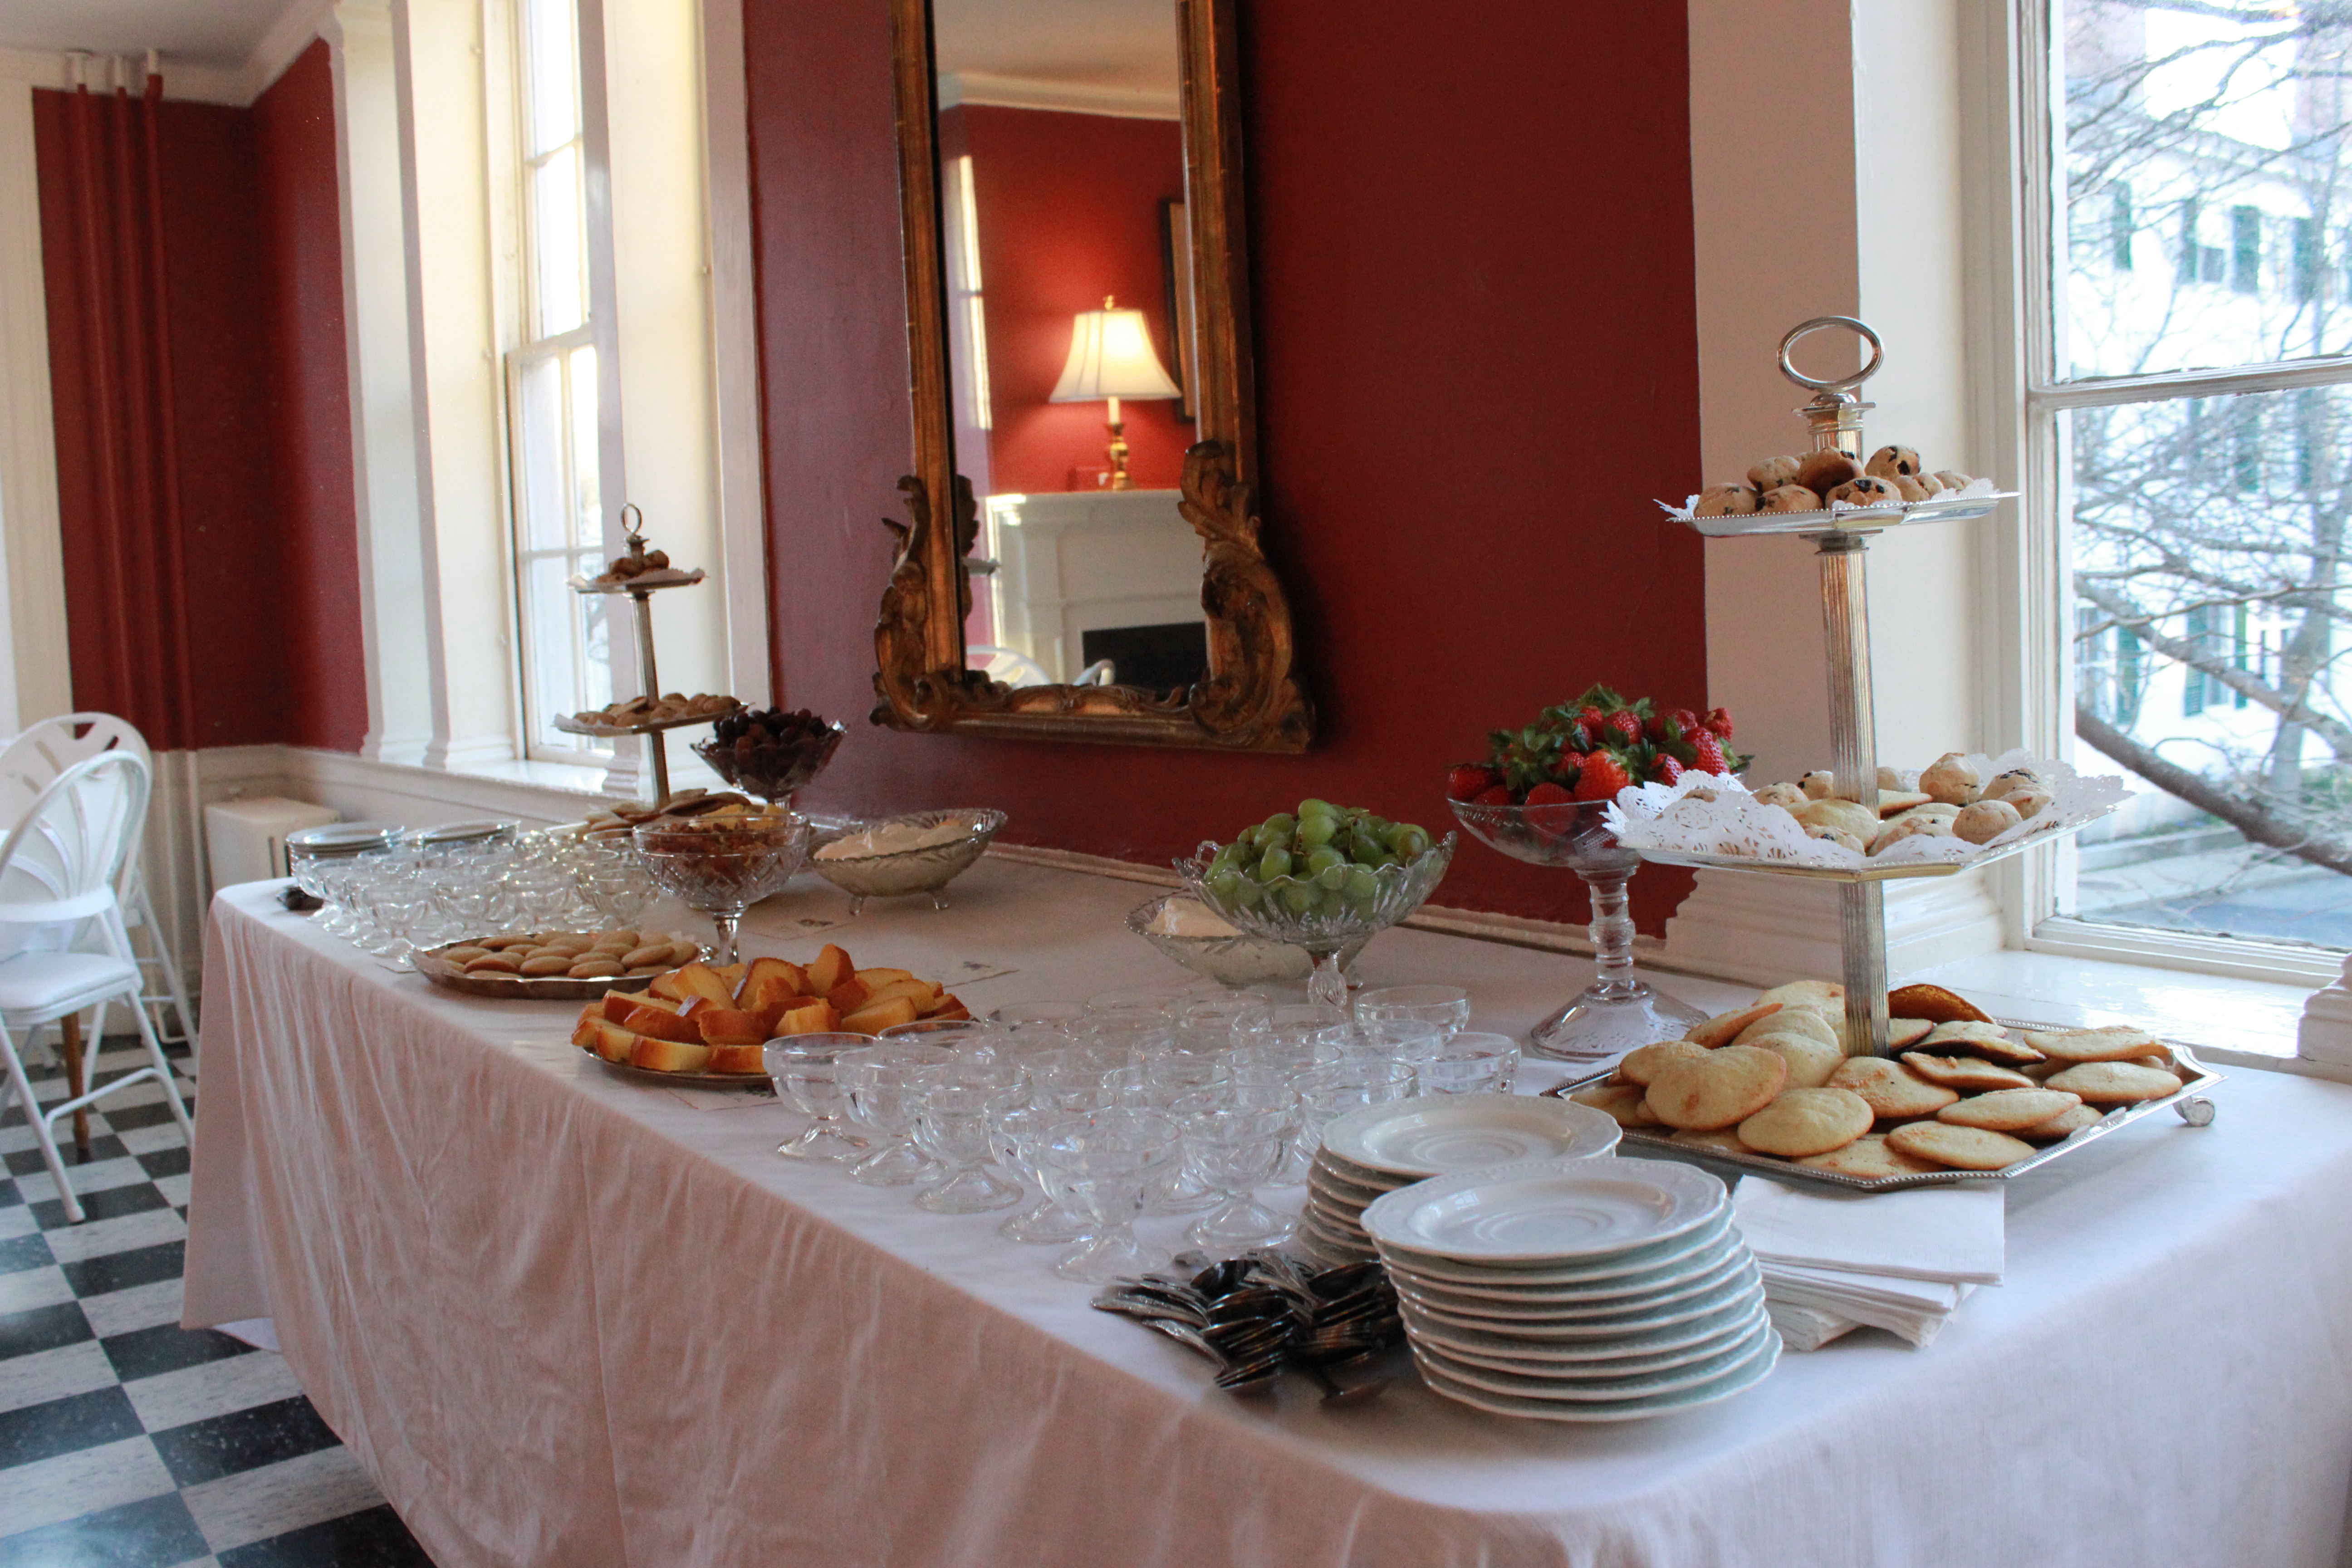
Punch had been nicely laid out in the refreshment room earlier in the evening.There were cookies, and fruit, and syllabub (sweet cream) with pound cake, just to name a few delicious treats.The refreshment room also had small tables set up to encourage chatting while eating.
Unlike some of balls during which we have refreshment breaks, at this ball a person could break for refreshments at any point in the evening. It was a nice change, and especially since we did so much dancing and less standing and listening, it was particularly useful to refresh oneself throughout the evening.
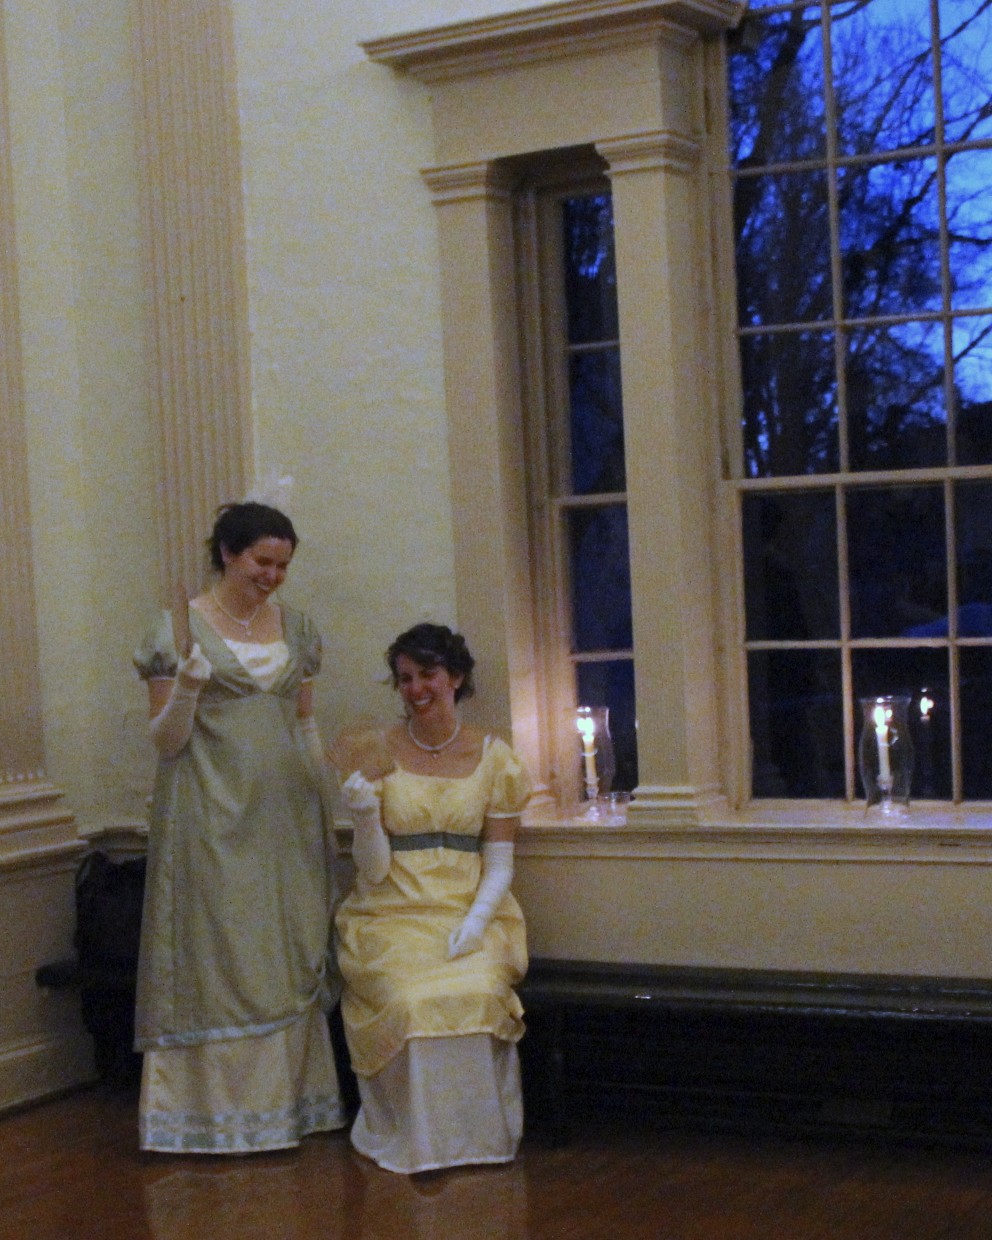
Of course, there was the opportunity to chat with friends and family throughout the evening in addition to time spent in the refreshment room.Setting up for a country dance. Or perhaps this was Sir Roger De Coverley?Yes, I believe that was Sir Roger. This was later in the evening after sillyness had set in… We were changing partners and gentlemen/lady positions just to keep things interesting.
Goodness! By the end of the evening my legs were feeling all the dancing of the weekend. The characteristic Regency upbeat rise was getting harder and harder to achieve… But what an event! What a weekend! It was so full of fun, and getting to know new people, and learning dancing… Really, an exquisite experience.
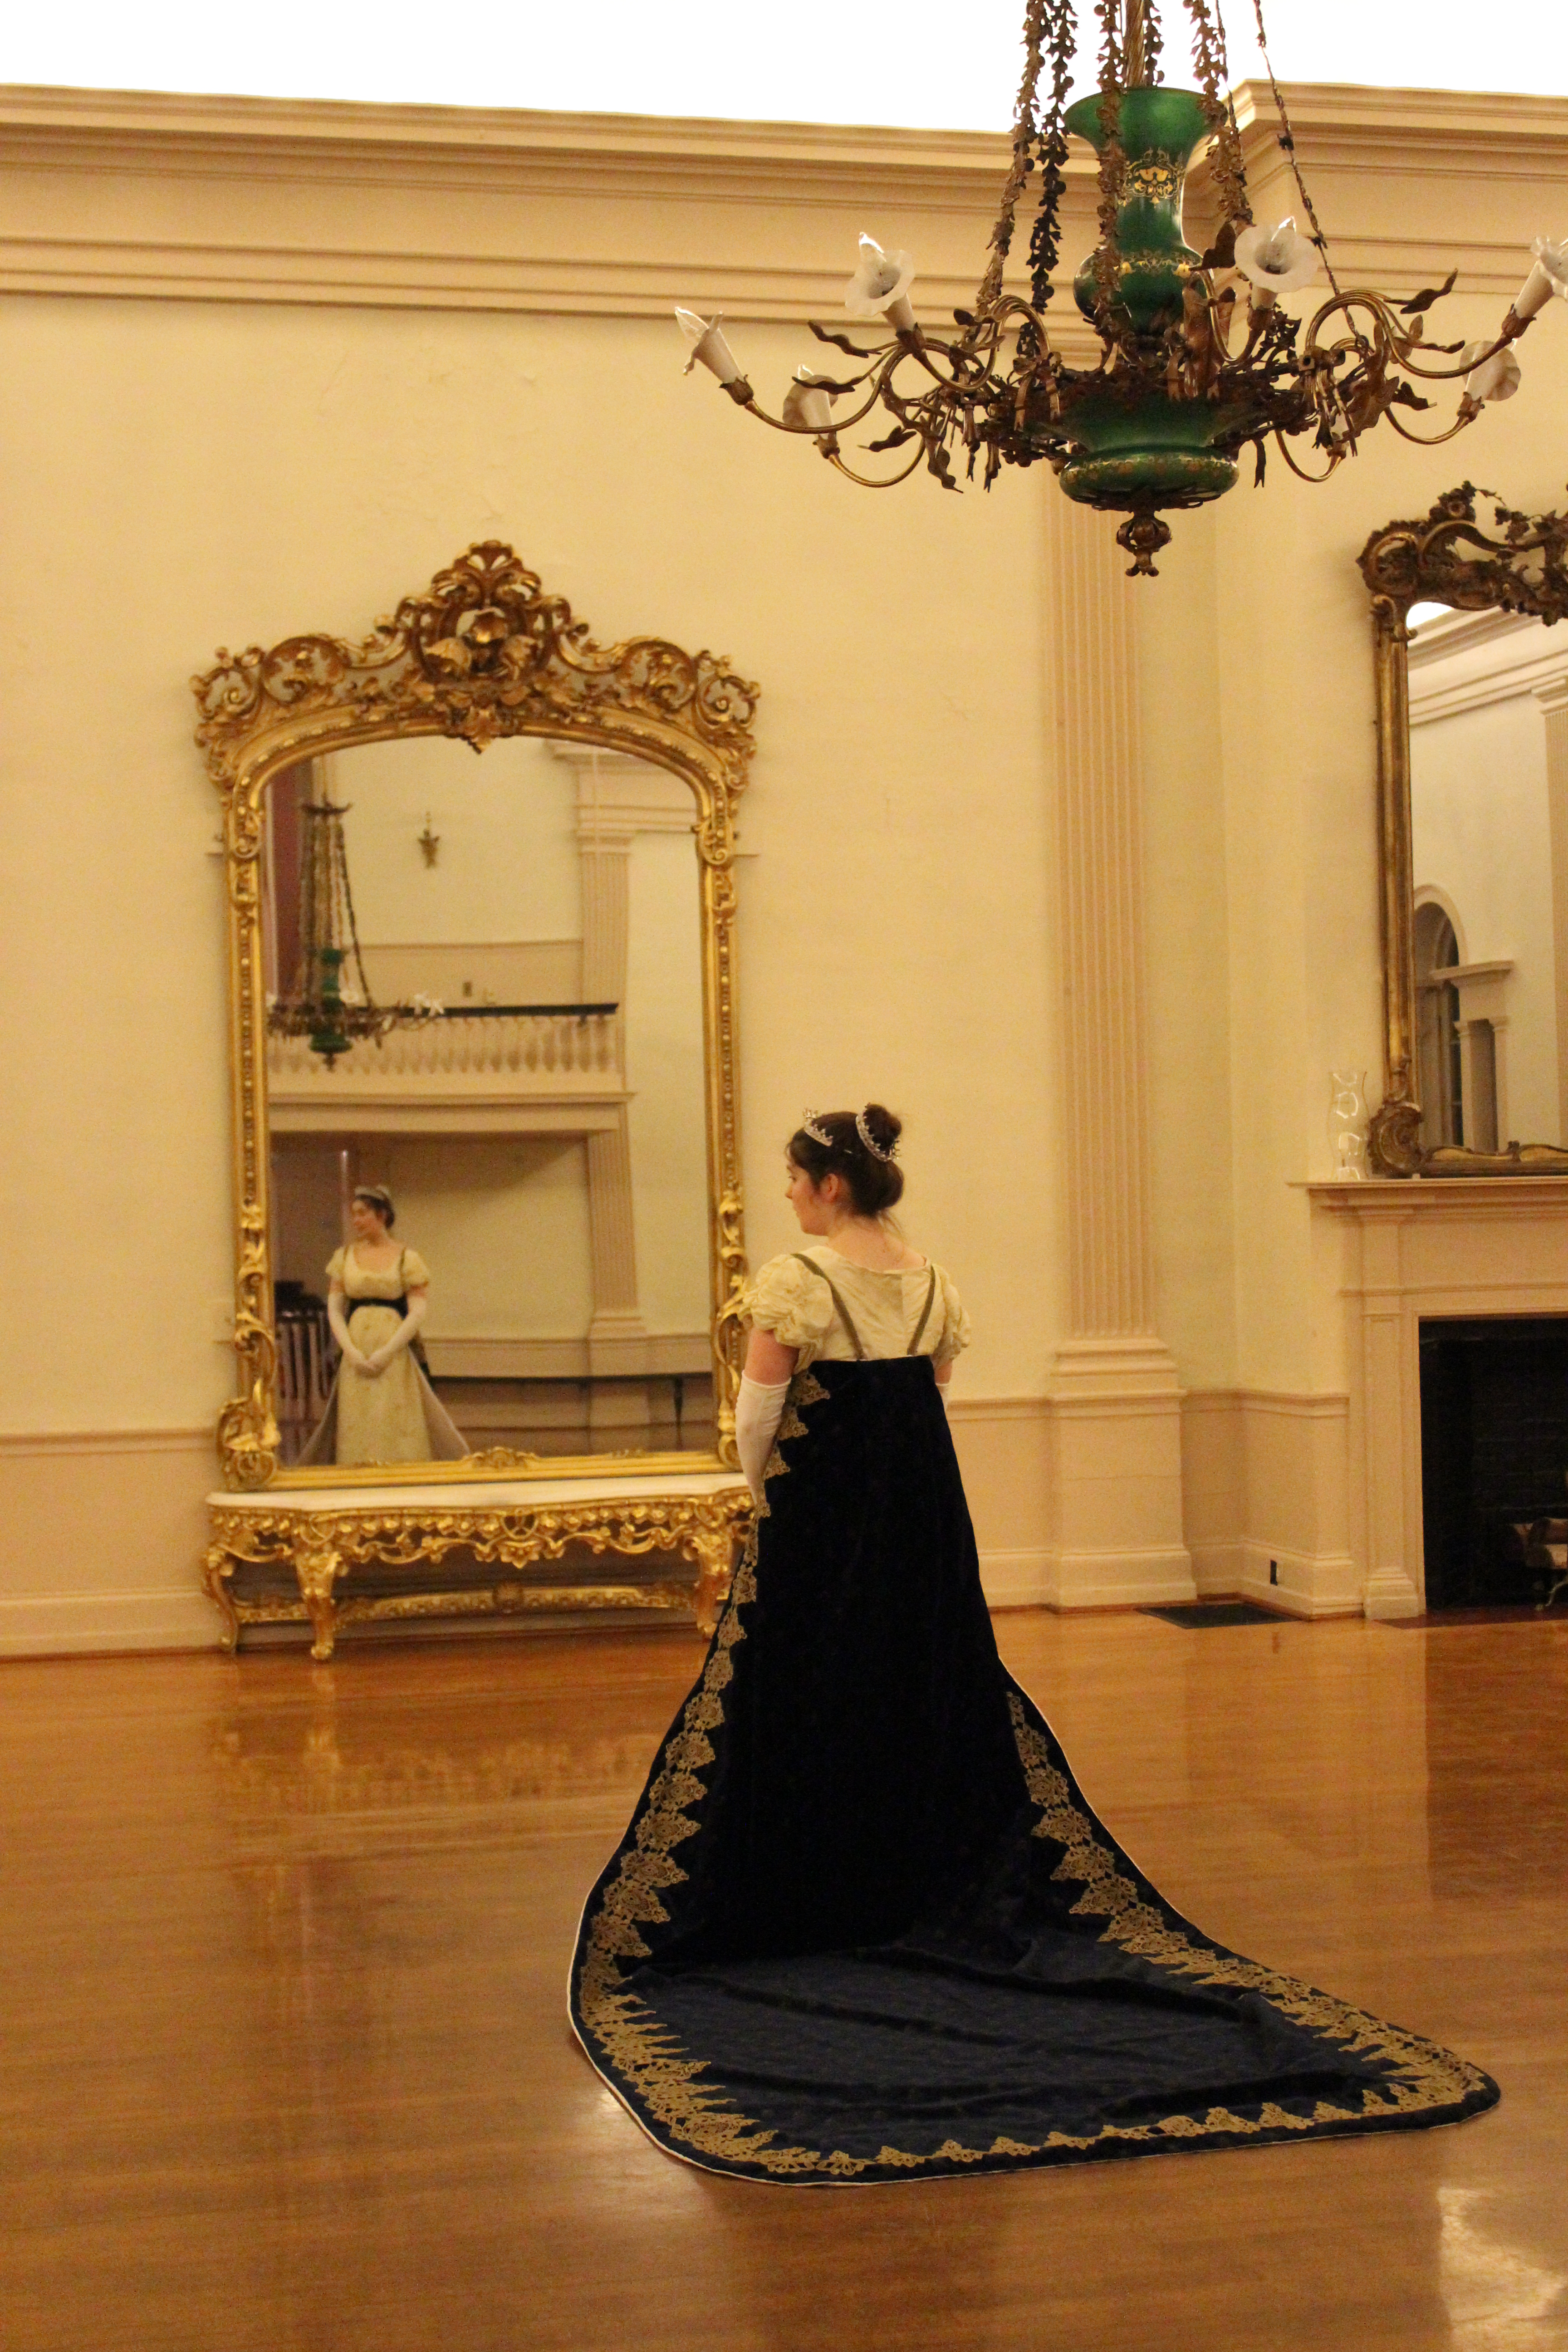
I’m eager to share pictures of the grand ball with you, but I want to insert this post before continuing to ball pictures. One of my friends had the ambition to complete a Regency court train to wear during the reception I showed pictures of last post. It’s a pretty fabulous train made of velvet printed with golden bees and trimmed with opulent gold lace.
The actual owner and maker of the train.
It’s not the sort of thing to be danced in, but that’s fine, because it attaches at the waist, so it’s easy to take off. During the course of the evening some of us tried on the train and tried out different poses in it. So nice of Antonia to share with all of us! It was quite grand and fabulous.
It’s my blog, and that means I can share as many pictures of me as I want…! Spoiled sounding? Probably… Okay, fine, I’ll return to my more humble un-royalty roots.
There are some absolutely stunning extant court trains out there. Here’s my pinterest page of court gowns and trains from all different periods. And here are some of my favorite Regency court trains to inspire you.
ca. 1809. The Met.1809. The Met.First Empire From the Chateau de Malmaison Costume Collection appFirst Empire From the Chateau de Malmaison Costume Collection app
There is an event at Dress U in about a month that requires court gowns or trains. I won’t be there, but I’m looking forward to seeing pictures of other people’s fabulous court trains! I hope you’ve enjoyed these silly pictures. I promise that the next post in this series about the Regency Weekend will be pictures of the ball: no more delays!
The reception was to include a toast with sparkling cider, so we pre-filled glasses to have ready to go at the right time. In addition, we worked on laying out the refreshments in pretty glass compotes and on silver trays as well as making the punch and laying out all the necessary silverware and dishes. Preparation was a bit hurried and I have to confess to getting super grumpy at one point…
Picturesque filling of the glasses.Picturesque grumpy face.
The alterations I made to my skirt to fix the rip created a new issue. Sigh. See those horizontal wrinkles on the rib area? Because the front of the skirt hangs differently now, the front skirt wants to wrinkle. I can fix this problem, but ugh! It’s so much easier when the clothes just fit perfectly!
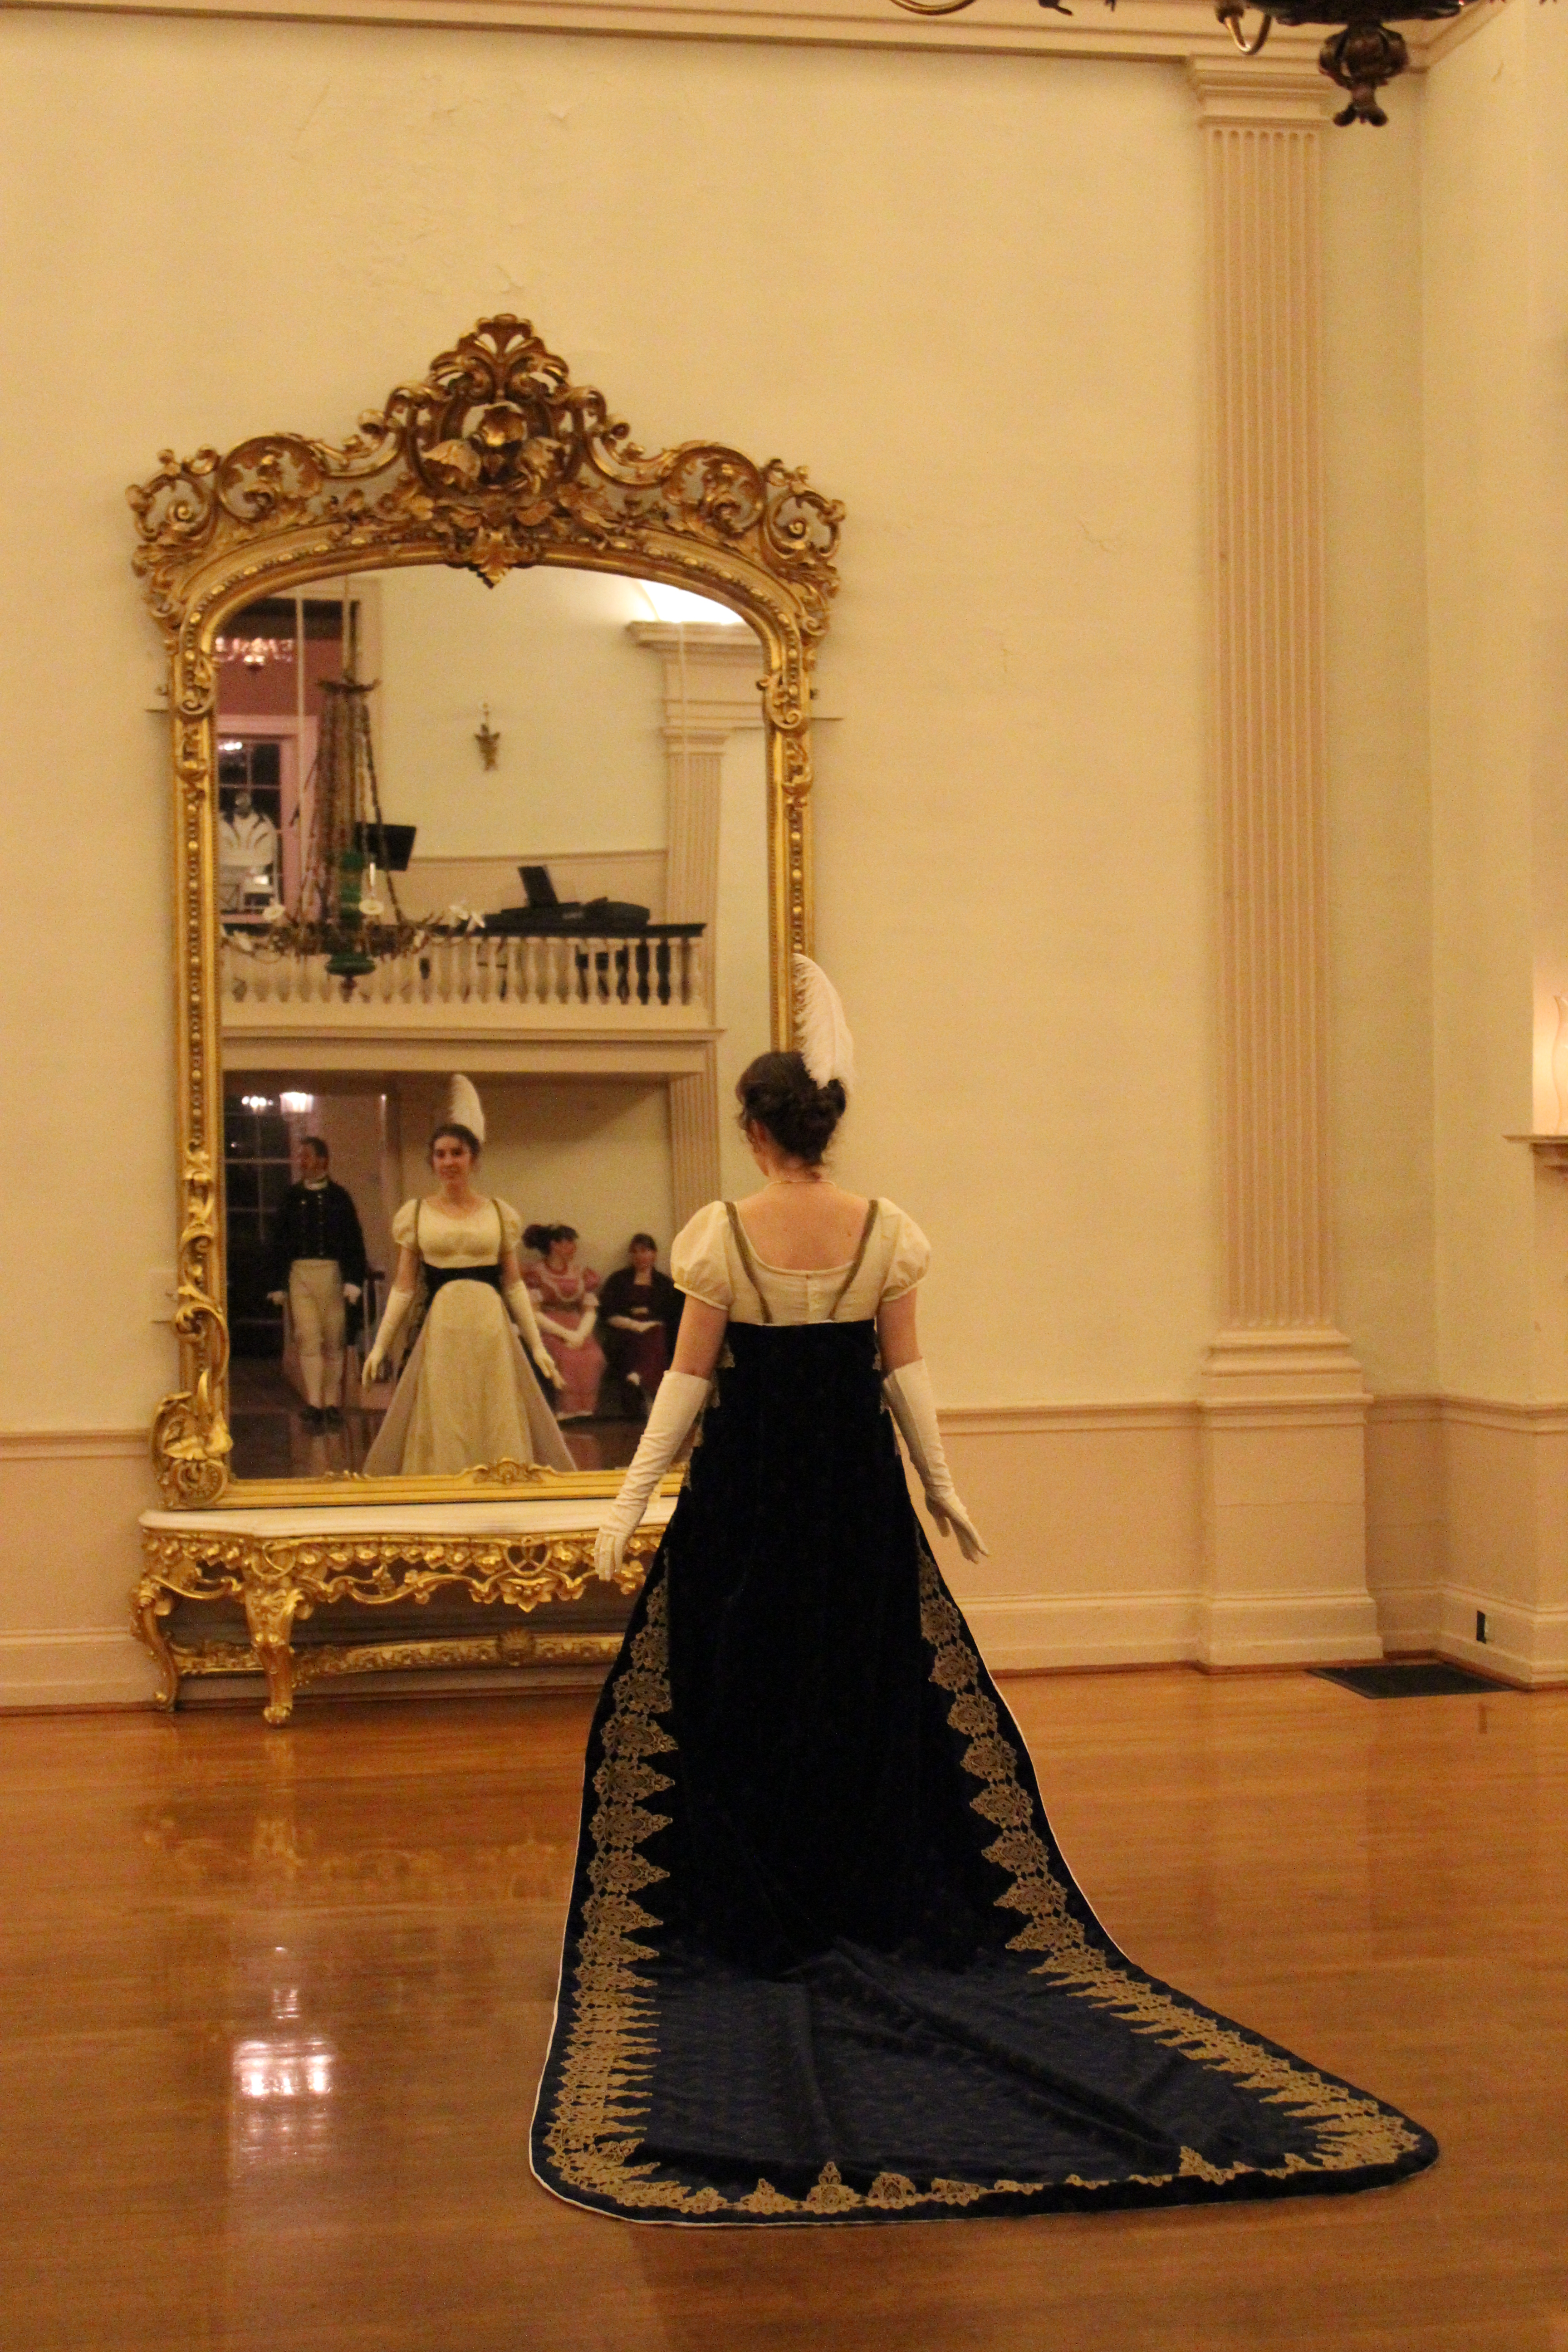
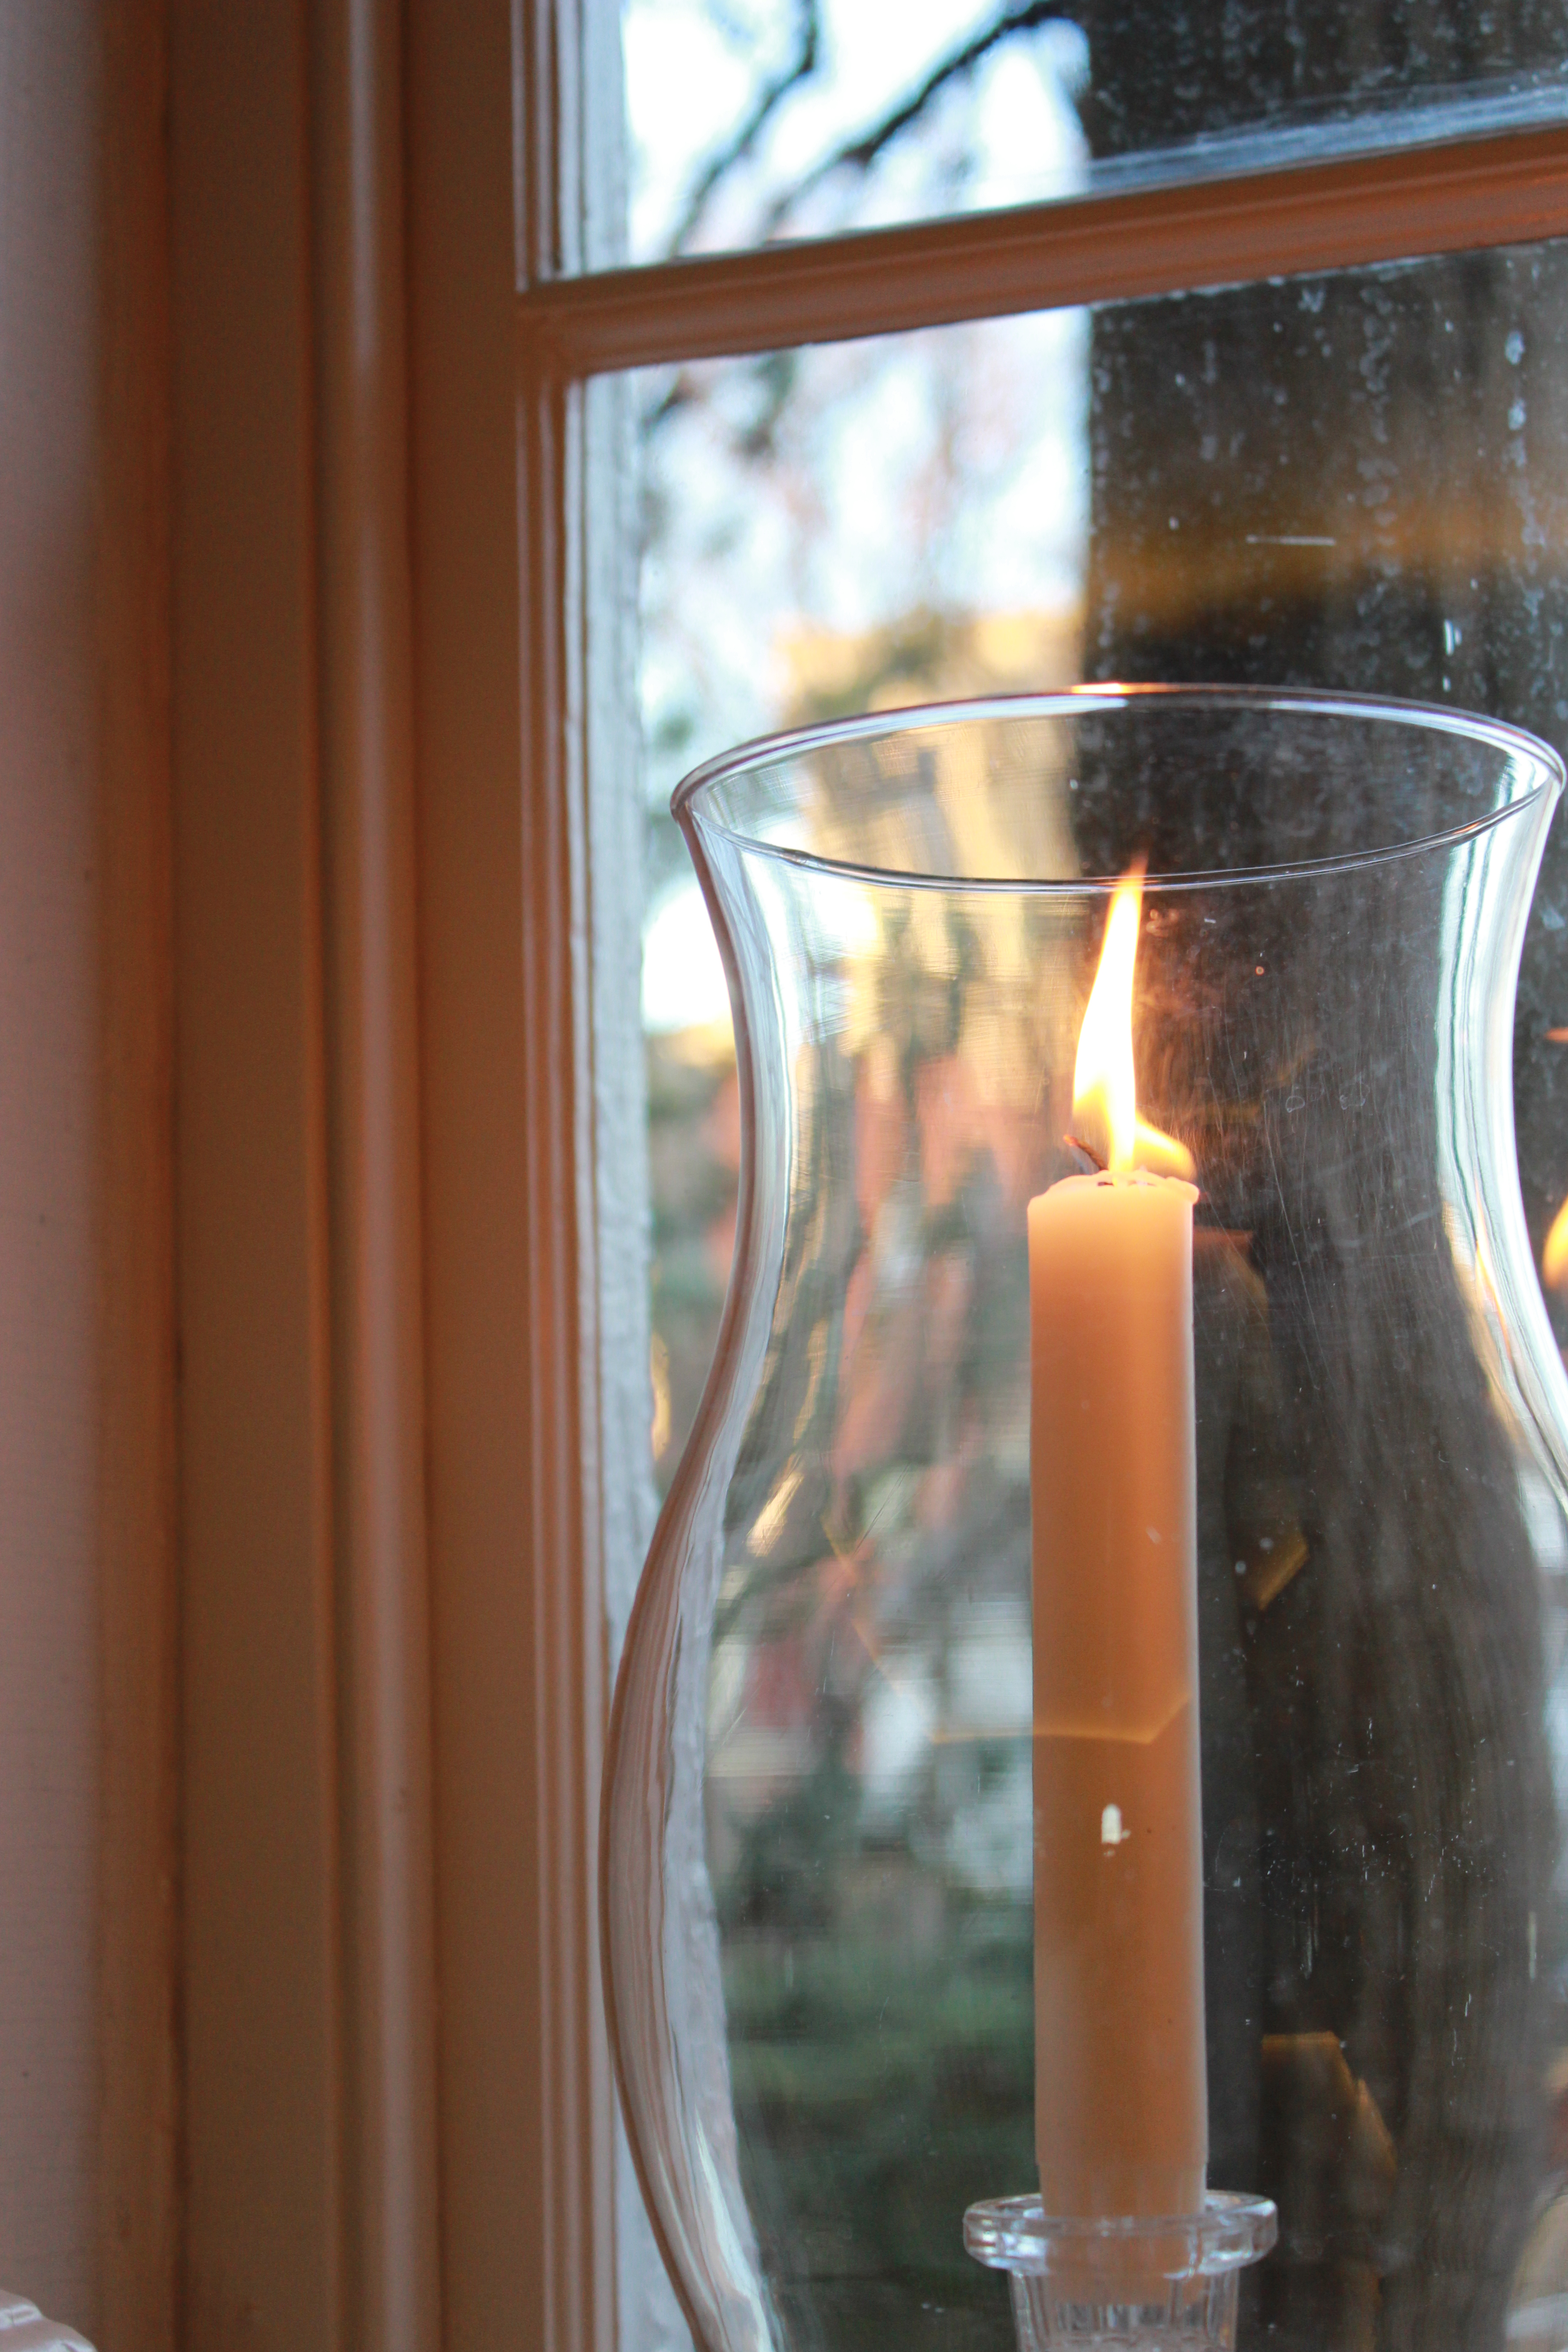
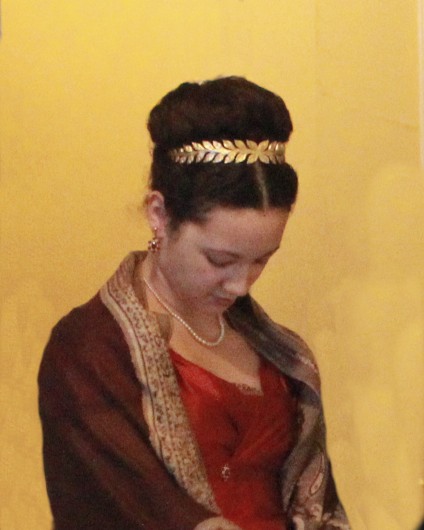
Partially completed spread of refreshments.When everything was ready we joined everyone else for some pictures in the lovely ballroom, where there were real candles in the windows! So pretty!These mirrors are stunning and beautiful, in addition to being wonderful places to pose for the camera.I thought my hair looked particularly regal for this event. Here’s a good picture of my poof and laurel wreath tiara.
It’s convenient for these sort of events to have hair that is easily made poofy. I don’t have any short bits of hair around my face (aside from frizz…) so curly tendrils for Regency hair styles don’t work for me. This had become my go-to Regency style: center part in the front with the front bits of hair saved for last; the back part of the hair put into a pony tail and brushed out to be super poofy, then rolled on itself to create a self rat and hide the ends. The poof is then pinned in place, the front bits are wrapped down and around the back which creates lovely lines on the back of the head, and finally the tiara is added to define the area between part and poof. The whole thing is finished off with a liberal douse of super hold hairspray to contain the frizz and keep the style in place.
But enough pictures of my dress and hair! After these reception pictures we all descended the stairs to the sidewalk, where we watched a celebratory champagne bottle be opened with a saber. Neat!
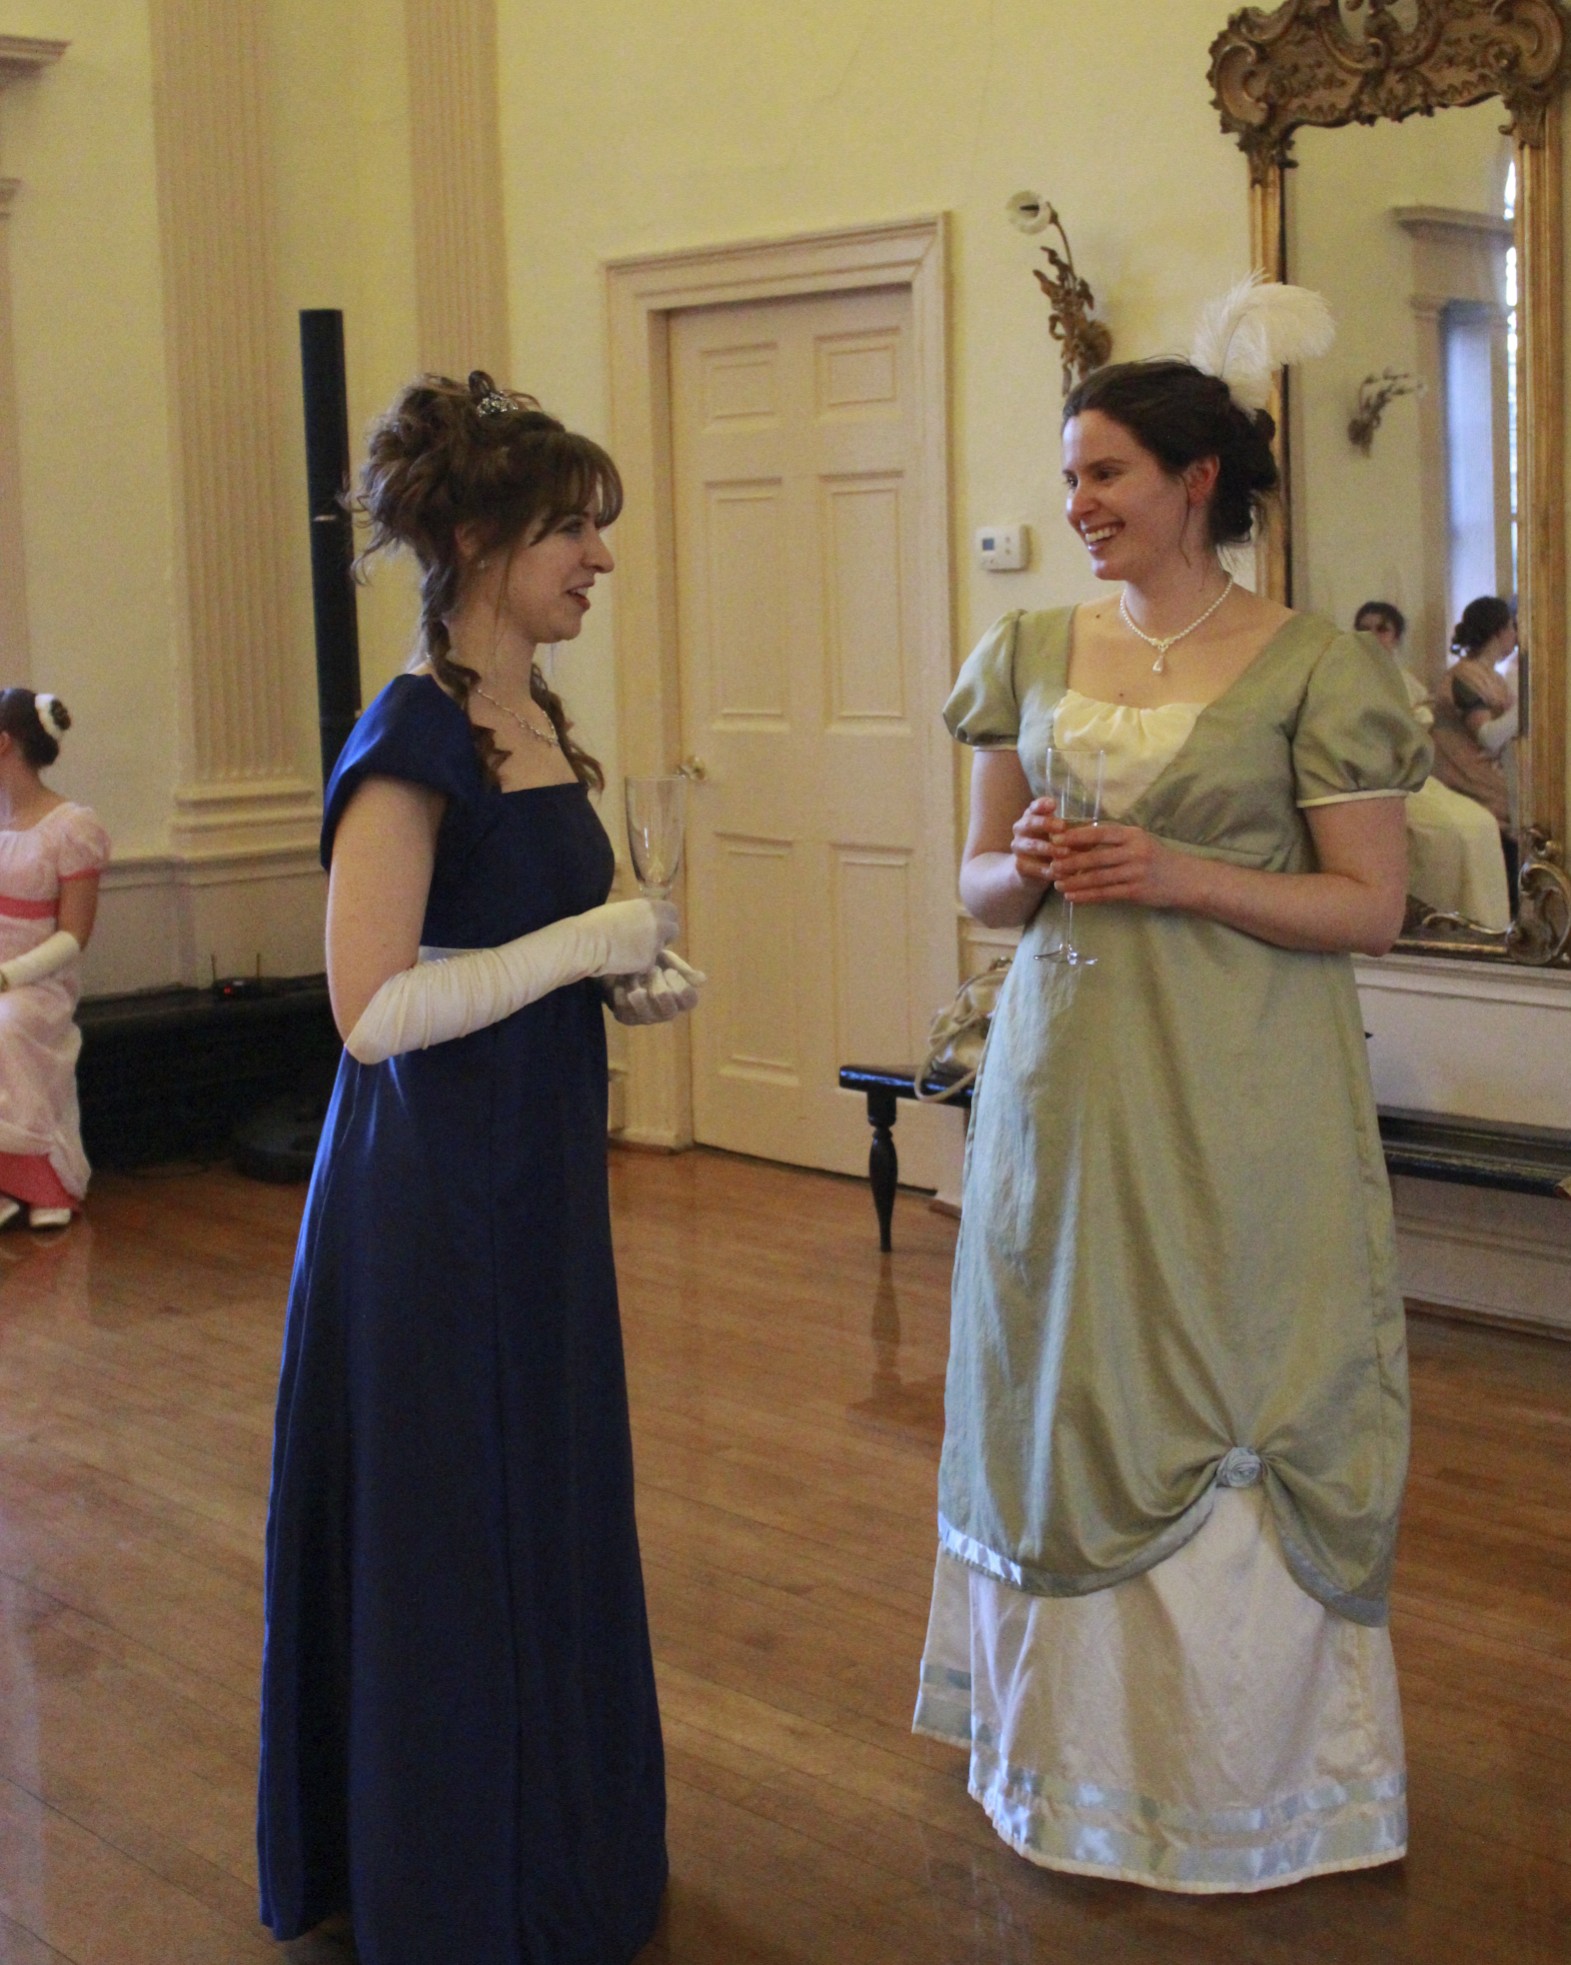
Ready?Each person was served with a glass of sparkling cider on his or her way back up to the ballroom.And then we all had a bit of time to socialize and admire the room, the people, and the circulating cider refills.
When the cider was beginning to dwindle (which didn’t take too long), the time had come for the dancing to begin. And my, what dancing there was!
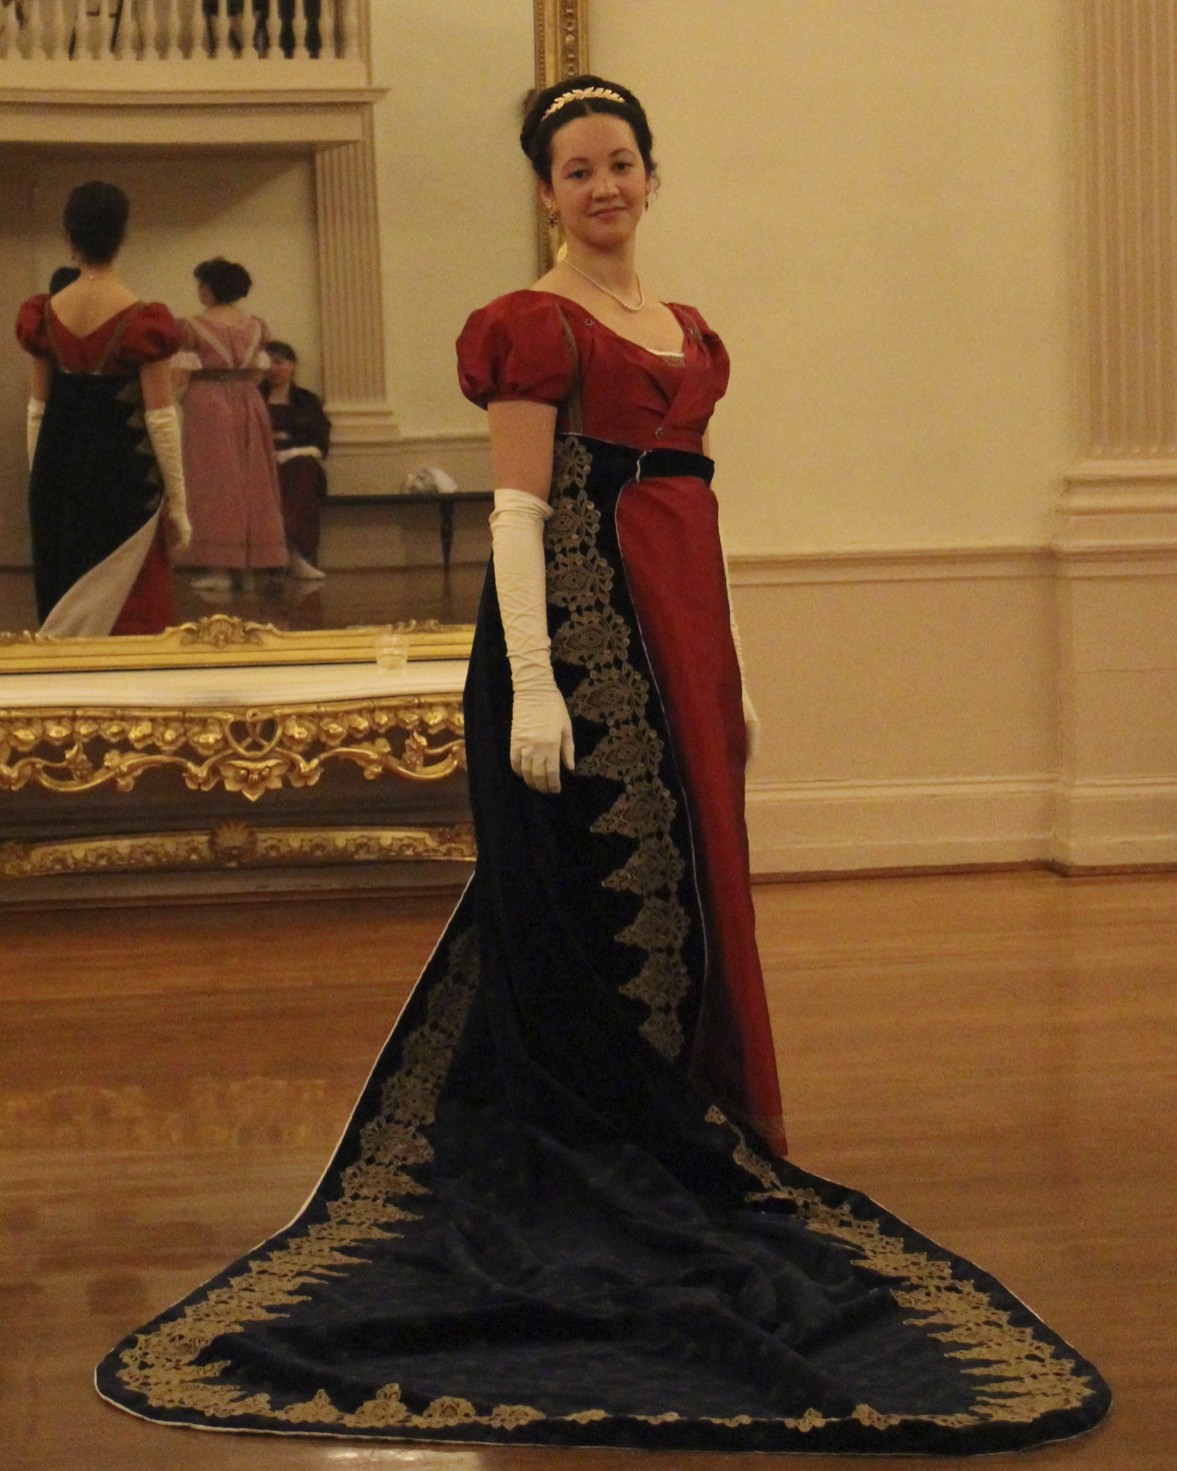
Yup, that’s me I’m talking about in the title of this post. I was straggling along the first bit of the Mar-pril Regency Sew Weekly road. For Goal #2: evening wear, I had hopes to fix the rip in my 1813 red evening gown, but unfortunately I didn’t get to it in time for the deadline.
Sad, sad rip.
I did get to it before the Regency Dance Weekend, though, so I was able to wear the dress for the Grand Ball and Reception on Sunday night. I’ve got pictures of the event to share soon, but for now I’m going to focus on the gown.
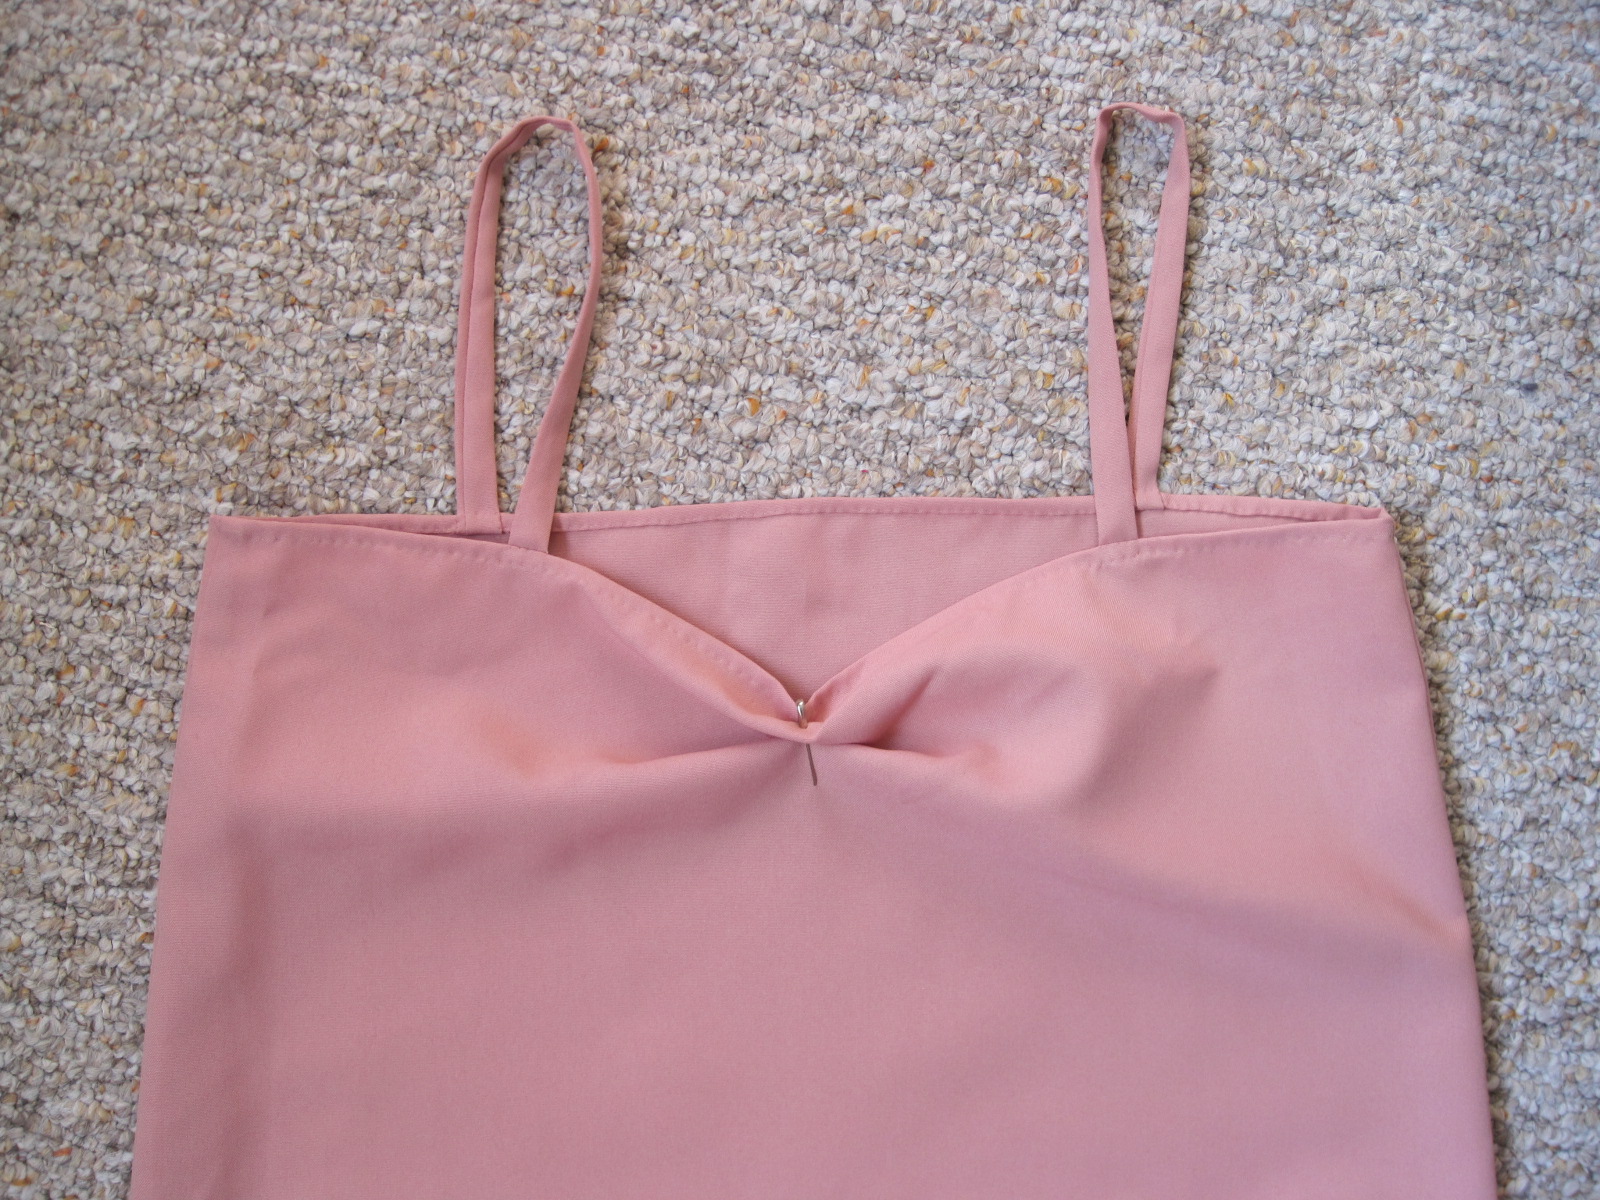
When I first made this dress back in January and wore it to the Pride and Prejudice Ball in February, the skirt of the dress was tightly gathered across the back to take in all the fulness of the skirt. But while taking pictures after the ball, the dress caught and ripped! I suppose it’s hard to tell in the picture, but the rip was not small.
Gathers used in the back to take in all the fullness.
Ugh! What to do? Try to patch it, or darn it, or replace the whole vertical panel where the rip was? None of those ideas sounded like they would be pretty or fun.
I didn’t actually get around to fixing this until after I had constructed my Tree Gown, which has a skirt with an angled (trapezoidal) front panel and the back panel cut as a rectangle. The effect of that shaping on the Tree Gown is neat: there is less fabric to gather at the back and the skirt has a nice shape to it that is different than the shape that is created by the original tube shaped skirt on the red gown. In addition, I decided after looking at the pictures of the red gown that the gathers were too poofy in the back and created a shape I wasn’t looking for.
So I came to the idea of using the trapezoid plus rectangle skirt shaping for the red gown, because making a trapezoid would allow me to cut out the section of the skirt with the rip. This required taking the skirt off of the back waistband, sewing the new seams, then reattaching the whole thing. Since I was taking it apart anyway at that point, I decided to also pleat the fabric around the back instead of gathering it, like this dress, below.
1812 Wedding Dress at the Met with a pleated skirt.The ripped side of the skirt, removed from the waistband and with the new seam pinned. Now you can see the scale of the rip!
It looks like I don’t have any great pictures of the back of the gown with the new pleated back… whoops! Here’s one picture, though, where you can sort of see what’s going on with the dress.
Sort of hard to tell, but the area where the skirt meets the waistband is much flatter, and the skirt has a much bigger flare at the hem due to the new seam shaping.
Perhaps hard to envision, but if you compare this back picture to the one at the beginning of this post, there is a definite difference. It wasn’t a fun project, but it needed to be done, and I sure am glad it is! Next time there will be pictures of the reception, including more fun pictures of this dress.