

Many years ago (well, in 2012), I started a bonnet that was intended to match my 1822 Walking Dress. I was making a whole ensemble, with the dress, a muff and tippet, and also a bonnet and chemisette. It was more than I had time to complete for the deadline at the time. The chemisette was not even started, but the bonnet was patterned, cut out, started, and then abandoned.
In the intervening years, the bonnet pieces have sat in my UFO box, patiently waiting for me to come back to them. This year, as I was making my 1834 yellow dress and thinking about how to accessorize it, I remembered the bonnet and wondered if the shape and color might work for the 1830s. It seemed more useful to use something that already existed, and was already partly finished, as opposed to starting something new, so I decided to go for it!
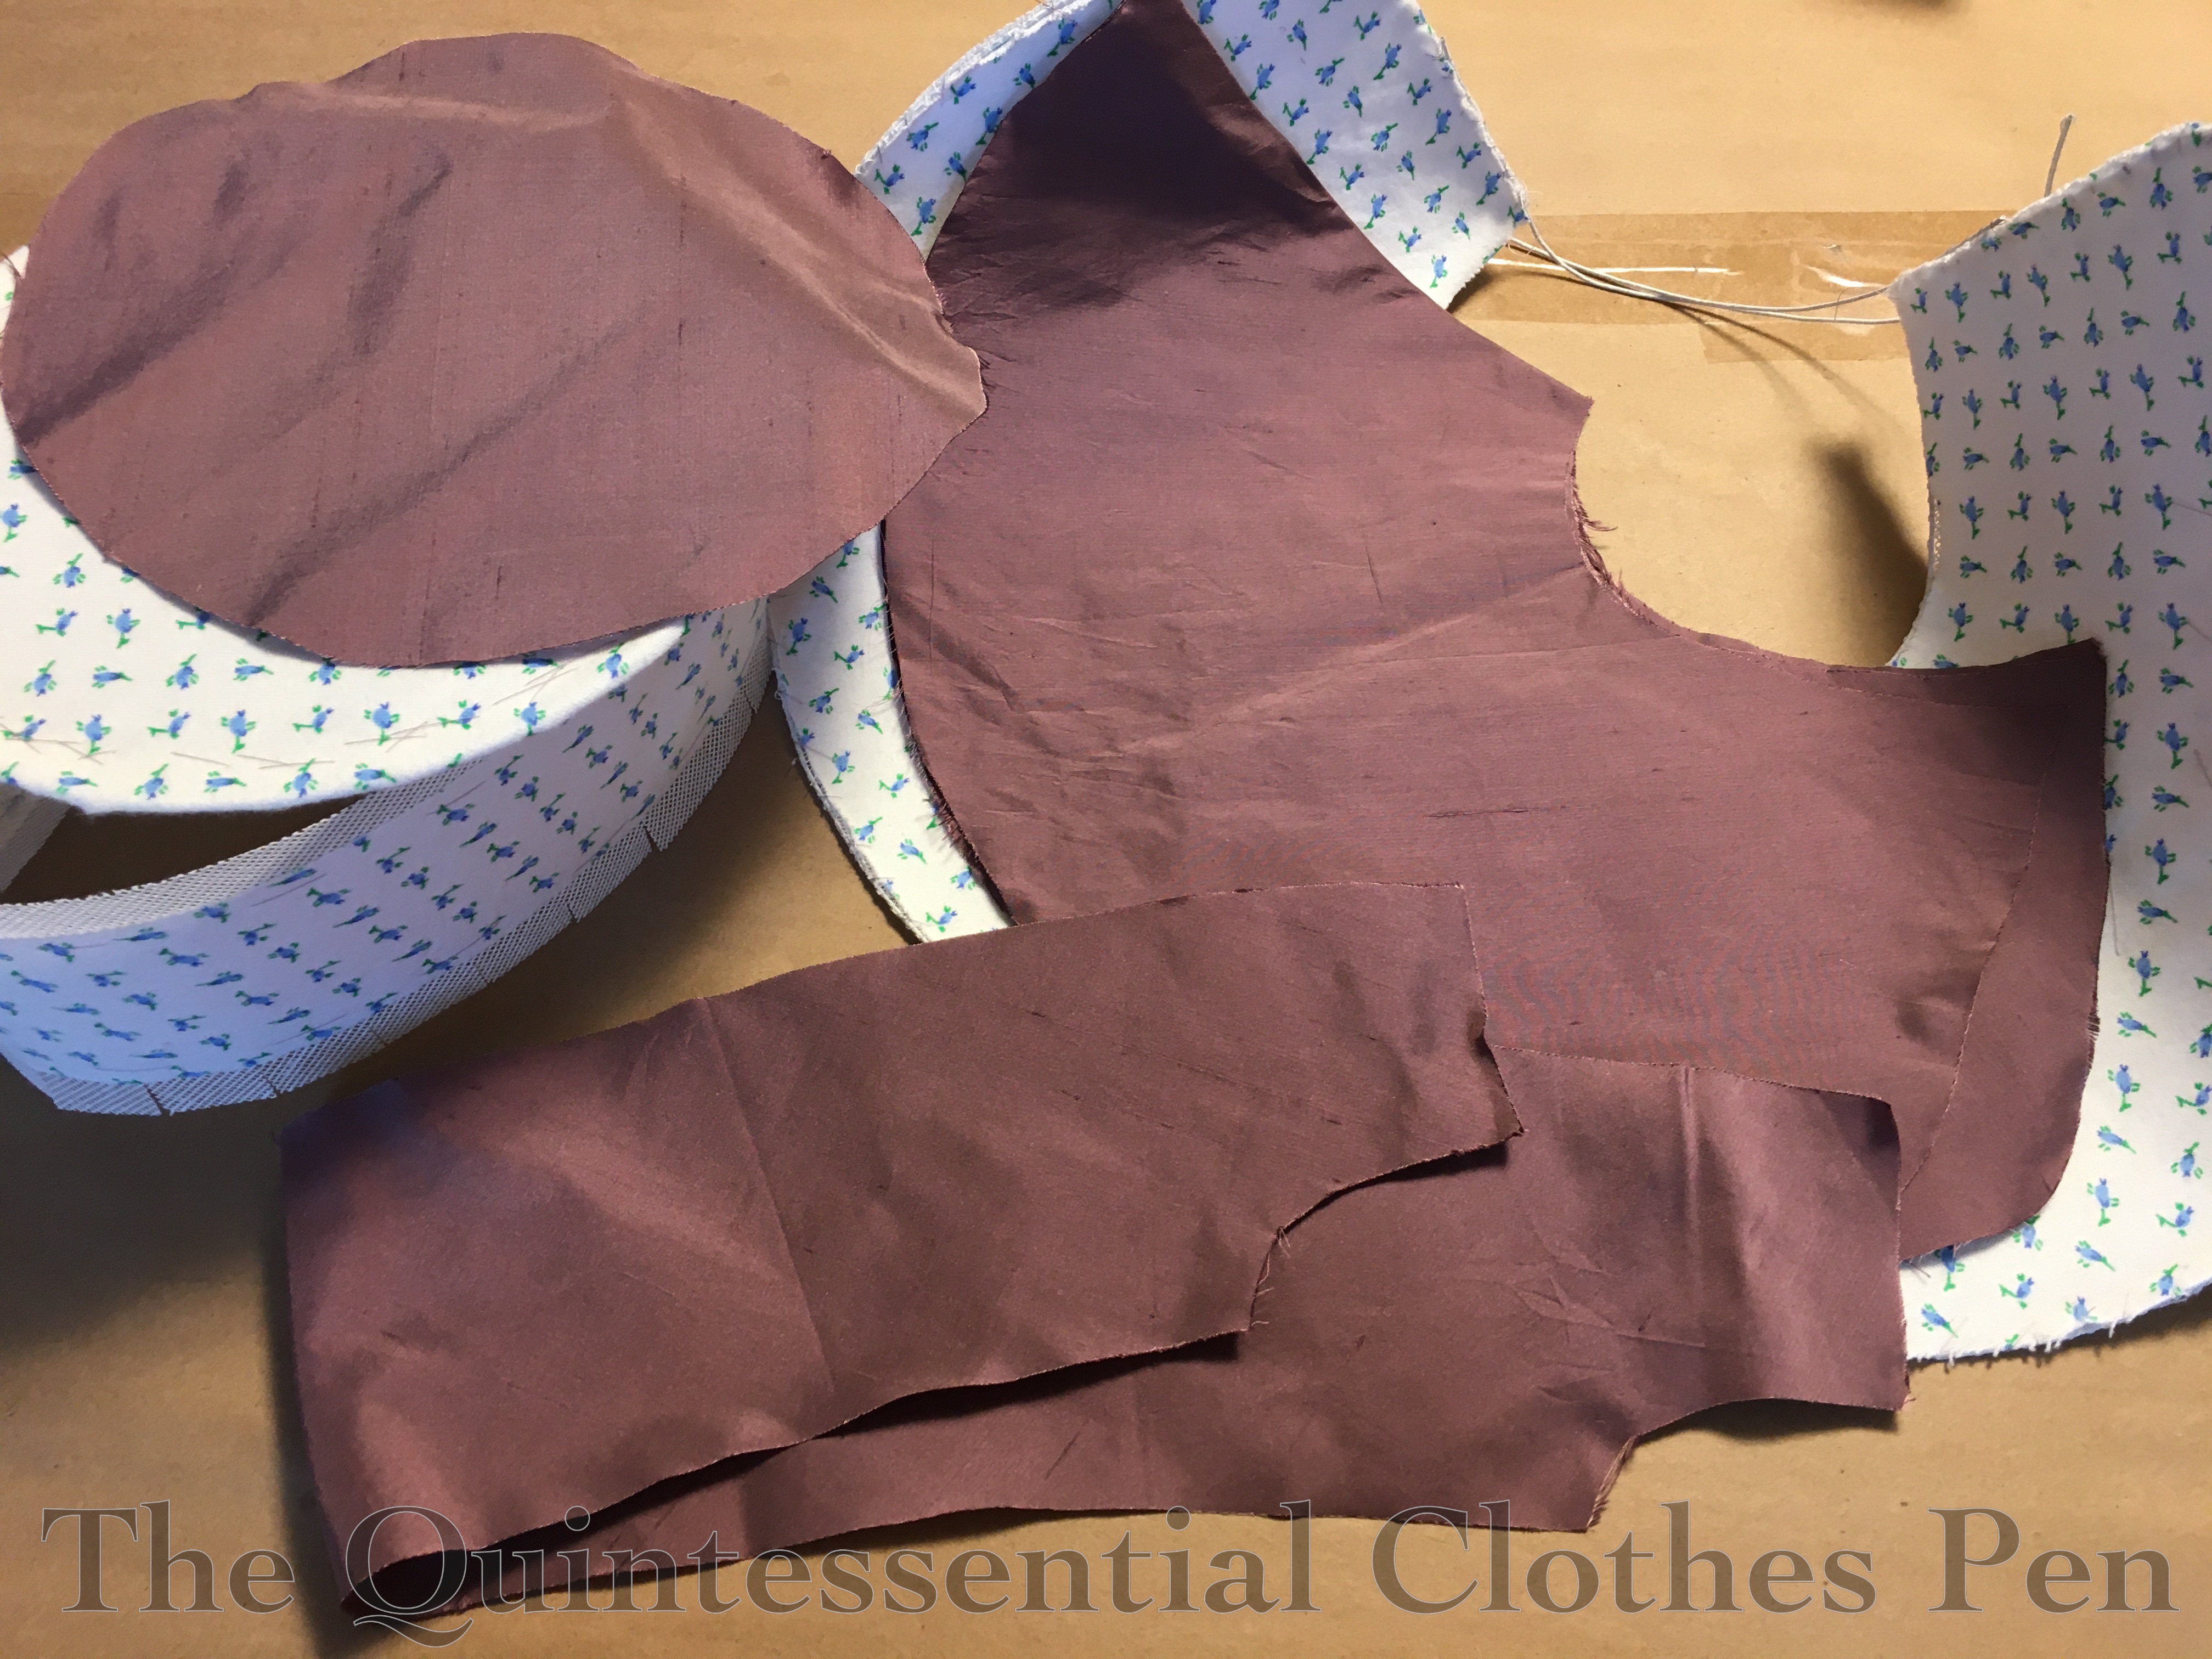
This is the state of the bonnet when I picked this project up again this fall. It’s not bad progress, actually. All the pieces were cut out of buckram, flannel, and slightly slubby silk; the buckram assembly was started; the flannel was basted on; and the edges of the pieces were wired.
All of that turned into this!

In this post, we’ll follow along with my construction process. Future posts will have more finished ensemble photos as well.
Inspiration
First, let’s go back to the inspiration for this bonnet.
The Metropolitan Museum of Art has a bonnet that is dated c. 1820, pictured below. It is silk and appears to be satin edged in velvet. It looks brown to me, but it’s also possible that it is black and that lighting and fading from age cause it to appear brown.

This is what I was aiming for when I started patterning in 2012. However, after finishing my bonnet, I realized that my brim shape is more open and high, and less forward, than the shape of this bonnet. This surprised me! And actually, it worked out in my favor, as the shape I patterned is more 1830s than 1820s.
Despite the shape not being quite like The Met bonnet (maybe someday I’ll alter the pattern and try again for the 1820s shape), I still took much color and material inspiration from it. I liked the tone on tone silk with velvet trim, the edges trimmed in velvet, and liked the lightweight silk ties (plus, I had all of these materials in the stash in perfectly coordinating purples!).
The trim needed to be different for the 1830s, though. I liked this 1830 bonnet, particularly for the inside of the brim trim, and this 1826-1830 bonnet for the fabric loop trim. There are other inspirational fashion plates showing floral trim inside and outside the brim on my Pinterest board for this project, as well. My bonnet is a melding of all of these sources of inspiration.
Construction
With my half finished pieces in hand, I decided to attach the tip of the bonnet to the side. Here is that step, pinned in place. These pieces were hand sewn together.
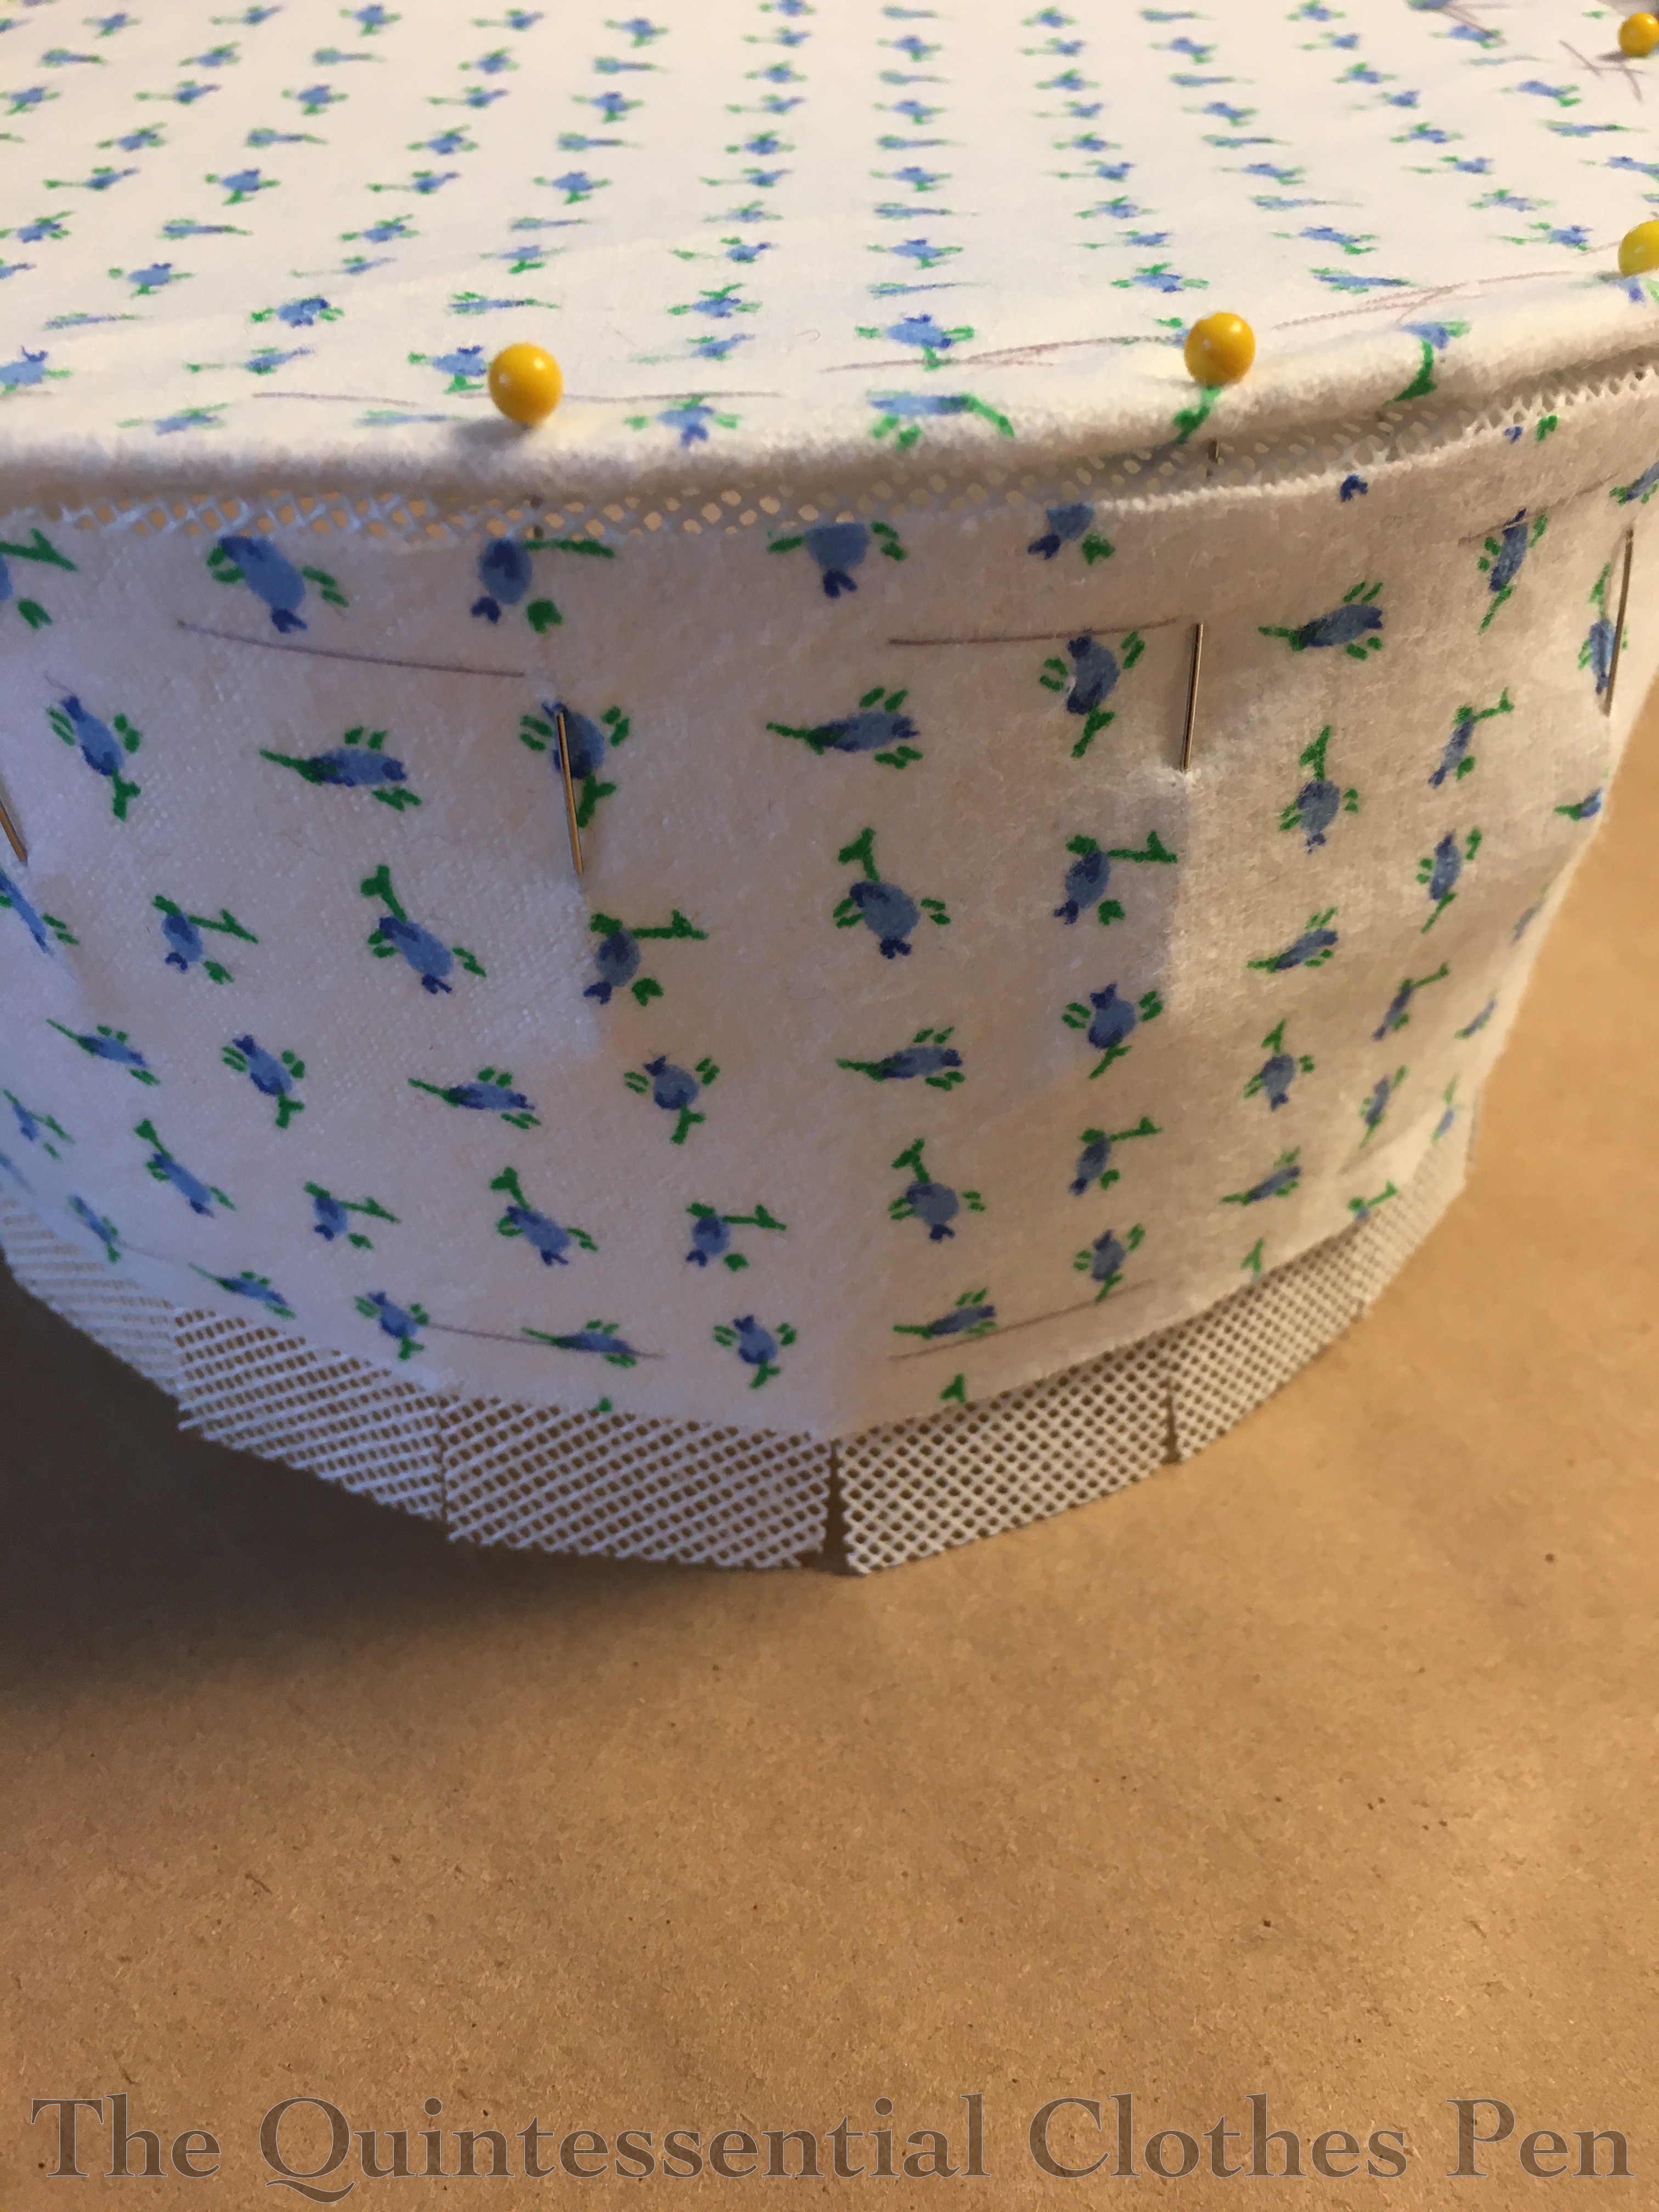
I’d decided to baste my flannel in place in order to help it follow the contours of the shapes instead of pulling away. On some bonnets (such as one covered in transparent fabric) these stitches might be seen, but I was confident that my silk would hide these quite well. The alternative would be to use spray adhesive to hold the flannel in place, but I didn’t have that at my fingertips 8 years ago.
In addition to the basting stitches in the middle, I also roughly whip stitched over the outside edge of the brim to hold the flannel in place.
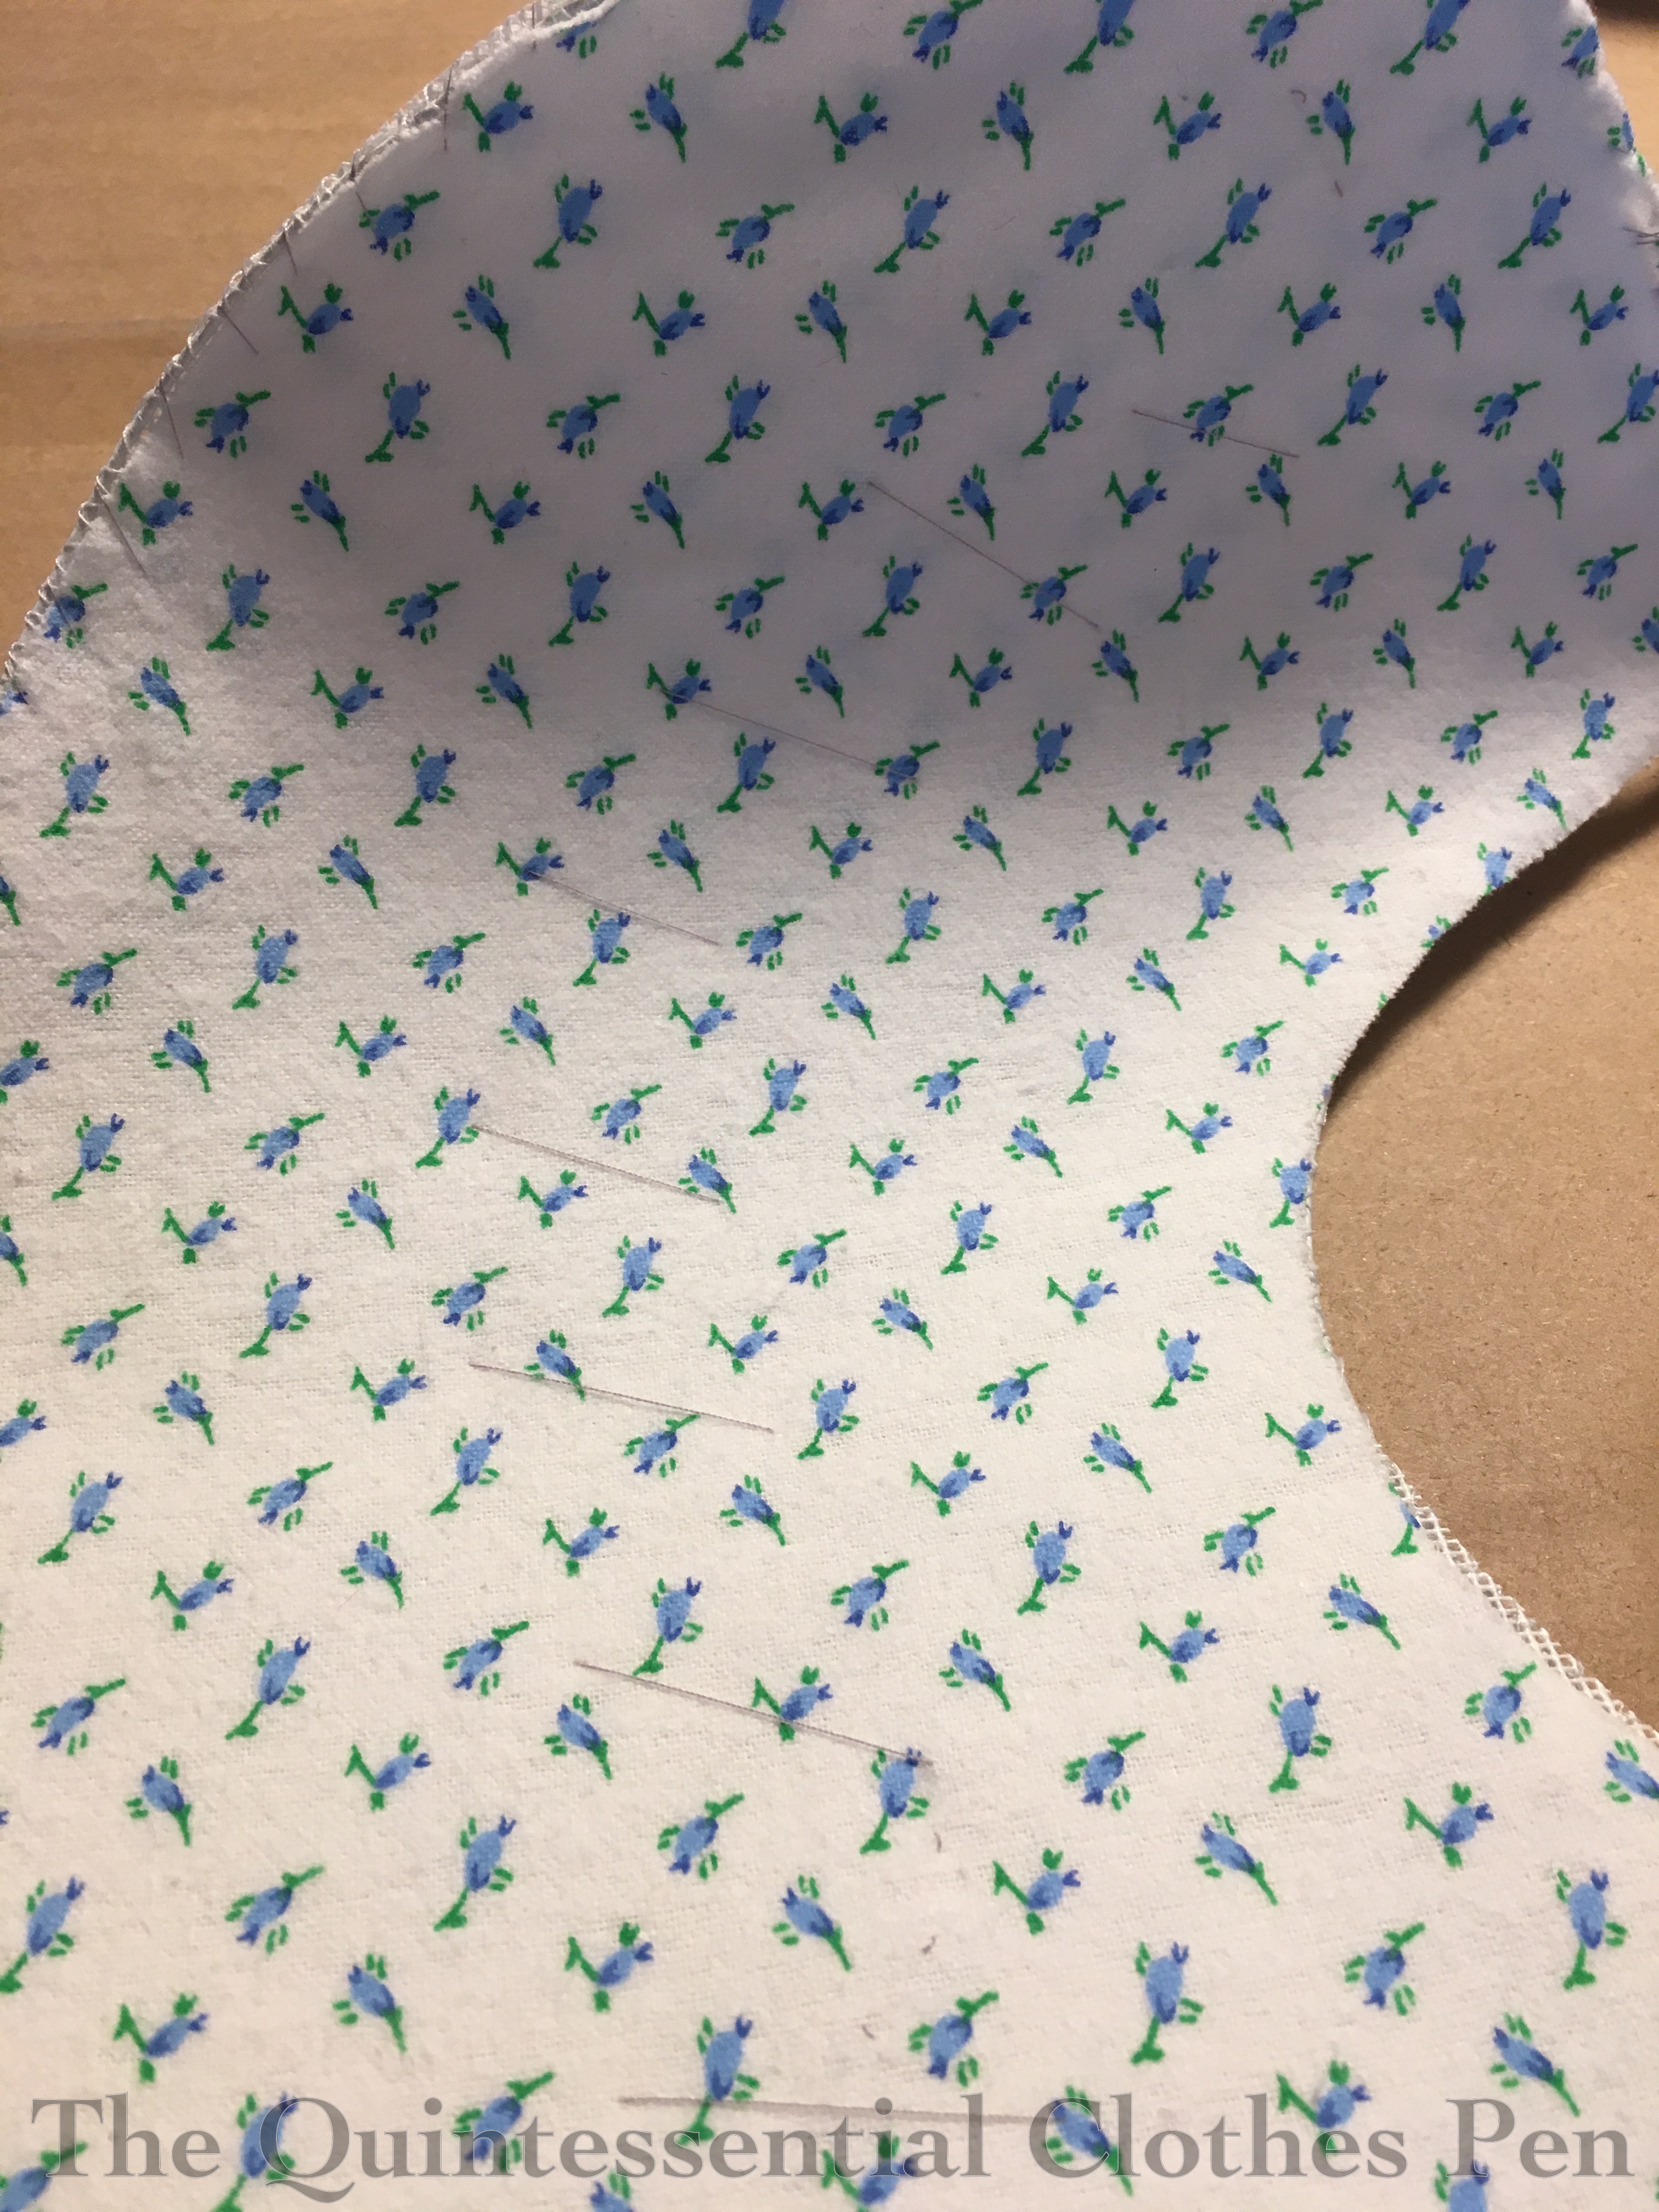
I took this brim piece and basted it to my assembled crown, then stitched those two layers together using a Z stitch. Pinning this was fiddly, as I had to get the buckram seam allowance of the side to slip under the flannel of the brim smoothly.

The next thing to do was cover the brim with my silk, but I still had the problem of getting the fabric to follow the contours of the curves without pulling away. When I started on this step I only had rubber cement on hand. I (smartly!) tried a sample to see if it would show through the silk. It definitely did! The rubber cement sample is on the bottom of the photo below. Not what I wanted! So, I ordered Krylon spray adhesive, which I knew would do the job. When it arrived, I tried another sample. The spray adhesive sample is on the top of the photo below. Success!
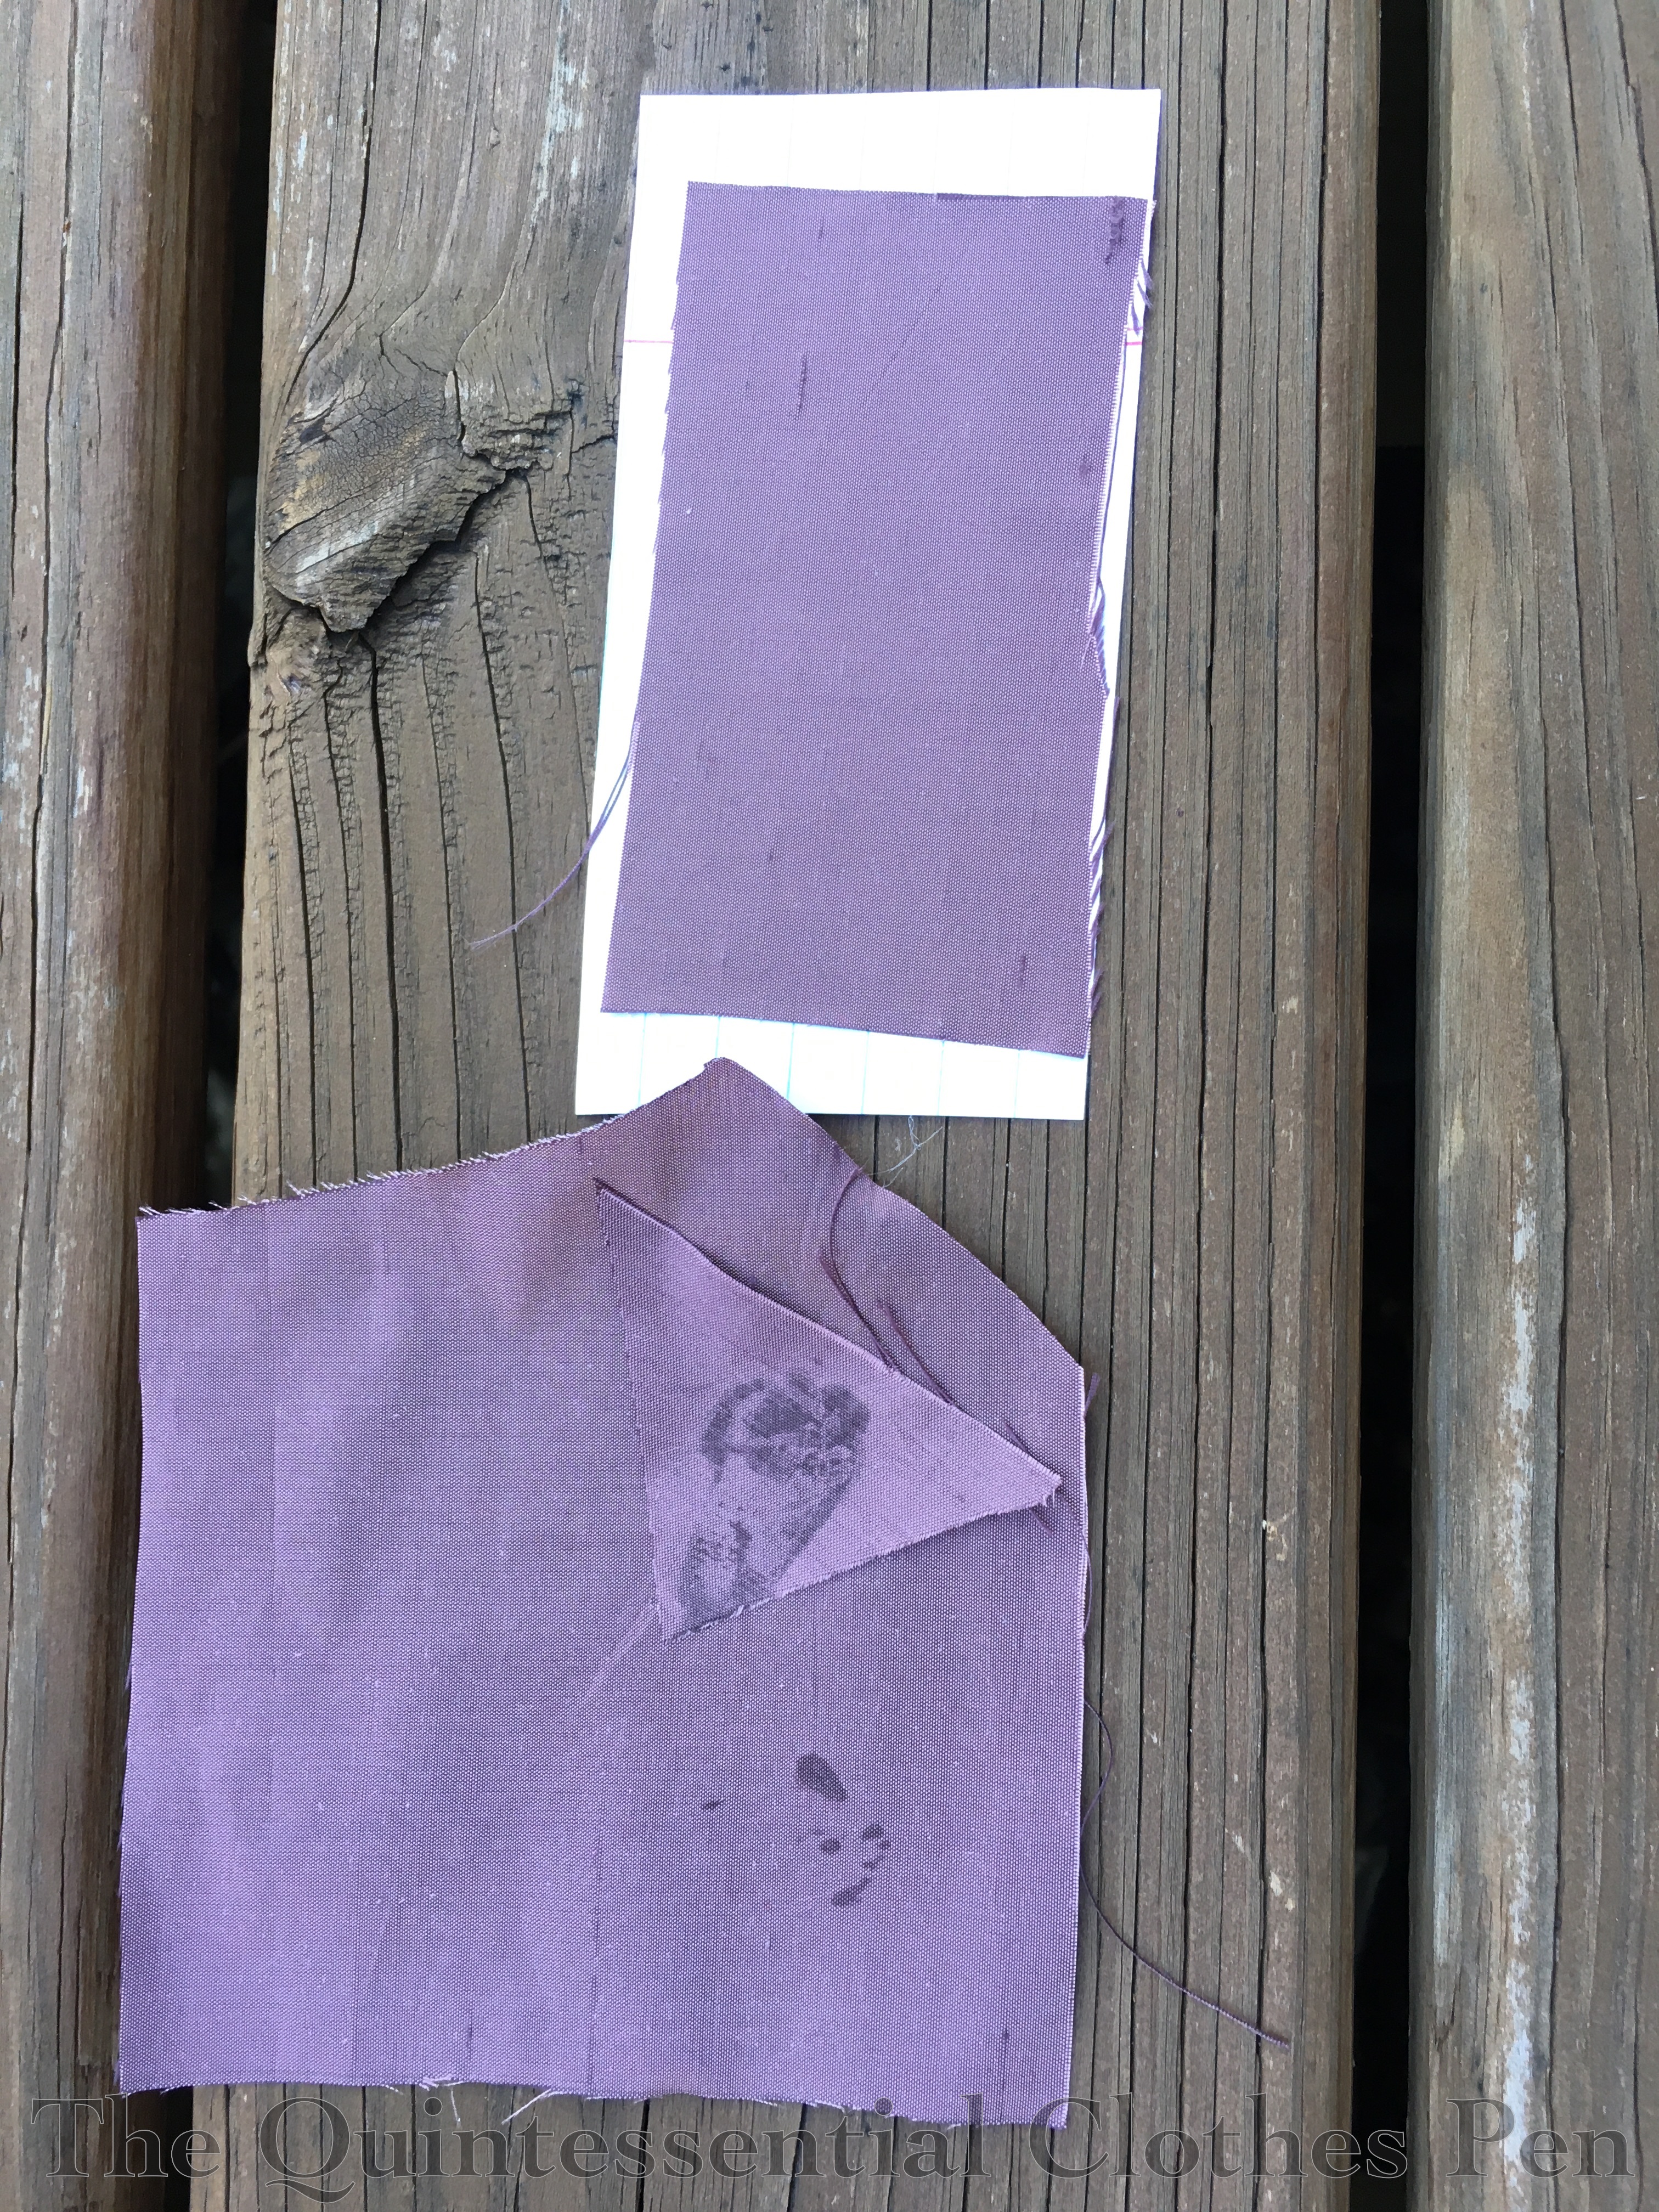
I used the spray adhesive for the inner and outer layers of the brim covering. It worked wonderfully, just as I had expected it to. The only exception is that I accidentally left a mark on one of my brim pieces where I’d let too much spray build up and had to recut that piece. So if you try this, make sure to do very light coats with the spray adhesive if your fabric is thin enough for it to show through!
Here is the inside of the brim, with the seam allowance clipped where it meets the crown.
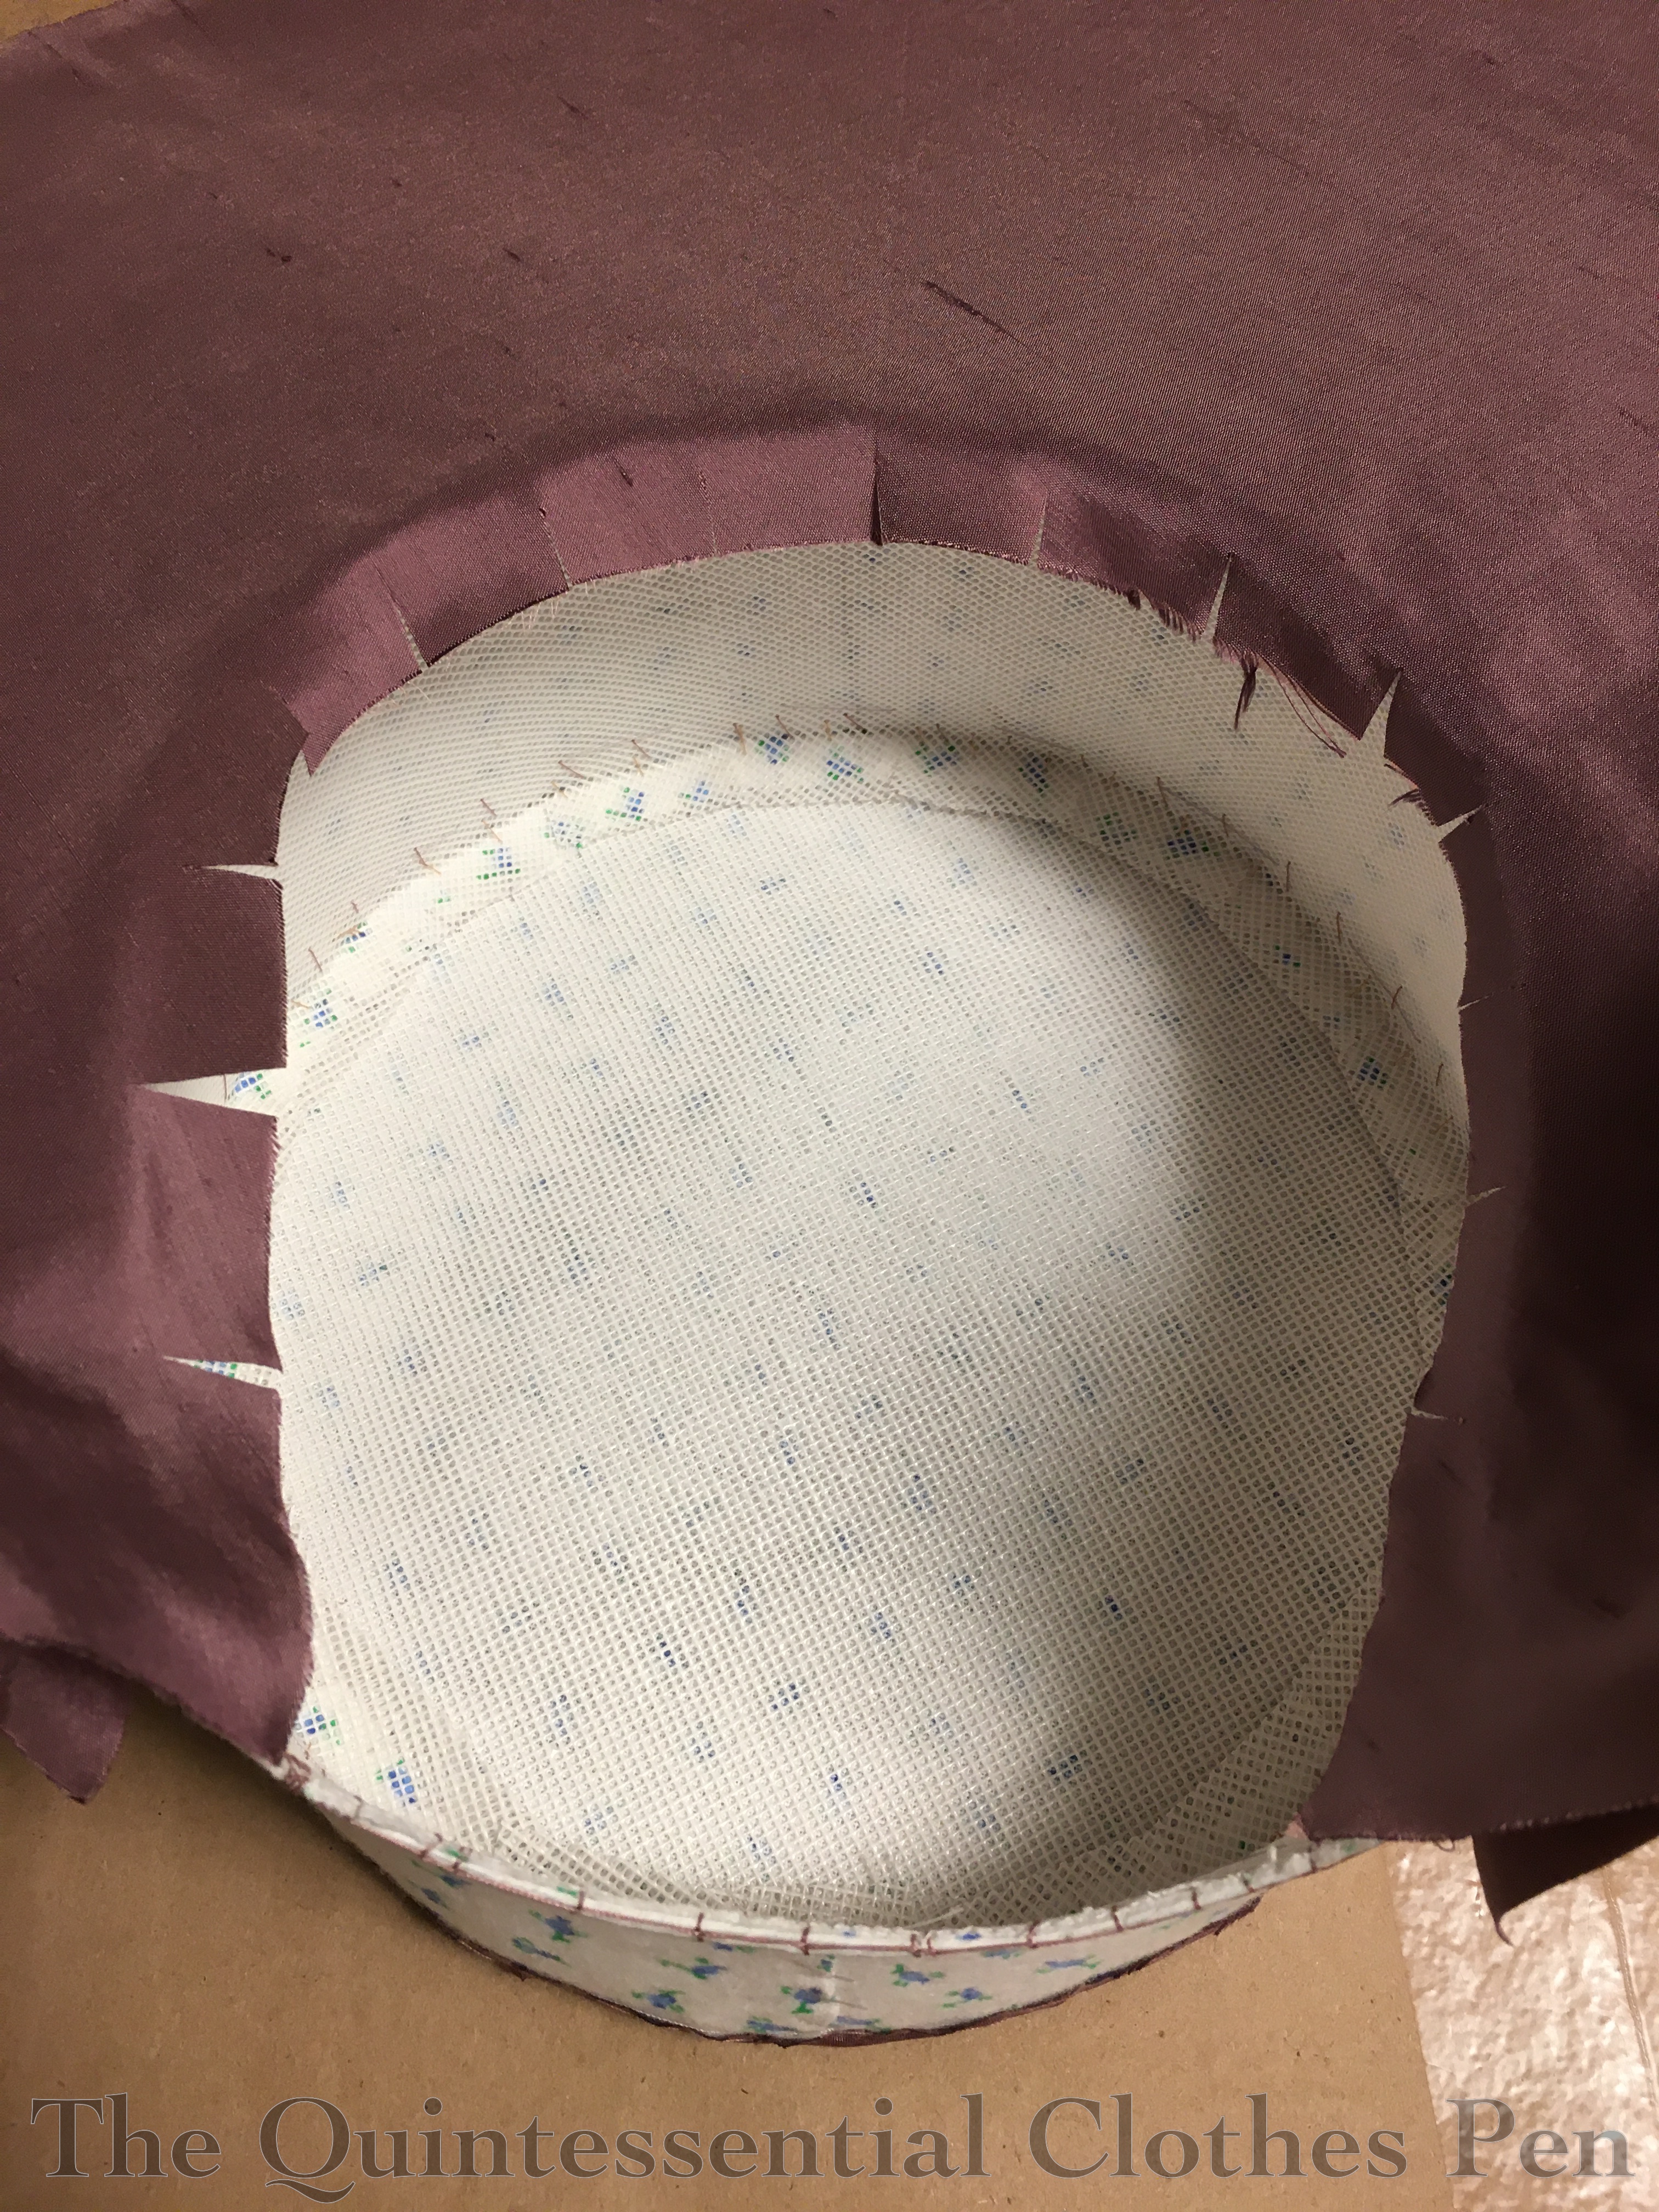
And here is the outside of the brim, with the seam allowance clipped so it can lay along the outside of the side band. You can see the interior of the brim showing on the extreme left of the photo, on the other side of the wired edge of the buckram. You can also see that by this point I’d put the silk covering on the tip of the bonnet. The seam allowances of that piece are clipped and then stitched over onto the side band through all the layers.

This photo shows the Z stitches holding the silk tip piece in place a little better than the last photo. It also shows the side band. For this piece, I pressed under the brim side seam allowance ahead of time, pinned it in place, and then turned the top edge under as I went along, so it would be just the right width. Stitching this piece on covered all of the seam allowances you can see in this photo.

In the next photo ,a few more steps have been completed. The side band was sewn on, the silk edges were trimmed and bound with bias velvet, I cut bavolet pieces (out of my glue stained brim piece!), edged the bavolet with bias velvet, and attached the bavolet. The great thing about the spray adhesive is that it’s not so glue-y that it gums up a needle or makes things hard to sew through, so I had no problem with any of these sewing steps.
As a side note, what is a bavolet? Interestingly, my go-to source for definitions, the Oxford English Dictionary, does not have an entry for this word! I believe that is because it is actually French, not English. I would define bavolet as ‘the curtain piece at the back of the bonnet’. There is more information about this word, including examples of the word in use from the 19th century, in this French Vocabulary Illustrated blog post. If you know of other good places to find a definition or etymology of the word bavolet I would love for you to share!
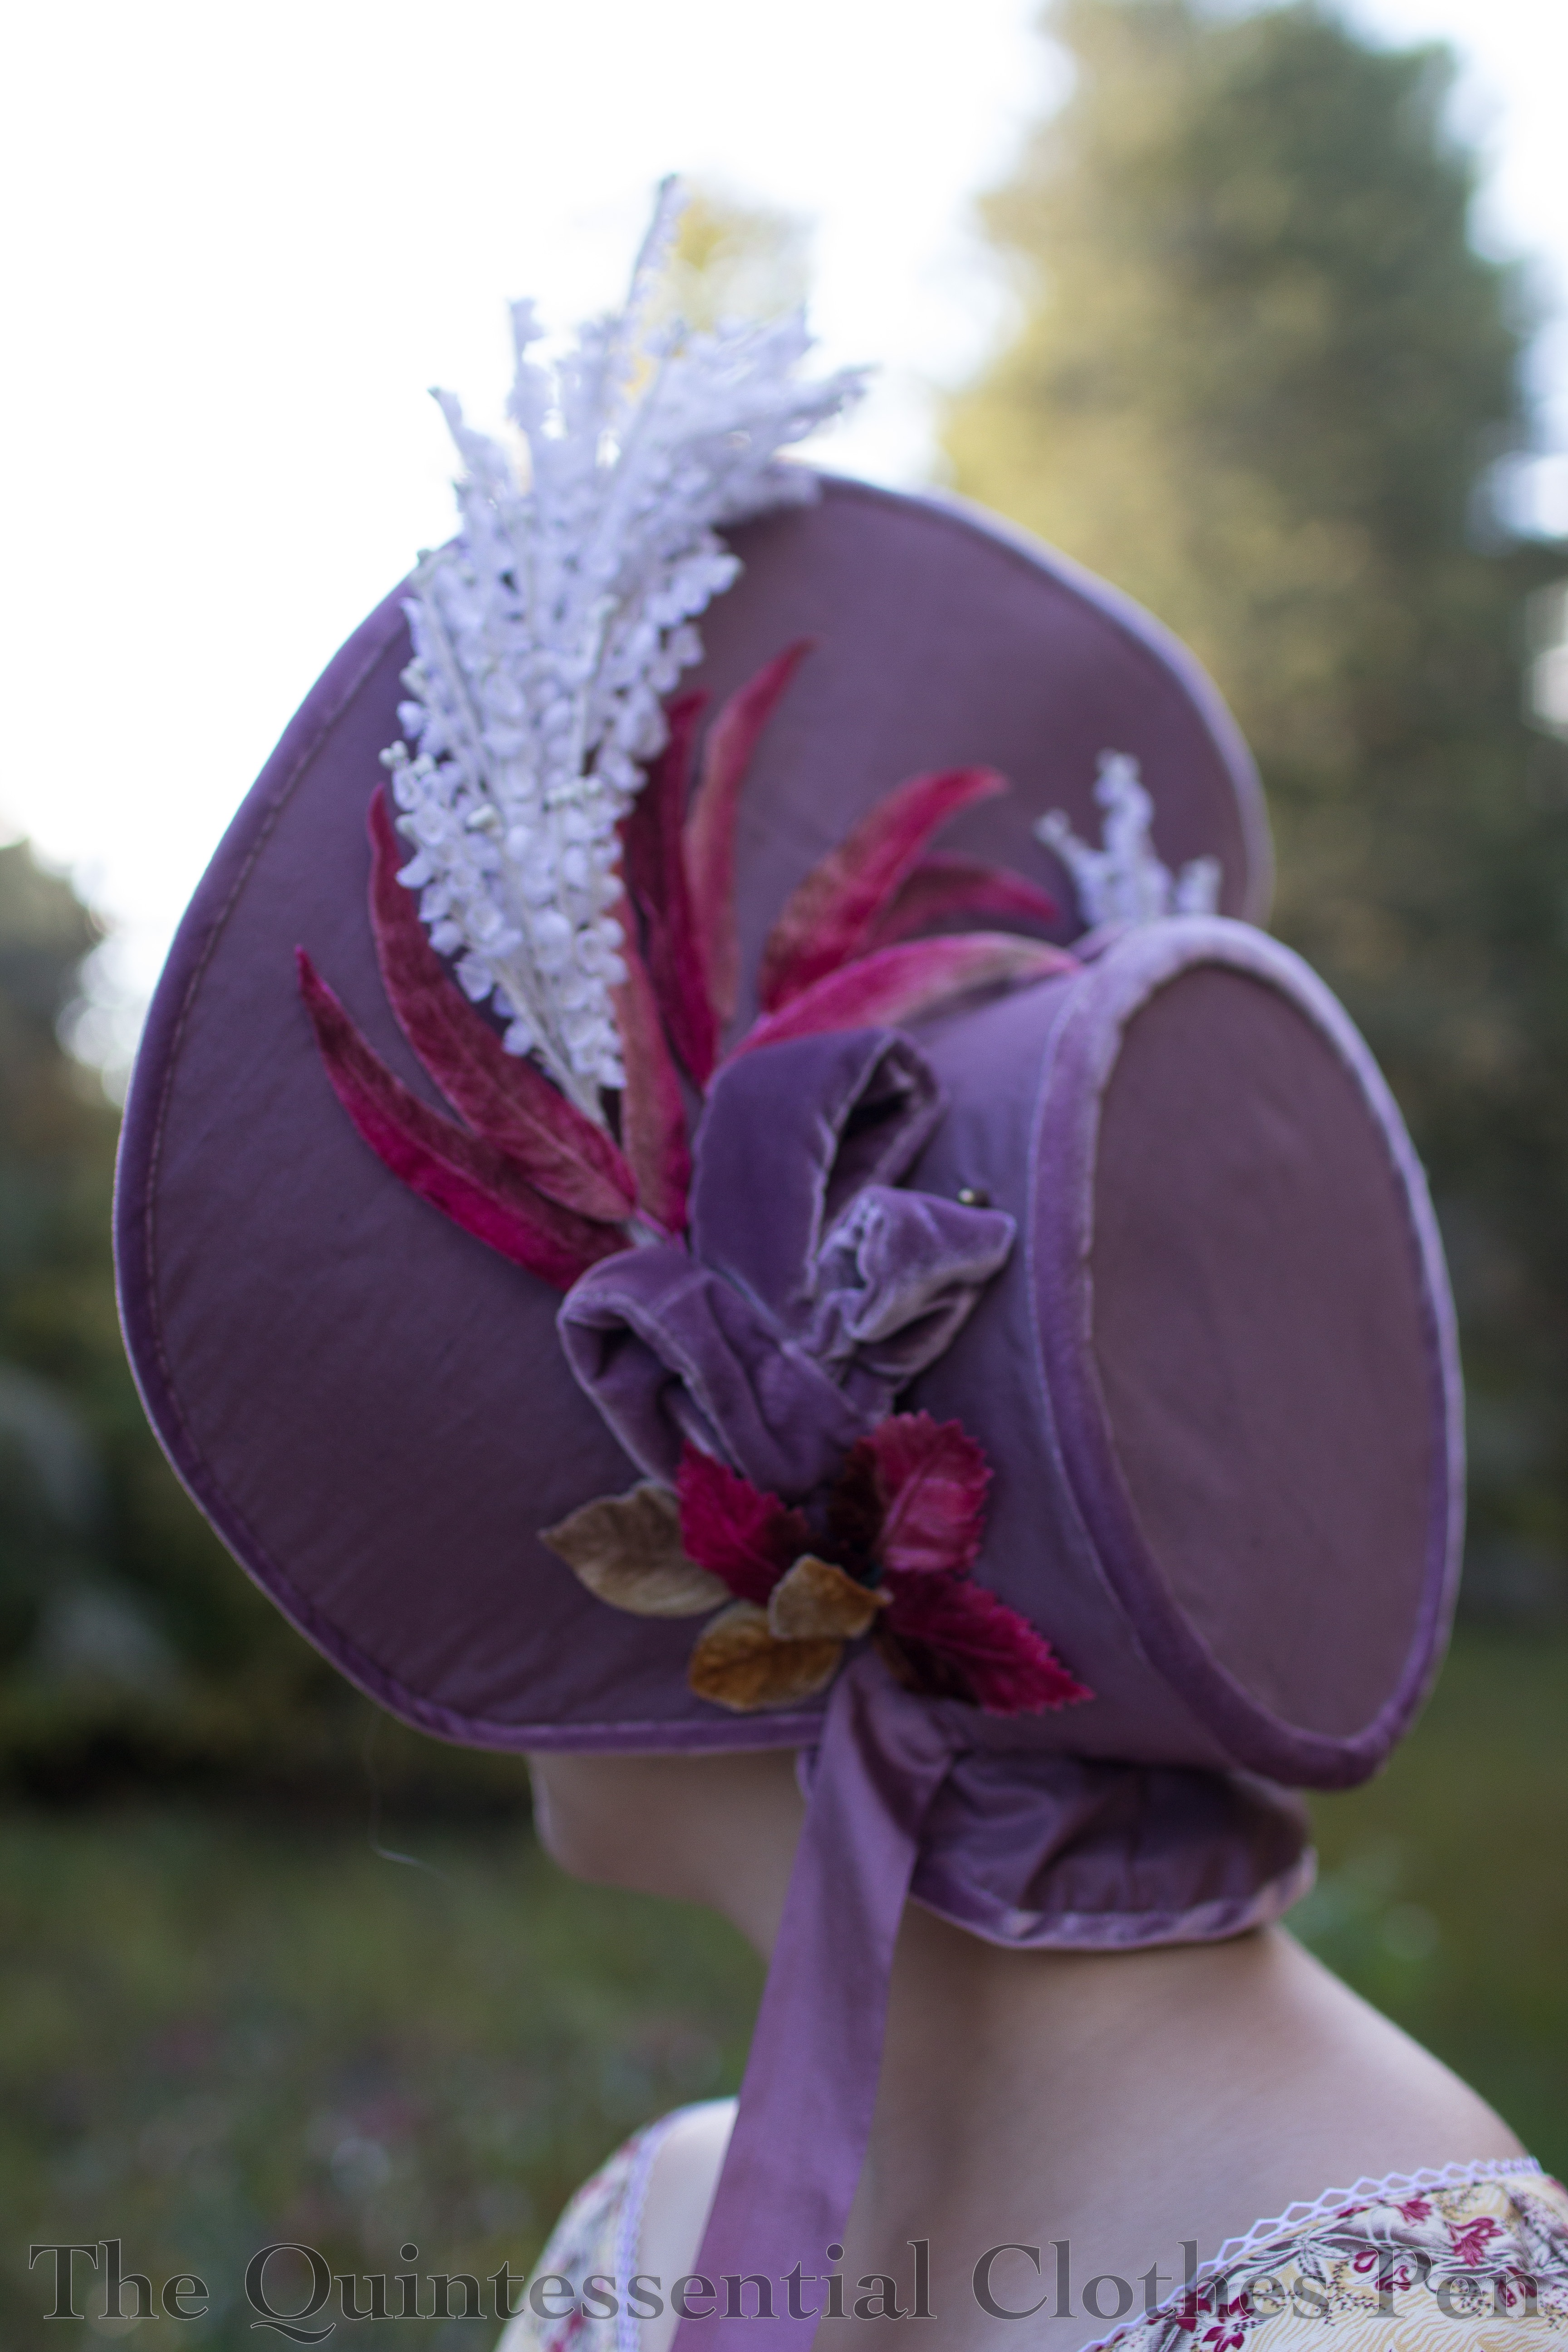
Back to the photos! All the long purple stitches around the side band are from attaching trim. I find that double thread makes it much easier to attach trimmings such as feathers and flowers, as you can double back through your looped thread to hold things in place and it makes it a little extra sturdy. The nice thing about doing all of that before lining the hat is that it makes for a really elegant interior when all is finished!

Below, you can see what that trim looks like from the exterior. I used some scraps of velvet to make loops and a variety of vintage paper and velvet millinery flowers and leaves in white, pink, and gold.
I’m super pleased with how it turned out, but it took hours to decide on the placement and then sew everything in place. It was finicky… The trim kept causing the bonnet to fall over as I was trying to place it and when sewing it the thread kept getting wrapped around the different elements and getting stuck. Plus, to make the stitches on the brim invisible they had to catch just one layer of the silk (as opposed to being stitched all the way through all of the layers) without pulling the silk away from the flannel.
Finally, it was time to make a lining! This used the same pattern pieces as the tip and side band and was cut from scraps of ivory shantung. The seams for the lining were machine sewn.

After I put the lining inside the crown of the bonnet, I covered most of the raw edges of the purple and ivory silk with a band of brown cotton velvet. This blends with my hair and provides a bit of a velcro effect to help keep the bonnet in place, in addition to providing nice finishing! This is the same process that I used when making my 1875 hat earlier this year.
At the bavolet edge, where there is no brown velvet, the ivory silk was turned under and sewn in place. I also added lightweight silk ribbon ties as a finishing step.

Finished!
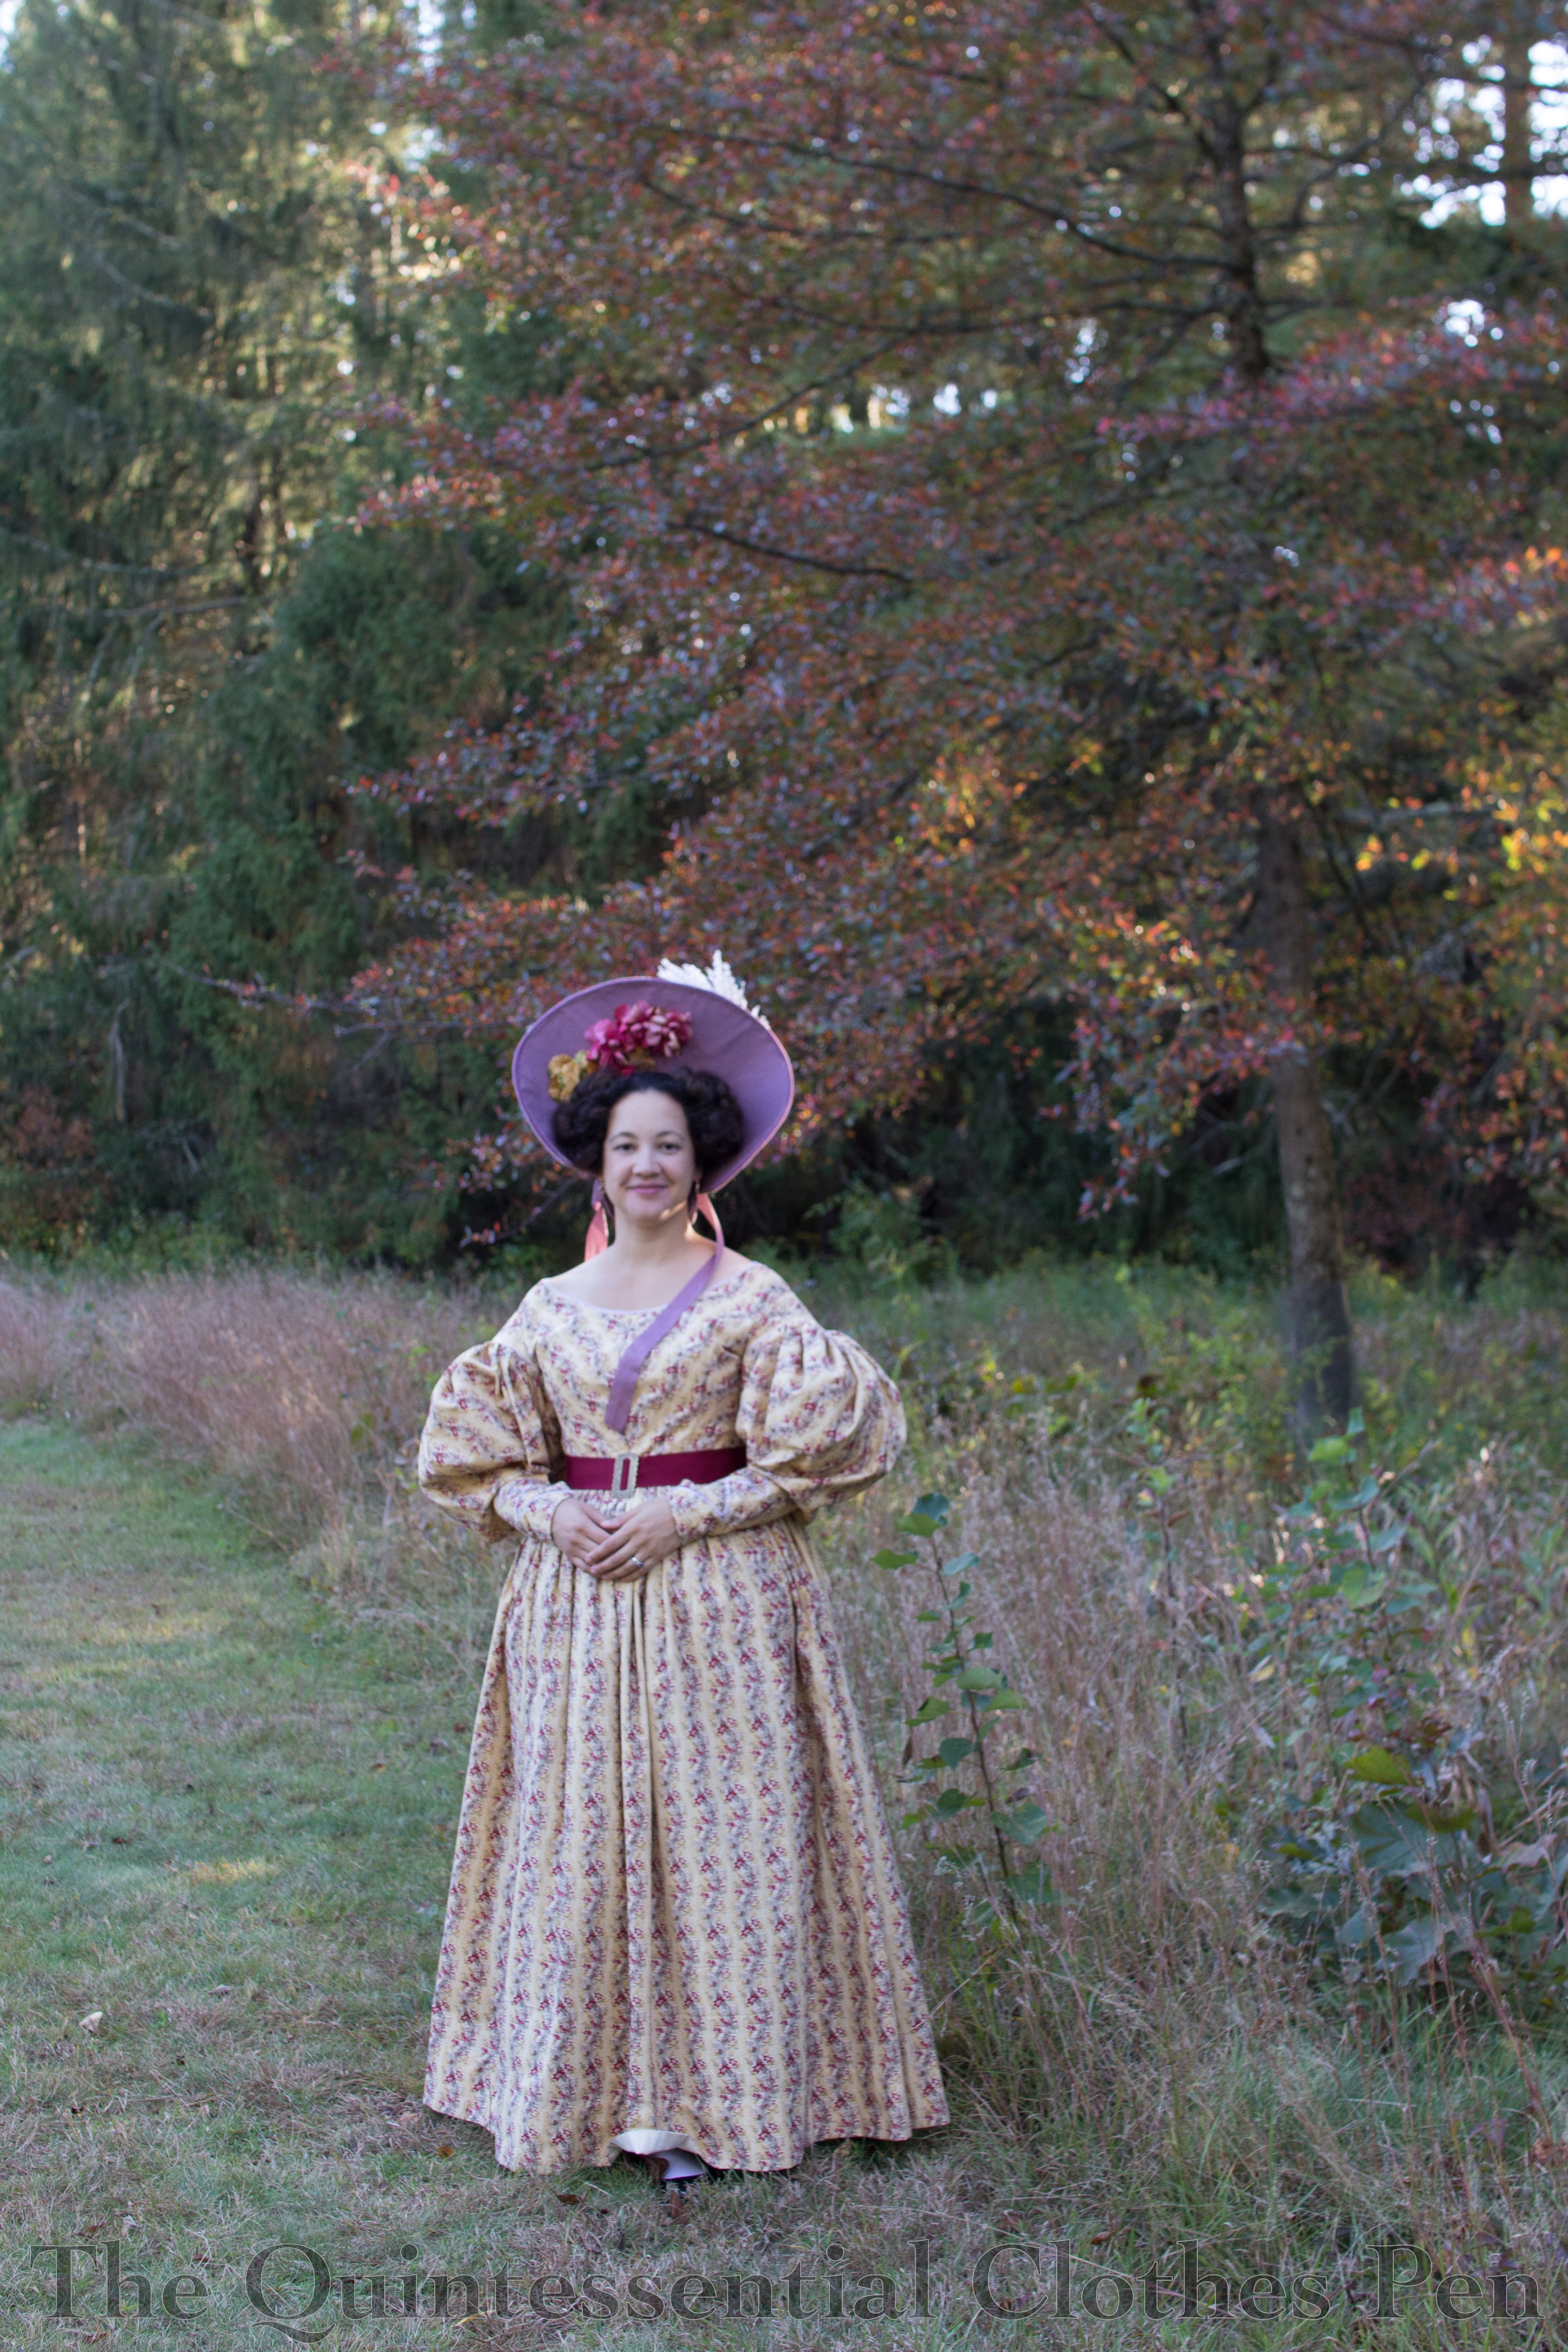
Here is the finished bonnet, being worn with my 1834 yellow dress! I love that the purple coordinates with my yellow print dress fabric without directly matching any of the colors in the print. It was also fun to choose white, pink, and gold floral trimmings for the bonnet to echo the colors in the print. I think the combination is anchored well while still being distinctive parts.
This photo clearly shows that the ties are purely decorative. I left them hanging free so that they could elegantly (usually!) move around. So what keeps this giant sail in place on my head? (Because I can say with certainty that a bonnet this big is basically just a wind catcher on the top of your head!) It will stay on its own… until moving around. I used the back section of my hair to make a bun, at just the right height so it would sit in the crown of the bonnet, and then used two hat pins at different angles to anchor the hat in place through the bun
I found that I placed the curl bunches too far back on the sides of my head when I tried to put on the bonnet and had to push them forward to get it to sit in the right place. It was unexpected how far forward the curls needed to be. As I’ve done in the past for 1830s side curls (explained here in 2016 and again in 2019), I used my own hair on top of mesh poufs to create the side curls. The combination of my hair getting very long and the curls needing to sit in front of the bonnet means that these curls are larger looking vertically than what I’ve had in the past. It seems to fill in the shape of the bonnet well, so I guess it’s good!
The other thing that the above photo does a good job of showing is the trim on the inside of the bonnet, which was also finicky to place. I had to get it in the right location so that it would organically grow out of my planned side curls hairstyle. The bonnet looks quite silly without the 1830s hair to go with it (and one might argue that it looks silly, in scale at least, even with 1830s hair!).
Speaking of scale, this bonnet is quite large. With the trim, it stands more than 8″ high on top of my head. I had to hold the brim when wind picked up while wearing it–the hat pins kept it in place but it would pull at my hair which wasn’t comfortable. Also, it required a pretty severe slouch in the car in order to not hit the roof! Thankfully, I was able to be a passenger while wearing the bonnet, so that I could arrange it, with the hat pins, in front of a mirror and then not need to sit up or look around while driving. Pretty silly! A carriage would have made so much more sense!
Just The Facts
While this bonnet does not qualify for any of the remaining challenges of the Historical Sew Monthly this year, I would still like to share the facts about this bonnet in the format I would use for an HSM garment. So, without further ado, the facts!
Fabric/Materials: ½ to ¾ yard each of floral cotton flannel and purple silk shantung, scraps of purple polyester velvet and ivory silk shantung, about ½ yard of buckram, about 3 yards of millinery wire, and a small piece of brown cotton velvet.
Pattern: My own.
Year: 1831.
Notions: Vintage millinery flowers, thread, and about 1 ½ yards lightweight silk ribbon.
How historically accurate is it?: 90%. Pretty good in terms of silhouette, construction methods, and materials; however, there are a few modern materials mixed in (such as spray adhesive).
Hours to complete: 15.75 hours to finish, plus maybe 6-8 from years ago.
First worn: In early October, 2020.
Total cost: Approximately $35.
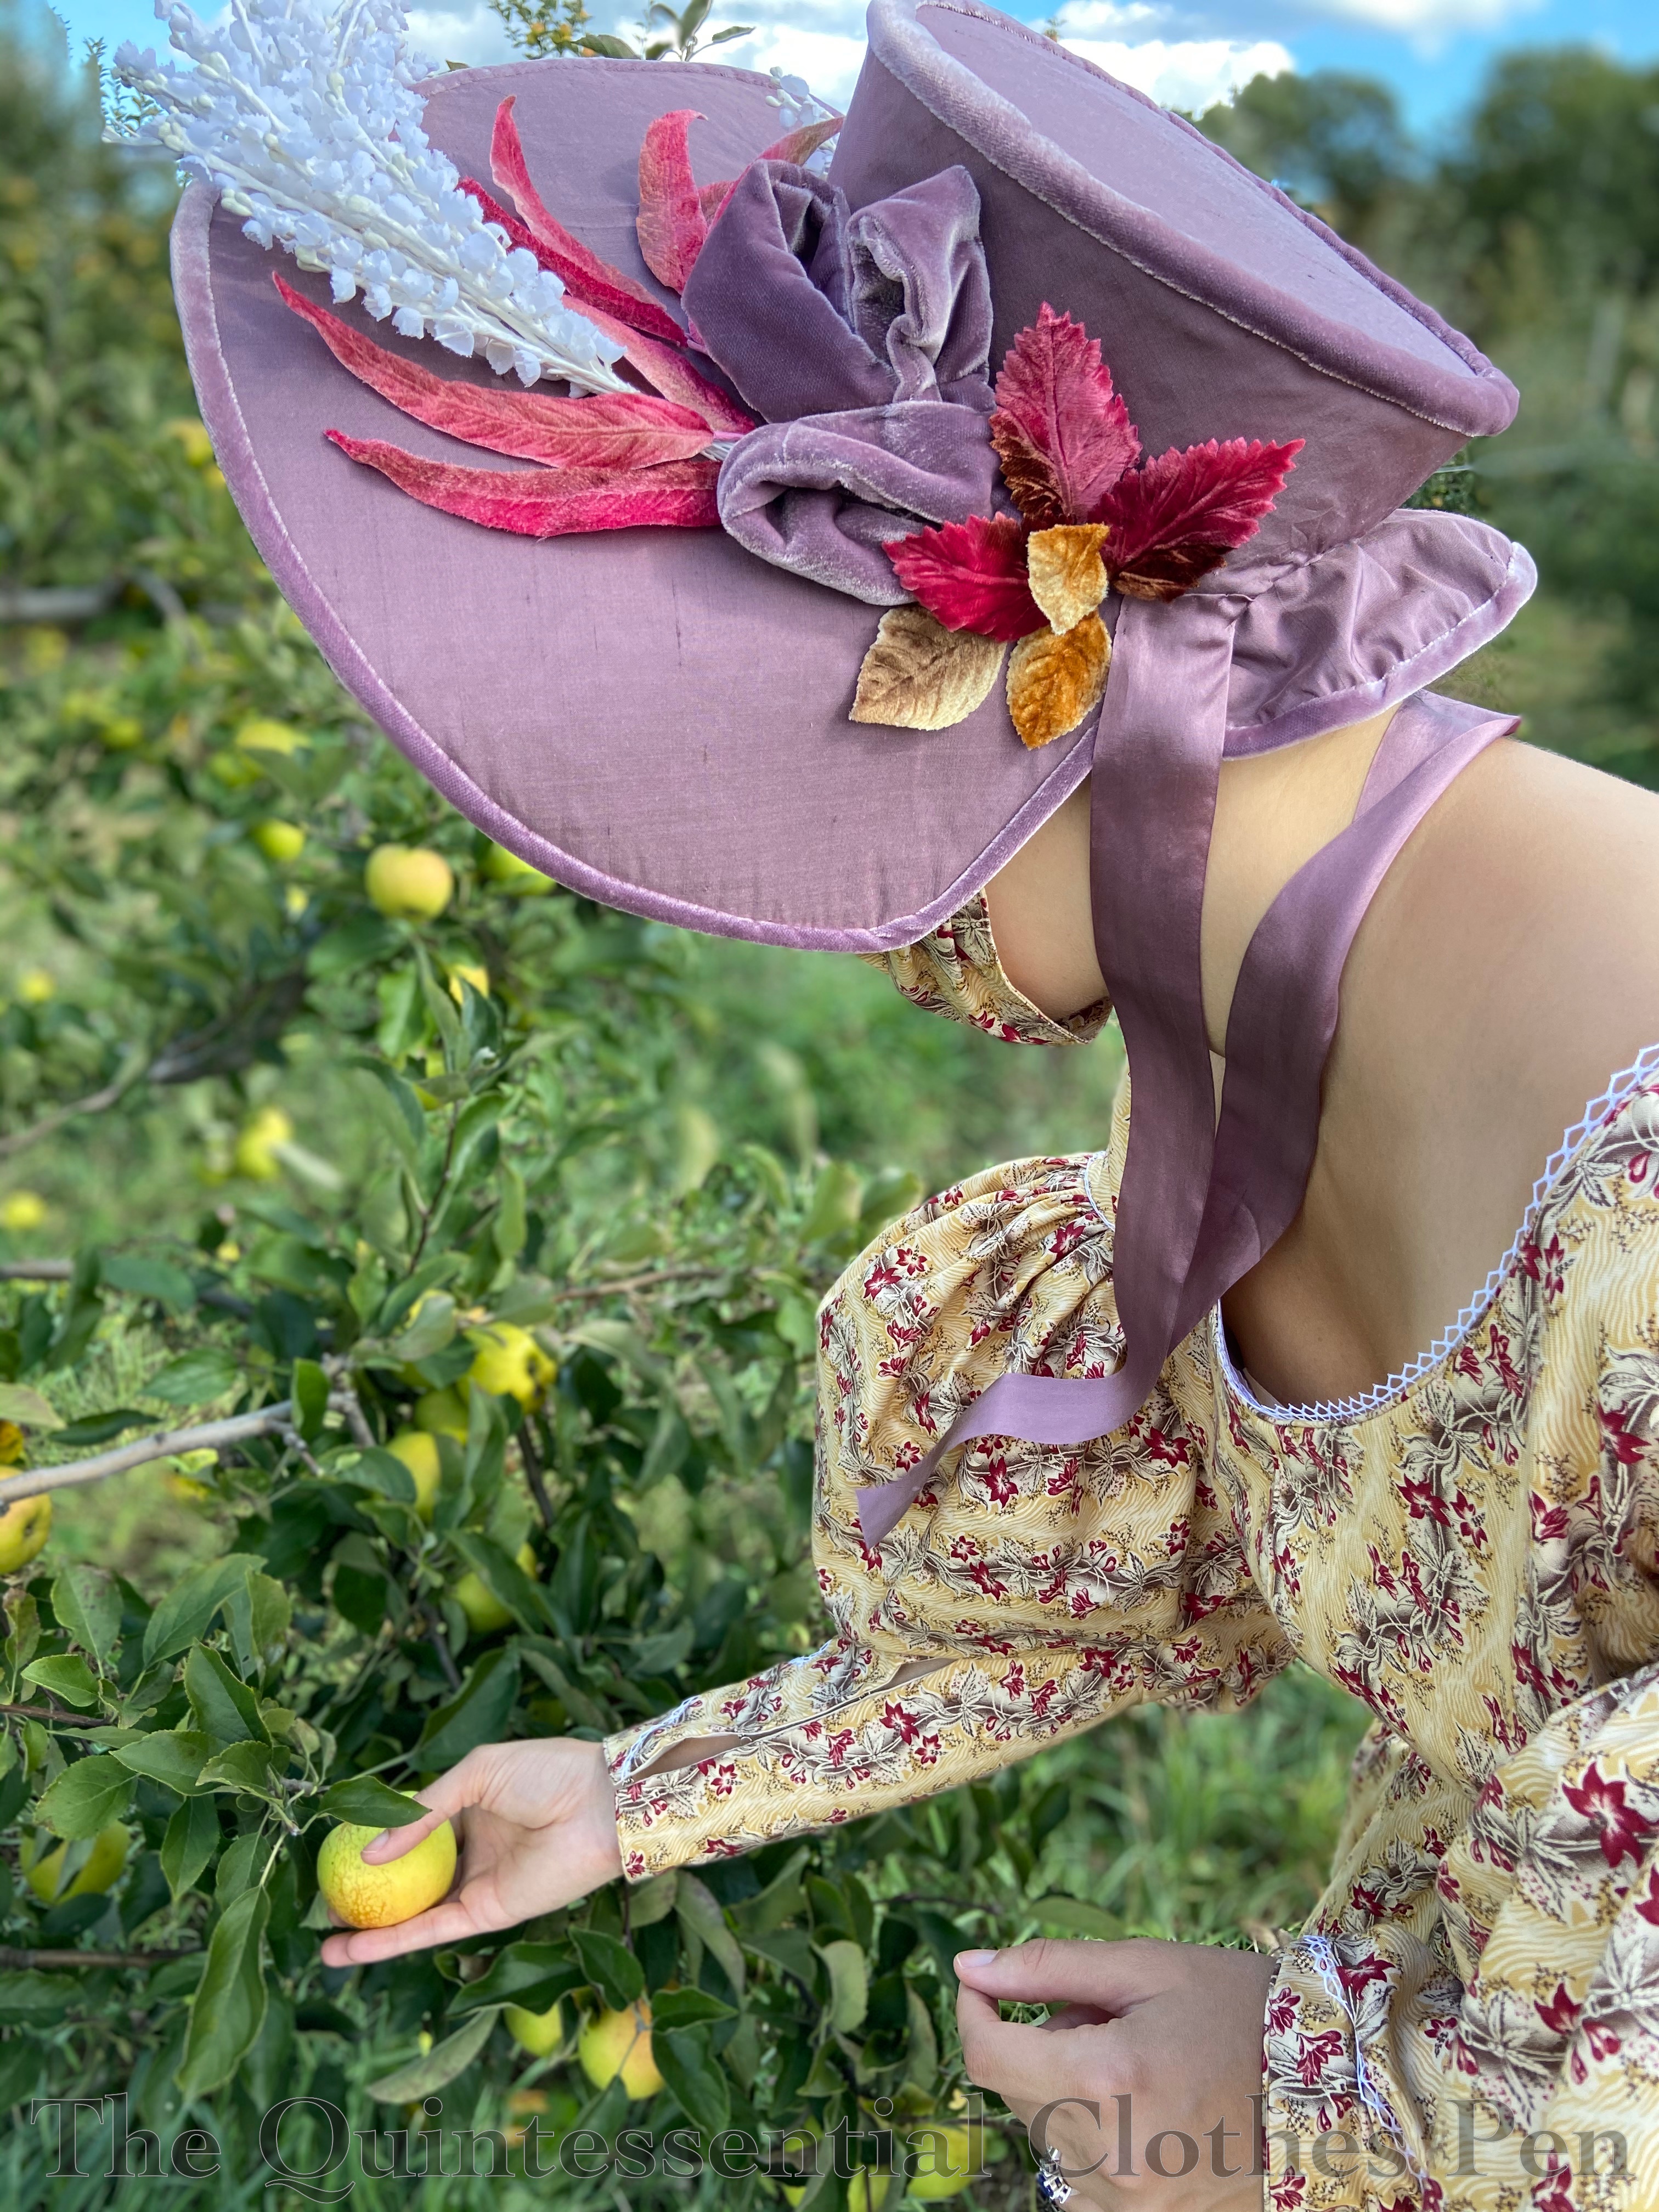
Thanks for sticking with me through another long construction post! I have one final photo that also hints at an upcoming post… 1830s apple picking adventure photos! Happy autumn!

Absolutely gorgeous! I haven’t tried making a bonnet from a pattern, but I really want to try it soon.
Thank you! It is a fun adventure, I think. I hope that you are able to try it!
That turned out so cute! I love the bright contrast of the purple and then the bright pinky purple trimmings. It pairs up beautifully with your dress. Adorable look!
Jennie from theuglydame.blogspot.com
Thanks, Jennie! The colors are great fun–perfectly me. 😉 I’m glad others appreciate them, too!
It’s lovely! I really like the mix of bows, feathers and leaves for the decoration, and it does look pretty with the dress. I’m working on an 1830’s bonnet myself, and trying to find something that would work both with a green and a gold dress is forcing me to be less ‘matchy’ than I might’ve otherwise been. It’s going to be brown and white, which should hopefully be quite versatile.
Thank you! It’s exciting that you’re making a bonnet! Choosing colors is hard… but I think that a bit of contrast in the colors makes sense, as not all women would have had a bonnet to match each outfit individually. Brown and white sounds like it should suit your dresses wonderfully. Looking forward to seeing it at some point! 🙂
The color and styling and shape are absolutely fantastic!!! This is everything I love in a bonnet and it looks even more awesome with the dress.
What a lovely compliment. Thank you!