Yikes, that is a long title… but I do like my titles to be descriptive sometimes…
As is suggested by the title of this post, though I did have new, wearable 1820s clothes (with closures, yay!) for Fezziwig’s Ball this past weekend, not all of the garments were entirely completed. I had set out with a rather rigorous plan for the month of December and I will admit that “my eyes were bigger than my stomach” and I wasn’t able to fully complete all of the projects I wanted to. That being said, however, I was very pleased with how things looked. (I will also admit that I spent the week before the ball furiously sewing every night… in fact, I was still sewing appliqués on the afternoon of the ball!)
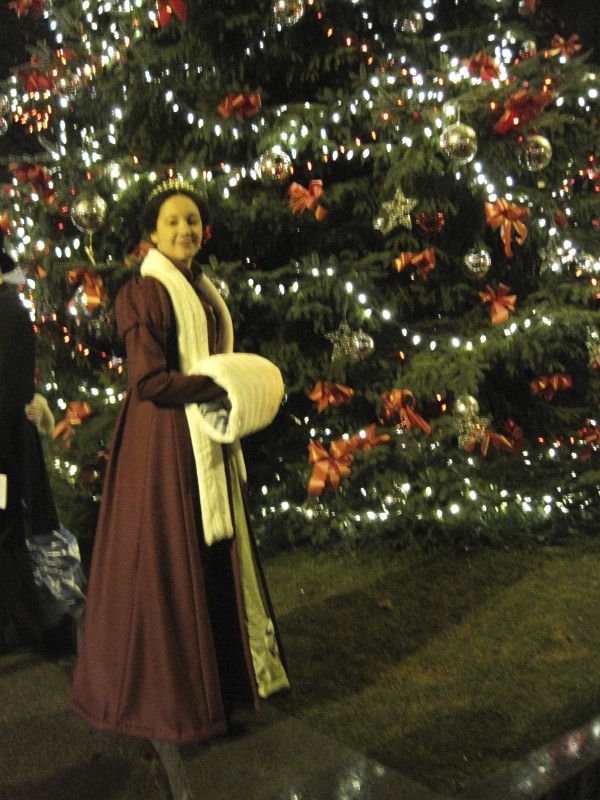
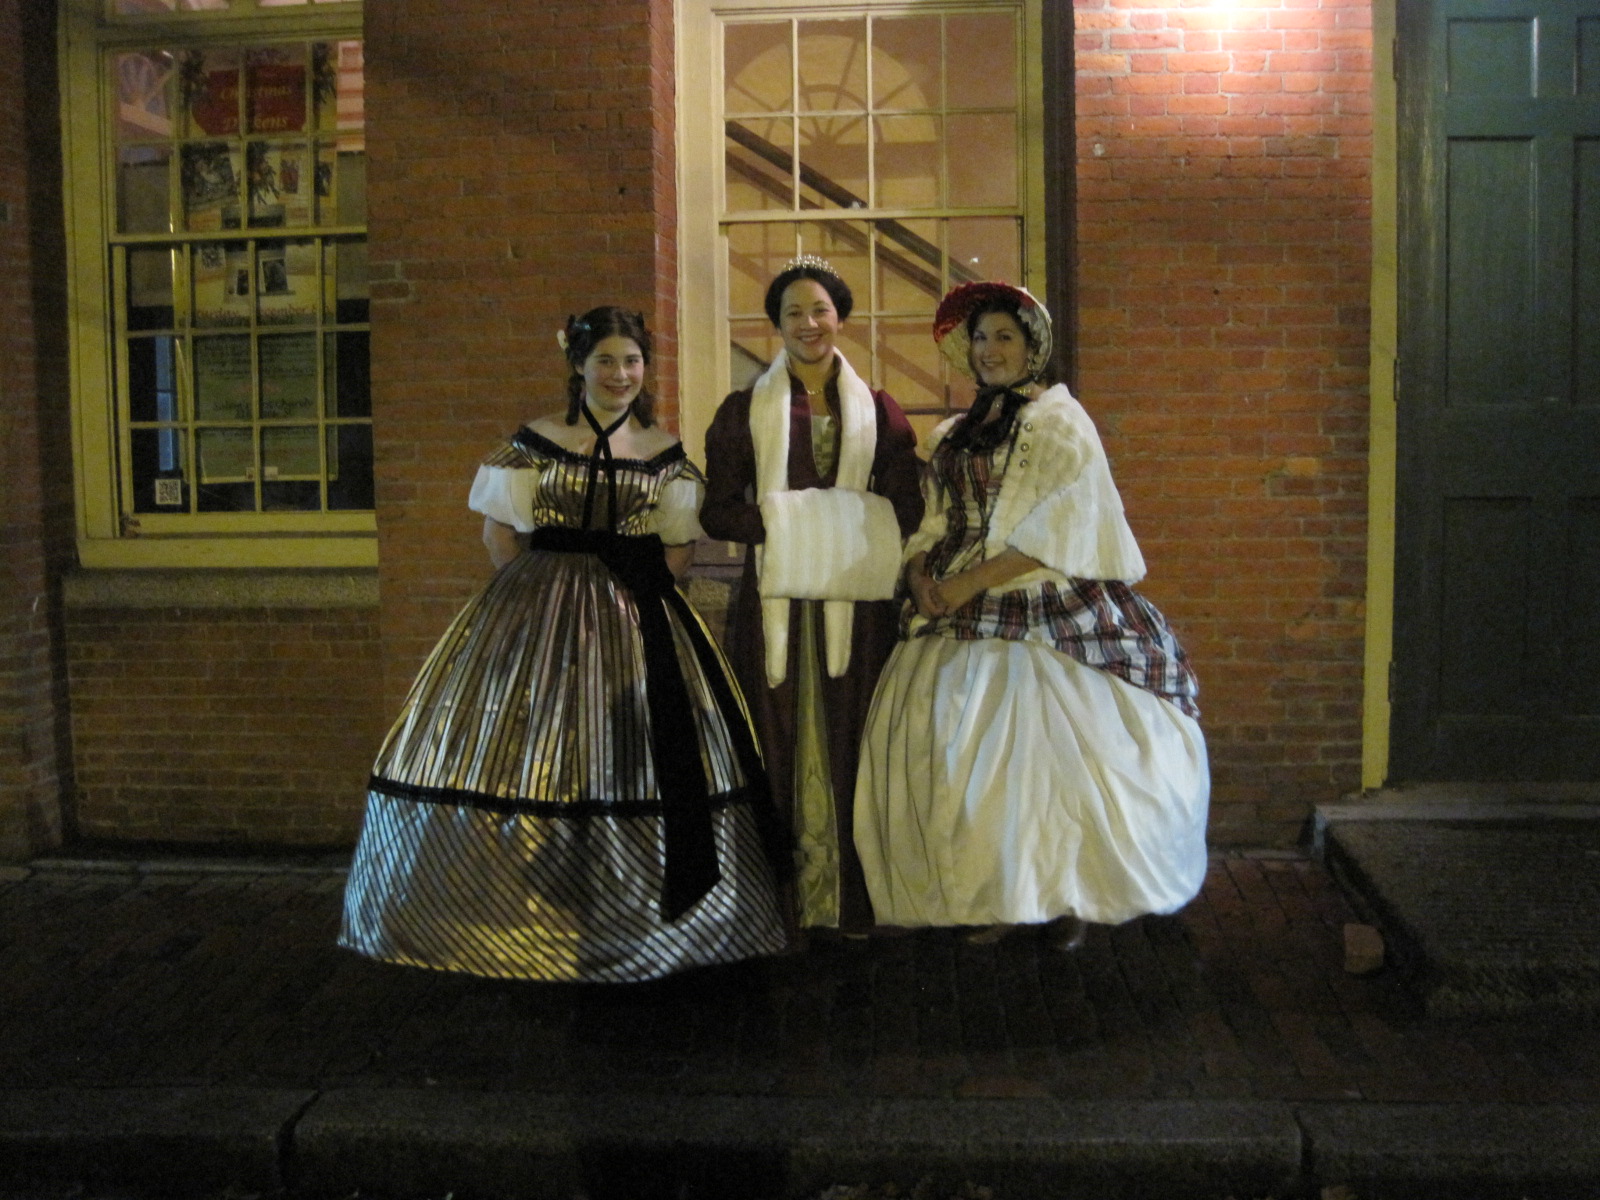
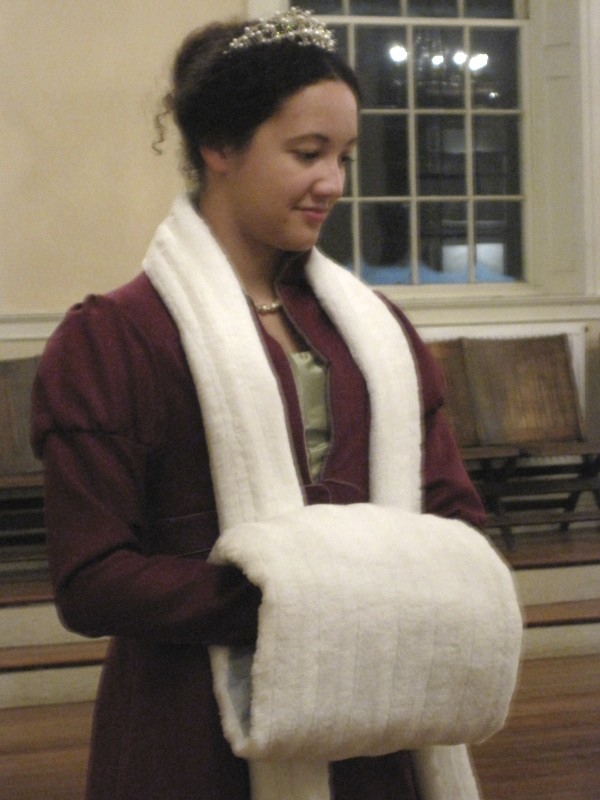
Caroling before the ball! We stopped at the super huge town Christmas tree to take pictures. I was perfectly warm in my new clothes!After caroling we paused outside the hall to take some more pictures… As you can see, the muff and tippet did get done! Entirely! Yay!Back of the new walking dress. I only just noticed that someone is in the window… That’s sort of creepy looking!Friends outside the hall.Staging a “gossiping” photo before the ball officially began.Waiting for the dance, Sir Roger De Coverley, to begin.Dancing Sir Roger. It is similar to the Virginia Reel.
I had a wonderful time during the ball. It was crowded, but that didn’t stop me from enjoying myself. Perhaps because I knew more people than I have in any year past, the entire evening felt full of friendship and fun. Also, it’s super new and exciting to dance the same dances as other balls, but to the tune of Christmas music! And there were lots of beautiful dresses and fashionable gentlemen to keep one’s eyes occupied.
After the ball I imposed on my friends to take pictures (in better lighting) of my new clothes, so I could document them here on my blog. I, in turn, took pictures of them so they would have pictures as well! That’s only fair, really.
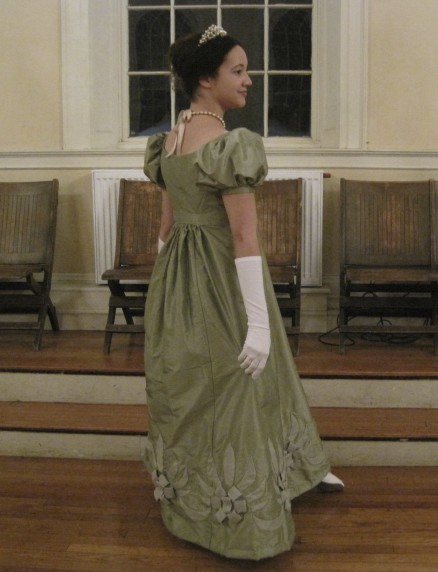
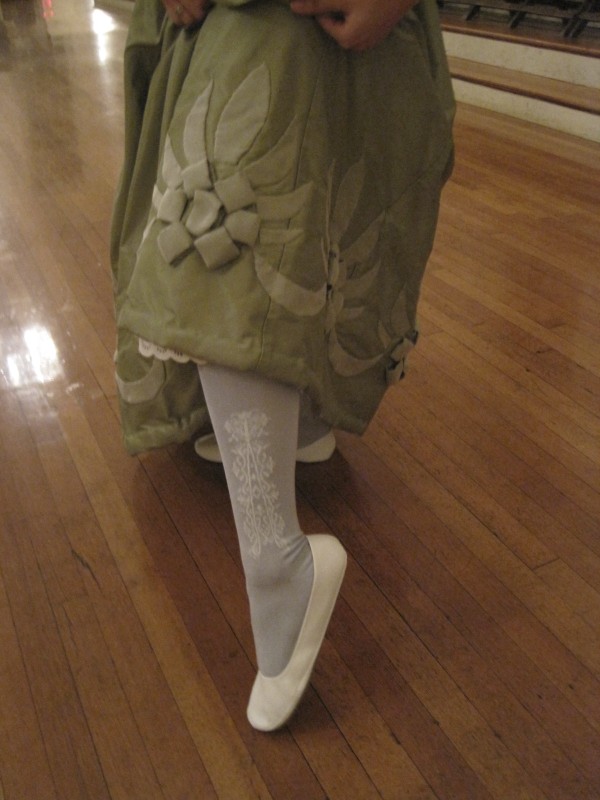
I am the photographer in this one.Here it is! Clear, full length picture of my new gown! I finished the hem appliqués! Whew! But it is missing it’s sleeve appliqués and the center front appliqués.I was having trouble making my hair look the way I wanted to, so I settled for a tiara (it’s actually the same one I wore to the 1890s Soiree during Newport Vintage Dance Week). In the end, I really liked how it looked!A closeup of the finished appliqué motif around the hem.For this event I took the opportunity to wear my blue American Duchess clocked stockings. I liked them! The only annoying thing is that one got brown puddle stains on it during caroling. I’ll have to see if I can scrub it out. I think I can.Here we are, a picture of the walking dress with better lighting! You can actually see the dark raspberry color of the wool. It’s pretty scrumptious. It’s soft on it’s own, but also lined with soft cotton, so really it’s quite cozy.This is how we all felt after the ball.Proof that the sleeve appliqués were partially complete! I didn’t have the time to finish the raw edges, make the centers, or sew them on…
Pictures of the petticoat will be in an upcoming post. It was almost finished for the ball. I’m looking forward to adding trim to the walking dress and the front and sleeves of the ball gown, as well as finishing the bonnet. All of these things were started (the pieces cut out and even sewn in some cases), but as you can see in the pictures, they didn’t make it in time for the ball. Oh well!
Well, I’ve got the green silk ball gown sewn together. That’s good, because the ball is fast approaching. There’s only a week to go! Eep!!! I’ve finished the padded hem, but I still need to have someone mark center back for me so I can put closures on. And I haven’t set the neckline yet, either, because I’m waiting to see how it looks with the back actually closed… So far every time I’ve tried it on the back has just been hanging open, because I can’t actually reach that part of my back by myself. Never fear, though, I’ll be seeing friends this weekend who can help with marking the back for me! Yay!
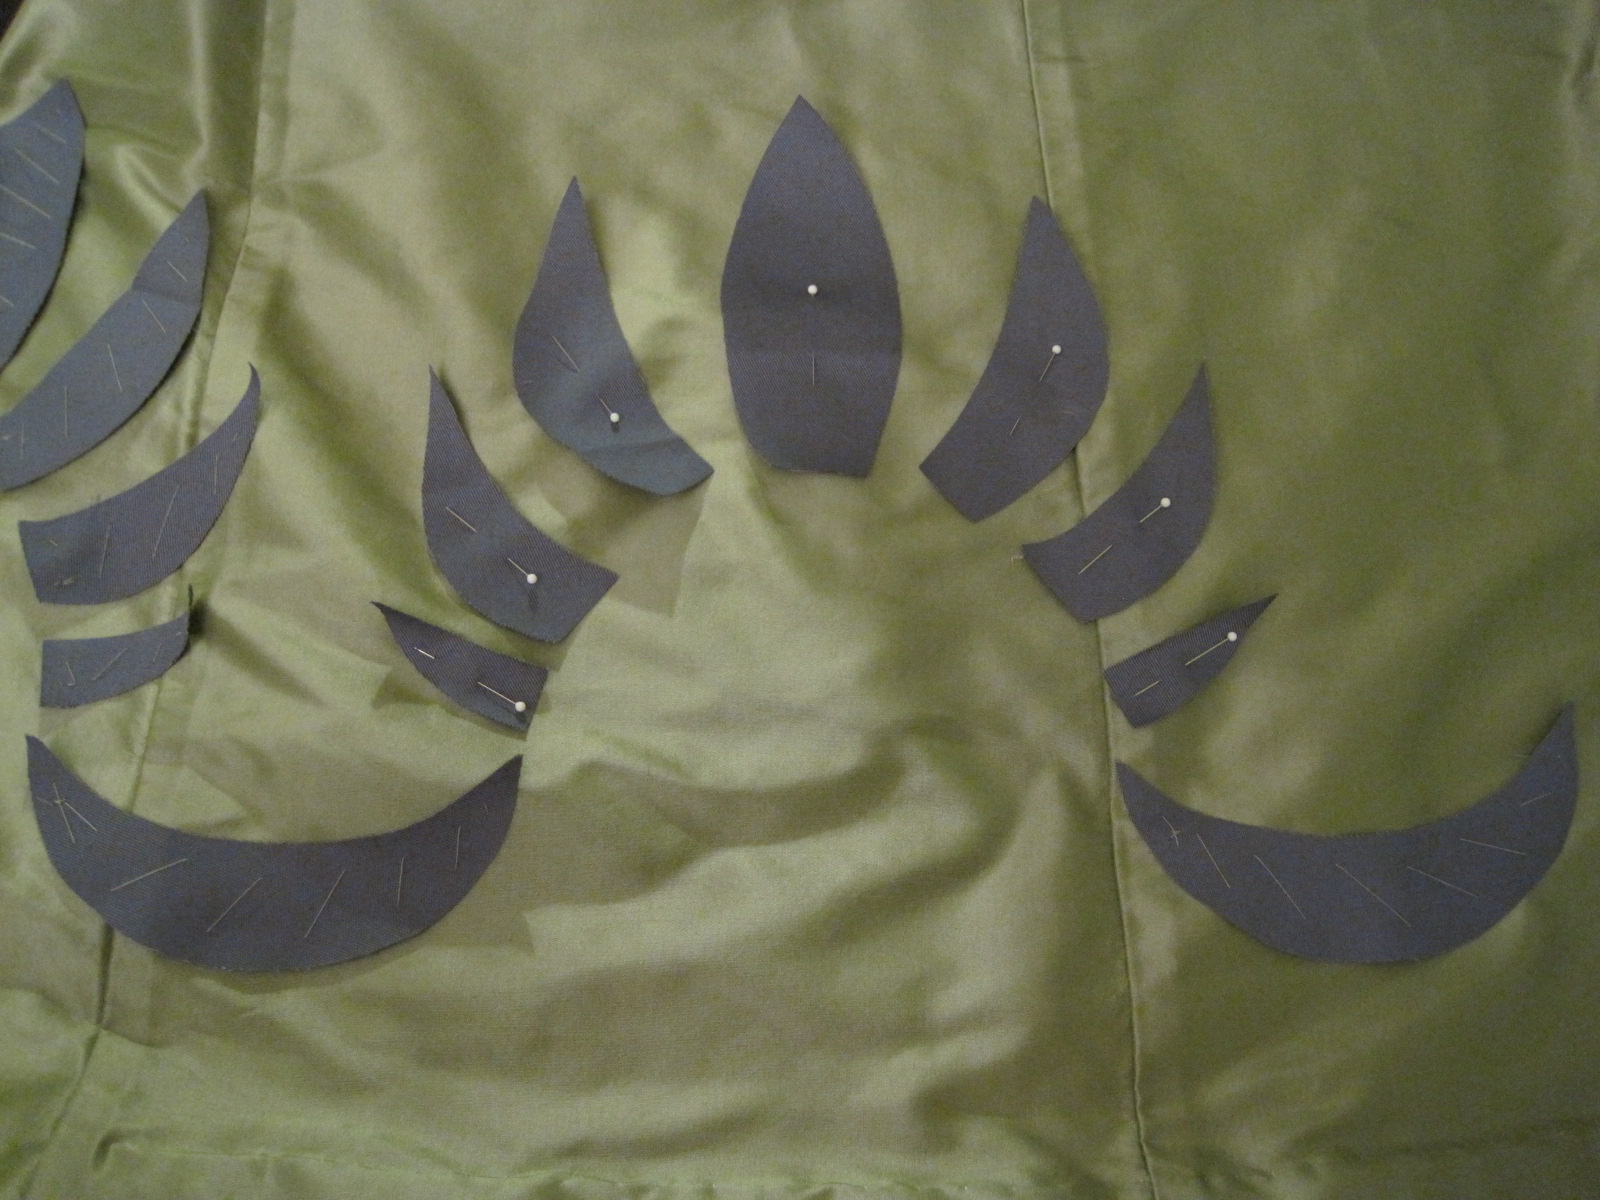
I’ve been furiously hand sewing, working on the skirt appliqués on the ball gown. These are my first priority. In part this is because they’re already started (and it would look silly to have only a fraction of them done) and in part this is because the hem decoration is pretty essential for 1820s dresses. This is how I’m making the appliqués.
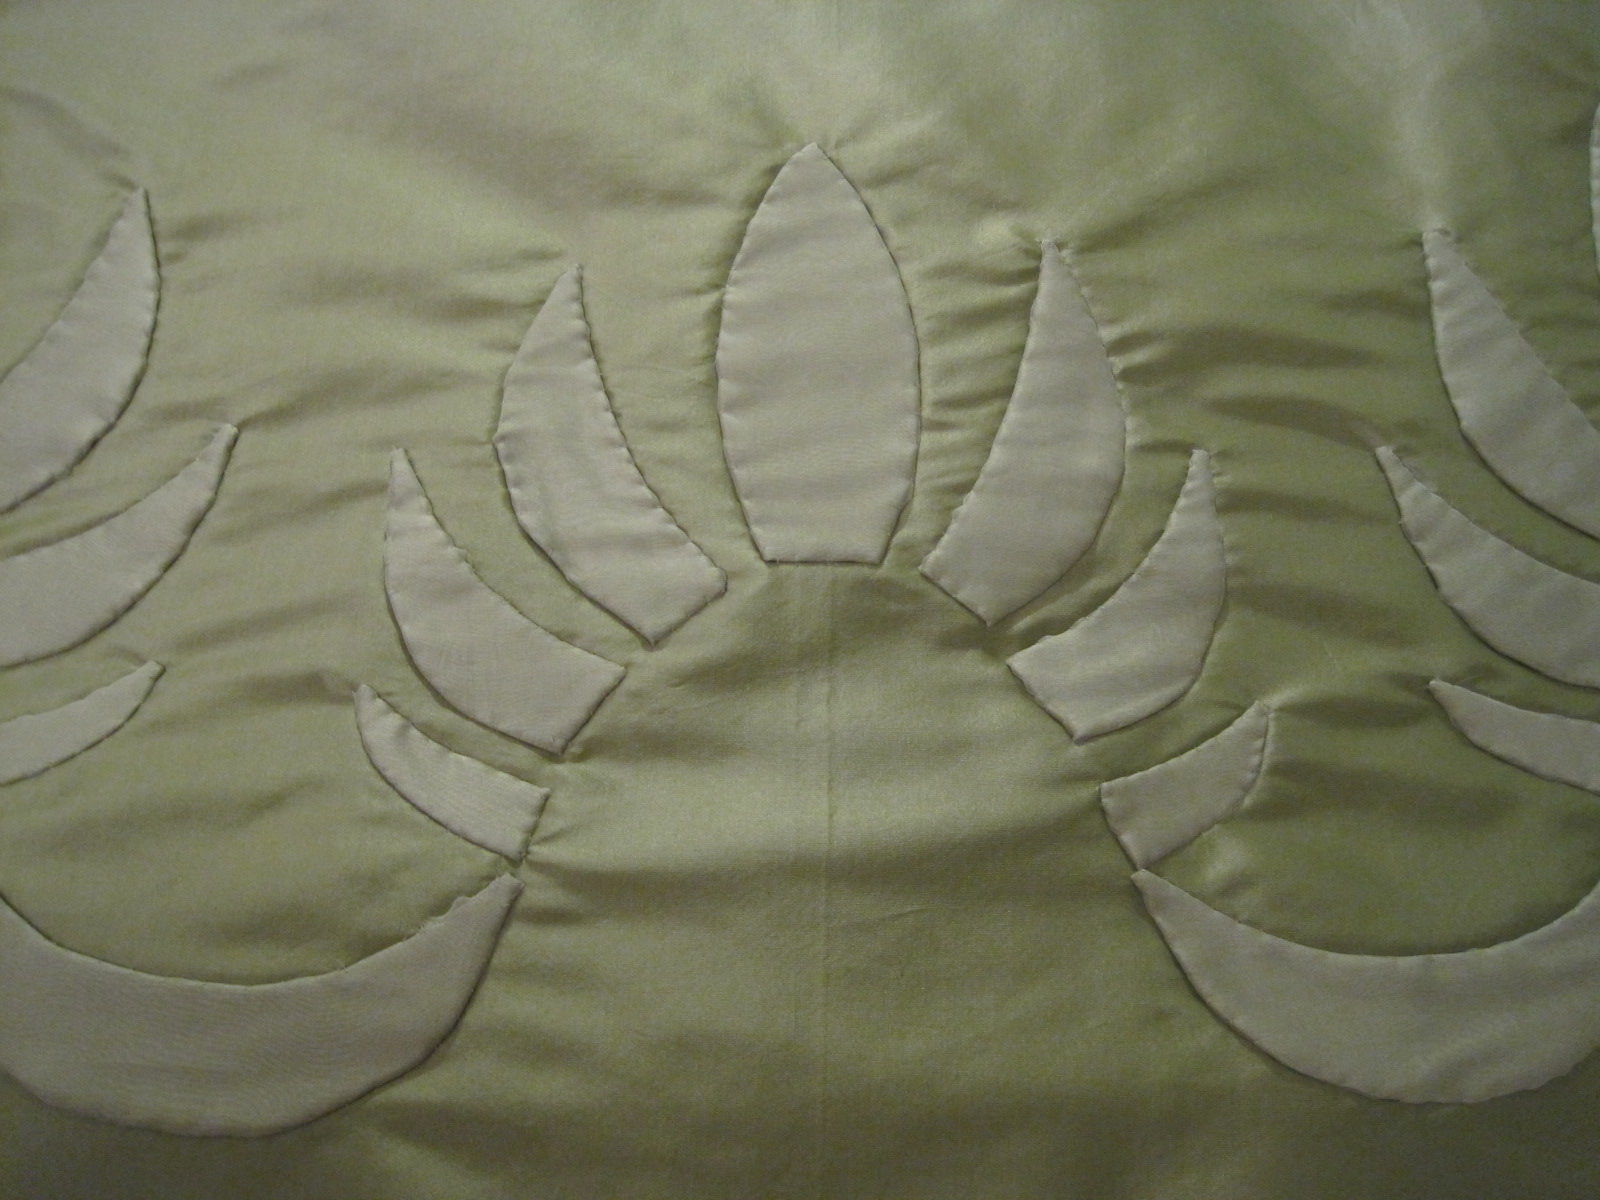
After cutting out literally hundreds of pieces… I pin the blue canvas bases to the silk of the gown. The pinning allows me to make sure everything is symmetrical before sewing the bases down. Once I’m satisfied, I baste the bases to the silk, leaving 1/4″ around all the edges unsewn, so I can tuck seam allowance under later.Whew! Finished basting that repeat of the pattern. The blue canvas is tightly woven and hardly frays, even at the points and in the curves! And even after being manipulated and folded while I’m basting all the pieces down, which is important because it keeps the shape accurate for the layers that go over the base.The next step is to take the two top layers (a layer of the green silk and a layer of white silk organza) and sew them over the base. The base provides sturdy edges so that I keep all those nice curves when turning under my seam allowance. This piece is just about done, except for the last corner. I used the technique in this great quilting appliqué blog post to make my sharp corners as sharp as possible.And here’s what the motif looks like when all the bases are covered! The silk organza is pretty tricky for making sharp points, so I think these turned out pretty well! The motifs are still missing their center sections. I’m focusing on all the pointy bits first. Right now I’ve got 3 out of 7 motifs done.This is what the inside of the skirt looks like after the appliquéing is finished. It’s kind of neat, I think, to see the relief of the front shapes.Most recently, I’ve just finished basting on the bases where they meet at the back. You can see in this picture there was only one more motif to go!
Right now the motifs really remind me of pineapples, a common motif in appliqué quilts (as a quilter as well, I appreciate the overlap between related interests). I’m sure once the centers are added they will look more like flowers and much more like the fashion plate. Each motif is 11″ tall and the repeat is 12″.
As I continue to sew these, I’m thinking about the sleeve appliqués. Currently, I’m stumped. I was going to sew my motifs on in the same way as the skirt, but I also made my sleeves pretty gathered… so I’m not sure how to nicely hide my seam allowances while also keeping the gathers looking un-squashed. I want the sleeve appliqués to sort of float on the gathered sleeves… I’m still brainstorming on how to make that happen. Perhaps I’ll stitch the seam allowance to the back of the base and then hope that the gathers mean you won’t see the base past the 1/4″ seam allowance that gets turned? If you have ideas, I’d love to hear them!
I’ve been meaning to post about my new 1893 ball gown since Newport Vintage Dance Week back in August… Well, I’m slow about getting it done, but but this is going to be a post with mounds of great detail, so I think the wait was worth it!
This gown is constructed of bronze shot silk shantung with pale pink slightly slubby silk satin. It is flat lined throughout with ivory waxed cotton. It is stabilized with cotton canvas at the hem and in the waistband. The bodice is trimmed with ivory net and bits of metallic bronze/gold net that have sequin motifs on it (in fact, it’s the same metallic net as the top sleeve section of my 1912 burgundy silk evening gown, which I also wore at Newport). The sash is trimmed with the metallic bronze/gold net. The sleeves have layers of ivory tulle inside them to help maintain the full shape.
I wore this dress with a combination, a corset, a slight bum pad, two petticoats (one silk, one cotton), stockings, and shoes. Exterior accessories include cotton/poly elbow length white gloves (I have lovely leather ones that come up above the elbow, but they are getting soiled from being worn while dancing with men who are not wearing gloves (breech of decorum on their part!), so I chose not to wear those to this ball); my handy Battenburg lace fan; my faux pearl drop earrings; a long strand of faux pearls (originally bought to be worn with my 1928 green silk evening gown); a nice bling-y necklace borrowed from a friend for the evening; and my fabulous almost-Victorian tiara from eBay!
My tiara shares a general design with the Lover’s Knot Tiara, below. Both tiaras have round elements connected by jeweled arches above a second row of round elements, both rows of which are surmounted by tear shaped pearl elements which are set above a final row of further round shaped elements around the base. Additionally, in both tiaras there is a high point in the center which then diminishes toward each side. Obviously, the two are not exactly the same, but I think they’re similar. Of course, wearing mine for an 1893 look is slightly earlier than the given date of the Lover’s Knot Tiara, which is c. 1913. But isn’t that excusable, when the tiara looked so wonderful with my dress and accessories? There’s a closeup of my tiara below so you can compare.
Lover’s Knot Tiara by Garrard c.1913.My eBay tiara.
It took a bit of work to come up with a hair style I liked that also worked with the tiara, I can tell you. I wanted to have a puff of hair not directly behind the tiara, but close enough that it would provide a dark background for the tiara to stand out from. Unfortunately, I don’t have any great pictures of my hair. Oh well! It also took A LOT of bobby pins to secure the tiara. I think I used about 20 for the tiara alone. I put one between each of the base pearls, then another to cross the first one. I also secured the ends of the tiara with extra pins. It was really stable and didn’t move at all during the entire night, so that part was successful!
Here’s a closeup of the jewelry.
In the picture above you can see the jewelry better. You can also see the one major flaw in this dress. The wide neckline wasn’t shaped quite right, so the sleeves started slipping off my shoulders, making the sleeves look slightly less impressive. This is one of those things that was perfectly fine in all my fittings. It’s during those pesky balls, when you move and sweat, that you really discover the flaws in your clothes! I’ll have to do something about that before I wear the dress again.
A full length view. This was the end of the night, and the end of the week, so that’s why I look tired.A full length back view. Again, you can see how the sleeves just didn’t want to stay on my shoulders.
Now on to the specifics of patterning. The bodice (and especially the sleeves) of this dress are from Janet Arnold’s Patterns of Fashion 2, as is the skirt. The decorative sash and bodice trim were inspired by an image in Norah Waugh’s The Cut of Women’s Clothes. I looked at many images that had similar sashes with bows, so I’m sure I was influenced by those as well.
The next thing to discuss is the construction of the dress. It is in two pieces: a plain bronze silk skirt and a decorative bronze and pink silk bodice. The wonderful thing about this arrangement is that I can make other bodices to go with the skirt (I’ve got extra bronze and pink silk). For example, I plan to one day make a day bodice to go with the same skirt. Since the skirt takes the biggest bulk of fabric, this is an economical and practical plan in addition to adding to my wardrobe!
I’ve got some great closeup pictures of the bodice construction, but I didn’t take any close up pictures of the skirt, come to think of it. Honestly, though, it’s not as interesting. The skirt is gathered in back and set into a waistband which closes at the back with hooks. There is a placket opening that is hidden in the gathers. The entire skirt is flat lined with ivory cotton. In addition, the hem has a 12″ band of bias cut canvas tacked between the silk and cotton. The canvas helps the skirt form those wide folds at the hem as well as providing a certain weight and gravity to the lightweight silk. Finally, it also helps provide a clean sharp edge over which to turn the hem. For the hem, the bronze silk is folded to the inside over the canvas, turned again, and stitched to the cotton lining. The hem is about 1/4″.
The bodice, by itself. As you can see, the sash is a part of the bodice.Here is the net applique on the sash ends. The net is great because it doesn’t fray, so I simply had to cut out the motif I wanted and then stitch it around all the edges to the sash. The sash is a tube of bias finished at an angle on the ends with a slip stitch.A closup of the shoulder and top of the sleeve. You can see the ivory net trim around the neck of the bodice, which terminates in those cute bows on the shoulder. The bronze part of the sleeves are rectangles that are knife pleated radially at the shoulder, which you can see in this photo. And finally, you can see the gold net applique which is stitched over the ivory net around the neck opening.Then comes the question, where are the closures on this bodice? Well, the sash is stitched to the bodice from the right side front around the left side to center back. Then the bodice opens up center back.To keep the sash in place around the right side, there are three hooks that correspond to thread loops on the bodice. This keeps the sash in place. You can see the canvas backing of the sash in this picture.One of the thread loops on the bodice that holds the sash in place.The center back closure is hooks and thread loops. I like thread loops better than the metal eyes or loops because you can’t see them when the bodice is pulled tight, like you can with the metal. You can see that I added a placket that extends farther than the loops just in case something pops open.The inside of the bodice. I LOVE to make the insides of garments pretty, and I think this is one of my finest examples! Aside from the fact that it is modern materials, it looks just like an extant garment from the 19th century. The bodice is boned up center front, the front darts (which create a V-shape on either side of center front), the side seams, and each of the four side back seams. The neck and hem are finished off with self fabric bias with is then nicely whip stitched to the cotton flat lining. The armholes are bound with self bias. Then there is also a waistband, to help alleviate the tension on the center back closure. This waistband is cross stitched to each boning channel and closes with hooks and eyes.The right side of the bodice. You can see the bias bindings, the boning channels, cross stitched waistband, and hooks. Oh, and I just noticed that I also finished the exposed seam allowances by turning them back on themselves and whip stitching. (The seam allowances under the boning channels are trimmed and left raw.)Center front. The boning channels were whip stitched to the cotton lining along the sides. It was a bit of a logistal problem to determine how to nicely bind off the edges of the bodice with bias, since there is a sash part of the way around. You can see that there is a separate piece of bias covering the join between the sash and the bodice from the right side where the sash opens.The left side. On the waistband I did use the metal bars instead of thread loops, since I knew they wouldn’t be seen from the outside. You can also see how the sash was attached. It was flipped up and topstitched to the bodice (avoiding bones!), then flipped down to cover the raw edges and joined to the bottom of the bodice with bias.The interior of the pink under sleeve. The silk is gathered into a cotton lining. Of course, you can’t see up into the sleeve when there is an arm in it!
It makes me feel all warm and fuzzy inside, to have such a beautifully finished bodice. And I felt like such a princess at the 1890s Soiree, to be wearing an all silk dress with silk petticoat and a fabulous tiara!
It was recently requested that I share more information about this dress, and maybe some extra pictures. This dress was lovingly placed in my closet upon my return from Newport, but as you’ll soon see, the silk charmeuse just LOVES to wrinkle! I didn’t steam the wrinkles out to take closer pictures, so you’ll have to bear with the wrinkly silk.
This dress may look complicated, but it’s actually just an L-shaped garment with neck and armholes.The bottom of the L-shape is stitched together on a diagonal to keep the drape-y bits from showing too much leg.Here are the drape-y bits hanging down, but folded open so you can see where the stitching stops. It’s about mid-thigh, but I didn’t have any problems with too much leg showing because it tends to hang closed all the way to the hem.All of the bottom hems and drape-y edges are narrow hemmed by machine, like this. The hem is about 1/4″This is a back view of the top of the dress. You can see that the front neck is a scoop and the back is a V-shape. The trim is from Heritage Trading on eBay. It’s is gold metallic threads/wires with sequins. Originally I had thought to trim the skirt as well, but decided against that because I didn’t want stitches to show on the inside when the skirt flipped around while dancing.A closeup of the neckline. I stitched hug snug around the neck and armholes then turned the hug snug and stitched again to enclose the raw edges of the silk. I then zig zag stitched the metallic trim on. It caused some puckering of the silk, but that’s not very noticeable when I have the dress on.Here it is!
The dress is a basic tunic with no waist, as you can see in one of the first pictures. I used my measurements to determine the basic shape, then held it up to myself (super scientific, I know) to determine arm and neck openings. I cut them, sewed the shoulder and side seams, then put the dress back on to make changes.
I didn’t want to put closures on the dress, but I did want those horizontal folds around the waist. Without a waist, the dress just droops and pulls on the side with the drape-y bits. So how did I fake a waist while still allowing easy access to the dress with no closures? Well, I took an elastic hair tie and scrunched the dress up while wearing it so that it sat the way I wanted! Then I pinned a (modern, ahem) sequined flower (left over from my beginning ballroom dancing days) to hide the scrunch. The sequins are bronze and gold, so while it didn’t match perfectly, I think it worked just fine.
It was a rather down-and-dirty sewing job. I wasn’t out to have the most beautiful interior of a dress (as I almost usually am). I was simply trying to get the dress done as quickly and easily as possible, so I could spend time making my other dresses really lovely, inside and out. As I have mentioned before, the 1920s aren’t super inspiring to me, so I didn’t have a whole lot invested in this dress, except that I wanted to look great at the Gatsby Ball at Newport with minimum effort. (My original thought was to hand bead a dress… but I didn’t have the time or interest for that, in the end.) However, I’ve got another 20s event coming up next year… and I plan to make a new 20s dress. And this time, it will be beaded. You’ll have to wait for a future post to hear about my plans for the new 20s dress!
This is super exciting! A significant part of my nine month sewing plan is to increase my Regency wardrobe pieces so I have more options for varying weather conditions and activities, including accessories. I’ll list my plan in another post sometime soon-ish, but let me jump forward to say that it includes a chemisette.
Well, there aren’t many extant chemisettes that I know of and it doesn’t seem like many other people are able to reference a wide variety either. Janet Arnold has patterns for some of them in Patterns of Fashion I… and I didn’t originally want to go with one of those (because, you know, it seems like everyone does and I like to be different), but after researching and realizing that Janet Arnold has the monopoly on extant chemisettes I decided to just go with it. I also do really like the chemisettes she has… I particularly like the ones with the mushroom pleated collars. And that style will work well for my wardrobe planning, because I want to make high necked walking dresses, spencers, and pelisses, and I like the idea of the mushroom pleating filling in the high necklines. Plus, the Regency was full of 16th century style references and ruff-like things.
All of that to explain that I looked into ways to make mushroom pleats. I discovered that the best way is to use a fluting iron: a special type of iron that produces small pleats. I got super excited and bought one on ebay for about $20.
Here it is: a fluting iron!
I also did research about different types and brands of fluting irons. This website was super informative about different types and their values. This one also has good pictures and information about fluting irons and their use. Essentially there are three types. I bought the rocking sort, which is an iron and a base; there is also the rolling sort, which has a rolling device (like a paint roller) and a base; and then there is the cranking sort, which has two rolls that wring the fabric through to create the pleats.
The rolling sort.The crank sort.
I chose to buy the rocking sort of fluting iron because of the price. There are enough of particular brand I bought (Geneva) in circulation today that they are relatively inexpensive. The type bought was patented in 1866, as you will see.
Proof of manufacture and name.The iron on its side and the base.
I also did research about how to use a fluting iron and how to get your pleats to stay in your fabric. It sounds like the best thing to do is use a homemade mixture of cornstarch and water to starch your fabric before pleating it. Once I try it I’ll report on how that works! One thing that did stump me for a day or two was how I plan to heat this thing and which part to heat. A lady in the 19th century could have heated either part on her cast iron stove, but I was thinking”I don’t have a cast iron stove… how am I going to heat this??? Do I heat the iron, or the base?” Well, one of those questions was easily solved by using my eyeballs…
Duh!
Isn’t it fabulous that the manufacturer included some sort of direction? I was thinking of putting either the base or the iron in the oven… And then it occurred to me that I do have a stove, even if it is not a cast iron stove… So my current plan is to heat the base on the stove, and then somehow figure out a way to take it off the stove, so I can use it without fear of burning my fabric by having it touch a hot burner. I’ll have to report back on that part of the adventure, too!
You can see that the iron and base are a little grimy, so I also need to consider cleaning them before I try using them. I have not yet researched methods of cleaning cast iron. I imagine you can use similar methods as to what you might use to clean a cast iron pot? If you have ideas about the cleaning, please do share!
The two pieces are smaller than they appear, but because the iron and the base are cast iron, they are actually rather heavy. Until I use them (and probably after I do) they will be a door stop… they work really well for that purpose! And they add a bit of history to the room. Mr. Q has dubbed the fluting iron the “Cast Iron Crinkle Cutter” because he thinks it looks like something you might make crinkle cut fries out of… which makes me laugh. So here’s a picture of the Cast Iron Crinkle Cutter being a door stop, which also helps to show scale!
For those of you who live near Boston, you will know that the fabric store selection in this area is pretty dismal. We do have a few small stores that have a fun selection of certain kinds of fabrics and/or great low prices on a random assortment of fabric, but we don’t have a great fabric store population. Have you heard that the new Fabric Place Basement opened at the end of last year where the old Fabric Place was, in Natick? (Spoiler: there is a coupon for 15% off of one cut of fabric on the website for the store!) When you descend the stairs it looks like a huge selection (of what I hoped to be all dress goods), but I found that about 1/3 of it is decorating fabrics (great for some things, but only rarely for historic costuming), 1/3 of it is quilting fabrics, and that leaves only 1/3 for dressmaking fabrics. They did have some great fur, and a lot of sequined things, and a huge selection of leather. They did also have silks, in a random assortment of colors and types, for between $10 and $20 a yard depending on the type. Oh, and they had some really nice wools, in a random assortment of weights and colors, but for pretty good prices, considering the quality of the fabric. The notions section was ok, but not outstanding, and the trim section just seemed a little random, with an abundance of sequined trims.
But… I did find some new pieces for my stash! The highlight is a bunch of cameo buttons. They are plastic, but I think they look pretty good (and for 25 cents a piece I really can’t complain!). It would also be possible to carefully paint the black background to change up the look… I have 2 different shapes in 5 different sizes. I envision a variety of uses for the cameos: as brooches, buttons, or to add interest to accessories.
Most of the cameos are the same frame and figure, but these two below were different. It is easiest to see the difference in the frame, and I think the little one has a man on it rather than a lady like the others.
It’s a button in disguise!
Anyway, the other thing I found (and bought…) is an ivory cotton gauze with a windowpane pattern on it. It is 118″ wide and was actually a really good price! Yay! I bought enough to make a Regency dress (at some point in the future…) as well as something else… Maybe an 18th century apron? Or an Edwardian blouse? I don’t plan to use it right away, but I am thinking of ideas. I’ll have to take a picture of it!
The specifics: wired buckram brim and sideband, ivory silk charmeuse flatlined with ivory cotton to cover the brim and crown, bias cut ivory silk shantung brim binding, trimmed with ivory tulle and black ostrich feathers, lined with the same ivory cotton as the flat lining. (Did you know that craft stores sell tulle in 6″ wide rolls 25′ long in all sorts of colors in the bridal section??? This is great for hats!)
All in all, I’d say the hat turned out beautifully! I didn’t take the time to smooth out every bubble in the silk charmeuse along the brim, so there are a few bubbles… but I think I’m the only person who will ever notice them. It’s rather a tall hat… But I like it! I think it achieved the mushroom-y look I mentioned in Part I of the Ivory Mushroom Hat adventure and it has space in the head size opening as I intended. It even resembles a mob-cap, as I mentioned in Part I. Yay! I think it lends some serious Edwardian grandeur to my look. Full length pictures of the tea gown are coming soon so you can decide what you think about the hat.
It turns out that hair makes a great bandeau! I added some fake hair to my coiffure for tea to help support the hat in the back and it worked wonderfully. Without the extra hair the hat slips down over my face to a point somewhere around my nose… luckily, my poofy hair plus some extra hair works wonders!
I decided to trim the hat with black feathers and an ivory tulle bow because all ivory was overwhelming… the tulle trim is lost, whereas when black feathers are added the tulle trim suddenly stands out as well. Judge for yourself, below! Here are some other trim ideas I sampled on the hat before making my decision.
All ivory with a tulle bow.All ivory with ivory millinery leaves.With black goose biots.
I am so pleased with my re-made 1819 dress. You can get the background here or read the sewing update here! In short, the new style shares only the skirt with its former self. The new ruffles are all hand hemmed and hand sewn on. The dress seams are a mix of machine and hand sewing, depending on if I felt like digging out the sewing machine or not. All of the bodice seams are flat felled by hand. The dress closes in the back with 4 mother of pearl buttons. Oh, and let me not forget that the dress no longer has built in petticoats. Part of the re-make was to create a separate petticoat from one of the two petticoat layers built into the dress. The petticoat ties under the bust and has a single button to close the top of the bust. It is just a sleeveless, simple version of the gown. I’ll have to take pictures sometime so I can share them. But the dress… It fits! It is ruffly! It has so much more style than it did before! Just to compare, the first picture is your first glimpse of its current style, and below that is from before the re-make.
The re-made 1819 dress, with ruffles!The 1819 dress in its first incarnation.
Isn’t it more stunning than it previously was? I wore it to the Commonwealth Vintage Dancers’ 1812 Ball (ok, so my dress was a little forward thinking… maybe I have a time machine?). I had a lovely time, as expected. I made some new acquaintances and renewed some old ones, I was able to wear my recently purchased kid leather opera-length (which means over the elbow) gloves and a beautiful shawl one of my aunts gave me a few years ago, I got to practice my historic hair styling techniques (more to come on that point soon), and I danced! But let me stop writing, because really this post is about sharing pictures.
The back view of the re-made dress.Friends: don't we make a lovely group? Ok, wait, but there's a funny face...How about this one? Same group, but now I'm making the funny face. Rather a severe expression, don't you think?
I’d just like to insert a comment here: looking again at these pictures, all the ruffles on the bodice of my dress really manage to make me look much more busty than I actually am… Hm… there are a lot of ruffles going on there!
My friend made this beautiful fan to go with her dress! It's hard to see the detail in this picture, but it's absolutely lovely.Front of her new dress. She also has the super cute tiara, that is much more sparkly in person...Back of her new dress.
I’ll leave you with this image: a teaser for a soon-to-come post about the creation of this hair style!
Quite picturesque, I think. Thanks for taking the photos, Carly (and Mark)!
As with the 1819 ivory gown, the bonnet that is part of my late Regency look has also been remade from its original style. Why re-make it, you might ask?
Though the bonnet was based off of an 1819 illustration in Cunnington’s English Women’s Clothing the Nineteenth Century, it was built for use in the theatre, so the materials used to trim it are nowhere near accurate for off stage use. However, the shape and placement of the trim was accuratly reproduced from the inspiration image and that fact made the re-trimming possible, because the base of the bonnet could remain unchanged!
Before: The bonnet before re-trimming
The original trim was entirely polyester, which stands out when placed with other, more accurate garments and in natural light (rather than stage lighting). The color scheme was pink and peach fabric manipulated in various ways: the flowers were pinked and gathered lengths of polyester fabric, the ribbons were bias cut polyester fabric, the inside of the brim was lined with pink polyester shantung, and the brim was edged with white polyester lace. Aside from the polyester problem, the pink color scheme would not match my darling new spencer, which is brown and green. It’s not that the colors would clash, it’s just that they would look like they were not intended for each other… and I really wanted a coherent, matching look to my ensemble.
And After: The re-trimmed bonnet with matching spencer
I removed all of the fabric flowers, the bias ribbon trim, the lace edging and the lining. The lining was replaced with green silk shantung to match the new bonnet trimmings and the spencer while the lace edging was changed to light brown vintage cotton lace that matches the lace used on the spencer. The flowers were replaced with millinery flowers in green and light brown from my stash. I decided to use the spark of orangey-brown near the top so that the bonnet wasn’t too matchy-matchy. The ribbon was changed out for a matching green ribbon that has narrow bands of gold along the edges (I confess it is still polyester… but I like the look of it and I didn’t have enough of my matching green silk satin ribbon to use it, nor did I like the shine of the satin with the green of the flowers). And voila! A bonnet that now is the right shape and has the right trimmings to match my Regency ensemble!
I’ve been stitching away at the re-make of my 1819 Regency gown. The progress:
the bodice and skirt ruffles are all being hemmed by hand and there is only one skirt ruffle left to complete
the bodice has been put together, with the exception of sleeves and the finishing of the neck edge
the seams on the bodice are finished by hand (each seam is flat felled to hide the raw edges on the inside)
Skirt ruffles in progress: I've actually completed more than is picturedThe hem and join of one skirt ruffle
The bodice seams with ruffles insertedThe rolled hem on the bodice rufflesCenter front on the bodice has a double edged ruffleThe flat felled seams on the inside of the bodiceThe flat felled seam used on each seam on the bodice and the hand sewn top stitching (which is only along these curved back seams)
Here is a refresher of the bodice inspiration image. My bodice looks like a reasonable interpretation to me. I am quite pleased with the progress and overall look so far. How do you think my interpretation compares?
The inspiration for my bodice
Lastly, here is the image of the sleeve I plan to use. I described the sleeve in my last post, an overview of my planned gown updates. The sleeve is on a page with many other sleeve variations from the 1830s, but I think that it will suit my 1819 Regency (pushing 1820s) dress quite well. I am debating the possibility of outlining the triangular inset with piping. Do you think that would suit the dress and be a faithful representation of the double line delineating the inset in the image? Alternatively, there is a possibility that I might use green piping or ribbon (the same shade of green used in my 1819 spencer) to delineate that line. But then must I also use the green somewhere else to create visual harmony? Hmm…
From the first few pages of Janet Arnold's early 19th century pattern book