1927 Blush Sparkle Dress

img_2353-1

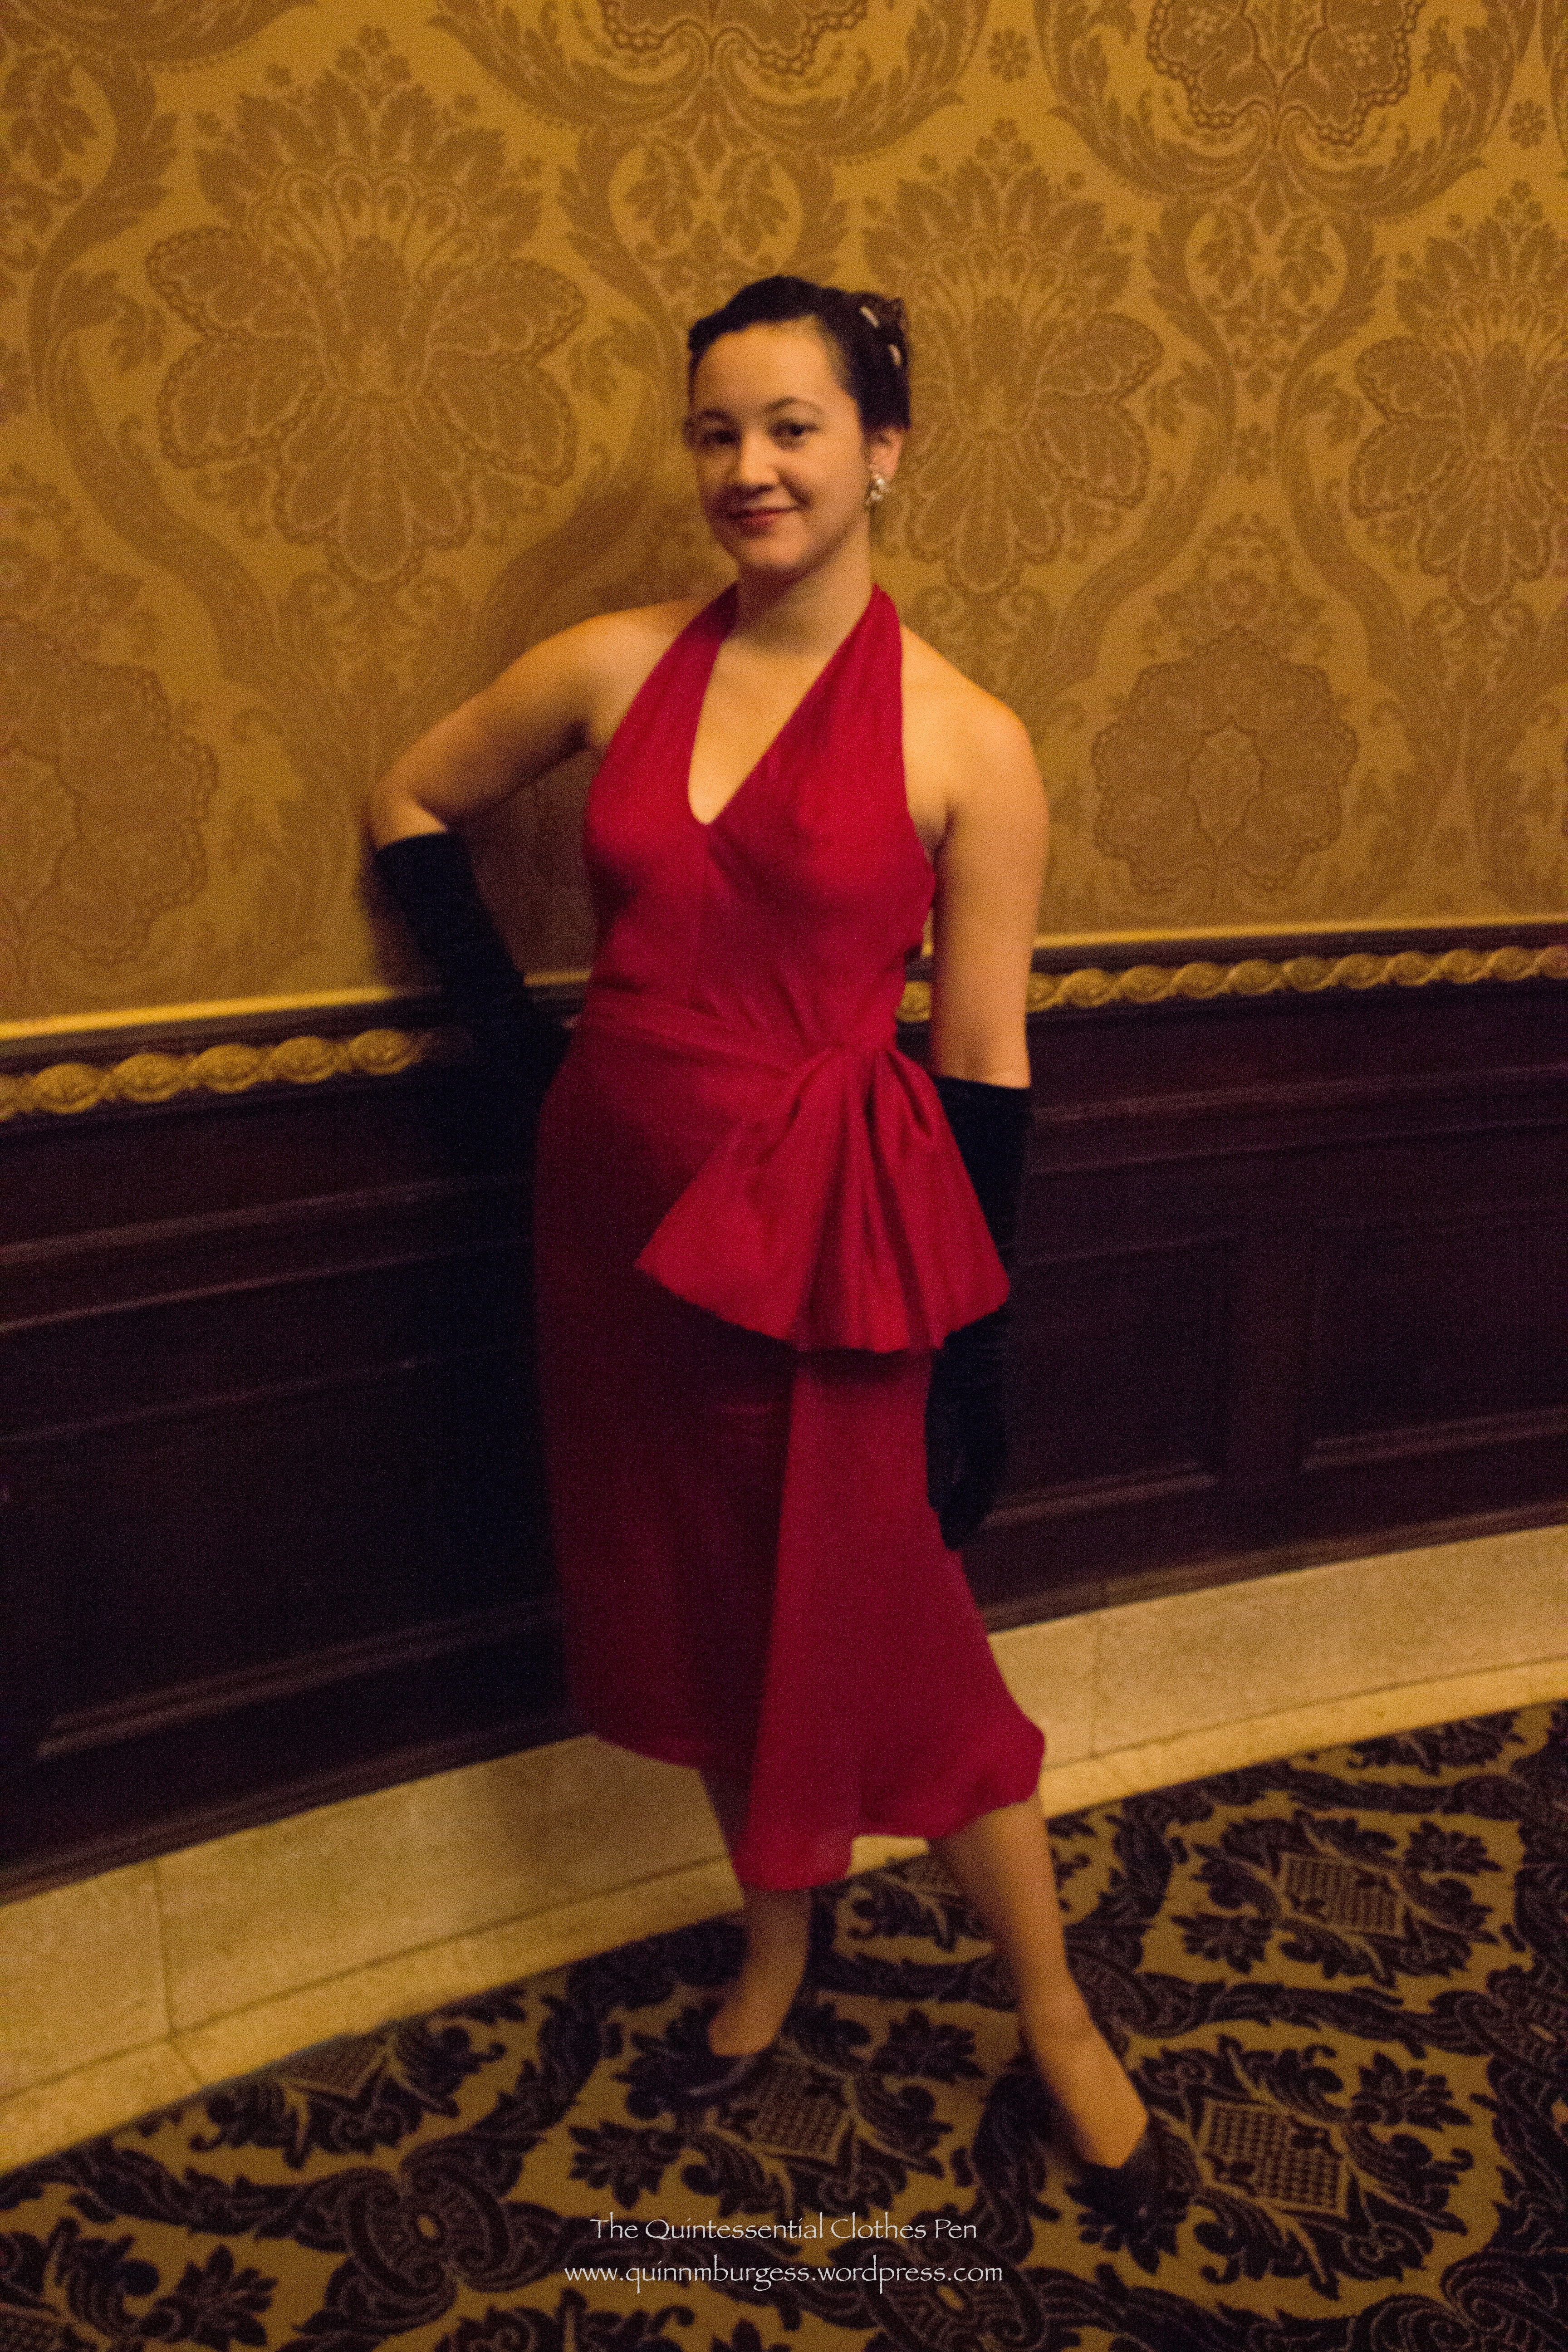
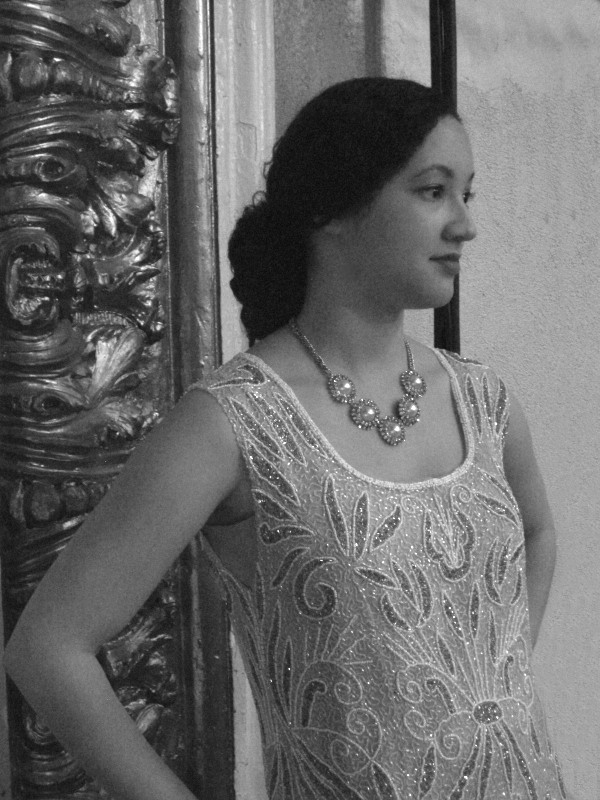
I was at the fabric store looking for other things… (the beginning of a lot of my fabric buying adventures) when two super sparkly fabrics caught my eye. They were screaming “1920s!” But the colors were somewhat costume-y 1920s and not often seen in my research of actual historical dresses from this period–red on nude net and black on nude net. A bit disappointed, I looked at the sparkly lace section some more and found the same fabric in blush on nude net! It was so sparkly and the pattern on it was so perfectly deco that I had to take some home with me. Luckily it wasn’t expensive and only cost $14 for 1.25 yards. Not bad!

The timing was perfect, because I had a 1920s event in January and just enough time to make the dress.  I didn’t have a slip to go under it that was the right shape or color, so I also squeezed in making a bias cut slip.

img_2349-1

For the pictures, I wore my American Duchess black Seaburys. They provided just the right 1920s shoe shape, encasing the front of my foot in a uniquely historical way that modern style shoes do not. You can see the shape more clearly in this post when I wore the shoes with my 1920s bathing suit in a beauty pageant look.

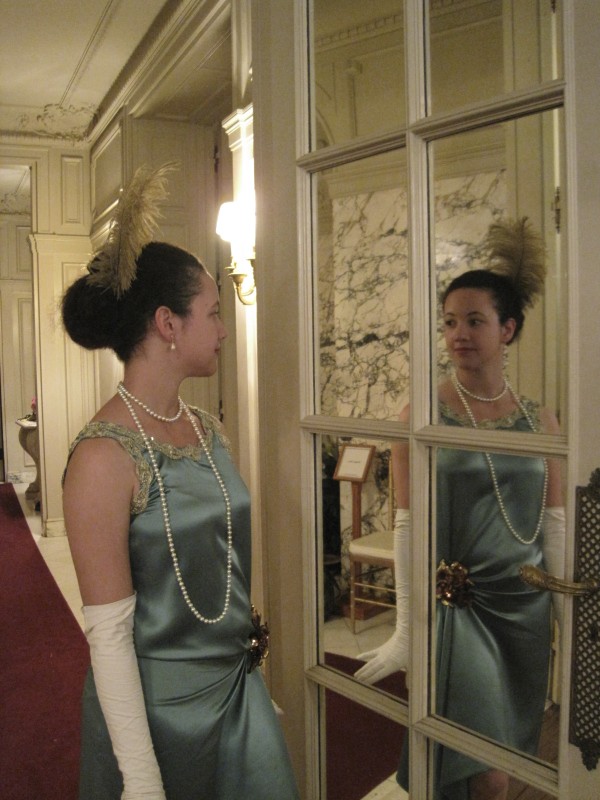
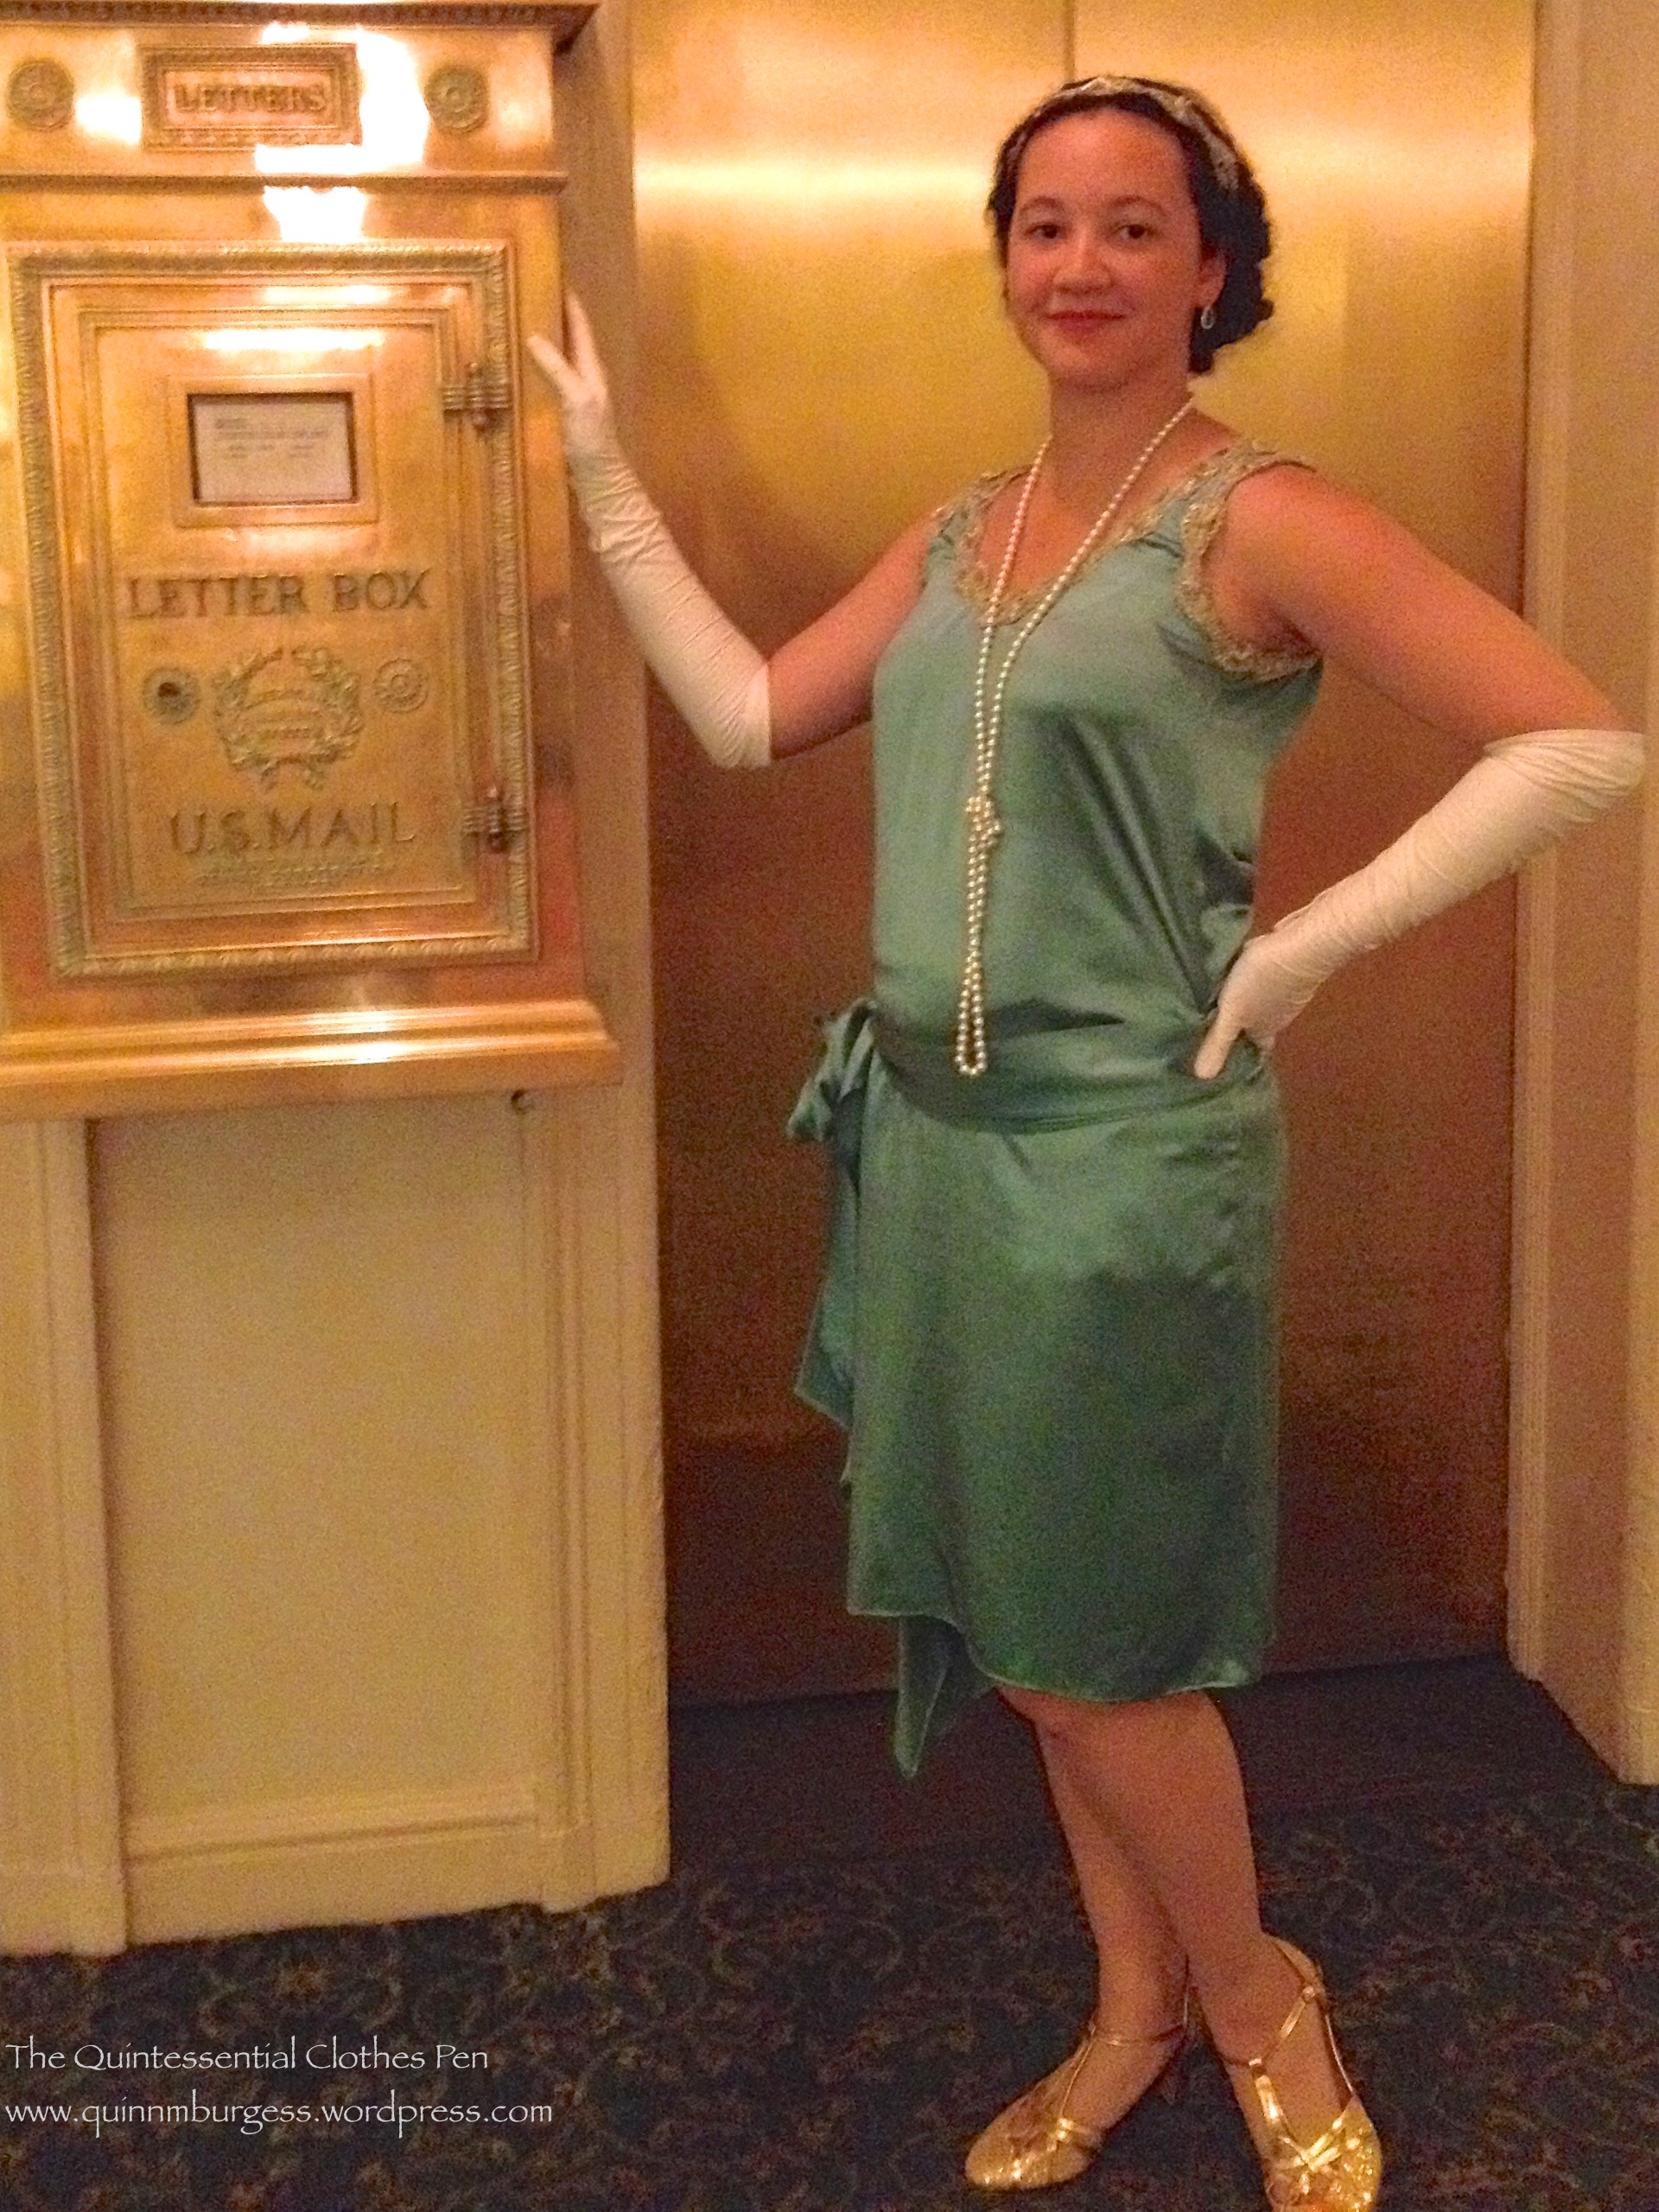
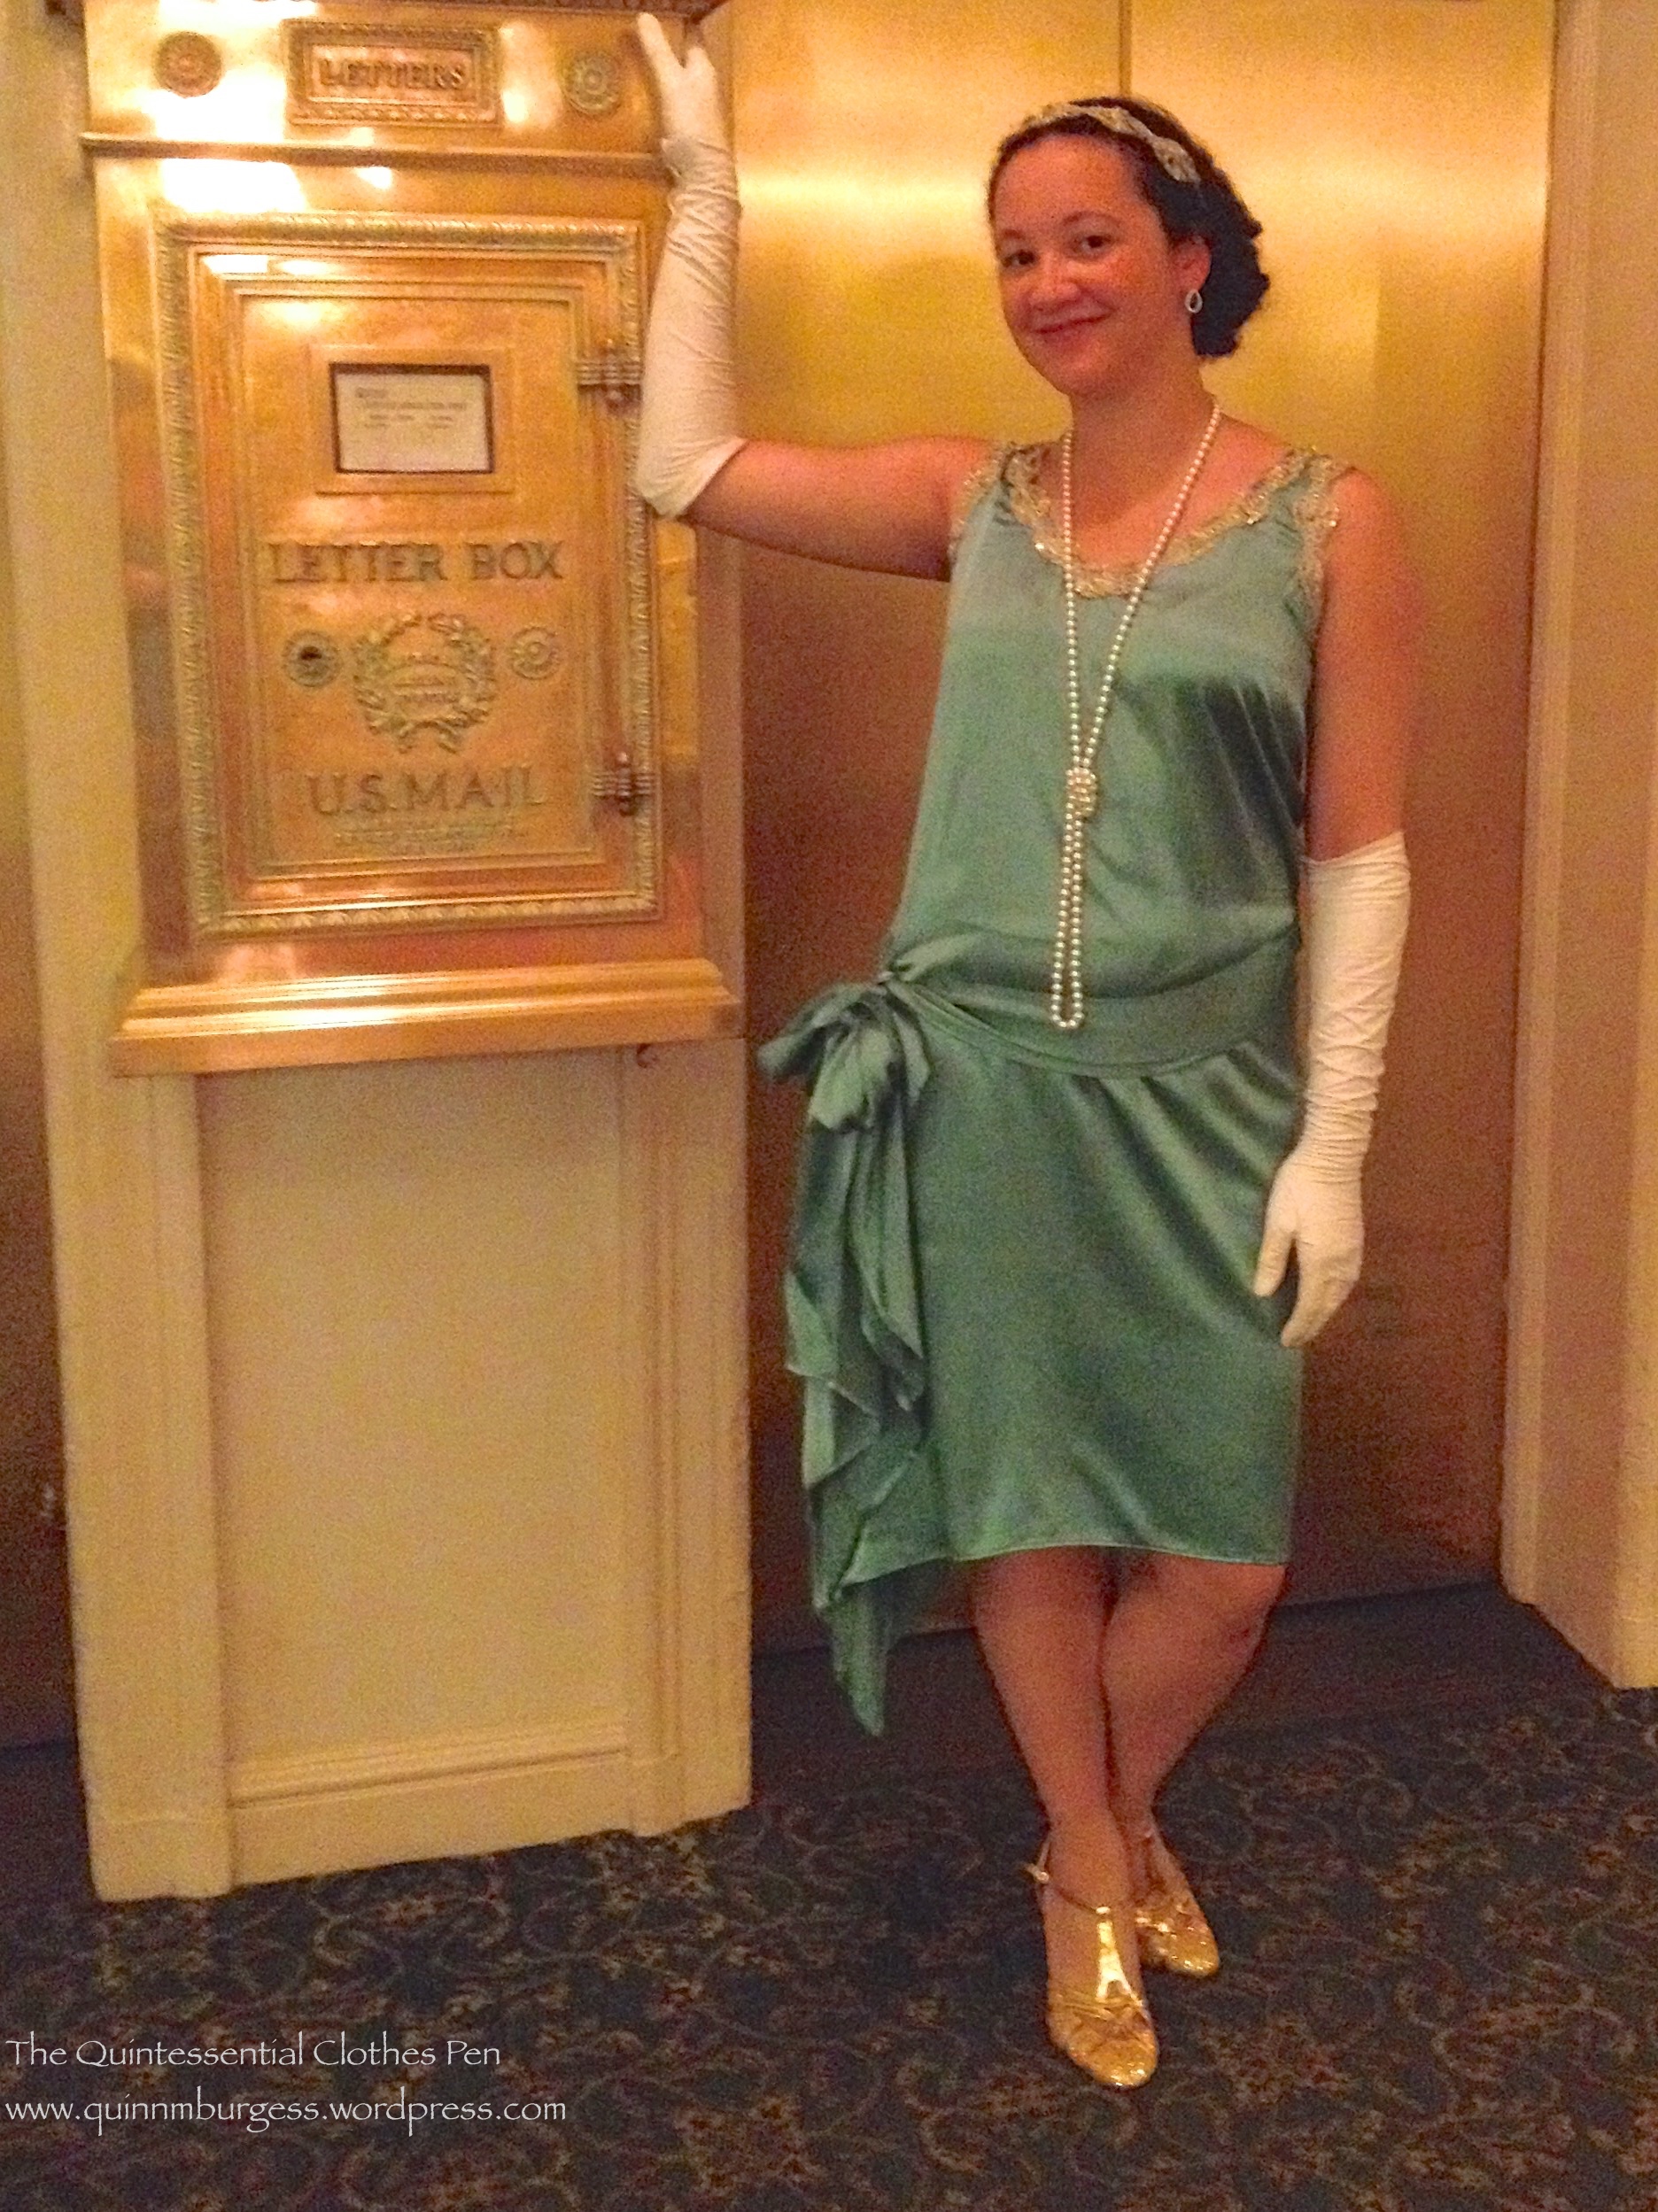
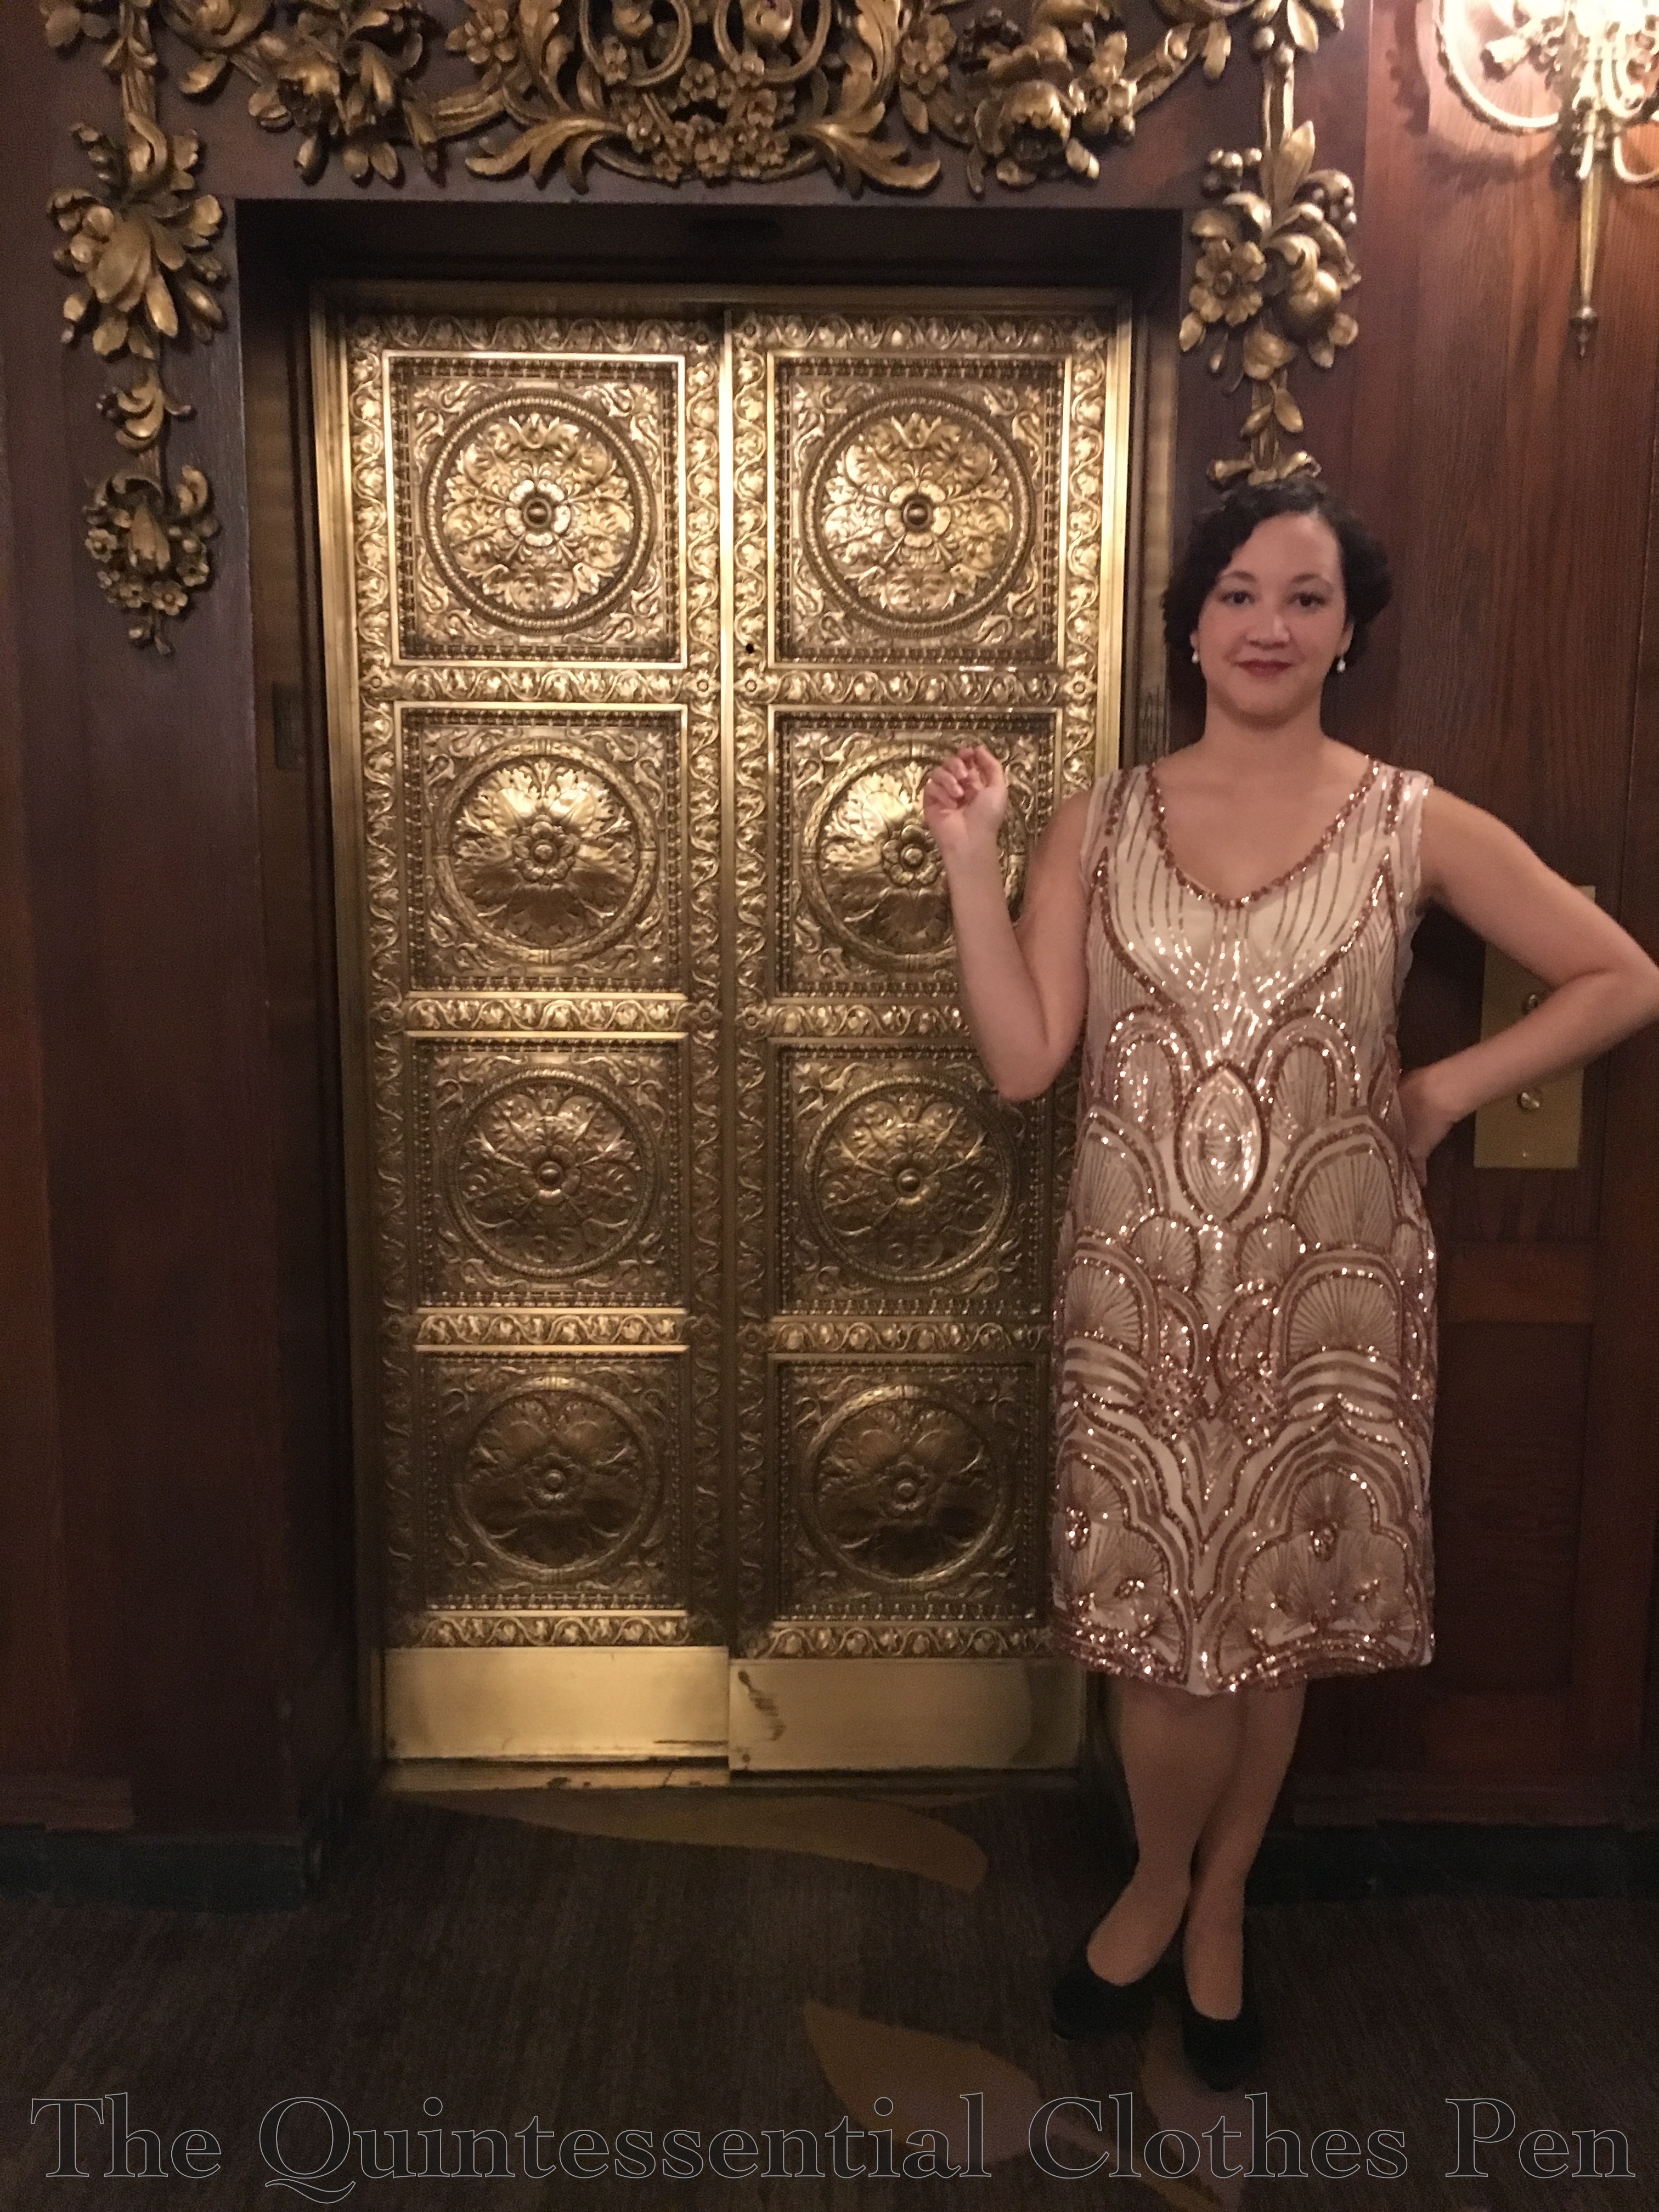
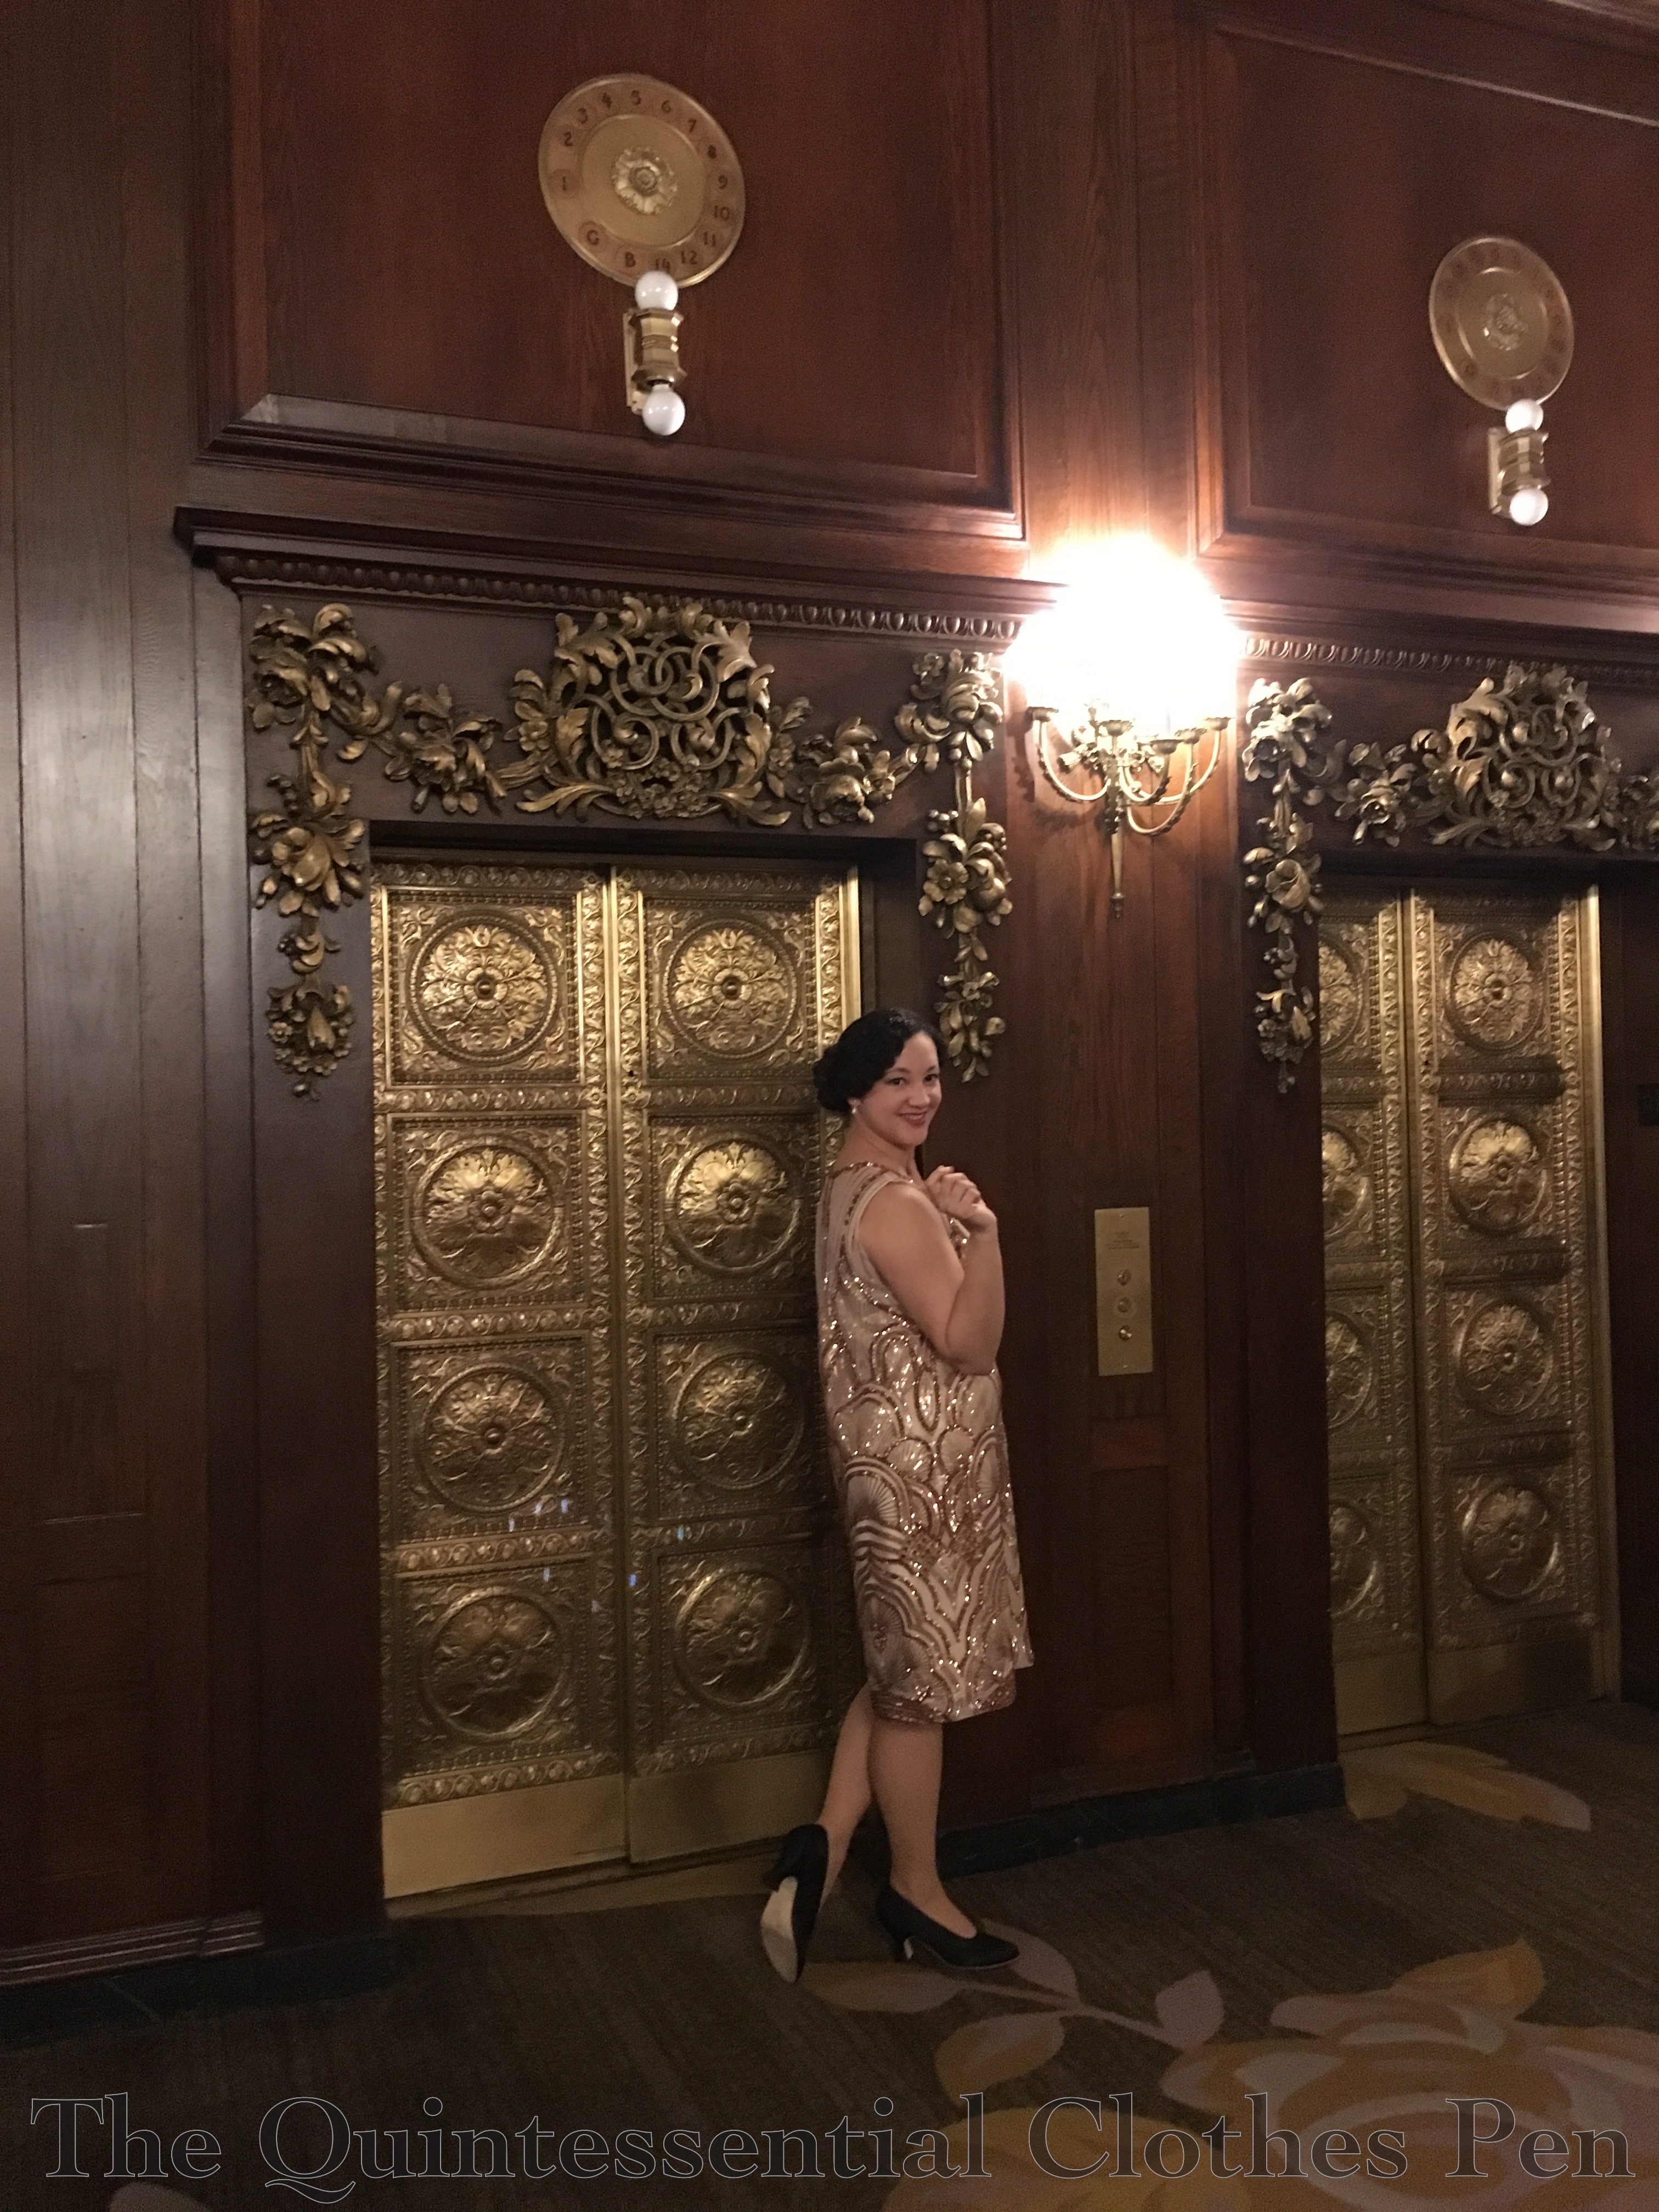
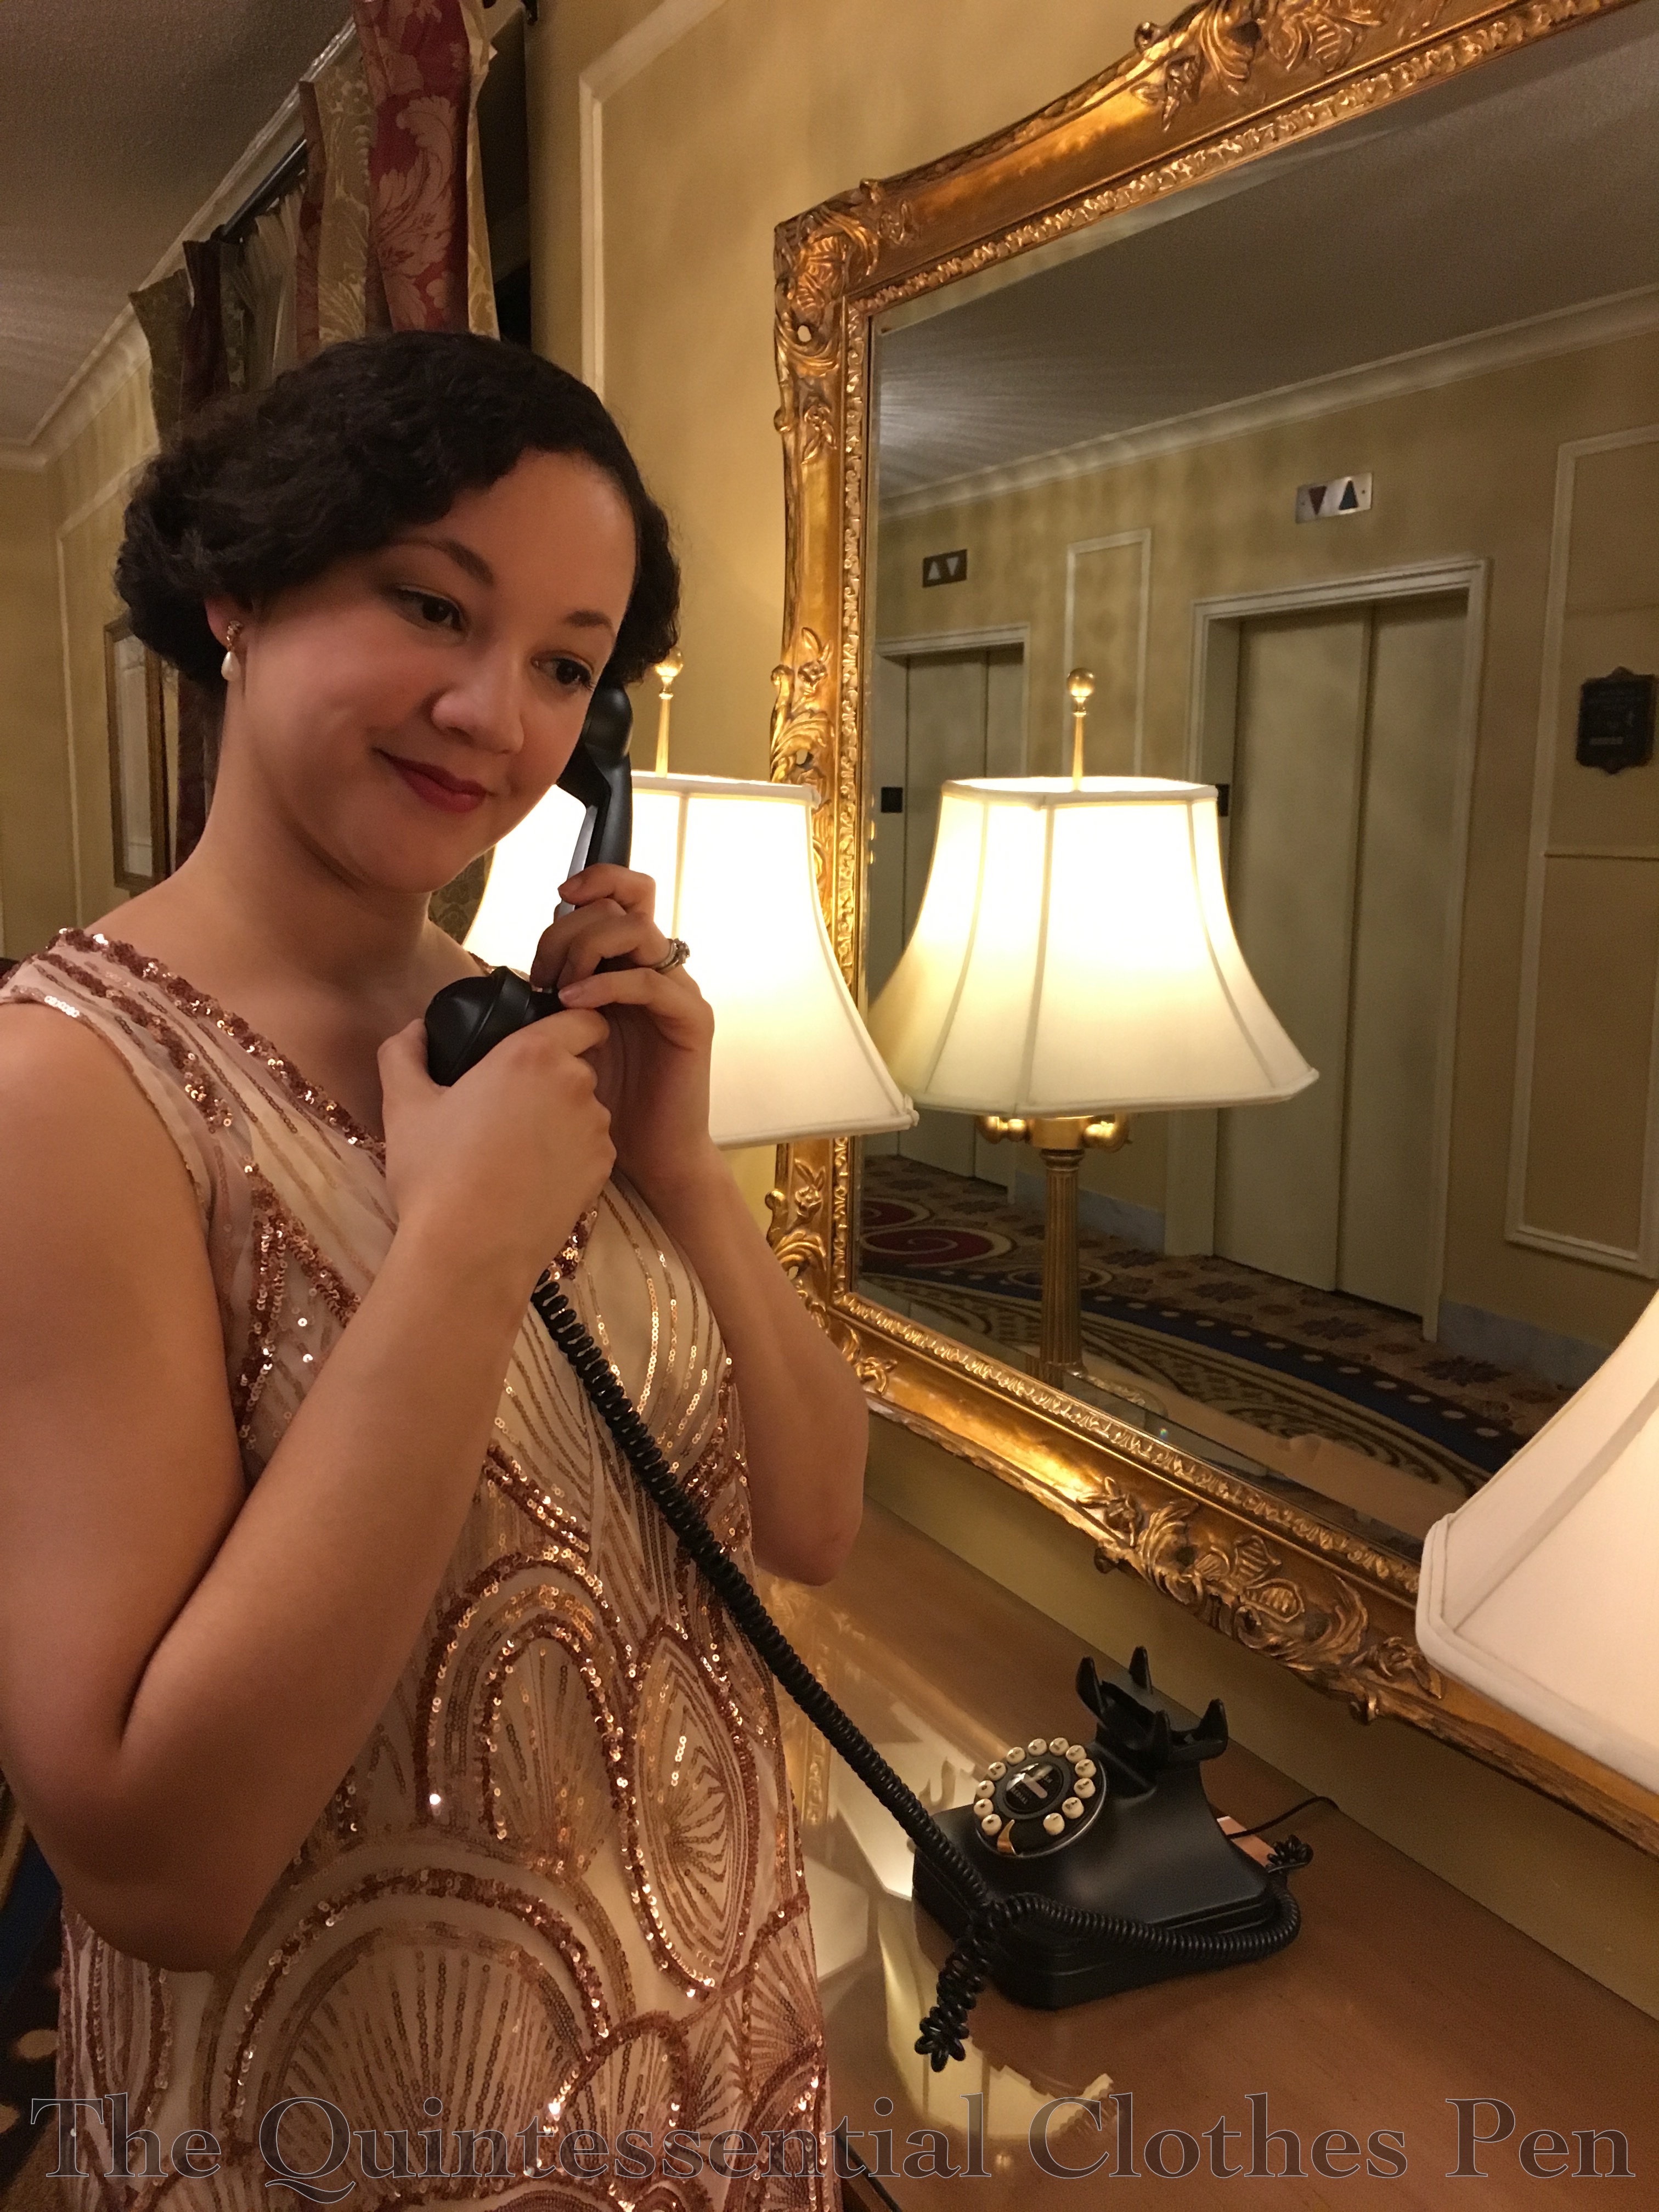
I was also incredibly lucky that the event was held in a historical hotel that provided fun backdrops for pictures! Those elevator doors are lovely! And look at this awesome phone–it had to be included in pictures!

img_2340-1

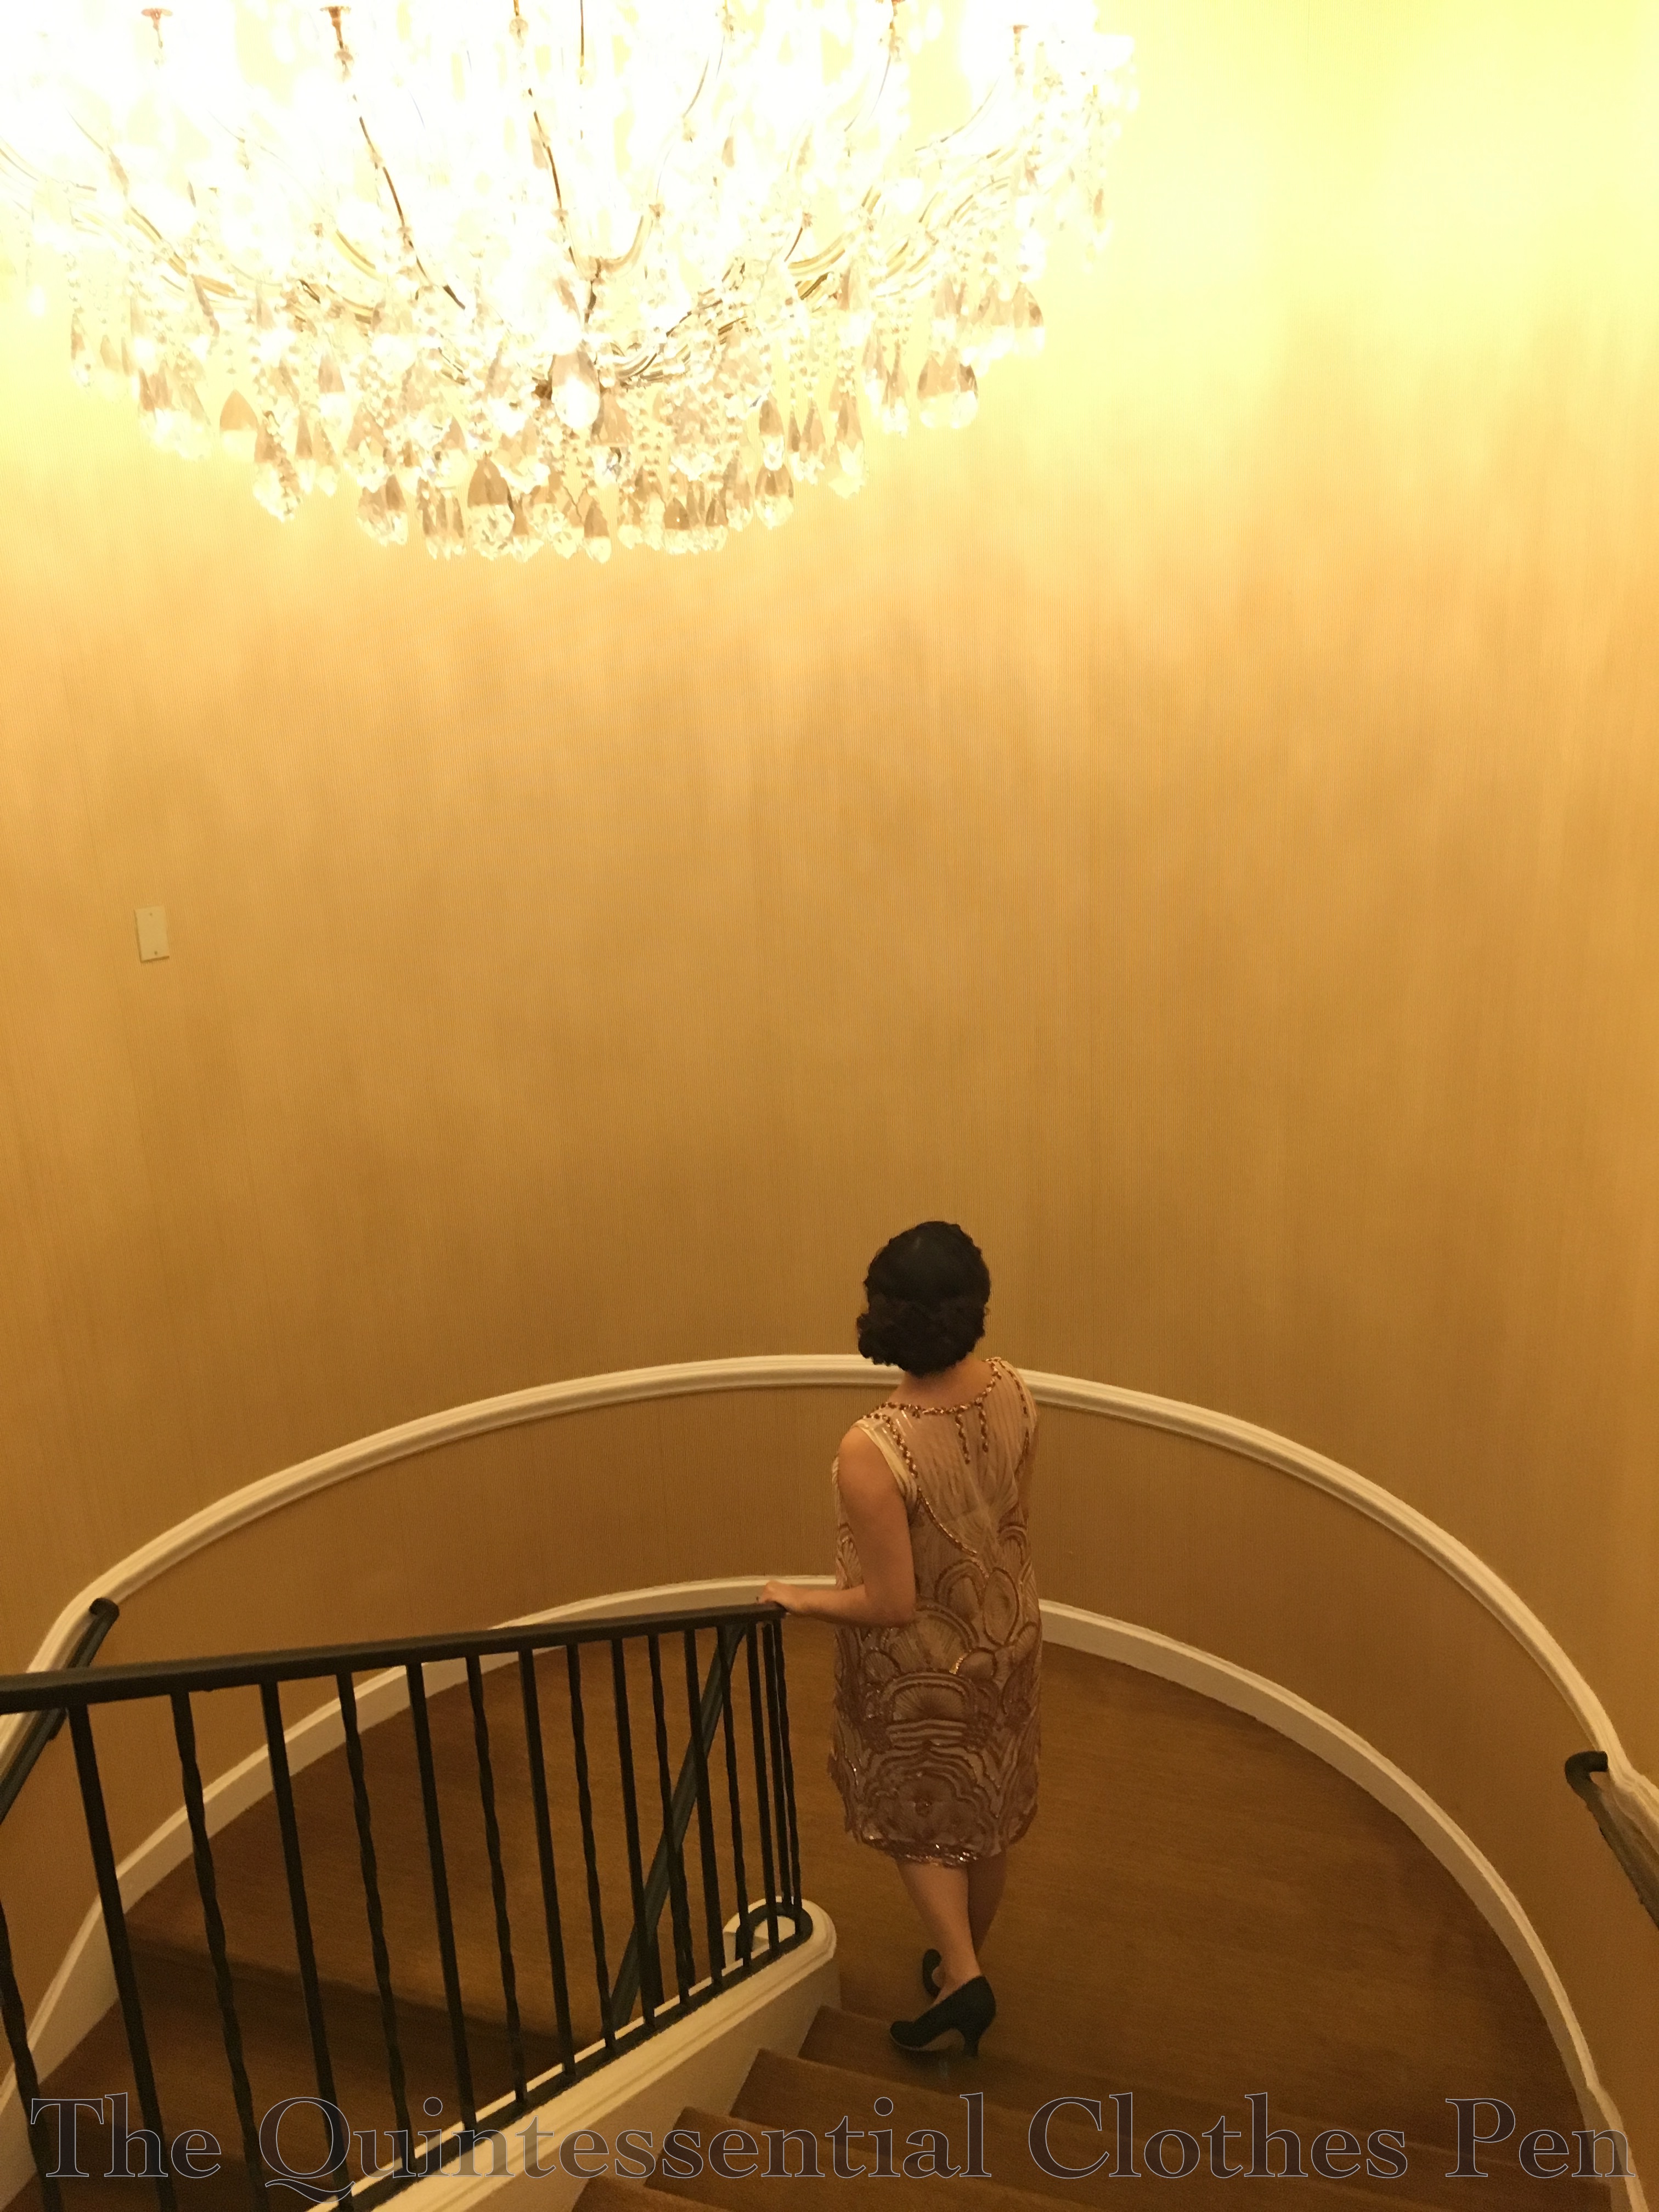
Another neat place we took pictures was this stairwell. I love how different these two pictures are, despite being so similar. One is much more about the dress while the other shows off the chandelier and is a bit more artsy and mysterious.

img_2329-1

img_2327-1

img_3151-1I was so pleased with how my hair turned out! I tried a style similar to one I did last summer for a different 1920s event that I have yet to post about… oops! But here’s a teaser of just my hair. Soon I’ll post the details and it will bring some warm summer memories to my New England winter.

For the summer event I did my hair when it was wet, resulting in a similar style, but much smaller and closer to my head. For that version, I did all the back curls while my hair was still distinctly damp, making the curls much tighter and closer to my head.

For this event, I braided my hair in the morning while it was still damp (to help create waves on the top but curls on the bottom) and left it all day, meaning it was mostly dry when I took out the braid. Then, when doing my hair for the evening, I added small rats under the puffed bottom portion to add a bit more volume than just my own curls. I covered the rats with the length of my hair then carefully placed and pinned the curly ends to imitate having a sort of 1930s smooth-on-top-curly at the bottom style, like this. This style is a few years later than my new dress, but I think it works as a 20s style for someone with longer hair, like me. I have a lot of hair to hide in a 1920s style!

img_2332-1

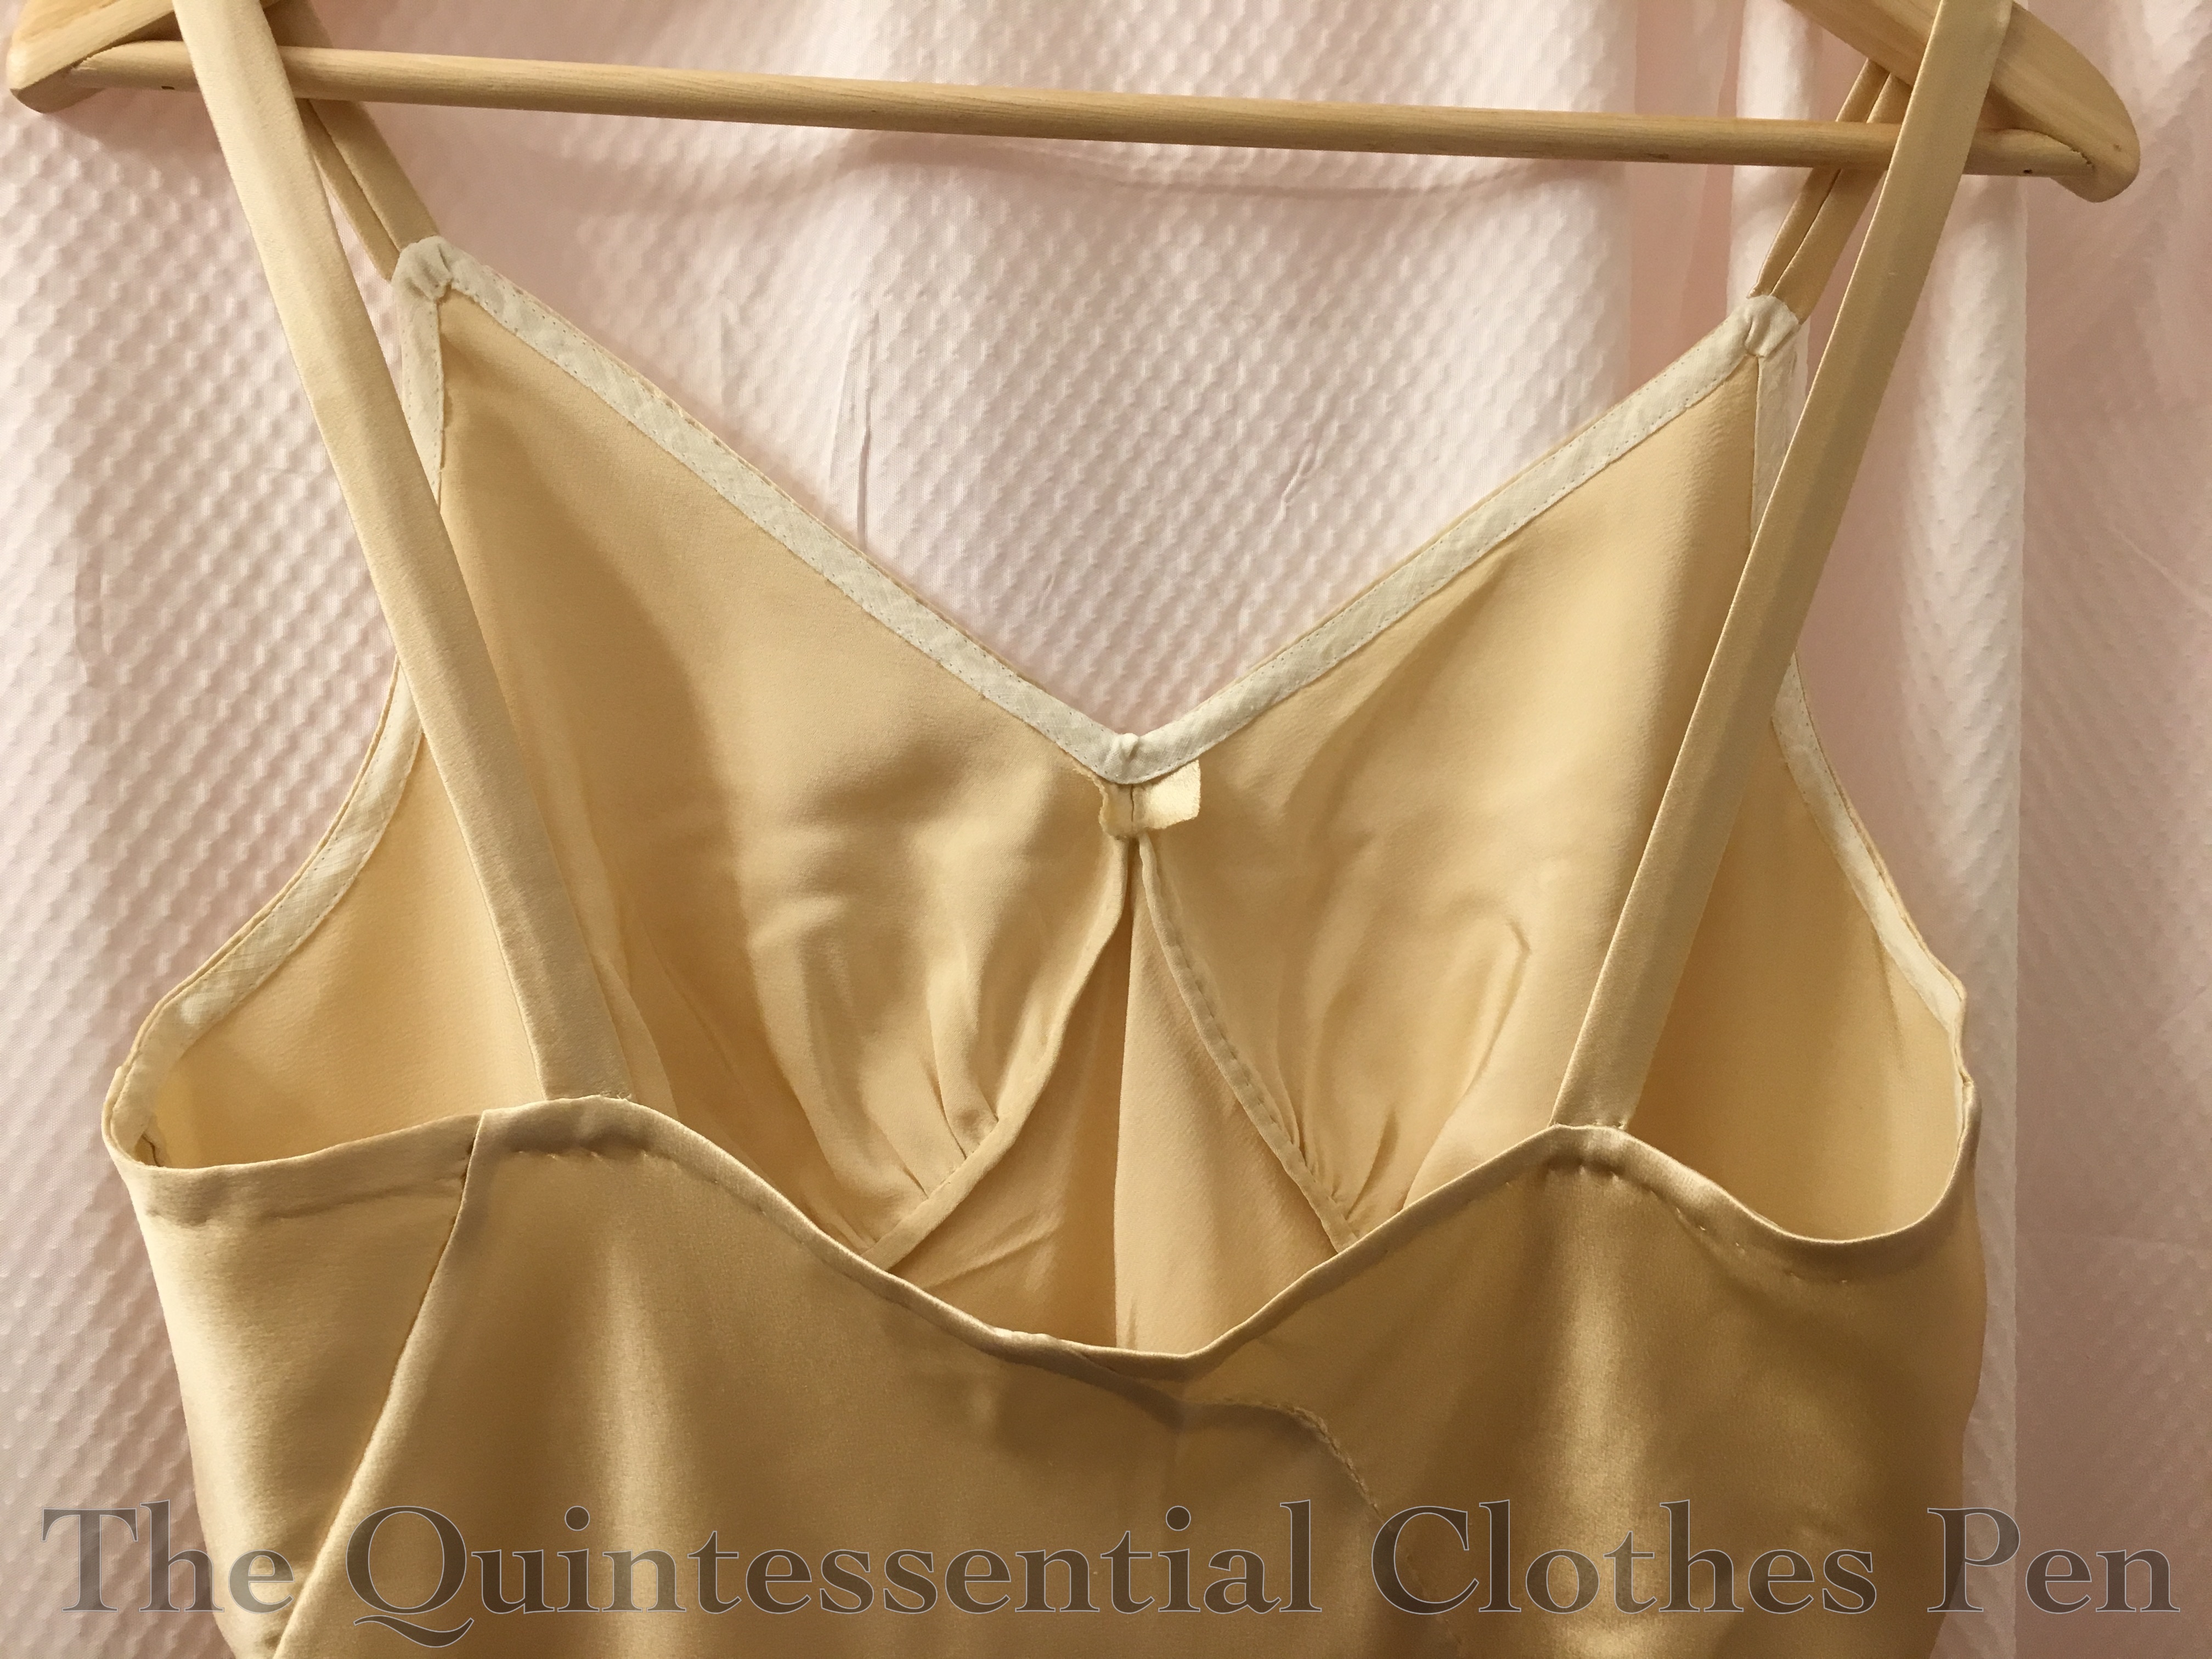
Both the dress and slip are entirely hand sewn, due to working on it away from home (I would have hand sewed the dress anyway because of all the sequins, but probably not the slip). The dress started out as a tube, but was more unflattering than I was willing to allow. It was fine from the hips down, but needed to be taken in above the hips. What I ended up with is a curved seam (or a long dart, depending on how you look at it–one side didn’t have a seam to begin with) allowing slight shaping from the torso to the skirt portion of the dress. 1920s dresses can be such bags, but after the extra shaping I am very happy with the still somewhat bag-like, skimming shape of the dress without feeling like it’s an absolute sack.

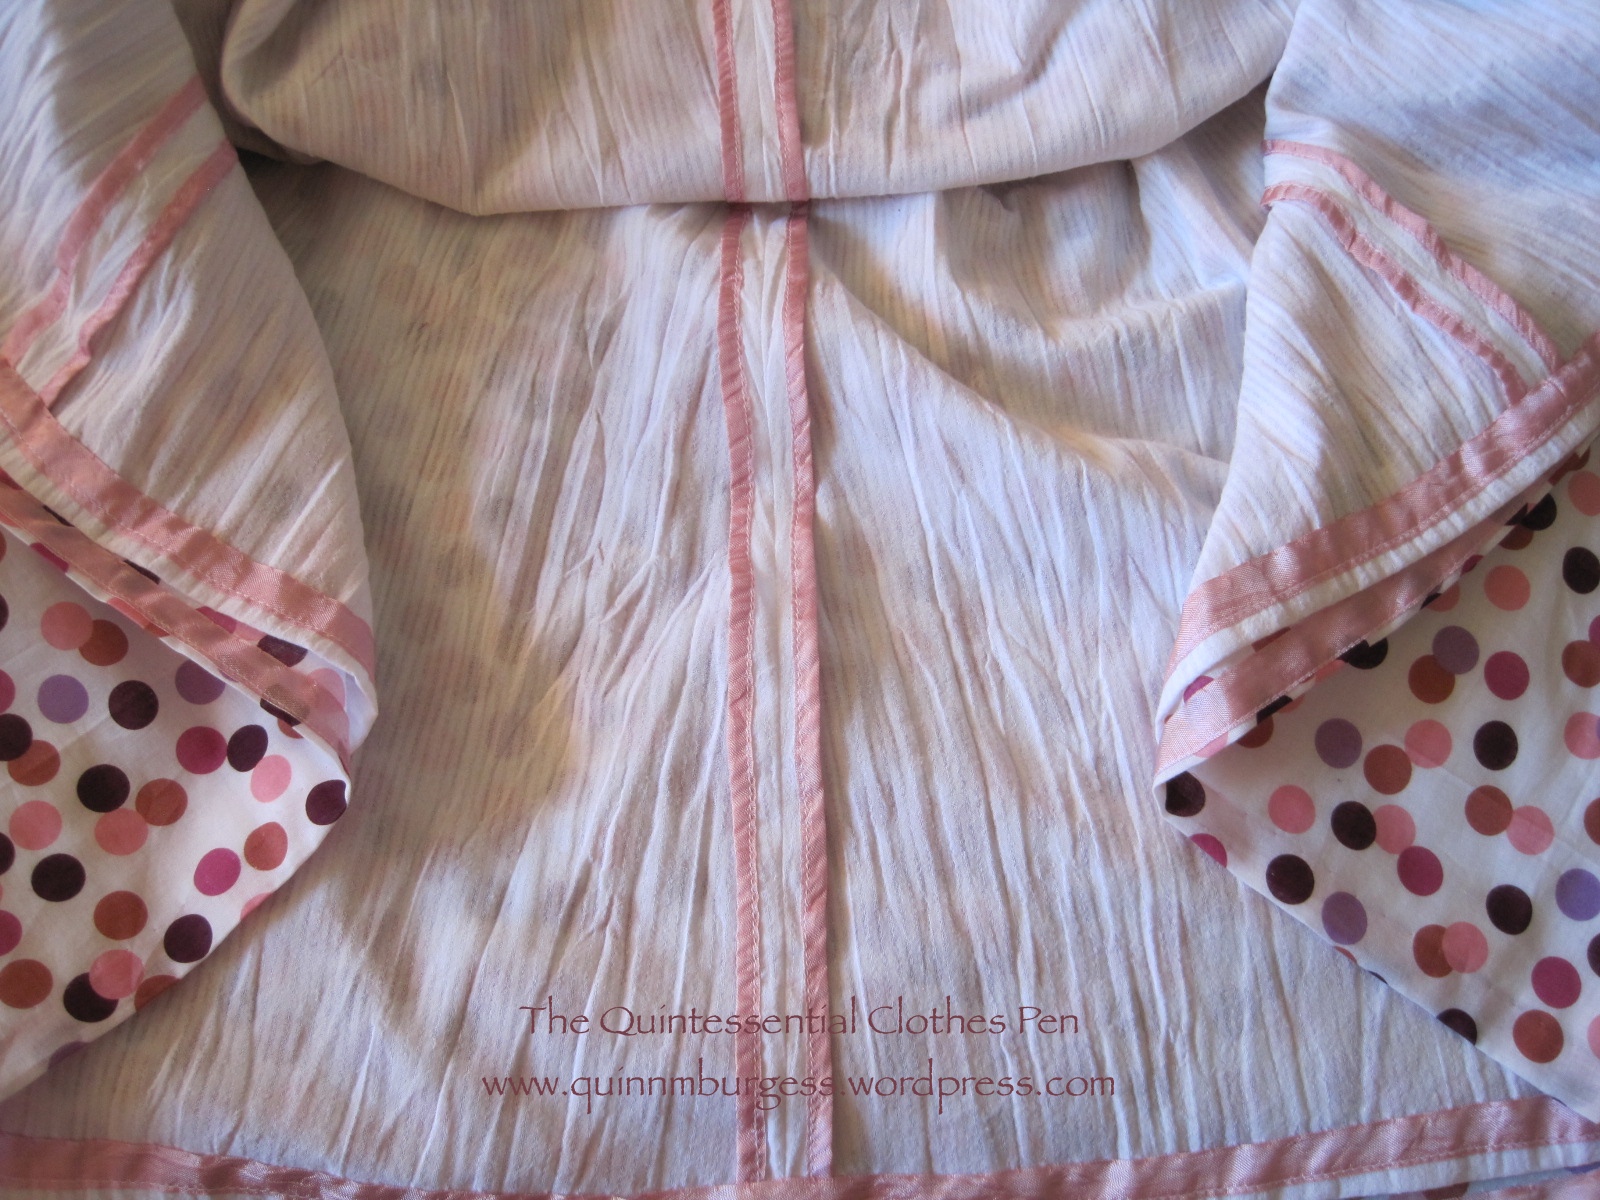
The slip was cut from a pattern I made a few years ago–perfect, since I didn’t have time to pattern something from scratch! I intentionally picked a 1930s pattern in order to have the addition of a perfectly fitting 1930s silk slip to my wardrobe, but also because the shape of the neckline was perfectly suited to the v-neckline I decided on for the sparkly overdress.

img_2374

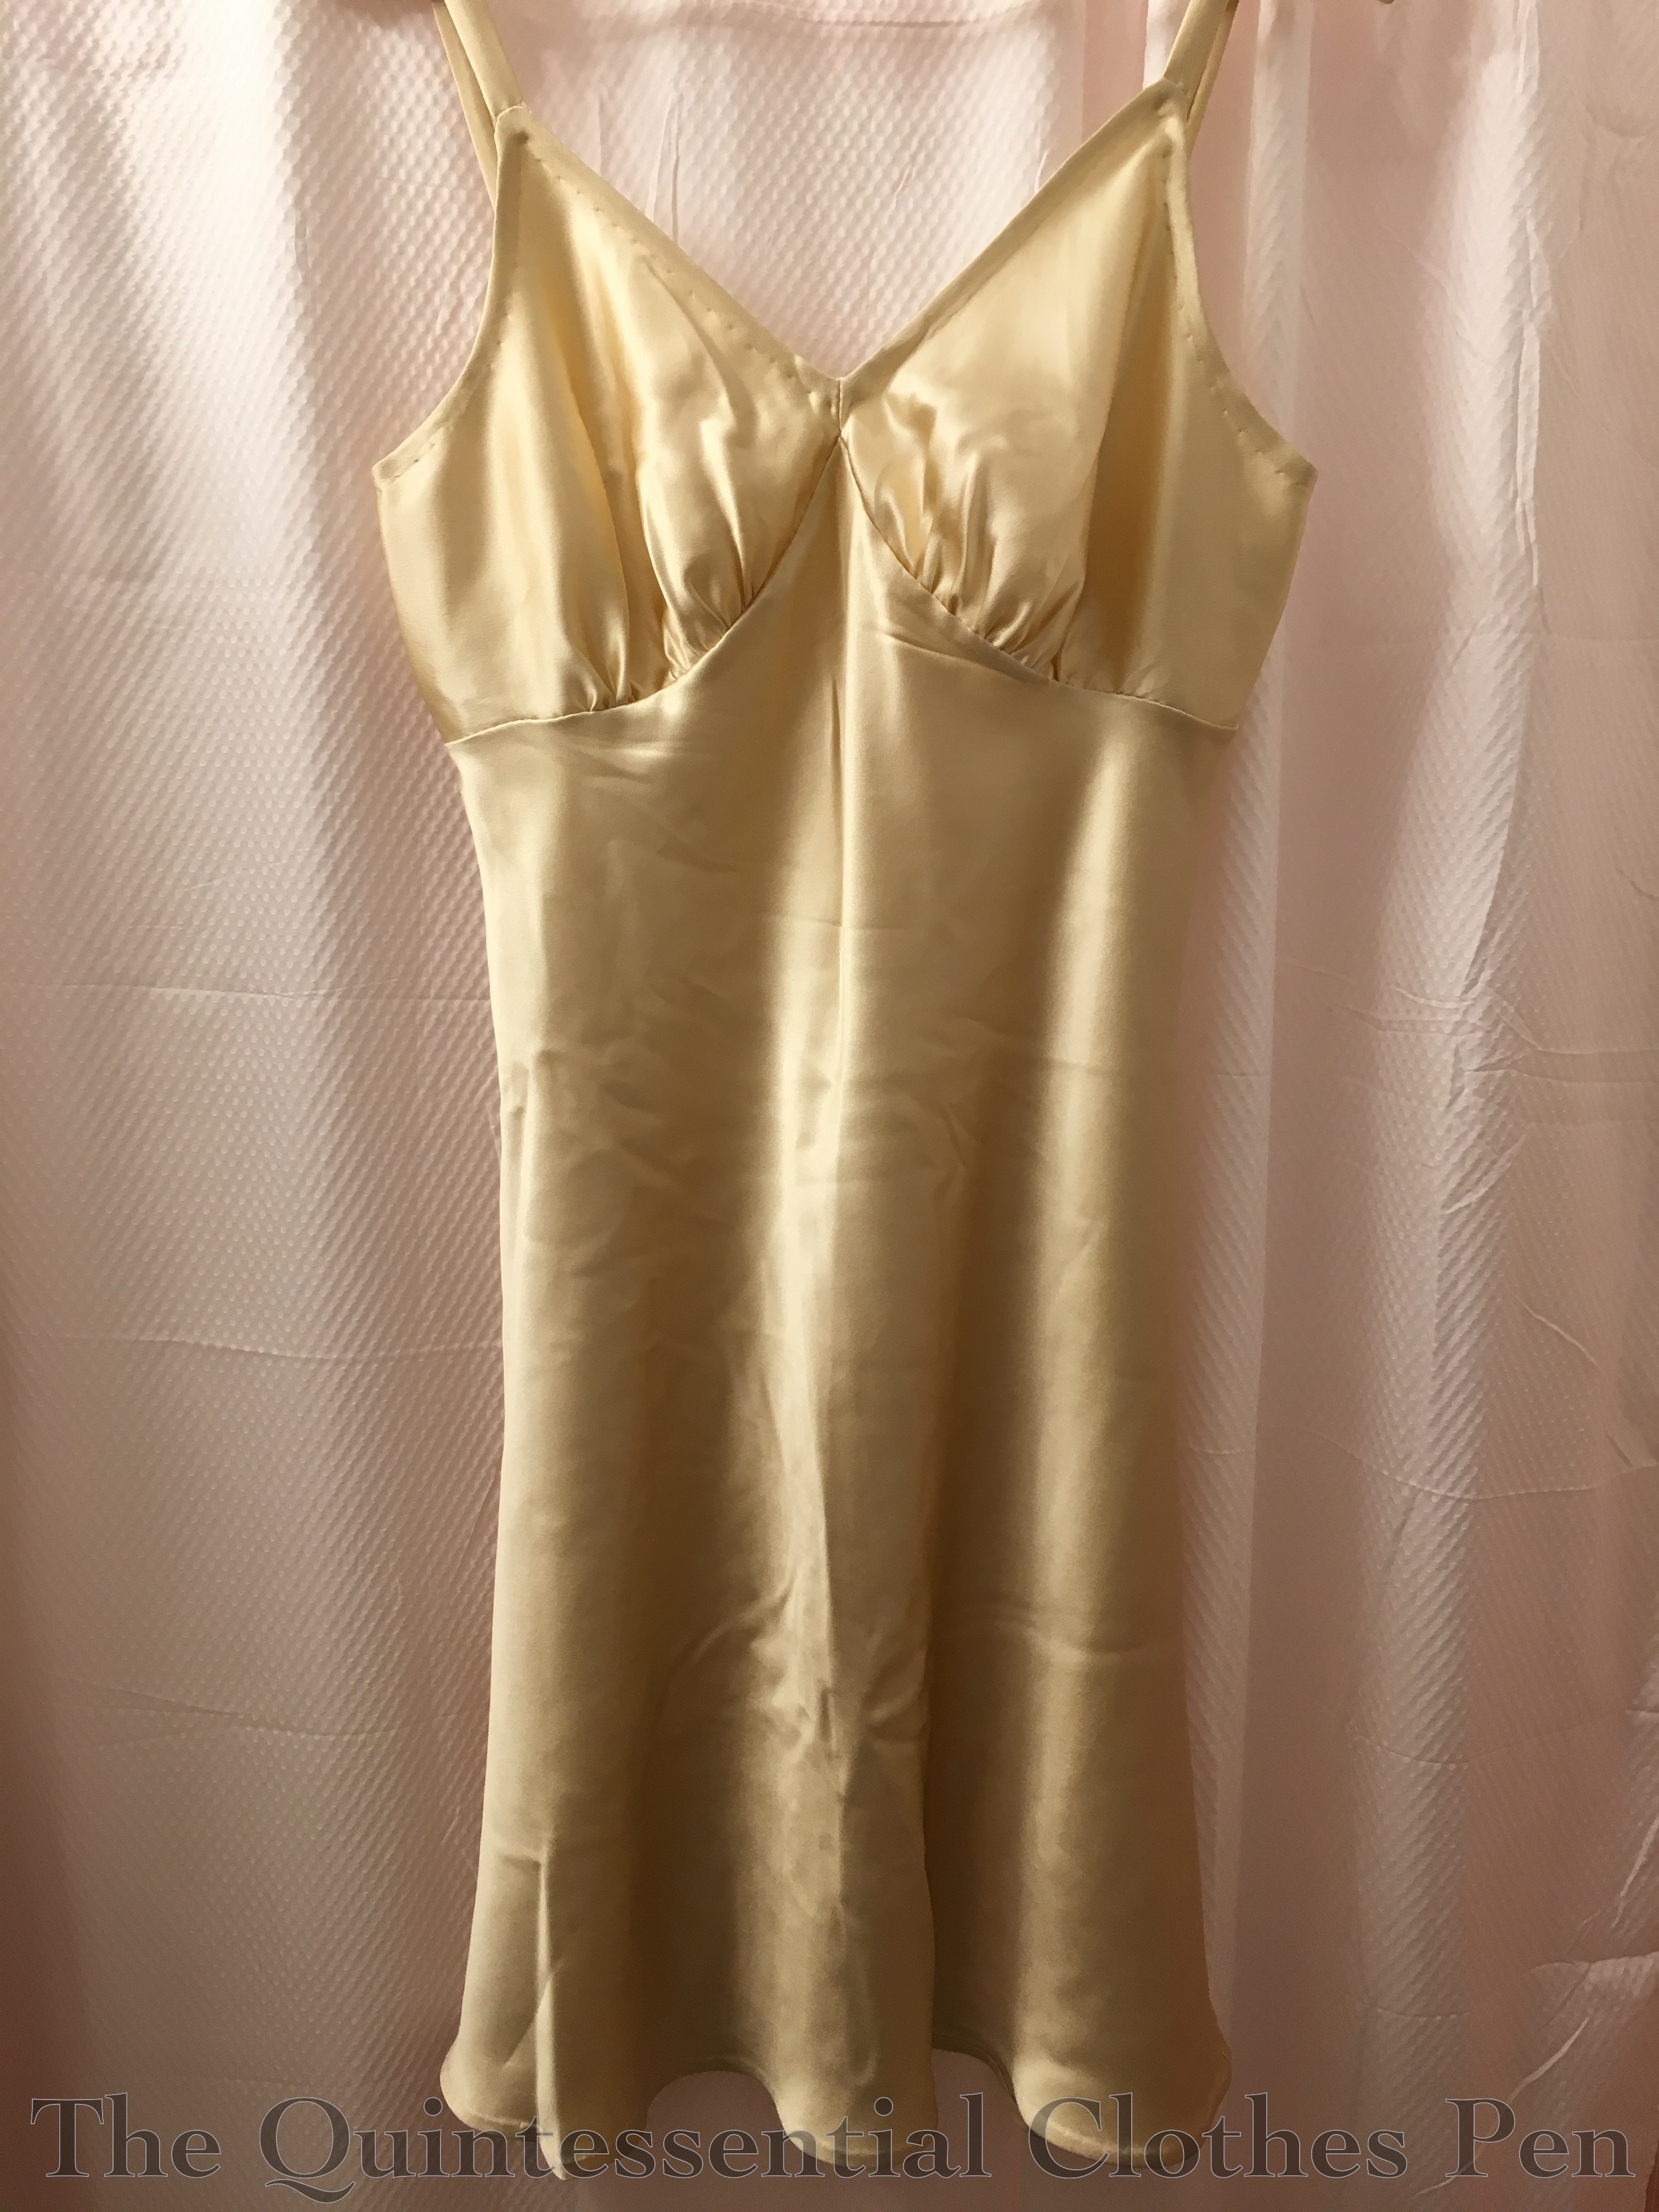
The slip has french seams on the sides. The under-bust seam allowance was trimmed away on the gathered piece and then the body piece seam allowance was turned over it and hand sewn to hide the raw edges. The top edge is mostly bound of with vintage cotton bias (which I removed from the top of the net petticoat I show in this post before shortening it. The piece wasn’t quite long enough to go all around the top edge of the slip, so the center back section is just turned twice and slip stitched, in the same way as the hem.

img_2378

The slip fabric is left over from a project that I did about 7 years ago. It’s lovely silk crepe back satin with the perfect weight for making bias cut 1930s clothing. I thought I would have just enough to eke out the slip, but I came up a little short on the back piece and decided to piece it to make it work, as the fabric is so nice to wear and it was the perfect color. As a result, there are two random diagonal seams on the top of the back piece of the slip. Oh well! They add character!

Sophie, 1861 Cotton Print (HSM #8)

Last week, I introduced Eleanor, a newly made plaid gown from 1862. Today’s introduction is to Eleanor’s friend, Sophie. Sophie actually came first, back during the summer when I was intending to participate in the same dance performance for which I’ve worn Georgina in the past (here are a selection of past posts about Georgina: the construction which is similar in some ways to Sophie, Georgina in action, and Georgina with a new collar).

This year, the performance was rescheduled due to rain and I couldn’t attend the new date, meaning that the new dress, Sophie, languished until October, when I was able to wear it during part of a recent mid-19th century dance weekend. The nice thing about the delay is that the pictures all have stunning fall leaves, which would not have been in the case in the summer.

img_3450-1

Also, had I worn this dress on the first intended date, it would not have been entirely completed. Having extra time allowed me to officially finish all the trim and closures which made this dress the perfect entry for the Historical Sew Monthly challenge #8 “Pattern – make something in pattern, the bolder and wilder the better.” I didn’t have any pictures of the dress on a body at that point, so I submitted a rather sad picture of the dress on a hanger at that time. It’s exciting to have real pictures now!

Just the facts:

Fabric: 7.5 yards cotton print.

Pattern: Adapted from Past Patterns #701, 1850-1867 Gathered and Fitted Bodices.

Year: 1860-1863 based on my extant inspiration, but I’m calling it 1861.

Notions: Thread, hooks and bars, muslin scraps, and narrow yarn for cording.

How historically accurate is it?: I’m going to go with 95% on this one. This is as accurate as I can be given the research I have done and the materials I used, though the use of a facing on the front edges is guesswork. Regardless, this would be entirely recognizable in its time.

Hours to complete: Unknown. A fair bit.

First worn: October 23 for an afternoon tea and dance games.

Total cost: $23.

img_3451-1

Sophie was directly inspired by this extant dress at the Kent State University Museum. I was considering what to wear for the performance, thinking that I’d worn Georgina enough to want something new, that I’d had an 1860s cotton print fabric in my stash for a few years, and then I remembered this dress. I decided to leave off the ruffle on the skirt (and also didn’t have enough fabric), but was so pleased that my cotton print is so perfectly suited for playing with the pattern in the same way as the extant dress!

19861270001

Dresses from this period with v necks are not common, but they do exist. This Pinterest board has lots of examples. My Pinterest board has a few other dresses that helped move me along as well.

As I mentioned in my post about Eleanor, finding and making use of subtle differences between dresses from similar years brings me joy. For example, Sophie has a v neck, no boning, cartridge pleated sleeves, gathered trim, and is actually sewn together as a dress, rather than hooking together at the waistband as with all my other dresses from this period.

img_3461-1

img_3464-1

img_3467-1

In other ways, Sophie is similar to Georgina, being partially machine and partially hand sewn, having a cartridge pleated skirt, cuffs with little ruffles at the ends, and pockets.

img_3462-1

Personally, I love having pockets in day dresses. It brings me peace of mind to know that modern things like my keys are close by and not sitting around somewhere. Plus, chapstick, fan, gloves, etc. are also excellent choices for stashing in pockets. These pockets, which you can see the top of in the picture below, are sewn in the same way as Georgina’s pockets, shown here. I love this collection of references to pockets from the 1840s, 50s, and 60s that Anna Worden Bauersmith put together. I’ve been waiting for just the right moment to share it for what seems like ages.

img_1871

Here are two more interior shots of the dress. The first shows the muslin facings. I don’t have documentation for this method being used to finish a lightweight summer cotton dress, but it makes sense that this method might have been used to finish the edges nicely while keeping the main body of the dress breathable and light. The second picture shows in the inside of the top of the sleeve, particularly to show the cartridge pleats.

img_1874

img_1872

In addition to the dress, I also made a new cage crinoline. I’ve been wanting a slightly smaller, less bell shaped one, particularly to wear with cotton dresses. I love my old cage crinoline (seen here) for evening dresses, but it is just a bit too much for a more practical daytime look. The new crinoline shape just looks ‘right’ with the cotton dress. The difference is subtle, but pleasing. Unfortunately, it did not perform well in its first wearing. The vertical tapes were sliding all over the place and causing the hoops to drop and be tripped on. Not good! It needs revision before being finished and shared, so for now you’ll just have to believe that I’m wearing it with this dress.

Now that you’ve heard all about the dress itself, here are some pretty pictures of it in action. These first ones are in the spirit of the development of rural cemeteries in the mid-19th century, which you can read more about in this blog post at Plaid Petticoats.

img_3492-1

img_3480-1

The next few are a celebration of the autumn season. The gorgeous leaves were beckoning us to have some laughs. Incidentally, I tend to jump in the air with my arms up whenever I’m having an amazing time in this period. Take this memory, for example. I’m doing pretty much the exact same thing!

img_3522-1

img_3525-1

img_3526-1

img_3543-1

We have so many things to be grateful for. I am always thankful for the many blessings in my life, particularly at this time of year. I hope that your life is also overflowing with blessings and reasons to give thanks, in autumn and always.

img_1956-1

Henrietta Maria At Sunset

Where I grew up in the Pacific Northwest, we would often have stunning summer sunsets that would bathe our western facing house with vibrant red-orange light. We get far fewer of these dazzling endings to summer evenings here in New England, especially with such depth as those Northwest sunsets. Honestly, until we had parked at the chosen location for this photo shoot, which happened to have a western view, I hadn’t realized how orange the sunset on this particular day was.

IMG_7484 (1)

The day had been a busy one and I had to hurry to look presentable and throw on the dress to catch these photos before the light faded. I wasn’t sure there was enough light left to get good photos, but I actually really love the unusual orange sunset light.

IMG_7482 (1)

I purchased the rayon print fabric I used to make this dress last winter from Blackbird Fabrics. I have an ongoing effort to try to add pattern to my modern wardrobe, which is mostly solid color garments. I didn’t know what I was going to do with the fabric, but then in the spring Leimomi (the Dreamstress) asked if I would be willing to do a favor for her relating to her soon-to-be released first ever Scroop Pattern, the Henrietta Maria. Squee! Of course! And my thank you from her was the pattern itself! Perfect!

IMG_7496 (1)

So this is a Henrietta Maria. The pattern is great, with clear directions and helpful tips. Leimomi has also posted some extra tutorials for the dress on her blog. I took advantage of the suggestion of adding elastic to control the waistline because without it the dress was looking like a bit of a muumuu, what with the busy floral print and the straight shape.

IMG_7474 (1)

The construction is straight forward, with the only time consuming part being the 44 tucks that make the dress particularly unique. They’re not hard, and their placement is clearly marked on the pattern, but they are time consuming. I think they took me about 3 hours to sew all by themselves. They could probably take less time, but I was very careful to match each guide line and sew them with precision. And the end result is worth it.

img_7499-1

IMG_7512 (1)

The inside of the dress looks like this. I used the lace edging method that Leimomi also blogged about. It provides such a nice, tidy finish without any visibility on the exterior. And all the tucks keep the lace in place perfectly.

IMG_1688 (1)

IMG_1686 (1)

Like the tucked edges, the hem edge is also edged with lace that is machine sewn onto the raw edge. The hem is sewn with a cross stitch that is pretty much invisible on the exterior.

IMG_1687 (1)

Here are a few more pictures from the sunset photo shoot. I’m not sure why there was a worn statue of a frog in the midst of the trees.

IMG_7489 (1)

IMG_7515 (1)

You can see more lovely versions of this dress on Leimomi’s blog here. Click back through previous posts with the tag to see more. There’s also a shirt version. Check them out!

Restyled 1928 Green Silk Dress

Perhaps you remember this late 1920s green dress, which I made and first posted about in 2012? When it was first completed, I was in the midst of creating lots of new things for Newport Vintage Dance Week and was grateful that it had made it to a wearable state. I hadn’t quite solved the issue of keeping one side bunched up, so for the first wearing I used the bronze sequined flower pin you see in the picture below.

The slippery silk of the dress caused the pin to move around and shift while I was wearing the dress. I also didn’t love that it did nothing to break up the smooth lines of the back side of the dress.

IMG_2793
In 2012.

Last year, I had a reason to wear the dress again and I came up with a new design idea, based on this image from 1929. I loved the simple lines of the green dress on the right (and it happened to be the right color!) and the sash with a huge bow. It took me another year to get proper pictures of the new look and document it here, but I’m really pleased with the pictures, so I guess it was worth the wait!

I used my remaining fabric to create a separate sash for my dress. It’s separate so I didn’t have to deal with adding closures to the dress–it still slips on over my head; however, because the silk is slippery and the bow side of the sash wanted to slide down, I did safety pin both the bow side and the opposite side of the sash to the dress to keep it in place.

IMG_2429
The same basic dress in 2015, styled differently. The same gloves and pearls (worn differently), with my newly shared gold t straps, green earrings, and a matching trim headband.
IMG_2438
And a different hair style. This is a better view of the bow.

I think the 20s silhouette grows in my estimation the more I wear it. It’s sort of odd at first, but can be quite elegant sometimes! I’m very pleased with how the sash and bow break up the dress and add extra oomph to the hem.

905794_10153002186899327_6142922609015185505_o
The event I wore the dress to was a 20s fundraiser at a local hotel. Here’s a bonus picture of the dress in action.


1950 Baroness Christmas Dress!

Success! I not only finished my 1950 Baroness Christmas dress the weekend after Thanksgiving, but we also managed to line up our schedules and go see The Boston Ballet’s Nutcracker at the beautiful Boston Opera House, where we took pictures! There were brass bands playing outside and carolers in silver down coats on our walk to the theatre. It was all very festive. And, of course, there was The Nutcracker with a live orchestra.

As you might be expecting, I wore my Christmas dress and took pictures for Edelweiss Patterns’ Virtual Christmas Dress Party. The original inspiration image is in this post. The dress is made from rayon and lined with polyester. I made an attempt to do a 50s stylized up-do, too, though I don’t have any close up head shots… but without further ado, here it is:

IMG_0025

IMG_0026

There were a few changes from the original, like adding a slit behind the front drape for ease of movement, adding a self fabric belt over the waist seam, and not quite making the pleats across the front deep enough to read once the bow was attached. I’m quite pleased, however, and love how festive the dress is! (And it’s quite formal, with that low back…)

Our group was very well balanced in having two greens and two reds, and three hats, and four  gloves (two pairs, you know)… (It sounds like One Fish Two Fish Red Fish Blue Fish or The Twelve Days of Christmas, doesn’t it?)

IMG_0033
3 hats!
IMG_0024
5 of us in 1950s inspired Christmas outfits!
IMG_0038
Merry Christmas!


Virtual Christmas Dress Party

Katrina, of the blog Edelweiss Patterns, has put together a Christmas Dress Blog Party. The short version is that anyone who wants to make a holiday dress and participate can share pictures and links on Katrina’s blog right before Christmas at the online party. Here’s the link to the full description.

blog-button-christmas

I have to say that I’m not a make-a-dress-every-holiday sort of person. I’m also not a wear-a-fancy-dress-for-Christmas-dinner kind of person. I don’t go to many holiday parties except historically clothed ones and for Christmas dinner I wear something nice, but then soon change into comfy clothes for lounging in front of the fire and playing board games (mmm, favorite holiday pastimes!).

This year, however, I’ve already started a dress that I’d been intending to wear to a Christmas party, which works out wonderfully! Unfortunately, the party I’d been planning to attend changed locations, making it impossible for me and my friends to be there, so we’re trying to find a date to do our own holiday-themed outing instead (if it works out there will definitely be pictures!). Regardless, my dress is well on its way to completion–hopefully I can finish it off over this Thanksgiving weekend–and I will get pictures somewhere even if our holiday outing doesn’t work out. It will be perfect for the Christmas Dress Blog Party!

ac5152046d7bb775df36e790f930178c
Here’s my inspiration: Vogue #588 from 1950, in the COPA at URI. (Click through to COPA to see an image of the pattern pieces.)

My dress is red sheer rayon with a slight textured stripe. I call it the Baroness dress because it reminds me of a mashup of the style of dresses worn by the Baroness in The Sound of Music (see below), despite the fact that the inspiration pattern is a bit later than the movie. It’s a fun coincidence, because Katrina particularly loves The Sound of Music, as you might guess by the title of her blog and pattern line, but I promise, it was the Baroness dress in my head long before Katrina posted about the virtual dress party!

80f92ea70326c7c748878446bbca69cf
The Baroness by the lake. Hip bow inspiration. And red.
877ee41611b9579fef0a00dc0ce84c5a-1
The Baroness in an evening gown. Evening dress inspiration in general.

And, happy Thanksgiving!

1940s-Does-Modern Anne Adams Dress

Summer is here, and I’ve been wearing dresses a lot lately. I’m trying to expand the number of dresses in my wardrobe and trying to incorporate more garments that make use of a pattern of some sort rather than just being a solid color. This new dress is… well, a dress, and it has a pattern! And, it’s purple with a wide skirt. What is not to like?

Robe with slip (1)

The inspiration is this Anne Adams dress pattern #4752 from the 1940s.

61808477bc920d62ad2e412260cd488f

I love it, and really wanted to make a dress just like it. But then, I also wanted a nice full skirt just like another dress I bought from H & M years ago and wear often. Turns out that the full skirt made the angled stripes on the skirt totally impossible to pull off. I tried! It was sad looking, though, and in the end I decided I’d be much happier with the dress if I adjusted the design to accommodate my more-full-than-1940s skirt. Good decision, because I love the dress just as it is! I wouldn’t mind some day making the dress with a skirt that has less fullness and a more 1940s silhouette and trying the stripes as they are in the inspiration, but it wasn’t fated to be for this iteration.

Robe with slip
See? Because the skirt is full it’s a curved piece, which meant that the striped panel had to have darts to fit, which wrecked the line of the stripes.

Once I decided to go for the Modern-Does-1940s look I also decided not to bother with the buttons on the bodice. My dress does have topstitching like the pattern image, though you can’t really see it with all the stripes going on.

The dress is constructed from a medium weight cotton I found on the remnant table at my local fabric store for $3ish/yard. Love that price! The armholes and hems are finished with self fabric bias. The dress closes up the left side with a purple lapped zipper. If you’re going to be purple, why not be PURPLE? (Maybe I should call this the Purple People Eater Dress?)

Robe with slip (3)

The bodice is a little different than the inspiration, because I wanted to make it fit my body. Thus, both sides of the bodice are gathered into the angled waist piece to create space for the bust (in the inspiration the dress is drawn with the proper left side being flat… but that would mean also being flat chested on that side…). The other thing is that I have a shoulder seam in my dress, and I wound up gathering the front pieces at the shoulders to make the whole thing sit correctly on my body. You can see in the picture with the dress on the mannequin that it started out with no gathers on the shoulders, but it wasn’t fitting me in a flattering way, so I gave up and altered it to be comfortable.

Robe with slip (4)

The back bodice has darts and corresponding tucks in the skirt. The tucks were unintentional, added only because the skirt had stretched out and was bigger than the waistband when I went to attach them. That’s what happens when you cut corners and don’t stay stitch… But see the perfect chevrons on the side seam? They make me happy!

Robe with slip (2)

I’m wearing modern summer sandals, but I did attempt to do a nod-at-the-1940s hair style for the photos. I don’t mind the style, but clearly I need some more practice (and likely a different hair type without so much frizz) to really get a 1940s style going.

Thanks so much to my wonderful friend photographer, who is so willing and excited to document the things I make so I can share them on my blog! Of course, the trade off is that she gets to practice photography skills on a willing model… Works out well for both of us!

1953 Dot Dress

It’s been months since I bought the fabric for this dress (I actually had to look back to see when I purchased the fabric: it was February). I bought it rather on a whim, with the goal of expanding the number of patterned dresses in my historic wardrobe. Well, success! My 1953 dot dress is complete!

IMG_4829
Yay!
IMG_4830
And the back.

I think it looks more flattering on me than it does on Squishy, but the opportunity I’m hoping to use to wear it and take pictures has been postponed due to the busy lives of my friends. We’ve got a grand plan involving roller skating, a 50s diner, and ice cream. All of those things just scream for pictures!

But for now, the facts (a la the HSF, though unfortunately the cutoff for the HSF is 1937, so this doesn’t qualify!):

Fabric: The dress is constructed from about 3 yds of lightweight cotton lawn printed with dots and lined with some of my white striped $1 a yard cotton fabric. It’s a perfect pairing, because it creates opacity but keeps the lightweight feel of the lawn.

Pattern: The skirt pattern is from a Vogue pattern I bought at Vintage In Vogue last year. The bodice pattern is a simple darted bodice pattern I draped for myself with the neckline adjusted to be a scoop in front and a v in back.

Year: 1953.

Notions: 10-12 yds of pink Hug Snug; white, off white, and pink thread; and an off white plastic zipper (It was all I had that wasn’t dark since I don’t use zippers much for historic sewing…).

How historically accurate?: I give it 95%. Cotton is entirely reasonable for the 1950s. I’m not sure when Hug Snug was first marketed, but the design on the spools certainly looks vintage (and rayon had been in use for at least 20 years by the 1950s). If they didn’t have Hug Snug, they probably had something similar. The pattern was printed in the 1950s and a basic darted bodice is seen on many 1950s dresses and patterns. The sewing machine was in widespread use by the 1950s. The only thing is that my plastic zipper is probably a bit modern (in the 1950s zippers were still metal, I believe).

Hours to complete: 30: lots of interior finishing by machine and hand .

First worn: By Squishy for pictures.

Total cost: My entire 50 yd roll of Hug Snug was only 50 cents, the fabric was about $15, and the zipper was probably about $2… Total: about $17.

Now, you know that I love paying attention to details. I had a lot of fun spending time on the interior details of this dress. Unfortunately, they won’t be visible, but I know that this dress is as cute inside as it is outside, and now you will, too!

IMG_4831 (1)
The hems flipped up to see the interior finishing. Both hems are finished with Hug Snug and I also used Hug Snug to bind the seam allowances of the white lining. The seam allowances of the dot fabric are turned and zig zagged (the Hug Snug showed through to the exterior too much when I did a sample using Hug Snug on the dot). The first side of the Hug Snug is machine stitched to the hem and the second side is hand sewn with only tiny prick stitches that go through to the outside fabric so it’s almost invisible.
IMG_4835
More of the inside of the skirt. It’s like candy, with all the pink Hug Snug seam binding on the white fabric! I love it!
IMG_4837 (1)
Here’s the side seam of the bodice that doesn’t have the zipper. On the bodice the dot and the white stripe fabric are treated as one, unlike on the skirt. All of the seams are bound with Hug Snug. The armhole (at the top of the photo) and the neckline are bound with self fabric bias strips.
IMG_4840
Here’s a close up of the shoulder seam showing the Hug Snug and the self fabric bias. All of the bodice seam and edge bindings are stitched down to the white stripe lining by hand using whip stitches.
IMG_4827
Here’s what it looks like without skirt support.

I might even like the inside more than the outside… I’m really looking forward to wearing this at some point! I was even thinking that perhaps I could wear it in my modern life without a crinoline petticoat under it, but I think the skirt is a little too long and the waist is a little too high. If I had more of an every day vintage style I might be able to pull it off, or if I was getting dressed up, but for normal days, unfortunately, I don’t think I’ll be wearing it around my everyday life. All the more reason my friends need to clear their calendars!!!