1815 Tree Bonnet (HSF #7)

You know how sometimes the best laid plans are waylaid by life? I had every intention of finishing this bonnet before the HSF deadline of yesterday, but along the way got side tracked by life and made conscious choices to do other things with my time instead of bonnet-ing. Oh well, it happens to the best of us!

IMG_4407
1815 bonnet (the more interesting side).

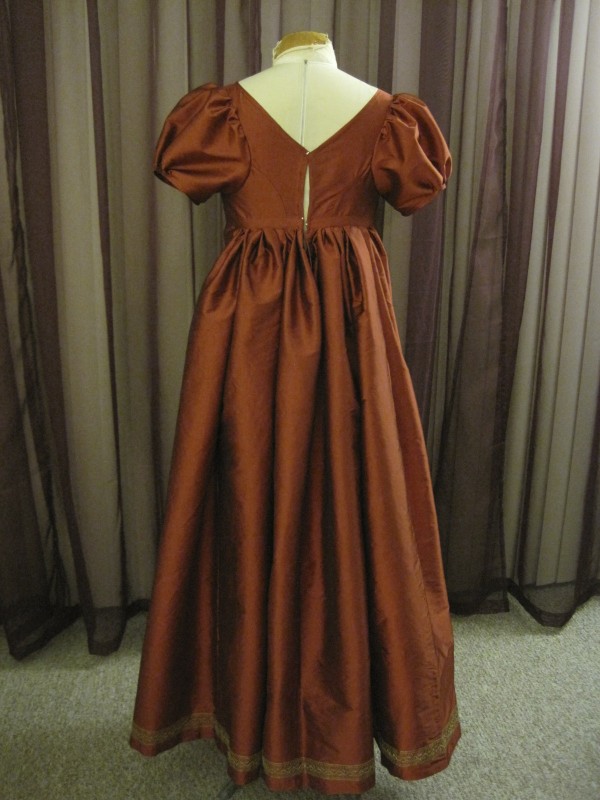
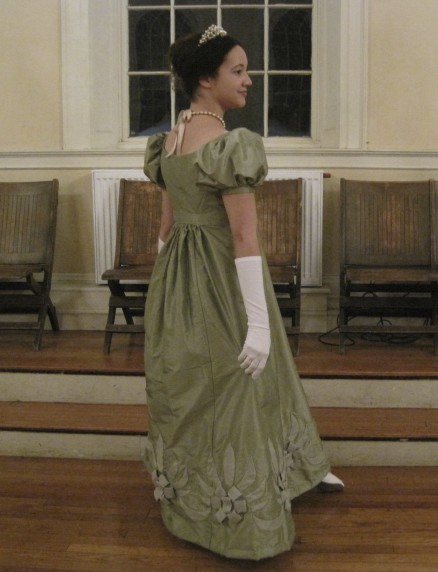
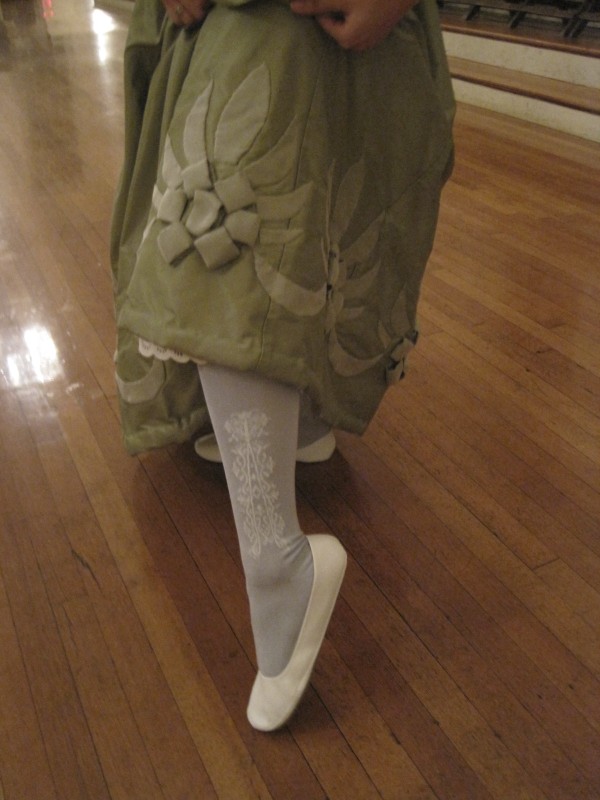
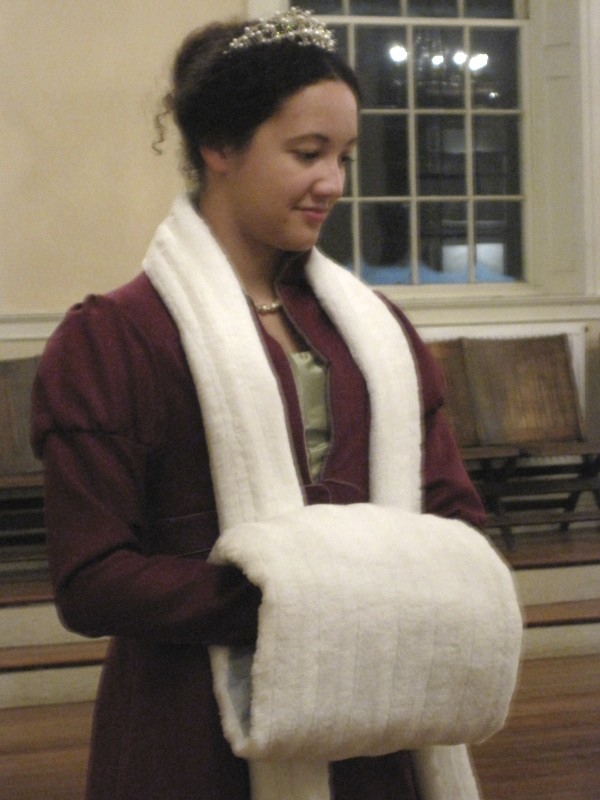
I made this bonnet to coordinate with my new Regency Tree Gown (which is why I’m calling it the Tree Bonnet). Lucky for me, it also fulfills the HSF Challenge #7: Accessorize and will coordinate with other items already in my closet (such as my 1819 brown spencer). I’ll be wearing the new gown, the spencer, and the bonnet this weekend for the Regency Dance Intensive, along with a lot of other Regency things, so be prepared for lots of pictures next week!

The facts:

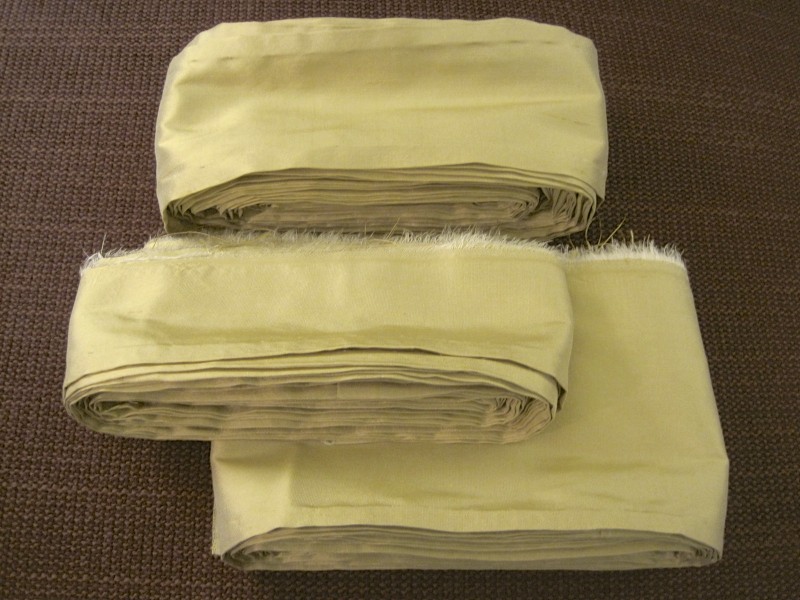
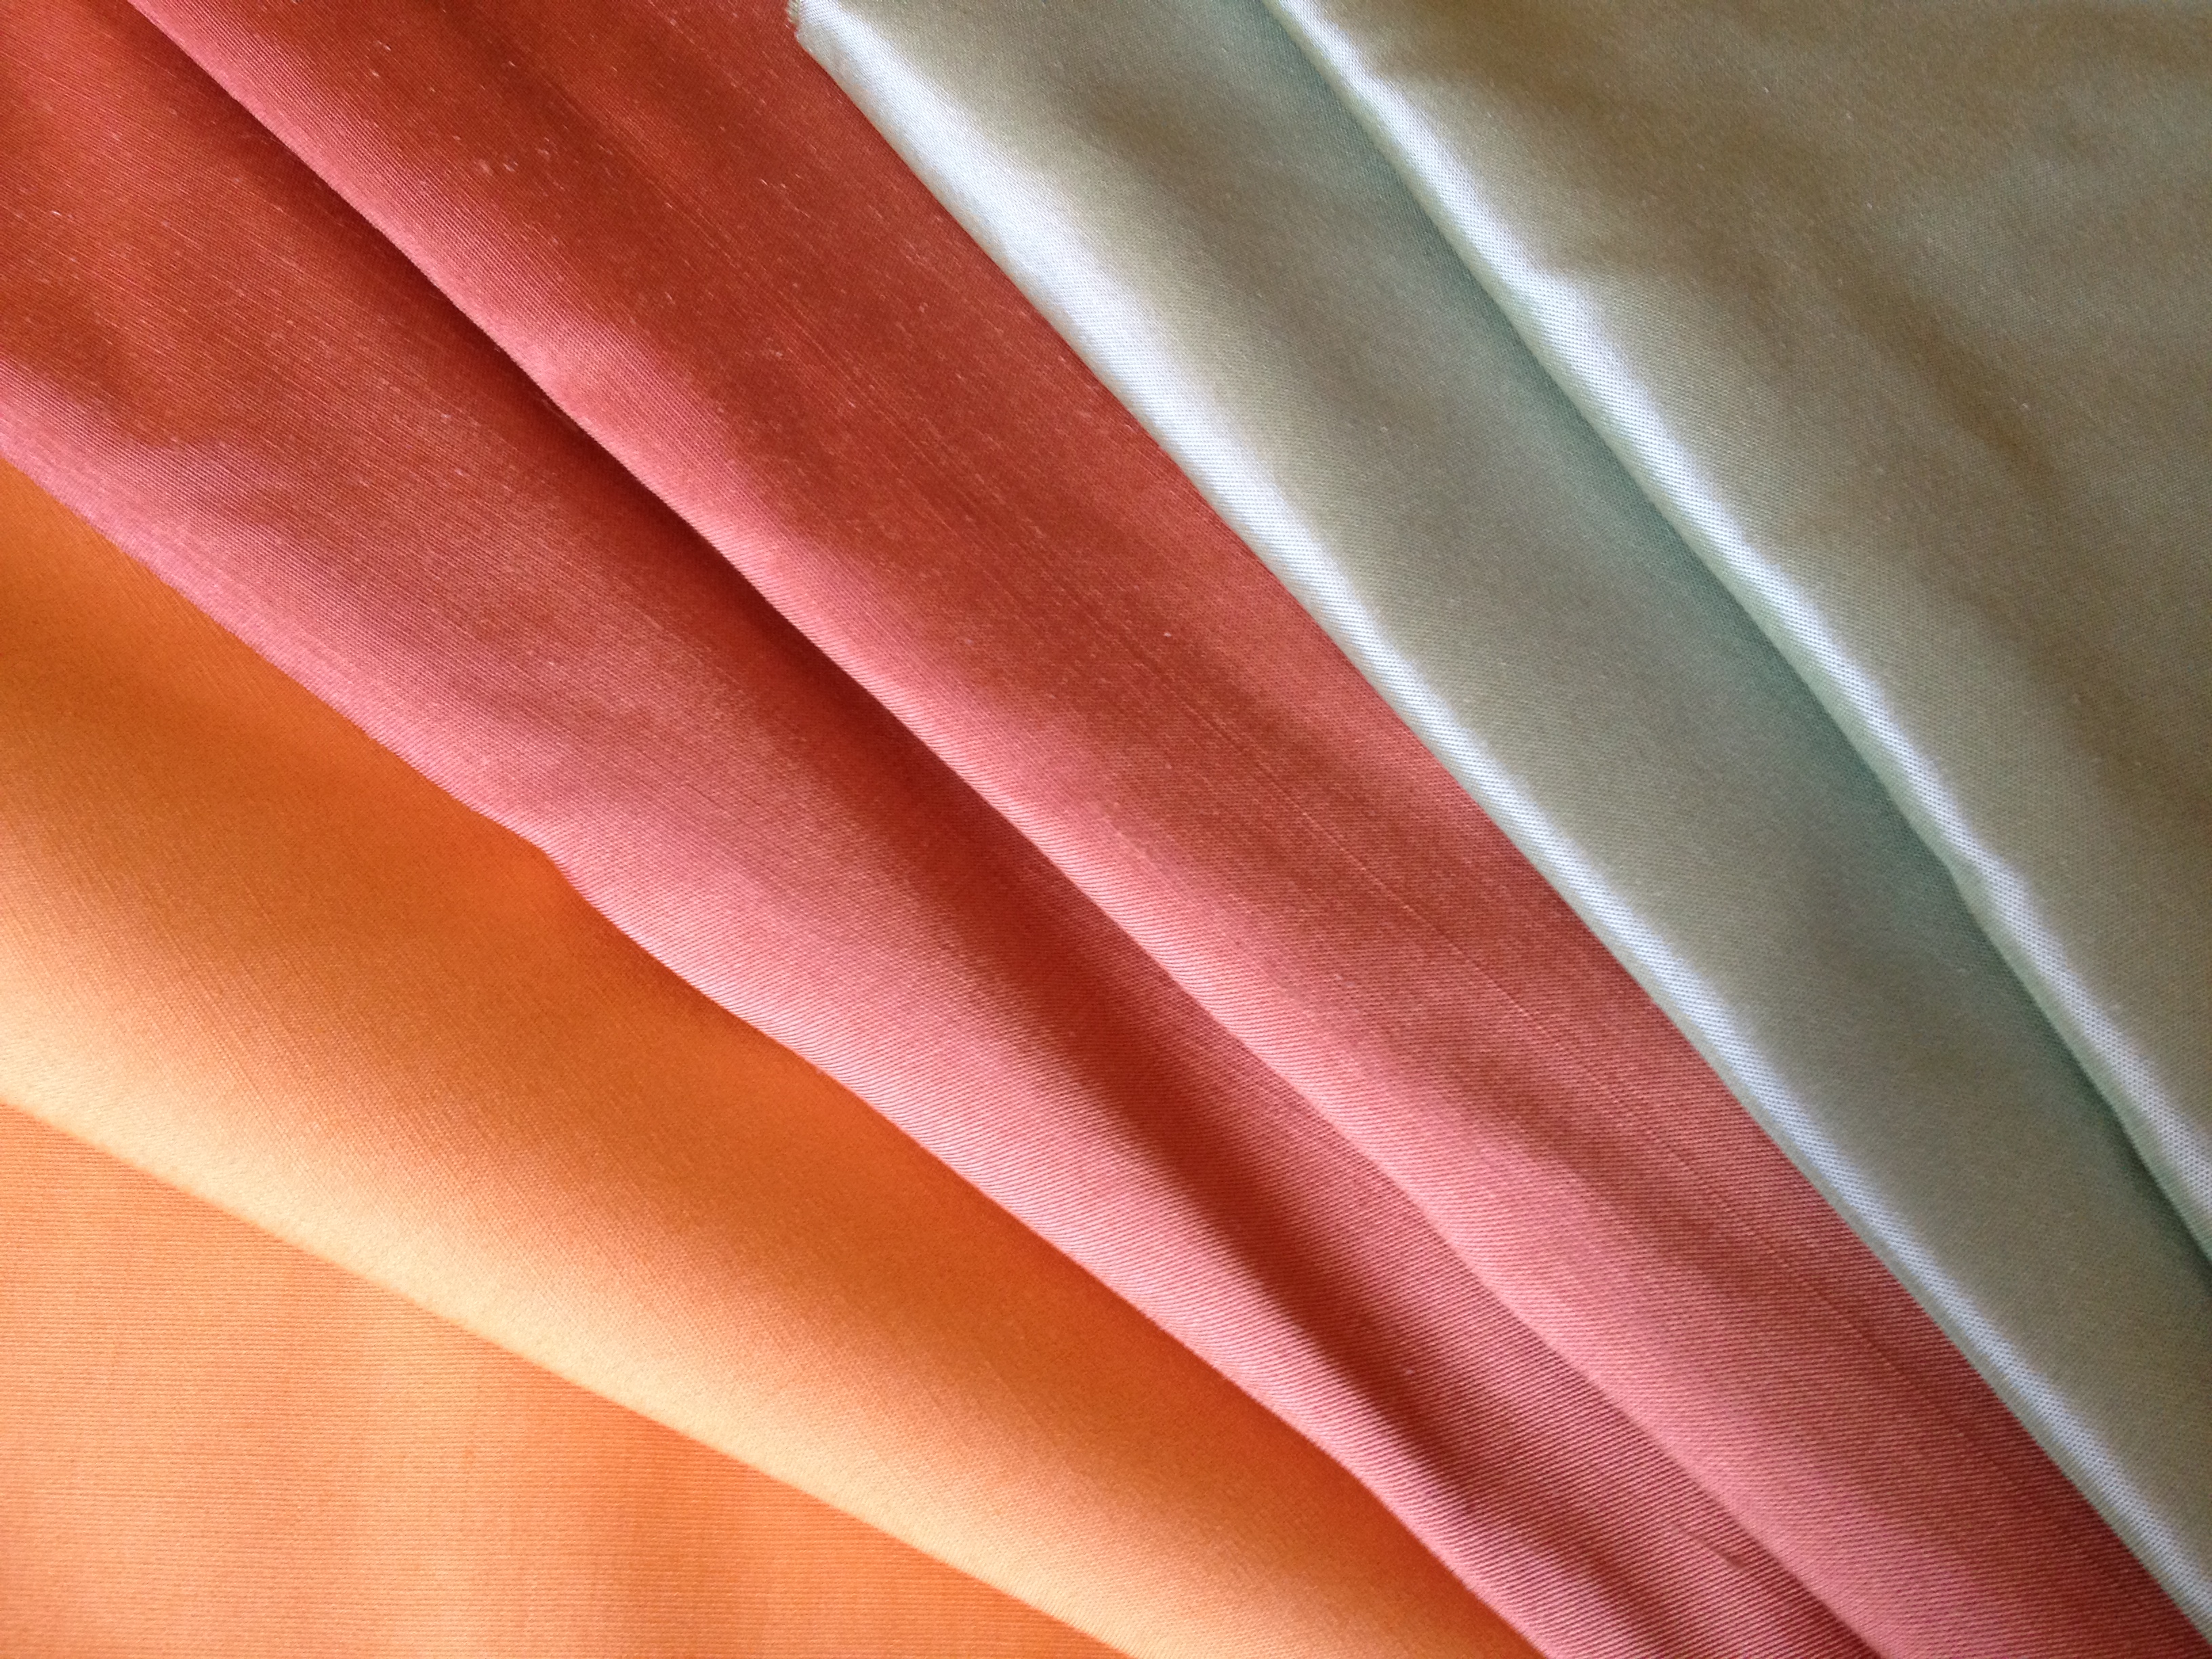
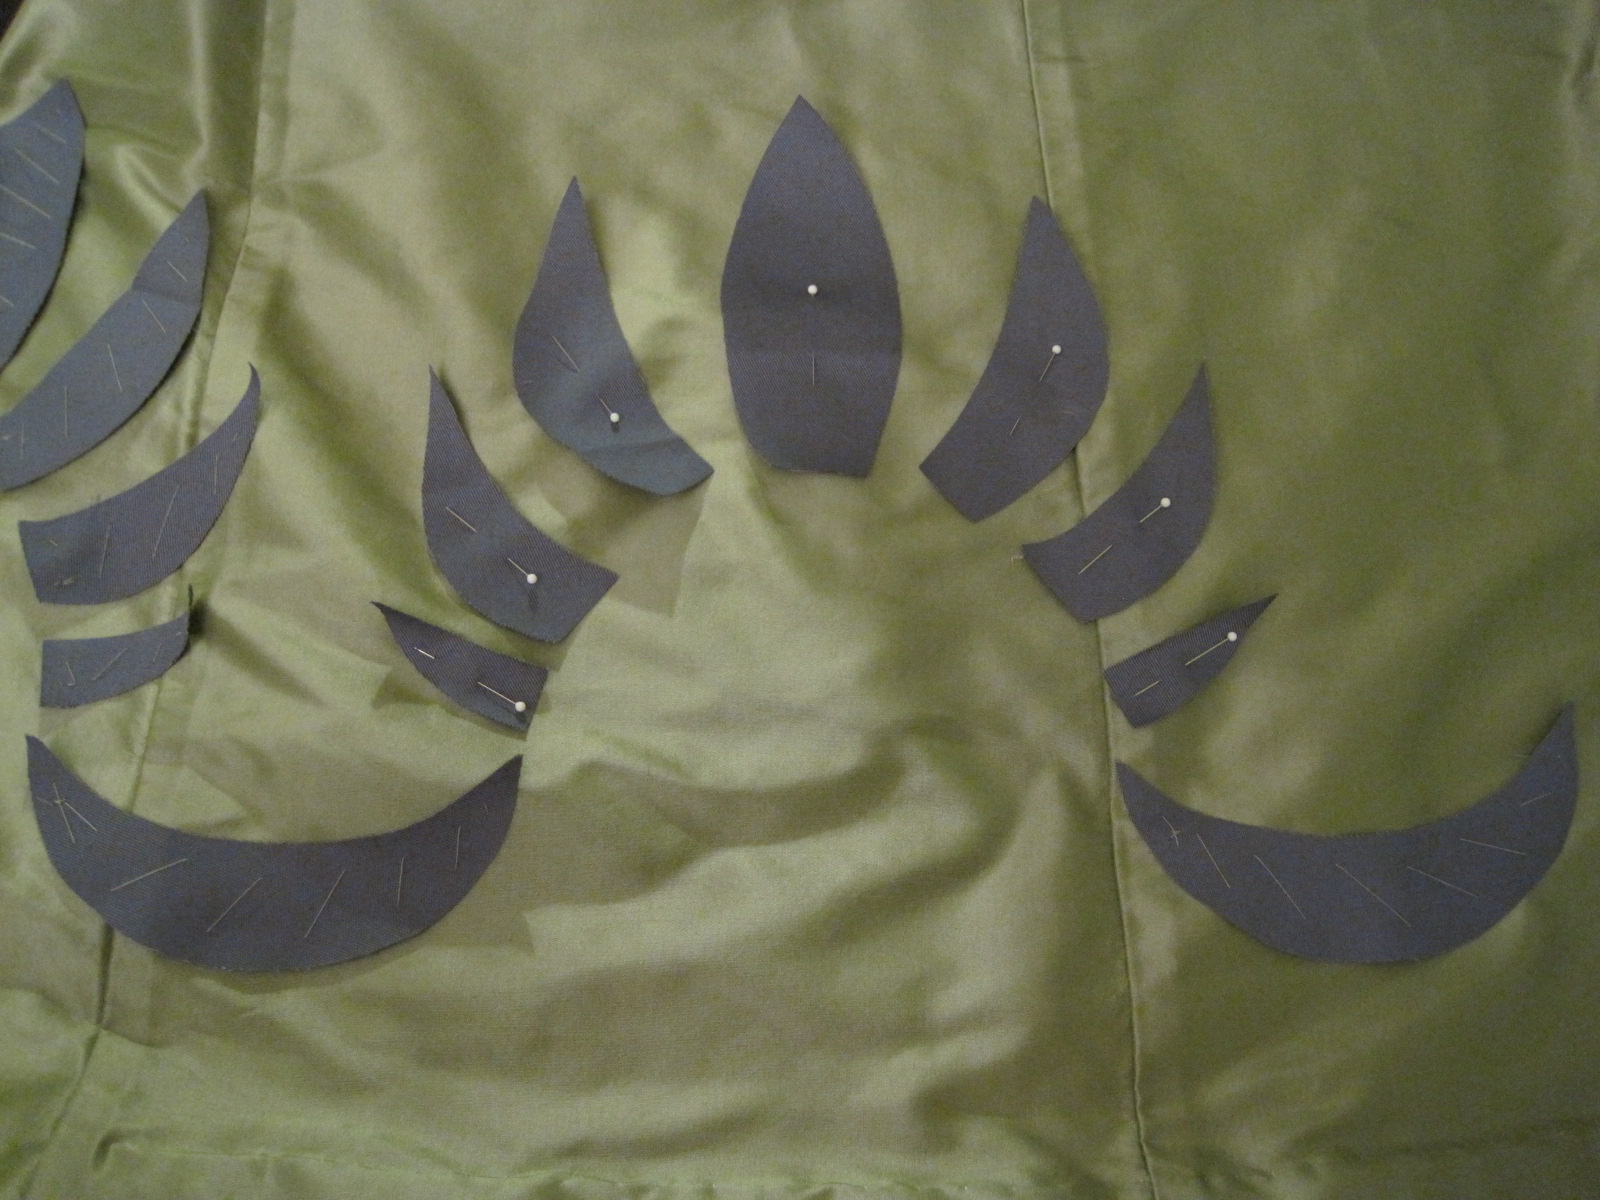
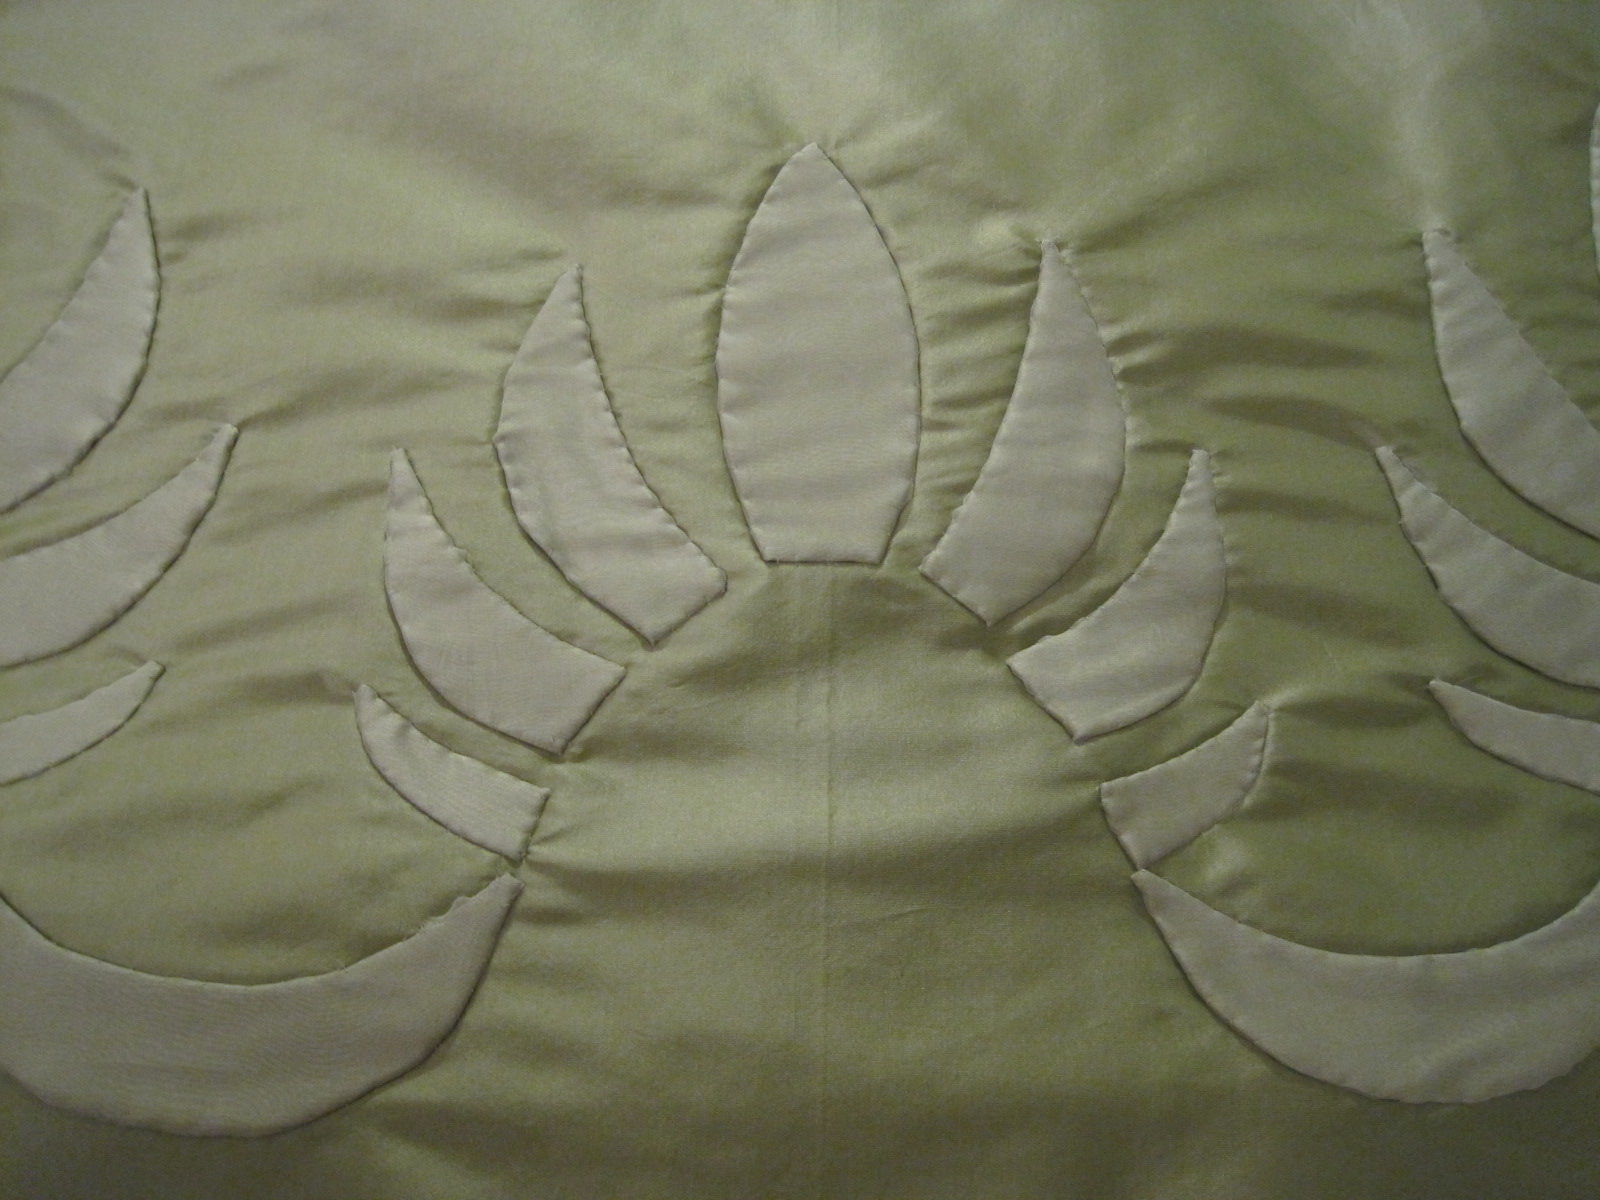
Fabric: Silk twill, changeable silk taffeta for trim, and china silk for lining.

Pattern: Created by me.

Year: 1815.

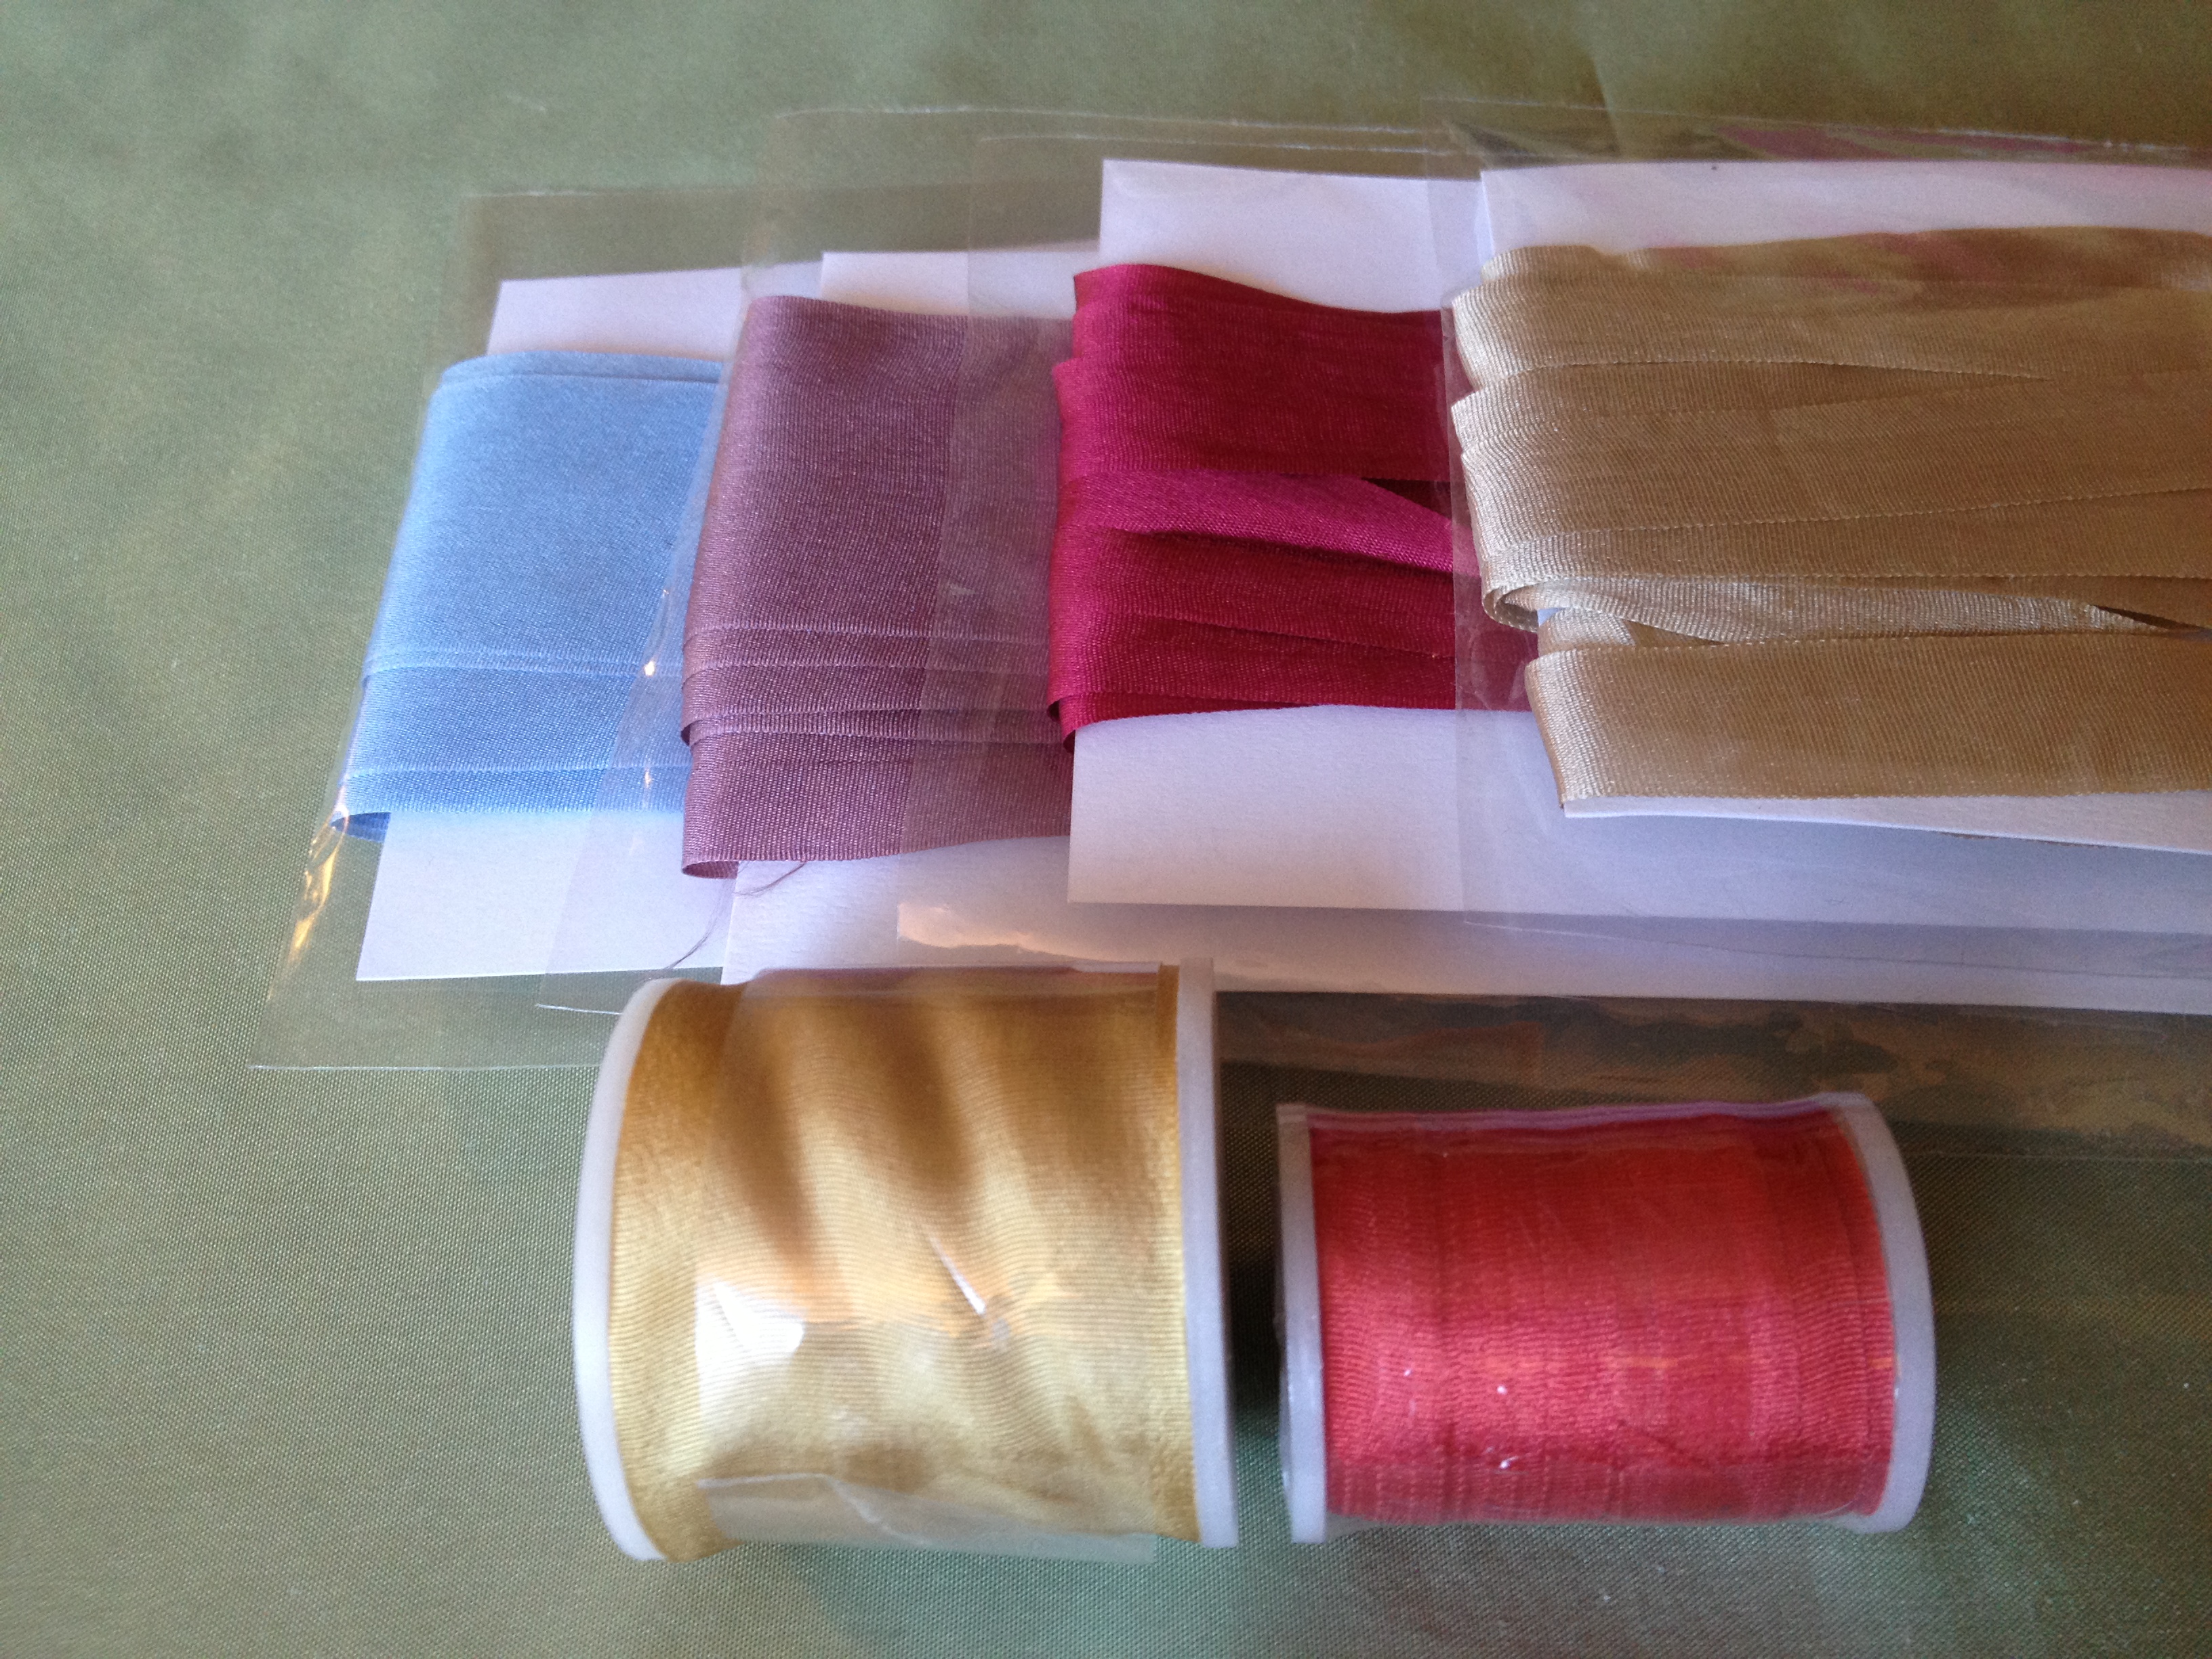
Notions: Four approximately 8″ pieces of sage green polyester ribbon, a spray of wired millinery flowers, about 1 1/2 yds of navy silk ribbon for ties, about 3/4 yd of navy grosgrain ribbon for inner band, buckram for the base, millinery wire, cotton flannel for mulling, tacky glue, and thread.

How historically accurate?: 95% I’d say. There are a few polyester things, but the overall shape, impression, and majority of materials are accurate.

Hours to complete: 28? Hand finishing and trimming takes a long time, especially on hats, because the angles are weird, so it’s a slow process.

First worn: Not yet, but will be worn this weekend!

Total cost: $6ish for the silk twill bit, the green silk and china silk are remnants from other projects, the polyester bits are old and from the stash, the millinery flowers were from the stash, the buckram was maybe $4, the wire was probably $2… so about $12? I didn’t buy anything special for this bonnet, it’s all from the stash! Yay! Go me!

IMG_4408
Close-up of the pleated silk trim and rosette-like decoration. You can also see the pleats on the side band of the bonnet.
IMG_4409
The millinery flowers on the front of the bonnet.
IMG_4410
The more plain side.
IMG_4405
Inside of the brim, looking into the lining and hat band.

This week marks the end of the MpRSW (though I still have one more post to go about that), with the final goal aimed at yesterday, #5: Anything Left! I’d already completed some packing for this goal, and procurement of kite making supplies (yes, there will be a future mention of kites!), but this bonnet also qualifies!

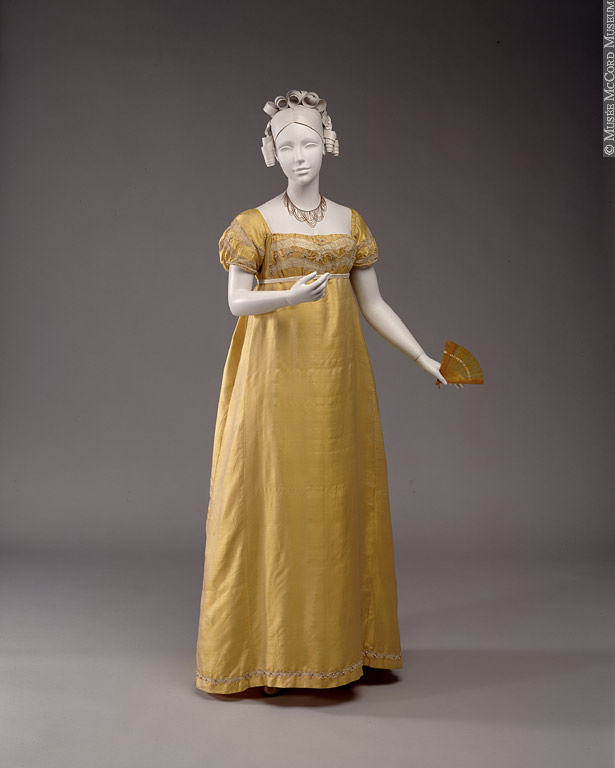
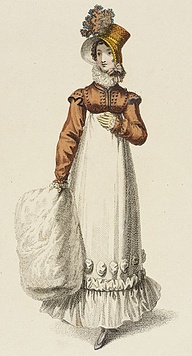
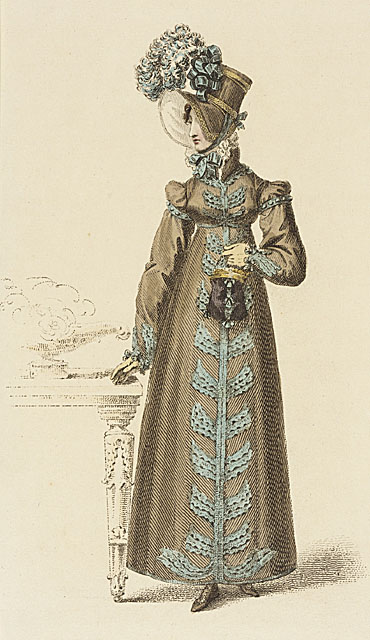
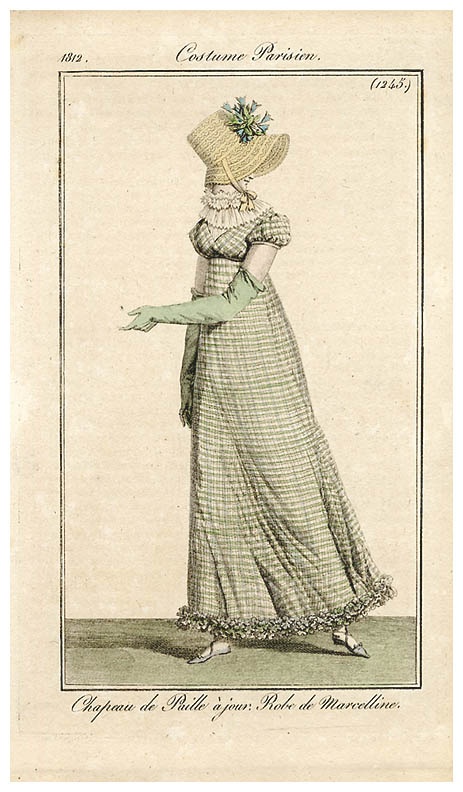
Now let me share some of my inspiration for this bonnet. There are more bonnet images on my 1810s Pinterest page as well.

9b8f7b45f7afff8db618554b973b5eab
From 1815. 
Volare digital capture
La Belle Assemblee, Parisian Promenade Hats, July 1816.
cf83f2dc91eb3bf303ba9087826b8419
Costume Parisien from 1814.
5aaaeddcc5533ec69fe92be1e72f8c83
Costume Parisien from 1815.

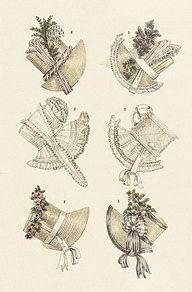
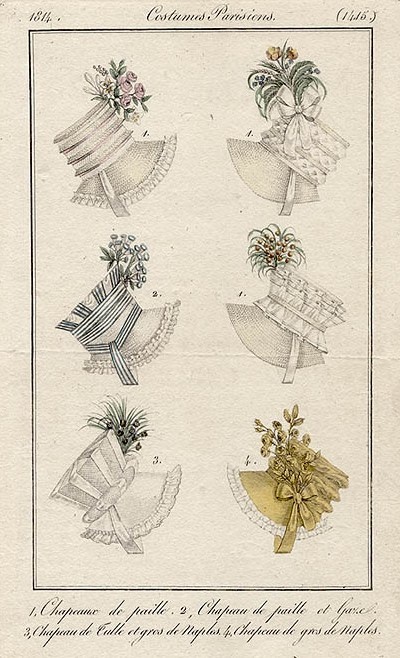
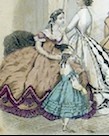
In trying to determine length of ties for the bonnet, I looked to some fashion plates that included people in them. Here are some of the best examples I found.

Volare digital capture
1813 afternoon promenade dress.
Volare Digital Capture
Ackermann’s Repository, Walking Dress, April 1817.
Volare Digital Capture
Ackermann’s Repository, Walking Dress, November 1817.
Volare Digital Capture
Walking dress 1815
61acb0c35e149289d55017462f06b675
EKDuncan – My Fanciful Muse: Regency Era Fashions – Ackermann’s Repository 1819
Volare Digital Capture
Ackermann’s Repository, Walking Dress, February 1818.
800b11831fa576966952e099671eae3e
Robe de Marcelline, 1812 Costume Parisien

Well, there we are. I just finished sewing that pleated brim trim tonight, and I am glad to be done! It’s slow and slightly painful on the fingers. But pretty, so totally worth it!

Project Journal: 1864 Ball Gown Part IV: Three Series Of Photos

Remember in my last post I promised pictures of the finished ball gown now known as Evie? The time has come! I had a hard time narrowing down the options (because of course I wanted to share ALL of the good pictures), but I’ve tried to limit myself to only the best of the best. This post will focus on the completion of my dress, Evie, but there are two more posts coming soon that will share some of the other photo series as well as pictures of the ball itself!

These photos are the idea of my friend with the camera. She wanted to take series of pictures of us in our modern clothes, 1860s undies, and then dressed in our 1860s ball gowns: all in the same location and the same pose. It’s a neat idea and the results are great, not only because it provided lots of pictures (yay!) some of which are of things I don’t have pictures of (like my 1860s undies), but also because you can see the time passing through the evening by looking at the light in the photos. They start in the afternoon, proceed to early evening, then finish at night. Not all the series are a complete set, but all around, it’s pretty cool. Which series do you like best?

Series 1: To The Right

IMG_9740
To The Right: first layer
IMG_9735
To The Right, second layer
IMG_0151
To The Right, third layer

Series 2: What A Change

IMG_9546
What A Change, first layer
IMG_9729
What A Change, second layer
IMG_0144
What A Change, third layer

Series 3: On The Stairs

IMG_9693
On The Stairs, first layer
IMG_9714
On The Stairs, second layer
IMG_0130
On The Stairs, third layer

I’ve never been able to get pictures of my 1860s undies before, so this is exciting! I’ve got a chemise, corset, drawers, cage crinoline, and petticoat (in addition to stockings, shoes, jewelry, hair wreath, gloves, fan, and gown). The crinoline is entirely hand sewn, except for the waistband. The measurements of the hoops are taken from an extant crinoline, and I believe the circumference of the bottom hoop is about 120″. The crinoline closes with a hook on the waistband. The other pieces are machine sewn and trimmed with lace, pin tucks, and ribbon. The chemise slips over the head and the drawers close at the back with a button and loop arrangement. (And that poor petticoat does need a press… but I threw it in the washer and dryer a while ago and since it doesn’t usually get seen I haven’t taken the time to press it.) The petticoat ties around the waist. As you can see, the crinoline stops mid-calf, so the intense petticoat ruffle really helps keep the shape for the skirt below that point, in addition to keeping my hoops from showing as horizontal lines through the skirt of the gown.

Want to be further amused? Look at the apparently changeable feathers on my hair wreath. Sometimes they’re brownish/gold and sometimes vivid green! They really do seem to change color depending on the light!

I don’t think I’ve mentioned it yet, but the basic pattern for this gown is essentially taken from Janet Arnold’s Patterns of Fashion 2. The trim however, is based on two things. Thing 1: the skirt trim is from the fashion plate I shared with you in the first post of this project journal. Thing 2 : the bodice trim is based on this gown, below. I went through a lot of phases trying to decide how to trim the bodice, since I didn’t really like the fashion plate bodice trim. In the end, I decided on this look: a graduated ruffle (just one, in my case, to match the one ruffle on the skirt) that gets longer toward center back, a triple pleated bertha that has a swoop towards center front rather than being straight, and a big trim thing right at the center (in my case, a rosette to match the skirt, rather than a bow). It’s pretty hard to see the front of my dress in these pictures I’ve shared so far, but there are some coming up in the next two posts which will show off the front of the gown better, so stay tuned for that!

5178aec3e06e5f940a6b607a4b697fcc
A costume from the movie Il Gattopardo (1962, costume design by Piero Tosi). It’s lovely, despite the fact that it is not an extant gown from the 1860s.

While getting dressed we might have been making silly faces for the camera while the owner walked away…

IMG_9674
Haha! Moose making companion! In case you don’t know, this is my favorite silly face to make. Don’t believe me? Look here and here!

Project Journal: 1864 Ball Gown Part III: Innards

It’s been a little while since I posted about my new 1864 ball gown. Over a month, I think, because in February I posted about the plan/inspiration and then about the progress I made on the trim. I was steadily working on it during the month of March and had it ready to go for the Returning Heroes Ball a week ago. That’s not to say there wasn’t a little bit of last minute sewing the afternoon of the ball. My last minute sewing was gloves and hair piece, though, not dress, so that’s an accomplishment! And I wasn’t alone in my afternoon sewing… friends were sewing with me! There are lots of upcoming pictures but for now I’m going to post about the insides of the skirt and bodice. It’s a sneak peak, since you have to wait for the others pictures to see the full ensemble!

IMG_4361
Completed skirt trim! I was SO ready to be done with it by the time I was sewing down the green zig zag (the last step of the skirt trim).

My other 1860s dresses have names: Belle is my dark blue gown and Annabelle is my white gown. I haven’t really been thinking of this dress by name until recently. Upon consideration, I’ve decided that she’s named Evelyn, or perhaps Evie for short. Why that name? I just like it, it’s old fashioned, and it has Y, and I have a fondness for the less commonly used letters of the alphabet. So here she is: Evie.

IMG_4362
Skirt waistband of self fabric, to which the box pleated skirt is sewn. There is a cleverly hidden opening on the fold of one of the pleats.
IMG_4363
Magic! The pleats are deep enough that you can’t see the opening when the skirt is hooked closed, even with my hoops underneath.

The raw top edges of the skirt are just turned to the inside and left alone. The silk skirt is flat lined with muslin, which helps give it some body, preventing creasing, and some stability at the hem for all that trim. There are six double box pleats evenly spaced around the skirt, as you can see. I haven’t tried this evenly distributed method on an 1860s skirt before (my previous dresses have knife pleated fronts and cartridge pleated backs, which makes them much heavier in the back than the front… I suppose I could divide the skirt in half and do that method, but given how those skirts are weighted, I’m sure there’s more fabric in back than in front). All that to say that I love how evenly weighted this skirt is! It means I don’t need a giant bum pad to keep my hoops level with the floor. (Come to think of it, I suppose I could remount the skirts of my other dresses onto new waistbands and redistribute the fabric… hm… I’ll have to think about that!)

IMG_4365
Inside of the bodice at center front. The bodice is flat lined in ivory polished cotton. The edges are finished with cording (even the top edge, which you can’t see on the outside because it is hidden by the bertha, grrr, but oh well!).
IMG_4368
Inside of the left front and outside of the right back.

The sleeve is lined in muslin. I originally intended that it wouldn’t be seen, but then changed the sleeve design so now the muslin is visible on the inside of the bodice. It doesn’t matter, though, but I do like it when everything matches. The seam allowances of the bodice are just left unfinished (I might whip stitch over the edges some day, but that’s unlikely, since I’ll probably be sewing something else!). The armhole seam allowances are whip stitched together to keep them from fraying and to keep all those layers together. The armholes also have cording in them. The bodice closes at center back with lacing. The eyelets, like everything else, are hand sewn. The bertha also closes at center back (unusual, since a lot of them close on the shoulder, but I didn’t want my bertha pleating to be able to move or show the top of the ruffle). You can see the stitching holding the bertha in place in the first bodice picture, because those stitches go right through to the inside of the bodice.

I stopped keeping track of how many yards of hand sewing went into this dress… but now I’m curious again. So when I finished stitching the gathering stitches I was at 86 1/2 yds just for the trim. I’d estimate about another 22 yds of stitching to attach the trim and about 12 yds of stitching to construct the skirt before attaching it to the waistband. Waistband attachment was probably about 7 yds (it’s quite sturdy and all those pleats are well sewn!). That puts the skirt at a total of about 127 1/2 yds of hand sewing. Then there’s the bodice, which is maybe 12 yds of hand sewing total? That’s a harder one to estimate. That brings Evie to a total of approximately 140 yds of stitching.

I’m proud to say that every single stitch is hand sewn. Next time, though, I’m planning on machine stitching the inside seams. It’s super satisfying to have an entirely hand sewn dress, but it took about two months, and that could have been much sped up with the use of a sewing machine, which means I could have made more things! Who knows, I might change my mind, but right now even I am tired of hand sewing that dress.

Project Journal: 1864 Ball Gown Part II: Trim Progress (HSF #4)

Well, I hope this isn’t too much of a stretch (or maybe interpretation is a better word), but I’ve finished preparing all of my skirt trim and I’m going to call it my project for the HSF #4  Challenge: Embellish. I say it’s a stretch because my completion of this project is the preparation of the trim, rather than the attachment to the garment. To be fair, just the prep has been a lot of sewing, so I think it counts. Here it is, below: gold trim on the rather wrinkly skirt of green and gold shot silk taffeta. Because the gold is shot with silver, and the green is shot with gold, they are both photographing more washed out looking than they appear to me when not looking through a camera. Hopefully one day I’ll be able to get a picture where they look a little less silvery.

IMG_4284
All the skirt trim, gathered and ready to be attached!

The top pile of trim (that rather resembles a ruffly brain, don’t you think?) is for the zig zag. The two piles on either side are the 18 rosettes. The section on the bottom center is the ruffle that goes at the bottom. You can see the inspirational fashion plate here, in this previous post, to see what these different trim sections look like in their actual context.

IMG_4285
My favorites are the rosettes. Aren’t they cute?
IMG_4286
Here’s all of them laid out like an accordion, or a slinky. They look so adorable!

Anyway… here are the facts:

Fabric: almost 1.5 yds of gold shot with silver silk shantung.

Pattern: none, just a lot of math.

Year: 1864.

Notions: none, just thread.

How historically accurate?: Well, shantung is not accurate, but silk is (and this shantung is pretty smooth and not slubby, so I don’t think anyone will know it’s shantung unless I tell them). The trim layout is from a fashion plate, so super accurate. The stitching is accurate. Overall, I give it a 90%.

Hours to complete: Um… a lot. It’s all hand sewn. I started in January, so… 50 hours to get to this point? I really have no idea. I think in terms of months or weeks usually, not hours or even days.

First worn: Not yet, but will be worn in March.

Total cost: $9, because the silk was a remnant.

And while I’m keeping count, let me also note the yards of stitching currently sewn into the trim. When it was all hemmed I was at 45 yards. Now I have the addition of gathering stitches (31 1/2 yds) and ruffle binding (9 yds). That ups the total yards stitched for trim to 86 1/2 yds, and that’s before attaching it! Nice.

Project Journal: 1864 Ball Gown Part I: The Plan And The Trim

It’s time. I’ve been wearing Annabelle, my flounced not-so-new-anymore white 1860 ball gown, to all Civil War events for about a year straight, with no relief on the horizon. Not that I dislike Annabelle, I just want options, and a change. I have Belle, a dark blue 1860 ball gown, as well, but I haven’t worn her since 2011, and since most of the women in our dance troupe have blue dresses it’s not likely that I’ll get to wear her soon, and anyway, she’s too heavy for summer, and summer is coming up. So it’s time. Time for a new 1860s gown! Yay!

This gown was included back in autumn of 2012, when I made my 9 month sewing plan. It’s my goal to have it finished by mid-March, for the annual Commonwealth Vintage Dancers Returning Heroes Ball. My inspiration is this fashion plate from 1864 (pictured below).

315_1864_FashionPlateAA
From The Bartos Collection. 1864.

Specifically, I’m going to be making the dress on the left. Or one inspired by/sort of like it. As I’ve been working on it I’ve made changes to my plan, as you’ll soon see. My dress will be green silk shot with gold and with gold silk trim. I bought the silk remnants for the project months ago, so I have had to make my plan work with the yardage I have. The green isn’t an issue, but the gold had to be carefully considered to make sure I have enough for all the trimmings. After lots of math, I realized I didn’t have enough to do all the trim, so I thought about what was visually most important and decided to eliminate the vertical lines of trim, as well as the waist trim. Here is the same fashion plate, with my changes:

480_1864_FashionPlateAA - Version 3

Of course, me being me, I’ve decided to hand sew the entire gown! Yes, sometimes I like my big projects. But I’ve got time (I think). I’ve sewn the skirt and the polished cotton lining and hemmed them, though the skirt isn’t attached to a waistband yet. I’ve sewn the bodice seams, so now it needs boning, and cording, and trim, and closures in the back. And, most importantly, I’ve cut and hemmed the MANY yards of gold trim for the skirt.

IMG_4198
Skirt trim: on top is the zig zag, in the middle is the rosettes, and on the bottom is the ruffle. Not gathered yet, but all hemmed!

Did I mention I’m hand sewing all of this? All of these trim bits on the skirt will be gathered to a ratio of just over 1 1/2 to 1 (that was all that my yardage would accommodate). The zig zag is hemmed on both sides and will be sewn onto the skirt with a band of green silk running down the middle. The rosettes will be gathered in the middle and the raw edges hidden, which is why that bit is hemmed on only one side. The ruffle at the bottom will be bound at the top, which is why only one edge is hemmed.

Hem-age: 13 1/2 yds of zig zag, hemmed on both sides equals 27 yds of hem; 10 1/2 yds of rosette hem (there will be 18 finished rosettes on the skirt, if all goes according to plan); and 7 1/2 yds of ruffle hem. Total hem-age: 45 yds, and that’s just the skirt trim!

I love hand sewing, which makes me excited about that total, rather than bored. And I really enjoy the sense of satisfaction I have when I’ve completed the different pieces of this project, so I can only imagine how great it will be when the entire gown is complete!

HSF #1: 1813 Evening Gown

IMG_4162
1813 Evening Gown

Historical Sew Fortnightly (HSF) Challenge #1 complete! It was actually completed a few days ago, which I am super pleased about. Even better is that it is for a Regency ball in February, and it is entirely complete a full month ahead of time! All the trim, all the closures, everything! All I have to do on the day of the ball is put it on. Wow! Usually when I wear a new dress to a ball I’m furiously sewing right up until the end and often all the trim doesn’t make it on (that’s what happened with my 1820s green dress back in December, remember?).

The facts:

Fabric: 4 yds red and black shot polyester

Pattern: The bodice front was draped, the back was adapted from my 1812 square neck Ikea gown, and the skirt is the same as the 1812 square neck Ikea gown, with the pattern originally from Janet Arnold’s Patterns of Fashion

Year: 1813

Notions: 3 yds metallic gold bobbin lace, hooks, and little brooch bits

How historically accurate?: The silhouette, cut, and style are accurate, as is the interior finishing (all flat felled and bound edges… it’s quite pretty!). The fabric is obviously not accurate and neither is the lace fiber content, though the style of it is. The closure is accurate. The little brooch bits are accurate in style, though not in materials.

Hours to complete: I’m so bad at estimating this. Let’s say 48 hours.

First worn: Hasn’t been worn yet! Its first wear will be in February 2013.

Total cost: Approximately $26

Now for other details!

Well, first, here’s a closeup of the bodice, so you can actually see the details and the little brooch bits. I’m super pleased with them, because I think they really finish off the bodice and add a little extra touch. I got them from New York and Company, actually. They were part of triple drop earrings, which I took apart. I kept the bottom drop and put them on clip backs (so now I have matching earrings for the dress!) which you can see in the picture below. And the best part is that one of the sections had a missing gem, so the cost of the earrings was refunded by NY&Co and so the total cost of the earrings is $0! Awesome! (It worked out perfectly, because I only used 5 sections of the triple drop earrings, so the damaged one wasn’t a problem.) Of course, the materials used in the earrings are not at all historically accurate, but I’m ok with that, for the cost (yay!) and the fact that they do have the right look.

IMG_4170
Little brooch bits!
IMG_4169
Single drop! Clips! Perfect!

And here’s the back. As you can see, it doesn’t quite fit Squishy in the back, but it shouldn’t have trouble fitting me. I love the drape of the fabric! Now that all the raw edges are enclosed and the polyester can’t fray everywhere, I am totally happy with the fabric choice (bargain!). The photos don’t really do justice to the fabulous gold lace at the hem.

IMG_4164
Aren’t those gathers and folds lovely?!?

The dress is entirely hand finished and mostly hand sewn. Originally, I was going to make it all by machine, but then I had sewing parties and things that required hand sewing, and I just didn’t feel like lugging out the machine, so I wound up hand sewing a lot of it, which was quite satisfying. There’s one side back seam sewn my machine, I think the long skirt seams are sewn by machine (though I can’t remember, because I started this dress back in October or November), and the waistband was sewn by machine. Actually, it was so much easier to keep the width consistent using the machine than when sewing it by hand.

The only other information to share is my inspiration for the dress.

19562579602239981_TEw2UjIU_c
For her neckline and sleeves: Comtesse de Tournon by Ingres, 1812.
131378514099875826_v9iatcAj_c
Another neckline inspiration: L’Art de vivre au temps de Josephine.
1810-gold-mccord
For the overall silhouette and the trim style: 1810.
12-501052
One more neckline inspiration and another similar dress built by Natalie Garbett. Here is her post about her 1812 gown with a v neck.

Clearly, I need a Kashmir shawl to complete the ensemble… I have a pashmina that sort of looks the part, so I’ll have to try that out at the ball. Stay tuned for more pictures of this dress in about a month!

January Stash Additions

This story starts as so many sewing related stories do: I went in “just to look.” In fact, we all went in “just to look.”

I’m sure you can guess what happened…

All three of us each came out with 2 or 3 lovely fabrics! We just couldn’t resist the bargain priced silks! My stash additions: 4 yards of apricot cotton, 6 yards of pink silk, and 2 yards of icy green silk. All truly stunning colors on their own, but together they just make me super happy!

IMG_0255

What will I use them for, you ask? What a practical question! Well, the cotton for an 18th century under petticoat (a garment that will probably never be seen, so I picked a fun color that is vaguely plausible for that period), the icy green silk for 18th century accessories (hat, muff cover, and maybe mitts, with some leftover to do something else with as well…), and the pink for… something. Perhaps an 18th century something, maybe a sacque? Perhaps a 19th century something, maybe a bustled gown? I got enough to make something and have enough for self fabric trim, I think (it was all that was left on the bolt…). I’ll have to wait to be specifically inspired, but in the meantime I am generally inspired by the color. It’s a great grown-up shade of pink! Whee!

I also bought some silk ribbon that is a stash addition. The champagne ribbon on the top is the ribbon I plan to use to decorate my Kensingtons. Of course, while looking for that I got totally distracted and overwhelmed by other beautiful ribbons as well… not surprising, really, considering how lovely they are!

IMG_0256

 I justified their purchase by proposing a use for each of them. Blue: to trim my soon to be made Waverly Mineral Felicite 1780s jacket. Purple (they called it silver/grape, which is a cute name): to trim future Regency bonnets and an 18th century cap. Dark pinkish/red: I couldn’t resist the color! One day I plan to make the Costume Close-up laced front jacket, and I think this would be lovely for that, perhaps with some plain purple wool that is in my stash. Champagne: to trim my Kensingtons. Gold spool: to trim an 18th century hat, perhaps with my icy green silk? We’ll see about that. Persimmon spool (it’s not quite so bright in person): I couldn’t resist the color! I love it! I do plan to use it to bind some 18th century pockets in the near future (it will make me super happy to know that color is on my pockets, even if no one else sees them!). I have 10 yards of it… so I’m sure it will get used for other things as well!

Oh, Making Decisions is Hard!

As I mentioned in my look back at 2012 post, one of early 2013’s projects will be to paint and decorate my recently purchased American Duchess Kensingtons.

This link contains an affiliate code, which provides a small benefit to my shoe fund. This does not affect my impressions and reviews of this product.
IMG_4154
Kensingtons, yay! And the buckles came in that cute little bag. Love it!

When I first thought of buying Kensingtons, I was set on painting them yellow, either a lightish shade of yellow or medium yellow, like the images below.

19562579602677726_cFeJQDSV_c
1775-1785. Colonial Williamsburg.
19562579602677731_yrV0rrlH_c
Mid-18th Century. Bata Shoe Museum. (Those buckles are so pretty!)

But then I started looking at fashion plates… Some of them had very cute yellow shoes, but there were also some that had pink shoes that caught my eye. I love pink things… so I started thinking about painting the shoes pink.

First, fashion plates with cute pink shoes from the 1770s and 1780s.

274015958548037863_VRkBS78G_c
PINK shoes. 1778.
19562579602929854_TvBA2Lfq_c
PINK shoes. Gallerie des Modes, 1778.
19562579601416378_ktNfy7WF_c
PINK shoes. 1778-1787.
19562579602930012_OUpEbC0c_c
PINK shoes. Magasin des Modes, June 1787.
19562579602930042_g7qnuQAd_c
PINK shoes. Magasin des Modes, March 1789.

Second, fashion plates with cute yellow shoes from the 1770s and 1780s.

19562579601572668_6j0WfNjA_c
YELLOW shoes. c. 1776.
19562579601572669_vhYl8jIp_c
YELLOW shoes. c. 1776.
19562579602929883_drhS3AdH_c
YELLOW shoes. Gallerie des Modes, 1779.
19562579602930017_AZLYCCiV_c
YELLOW shoes. Magasin des Modes, April 1787.

Then I went back to looking at extant shoes and thought “perhaps two-tone shoes?” Either yellow with pink accents or pink with yellow accents… perhaps like the ones below? Here’s a fashion plate showing two-tone shoes, and there are more extant examples a little farther down in the post.

Digital Capture
Two-tone pink shoes. The Dress of the Year 1775 by Ann Frankland Lewis.

Another thing, I’ve noticed that many of the extant shoes I see are cloth, not leather. Well, the Kensingtons are leather, so that’s what I’ve got to work with (and I like it in a way, because the shoes will be much more durable). So then I started thinking about what I need to do to capture the 18th century in leather shoes that already have the right 18th century shape. I took a close look at the details in these next photos and analyzed what I saw.

11540542764788394_bZ4HTkIV_c
Light blue satin shoes with silver braid. c. 1770. The Charleston Museum. STUNNING!
19562579602698433_JUXVWNDE_c
Silk. 1770s. Met.
19562579602698458_UwyGiIcl_c
Silk and leather. 1770-1789. Met.
199706564696595060_J9Y7ByPi_c
Silk and leather. c. 1775-1785. Shoe Icons.
19562579602698437_ckDGMif0_c
Silk. 1780s. Met.

If that isn’t enough examples, you can see more on my pinterest board: Shoes: 1770-1789. The details that strike me are: the binding around the ankle opening and latchets (often in a contrasting color) and the 3D quality of the trim and fabric of the shoes… the decorations are not simply painted on, but sewn on. That’s hard with leather, but glue is a good alternative to stitching.

I’ve seen other styles of painted and decorated historic shoes on my costuming friends. And at American Duchess, Lauren has done multiple posts and tutorials about 18th century shoes that she has painted and decorated.

blue n white shoe nov 11 (3 of 4)
Two-tone painted and bound Devonshires, from American Duchess.
pretty pink princess shoes (11 of 13)
Two-tone painted and bound Devonshires, from American Duchess.

What materials to use for decorations? Lauren used what looks like cotton bias tape, and on later Regency shoes narrow grosgrain which comes in a wide variety of colors. But the extant shoes look like they are bound with silk, so that’s what I’m going to aim for.

“What will I wear these shoes with?” is an important question I asked myself. “Well, everything I own from the 18th century until I buy another pair of 18th century shoes,” I answered. In the works right now are a taupey-brown silk petticoat, blue wool petticoat, Waverly mineral felicite jacket, and creamy quilted petticoat (you can see most of these fabrics in this previous post). In the future, I’m inspired by a purple and yellow color combination, as well as green and pinkish/red (these colors all in the fashion plates above!).

I’ve been ruminating over this decision for months so I make a choice I’m really happy with. I had all these options to think about: pink, yellow, both… It was tough. But I finally made a decision to go simple: yellow with champagne silk binding and champagne heels (saving pink for later, or removable ribbons, or other accessories). The latchets might also get pained champagne, I’m undecided on that point. Do you have thoughts about that? (More opinions is always better in these situations, you know!) I’ve got the paint from my Astorias, so that was easy… and the silk ribbon has been ordered! More to come soon!

SaveSave

Project Journal: 1822-1824 Ensemble Part IV: Partial Completion For The Ball (Fezziwig’s Ball 2012)

Yikes, that is a long title… but I do like my titles to be descriptive sometimes…

As is suggested by the title of this post, though I did have new, wearable 1820s clothes (with closures, yay!) for Fezziwig’s Ball this past weekend, not all of the garments were entirely completed. I had set out with a rather rigorous plan for the month of December and I will admit that “my eyes were bigger than my stomach” and I wasn’t able to fully complete all of the projects I wanted to. That being said, however, I was very pleased with how things looked. (I will also admit that I spent the week before the ball furiously sewing every night… in fact, I was still sewing appliqués on the afternoon of the ball!)

IMG_4083
Caroling before the ball! We stopped at the super huge town Christmas tree to take pictures. I was perfectly warm in my new clothes!
IMG_7378
After caroling we paused outside the hall to take some more pictures… As you can see, the muff and tippet did get done! Entirely! Yay!
IMG_4101
Back of the new walking dress. I only just noticed that someone is in the window… That’s sort of creepy looking!
IMG_4104
Friends outside the hall.
IMG_4106
Staging a “gossiping” photo before the ball officially began.
IMG_4110
Waiting for the dance, Sir Roger De Coverley, to begin.
IMG_4113
Dancing Sir Roger. It is similar to the Virginia Reel.

I had a wonderful time during the ball. It was crowded, but that didn’t stop me from enjoying myself. Perhaps because I knew more people than I have in any year past, the entire evening felt full of friendship and fun. Also, it’s super new and exciting to dance the same dances as other balls, but to the tune of Christmas music! And there were lots of beautiful dresses and fashionable gentlemen to keep one’s eyes occupied.

After the ball I imposed on my friends to take pictures (in better lighting) of my new clothes, so I could document them here on my blog. I, in turn, took pictures of them so they would have pictures as well! That’s only fair, really.

IMG_4123
I am the photographer in this one.
IMG_4131
Here it is! Clear, full length picture of my new gown! I finished the hem appliqués! Whew! But it is missing it’s sleeve appliqués and the center front appliqués.
IMG_4135
I was having trouble making my hair look the way I wanted to, so I settled for a tiara (it’s actually the same one I wore to the 1890s Soiree during Newport Vintage Dance Week). In the end, I really liked how it looked!
IMG_4076
A closeup of the finished appliqué motif around the hem.
IMG_4136
For this event I took the opportunity to wear my blue American Duchess clocked stockings. I liked them! The only annoying thing is that one got brown puddle stains on it during caroling. I’ll have to see if I can scrub it out. I think I can.
IMG_4145
Here we are, a picture of the walking dress with better lighting! You can actually see the dark raspberry color of the wool. It’s pretty scrumptious. It’s soft on it’s own, but also lined with soft cotton, so really it’s quite cozy.
IMG_4152
This is how we all felt after the ball.
IMG_4156
Proof that the sleeve appliqués were partially complete! I didn’t have the time to finish the raw edges, make the centers, or sew them on…

Pictures of the petticoat will be in an upcoming post. It was almost finished for the ball. I’m looking forward to adding trim to the walking dress and the front and sleeves of the ball gown, as well as finishing the bonnet. All of these things were started (the pieces cut out and even sewn in some cases), but as you can see in the pictures, they didn’t make it in time for the ball. Oh well!

SaveSave

Project Journal: 1822-1824 Ensemble Part III: Green Dress Hem Appliqués

Well, I’ve got the green silk ball gown sewn together. That’s good, because the ball is fast approaching. There’s only a week to go! Eep!!! I’ve finished the padded hem, but I still need to have someone mark center back for me so I can put closures on. And I haven’t set the neckline yet, either, because I’m waiting to see how it looks with the back actually closed… So far every time I’ve tried it on the back has just been hanging open, because I can’t actually reach that part of my back by myself. Never fear, though, I’ll be seeing friends this weekend who can help with marking the back for me! Yay!

You’ll remember from my overview of this early 1820s ensemble that the fashion plate below is my inspiration for this gown.

19562579602401819_964eyRUt_c
May 1824. Ackerman’s Repository.

I’ve been furiously hand sewing, working on the skirt appliqués on the ball gown. These are my first priority. In part this is because they’re already started (and it would look silly to have only a fraction of them done) and in part this is because the hem decoration is pretty essential for 1820s dresses. This is how I’m making the appliqués.

IMG_3966
After cutting out literally hundreds of pieces… I pin the blue canvas bases to the silk of the gown. The pinning allows me to make sure everything is symmetrical before sewing the bases down. Once I’m satisfied, I baste the bases to the silk, leaving 1/4″ around all the edges unsewn, so I can tuck seam allowance under later.
IMG_3963
Whew! Finished basting that repeat of the pattern. The blue canvas is tightly woven and hardly frays, even at the points and in the curves! And even after being manipulated and folded while I’m basting all the pieces down, which is important because it keeps the shape accurate for the layers that go over the base.
IMG_3965
The next step is to take the two top layers (a layer of the green silk and a layer of white silk organza) and sew them over the base. The base provides sturdy edges so that I keep all those nice curves when turning under my seam allowance. This piece is just about done, except for the last corner. I used the technique in this great quilting appliqué blog post to make my sharp corners as sharp as possible.
IMG_3969
And here’s what the motif looks like when all the bases are covered! The silk organza is pretty tricky for making sharp points, so I think these turned out pretty well! The motifs are still missing their center sections. I’m focusing on all the pointy bits first. Right now I’ve got 3 out of 7 motifs done.
IMG_3970
This is what the inside of the skirt looks like after the appliquéing is finished. It’s kind of neat, I think, to see the relief of the front shapes.
IMG_3967
Most recently, I’ve just finished basting on the bases where they meet at the back. You can see in this picture there was only one more motif to go!

Right now the motifs really remind me of pineapples, a common motif in appliqué quilts (as a quilter as well, I appreciate the overlap between related interests). I’m sure once the centers are added they will look more like flowers and much more like the fashion plate. Each motif is 11″ tall and the repeat is 12″.

As I continue to sew these, I’m thinking about the sleeve appliqués. Currently, I’m stumped. I was going to sew my motifs on in the same way as the skirt, but I also made my sleeves pretty gathered… so I’m not sure how to nicely hide my seam allowances while also keeping the gathers looking un-squashed. I want the sleeve appliqués to sort of float on the gathered sleeves… I’m still brainstorming on how to make that happen. Perhaps I’ll stitch the seam allowance to the back of the base and then hope that the gathers mean you won’t see the base past the 1/4″ seam allowance that gets turned? If you have ideas, I’d love to hear them!