Project Journal: Versailles Sacque: Chameleon Shoe Progress

This month has been super crazy busy for me and progress on my Versailles Project has therefore been quite slow. Aside from thinking about my hair the only other real progress I have made is on my shoes, which have been painted with about 10 coats of paint as I’ve tried to make up my mind about what color I want them to be.

The process began after my materials were ordered and assembled: unpainted ivory Kensingtons from American Duchess, 3 colors of Angelus leather paint, and scraps of my changeable silk fabric. The plan was to go for dark turquoise/teal. (I did tape off the heel cap and the inside part of the latchets closest to the vamp with masking tape to keep things tidy. Then I got bored and stopped taping.)

IMG_0738

I’ve referenced two American Duchess resources during the process so far, which included prepping my shoes as suggested and mixing water into my paint for more even layers of color. (Well, I forgot to add water to the first coat, as you’ll see, but I remembered after that!) This blog post and this information page are the two resources I just mentioned.

Here was the first batch of paint. Lots of dark green with a small bit of turquoise and gift box blue.

IMG_0740

I was doing quite well taking pictures of my paint mixing as a record as I started, but then as I kept doing more and more layers and getting frustrated I slacked on the picture taking. I did make a sample card with little swatches of all my paint colors as I went along, though I didn’t take notes on how I achieved each color, so I’m not sure it will be very useful in the future.

Here are the results of the first two coats of paint. The shoe on the right was the first layer, for which I was so excited I forgot to add some water… oops! The color was more green than I wanted, so for the second coat I added more turquoise paint to the mix. The result is on the left.

IMG_0743

I stopped with the two coats of paint, but wasn’t sold on the color–too bright. Fast forward a week and I tried again, painting the shoes in multiple layers between paying attention to other house tasks, like cooking and baking.

First is the shoes after two coats, then after I tried a darker blue, then after I decided they didn’t match and tried a lighter blue, then after I decided they didn’t look like a plausible 18th century color and needed to be a bit more grey…

Untitled 2 (1)

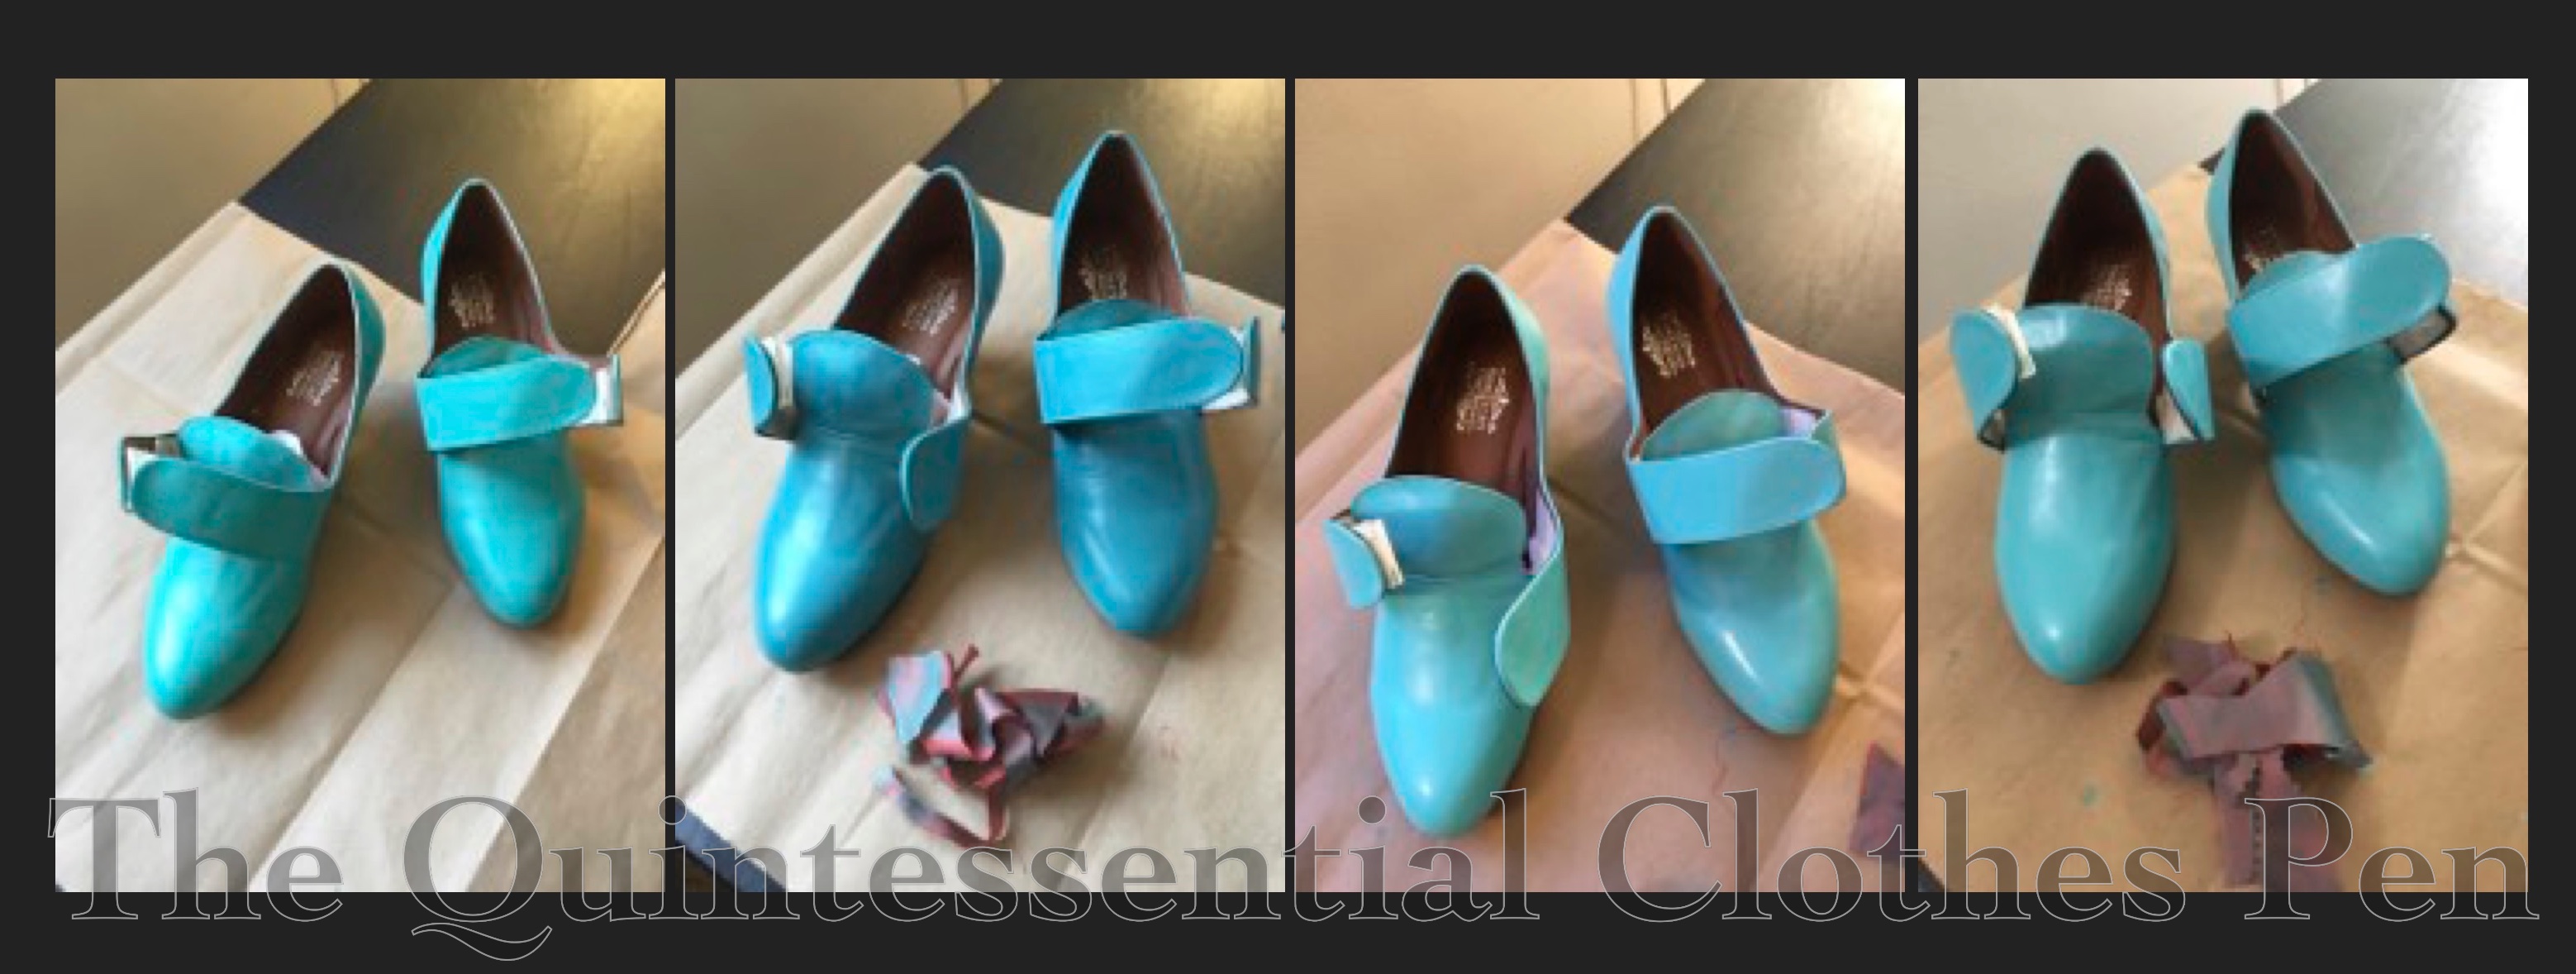
(Oh yes, on the second day of painting I also used some white and black and dark grey paint to mix in as well). Unfortunately, after all that I still wasn’t happy!

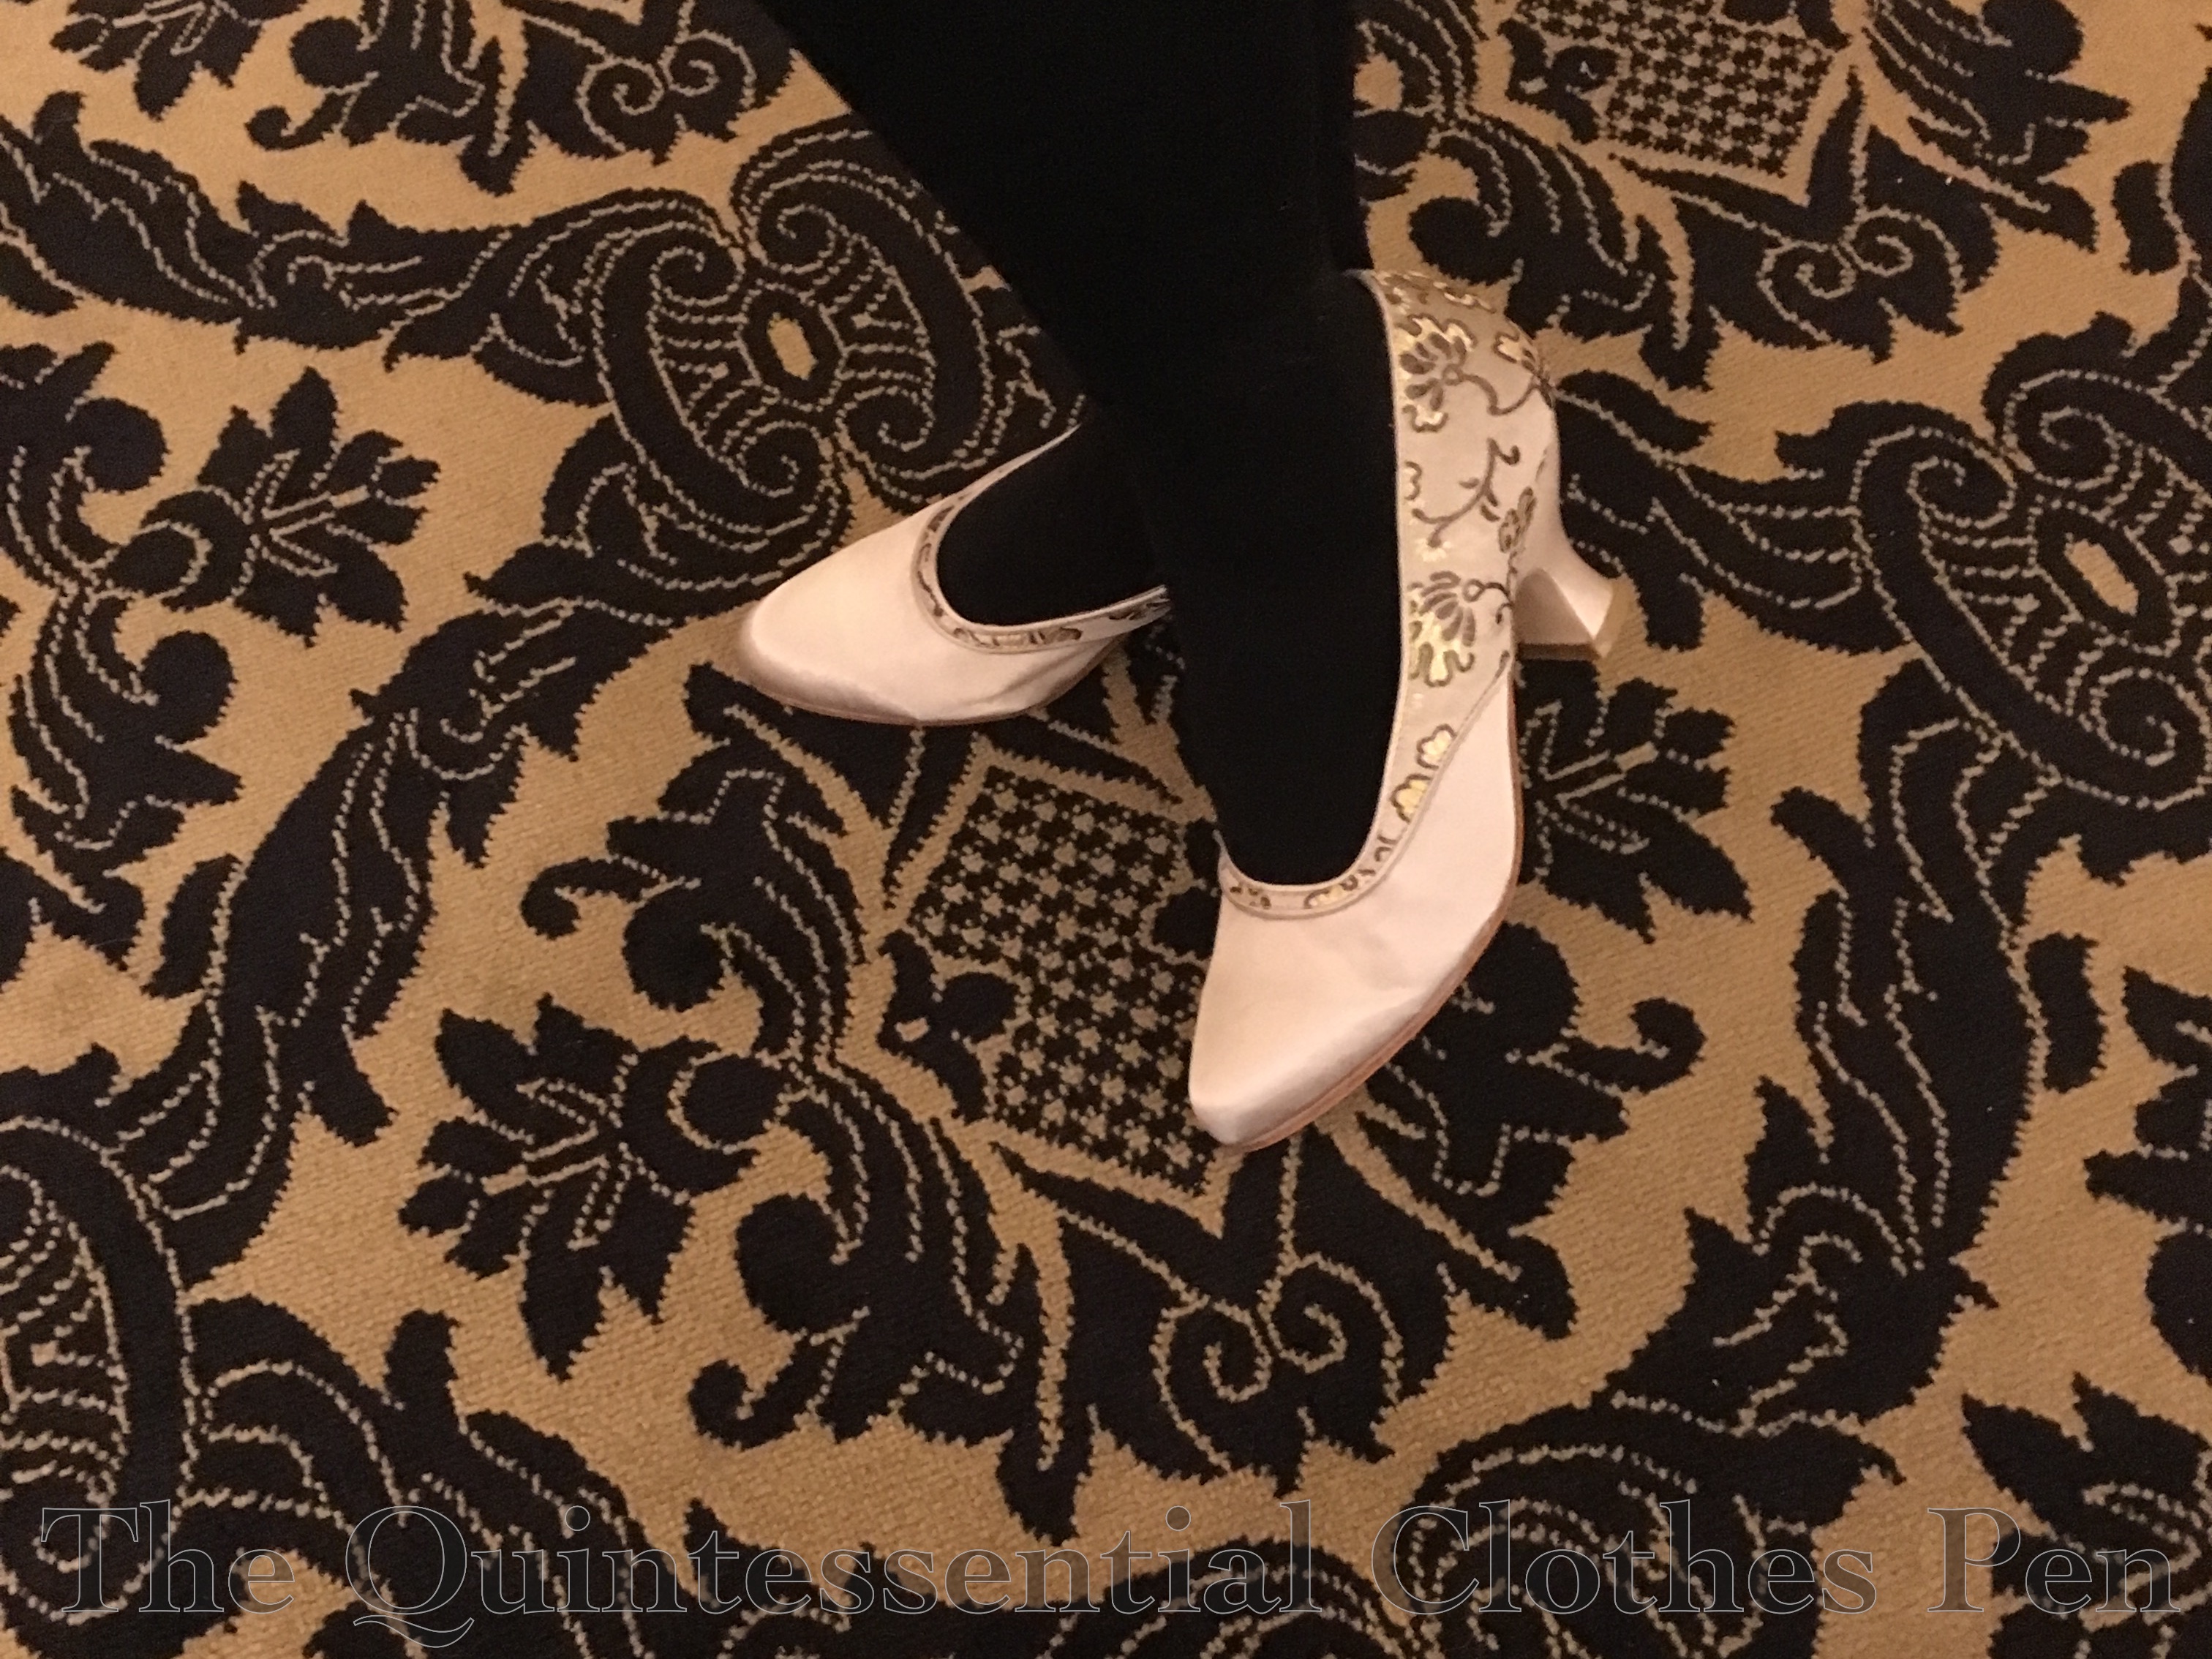
I did one final coat you’ll have to wait to see and then put the shoes away to consider if they grew on me over time or not. That was about two weeks ago. I haven’t had time to work on them in that time, but I think I’m mostly happy with the color and frankly I’m running out of time, so the color they ended up with will likely be the color they stay. When I have time I will be applying a matte finisher as suggested in the American Duchess links and then figuring out attaching the buckles.

Product links in this post contain an affiliate code, which provides a small benefit to my shoe fund. This does not affect my impressions and reviews of this product.

SaveSave

Smiling Bears And Happy Penguins

IMG_0678Just imagine my smile when I saw this fabric with polar bears and penguins on it…fun! You have to know that these are some of my most favorite animals–bears, especially of the polar variety, because they’re just cute, and penguins because they waddle, and animals that waddle amuse me a whole lot (also, bears waddle, too). Anyway, I saw these smiling bears and happy penguins and couldn’t resist. (Plus, there are baby bears–or, as I often call them, “little guys”!) Their cuteness combined with a thought I had of making a practical apron to use at home when doing the dishes or baking inspired me to purchase just enough of the cotton yardage to make an apron. I spent way longer than was really necessary looking for just the right fabric for contrast options. I looked at all sorts of blues and tans but found nothing right… so I settled on black and white. And it’s perfect!

IMG_0677

I used my refreshing apron as a general guide, though I made a few changes: less fullness in the skirt, a shorter length, and ties that tie at the neck and waist rather than crossing in back. After I had the project on the brain, I was using a lovely green print fabric to make some accessories for the house when I decided that I would need extra of it to make another apron! This one used small scraps of raspberry pink cotton as accents. It’s fun to have a reason to use this color pink and with the brocade style pattern on it, too.

IMG_0679

Both aprons required piecing the contrast bands to have enough fabric, but I did an incredibly meticulous job lining up the pattern repeats so they aren’t very noticeable (yes, I really care that much–can you spot any seams?). It’s also why the contrast bands are different widths from apron to apron–I just used what I had and made it work. It’s so satisfying to use up the last small bits of a fabric.

A Post About Seaburys

I mentioned in my last post that I am the happy owner of a pair of black American Duchess Seaburys. What I didn’t mention in that post is that I am also the happy owner of a pair of dove gray Seaburys!

I bought the black ones first, around Christmas-time, and picked that color because of the versatility of black shoes. Once I received them and was able to fully appreciate the gorgeous materials, elegant design, and sturdy construction I started raving about them to friends. During one conversation in particular, I managed to inadvertently talk myself into buying the dove grey Seaburys as well… They’re being discontinued and are such lovely shoes with such a distinctive shape that they’re worth having in two different colors.

I’ve only worn the gray ones once so far, when I decided to wear them with modern clothes to the ballet. I found them to be just as elegant for modern dress as for historical dress, which was great! It’s hard to find gorgeous modern heels that meet all my various criteria.

IMG_0660

I decided to try this pair without the shoe clip bows. The gray silk gleamed and the custom designed brocade was much more obvious in this color than in the black, as I expected.

IMG_0659

The black pair I wore most recently with my 1924 robe de style at the GBVS White Lightning Ball. Here I am showing them off!

IMG_2369 (1)

In fact, there were three of us at that event wearing black Seaburys. The nice thing is that they looked elegant and unique on each of us. Emily, in the center, got creative with hers and changed out the removable bows for vintage shoe clips… and it blew my mind!

IMG_2295 (1)

The idea of shoe clips with different decorations for Regency shoes is standard to me at this point, but I had never considered the idea for 20th century shoes. I loved the look of Emily’s and immediately came home and started searching for some that I liked so I could vary my shoes more. Since then, I have acquired two different pairs of shoe clips. Now I need places to wear them!

IMG_0728

The gold buckle ones are my favorite of the two styles. I love the color and the curved edges! The rhinestone ones are a nice bit of bling, but aren’t quite as exciting as the gold. I haven’t tried them on my grey Seaburys, but I’m curious if they might match better. I also like them flipped over so the rhinestones spread over the toes, but wearing them that way would require some finagling, since the clips on the back would be upside down.

IMG_0730

The verdict is that after wearing Seaburys multiple times in different situations, I can say with certainty that they are stunning shoes. They’re quite comfortable for standing around and light walking, with a well balanced, elegantly shaped heel. I have a narrow foot and I am pleased that these pumps stay on the back of my heels without a problem and without extra assistance. I wouldn’t plan to walk too far in mine especially outdoors, partly because the uppers are silk and I wouldn’t want to ruin them with scrapes and scratches.

For dancing, however, these are not the most comfortable shoes. They work pretty well, but as with most heels, my toes started to feel a bit pinched and tight after a few Charlestons and my feet were much more relieved to take off the shoes after wearing them while dancing vs. wearing them while just standing. Also, with nylons, I was more afraid that while dancing my heels might slip out of the back of the pumps.

But as I said at the beginning, these shoes are worth raving about. Both the solid silk and the silk brocade are gorgeous, Lauren created an incredibly elegant design with an attractive toe box and beautiful French heel, and they are sturdy and carefully crafted.

Unfortunately, Seaburys are no longer being produced. However, the new American Duchess Amelie shoes have the same gorgeous silk exteriors (without the brocade). They have a lower heel but are still a unique, historical shape, and they come in a variety of beautiful colors in addition to black and silver.

Product links in this post contain an affiliate code, which provides a small benefit to my shoe fund. This does not affect my impressions and reviews of this product.

SaveSave

Wicked, Monstrous, Silly, And A Good Time

10012673_1109871912380610_4283278151979500963_o
Some friends and I, taken by the official photographer of the night.

In the words of journalist Heywood Broun, “The Jazz Age was wicked and monstrous and silly. Unfortunately, I had a good time.” I don’t know about wicked or monstrous, but I certainly had a silly and good time recently at the Greater Boston Vintage Society’s White Lightning Ball.

IMG_2309
Silly faces!

I wore my 1924 robe de style from last summer, updated with new dramatic trimmings that suit the dress much better than the last iteration. It’s such a fun, unusual, and distinctive style to wear. I fielded quite a few questions about the style and happily encouraged people who knew things about it such as that it looked like Lanvin. For my hair, I didn’t have time to attempt waves, so I aimed for a romantic style that was less time consuming, inspired by these: no waves worn with a robe de style, a romantic bun (on the right), and long hair pinned up. Also, this set of drawings shows a large hair comb worn with a robe de style which reminded me that I haven’t worn mine in a long time.

IMG_2331 (1)

My accessories include: my vintage celluloid hair comb; silver drop earrings with peachy faux stones, which don’t often match things, so it was nice to wear them since they don’t get worn often; and a recent purchase from American Duchess, black Seaburys! (Never fear, there’s a whole post coming about the Seaburys, but for now we’re focusing on the event and the clothes.)

IMG_2362 (1)

This event is held at the Larz Anderson Auto Museum in what was the Anderson family’s carriage house in the early 20th century. It is a large building with multiple levels used for stabling horses as well as storing carriages and cars. The upper floor of the carriage house housed an exhibit of motorcycles during the event, if you’re wondering about the background. Downstairs was the collection of Anderson family cars from the 1900s and 1910s. They were very fun to look at and so tempting to sit in… I know it wouldn’t be good for the cars… And there were security cameras… so I had to content myself with looking at them and dreaming of reproductions that we could ride in.

IMG_2352 (1)

My other silly accessory was a candy cigarette. It does rather add to the 20s look, but of course I don’t smoke, so there was rather a lot of me flipping it around in my hand trying to figure out how to hold it and not look ridiculous. I didn’t ever try eating it, so I can’t report how it tasted, but I was pleased that it lasted almost until the end of the night when I dropped it for the second time and it broke in half. Until then it was going strong and gave me something to do with my hands in pictures, which is always a good thing.

IMG_2372-2 (1)

Mostly I stood around and talked to friends, hatched dreamy plans for how to sit in the cars, and took pictures, but we did go out on the dance floor a few times for some Charleston. Too bad nobody got pictures of that!

IMG_2375 (1)

This was the third year of the event, I believe, but only the first year I had been free to attend. It was fun, and nice to attend an event that I wasn’t helping to run.

SaveSave

1890s Skating Ensemble Photo Shoot

When I first wore my 1895 skating ensemble last January, I ran out of time and braid after trimming the back and sleeves. Sometime last year I ordered more of the braid from Debs Lace and Trims* and in November or December I ordered black wood toggles from eBay (super cheap, 50 for $2–I’ll have toggles for life!).

IMG_7425
Showing off the finished trim on the back and sleeves from the first wearing.

I’ve only found this one picture of the front of the inspiration skating jacket. It’s not as close-up as I would like, but it was enough to base a plan on for my own jacket. Using that and other images on my sewing project Pinterest board, I planned out the yardage for each new row of trim. After lots of pinning, stringing toggles, and careful sewing I had used up every single inch of the new batch of braid for a total of 10 yards of braid trim on the jacket. But the result is excellent! I’m just as chuffed with the additional trim as I was with the ensemble when I first made it.

IMG_7421

It didn’t snow much here this year (such a change from last year!), but we did have a day of sticky snow right after I finished the trim that was lovely to look at. I convinced Mr. Q to take pictures of me around our neighborhood the next morning while the temperature warmed up and everything began to melt. Luckily we made it out early enough in the day that there was still snow!

IMG_7452

Passersby were staring, a lady on a balcony started a conversation with me about my outfit, and Mr. Q was, well, out of his comfort zone. I guess I’m just used to the situation. He was not–and I was amused.

IMG_7417

However, despite my penchant for making really odd faces and talking when someone is trying to get a good shot of me, Mr. Q did manage to get a number of very nice pictures of the totally finished ensemble.

IMG_7439

As you can see, I’ve edited out the odd faces and so far only included some of the more elegant and put together ones I managed to pull off.

IMG_7423

Here are some silly ones. I’m not sure what’s happening this one–it looks like I’m blowing a kiss or making a wish. I might have been talking. It’s cute though!

IMG_7429

This was a successful pose! Sometimes I just look totally silly when I pose, but I guess curious-what’s-around-this-tree face is not so bad.

IMG_7418

And finally, one in which I wonder again what I’m doing… I think I was going to reach up for the tree branch, but then Mr. Q pointed out that it looked weird… It’s a fun silhouette shot, anyway.

IMG_7431

*If you haven’t been before, check out Debs Lace and Trims. You can’t beat her prices and most laces and trims I’ve ordered from her have been excellent, with the exception of a few stiff laces when I was hoping for soft lace. But even then, the prices are so low that I put the lace in my stash and use it for other projects without being worried I wasted my money on a product I wasn’t happy with.

Project Journal: Versailles Sacque: Meet Mr. Panniers

There are five big checkboxes on my related-to-the-trip sewing to-do list before my trip involving Versailles in May:

  1. Panniers
  2. Petticoat
  3. Robe a la francaise (with a subset of trimming)
  4. Hair
  5. Shoes

This week, I checked the first item off the list!

IMG_0681
“Take that, Mr. Panniers! You are totally and completely done!”

I think part of the reason I feel so triumphant is that I really had to wrangle these to make them bend to my will. I started back in 2013 or 2014 when I decided to join the 18th Century Court Gown Sew Along. At that point, I made the decision to use the Simplicity pattern (#3635) and $1/yard lightweight and tightly woven mystery fabric from my stash.

At first, everything seemed to behave: I cut out the pieces and started sewing. Then I realized I didn’t have time for the project and so I let the panniers languish until earlier this year when I pulled them out again to finish them so I could use them as a base for my Versailles Sacque. Perhaps it was the languishing that caused Mr. Panniers to take on a personality and want to thwart me when I got back to him this year…

It started with perfectly amiable sewing. The waist casing and drawstring were without event. And then, boning! There was twisting, and warping, and curving inwards, and all sorts of bad. The lower three bone channels eventually cooperated, but those angled top bones? Nope! No cooperation from them! (Yes, check my picture, there are no angled top bones. No, I’m not trying to trick you.)

The bones curved in on my bum and front side so badly that it made the panniers look like a jelly bean! Not what I was aiming for. My solution was to unpick the channels across the front and back (not the sides) and make one continuous horizontal bone channel like those below it. (That’s why you can’t see angled bone channels in the picture.) But the fabric is a very tight weave and does not easily forgive pin or needle holes, so you can still see the angle I originally stitched as directed by the pattern if you look closely.

IMG_0682

Mr. Panniers was much more cooperative with the new horizontal channel across the top. Whew! And ok, I have to take some responsibility for the problems because I’m confident that some of the struggle was due to my choice of boning–1/2″ wide zip ties about 18″ long that I masking taped together to get the lengths I needed. I have to pack this guy, and having bones that don’t weigh a lot (like metal) and won’t break (like cane or reed) was high on the list. The bones are simply overlapped in the channels, each of which has an opening, so the plan is to remove them (and label them) for packing, then reinsert them once I’m unpacking the whole ensemble in France. Anyway, the zip ties were coiled in the packaging and didn’t want to change their shape, which is why the angled bones were curving in towards my body and why the whole thing is so bent on warping if not carefully and delicately handled.

IMG_0684

Here’s a look at Mr. Panniers interior. The white ribbons are suggested in the pattern to help keep the shape. They’ve all been adjusted to my body shape (tedious, but worth it–sewing these on and fixing that angled bone channel problem were the things that kept this from being finished a month ago!).

As you can see, in terms of materials and construction, Mr. Panniers aims for the right shape as the goal. To that end, I appreciate that with my overlapping bones I can easily adjust the size at any point by overlapping the bones more. I find that this pattern is a bit too trapezoidal for my taste, so I’ve overlapped the bottom bone a little extra to make the skirt hang more vertically from about the knee down.

Needless to say, the bones are staying in and Mr. Pannier will be resting flat and collapsed until I need to pack him, so that for any fittings, etc. no more wrangling will be necessary.

(Side question: Does anyone know when it would be appropriate to use singular ‘pannier’? Would that be appropriate for referring to one of a set of two pocket hoops, for example?)

Side note: this is officially the last post that will be tagged 1770 court gown, since that project has now morphed into the saga of the Versailles Sacque and accessories.

19CBRE: Following With Trust

(I thought I was very clever when I came up with the name for the post… and then a few days later I couldn’t remember what I was thinking the content should be! I guess if I confuse myself that easily I should certainly explain my cleverness so you can appreciate it, too!)

I was reading Thomas Hillgrove’s The Art of Practical Dancing from 1868 and I came across this passage on page 154:

“It is recommended that the lady, when waltzing, leave herself to the direction of her partner, trusting entirely to him, without in any case seeking to follow her own impulse. A lady who should endeavor to avoid an encounter with other dancers, would risk interfering with the intention of the gentleman, to whom alone should be trusted her security amid the crowd surrounding and crossing her in every direction.” 

IMG_4854

I thought, “Hm! Trusting myself entirely to my partner’s care is something I rarely do! I’m often giving non-verbal hints about my opinions on where we should go, how much we should rotate, etc… and depending on the ability of my partner, my hints sometimes come down to downright back-leading.” I’m sure this partly comes from eight or so years of competitive modern ballroom dancing, in which the leader is in charge, but the lady has the duty to do her part to see what’s going on around the floor and help ensure that crashes, etc. don’t occur, as well as my independent-modern-woman mindset. However, despite these reasons, I imagine Hillgrove would have taken exception to my dancing style!

I started thinking about whether it made sense for me to attempt Hillgrove’s method while dancing historical dances. I dance in three settings, at private rehearsals when the dance troupe I am part of is practicing for performances, during performances with said dance troupe, and at public balls when I am dancing with guests of varying abilities or with members of the dance troupe.

I think it boils down this way: when dancing in a performance there are goals of elegance, nice spacing between couples, etc. that we are aiming for, and my interpretation of our artistic directors’ instruction in addition to my own feeling is that every person dancing should contribute to these goals, so a bit of hinting makes sense for the context. I feel similarly about hinting while dancing at balls depending on the ability of my partner, and if the goal is to ensure the safety of myself, my partner, or other people who might cut us off, etc. I also feel justified in back-leading a partner who needs some assistance to stay with the music, avoid crashes, or know how much rotation to complete in a given step, etc… but it sounds like I don’t really ever  follow with trust!

With these thoughts in mind at a recent ball, I attempted to follow partners (whose abilities I have faith in) with trust. It was surprisingly uneventful! I think it really comes down to the ability of a partner in order to determine if I’m comfortable with that level of trust. Do you entirely follow your partners with trust at historical dance events? Or are you like me, picking and choosing when you feel comfortable doing so?

IMG_0647
Success! Time to go home.

(As another side note, it’s been just about a year since my last 19CBRE post. If you’re not sure what that’s all about, check out this introductory post. You can see all of the posts relating to 19CBRE here. Perhaps this year I’ll get around to posting more of the interesting tidbits I’ve been thinking of posting over the last year!)

Hoops On A Playground

I’ve had a long week and am feeling like silliness is about all my brain can deal with posting for the moment. Plus, I’m ready for summer, or at least spring. So here are some silly pictures from last summer that I’ve been waiting to share until just the right moment. They bring a smile to my face and I hope they do to yours as well! Bring out your inner child and enjoy!

IMG_2262 (1)

IMG_2273 (1)

IMG_2279 (1)

IMG_2267 (1)

IMG_2269 (1)

IMG_2317 (1)

IMG_2299 (1)

IMG_2303

IMG_2305

Who says you always have to act like an adult? Playgrounds are fun!


Project Journal: 1880s Steam Molded Corset: Finished Corset Photo Shoot

IMG_2119 - Version 2

I’m excited that the 1880s corset I made last summer is finally, actually, finished! I got around to adding the finishing touches, lace and ribbon around the top, over the fall. Now there is nothing left to sew, and, after two wearings I can say with confidence that there are no little alterations I want to do! Yay!

IMG_2126

The first wearing was in August last year, with my 1885 frills and furbelows dress. The second wearing was in January this year, under my new 1899 evening gown. Both times I found the corset to be extremely comfortable to wear. And in January, I was able to get pictures of the completely finished corset! So, without further explanation, here is the corset in its finished form. (If you didn’t get to read all the intricate details of the patterning, construction, and steaming process, you can see all past posts here, in the project journal.)

IMG_2124

The super frilly petticoat was a great prop for these photos! (I’m much better at looking natural rather than awkward when I have props!). It’s from 1903 and was finished in 2011. I’ve worn it many times but have never taken photos of it on me. It’s entirely silk, with two layers of flounces, both made of multiple gathered circles and edged with wide lace in a scallop pattern. It closes with a silk ribbon that threads through the waistband in manner described in Authentic Victorian Dressmaking Techniques. It’s decadent to wear–it makes rustling sounds, has great body, and when you take it off it stands up on it’s own! I can’t remember how many yards of fabric went into this petticoat, but I know it was a lot, with all the circles in the flounces!

IMG_2131

In these examples, you can see the petticoat being worn with clothes on top: I’m wearing it to wade at the beach in 2012 and to give volume to a summer ensemble in 2012, but I’m also wearing it under probably every outfit you can find on the blog from the 1890s or 1900s, even if you can’t see it. (If you’re curious, here’s what it looked like in a half finished state.)

IMG_2133

Awesome petticoat aside, this corset is pretty decadent to wear, also. Silk, tons of curvy seams and bones, perfectly fitted, lovingly, painstakingly, and beautifully sewn… what’s not to like!

IMG_2117 - Version 2

Thanks to the usual camera toting culprit for doing a corset photo shoot with me in the midst of getting dressed for a ball! You know who you are.

(As a side note, it’s a challenge to take historical clothing underwear pictures that look reasonably like historical photos and images but don’t go into the modern lingerie photo direction. See the inspiration here and here? I tried this as well as the standing pose in the second link, but awkward really describes the outcome. But I think we did pretty well in the end. It’s amusing to feel these photos are revealing when I’m quite dressed by modern standards… Do you feel the same way about taking pictures in your historical underwear?)

1899 Gibson Girl Coiffure

I was very pleased with my hair for the 1890s ball! One of the reasons I liked the idea of an 1899 dress is because it is close enough to the turn of the century that a Gibson Girl hair style made sense. My hair loves cooperating in poofy styles, so this was perfect!

IMG_2184

I created the super poof using a pad made from one leg of a pair of tights. It’s stuffed with cheap “wizard beard” hair that would otherwise have gone in the trash. Being stuffed with synthetic hair, the pad is pretty warm. And I did struggle a bit to get bobby pins through the tights–I need to add loops to the ends for next time I think. Aside from those things, though, the pad was perfect!

IMG_2245

I also created a new hair ornament to finish off the coiffure. I had originally thought of bleaching the ostrich feathers to create an aigrette*, like this, but decided that I liked the ostrich feathers as is and didn’t feel like dealing with bleach. There are two feathers: a grey and a white. I found that the white helped create definition for the grey on my dark hair. The sparkly bit is a cheap eBay brooch. I sewed the feathers to it and then used the pin part to bobby pin it in place on my head.

IMG_0524 (1)

Success! Look at that haughty Gibson girl look (like this)!

IMG_2197

*An aigrette is a spray of feathers from an egret. Confusing!