Project Journal: 1880s Steam Molded Corset: Mockups/Patterning

I began the patterning process for my new 1880s corset with the late 1880s corset in Norah Waugh’s Corsets and Crinolines. I immediately had to adjust the pattern for size, as is often the case when using scaled historical patterns. While doing that, I also made some initial guesswork at adjusting the pattern to get the curvy seam lines in my inspiration corset at the V and A.

The result was a perfectly usable pattern for an 1880s corset, but the pieces didn’t have the exaggerated curvy seams I was looking for. So I started playing with the pattern pieces from the first iteration and came up with a second mockup that was satisfyingly curvy. The back pieces didn’t change, so I’ll only show a comparison of the fronts and sides. The noticeable differences are in the silhouette of the bust and hips. (I roughly padded out the dress form to be shaped like me, but being rather un-squishy, as dress forms often are, the corset mockups aren’t really filled out as they would be by a squishy body.)

Untitled 2
Front.
Untitled 2 (1)
Side front.

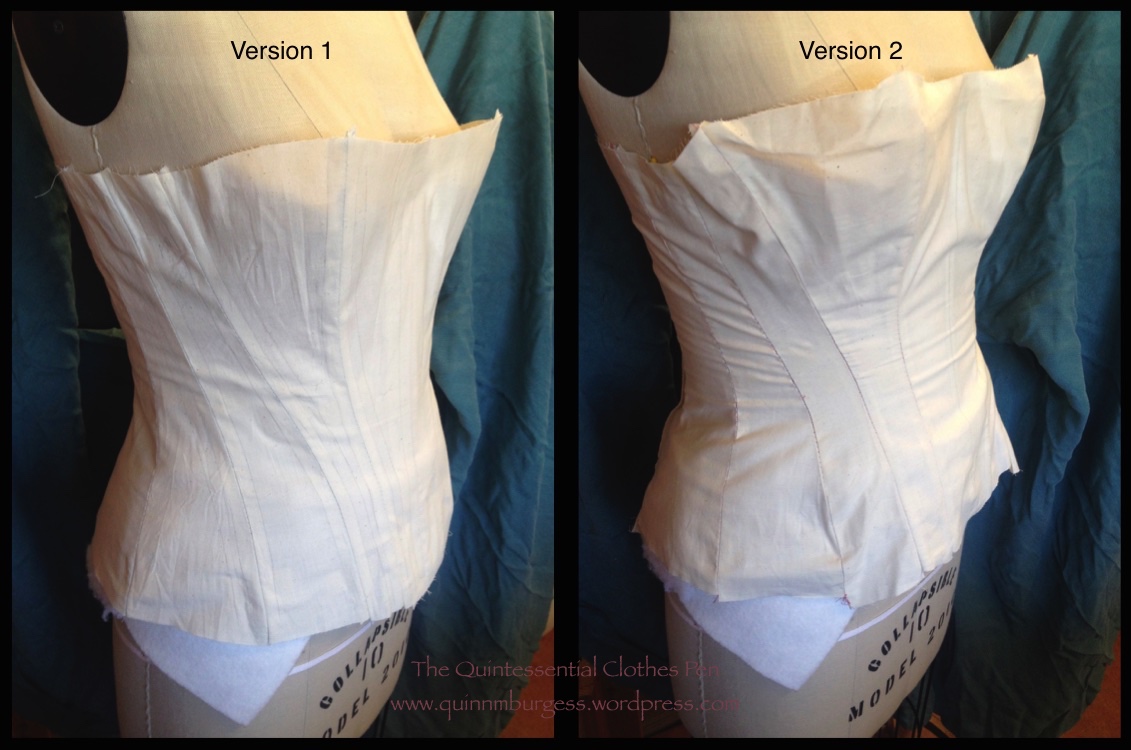
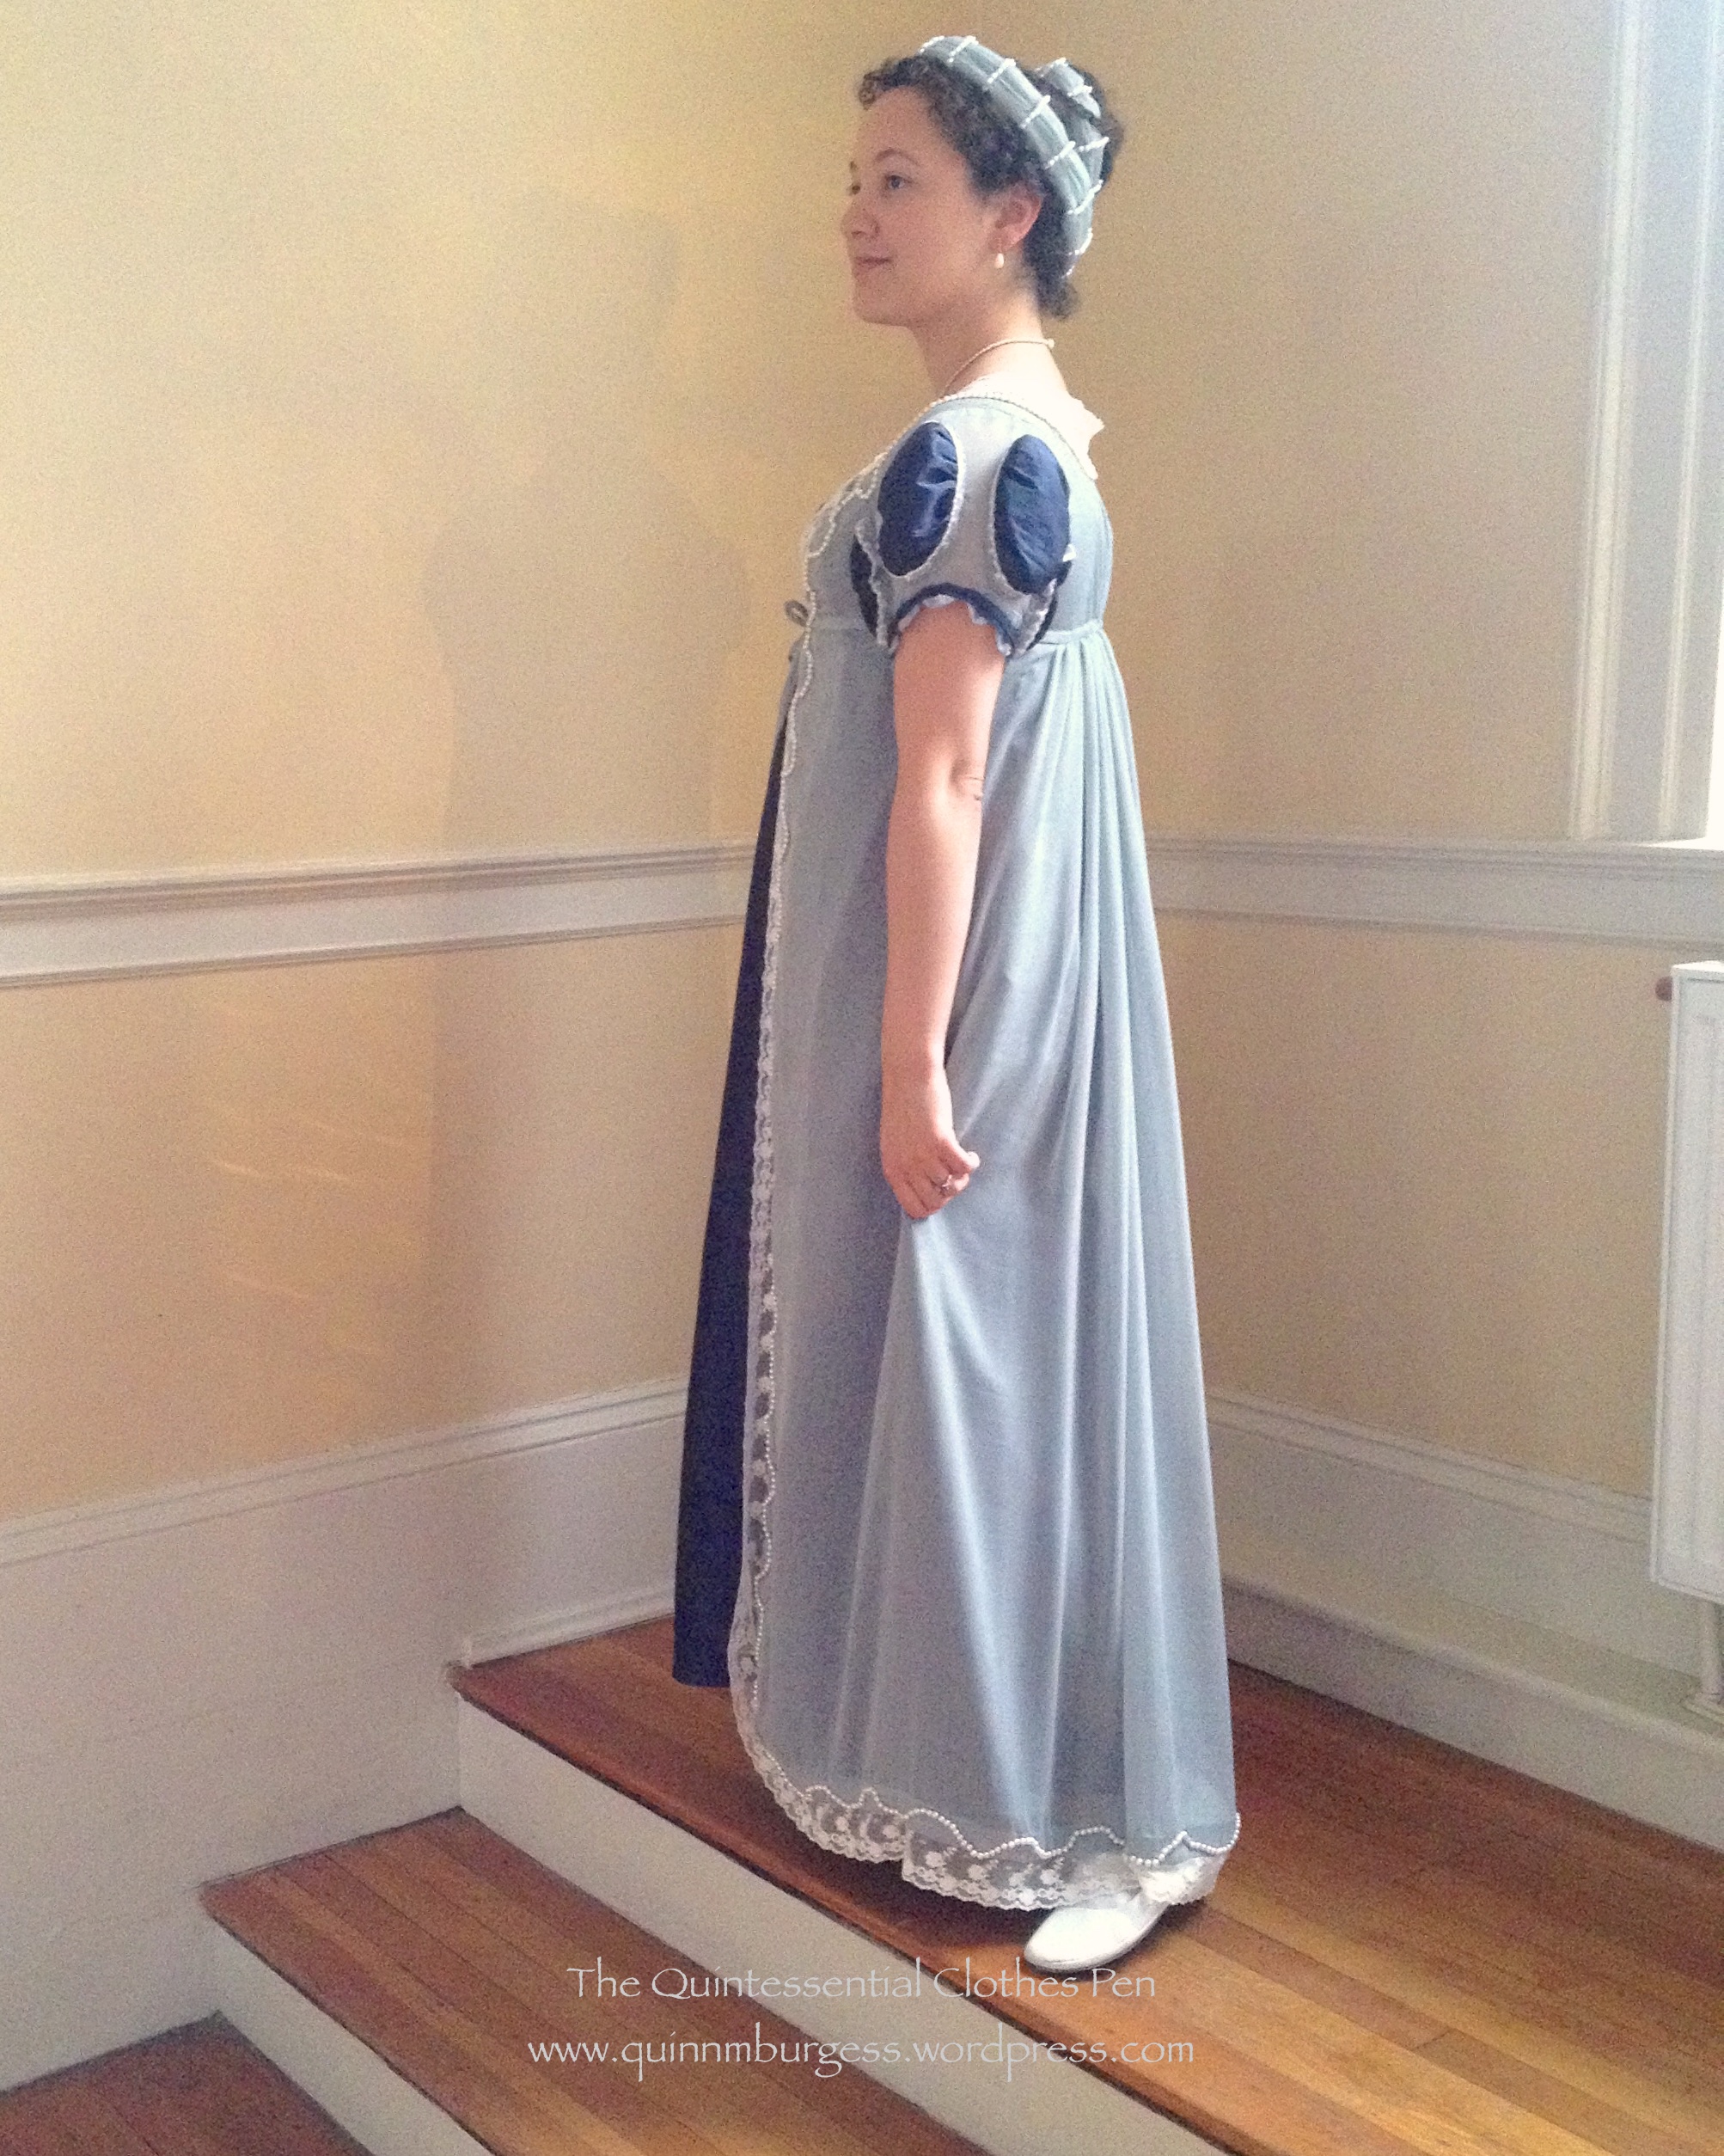
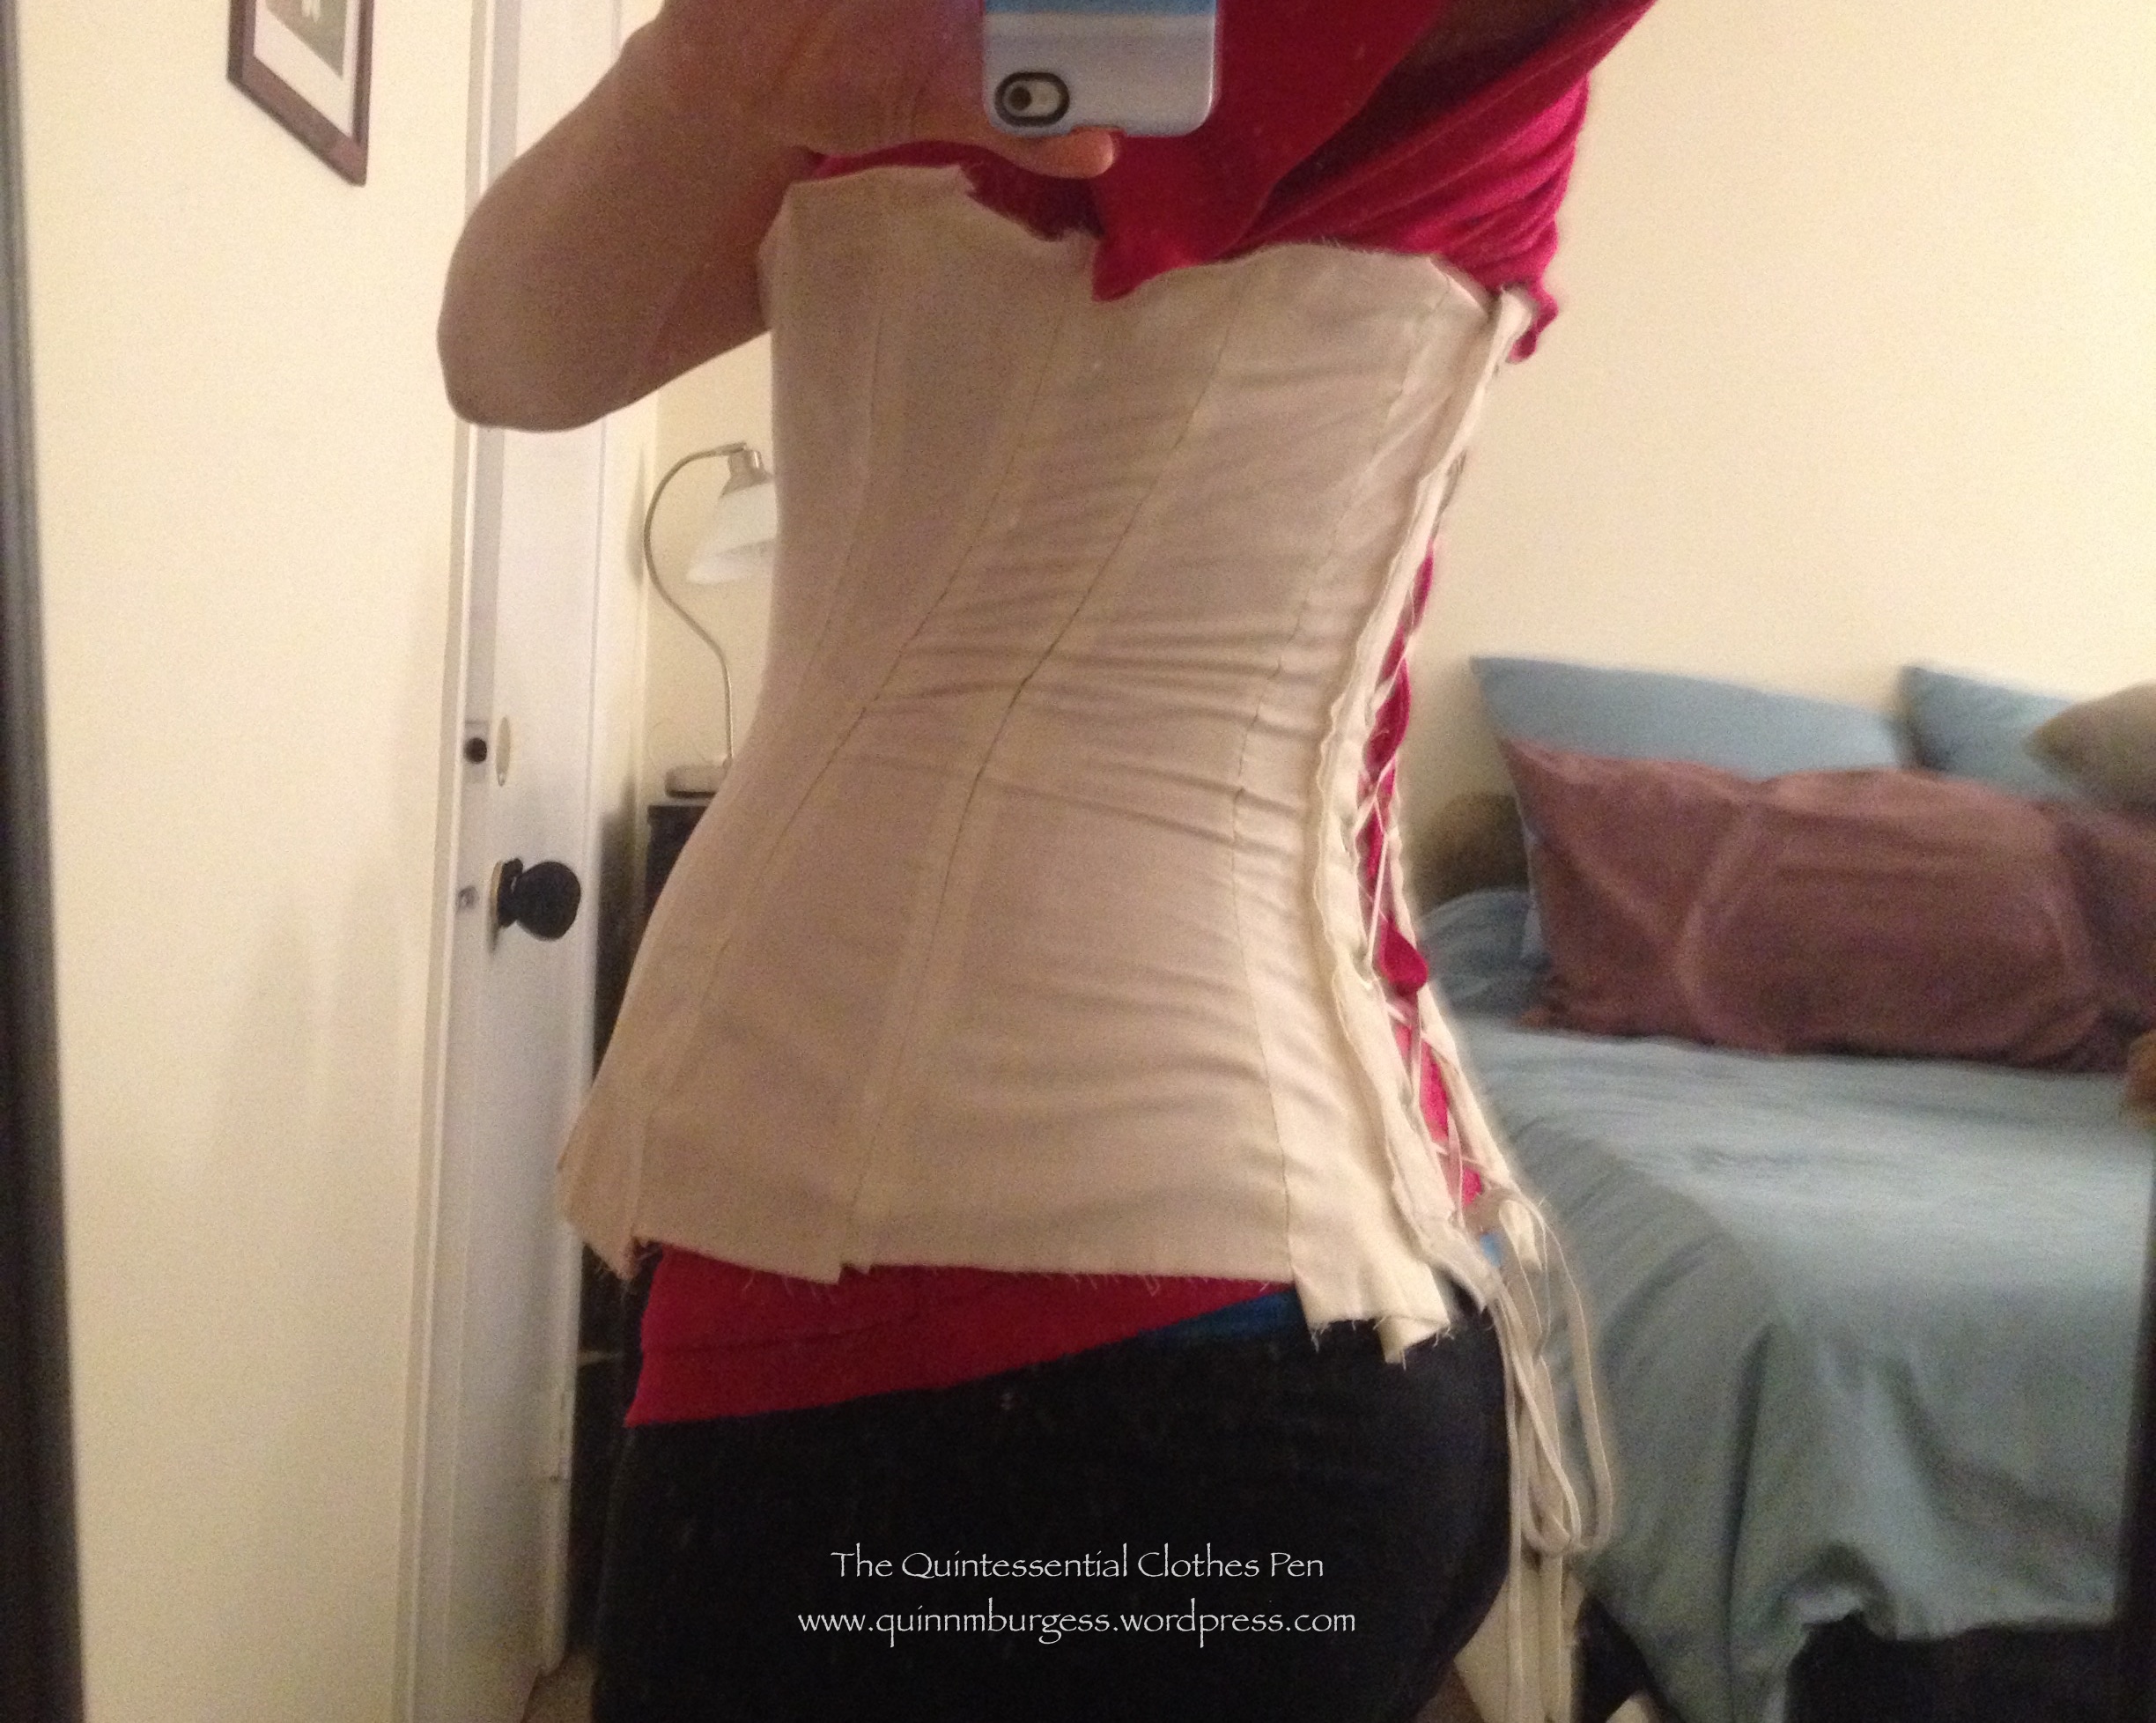
I didn’t take pictures of the first corset mockup on me, but I did take pictures of the second one, to give an idea of how it fits onto a squishy real body. The mockup corset is made from a single layer of muslin, with spiral bones taped onto the seams and a wide flat bone at the front to simulate a busk. The back has lacing strips basted on. I didn’t have help taking the pictures, so you’ll have to forgive the awkward angles!

IMG_2211
Front.
IMG_2210
Side front.
IMG_2214
Side.
IMG_2217
Back.

After the second mockup/pattern I still made a few changes, such as truing the pattern pieces so the edges that meet are the same length and some other small adjustments such as taking in the bottom front pieces a little to keep them from standing away from my body. The largest change I made was to change the seam closet to the back grommets.

You can see in the back picture how the seam lines are rather vertical once the corset is on my body, which didn’t seem to match the curvy seams on the front of the corset. Unfortunately, the V and A doesn’t have any pictures of the back of my inspiration corset online that I have found, so I had to turn to other extant 1880s corsets to look at seaming (and bone placement, but I’ll discuss that in my next post). I settled on the image below as my inspiration for the back of my new corset.

8af42269aeecc4fb8255d408c916c8d5
1884, French, The Met

As with the front pieces, I noticed that the curviness of the seams is distinct as the corset goes over the hips and up the torso, but my second mockup didn’t have enough curve in these areas for my taste. So I went back to my pattern and made new pattern pieces for the two back pieces to adjust the seam line.

And that’s a great place to end this post. The next post in the series will be a comparison of the two patterns, looking at the pieces themselves.


Project Journal: 1880s Steam Molded Corset: Inspiration

The first corset I ever constructed was from a modern historical pattern company. While the corset was fitted to my specific curves, the pattern pieces for it still created a basically cylindrical shape without a lot of hip or bust shaping visible when the corset was laid flat. (I’m wearing that first-ever corset in the pictures in this past blog post.) I’m not saying that shape is wrong for the 19th century, because there are extant examples, patents, and other information showing us that style, such as the corset below.

34cccb898ab3130f745b2c3bb6017b26
French corset c. 1885, The Met

Looking at corsets from the last half of the 19th century, however, there are a variety of other styles that have more interesting lines and definitive flare at curvy points than the basic cylindrical shape. My c. 1860 pink silk corset is an example of a style of corset that uses bust and hip gores to create a more curvy silhouette. (I discussed this in detail in a post about that c. 1860 corset that you can read here. That post has examples of extant corsets showing that shape.) Here is a catalog page of corsets from the 1880s showing that same style.

In addition to the hip gore style corset, there are also a growing number of curvy seam corsets as the 19th century progresses. Some of these also make use of bust gores while maintaining the curvy seams to really provide shape. These all lead up to the s-shape corset of the early 20th century, but we’re not quite there yet in the 1880s.

Here are some extant examples of curvy seam 1880s corsets: black, light blue, and ivory (very similar to the one pictured above, but more extreme in its curves if you look carefully). The curvy seam corset style is what caught my eye for this project, because it is a style that brings new challenges in terms of patterning and because it will be a new style in my wardrobe when completed. Compare this to the the photo above and you can see quite a difference in terms of the cut of the pieces.

046b07af92b3f1063aa27c342bed5124
Edwin Izod corset, 1887, V and A.

This Edwin Izod corset from the V and A is my inspiration. I’m intrigued by the shaping of the panels and the completed silhouette, but also by the construction method. The V and A gives some tantalizing information about the steam molding process patented by Edwin Izod and used to create this corset, just enough information to make me want to see if I can create some form of steam molding and discover how it might change the finished silhouette and wearable feel of the finished corset when compared to other corsets I’ve constructed.

From the V and A:

Fashion and technological innovation changed the shape of late ninteenth-century corsets. As the bustle replaced the crinoline and bodices contoured the figure, corsets became longer to achieve the desired hourglass silhouette. They encased the abdomen and enveloped the hips, and the amount of whalebone also increased to give a smoother outline and help prevent wrinkling of the fabric. This corset from the 1880s is composed of twelve separate shaped pieces and forty whalebone strips.

To improve shape, performance and comfort, manufacturers claimed numerous inventions. One of the most successful was the steam-moulding process developed by Edwin Izod in 1868, and still used in the 1880s to create elegant corsets such as this one. The procedure involved placing a corset, wet with starch, on a steam-heated copper torso form until it dried into shape. The result was a beautifully formed corset, whereby ‘the fabric and bones are adapted with marvellous accuracy to every curve and undulation of the finest type of figure’ (The Ladies’ Gazette of Fashion advertisement, London July 1879).

I’ll be coming back to the nuggets of detail contained in this description, because some relate to patterning and some relate to the steam molding itself, but those are topics for future posts.

* In case you’re wondering why I spell steam molding without a “u” but the V and A quote spells it with a “u”, check out this little bit of information.

Project Journal: 1880s Steam Molded Corset: The Plan

I have a number of corsets, some made for me specifically and some made for other ladies but which I wear, but there are still periods for which I don’t have any corsets that are really perfect. When it comes to the later 19th century, I’ve got a corset intended for the 1860s, whose style continues to be seen through the 1890s, and a corset from the 1890s that wasn’t made for me and doesn’t fit as well as I would like it to, despite the fact that I wear it rather regularly. The 1890s corset is being worn under most of the 1890s/turn of the 20th century garments shown here on my blog, but I’ve never shared pictures of the corset itself here before.

IMG_6341_2
1890s corset on the body it was constructed for in 2009. The pattern is from Corsets and Crinolines and has 4 elastic panels in the front.

Someday, I’ll make a new 1890s corset that is fitted for me using the features I like from the current one, such as the very comfortable elastic panels, but changing things such as the busk length (the current one is too long and pokes me in the legs when I sit or bend… it’s ok if I get it just between my legs, but has caused bruises when I’ve bent over unexpectedly in the past and dug the busk into my leg…) and creating more room the bust area. But I digress, because an 1890s corset is not on my to-do list for this summer.

What is on my to-do list is completing a summer dress from the 1880s (that I started back in 2013, yay for super overdue UFOs!). The skirt is pretty close to completion, but I’d been holding off on the bodice not only because the project has been generally on hold, which is most of the reason, but also because I really wanted to fit the mockup over the corset I planned to wear with the dress. The plan was to have a new specifically 1880s corset to wear. And now that the dress is on my to-do list again, the corset has joined in as well!

I’ll be doing a Project Journal series on this corset, because in addition to showing in progress pictures, I also plan to attempt to steam mold this new corset, so there will be lots of interesting information and success or failure updates. Next post in this series will be about my inspiration!

Modern Dotty Tap Pants

I’ve been making rather slow progress on bigger projects lately, but my stack of recently started UFOs was causing me stress and I really felt the need to finish a project entirely. I had a bit of time today and used it to finish up 3 small projects, as well as fitting a final mockup so I can move on with making a pair or two of modern capris (depends on if I can squeeze two pairs out of my fabric or not) and realizing that another modern top pattern I’ve been trying to make work for me just needs to be left alone for now. If I make the conscious decision to let something go then I feel like I can take it off the to-do list and not feel like it’s a UFO, so all of these things feel like progress!

Two of my three finished projects are pretty much the same: two pairs of cotton dot printed tap pants to wear under modern and historical skirts during warm weather. They’re useful for soaking up sweat! I bought the fabric thinking I’d make a top, but then realized that I would never like a top made out of this fabric, so I decided to make these summer tap pants instead. And I really enjoy the result, because having dotty tap pants that no one will see brings me joy. Unless I’m changing at an event… and then some ladies out there might see them!

IMG_2254

The pattern is Butterick #4289 from 1976. I made view C and altered it just slightly: eliminated the waistband, lengthened the inseam, lowered the top edge a bit, eliminated the darts, straightened the hips instead of curving them inwards to accommodate the fact that I did not include a fly, and finished the top edge with elastic. I have another pair of cotton tap pants I made sometime in the last few years that are complicated, with a fly and a waistband, but all of that is rather unnecessary, really. I was inspired to simplify the idea after purchasing some tap pants (like these, called petti pants, which are great for wearing over tights and under dresses in the winter!) and realizing how simple these garments could be.

So these are my simplified version, with a pattern that fits perfectly. Hooray! These are all nicely finished on the inside with serged seams. As I pointed, out the top edgess are finished with elastic, though I tried different methods of attaching the elastic on each pair. We’ll see if I notice a difference when wearing these. The only other thing to note, which makes me quite happy, is that I included a little blank cotton twill tape “tag” on the back seam of each pair. Without a tag it’s hard to find the back when getting dressed and this makes it very easy!

(The other project I completed today is an old pair of jeans that I cut off, reshaped the legs of, and hemmed, thereby turning them into capris! If I get pictures of me wearing them someday I’ll share, but it’s not a super high priority. It’s mostly just that I haven’t been able to find ready made capris that I like in years and so I haven’t had any that fit for years, and during the summer that is just not an enjoyable situation. So I’m glad to have some capris again!)

Vernet Project: Witzchoura Images

As a quick recap, I started my witzchoura research journey here, being confused about how the word was spelled. After sharing that with you, I moved on to look at basic witzchoura definitions and then further witzchoura references, but I haven’t really shared images of witzchouras with you yet, so that’s what this post is going to focus on.

Out of the thousands of pins on my historic clothing Pinterest boards, the images below are the only ones I could find that specifically mention that they show a witzchoura. (Never fear, I’ll be looking at not-quite-witzchouras in a future post.)  If you know of any other images that specifically name the garment shown as being a witzchoura please let me know!

I find it interesting that two are yellow and two are blue. Also interesting that all the furs that are depicted are textured or downright weird (like the first one with the flower-fur… what is that?). However, in terms of materials there is variation: one of merino (wool), one of reps (could be wool, silk, or cotton, according to the OED), and two of velvet (fabric content unknown, though wool, silk, or cotton would seem to be likely).

b2e293cd8d6787e52979911acc6c3539
Costume Parisien, 1812
pictura2009%5Cs_a_55466_000
Costume Parisien, 1813
49a82ad6569f70e121aebe638e857efd
Costume Parisien, 1818
1ec484b324c9135cf9d6934f28eb8dfd
Costume Parisien, 1820

A Turban Fillet, 1811

A while ago now, during the Journal Journey Into La Belle Assemblee series, Natalie over at A Frolic Through Time brought two similar ball/evening hair styles to my (and her other readers’) attention. These styles for October 1811 were pointed out by Natalie as being perfect for someone to attempt for a Regency event and I thought “Oh! These are neat! And they would go so well with my pearl trimmed 1811 Elusive Blue gown. Perfect!” So I saved the link to the post and have been meaning to go back to it for the last few months.

After returning to that inspiration earlier this year and comparing the two styles in Natalie’s post, I decided on a turban fillet (see end of post for a definition). February’s HSF/M Challenge #2: Blue was the perfect kick I needed to get to work. While I technically submitted finishing the trim on my elusive blue dress for the challenge, I also finished my turban fillet slightly after the deadline. I enjoyed having a small project: it was a nice change from the usually long and complicated projects I often take on and am constantly in the midst of.

Here, then, is the fashion plate to which I am referring.

october-1811-evening-dress-bassemblee-hern
No. 1. EVENING DRESS. A sea-green crape dress, vandykcd round the petticoat, and ornamented with large beads; a full drapery over the shoulders, and confined in to the back with a pearl band, ornamented round the neck and down the back with beads. A full turban fillet tapered, worn on the head. Pearl necklace, white kid gloves and shoes.

And here is the finished result of my labors.

IMG_2195
Side.
IMG_2198
Back.
IMG_2176
And the full ensemble.

I attempted to follow the detail of the hairstyle from La Belle Assemblee, down to the curls around my face (lots of extra work since all my hair is long!) and the little braid on the side. It was a puzzle to figure out and enjoyable to wear.

The question is, how did I get the turban fillet to stay in place on my head? Well, I thought of making a gathered tube wound with pearls, as Natalie proposes below, but decided to make my turban fillet have a flat back instead for multiple reasons. #1: there has to be a seam somewhere, so why not hide it intentionally? #2: I only had so many pearls, and winding them all around a sample tube used them up far too quickly so that I would never have reached the end and still been able to have pearls. #3: the angle of the pearls when winding them around was very challenging and I couldn’t figure out how to arrange them pleasingly. #4: “why waste pearls against my head?” I thought, when they’re going to be slightly uncomfortable and slippery there anyway?

So here is what I came up with: a length of fabric about 40″ long, wrapped around a strip of hi-loft poly-fill batting (not period, I know, but easy and free!), turned under and sewn down on the back, gathered across the top, with rows of pearls sewn on at intervals, and finished with loops on the back every few rows of pearls in order to secure the whole thing to my head. The entire thing is hand sewn. I have no idea how you would use a machine to assemble this the way I did!

IMG_2199
The top is the front of the turban fillet and the bottom is the back.

And yes, I was able to wear this to a Regency ball in April!

* Natalie notes the following about the description “turban fillet”. Please check out her post to see both fashion plates she refers to.

Turban fillet. For a change, just what you might imagine: a “fillet” is normally a narrow ribbon or wire wound round or encircling the head, while a turban is a, well, a turban. In this month’s evening dress hairstyle, we have a length of fabric well gathered to make a narrow, round, gathered tube, wound round the head. The turban is wound with pearls for extra measure. Handsome and I hope that someone will take up this style for a ball before long! The ball dress plate uses a similar design; it encircles the head more like the fillets we remember from Medieval fairy tales, but ironically, the effect is more turban-like to my eyes than the evening dress example, yet isn’t called a turban. Fashion, fashion.

Returning Heroes 2015

Back in March, I was again able to attend The Commonwealth Vintage Dancers‘ annual strictly-Civil-War ball (this is the 5th year I’ve been there, wow!). It’s been a joy every year I’ve attended and this year was no exception. Unfortunately, I only had my phone to document the evening, which means my pictures came out rather blurry. Here’s just a few.

IMG_2052
Obviously, the most important thing to document was that I was able to wear my Refreshing Apron for the first time with a mid-century dress.
IMG_2087
Also, I danced. In this case, a schottische. (Other people danced, too, and looked quite elegant and lovely.)

Evie is always special to wear and was accompanied by the usual accessories and undergarments. The only thing I did when I came home was to mark front on the skirt, because every time I wear this gown I struggle to remember where front is! (It makes a difference when your skirt hooks to your bodice–without everything lined up properly it just doesn’t work!)


Belated Fezziwig’s Ball 2014

Last December, I had the opportunity to wear my green 1824 dress again at an annual holiday ball. It took a lot of time to sew all the trim on the dress (there are construction posts about this dress here) and I don’t get many opportunities to wear 1820s clothes, so it’s quite lovely to have a general “early 19th century” ball to wear this dress to.

This year we had new garland decorations and were able to get some adorable pictures! I was quite pleased with my silly figure eight braid hair style and my other accessories (the green earrings added a nice matching pop of color, the hair wreath worked well as it has in the past, and I like the white shoes with this dress). I’m behind sharing the photos, but pleased that they’re finally making it into a post.

IMG_9969

IMG_9935

IMG_9951

IMG_9986

IMG_9987

Don’t you want to jump out of your chair and join in the dancing?

1860s Flower Basket Fancy Dress

A few weekends ago now, I went to an event at The Down Town Association in New York. It was an event out of my usual ordinary line of events and so I took the opportunity to create something out of the ordinary to wear. The title of the post rather gives it away… but I only had a week to put my outfit together!

20493f96d0c4b86b724418e53a1d9f25
Flower Basket, 1860s. This design was created by Jules Helleu or Léon Sault, possibly for Charles Frederick Worth.

Using this image as my inspiration, I determined that I needed to make a flower basket, but that I could use Annabelle as the base for the floral dress. I also wanted to use only items from my stash, thus limiting my options a little bit. So I spent my weeknights creating a fabric basket that fit over my hoops and then furiously pinned flowers to my skirt the day we were leaving for New York in the hopes that they would look good and at least a little like my inspiration image…

IMG_2154
(What does a flower basket do with her hands without a bouquet?)

In the end, I enjoyed my flower basket very much, but didn’t like the fact that my furious pinning job didn’t really achieve the cascading flower look I was going for and that Annabelle’s pre-existing flowers were rather heavier looking than I had hoped, also contributing to the lack of cascading flower look. Maybe someday I’ll try again with the same basket and a different, or differently modified dress, but it was fun to do something different even if the results were not as great as I hoped for.

IMG_0622
I like the basket when you don’t see the skirt flowers.
IMG_0618
(Maybe a flower basket holds her handles?)

As I mentioned, this event was held at The Down Town Association in New York, which was established in 1860 (perfect for my fancy dress!). As far as I can tell the association is still housed in the same building they’ve been in since 1860. It was quite lovely inside, with detailed architecture and beautiful rooms. One room was a library full of a rather random collection of books. I enjoy perusing books and so proceeded to examine the titles closely. And guess what I found? A volume of Burke’s Peerage and Baronetage from 1912!

This excited me quite a bit, not only because it was from 1912, but I think also because it reminded me of Persuasion, in which Mr. Elliot is described as putting Burke’s Peerage in a position of honor in his estimation of important things in the world. Regardless, I got distracted and insisted that I needed to take pictures and look through.

IMG_2122 2

IMG_2124 1

IMG_2131 1

IMG_2130 2

IMG_0604
Here I am, reading Burke’s Peerage!

Burke’s Peerage certainly is an undertaking, and this volume only covered the alphabet through letter L! Unfortunately, I didn’t spot a second volume in the library, but I hope it’s there somewhere.

Vernet Project: Further Witzchoura References

Last post relating to witzchouras, we looked at basic definitions of the word, determining that the garment and its name developed from Polish and French influences, that the garment was popular c. 1808 to 1835, and that the chief qualifications are that it is an outer coat or mantle lined and trimmed in fur. But let’s not stop there: here are more references to the witzchouras from the early 19th century.

In 1817, La Belle Assembleé has multiple mentions of witzchouras. The following excerpt tells us a good amount about this style:

8ae3d6c93e063c498406346d8b7c7662

Side note: A Louis d’Or is a French gold coin first struck in 1640. These were promoted by the French kings to fill the need for a large denomination coin, since the franc and livre silver coins were greatly decreasing in value. In 1726, France developed monetary stability and the Louis d’Or was established as being worth 24 livres, a value that remained static through the French Revolution. At the time of this quote in 1817, a Louis d’Or referred to a 20 franc gold piece, also called a Napoleon, so named because Napoleon coopted the idea of the French kings before him. (Sources: Merriam Webster, the OED for louis d’orNapoleon, and livre, and the Encyclopedia Britannica.)

France_1709-A_One_Louis_d'Or
Louis d’Or from 1709

Throughout the 18th century, a franc was similar in value to a livre, and about 20 of either of these coins equalled one Louis d’Or. La Belle Assembleé tells us that a witzchoura in 1817 was worth 30-90 Louis d’Ors. What I’m driving at here is the relative value of one of these garments.

The OED gives us an idea of the value of a livre over time: in 1746 one captain was paid 120 livres a month (6 Louis d’Ors). Extrapolate that for a year, and that captain was making 72 Louis d’Ors, just enough for a witzchoura or two and nothing else! Another example from 1797 sounds outraged that an English sea officer was charged 300 livres for eight days of lodging (15 Louis d’Ors). That’s almost 60 Louis d’Ors per month, which would easily be a witzchoura, though I doubt that sea officer would need a witzchoura instead of lodgings! The takeaway message is that, as La Belle Assembleé says, witzchouras were costly and worn only by the wealthy.

It is worth noting that there are fur lined pelisses mentioned which do not qualify as witzchouras in the eyes of La Belle Assembleé. I’ll be examining these almost-witzchouras in a later post.

Moving along some years, The Ladies’ Pocket Magazine describes fashionable witzchouras in 1833 (the OED had quoted part of this in their definition of witzchoura that we looked at in my last post):

ead143cce8137354ba0807c21dd308b2

As we established before, by the 1830s the shape of the witzchoura had changed to accommodate the changing fashions of dresses under them: becoming more cape-like, with collars and loose sleeves rather than being fitted like a pelisse as they were in the earlier years of their popularity. Again, we are reminded that witzchouras are made from expensive fur, and the more expensive the fur the more likely to see it displayed as much as possible.

Moving forward once again, C. Willet Cunnington mentions witzchouras in his book English Women’s Clothing in the 19th Century referencing a year as late as 1849: “The Witzchoura Mantle, for the carriage, lined and trimmed with fur.”

This quote from La Belle Assembleé in 1849 could be the source for Cunnington’s mention of the style, as the phrasing is quite close to Cunnington’s description:

1e04c8043ce18b6ef88613d6b34c37cb

Here there is a mention of another garment similar to a witzchoura: in this case a burnous. According to the OED again, a burnous is a woman’s cloak or mantle from the 19th century resembling an Arabian upper garment of the same name. It is interesting to note that by the 1830s and 1840s a witzchoura is described as heavy, cumbrous, and very ample instead of the more fashionable and positive descriptions from the decades prior.

One final mention of the witzchoura is from The Outdoor Girl Of A Century Ago, published in 1922:

books

This is the second mention in this post of a similar (or possibly the same) garment of Russian origin. In addition to the specific evidence of the Polish origins of the witzchoura in name and relating to Napoleon himself, I’ve also come across multiple mentions of the witzchoura style being brought back to France from Russia by Napoleon’s forces. Both of these influences fit in with the dating we’ve established and lead me to wonder if these are two separate and unique garments. Perhaps, though I suspect that if they were indeed separate styles in name they would have been variations on a similar theme, just like the fur-lined pelisse mentioned earlier in this post.