I am leaving the Regency period for now to focus on preparing dresses from 1912 to wear to Titantic-themed events in April. I’m hoping that by starting early I will be able to spread the workload out and include lots of beautiful details.
I am making the dress on the right side (the black one) and I plan to include beaded panels (this is why I am getting an early start!)… I can see a beaded pattern: the top and mid beaded sections appear to have an inner outlined area that mimics the exterior shape of the beaded panel and the remaining space appears to be filled in by zig zags. Similarly, the bottom panel appears to also be filled in with a zig zag pattern. (Or is it a pattern more curvy than a zig zag?)
(From Vol. 59 of the magazine Bon Ton)
I feel like I have a clear idea and can move forward with the beading, but at the same time I am doubting myself and thinking that perhaps I need to do more research on 1912 beading motifs. Do you think I can take creative license and go forward with the information I can glean from the Bon Ton image? I did find this example of an extant 1912 beaded dress that is similar on the one from Bon Ton.
1912 Beaded Ball Gown1912 Beaded Ball Gown
I don’t own any books that are specific enough to assist me in this search and various online searches have been generally disappointing. And yet it seems that someone out there must have some good information! Do you know of any sources for information on Edwardian beading motifs? I hope to hear from you, if you do have any ideas!
Despite the long name of this post… Here it is! My (almost) finished 1819 Regency Ensemble! The ensemble includes an early 19th century white linen chemise, 1815-1820 pink cotton corset, 1815-1825 ivory cotton gown, 1819 brown velvet Spencer, 1819 straw bonnet, and mid-19th century fur muff (ok, so it’s not quite as giant and droopy as a Regency muff… but it was cold outside!). You can click on the links to see more about each piece. There is more to come on the gown and bonnet.
Right now I want to focus on the completed Spencer and its details. Please click on the link above to see my research for the Spencer: it is based off a Spencer at the Metropolitan Museum of Art. You can see pictures of the mockup Spencer here. The Spencer is constructed of brown cotton velvet that is flatlined with white cotton. It is trimmed with green cotton cording, vintage brown lace, and green tassels to match (Aren’t the tassels so adorable?).
1819 SpencerBack of the 1819 Spencer
I wore this Spencer to the Massachusetts Costumers annual Regency Holiday Tea. This year, in addition to having tea, we visited the Lyman Estates Greenhouses, which were built in 1804 and added to in 1820, 1840, and 1930.
On to see more of the greenhousesOrnaments hanging from a tree!Picture time!Admiring the decorSo many beautiful things to look at
The tea was lovely and I do believe that my Spencer turned out wonderfully! Spencers are so adorable and varied. I hope to make more in the future… but there are other things to do before I go back to Spencers. The next big push is going to be Edwardian outfits for Titantic evens in April!
I recently shared with you my research for a Regency Spencer! I found many inspiring images, but below is the one that I chose to reproduce, with some creative license, of course. 1819 is the specific year much of my Regency ensemble is aimed at, so this Spencer fits in perfectly! Aren’t the tassels adorable?
1819-1822 Spencer at the Metropolitan Museum of Art1819-1822 Spencer Back
First of all, let me share pictures of the mock-up of this garment!
I draped the pattern and left seam allowance on the draped pieces (to eliminate the step of creating a paper pattern from my muslin) so I could move straight to the mock-up stage. In this case especially, I felt the mock-up to be essential to the fit of the spencer (especially the seams in the back) as well as to reaffirm the scale and placement of the decorative elements. Only after I had fit the Spencer and marked the necessary alterations did I rip open the seams and use the muslin to create a paper pattern.
1819 Spencer Mock-up1819 Spencer MockupBack: close upSleeve: close up
Coming soon will be pictures of the finished garment!
Let me start by explaining my reasoning about adding to my Regency wardrobe. You see, I had two events in mind for which I needed two different Regency looks: the Massachusetts Costumers annual Regency Holiday Tea and the Commonwealth Vintage Dancers 1812 Ball. What to wear???
“Well,” I thought, “I have an 1819 dress that I built last year for the Sense and Sensibility Ball… but I don’t have the right corset to wear under it. Nor do I have any way to make the ball gown into day wear… And, now that I think of it, what will I do with my hair for a day style???”
The first and most foundational step was to build a corset to provide the proper support and shape for the Regency period. You can see my research and construction of the corset in previous posts.
The next step was to turn my ball gown into day wear! Well, Spencers are a classic Regency garment that can perfectly disguise my ball gown by hiding the short sleeves and low neckline, thus turning it into day wear. Perfect! After the Spencer will come the adventure of finding a suitable hair/hat solution.
What is a Spencer? It is a short, waist length jacket from the 18th and 19th centuries first worn by men but quickly adapted into women’s wear. The garment is named after George John, the 2nd Earl of Spencer who was an English politician during the last quarter of the 18th century and the first quarter of the 19th century.
Early 19th Century Fashion Plate at LACMA (Spencer on the right)Fashion Plate, 1807 at LACMA (Spencer on the right)
Right now I am interested in the Regency style Spencers, since that is what I will be making, so I will focus my research on that period. Here are some of the Spencers I found most inspirational for my reproduction. These garments are from the Metropolitan Museum of Art’s collection.
1819-1822 SpencerEarly 19th Century SpencerEarly 19th Century Spencerc. 1815 Spencer1814-1820 Spencerc. 1816 Spencerc. 1818 Spencer1804-1818 Spencer (That is a lot of tassels!)c. 1820 Spencer
Let’s leave the Spencer here, in the research stage, for today. More will be coming soon with mock-up pictures of my reproduction!
While looking for research images I did come across this blog post that shows a reproduction of an 1815 Spencer at the LACMA. The post (and her other posts as well) have great commentary about the research and construction of reproduction garments with lots of pictures included!
Well, it’s been a little bit of time since I shared with you my research and plan to build a Regency corset to accompany my 1819 gown. I’m excited to say that I was successful! The corset is complete, although I still plan to quilt a diamond pattern along front rib section within the next few months (I’ll share photos of that once it is complete). You can see the diamond quilting in the photos in the link, above.
The dummy isn't quite the right shape for this corset, but here it is!Corset back
This corset is constructed of two layers of pink cotton twill with a layer of coutil sandwiched between them to provide stability and support. I began construction by flatlining the coutil to the outer layer of twill. I sewed the non-gusset seams (the front and back pieces) together in these flat lined pieces, leaving the inside twill layer for later. Each gusset had all three layers flatlined together and sewn into place with the seam allowances pressed away from the gussets themselves. Then I went back and basted the inner twill pieces into place that had been left aside. I turned under the seams on these pieces and hand sewed them over the seam allowance of the gussets so that no seam allowance was showing.
After completing the inside construction I bound the edges with purple bias silk taffeta, scraps from another project. The final step was to create eyelets. I decided to do these by hand in purple cotton embroidery floss. Each eyelet is reinforced with a metal jump ring that is caught under the thread on the inside of each eyelet. This reinforces the edge of each eyelet and keeps them from stretching out of shape when laced. The jump rings are only visible on the inside of the eyelets, where the stitching is bulkier because it passes over the rings.
Hand sewn eyelets, on the outside
The corset is lightly boned at center front and center back. I struggled over what material would be best to create the 2″ wide center front bone. Eventually I remembered a suggestion from a friend, Carly, who had used a creative option for boning that I decided would be perfect for this project. Home supply stores such as Home Depot and Loew’s sell plastic wire ties that are about 3/8″ wide and which come in lengths up to about 20″. The ties are a good 1/8″ thick, strong, but still bendable. They have a similar tension to a steel bone, but are a little thicker. And the nice thing is that you can cut and shape them easily with scissors! Of course, plastic boning is not historically accurate, but it is functional and affordable (a pack of these wire ties is about $5, and there are about 12 per pack) and creates a boned garment that feels similar to one boned with steel bones (and once you finish the garment, who would know?).
In this corset, each side of center back has a single bone. The 2″ wide center front bone is actually 5 wire ties attached to one other with (shhh!!!) masking tape! This is an experiment that I hope will work (I have slight fears that body heat might one day cause the tape to lose its grip and the bones to start to move around in funny ways, or worse, that the tape will leech sitcky goo onto the fabric that will stain the exterior). I put the center front bone in between the layer of coutil and the inside twill, so even if the masking tape does one day create stains, it is unlikely that the stains will make it to the outside of the corset.
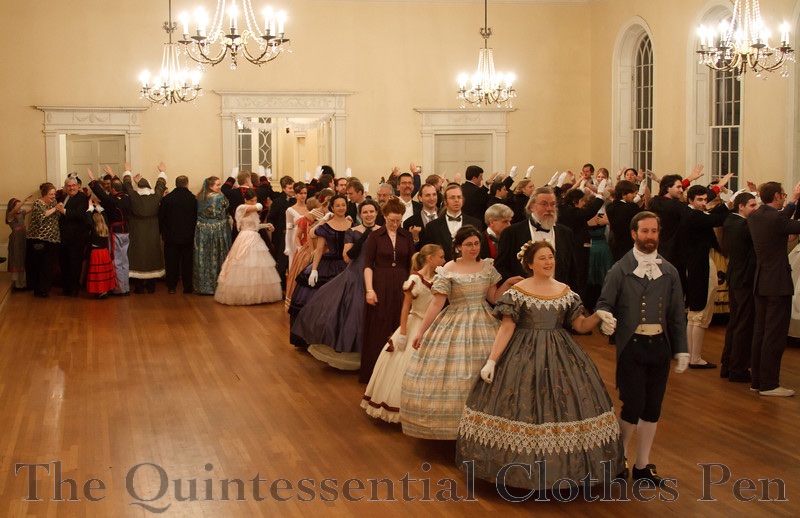
Well, I promised you pictures of my new hair crescent in place… and I did wear it with Belle, my dark blue ball gown, to Fezziwig’s Ball recently… but I was so caught up in the fun of the evening I forgot to stop and have someone take a still picture of the crescent! (I’m sure I will wear it again, though, so hopefully I’ll remember at that time.) This post about last year’s Fezziwig’s Ball gives you background on the theme and title of the ball.
Ready to whirl away on a dancing adventure? Look on!
As a final note, let me just say that the evening was wonderful. My favorite moment: the Grand March proceeding up and down stairs, twice! The room was so full that the leaders ran out of options and marched down the stairs!
Over the summer I built Annabelle, a white flounced 1860 ball gown, in order to have an alternative to my dark blue 1860 ball gown. My intention was to adorn Annabelle with flowers, as in my inspiration fashion plate from Godey’s Lady’s Book (Annabelle is based off of the gown on the far right); however, I did not have time over the summer to add the flowers.
September 1860 "Dressed for a party" (Fitting title, don't you think?)
I decided to wear a be-flowered Annabelle to the Commonwealth Vintage Dancer’s German Cotillion last week. My original plan was to hand make the flowers from hand painted pink silk organza. I started on that endeavor, but the process was time consuming and so I have only made perhaps 100 flowers (first: cut 5 rounded point shapes, second: fray check the edge all around, third: gather the center of each flower). Each flower is about 1 1/2″ across. When I went to sew the flowers on the dress I realized two things that made me change my mind about using them: the flowers were too small for the scale of the dress and I would need so many more hundreds to make the look work. In the end I used purple millinery flowers, from the fantastic stash I mentioned in the post about my 1860 hair crescent, to adorn the dress. I actually really enjoy the purple flowers and the scale is far better for the overall look as well.
Annabelle with flowers!
I used matching flowers plus a few others in the pink family to create a wreath for my hair to match the dress.
Annabelle backMatching hair wreath
If you would like to see what Annabelle looked like without the flowers, you can visit the following posts and see pictures: Of Flounces and Dance Cards: Part I and Ochre Court 1860s Ball 2011. And, to finish off this post, here are a few pictures of Annabelle in action at the German!
Playing dance games at the German CotillionPlaying dance games at the German Cotillion
These fabulous 24″ dolls are at the Metropolitan Museum of Art. They have a compelling story, which you can read about here, on the Diary of a Mantua Maker’s blog. As noted, they are not entirely historically accurate, but they are beautiful, nonetheless. The details are exquisite! Here are some of my favorites: I encourage you to go to read and see more by clicking on the above link!
1884: Nina Ricci1867: Jacques Fath1828: Henriette Beaujeu1774: Jean Desses1733: Jean Bader
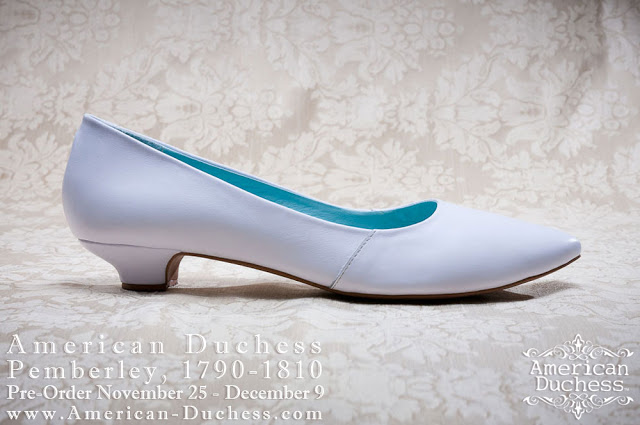
I’m sure many of you have read about the Pemberley shoes being offered by American Duchess… but in case you have not seen yet, or in case you need a reminder… American Duchess is now offering a Regency style, historically accurate shoe! The shoe is available for pre-order today (November 25 through December 9) and at least 100 orders must be placed for the shoe to be produced. Let’s make it happen!
Also, given that it is the holiday season (which is a time for wishes, you know), I would like to wish that a higher heel Pemberley shoe would one day be produced by American Duchess… I envision a shoe with a 1 1/2″ – 2″ heel that can be worn with late 19th century clothing, like the styles below…
I have a whole list of projects to work on during this Thanksgiving period: I need to reinforce some trim and closures on various gowns that will be worn during the next few months, I need to build a flowered hair accessory (I hesitate to say wreath) to match my blue 1860s ball gown, Belle, and I need to construct a Regency corset! I’ll pass over the stitching of the trim and closures (because, really, I don’t think that would be an exciting post) and save the hair ornamentation post for later. That leaves us with one more topic… The Regency corset.
I don't have very many good pictures of this gown (I'll have to get some!) but I'm on the far right. Click on the link to the left to read more about this ball!
Here’s the background on this plan: I have a Regency dress that I built last February. At the time, I could not build the undergarments that would accompany this gown at that time. (You can read the story of the dress here.) Now I have time and so I plan to backtrack to this project and make the right undergarments! I have a chemise which will work (you can see it under my 1780s corset in the photos in this post) because chemise styles were unvaried from the late 18th century through the first quarter of the 19th century; however, I do not currently own a Regency period corset!
First of all, what is the Regency period? The term brings to mind Jane Austen books and films and general ideas of the early 19th century, but upon closer inspection Regency is actually more specific than I was thinking. I’ve got two relevant definitions for you from the Oxford English Dictionary.
Noun: Senses relating to government or rule by a regent. Usu. with capital initial. The period during which a regent governs; spec. the period in France from 1715 to 1723 when Philip, Duke of Orleans, was regent, or in Britain from 1811 to 1820 when George, Prince of Wales, was regent.
Designating a style of architecture, clothing, furniture, etc., characteristic of the British Regency of 1811–20 or, more widely, of the late 18th and early 19th centuries, featuring neoclassical elements often with Greek and Egyptian motifs.
Regency is a more specific period of time than that of the overarching Georgian period, which includes the reins of George I, George II, George III, and George IV of Great Britain. The Georgian period is from 1714-1830 and sometimes includes the years 1830-1837 as well. 1837 marks the beginning of Queen Victoria’s reign, which is where the term Victorian comes from.
Upon reflection I realized that I had forgotten the year my dress is from! Certainly it is Georgian, but is it really Regency? I had made the gown in a rush and so I had to retrace my steps and really think about what specific span of years the gown fits into to answer that question. It turns out that the gown is, in fact, from the Regency period: it is from 1816-1819! Whew!
Once that information was determined, I could move forward and research the corset shapes and patterns of that specific period (that is, 1816-1819). It turns out that patterns in Norah Waugh’s Corsets and Crinolines jump from the late 18th century to the 1820s; however, I did find images of extant corsets from the first part of the 19th century. “Oh well,” I thought, and used the images and the 1820s pattern in Corsets and Crinolines to drape a pattern.
Here are some of the research images from the Metropolitan Museum of Art. I’ve included a wide span of years so you can see the development of the corset shape over time. Note the bust and hip darts as well as the beautiful quilting that begins to define the waist by the 1840s.
c. 1811 Cotton Corsetc. 1811 Cotton Corset Back1815-1825 Corset (I really like the simple lines and straight forward color combination in this garment: this is my most inspiring image. It is interesting that the lines of this corset are so simple, relative to these other examples. This corset seems to be lacking hip darts or an inward angled front panel plus side panel.)1820-1839 Cotton and SIlk Corset (the embroidery on this corset is great)1820-1839 Cotton and Silk Corset Back (I especially like the back)1830-1835 Cotton Corset1830s-1840s Corset
I am including these last ones because I think they are lovely, even thought they are not from the period I need to build. I’ll have to keep them in mind for future!
1820 Corset (this is in the Collection of the Kyoto Costume Institute)1830-1839 Cotton Corset