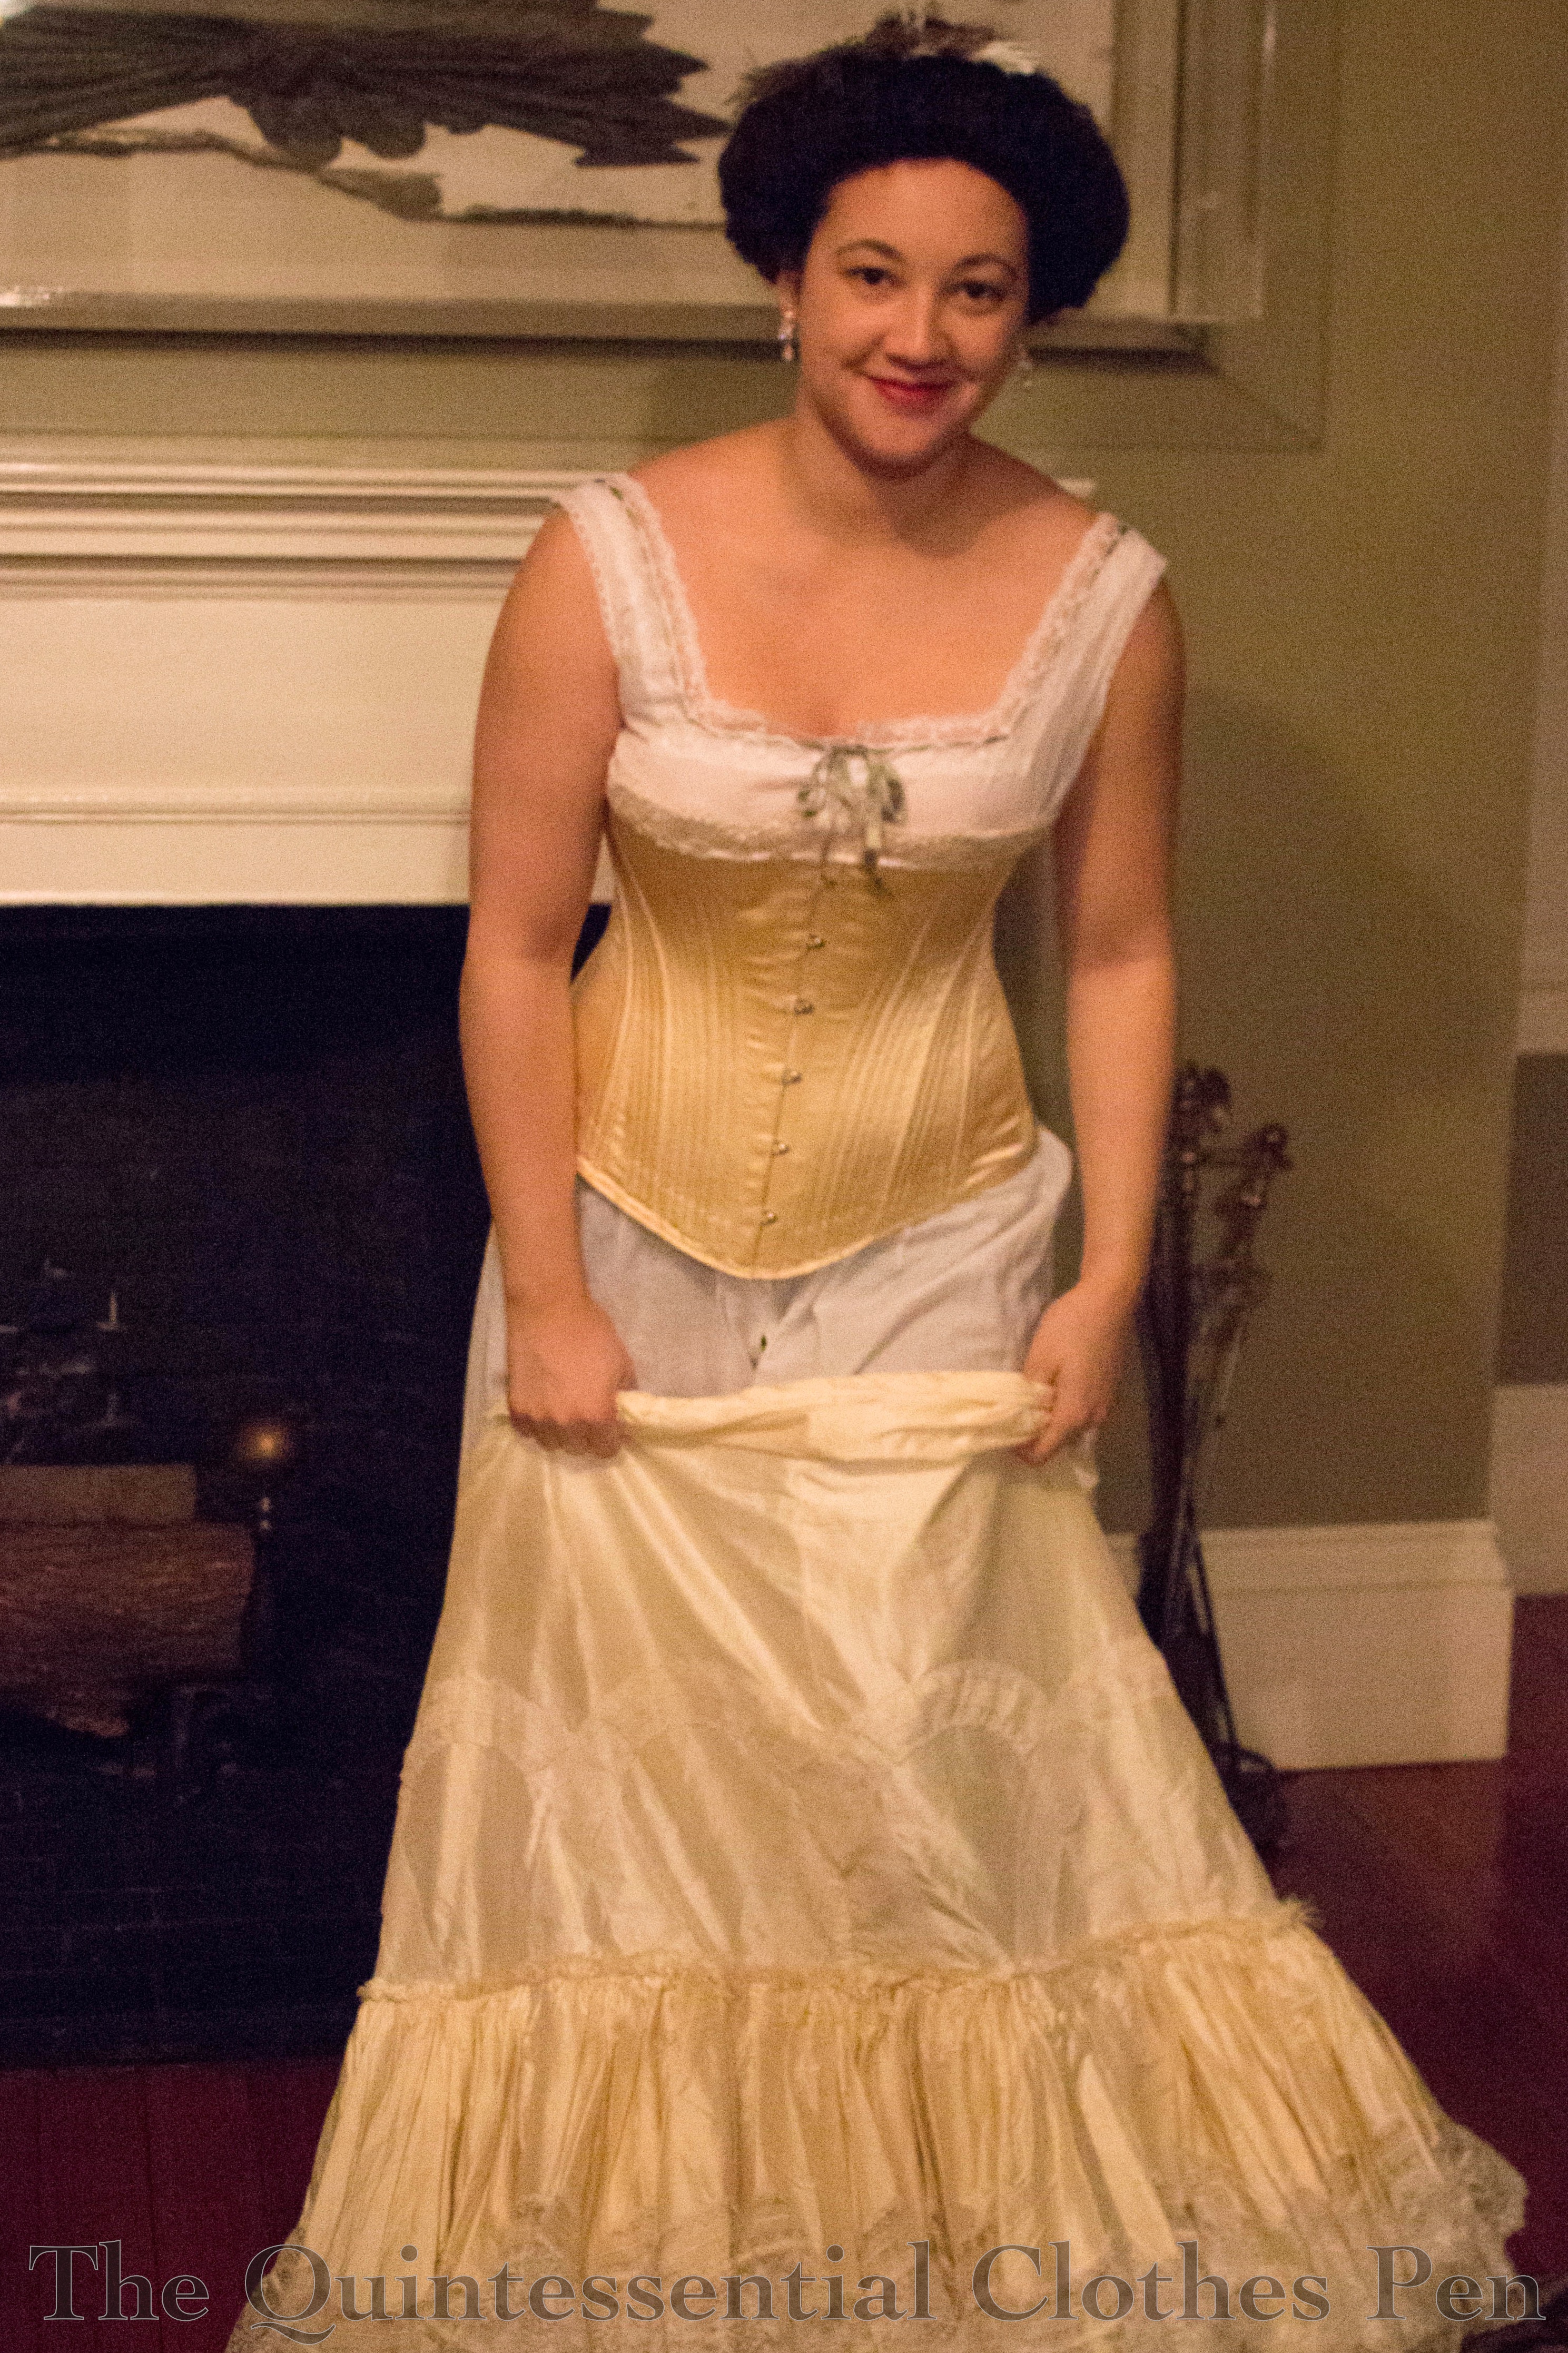
I’m excited that the 1880s corset I made last summer is finally, actually, finished! I got around to adding the finishing touches, lace and ribbon around the top, over the fall. Now there is nothing left to sew, and, after two wearings I can say with confidence that there are no little alterations I want to do! Yay!
The first wearing was in August last year, with my 1885 frills and furbelows dress. The second wearing was in January this year, under my new 1899 evening gown. Both times I found the corset to be extremely comfortable to wear. And in January, I was able to get pictures of the completely finished corset! So, without further explanation, here is the corset in its finished form. (If you didn’t get to read all the intricate details of the patterning, construction, and steaming process, you can see all past posts here, in the project journal.)
The super frilly petticoat was a great prop for these photos! (I’m much better at looking natural rather than awkward when I have props!). It’s from 1903 and was finished in 2011. I’ve worn it many times but have never taken photos of it on me. It’s entirely silk, with two layers of flounces, both made of multiple gathered circles and edged with wide lace in a scallop pattern. It closes with a silk ribbon that threads through the waistband in manner described in Authentic Victorian Dressmaking Techniques. It’s decadent to wear–it makes rustling sounds, has great body, and when you take it off it stands up on it’s own! I can’t remember how many yards of fabric went into this petticoat, but I know it was a lot, with all the circles in the flounces!
Awesome petticoat aside, this corset is pretty decadent to wear, also. Silk, tons of curvy seams and bones, perfectly fitted, lovingly, painstakingly, and beautifully sewn… what’s not to like!
Thanks to the usual camera toting culprit for doing a corset photo shoot with me in the midst of getting dressed for a ball! You know who you are.
(As a side note, it’s a challenge to take historical clothing underwear pictures that look reasonably like historical photos and images but don’t go into the modern lingerie photo direction. See the inspiration here and here? I tried this as well as the standing pose in the second link, but awkward really describes the outcome. But I think we did pretty well in the end. It’s amusing to feel these photos are revealing when I’m quite dressed by modern standards… Do you feel the same way about taking pictures in your historical underwear?)
Most of the work on this new corset was completed during the sewing process, which you can read all about in detail in this previous post. The remaining steps were to starch and steam mold the corset, to floss the corset, and to add lace to the top of the corset.
One of the most successful was the steam-moulding process developed by Edwin Izod in 1868, and still used in the 1880s to create elegant corsets such as this one. The procedure involved placing a corset, wet with starch, on a steam-heated copper torso form until it dried into shape. The result was a beautifully formed corset, whereby ‘the fabric and bones are adapted with marvellous accuracy to every curve and undulation of the finest type of figure’ (The Ladies’ Gazette of Fashion advertisement, London July 1879).
To begin, I made a solution of cornstarch dissolved in water. I put 2 tsp to 350 ml water, but wound up using only about 1/5 of that. On a scrap, I tried applying the starch solution with a spoon, but decided against that because it left a visible starch crust on the fabric as it dried. What I found worked better for even distribution of the starch solution was a spray bottle. I sprayed the inside of my corset (the coutil layer) until it was thoroughly damp, then put it onto Squishy (since I don’t have a steam-heated copper torso of myself available, darn!): she’s a squishable dress form that I had previously padded to be close to my measurements and proportions (that’s an important point, that she had my proportions–padding in the right areas so the corset would dry into my shape!) and covered with a plastic garment bag so the starch would stay on the corset. Once the corset was on the form, I steamed it all over using a Rowenta Steam-n-press hand held steamer about three or four times. Then I intermittently steamed it again while it dried overnight.
Steaming the starched corset on Squishy.
I only did one application of starch and I believe it had some effect. It’s not as stiff as cardboard and able to stand up on its own, as I have heard some steam molded corsets described, but it does seam to want to create the curves that were patterned into it with ease and I do think that the bones took on a little of the curvy shape during the drying process as well. (Here is an example of an extant very stiff steam molded corset. Look at how well it retains its shape! I want to do some more research regarding the Symmington corset company but that’s going to have to wait a bit.)
After the corset was dry, I flossed the boning channels using ivory silk thread and the flossing pattern from my inspiration corset. Unfortunately, I only had enough of the thread to floss the bottom of the channels… so I have to deviate from my inspiration a little and not have flossing across the top.
The last step will be to add lace across the top of the corset. I’d like to use the same lace that I’m using to trim my in-progress 1885 bustle dress, but I’ve only got a small bit left and I want to make sure the dress has enough before I use it on the corset. I’ve started figuring it out but am not confident yet that I have enough, so I’m going to hold off on taking absolute final pictures of the corset with the flossing and lace until I’ve officially decided that point. Regardless of the lace issue, we’re going to call this corset done, because it is entirely wearable at this point, just in time for it to qualify for the HSF/M #6: Out Of Your Comfort Zone!
Just the facts:
Fabric: A remnant of yellow silk duchess satin, a remnant of ivory linen, and white herringbone coutil.
Pattern: Created by me (more details in this blog post about mockups and this one about the pattern pieces themselves).
Year: c. 1885
Notions: 38 bones (34 of which are spiral steel and 4 of which are flat steel), a metal busk, metal grommets, cotton twill tape, thread, silk thread for flossing, and a lace for the corset (with the addition of decorative lace sometime soon).
How historically accurate is it?: As accurate as I can be using the research I’ve done and the materials that are available in 2015. I think it passes Leimomi’s test of being recognizable in its own time.
Hours to complete: Many! Patterning, cutting, sewing, finishing…
First worn: Only for fitting the mockup of the dress that inspired it–but I plan to wear it with that dress in August.
Total cost: The fabrics were all from the stash, as were most of the notions, except for the bones and busk, for which I paid about $50.
New techniques: Steam molding! But I also added a few new details to the corset construction process. Details in this construction in detail blog post.
Reflecting back on the process, I think I probably could attempt to starch the corset with a stronger solution or more applications, but at this point I’m satisfied and ready to move on to the many other things I’d like to sew this summer, including the 1885 bustle dress that sparked this project in the first place! (I’ve actually already moving ahead with that–I fit the mockup bodice over the corset and was very pleased! More on that in a few weeks hopefully!)
This corset is made up of three different fabrics, all sandwiched together and flat lined. The outer fashion fabric is a scrap of butter yellow duchess silk satin that just barely fit all my pattern pieces (whew!). The inner layer is a white herringbone cotton coutil. Sandwiched in between these two layers is a tightly woven slightly off white linen. I chose this fabric for a few reasons: #1, because it was in the stash and an odd shaped scrap not likely to be used for a garment that required large pattern pieces; #2, because it didn’t have any dye that might leech through onto the yellow silk; and #3, because it is tightly woven enough that I’m not worried about the bones poking through it over repeated use.
The three layers of fabric in this corset.
I decided to use three fabrics instead of the usual one (coutil) or two (coutil and a fashion fabric) for two reasons: #1, because I wanted an extra layer of fabric between my silk fashion fabric and my inner coutil layer so there would be less chance of any sort of spotting from the starch; and #2, because applying boning channels of any material would have been incredibly bulky and challenging with all the curves and bones on seams, but by having a third layer of tightly woven fabric I could sew boning channels anywhere I pleased without adding bulk.
After cutting out all 12 pieces in each fabric I machine basted the layers together so nothing would be sliding around creating bubbles while I assembled the pieces. Most of the basting wound up being removed as I moved through other steps in the process–either during the grading of the seams or while inserting bones.
Once the layers were flat lined I put the grommets in the two back pieces. Normally, I do this later in the process, but this time it worked well placed here. I used size 0 silver grommets. They are a little larger than extant corsets seem to have, but they are what I had available. After that, I assembled the pieces along their vertical seams. Then I graded each seam so that when it was pressed towards the back of the corset it would be less bulky.
A graded seam.And here’s what it looked like with all the seams graded and ready to go.
Most of my previously made corsets have flat felled seams, some of which are used as boning channels and some of which are not. I prefer this method because it provides more strength along each seam than any method in which seam allowances are left pressed open. In this case, though, 3 layers of fabric getting flat felled was very thick, so I decided to try a different method. I bound each seam with ⅝” cotton twill tape, not worrying about the fact that the graded fabrics closest to the original seam were not encased in the binding.
All the seam allowances bound with twill tape.
The seam allowances were all pressed towards the back, but not immediately topstitched as with a flat felled seam. Instead, they were caught and stitched down as I stitched boning channels. Some of them have boning channels that run all the way down the seam while others are held down by boning channels in enough places that, when combined with a binding on the top and bottom edges, will be sufficient to keep the binding flat and not allow any of the graded seam allowances to peek out.
With all the boning channels in place the bound seam allowances are caught in enough places that they won’t flip around.
Another detail unique to this corset is related to stitching the boning channels. Often when I flat fell seams for corsets I don’t also topstitch right along the seam. For this corset, however, I stitched an extra line of stitching next to the fold of the seam allowance. This detail is taken directly from my inspiration corset at the V and A. While this might provide a little extra strength, I believe it is mostly a decorative and flattening stitch.
On the left you can see how the seam has not been topstitched next to the fold, while on the right you can see the extra line of topstitching.
I was able to stitch most of the boning channels prior to inserting any of my boning. This corset was intended to have 4o bones, as the V and A description states, but wound up with 38. Unlike the original, which has whalebone, this corset has ¼” spiral steel bones except for the bones that flank the grommet channel, which are ¼” flat steel.
This is the first corset I’ve made that uses this much spiral steel. Usually I use flat steel, but these boning channels are much to curvy for that. The spiral steel definitely lends itself to the curviness of the corset, allowing it to shape to my body rather than making it a more cylindrical shape.
This is also the first corset I’ve made with this much boning. I’d say it has about double the usual amount of boning. That, combined with the three layers of fabric, make this one heavy corset (and heavy duty, too!)! Unfortunately, I don’t own a scale to weigh it, but the weight is surprising every time I pick it up.
The back of this corset has diagonal boning channels that bump up against a seam on one side and the grommet channel on the other. I order to sew those and also get a bone in them, I first stitched the bottom line of stitching, then inserted a bone and used a zipper foot to sew very close to the other side of that bone to create the channel. These diagonal back channels are where I lost 1 bone on each side of the corset. My estimates must have been off, because I had one bone that was way to long for the channel, but eliminating it fixed everything. I was ok with that deviation from my inspiration corset by this point in the process.
My boning channels got a little wonky up near the top (where the presser foot is), but it almost looks artistic, and is symmetrical on both sides of the corset. And I was ready to be done by the time I reached these boning channels!
The above picture shows another corset trick, also. When I’m stitching boning channels that end partway across a panel, rather than at the top or bottom, I leave my thread tails and do not backstitch. Once I’ve completed the channel I flip the corset over to the wrong side, use a seam ripper to pull both thread ends to the inside, hand tie them, and snip them close. That leaves no tiny thread ends on the outside of the corset making little shadows that look un-tidy. The method works wonderfully!
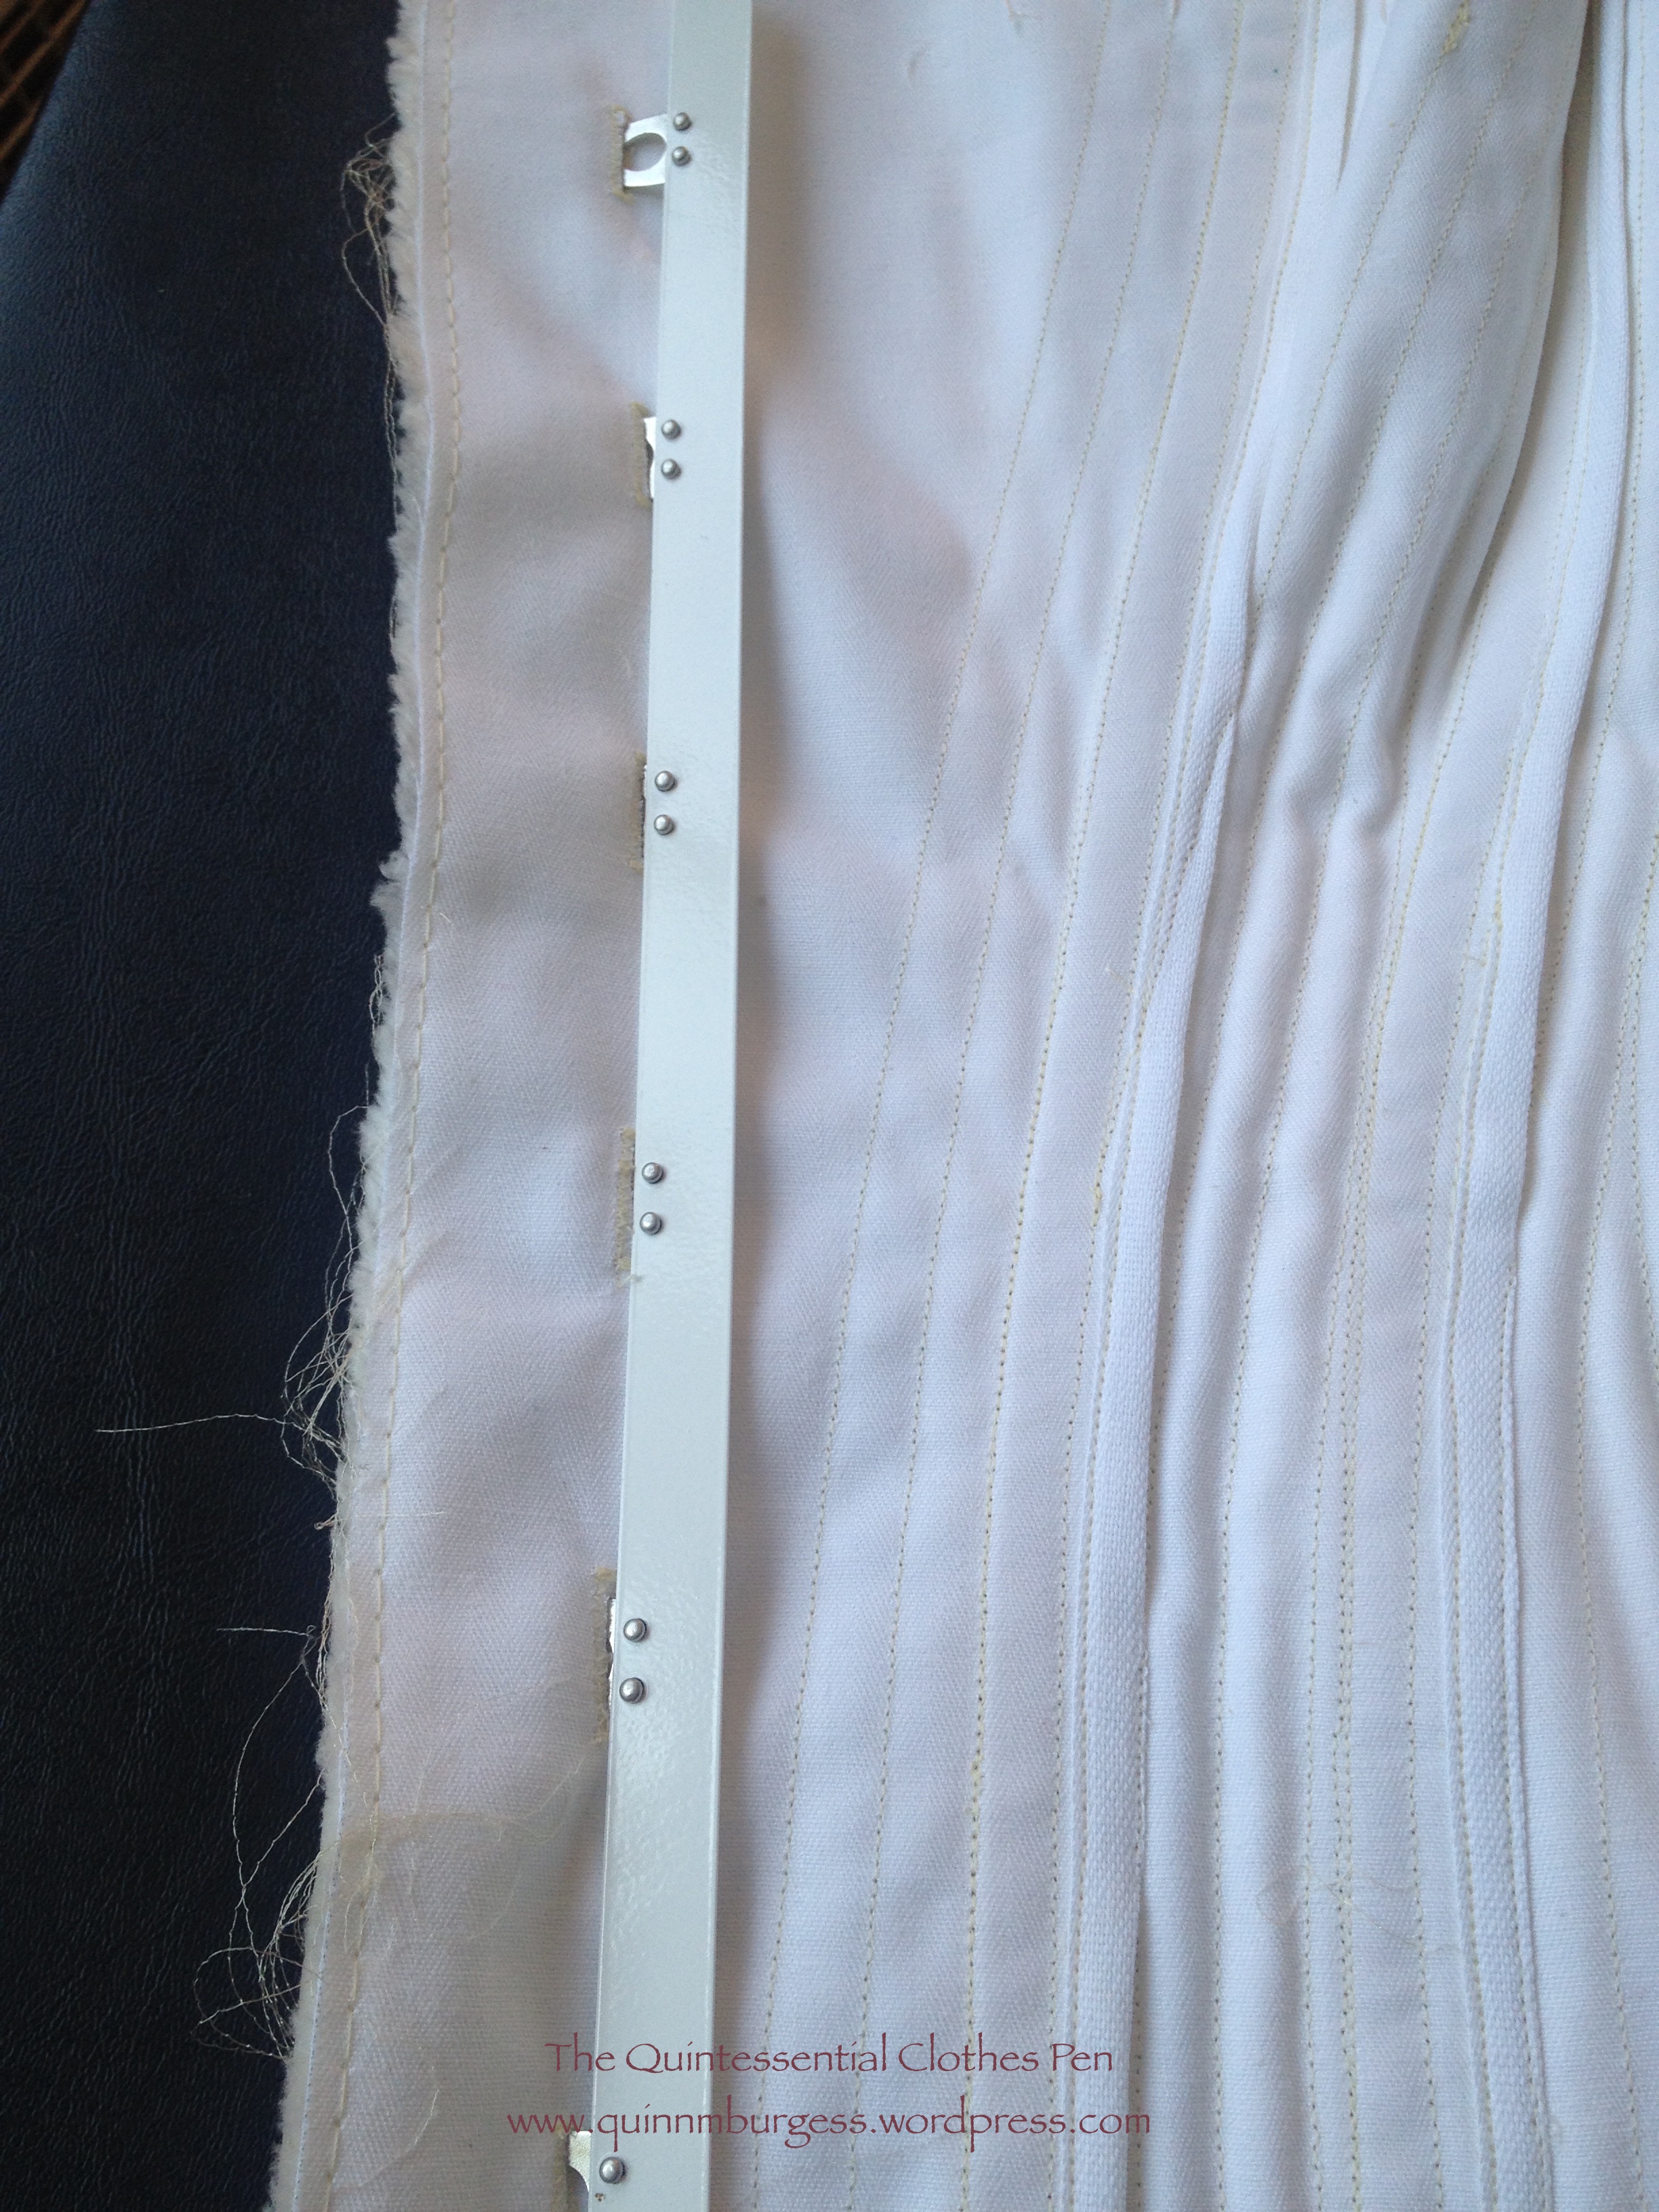
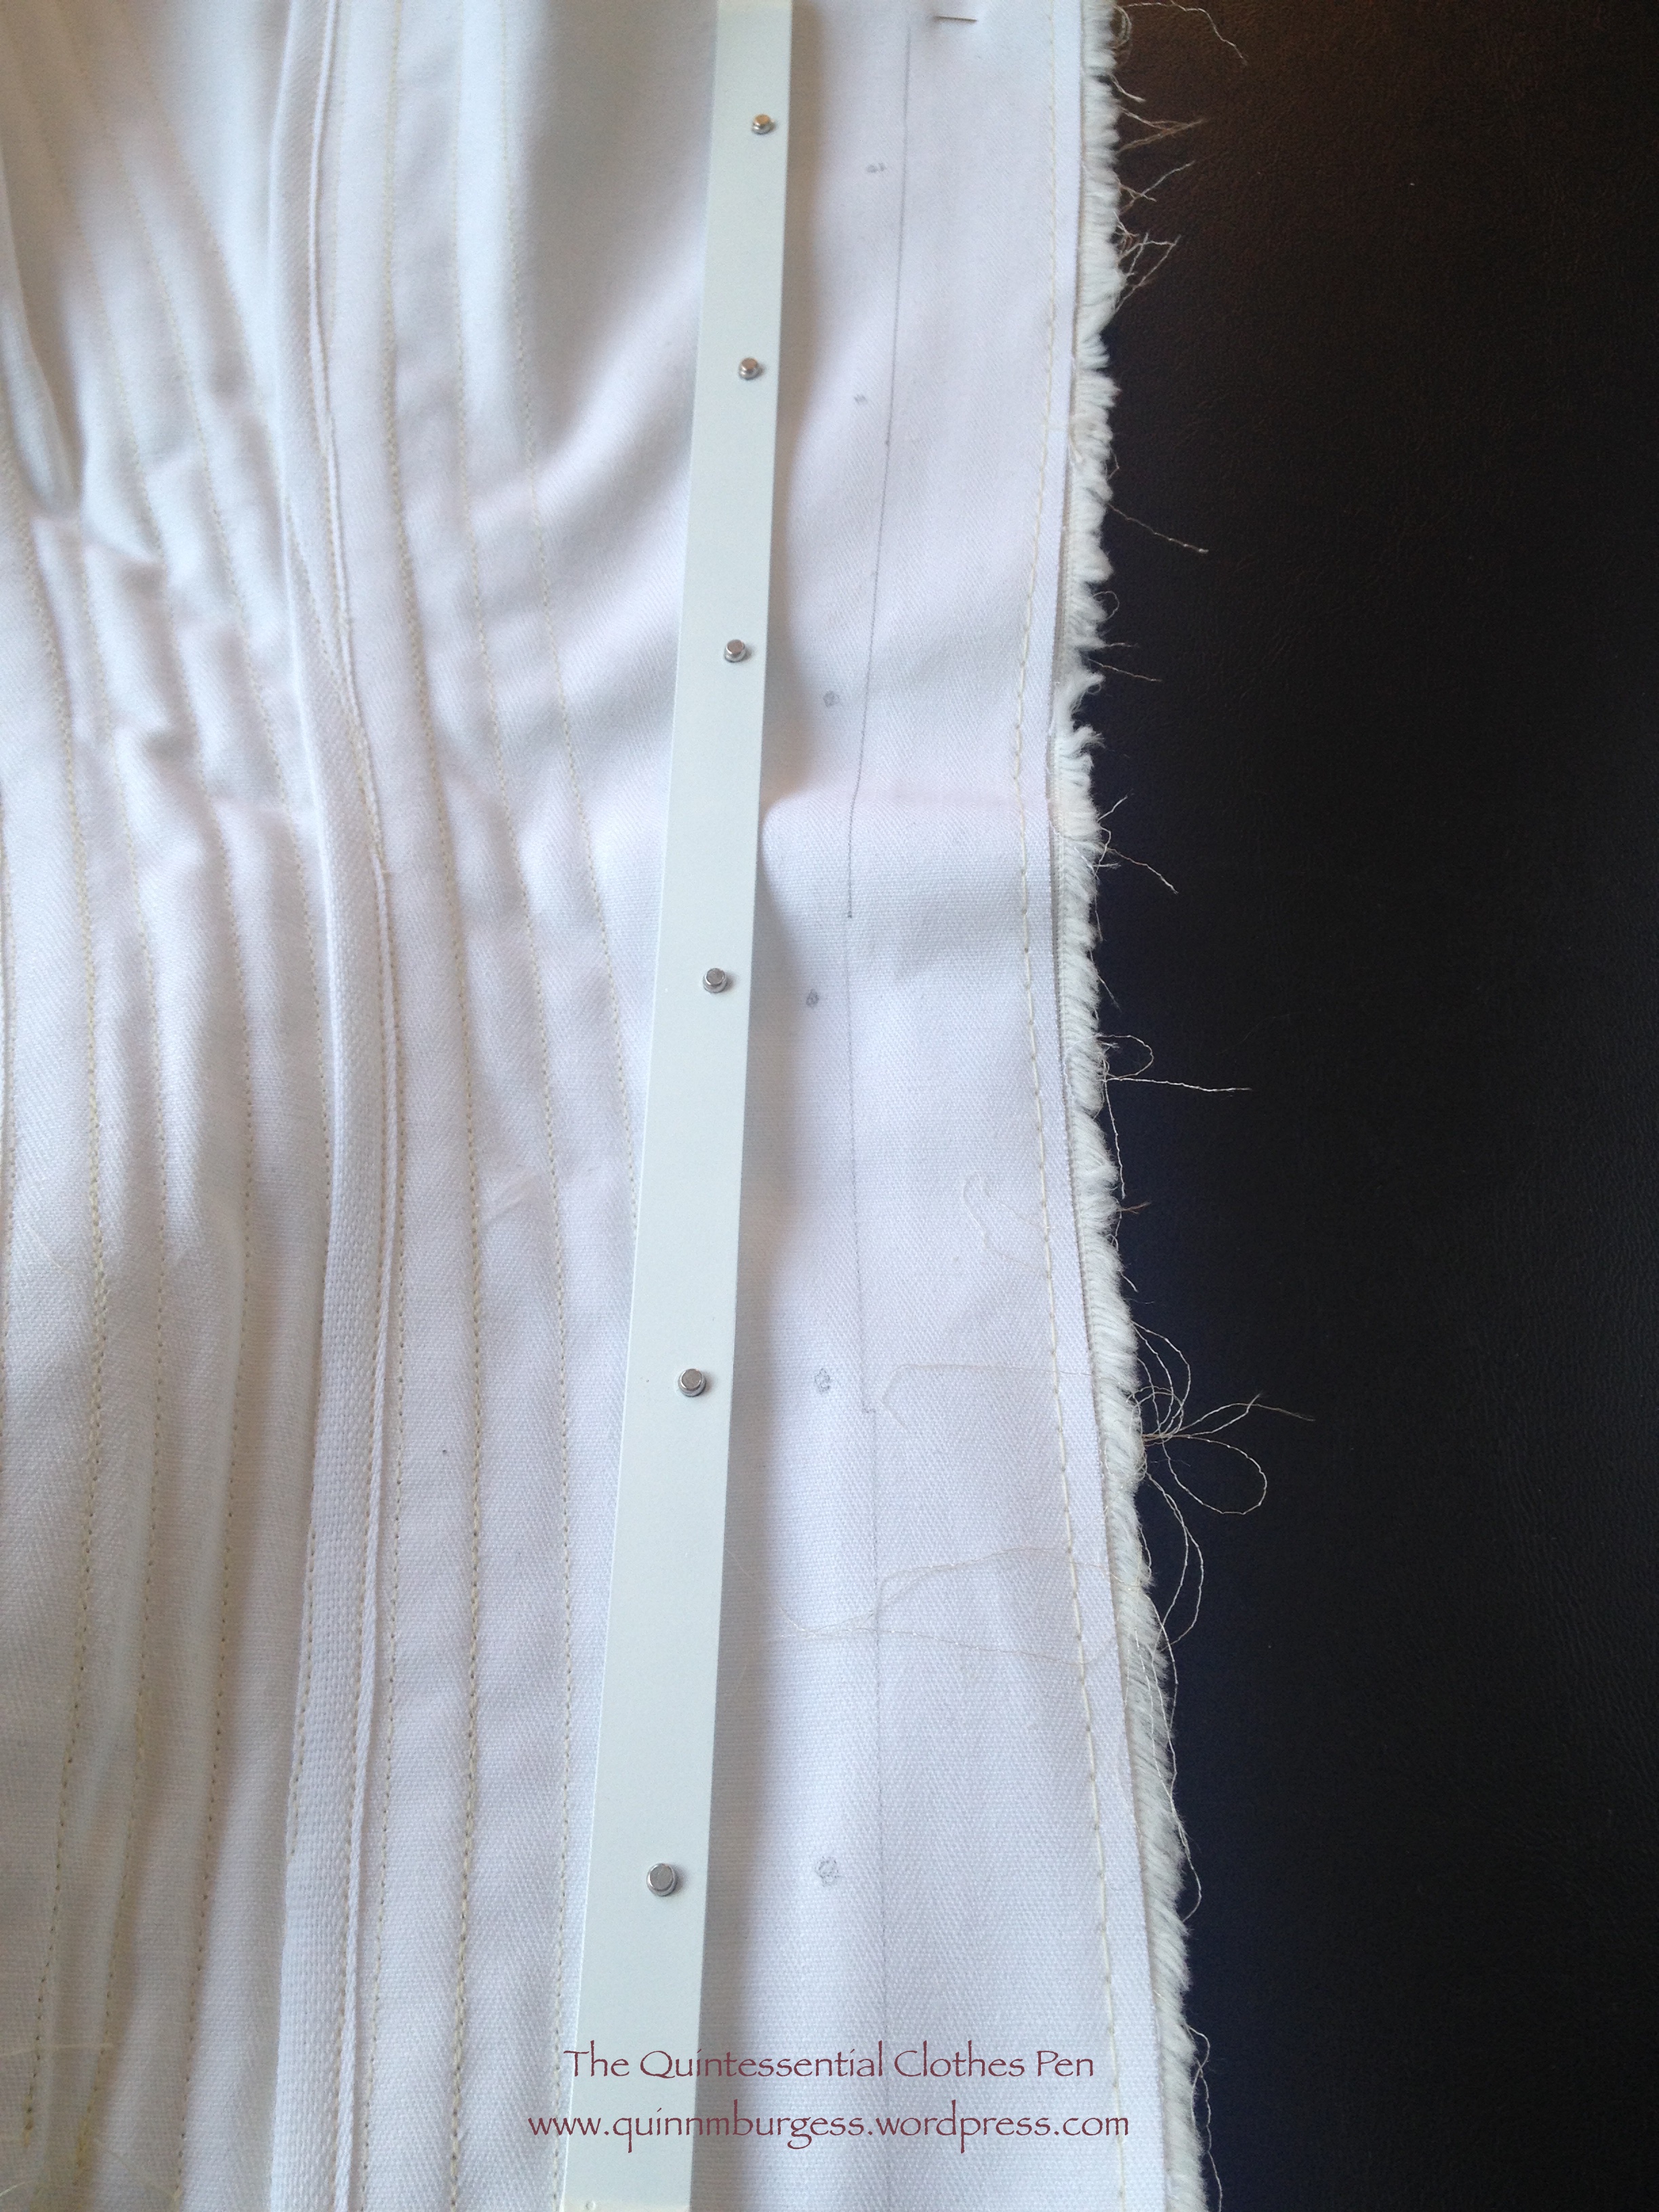
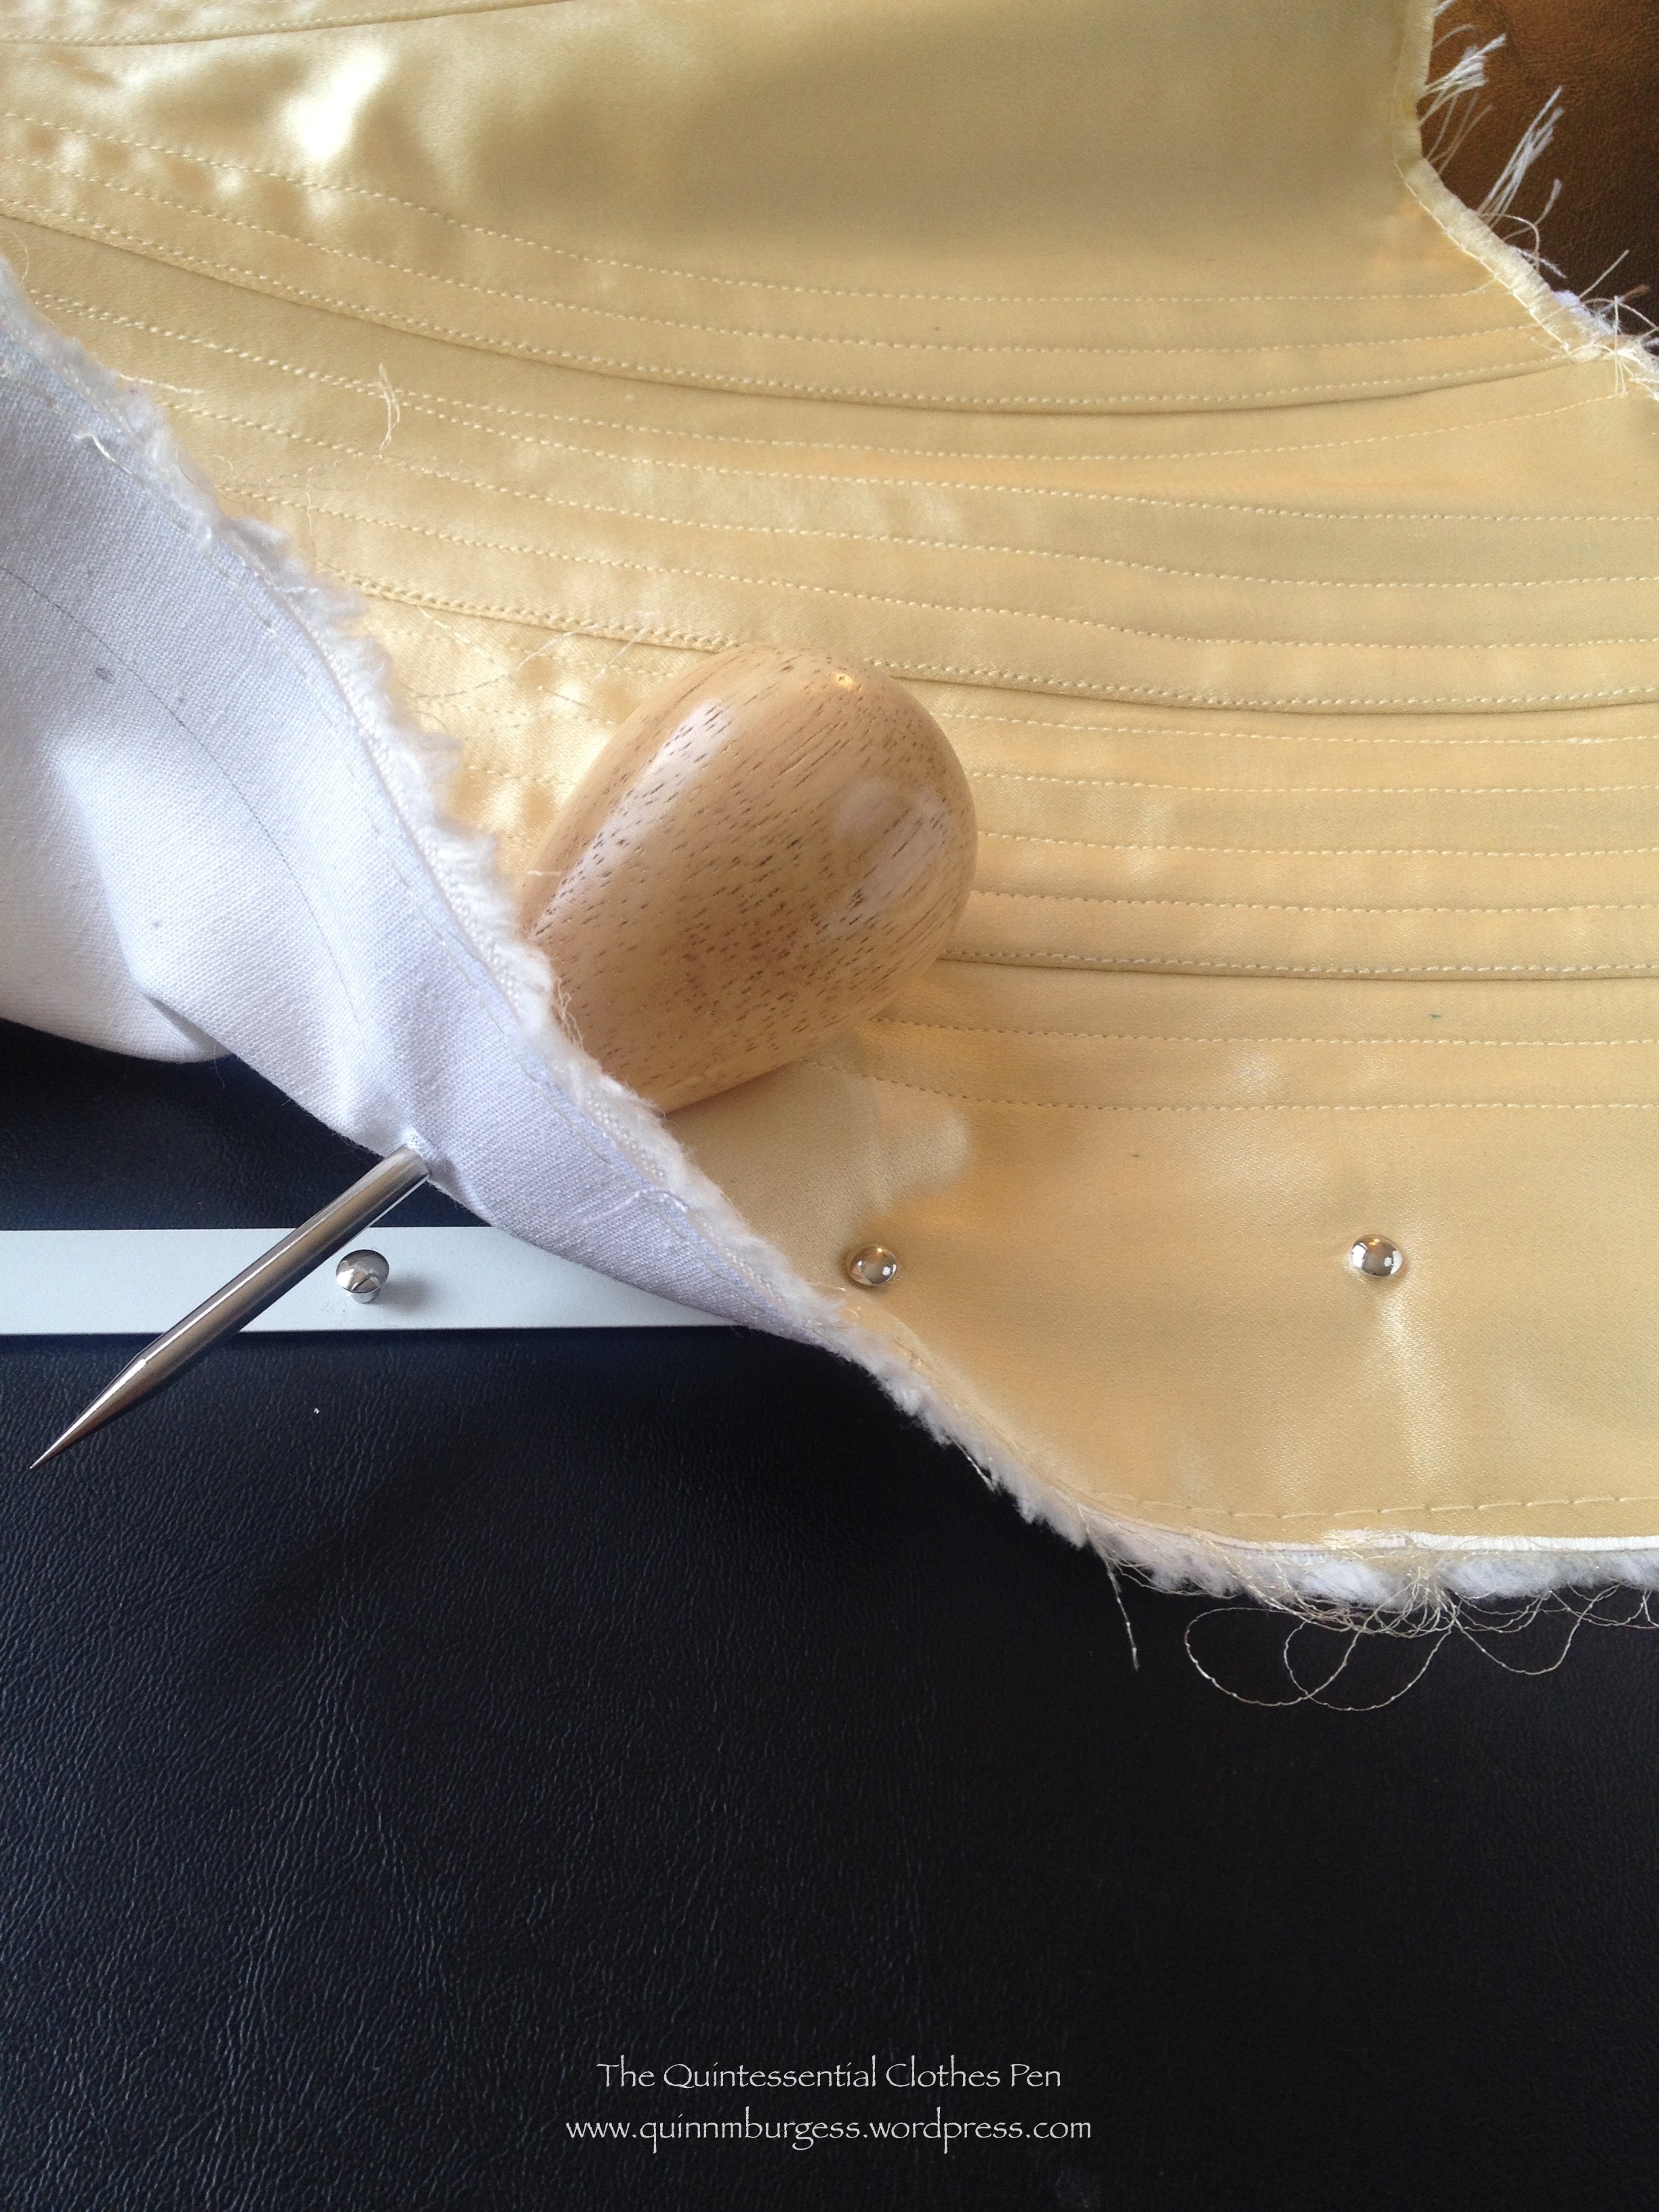
Once I finished the boning channels I put the busk into the two front edges of the corset. I thought I’d show you how I like to do those steps in more detail. After the steps that are pictured, I turn the extra seam allowance under the busk on the inside (trimming it if I’ve left too much) and top stitch with a zipper foot right next to the edge of the busk. On my older corsets, I stitched a straight line from top to bottom, but on more recently made corsets I curve around the top and bottom of the busk to keep it from sliding up and down (another detail I’ve noticed in extant corsets).
I’ve found that putting both sides of the front busk on a fold is nice and sturdy. I’ve also found that creating buttonholes for the loops to poke through helps minimize wear and tear on the corset over time as well.I make sure to make the buttonholes just larger than each loop and placed exactly so there are no bubbles anywhere.For the other side of the busk, you can see that I’ve roughly marked a fold line as well as the placement of each knob. Again, these have to be exactly placed.Then I use an awl to open up the weave of the fabrics so I can push the knob through.
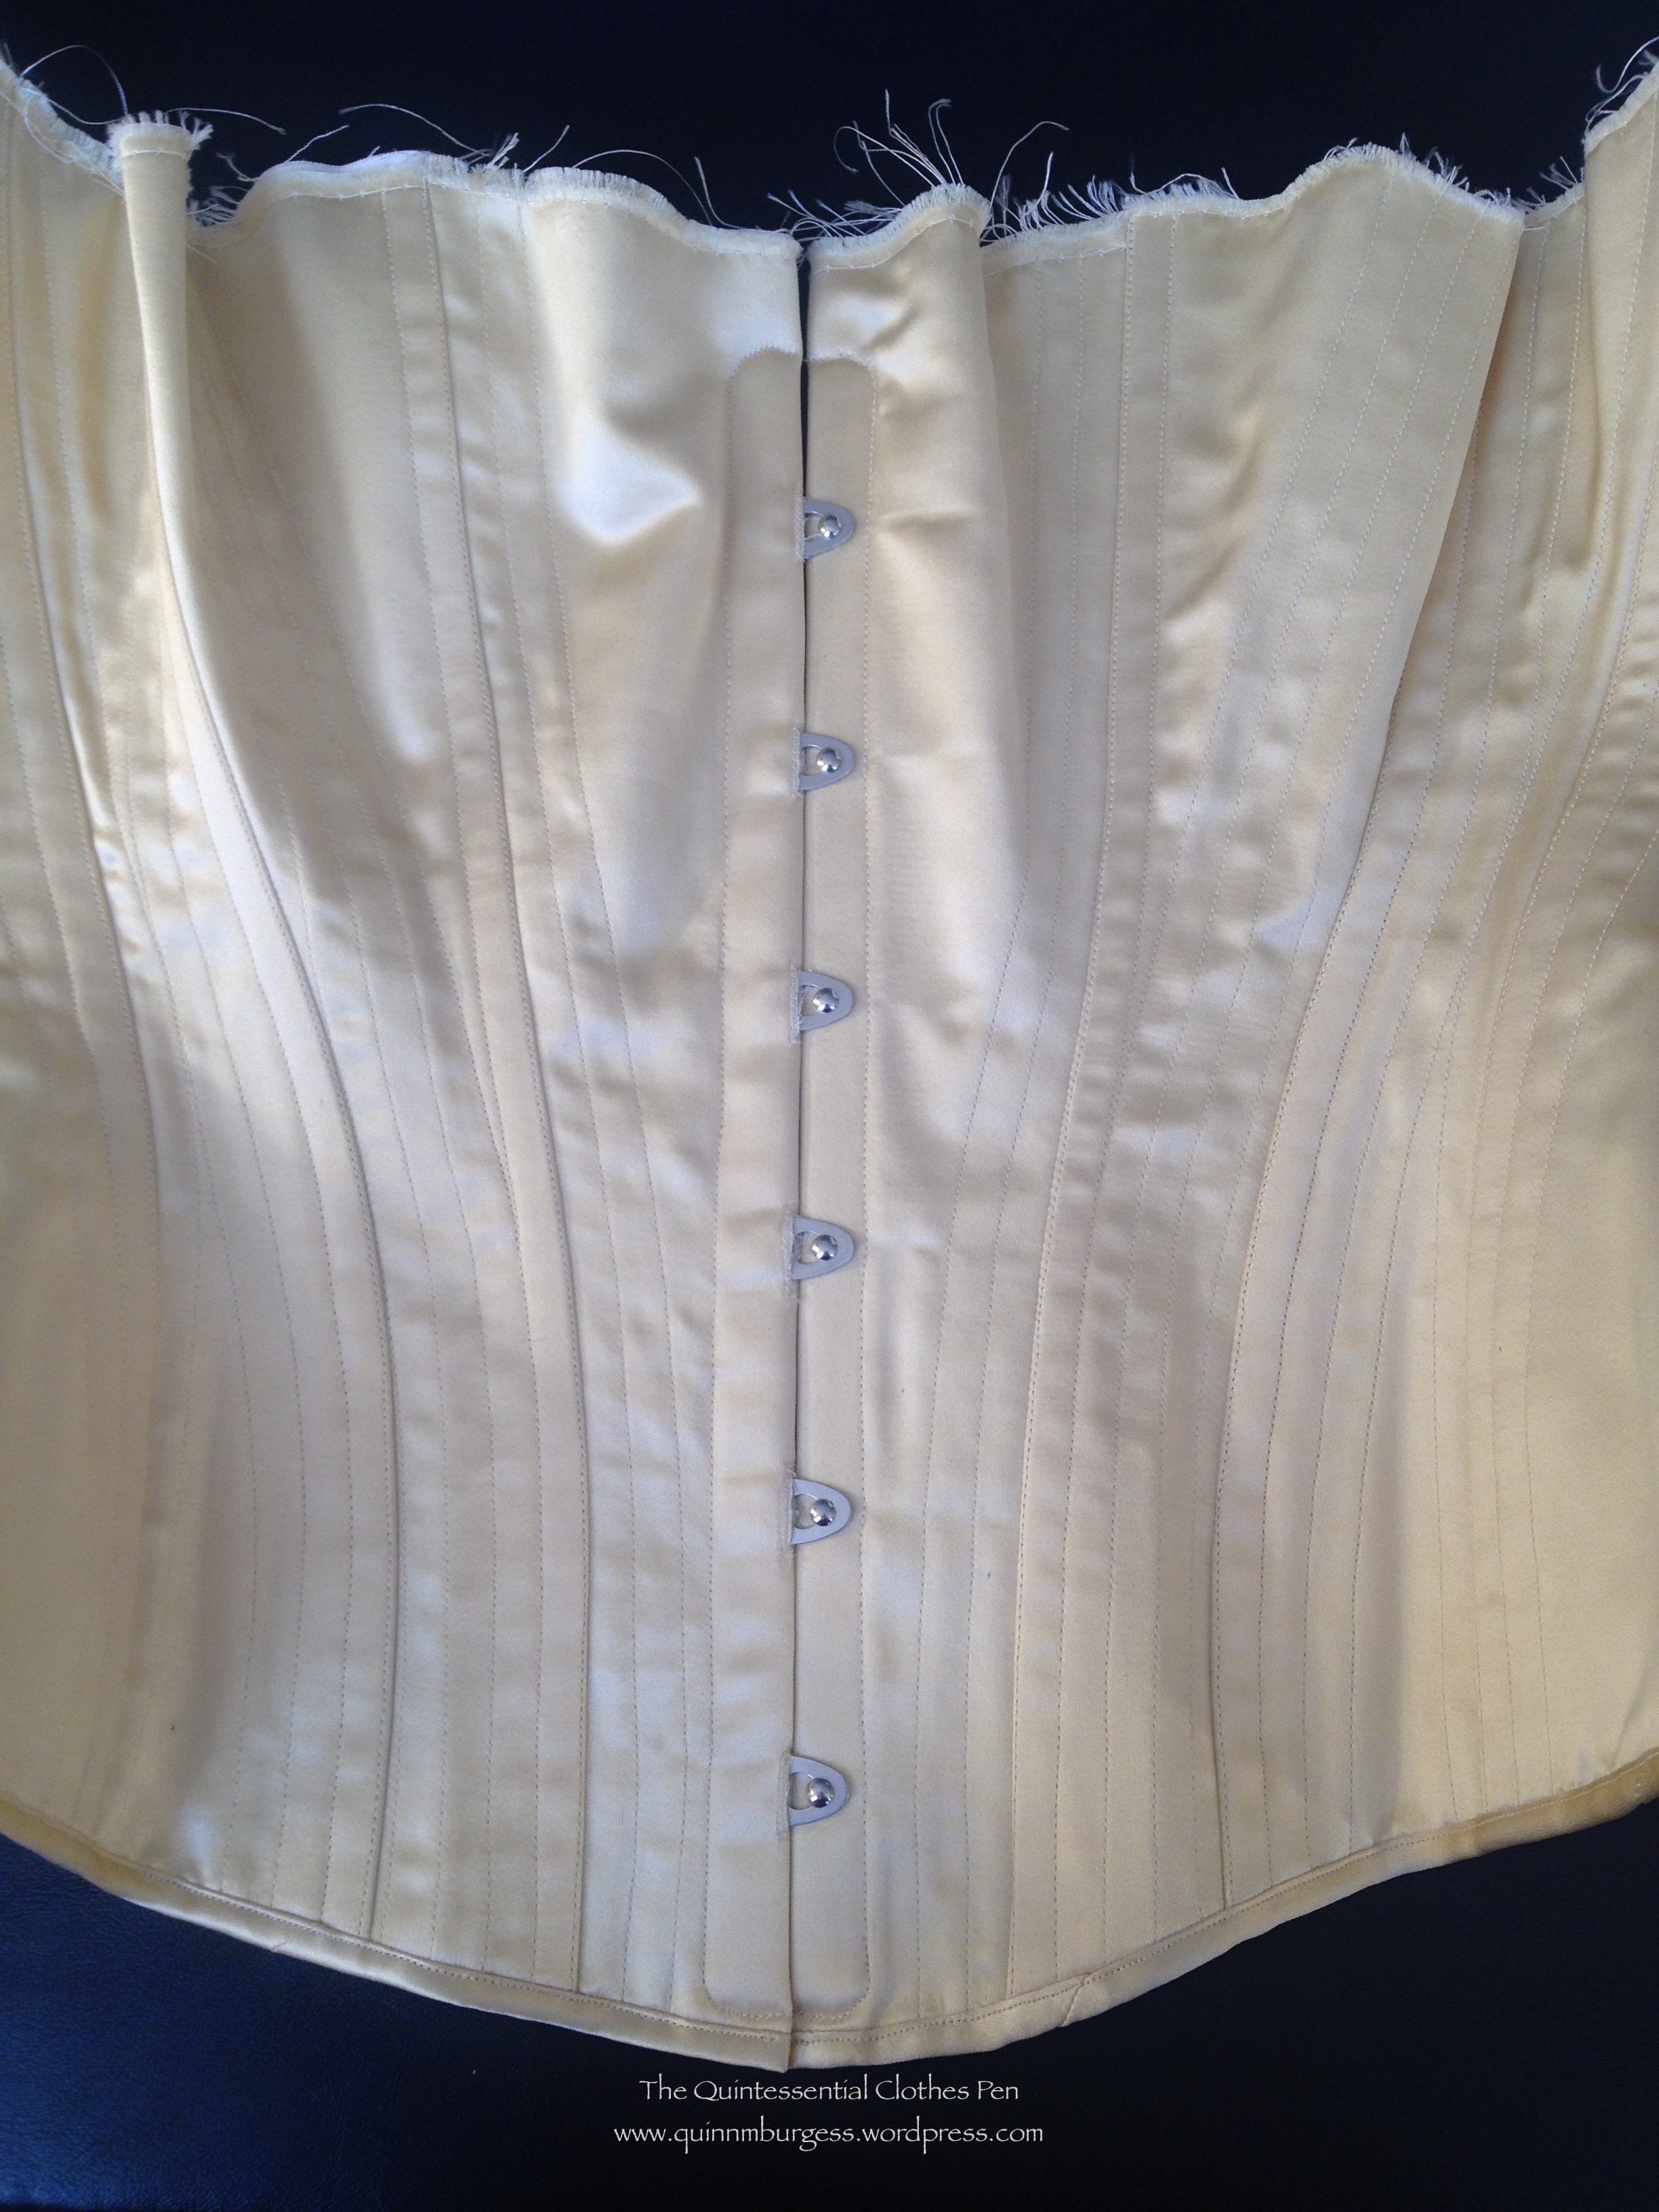
After that, I was ready to bind the bottom edge of the corset! Sewing all 38 boning channels took hours (this corset is thick and sewn with small stitches, another detail I’ve noticed in extant corsets), so I was excited to move on to the next step. Luckily, I thought ahead and realized that there are three vertical bones on the back panels that dead-end at those diagonal channels–the bones for those channels had to be inserted before I sewed the bottom binding on. I didn’t take a picture of that exact step, but I did take a picture of the assembled corset with boning channels before I bound either edge.
You can see the vertical boning channels in the back that dead-end at the diagonal channels and you can see that the diagonal channels that don’t reach the top edge had the bones stitched in as I went along.
The bottom binding is bias strips cut 1″ wide. I had to do a lot of piecing of my small scraps to have enough binding for the entire corset (see that seam just to the right of the busk in the picture below?). I stitched them first to the right side of the corset with ⅛” seam allowance on my bias, trimmed my corset seam allowance to just about ⅛”, folded the bias over the edge, turned the raw edge under on the wrong side, hand whip stitched the bias down on the inside (slow, but a more effective method than pinning in this case), then turned the corset back to the right side and topstitched very close to the edge of the first fold. This narrow topstitched binding seems to be common on late 19th century extant corsets and looks very tidy.
Bottom binding sewn on.
Then came the struggle of the bones! I really struggled with this! I spread the job out over about a week and worked on it a little each day because it was hard on my fingers and wrists. The spiral boning condenses when pressure is applied, so pushing it through tight boning channels was a challenge! I wound up wrangling the corset bones into submission using a thimble, pliers, and a chopstick to help out my hands. Turns out that especially at the boning channels on seam lines, where the seam allowances were thick, I should have made the channels a little wider to make getting the bones in easier. There were one or two channels I finally resorted to unpicking and then restitching after inserting the bones for part of their length. In the end, victory was mine and I was able to move on and bind off the top edge of the corset. This was done in the same way as the bottom edge, being careful to be symmetrical between the sides and avoid sewing over bones.
And here is the result! It’s wearable at this point, but not quite complete.
The previous post in this series compared the two mockups I created while finalizing the pattern for the new corset. This post let’s compare the pattern pieces themselves.
Since my inspiration corset is only shown from one angle in a single photo, I had to use other information to extrapolate information for the areas not visible in that photo. As I mentioned in my previous post, I began the patterning process with the 1880s corset pattern in Corsets and Crinolines. That, combined with observations of other 1880s corsets, and the information below from the V and A description of my inspiration corset, all helped inform my decision to have 6 pieces in each half of the corset.
This corset from the 1880s is composed of twelve separate shaped pieces and forty whalebone strips.
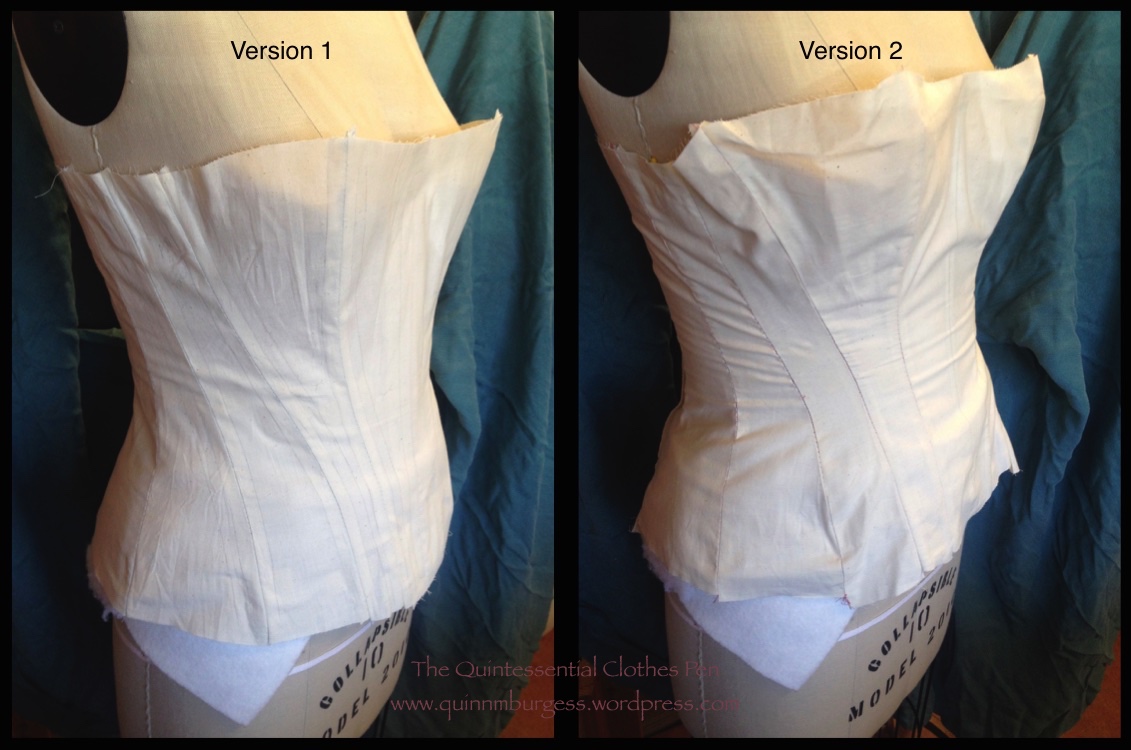
The image below shows the pattern pieces from my first mockup compared to the pattern pieces from my second mockup. At first glance they are basically the same, but upon closer inspection there are subtle differences. It’s the same idea I’ve been repeating in every post about this corset: the lines aren’t really that different, but the curves on them have been exaggerated (this is especially noticeable on pieces 1 (CF), 3, and 6 (CB)).
Center front is on the left and center back is on the right.
You might also remember that I mentioned in my previous post that I had changed the two pieces closet to center back after the mockup. Here are the two original 5 and 6 pattern pieces from Version 2 compared to the newer 5 and 6 pieces from Version 2.
On the left, pieces 5 and 6 (CB) Version 2.1, as seen in the mockup. On the right, pieces 5 and 6 (CB) Version 2.2, updated after the mockup.
I think the change in the pattern pieces is pretty obvious when they are compared side by side. You can see the inspiration image of the back of an 1880s corset that prompted me to make this change in my previous post.
Determining where the boning channels would be was an essential part of the patterning process, due to the immense number of bones and their specific placement between seams on the inspiration corset. I looked very closely at the inspiration corset to determine where the bones would be located on the front pieces of the corset. For the back pieces, I used the mention from the V and A that the inspiration corset had 40 bones to figure out how many additional bones I needed after the front ones were planned and information gathered from back views of other 1880s corsets to determine bone placement. You can see that the pattern pieces from Version 2 have short vertical lines drawn on them to help me envision where the boning channels would be as I created the pattern. Once I was satisfied with the shape of the pieces and the location of the boning channels I was able to move on to the cutting and construction… more on that soon!
I began the patterning process for my new 1880s corset with the late 1880s corset in Norah Waugh’s Corsets and Crinolines. I immediately had to adjust the pattern for size, as is often the case when using scaled historical patterns. While doing that, I also made some initial guesswork at adjusting the pattern to get the curvy seam lines in my inspiration corset at the V and A.
The result was a perfectly usable pattern for an 1880s corset, but the pieces didn’t have the exaggerated curvy seams I was looking for. So I started playing with the pattern pieces from the first iteration and came up with a second mockup that was satisfyingly curvy. The back pieces didn’t change, so I’ll only show a comparison of the fronts and sides. The noticeable differences are in the silhouette of the bust and hips. (I roughly padded out the dress form to be shaped like me, but being rather un-squishy, as dress forms often are, the corset mockups aren’t really filled out as they would be by a squishy body.)
Front.Side front.
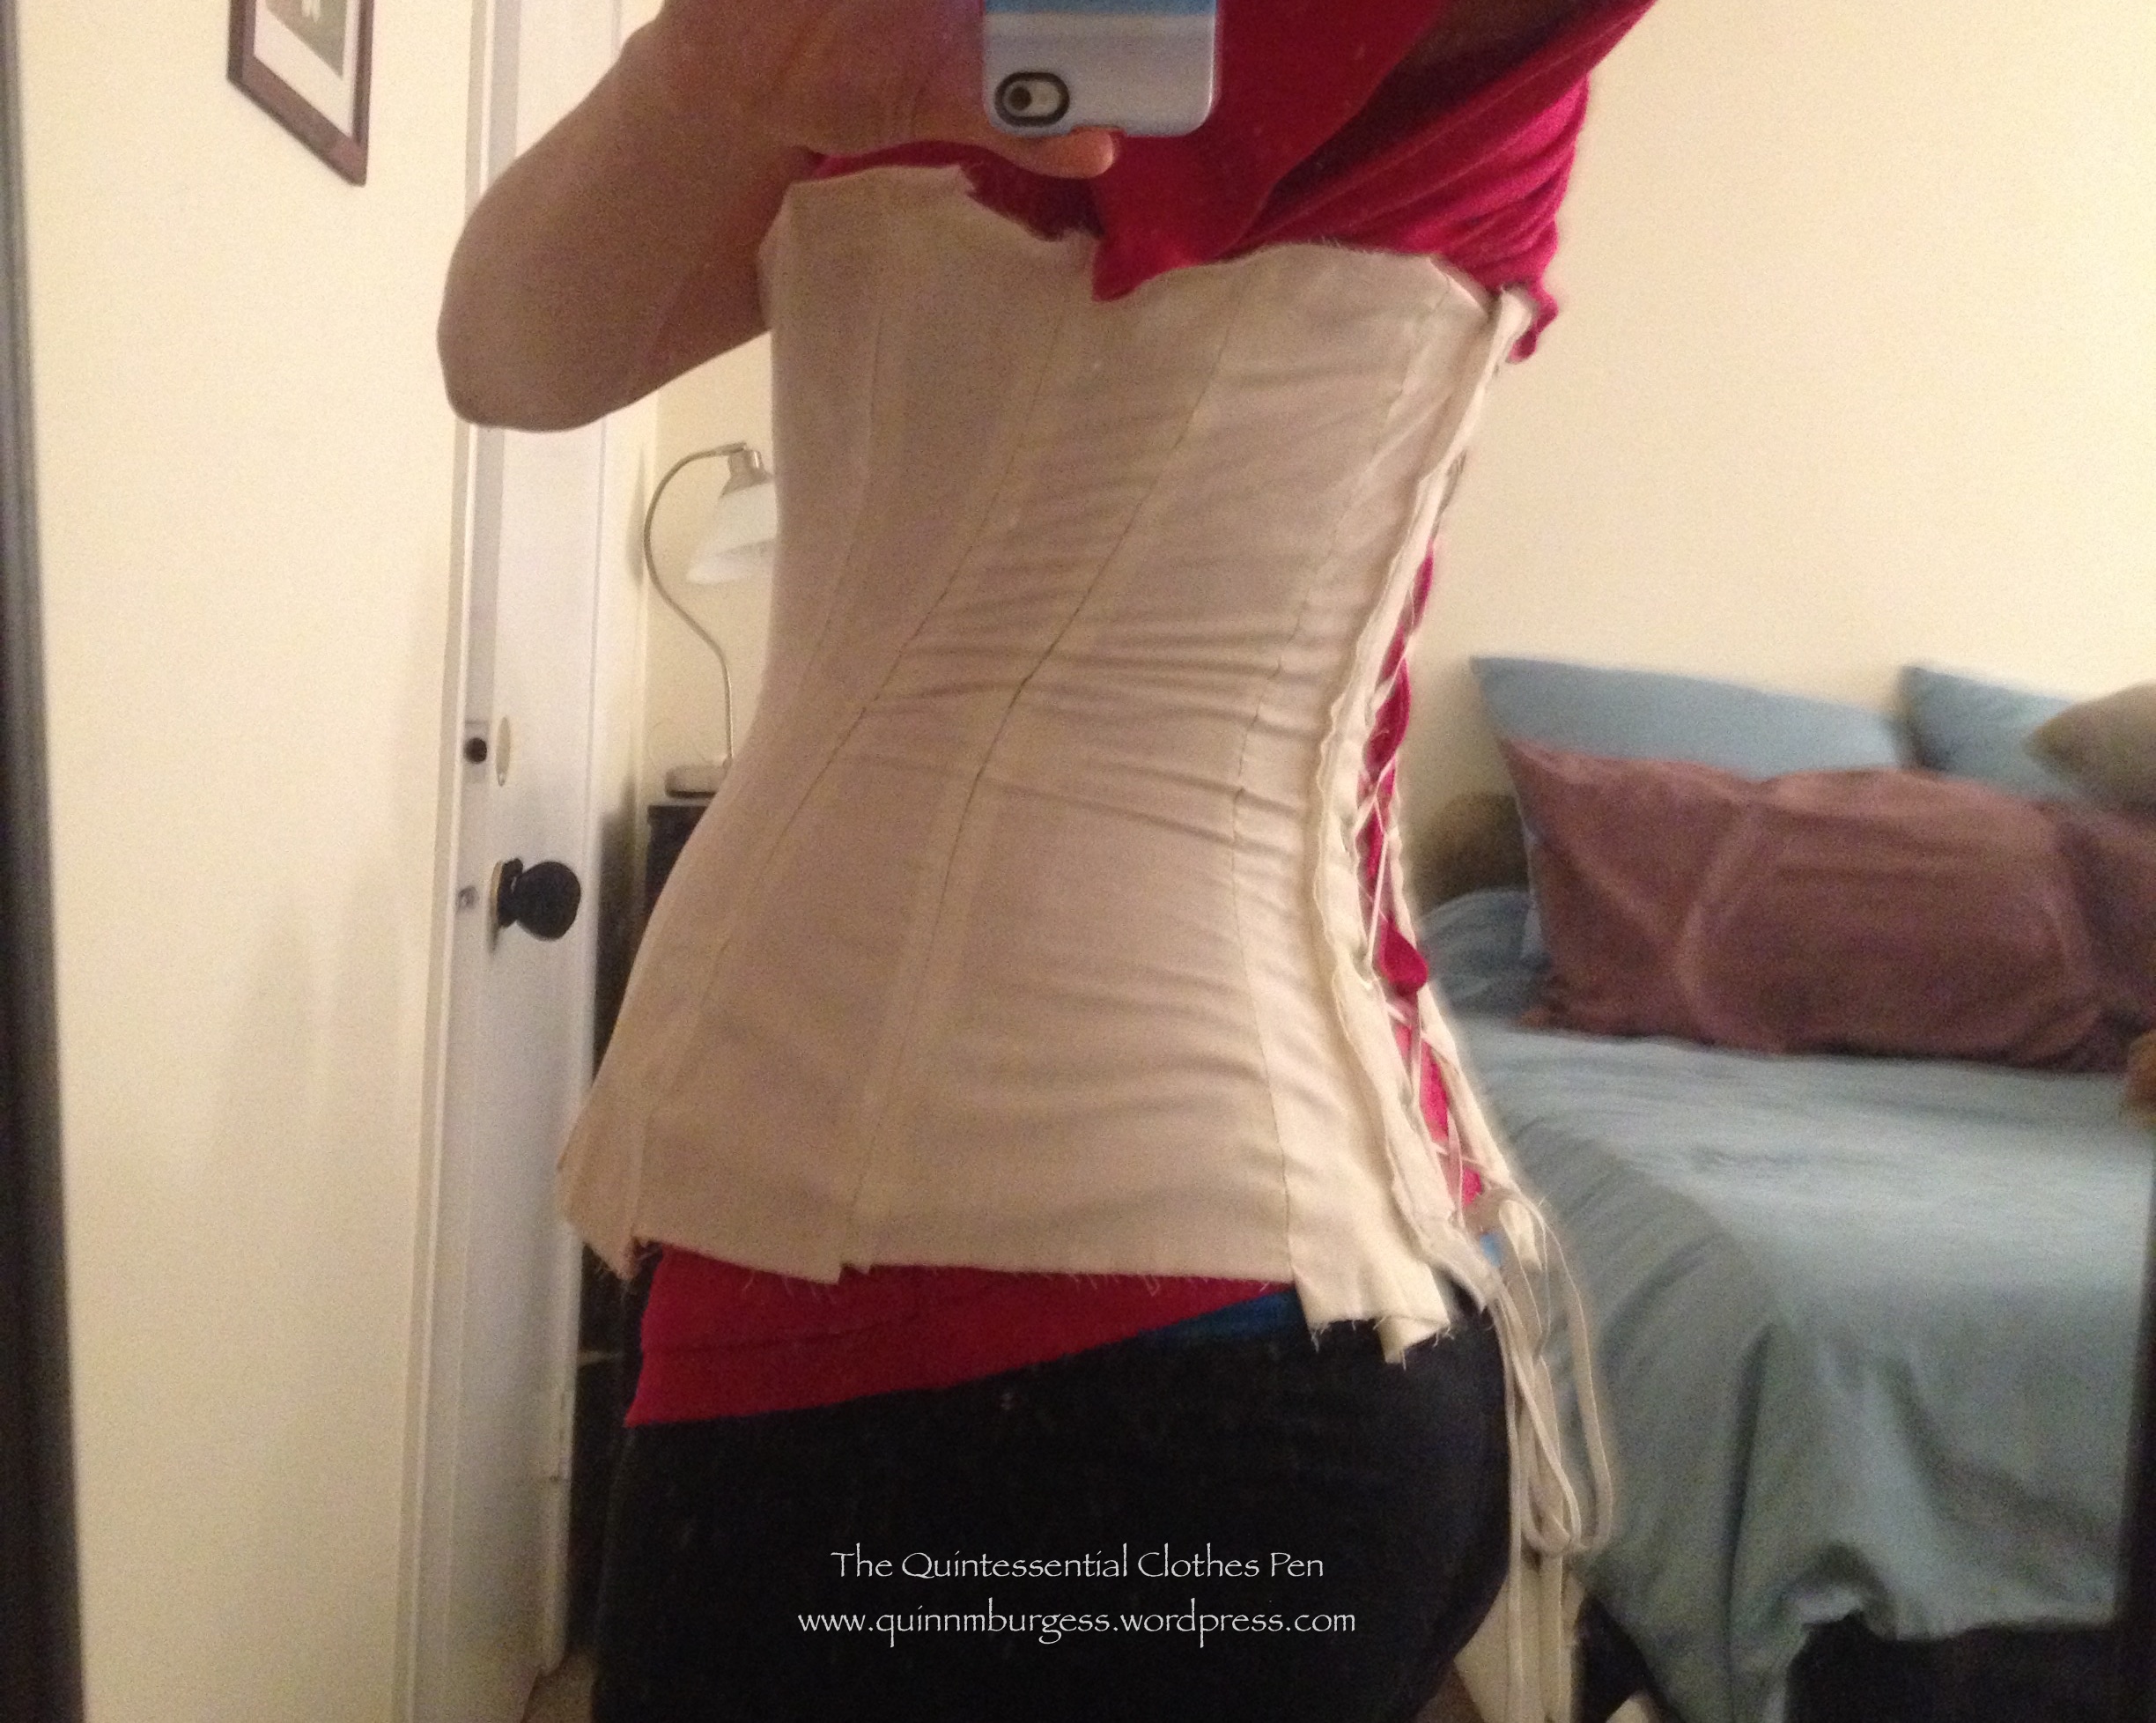
I didn’t take pictures of the first corset mockup on me, but I did take pictures of the second one, to give an idea of how it fits onto a squishy real body. The mockup corset is made from a single layer of muslin, with spiral bones taped onto the seams and a wide flat bone at the front to simulate a busk. The back has lacing strips basted on. I didn’t have help taking the pictures, so you’ll have to forgive the awkward angles!
Front.Side front.Side.Back.
After the second mockup/pattern I still made a few changes, such as truing the pattern pieces so the edges that meet are the same length and some other small adjustments such as taking in the bottom front pieces a little to keep them from standing away from my body. The largest change I made was to change the seam closet to the back grommets.
You can see in the back picture how the seam lines are rather vertical once the corset is on my body, which didn’t seem to match the curvy seams on the front of the corset. Unfortunately, the V and A doesn’t have any pictures of the back of my inspiration corset online that I have found, so I had to turn to other extant 1880s corsets to look at seaming (and bone placement, but I’ll discuss that in my next post). I settled on the image below as my inspiration for the back of my new corset.
1884, French, The Met
As with the front pieces, I noticed that the curviness of the seams is distinct as the corset goes over the hips and up the torso, but my second mockup didn’t have enough curve in these areas for my taste. So I went back to my pattern and made new pattern pieces for the two back pieces to adjust the seam line.
And that’s a great place to end this post. The next post in the series will be a comparison of the two patterns, looking at the pieces themselves.
The first corset I ever constructed was from a modern historical pattern company. While the corset was fitted to my specific curves, the pattern pieces for it still created a basically cylindrical shape without a lot of hip or bust shaping visible when the corset was laid flat. (I’m wearing that first-ever corset in the pictures in this past blog post.) I’m not saying that shape is wrong for the 19th century, because there are extant examples, patents, and other information showing us that style, such as the corset below.
French corset c. 1885, The Met
Looking at corsets from the last half of the 19th century, however, there are a variety of other styles that have more interesting lines and definitive flare at curvy points than the basic cylindrical shape. My c. 1860 pink silk corset is an example of a style of corset that uses bust and hip gores to create a more curvy silhouette. (I discussed this in detail in a post about that c. 1860 corset that you can read here. That post has examples of extant corsets showing that shape.) Here is a catalog page of corsets from the 1880s showing that same style.
In addition to the hip gore style corset, there are also a growing number of curvy seam corsets as the 19th century progresses. Some of these also make use of bust gores while maintaining the curvy seams to really provide shape. These all lead up to the s-shape corset of the early 20th century, but we’re not quite there yet in the 1880s.
Here are some extant examples of curvy seam 1880s corsets: black, light blue, and ivory (very similar to the one pictured above, but more extreme in its curves if you look carefully). The curvy seam corset style is what caught my eye for this project, because it is a style that brings new challenges in terms of patterning and because it will be a new style in my wardrobe when completed. Compare this to the the photo above and you can see quite a difference in terms of the cut of the pieces.
Edwin Izod corset, 1887, V and A.
This Edwin Izod corset from the V and A is my inspiration. I’m intrigued by the shaping of the panels and the completed silhouette, but also by the construction method. The V and A gives some tantalizing information about the steam molding process patented by Edwin Izod and used to create this corset, just enough information to make me want to see if I can create some form of steam molding and discover how it might change the finished silhouette and wearable feel of the finished corset when compared to other corsets I’ve constructed.
Fashion and technological innovation changed the shape of late ninteenth-century corsets. As the bustle replaced the crinoline and bodices contoured the figure, corsets became longer to achieve the desired hourglass silhouette. They encased the abdomen and enveloped the hips, and the amount of whalebone also increased to give a smoother outline and help prevent wrinkling of the fabric. This corset from the 1880s is composed of twelve separate shaped pieces and forty whalebone strips.
To improve shape, performance and comfort, manufacturers claimed numerous inventions. One of the most successful was the steam-moulding process developed by Edwin Izod in 1868, and still used in the 1880s to create elegant corsets such as this one. The procedure involved placing a corset, wet with starch, on a steam-heated copper torso form until it dried into shape. The result was a beautifully formed corset, whereby ‘the fabric and bones are adapted with marvellous accuracy to every curve and undulation of the finest type of figure’ (The Ladies’ Gazette of Fashion advertisement, London July 1879).
I’ll be coming back to the nuggets of detail contained in this description, because some relate to patterning and some relate to the steam molding itself, but those are topics for future posts.
* In case you’re wondering why I spell steam molding without a “u” but the V and A quote spells it with a “u”, check out this little bit of information.
I have a number of corsets, some made for me specifically and some made for other ladies but which I wear, but there are still periods for which I don’t have any corsets that are really perfect. When it comes to the later 19th century, I’ve got a corset intended for the 1860s, whose style continues to be seen through the 1890s, and a corset from the 1890s that wasn’t made for me and doesn’t fit as well as I would like it to, despite the fact that I wear it rather regularly. The 1890s corset is being worn under most of the 1890s/turn of the 20th century garments shown here on my blog, but I’ve never shared pictures of the corset itself here before.
1890s corset on the body it was constructed for in 2009. The pattern is from Corsets and Crinolines and has 4 elastic panels in the front.
Someday, I’ll make a new 1890s corset that is fitted for me using the features I like from the current one, such as the very comfortable elastic panels, but changing things such as the busk length (the current one is too long and pokes me in the legs when I sit or bend… it’s ok if I get it just between my legs, but has caused bruises when I’ve bent over unexpectedly in the past and dug the busk into my leg…) and creating more room the bust area. But I digress, because an 1890s corset is not on my to-do list for this summer.
What is on my to-do list is completing a summer dress from the 1880s (that I started back in 2013, yay for super overdue UFOs!). The skirt is pretty close to completion, but I’d been holding off on the bodice not only because the project has been generally on hold, which is most of the reason, but also because I really wanted to fit the mockup over the corset I planned to wear with the dress. The plan was to have a new specifically 1880s corset to wear. And now that the dress is on my to-do list again, the corset has joined in as well!
I’ll be doing a Project Journal series on this corset, because in addition to showing in progress pictures, I also plan to attempt to steam mold this new corset, so there will be lots of interesting information and success or failure updates. Next post in this series will be about my inspiration!