The first corset I ever constructed was from a modern historical pattern company. While the corset was fitted to my specific curves, the pattern pieces for it still created a basically cylindrical shape without a lot of hip or bust shaping visible when the corset was laid flat. (I’m wearing that first-ever corset in the pictures in this past blog post.) I’m not saying that shape is wrong for the 19th century, because there are extant examples, patents, and other information showing us that style, such as the corset below.
French corset c. 1885, The Met
Looking at corsets from the last half of the 19th century, however, there are a variety of other styles that have more interesting lines and definitive flare at curvy points than the basic cylindrical shape. My c. 1860 pink silk corset is an example of a style of corset that uses bust and hip gores to create a more curvy silhouette. (I discussed this in detail in a post about that c. 1860 corset that you can read here. That post has examples of extant corsets showing that shape.) Here is a catalog page of corsets from the 1880s showing that same style.
In addition to the hip gore style corset, there are also a growing number of curvy seam corsets as the 19th century progresses. Some of these also make use of bust gores while maintaining the curvy seams to really provide shape. These all lead up to the s-shape corset of the early 20th century, but we’re not quite there yet in the 1880s.
Here are some extant examples of curvy seam 1880s corsets: black, light blue, and ivory (very similar to the one pictured above, but more extreme in its curves if you look carefully). The curvy seam corset style is what caught my eye for this project, because it is a style that brings new challenges in terms of patterning and because it will be a new style in my wardrobe when completed. Compare this to the the photo above and you can see quite a difference in terms of the cut of the pieces.
Edwin Izod corset, 1887, V and A.
This Edwin Izod corset from the V and A is my inspiration. I’m intrigued by the shaping of the panels and the completed silhouette, but also by the construction method. The V and A gives some tantalizing information about the steam molding process patented by Edwin Izod and used to create this corset, just enough information to make me want to see if I can create some form of steam molding and discover how it might change the finished silhouette and wearable feel of the finished corset when compared to other corsets I’ve constructed.
Fashion and technological innovation changed the shape of late ninteenth-century corsets. As the bustle replaced the crinoline and bodices contoured the figure, corsets became longer to achieve the desired hourglass silhouette. They encased the abdomen and enveloped the hips, and the amount of whalebone also increased to give a smoother outline and help prevent wrinkling of the fabric. This corset from the 1880s is composed of twelve separate shaped pieces and forty whalebone strips.
To improve shape, performance and comfort, manufacturers claimed numerous inventions. One of the most successful was the steam-moulding process developed by Edwin Izod in 1868, and still used in the 1880s to create elegant corsets such as this one. The procedure involved placing a corset, wet with starch, on a steam-heated copper torso form until it dried into shape. The result was a beautifully formed corset, whereby ‘the fabric and bones are adapted with marvellous accuracy to every curve and undulation of the finest type of figure’ (The Ladies’ Gazette of Fashion advertisement, London July 1879).
I’ll be coming back to the nuggets of detail contained in this description, because some relate to patterning and some relate to the steam molding itself, but those are topics for future posts.
* In case you’re wondering why I spell steam molding without a “u” but the V and A quote spells it with a “u”, check out this little bit of information.
I have a number of corsets, some made for me specifically and some made for other ladies but which I wear, but there are still periods for which I don’t have any corsets that are really perfect. When it comes to the later 19th century, I’ve got a corset intended for the 1860s, whose style continues to be seen through the 1890s, and a corset from the 1890s that wasn’t made for me and doesn’t fit as well as I would like it to, despite the fact that I wear it rather regularly. The 1890s corset is being worn under most of the 1890s/turn of the 20th century garments shown here on my blog, but I’ve never shared pictures of the corset itself here before.
1890s corset on the body it was constructed for in 2009. The pattern is from Corsets and Crinolines and has 4 elastic panels in the front.
Someday, I’ll make a new 1890s corset that is fitted for me using the features I like from the current one, such as the very comfortable elastic panels, but changing things such as the busk length (the current one is too long and pokes me in the legs when I sit or bend… it’s ok if I get it just between my legs, but has caused bruises when I’ve bent over unexpectedly in the past and dug the busk into my leg…) and creating more room the bust area. But I digress, because an 1890s corset is not on my to-do list for this summer.
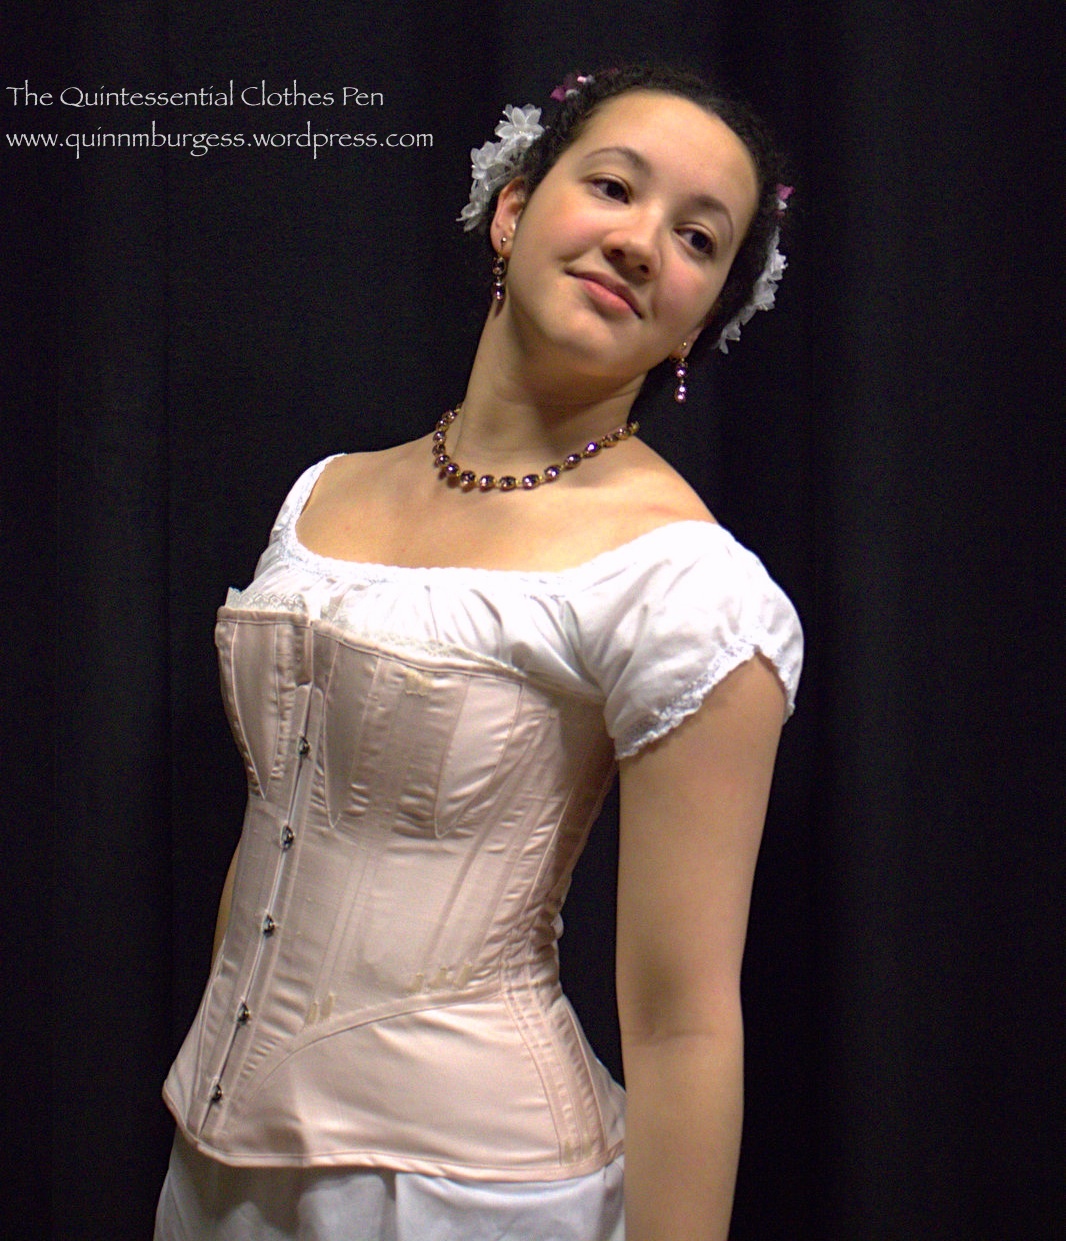
What is on my to-do list is completing a summer dress from the 1880s (that I started back in 2013, yay for super overdue UFOs!). The skirt is pretty close to completion, but I’d been holding off on the bodice not only because the project has been generally on hold, which is most of the reason, but also because I really wanted to fit the mockup over the corset I planned to wear with the dress. The plan was to have a new specifically 1880s corset to wear. And now that the dress is on my to-do list again, the corset has joined in as well!
I’ll be doing a Project Journal series on this corset, because in addition to showing in progress pictures, I also plan to attempt to steam mold this new corset, so there will be lots of interesting information and success or failure updates. Next post in this series will be about my inspiration!
This is a follow-up post to my last post: ca. 1860 Corset For Me! (HSF #4). That post has a short background on my reasons for building the corset, but it doesn’t mention other details, so that’s what this post is for!
My new ca. 1860 corset.
So let’s start with more background, since this post is all about intense amounts of details! We’ll start with the pattern I made for this corset: you’ll notice it has bust and hip gores as well as that curved piece on each side of the front. The bust gores aren’t so unusual for a modern 1860s corset recreation, but I don’t see too many corsets made (and certainly not many corset patterns) with hip gores and I’m not sure I’ve ever seen anyone reproduce an 1860s corset with that curved piece in front. I found these details intriguing and wanted to make this style for two reasons: 1, because it’s a style I haven’t seen recreated, but which I have multiple examples of in my research, and 2, because it seemed like it would fit into a new thought I absorbed a few months ago.
1865-1867 corset, The Met
First, a discussion about the style. It seems like a lot of modern ca. 1860s corsets are cut with vertical seams that run from top to bottom of the corset to create shaping, sometimes with the addition of bust gores. (The corset on the right is an example of one from the 1860s that uses this style of seaming to create shape.) These corsets are cut with shaping in the seams to create space for the bust and hips, but an alternative to this is to use bust and hip gores to achieve shape for the body. The interesting thing is that hip gores do not seem to be very commonly used in historic corsets made by modern people, despite their use in historic clothing. I attribute this to the fact that shaped seams are easier to execute than inserting gores of any type, but especially gores that are not in a seam (like the gores in my corset). Also, I would think that pattern companies have an easier time grading patterns using the shaped seams, because the gores (particularly hip gores) really need a lot more individual adjustment and fiddling on a body than shaped seams do.
Second, about this new thought that I absorbed. While reading Merja’s most recent blog posts about corset construction, I was rather surprised by a simple statement that makes so much sense but which I haven’t necessarily followed in corset making in the past (here are Merja’s gusseted 1870s corset, which has the sentence which mentions this magical new thought, as well as her 1880s purple corset and 1860s white corset with seaming like the Met corset, above, which exhibit the thought without it being explicitly stated). Essentially, she says that she always makes adequate space in the corset for bust and hips, so that the corset is only constraining her waist. Duh! A related thought is that when you tighten your corset you displace some bits to your bust and hips, so your corset really does need adequate room there to accommodate the normal and the extra. That makes so much sense and sounds so much more comfortable than having a corset that digs into your hips or pushes your bust around uncomfortably. I made the goal to take this approach for the new corset and all future corsets! and this new corset was my first attempt at really following this sound piece of information.
So given that the style I set out to make is one that I haven’t ever seen a pattern for, where did I get mine? Well, it’s loosely based off of one in Corsets and Crinolines by Norah Waugh (the pattern is ca. 1873, pg. 80). I say loosely, because I started there, but then began combining pieces and changing the shape of them to suit my measurements and the seam placement that I wanted (most importantly the hip gore and that curved front piece). Interestingly, Waugh notes on a different corset pattern (ca. 1860, pg. 78) that the 1860s style of corset without bust or hip gores (more like what I seem to see in modern made ca. 1860 corsets like the one from the Met at the top of this post) was a style preferred in France. The English preferred the style of corset I am making with gores. (Merja’s white 1860s corset I mentioned in the pervious paragraph uses this French corset pattern in Waugh, if you’d like to see what it looks like made up.)
I wound up making two mockups to get the pattern the way I wanted it even after adjusting the pattern from the beginning (and still made a few alterations before cutting out my real fabric). The original pattern in the book had a waist that was much too small and a bust that was a little large relative to my measurements. Despite my changes, the first mockup was too short waisted, needed bigger and longer bust gores, smaller hip gores (I had overestimated how much ease I needed there), and a little bigger waist. The second mockup was still a little short (I added another ½” to the top), the hip gores were still just slightly too big, and the lacing gap between the back pieces was wider than I wanted it to be by about 3″. Ugh! I actually determined that last fact after cutting out and sewing up my actual fabric. Turns out my shoulder blade area is bigger than I thought. I had an inner struggle about if I wanted to take out the small stitch size flat felled seam to insert a piece or if I wanted to just let it go. Adding a piece won in the end, because I figured that I was spending so much time on the corset that I really wanted to be pleased with it and not have nagging doubts for the next number of years until making a replacement. (The piece I added is between the front and back pieces. You can see it easily in the first picture in this post. It’s a v shaped piece that extends from top to bottom.) Adding the piece actually wasn’t so bad, despite all my inner complaining and I’m very pleased I did it, because I am happy with the result.
1864 corset, The Victoria and Albert Museum.
That’s all the aspects of choosing the pattern and executing it. Now I can move on to my inspiration for creating it. This blue corset at the V and A is the most thoroughly photographed piece of inspiration (click through, there are lots of different angles of the corset, and close up pictures!). As you can see, the blue corset has bust gores, that curved front piece, (and if you look at the pictures of the back…) hip gores, as well as useful close up construction photos showing the flossing, how the busk is sewn in, how the binding is sewn on, etc. You can also see great detail for things like how to sew the points of the bust darts and the tops of the hip gores: they are overcast near the tips of the bust gores and tops of the hip gores before being machine sewn with topstitching to the binding. I used this method in my corset, sewing the overcasting by hand. I found that it was very useful on the bust gores (since mine are set into a slit in the fabric, not a seam) because the amount of seam allowance near the points is negligible (like, less than ⅛”) and that would have been extremely frustrating to try and machine sew! Also, the overcasting kept the edges from fraying as I was working with them. It also adds an extra measure of stability and sturdiness to those areas.
1839-1841 corset, The Met.
Other very useful images to me were this orange 1860s corset front and side views (with generally similar lines as the blue V and A one) and this 1862 Godey’s image of a corset (with very similar lines as the blue V and A one). (As a side note: Does anyone know what collection houses the orange corset? I’ve only been able to find images, but no real source.) These corsets provide a nice end date range for my corset pattern, because in the 1870s the corset begins to change shape. But to determine a good start date for my corset I had to look elsewhere. The Met has a corset dated 1839-1841 with similar hip gores and the front curved piece (great zoomable pictures including an interior view, click through the image!), but it does not have separate bust gores (they are cut in one with the front pieces as is usual for 1840s corsets) and it does not have a front opening busk (those weren’t in general use until 1849). The 1839-41 corset is more curvy than the 1860s ones, as you would expect from an 1840s corset, but it still looks like a forerunner to me! Waugh has an 1844 corset pattern (pg. 77) that has similar lines to the 1839-41 Met one, with bust gores but without hip gores or the curved front piece. These 1840s corsets are useful for determining the start point of my date range, which seems to safely be the 1850s. Thus, my corset is dated ca. 1860, which is just a shorter way of saying 1850-1870. That makes sense looking at the silhouette of the dresses from these decades, as well, since neither the 1850s or 1860s require the curvy shape of 1840s or 1870s corsets.
EDIT: The orange corset mentioned above is in the collection of the Manchester Art Gallery via this link.
I used all of these different images to look for construction details to use in my corset. Specific things I was looking for include: stitch size, width of the binding, method of sewing the binding, placement of bones, design of flossing, seam placement, method of setting bust and hip gores, location of topstitching, placement of eyelets down the back, finishing of the interior of the corset, and length of the busk. Some of these things can be determined by looking at the extant corsets I’ve shared in this post, but others required other helpful research. Specifically, the gusset construction method I used came from this image that Merja shared in her 1870s corset post. It’s from 1872, but is still relevant for my corset, because if you look at the blue and orange corset pictures you will see it used on the overcasting at the bust and hip gores. This image, from 1868, shows similar methods as well (and has a selection of mostly French and a few English style corsets if you’d like to see more examples of those).
And now, here are the close up construction details of my corset that I promised.
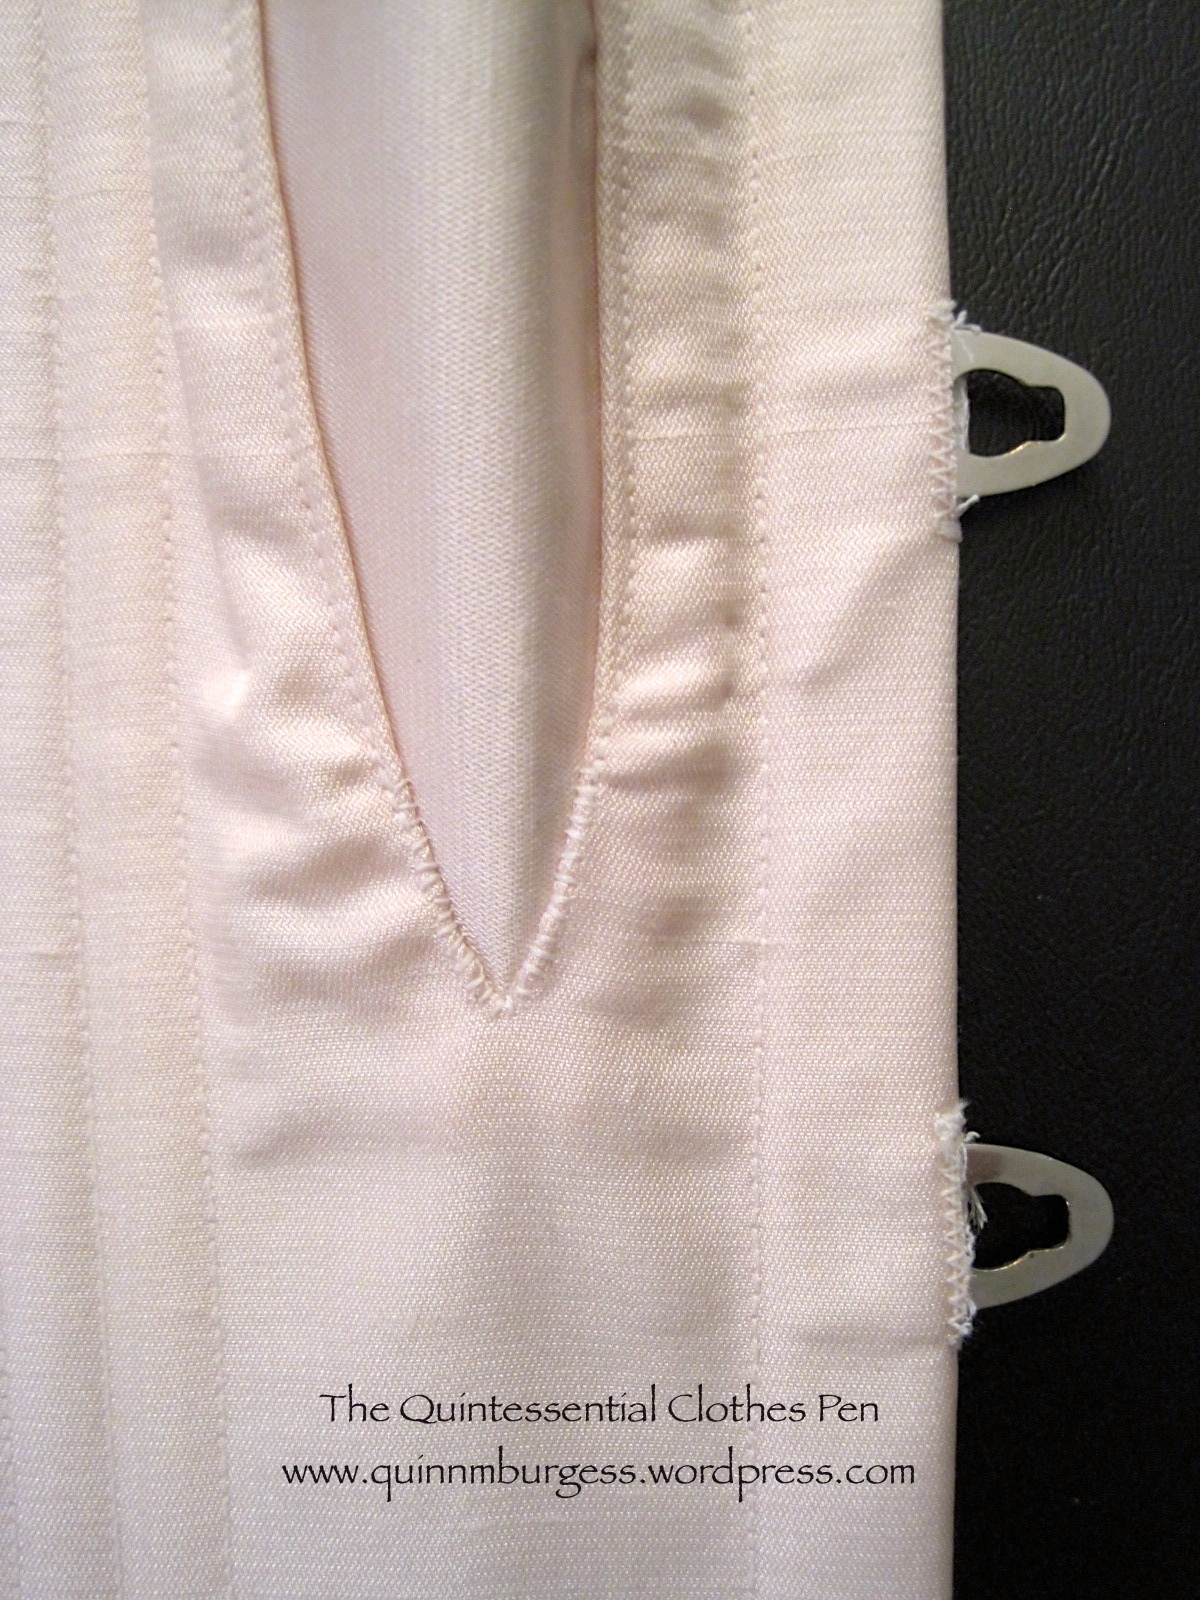
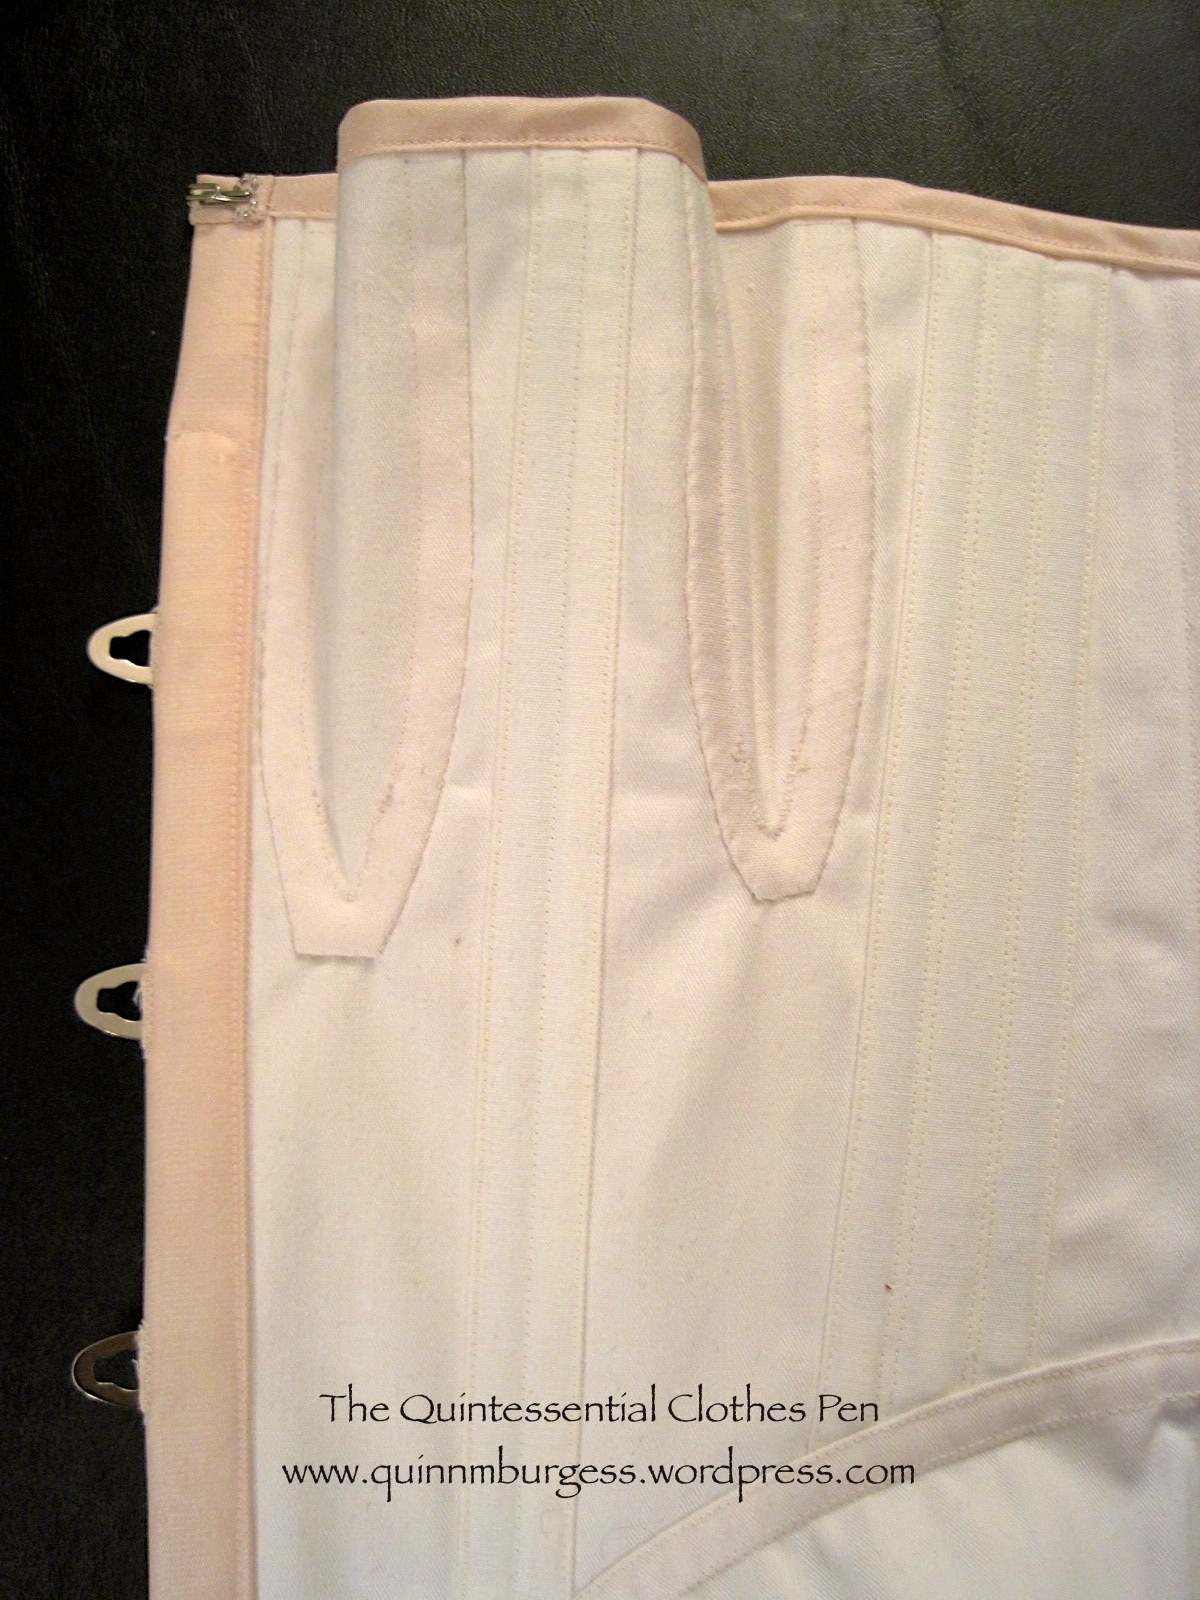
An interior view of my corset. It’s important to me that the inside of garments is as nicely finished as the outside, as you can see. It’s a little hard to see, but the grommets near the waist are set closer together than the ones a the top and bottom.Details: Hand sewn overcast stitches at the bast of the bust gore and machine top stitching above that. Machine sewn button holes for the busk hooks (I’ve found this method to be much sturdier than leaving a gap in a seam on the edge).Details: The busk is top stitched around the top curve to keep it from moving. There is flossing at the top of the boning channels (every boning channel is flossed at the top and bottom). Machine sewn top stitched binding.Details: The top hook of my busk is a few inches below the top of the corset, so I added a hook and thread loop at the top to keep it closed. I used coutil cut on the straight of grain for my boning channels: the edges are pressed under and then they are topstitched into place and into the proper number of channels (keeps the inside tidy and doesn’t require extra notions!). The seam allowance of my bust gores is turned under and flat felled by hand with a whip stitch that only catches the coutil. The curved front piece is flat felled by machine.Years of use have caused my busk to have a bend in it at my waist line. See how it curves up from the table in the middle? Impressive, really, that my body can permanently change the shape of metal.
I’m hoping to get pictures of the corset on me this weekend at its first ever wearing. Hopefully I’ll be able to share those in the near future!
Unfortunately, I’m a few days late completing my project for the HSF Challenge #4: Under It All. I tried really hard on this one and was definitely motivated to keep working consistently by the fact that I wanted to get it done for the HSF challenge. I was held up by a severe cold that took me out for about a week and other dealing with life things. So while I’m late, I’m super glad and excited to be done with this project (especially because the last two days have included a lot of flossing, and my fingers/hand muscles are so done with that for awhile)!
The last ca. 1860 corset I built for myself was made in 2006 or 2007 (you can see it in this post). It’s been worn more times than I can count and has stood up to the test of time and tension well, especially considering it was the first corset I ever made! But the time has come for a new corset for this period–one that is made to fit me using all the skills in pattern making and construction that I’ve gained over the last 7 or 8 years.
I realized while working on this corset that aside from building my first corset to fit me in 2006 or 2007, the only other stays or corsets I wear with my historic clothes that were made to fit me are my 18th century stays, my short Regency stays, and my c. 1825 long stays. I wear other corsets from 1895 (hm, I don’t think there are pictures of this on the blog), 1903, and 1913 but none of them were constructed to fit me (though I did construct them beautifully!). I’ve made them work and they sort of fit me, but all of them have problems because they were made to fit other people: a busk that’s too long, being a little small, especially in the hips, or being too big and needing a tuck. So it occurred to me that I should probably invest in making a few more corsets made to my measurements for the Victorian and Edwardian periods. Sounds obvious, but it was a revelation to me when I sat down and thought about it!
So that’s what this project is: a ca. 1860 corset made to fit me!
Hard to see the details in this picture, I know. There will be detail shots and lots of commentary in an upcoming post!
I have lots of other thoughts and inspiration to share with regard to this project, but I expect it to be lengthy, so I’ll be writing it up in a separate post. Plus, I want to post about my completion of the challenge as soon as possible. So for now, the very much condensed details.
Fabric: 1/2 yd ish of white herringbone cotton coutil and ½ yds ish of slightly slubby pale pink silk satin.
Notions: Metal boning, metal grommets, a recycled metal busk from my old ca. 1860 corset, regular weight ivory thread, and heavy weight ivory thread for flossing.
How historically accurate?: Pretty darn accurate, I’d say. I wanted to create a corset using the seam lines found in extant garments, but which don’t seem to be much recreated. I used construction methods that are accurate as far as I know. Let’s say 90% because you can’t ever quite make it to 100% if it’s modern, can you?
Hours to complete: A lot. I didn’t keep track, but I’ve been working on this for at least 2 or 3 weeks, and some of those days have been a full day’s work on the corset, not just evenings.
First worn: Has not been worn yet, but will be worn to a ball in March.
Recently, at Fezziwig’s Ball, I was able to wear my almost-finished 1820s ensemble. You can see pictures of that event, which includes pictures of the ball gown, walking dress, muff, and tippet in this previous post. In that post, I didn’t get to share pictures of the petticoat that went along with these 1820s garments, so that’s what this post is about! For the record, after the ball I simply starting taking off layers and having my friends take pictures so I would have evidence of all my sewing (while I still was wearing the proper hair style and accessories!).
Ok, I’m making a funny face (I think my eyes are closed)… but it’s full length picture of the petticoat! You can see the shape, and the cording, and the lace at the bottom.I didn’t get to finish the neckline before the ball… so you can see how that right shoulder seam is starting to split. I’ll have to repair it before finishing the neckline.
This simple white cotton petticoat has 16 rows of cording to help it stand out. It is entirely hand sewn and closes in the back with ties. Close up photos showing the construction of this petticoat are in this previous post.
With this petticoat I wore my short sleeve linen chemise and pink 1820s/30s corset. Both of these things were made last year and have been worn multiple times since then (especially the linen chemise, which gets worn often!). I finally have pictures of me (versus Squishy, the dress form) in the corset! Granted, it’s not a particularly exciting picture, but sometimes you just have to take what you can get.
1820s/30s corset. You can read more about the inspiration and construction by clicking on the links. Clearly, I haven’t actually quilted a diamond pattern on the front like I planned to do when it was built…
And just for fun, I thought I’d include this fun picture of me getting ready for the ball. One of my friends is on an “artsy photo” kick… I didn’t even know she was taking this picture, but I like it! I especially like the mixture of modern and historic that is me in my chemise and corset putting on mascara… they had modern mascara in the 1810s, right?!?
Remember I recently shared with you the square necked 1812 Ikea curtain gown? And I promised pictures of the accompanying undergarments? Now is the time! Please forgive the silly black and white checked walls in these photos… I took the opportunity of having people around to take photos of me in the garments, despite the lack of a fitting setting.
Chemise and short stays.
The chemise is constructed of linen, and despite its rather cute a line shape, it is actually just a tube with shoulder straps. The front has a draw string across it to help it shape over the bust, which I think is part of the reason the front looks so evenly distributed and full. As you can see, I chose to make a sleeveless chemise, specifically for the square necked gown.
Back view.
The back of the chemise is cut low and square to fit within the shape of the square necked gown. Next is a closeup of the stays so you can see more detail.
Short stays.
In this photo you can see the drawstring on the chemise. You can also see the front lacing stays better. They are essentially the same basic shape as my longer pink stays, with a few differences. The pink stays have a simple front, back, hip gusset, bust gusset construction, whereas these new stays have a back piece, side piece, and then front piece with the bust gussets. For this pair, I think I actually could do without one of the bust gussets, since it looks a little big. But it’s WAY too late now to change that! I had to cut the area under the arm pretty low to be comfortable, and I also had to move the straps a few times, especially in front. If they are too far out they cut into your arm joint when you try to move–not comfortable, let me tell you–but they needed to be pretty wide in order to accommodate the wide neckline of the square necked gown.
The stays are white cotton twill layered with two layers of cotton canvas, except the gussets and straps, which are just one layer of the canvas and one layer of the twill. The stays are bound with white cotton bias. They are boned (only at center front to stabilize the eyelets) with plastic wire ties. Despite the light boning they are quite stable when laced up. And let me just say how much easier it is to get dressed when your stays lace in front! So easy! Love it!
These stays were stitched by machine. I needed them done quickly and I wanted to be able to dance and sweat in them without having spent lots of hours hand sewing them. Also… at some point when I washed them (after the 1812 Guerriere weekend, when they were wet through from sweat) they got streaky. Now they are mostly off white, but still have bright white streaks. So I didn’t feel the need to make them super pretty and spend the time hand sewing them. I did hand sew the eyelets for the lacing. I thought about doing spiral lacing, but then when I made the eyelets I forgot to space them that way… so they don’t spiral lace.
Under dress.
The other new undergarment is this under dress–needed because of the sheerness of the dress fabric. So here it is. The skirt is the same dimensions as the square neck dress, and mounted to the bodice in the same way. The bodice also uses the same pattern, except that the front is not gathered. There is a small tuck on each side of the bust, but that’s it. The straps on the under dress are similar to the straps on the chemise and stays, so that they don’t interfere with the sheer sleeves of the gown. The under dress ties in back at the top and where the waist is. The day of these pictures one of the lower ties came off, so you can see the gap where a tie would normally be. Below the ties are an opening of about 8″ that allows me to get in and out of the garment. It all looks quite a-line in these photos, but with the dress on top the whole thing looks much more columnar.
Back of the underdress with the missing tie.
I think I’ll do another separate post with some of my research images for the sleeveless under garments. So for now, this is it!
Well, it’s been a little bit of time since I shared with you my research and plan to build a Regency corset to accompany my 1819 gown. I’m excited to say that I was successful! The corset is complete, although I still plan to quilt a diamond pattern along front rib section within the next few months (I’ll share photos of that once it is complete). You can see the diamond quilting in the photos in the link, above.
The dummy isn't quite the right shape for this corset, but here it is!Corset back
This corset is constructed of two layers of pink cotton twill with a layer of coutil sandwiched between them to provide stability and support. I began construction by flatlining the coutil to the outer layer of twill. I sewed the non-gusset seams (the front and back pieces) together in these flat lined pieces, leaving the inside twill layer for later. Each gusset had all three layers flatlined together and sewn into place with the seam allowances pressed away from the gussets themselves. Then I went back and basted the inner twill pieces into place that had been left aside. I turned under the seams on these pieces and hand sewed them over the seam allowance of the gussets so that no seam allowance was showing.
After completing the inside construction I bound the edges with purple bias silk taffeta, scraps from another project. The final step was to create eyelets. I decided to do these by hand in purple cotton embroidery floss. Each eyelet is reinforced with a metal jump ring that is caught under the thread on the inside of each eyelet. This reinforces the edge of each eyelet and keeps them from stretching out of shape when laced. The jump rings are only visible on the inside of the eyelets, where the stitching is bulkier because it passes over the rings.
Hand sewn eyelets, on the outside
The corset is lightly boned at center front and center back. I struggled over what material would be best to create the 2″ wide center front bone. Eventually I remembered a suggestion from a friend, Carly, who had used a creative option for boning that I decided would be perfect for this project. Home supply stores such as Home Depot and Loew’s sell plastic wire ties that are about 3/8″ wide and which come in lengths up to about 20″. The ties are a good 1/8″ thick, strong, but still bendable. They have a similar tension to a steel bone, but are a little thicker. And the nice thing is that you can cut and shape them easily with scissors! Of course, plastic boning is not historically accurate, but it is functional and affordable (a pack of these wire ties is about $5, and there are about 12 per pack) and creates a boned garment that feels similar to one boned with steel bones (and once you finish the garment, who would know?).
In this corset, each side of center back has a single bone. The 2″ wide center front bone is actually 5 wire ties attached to one other with (shhh!!!) masking tape! This is an experiment that I hope will work (I have slight fears that body heat might one day cause the tape to lose its grip and the bones to start to move around in funny ways, or worse, that the tape will leech sitcky goo onto the fabric that will stain the exterior). I put the center front bone in between the layer of coutil and the inside twill, so even if the masking tape does one day create stains, it is unlikely that the stains will make it to the outside of the corset.
I have a whole list of projects to work on during this Thanksgiving period: I need to reinforce some trim and closures on various gowns that will be worn during the next few months, I need to build a flowered hair accessory (I hesitate to say wreath) to match my blue 1860s ball gown, Belle, and I need to construct a Regency corset! I’ll pass over the stitching of the trim and closures (because, really, I don’t think that would be an exciting post) and save the hair ornamentation post for later. That leaves us with one more topic… The Regency corset.
I don't have very many good pictures of this gown (I'll have to get some!) but I'm on the far right. Click on the link to the left to read more about this ball!
Here’s the background on this plan: I have a Regency dress that I built last February. At the time, I could not build the undergarments that would accompany this gown at that time. (You can read the story of the dress here.) Now I have time and so I plan to backtrack to this project and make the right undergarments! I have a chemise which will work (you can see it under my 1780s corset in the photos in this post) because chemise styles were unvaried from the late 18th century through the first quarter of the 19th century; however, I do not currently own a Regency period corset!
First of all, what is the Regency period? The term brings to mind Jane Austen books and films and general ideas of the early 19th century, but upon closer inspection Regency is actually more specific than I was thinking. I’ve got two relevant definitions for you from the Oxford English Dictionary.
Noun: Senses relating to government or rule by a regent. Usu. with capital initial. The period during which a regent governs; spec. the period in France from 1715 to 1723 when Philip, Duke of Orleans, was regent, or in Britain from 1811 to 1820 when George, Prince of Wales, was regent.
Designating a style of architecture, clothing, furniture, etc., characteristic of the British Regency of 1811–20 or, more widely, of the late 18th and early 19th centuries, featuring neoclassical elements often with Greek and Egyptian motifs.
Regency is a more specific period of time than that of the overarching Georgian period, which includes the reins of George I, George II, George III, and George IV of Great Britain. The Georgian period is from 1714-1830 and sometimes includes the years 1830-1837 as well. 1837 marks the beginning of Queen Victoria’s reign, which is where the term Victorian comes from.
Upon reflection I realized that I had forgotten the year my dress is from! Certainly it is Georgian, but is it really Regency? I had made the gown in a rush and so I had to retrace my steps and really think about what specific span of years the gown fits into to answer that question. It turns out that the gown is, in fact, from the Regency period: it is from 1816-1819! Whew!
Once that information was determined, I could move forward and research the corset shapes and patterns of that specific period (that is, 1816-1819). It turns out that patterns in Norah Waugh’s Corsets and Crinolines jump from the late 18th century to the 1820s; however, I did find images of extant corsets from the first part of the 19th century. “Oh well,” I thought, and used the images and the 1820s pattern in Corsets and Crinolines to drape a pattern.
Here are some of the research images from the Metropolitan Museum of Art. I’ve included a wide span of years so you can see the development of the corset shape over time. Note the bust and hip darts as well as the beautiful quilting that begins to define the waist by the 1840s.
c. 1811 Cotton Corsetc. 1811 Cotton Corset Back1815-1825 Corset (I really like the simple lines and straight forward color combination in this garment: this is my most inspiring image. It is interesting that the lines of this corset are so simple, relative to these other examples. This corset seems to be lacking hip darts or an inward angled front panel plus side panel.)1820-1839 Cotton and SIlk Corset (the embroidery on this corset is great)1820-1839 Cotton and Silk Corset Back (I especially like the back)1830-1835 Cotton Corset1830s-1840s Corset
I am including these last ones because I think they are lovely, even thought they are not from the period I need to build. I’ll have to keep them in mind for future!
1820 Corset (this is in the Collection of the Kyoto Costume Institute)1830-1839 Cotton Corset
Wohoo! My 1780s stays are complete! I think they turned out quite well. They certainly resembles my inspiration image. You can see that image and read more about the construction of these stays by reading this previous post.
Finished frontI used 1/4" linen tape for the lacingThe lacing holes are hand sewn eyeletsSide viewSide front view
I made the chemise as well. It is just a simple linen tee shape without set in sleeves. It is mid calf length and has a low neckline in front and back.
Soon I’ll post pictures of the finished 1780s exterior garments as well!