HSF #1: Elusive Blue In 1899

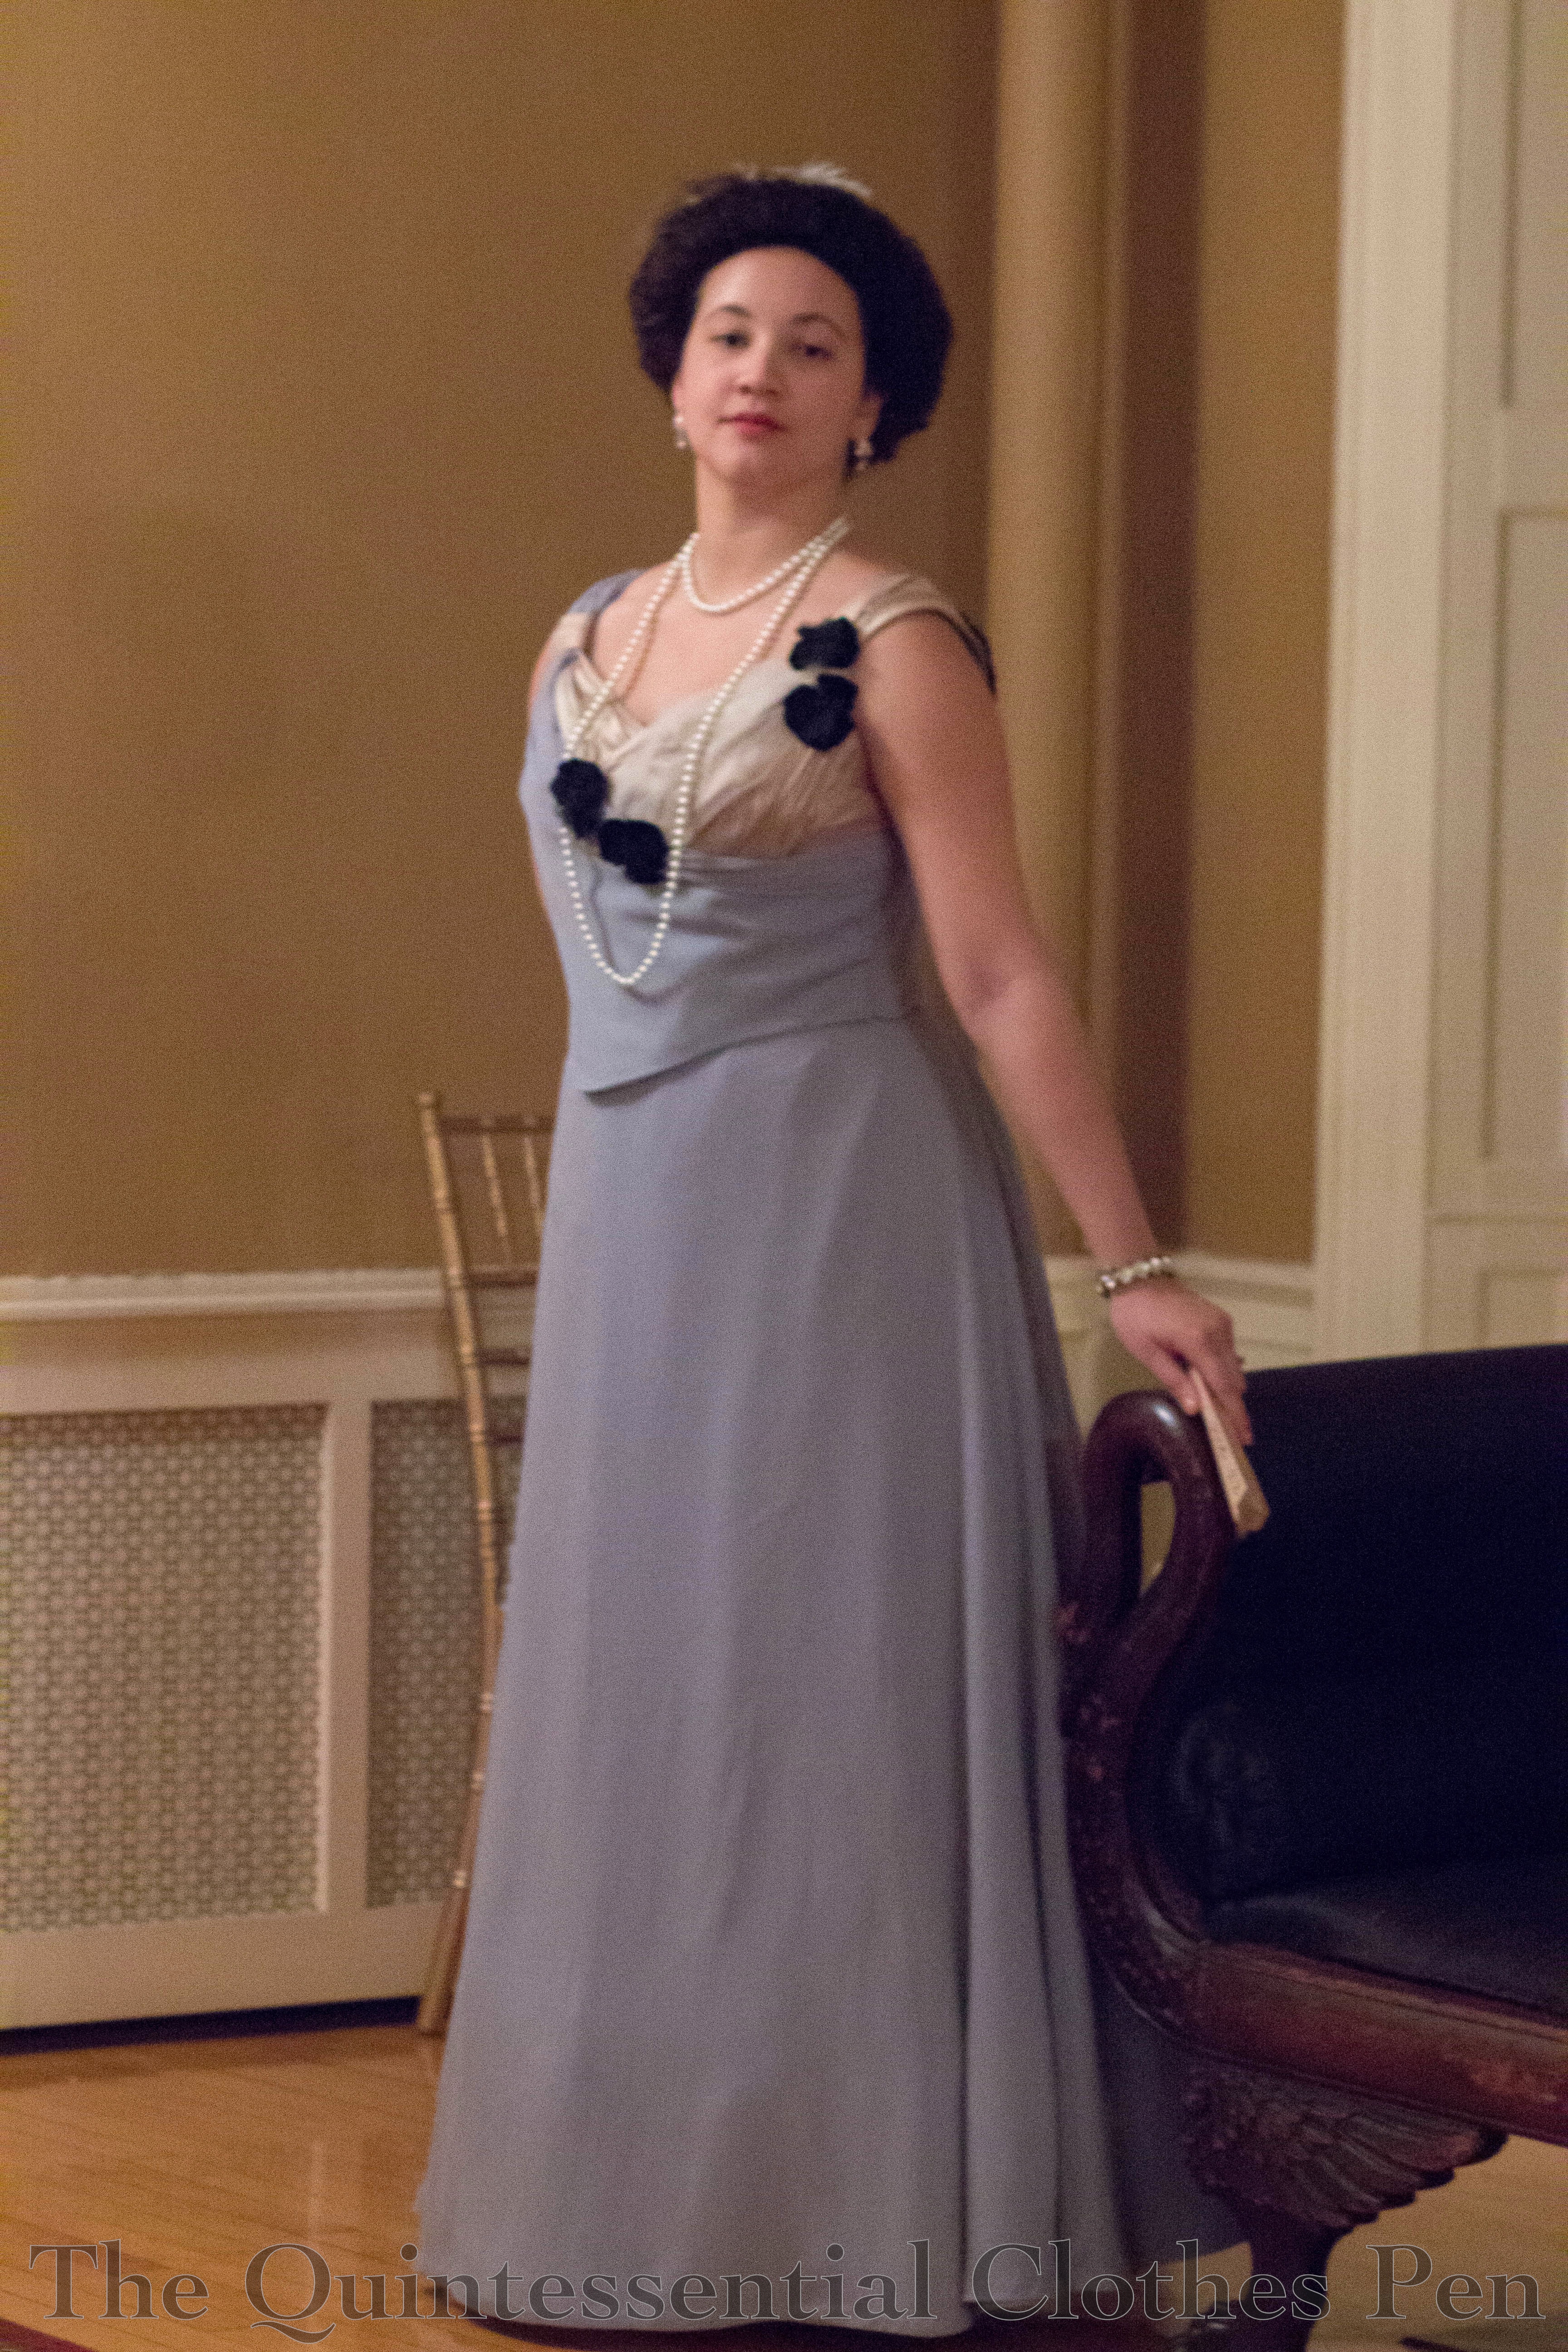
I made my (first) and last 1890s ball gown in 2012. It is from 1893, with super poof sleeves, and is lovely, but after wearing it to more events than I’ve kept track of without serious thought (which means somewhere over 5 and probably under 10), I was growing tired of it and wanted something new. (Of course, now I’m curious when I wore it. Let’s see: last January’s 1890s ball in 2015, the Nahant Vintage Dance Weekend Grand Ball in 2014, a December Victorian ball in 2013 where I solved the problem of it sliding off my shoulders when I wore it for the first time during Newport Vintage Dance Week in 2012, plus various performances.)

I already had inspiration pinned to a board, I had fabric in the stash (the fabric is more of the same elusive blue I used to make my 1811 evening gown in 2014–it time travels!), and I had an opportunity to wear an 1890s gown this past month! With a vague plan in mind, I started the skirts* sometime in the fall with the sincere hope of getting a fair bit done on them, but only got as far as cutting them out, after which they languished in the closet while I worked on other projects. Languishing is a variation on procrastination, which is the HSF challenge for this January. And so, with the languishing having finished its course, here is the finished new gown.

IMG_2204-2

Just the facts:

Fabric: 5 yards or so of (likely polyester) elusive blue chiffon, 3 yards or so of elusive blue polyester for skirt lining, 3/4 yard or so robin’s egg blue cotton, 1 yard or so of pink glazed cotton, 1/8 yard or so of taupe silk shantung, some small bits of ivory polyester tulle and ivory silk gauze.

Pattern: Created by me, with reference to Janet Arnold dresses from the 1890s.

Year: 1899.

Notions: Wide grosgrain ribbon, bone casing, 1/4″ plastic wire tires, narrow grosgrain ribbon, black velvet and organza millinery flowers, hooks and eyes, and thread.

How historically accurate is it?: Definitely recognizable in its own time. The silhouette is spot on. The colors are inspired by extant clothing. The construction is mostly accurate. The materials are a mix of accurate and inaccurate. I’ll give it 80%.

Hours to complete:  Many. I worked on this over a few months.

First worn: January 9, 2016.

Total cost: About $15-$20.

(The low cost is due to the fact that the chiffon and lining fabrics were purchased for the amazing price of $1/yard and that many of the notions and small bits were in my fabric stash.)

IMG_2197

For the bodice, I started with the pattern for my 1893 gown (which was adapted from Janet Arnold originally). The back needed very slight alteration, but the front had quite a few changes, due to being worn over my new 1880s corset  and because I wanted different dart placements, neckline, a front/side hidden closure, etc. I did multiple mock-up fittings (no pictures, sorry) before feeling ready to cut real fabric.

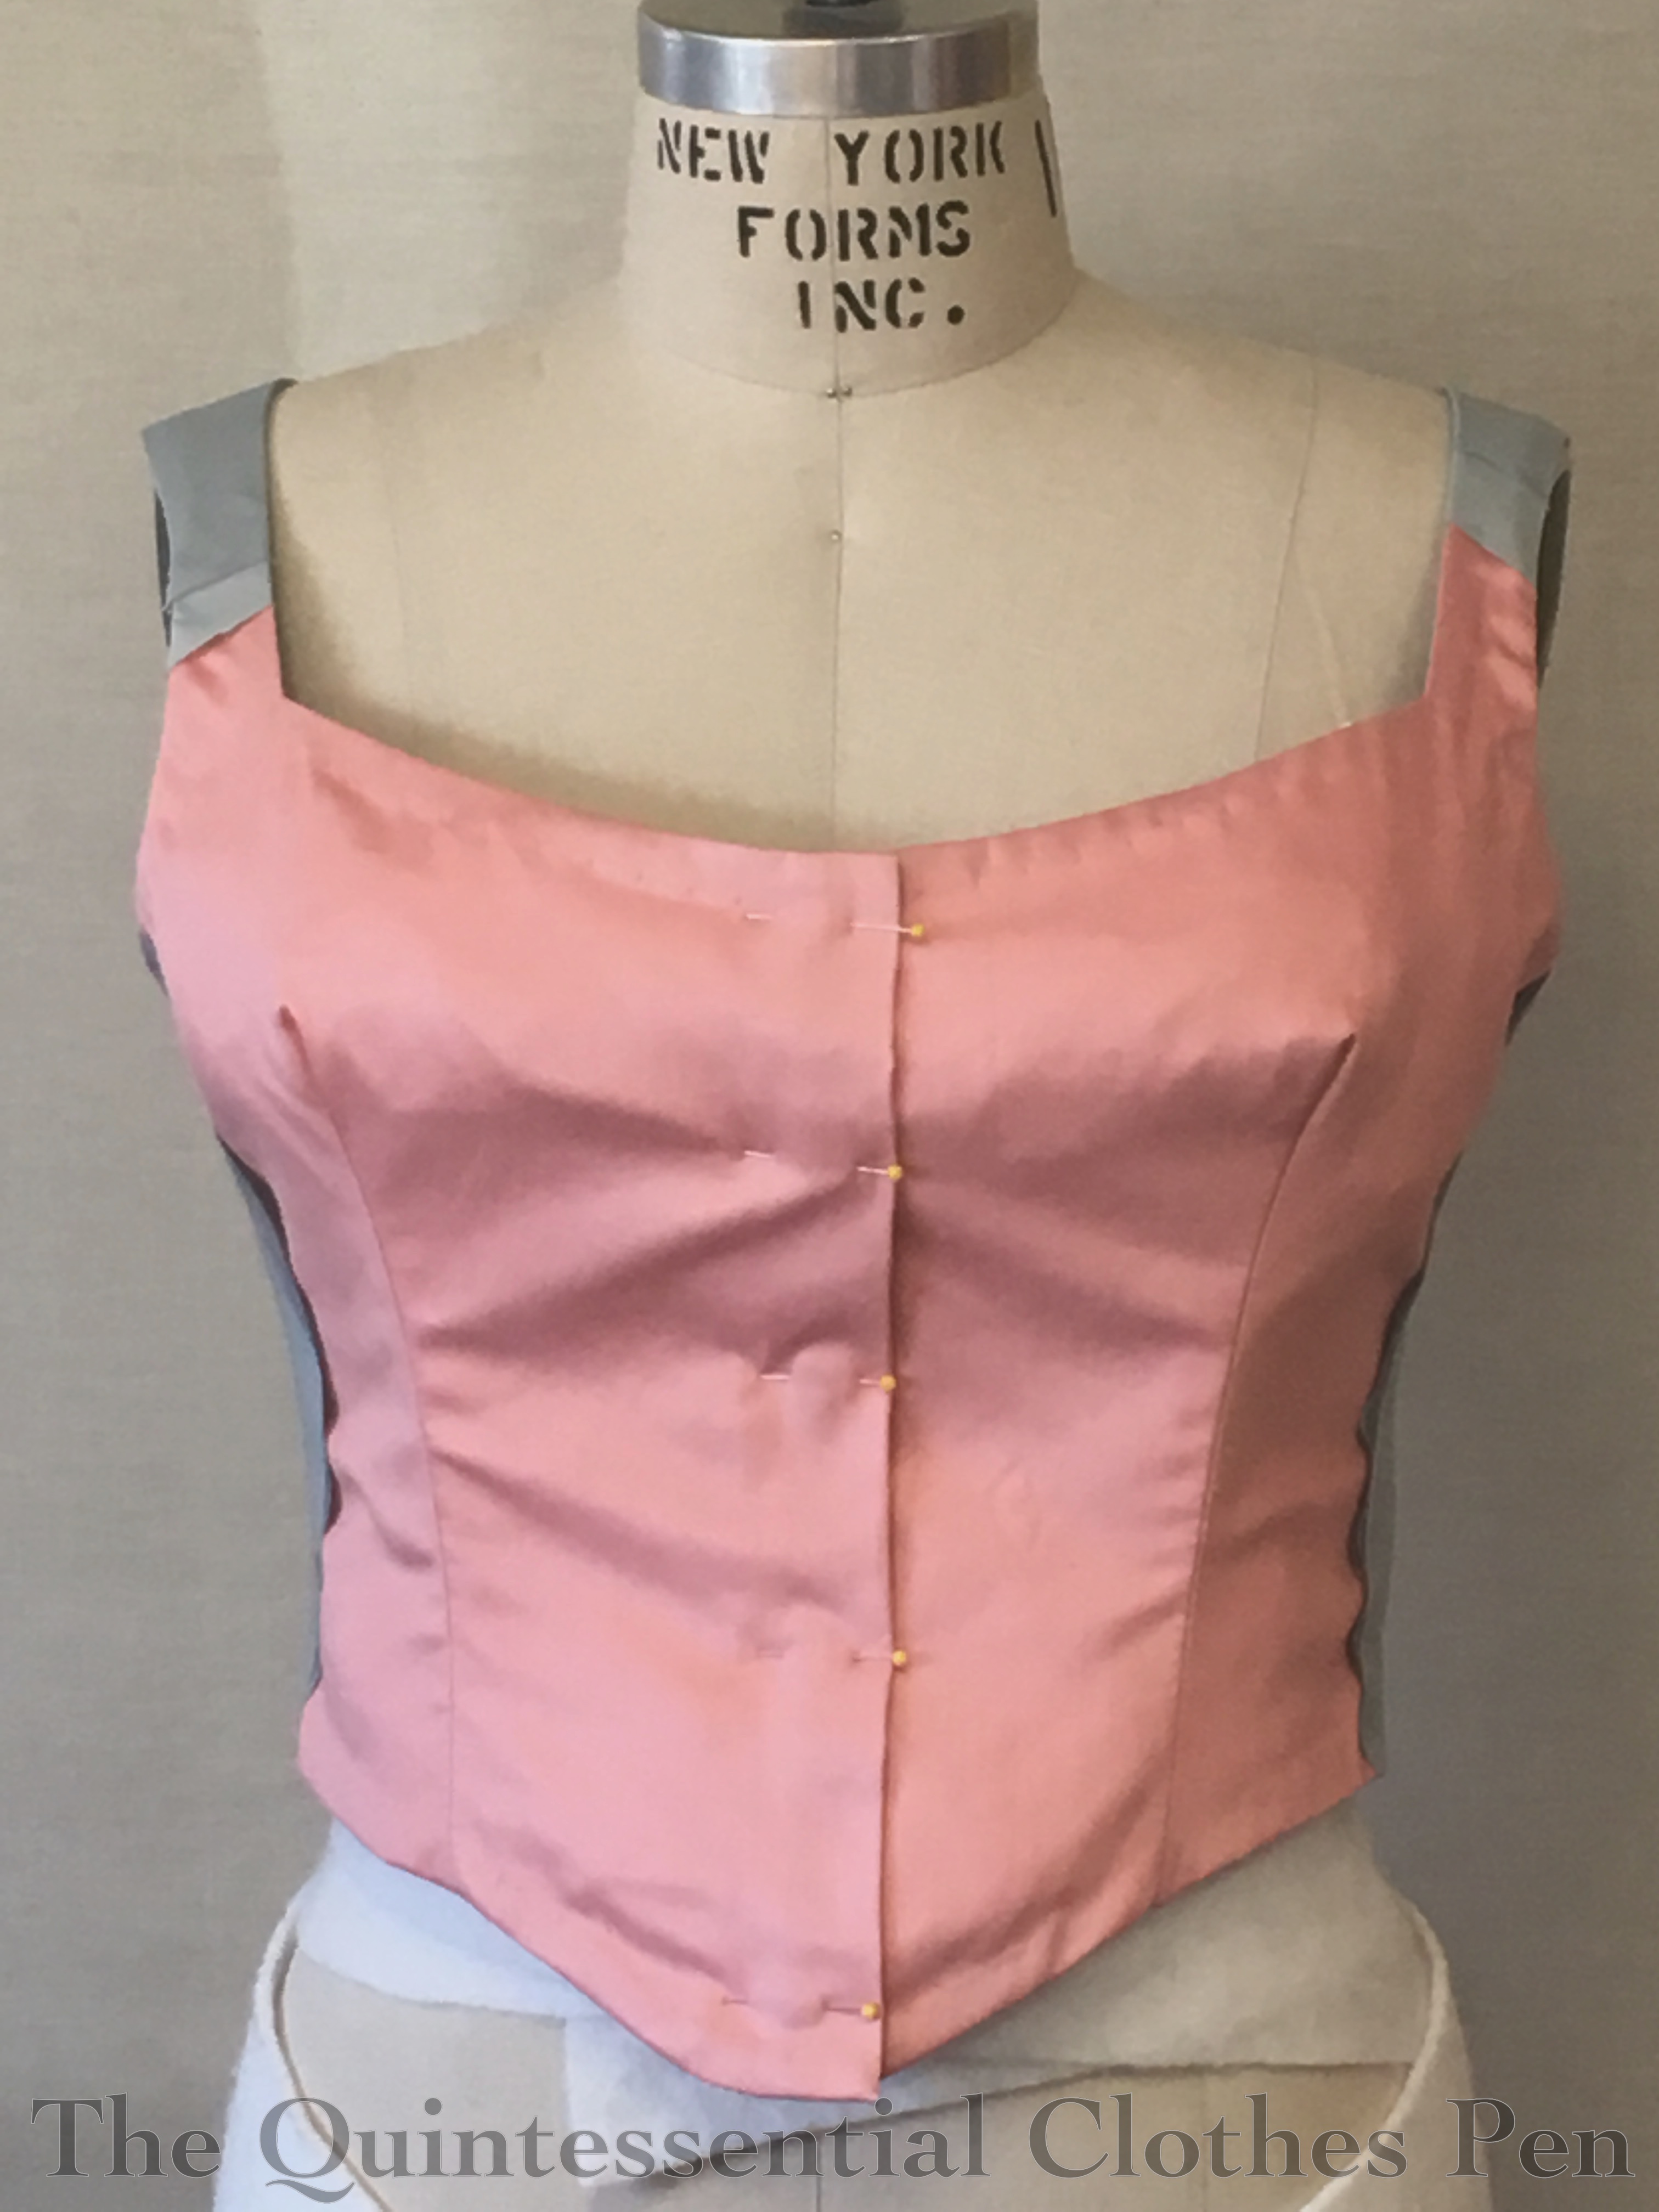
Here is the bodice in the middle stages on construction. You’d never guess from the exterior, but the bodice is flat lined with pink! This is not a standard lining color, but I had it on hand, it is the right weight (with a glazed finish, which is standard), and it amused me. By this point, I’d finished my edges, adding boning, nicely finished my interior seam allowances, and covered the back with elusive blue lining and chiffon cut on the bias.

IMG_0459 (1)

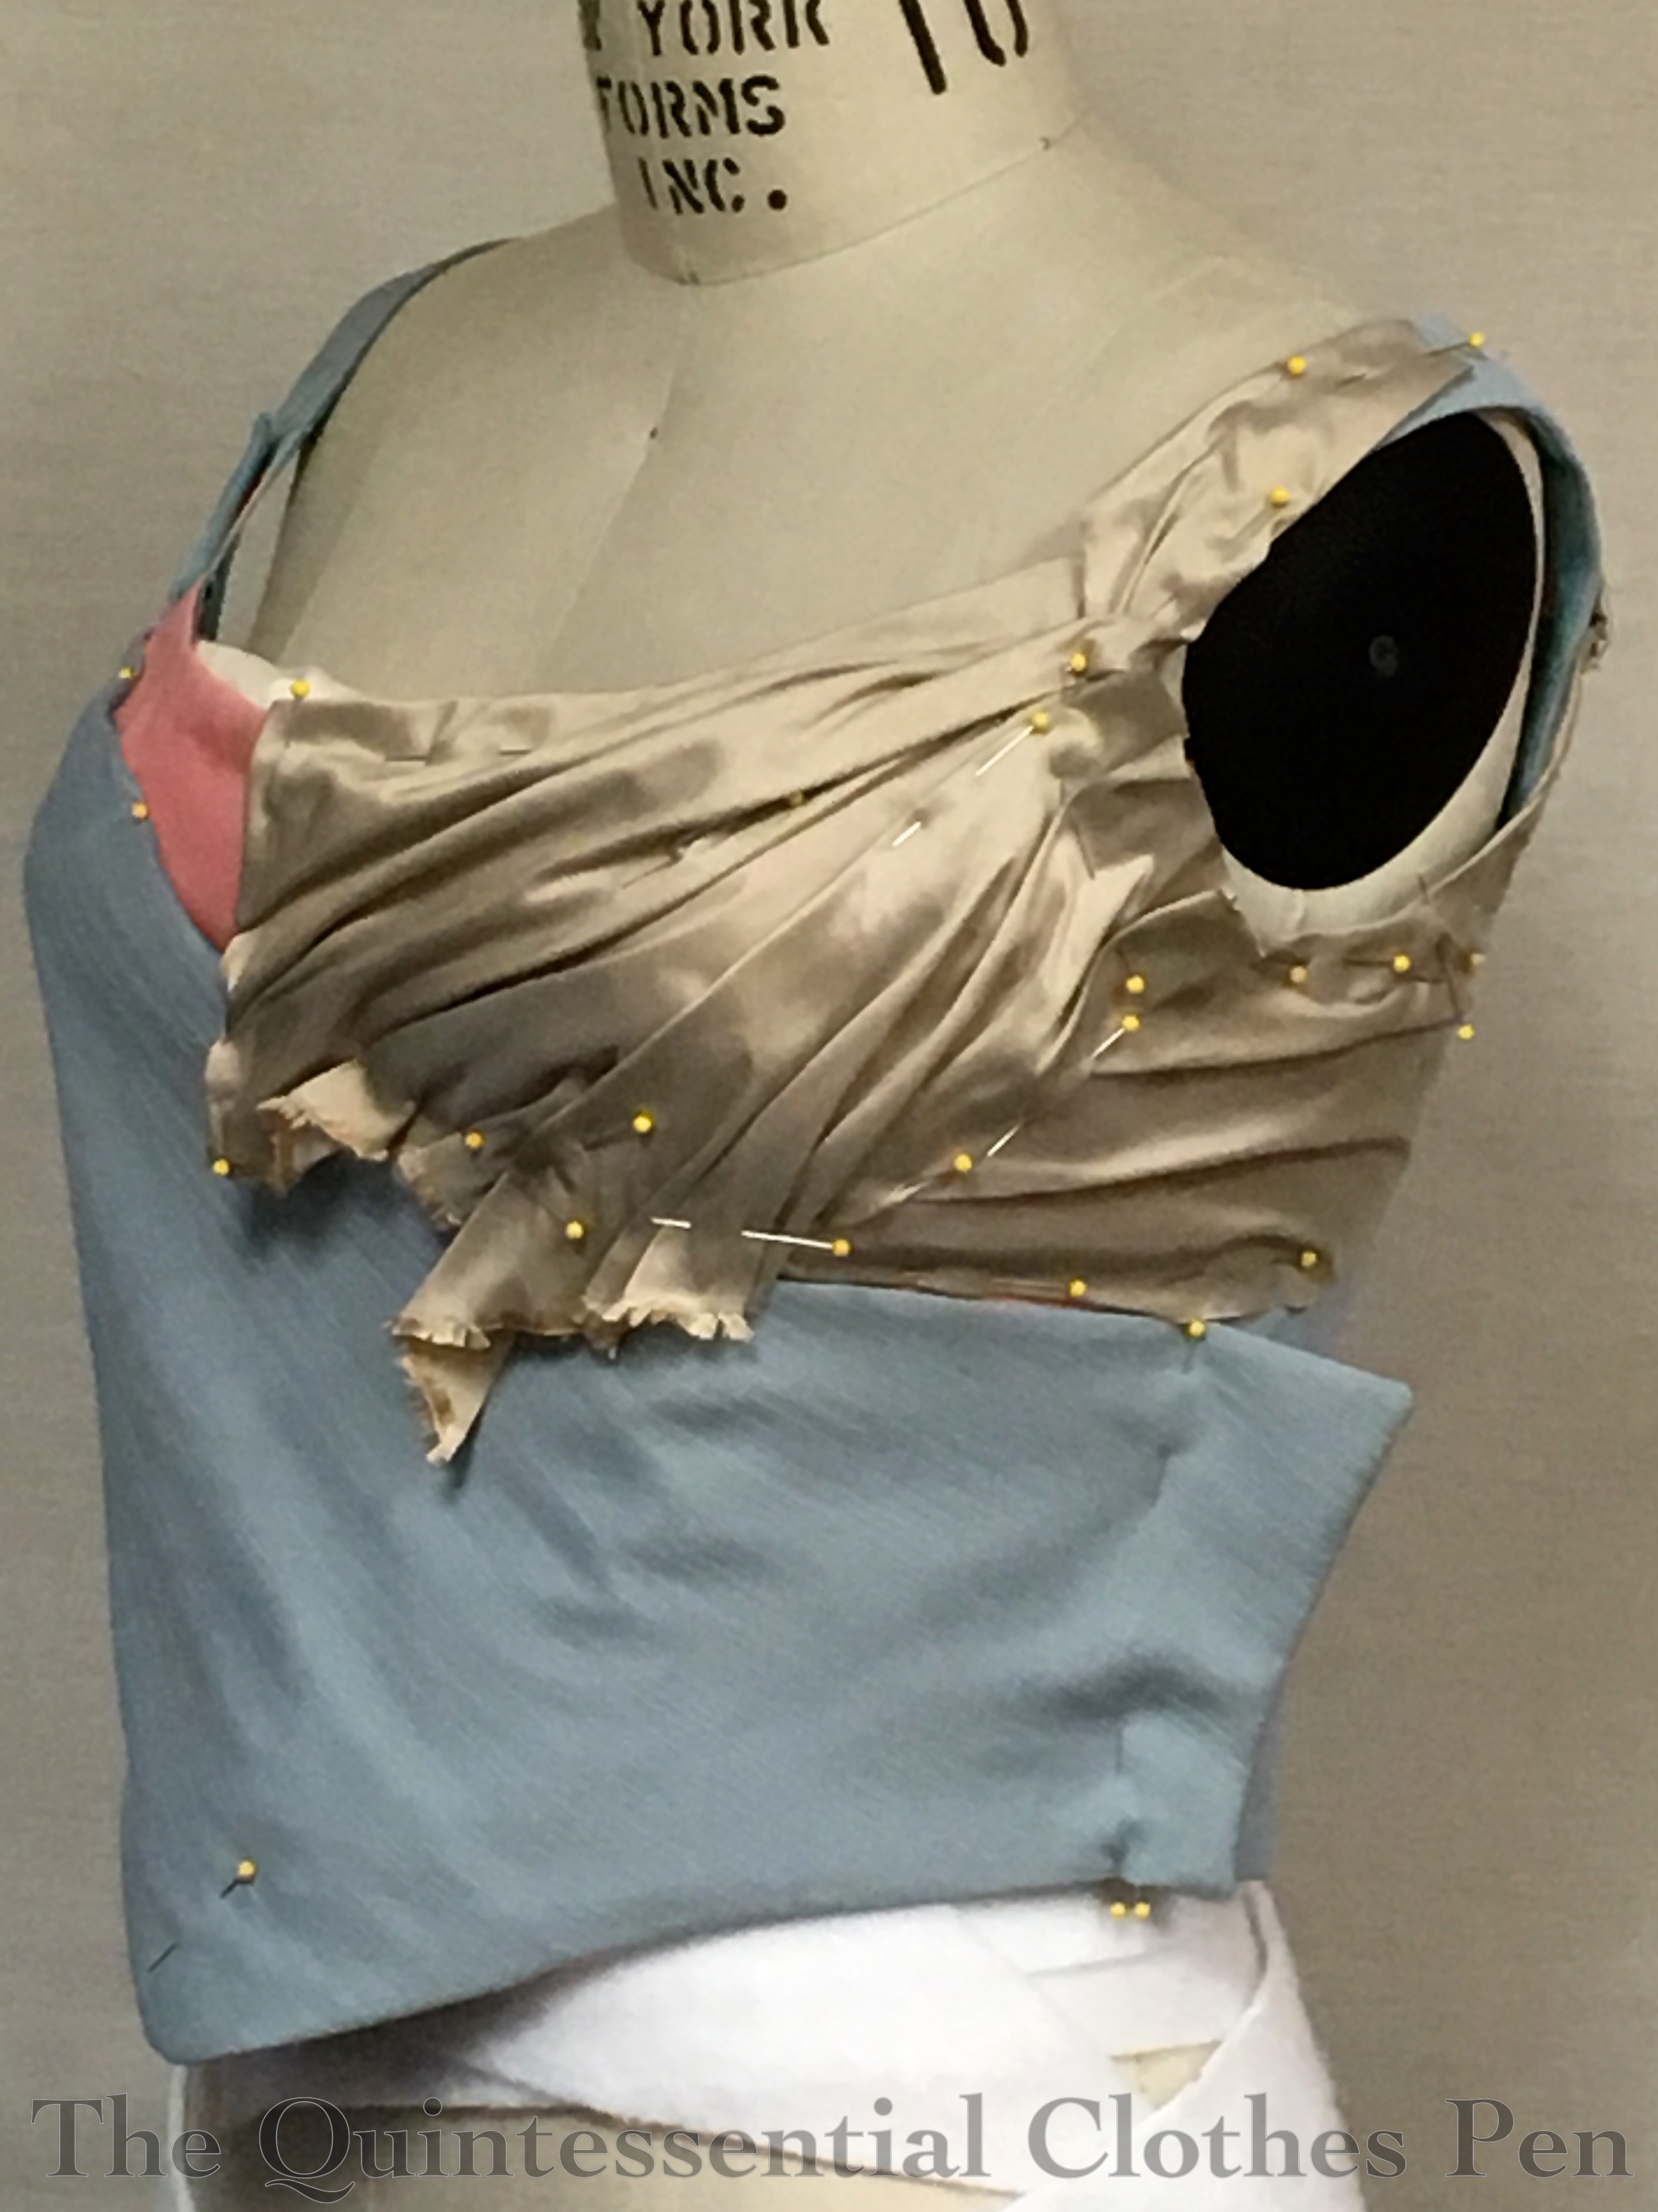
Next was creating the front bodice main piece, which is also on the bias. I draped it and then bagged the lining/chiffon with the robin’s egg cotton to create nice finished edges. The flapping bit on the left of the picture was turned under and hand sewn later in the process.

IMG_0470 (1)

Draping the silk was next. There are actually a number of small pieces carefully pleated before being hand sewn in place.

IMG_0473 (1)

My original main inspiration was this gown at the Met (and the alternate skirt follows this idea quite closely), but when I looked at my material options, I really loved this variation, also from the Met. Other dresses with a similar cut were also influential, including this, this, and this. Here’s a similar example that clearly shows the shadow of a side closure.

In the next picture, both the left and right sides have been covered in silk. Each side of the bust layers and attaches separately. I also started playing with flower placement at this point. I was inspired to add black accents to the otherwise subdued colors by this dress. I really like how the black pops!

IMG_0477 (1)

Here’s the back around the same stage.

IMG_0478 (1)

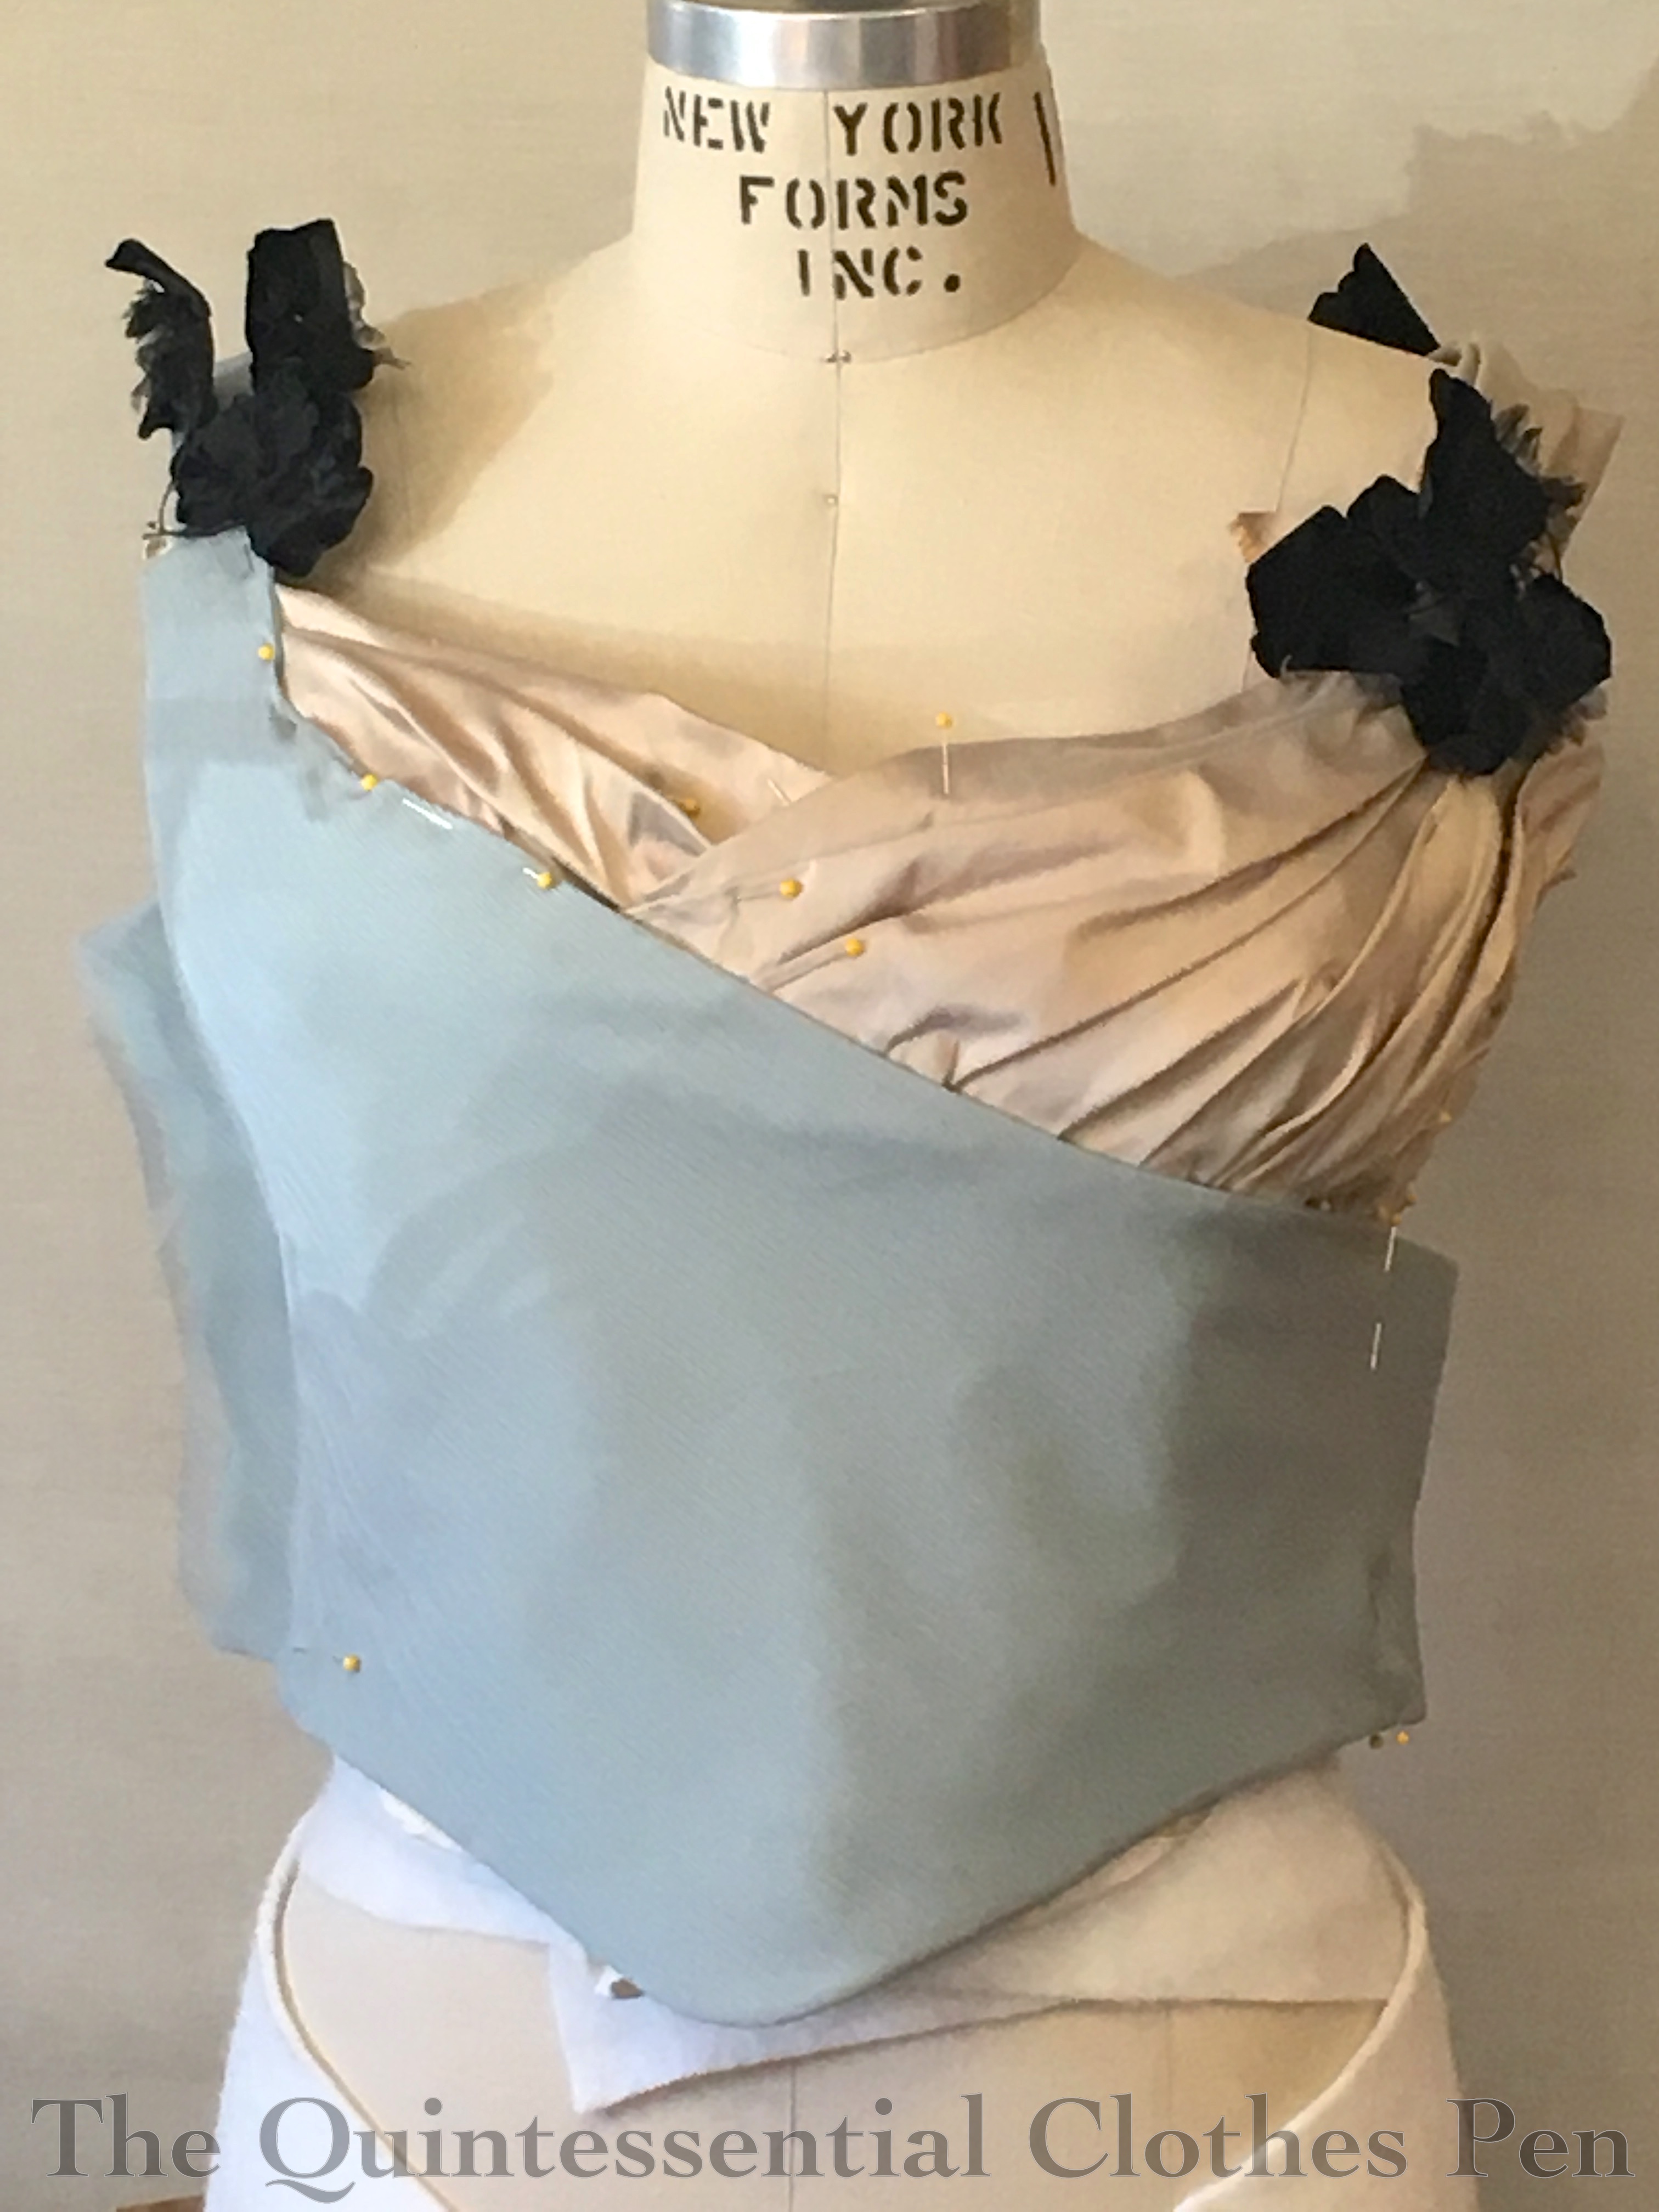
At this stage, I’ve added gauze and tulle to the front and am playing with the chiffon edging. The flowers are tucked into place to see the effect. I’ve also sewn down the proper right (left in the picture) side. The proper left (right in the picture) side is pinned and tucked, waiting for a final fitting before finishing and adding closures.

IMG_0514 (1)

The back also received a treatment of gauze and tulle in addition to a chiffon edging. You can see that the flowers came in stems of three (these are another part of one of two huge hauls of millinery flowers for super cheap that I’ve had in the last few years, yay!).

IMG_0516 (1)

Sewing down all the pleats just so, in order to look natural and not constrained, took rather a long time, as did nicely tucking all the silk around the armhole. But it was worth it!

Here is the inside of the bodice, finished. I decided to bind the seam allowances in the same robin’s egg blue cotton that I used for bias binding for the edges and armholes. A hong kong finish is not accurate, but I didn’t feel like hand whip stitching all the seam allowances (although, in the end, it probably would have taken just as much time, or less), plus, I enjoy the effect. There are also closures (yay!) and a waist tape.

IMG_0544

And here’s what the bodice looks like with center fronts together. The bit with the tulle actually hooks over the other side (but pictured this way, you can see the closures). After that, the front panel hooks across the front and is securely hooked at the side seam, effectively covering my pink lining.

IMG_0545

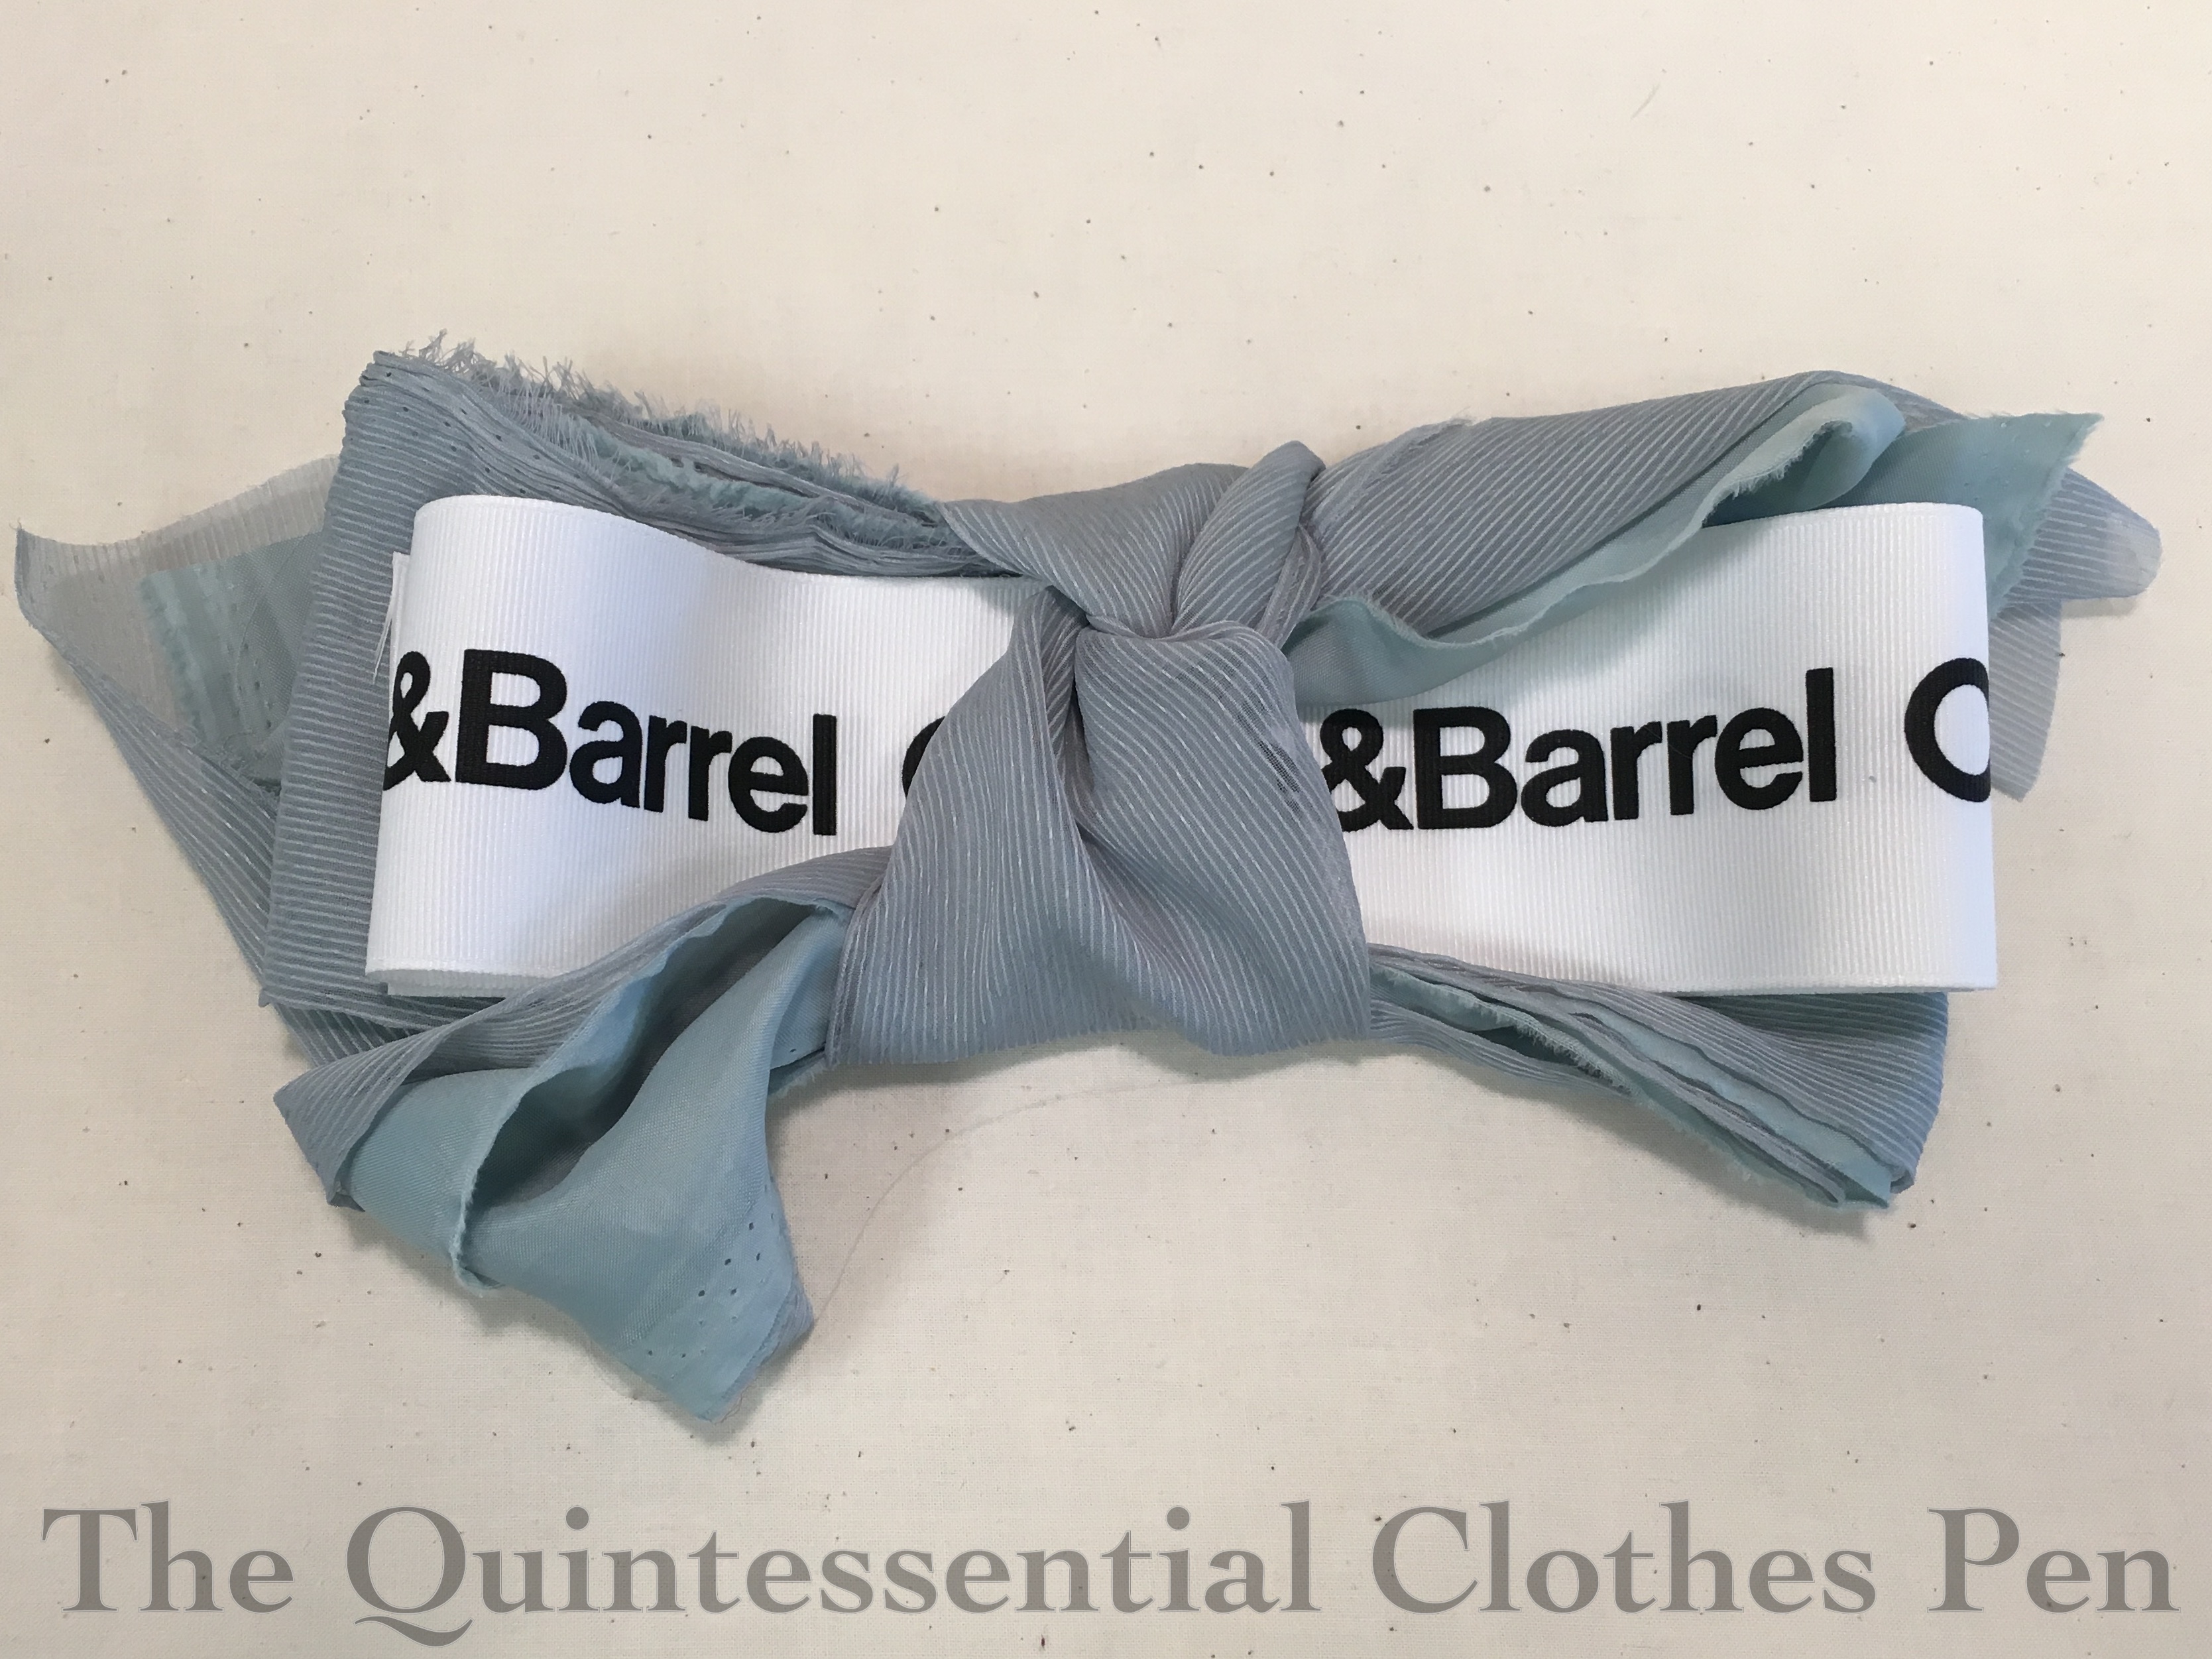
The untrained skirt is flat in front and gathered at the back. It is cut in an umbrella shape (like my 1895 skating ensemble skirt), so that the only seams needed are center back, and a diagonal seam across the back to add width to the panel. The waistband and placket are standard 19th century style, with the exception of the fact that the ribbon I used to stabilize the thin fabrics is leftover gift wrapping ribbon from wedding gifts we received from Crate and Barrel. Yay! It’s hidden on the inside and folded in half, but it amuses me, because recycling is great and it’s nice to have a bit of Mr. Q-related-something in a dress.

IMG_0479 (1)
A nice package of placket and waistband pieces. I made one for each skirt.

The most annoying thing about fitting this gown was marking the hem on the skirt. (Fitting the bodice on myself with all the layered closures was also a feat, but more uncomfortable twisting than annoying.) Chiffon is annoying to hem most of the time and it only gets more complicated when you’re marking the hem on yourself. It meant looking in the mirror, bending over to place a marking pin while everything shifted, standing up to check things, and then repeating that over and over again to shift pins by tiny amounts until they all looked good (while wearing a corset and fluffy petticoat of course, so the whole thing would hang properly on my body). Once that was all over, I hemmed each layer with self fabric bias that is turned to the inside and invisibly hand stitched in place.

I was quite successful, but it took a whole afternoon to mark and cut and sew the hem of the chiffon and of the lining (because of course the lining couldn’t stick out or be too short!). The whole thing would have been much speedier if I’d had someone else to mark the hem for me. (I thought of using my hem puffer, but the floor is too close for the puffer to reach and I didn’t have anything to stand on.)

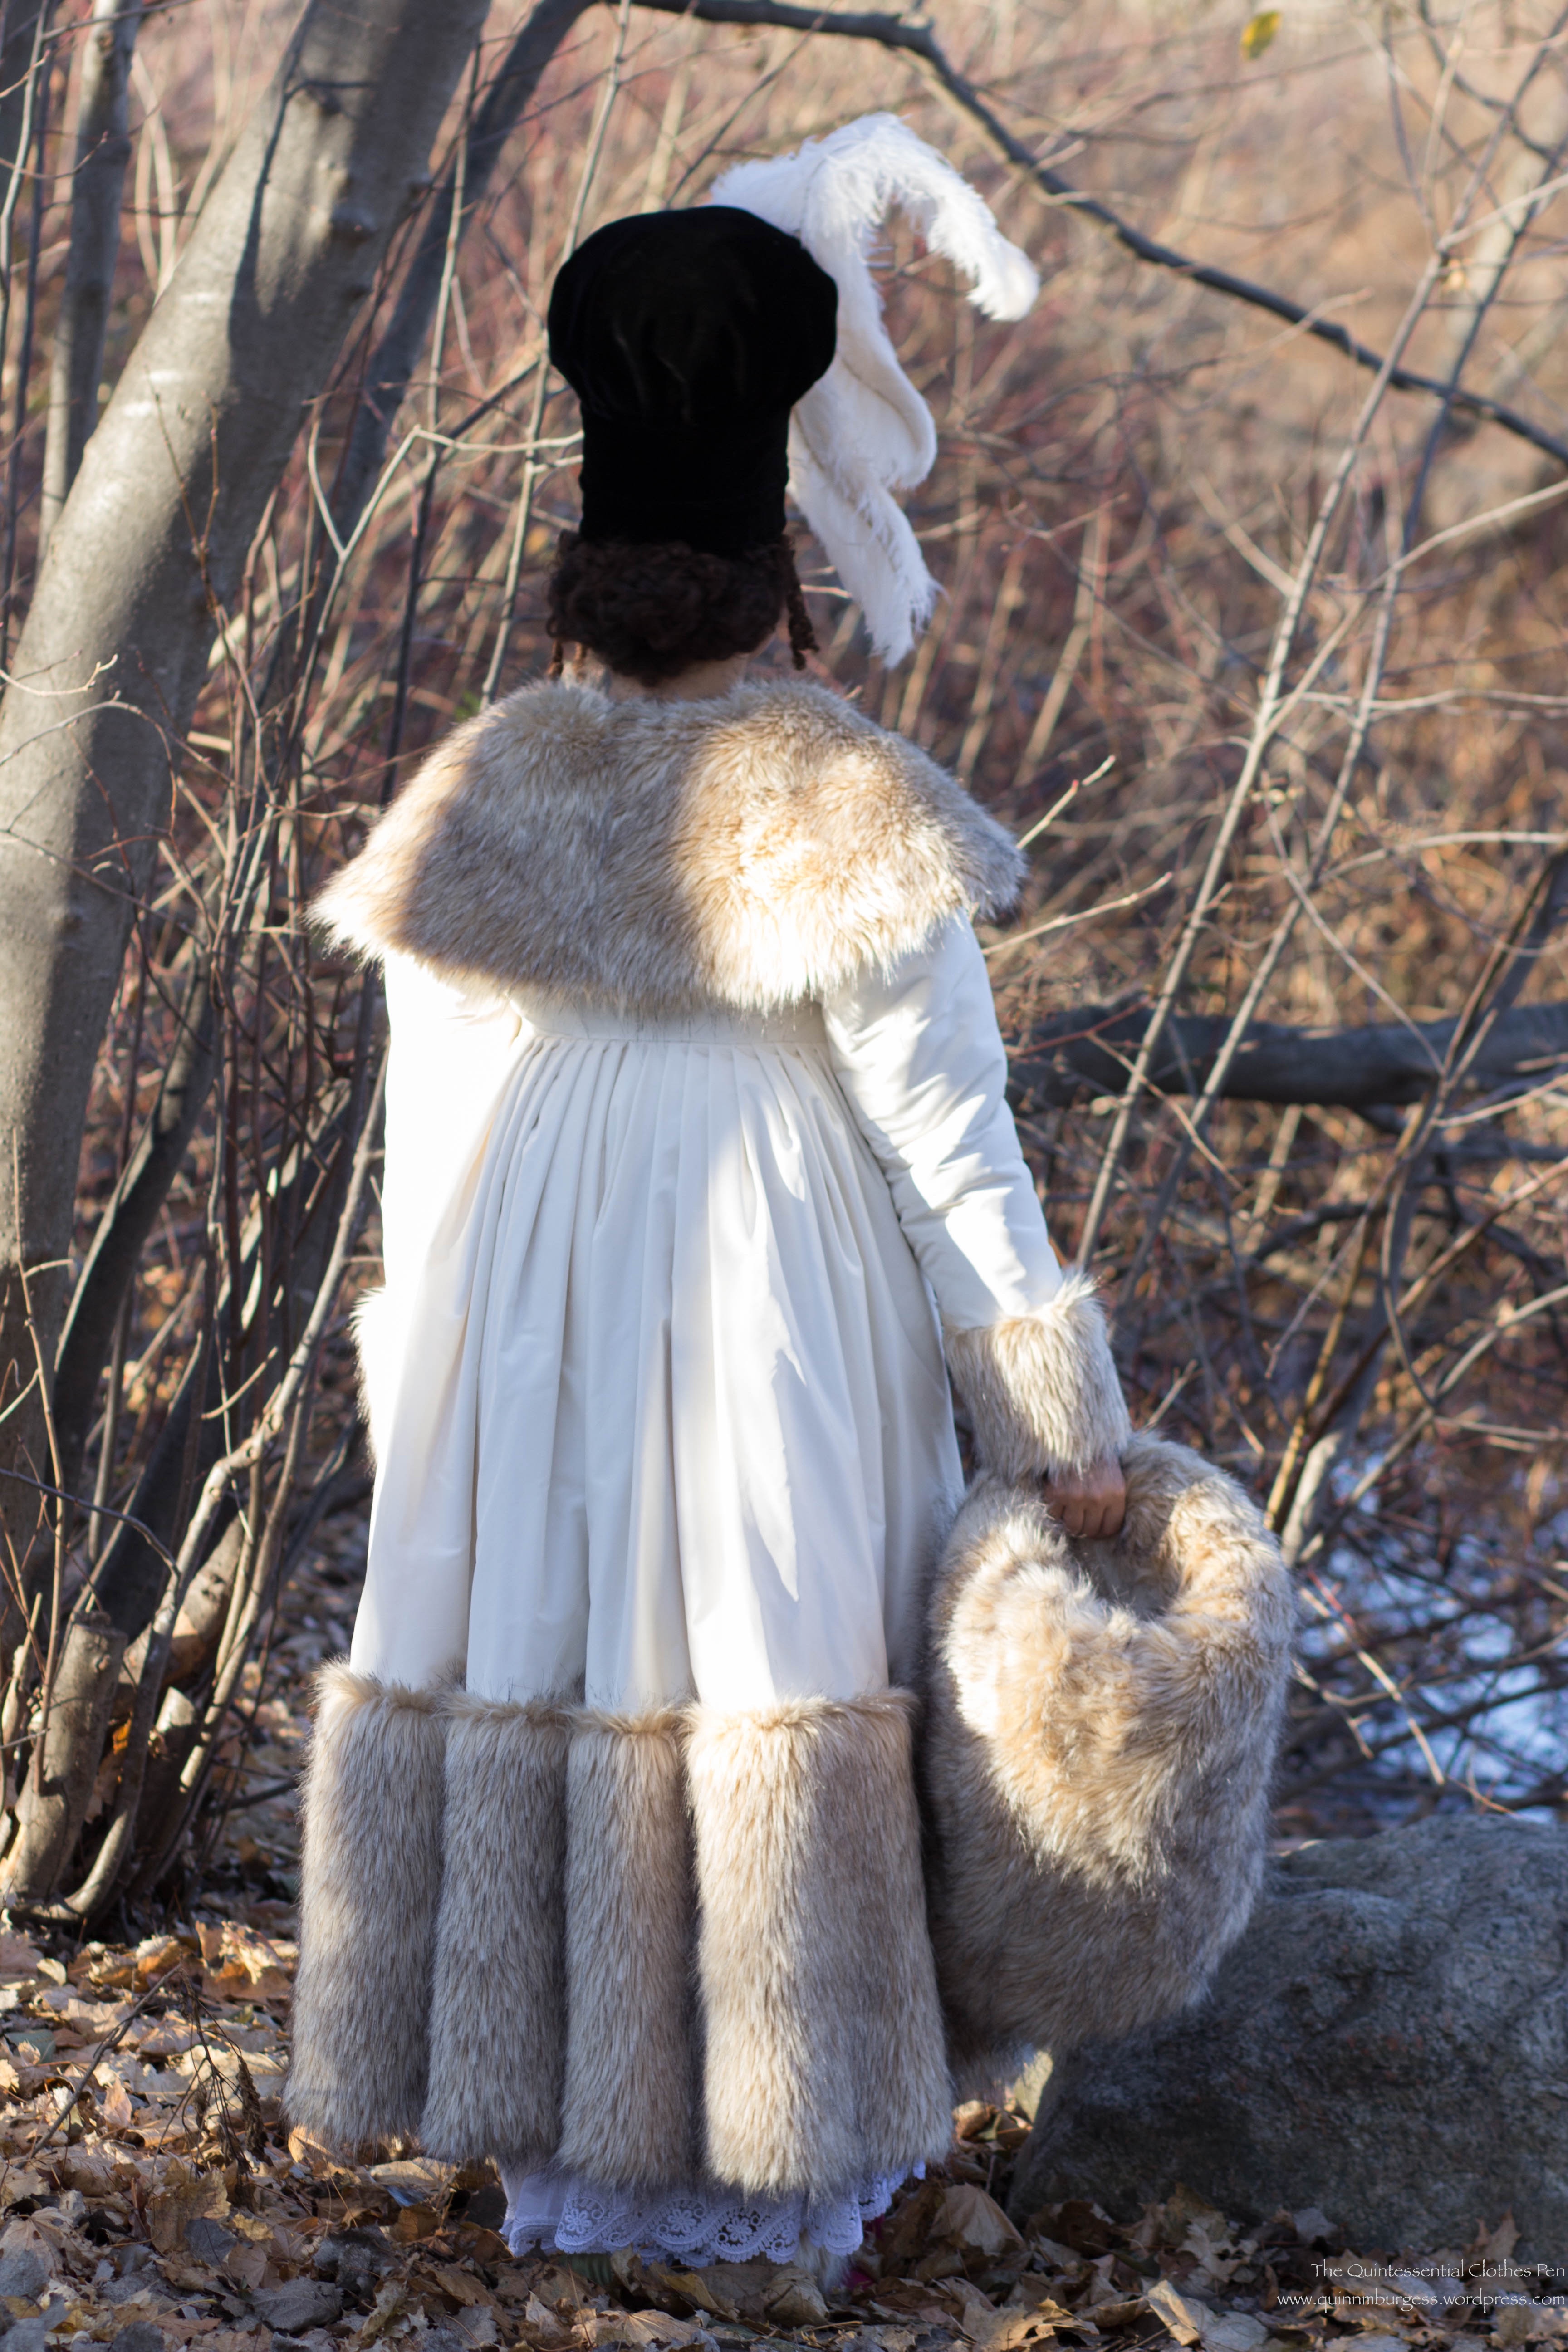
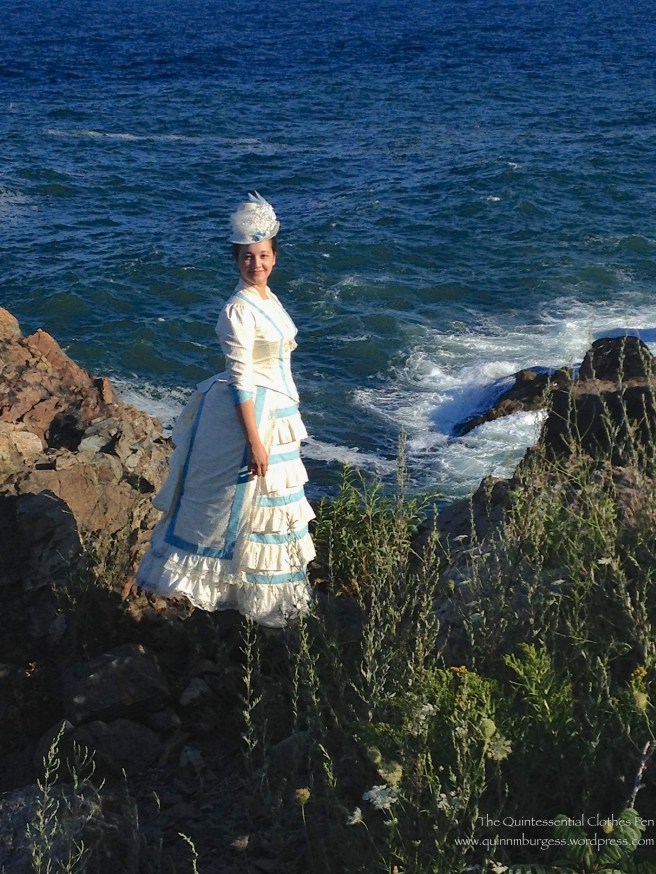
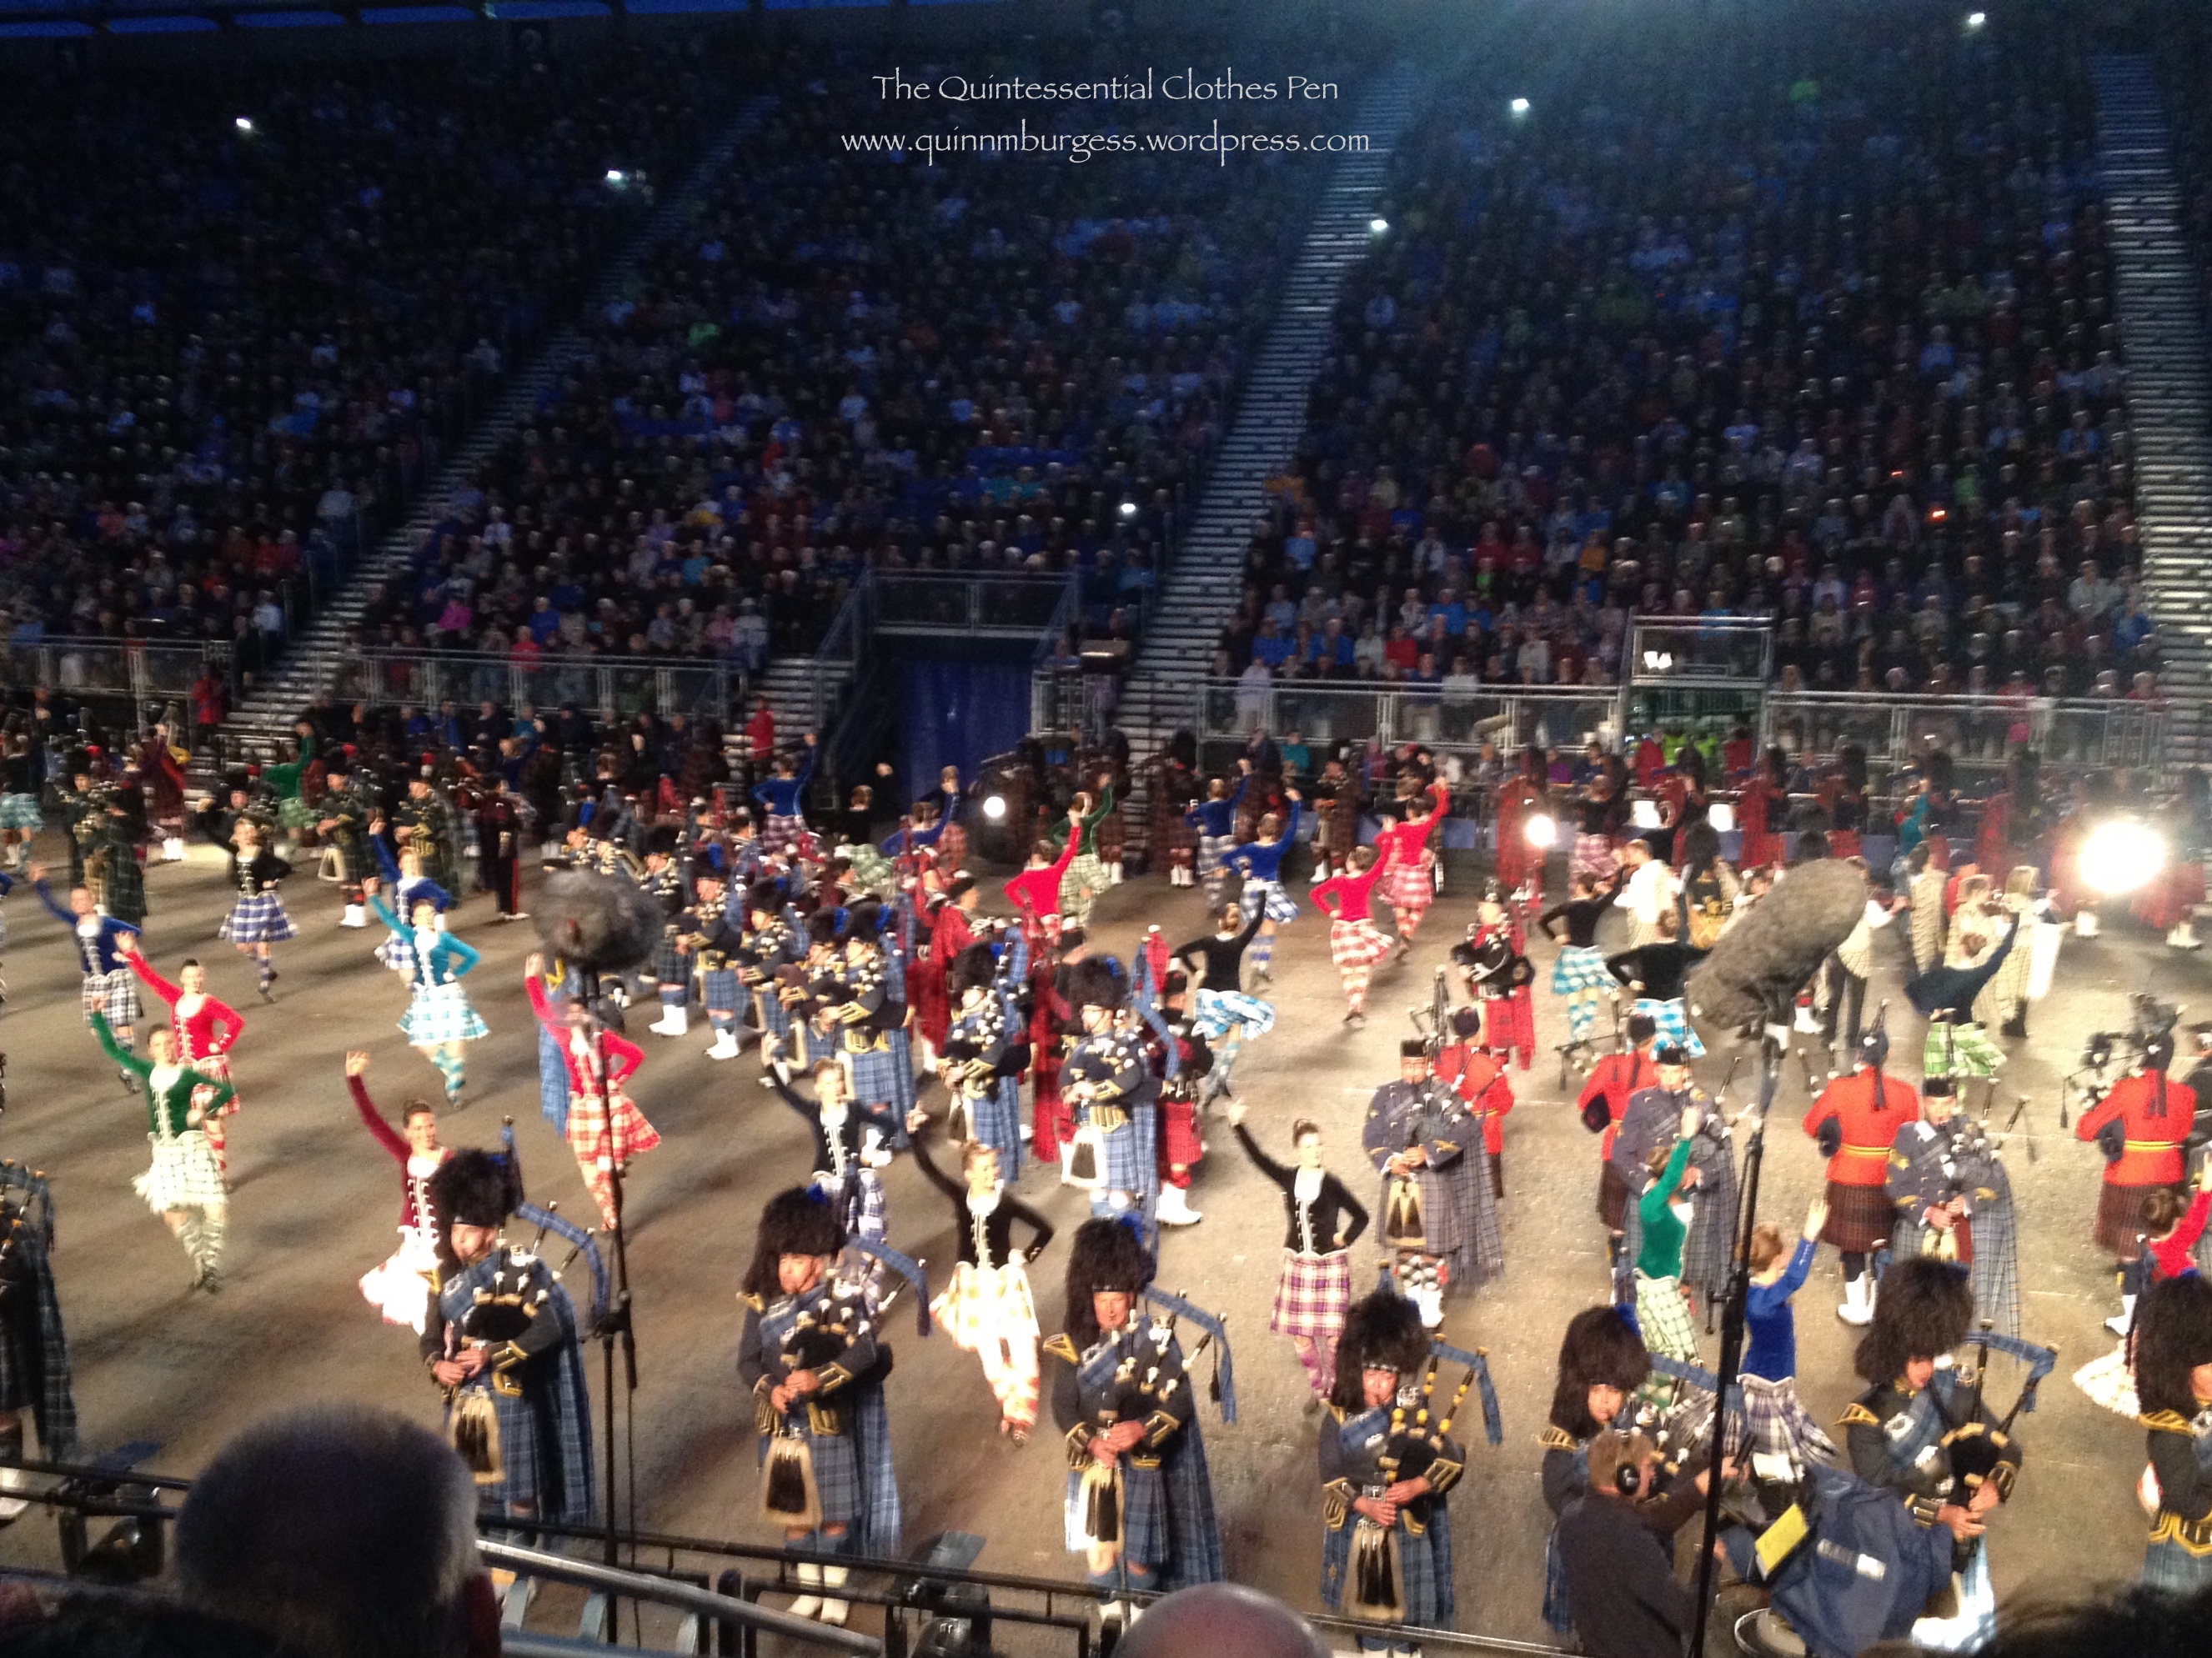
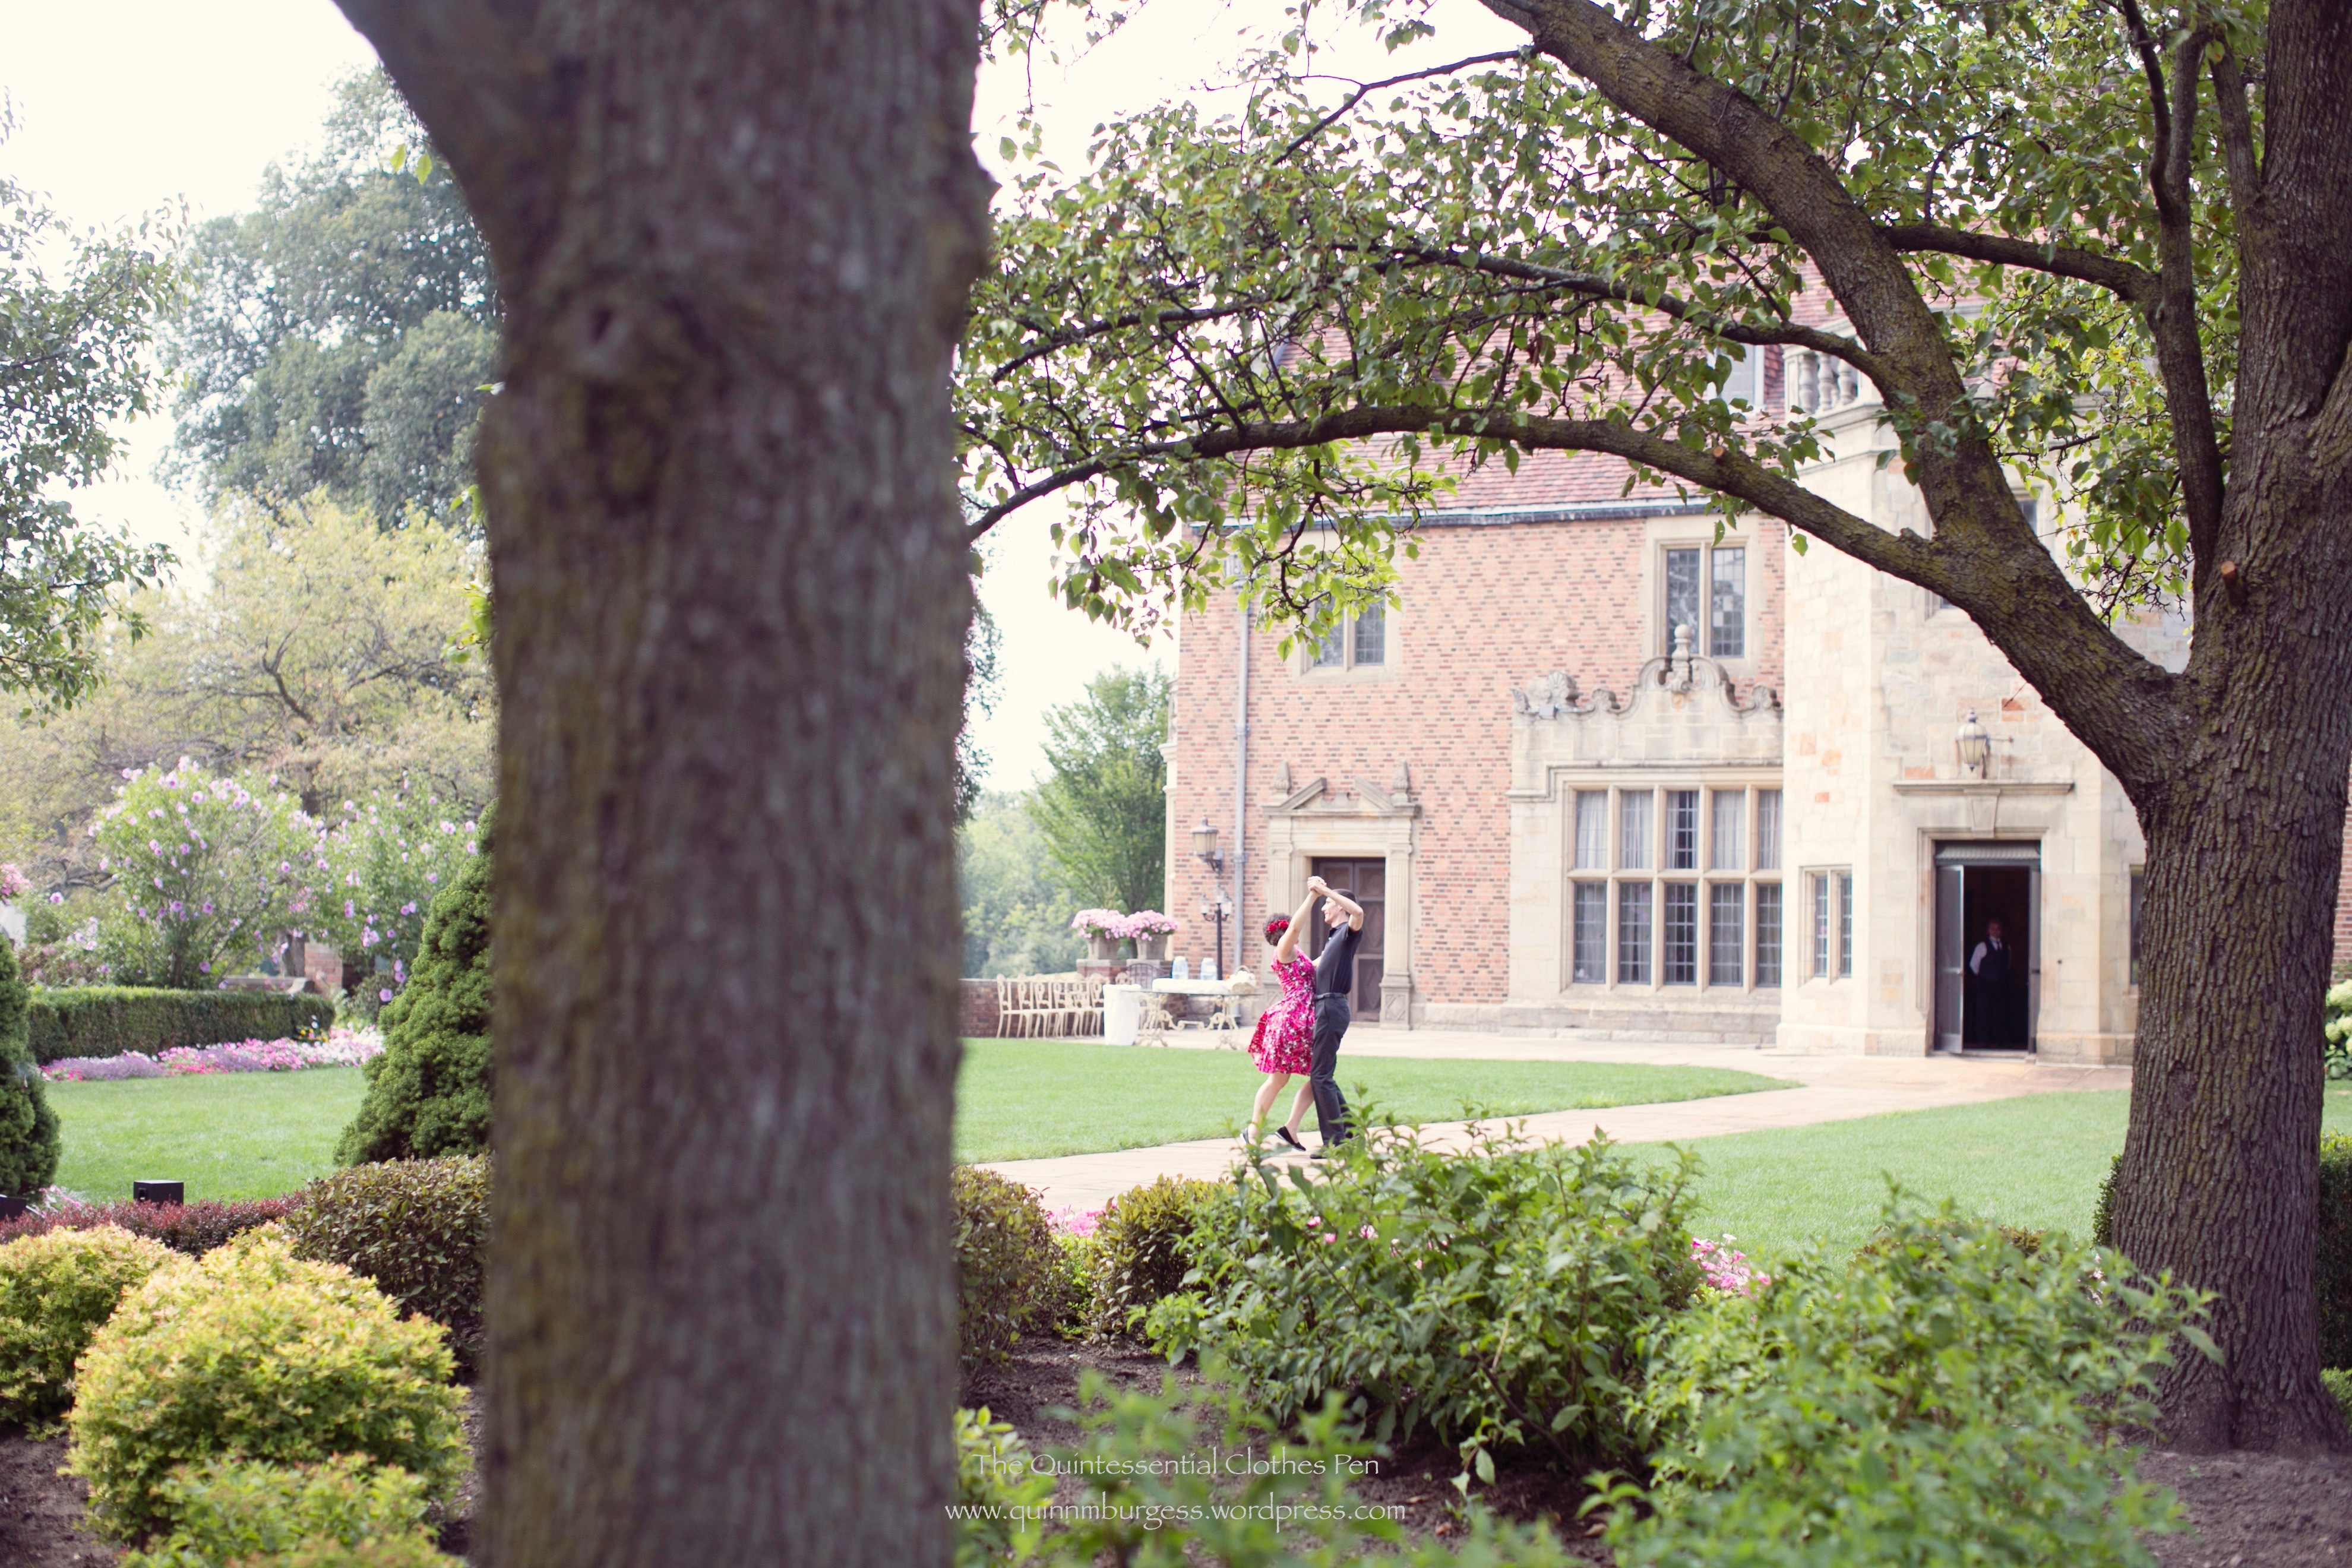
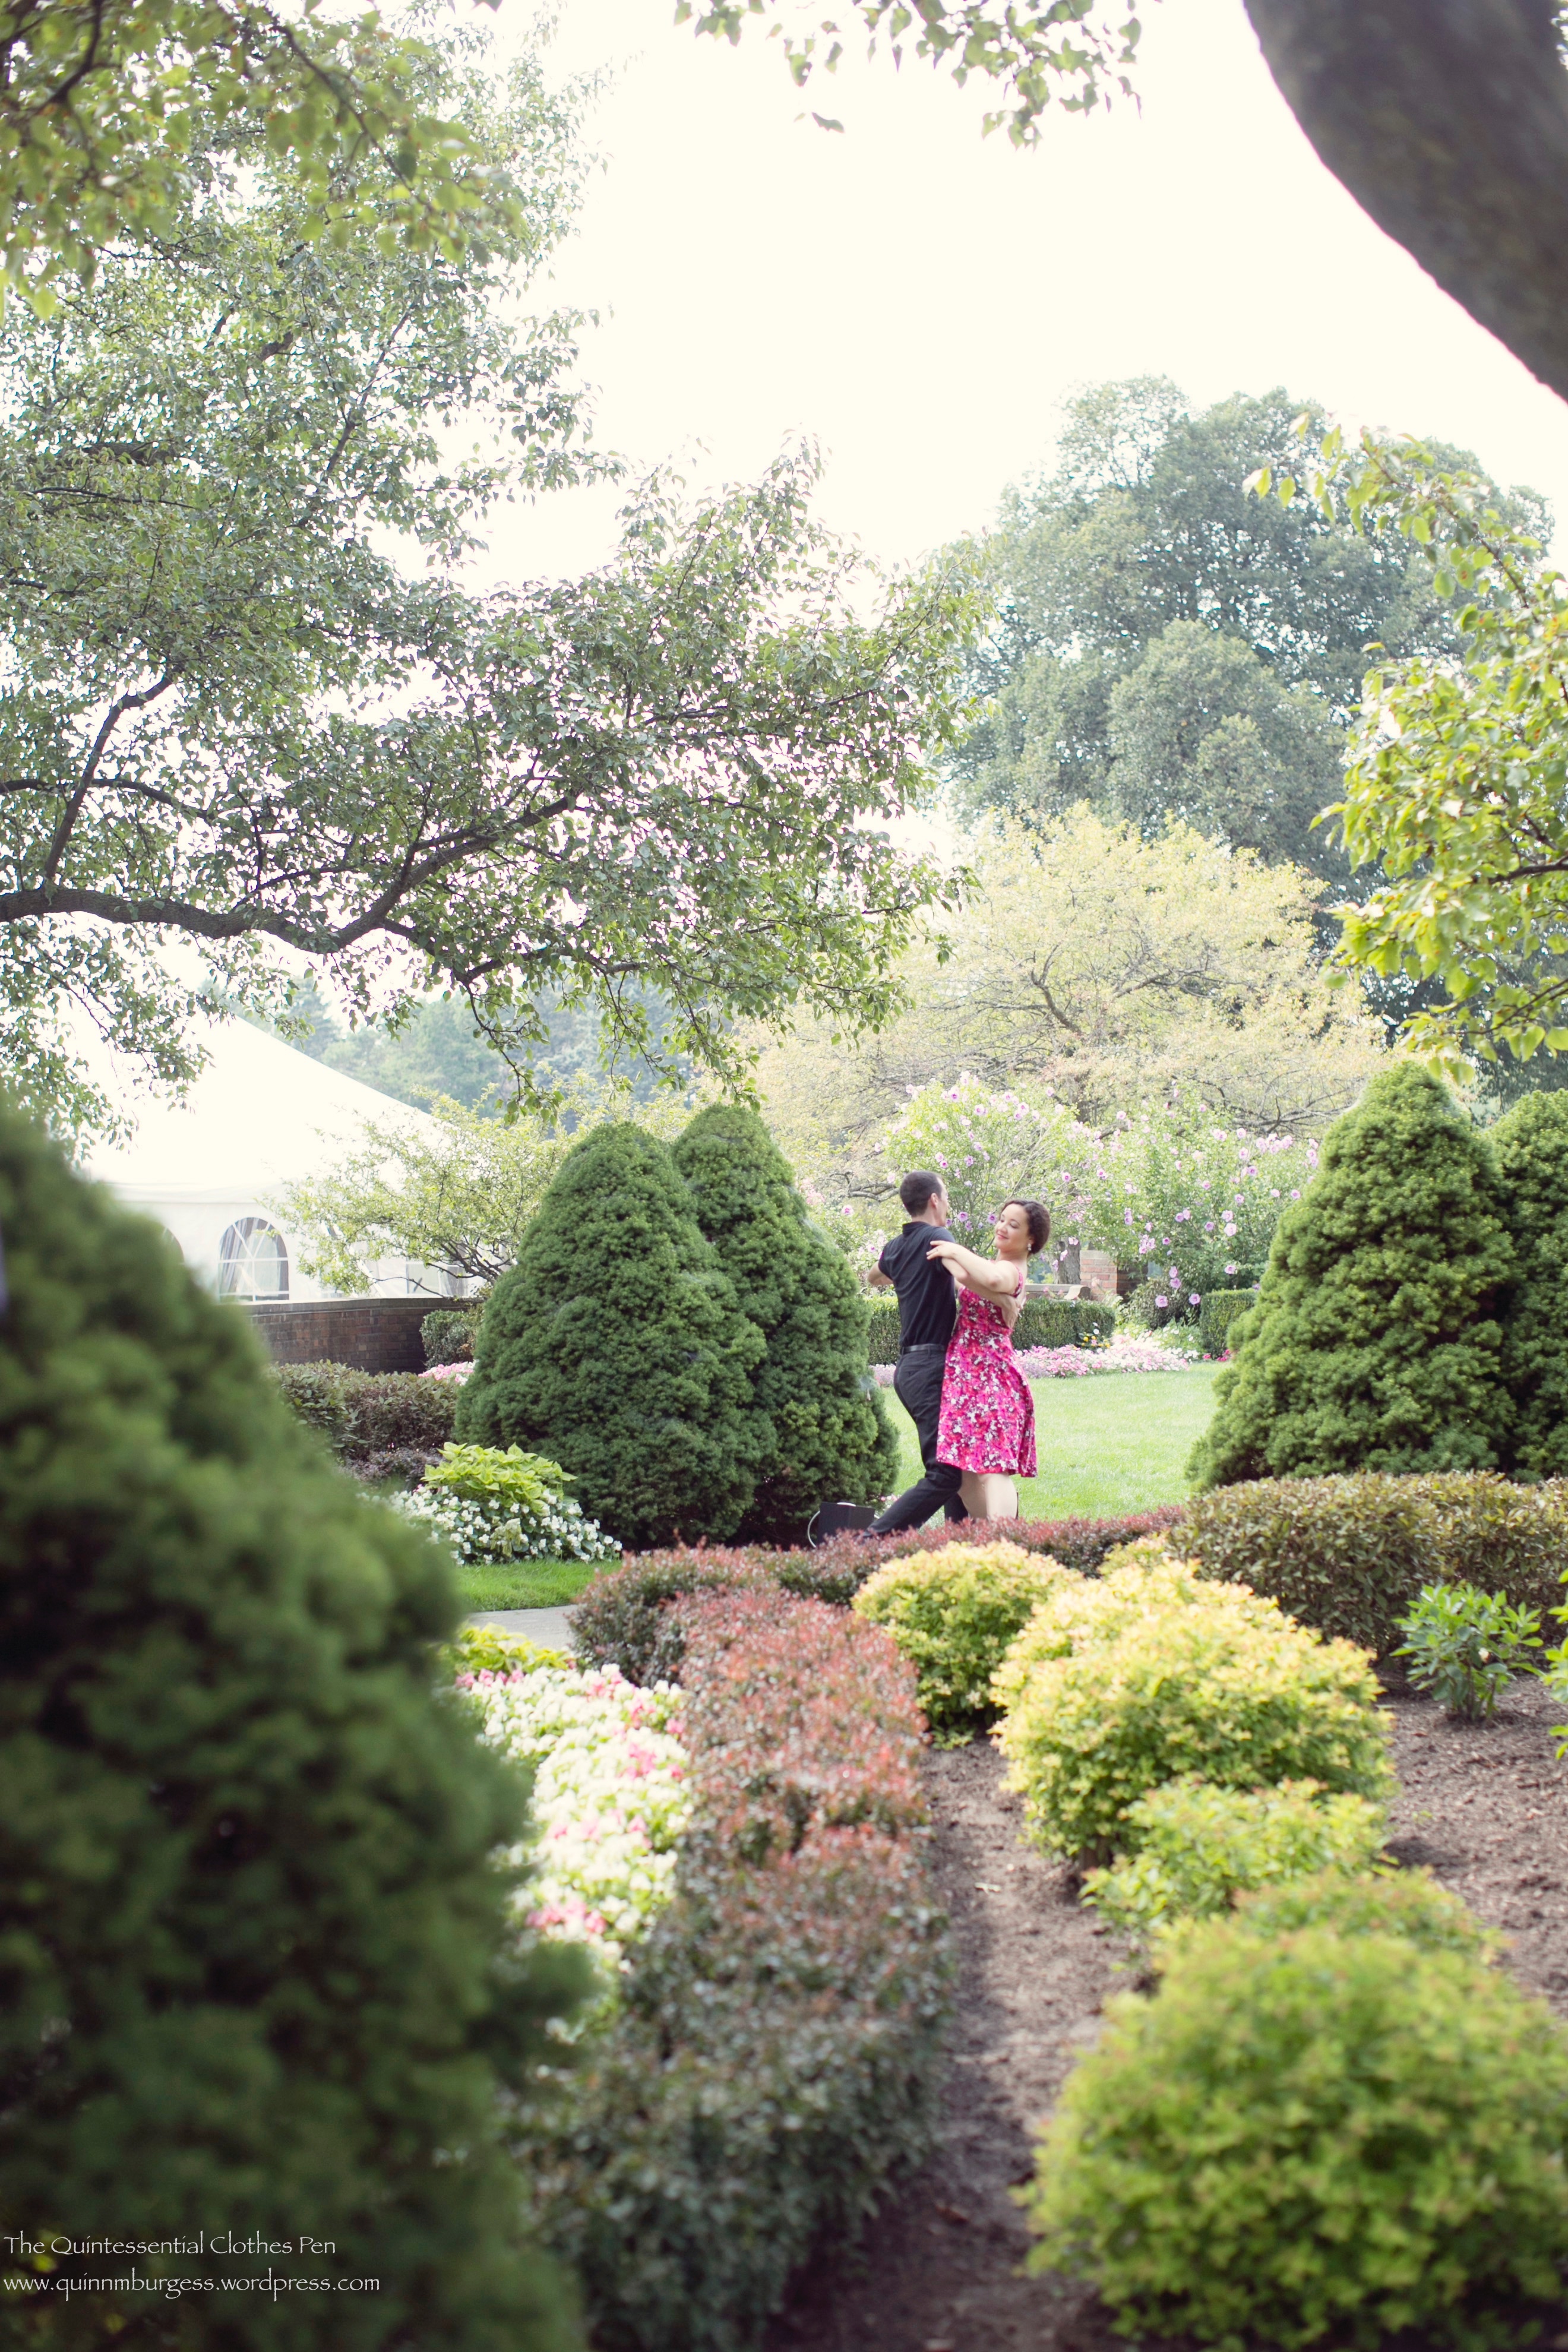
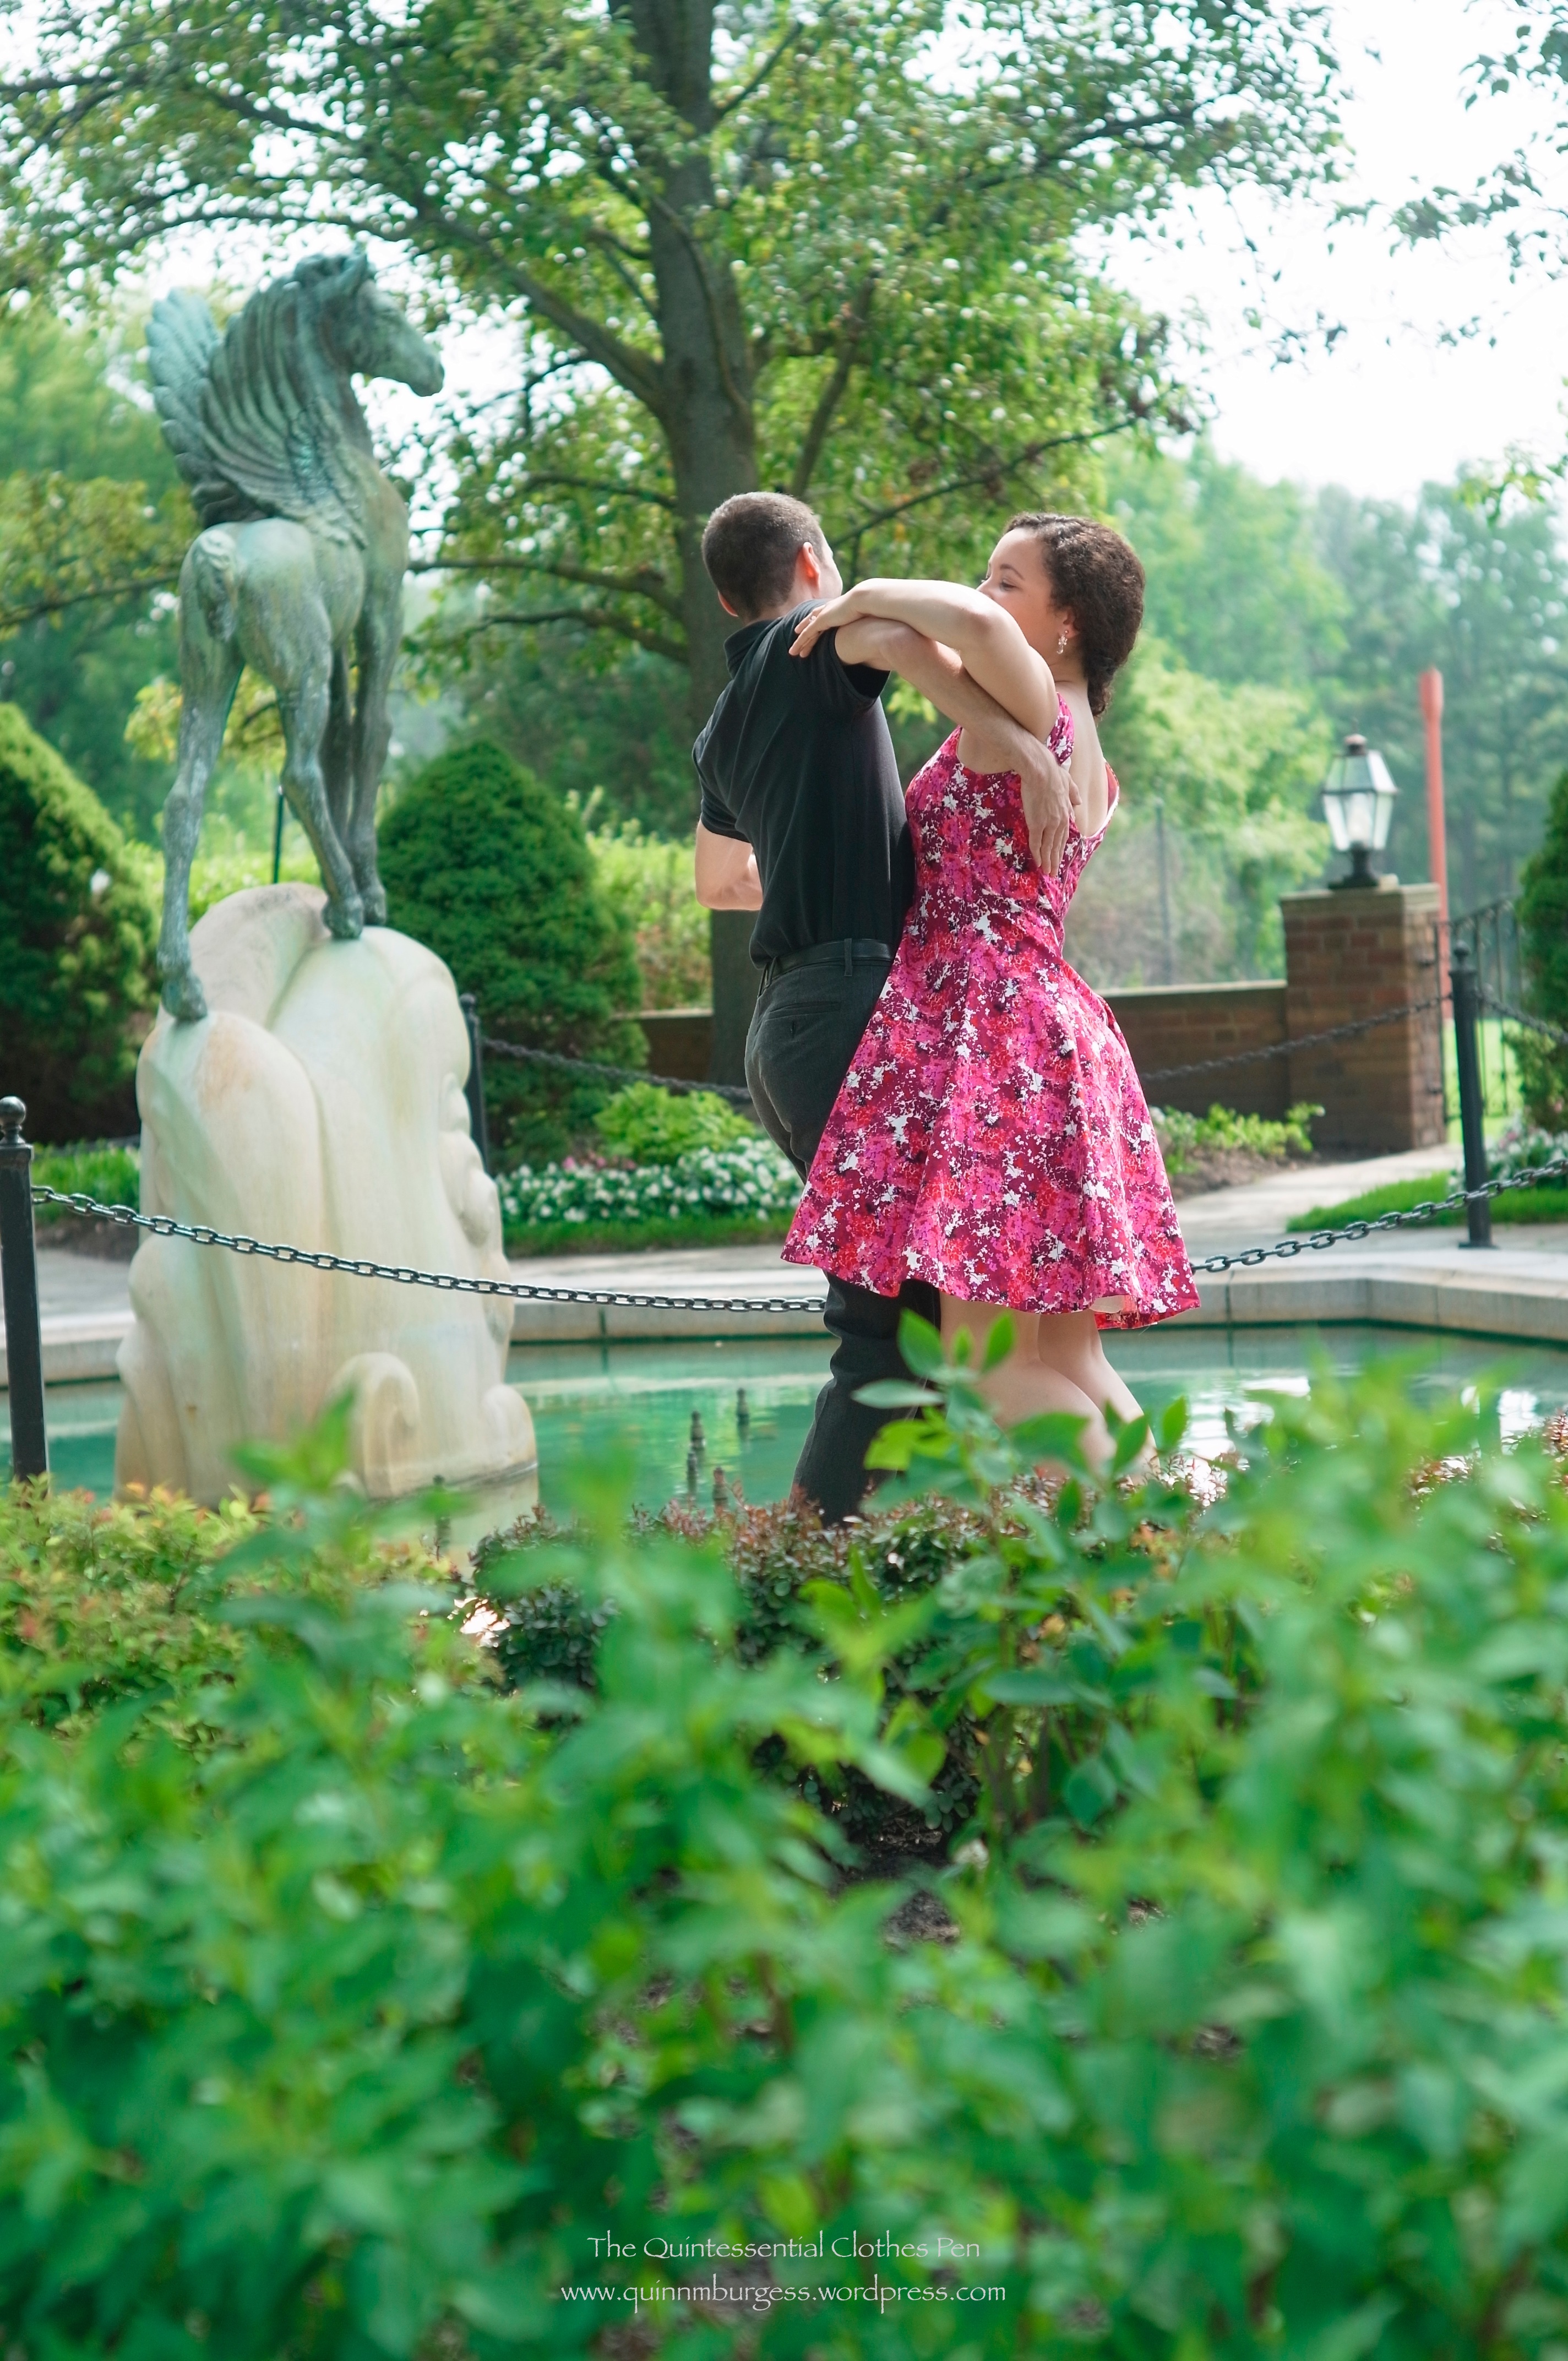
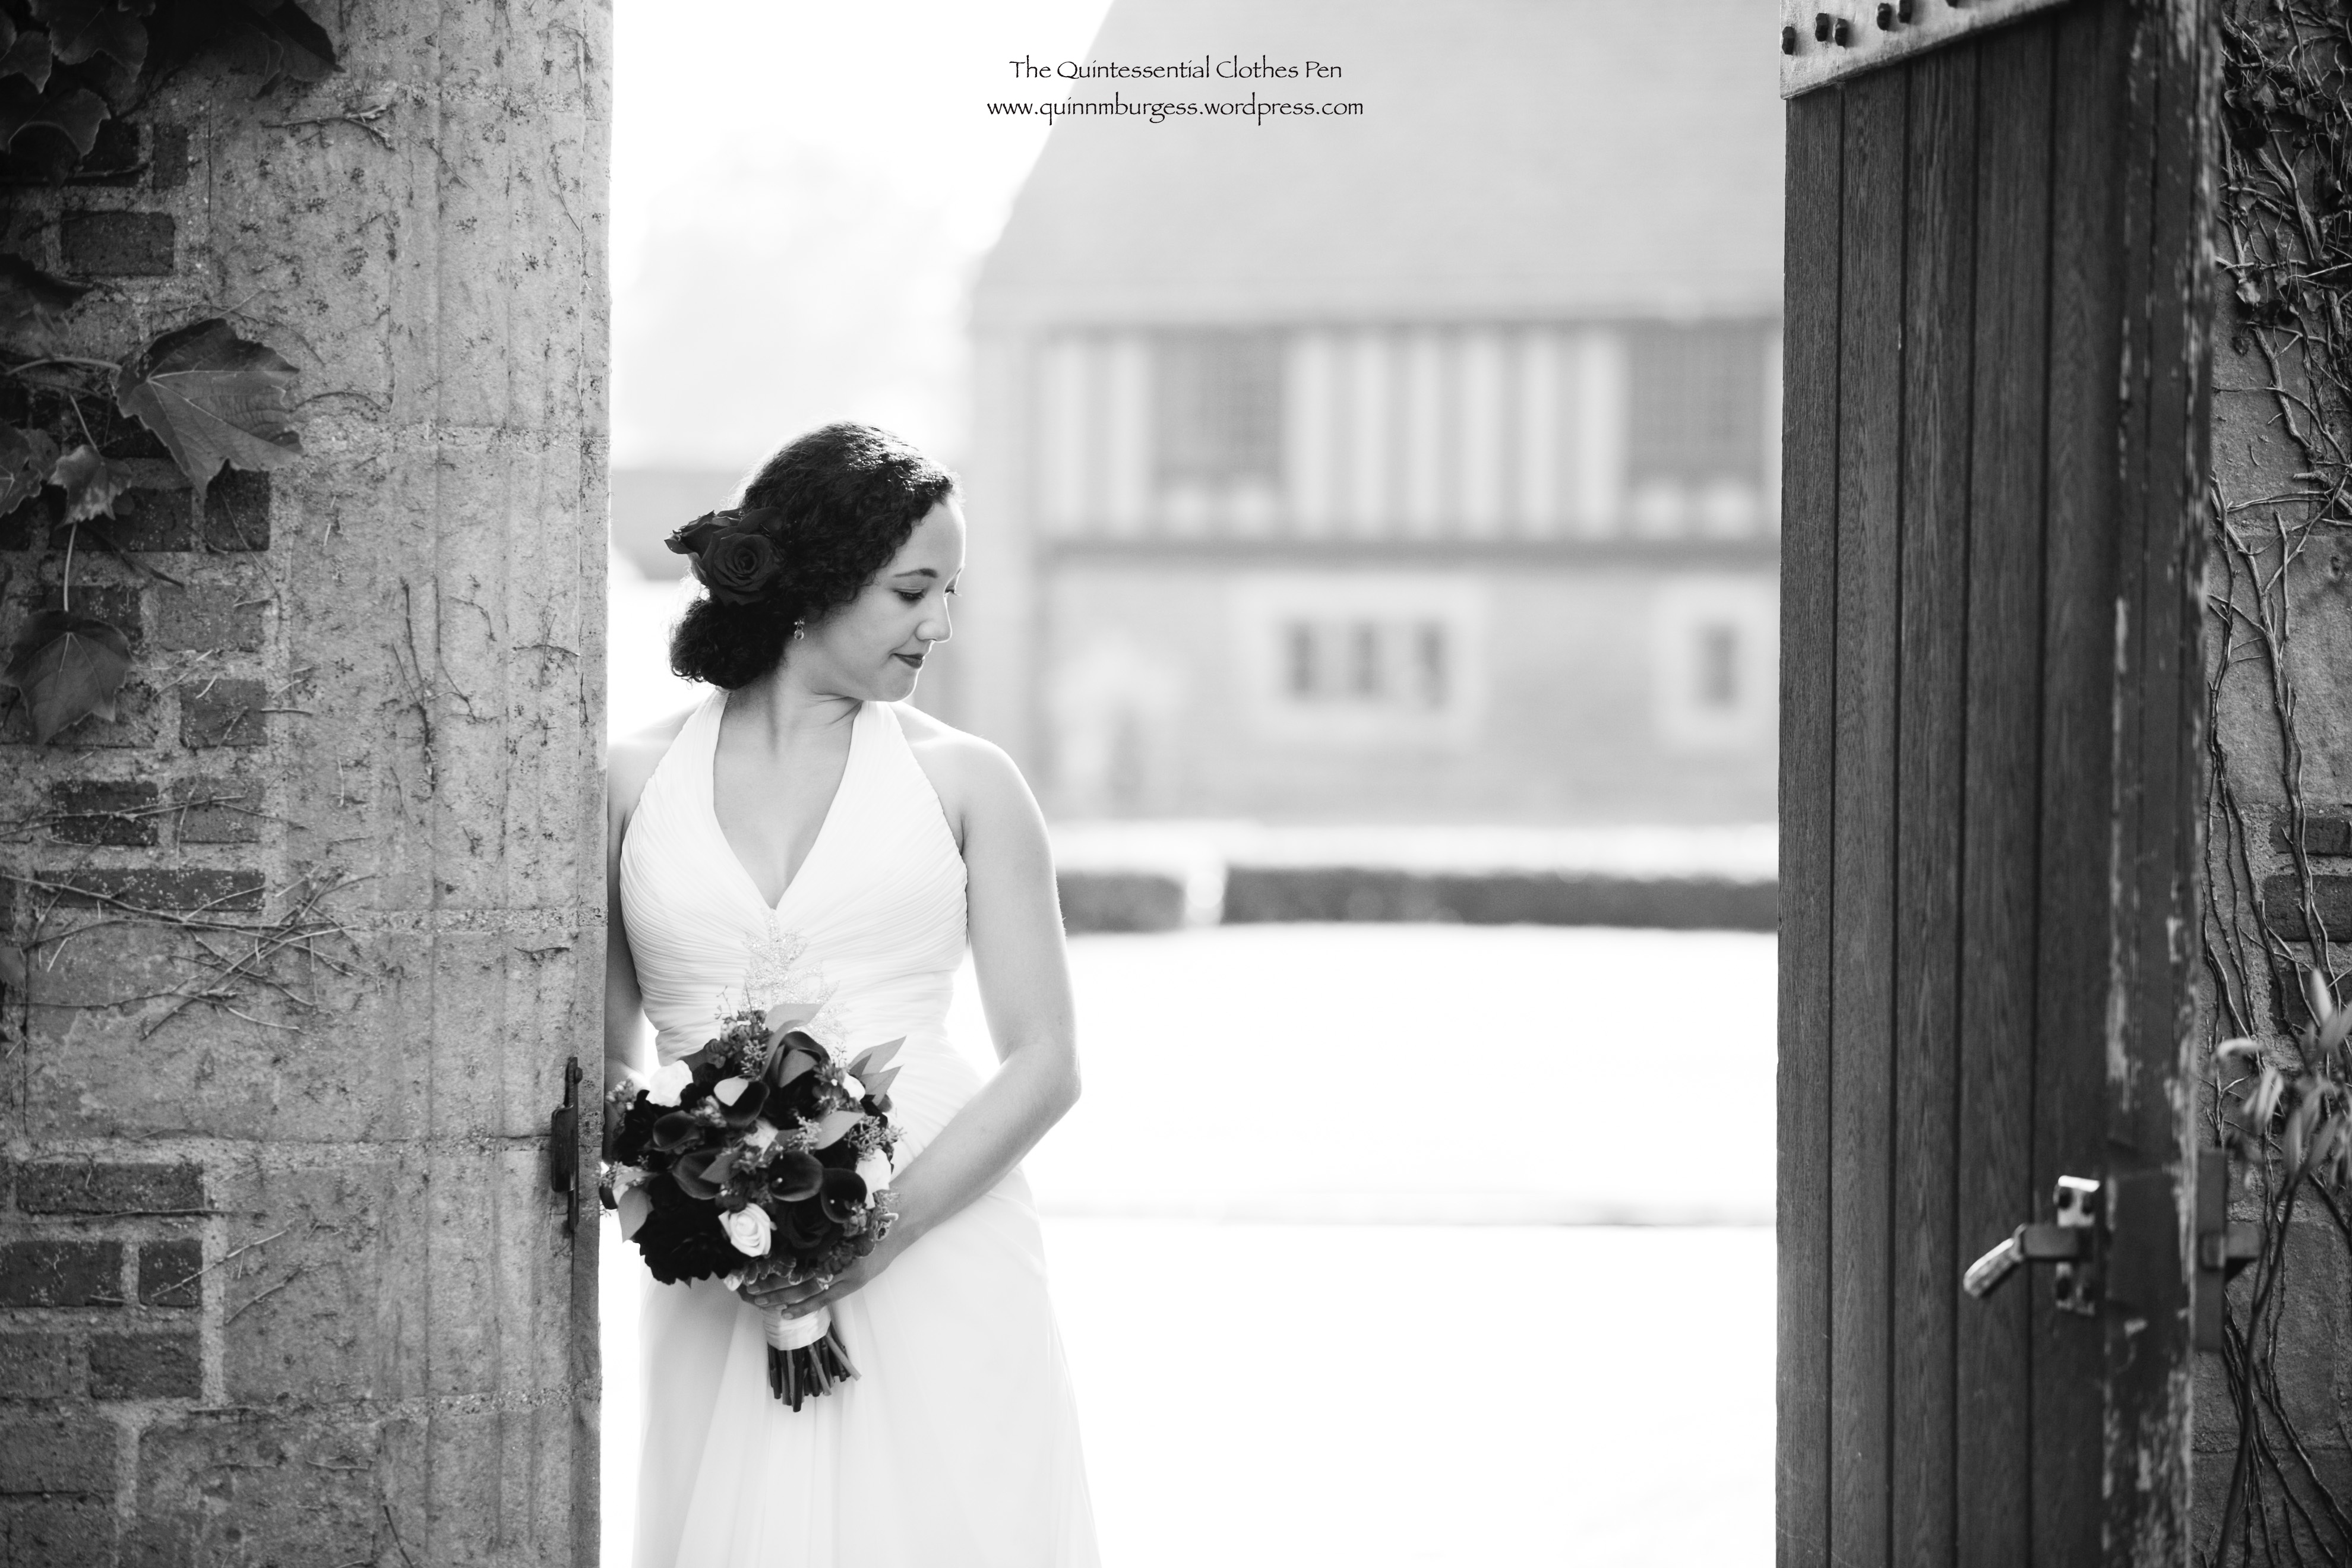
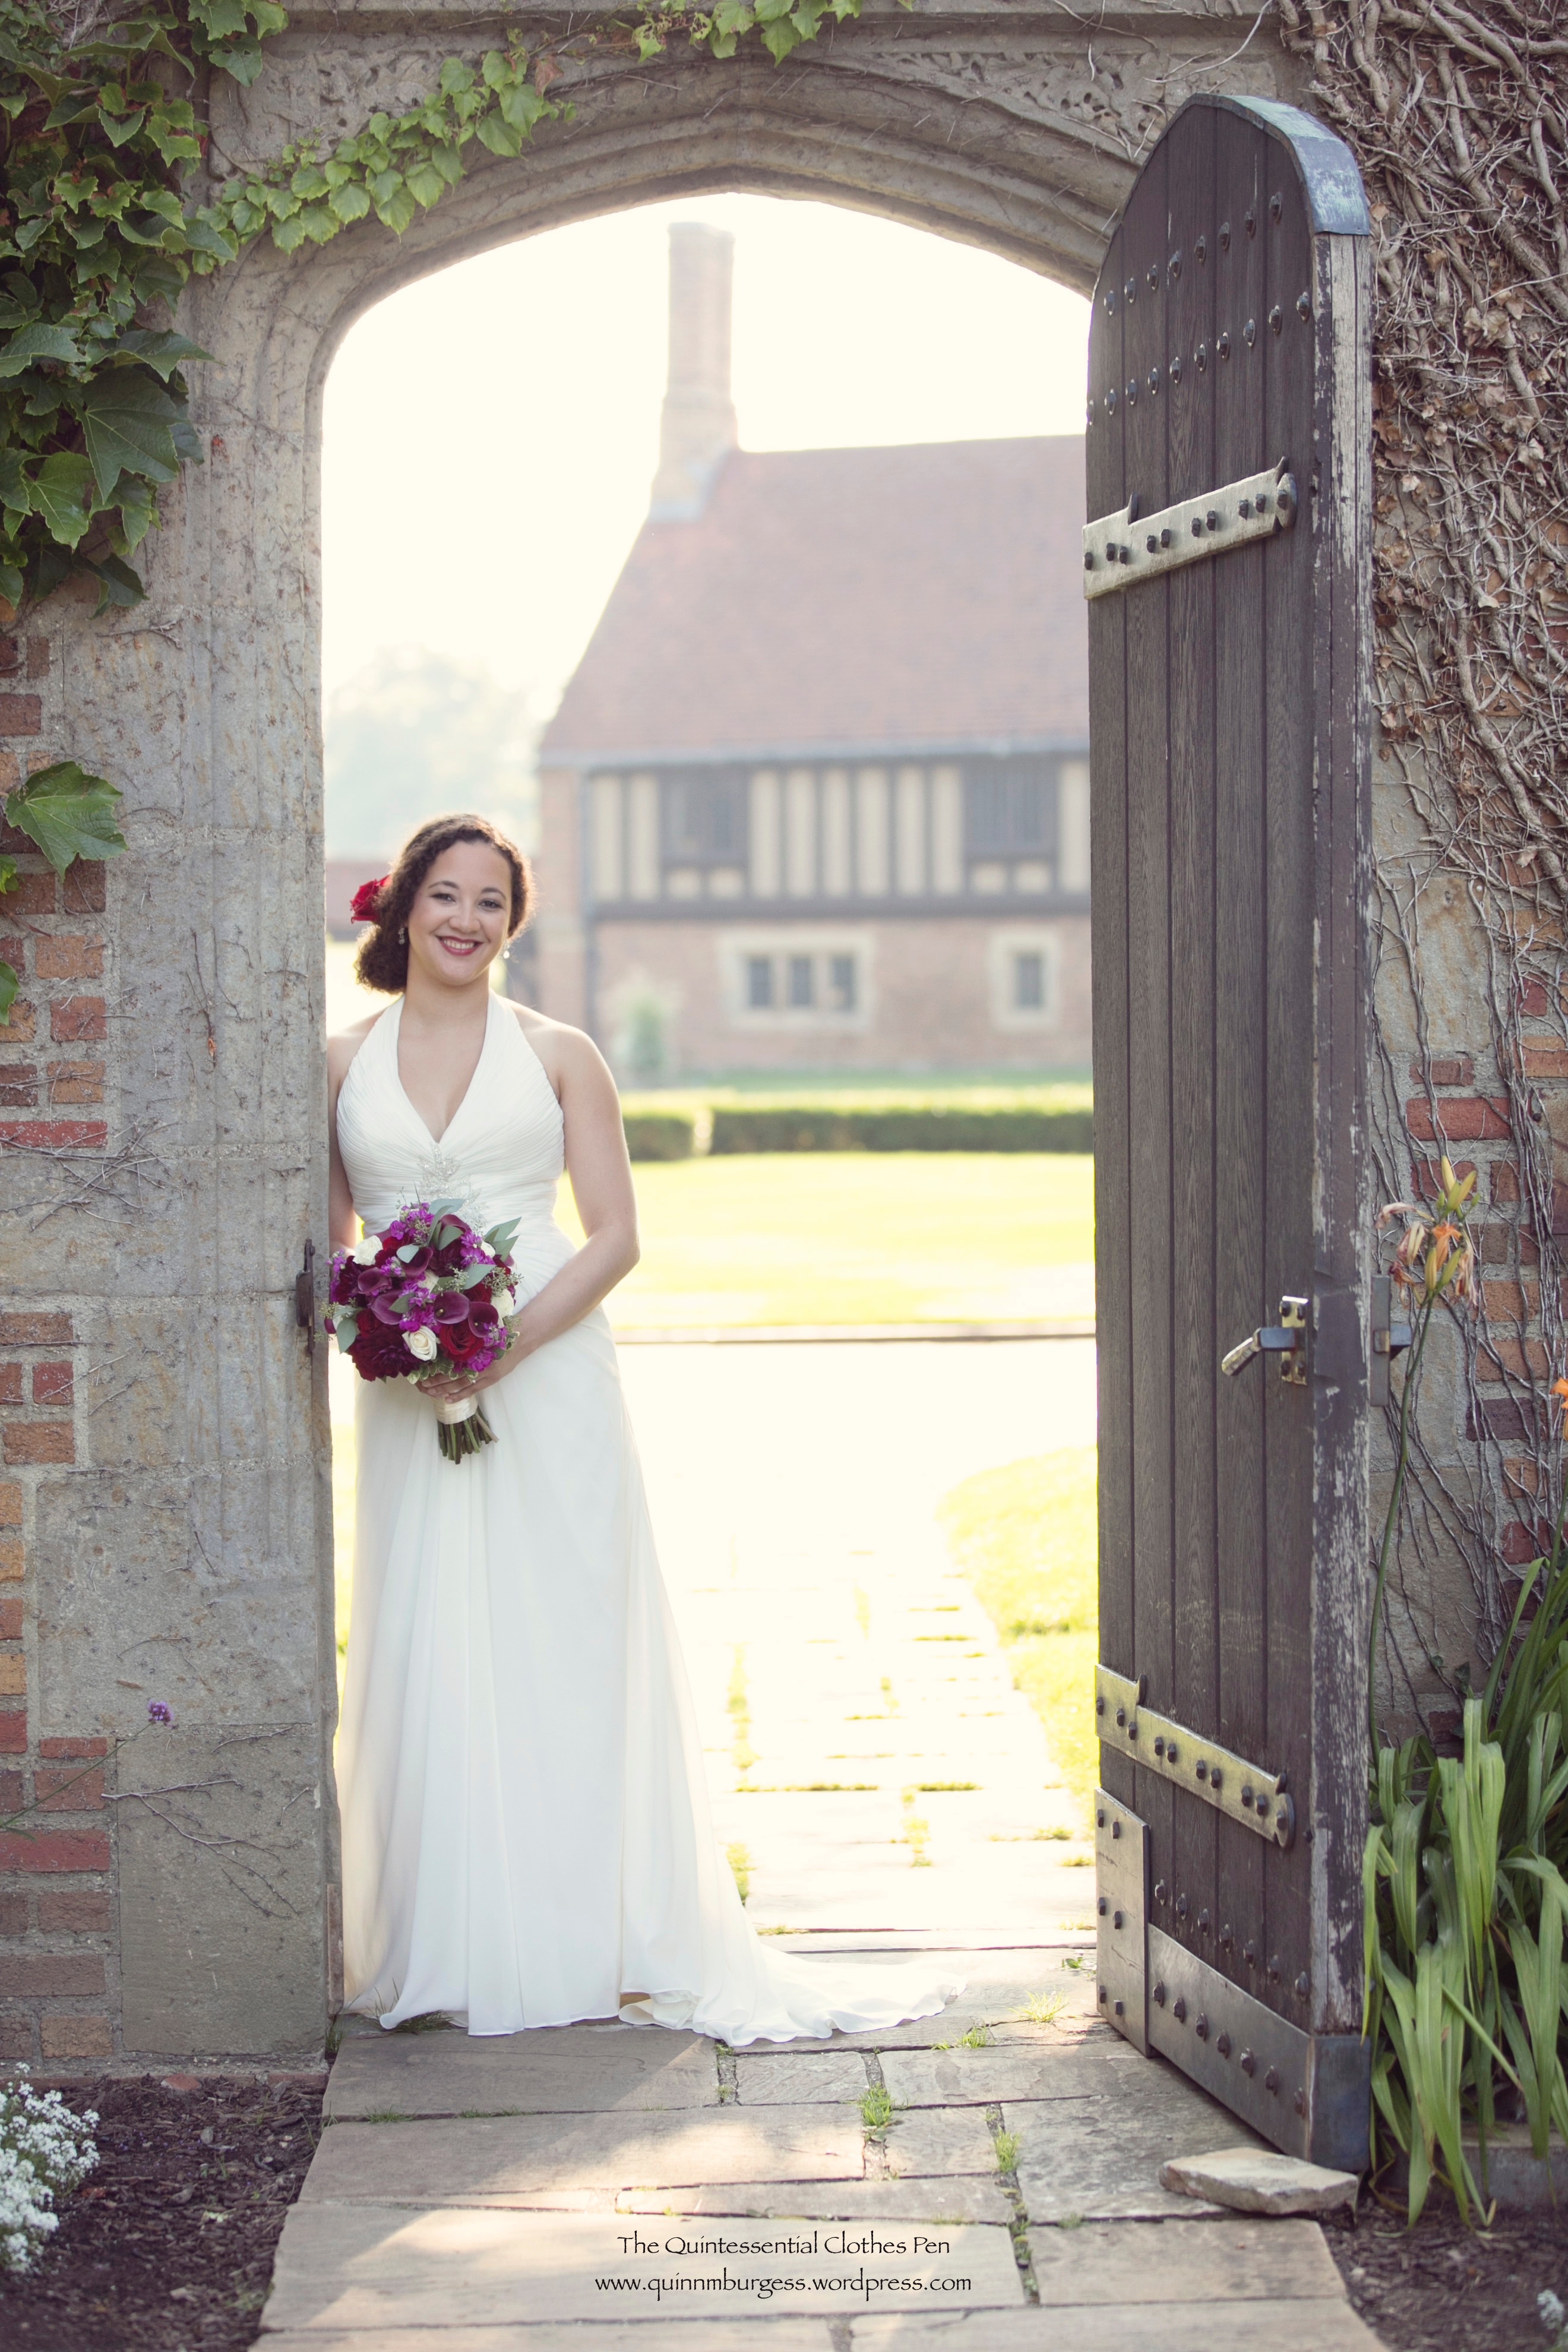
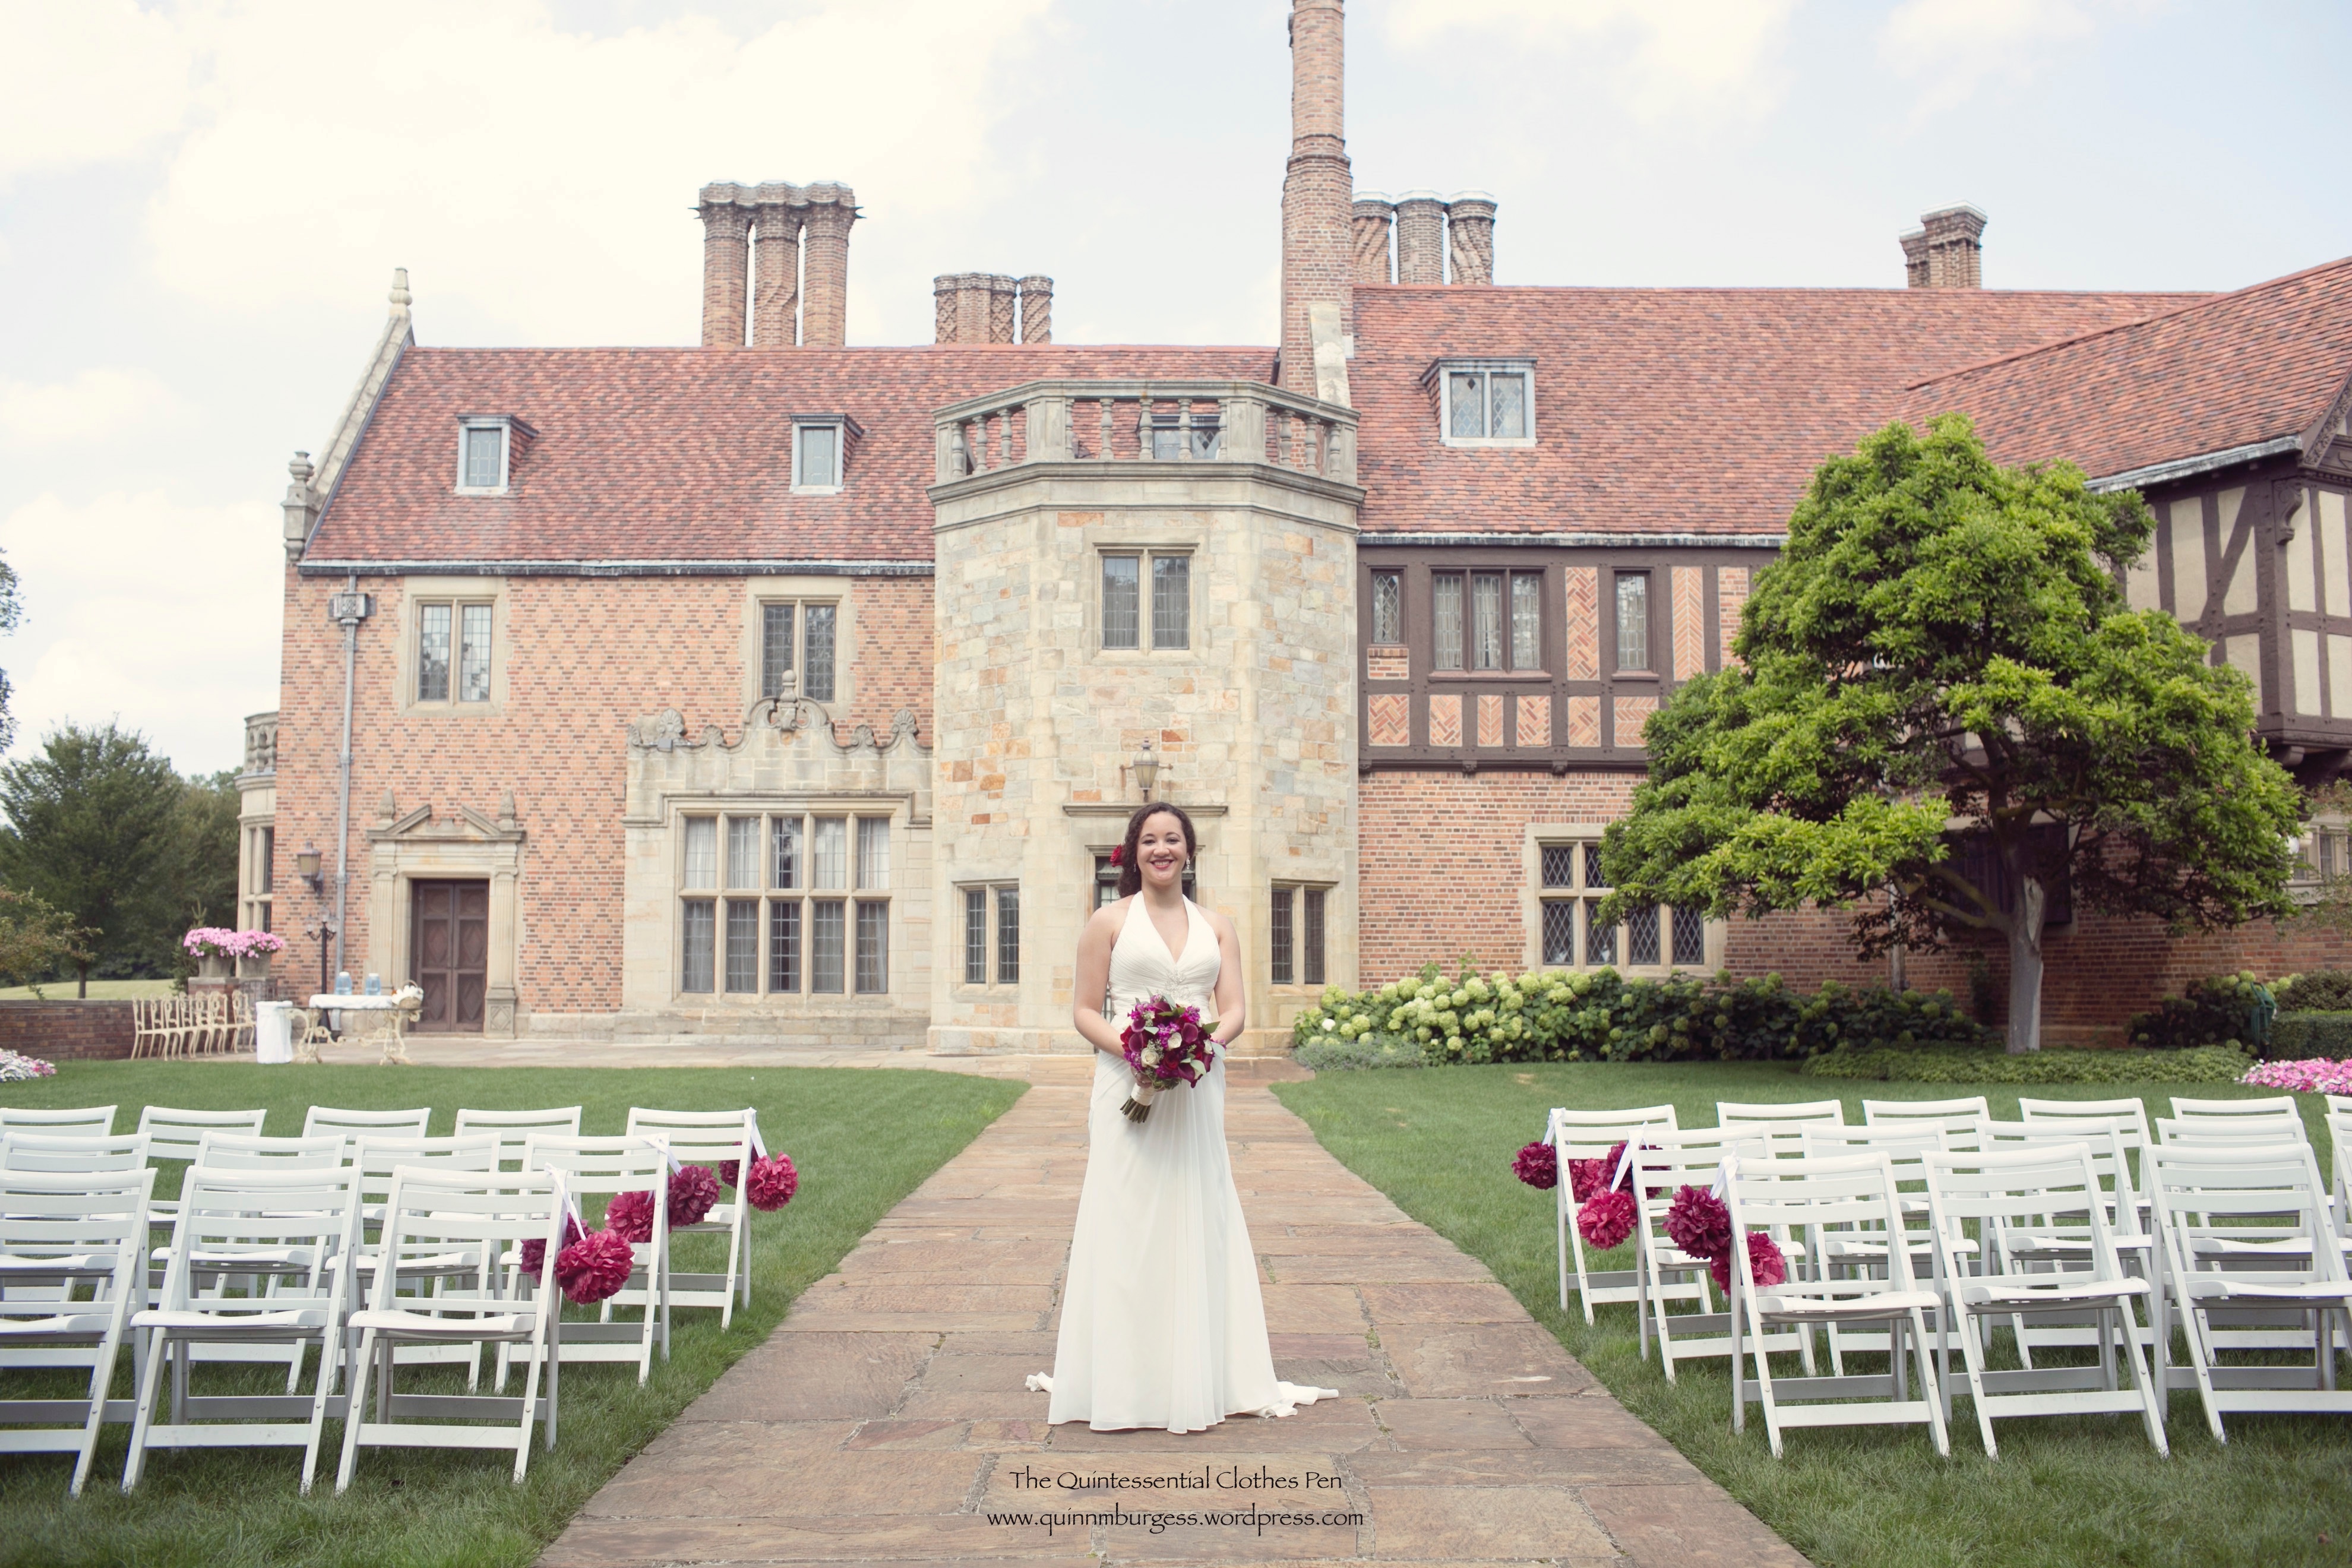
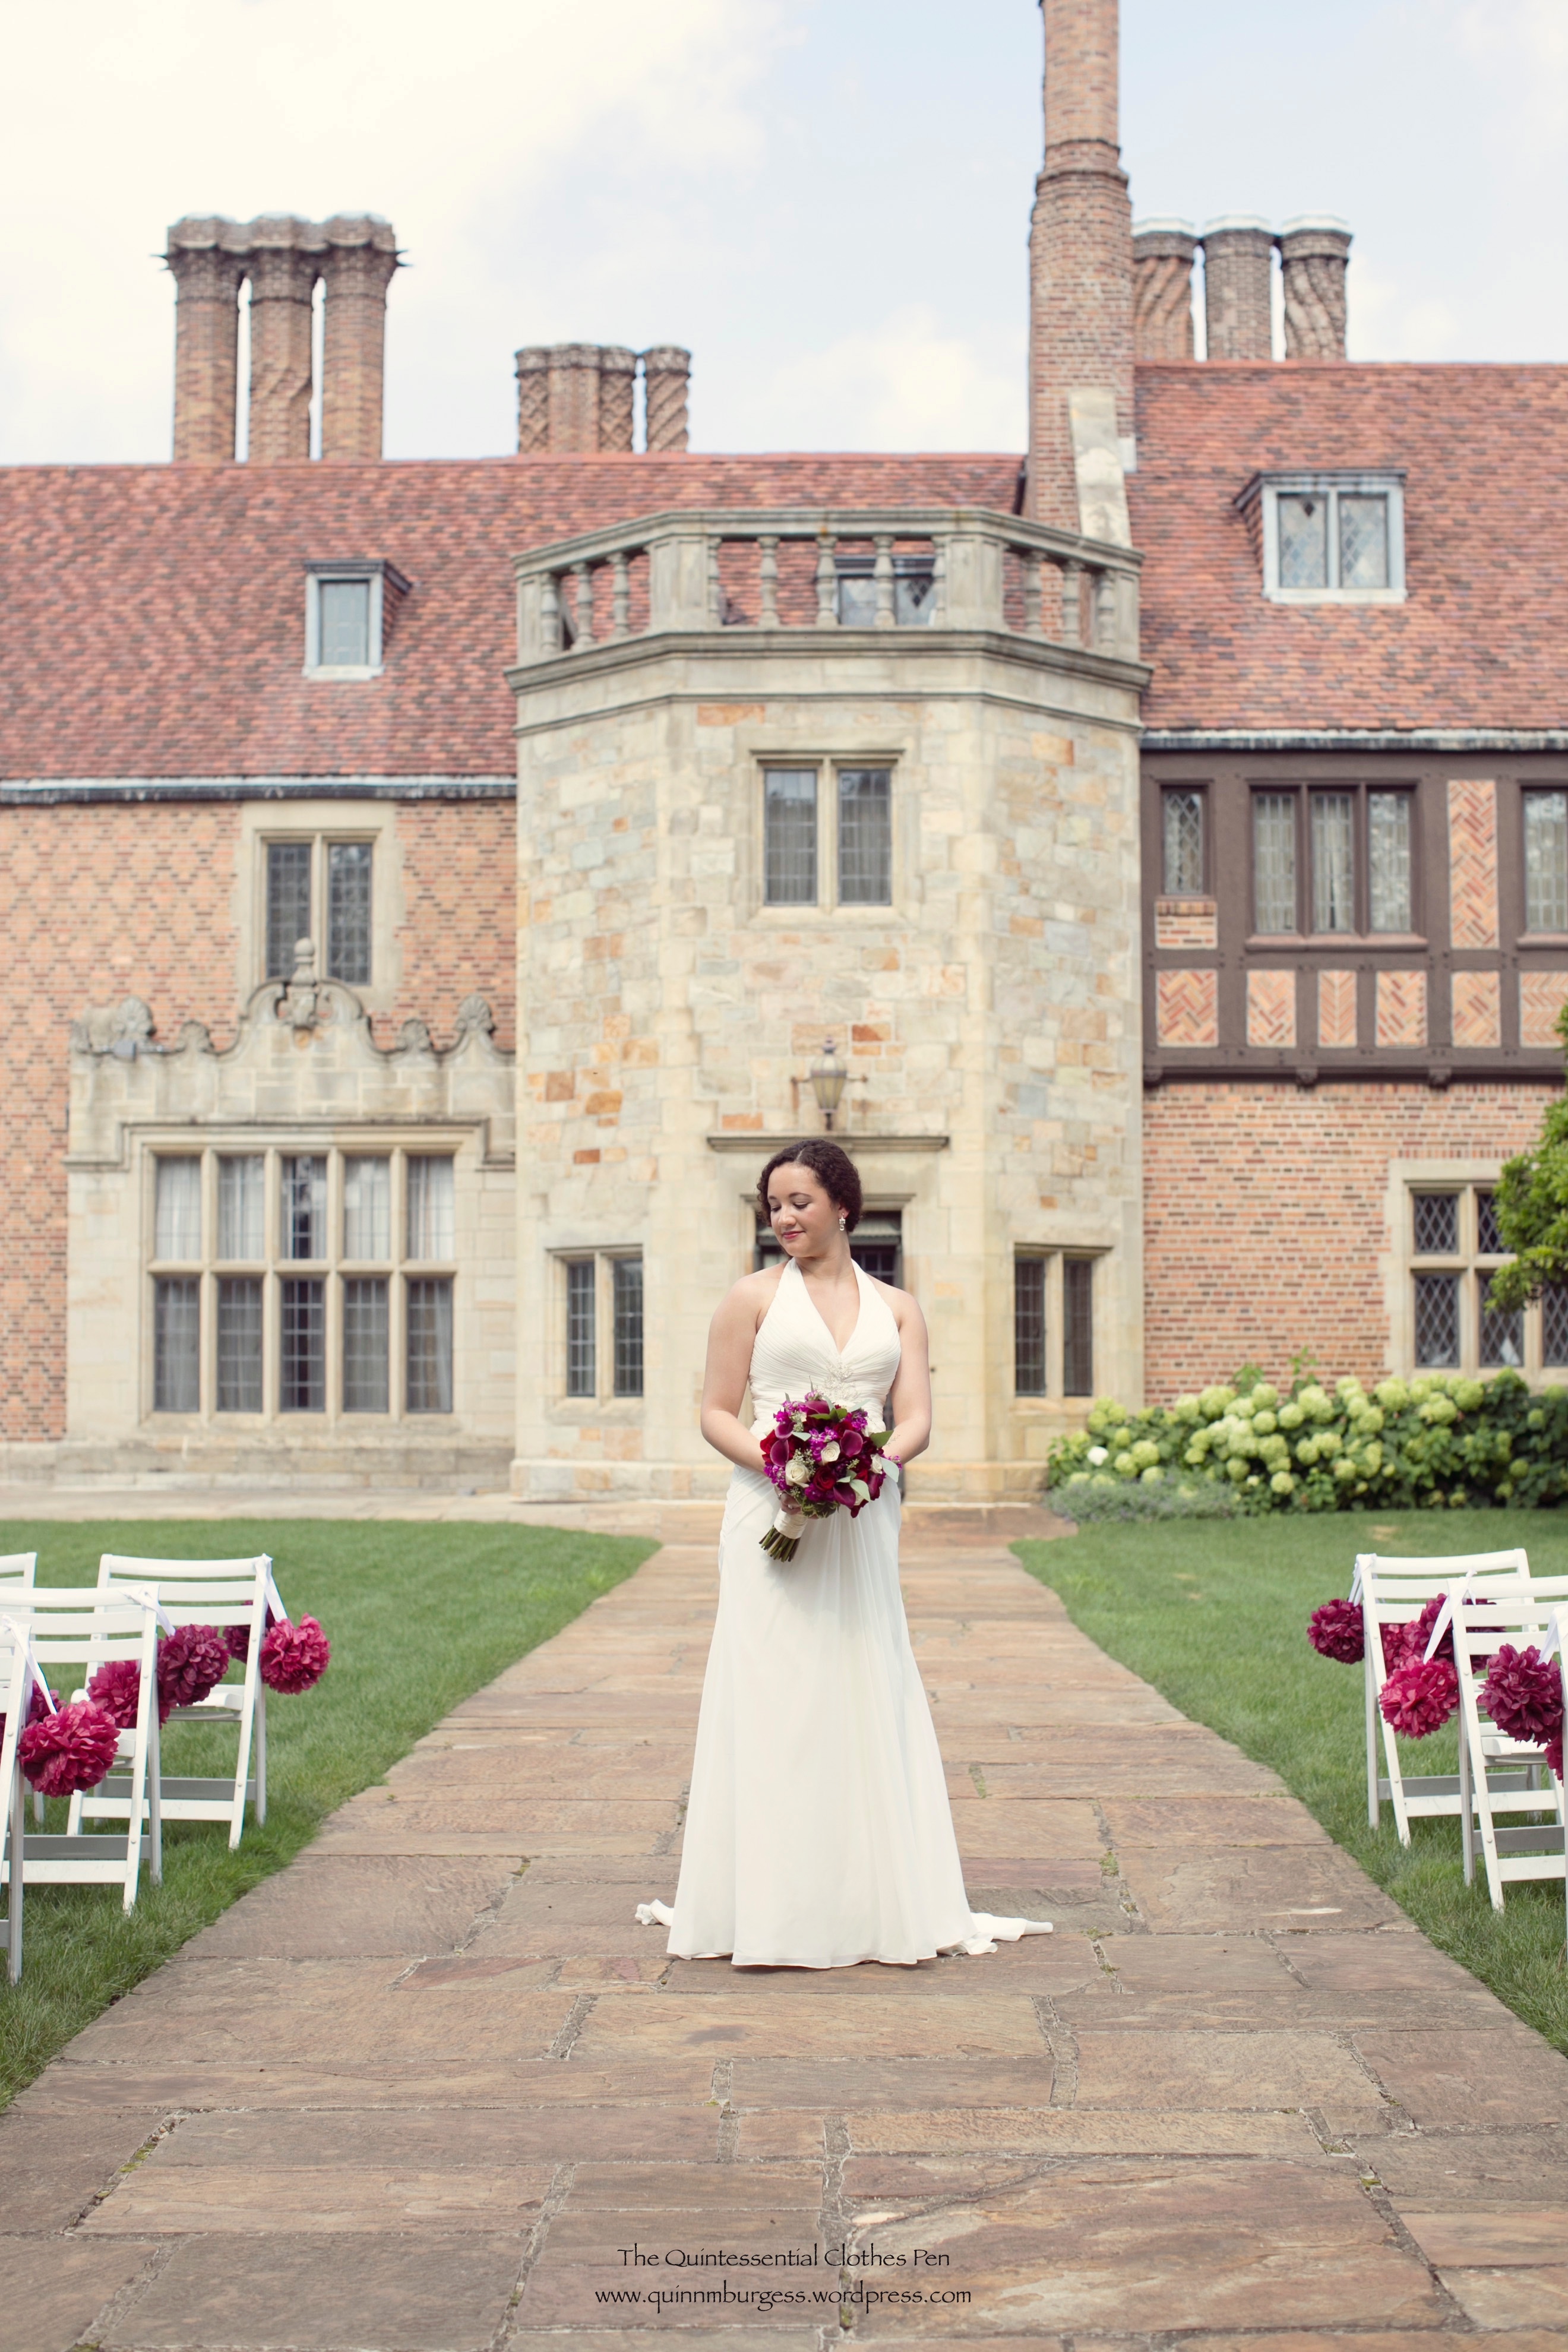
Anyway, the end effect was fabulous. The chiffon and lining swooshed so beautifully that it was necessary to get “swooshy skirt” pictures at the ball just to highlight their movement.

IMG_2208

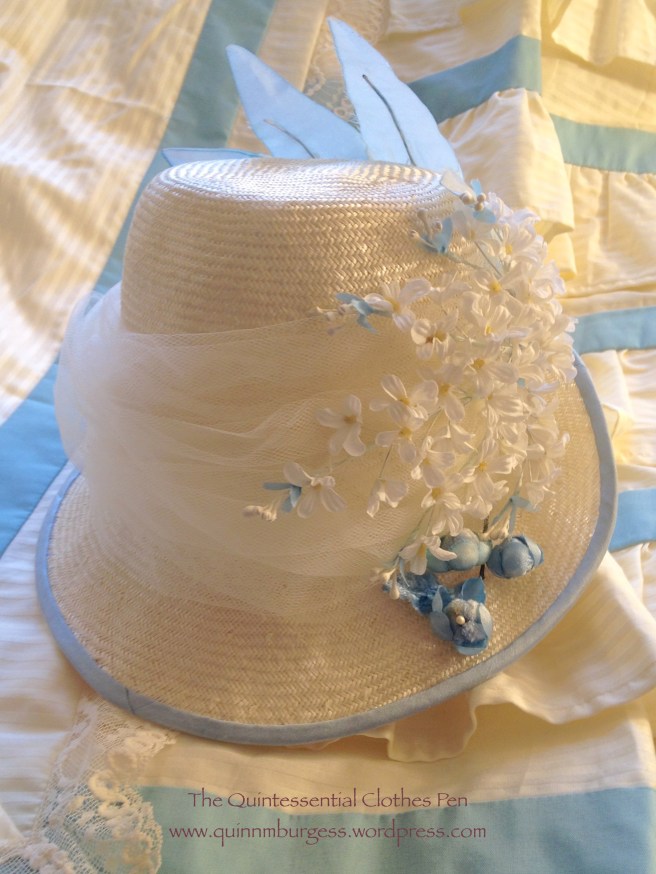
The ball also gave me an opportunity to have fabulous hair and a new hair ornament instead of a tiara as well as an opportunity to photograph my new 1880s corset completely finished and the fabulous petticoat I have for 1890s/1900s styles. It gets worn often, but hardly ever seen (which I suppose is rather the point of a petticoat, but when you have one as lovely as this, it really should be seen!). There will be future posts for the hair and undergarments, as this post is getting pretty long.

Overall, 1890s ball was lovely, with beautiful dresses and beautiful dancers. There were fun new people as well as quiet moments to sit and have engaging exchanges with friends.

IMG_2179

And the new gown was very comfortable and fun to wear. I’m looking forward to completing the trained skirt (hopefully without too much procrastination) and wearing it this summer!

*My plan is to have two skirts for this gown, one without a train, for dancing, and one with a train, because trains are fun! I only finished the non-trained skirt for the ball, though the trained skirt is assembled and mostly finished with the exception of a closure and hems.

Vernet Project: Toque de Velours

Today, I’m going to share more information about the unusual hat in my Vernet fashion plate.

IMG_1903

The caption reads “Toque de Velours.” I already had a rough translation in my head, basically “Hat of Velvet,” but thought I should double check the definitions before deciding on materials.

Toque:

1:  a woman’s small hat without a brim made in any of various soft close-fitting shapes

2:  tuque (a warm knitted usually pointed stocking cap)

3: a tall brimless hat worn by a chef —called also toque blanche

Velours:

1:  any of various fabrics with a pile or napped surface resembling velvet used in heavy weights for upholstery and curtains and in lighter weights for clothing; also  :  the article of clothing itself

2:  a fur felt (as of rabbit or nutria) finished with a long velvety nap and used especially for hats

Well, the hat does rather resemble a chef hat, doesn’t it? My rough translation was confirmed! Luckily, I had black silk velvet in my stash, which perfectly suited the project.

The hat base is buckram in the simple shape of an oval to fit my head with a flat tip on top. I don’t have pictures, but imagine the shape of a straight sided Lincoln-like top hat without the brim and you’ll have the right idea. The buckram is mulled with cotton flannel and wired around the head opening, tip, and partway up the side. The buckram support is about 8″ tall.

In addition, there is padding to support the poof on top. I chose to use polyester batting–it’s not at all accurate, but I had it on hand and it isn’t seen. There are concentric ovals on top that diminish in size with each layer as well as a few layers around the top of the buckram on the side to provide support for the tucks/pleats.

rolledpleats
The “stacked” pleat is on the right.

The poof is a large circle that is flat lined with a piece of muslin to help provide the support for the pleats. The pleats are about 1″ wide knife pleats that are then folded back on themselves to create a double pleat (this website calls this type of pleat a stacked pleat and is the source for the image). To determine the type of pleat, I played around with my fabric until I found a method that created an effect like the fashion plate, which is like fans or slices (you can see it in this post). Then I eyeballed how many to do, pinning and re-pinning until the pleats were evenly spaced and the poof fit into the side of my hat (no math here, I avoid it as much as possible most of the time).

The definition on the sides (at the head opening and about 1.5″ up from the head opening) was created by inserting “cording” under the velvet. My “cording” is actually modern acrylic yarn in sunshine yellow (like the batting, I made this choice because I had the materials on hand, it worked, and it will not be seen–but it is not accurate). I believe there are two or three lengths of yarn in each single section of “cording” to get the right thickness to show under the velvet.

IMG_1887
We took this photo specifically to capture the detail of the hat construction (usually the black all washes together, eliminating evidence of all the detail).

The rest is just sewing! The hat is entirely hand sewn, with the layers of velvet either tacked to the mulling or stitched through to the interior of the buckram base. Once I had finished the exterior sewing, I whipped up a lining of black silk  to tidy up the inside.

The last step was to trim the hat with the immense ostrich feathers depicted in the fashion plate. I ordered my feathers from Lamplight Feather, which I highly recommend (quick shipping, good quality, and great selection). The hat has 6 total feathers, each 17″-21″in length. Each plume is two feathers sewn together along the central stem before being shaped and sewn to the hat. The trickiest part was shaping the feathers to achieve the shape in the plate. Each plume is shaped so that it does an 180 degree turn (the plumes are attached to the hat standing up, but then are turned downward) in addition to the side sweep shape. As you can see, the wind occasionally blew lots of feather fluff into my face during the photo shoot, but it was totally worth it, to wear such lovely feathers.

IMG_1957
Feathers!

I constructed the hat such that it would sit almost horizontal across my head. It’s pretty light in terms of weight and is not uncomfortable to wear, being sized perfectly to fit my head. It also comes down far enough to be quite stable: even with the breeze and moving my head around there was no fear of it falling off.

As fun and silly as it is, I don’t really see a use for it in regular Regency wear. I will likely remove the feathers to use for another project someday (also partly because it would be hard to store the hat nicely with the feathers still attached). I’ve toyed with the idea of removing the poof (and maybe making a tam or turban or something out of it, or just sticking it back in my stash with the rest of the velvet) and using the buckram base with the velvet sides to make a shako style Regency hat. I have no immediate plans to put these ideas into action, except for removing the feathers, which I really should do soon, so I can put the hat away!

Vernet Project: Photo Shoot!

I thought I’d start the new year off with photos from my Vernet Ensemble photo shoot. (I’ll be doing separate posts with details about the construction of the ensemble as the year progresses.) I’m so incredibly pleased with my ensemble and with the quality of the pictures. I often have lovely pictures after events and when documenting sewing projects, but these are extra special in terms of the sharpness of the images, the clear colors, and the fun use of a historical lens.

Hopefully, you were following along with the release of finished ensembles in December, but in case you missed mine or haven’t figured out yet which fashion plate I was recreating, here it is.

Plate No. 20 “Toque de Velours. Witz-choura de Satin.”

164-0000-021 - Version 2

Below is the “official release” picture. I did my best to mimic the pose of the fashion plate, but it was really hard to wrap my brain around the left and right of things in my own pose relative to the fashion plate. Left was right and right was left, and in the end we did the best we could and called it done. I think we actually did it right, it’s just that I’m facing the camera at a different angle. It still boggles my brain to try and figure it out!

IMG_1915 blog

Unfortunately, there was no snow in November when we took these pictures and so I didn’t get ice skaters falling over behind me (also, I would have had to find ice skaters)… but I did get unfrozen water, and you’ll just have to imagine the ice and the skaters!

IMG_1903

IMG_1902

IMG_1936

IMG_1978

IMG_1963

IMG_1972

IMG_1985

IMG_2004

IMG_2020

These last few pictures with the blurred background were taken using a reproduction 19th century Petzval lens. You can read more about the lens and how it causes this effect here, at my photographer’s blog. 

IMG_1928

IMG_1922

IMG_1917

I am so incredibly blessed that to have a friend that joyfully enjoys practicing her photography skills with her nice digital camera (with fancy and historical lenses, to boot!) by taking pictures of my endeavors, amongst other things. She happily came over one afternoon in November just to accompany me for the photo shoot and take these absolutely gorgeous pictures. Thank you!!!

Summary Of 2015: Looking Forward To 2016

It’s that time of year, when I look back at what I’ve accomplished in the past year and share what I’m thinking of for the next year. As usual, I rather forget all that I’ve accomplished until I stop to think about it. When I put together pictures for this post it’s always amazing to see how many awesome projects I completed and how many special events I was able to be a part of in absolutely stunning places.

To start, projects I completed in 2015:

IMG_1956
January: One of my favorite ever outfits to wear, 1895 Skating Ensemble (HSF/M #1)
IMG_2021
February: Polka Dot Ice Skate Soakers
IMG_2042
February: Completed 1811 UFO (HSF/M #2)
IMG_2195
March: Turban Fillet
IMG_0622
March: Flower Basket Fancy Dress
IMG_2254
May: Modern Dotty Tap Pants (and a pair of jeans turned into capris that I wore all the time this summer but didn’t get pictures of)
IMG_2390
June: 1924 Robe de Style
IMG_2344
June: 1880s Steam Molded Corset (HSF/M #6)
IMG_2446
July: 1880s Flower Pot Hat (HSF/M #7)
IMG_2658
July: 1930s Beach Pajamas and Halter
IMG_2725
August: 1885 Frills and Furbelows Dress


IMG_1597
September: 1910 Dowager Countess Evening Gown (HSF/M #10)
IMG_1915 blog
November: A serious accomplishment, my 1814 Vernet Ensemble! (Don’t worry,I’ll be posting details about this ensemble in 2016!)
IMG_2069
November: Green Regency shawl (HSF/M #12)

Also in 2015:

I participated in the Historical Sew Monthly 2015 and completed 6 of the 12 challenges. As usual, many of things I was sewing did not line up with the challenges. I wasn’t sure if I was going to participate in 2016, as I tend to sew the things that I have an immediate opportunity to wear or that bring me joy without intentionally matching them up to a challenge, but I’ve decided to attempt it and see how I do.

In terms of events, I participated in 25 in 2015: 6 balls, 11 other events (teas, picnics, outings etc.), and 8 vintage dance performances.

Sewing-wise, I completed many of the things on my 2014 “to make” list (many pictured above), including the 1895 skating ensemble, the 1811 elusive blue turban fillet, my 1814 Vernet fashion plate recreation, the 1910 dowager countess evening gown, the 1880s steam molded corset, the 1885 frills and furbelows day dress, and the 1924 robe de style. Plus, I also squeezed in some small things that weren’t on the list in 2014!

There were also things that didn’t get made, but those were all on the maybe list, so I don’t feel at all bad about not getting to them, especially when looking at all the other fabulous things I did get to making!

Looking forward, I’ve been thinking of my 2016 sewing plan for months… and already have a full sewing schedule to keep me busy through May! Beyond that, it’s a little hard to know what items will take priority without knowing what events might pop up on my calendar. Also, it’s nice to keep things a little flexible so that I can adjust my sewing level as needed throughout the year. But I can say that these projects are certain:

  • An 1899 evening gown with two skirts: one for dancing and one with a  train
  • An 1880s “Starry Night” or “Starlight” fancy dress evening gown (I haven’t decided on a name yet)
  • A 1780s robe a la francaise (with panniers and accessories)

These other things are on the maybe-sew list for 2016:

  • A modern dress made of black patterned rayon
  • An 1850s plaid ball gown and a new smaller set of hoops
  • A pair of modern black capris
  • Finishing a modern cotton dress I started in 2013
  • Finishing an 1814 pelisse and matching hat
  • A 1900s blouse
  • An 1890s daytime skirt
  • An 1830s evening gown
IMG_0255
One thing in 2016 that will be incredibly special and exciting is that I’m going to make a garment from the fabric I set aside for the 18th Century Court Gown Sew Along in 2014. (It’s the pink silk in the middle… I love the colors in this picture!)

Last year, I was sad I hadn’t worked on the project very much and was hesitant to let it go… But in May, I will be attending an event at Versailles. Yup, that Versailles. In France. Yikes! And of course I need clothes! (And hair! And shoes! There will be blog posts about getting things together! It will be great to have a reason to decorate and wear the Kensingtons I’ve had since 2012, but which have never been worn!)

This event is perfect inspiration to complete my court gown… except that if I ever have need of another lovely 18th century gown for an event in the US, it would be much more practical to have a robe a la francaise in my closet instead of a court gown… Luckily for me, by the 1770s a robe a la francaise was allowed in the French court except at the most formal occasions (check out Leimomi’s post about court gown history to learn more). I’ll be making wide panniers instead of modest pocket hoops, because it is Versailles, after all, but I’m feeling better about my decision to spend all the time and materials making something that might actually be worn again. So, I’ll sort of be completing the Court Gown Sew Along. The gown will certainly count in my books, and that’s what counts, right?

0029-burgess
Blessings to you in 2016. I’m looking forward to more fun, more historical clothing, and more adventures!

HSF/M #12: Green Regency Shawl

IMG_2034

I was inspired this fall to make an extra long Regency shawl. Others around the blog world have done this before–it’s certainly not a new idea I came up with so I can’t take credit for the creativity of sewing two pashminas together to make one longer one.

IMG_2032

I started by looking at my Pinterest boards to see what colors popped up often in fashion plates and extant shawls so I could pick a reasonably Regency color for my own creation (this board has a number of fashion plates and extant shawls). Common colors I saw were cream, dark red, grassy green, and dark blue. Occasional other colors included vibrant autumnal orange and rich yellow.

The second step was to consider the colors in my current Regency wardrobe so I could pick a color shawl that would harmonize with my outfits. Lastly, I looked at what was available on eBay for available color options and with sufficiently wide borders around all the edges to have the look of a Regency shawl. I found a few that matched my research but the color that best fit all of my criteria was grassy green. This shawl from the Met is a very similar in color to mine and was an inspiration in terms of border proportions.

The shawl fulfills the HSF/M Challenge #12: Re-Do, with a re-do of Challenge #7: Accessorize. Just the facts:

Fabric: Two pashminas.

Pattern: None.

Year: c. 1805

Notions: Thread.

How historically accurate is it?: It definitely passes Leimomi’s test of being recognizable in its own time in general and in terms of the color and border trim proportions, but most shawls would have been silk or wool, which mine is not. Also, since it is two shawls sewn together, it has an inaccurate seam down the back. So we’ll sway 75%.

Hours to complete: Less than 1.

First worn: December 5, 2015.

Total cost: About $10-$15.

IMG_2062

I was dancing in a Regency period hall in December and it was the perfect opportunity to get some of the classic Regency shawl pose pictures. (The hall was decorated for the holidays, which matched my accessories perfectly!) It’s always amusing to me how the shawls are often depicted halfway off the wearer or draped artfully but with no apparent desire to keep warm.

IMG_2069

I wore my 1812 square neck dress but removed the pink sash that I’ve had on it for the last two years or so. It was nice to go back to a plain white dress for a change. It’s not plain at all with the new shawl!

I took the time to create a fun hairstyle with small diameter face framing curls and an extra braid of fake hair. I was very pleased with the overall shape and silhouette. (I’ll be sharing more about how I made the curls at some point in 2016 when I post more information about my Vernet ensemble and the photo shoot of the completed outfit.)

IMG_2078

IMG_2080

I had a blast dancing all day in such a beautiful space. When I cooled off between dances the shawl was great to keep me warm. And I love how festive it looks with the red necklace! I hope your holidays are full of fun, joy, and blessings!

IMG_2089

Honeymoon Pictures, Part II

Being in London, I was relatively so close to the Warner Bros. Studio Tour Harry Potter experience that it was very important to me that I made it for a visit! With some finagling, I managed to do it, and it was silly and fun and really quite amazing! Mr. Q and I actually split up for this day’s activities, because going was rather expensive and while he’s seen the movies once he doesn’t remember much about HP (sad, I know!). He had his own fun, though, that I wouldn’t have been interested in, so it worked out well. I took hundreds of pictures and had to comb through them to find the ones that made it to the blog.

IMG_7641
I did the HP tour bus thing to get there. Easy and pretty darn eye catching.
IMG_7644
In the line to enter… it’s the cupboard under the stairs!
IMG_7648
After a short movie introducing things, there’s a spectacular event where the last image is the door to the great hall, then the screen rises… and the actual door to the great hall is waiting for you! These are the awesome knights outside the great hall.

I believe that part of my reason for liking HP so much is that there is such an immense amount of detail in the creation of the world in both the books and the movies. I love being able to step into such a well-developed reality.

IMG_7653
Inside the great hall. I couldn’t get a good shot of the whole thing (too big!), so you just get part of it.
IMG_7672
This is so neat. You walk out of the great hall and into the general warehouse space and get to see the back sides of the set pieces. These are the supports of the great hall!
IMG_7685
Hogwarts gate.

There was a special interest area devoted to the costumes and hair in the show, which of course was right in line with my interests. There was also an employee talking about the wigs and hair and answering questions, which was really interesting and informative. Even some of the every day hairstyles were wigs, so that the actors would always look the same for certain scenes, even if re-filming was necessary and they had cut their hair, etc.

IMG_7689
This display had a Beauxbatons dress right next to the pattern for it on a dummy!
IMG_7690
And a bit of distressing. Multiples of garments that are distressed is standard for film and it’s interesting to see multiple stages side by side.

There were also costumes on mannequins scattered throughout the tour, but I can’t show them all! Again, there is so much detail in the costumes. Such amazing fabrics, and construction, and details…

IMG_7699
Wands obviously play a huge part in HP. This was a creative way to display lots of them. There is such attention to detail and character!
IMG_7700
What do you see in the Mirror of Erised? I see me, at the HP studio!
IMG_7701
Part of the Gryffindor common room. There is a painting of Minerva McGonagall in her younger days on the wall that I never noticed in the films. I rather like her outfit!
IMG_7729
Part of the potions classroom.
IMG_7746
The Weasley house–there were interactive objects that would “magically” move when the controls were activated. In this case, I’m causing the knife on the table to chop the carrots.
IMG_7747
The iron also “magically” ironed the dress on the ironing board.
IMG_7759
Magic is Might. Or not.
IMG_7774
Platform 9 3/4!
IMG_7772
See? There are about four of these in a line along a wall so the line doesn’t get too long for people who want to take pictures.
IMG_7770
Yes, that’s me with the Hogwarts Express!
IMG_7778
Just one of many cases full of the printed material from the films. I bet creating all the books and papers and letters and labels and everything was a fun job at times!
IMG_7785
On the backlot–the triple decker Knight Bus. Turns out they stuck multiple buses together to create it. And they actually arranged to shut down very specific streets in London to film it. Why specific? Because it’s too tall to fit under bridges!
IMG_7786
Next to the Knight Bus is Number 4, Privet Drive.
IMG_7789
Or at least, the front of it! Right next to…
IMG_7790
Bathilda Bagshot’s house.
IMG_7795
The life size chess pieces are also in the back lot. They are really neat!
IMG_7808
Then there’s a look into the creature studio.
IMG_7820
And there’s Diagon Alley! So much detail, so many HP scenes… Gringotts was always in shadow, so no good pictures of that.

IMG_7826

IMG_7848

IMG_7846

IMG_7840

IMG_7839

IMG_7836

IMG_7831

IMG_7827

Then there is a whole area devoted to the designing and drafting of all of the elements in the films. It’s amazing to think that every little thing had to be designed down to the smallest detail!

IMG_7852

IMG_7856

And there’s also concept art…

IMG_7878

IMG_7880

And models of different sets. These have such detail in them, but were relatively small–this one is maybe four feet across?

IMG_7867

IMG_7887
There are paper owls in the Owlery nooks!
IMG_7891
Then there is a model that tops it all…

It has it’s own room, with a ramp that circles around and slowly descends, so you can see the castle from every angle. This is what they used to shoot some of the outside scenes of the castle.

IMG_7893

IMG_7909

IMG_7896

IMG_7906
With people, for scale.
IMG_7913
I firmly believe that those behind the scenes deserve credit, too, whether they make it into the credits or not.

IMG_7914

Finally, you end up in the HP store. Mostly overpriced, in my opinion, and I really didn’t need stuff to take home with me. If I was going to be tempted by anything though, these were them.

IMG_7922
Stuffed Hedwigs!
IMG_7923
And stuffed Pygmy Puffs!

And there were so many other really awesome things I didn’t include pictures of! If you like HP and you’re in London, I highly suggest visiting. Of course, if you don’t like HP, I wouldn’t spend the money, because while you can still enjoy the attention to detail, if you don’t know what all the things are it wouldn’t be nearly as entertaining and fantastic.

Anyway, here’s the last picture–from the green screen broomstick experience!

IMG_0449

Vernet Project: Check Out The Finished Ensembles!

Photos of each recreation of one of Vernet’s Merveilleuses and Incroyables fashion plates start to be released tomorrow (December 8) on the group Facebook page! One fashion plate per day will be shared right next to a photo of the recreation, right up through the 31st of December (my plate will be on the 21st). Check it out! It will be a fun way to end 2015!

10394822_835881046430902_3846149313268917321_n

I’ve seen some of the finished ensembles ahead of time, and let me just reiterate how wonderful, weird, and wacky they are! Further posts with more images and specifics about construction, etc. will be released by participants in 2016, so don’t forget to check back to see updates on the ensembles that most capture your fancy.

(You can see all my posts from this past year relating to this project here, and I’ll be sharing more in 2016!)

Our Honeymoon Pictures, Part I

Back to wedding related things for a few quick posts, here are a a select number of pictures from our honeymoon! We went to Edinburgh, Conwy (Wales), and London and had a glorious time. There are so many things to see and do that we couldn’t take it all in. By the end we had been museum-ed out and were ready to go home, which was a nice feeling actually, because we weren’t lamenting the fact that we had to return to real life.

IMG_2874
The hair flowers from the wedding day (photos here) traveled around with us and lasted a week into our honeymoon! Here they are on the plane on wedding day with super adorable salt and pepper shakers.
IMG_7521
The weather in Scotland mostly looked like this.
IMG_7534
Here’s some clouds over the castle, with the stands for the Royal Edinburgh Military Tattoo off to the right.

One of the highlights of our entire trip was getting day-of tickets to the Royal Edinburgh Military Tattoo. This amazing annual performance of military bands, music, and dancing from around the world brings together thousands of people and is televised in more than 40 countries! It was suggested to us by our local host and was downright jaw dropping! The performances take place literally outside the gate to the historic castle and involve, amongst other amazing performances, hundreds of bagpipes and bagpipers wearing so much tartan!

IMG_2889
I couldn’t even get close to getting all the performers in one picture!
IMG_7538
We took most of a day to walk/hike up Arthur’s Seat, an extinct volcano, right in Edinburgh. The orange speck on the rocks is Mr. Q.
IMG_7582
After Edinburgh, we headed to northern Wales for a long weekend for some in-between-cities time. This is Conwy, the town we stayed in, with a castle from the end of the13th century.
IMG_7540
We stayed at a bed and breakfast that backed right up to the town walls.

IMG_7581

Conwy was lovely and small. We could walk across the town in about ten minutes, had a variety of really neat historic house and castle museums to visit without being overwhelmed, and even got to hang out on the wharf for a local Saturday festival with live music. And Wales was nice and green, reminding me very much of the Pacific Northwest, where I grew up. I highly recommend it!

IMG_7565
Modern roads don’t quite fit under 13th century castle walls…
IMG_7557
Also, Wales (well, and the UK in general) is full of sheep! We took the train between each destination and got to spend lots of time looking out the windows and exclaiming at the sheep! Plus, I got my tartan wool picnic blanket and scarf. Sheep!

It only took about a day and a half to see everything inside the town walls of Conwy, so we took a day for a little trip not far outside town to Bodnant Garden. It’s an amazing garden that’s been tended for over 150 years with plants from around the globe. There are all sorts of different types of gardens and forest areas to explore and it was easy to spend hours roaming around.

IMG_7583

IMG_7591
Look, it’s me!
IMG_7592
Looking at a very tall, old tree!
IMG_7589
It wouldn’t fit in the picture!
IMG_7598
Similar trees, for scale.
IMG_7610
Mr. Q, looking short next to other tall trees.
IMG_7608
This was the closet we got to… sheep!
IMG_7614
Formal garden within Bodnant Garden.

Our final stop was London, where we went to shows, got thoroughly drenched in rainstorms almost every day, went to many museums and sights (The British Museum, The Victoria and Albert, The National Gallery, Portobello Road, The Tower of London, Westminster Abbey, and St. Paul’s, to name a few), visited famous stores (Liberty of London and Fortnum and Mason, for example), and generally stayed super busy. We also discovered a super yummy vegetarian restaurant called Tibits in a lovely, quiet little alcove off of Regent Street, which was perfect for hanging out as the sun set and people watching while eating really amazing food. So amazing, in fact, that Mr. Q bought me their cookbook for a birthday present (with a hint from me, of course)! I haven’t had a chance to make anything from it yet, but I look forward to having the time!

IMG_7638
The view from the top observation area at St. Paul’s.
IMG_7926
The sun did come out at the very end of our stay and it was such a change from grey!

And I took a day while we were in London to have a special day trip that I haven’t mentioned yet… A Harry Potter day! I’ve got enough pictures to do a whole post just for that, though, so watch out. I’m really looking forward to some hang-around vacations vs. the go-do-everything style of our honeymoon, though I don’t regret getting to visit so many amazing things and places! It was quite a memorable trip.

Vernet Project: Making Progress

Our group’s early December deadline to finish sewing our Vernet Projects is fast approaching! Thank goodness we’ve had all year to work on these–mine has been quite a project with all the hand sewing and patterning and learning new skills. Of my five pieces, one is totally done, two have less than three tasks left to be finished, and 2 are still about halfway completed. It won’t quite be furious sewing, but I do have to keep at it to get it done in time. For now, here is proof that I’ve been making progress!

IMG_0288

IMG_0284

IMG_0124

IMG_0272

Starting December 7th, you should check in often with the group on Facebook to see each recreation released side by side with the original Vernet fashion plate. It’s going to be really, really amazing to see these crazy and beautiful fashion plates in 3D form!

Wedding Pictures!

I did my best to narrow down our wedding pictures to the best of the ones that most share the spirit of the day and the special details I spent countless hours working on. As it is, this is still going to be a long, picture-heavy post! (All but one of these photos was taken by our professional photographer. Please do not share these photos without a link back to the source.)

Photography: Kristen G., at Kristen Taylor and Co. Photography

Venue and Catering: Meadow Brook Hall

Hair and Makeup: Andrew Marke Salon

Flowers: Bellisario Florist

Cake: Sweet Dreams Bakery

Let me start by saying that I wanted an elegant wedding with a cozy feeling. I’m a unique person and I wanted our wedding day to be a mix of the traditional details I care about (and not those I don’t care about) and special unique details that express our personalities. I was also surprisingly pragmatic about what details were worth spending money on and how to achieve what I wanted without breaking the bank.

(No, I didn’t make my dress. I bought it on a super sale for just $99, which is pretty spectacular considering I only wore it for about 5 hours. It was rather an adventure to find my size and involved calling all over the country–my dress wound up being shipped to be from Utah, but it fit perfectly, with only a small hem and a slight alteration to the halter closure being necessary. Yay! A good curly haired friend was able to mark the alterations for me and then I did them myself. It was definitely a blessing to find a dress I liked that came under my hopeful $100 dress budget. A bride could so easily spend so much more! After the wedding it was whisked away to get cleaned and go to some other new home by one of my aunts, who I’m sure will make sure that some other bride is able to reuse it. Yes, I was surprised at myself for not feeling particularly attached to my dress, but the dress isn’t the important part to hold on to.)

0097-burgess
Meadow Brook Hall, an elegant estate built by the Dodge family with an interesting history. The car connection reminds me of one of my grandfathers, who worked for Ford. (Yes, the car Dodges and the Ford car company. This is Michigan after all.)
0610-burgess
Details: small tissue paper pomanders in wedding colors, purchased on Etsy but fluffed by me and various members of my family (great hang out time!) and African fabric made by women to support themselves, bought from Fabric of Life in my hometown.

0074-burgess

0071-burgess
Details: puzzles and games are a tradition in my family and after a visit to Hiroshima in fifth grade I spent a lot of time making origami paper cranes–I haven’t finished making 1,000, but my parents have still held onto the ones I did make as well as the paper, and the origami paper we provided for our “guest book” was part of that stash.

Our guests count was about 35 people from around the country and the world. We were blessed to have most of them join us the weekend before the wedding to hang out and get to know each other, which was a blast, but terribly exhausting! It made for a wonderful feel, though, for the guests to know each other ahead of the wedding day.

0048-burgess

We were married on a Monday, at a morning ceremony followed immediately by a brunch reception. It was an early morning, with hair and makeup appointments starting at 6:30am after a long weekend without quite enough sleep each night, but after getting some breakfast I felt ready to take on the day.

Luckily, it was sunny and beautiful with no clouds as far as I can remember. In fact, it was hot! We were all sweating during the ceremony and trying not to fidget as the sweat rolled down… we got the occasional breeze, which was lovely, but it was nice to get inside and sit down for some brunch!

0067-burgess

0294-burgess

0723-burgess

0503-burgess
Proud parents of the bride. Yay, we all made it! They’ve been married for forty years–talk about inspiring role models!

The brunch reception was followed by a surprise tour of the venue, so that guests (and I plus the wedding party!) could learn about and appreciate the history of the venue. I picked it not only for its beauty, but also because of my love of history and beautiful historic places, and it was important for me to share that with the guests.

0076-burgess

0075-burgess

After some cake and toasts, it was time for us to make a grand exit to the airport to catch our honeymoon flight (amusingly, we took a car service to the airport, had some time before our plane left, and as we were nearing boarding were greeted by guests we had just left behind at the venue who were also arriving at the airport to catch flights, including my maid of honor!).

0626-burgess
Simple, with flowers to match our bouquets.

0646-burgess

If you’ve been reading the blog for awhile, you might remember that Mr. Q and I were competitive ballroom dance partners for about eight years, so instead of walking to the car we danced our way down the path! At the end of the path our guests waited with small bottles of bubbles to send us on our way.

0096-burgess

0748-burgess

_1084841

0770-burgess
Dancing together for years means we almost always walk in step with each other without realizing it. If you look back at the black and white picture of us right after the ceremony concluded you’ll see the same thing!

And of course, there were pictures of our very small bridal party: Mr. Q’s father was his best man (which was lovely, because Mr. Q’s grandfather had been his father’s best man at his wedding to Mr. Q’s mother) and my best friend of 25 years was my maid of honor. It was incredibly special to have both of them join us–they each travelled the farthest, from the Philippines and from France!

0453-burgess

0441-burgess

There were also gorgeous pictures of Mr. Q and I together as well as each of us alone, as you would expect from wedding pictures. Meadow Brook has three lovely gardens to choose from for a wedding ceremony: we picked the Pegasus Garden, which has the statue of pegasus in it, but there is also a rose garden and a lovely rock garden, where we were able to get pictures as well.

0406-burgess

0424-burgess

0417-burgess

0029-burgess

0389-burgess

0396-burgess

0032-burgess

0034-burgess

0331-burgess

0338-burgess

0342-burgess

0036-burgess

0345-burgess

0353-burgess

We purchased limited amounts of flowers to keep costs down. Corsages and boutonnieres for parents and grandparents, a boutonniere for the groom, and only two bouquets, one for me and one for my maid of honor. We repurposed the bouquets to decorate our head table so we could enjoy them and then we gifted them to my grandparents, who were local and able to enjoy the flowers hopefully long after we had flown off on our honeymoon. (Gosh, that bouquet was heavy! I didn’t realize it would weigh so much. But its was lovely. The colors fit perfectly with my wedding colors and I loved the mix of textures that our florist achieved with regular stock flower varieties.)

0117-burgess

0084-burgess

0038-burgess

There were a few very small not-quite-perfect things on the day, but most things went smoothly and I have nothing of importance to complain about. It was a beautiful venue on a beautiful day that we were able to share with all the people who are most special to us and who had gone out of their way to make it to the wedding. What more could we have asked for?

0732-burgess