Is there enough alphabet soup for you in the title of this post? In case you’re not familiar with those acronyms, it means that this is a post about the Historical Sew Fortnightly Challenge #2: Un-Finished Object. In this case, the UFO is my 1820s petticoat from the very end of 2012.
You’ll remember that I wore it to Fezziwig’s Ball in December, but that I hadn’t finished the neckline? I’m pleased to say that it is now entirely complete!
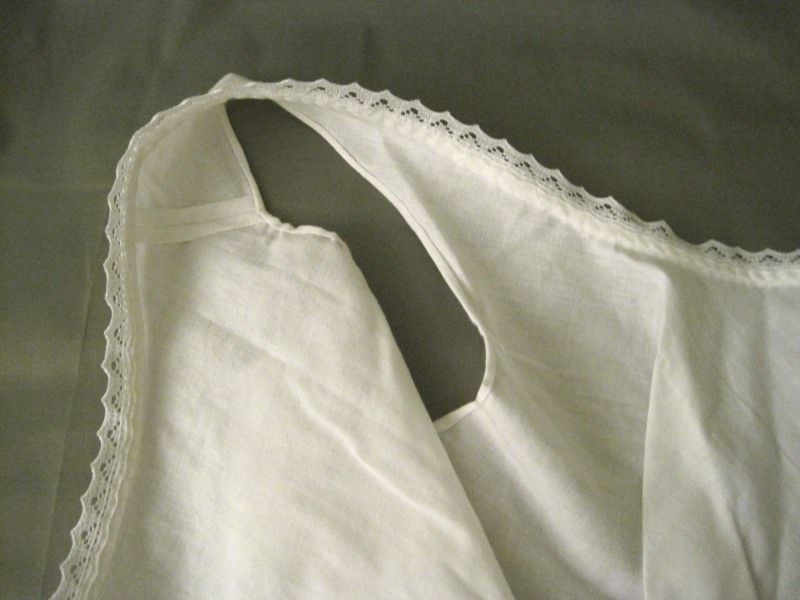
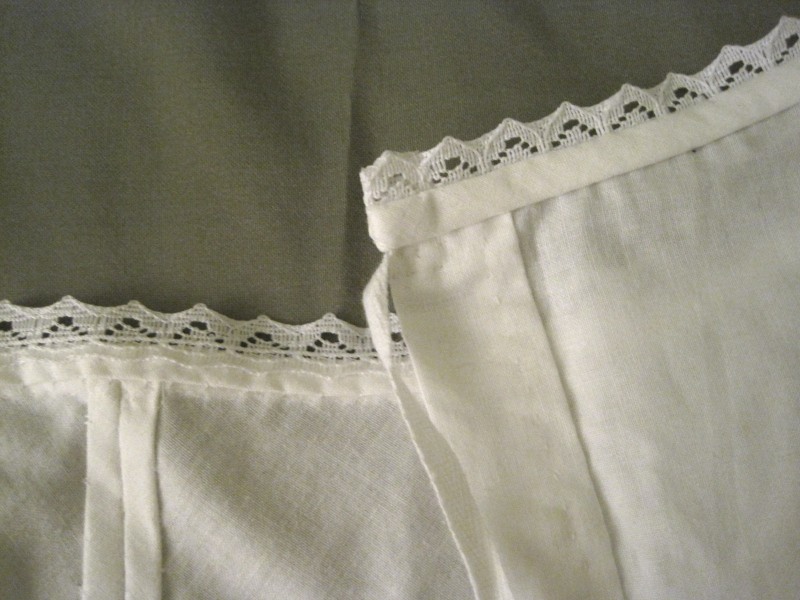
Inside view. This petticoat has three ties at center back to keep it closed.You know I like my insides to be pretty. This is a closeup of the arm hole and the neckline, which is bound with bias before having the lace sewn on.The double hem on the left is center front. Diagonally across the photo is the right side of the back.This cording was done last month, so it’s not really part of the UFO-ness, but it is still an accomplishment. 16 rows of hand sewn cording all around the hem.A close-up of the lace at the hem and my tiny stitches.
Pattern: Adapted from my 1822 green ball gown pattern. It’s pretty much exactly the same except that it doesn’t have sleeves. The ball gown pattern is based off of a pattern in Janet Arnold and styled as in the fashion plate you can see in this previous post.
Year: 1820s. The inspiration image is dated 1828-1835. You can see the inspiration image and my reasoning for it being more 1820s than 1830s here, in this past post.
Notions: About 1 1/2 yds of broderie anglaise trim, cut in half the long way to create double length; about 1 yd of white edging lace; and about 1 yd of 1/4″ cotton twill tape.
How historically accurate?: Very, having used modern materials. The pattern is from Janet Arnold, so you know it is good on accuracy. The entire petticoat is hand sewn and made of accurate fabric. The lace is machine made and the content is almost certainly not entirely accurate, but it is in the style of the early 19th century and the lace in the inspiration image. I’m not 100% sure that all of my seam finishes are perfectly accurate for this garment, but they are accurate for the period as a whole.
Hours to complete: I’m always bad at estimating this. Let’s say 120 hours.
Recently, at Fezziwig’s Ball, I was able to wear my almost-finished 1820s ensemble. You can see pictures of that event, which includes pictures of the ball gown, walking dress, muff, and tippet in this previous post. In that post, I didn’t get to share pictures of the petticoat that went along with these 1820s garments, so that’s what this post is about! For the record, after the ball I simply starting taking off layers and having my friends take pictures so I would have evidence of all my sewing (while I still was wearing the proper hair style and accessories!).
Ok, I’m making a funny face (I think my eyes are closed)… but it’s full length picture of the petticoat! You can see the shape, and the cording, and the lace at the bottom.I didn’t get to finish the neckline before the ball… so you can see how that right shoulder seam is starting to split. I’ll have to repair it before finishing the neckline.
This simple white cotton petticoat has 16 rows of cording to help it stand out. It is entirely hand sewn and closes in the back with ties. Close up photos showing the construction of this petticoat are in this previous post.
With this petticoat I wore my short sleeve linen chemise and pink 1820s/30s corset. Both of these things were made last year and have been worn multiple times since then (especially the linen chemise, which gets worn often!). I finally have pictures of me (versus Squishy, the dress form) in the corset! Granted, it’s not a particularly exciting picture, but sometimes you just have to take what you can get.
1820s/30s corset. You can read more about the inspiration and construction by clicking on the links. Clearly, I haven’t actually quilted a diamond pattern on the front like I planned to do when it was built…
And just for fun, I thought I’d include this fun picture of me getting ready for the ball. One of my friends is on an “artsy photo” kick… I didn’t even know she was taking this picture, but I like it! I especially like the mixture of modern and historic that is me in my chemise and corset putting on mascara… they had modern mascara in the 1810s, right?!?
This bodiced petticoat is the inspiration for the first piece of my 1822-1824 ensemble that I need for December events. You can read more about the overview of the ensemble by viewing my last post: here. Despite the slightly later date given for this garment (later than my target of 1822-1824), the shape and construction are consistent with garments from the earlier 1820s, so I have no qualms about using this for my purposes in this case.
White cotton with high waist. Low, wide, round neck edged with embroidery and lace frill; piped armholes; front in one bias-cut section, back in two shaped sections, centre back fastening with drawstring at top and bottom of neck edging and at high waistband and two buttons; skirt front in one slightly flared section, two sections each side flared towards back, slit at hip in right back seam, centre back in two straight sections, closely gathered at centre waist; sixteen lines of piping at hem; edging of finer cotton scalloped and with openwork embroidery.
I used this description in combination with the 1820s patterns in Janet Arnold to create the bodice and skirt patterns. My petticoat is constructed out of plain white cotton. It is entirely hand sewn and has 16 rows of cording in the skirt. There is a edging of white cotton openwork embroidery at the hem. The seams are all flat felled in the skirt. The bodice seams are turned twice and stitched on each side of the seam. The petticoat closes in the back with ties.
Bodice of the petticoat with unfinished neckline.Near the hem: 16 rows of cording and embroidery edging.Super close up of a flat felled skirt seam, narrow hem, and whip stitches attaching the embroidery. The embroidery is whip stitched to the hem at the very bottom, and the top edge is whipped again on the inside (that’s the top horizontal row of stitches).Back of the bodice.
The only remaining work to be done is to add another tie between the current two since the back wants to gap open just below my shoulder blades, to finish the neckline, and to adjust the gathers across the back (secret tip I’ve learned through building these garments: to get that great 1820s triangle shape, your gathers have to be super concentrated at the center back area, not spread out across the entire back, as these currently are). I plan to finish the neckline with narrow white lace, but I want to determine the neckline of my ball gown before finishing the neck of the petticoat. You understand that desire, I’m sure!
Differences from the original include: that I have a seam up center front of the bodice (no particular reason, it’s just that’s how it turned out), my cording is spaced closer together (which I’m not sure I like as much as the original, but I’m not taking it out now!), my armholes are narrow hemmed rather than piped, and my skirt closes right in the middle of the gathers rather than off center at the side back seam.
Pictures of the entire petticoat will have to wait. It looks pretty foolish on hanger, doesn’t fit a dress form (because the bust is so high), and it’s super awkward to get a full length picture of oneself… so we’ll just have to wait until I’m wearing it!
Well, as you recently read, I have a 9 month sewing plan to get me through May of 2013. It’s not set in stone (which means that mostly I keep adding to it, not taking things away…), but it gives me a great overview of what I need to accomplish and by what month. Deadlines really help in getting things completed!
The first major portion of the sewing plan is an ensemble of clothing from about the year 1823. I’ve been doing lots of looking at fashion plates and extant clothing from the early 1820s, in books and online. Here’s a link to my pinterest board: 1820-1824. I had so many pins in the 1820-1829 board that I had to separate the decade, so I also have a separate pin board of 1825-1829.
The 9 month plan includes the following pieces: petticoat, ball gown, walking dress, muff, bonnet, and chemisette. I’ve added one more thing since the plan was created: a tippet to match the muff! Before I explain why I want these items (ie, where I plan to wear them!), let’s look at my inspiration for the items themselves!
Petticoat. Manchester City Galleries. (I’m making a petticoat out of white cotton. It is entirely hand sewn.)Actually a Dinner Dress (but I’ll use it as a ball gown). Ackerman’s Repository. May 1824. (I guess I lied about the year… I’ve been looking at the images so much I haven’t even glanced at the date in ages! Anyway… I’m making this in apple green silk with hand sewn silk organza appliqués.)Promenade Dress. Ackerman’s Repository. December 1822. (I am making this out of deep, rich pinkish burgundy wool with hand sewn lavender silk trim.) This is also my inspiration for the tippet. (I’m making the tippet out of white faux fur.)Walking Dress. Ackerman’s Repository. March 1823. (I think this is where I got the year 1823 from… This is another influence on my walking dress design, especially at the collar.) This is also my inspiration for my muff. (The muff will be the same fur as the tippet, lined with pale blue silk shantung.)Bonnet. C. 1820. The Met. (I plan to make this in lavender to match the walking dress.)Chemisette. c. 1810-1825. Snowshill Collection. (Yes, this is one of the ones in Janet Arnold. I plan to make this out of lightweight cotton and use my fluting iron! However, I have to say that if one thing in my December-to-do doesn’t make the cut, this would be it. I really want to take my time on this and play with my fluting iron, and I’m not sure I’ll have the time on this one…)
What is all of this for, you ask? I plan to wear the whole ensemble in December when I attend Fezziwig’s Ball, a 19th century ball hosted by the Commonwealth Vintage Dancers in Salem, MA. Since it’s a ball, I’m sure you understand why the petticoat and ball gown are required! But why the outerwear? Before the ball begins, ball-goers have the opportunity to go caroling around the streets! It’s really fun, and usually pretty cold. I need to stay warm, hence the wool walking dress, tippet, and muff. The chemisette is to fill in the collar of the walking dress, and the bonnet is really icing on the cake to help pull the whole ensemble together! As an added bonus, later this winter my friends and I hope to go ice skating in 19th century dress, so this will also be my ice skating outfit!
As I mentioned in my last post, the one where I shared pictures of my new 1812 under garments, there aren’t a whole lot of extant examples of sleeveless undergarments from the Regency period, so I had to take the research images I could find and extrapolate what was necessary for my dress from that information. Here are a few extant examples of sleeveless underdresses.
Early 19th century. Petticoat. The Met.Petticoat. 1800. Cotton. National Trust.Early 19th century cotton petticoat/underdress. MFA Boston.
It is fitting that this last one was worn by someone who lived in Boston, MA (that’s where I live). Neat! And isn’t the whitework at the hem lovely? Fashion plates and extant underdresses and petticoats from the early 19th century not uncommonly have hems that had white work and lace decorations. I didn’t incorporate that into my underdress… but maybe in the future I can make another such garment and include that detail!
Natalie Garbett also wrote a blog post about a sleeveless underdress that she made, which you can read by clicking this link. It’s super cute (and has hem trim)!
I actually didn’t find any sleeveless chemises, though I did come across mentions of them. I suppose a lady could have tucked up the sleeves of a normal chemise, or worn a sheer dress with the sleeves of the chemise showing through. Here’s an example of an early 19th century chemise with sleeves. This one is pretty ruffly, but the basic shape is the same, as is the gathering tie at the neck.
I am so pleased with my re-made 1819 dress. You can get the background here or read the sewing update here! In short, the new style shares only the skirt with its former self. The new ruffles are all hand hemmed and hand sewn on. The dress seams are a mix of machine and hand sewing, depending on if I felt like digging out the sewing machine or not. All of the bodice seams are flat felled by hand. The dress closes in the back with 4 mother of pearl buttons. Oh, and let me not forget that the dress no longer has built in petticoats. Part of the re-make was to create a separate petticoat from one of the two petticoat layers built into the dress. The petticoat ties under the bust and has a single button to close the top of the bust. It is just a sleeveless, simple version of the gown. I’ll have to take pictures sometime so I can share them. But the dress… It fits! It is ruffly! It has so much more style than it did before! Just to compare, the first picture is your first glimpse of its current style, and below that is from before the re-make.
The re-made 1819 dress, with ruffles!The 1819 dress in its first incarnation.
Isn’t it more stunning than it previously was? I wore it to the Commonwealth Vintage Dancers’ 1812 Ball (ok, so my dress was a little forward thinking… maybe I have a time machine?). I had a lovely time, as expected. I made some new acquaintances and renewed some old ones, I was able to wear my recently purchased kid leather opera-length (which means over the elbow) gloves and a beautiful shawl one of my aunts gave me a few years ago, I got to practice my historic hair styling techniques (more to come on that point soon), and I danced! But let me stop writing, because really this post is about sharing pictures.
The back view of the re-made dress.Friends: don't we make a lovely group? Ok, wait, but there's a funny face...How about this one? Same group, but now I'm making the funny face. Rather a severe expression, don't you think?
I’d just like to insert a comment here: looking again at these pictures, all the ruffles on the bodice of my dress really manage to make me look much more busty than I actually am… Hm… there are a lot of ruffles going on there!
My friend made this beautiful fan to go with her dress! It's hard to see the detail in this picture, but it's absolutely lovely.Front of her new dress. She also has the super cute tiara, that is much more sparkly in person...Back of her new dress.
I’ll leave you with this image: a teaser for a soon-to-come post about the creation of this hair style!
Quite picturesque, I think. Thanks for taking the photos, Carly (and Mark)!
I have decided to remake my ivory 1819 cotton gown for an upcoming Regency ball. Originally, my plan was to add trim to the dress as it currently exists, but I realized there were many things about the dress I wanted to change: with my new late Regency corset the neckline tended to sit away from my body in front, the back closure was too tight for comfort, the bust line in front was so high that it was very hard to get it to sit below my bust, the sleeve openings were uncomfortably tight, the sleeves weren’t puffed enough, I wanted to separate all the petticoat layers to be individual layers rather than petticoats built into the dress, and I wanted to add ruffles to the skirt to really bring it up to the years just before the 1820s. Indeed, the things I wanted to change were so numerous that I decided to just remake the dress!
In the end, the only thing that I decided to keep the same is the skirt base fabric… Using just one additional yard of the original fabric, I plan to complete the following changes: constructing an entirely new bodice with ruffled trimming, creating entirely new puffed sleeves with a cute v-shaped detail, making stand alone petticoats out of the original built in petticoats, and adding bias ruffles to the skirt.
From Ackermann's Repository 1822
My dress is from the period just before the 1820s and I felt that I needed to go more in an 1820s direction with the new trimming and adornment. The main feature of trimming in the 1820s is wide sections of trimmings on the skirt, in combination with corresponding trim across the bodice and sleeves. Thus, there two horizontal lines of interest with a simple, unadorned mid-section (as in the fashion plate on the left, from 1822).
Before I had decided to make so many changes, my original intention was to simply add ruffles to the bottom hem, along the lines of the dress (below) from the Kyoto Costume Institute.
c. 1820 Silk Day Dress (Kyoto Costume Institute)Ribbon trim on 1819 dress before the remake
However, as I thought about it I realized that the ruffle style (above) just would not have a corresponding look to the current zig zag ribbon trim on the dress bodice (right). Those two styles did not make sense on one dress.
The logical step was to change the trim on the bodice. But remember that I had other complaints about the bodice as well… So came the decision to remake the bodice. But how to trim it to correspond with the ruffles on the skirt? I was not at all interested in the bodice trimming on the Kyoto dress for my dress, because the fabric doesn’t lend itself to that look. Well, I started researching trimming from the late 18-teens to see if I would be inspired. The image below is one of my favorites that didn’t make the cut, and there are more on my 1819 dress trimming ideas Pinterest board (thank you to Lauren, at American Duchess, for linking to her Pinterest board in a post and sparking my interest in this fabulous organization tool).
From Ackermann's Repository 1819
Many of my Pinterest images come from the same place: the blog “My Fanciful Muse” by EK Duncan. She has a series of posts that contain text and fashion plates from Ackermann’s Repository beginning in 1808 and going through 1828! Here is the link for the post on 1828: if you scroll to the bottom you will see a list of links to all of the previous years. It is absolutely fabulous! If you haven’t seen this yet you MUST visit! (Thank you for sharing, Evelyn!)
In the end, I decided on a combination of the two dresses in the image below: the ruffles on the skirt of the dress on the right (for some reason I really like the idea of ruffles on my skirt!) and the bodice of the dress on the left. The repeated use of ruffles on the skirt and bodice will produce the corresponding style I am aiming for. The sleeves will be a style from the first few pages of the first half of the 19th century Janet Arnold pattern book: a puffed sleeve with a triangular inset coming from the shoulder. I’ve wanted to use that sleeve style for months and now I finally have a way to use it that makes sense!
1820 illustration from Cunnington's English Women's Clothing in the Nineteenth Century (the illustration is based off of contemporary fashion plates)
This Etsy shop (empireroom) has wonderful vintage lace for sale by the yard! The prices are very low and even better for bulk lace (over 20 yards). The seller, Jayne, has been quite helpful in providing me with information about bulk pricing and quantities. The only down side is that she is in Australia, so shipping is slightly expensive. But you should check out her selection anyway!
I have found other lace sources that have lower prices, but not for vintage lace! Usually the low prices are only for modern made lace, which means that a distinct measure of discernment is needed to choose lace that is the right scale, color, and pliability for the project.
Most of the lace listed on this site would work very well for a reproduction 19th century garment, I think. I can especially envision an Edwardian skirt or blouse embellished with some of this lace as edging or insertion, but I can also envision the lace being used to trim undergarments such as petticoats or chemises.
I’ve decided to attend 2 events in September which require clothing from the last quarter of the 18th century (1775-1799). This decision is rather at the last minute when it comes to building new historic clothes: I now have exactly three weeks to make a decision about what to wear, pick out fabrics, make patterns, and complete the construction of the garments. Yikes!
So I’ve been busy researching this period because it is not within the realm of my previous historic clothing projects, which have generally focused on the 19th century. Unlike women’s clothing in the 19th century, for which I can recall silhouette, construction details, pattern shapes, and fabric choices and colors with far less research for each garment (because I’ve already done all that research and it’s all in my head…), I really need the research to be able to consider reproducing historic clothing from the 18th century. Here are some inspirational images I thought I would share!
Here’s how this conversation went in my head: “Where do I start?” I asked myself. “Silhouette?” I replied. “Ah, yes. That sounds good. But… what is the silhouette during this period? Hopefully not panniers!” because panniers, you see, require a lot more effort to produce and a lot more fabric to cover. “Well, let’s start by looking for some images,” I suggested. And here we go!
c. 1770 Silk Robe a l'Francaise at the Metropolitan Museum of Art
Now, you can see by looking at the above image that these gowns require panniers to achieve the exaggerated hip shape. You can also see that these gowns are Robes a l’Francaise, meaning robes in the French style. This style of gown has the characteristic pleating at center back that falls from the back neck line to the floor in one piece. This style, with the panniers and the Robe a l’Francaise, is not what I have the time to make in three weeks. So we move on!
1770-1775 Silk Robe a l'Anglaise at the Metropolitan Museum of Art
In contrast to the Robe a l’Francaise, I am actually interested in the style of dress on the left: the Robe a l’Anglaise, or English style robes. This style evolved from the Robe a l’Francaise: over time the side back seams of the Robe al’Francaise were cut close enough together that the characteristic pleats were no longer used.
Below, you can see another two examples of gowns in the style of a Robe a l’Anglaise. These two are from the 1780s and you can see that the width of the hips has diminished from the 1770s. Note that all of these gowns have open fronts that show the petticoat underneath.
c. 1780 Cotton Robe a l'Anglaise at the Metropolitan Museum of Artc. 1780 Cotton Robe a l'Anglaise from the Metropolitan Museum of Art
1780-1785 Cotton Robe a l'Anglaise at the Metropolitan Museum of Art1780-1785 Cotton Robe a l'Anglaise at the Metropolitan Museum of Art
There are other options for this period as well: there is the style Robe a la Polonaise, which has a characteristic bunching of fabric across the back side as well as the skirt and jacket combination. I’m not interested in making a Robe a la Polonaise at this point, but a skirt and jacket combination is a possibility. You can see these styles below. There is another style as well: the Chemise Dress, but you’ll have to wait for my next post to see and read about it!
c. 1780 Linen Robe a la Polonaise at the Metropolitan Museum of Art
c. 1785 Silk Jacket at the Metropolitan Museum of Art
Flounced 1860s dresses seem to be pure confections: cupcakes iced with lace and frothy ruffles. That is the vision in my mind while I was looking for inspiration for my latest crinoline dress.
Fashion Plate from Godey's Lady's Book September 1859 "Dressed for a Party." (The dress on the right is the inspiration for my latest gown)
I already made one 1860s dress for myself. Named Belle, it is a dark blue satin and velvet gown with a three tiered skirt. It’s very heavy and a dark color: neither of those two features seemed fitting for a summer ball in temperatures around 80 degrees! And so I decided to create an all new gown… in my head this one is named “Annabelle.” (I hope you are also amused by the name!)
"Annabelle" my new 1860s ball gown
As you can see, there is one crucial element missing… the pink flowers! My goal is to make the flowers by hand from silk organza and to be perfectly honest, I ran out of time. I just decided to wear the dress as-is and finish the flowers later. I also ran out of time to bone the front, as you can see by the wrinkles along my tummy. No worries though, as I’m sure I’ll be able to wear this gown again.
"May I have this dance?" Side view of Annabelle.
In order to be to light and breathable, Annabelle is constructed entirely of cotton. The skirt has a medium weight cotton foundation to which cotton voile flounces are attached. The bodice is three layers of cotton for the sake of being opaque: two of medium weight cotton and one layer of voile. The layers are flatlined together and treated as one piece. The flounces on the skirt and bodice are cotton voile edged in narrow white lace.
This gown was flat patterned using research from books by Janet Arnold, Norah Waugh, and Kristina Harris. View this post about patterning from my Project Journal: Women’s Tailoring to see which titles I used and get a smidgeon of bibliographic information. The skirt pattern is fairly simple: a big tube cartridge pleated at the waist. The bodice has narrow v-shape seams front and back with puffed sleeves and a flounced bertha. It is worn over a chemise, corset, double thickness bum pad, hoops, and petticoat.
While this dress is eventually intended to be a reconstruction of the dress in the 1859 fashion plate above, I was also inspired by these other, similar fashion plates for further information. Enjoy!
Fashion Plate from Godey's Lady's Book October 1859 "The Soiree"Fashion Plate from Godey's Lady's Book August 1859 "Godey's Fashions for August"