A Collar For Georgina

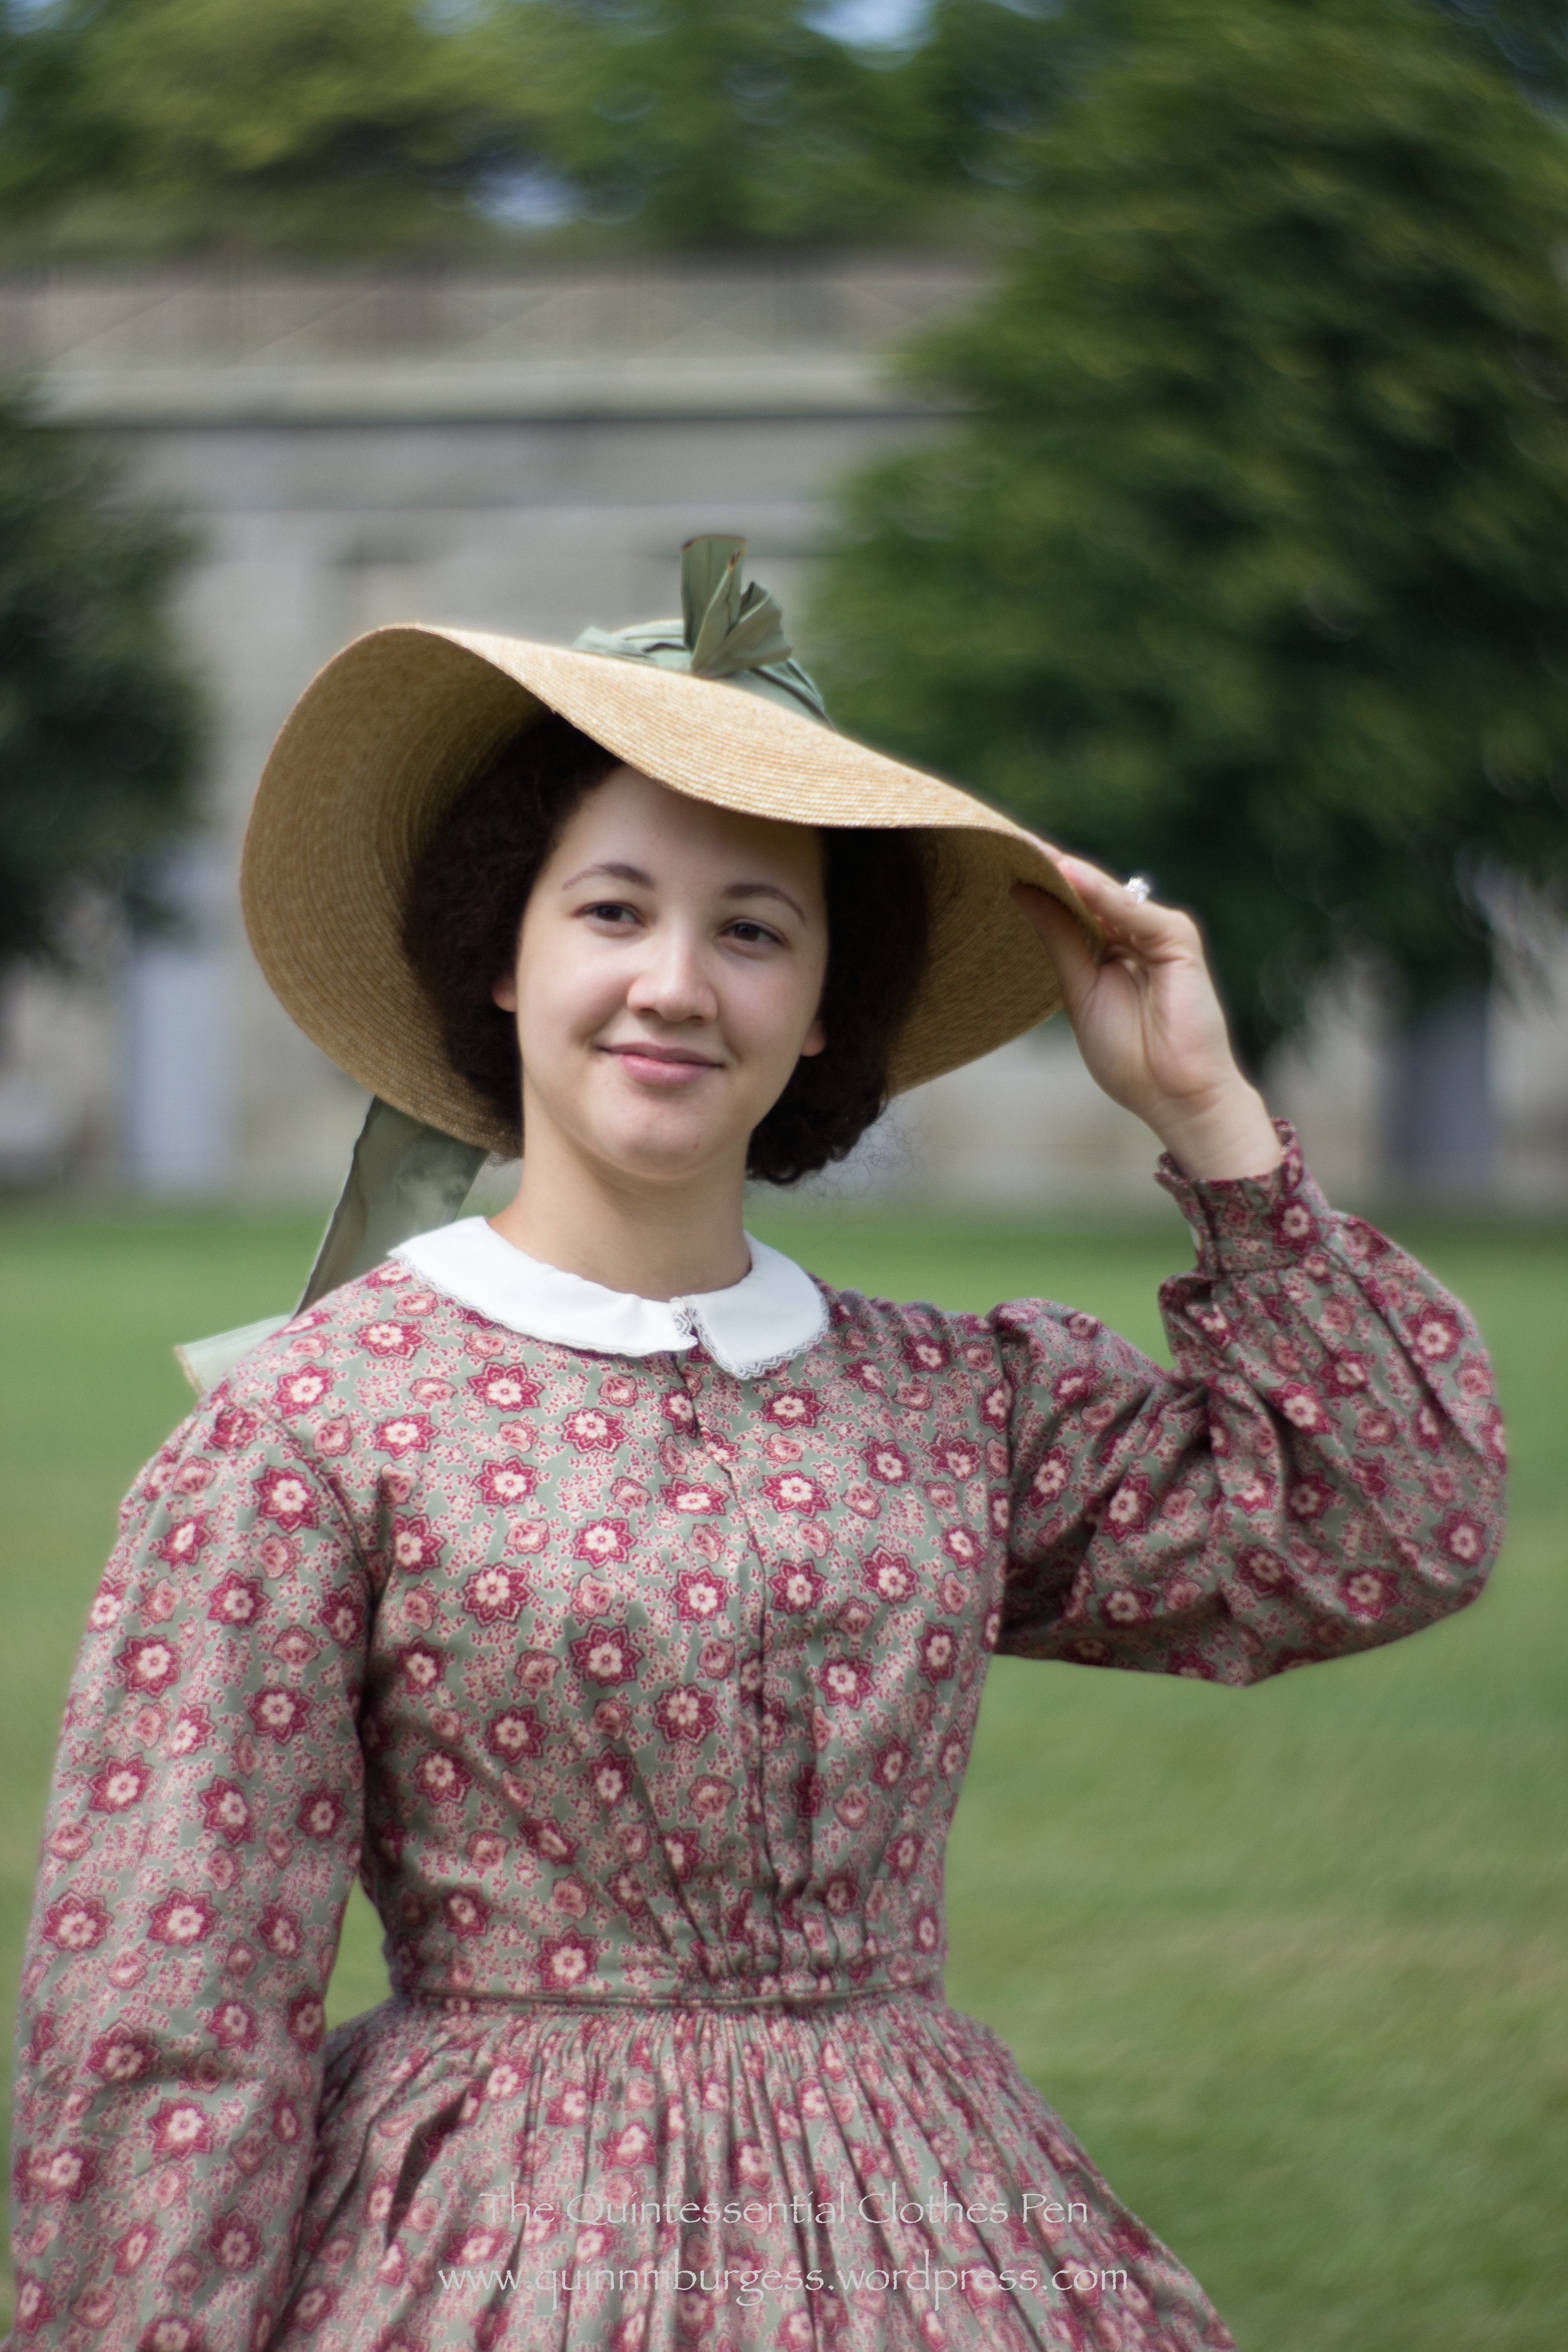
You might recall that last July our vintage dance group performed on George’s Island, in the Boston Harbor, after which we took time to explore the fort located on the island. It was great fun, though super hot, and I was able to wear a new reproduction cotton print dress, named Georgina, and a new straw hat to match.

We performed on George’s Island again this year and were quite thankful that the weather was slightly cloudy and at least 15 degrees cooler than last year! It was a great opportunity for all of us to wear our cotton print day dresses again and it was neat to see the entire dance troupe all wearing cotton dresses with a pattern (no solids to be seen!).

I wore Georgina just as I did last year, the only difference being that I took a little bit of time to make a collar for this year. I had wanted to last year but ran out of time. It seemed more important to have the dress than to have a collar without the dress… But it was entirely feasible this year to add just the small item of the collar and I do think it really completes my outfit quite nicely.

IMG_9688 (1 of 1)
New collar!

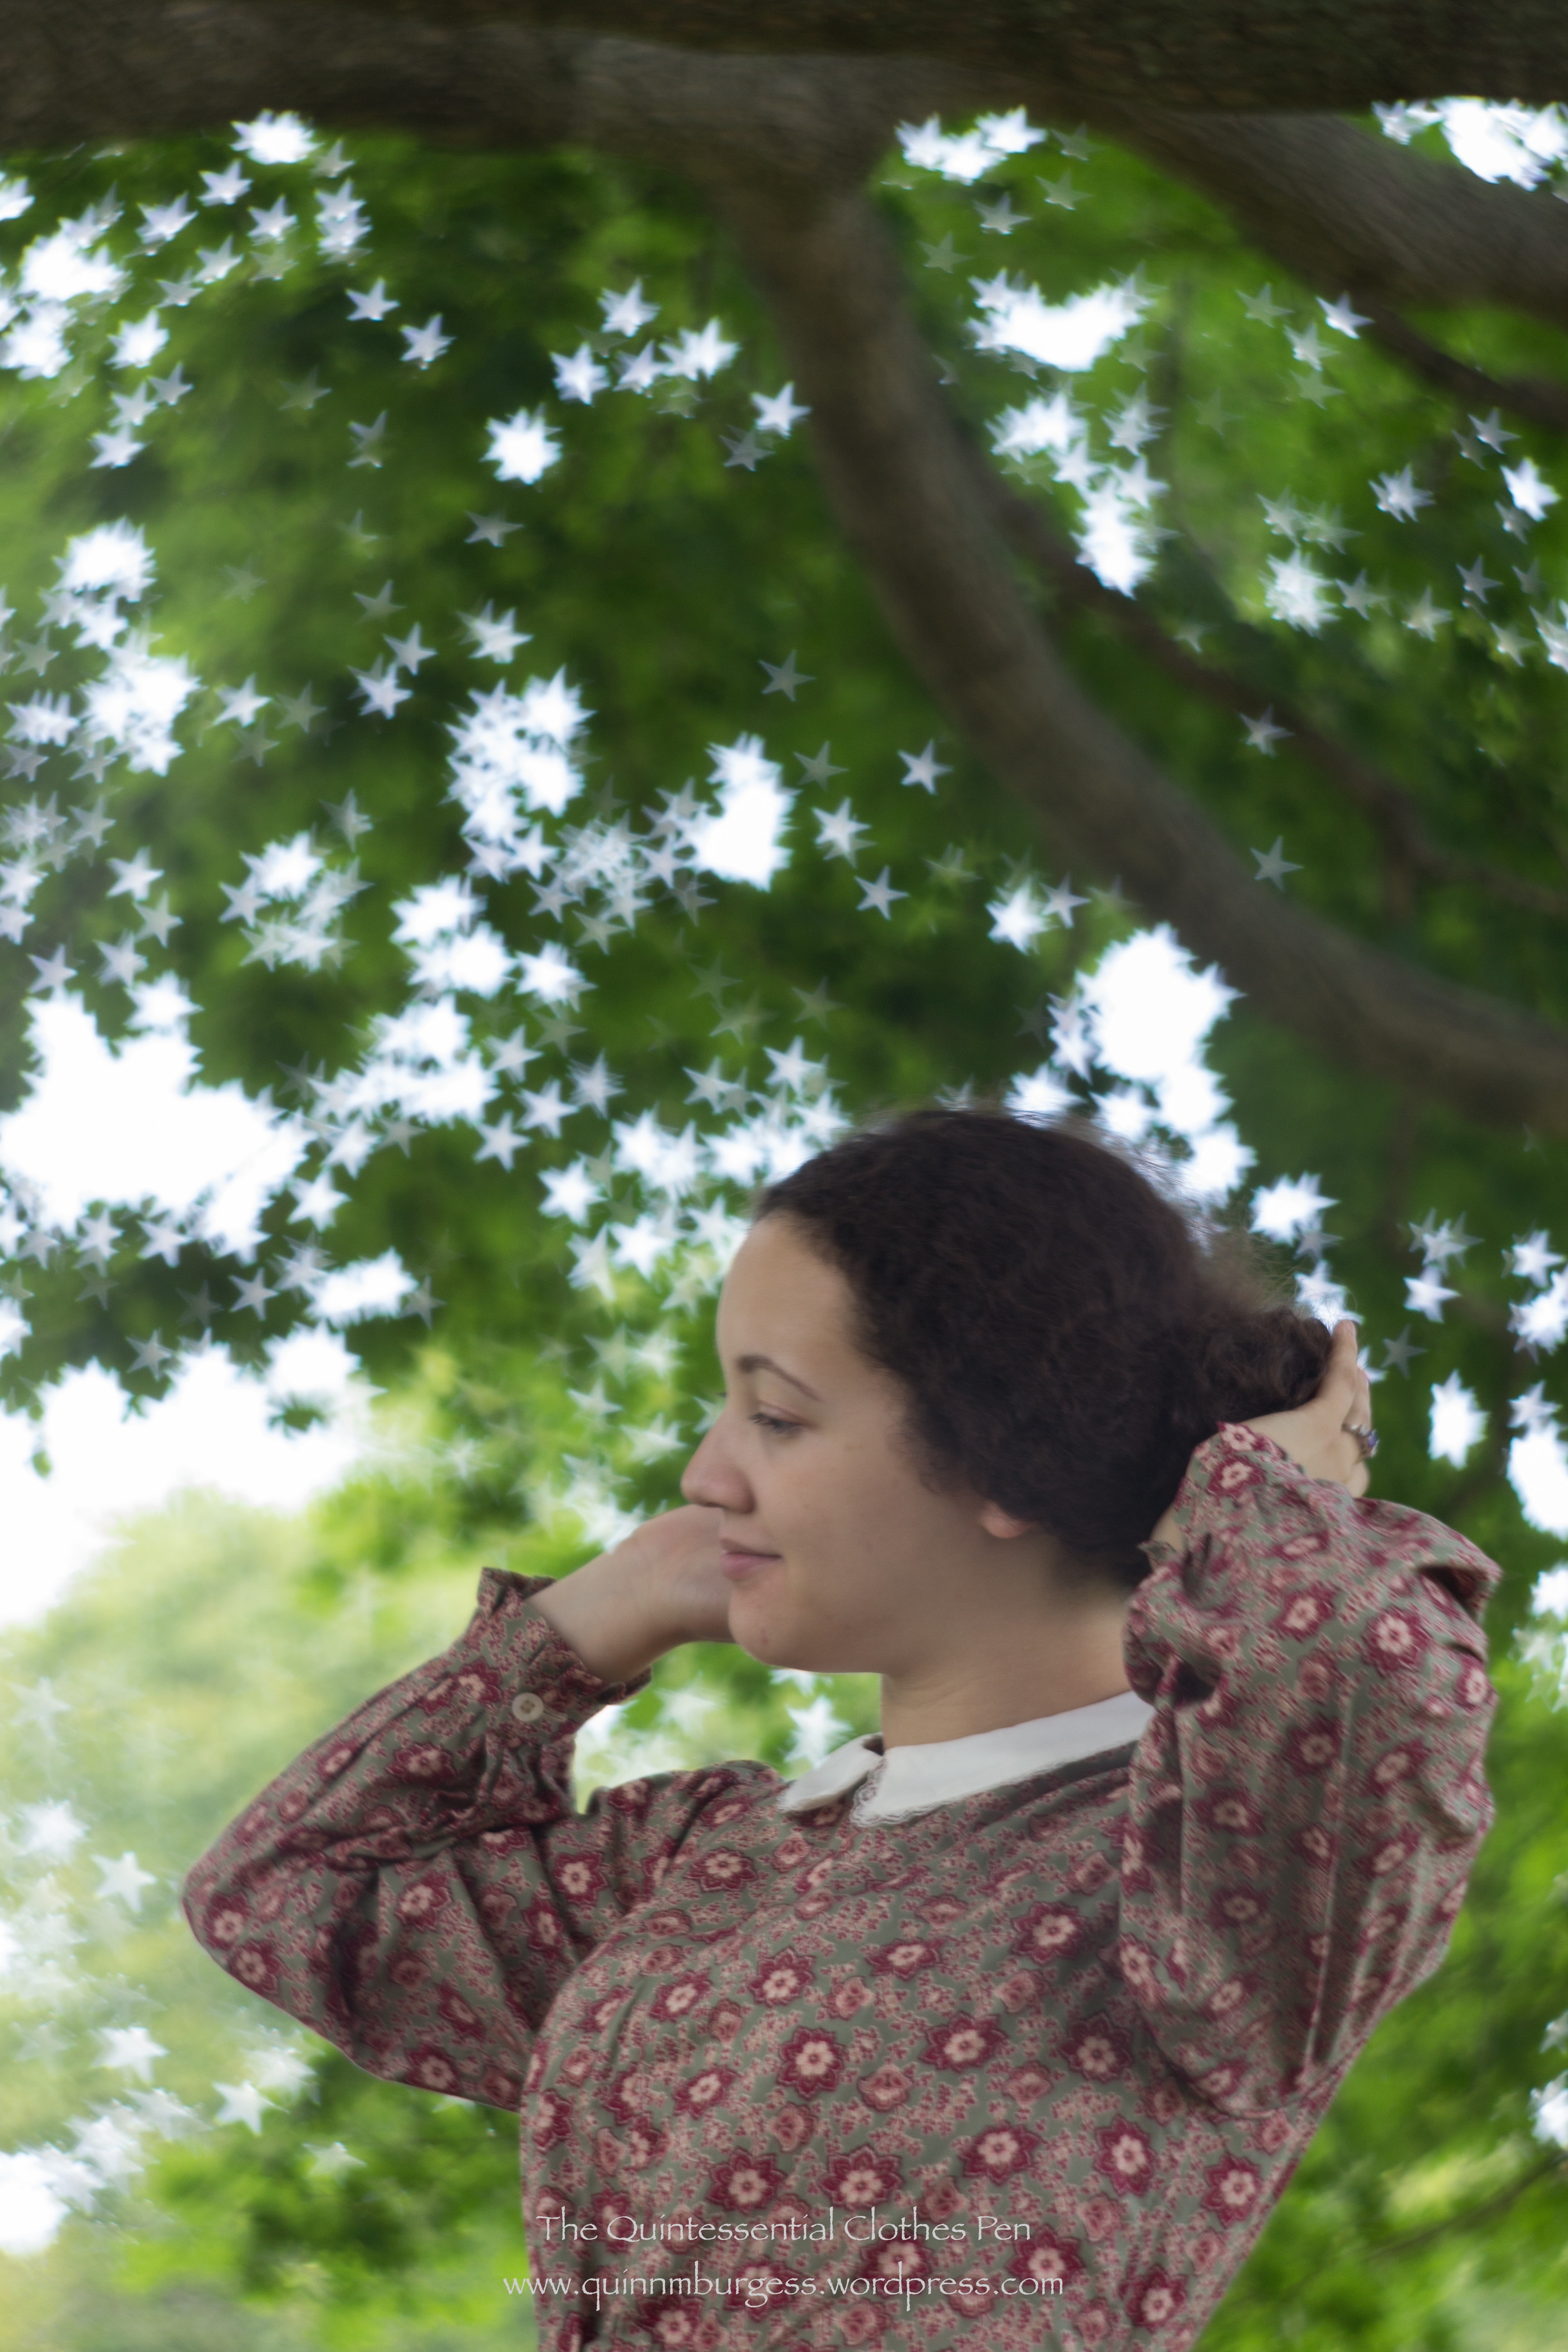
This year, our friend with the camera had purchased a new, special, Petzval lens (you can learn more about it and 19th century photography here at her blog). It’s a modern digital version of a historic lens. I love the pictures it produces! I’ve been told that the background is sort of swirled when the picture is captured, but to me it just looks nicely diffused and out of focus. It’s a lovely contrast to the foreground, which stays nicely in focus. All of these pictures were taken in color, but some of them are much more stunning in black and white.

BW-9698 (1 of 1)
This one captures the breeze and a bit of sun squint…
IMG_9679 (1 of 1)
This one a burst of joy and laughter…
BW-9674 (1 of 1)
This one the tired desire for food during a picnic break…
BW-9684 (1 of 1)
And this one just a simple stroll across the lawn.

This last one made use of a special part of the new lens. There is a piece which can be changed out and which creates the interesting background variations. All of the previous pictures were taken using the piece which blurs the background, but this last one was taken using the piece which causes the light in the background to be star shaped. Isn’t that neat?

IMG_9711 (1 of 1)
Fixing my wind swept and straw hat frizzed hair… with stars in the leaves!

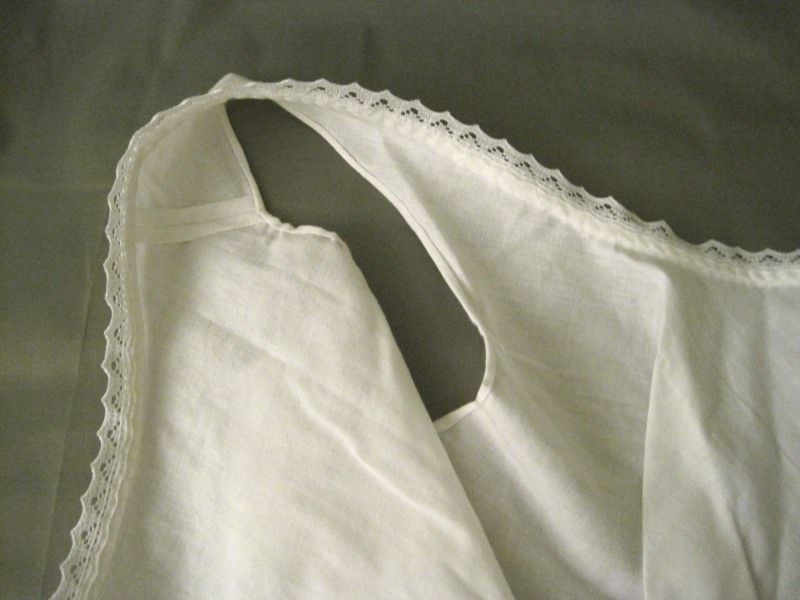
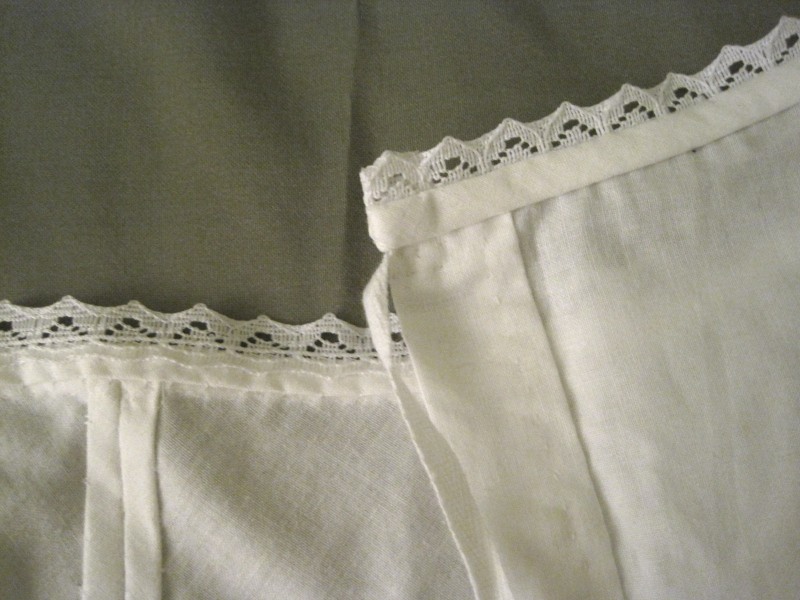
 The collar is constructed from 2 layers of ivory cotton from my small bits stash (at least, it’s likely cotton… I don’t remember where it came from and there was the perfect amount, so I just went with it without knowing the details). It is edged with ivory lace. I made the pattern directly on Georgina’s day bodice so that it would fit the neck perfectly. It’s mostly machine sewn with hand finishing. It is lightly basted on to the piping at the neck edge of the bodice so that I can easily remove it if I want to in the future. I’m quite satisfied. I like the scale, the lace, and I think it adds a nice 1850s touch, completing the ensemble.

HSF #2: UFO

Is there enough alphabet soup for you in the title of this post? In case you’re not familiar with those acronyms, it means that this is a post about the Historical Sew Fortnightly Challenge #2: Un-Finished Object. In this case, the UFO is my 1820s petticoat from the very end of 2012.

You’ll remember that I wore it to Fezziwig’s Ball in December, but that I hadn’t finished the neckline? I’m pleased to say that it is now entirely complete!

IMG_4187
Inside view. This petticoat has three ties at center back to keep it closed.
IMG_4188
You know I like my insides to be pretty. This is a closeup of the arm hole and the neckline, which is bound with bias before having the lace sewn on.
IMG_4189
The double hem on the left is center front. Diagonally across the photo is the right side of the back.
IMG_4190
This cording was done last month, so it’s not really part of the UFO-ness, but it is still an accomplishment. 16 rows of hand sewn cording all around the hem.
IMG_4191
A close-up of the lace at the hem and my tiny stitches.

You can see some more detail shots in this past post.

And the facts?

Fabric: 3 1/2ish yds of white cotton

Pattern: Adapted from my 1822 green ball gown pattern. It’s pretty much exactly the same except that it doesn’t have sleeves. The ball gown pattern is based off of a pattern in Janet Arnold and styled as in the fashion plate you can see in this previous post.

Year: 1820s. The inspiration image is dated 1828-1835. You can see the inspiration image and my reasoning for it being more 1820s than 1830s here, in this past post.

Notions: About 1 1/2 yds of broderie anglaise trim, cut in half the long way to create double length; about 1 yd of white edging lace; and about 1 yd of 1/4″ cotton twill tape.

How historically accurate?: Very, having used modern materials. The pattern is from Janet Arnold, so you know it is good on accuracy. The entire petticoat is hand sewn and made of accurate fabric. The lace is machine made and the content is almost certainly not entirely accurate, but it is in the style of the early 19th century and the lace in the inspiration image. I’m not 100% sure that all of my seam finishes are perfectly accurate for this garment, but they are accurate for the period as a whole.

Hours to complete: I’m always bad at estimating this. Let’s say 120 hours.

First worn: To Fezziwig’s Ball in December 2012.

Total cost: Approzimately $13.

HSF #1: 1813 Evening Gown

IMG_4162
1813 Evening Gown

Historical Sew Fortnightly (HSF) Challenge #1 complete! It was actually completed a few days ago, which I am super pleased about. Even better is that it is for a Regency ball in February, and it is entirely complete a full month ahead of time! All the trim, all the closures, everything! All I have to do on the day of the ball is put it on. Wow! Usually when I wear a new dress to a ball I’m furiously sewing right up until the end and often all the trim doesn’t make it on (that’s what happened with my 1820s green dress back in December, remember?).

The facts:

Fabric: 4 yds red and black shot polyester

Pattern: The bodice front was draped, the back was adapted from my 1812 square neck Ikea gown, and the skirt is the same as the 1812 square neck Ikea gown, with the pattern originally from Janet Arnold’s Patterns of Fashion

Year: 1813

Notions: 3 yds metallic gold bobbin lace, hooks, and little brooch bits

How historically accurate?: The silhouette, cut, and style are accurate, as is the interior finishing (all flat felled and bound edges… it’s quite pretty!). The fabric is obviously not accurate and neither is the lace fiber content, though the style of it is. The closure is accurate. The little brooch bits are accurate in style, though not in materials.

Hours to complete: I’m so bad at estimating this. Let’s say 48 hours.

First worn: Hasn’t been worn yet! Its first wear will be in February 2013.

Total cost: Approximately $26

Now for other details!

Well, first, here’s a closeup of the bodice, so you can actually see the details and the little brooch bits. I’m super pleased with them, because I think they really finish off the bodice and add a little extra touch. I got them from New York and Company, actually. They were part of triple drop earrings, which I took apart. I kept the bottom drop and put them on clip backs (so now I have matching earrings for the dress!) which you can see in the picture below. And the best part is that one of the sections had a missing gem, so the cost of the earrings was refunded by NY&Co and so the total cost of the earrings is $0! Awesome! (It worked out perfectly, because I only used 5 sections of the triple drop earrings, so the damaged one wasn’t a problem.) Of course, the materials used in the earrings are not at all historically accurate, but I’m ok with that, for the cost (yay!) and the fact that they do have the right look.

IMG_4170
Little brooch bits!
IMG_4169
Single drop! Clips! Perfect!

And here’s the back. As you can see, it doesn’t quite fit Squishy in the back, but it shouldn’t have trouble fitting me. I love the drape of the fabric! Now that all the raw edges are enclosed and the polyester can’t fray everywhere, I am totally happy with the fabric choice (bargain!). The photos don’t really do justice to the fabulous gold lace at the hem.

IMG_4164
Aren’t those gathers and folds lovely?!?

The dress is entirely hand finished and mostly hand sewn. Originally, I was going to make it all by machine, but then I had sewing parties and things that required hand sewing, and I just didn’t feel like lugging out the machine, so I wound up hand sewing a lot of it, which was quite satisfying. There’s one side back seam sewn my machine, I think the long skirt seams are sewn by machine (though I can’t remember, because I started this dress back in October or November), and the waistband was sewn by machine. Actually, it was so much easier to keep the width consistent using the machine than when sewing it by hand.

The only other information to share is my inspiration for the dress.

19562579602239981_TEw2UjIU_c
For her neckline and sleeves: Comtesse de Tournon by Ingres, 1812.
131378514099875826_v9iatcAj_c
Another neckline inspiration: L’Art de vivre au temps de Josephine.
1810-gold-mccord
For the overall silhouette and the trim style: 1810.
12-501052
One more neckline inspiration and another similar dress built by Natalie Garbett. Here is her post about her 1812 gown with a v neck.

Clearly, I need a Kashmir shawl to complete the ensemble… I have a pashmina that sort of looks the part, so I’ll have to try that out at the ball. Stay tuned for more pictures of this dress in about a month!

Edwardian Gown Eye Candy

This fabulous vintage Edwardian dress was recently brought to my attention by one of you fabulous readers. It is for sale on eBay for $2,250! I certainly won’t be purchasing this original, but I absolutely think it is something to add to my body of inspirational images of clothing for future projects… The seller has included many pictures of the dress as well as background information on the dressmaker and a detailed description of the garment. I have included some of that information in addition to pictures for you to view here in this post.

The lace is exquisite! The rhinestones add even more sparkle! I love that there are pictures which show the closures and construction details. I classify this gown as “drool-worthy.” What do you think? Do you like it? Or not? Why?

Some of the information from the eBay seller, labellevintage_inc:

“This was created by Mrs. Catherine Donovan who was originally from Ireland (b.1826) and studied fashion in Paris. She owned the couture shop “MRS. C. DONOVAN & CO” which was located at 29 East 55th St.in New York. Her dresses in 1910 were billed at $100 and up which was extravagant as a gown from her would cost over $4,000 today!

Many of her garments are found in Museums throughout the world. There are 4 dresses at the Metropolitan Museum of Art alone. But the detailing and workmanship of these garments are worth every penny in my opinion.

FABRIC:
This is made of peach satin (formerly peach silk) and covered in exquisite ivory lace with re-embroidered patterns done with silk thread. The lace gives hints of Orientalism (which was made popular by Paul Poiret ) with its Royal Pavillion shapes on the back panels. The rosette and belt details are done in peach silk.

This enchanting garment features a fitted satin strapless bodice covered with a blouson bodice of lace. The bodice features a low square neckline and the dolman sleeves are short. Both the neckline and arms are decorated with cream glass and gold painted cut steel beads. There is an inner netted bodice which helps with the weight of the dress.

The empire waist is decorated with a ruched sash which is adorned with rhinestones, each individually sewn on a gold lame’ backing in the shape of a buckle.

The straight satin skirt is covered in two tiers of lace at the front. Each tier is decorated with cream glass beads and gold steel cut beads in a chevron shape. The tier is separated with a silk band featuring a large silk rosette. The top tier is adorned with crystal cut glass beads around the hemline.

The back has a surplice detail on the bodice with the silk band closing at the back decorated with more rhinestones.

The lace skirt is made of 3 tiers with one extra panel which attaches to the finger as a drape or can be left hanging as a short train. The top tier and second tier are both decorated with crystal cut glass beads.

This closes with several snaps, hook & eyes and tiny crochet buttons at the back.”

Thank you, Kimberly, for bringing this dress to my attention!

Titanic Weekend Part II: All About The New 1912 Day Ensemble

We took a rather in-depth look at my new 1912 evening gown. Now, on to the second 1912 ensemble that I also wore during the weekend: day gown and hat!

Gown and hat with (unbuttoned...) white kid opera gloves. I'm so pleased with the overall effect! Unfortunately, I don't have pictures of the back. There are cool details back there, so another fashion shoot will be required in the future...

This gown is constructed from silk charmeuse. The skirt is a single layer in addition to the overskirt panel in front. The bodice has a foundation of the same white cotton as my new evening gown. Mounted on to that cotton are (from the neck down) layers of ivory silk charmeuse, ivory silk flat lined with fabulous ivory colored diamond lace, black silk velvet, and black silk charmeuse. The overskirt panel is trimmed with matching silk velvet and the belt is constructed of the same. There are small buttons on the overskirt velvet trim (because, really, the Edwardians just loved adding buttons everywhere!). Because the back bodice mirrors the front in its style (which unfortunately I don’t have a picture of right now…), I had to be crafty with my closures. The dress has two places that open with hooks and bars: the left side from just under the arm to a few inches down the hip and the left shoulder seam around the neck to the center back of the collar. The effect is a form fitting dress that looks like it was magically donned. The side closure is straight forward, with the foundation layer hooking first, to take the tension of holding the dress tight, and the outer charmeuse layer hooking over that simply to stay closed. Again, the foundation is essential to achieving the elegant, effortless exterior. The neck closure is a series of hook and bars that turn different directions to accommodate the seams: front to back at the shoulder, hooks that hook up on the collar to attach it to the back neck, and hooks going sideways on the center back of the collar.

In addition to the gown, I also constructed what I call the “mushroom” hat, which you can read more about in this previous post. I created the pattern for the hat, which is basically just a shaped brim with circular side band. The side band support the crown, which is a circle that is pleated to create that “mushroom” shape. I love the hat! It lends such an air of Edwardian drama and elegance to the look! And I am so pleased the the “mushroom” shape worked out!

Hm… Patterning this dress… Well, the general skirt shape is from Janet Arnold, but it is adapted to have two symmetrical box pleats that terminate at the top in delightfully detailed seams (which I really, really need pictures of!). The bodice pattern was draped with many references to my inspiration image. I created a basic shape for the bodice and then cut in into the different pieces (ivory silk, ivory silk and lace, black velvet, and black charmeuse) so that each piece would fit together perfectly. The belt is slightly shaped but doesn’t actually have a pattern.

The dress is inspired by this image from a 1910 issue of the magazine Bon Ton.

I'm sure you can guess, but the dress I was referring to is the one on the right.

In the end I made a few changes: I added a train, discarded the white under sleeves (I made them, I tried them, and they just didn’t work! They pulled the bodice in all sorts of weird ways… Maybe if the were not so tight they wouldn’t pull so much? I am fine with having gloves cover my lower arms, anyway.), and drastically scaled back the beading. Perhaps you’ll remember my plan to bead this dress? Well, the beading was drastically scaled back because I didn’t like the beads I bought as much as I thought I would (they are rectangular and larger than I thought… not seed bead-y at all), I realized I didn’t want to devote as much time as it would take to do the amount of beading I originally intended, I didn’t have enough beads to bead all four panels as much as the one panel I completed and I didn’t want to buy more beads, and I didn’t like the beading motif I had created, nor was I inspired to change it. You can see that I did leave one outline shape of beading on the bodice in the velvet section, but the rest was scrapped. That one line is repeated front and back (symmetry, you know). I did actually complete the overskirt top panel, but decided not to use it after my scaling back plan was complete (you can see it, below). I’m going to keep the beaded panel and see if it finds its way onto another project one day… I would still love to do intense beading on a garment, but I’ll have to pick a different one, because it wasn’t measuring up to my expectations for this dress.

Scrapped beaded panel. A mix of silvery and black beads. I started in the center with the somewhat wonky lines, can you see improvement? I think it would have been distracting from the dress to have four panels like this.

Project Journal: 1815-1820 Regency Ensemble Part VIII: Re-Trimming the Bonnet

As with the 1819 ivory gown, the bonnet that is part of my late Regency look has also been remade from its original style. Why re-make it, you might ask?

Though the bonnet was based off of an 1819 illustration in Cunnington’s English Women’s Clothing the Nineteenth Century, it was built for use in the theatre, so the materials used to trim it are nowhere near accurate for off stage use. However, the shape and placement of the trim was accuratly reproduced from the inspiration image and that fact made the re-trimming possible, because the base of the bonnet could remain unchanged!

Before: The bonnet before re-trimming

The original trim was entirely polyester, which stands out when placed with other, more accurate garments and in natural light (rather than stage lighting). The color scheme was pink and peach fabric manipulated in various ways: the flowers were pinked and gathered lengths of polyester fabric, the ribbons were bias cut polyester fabric, the inside of the brim was lined with pink polyester shantung, and the brim was edged with white polyester lace. Aside from the polyester problem, the pink color scheme would not match my darling new spencer, which is brown and green. It’s not that the colors would clash, it’s just that they would look like they were not intended for each other… and I really wanted a coherent, matching look to my ensemble.

And After: The re-trimmed bonnet with matching spencer

I removed all of the fabric flowers, the bias ribbon trim, the lace edging and the lining. The lining was replaced with green silk shantung to match the new bonnet trimmings and the spencer while the lace edging was changed to light brown vintage cotton lace that matches the lace used on the spencer. The flowers were replaced with millinery flowers in green and light brown from my stash. I decided to use the spark of orangey-brown near the top so that the bonnet wasn’t too matchy-matchy. The ribbon was changed out for a matching green ribbon that has narrow bands of gold along the edges (I confess it is still polyester… but I like the look of it and I didn’t have enough of my matching green silk satin ribbon to use it, nor did I like the shine of the satin with the green of the flowers). And voila! A bonnet that now is the right shape and has the right trimmings to match my Regency ensemble!

You can see the green bonnet lining here

Project Journal: 1815-1820 Regency Ensemble Part V: Completed Spencer (Massachusetts Costumers Regency Holiday Tea)

In the greenhouses at the Regency Holiday Tea.

Despite the long name of this post… Here it is! My (almost) finished 1819 Regency Ensemble! The ensemble includes an early 19th century white linen chemise, 1815-1820 pink cotton corset, 1815-1825 ivory cotton gown, 1819 brown velvet Spencer, 1819 straw bonnet, and mid-19th century fur muff (ok, so it’s not quite as giant and droopy as a Regency muff… but it was cold outside!). You can click on the links to see more about each piece. There is more to come on the gown and bonnet.

Right now I want to focus on the completed Spencer and its details. Please click on the link above to see my research for the Spencer: it is based off a Spencer at the Metropolitan Museum of Art. You can see pictures of the mockup Spencer here. The Spencer is constructed of brown cotton velvet that is flatlined with white cotton. It is trimmed with green cotton cording, vintage brown lace, and green tassels to match (Aren’t the tassels so adorable?).

1819 Spencer
Back of the 1819 Spencer

I wore this Spencer to the Massachusetts Costumers annual Regency Holiday Tea. This year, in addition to having tea, we visited the Lyman Estates Greenhouses, which were built in 1804 and added to in 1820, 1840, and 1930.

On to see more of the greenhouses
Ornaments hanging from a tree!
Picture time!
Admiring the decor
So many beautiful things to look at

The tea was lovely and I do believe that my Spencer turned out wonderfully! Spencers are so adorable and varied. I hope to make more in the future… but there are other things to do before I go back to Spencers. The next big push is going to be Edwardian outfits for Titantic evens in April!

Vintage Lace! (for sale on Etsy)

This Etsy shop (empireroom) has wonderful vintage lace for sale by the yard! The prices are very low and even better for bulk lace (over 20 yards). The seller, Jayne, has been quite helpful in providing me with information about bulk pricing and quantities. The only down side is that she is in Australia, so shipping is slightly expensive. But you should check out her selection anyway!

I have found other lace sources that have lower prices, but not for vintage lace! Usually the low prices are only for modern made lace, which means that a distinct measure of discernment is needed to choose lace that is the right scale, color, and pliability for the project.

Most of the lace listed on this site would work very well for a reproduction 19th century garment, I think. I can especially envision an Edwardian skirt or blouse embellished with some of this lace as edging or insertion, but I can also envision the lace being used to trim undergarments such as petticoats or chemises.

Of flounces and dance cards: Part I

PART I: Of flounces…

Flounced 1860s dresses seem to be pure confections: cupcakes iced with lace and frothy ruffles. That is the vision in my mind while I was looking for inspiration for my latest crinoline dress.

Fashion Plate from Godey's Lady's Book September 1859 "Dressed for a Party." (The dress on the right is the inspiration for my latest gown)

I already made one 1860s dress for myself. Named Belle, it is a dark blue satin and velvet gown with a three tiered skirt. It’s very heavy and a dark color: neither of those two features seemed fitting for a summer ball in temperatures around 80 degrees! And so I decided to create an all new gown… in my head this one is named “Annabelle.” (I hope you are also amused by the name!)

"Annabelle" my new 1860s ball gown

As you can see, there is one crucial element missing… the pink flowers! My goal is to make the flowers by hand from silk organza and to be perfectly honest, I ran out of time. I just decided to wear the dress as-is and finish the flowers later. I also ran out of time to bone the front, as you can see by the wrinkles along my tummy. No worries though, as I’m sure I’ll be able to wear this gown again.

"May I have this dance?" Side view of Annabelle.

In order to be to light and breathable, Annabelle is constructed entirely of cotton. The skirt has a medium weight cotton foundation to which cotton voile flounces are attached. The bodice is three layers of cotton for the sake of being opaque: two of medium weight cotton and one layer of voile. The layers are flatlined together and treated as one piece. The flounces on the skirt and bodice are cotton voile edged in narrow white lace.

This gown was flat patterned using research from books by Janet Arnold, Norah Waugh, and Kristina Harris.  View this post about patterning from my Project Journal: Women’s Tailoring to see which titles I used and get a smidgeon of bibliographic information. The skirt pattern is fairly simple: a big tube cartridge pleated at the waist. The bodice has narrow v-shape seams front and back with puffed sleeves and a flounced bertha. It is worn over a chemise, corset, double thickness bum pad, hoops, and petticoat.

While this dress is eventually intended to be a reconstruction of the dress in the 1859 fashion plate above, I was also inspired by these other, similar fashion plates for further information. Enjoy!

Fashion Plate from Godey's Lady's Book October 1859 "The Soiree"
Fashion Plate from Godey's Lady's Book August 1859 "Godey's Fashions for August"

Bolero jackets of the 20th century: 1900-1909

A few posts ago, we took a look at Bolero jackets from the mid-19th century. Let’s look at them  in another context: Boleros from the early 20th century, with a hint of information from the 1890s as well.

1904 Dress with Bolero

What exactly is a Bolero jacket? The Oxford English Dictionary defines it as “A short jacket, coming barely to the waist; worn by men in Spain; applied to a similar garment worn  by women elsewhere, usually over a blouse or bodice.” This definition condenses the influence and origination of the Bolero down quite eloquently (of course, it is the job of the OED to eloquently distill all words down to a concise definition… but still, I do like this definition). The men’s style Spanish Bolero, with elaborate braiding and bright colors, influenced the style of women’s Boleros from the Victorian period. The following quotes from the OED provide more insight into the history of the Bolero (they also mention other styles of short jackets including the Zouave and the Eton).

“1892    Daily News 14 Nov. 6/3   The Zouave is as great a favourite as it has been for some seasons, and though it varies in form—being sometimes a bolero, sometimes a toreador, and sometimes a cross between an Eton jacket and a Zouave.
1893    Daily News 1 Apr. 2/4   The Zouave is quite as popular as it was last year.‥ Sometimes it is pure bolero.
1893    Lady 17 Aug. 178/1   Zouave Bodices are a feature of autumn gowns. (in the Zouave definition)
1899    Westm. Gaz. 6 July 3/2   Robbing the coat of its basque has created‥the bolero corsage, really an actual bodice, though appearing a bolero coat and skirt.”

The flared skirt and small waist silhouette of women’s clothing during the first decade of the 20th century was well suited to the style of Bolero jackets, as they could help to visually balance the figure by adding just a small amount of width across the chest and shoulders.  Here are a few Boleros from the Metropolitan Museum of Art. One is silk velvet, elaborately trimmed. The other is lace. Can you imagine the dresses that would have accompanied these Boleros? Clearly, they were intended for different purposes. Perhaps the first was intended for evening wear and the second for an afternoon stroll or visiting friends?

c. 1905 Bolero from the Metropolitan Museum of Art
c. 1907 Bolero from the Metropolitan Museum of Art