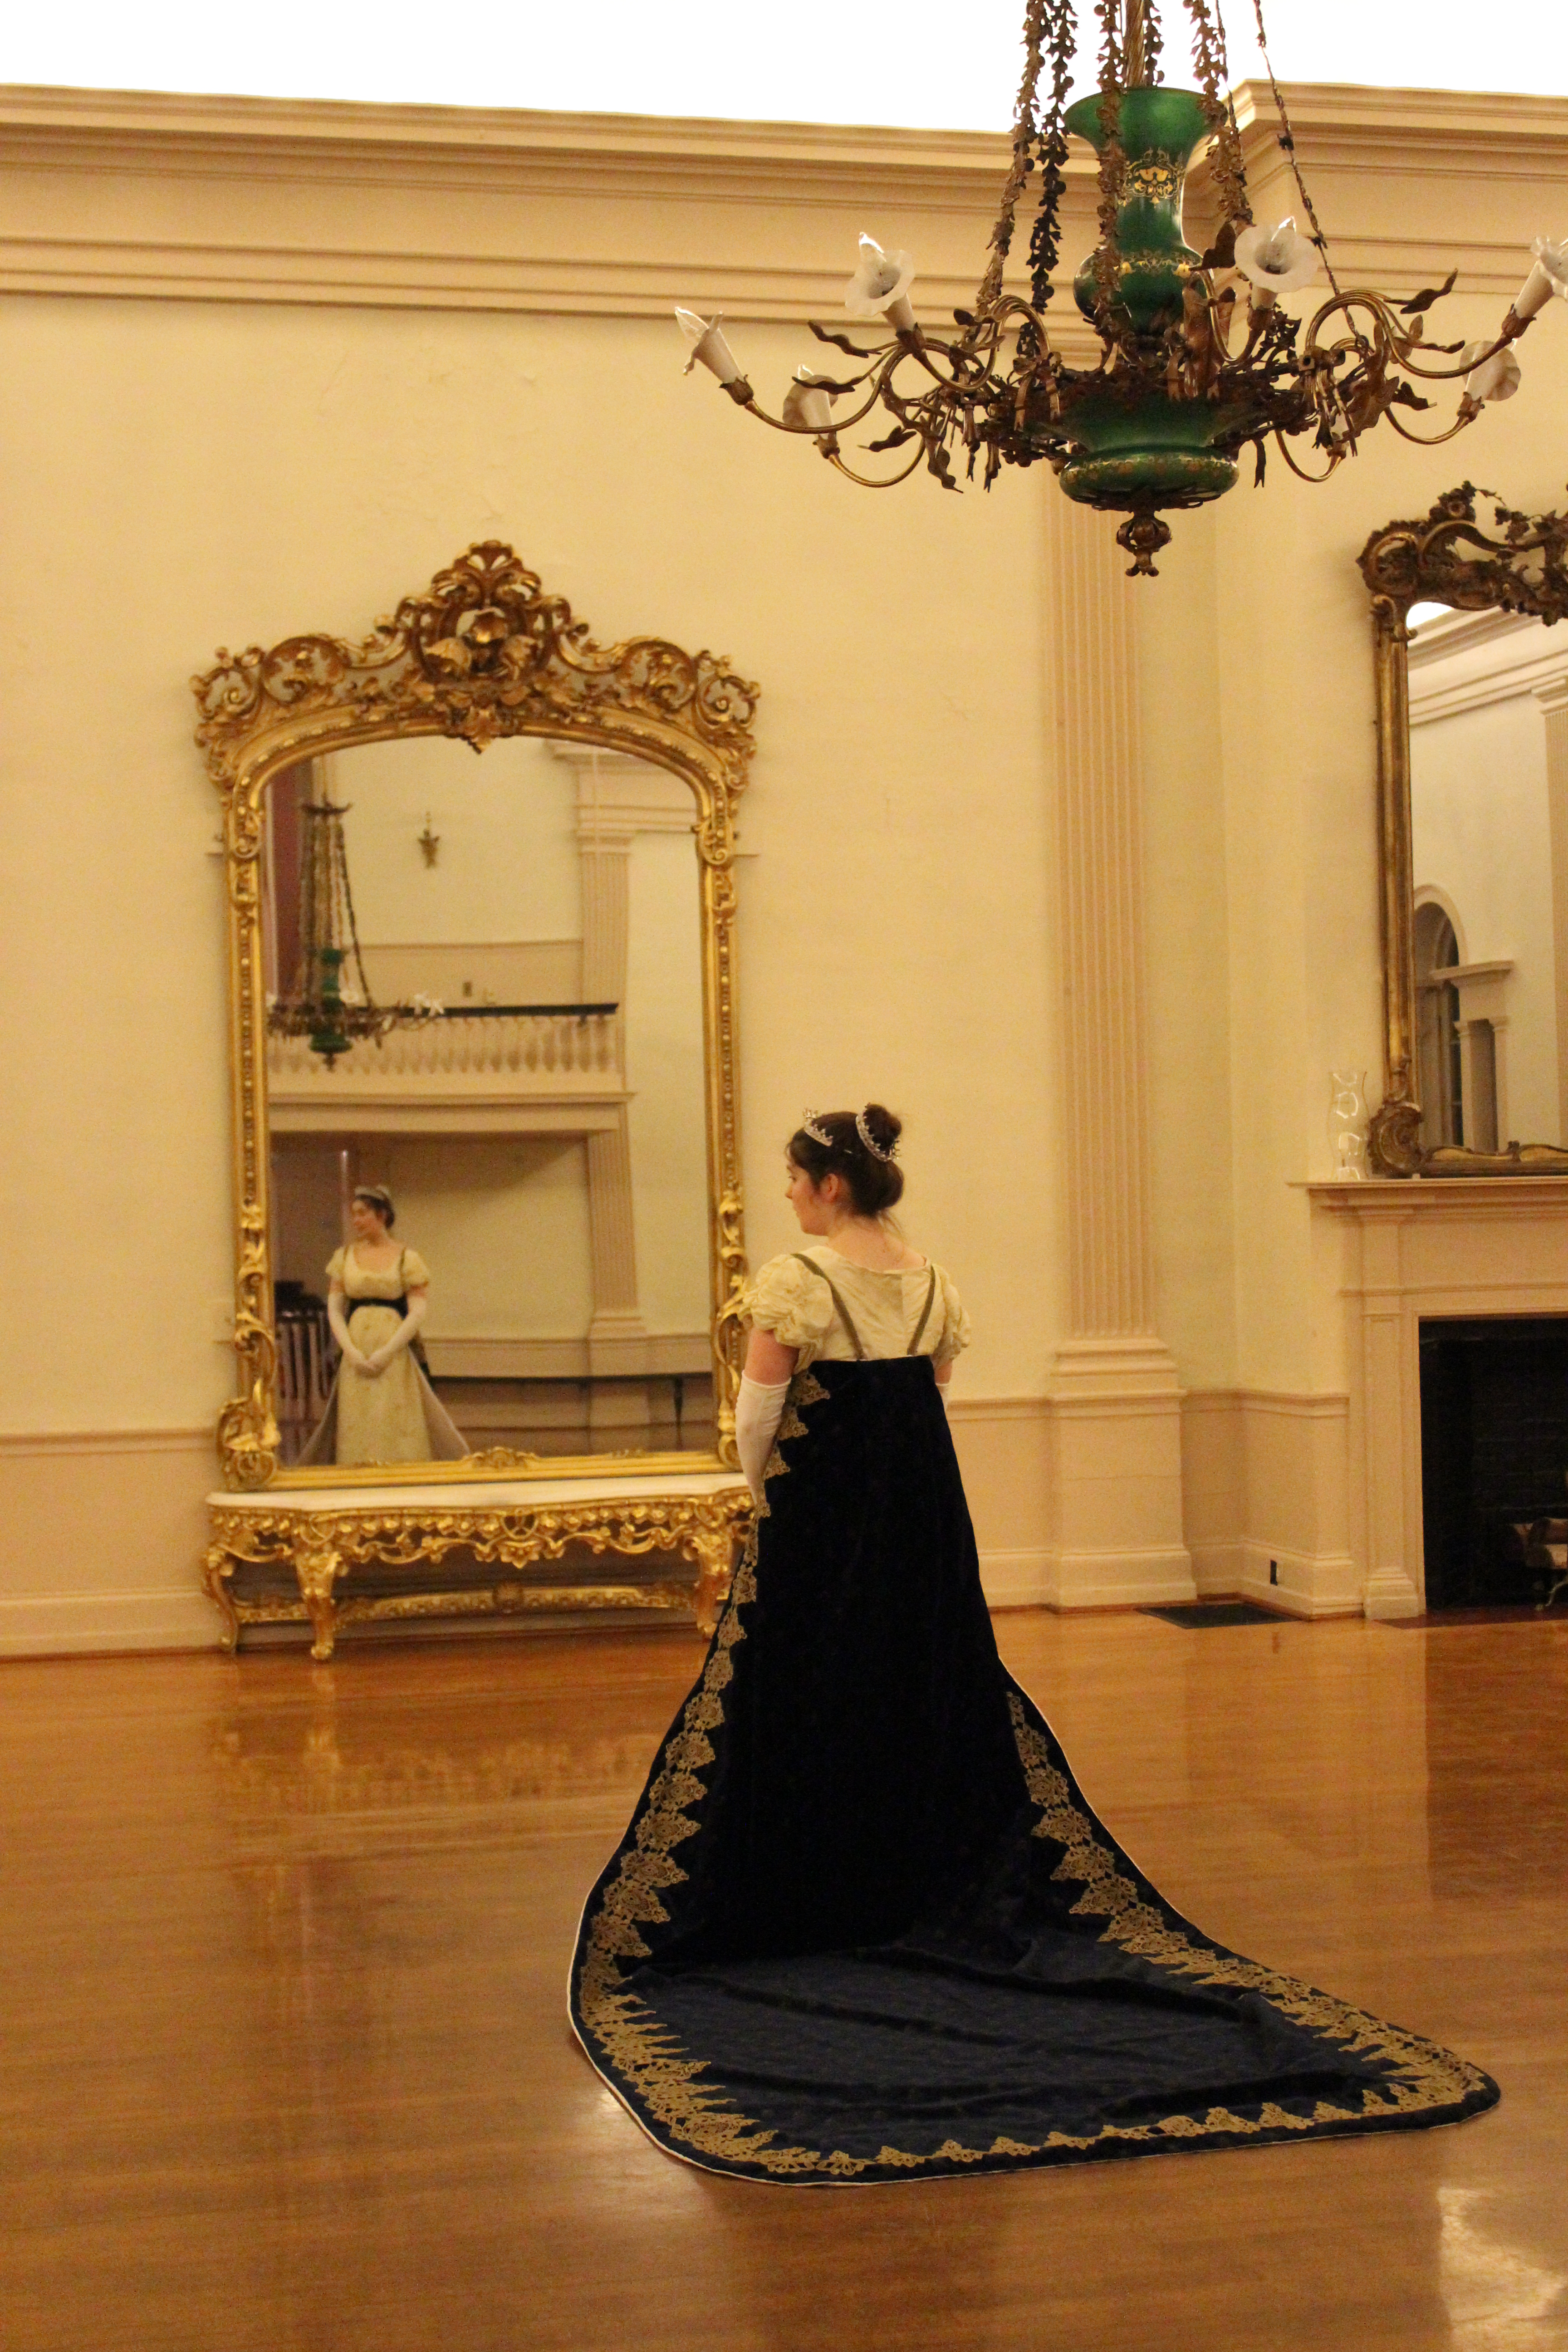
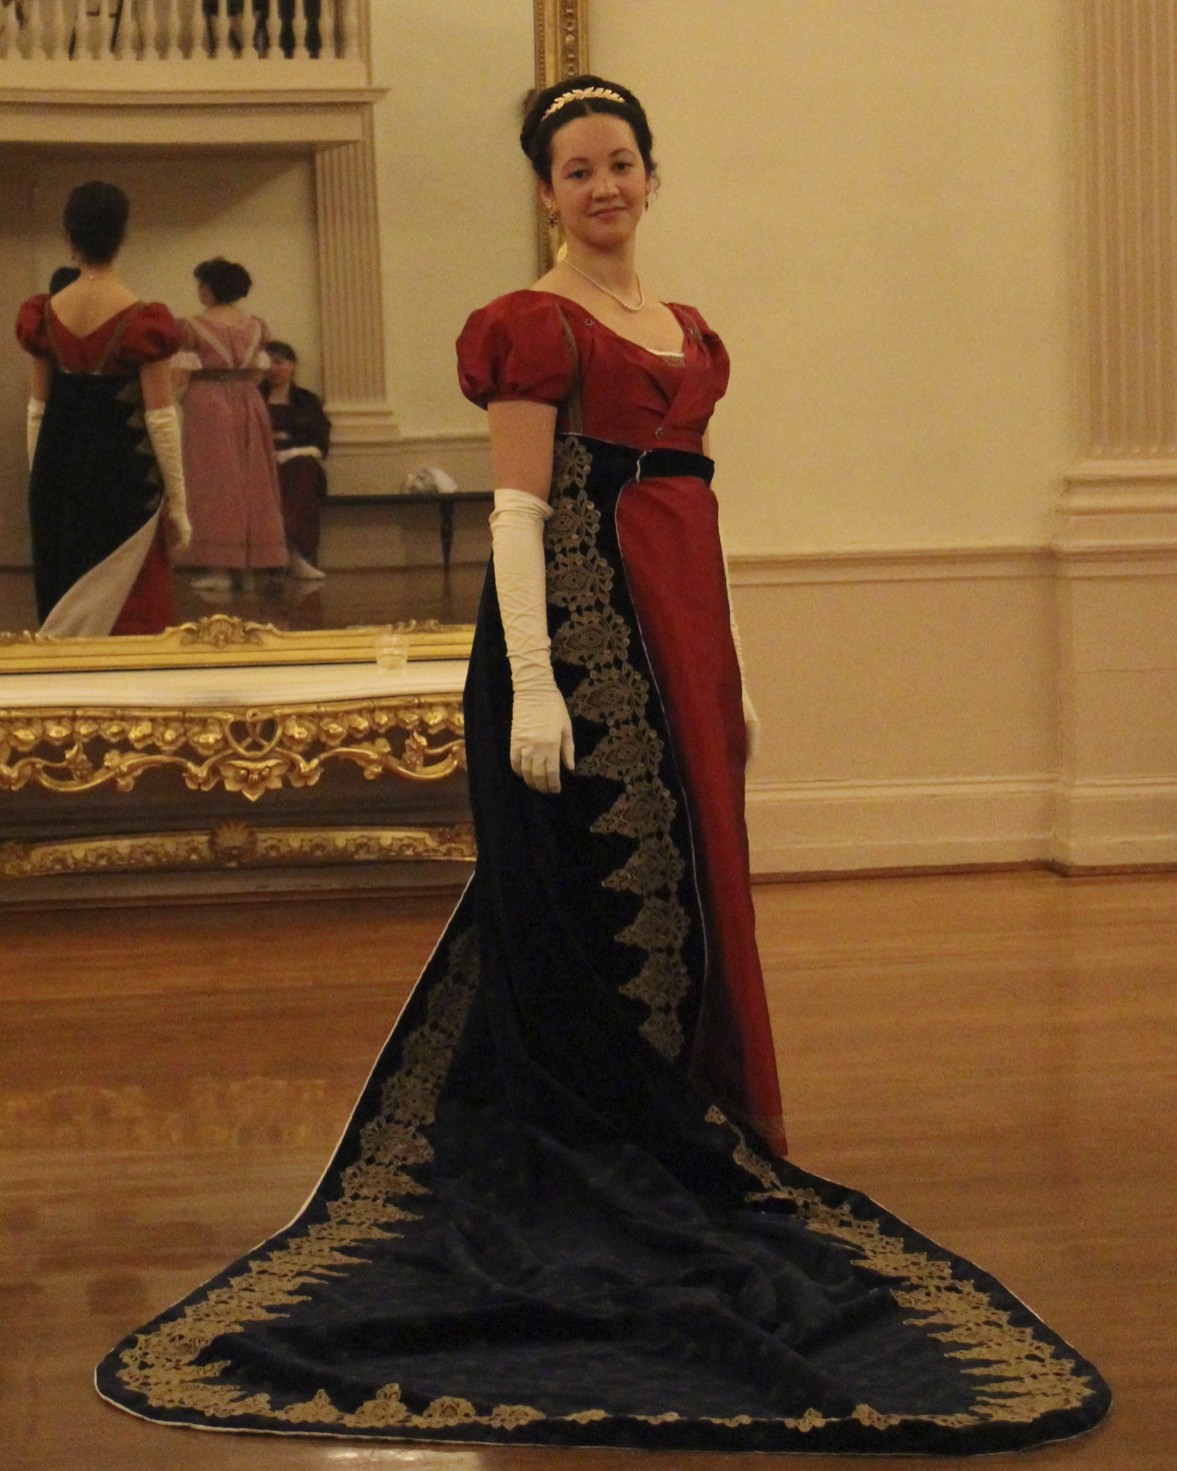
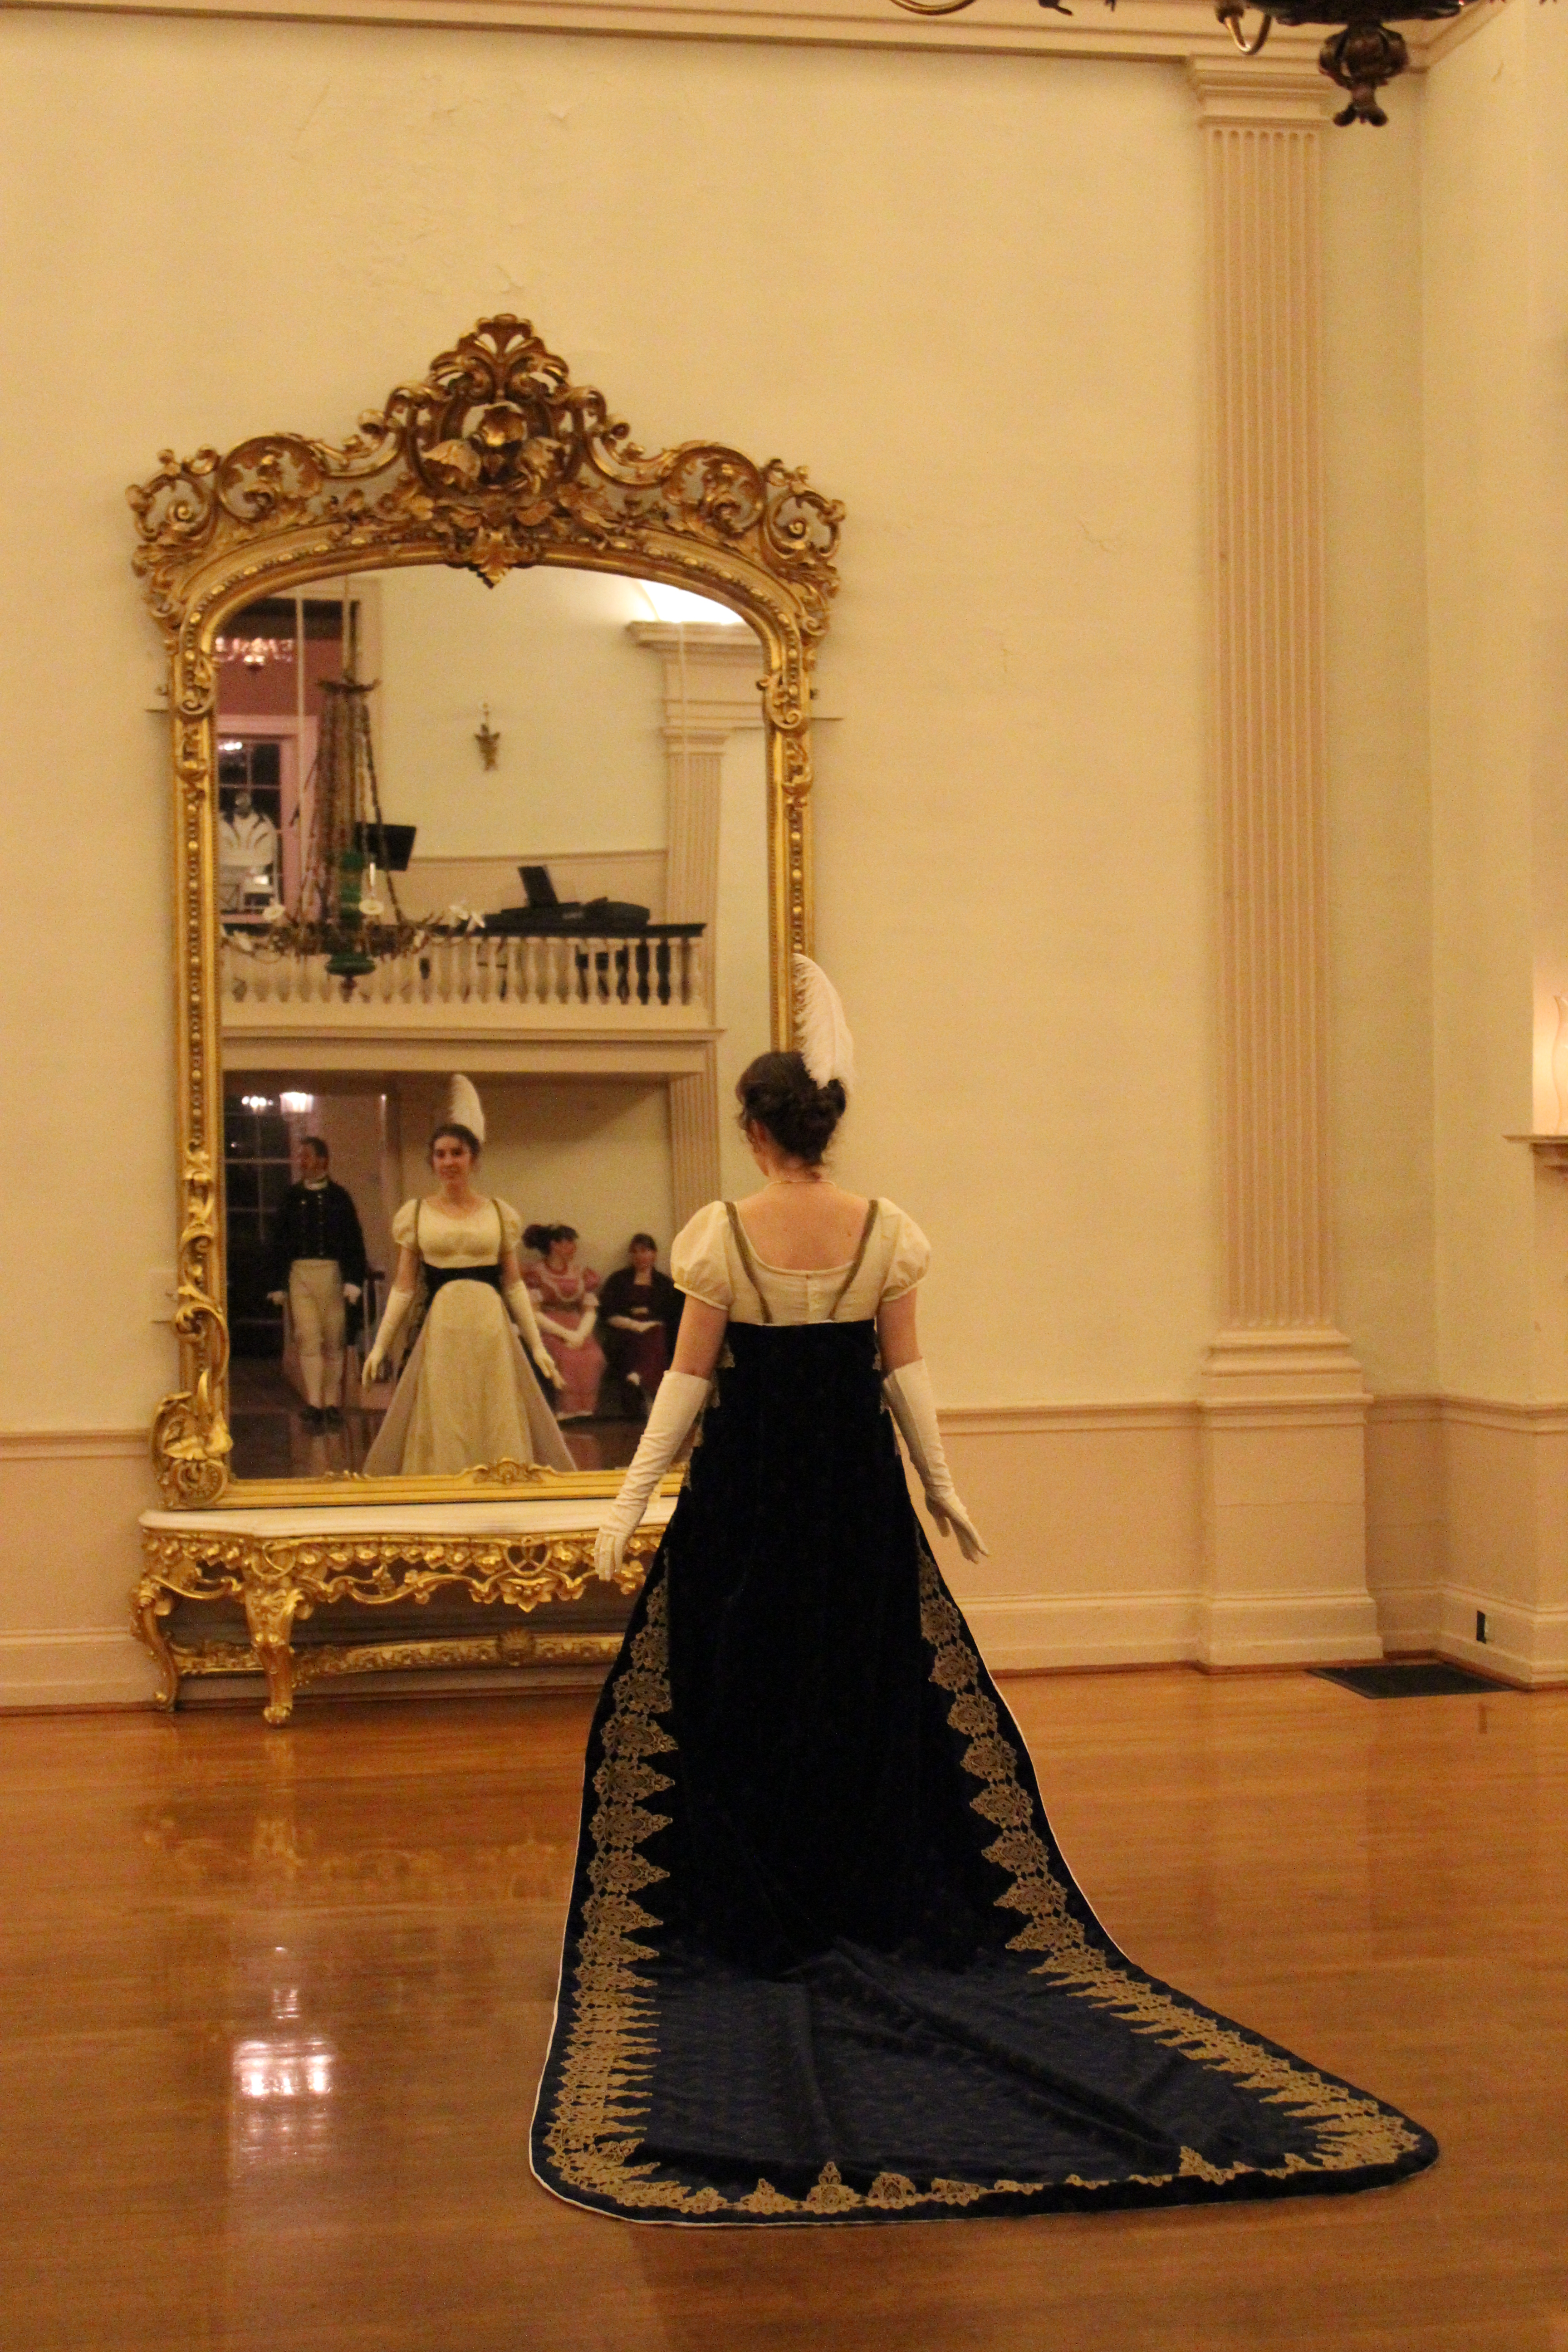
I’m eager to share pictures of the grand ball with you, but I want to insert this post before continuing to ball pictures. One of my friends had the ambition to complete a Regency court train to wear during the reception I showed pictures of last post. It’s a pretty fabulous train made of velvet printed with golden bees and trimmed with opulent gold lace.
The actual owner and maker of the train.
It’s not the sort of thing to be danced in, but that’s fine, because it attaches at the waist, so it’s easy to take off. During the course of the evening some of us tried on the train and tried out different poses in it. So nice of Antonia to share with all of us! It was quite grand and fabulous.
It’s my blog, and that means I can share as many pictures of me as I want…! Spoiled sounding? Probably… Okay, fine, I’ll return to my more humble un-royalty roots.
There are some absolutely stunning extant court trains out there. Here’s my pinterest page of court gowns and trains from all different periods. And here are some of my favorite Regency court trains to inspire you.
ca. 1809. The Met.1809. The Met.First Empire From the Chateau de Malmaison Costume Collection appFirst Empire From the Chateau de Malmaison Costume Collection app
There is an event at Dress U in about a month that requires court gowns or trains. I won’t be there, but I’m looking forward to seeing pictures of other people’s fabulous court trains! I hope you’ve enjoyed these silly pictures. I promise that the next post in this series about the Regency Weekend will be pictures of the ball: no more delays!
Textiles and the natural world are inextricably linked. Until very recently, all textiles were made from flora (linen, raime, hemp) or fauna (wool, silk, fur), and dyed with flora and fauna. Flora and fauna also influenced the decoration of textiles, from Elizabethan floral embroidery, to Regency beetle-wing dresses, to Edwardian bird-trimmed hats. Celebrate the natural world (hopefully without killing any birds) with a flora and/or fauna inspired garment.
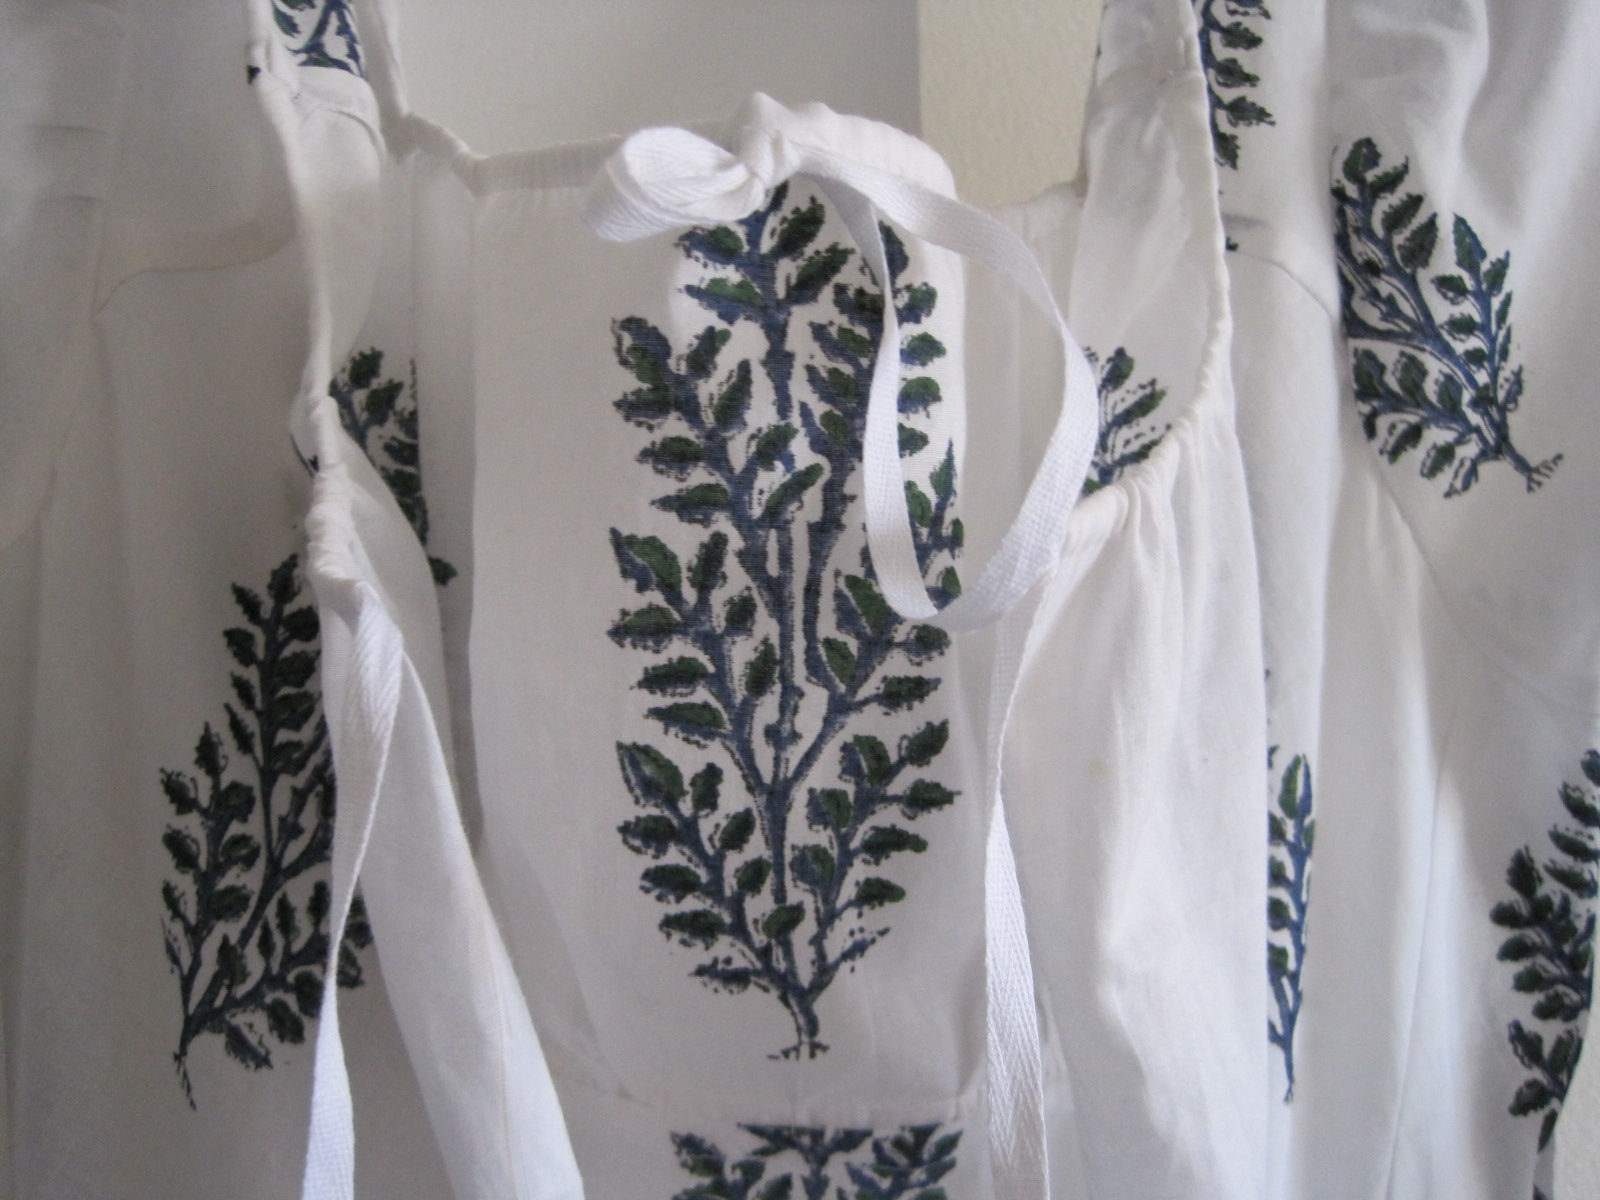
This is the description of the HSF Challenge #9: Flora and Fauna. I’m super excited about my garment: the all new 1815 Tree Gown I recently showed a sneak peak of as well as photos of in action during archery and outdoor lounging! The archery and outdoor lounging, in particular, include great pictures of the dress, so if you haven’t seen them yet, you really should go check them out!
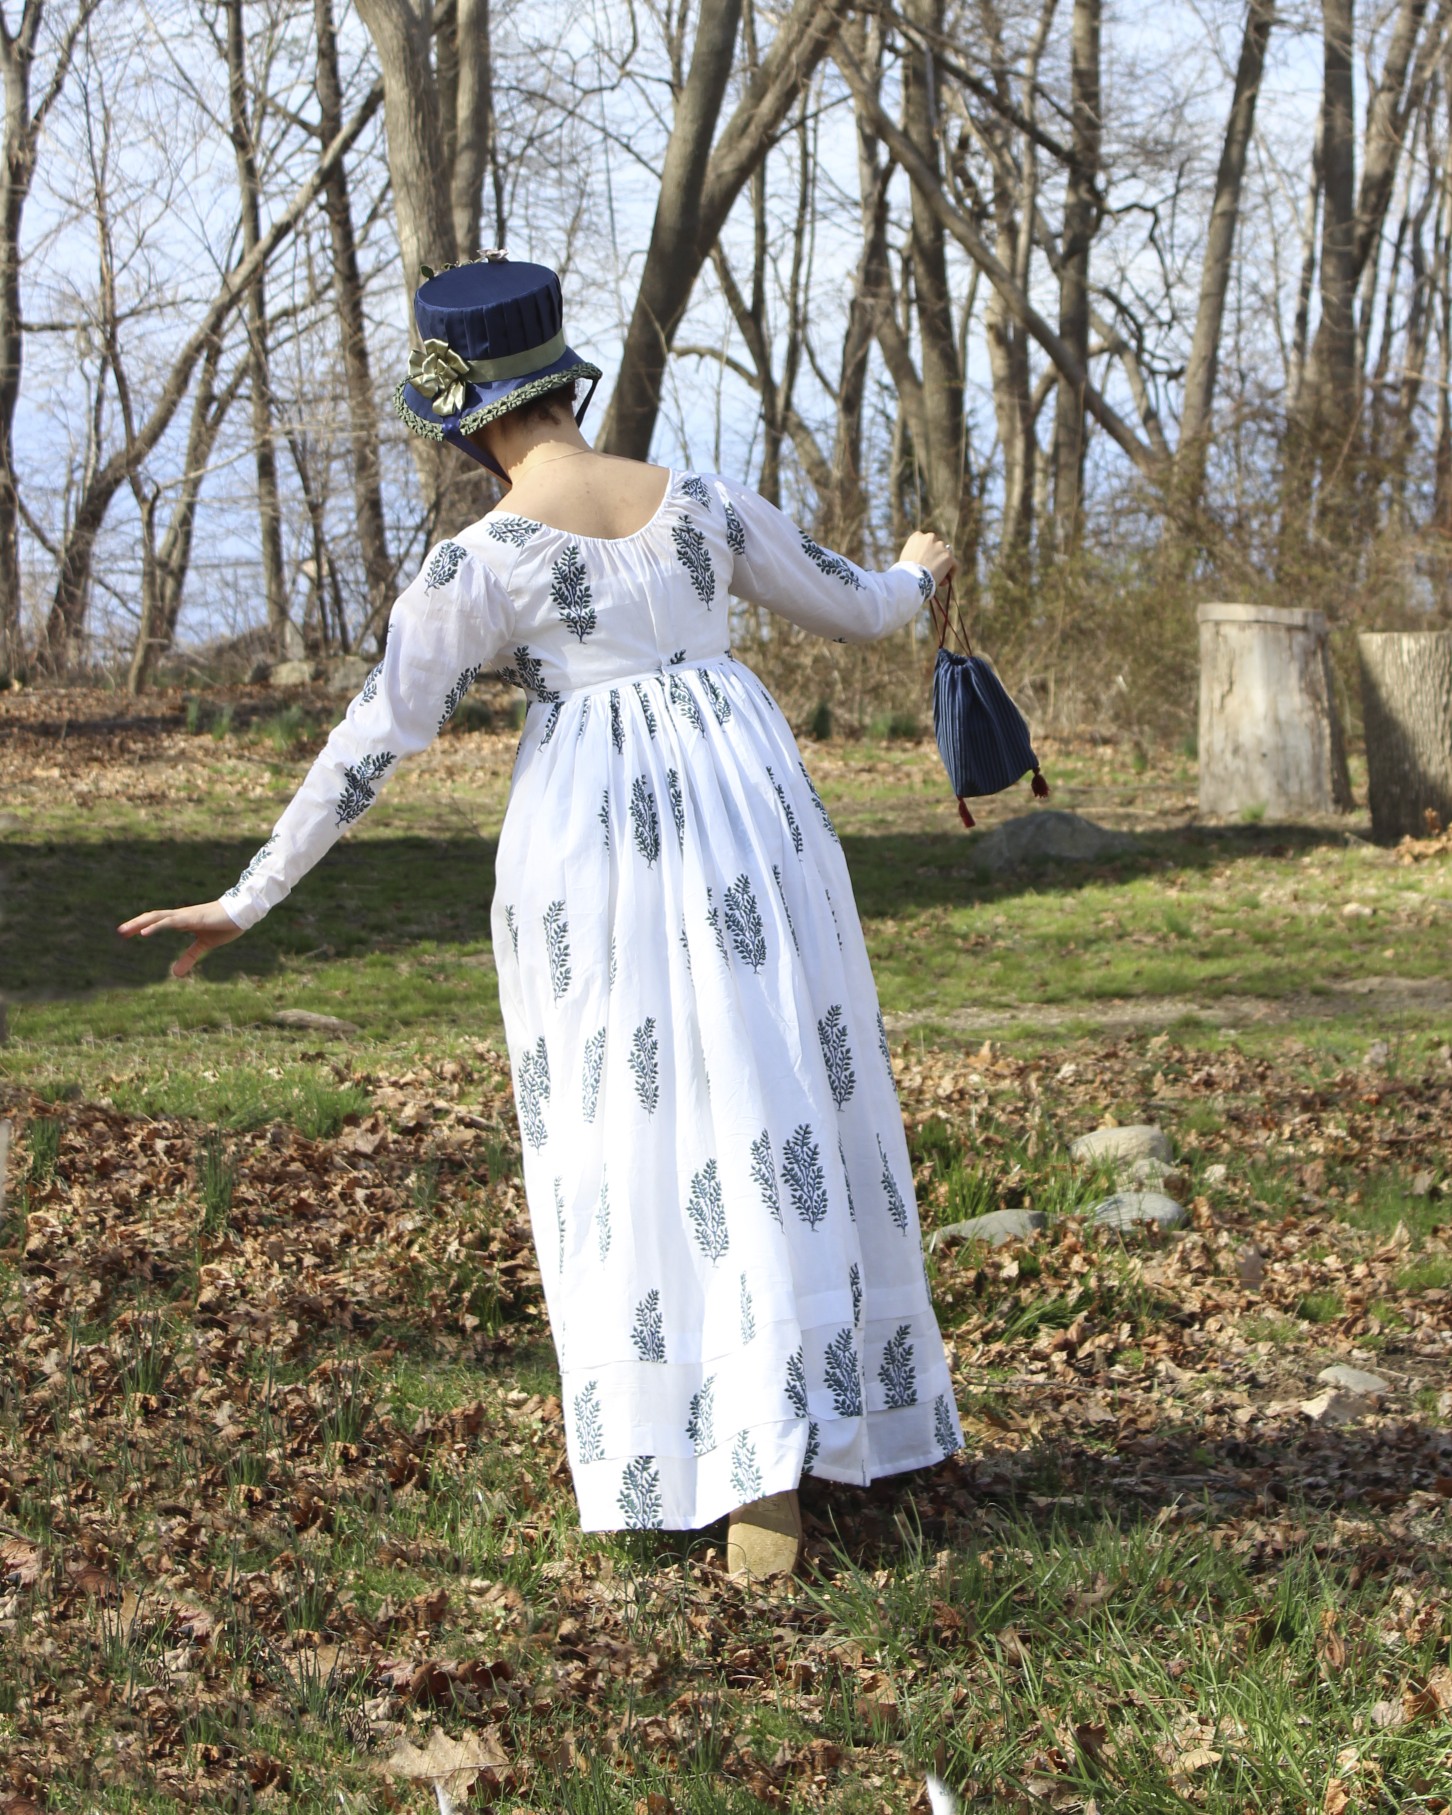
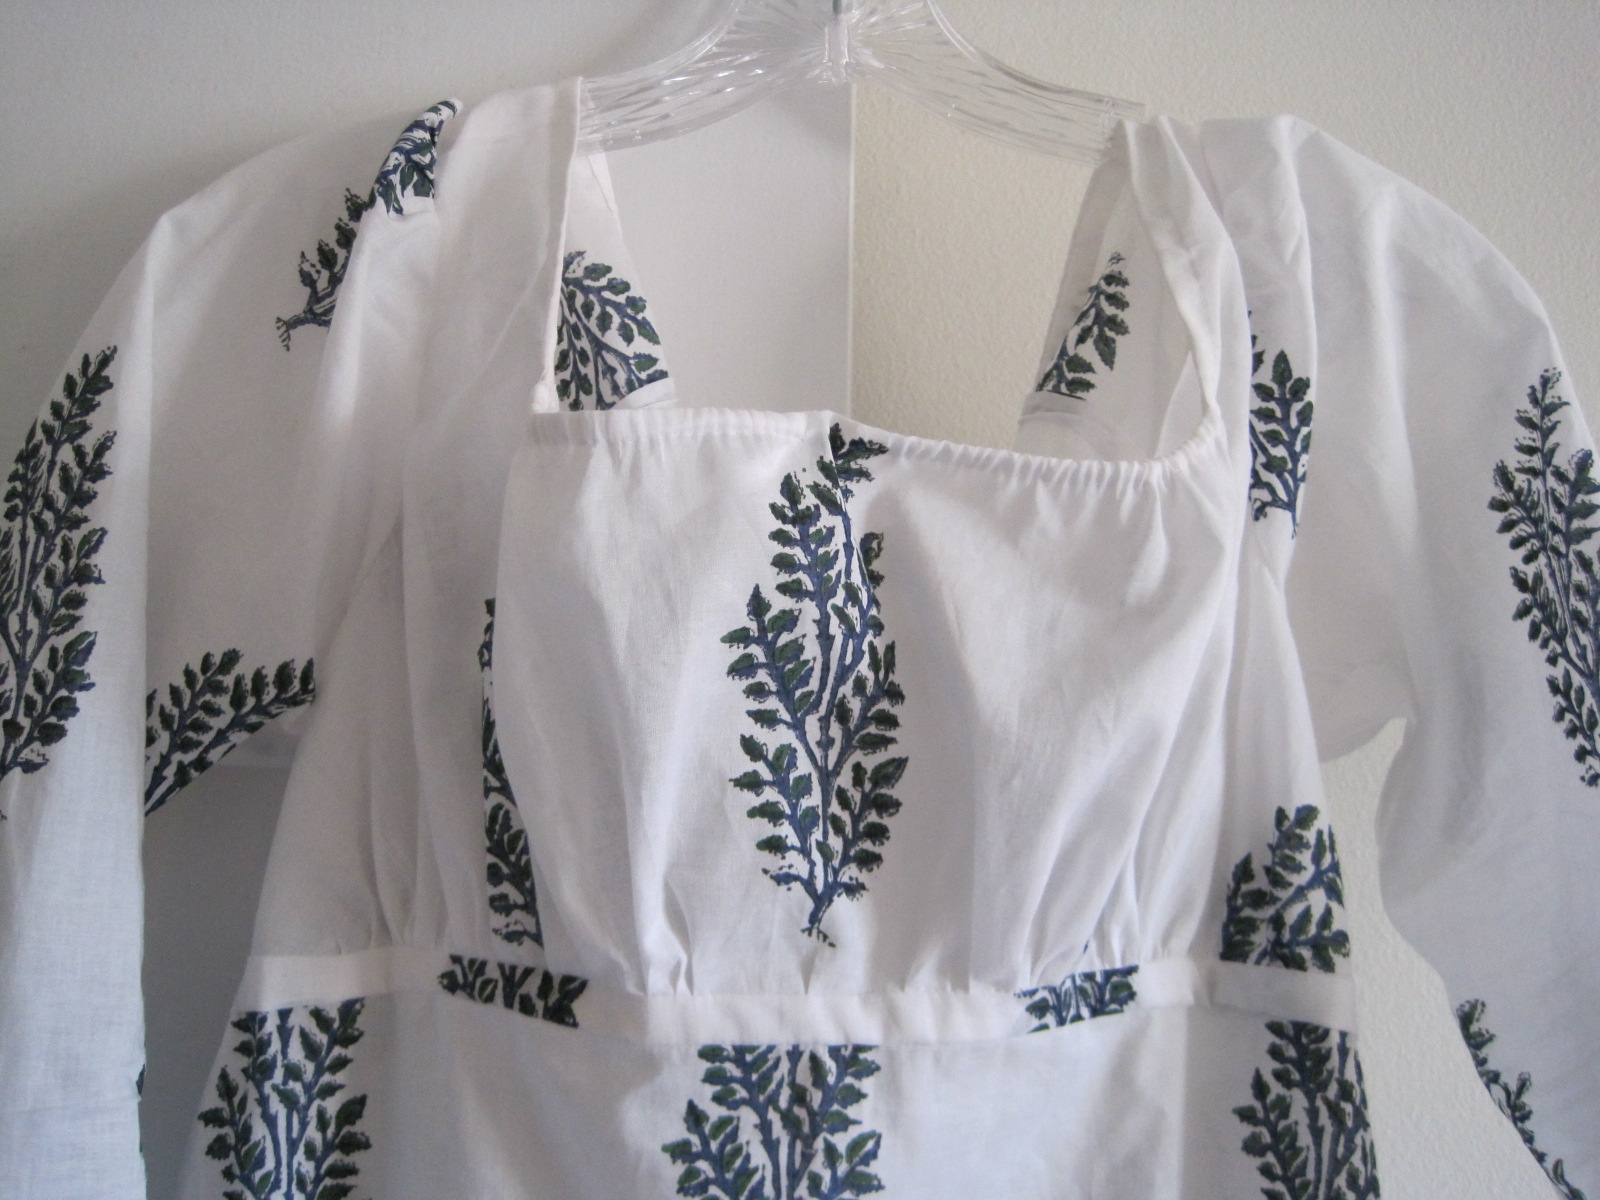
I love love love this dress! It’s super comfy and super cute. You might remember that I don’t own many printed or patterned clothes (modern or historic), but I branched out (haha, unintentional bad pun) with this one and I love the results! There’s something so refreshing about the classic white Regency dress that has been shaken up a bit with a bold print. Also, from the HSF perspective, it is made from cotton and printed with a flora inspired motifs! Double duty challenge fulfillment right there.
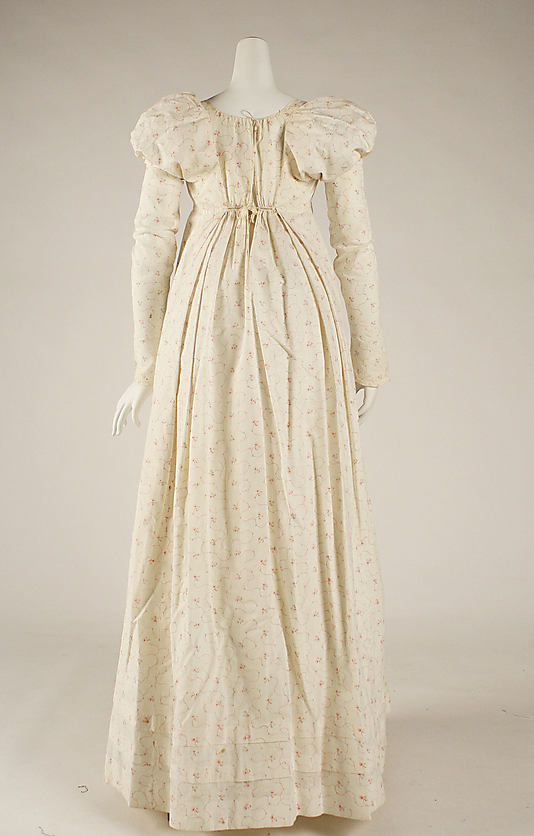
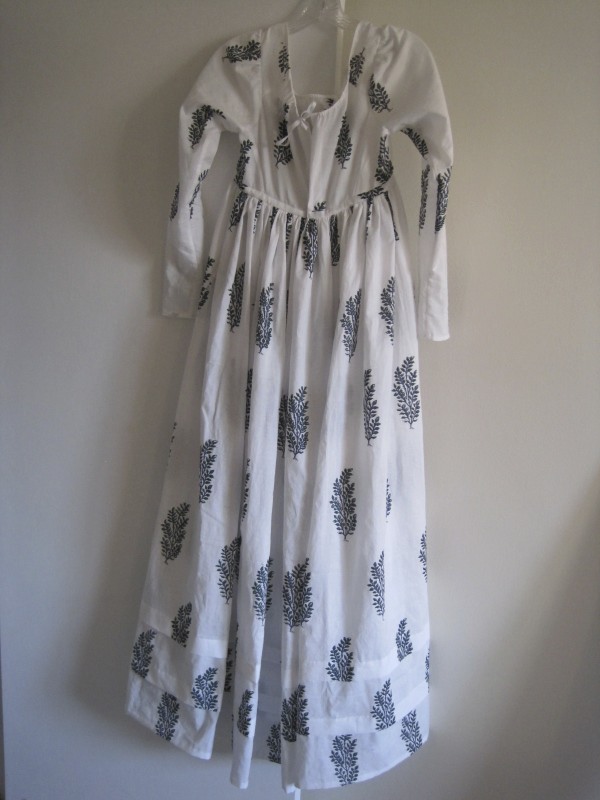
Back view. The drawstring at the back neck is so subtle and clean looking, and I love the results of my careful cutting which keeps the print symmetrical on each side.
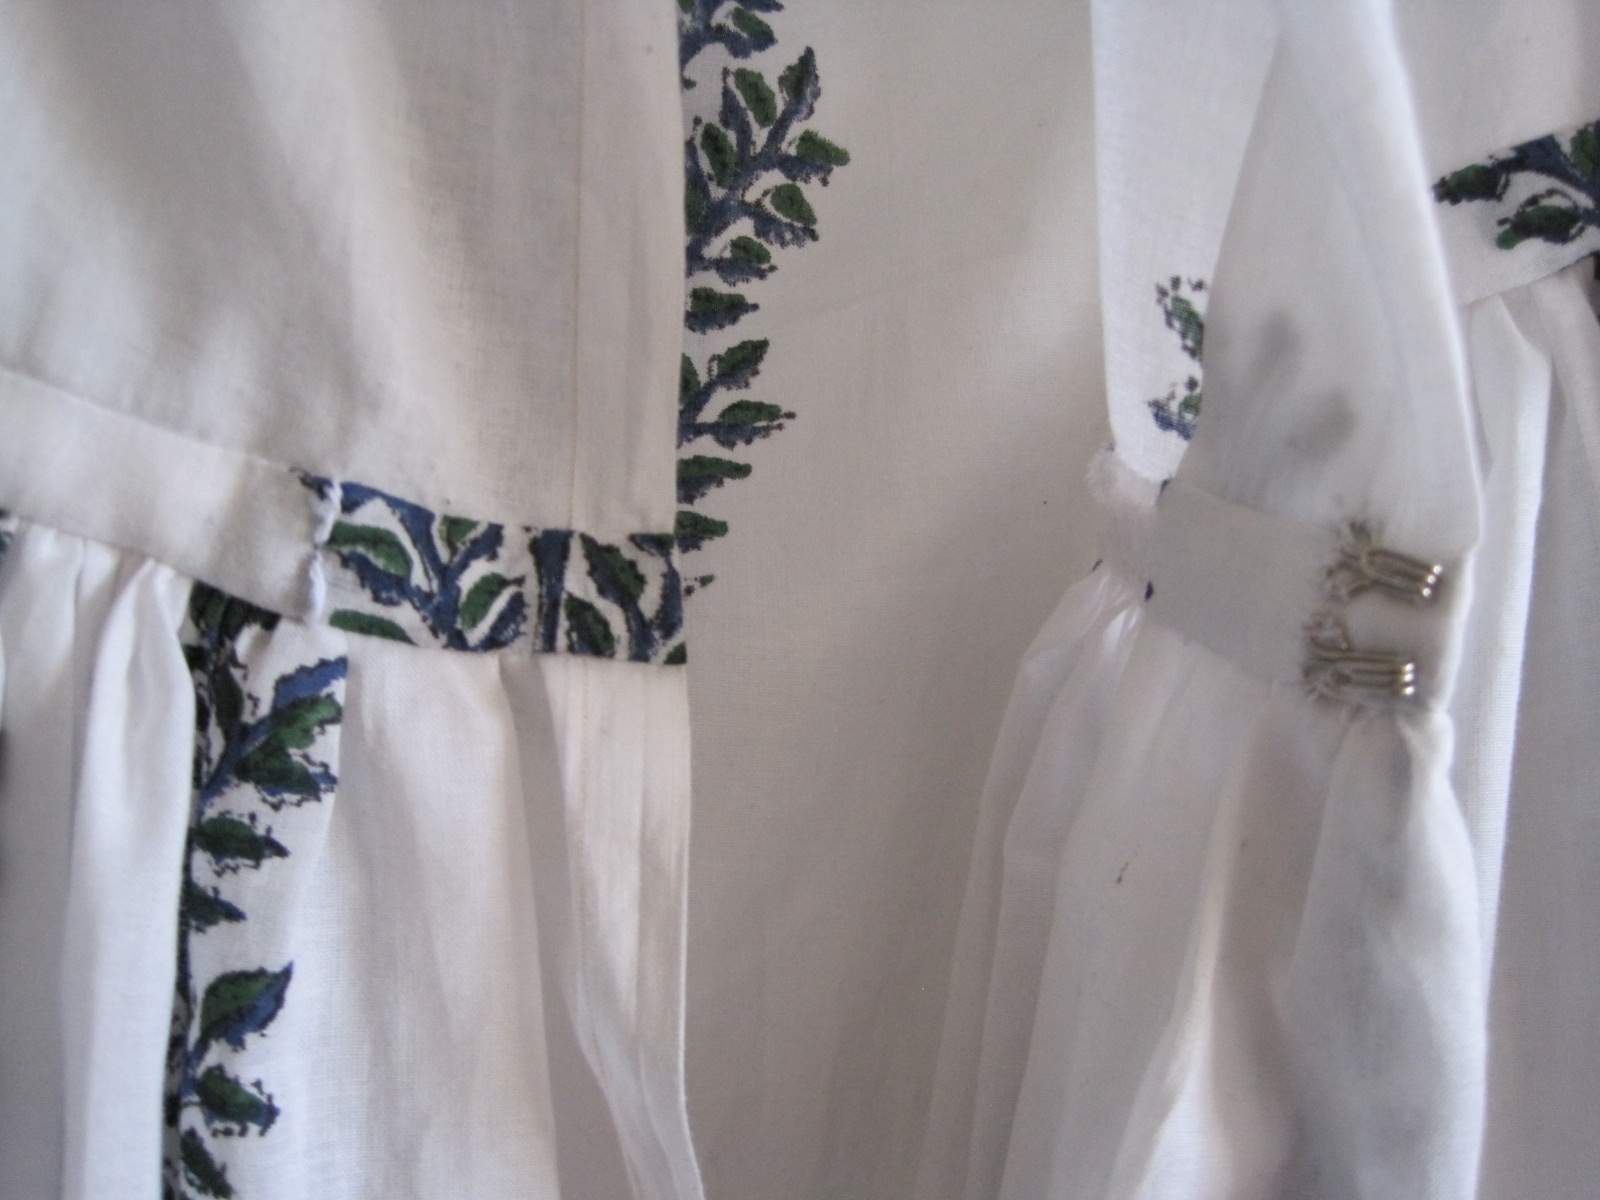
There are pictures of the interior construction of this dress in this previous post. To summarize, the dress is machine sewn on the inside seams and hand finished. Most of the interior seams are french seams. The dress closes at the back with hooks at the waist and a drawstring at the back neck. The front neck has a drawstring as well.
More facts:
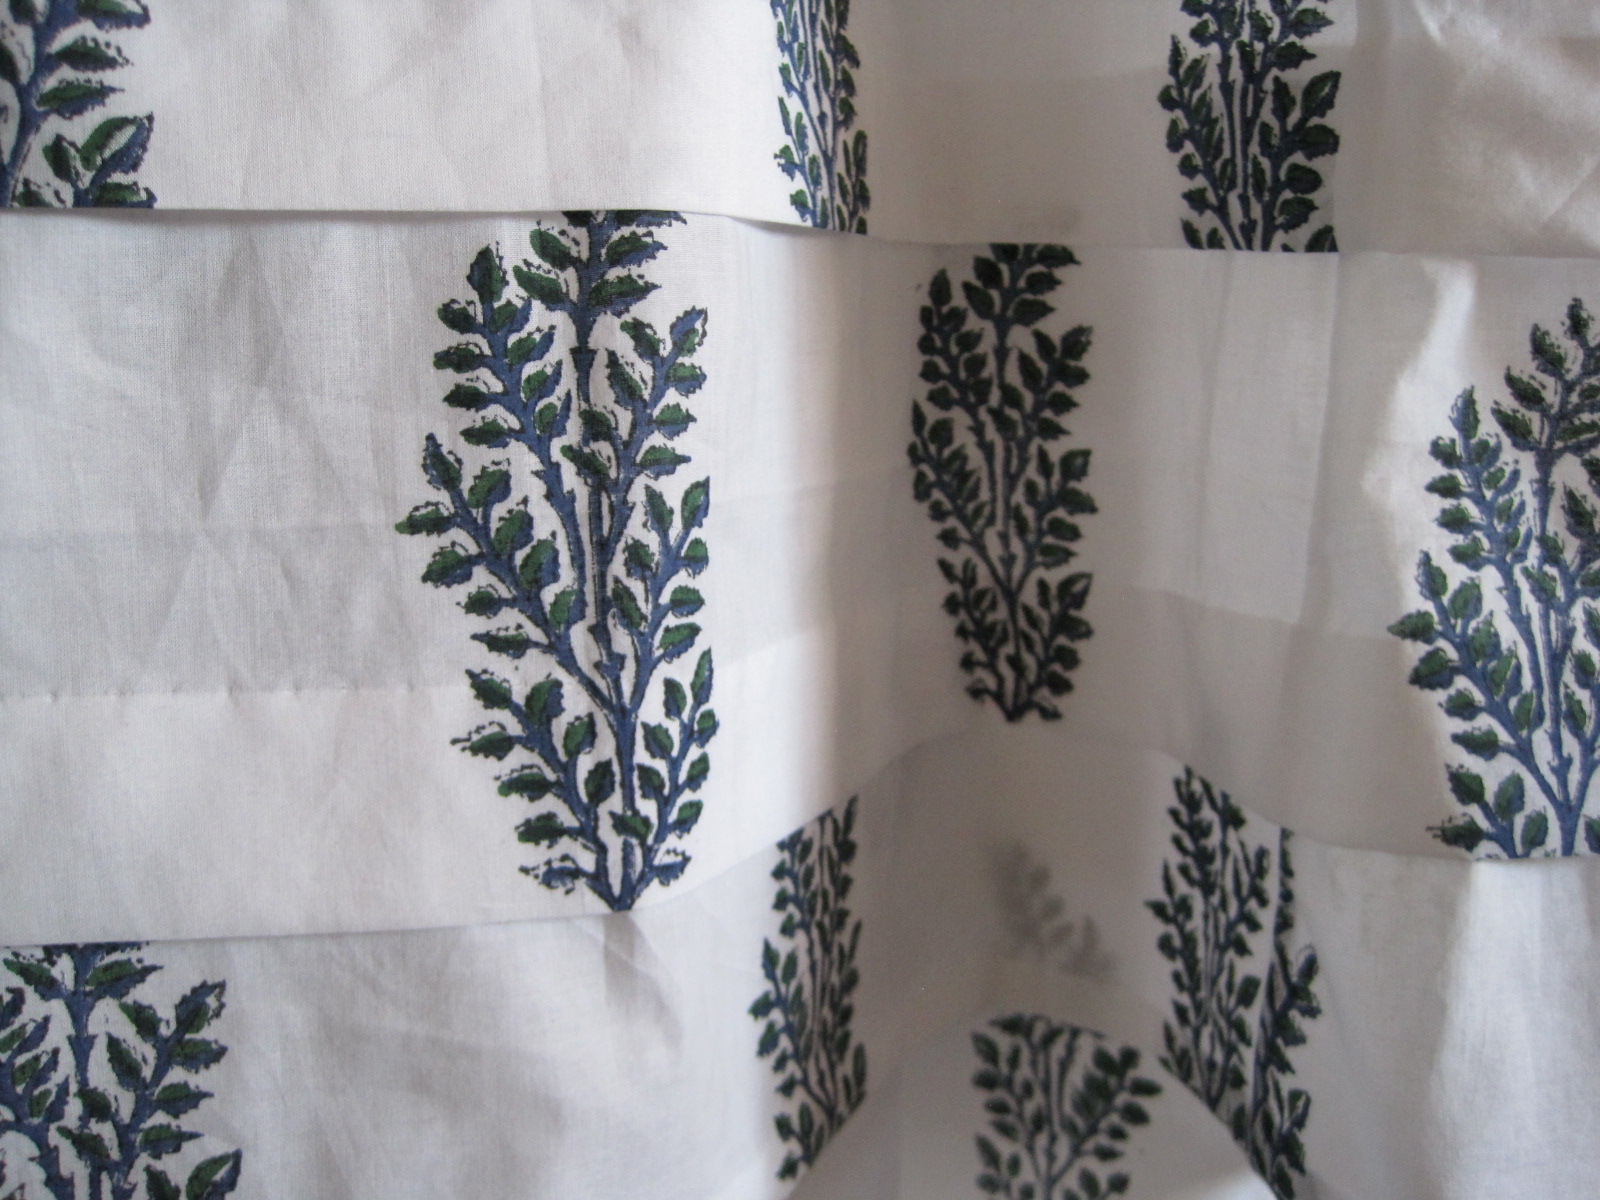
Fabric: almost 5 yds of hand block printed sheer cotton (made in India and sold on eBay via Heritage Trading).
Pattern: loosely based on my other Regency gown patterns for my basic measurements, but adapted to resemble my main inspiration dress at the Met.
Year: 1815.
Notions: two hooks, about 1 yd of 1/4″ cotton twill tape, thread.
How historically accurate?: I give it 95% rating. Really, the only thing keeping it from “as accurate as can be with modern materials” is that it is machine stitched on the inside seams. It is hand printed fabric, sewn in historic ways, and hand finished.
Hours to complete: 16? Total? That’s not bad for me!
First worn: Regency Dance Weekend, mid-April 2013.
Total cost: $25 for the fabric (it’s almost doubled in price since I bought mine!), maybe another $1 for the notions?
Now for inspiration. The dress is most closely based off of this dress at the Met. I changed some things, but I think the resemblance is quite clear.
I intended to complete this reticule for the HSF Challenge #6: Stripes this past week, but as the deadline approached and I reread the fine print, I realized that the challenge was supposed to be fulfilled by a garment. Whoops! I don’t think I can convince myself that a reticule is garment, let alone other people. So I put the project on hold while working on other things (like Evie, my 1864 ball gown, and the completion of my purple ballroom competition dress), but finally got back to it and finished it off towards the end of last week.
Lucky for me, this reticule does fulfill the MpRSW Goal #4: Accessories (due April 8th: I’m early!). (If you’re paying attention, I did fail to post about the MpRSW Goal #2: Evening Gown… I might have fallen off the wagon on that one and not managed to fix the rip in my gown on time. But luckily, the MpRSW is motivating me to complete that repair this week, even if I am delayed!)
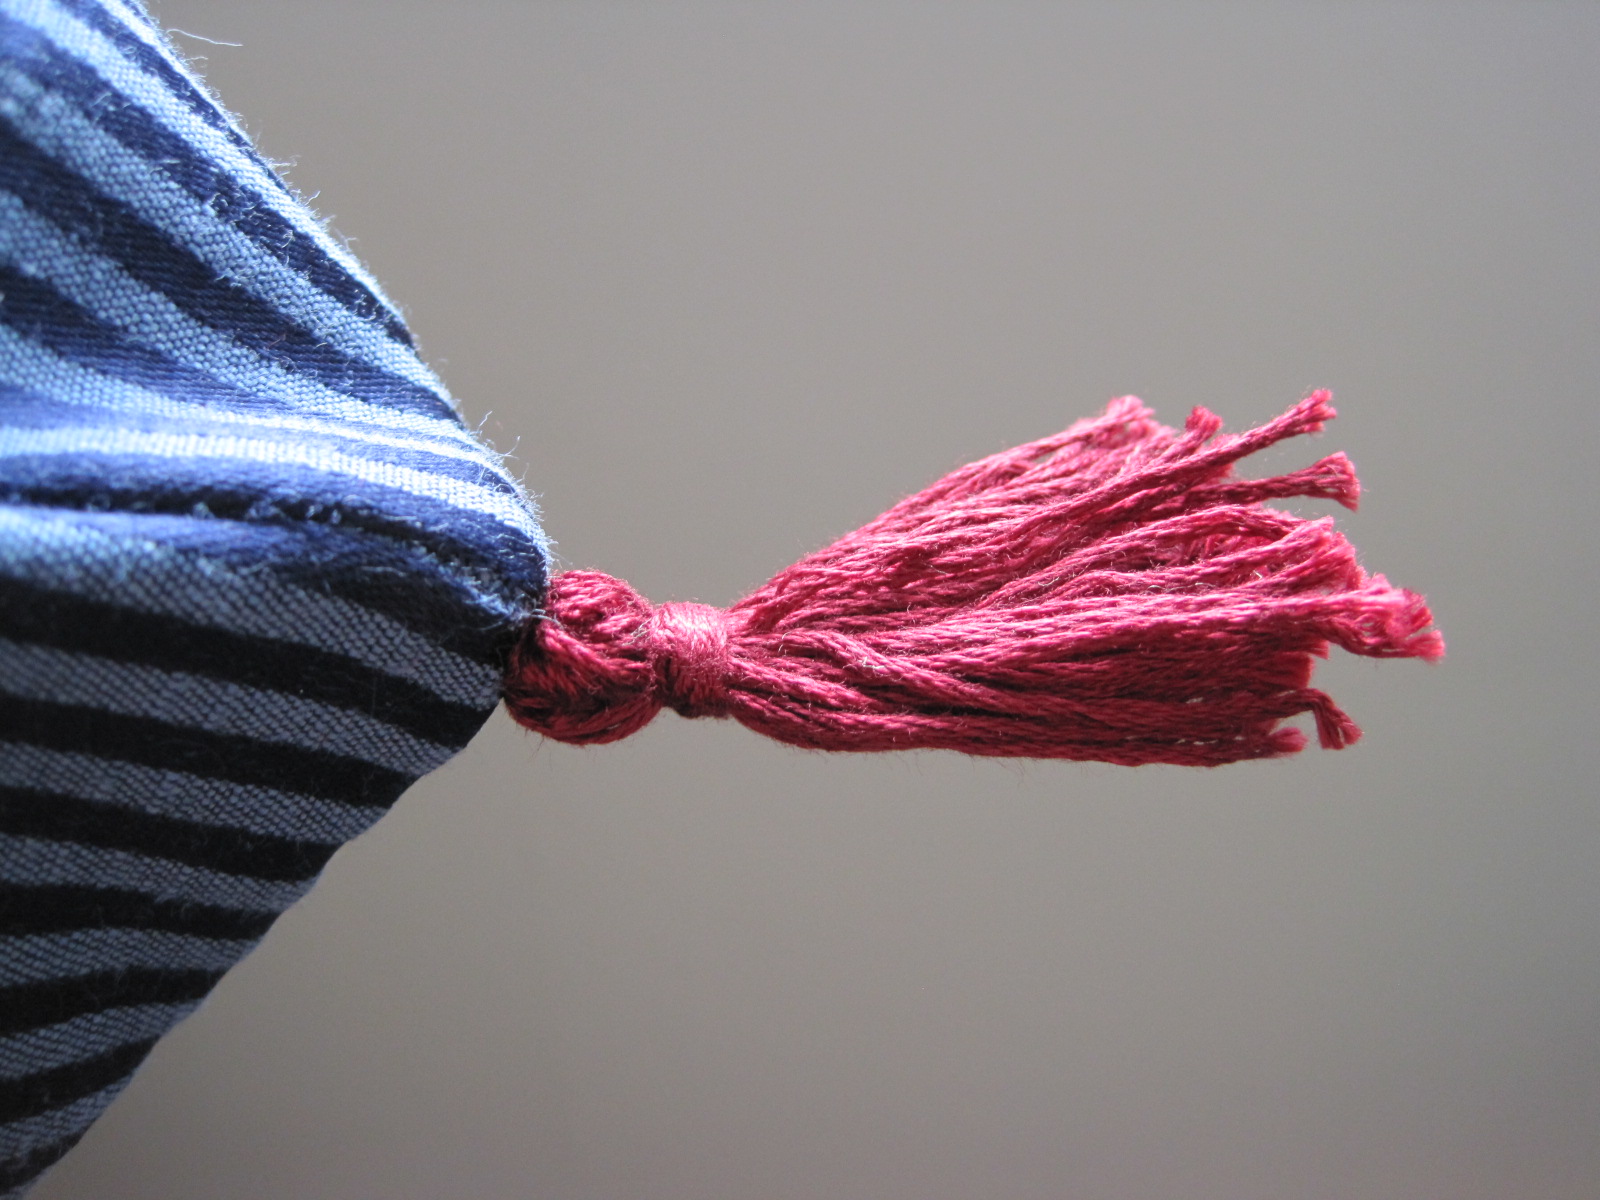
Tassels!
Trust me, this is not a historically accurate reticule. The fiber content is questionable… (probably a blend including polyester), the ribbon is polyester, and the tassels are cotton embroidery floss. But it’s cute and functional and has the general look of the period, so I’m happy. This will get packed for the Regency weekend coming up in April!
Inside the reticule: french seams and a cotton canvas purple (woohoo, extra fun on the inside!) layer whip stitched to the inside of the bottom to provide stability and help keep the triangular shape. The seams are hard to spot because the stripes blend into each other so much, but they’re there!
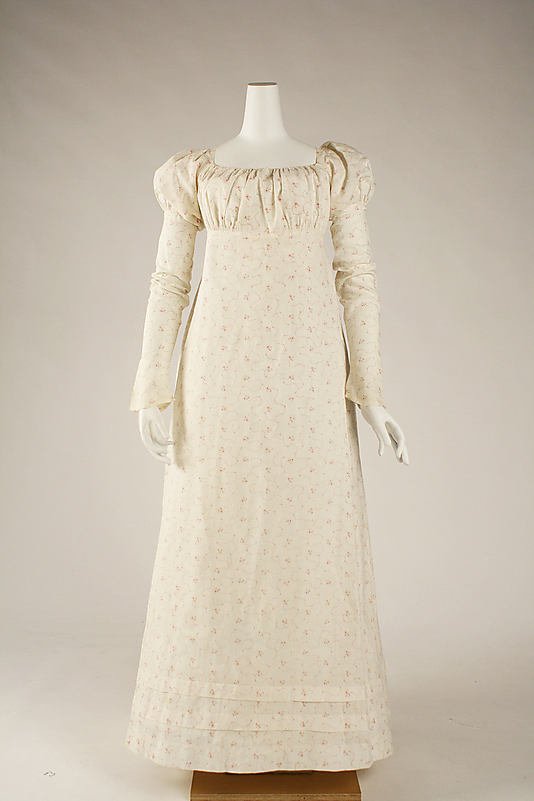
What you saw in the first picture (behind the reticule) was a first glimpse of my latest Regency gown! This new block printed cotton gown, from 1815, is “The Tree Gown” in my head because the motif reminds me of trees (or shrubs perhaps, but I like the sound of The Tree Gown better than The Shrub Gown). This gown fulfills the MpRSW Goal #3: Day Wear! It’s due today, so I’m right on time. The gown is machine sewn on all of the non visible seams, and hand finished on the visible sections.
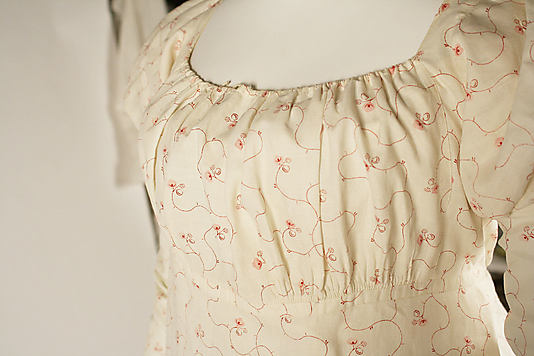
Center front. This gown has a mostly squared neckline with a drawstring across the bust, like my 1812 white striped gown.Unlike previous Regency gowns in my possession, this gown has long sleeves! (This is a back view.)There are two 1 1/2″ tucks around the hem of this gown, for decoration.The gown closes at center back with two hooks on the waistband (see the thread loops?) and a tie at the top of the back.The tie at the top of center back is a drawstring that continues to the shoulder seam, allowing the back to gather slightly. The bow in the middle is the drawstring for center front.The fullness at center back is gathered. This gown has french seams and the waistband seam allowance is just whip stitched together to keep it tidy.The inside of the neck opening. The area over the shoulder is reinforced with an extra bit of fabric cut on the straight of grain to keep it from stretching.
This gown below is my main inspiration for this dress: the tucks at the hem, the sleeves, the pattern for the skirt, the gathers on the bodice, the mostly squared neck in front, the tie at the back of the neck… I omitted the extra sleeve puff (partly because I didn’t have enough fabric, partly because I wanted this dress to be more streamlined) and the tie at the back waistband. I love the super zoom on the Met’s website because you can see so many great details!
For example, I could see where the center front skirt panel ended and the angle of that seam (as well as the angle of the back panel). Using that information, I determined that my front panel should be a rectangle (it’s 21″ across in my dress given my proportions) and that the back panels should be cut straight at center back, but with an angle on the side seams that goes up toward center back making an elongated trapezoid. There is a seam at center back, so the hem of each back piece is 45″, but each top narrows to 31″. I’m curious to see how that style of skirt fits me. I certainly like the look of the skirt on the dress in the museum!
1810-1815 dress at the Metropolitan Museum of Art.
This gown also fills the HSF #9 Challenge: Flora and Fauna, so you’ll be seeing another post about it with some more details (and pictures of it on a body!) coming up in a few weeks (after the Regency Weekend in April, you know!).
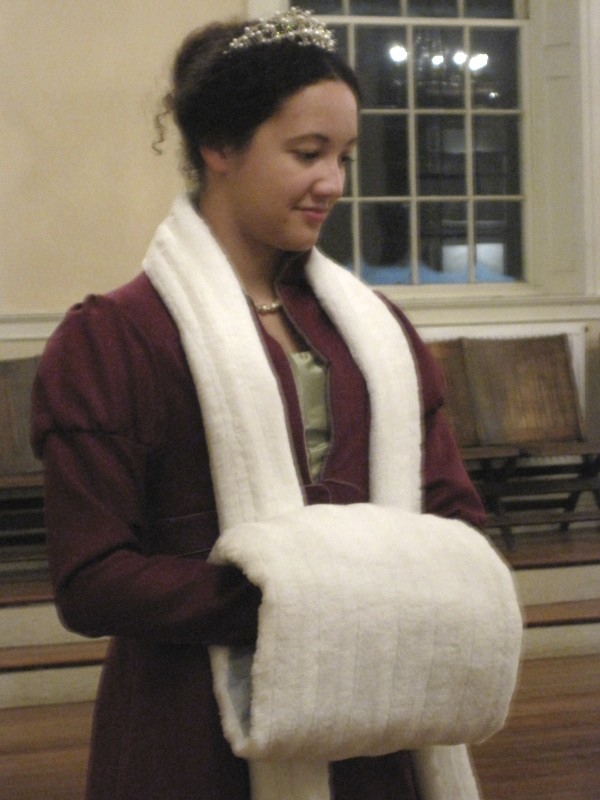
One thing I actually did finish for the recent ball was the muff and tippet. For visual reference, the picture below shows the garments I’m discussing.
1822 walking dress with muff and tippet (and a bit of the 1824 ball gown peeking out).
What is tippet, exactly? Merriam-Webster defines it, thus:
1: a long hanging end of cloth attached to a sleeve, cap, or hood
2: a shoulder cape of fur or cloth often with hanging ends
So, how did I make my tippet? First, I cut a piece of high loft polyester batting the length and width that I wanted. (I know they didn’t have poly batting in the 19th century… but it’s super warm and sometimes just worth it!) Then I cut a piece of my faux fur that was double the width of the batting plus an extra 3/4″ or so on each side as well as about 1″ longer on each end. I centered the batting on the wrong side of the fur, wrapped the fur around to the back, turned one edge under, and pinned. The ends of the fur I just turned up and under the other pinned bits. Then I whip stitched that folded edge down using pretty large stitches. The stitches disappeared in the fur… and voila, tippet! Too bad I didn’t take pictures of the construction!
The muff was slightly more tricky, not because of construction details, but because I agonized over what color lining to use! (To construct the muff, I made two tubes, one out of fur and one out of silk lining. I stitched one end of each tube to the other, turned the whole thing right sides out, inserted a tube of poly batting (warm!), pulled the lining through the middle, and pinned the open side of the fur to the silk, with the fur edge turned under. Then I simply whip stitched it like I did the tippet.
But before I could make the muff, I had to pick the lining color! Did I want it to match my walking dress trim (and be lavender?) Did I want to pick a color from a fashion plate? What colors were used in fashion plates? So many questions! I determined that of the muff linings I could see in fashion plates from that general period, there were three recurring colors: pink, blue, and white. Here’s what I came up with, image-wise:
PINK
January 1823 Walking Dress. La Belle Assemblee.December 1822 Promenade Dress. Ackerman’s Repository.January 1826 Promenade Dress. Ackerman’s Repository.
c. 1810 Redingote (and muff!). KCI. (Also a tippet, though they call it a “palantine”: which M-W defines as a fur cape or stole covering the neck and shoulders.)November 1814. La Belle Assemblee.November 1817 Walking Dress. Ackerman’s Repository.1823 Carriage Dress
So pink came in with 3, blue and white tied with 2 each, and then there were an assortment of unknown/other. But I didn’t like the idea of pink with my dark pinkish wool (you can see what that would look like in the December 1822 fashion plate: that’s the inspiration for my walking dress), so I settled for the light blue, which I think is delicate and softly Regency. Also, I had just a small amount of that color silk, and it’s a color that doesn’t really complement my skin, so I wasn’t likely to use it for a bonnet or something similar… but with a muff most of my skin is hidden! You can see the predominance of white fur for the muffs in these fashion plates (one of the reasons I chose white fur for the muff and tippet). There are brown, too, but a lot of white! 7 out of the 11 I included are white. Well, there you go. That’s my rationale for the muff and tippet.
This bodiced petticoat is the inspiration for the first piece of my 1822-1824 ensemble that I need for December events. You can read more about the overview of the ensemble by viewing my last post: here. Despite the slightly later date given for this garment (later than my target of 1822-1824), the shape and construction are consistent with garments from the earlier 1820s, so I have no qualms about using this for my purposes in this case.
White cotton with high waist. Low, wide, round neck edged with embroidery and lace frill; piped armholes; front in one bias-cut section, back in two shaped sections, centre back fastening with drawstring at top and bottom of neck edging and at high waistband and two buttons; skirt front in one slightly flared section, two sections each side flared towards back, slit at hip in right back seam, centre back in two straight sections, closely gathered at centre waist; sixteen lines of piping at hem; edging of finer cotton scalloped and with openwork embroidery.
I used this description in combination with the 1820s patterns in Janet Arnold to create the bodice and skirt patterns. My petticoat is constructed out of plain white cotton. It is entirely hand sewn and has 16 rows of cording in the skirt. There is a edging of white cotton openwork embroidery at the hem. The seams are all flat felled in the skirt. The bodice seams are turned twice and stitched on each side of the seam. The petticoat closes in the back with ties.
Bodice of the petticoat with unfinished neckline.Near the hem: 16 rows of cording and embroidery edging.Super close up of a flat felled skirt seam, narrow hem, and whip stitches attaching the embroidery. The embroidery is whip stitched to the hem at the very bottom, and the top edge is whipped again on the inside (that’s the top horizontal row of stitches).Back of the bodice.
The only remaining work to be done is to add another tie between the current two since the back wants to gap open just below my shoulder blades, to finish the neckline, and to adjust the gathers across the back (secret tip I’ve learned through building these garments: to get that great 1820s triangle shape, your gathers have to be super concentrated at the center back area, not spread out across the entire back, as these currently are). I plan to finish the neckline with narrow white lace, but I want to determine the neckline of my ball gown before finishing the neck of the petticoat. You understand that desire, I’m sure!
Differences from the original include: that I have a seam up center front of the bodice (no particular reason, it’s just that’s how it turned out), my cording is spaced closer together (which I’m not sure I like as much as the original, but I’m not taking it out now!), my armholes are narrow hemmed rather than piped, and my skirt closes right in the middle of the gathers rather than off center at the side back seam.
Pictures of the entire petticoat will have to wait. It looks pretty foolish on hanger, doesn’t fit a dress form (because the bust is so high), and it’s super awkward to get a full length picture of oneself… so we’ll just have to wait until I’m wearing it!
Well, as you recently read, I have a 9 month sewing plan to get me through May of 2013. It’s not set in stone (which means that mostly I keep adding to it, not taking things away…), but it gives me a great overview of what I need to accomplish and by what month. Deadlines really help in getting things completed!
The first major portion of the sewing plan is an ensemble of clothing from about the year 1823. I’ve been doing lots of looking at fashion plates and extant clothing from the early 1820s, in books and online. Here’s a link to my pinterest board: 1820-1824. I had so many pins in the 1820-1829 board that I had to separate the decade, so I also have a separate pin board of 1825-1829.
The 9 month plan includes the following pieces: petticoat, ball gown, walking dress, muff, bonnet, and chemisette. I’ve added one more thing since the plan was created: a tippet to match the muff! Before I explain why I want these items (ie, where I plan to wear them!), let’s look at my inspiration for the items themselves!
Petticoat. Manchester City Galleries. (I’m making a petticoat out of white cotton. It is entirely hand sewn.)Actually a Dinner Dress (but I’ll use it as a ball gown). Ackerman’s Repository. May 1824. (I guess I lied about the year… I’ve been looking at the images so much I haven’t even glanced at the date in ages! Anyway… I’m making this in apple green silk with hand sewn silk organza appliqués.)Promenade Dress. Ackerman’s Repository. December 1822. (I am making this out of deep, rich pinkish burgundy wool with hand sewn lavender silk trim.) This is also my inspiration for the tippet. (I’m making the tippet out of white faux fur.)Walking Dress. Ackerman’s Repository. March 1823. (I think this is where I got the year 1823 from… This is another influence on my walking dress design, especially at the collar.) This is also my inspiration for my muff. (The muff will be the same fur as the tippet, lined with pale blue silk shantung.)Bonnet. C. 1820. The Met. (I plan to make this in lavender to match the walking dress.)Chemisette. c. 1810-1825. Snowshill Collection. (Yes, this is one of the ones in Janet Arnold. I plan to make this out of lightweight cotton and use my fluting iron! However, I have to say that if one thing in my December-to-do doesn’t make the cut, this would be it. I really want to take my time on this and play with my fluting iron, and I’m not sure I’ll have the time on this one…)
What is all of this for, you ask? I plan to wear the whole ensemble in December when I attend Fezziwig’s Ball, a 19th century ball hosted by the Commonwealth Vintage Dancers in Salem, MA. Since it’s a ball, I’m sure you understand why the petticoat and ball gown are required! But why the outerwear? Before the ball begins, ball-goers have the opportunity to go caroling around the streets! It’s really fun, and usually pretty cold. I need to stay warm, hence the wool walking dress, tippet, and muff. The chemisette is to fill in the collar of the walking dress, and the bonnet is really icing on the cake to help pull the whole ensemble together! As an added bonus, later this winter my friends and I hope to go ice skating in 19th century dress, so this will also be my ice skating outfit!
I recently met up with friends from the Massachusetts Costumers to attend a colonial faire. It was a cold, damp, day so we had the opportunity to pull out warm clothes and accessories like mitts, muffs, and cloaks.
First, I made a matching petticoat out of the remaining bit of striped fabric I had. I had enough to make the front stripes run vertically, but in the back the stripes are only vertical for about 12″ and then I hd to do lots of piecing to even have enough fabric. Right above the vertical stripes are stripes that run horizontal, and above that are remnants of my green 1900 skirt from Newport. And I really do mean remnants! There are 3 rows of pieced in remnants, some of those are even pieced together with vertical seams to be wide enough! Of course, you can’t see all of the crazy piecing, since the skirt of the anglaise covers it. And I was rather in a hurry while doing all of this, so I have to confess that I did not iron any of my seams… or my hem… Bad behavior, I know!
Robe a la anglaise worn a la polonaise.
Second, I decided to wear the anglaise a la polonaise. I did this in part to keep it out of the mud in the fields we would be wandering through, and partly because I found multiple examples of striped robes a la anglaise with matching petticoats that were worn a la polonaise.
Robe retroussee dans les poches. KCI. c. 1780. French. In “…the “retroussée dans les poches”… [The] gown’s hem is pulled out from slits in either side, and draped on the back.” (From KCI) Okay, not actually a polonaise, but very similar.Robe a la polonaise. KCI. c. 1780. French.
Third, I decided against wearing the straw hat I wore last year. The shape of the brim is good, but the crown is too high for the 18th century and the ribbon wasn’t sewn on in an 18th century decorative way. I thought of adding that same blue silk ribbon to my 1912 ivory mushroom hat since that hat shape also appears in the 18th century… but it seemed a bit too much to have an ivory silk hat to wander around muddy fields. Plus, after completing my hair style, I realized that I hadn’t made my hair big enough to support the hat (and I didn’t want to cover up the rolls I had attempted in the back!).
Bun roll hair.
Fourth, I attempted a new hair style with rolls in the back. I don’t think I quite made it, since it kind of looks like edible buns on the back of my head… But it was an experiment, and I learned some things, so it wasn’t a total bust. I separated the hair on the front part of my head and brushed it out and hair sprayed it upside down to add volume. Then I actually put it into a pony tail on the back of my head, which I pinned in place to create the poof in front. I then separated the pony tail into those three sections and rolled them individually. I took the remaining bottom section of hair, brushed it out a little, and pinned it up so it would fall from the bottom roll, rather than the base of my scalp.
Rather sad petticoat, but fabulous new muff!
Fifth, I wore my new 18th century muff! The muff is from one of the classes I took at Dress U this summer, with Stephanie Pool. It’s stuffed with 100% down and is super warm. The blue silk cover is removable, so I can make lots of covers and have interchangeable muffs! I was hoping to have the blue silk ribbon on my head to complement the muff, but that didn’t happen. Incidentally, muffs make rather good pockets… I was able to put a little bag with my phone, money, etc. in it as well as my camera inside my muff!
You can see the down filled pillow inside. The two ends have a silk ribbon running through a channel. You simply pull the ribbon to gather the ends and then tie them to secure the gathers. You simply have to untie the ribbons to loosen the gathers and change the cover!
I did sort of give up and not try super hard for accuracy when I was getting dressed. I decided not to wear stockings, because I didn’t want them to get dirty. I couldn’t find any shoes that were remotely 18th century-like. I clearly need to make some under petticoats and readdress my bum pad/roll situation (I had also made my bum pad smaller, since it seemed so large last year… but this year my skirts looked a little sad and droopy… so maybe I went too far?). I need to actually hem the silk tucked into my bodice, so it’s not a full square of fabric… Oh also, I guess I need to make some simple pockets, until I learn embroidery and make some fancy embroidery pockets as I mentioned earlier this year.
At this point, I am going to freely admit that I rather failed at creating an outfit that is historic clothing, rather than a historic costume. Certainly, there are some aspects of this ensemble that are correct. For example, I’m very pleased that I cut my sleeves so that the stripes go around my arm, not vertically. I think my trim is well done and really makes good use of the fabric I selected. And I like the scale of my stripes, but feel that the fabric is really not the right choice for a piece of historic clothing, rather than a historic costume. In addition to that knowledge, I have learned a lot about the construction of 18th century clothing, which I did not know when I made this last year. For example, I now know how to make petticoats the correct way, and how to construct the bodice of the robe the correct way, and how to sew the shoulder straps the correct way. I plan to make more 18th century things in the next year, so I will be sharing these sources with you as I go so that you will be able to gain this knowledge as well.
In the end, I’ve chalked this green anglaise up to experience, as every seamstress has to do, now and again. We all have to start somewhere. It’s pretty rare that the first thing you make from a totally new era is as correct as you want it to be!
Here’s a few more shots from the day, of me and my companions. Enjoy!
New caraco and quilted petticoat.New jacket! In a day! You can read more at Jenni’s blog: here.I really enjoy this pond. That willow on the right is the very same one we took pictures at last year!It was chilly, so we stopped in the tavern at the inn to warm up a bit.In front of the real fire! It was really pleasant.Of course, I took this picture to be silly. There was a lot of picture taking and iphone-ingShoe shot! With our “chaperone,” who was obviously not wearing historic clothes.
Oh yes, and I’ve realized I don’t have any shoes that are remotely 18th century-like. So I need to deal with that too… I want yellow ones!…
As I mentioned in my last post, the one where I shared pictures of my new 1812 under garments, there aren’t a whole lot of extant examples of sleeveless undergarments from the Regency period, so I had to take the research images I could find and extrapolate what was necessary for my dress from that information. Here are a few extant examples of sleeveless underdresses.
Early 19th century. Petticoat. The Met.Petticoat. 1800. Cotton. National Trust.Early 19th century cotton petticoat/underdress. MFA Boston.
It is fitting that this last one was worn by someone who lived in Boston, MA (that’s where I live). Neat! And isn’t the whitework at the hem lovely? Fashion plates and extant underdresses and petticoats from the early 19th century not uncommonly have hems that had white work and lace decorations. I didn’t incorporate that into my underdress… but maybe in the future I can make another such garment and include that detail!
Natalie Garbett also wrote a blog post about a sleeveless underdress that she made, which you can read by clicking this link. It’s super cute (and has hem trim)!
I actually didn’t find any sleeveless chemises, though I did come across mentions of them. I suppose a lady could have tucked up the sleeves of a normal chemise, or worn a sheer dress with the sleeves of the chemise showing through. Here’s an example of an early 19th century chemise with sleeves. This one is pretty ruffly, but the basic shape is the same, as is the gathering tie at the neck.
Since I seem to be on a shoe spree, I thought it would be a fitting time to share with you a series of striped shoes from the 19th and early 20th century. The continuity of the adornment over the changing shoe styles on these first three pairs is so interesting.
Striped evening slippers. 1840-1849. The Met.Striped evening slippers. 1860-1870. The Met.Striped evening pumps. 1920. The Met.
Do you have a favorite amongst these? Personally, I like the pair from 1860-1870 best (maybe it’s the rosette that appeals to me in addition to the stripes!). You can also pick from these next few pairs, which I’ve included just for fun.
Striped slippers. 1795-1810. The Met.Striped shoes. 1845-1865. The Met. (These kind of look like Toms?!?)Striped evening shoes. Late 1920s. The Met.
I recently returned from a successful Titanic-themed weekend of events, including multiple vintage dance opportunities. I’ve been working on some new clothing for these events since January, which you can read more about in my past posts relating to the 100th Anniversary of the Titanic. I’ve been rather remiss in posting updates about the progress of the new dresses I constructed for these events… So my first task is to share pictures of my attire and explain the inspiration and construction of the garments.
I created two new 1912 ensembles: an evening gown and a day gown with accompanying hat. Let’s start with the evening gown!
My camera had a challenging time capturing the colors and shimmering sequins on this gown, but this is a good representation of the colors. Look! I wore my ballroom dance shoes, which worked well, and my white kid opera gloves and pearl drop earrings... fabulous!Fabulous painted backdrop! Perfect for taking photos, although my camera didn't quite catch the colors so well in this photo. I think this gown is so much more fabulous in person! I was told that the sequins just shimmer in subdued mood lighting.
This gown is burgundy silk charmeuse with a gold silk charmeuse underskirt. The bodice is gold silk layered under gold sequined net. The sleeves are the same gold sequined net flat lined with nude colored tulle: the tulle provides unnoticeable stability for the net layer. The burgundy layers are pleated up and held in place in two places by gold silk and sequined net covered buttons. The bodice and skirt are lined with brown cotton and the entire dress is mounted on a foundation of some extra white cotton which I have an excess of in my fabric stash. The foundation layer is essential to the drape of the dress, because it provides stability as well as a layer to attach all of the pleats and drapery points to. The foundation allows the burgundy silk to effortlessly hang and artfully fold without looking heavy or as though it serves to hold an weight. The foundation layer also supports the underskirt which is attached at about knee height (thus not extending all the way up to the waist and saving fabric). If you plan to create a draped Edwardian gown I strongly suggest that you include a foundation layer: the practice is historically accurate and will help your dress look effortless rather than heavy. This gown closes center back with hooks and eyes along the gold sequin area and a complicated series of further hooks and eyes at the top of the burgundy back drape. The hooks and eyes help create the tension that is required to keep the waist carefully draped in elegant folds across the waist.
There is not a hat associated with this gown because hats were not worn for formal evening events. I did create a wonderful Edwardian coiffure with loops and puffs of hair on the crown of my head surmounting the two front sweeps from the front as they swooped around the base of the back of my head. Unfortunately, I didn’t get any closeups of the style. I feel it is necessary to encourage you by saying that the more often I practice my Edwardian hair styling the faster I am and the better the styles look. You, too, can have fabulous Edwardian hair! Practice! Practice! Practice!
I draped the pattern for the foundation, bodice, and sleeves. The underskirt is a mix of information from the usual pattern book culprits (Janet Arnold and Norah Waugh) that I took in and then kept in mind while flat patterning a knee high underskirt pattern. The outer draped layer is just that: draped. It was a good challenge–I would have a hard time creating a flat pattern of that layer. All I can say is that it is just one rectangular piece of fabric that was sometimes frustrating and draped with many references to my inspirational images.
It turns out that the evening gown is a mash-up of two gowns (pictured below) at the Metropolitan Museum of Art. I think I started by aiming for the pink dress but wound up moseying my way along to the pale blue dress. Do you see the influence of both the pink and pale blue dresses? I do…
1914 Callot Soeurs evening dressSide/Back of the same.1911-1914 Callot Souers evening dress.Side/Back of the same.