HSF/M #7: 1885 Straw Hat

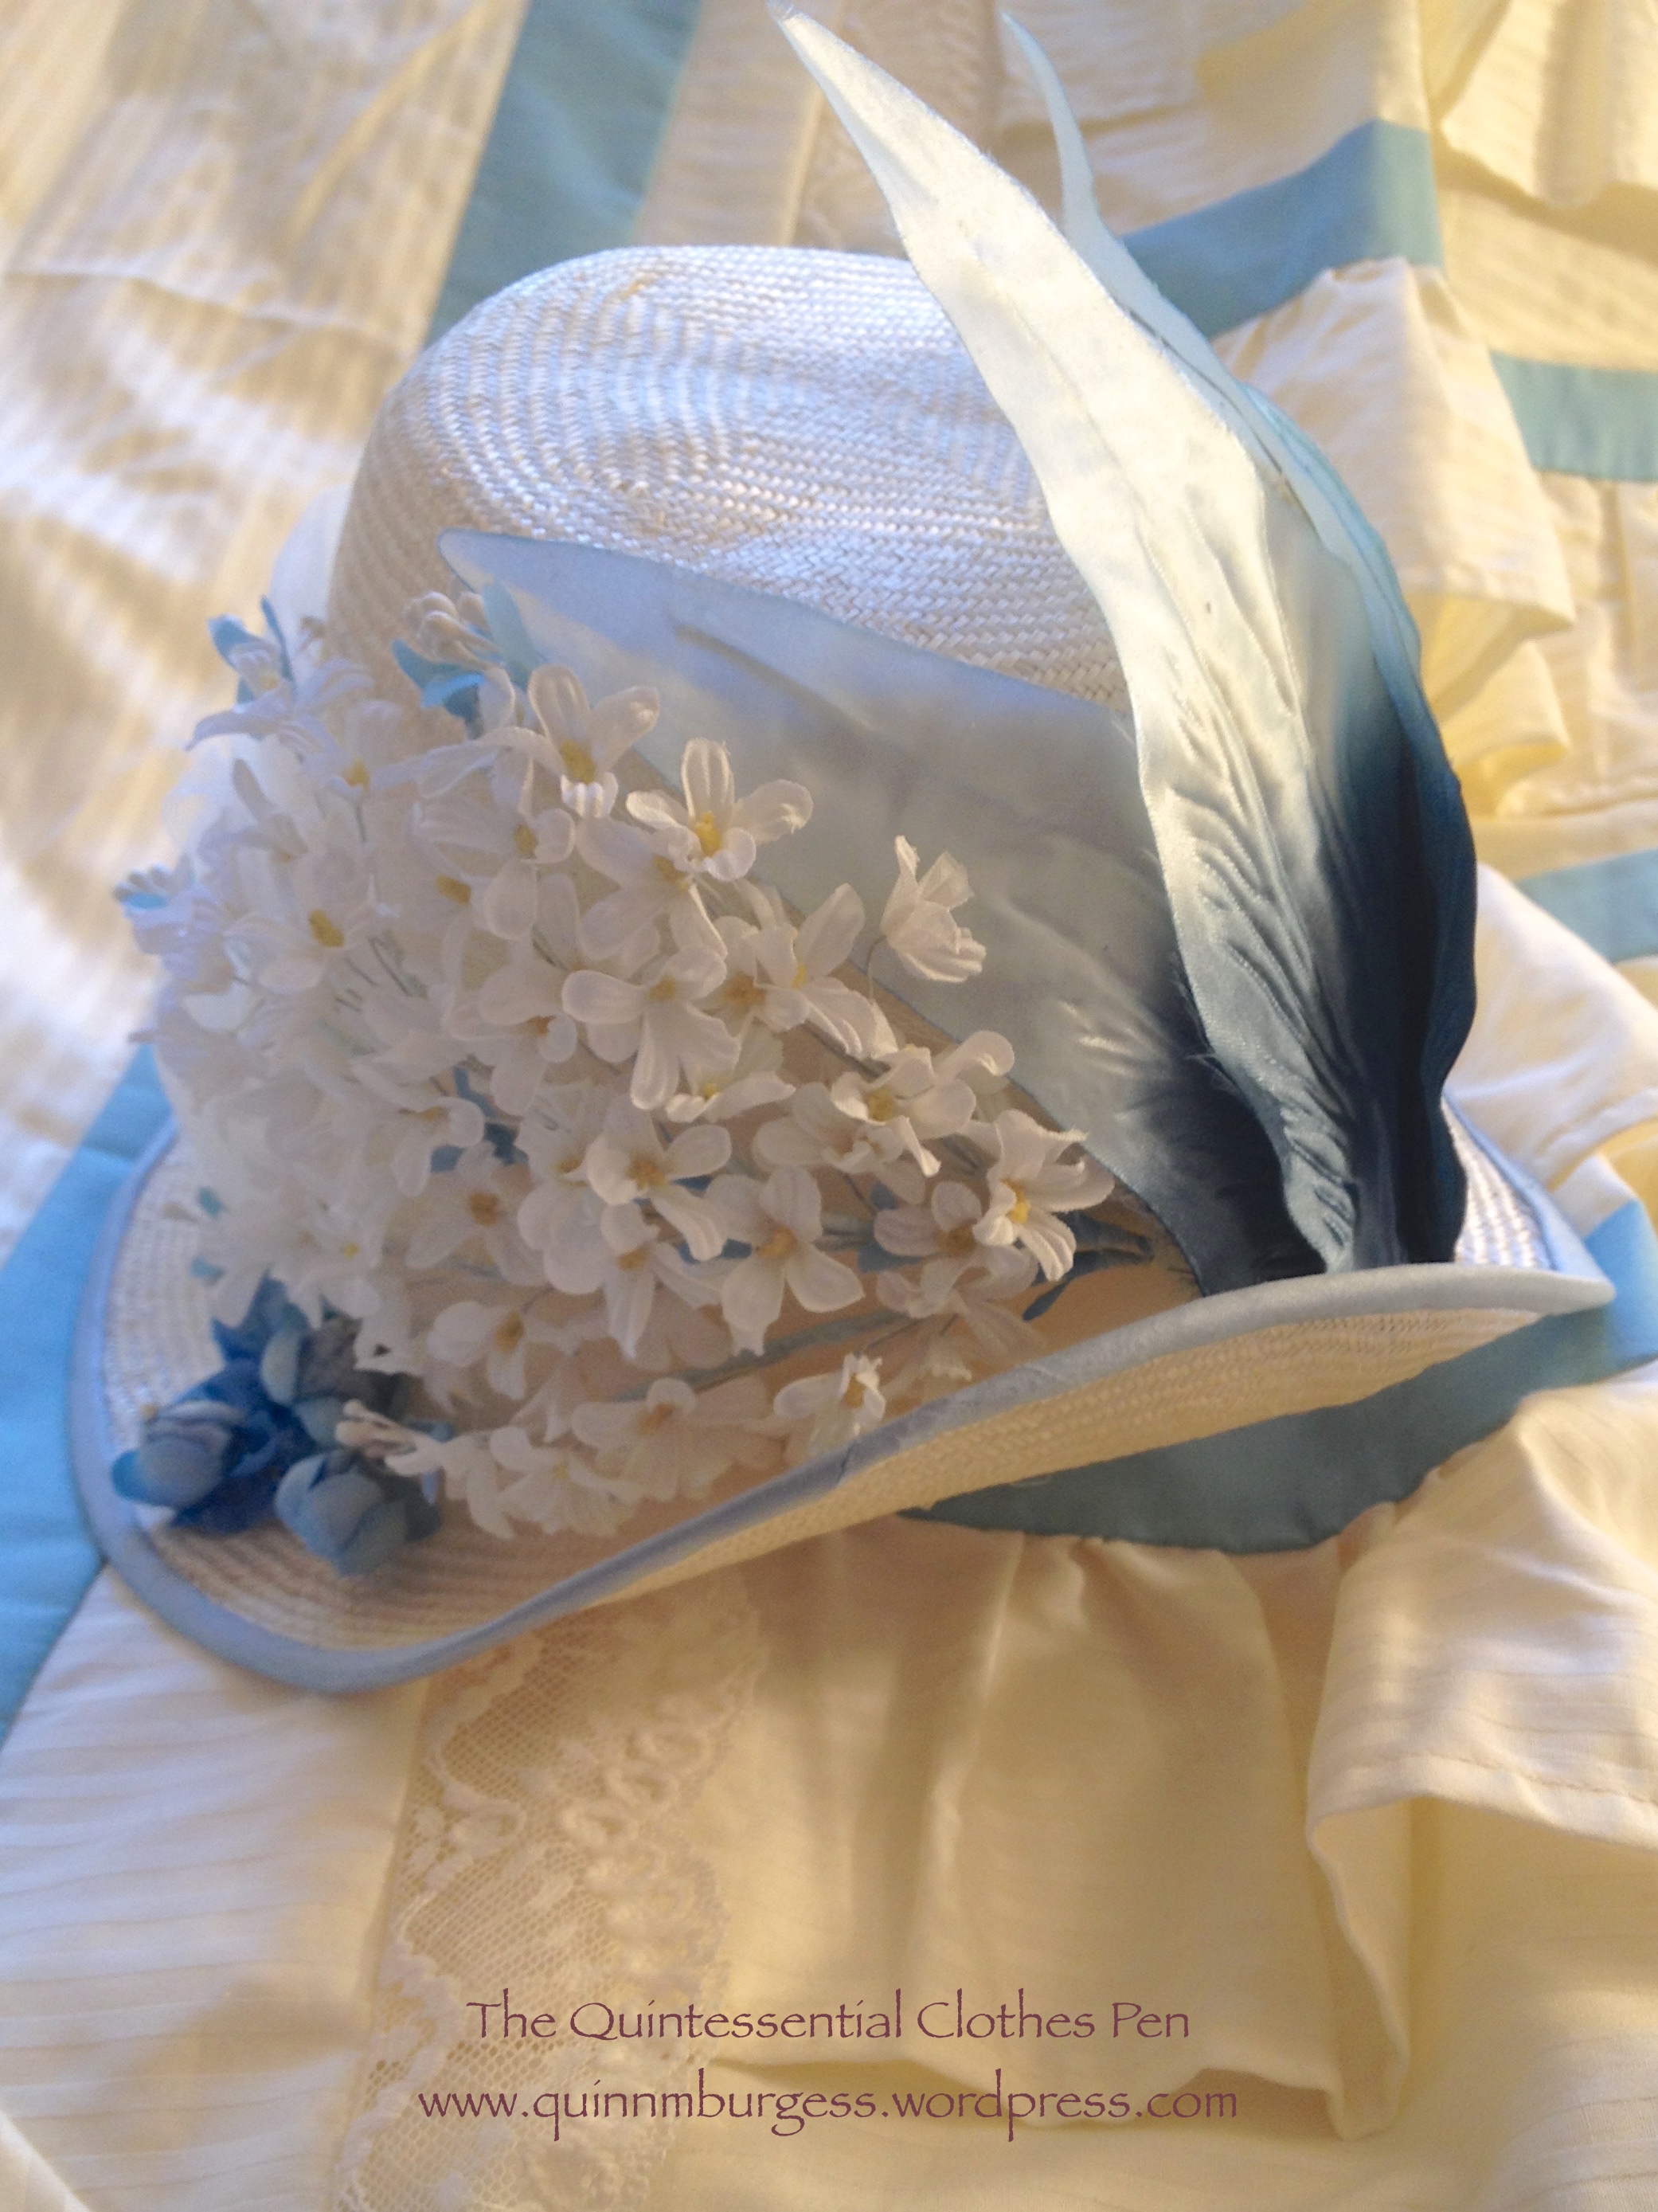
This month’s HSF/M challenge is “Accessorize.” In preparation for the first wearing of a new 1885 outfit next month, I made up a hat to match.

IMG_2446

I chose to make a flowerpot shaped hat, a style that is quite common in the mid-1880s. You can see other examples of this style and others on my 1880s headwear Pinterest board.

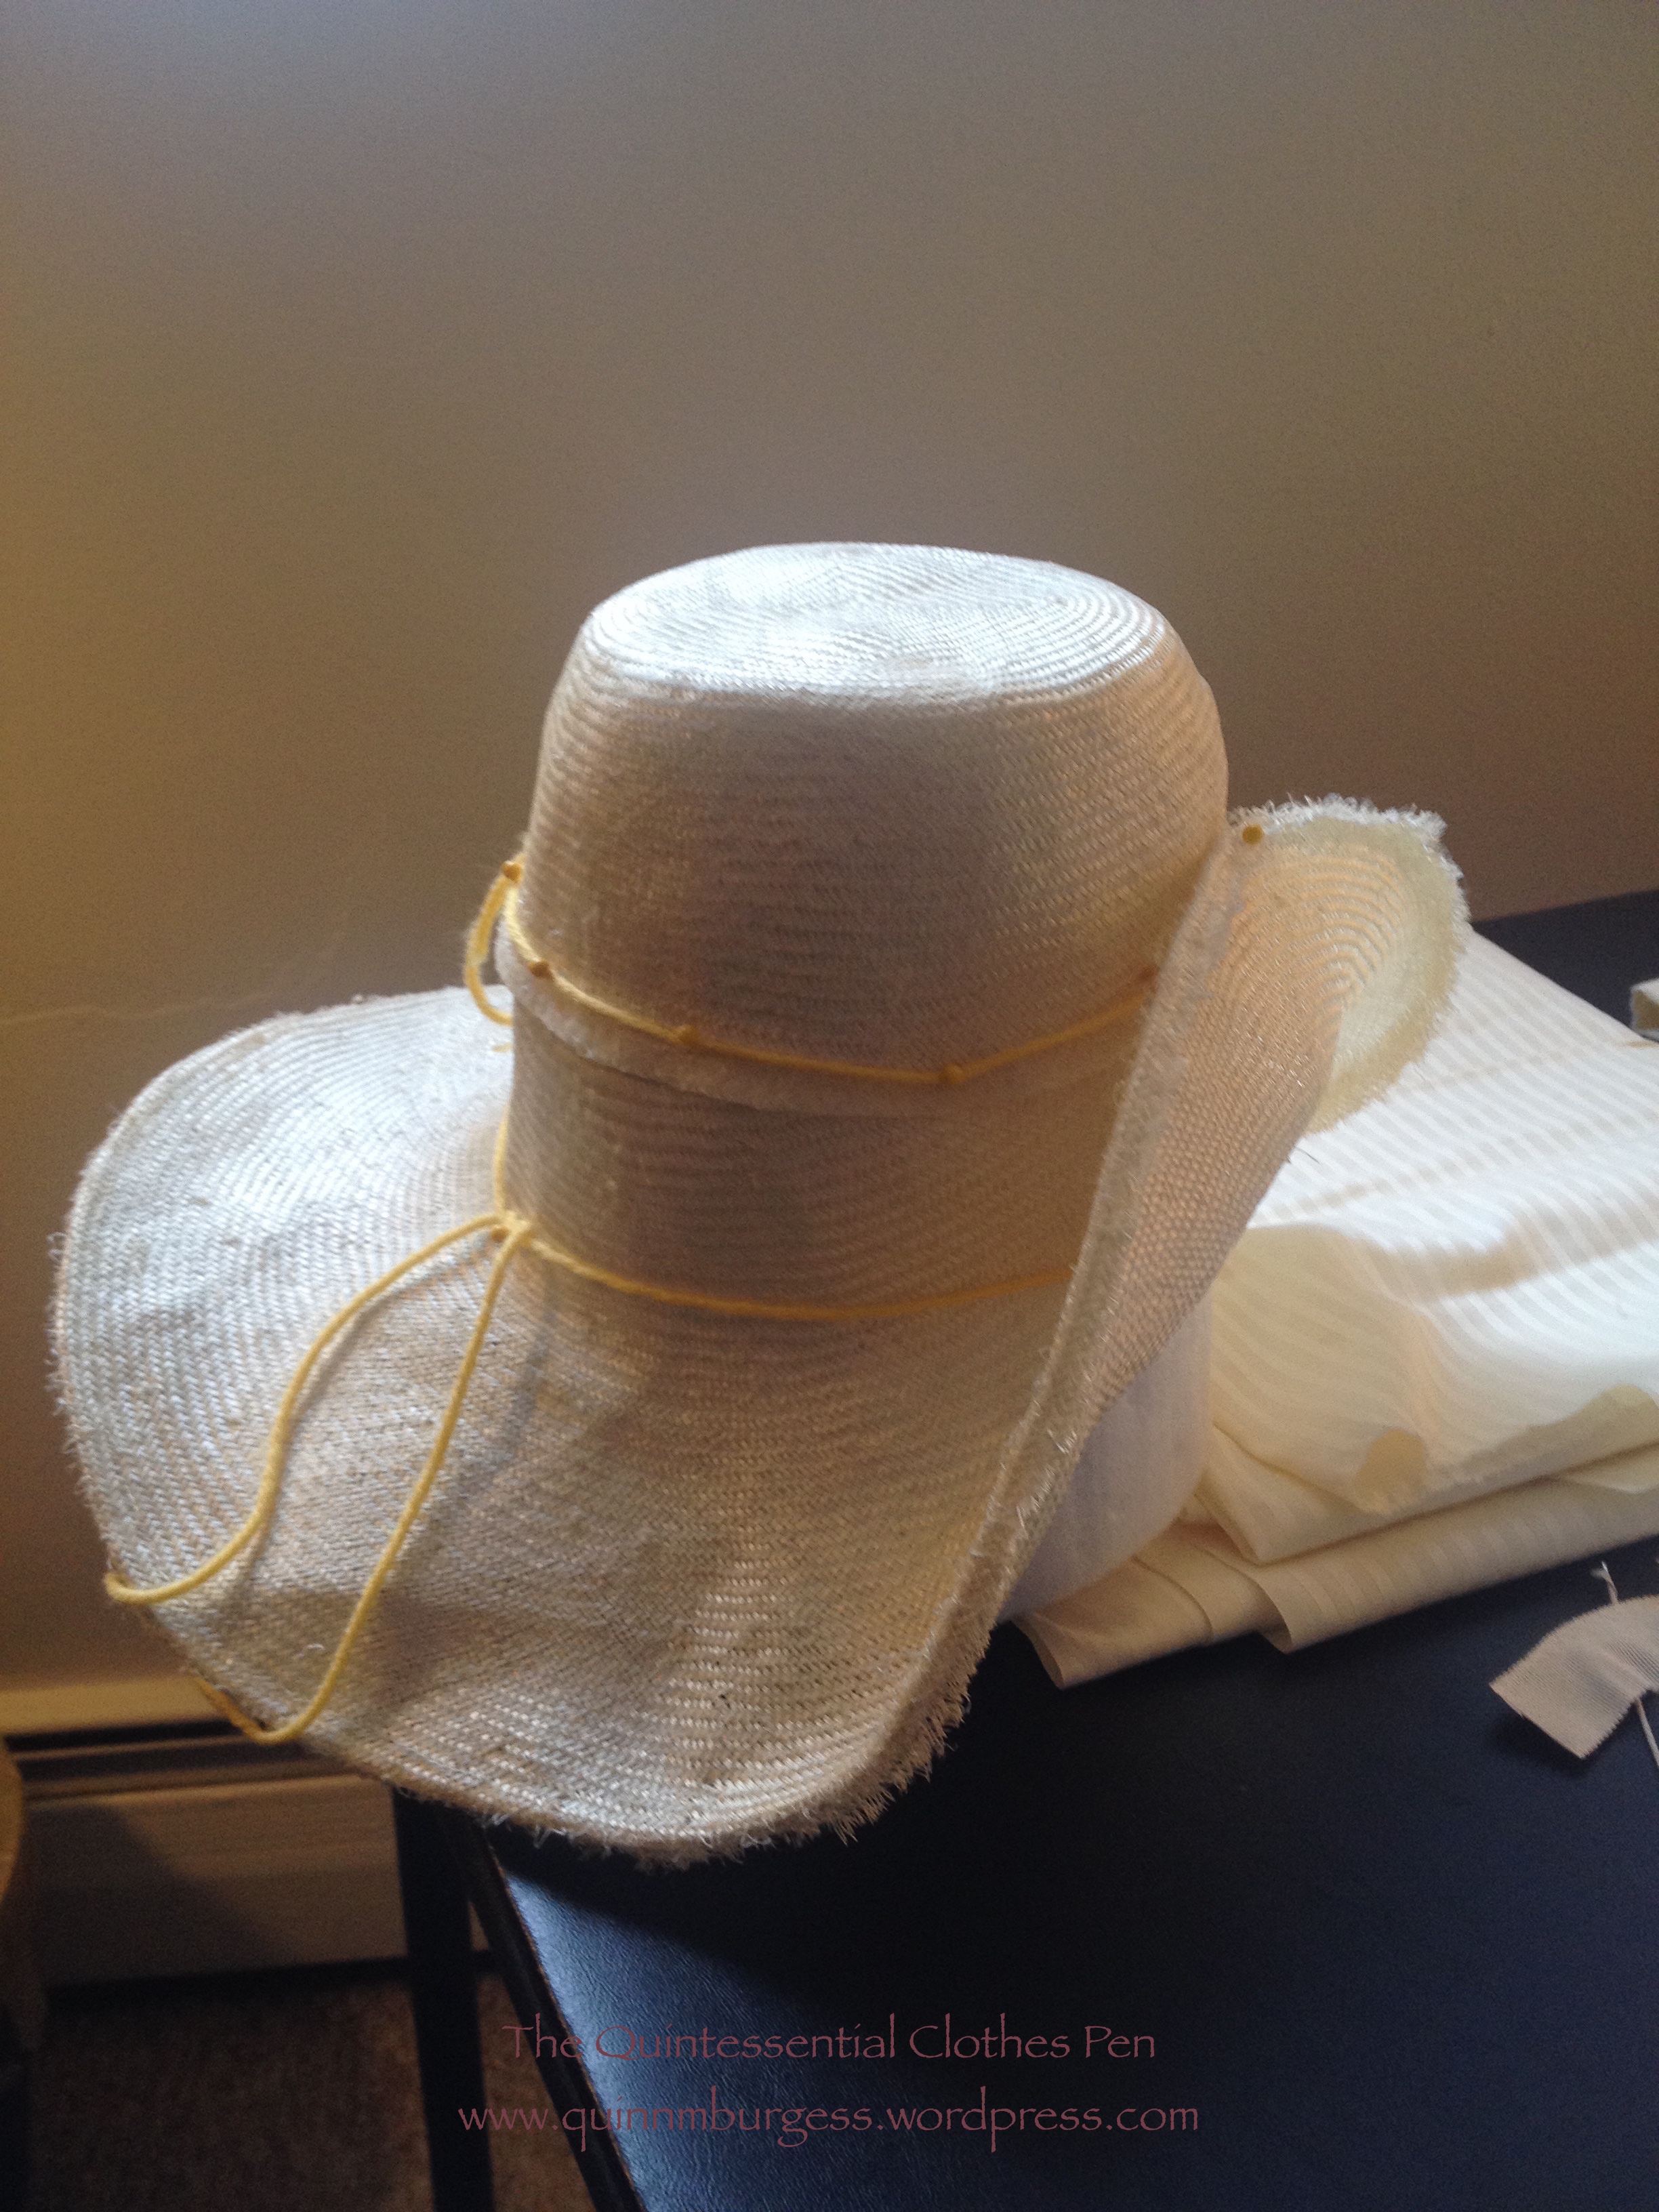
The straw base of this hat has seen multiple previous shapes that failed in creating a look I was happy with. (You can see one of the old iterations in this previous post from 2012. And as a side note, I really need to wear the other clothes in that post again–it’s been awhile and they’re cute!) So I was happy to reblock the straw into a new shape (that I am very happy with!).

IMG_2398I made my hat block out of packing foam stuff that I masking taped around a lysol wipe container–make do with what you have, right? To begin, I wet the straw, then used a paintbrush to cover the straw with a layer of my sizing (a bit of elmer’s glue dissolved in water–no formula, I just winged it). In order to keep the straw in place while the hat was drying overnight I used yarn tied and pinned in strategic locations to keep everything in place. I wanted to use twine, but we’d run out, so I made do again. As you can see, there is a random seam in the middle of the hat crown, because in the past it had made sense to have a crown separate from a brim, but for this hat I needed some of the old brim to become the crown. (The seam was later covered by the tulle trimming.)

IMG_2396

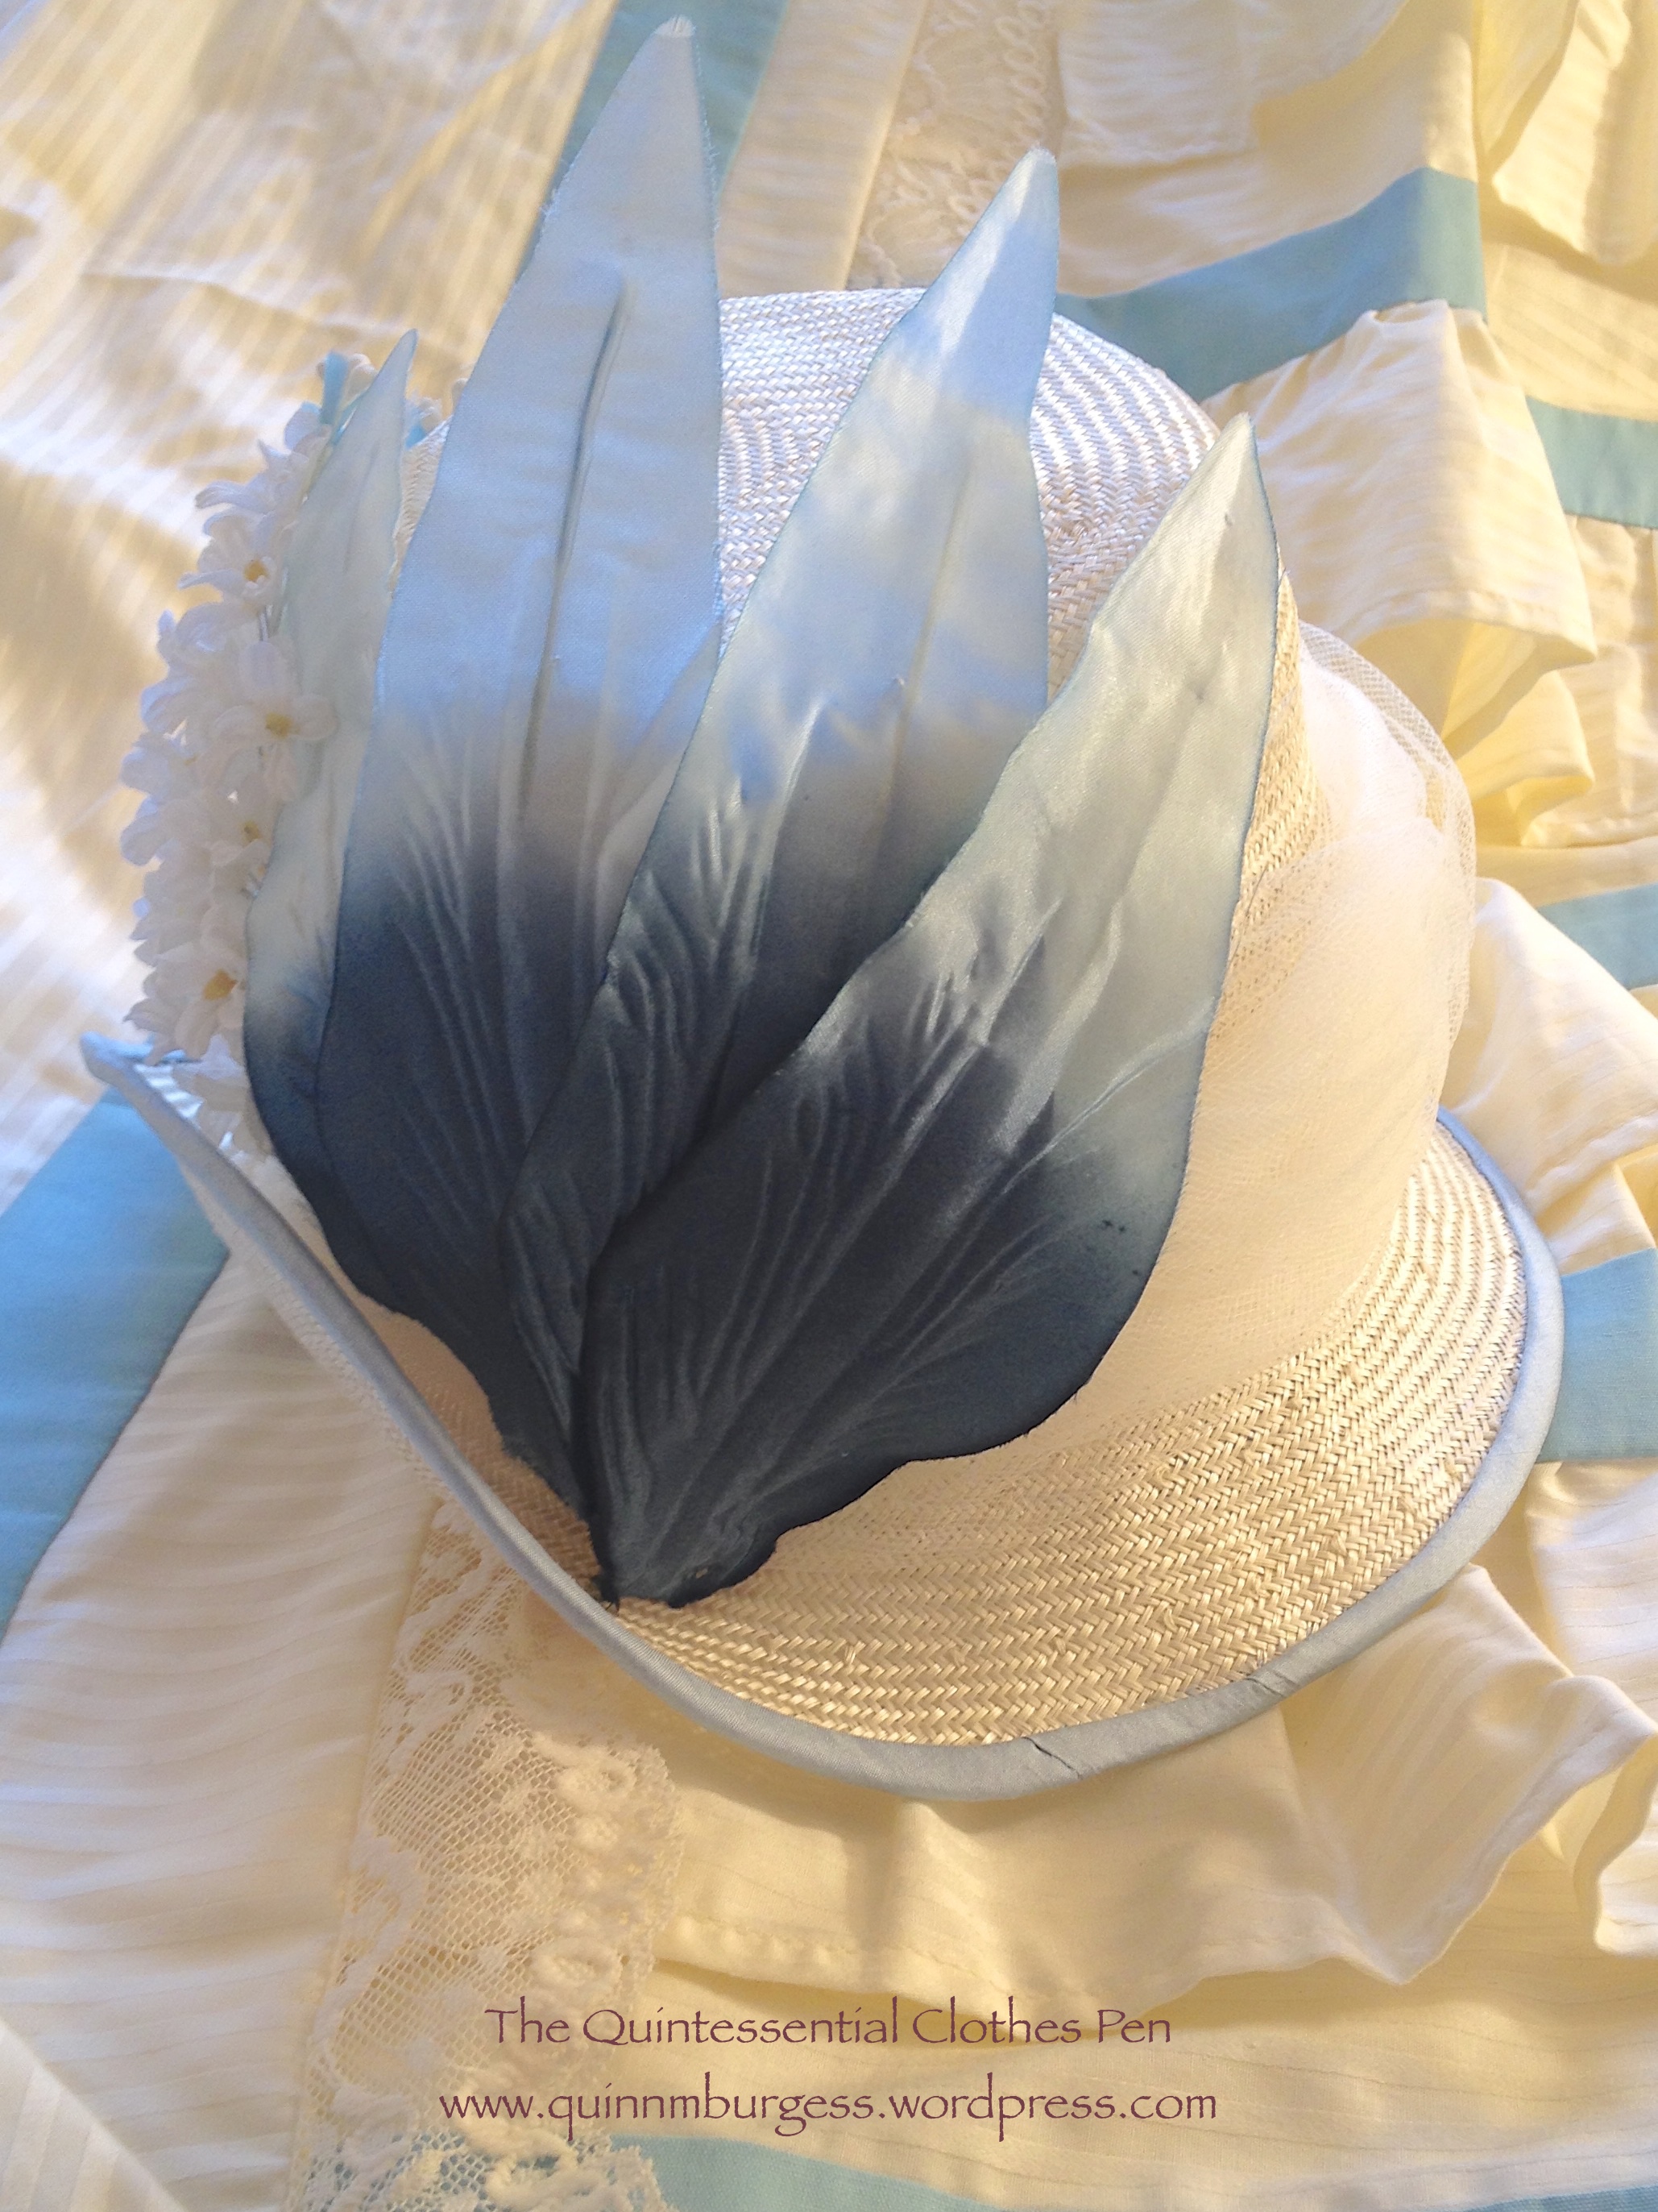
My inspiration for the trimming of this flowerpot hat is this fashion plate. The lady on the left happens to be wearing an outfit in the same colors as my outfit and the fashion plate is dated only one year later. I used materials I had on hand, but was inspired in general by her trim placement and scale.

IMG_2449
Side view.
IMG_2450
Side back view.

Just the facts:

Fabric: A bit of blue silk shantung for binding and a length of 6″ wide tulle.

Pattern: None.

Year: c. 1885.

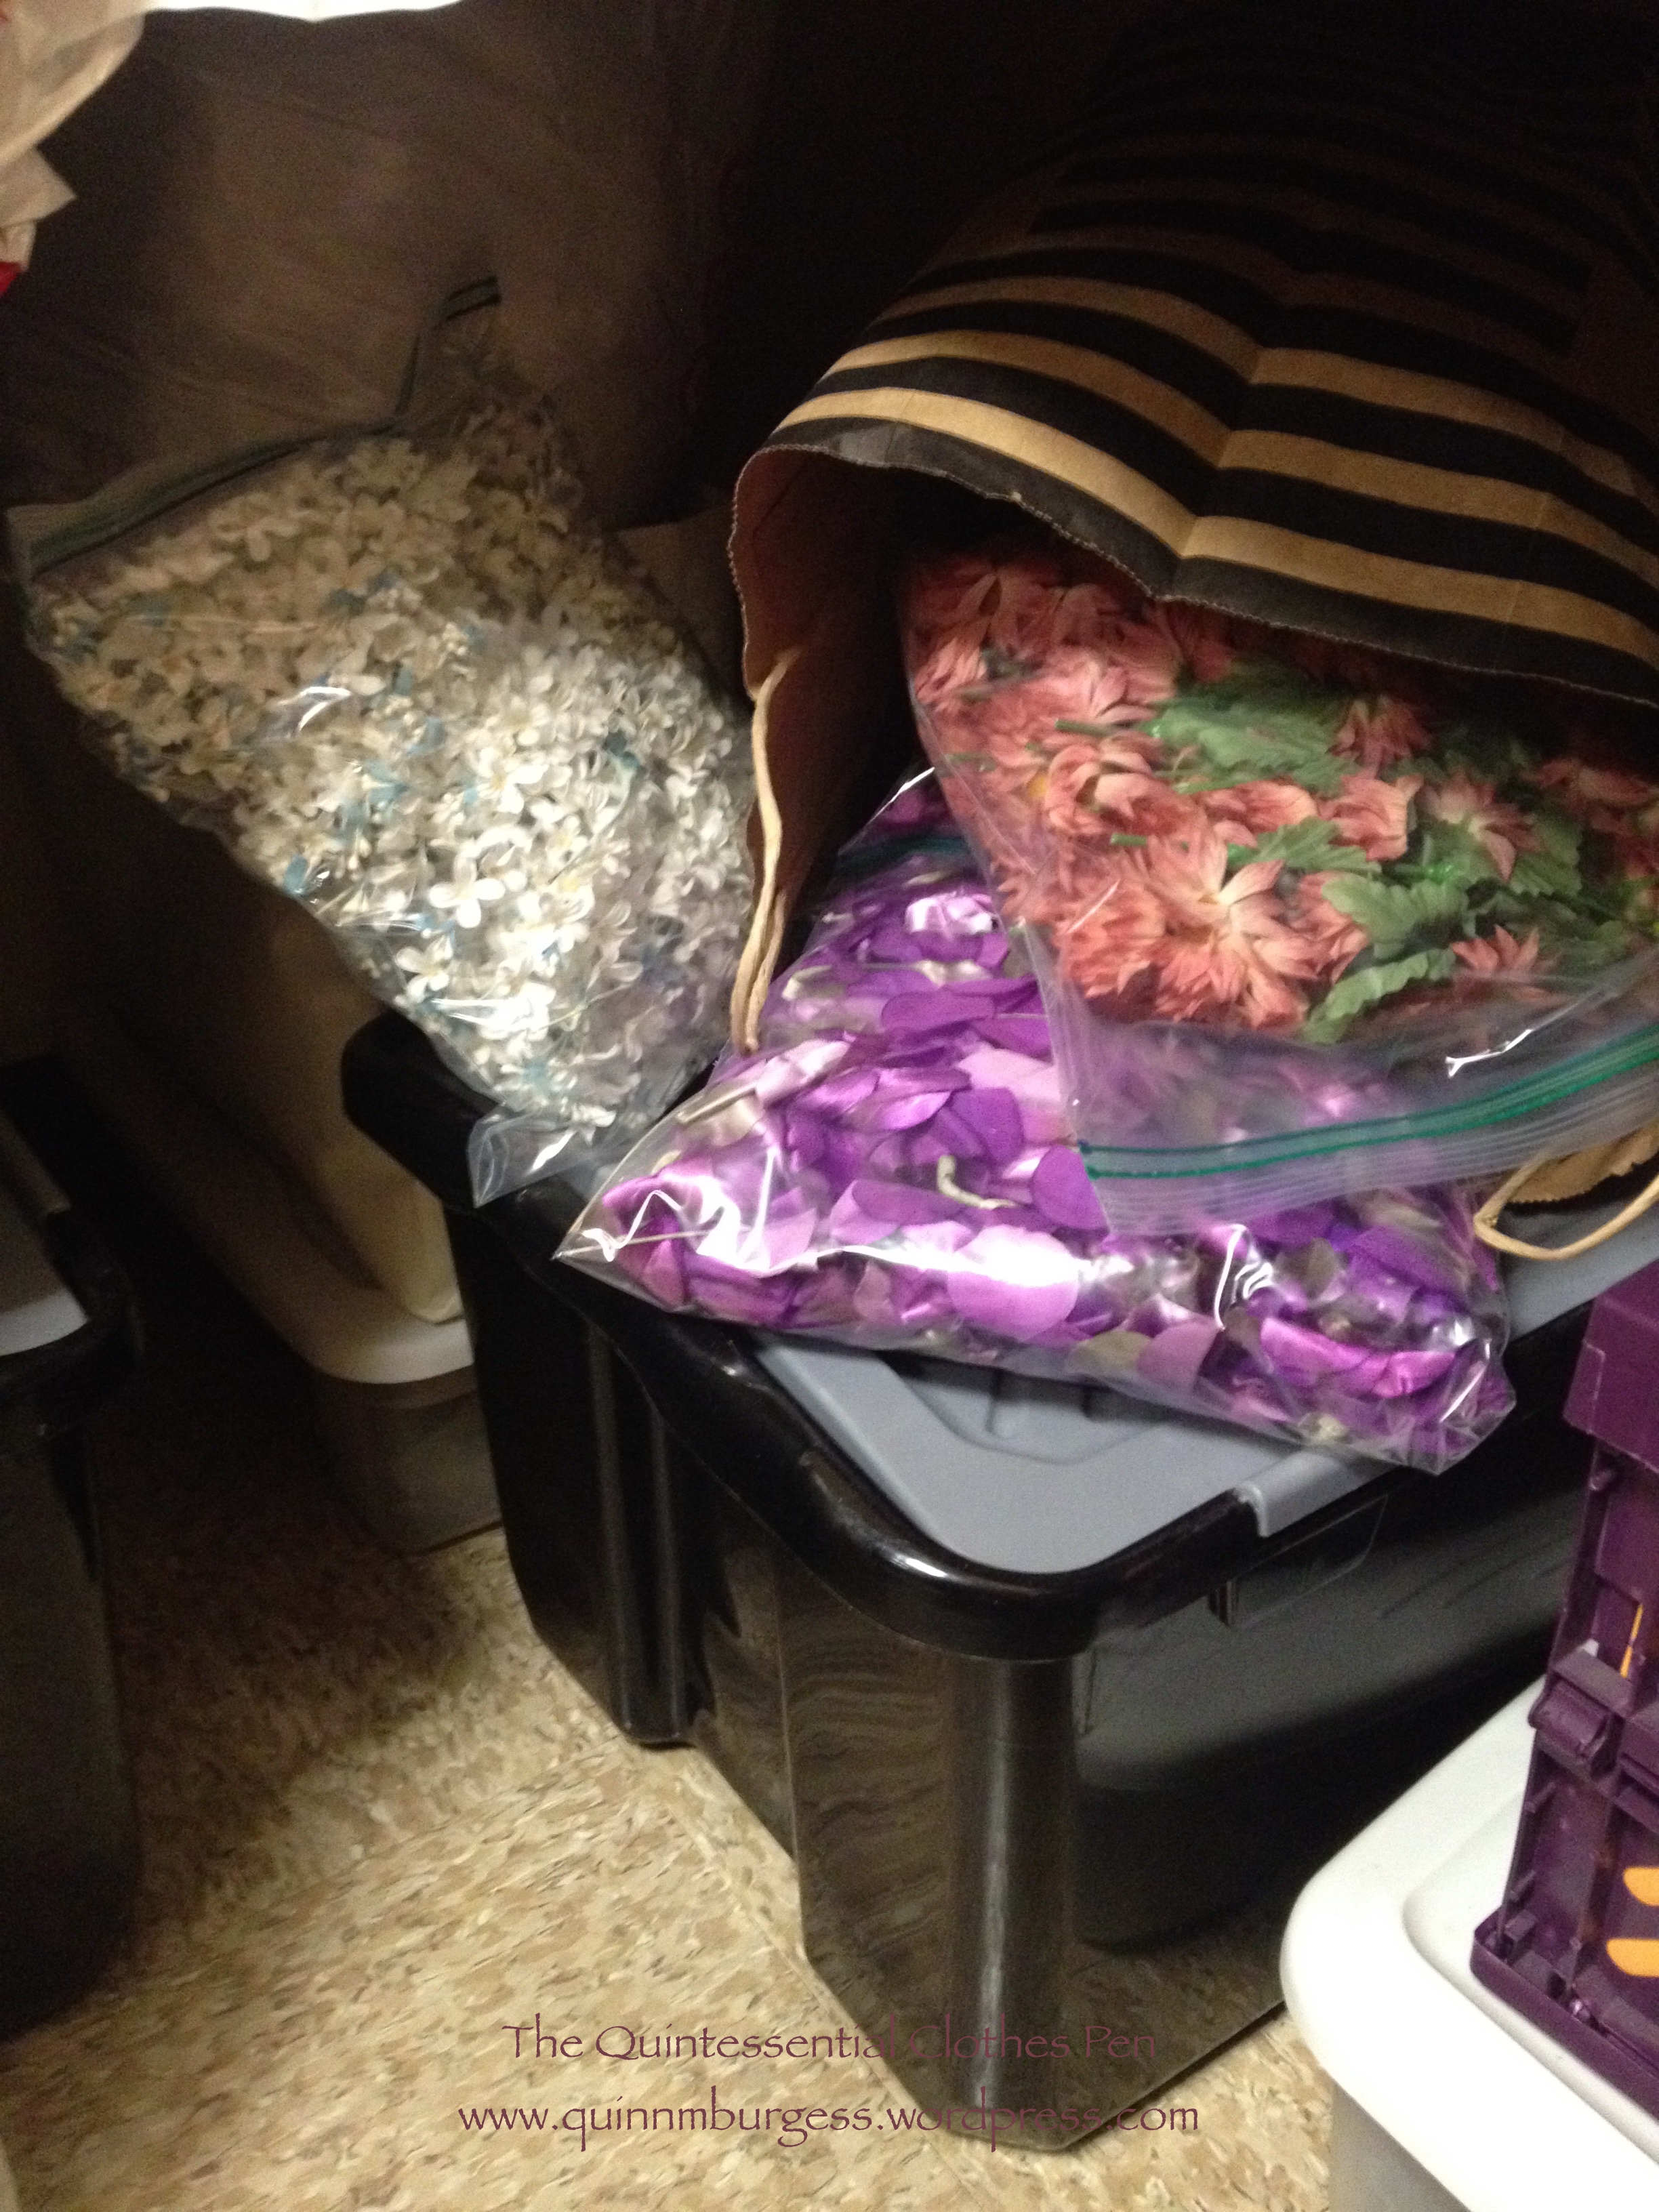
Notions: French crinoline for binding the straw edges, thread, millinery grosgrain for the inner hat band, elmer’s glue for sizing, and vintage millinery flowers.

How historically accurate is it?: As accurate as I can be using the research I’ve done and the materials that are available in 2015. It definitely passes Leimomi’s test of being recognizable in its own time.

Hours to complete: All hand sewn, so a few mostly on the brim binding. Then a whole lot of days debating over the placement of the flowers–actually sewing them on didn’t take very long.

First worn: Has not been worn yet, but I have plans to wear it in August.

Total cost: Free! All from the stash!

1924 Golden Robe De Style

I’ve wanted a robe de style to join my historic closet for at least a year, but haven’t had just the right fabric or the time or impetus to make it happen until this past spring. And as a general goal, I’ve been trying to expand my color choices beyond blues, greens, and reds, because those colors seem to dominate my historic wardrobe. Then this spring, I found gorgeous yellow silk at the local discount fabric store. I convinced myself that I didn’t need it, but couldn’t stop thinking about it, so I drove back to the fabric store a few days later to purchase the fabric.

IMG_2390

I was inspired by the styles from the earlier years of the 20s for this particular robe de style, when the skirts were long and full. You can see a mix of robe de styles from the 20s on my inspiration Pinterest board. I didn’t follow any particular image or extant garment, but used them in general to create a unique dress. I really enjoyed wearing this dress and would like to make another someday that I think I’ll make a little shorter, more like later 20s styles.

I chose to accent the waistline of this dress with a ribbon rosette in a contrasting silk ribbon. It has an inner circle of matching yellow silk and a bit of gold sequined lace in the center. It looks a little like I won a prize at a state fair, but I like that it breaks up all the yellow of the dress.

IMG_2388

The pattern is loosely based off the information provided by Maria in this blog post about her black robe de style. I scaled up her pattern, made a mockup, and then adjusted it to suit my body shape. The skirt required some math to get the right curve across the top to achieve the high-low hem–the bottom edges are the straight selvedge edges–but aside from that the panels are just gathered to fit the waist, with more gathers concentrated over the sides than in the front and back. The extra bonus about using selvedge edges for the hems is that they have a nice fringed edge that meant I didn’t even need to hem them! Instant hems and a nice lightweight looking skirt. Double win!

I used the opportunity of wearing this new dress to break out a new pair of shoes. Glamorous gold t-straps! (All the credit goes to Katherine for these shoes–she bought them in silver and posted about it which is what directed my attention to the style in the first place.) I bought them about 10 months ago for my birthday but hadn’t had an opportunity to wear them until now.

IMG_2362

IMG_2361

IMG_2354

In addition to the pattern, I was also inspired by Maria’s simple finishing methods. I therefore flat lined my bodice, finished the neck and armholes with bias, and made a side closure. I opted to alternate snaps and hook/eyes for the closure, since Maria (and Katherine, who also made an inspirational robe de style you can see here) mentioned that their predominantly snap closures had a tendency not to stay closed. I had no problems with my closures on the dress’s first outing!

IMG_2403

I chose to keep the understructure for this dress separate rather than building it in–that way I can easily use it for a second robe de style in the future! The understructure is mini-18th century pocket hoops attached to a grosgrain ribbon that fastens around my hips. I found that they shifted a little bit while I was wearing the dress, but not enough for me to really notice or care.

Unfortunately, the silk does want to wrinkle every chance it gets. But when the dress is in motion it’s really not very noticeable! I wore the new dress to an afternoon ragtime tea dance, which is what the pictures in action are from. There are 2 more tea dances this summer (one of them is this coming Sunday) and a suffrage rally and formal ball in September, so if you’re in the area and have the time I would love to see you at one of these future events (details here).

IMG_2378

IMG_2374

How I Organize My Patterns And Sewing Books

I showed you how I organized my fabric stash and now I thought I’d show you how I organize my patterns and sewing books.

Most of the patterns I make and choose to keep are for historic clothing. I choose to keep them so that I can use them as a reference for future garments or so I can reuse them as is. A lot of these are garments that I’ve made for myself, but some are also patterns I’ve made for work. Probably 85% of the patterns I keep are historic or vintage. And probably 90% of my patterns are self-made. (I really like having self-made patterns–I find it easier to see what’s going on when there is only one size on the pattern, no seam allowance included.) Some of the envelopes contain vintage and modern commercial patterns for which I’ve traced off my size for the given garment pieces, sometimes making changes to them as well. At that point, I choose to keep those pattern pieces separate from an original purchased pattern.

Given these factors, I choose to organize my patterns by historic period. I use the post-it notes so I can easily change which folder the label is on. Purchased patterns (of which I only own very few) are stored separately, because there are so few of them.

Each self-made pattern is folded and put into a manilla or recycled envelope. I label the front of each envelope with:

  • the month and year I made the pattern
  • the name of the garment
  • other pertinent information: such as the measurements the garment is made for, whether a mockup of the garment is also in the envelope, and an image or drawing of the garment if possible, etc.
IMG_1476
Each section is also organized chronologically.

At this point, I’ve maxed out the number of patterns I can fit in this one basket, so I’m trying to decide what categories of patterns can be stored somewhere else, and where that somewhere else is… Someday when I have a sewing room I hope to change these over to a filing cabinet.

As for my books, I keep all of my personal books at home and bring them into work only on an as-needed basis. I do this for two reasons: first, that I’m very protective of all books that I own and want them to stay in the best condition possible; and second, that I enjoy seeing these books regularly.

IMG_1492
The books are organized by the type of information they contain, then chronologically, if possible. The binders peeking up from the bottom shelf on the left are all full of notes and samples and other construction-related information. The books on the bottom right are other things including a binder of cooking recipes, wedding research, knitting books, and my Janet Arnold books.

How do you organize your sewing related patterns and books?

How I Organize My Fabric Stash

As with most people who have a sewing professional life or sewing hobby, I have a collection of fabrics, patterns, and books. Today I thought I’d share my fabric stash organization with you.

As I designed my system, it was important that my fabrics by organized in a way that was easy to access and maintain. I also wanted to know what I have without needing to physically dig through a box to see the yardage. Here is a pictorial walk through the bulk of my storage:

IMG_1478
Fabrics are stored in plastic boxes. There’s more fabrics than will fit in the boxes I currently have, so you can see that there are bags piled on top as well, but even the bags are organized! I have some other boxes as well, but this is most of them.
IMG_1481
The boxes have folded fabrics stacked inside. Fabrics are organized by fiber content. There is a post-it inside each box telling me what categories that box contains.
IMG_1482
The boxes are in a corner, so there is a space behind them for more things! (You can also see some of the fabrics stashed on top of the boxes here, like the reproduction cottons on bolts poking out on the left.)
IMG_1477
I also have some fabrics on rolls. These stand against the wall.
IMG_1484
The area between the boxes in the corner is where I keep items I access less frequently, such as lace and trims. These are organized by type in large plastic bags. The large plastic bags are all contained in one large shopping bag.
IMG_1485
Also in the corner are my millinery flowers. I’ve had multiple opportunities to purchase large numbers of vintage millinery flowers at super cheap prices, so I have lots of them. These only scratch the surface! The flowers are organized by type (if I have tons of the same exact flowers) or color in plastic bags, which are then either contained in plastic boxes or shopping bags (once I ran out of plastic box space!).

When I first made this system, I tried to remember what was in each box. (I don’t label them on the outside.*) As I went along though, opening multiple boxes to jar my memory just wasn’t working out. So I simply wrote a list of which boxes have which categories and stuck it in the front of my swatch book.

IMG_1486
My cheat-sheet box content list.

Ah ha, but I haven’t mentioned my swatch book yet! This is probably the best organizational part of my stash organization. My swatch book is a binder full of information on every fabric and trim that I own (or most of them… sometimes new ones take a bit to make it into the binder). I just add pages as needed to each section as I log new fabrics and trims.

The binder is organized by fiber content for fabric and then by type when it gets to lace and trim. Each item has the following information:

  • A swatch of that fabric or trim
  • A description
  • The yardage I currently own
  • The width of the fabric or trim
  • Where I purchased it and the year (if I can remember)
  • Extra notes
  • And I’ve started adding price paid per yard, though for older items I generally just can’t remember and haven’t gone through my records to figure it out (though I do keep receipts and records of these things)

The random blue and pink post-it bits are marking the pages where I’ve removed one of the fabrics from my stash and brought it home to work on a project. That way I can keep track of what is in boxes and what is at home.

IMG_1487
Page one of the silk section.
IMG_1489
One of the lace pages.

It’s quite a great system, because I can take my binder home with me to consider options and ideas without having to drag out fabric yardage. I can also see at a glance if I have enough of a fabric or trim for a project without having to measure. It did take some time to set this up, measuring everything and taking swatches, but now that it is set up it is very easy to maintain. Even if I stored everything in an easily accessible location I would still appreciate my swatch book system!

*I store all this in my office at work. The room is actually a converted star dressing room, so my desk is a makeup counter. Unlike most offices, where boxes of fabric might be obvious, out of place, or unacceptable, my office is essentially a fabric/trim/jewelry/accessory storage closet even without my personal items, so more boxes and more fabric aren’t out of the ordinary at all, and since it’s technically my office I can store whatever I want in there. Also, I spend very little time in my office and hardly ever do work in there, so lots of space devoted to even more fabric, etc. is not a big deal.) Also, because my “office” is a general storage space with labeled boxes that other people are allowed to access, I choose not to label my personal boxes to make it clear that no one should be digging through them. That’s also why the boxes are opaque.